

Rivera Primo 1041-0064 User Manual
INSTALLATION INSTRUCTIONS
t
FOR
SU SPORTSTER KIT
(1041-0062, 1041-0063, 1041-0064)
Fits Carbureted EVO XL Models
Congratulations on your purchase of the “King of Carbs” SU kit
for carbureted EVO Sportsters. This kit has everyting you’ll need
to accomplish an easy, safe install. We recommend however, that
you enlist the aid of a seasoned professional mechanic to help you
with the installation.
PLEASE NOTE: When working on a motorcycle, disconnectt the battery to avoid
accidental starter engagement. When working with gasoline, work in a well ventilated area
away from open sparks or flames. Be sure that you have the necessary tools prior to beginning the
install, and check all the contents of the kit to insure that it is all there.
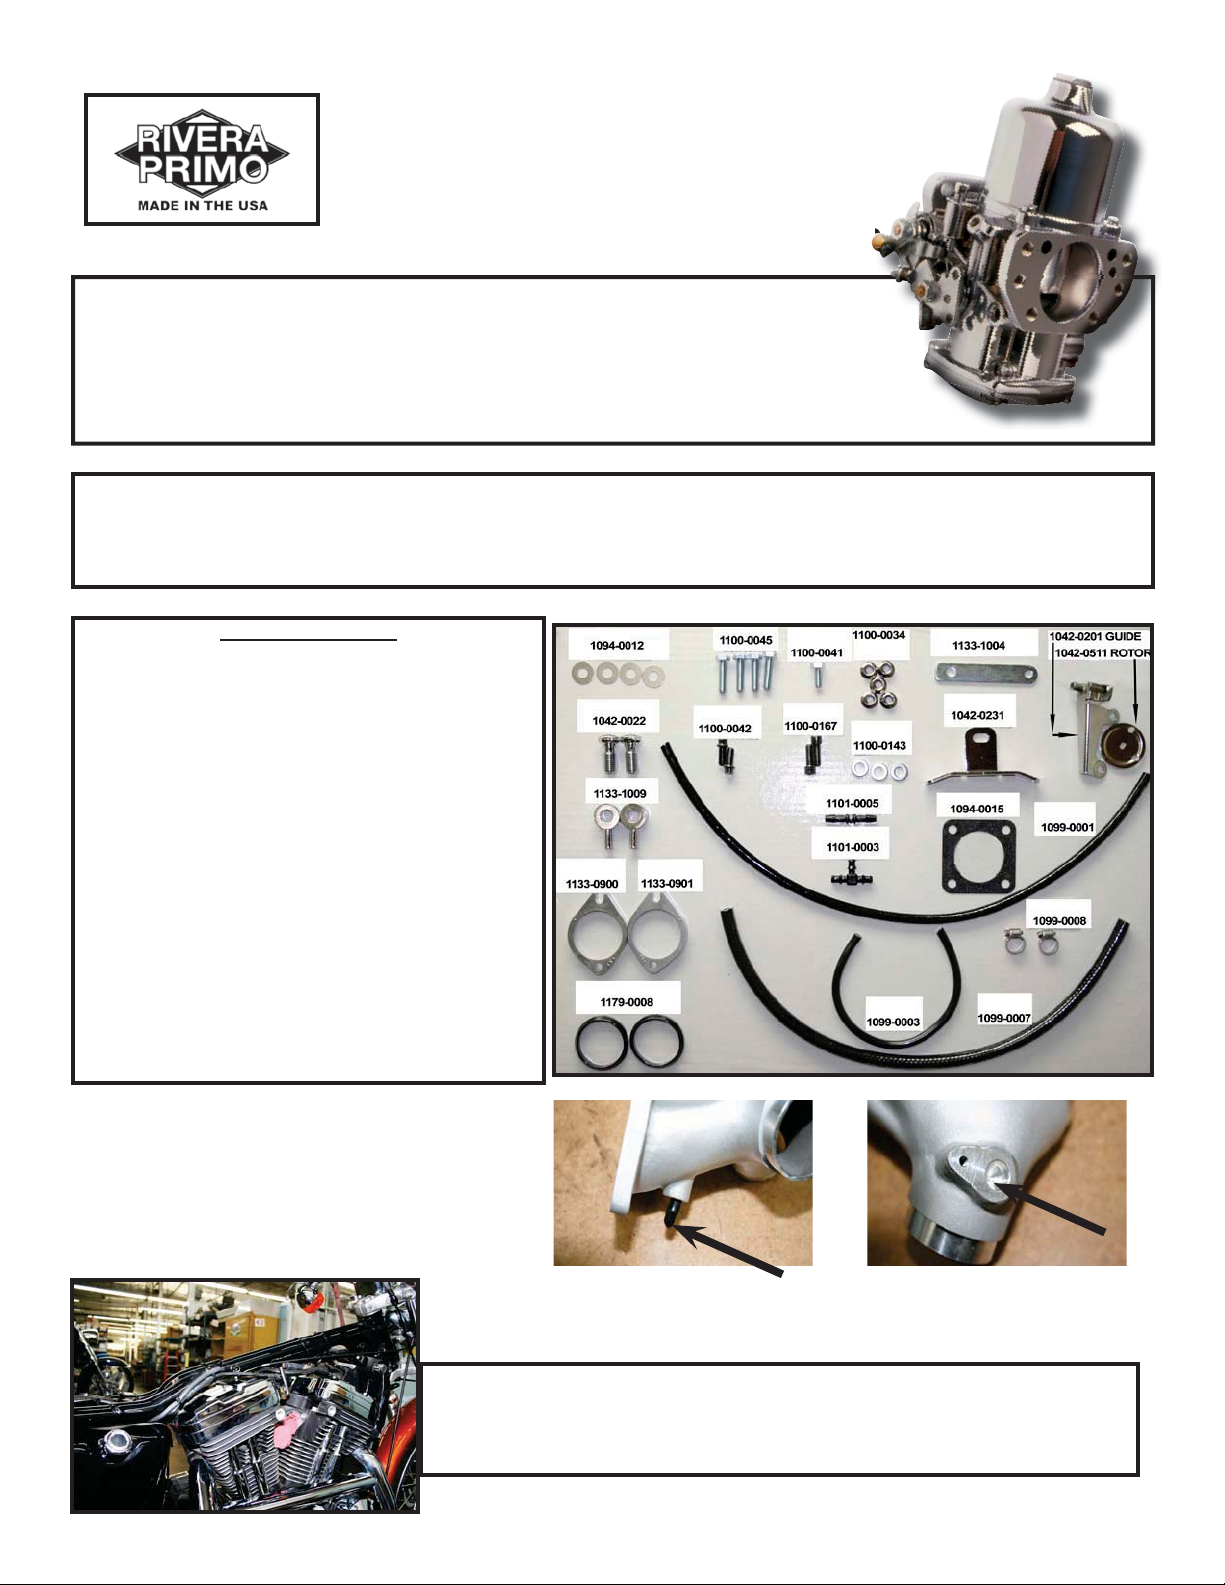
KIT CONTENTS
1094-0012 4 Breather Bolt Washer
1100-0045 4 Hex Head Bolt 5/16-18 x 1 1/4”
1100-0041 1 Hex Head Bolt 5/16-18 x 3/4”
1100-0034 5 Locking Flange Nut
1042-0231 1 Support Bracket
1042-0201 1 Cable Guide & Bell Crank
1042-0022 2 Breather Bolt
1100-0042 2 12 PT. Bolt 5/16-18 x 3/4”
1100-0167 2 Socket Head Bolt 5/16-18 x 1”
1100-0143 3 Flat Washer 5/16”
1133-1004 1 Support Bracket
1099-0001 1 Rubber Vacuum Hose 1/4” ID
1133-1009 2 Single Breather Fitting
1101-0005 1 Plastic hose Connector Staight
1101-0003 1 Plastic Hose Connector Tee
1094-0015 1 Manifold Gasket
1133-0900 1 Manifold Flange Front
1133-0901 1 Manifold Flange Rear
1099-0008 2 Worm Drive Hose Clamp
1179-0008 2 Manifold Flange Seal
1099-0003 1 Rubber Vacuum Hose 5/32” ID
1099-0007 1 5/16” Fuel Line
V.O.E.S. Port
u
MAP Sensor Port
manifold port options
NOTE: If using the MAP port on the manifold, you
1
Please read the notes above and then read through the entire install prior
to proceeding with this installation.
First drain then remove the fuel tank.
MUST finish drill a hole into the area where the MAP
sensor will be located. (See arrow)
1108-0055

2
Prior to beginning the actual install, we recommend that
you remove the Dome & Piston from your new SU carb to
help make the install easier.
Remove the Dome & Piston assy. by taking off (3) screws
with a blade type screw driver.
3
Dome & Piston assy. removed.
4
Dome, Piston and Piston Return Spring should be kept to
the side of the carb install until needed. It is recommended to keep all the Dome parts together as a unit.
5
The SU carb body without the Dome & Piston will make it
much easier to do this installation.

6
Install the manifold flange and seal on both outlets on
the manifold. NOTE: The flanges are marked (F) for front
intake and (R) for rear intake.
Install rear intake flange12 pt. bolts (1100-0042) a few
threads into the heads.
7
8
(2) rear intake flange bolts ready for the manifold!
9
Install one hex head bolt (1100-0045) into the lower manifold to carb flange closest to the rear head.

10
Slide manifold onto (2) rear manifold intake flange bolts
you peviosusly installed.
11
Install (2) front manifold intake flange bolts (1100-0167).
12
(2) front manifold intake flange bolts (1100-0167) installed.
13
Tighten Front manifold intake flange bolts.

14
Prepare to install the lower carb support (1042-0231).
15
Place the lower carb support (1042-0231) on top of lifter
block inside bolt hole on each lifter block.
Apply a drop of blue thread locker to each bolt (use the
OE bolt).
Hand thread each bolt into the lifter base holes to make
sure that you have good thread retention.
16
17

18
Tighten the two OE lifter base bolts to secure the lower
carb support.
19
Prepare to install the upper carb support (1133-1004).
20
Place one hex head bolt (1100-0045) into the upper carb
support hole closest to the rounded top. Slide the bolt
through the lower right manifold flange hole closest to the
front head.
21
Use a hex head bolt (1100-0041) & flat washer (1100-
0143) for joining the lower carb support to the upper carb
support.
 Loading...