

Page 1

RISCO Cloud
RISCO Application Server
Web Administration Manual
For more information about the control panels that are supported by RISCO Cloud
please refer to our website: www.riscogroup.com
Page 2

Table of Contents
1. Introduction ................................................................................................................................................................................ 1
1.1. Related Documents ................................................................................................................................................ 1
1.2. Abbreviations .......................................................................................................................................................... 1
2. Overview ..................................................................................................................................................................................... 2
2.1. System Architecture ................................................................................................................................................ 3
2.2. The Web Administration Application ....................................................................................................................... 3
3. Login ............................................................................................................................................................................................ 4
3.1. Login Access Level ................................................................................................................................................. 4
3.2. Logging Into the Web Administration Application ................................................................................................... 5
3.3. Logging Out............................................................................................................................................................. 5
4. Web Admin/WEB RP User Management................................................................................................................................... 6
4.1. Adding a New User ................................................................................................................................................. 7
4.2. Editing an Existing User .......................................................................................................................................... 8
4.3. Filtering by RP User Assigned to Group Option...................................................................................................... 9
4.4. Deleting a User ....................................................................................................................................................... 9
5. Service Providers List .............................................................................................................................................................. 10
5.1. Adding a New Service Provider ............................................................................................................................ 11
5.2. Editing an Existing Service Provider ..................................................................................................................... 13
5.3. Deleting a Service Provider ................................................................................................................................... 13
6. Control Panels List ................................................................................................................................................................... 14
6.1. Adding a New Control Panel ................................................................................................................................. 14
6.2. Editing an Existing Control Panel .......................................................................................................................... 16
6.3. Deleting a Control Panel ....................................................................................................................................... 17
6.4. Additional Control Panel Options .......................................................................................................................... 17
7. Control Panels Groups ............................................................................................................................................................ 26
7.1. Creating a Control Panel Group ............................................................................................................................ 26
7.2. Managing Control Panels Groups ......................................................................................................................... 27
8. System Status Tools ................................................................................................................................................................ 29
8.1. Statistics ................................................................................................................................................................ 29
8.2. Database Services Information ............................................................................................................................. 31
9. E-mail Template Editor............................................................................................................................................................. 32
10. SMS Template Editor................................................................................................................................................................ 35
11. Licenses .................................................................................................................................................................................... 36
12. General Configuration Options ............................................................................................................................................... 38
12.1. RISCO Cloud Common Parameters ..................................................................................................................... 38
12.2. Event Groups Enable/Disable ............................................................................................................................... 42
ii
Page 3

13. Customization ........................................................................................................................................................................... 46
13.1. Editing Text ........................................................................................................................................................... 46
13.2. Editing Tip of the Day Texts .................................................................................................................................. 48
13.3. Adding Customized Logos and Images ................................................................................................................ 48
13.4. Modifying the Icon Text ......................................................................................................................................... 50
13.5. Modifying the Hints ................................................................................................................................................ 51
13.6. Modifying the Web User Application Color Scheme ............................................................................................. 52
13.7. Managing Files on the Web User Application’s Downloads Page ........................................................................ 53
13.8. WUApp Translations Page.................................................................................................................................... 54
13.9. Messages, Remarks and Terms of Use ............................................................................................................... 58
Appendix A: Event Table ................................................................................................................................................................... 59
Appendix B: E-mail Notification ........................................................................................................................................................ 63
iii
Page 4

Page 5

1 Introduction
1. Introduction
This guide provides information regarding the RISCO Application Server (RISCO Cloud) and
instructions on how to use the Web Administration application. The target audience for the guide is
personnel responsible for RISCO Cloud administration. The principle purpose of this guide is to
provide the reader with the information necessary to manage RISCO Cloud admin and WEB Based
RP users, customers (subscribers) and service providers.
If you have any questions concerning any of the procedures described in this guide please contact
RISCO Group at (+972-3) 963-7777.
1.1. Related Documents
(UL Note: All security systems working with RISCO Cloud are subject to UL approval).
The Agility 3 User & Installer manuals provide additional information on some of the subjects
addressed in this guide.
1.2. Abbreviations
The following abbreviations are used throughout the guide:
Abbreviation Meaning
CP
CPNS
CPWS
CSR
Proxy
GPRS
GPRS Proxy
IIS
ISP
RISCO Cloud/Proxy
RISCO Cloud
PSTN
RP
Control Panel, or Security Panel. In some manuals, term Control System is also used.
Control panel Notification Service
Control panel Web Service
Central Station Receiver
RISCO Proxy Server
General Packet Radio Service
A server installed as part of RISCO Cloud topology responsible for the
communication with the GPRS based security panels.
Internet Information services
Internet Service Provider
RISCO Application/Proxy Server
RISCO Application Server
Public Switched Telephone Network
Remote Programmer application (for programming control panels)
SIA
SP
WAApp
WUApp
RISCO Cloud Web Administration Manual
Security systems event reporting protocol
Service Provider – refers to monitoring stations serviced by RISCO Cloud
Web Administrative Application (Administrator Access to RISCO Cloud)
Web User Application (Security Systems Users connected to RISCO Cloud).
1
Page 6
2 Overview
2. Overview
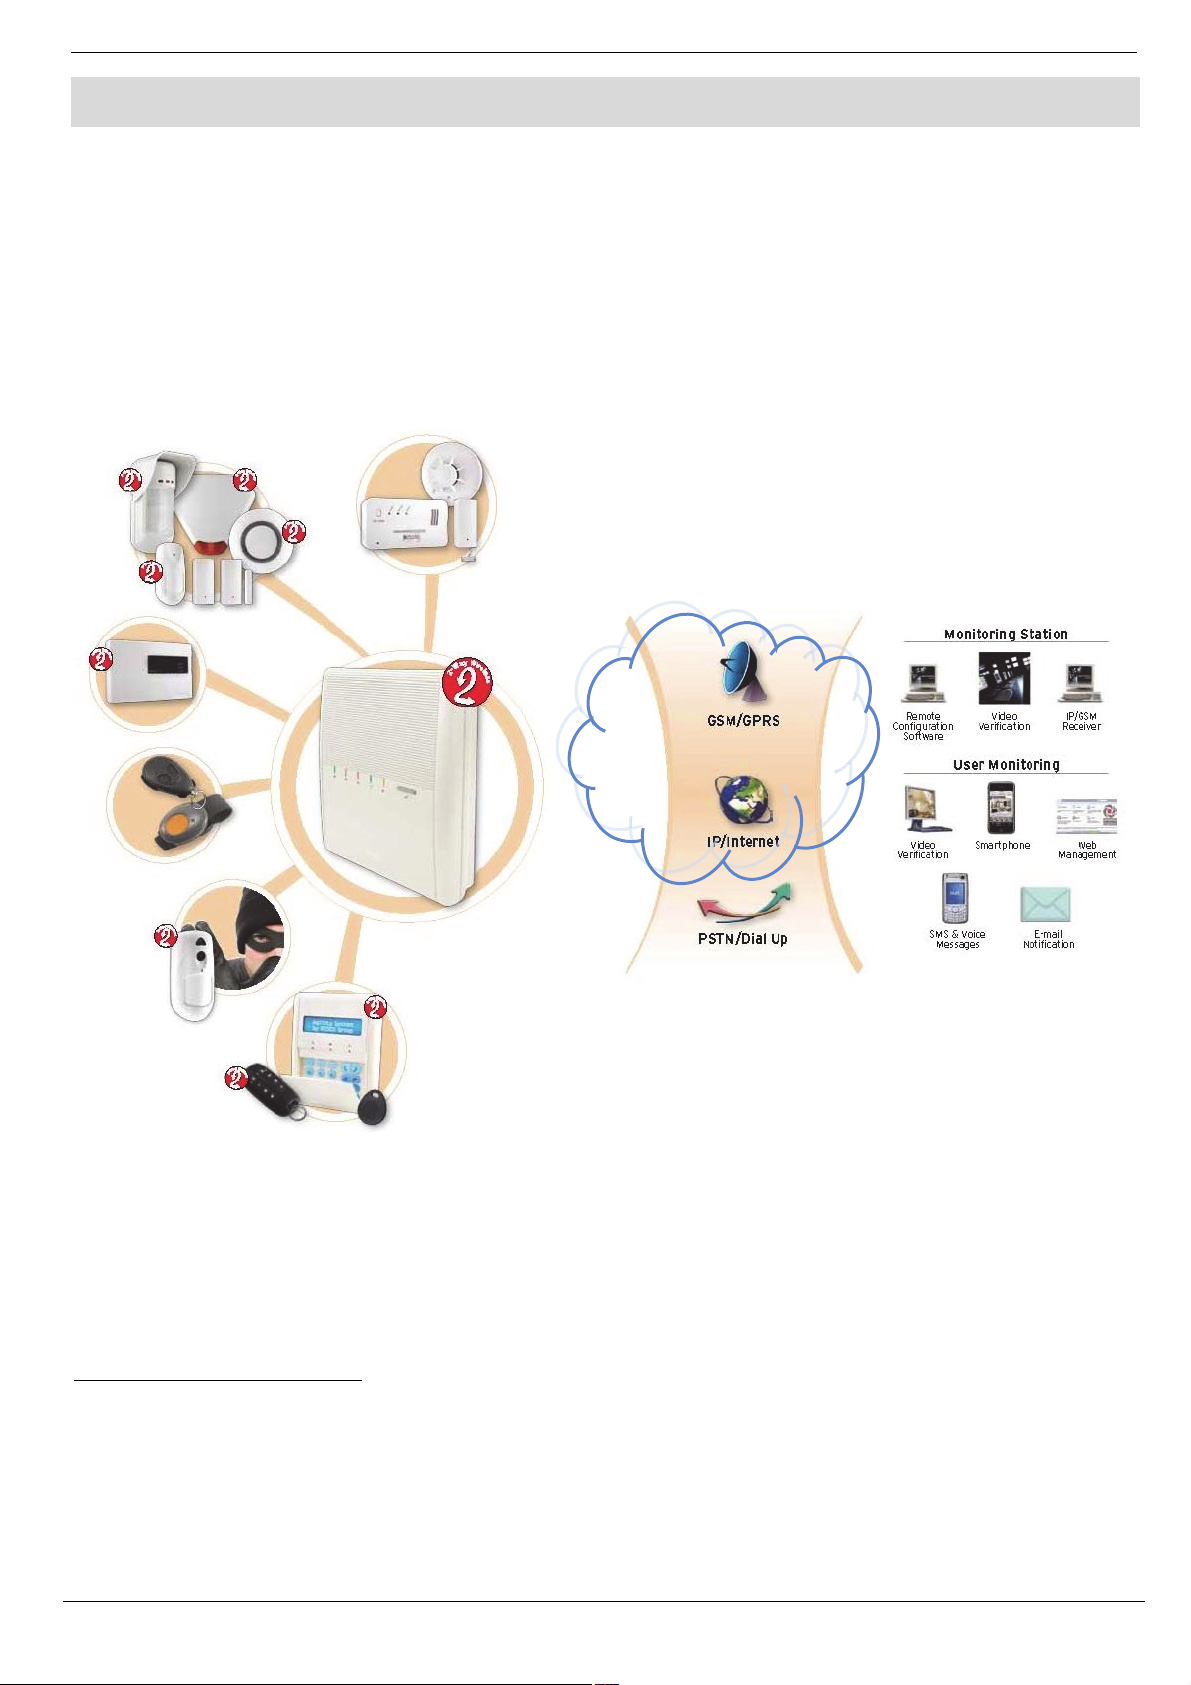
RISCO Application Server (RISCO Cloud) is the central component of RISCO’s Web based service
platform. Implementing secure TCP/IP network connectivity, RISCO Cloud provides high-speed
central station reporting via a broadband interface.
The predominant role of the RISCO Cloud is to handle and manage communications between
security systems installed in the homes and businesses of subscribers and multiple alarm
monitoring service providers. In addition to event reporting, RISCO Cloud enables the security
system to be programmed and controlled via the Web by means of a number of Web applications
and utilities.
RISCO Cloud
Figure 2-1: System Architecture
The main components of the system are:
• RISCO Cloud/Proxy – application/proxy server responsible for connection between
end-users’ control panels1 and service providers, for system management, and data
transfer to the central station's alarm monitoring system
• Agility 3 – security panels with GSM/GPRS, IP or PSTN connection.
1
Please note that Control Panel, Security Panel, and Control System terms refer to the same notion.
2
RISCO Cloud Web Administration Manual
Page 7

2 Overview
2.1. System Architecture
The security control panel, installed in the home or business of the subscriber, provides the interface
to a wide range of encrypted wireless peripherals and household appliances. The control panel
communicates with RISCO Cloud via broadband or wireless GPRS connection to the Internet.
Event messages are forwarded to the monitoring service’s central station. backup communication is
provided to a traditional receiver at the monitoring service. The proxy server Risco Cloud/Proxy
forwards events to the central station’s management software application.
Additionally, monitoring, control and programming of the remote premises security systems can be
performed from RISCO Group’s Smartphone application (iRISCO) or a PC with an Internet
connection.
2.2. The Web Administration Application
The Web Administration application is the main administrator interface with RISCO Cloud and
offers the following features
• Web Administration and Web RP user management
• Service Provider configuration
• Control panel record configuration
• Web User application customization features
• RISCO Cloud configuration features
• Control panels Groups configuration
• Event forwarding email and SMS template editing
The user can access the Web Administration application from a standard Web browser (Internet
Explorer version 6.0 and above with JavaScript support).
In addition to the configurable options listed above, the Web Administration application also
displays statistics regarding the current status of the system; for example, offline control panels and
panels with a trouble condition, and database status information. RISCO Cloud provides additional
status notification to the administrator via email. For further details on the content of these email
messages, see Appendix B: E-mail Notification.
RISCO Cloud Web Administration Manual
3
Page 8
3 Login
3. Login
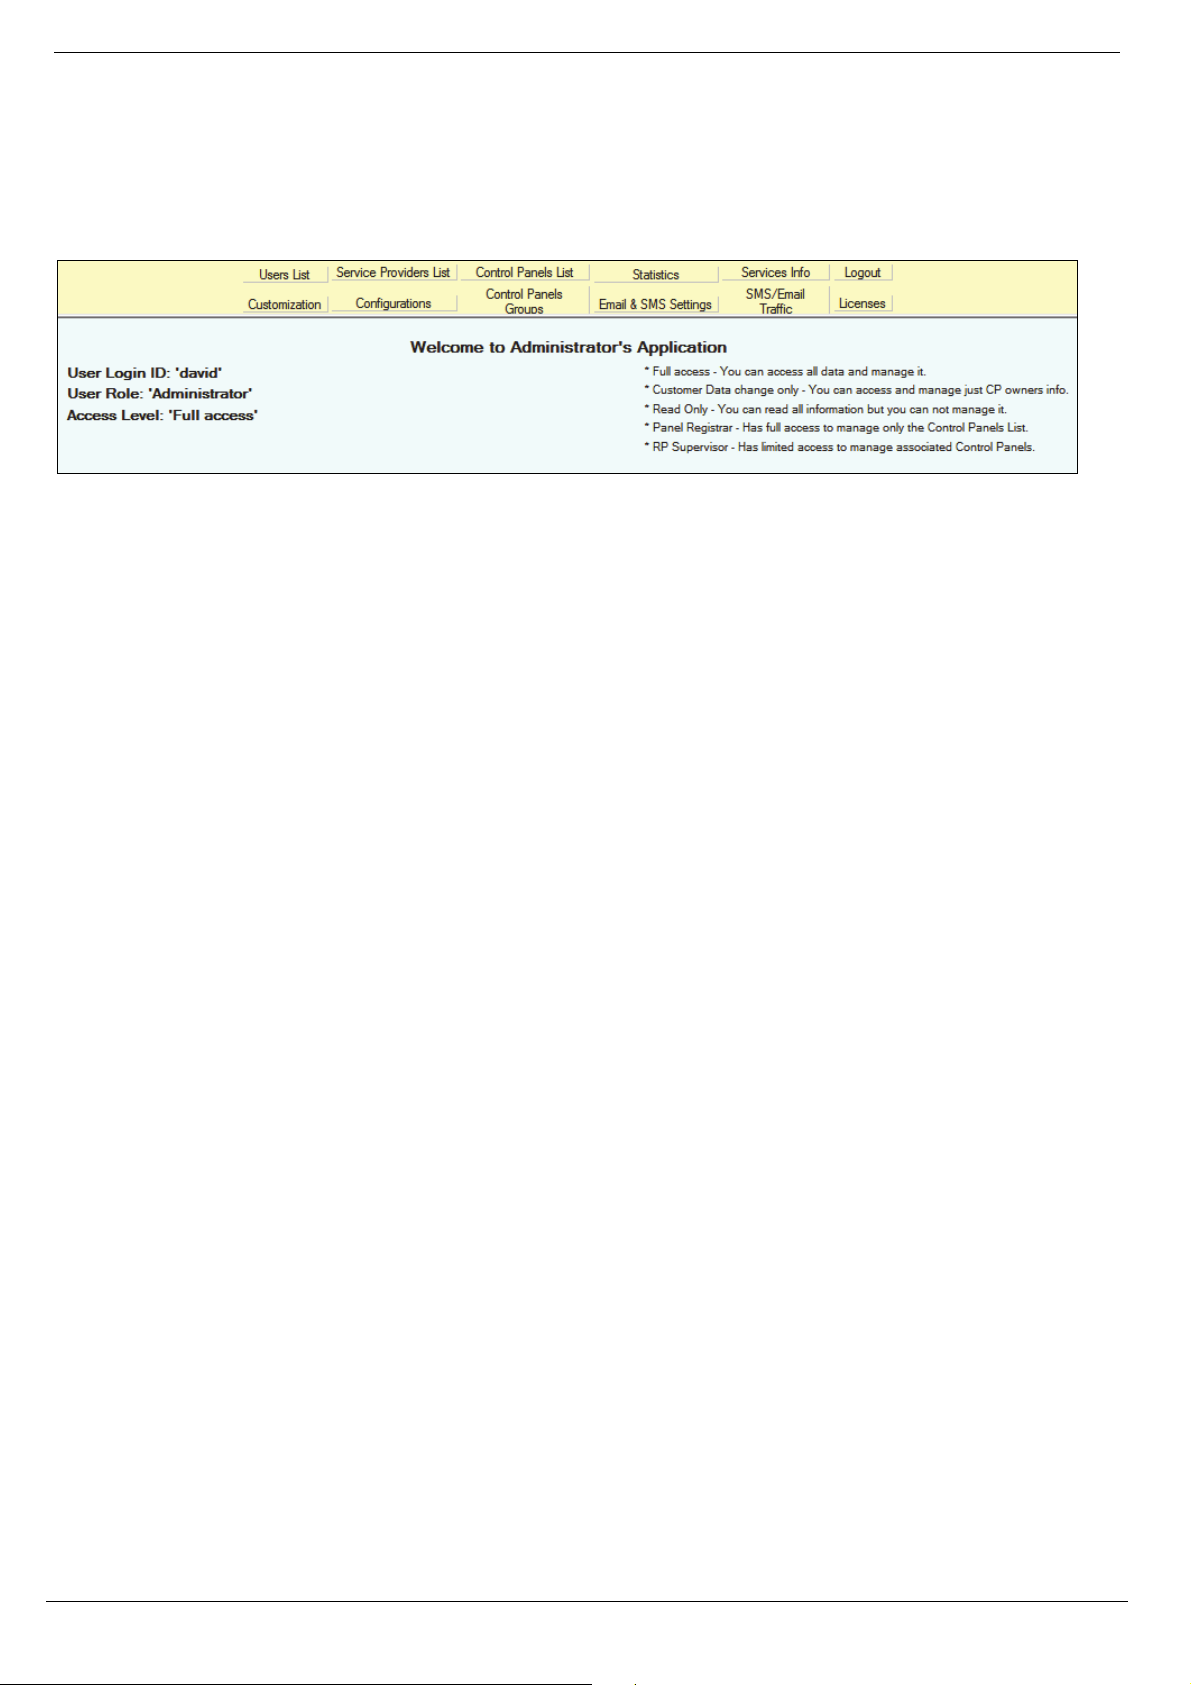
To begin a session, the Web Administration application requires that the user logs in.
3.1. Login Access Level
The Login Access Level is the authorization granted to the Web Administration Application user.
There are five types of access levels available for Administrator accounts:
Table 3-1: Login Access Levels
Access Levels Available Options
Role
Administrator Full Access WAApp: Management of all data in RISCO Cloud WAApp
Customer Data
Change Only
Remote
Programmer
Read Only
Panel Registrar
Supervisor
Operator
Technician
WAApp: Modifying data that is related to CP owners in Control Panel
Update page only.
WAApp: Reading data but no data management.
WAApp: Access to the CP list for panel registration.
WAApp:
1
Control Panels
service Providers.
Users: Allocating users to CP groups and updating user details.
WEB RP: Full Access
WEB RP: Has restricted access to the General frame of the Web RP
where only the CP ID and the SW versions of the CP modules are
displayed.
Monitor: Arming/Disarming, seeing the registered devices' status,
bypassing/unbypassing of the zones.
WAApp: No Access
WAApp: No Access
Web RP: The same access level as the Supervisor, but no access to the
User Management frame (user names and the passcodes).
: Adding new CPs and assigning CPs to groups and
1
The Remote Programmer has access to manage only the associated Control Panels based on the “WEB RP Users and
Control panels assignment groups” membership. Complete access to the CP data is provided, with only one restriction:
no option to select Service Provider that has no relation.
4
RISCO Cloud Web Administration Manual
Page 9
3 Login
3.2. Logging Into the Web Administration Application
To log into the Web Administration application:
1. Enter user name and password.
2. Click Login; the Main page is displayed.
Figure 3-1: Main Page
The Main page displays the details of the current user. At the top of the page, there is a menu
offering links to the various pages of the application.
3.3. Logging Out
To log out of the Web Administration Application:
Click Log Out; you are automatically returned to the Log In page.
RISCO Cloud Web Administration Manual
5
Page 10
4 Web Admin/WEB RP User Management
4. Web Admin/WEB RP User Management
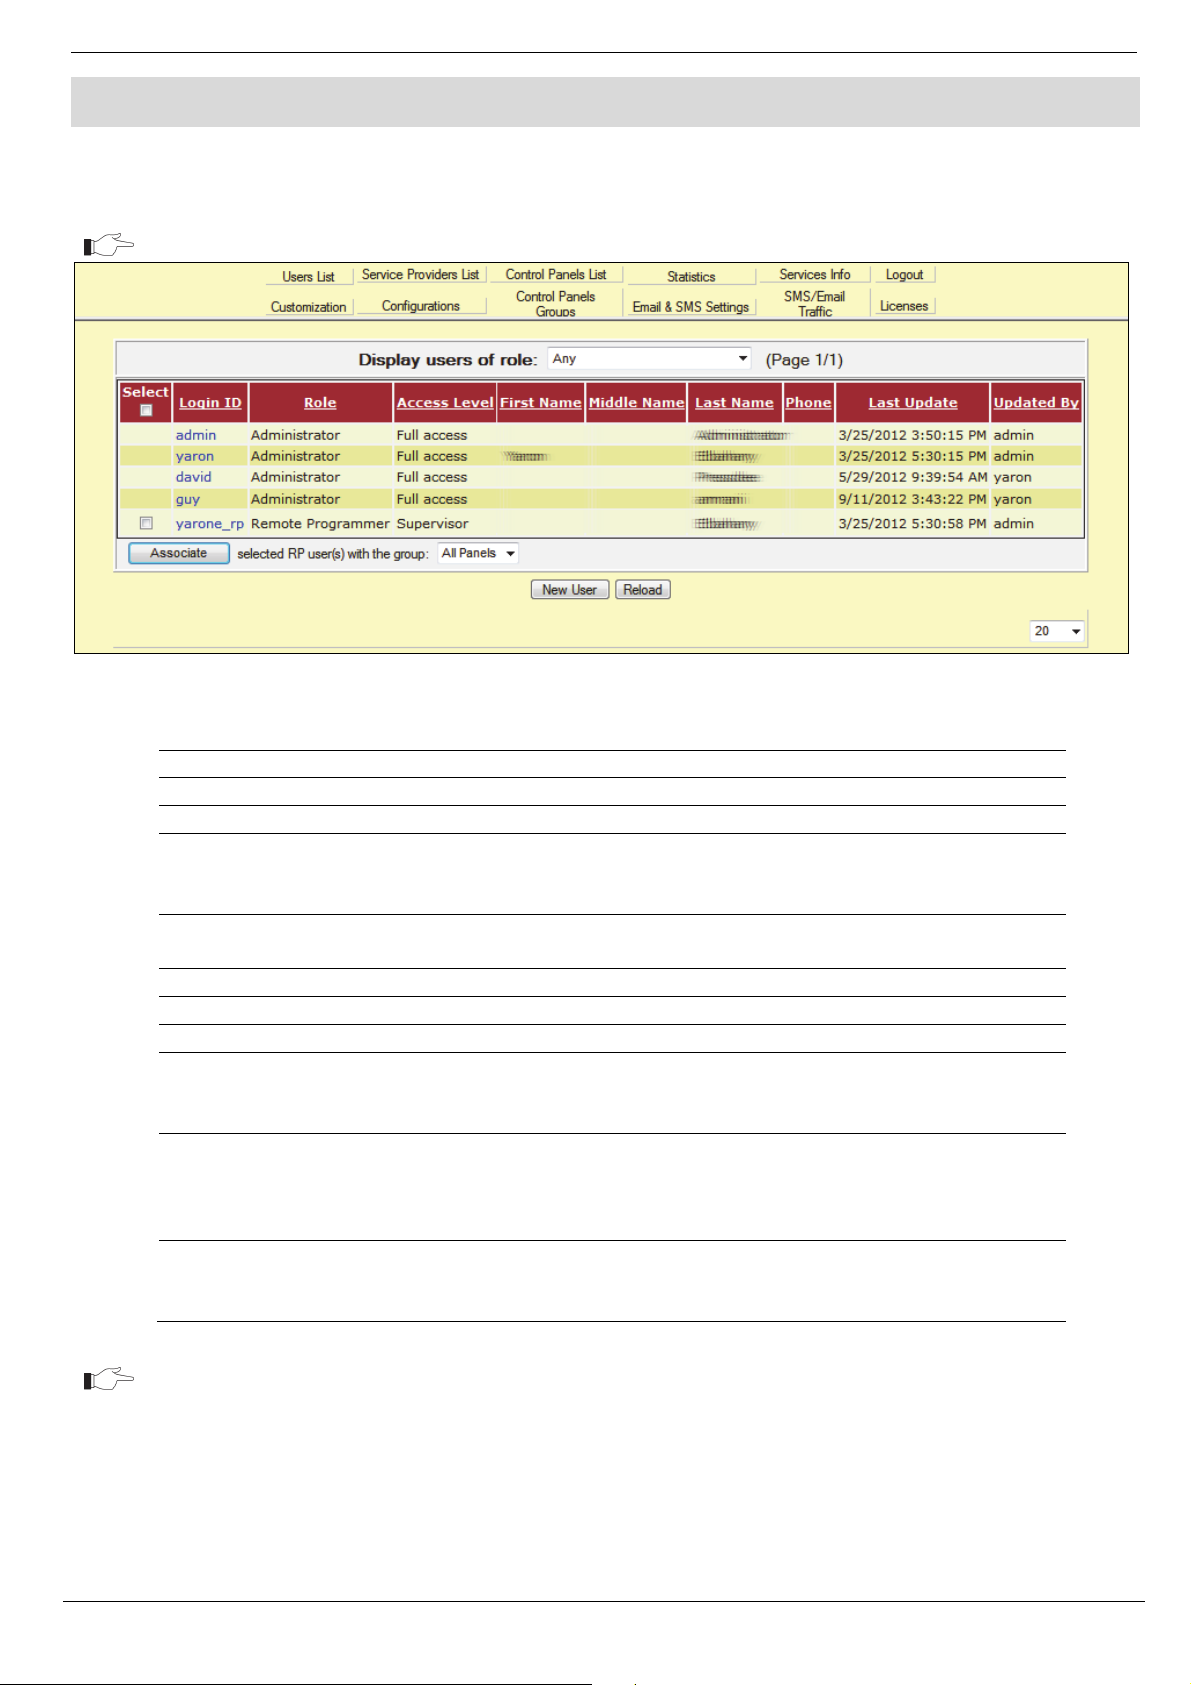
On the Users List page, you can view the list of users who are authorized to enter the Web
Administration application or the Web Remote Programmer (RP) application.
For RP users, there is an option to display the list for each group of panels specifically.
Figure 4-1: Users List
Table 4-1: User Fields description
Column
Select If selected, the WEB RP User can be allocated to a Control panel Group*.
Login ID The user name that is entered when logging in.
Role The type of user. The role can be Administrator (RISCO Cloud operator
Access Level The authorization level of the user. Various authorization levels are
First/Middle/Last Name User's personal details for identification purposes.
Phone User’s telephone number for reference purposes.
Last Update The date when the user’s details were last edited.
Updated By The RISCO Cloud WAApp operator who last updated the user’s details.
Associate If one of the WEB RP users were selected in the list, the operator can
Display List Filtering The users display list can be filtered by selection of the list length on the
Description
for Web Administration application user), Remote Programmer (RP
user), or CMS user (for Central Monitoring Station)
available for each role.
(If Deleted displayed in the Update By column, meaning this
Administrator User was deleted from the RISCO Cloud DB)
Choose a Control Panel Group and Associate the selected Users to this
Group (for more information, see, Control Panels Groups
foot of the page on the right, or by selecting the User Role for display
from the dropdown list on the top of the table.
For more information, see, Control Panels Groups
6
RISCO Cloud Web Administration Manual
Page 11
4 Web Admin/WEB RP User Management
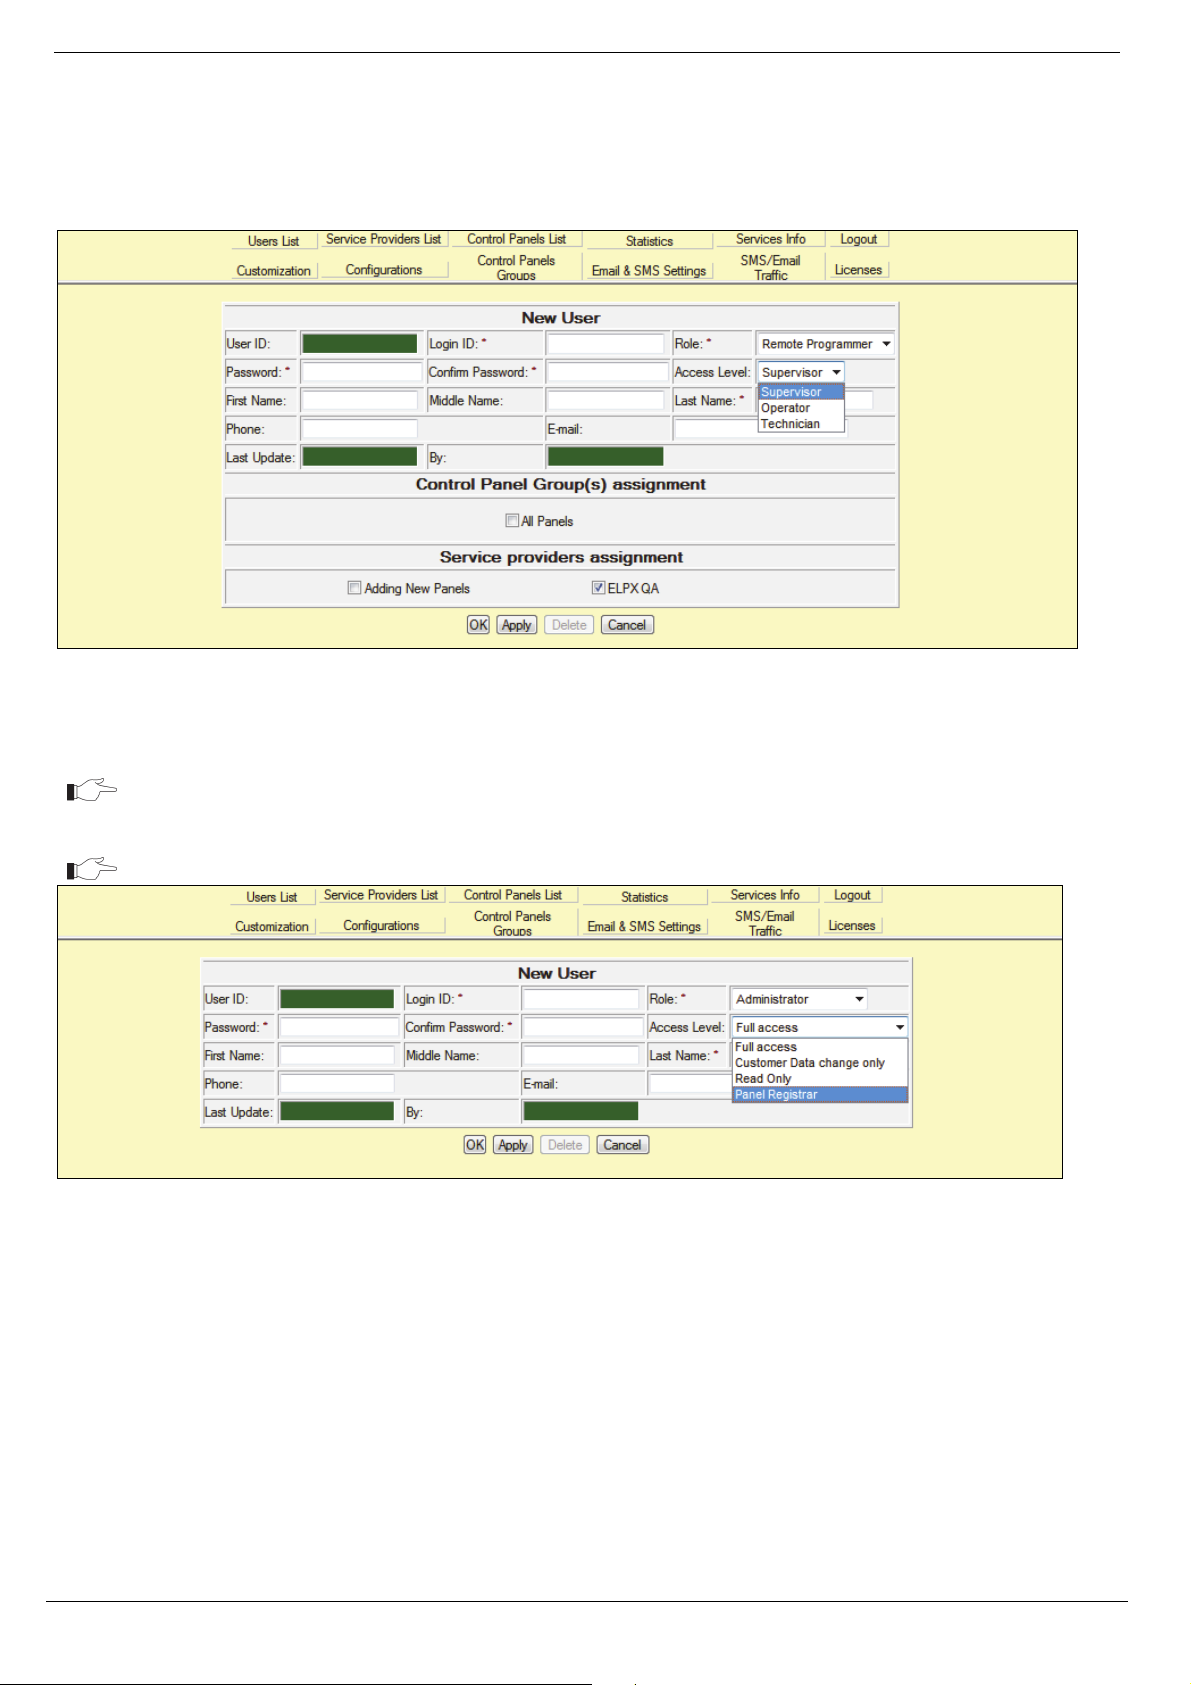
4.1. Adding a New User
To add a new user:
1. On the Users List page, click New User (located at the foot of the list); the User Update
page is displayed.
Figure 4-2: New User Page
2. Enter the new user’s login ID, password (twice) and personal details in the appropriate
fields.
The User ID is automatically assigned once the new user is saved in the system.
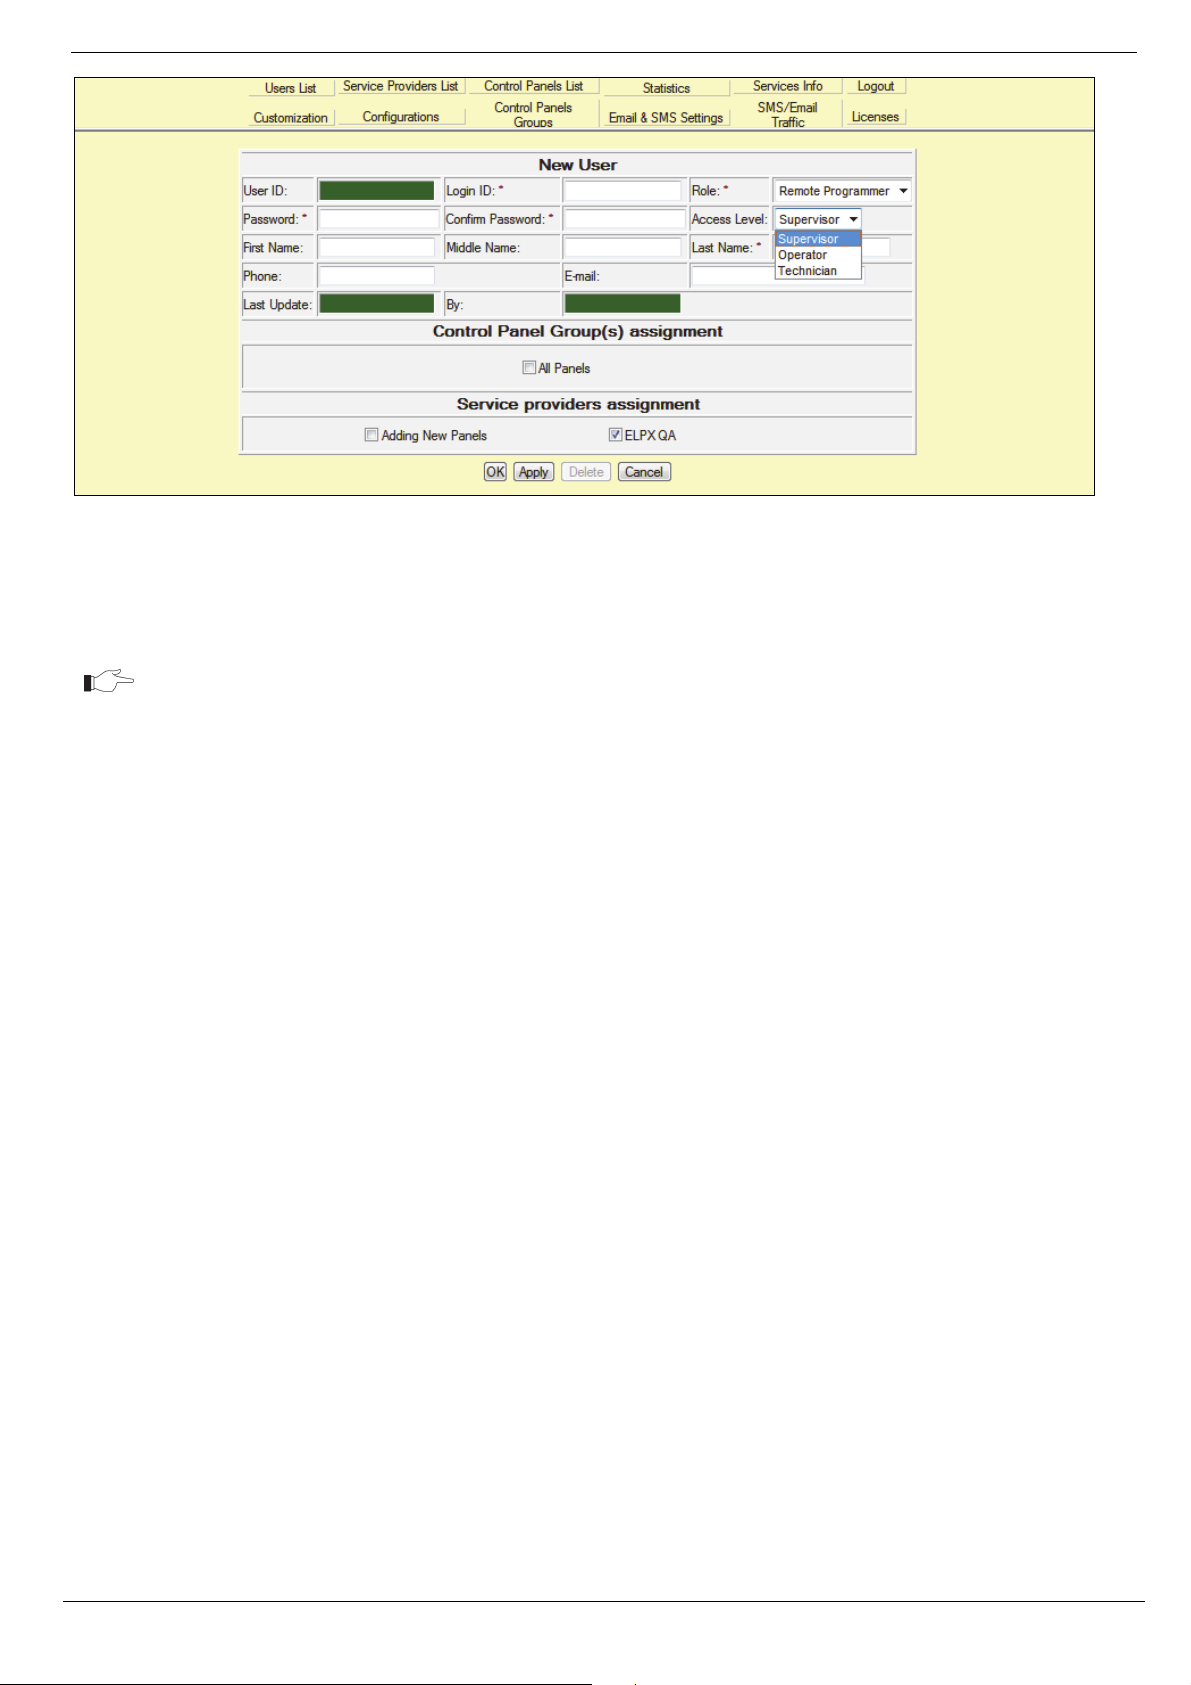
3. Choose the new user’s role and access level.
Panel Registrar access level allows only panel registration – see Figure 4-3
Figure 4-3: New User Page – Control Panel Registrar
If the RISCO Cloud administrator grants Supervisor access level to a Remote Programmer, the
Remote Programmer acquires access to WebRP and WAApp, therefore allowing him to assign
control panels to groups and service providers as well as add new panels – see Figure 4-4.
RISCO Cloud Web Administration Manual
7
Page 12
4 Web Admin/WEB RP User Management
Figure 4-4: New User Page – Remote Programmer with Supervisor access level
4. Click OK to update and return to the Users List
– Or –
Click Apply to update and remain on the User Update page.
Mandatory fields are indicated by an asterisk (*).
4.2. Editing an Existing User
To edit the existing user's details:
1. On the Users List page, click the Login ID Name of the user you wish to edit (colored in
blue); the User Update page is displayed.
2. Edit the user’s details as required.
3. Click OK to update and return to the Users List
– Or –
Click Apply to update and remain on the User Update page.
8
RISCO Cloud Web Administration Manual
Page 13
4 Web Admin/WEB RP User Management
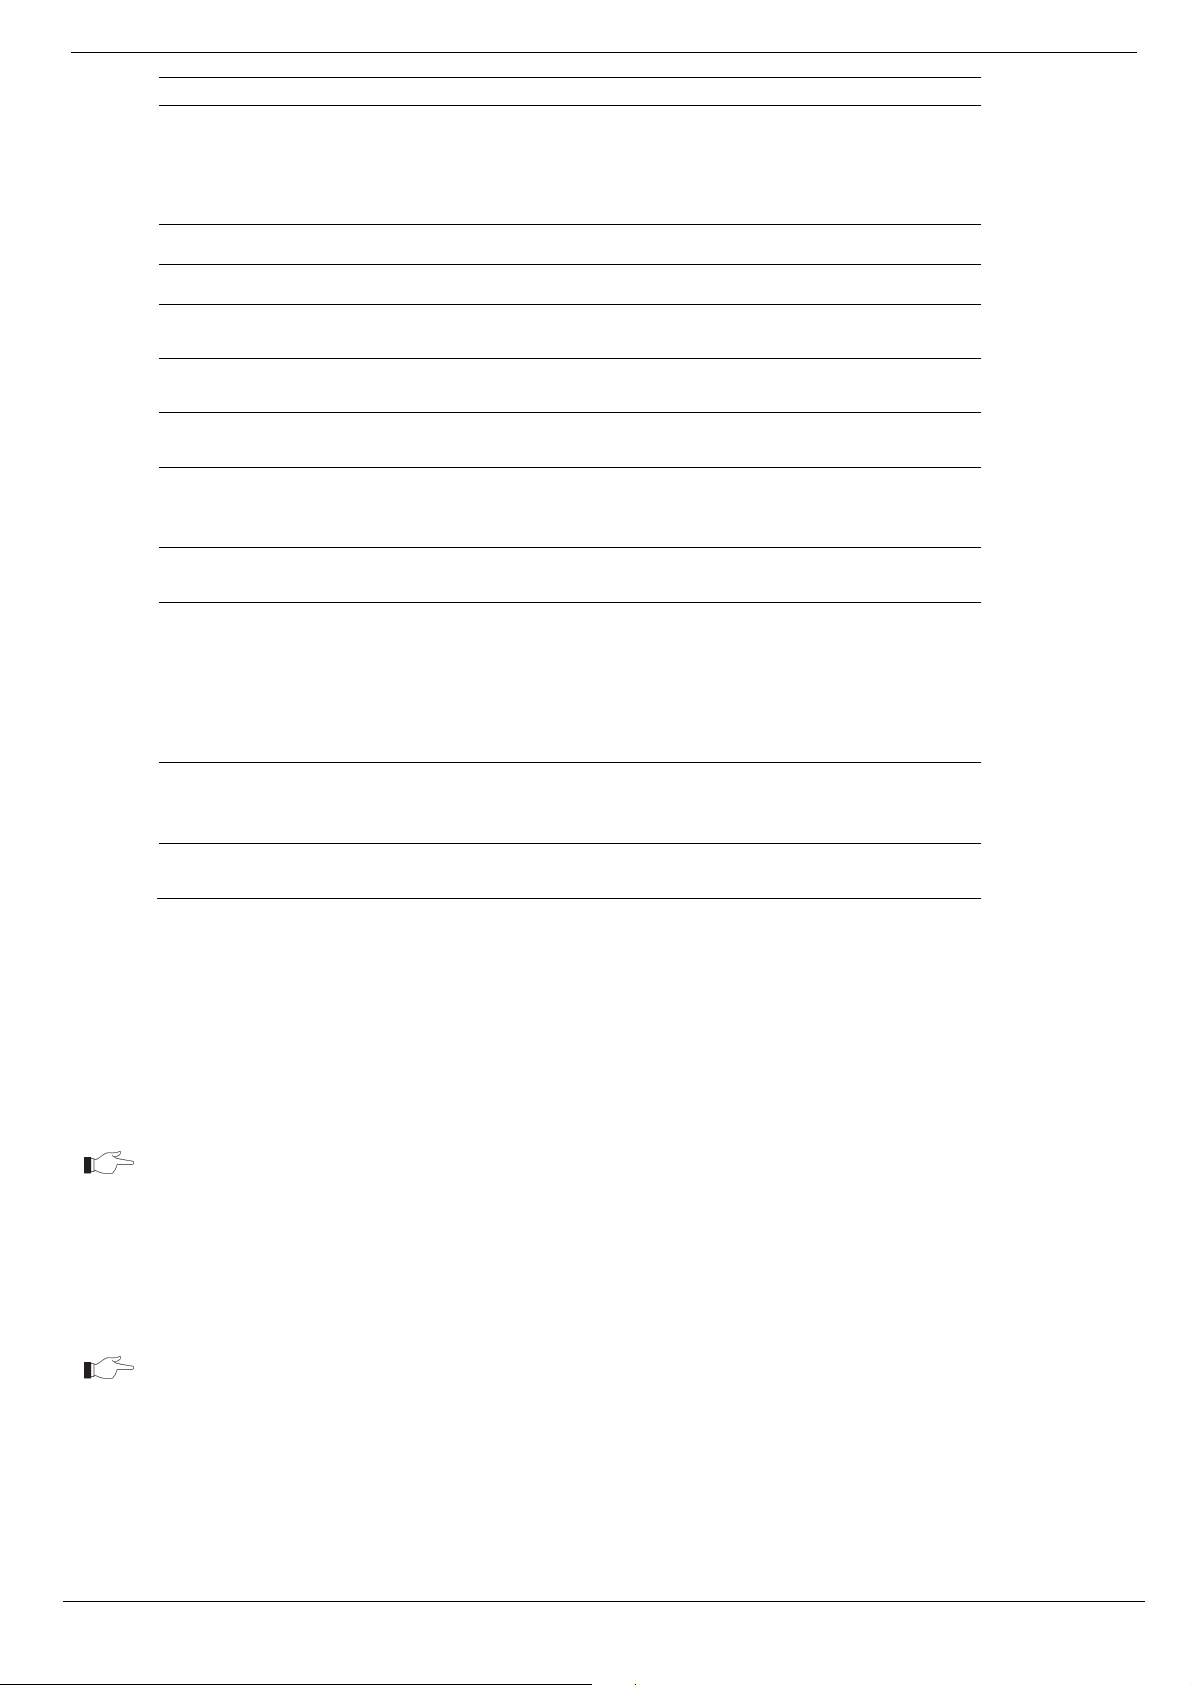
4.3. Filtering by RP User Assigned to Group Option
If the operator chooses to filter the Users Display list by the RP User Assigned to Group option, two
new options, relevant for this display only, will appear on the foot of the page in addition to
Associate, as displayed below.
Figure 4-5: Filtering by RP User Assigned to Group display
• Associate – When the operator wishes to associate one or several WEB RP users from
one group with another group, too, the relevant users will be selected from the
displayed list, the new group will be selected from the dropdown list, and associate
button will be pressed. Now the WEB RP users will be associated with the new group
as well.
• Transfer – If the operator wishes to transfer WEB RP users between groups, the above
procedure will be executed, and Transfer button will be pressed instead of Associate,
thus deleting the WEB RP users from the previous group, and transferring them only
to the newly chosen group.
• Remove – If the operator wishes to remove WEB RP user from a group, the relevant
user or users will be selected, and pressing the Remove button will remove those
users from this list.
The WEB RP users won’t be deleted from the RISCO Cloud database, but only
removed from the association with the group.
4.4. Deleting a User
To delete a user:
1. On the Users List page, click the Login ID of the user you wish to delete; the User Update
page is displayed.
2. Click Delete and then OK; the user is deleted.
RISCO Cloud Web Administration Manual
9
Page 14

5 Service Providers List
5. Service Providers List
The Service Providers list displays all of the current service providers that are configured for RISCO
Cloud. After an event is received from a control panel, the event data is forwarded to the Proxy of
the service provider which is, in turn, passed on to the service providers monitoring software. The
Service Providers page comprises a list of the service providers that are available for allocation to
each customer (i.e. each control panel). In the certain countries, a common service provider will be
responsible for all events and will be so entered in this screen.
Figure 5-1: Service Providers Page
Table 5-1: Service Providers Columns/Fields
Column/Field
Provider Name The name of the service provider.
Provider Type The Type of the service provider: Proxy or IP SIA CSR.
Last Update The date when the service provider’s details were last edited.
Updated By The person who last updated the service provider’s details.
Default Provider Option to assign a default service provider in cases when multiple
Description
service providers are used.
10
RISCO Cloud Web Administration Manual
Page 15

5 Service Providers List
5.1. Adding a New Service Provider
To add a new service provider:
1. On the Service Providers List page, click New Service Providers (located at the foot of the
list); the New Service Provider page is displayed.
Figure 5-2: New Service Provider Page
2. Enter the new service provider’s details in the appropriate fields. The available fields are
described in the table following this procedure.
3. Click OK to update and return to the Service Providers List.
– Or –
Click Apply to update and remain on the Service Provider Update page.
Mandatory fields are indicated by an asterisk (*).
Table 5-2: Service Providers Fields
Field Description
Provider ID The serial number of the Service Provider that is allocated
automatically when the Service Provider is registered in
RISCO Cloud.
Provider Name The name of the service provider.
Description A short description of the service provided.
Location A description of where the service provider is located.
Contact Name General details for future reference.
Contact E-mail General details for future reference.
SP Type
Service Provider Type – Choose from the dropdown list the
type of the service provider. The Proxy Provider – emulating
events in event reporting protocol to PSTN CSR or SIA IP
Receiver Provider (CSR) which receives the events in SIA
protocol using TCP/IP communication.
RISCO Cloud Web Administration Manual
11
Page 16
5 Service Providers List
Field Description
Login ID The name used for identification when RISCO Cloud attempts
to forward an event, used for security and authentication
method, for Monitoring Station control of RISCO Cloud event
reporting.
CSR Host IP address of the service provider.(only applicable to SIA lP)
CSR Port
CSR Protocol
Account Prefix
Receiver Number
Report Attempts
Other Settings
Password The password used for authentication when RISCO Cloud
RSICO Cloud/Proxy
URL 1 & 2
Last Update/By Last time the service provider fields were updated and details
Port number of the service provider.(only applicable to SIA IP)
Communication connection protocol used by the service
provider.(only applicable to SIA IP)
Prefix number used by the service provider.(only applicable to
SIA IP)
Receiver number used by the service provider.(only applicable
to SIA IP)
Number of times RISCO Cloud will attempt to report to the
service provider before a report “report failed” event is
triggered (only applicable to SIA IP)
Enable/ disable the reporting of guard code usage and
arm/disarm control panel events to the service provider
forwards an event. If a password is required (this is defined by
the Proxy application), enter the password again in the
Confirm Password box. If no password is required, select the
Blank Password check box. The password must be between 6
and 16 characters and must begin with a letter.
The URL of the two RISCO Cloud/Proxy servers (1 = Primary,
2 = Backup). It is possible to enter one URL if no backup is
required.
of the user/administrator that performed the changes
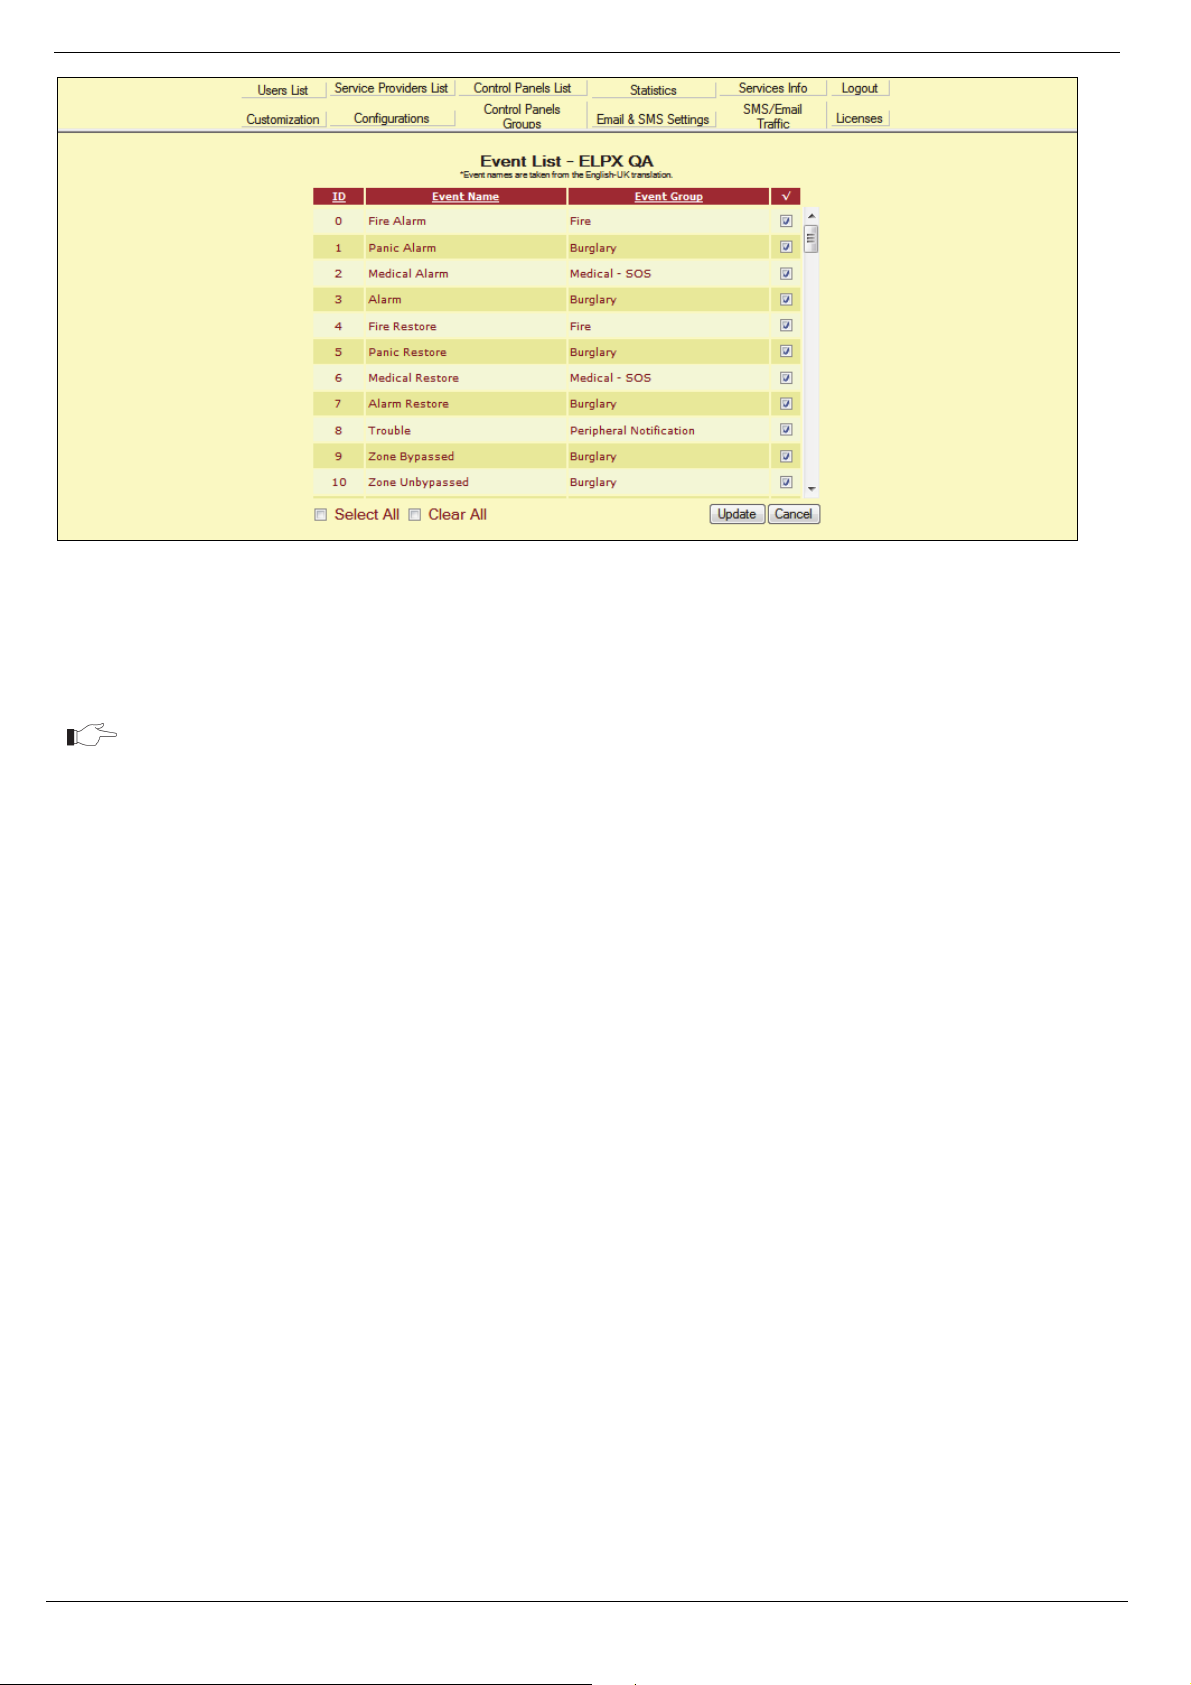
5.1.1. Editing the Service Provider’s Event List
Each service provider has an Event List used to filter the events that are sent from RISCO
Cloud/Proxy to the monitoring station. When a control panel sends an event to the RISCO Cloud,
only events that are enabled in the service provider’s Event List are forwarded to the control
panel’s service provider. For a complete list of events included in the Event List, refer to
Customization.
In case of the CMS connection failure, the end user notification will be repeated three
times.
To edit a service provider’s Event List:
1. On the Service Provider Update page (see, Adding a New Service Provider), click Event
List; the Event List page is displayed.
To edit a service provider’s Event List, you must first create the Service Provider. It is
not enough to enter the mandatory fields in the Service Provider Update page; you
must also click Apply before you can access the Event List.
12
RISCO Cloud Web Administration Manual
Page 17
5 Service Providers List
Figure 5-3: Service Provider Event List
2. Using the checkboxes located on the right hand side of the list, select the events that the
RISCO Cloud/Proxy shall forward to the service provider.
By clearing the checkbox the user disables event forwarding to the service provider,
but not the end user SMS notification.
Clicking a column label sorts the event list according to ID, Event Name or the Event
Group to which the event belongs. Two checkboxes located at the bottom of the table
allow you to select or clear all checkboxes simultaneously.
3. When you have finished configuring the Event List, click Update to return to the Service
Provider Update page.
5.2. Editing an Existing Service Provider
To edit an existing service provider:
1. On the Service Providers List page, click the Provider Name of the service provider you
wish to edit; the Service Provider Update page is displayed.
2. Edit the service provider’s details as required.
3. Click OK to update and return to the Service Providers List.
– Or –
Click Apply to update and remain on the Service Provider Update page.
5.3. Deleting a Service Provider
To delete a service provider:
1. On the Service Providers List page, click the Provider Name of the service provider you
wish to delete; the Service Provider Update page is displayed.
2. Click Delete; the following dialog box appears.
3. Click OK; the service provider is deleted.
RISCO Cloud Web Administration Manual
13
Page 18
6 Control Panels List
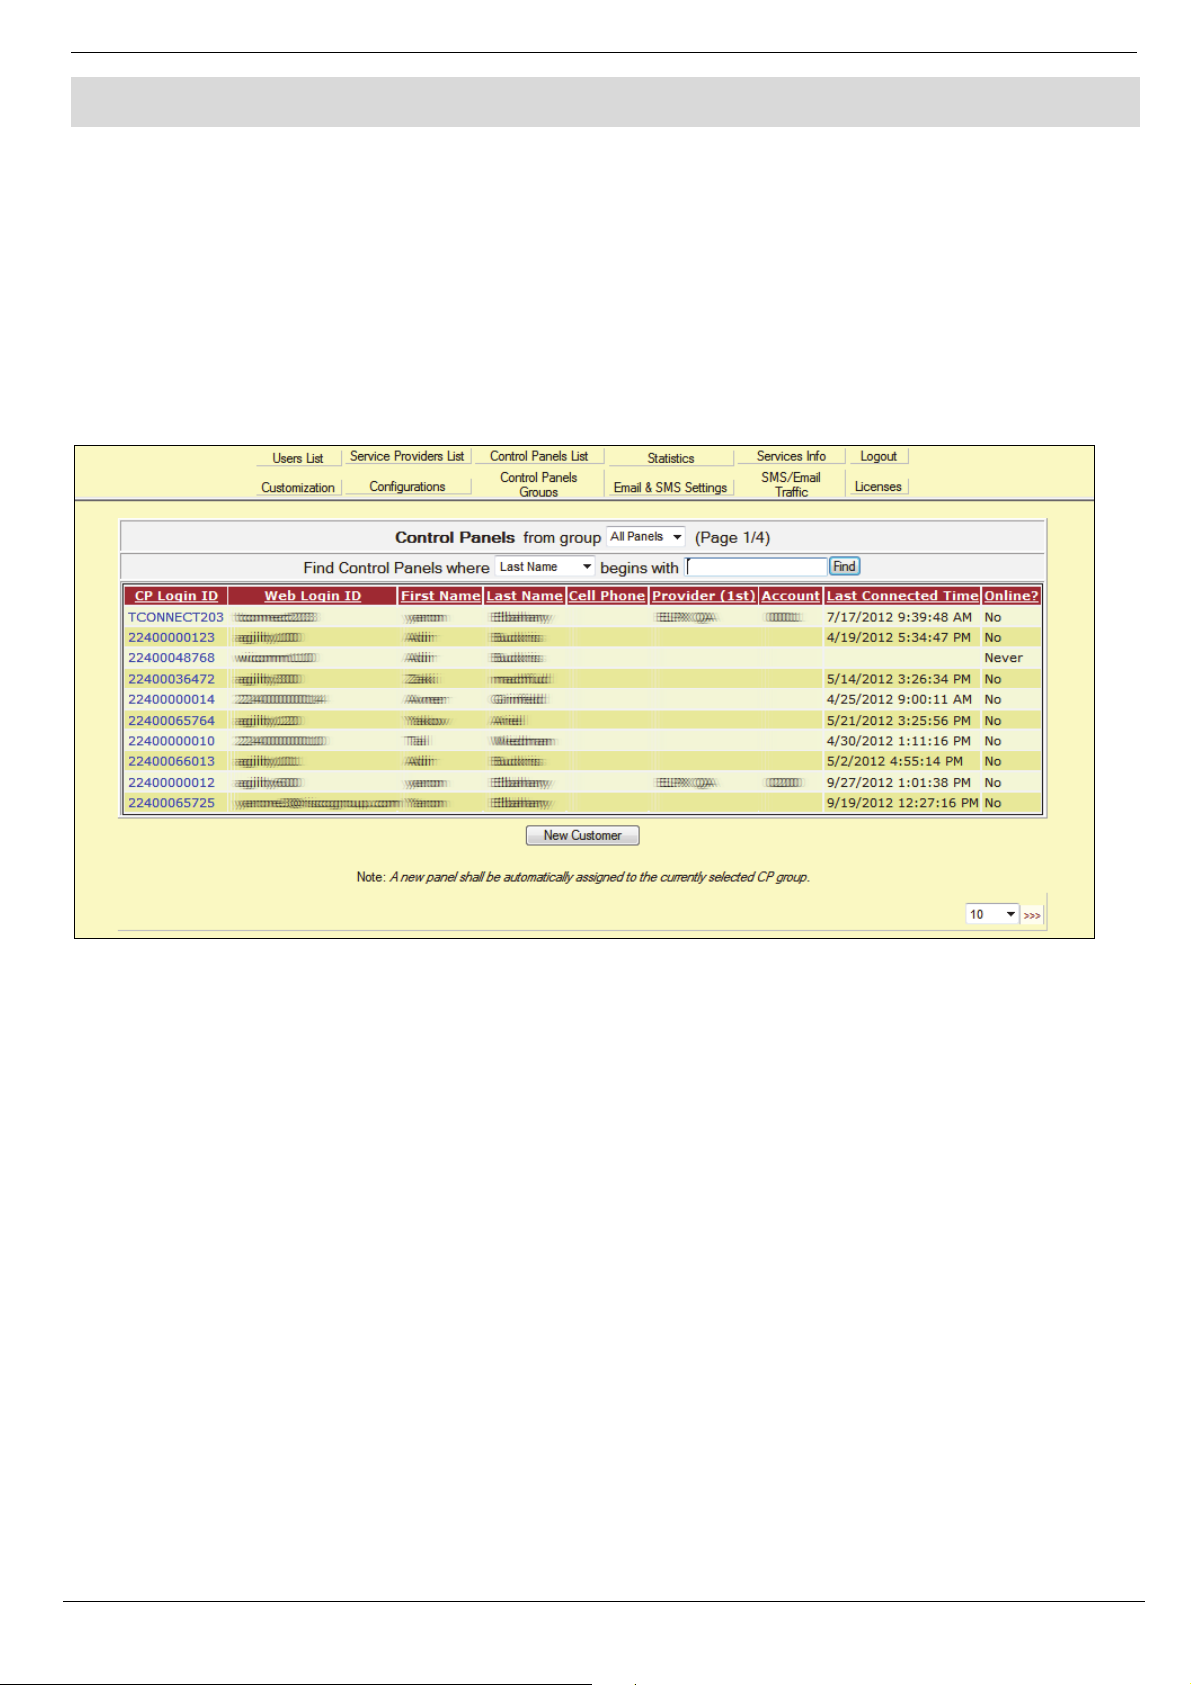
6. Control Panels List
The Control Panels List is an inventory of the customers’ control panels. A control panel must
appear in the list in order to be recognized by RISCO Cloud.
To view the Control Panels List:
1. Open the Control Panels List page.
2. Select the Control Panel Group you wish to view (for more information about Control
Panels Groups see Control Panels Groups).
3. Choose the appropriate search filters for the control panels you wish to view.
4. Click Find; the required entries in the Control Panels List are displayed.
Figure 6-1: Control Panels List Page
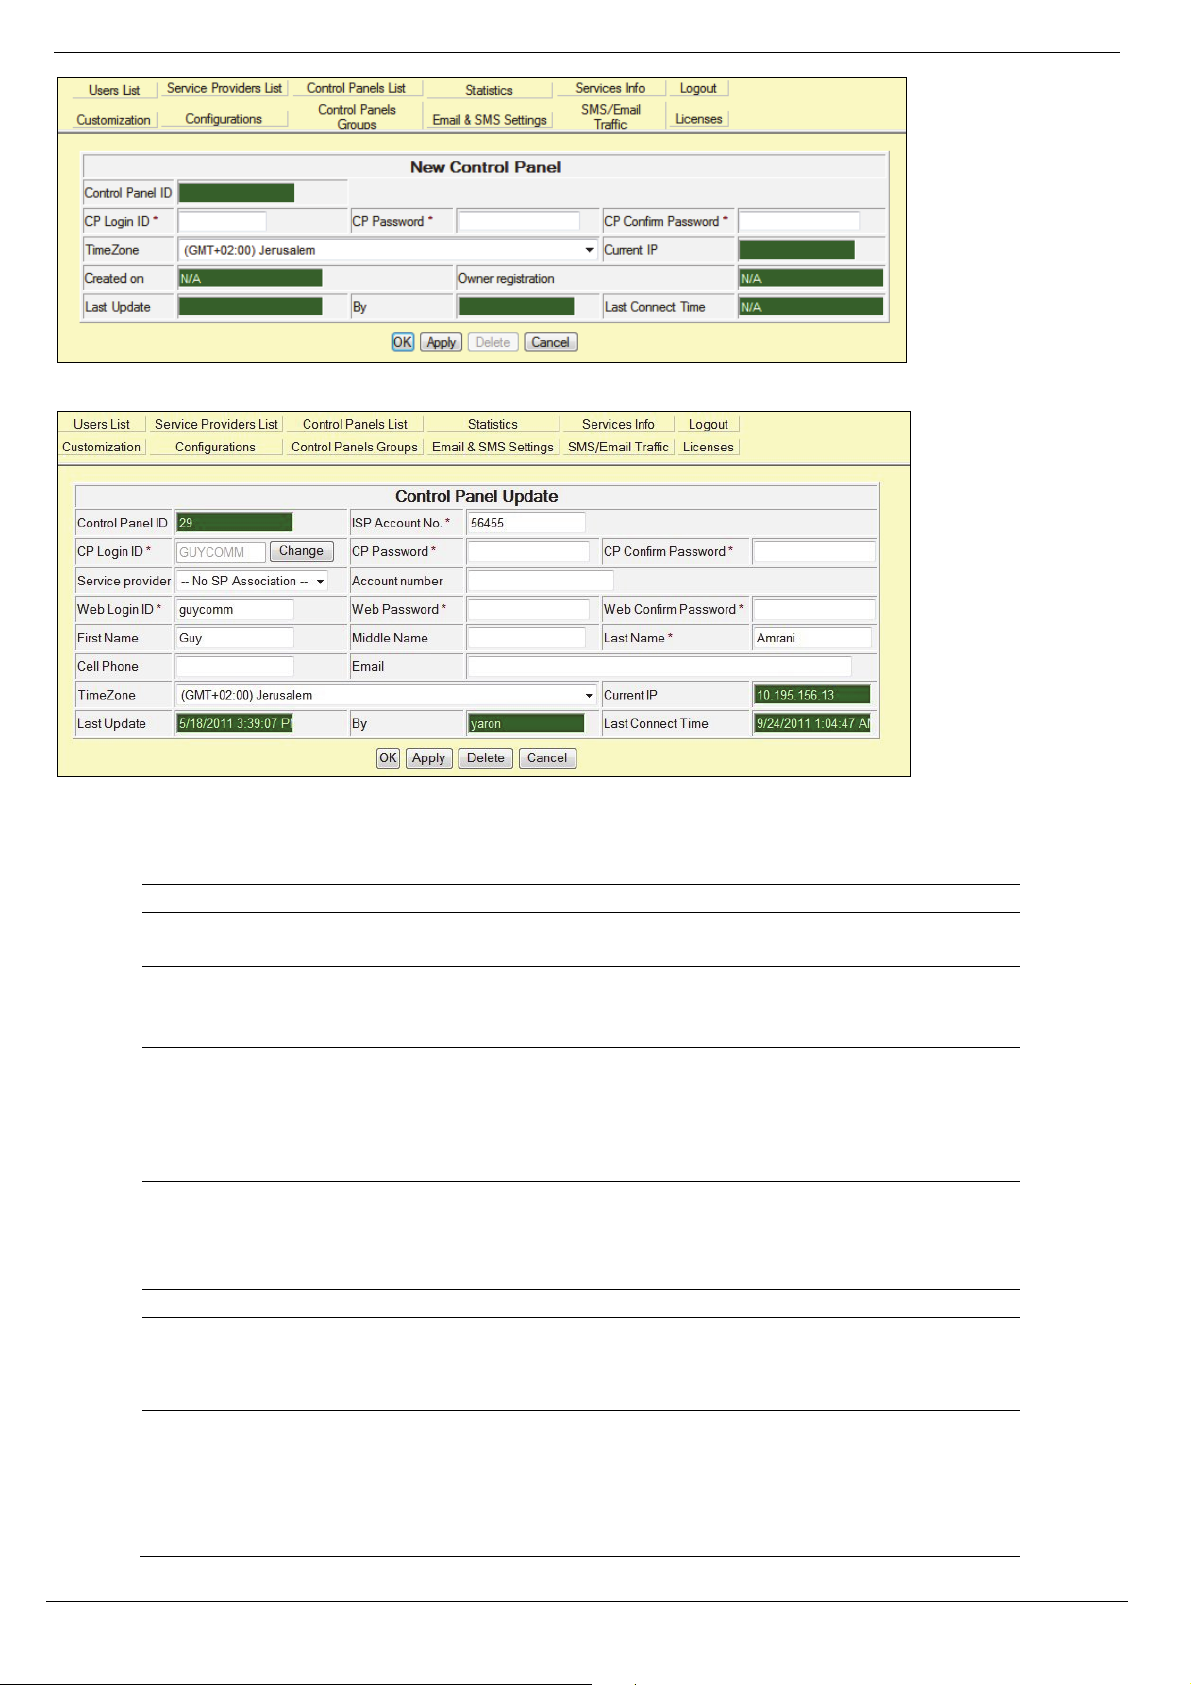
6.1. Adding a New Control Panel
To add a new control panel:
1. On the Control Panels List page, click New Customer; the Control Panel Update page is
displayed.
2. Enter the new customer’s details in the appropriate fields. The available fields are
described in the table following this procedure.
3. Click OK to update and return to the Control Panels List.
–Or–
Click Apply to update and remain on the Control Panel Update page.
14
RISCO Cloud Web Administration Manual
Page 19
6 Control Panels List
Figure 6-2: New Control Panel Page (Self Registration enabled)
Figure 6-3: New Control Panel Page (Self Registration disabled)
Table 6-1: Control Panel Update Page
Field Description
Control Panel ID The serial number of the control panel that is allocated automatically
when the customer is created.
ISP Account Number The customer’s account number at the ISP/Cable provider used for
billing purposes (only applicable when the Self Registration option is
disabled).
CP Login ID Used by the control panel for identification when connecting to RISCO
Cloud. This parameter must be identical to the CP ID programmed at
the control panel. To edit this field, click the Change button to the right
of the field then click OK in the confirmation dialog box. The
maximum number of characters you should enter for the CP ID is 16.
CP Password Used by the control panel for authentication when connecting to
RISCO Cloud. This parameter must be identical to the CP Password
programmed at the control panel. The maximum number of characters
you should enter for the CP Password is 16.
CP Confirm Password Confirmation field for the CP Password.
Web Login ID The customer’s login name that they must enter when they log in to the
Web User Application (only applicable when the Self Registration
option is disabled).
Web Password The customer’s password that must be entered when they log in to the
Web User Application. The maximum number of characters you
should enter for the Web Password is 16 and the password must begin
with a letter (only applicable when the Self Registration option is
disabled).
RISCO Cloud Web Administration Manual
15
Page 20
Field Description
Web Confirm
Password
Confirmation field for the Web Password (only applicable when the
Self Registration option is disabled).
6 Control Panels List
First/Middle/
Last Name
Cell Phone/E-mail Additional customer information for reference purposes (only
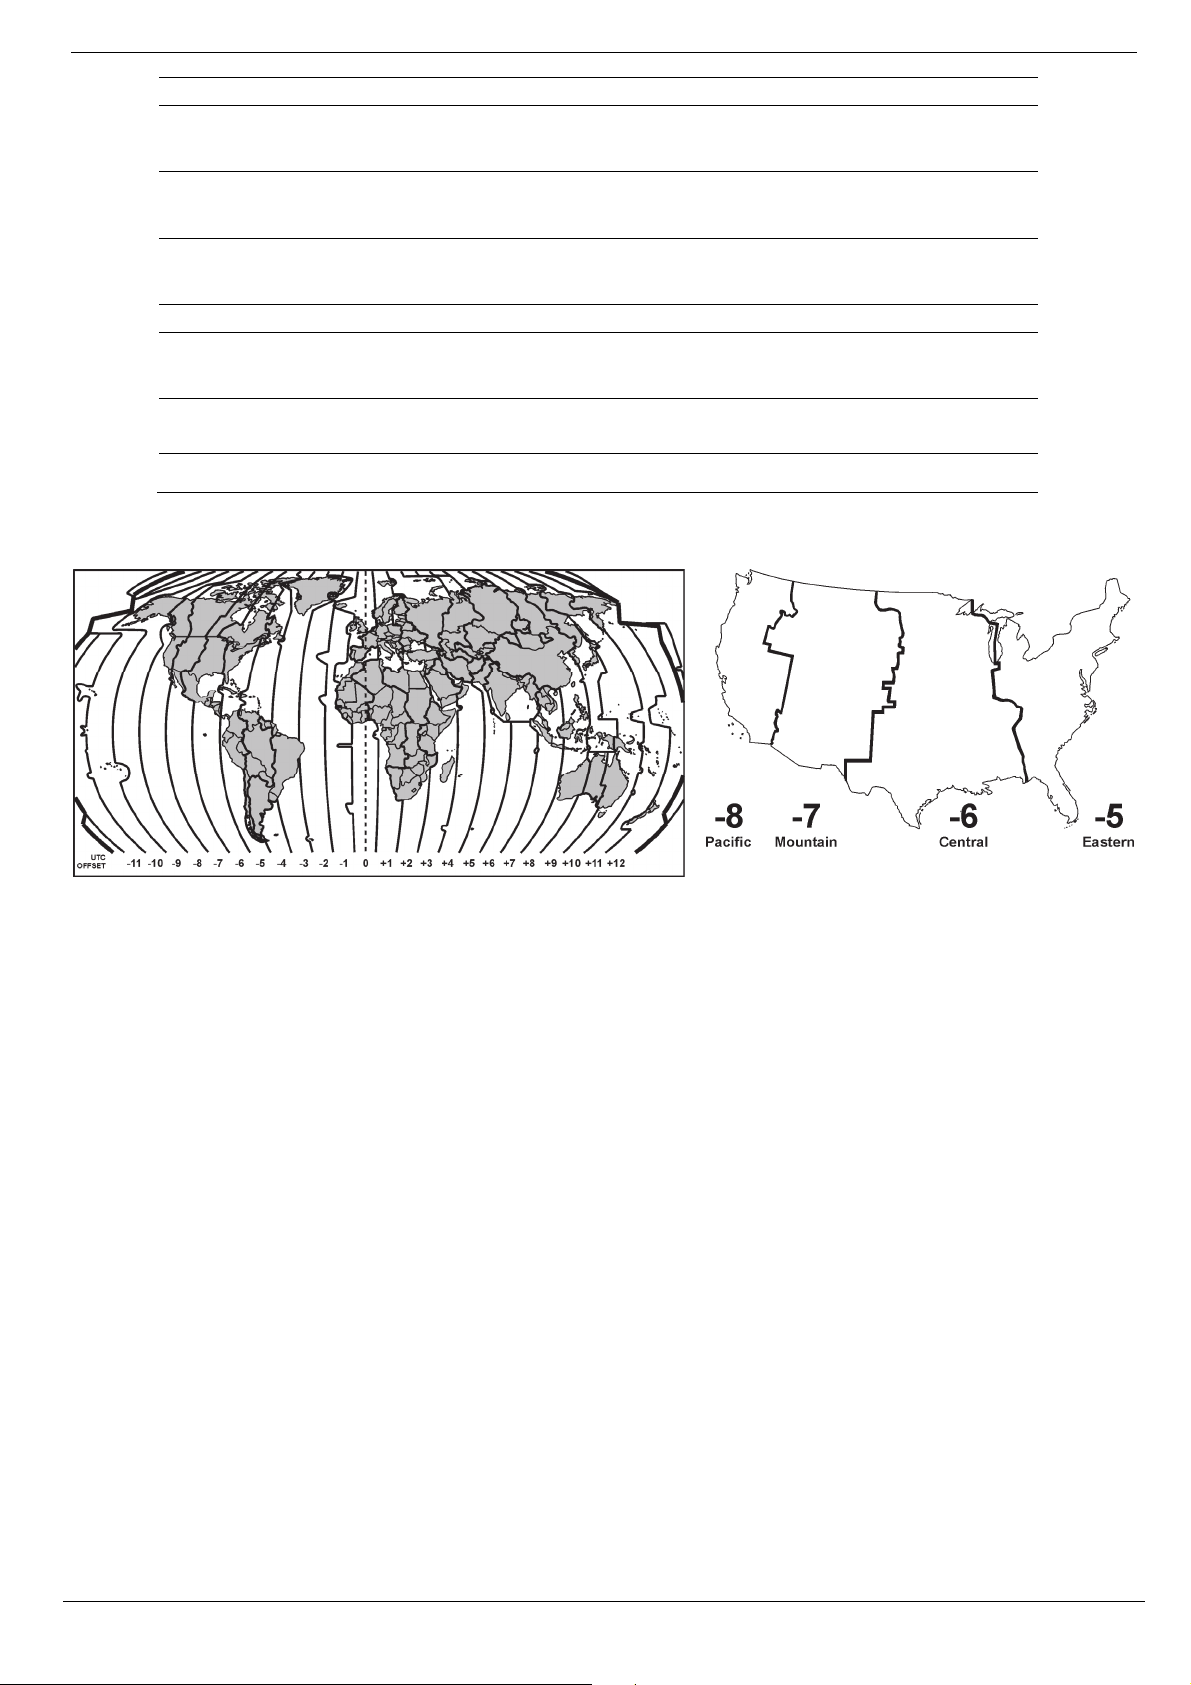
Time Zone The UTC offset and time zone in which the control panel is located.
Current IP IP address of the control panel (this parameter is displayed after the
Last Update/By
Last Connect Time Last time the control panel connected to RISCO Cloud.
The customer's personal details for identification purposes (only
applicable when the Self Registration option is disabled).
applicable when the Self Registration option is disabled).
first connection between the control panel and RISCO Cloud).
Last time the control panel fields were updated and details of the
user/administrator that performed the changes.
The following diagrams show world time zones, US time zones and their UTC offset.
Figure 6-4: World Time Zones Figure 6-5: US Time Zones
6.2. Editing an Existing Control Panel
To edit an existing control panel:
1. On the Control Panels List page, click the CP Login ID of the customer you wish to edit;
the Control Panel Update page is displayed.
2. Enter the control panel’s details as required.
3. Click OK to update and return to the Control Panels List.
– Or –
Click Apply to update and remain on the Control Panel Update page.
16
RISCO Cloud Web Administration Manual
Page 21

6 Control Panels List
6.3. Deleting a Control Panel
To delete a control panel:
1. On the Control Panels List page, click the CP login ID of the control panel you wish to
delete; the Control Panel Update page is displayed.
2. Click Delete and then OK; the control panel is deleted.
6.4. Additional Control Panel Options
On opening the Control Panel Update page, the column on the left hand side offers a number of
additional options relevant to each control panel. These are as follows:
• Event Forwarding – allows the user to enable or disable the event forwarding groups
that are available for the Alerts event forwarding feature in the Web User Application.
• Service Providers – allows the user to define the service provider (monitoring service)
to which events are reported.
• Web Users – allows the user to add additional Sub users for the security panel.
• Group Membership – on this page the user can assign the panel to any group
available in RISCO Cloud.
• Devices Descriptors – allows the web user to edit descriptors of registered devices via
WUApp.
• User Video Events – on this page the user can define additional user video event
parameters and view a log of the video events removed by the web user.\
• CP Statistics – allows the user to view general statistical information about the
selected control panel and associated Web and Smartphone user
• Smartphone List – allows the user to view the list of registered Smartphone’s
associated to the selected control panel.
Each of these options is explained in the following sections.
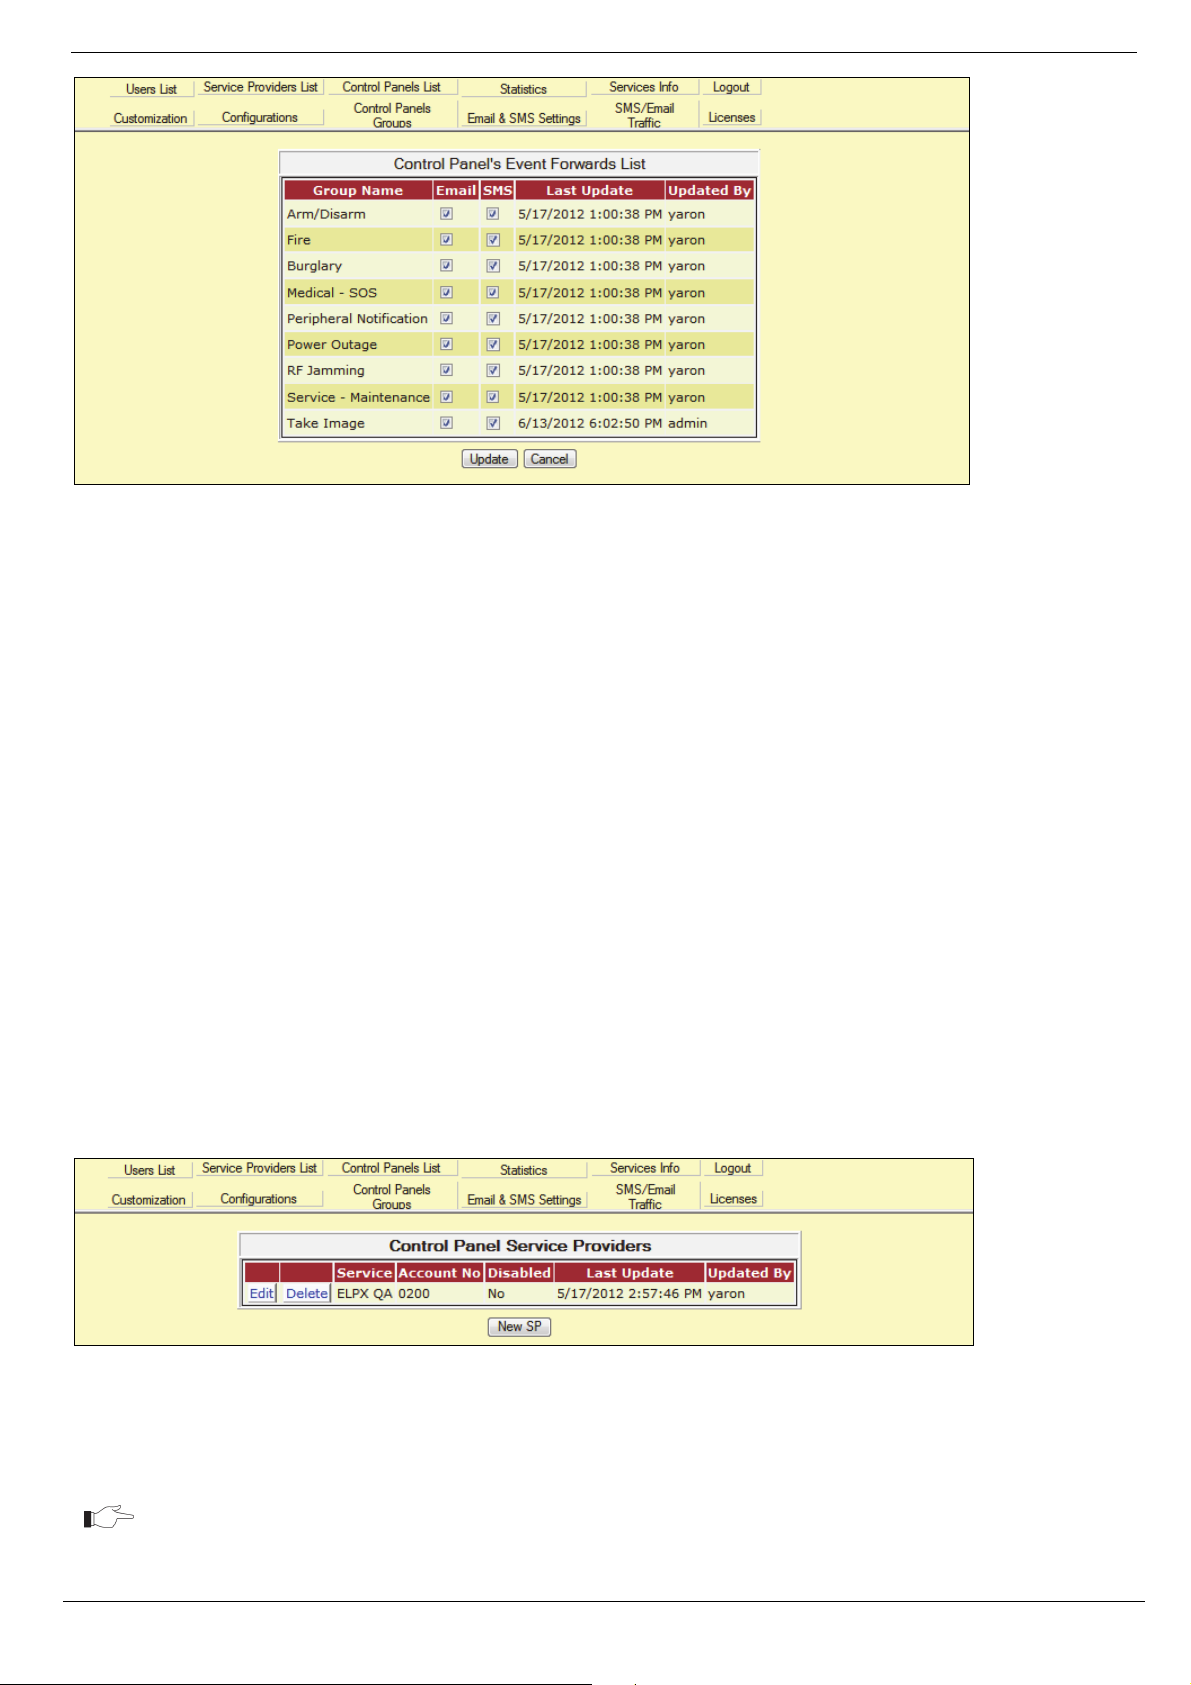
6.4.1. Event Forwarding
Alert notification is an event forwarding feature that allows notification by email or text message
after an event has occurred. The list of event forwarding options appears on the Control Panel
Update page located below the customer details. This option in the Web Administration application
is used for enabling or disabling email and/or SMS notification per event forwarding group.
Contacts for event forwarding, however, are edited by the customer in the Alerts section of the Web
User application. The user fills in contacts credentials and then chooses the desired events to be
forwarded from the available groups, as chosen by administrator on this page.
To edit event forwarding options:
1. Open the Control Panel Update page.
2. Click the Event Forwards link in the left-hand column; the Event Forwards table is
displayed.
RISCO Cloud Web Administration Manual
17
Page 22
6 Control Panels List
Figure 6-6: Event Forwards Table
3. Using the checkboxes that appear in the E-mail and SMS columns enable or disable event
forwarding per event group as required.
4. Click Update.
6.4.2. Service Provider
Service providers can generally be defined as the monitoring station to which RISCO Cloud forwards event
data. This section explains how to allocate a service provider to a control panel. The list of service providers
available for allocation to a control panel is determined elsewhere in this application – see Service Providers
List.
Allocating a service provider to a control panel
Each control panel can be allocated with several service providers, Proxy or IP SIA. This ensures
that the service provider to which the customer has subscribed will receive the relevant event
messages generated by the customer’s security system. The event will be filtered by the Event
Forwarding as explained above, and by Service Provider Event List as defined per service provider,
see Editing the Service Provider’s Event List.
To allocate a service provider to a control panel:
1. Open the Control Panel Update page.
2. Click the Service Providers link in the left-hand column; the Service Providers table is
displayed. The page appears as follows.
Figure 6-7: Service Provider Allocation
3. Click on New SP button then choose an available service provider.
4. Enter the account number in the text field provided.
This account will be reported in the events sent to service provider’s monitoring
system, regardless of the account number registered in the panel for other means of
communication.
5. Click Update.
18
RISCO Cloud Web Administration Manual
Page 23

6 Control Panels List
Editing a control panel’s service provider
To edit a control panel’s service provider:
1. Open the Control Panels Update page.
2. Click the Service Providers link in the left-hand column; the Service Providers table is
displayed. – see Figure 6-7.
3. Click the Edit link next to the control panel’s service provider.
4. Edit the service provider details as required.
If you want to disable the service provider without deleting it from the control panel’s
record, select the Disabled check box.
5. Click Update.
Deleting a service provider from a control panel record
To delete a service provider from a control panel record:
1. Open the Control Panel Update page.
2. Click the Service Providers link in the left-hand column; the Service Providers table is
displayed – see Figure 6-7.
3. Click the Delete link next to the control panel’s service provider; the service provider is
deleted.
This procedure only deletes the service provider from the control panel record and
does not delete the service provider from the RISCO Cloud database.
RISCO Cloud Web Administration Manual
19
Page 24

6 Control Panels List
6.4.3. WEB Users
On the WEB Users page, the RISCO Cloud administrator can create additional Sub users to work
with the WUApp, receive Video Events and use a Look In option to view their premises. Sub users
can also be created by the Master user of the security panel registered in the Control Panel Update
page, and referred as Web Users in the WAApp.
Figure 6-8: New Web Page User
20
RISCO Cloud Web Administration Manual
Page 25

6 Control Panels List
6.4.4. Creating Sub users
To create a WEB User (Sub User) to work with the control panel:
1. Open the Control Panel Update page.
2. Click the Web Users link in the left-hand column, the Control Panel Web Users page is
displayed.
3. Click on New Sub user.
4. Control Panel Web Users page appears, as displayed below.
Figure 6-9: New Web (sub) User Creation
Table 6-2: Adding New Web (sub) User
Field
Description
Login ID The Sub Users’ login name that he must be entered
when logging in to the Web User Application.
Login Password The Sub Users’ password that must be entered when
logging in to the Web User Application. The maximum
number of characters that should be entered for the Web
Password is 16 and the password must begin with a
letter.
Login Confirm Confirmation field for the Login Password.
First/Middle/
Last Name
Cell Phone/E-mail Additional customer information for reference
Last Update Last time the web user’s information was updated.
The customer's personal details for identification
purposes.
purposes.
RISCO Cloud Web Administration Manual
21
Page 26

6 Control Panels List
6.4.5. Group Membership
Using this page you can include or remove the security panel from relevant Control Panel Groups.
To see more information about the Control Panel Groups, refer to Control Panels Groups section.
1. Open the Control Panel Update page.
1. Click the Group Membership link in the left-hand column, a Control Panel Group List is
displayed.
Figure 6-10: Control Panel Groups Membership
2. Select or deselect relevant checkboxes.
3. Click Apply to update the selection and remain on the same page, or OK to return to
Control Panel Update page.
6.4.6. Device Descriptors
The Device Descriptors page allows the user to enable/disable the editing of descriptors of
registered devices via WUApp by the web user for the selected control panel.
1. Open the Control Panel Update page.
2. Click the Device Descriptors link in the left-hand column, the Control Panel Device
Descriptors page is displayed as shown above.
Figure 6-11: Control Panel Device Descriptors
3. Select or deselect the relevant check box.
4. Click Save to update the selection.
6.4.7. User Video Events
On the User Video Events page the user can define additional user video event parameters and
view a log of the video events removed by the web user.
1. Open the Control Panel Update page.
2. Click the User Video Events link in the left-hand column, the Control Panel User Video
Events page is displayed.
22
RISCO Cloud Web Administration Manual
Page 27

6 Control Panels List
Figure 6-12: Control Panel User Video Events
3. Define the relevant parameters.
4. Click Save to update the changes.
Video events removed from the system by the web user are displayed in the list directly below the
user video event parameters. Upon a request from the web user, the Restore option allows the
administrator user to restore any deleted video events from storage.
6.4.8. CP Statistics
The CP Statistics page allows the user to view general statistical information about the selected
control panel and associated Web and Smartphone user.
To display the CP Statistics page:
1. Open the Control Panel Update page.
2. Click the CP Statistics link in the left-hand column; the CP Statistics page is displayed.
Figure 6-13: CP Statistics
RISCO Cloud Web Administration Manual
23
Page 28

Table 6-3: CP Statistics
Field Description
6 Control Panels List
CP account creation date
Owner registration
First login (Web or
Smartphone)
CP last connect time
Last update
Smartphone(s) registered
Last login (Smartphone)
Last time armed
Last time snapshot
requested
Disarm commands
The time the control panel account was created
The first time the owner of the control panel registered to the
RISCO Cloud system
The first time the user logged into the RISCO Cloud system using
the web or Smartphone application was recorded
The last time that the control panel connected to the RISCO Cloud
system
Last time the Web or Smartphone application user’s information
was updated.
The number of Smartphone registered to the control panel
The last time that a Web or Smartphone application user logged into
the RISCO Cloud system
The last time Web or Smartphone application user armed the control
panel
The last time Web or Smartphone application user requested a
snapshot
The number of times a Web or Smartphone application user
activated a disarm command
Full arm commands
The number of times a Web or Smartphone application user
activated a full arm command
Partial arm commands
The number of times a Web or Smartphone application user
activated a partial arm command
Perimeter arm commands
The number of times a Web or Smartphone application user
activated a perimeter arm command
Snapshot request
commands
The number of times a Web or Smartphone application user
activated a snapshot request command
24
RISCO Cloud Web Administration Manual
Page 29
6 Control Panels List
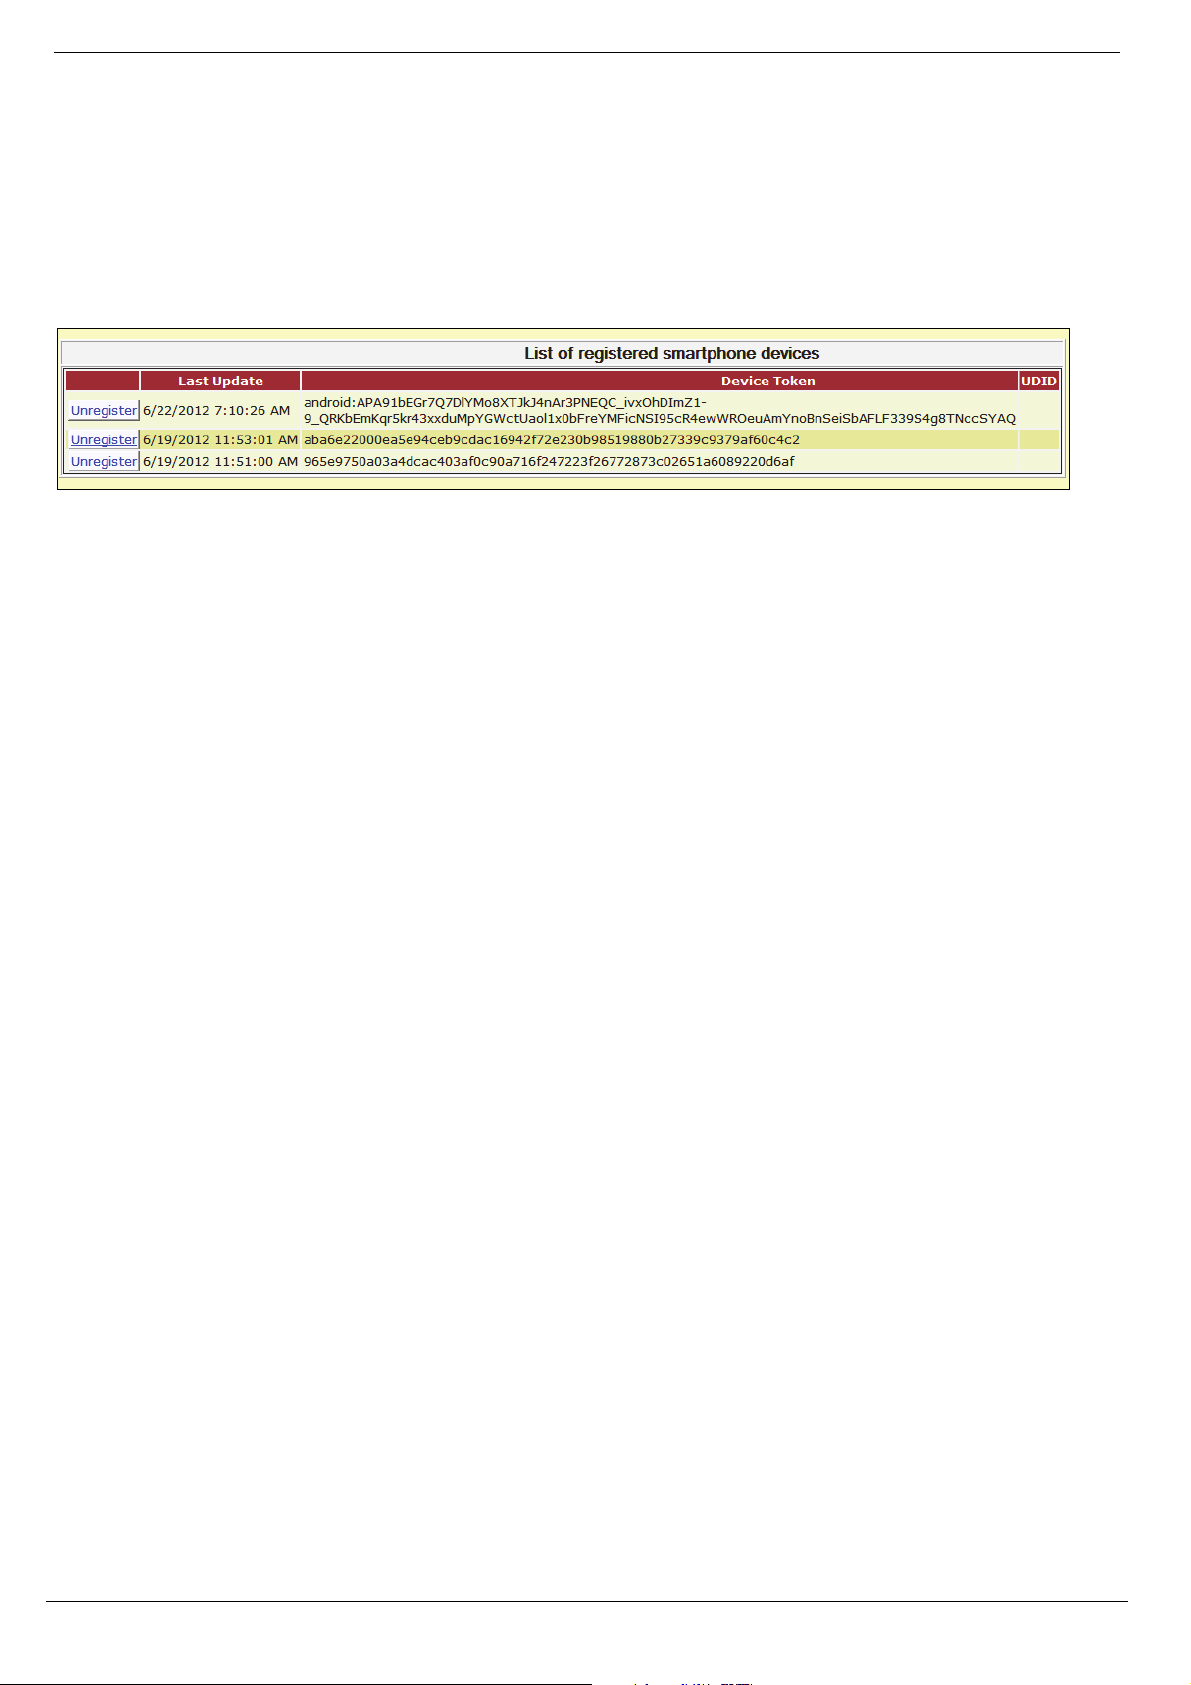
6.4.9. Smartphone List
The Smartphone List page allows the user to view the list of registered Smartphone’s associated to
the selected control panel.
To display the Smartphone List page:
1. Open the Control Panel Update page.
2. Click the Smartphone List link in the left-hand column; the Smartphone List page is
displayed.
Figure 6-14: CP Statistics
The Unregister option allows the administrator user to unregister any Smartphone user from the
system.
RISCO Cloud Web Administration Manual
25
Page 30

7 Control Panels Groups
7. Control Panels Groups
In the RISCO Cloud server, all security panels are registered in the same database, managed by the
same services and exposed to the RISCO Cloud administrator. The WEBrp users, whose accounts
are managed by the RISCO Cloud administrator as well, can access this database using a WEBrp
program supplied by the RISCO Cloud administrator to relevant personnel, for panels’
maintenance purposes. By uploading panels’ parameters, the WEBrp operators can change
programming, view arm status, system event log, Etc…
When uploading the security panels list, the WEBrp operators should be exposed only to security
panels relevant for them. For this purpose, Control Panel Groups are available to RISCO Cloud
administrator, to create relations between security panels, WEBrp users and monitoring stations.
When clicking the Control Panels Groups icon from the main menu, the following page appears,
displaying a list of all Control Panels Groups available.
Figure 7-1: Control Panels Groups
Table 7-1: Control Panels Groups Fields
Field
Description
Group Name The Name of the Control Panel Group, and can be changed by clicking
on the Edit button on the left hand side of the list.
Maximum Count The maximum number of security control panels that can be added to
the group.
CP Members Displaying the number of the security control panels assigned to each
group.
RP Users Assigned Displaying the number of the WEBrp users assigned to each group.
7.1. Creating a Control Panel Group
1. Open the Control Panels Groups page.
2. Click on the New CP Group button. The New Control Panel Group page is displayed.
26
RISCO Cloud Web Administration Manual
Page 31

7 Control Panels Groups
Figure 7-2: New Control Panels Group Creation
3. Enter the name for the new Control Panels Group.
4. Define the maximum number of control panels that can be added to the Control Panels
Group.
When creating a new group, the group is empty until panels and WEBrp users are
copied or moved to it.
5. Click Update to save the defined Control Panels Group and return to main page, or
Cancel to return without saving the changes.
7.2. Managing Control Panels Groups
1. On the Control Panels Groups page click on Edit to change the name of the Group or on
the numbers displayed in CP members and RP Users Assigned columns to edit the
relevant control panels and WEBrp Users respectively.
Figure 7-3: Control Panels Groups List
2. When Clicking on the number of CP Members column, the list of security panels
assigned to the group is displayed, as shown below.
RISCO Cloud Web Administration Manual
27
Page 32

7 Control Panels Groups
Figure 7-4: Control Panels Assigned to Specific Group
• To copy/move control panels to another group, select panels by selecting a checkbox
in Select column, then choose a group in the drop down list on the right, and then
click the Copy or Move button.
• To remove a control panel from group association, use the CP Update Page – see
section.
• To create a new control panel group, click on the New CP Group button. The creation
procedure is similar to the section about Adding a New Control Panel.
• When clicking on a number of the RP Users Assigned column on the Control Panel
Group List, in a similar manner, the list of assigned WEBrp users is displayed, as
shown below.
Figure 7-5: Users Assigned to Specific Groups
On this page you can associate the WEBrp User with an additional group, by selecting a group from
the drop down list and a user by checking the relevant checkbox, then clicking on the Associate
button.
• To transfer one or multiple users to another group, check the relevant checkboxes,
select a new group from the drop down list, and click on the Transfer button (this
function is widely used when replacement for a WEBrp user is necessary, allowing
you to avoid transferring each panel individually).
• Clicking on the New User button will open a page for WEBrp user creation as
described in the section about Adding a New User.
28
RISCO Cloud Web Administration Manual
Page 33

8 System Status Tools
8. System Status Tools
8.1. Statistics
The Statistics page enables you to view the current state of control panels that are online, offline or
have detected a system trouble condition. This page allows you to filter the data you want to view
in the displayed list. To do so, on the Main menu, click Statistics; the Statistics page appears. Select
the required filtering options (Any Armed State, Armed, Disarmed, No Trouble, Trouble, etc.) and
click the Collect button. Additional system status notification is provided by RISCO Cloud via
email – see Appendix B: E-mail Notification.
The Control Panel Statistics page is divided into two tables. The first table represents a summary of
the current state of all control panels that are online, offline or have a trouble condition.
Figure 8-1: Control Panel State Statistics
Table 8-1: Summary of Status for all Control Panels Columns
Column
Time and Date The time and date at which the statistics were collected.
Total Number of Panels The total number of control panels that are listed in the
Online Panels Control panels that are online.
Offline Panels Control panels that went offline.
Never Connected Control panels that appear in the list of customers but
Panels with Trouble Control panels that have reported a trouble condition.
Description
control panels table.
have never been connected.
The second table represents a more comprehensive version of the current state of each control panel
that is online, offline or has a trouble condition
RISCO Cloud Web Administration Manual
29
Page 34

Figure 8-2: Control Panel State Statistics
8 System Status Tools
Table 8-2: Individual Status of Each Control Panel Columns
Column
CP Login ID The control panel’s ID number.
First/Last Name The customer’s personal details.
Last Connect Time The last time that the control panel was online.
Online Current online status (Yes/No).
Armed Current arming status (Yes/No).
Trouble Current trouble status (Yes/No).
Trouble Time The time that the trouble condition was recorded.
Login via Smartphone The time that a Smartphone login was recorded.
Smartphone Associated Smartphone ID.
Last Armed Last time an arm command was initiated.
Last Snapshot Last time a snapshot command was initiated.
Snapshot Commands Number of snapshot commands initiated.
Disarm Commands Number of disarm commands initiated.
Description
Full Arm Commands Number of full arm commands initiated.
Partial Arm Commands Number of partial arm commands initiated.
Perimeter Arm Commands Number of perimeter arm commands initiated.
30
RISCO Cloud Web Administration Manual
Page 35

8 System Status Tools
8.2. Database Services Information
The DB (database) Services Information page allows the administrator user to view the current
status of the Primary and Backup database servers.
Figure 8-3: Database Servers Status – Common Information
Table 8-3: Database Status
Field Description
Status The current status of the server.
Metadata Consistence The current status of the main DB tables. If this field
displays “OK”, all of these tables exist and are correctly
linked to one another.
Schema Version The current RISCO Cloud database schema version.
The Advanced Information tab offers the administrator user additional troubleshooting tools if any
problems are experienced with the database servers.
Figure 8-4: Database Servers Status – Common Information
Enter your User ID and Password into relevant fields to get advanced troubleshooting information.
RISCO Cloud Web Administration Manual
31
Page 36

9 E-mail Template Editor
9. E-mail Template Editor
The E-mail Template Editor enables you to determine the exact text of the E-mails sent by the Alerts
event forwarding feature – see Event Forwarding.
The E-mail templates are simple "****.eml" files produced by a regular e-mail client application like
MS Outlook (Express), Mozilla Thunderbird, or the like. In other words, you create an E-mail and
save it to be used later as a template.
You can put any of the meta-characters (see Figure 9-1) inside the textual part of the E-mail to be
replaced by the actual text relevant for the reported event. Using images inside the body is allowed
- they are part of the "****.eml" file structure. You can also attach files that will become part of the
message.
To start editing the E-mail and templates settings:
1. Open the E-mail & SMS Settings wizard by clicking the relevant link on the menu bar at
the top of the page.
2. On the Information page, general information about this application is presented,
explaining the upcoming pages and steps.
3. Click Next to proceed.
Figure 9-1: All available % characters for E-mail and SMS templates
The Meta-Characters Legend page displays a list of all % characters and their meaning that can be
used in the following configuration steps.
In SMS Templates, only %n, %w, %d, %m, %u, %g, %t, %a, and %% can be
used.
4. Click Next to proceed.
32
RISCO Cloud Web Administration Manual
Page 37

9 E-mail Template Editor
Figure 9-2: Common E-mail and SMS WS Settings Editor
5. Enter the required settings in the fields provided.
Table 9-1: Common E-mail and SMS WS Settings Editor
Field
Description
Target IP Address The IP address of the SMS Server.
Target PC Port Port that the RISCO Cloud uses to reach the SMS server.
SMTP Server The IP address of the SMTP server.
Sender E-mail Address The address from which emails are sent to the Alert contacts.
Main Message: Number of
Messages in Queue
Main Message: Delete
Mechanism
Event Message: Number of
Messages in Queue
Event Message: Expire Time The amount of time (in minutes) that a single message can
The maximum capacity of the queue. This is the maximum
number of email messages to all recipients. The possible values
that may be programmed for this field are: 50, 100, 200, 300,
400, 500, 750 and 1000.
This option defines how RISCO Cloud handles a full queue.
Two options are available. If Delete Last Message When Full is
selected, a new message causes the oldest message to be
deleted (FIFO). If No Action is selected, new messages are
ignored when the queue is full.
The maximum number of email messages to a single Alert
contact that may be entered in the queue. The possible values
that may be programmed for this field are: 5, 7, 10, 15 and 20.
remain in the queue before it is deleted. The maximum value
that you can program for this field is 60 minutes.
Event Message: Delete
Mechanism
WUApp access URL:
WUApp URL:
This option defines how RISCO Cloud handles a full queue for
a single alert contact. Two options are available. If Delete Last
Message When Full is selected, a new message causes the
oldest message to be deleted (FIFO). If No Action is selected,
new messages are ignored when the queue is full.
The image event file link that is added to the SMS/e-mail that
is sent to the web user.
6. Once you have configured the required settings, click Apply.
7. Click Next to proceed.
RISCO Cloud Web Administration Manual
33
Page 38

9 E-mail Template Editor
Figure 9-3: E-mail Template Editor
8. Select the language you wish to edit from the Language dropdown list.
Each language can have its own unique template, allowing the administrator user to
choose in the WUApp a language for each alert.
9. In the Active Template Management area, choose the desired template from the list in the
Available Templates field. You can upload a new template in the Add New Template
area. To do so, browse to the desired file, enter description (mandatory field), then click
Upload.
Please make sure that the language of the chosen template is the same as the language
chosen in Step 8.
10. Choose the Template you want to use as default and click Set.
11. Enter the Sender Name - the text that appears as the sender of the email – typically the
service provider’s name.
12. In the Signed By field, you can enter the signature text that you want to appear at the end
of the email.
13. Click Test if you wish to test the Template, enter your E-mail address, then click Send.
You will receive a test message from RISCO Cloud.
14. Click Save to save your settings.
15. Click Next to open the Test E-mail Template Editor.
16. Edit the Test E-mail in a similar way to E-mail Template editing. This template will be
sent when the user generates Test Event from Alerts page on WUApp.
34
RISCO Cloud Web Administration Manual
Page 39

10 SMS Template Editor
10. SMS Template Editor
The SMS Template Editor enables you to determine the exact text of the SMS messages sent in the
Alerts event forwarding feature – see Event Forwarding.
To start editing the SMS texts and templates settings:
1. Open the E-mail & SMS Settings wizard by clicking the relevant link on the menu bar at
the top of the page.
2. Click SMS Template Editor to open the SMS Template Editor.
Figure 10-1: SMS Template Editor
3. Select the Language you wish to edit from the dropdown list on the left (Note: Each
language can have its’ own unique template, allowing the user to choose in the WUApp a
language for each alert).
4. In the Appeal field enter the required text for the opening line of the SMS. For example,
“Dear %n” (where %n is the name of the Alert contact).
5. In the Message Body field, enter the text that you want to appear in the SMS. See Figure
9-1 for the variables available.
6. In the Signed By field, enter the signature text that you want to appear at the end of the
message.
7. Click Apply.
8. Click Next to open the Test SMS Template Editor.
9. Edit the Test SMS Template in a similar way to SMS Template editing. This template will
be sent when the user generates Test Event from Alerts page on WUApp.
10. Click Apply; All settings are set to the registered information; all will be used for E-mail
and SMS alerts that the user will receive from RISCO Cloud.
RISCO Cloud Web Administration Manual
35
Page 40

11 Licenses
11. Licenses
The licenses page allows the administrator user to view information regarding the current software
licenses that have been activated as well as add additional licenses if required. The RISCO Cloud
software license determines how many subscribers’ control panels and which features are
supported by RISCO Cloud. License keys are issued by RISCO and can be added as required.
The Licenses page is divided into two tables. The first table represents a list of the current software
licenses that have been activated in the system.
Figure 11-1: License Summary Page
Table 11-1: Registered License Information
Field
Description
Serial number Used for indication of correct key programming.
Issue Date The date and time the Key was created in the Database.
Expired Date Expiration Date for the Key.
Added in DB Time The time the Key was programmed in the WAApp.
Updater Name RISCO Cloud Administrator Username who
programmed the License.
Last Updated Last time the license was updated.
Supported CPs Number of supported control panels.
State Current state of the license.
The second table (see above) represents a list of which options that are supported by the system.
Table 11-2: License Options Summary Information
Field
Description
Valid License(s) The number of valid licenses.
Control Panels Total number of control panels that can be connected to
RISCO Cloud server.
SMS Sending Indicates if SMS user notification is supported by the
license.
Home Automation Indicates if HA activation by users from WUApp is
supported by the license.
Video Monitoring Indicates if Video Camera viewing by users from WUApp
is supported by the license.
36
RISCO Cloud Web Administration Manual
Page 41

11 Licenses
To add a new license:
1. On the Licenses page, click + Adding License; the Add License Key field is displayed.
Figure 11-2: Add License Key Field
2. Enter the license key that you received from RISCO GROUP.
3. Click Add License. The new license is displayed in the current software licenses list.
RISCO Cloud Web Administration Manual
37
Page 42

12 General Configuration Options
12. General Configuration Options
On this page you can configure common parameters affecting the installation and general RISCO
Cloud activity, default settings appearing in several parts of the RISCO Cloud Admin. application,
RISCO Cloud event groups description, etc…
12.1. RISCO Cloud Common Parameters
RISCO Cloud Common Parameters include options and settings that affect the functionality of
RSICO Cloud. Any task that needs to be sent to the control panel over the Web is sent via the
RISCO Cloud. For example, when the user wishes to arm the system using the Web User
Application, the command is sent via RISCO Cloud to the control panel.
Figure 12-1: RISCO Cloud Common Parameters Configuration Page
The following table explains the common configurable parameters for RISCO Cloud.
Table 12-1: RISCO Cloud Common Parameters Configuration
Field
Description
Enable Self Registration Enable or disable the self registration option
(log-off and then login to see changes).
XML Proxy Notification
UDP Port
SV Loss/Restore Source
GPRS
SV Loss/Restore Source
LAN
38
RISCO Cloud Web Administration Manual
The UDP port that the panels use to
communicate with the XML Proxy.
The number of the event that is sent to the
service provider in cases of GPRS service
loss/restore.
The source of the SV Loss/Restore for the
LAN.
Page 43

12 General Configuration Options
Field
Description
Apple Push Notification
(APN) Enabled
Use APN Sandbox
Servers
Apple Certificate Apple certification status.
Apple Certificate
Password
Android Push
Notification Enabled
(C2DM)
Android e-mail Account The login ID of the e-mail account that has
Android Account
Password
Android Account Type The type of android account (GOOGLE,
Enable or disable the Apple push notification
(APN) mechanism.
Enable or disable the use of the push
notification mechanism via the Apples
Sandbox Servers (APN).
The password for Apple certification.
Enable or disable the Android push
notification (C2DM) mechanism.
been registered to use the C2DM service.
The password for the above e-mail account.
HOSTED or both).
To edit Common Parameters for RISCO Cloud:
1. Open the Configurations page; the Common Parameters for RISCO Cloud are displayed.
2. Define the relevant parameters, see Table 12-1: RISCO Cloud Common Parameters
Configuration.
3. Click Apply.
The Reset button is used to undo any changes made to the configuration before you
click Apply.
12.1.1. Control Panel Parameters
Control Panel parameters include options and settings that affect the functionality of RISCO Cloud
towards the control panel. Any control panel status events that need to be sent to RISCO Cloud
over the Web are sent by the control panel.
Figure 12-2: Control Panel Configuration Page
RISCO Cloud Web Administration Manual
39
Page 44

12 General Configuration Options
The following table explains the configurable parameters that apply to the control panels.
Table 12-2: Control Panel Parameter Configuration
Field
Description
I’m Alive Interval When
Armed (Seconds)
I’m Alive Interval When Not
Armed (Seconds)
I’m Alive Grace Period
(Seconds)
Offline Scan Period (Seconds) The control panel status refresh time (in
Send CP State Email Enable/disable the sending of control panel
Default Time zone Defines default system time zone.
The amount of time RISCO Cloud waits for a
status message (I’m Alive) from the armed
control panels before issuing an alert event (in
seconds).
The amount of time RISCO Cloud waits for a
status message (I’m Alive) from the disarmed
control panels before issuing an alert event (in
seconds).
The amount of additional time RISCO Cloud
waits for a status message (I’m Alive) from the
control panels (after the initial waiting time)
before issuing an alert event (in seconds).
seconds).
status change email.
To edit Control Panel Parameters for the Panel:
1. Open the Configurations page.
2. Click the Control panel Parameters link in the left-hand column; the parameters for the
control panels are displayed.
3. Define the required parameters, see Table 12-2: Control Panel Parameter Configuration.
4. Click Apply.
The Reset button is used to undo any changes made to the configuration before you
click Apply.
12.1.2. Event Texts
The Event Texts page enables you to edit texts in the RISCO Cloud Event table, see Appendix A Events
Table. The table includes two columns that may be edited according to personal preferences, long and short
template styles or translation into different languages.
These event texts are used both in the Web User application and in the emails sent by the Alerts
event forwarding feature.
For example, if you edit the Event Name and the User Support Text for a specific event, the new
Event Name text appears in the event log displayed in the Web User application and the User
Support Text appears as the tool tip for that event.
40
RISCO Cloud Web Administration Manual
Page 45

12 General Configuration Options
Figure 12-3: Event Texts Page
The following table explains the columns in the Event Texts table.
Table 12-3: Event Texts
Column
Event Text Template
Language
ID The ID number of the event in the RISCO Cloud Event table.
Event Name
Event Group
User Support Text
Description
Choose the text template you wish to edit – Long for RISCO
Cloud and panel messages, Short for Web User panel messages.
Choose the language you wish to edit (Note: The language
templates are unique per language, and selected by user according
to flags chosen).
The name of the event as it appears in the Web User application’s
event log display and in event forwarding email messages (%m –
see Figure 9-3)
The event group to which the event belongs. This text cannot be
edited.
The associated event text that appears as a tool tip in the Web
User application’s event log display and can be sent in event
forwarding email messages.
To edit event texts:
1. Open the Configurations page.
2. Choose the language you wish to edit.
3. Click the Event Texts link in the left-hand column; the Event Texts table is displayed.
4. Edit the event names and their associated event texts in the fields provided.
5. Click Apply.
The Reset button in the CPNS configuration page is used to undo any changes made
to the configuration before you click Apply.
RISCO Cloud Web Administration Manual
41
Page 46

12 General Configuration Options
12.2. Event Groups Enable/Disable
The Event Groups list allows you to determine the types of event that will be displayed in the
control panel’s Event Forwards page and the Alerts page in the Web User application.
Figure 12-4: Event Group List
To enable/disable event groups:
1. Open the Configurations page.
2. Click the Allowed Event Groups link in the left-hand column; the Event Group list is
displayed.
3. Use the checkboxes on the right hand side of the list to enable or disable event groups as
required.
4. Click Update.
12.2.1. Alert Log Settings
Alert Log Settings allows the RISCO Cloud Administrator to determine the amount of time the alert
messages are displayed in the alert log record. This page also provides the capability to define email
recipient (s) for alert warnings.
Figure 12-5: Alert Log Settings Configuration Page
42
RISCO Cloud Web Administration Manual
Page 47

12 General Configuration Options
The following table explains the Alert Log Setting parameters that apply to the alert log record.
Table 12-4: Alert Log Settings Configuration
Field Description
Alert Log Maximum
Message Count
Maximum Log Record Age
(in days)
Email recipient for Warnings The alert warning e-mail recipient
The maximum number of alert messages stored in
the alert log
The maximum amount of time alert messages are
stored in the alert log (in days)
To edit Alert Log Settings:
1. Open the Configurations page.
2. Click the Alert Log Settings link in the left-hand column; the Alert Log Setting Parameters
are displayed.
3. Enter the alert log setting parameters and the alert warning notification email recipient (s)
in the fields provided.
4. Click Apply.
The Reset button is used to undo any changes made to the configuration before you
click Apply.
12.2.2. Statistics Parameters
Statistic Parameters allows the RISCO Cloud Administrator to define the amount of time to retain
information for statistics purposes.
Figure 12-6: Statistics Parameters Configuration Page
The following table explains the Statistics parameters that apply to the statistics record.
Table 12-5: Statistics Parameters Configuration
Field Description
Long Time Offline The amount of time a control panel can be in an offline status before being
displayed in Statistics (in days)
Long Time Trouble The amount of time a control panel can be in a trouble status before being
displayed in Statistics (in days)
Statistics Data Retention
Time
The amount of time statistical data is displayed in statistics panel
RISCO Cloud Web Administration Manual
43
Page 48

12 General Configuration Options
To edit Statistics Parameters:
1. Open the Configurations page.
2. Click the Statistics Parameters link in the left-hand column; the Statistics Parameters are
displayed.
3. Enter the Statistic Parameters in the fields provided.
4. Click Apply.
The Reset button is used to undo any changes made to the configuration before you
click Apply.
12.2.3. Video Events
The Video Events page, allows you to configure parameters for the video module, affecting the way
video events are stored and removed.
Figure 12-7: Video Events Configuration Page
The following table explains the Video Event parameters that apply to the video module.
Table 12-6: Video Event Configuration
Field Description
Video Events Root Folder (UNC
or Local Path)
UNC Access Username Access username for UNC
UNC Access Password Access password for UNC
Video Events Maximum Age The maximum global storage time for video events (in days)
Remove Aged Images From
Storage After
Do not use 1st image for end user
“Take Image” requests
The directory path for the video events root folder
The maximum global storage time for video images (in days)
Check to activate option
To edit Video Event Parameters:
44
RISCO Cloud Web Administration Manual
Page 49

12 General Configuration Options
1. Open the Configurations page.
2. Click the Video Events link in the left-hand column; the Video Event parameters are
displayed.
3. Enter the Video Events Root Folder path and the UNC access username and password (if
required) in the fields provided.
Access username & password fields are only required when root folder is an UNC
share, e.g. path starts with \\. The video files are accessed by WUWS, WUApp and
OLS service.
4. Enter the remaining Video Event parameters in the fields provided.
5. Click Apply.
The Reset button is used to undo any changes made to the configuration before you
click Apply.
RISCO Cloud Web Administration Manual
45
Page 50

13 Customization
13. Customization
The Customization page allows you to customize the Web User Application. The following screen
shot will help to familiarize you with the different customizable sections of the application’s home
page.
Changeable Logo, when clicked
linking user to pre-defined link.
4 digits pass code for security panel Username and password for access
Drop-down List of
supported languages.
Enter any news you wish to inform
your users about (example above).
Scroll ticker
Up to 4 rollover images,
periodically changed.
Tip of the day field – displaying up to 10 changeable tips.
Figure 13-1: Web User Application Home Page Layout
13.1. Editing Text
For the text sections that you can customize on the Web User Application, the editing interface is
identical. The interface allows you to edit the text that appears in specific sections of the application
and offers many of the tools that are included in most word processing applications. Among others,
you can modify:
• … the names and descriptions of the icons that appears on Home and Settings pages
of the WUApp (Icon Text);
• …pop-up balloons for different items of the WUApp interface (Hints);
• …text below the navigation icons on the Home Page (Welcome Messages).
• …text that appears the Automation page is selected and the panel or RISCO Cloud do
not support Automation (HA Unavailable Msg).
• … text that appears when Video tab is selected and your RISCO Cloud configuration
does not support video, or no camera is configured (Video Unavailable Msg).
• … text that appears on the video cameras monitoring page (Cameras Remarks).
46
RISCO Cloud Web Administration Manual
Page 51

13 Customization
To edit text:
1. On the Customization page, choose the text you want to edit.
Figure 13-2: Web User Application Home Page Layout
2. Select the Language you wish to edit. (Note: The templates are unique per language, and
can be set independently).
3. Edit the text as required.
4. Click Save.
RISCO Cloud Web Administration Manual
47
Page 52

13 Customization
13.2. Editing Tip of the Day Texts
Tip of the Day texts appear at random order every time the Web User Application Log-In page is
opened. You can enter up to ten different tips with up to 70 characters per tip.
Figure 13-3: Tip of the Day Editing Interface
To edit Tip of the Day texts:
1. On the Customization page, choose Tip of the Day.
2. Enter up to ten texts in the fields provided.
3. Click Save.
13.3. Adding Customized Logos and Images
In addition to customized texts, you may also determine which logo and images appear in the Web
User Application. The interface that allows you to upload images is similar for all the images that
appear in the interface.
Figure 13-4: Adding Logo and Internal Image
48
RISCO Cloud Web Administration Manual
Page 53

13 Customization
Figure 13-5: Adding Custom Rollover Images to the Web User Application
To add customized logos and images to the Web User Application:
1. On the Customization page, choose the type of image you wish to upload. The choices
are:
• Logo & Internal Image – this is the logo that appears at the top all pages and the
image that appears on the right hand side of the internal pages in the application.
• Rollover Images – these are the images that appear on the home page, changing once
every few seconds.
Do not upload any file larger than 995174 bytes.
2. Click Browse for the image you wish to upload.
3. Choose the image file and click Open.
4. Click Save.
RISCO Cloud Web Administration Manual
49
Page 54

13 Customization
13.4. Modifying the Icon Text
You can change names and descriptions of the icons that appear on Home and Settings pages of the
WUApp (Icon Text).
Figure 13-6: Icon Text Editing Page
To modify the icons names and descriptions:
1. On the Customization page, choose Icon Text.
2. Edit the text in the fields provided.
3. Click Save.
50
RISCO Cloud Web Administration Manual
Page 55

13 Customization
13.5. Modifying the Hints
Hints are the messages that appear in context-oriented pop-up balloons provided for the WUApp
interface. On the configurations page you can modify the hints' text for the following three areas of
the WUApp interface: Main Page, Fixed Menu, and Settings menu bar – see Table 13-1: Hints in the
WUApp.
Figure 13-7: Hint Text Editing Page
The following table illustrates the three areas of the WUApp interface (Main Page, Fixed Menu, and
Settings menu bar) that can be modified from the Hint text editing page.
Table 13-1: Hints in the WUApp
Main Page – User
Registration fields
Fixed Menus – Home Page
frames
Settings menu bar – menu
bar that appears at the top of
the Settings page.
RISCO Cloud Web Administration Manual
51
Page 56

13 Customization
To modify the Hints text:
1. On the Customization page, choose Hints.
2. Edit the text in the fields provided.
3. Click Save.
13.6. Modifying the Web User Application Color Scheme
In order to fit in with the color scheme of your website, you can determine the color scheme of the
Web User Application.
Figure 13-8: Color Scheme Modification Page
To modify the Web User Application’s color scheme:
1. On the Customization page, choose Colors.
2. Enter the HTML tag of the colors you wish to appear in the Web User Application, or
select the color from the list by clicking on the color icon.
3. Click Save.
To reset the Web User Application’s default color scheme:
1. On the Customization page, choose Colors.
2. Click Set Defaults.
The color set will affect only the main page, while the user can choose inside WUApp
an appearance of their choice.
52
RISCO Cloud Web Administration Manual
Page 57

13 Customization
13.7. Managing Files on the Web User Application’s Downloads Page
The Downloads page is part of the Help menu in the Web User application. This page is designed
for files that can be downloaded by the user. For example, you can add a PDF file of the control
panel’s user manual on this page.
Figure 13-9: Downloads Page
To add a file to the Downloads page:
1. On the Customization page, choose Downloads.
2. Click Browse; the Choose File window opens.
3. Choose a file and click Open.
Do not choose a file larger than 995174 bytes. If you choose a file with the same name
as a file that has already been uploaded, the previous file will be overwritten.
4. In the Description field, enter the name of the file as you want it to appear on the Web
User application’s interface (e.g. User Manual).
The Description field is used as the link to download the file. If the Description field is
left blank, it will not be possible to save the changes.
5. Click Upload and Save; the file is added to the file list at the bottom of the page.
To delete a file from the Downloads page:
1. On the Customization page, choose Downloads.
2. In the list of files at the bottom of the page, click Delete next to the file you want to delete;
a dialog box opens asking for confirmation.
3. Click OK.
To edit the description of a file on the Downloads page:
1. On the Customization page, choose Downloads.
2. In the list of files at the bottom of the page, enter a new description in the Description
field next to the relevant file.
3. Click Update.
RISCO Cloud Web Administration Manual
53
Page 58

13 Customization
13.8. WUApp Translations Page
On the WUApp Translations page you can define and edit language translations, import and export
predefined translation files (XML) and choose which languages should appear on the Web User
Application for the user to choose from. You can also choose which language should appear as
default on the Web User Application.
Figure 13-10: WUApp Translations Page
The following table explains the available options that apply to the WUApp Translation page.
Table 13-2: WUApp Translation Page Options
Option Description
Language Select a language from the existing languages list.
Once the selected language is displayed, the following legend applies to the
translation list:
- Changes that have been made to the translation list
- Missing translation that remains in English
New Define a new language translation
Edit Change the language file icon file for an existing language
Import Import predefined language translation files (XML)
Export/Export All Export stored language translation files (XML)
Enable/Disable Choose which languages should or should not appear on the Web User
Application for the user to choose from. You can also choose which language
should appear as default on the Web User Application
Select WUApp
Section
54
RISCO Cloud Web Administration Manual
Filter the translation list in order to display only the section of the translation
list that is required
Page 59

13 Customization
13.8.1. Defining a New Language
To define a new language on the WUApp Translations page:
1. On the Customization page, choose WUApp Translations.
2. Click New. The New Translation page is displayed.
Figure 13-11: New Translation Page
3. Select a language from the Translation Language selection
4. Enter a Language Name.
You can change the language name at a later stage via the Language Translation list.
5. Click Browse; the Choose File window opens.
6. Choose a translation flag image file and click Open.
7. Click Add.
RISCO Cloud Web Administration Manual
55
Page 60

13.8.2. Importing/Exporting Translation Files
To import a predefined translation file:
1. On the Customization page, choose WUApp Translations.
2. Click the Import. The Import File page is displayed.
Figure 13-12: Import File Page
3. Click Browse; the Choose File window opens.
4. Choose a translation file and click Open.
5. Click Import.
To export an existing translation file:
13 Customization
1. On the Customization page, choose WUApp Translations.
2. Click Export and save the translation file in the desired directory.
3. Once the export process is complete, click Close.
56
RISCO Cloud Web Administration Manual
Page 61

13 Customization
13.8.3. Enabling/Disabling Languages for the Web User Application
You can choose which languages should appear on the Web User Application for the user to choose
from – see p. 52, Figure 13 1, as well as define which language should appear as default on the Web
User Application.
To enable/disable languages for the Web User Application on the WUApp Translations page:
1. On the Customization page, choose WUApp Translations.
2. Click the New button. The New Translation page is displayed.
Figure 13-13: Language Selection page
3. Select the checkboxes for the languages you want to appear on the Web User
Application.
Every language you select on this page is represented by the flag of its country on the
WUApp's Home Page.
4. Choose the default language.
5. Click Save.
RISCO Cloud Web Administration Manual
57
Page 62

13 Customization
13.9. Messages, Remarks and Terms of Use
Messages, remarks and terms of use that appear in certain areas of the WUApp interface can be
included and modified on the customization page. You can modify the text for the following areas
of the WUApp interface: Welcome message, HA unavailable message, Video unavailable message,
camera remarks and self registration license terms.
To define a new message, remark or term on the WUApp Customization page:
1. On the Customization page, choose one of the available options (e.g. Welcome Msg). The
selected page is displayed.
Figure 13-14: Welcome Message page
2. Add or update the desired message.
3. Click Save to save the changes.
58
RISCO Cloud Web Administration Manual
Page 63

Appendix A: Event Table
The following table explains the events that are included in the event table, their SIA and Contact
ID equivalents and each event’s associated event data (address field).
For each defined Service Provider, any event that appears in the event table may be enabled or
disabled (i.e. an enabled event shall be forwarded to the service provider when the event is received
by RISCO Cloud).
Table 3: RISCO Cloud Events List
ID Event Name SIA Cont. ID Event Group Address Field
0 Fire Alarm FA 1110 Fire Device Number
1 Panic Alarm PA 1120 Burglary Device Number
2 Emergency Alarm MA 1150 Emergency Device Number
3 Alarm BA 1130 Burglary Device Number
4 Fire Restore FR 3110 Fire Device Number
5 Panic Restore PR 3120 Burglary Device Number
6 Medical Restore MR 3150 Medical - SOS Device Number
7 Alarm Restore BR 3130 Burglary Device Number
8 Trouble BT 1380 Peripherals Device Number
9 Zone Bypassed UB 1570 Burglary Device Number
10 Zone Unbypassed UU 3570 Burglary Device Number
11 Zone Tamper TA 1137 Burglary Device Number
12 Tamper Restore TR 3137 Burglary Device Number
13 Full Arm CL 3401 Arm/Disarm User Number
14 Part Arm CG 3456 Arm/Disarm User Number
15 Perimeter Arm CG 3441 Arm/Disarm User Number
16 Disarmed OP 1401 Arm/Disarm User Number
17 Medical Alarm MA 1100 Medical - SOS Device Number
18 Panic Alarm PA 1120 Burglary Device Number
19 Fire Alarm FA 1110 Fire Device Number
20 Edit User Code JV 1462 Service – Maintenance User Number
21 Delete User Code JX 3462 Service – Maintenance User Number
22 Duress HA 1121 Burglary N.A.
23 Bell Cancel BC 1521 Burglary User Number
24 Battery Low YT 1302 Power Outage Device Number
25 Battery Restore YR 3302 Power Outage Device Number
26 Battery Low XT 1384 Power Outage Device Number
27 Battery Restore XR 3384 Power Outage Device Number
28 AC Loss AT 1301 Power Outage Device Number
Page 64

ID Event Name SIA Cont. ID Event Group Address Field
29 AC Restore AR 3301 Power Outage Device Number
30 Tamper TA 1137 Burglary Device Number
31 Tamper Restore TR 3137 Burglary Device Number
32 Communication Trouble YC 1350 Peripherals Notification Device Number
33 Communication Restore YK 3350 Peripherals Notification Device Number
34 Media Loss LT 1351 Peripherals Notification Device Number
35 Media Restore LR 3351 Peripherals Notification Device Number
36 Device Trouble ET 1330 Peripherals Notification Device Number
37 Device Trouble Restore ER 3330 Peripherals Notification Device Number
38 FM Jamming XQ 1344 RF Jamming Device Number
39 FM Jamming Restore XH 3344 RF Jamming NA
40 Programming Start LB 1627 Service – Maintenance N.A.
41 Programming End LX 1628 Service – Maintenance N.A.
42 Remote Programming Start RB 1412 Service – Maintenance N.A.
43 Remote Programming End RS 3412 Service – Maintenance N.A.
44 Periodic Test RP 1602 Always Report N.A.
45 Walk Test TS 1607 Service – Maintenance User Number
46 End Walk Test TE 3607 Service – Maintenance NA
47 Set Time JT 1625 Service – Maintenance User Number
48 Set Date JD 1625 Service – Maintenance User Number
49 Out of synchronization UT 1341 Do Not Report Device Number
50 Resynchronization UR 3341 Do Not Report Device Number
51 CP out of synchronization UT 1341 Peripherals Notification Device Number
52 CP resynchronization UR 3341 Peripherals Notification Device Number
53 Supervision Loss US 1381 Peripherals Notification Device Number
54 Supervision Restore UR 3381 Peripherals Notification Device Number
56 Clear Log LB 1621 Service – Maintenance User Number
57 Stop Communication OC 1350 Do Not Report User Number
58 Listen In Start LF 1606 Service – Maintenance N.A.
59 Listen In End LE 3606 Service – Maintenance N.A.
60 WDT Reset RR 1305 Service – Maintenance Task
61 Power Up Reset RR 3301 Power Outage Device Number
62 Net Disconnect RA 1350 Service – Maintenance Device Number
63 Init Start YD 1551 Service – Maintenance Device Number
64 Init End YE 3551 Service – Maintenance Device Number
65 Message Queue Full JO 1624 Service – Maintenance Device Number
66 Message Queue Restore JL 3621 Service – Maintenance Device Number
Page 65

ID Event Name SIA Cont. ID Event Group Address Field
67 Message Queue Disc. YO 1102 Service – Maintenance Device Number
68 24 HR-X Alarm TT 1370 Burglary Device Number
69 24 HR-X Restore TR 3370 Burglary Device Number
70 Open After Alarm OR 1458 Burglary User Number
71 GSM Signal Level YY 1605 Peripherals Notification Signal Level (0-9)
72 No Arm Period Expire CD 1654 Service – Maintenance N.A.
73 Trouble Restore BJ 3380 Peripherals Notification Device Number
74 Water Alarm WA 1154 Burglary Device Number
75 Water Restore WH 3154 Burglary Device Number
76 Gas Alarm GA 1151 Fire Device Number
77 Gas Restore GH 3151 Fire Device Number
78 Environmental Alarm UA 1150 Burglary Device Number
79 Environmental Restore UH 3150 Burglary User Number
80 No Motion Alarm NA 1102 Medical - SOS Device Number
81 Manual Test RX 3601 Burglary User Number
82 Recent Closing CR 1459 Burglary User Number
83 Exit Alarm EA 1454 Burglary User Number
84 Exit Error EE 1457 Burglary User Number
85 Alarm Canceled OC 1406 Burglary User Number
86 Report Aborted YO 1466 Do Not Report User Number
87 Swinger Trouble BD 1377 Service – Maintenance Device Number
88 Cross Zoning Verification BG 1378 Service – Maintenance Device Number
89 Daylight Change YO 0000 Do Not Report NA
90 RF Comm Trouble XQ 1353 Service – Maintenance Device Number
91 RF Comm Restore XH 3353 Service – Maintenance Device Number
92 System Bell Fault YA 1321 Service – Maintenance Device Number
93 System Bell Restore YH 3321 Service – Maintenance Device Number
94 Web User Access Start RB 1412 Service – Maintenance User Number
95 Web User Access End RS 3412 Service – Maintenance User Number
96 No XML Proxy Connection NC 1350 Do Not Report NA
97 No XML Proxy Connection Restore NR 3350 Do Not Report NA
98 System Radio Jamming XQ 1344 RF Jamming Device Number
99 External Battery Low YT 1302 Service – Maintenance Device Number
100 External Battery Restore YR 3302 Service – Maintenance Device Number
101 DHCP Fail LT 1351 Peripherals Notification NA
102 DHCP Restore LR 3351 Peripherals Notification NA
103 High Temperature KA 1158 Burglary Device Number
Page 66

ID Event Name SIA Cont. ID Event Group Address Field
104 High Temperature Restore KH 3158 Burglary Device Number
105 Low Temperature ZA 1159 Burglary Device Number
106 Low Temperature Restore ZH 3159 Burglary Device Number
107 Partition 1 Armed CG 3400 Arm/Disarm User Number, Address Number
108 Partition 2 Armed OG 3400 Arm/Disarm User Number, Address Number
109 Partition 1 Disarmed CG 1400 Arm/Disarm User Number, Address Number
110 Partition 2 Disarmed OG 1400 Arm/Disarm User Number, Address Number
111 Local Snapshot XX 1400 Do Not Report User Number, Address Number
112 SMS Snapshot XX 1400 Do Not Report User Number, Address Number
113 WEB Snapshot XX 1400 Do Not Report User Number, Address Number
114 RP User Snapshot XX 1400 Do Not Report User Number, Address Number
115 Sensor Snapshot TW 1139 Burglary Device Number
116 RF Device WDT Reset RR 1305 Do Not Report User Number, Address Number
117 Crash and Smash UZ 1777 Burglary Device Number
Page 67

Appendix B: E-mail Notification
Among the features of RISCO Cloud is the ability to notify the administrator by email to provide
information concerning system status.
A query is run periodically that gathers statistics concerning control panels that are offline and/or
have a trouble condition. The interval between these queries can be configured by RISCO to meet
the requirements of the application.
The resulting email appears as follows:
Subject:
Control panels Offline and Trouble statistics for [server current time]
Body:
Never connected = [number of panels never connected]
Trouble = [number of panels with a trouble condition
Trouble for more than [pre-configured parameter] seconds = [number of panels
with a long-term trouble condition]
Offline Armed = [number of panels that went offline while armed]
Offline Disarmed = [number of panels that went offline while disarmed]
Offline for more than [pre-configured parameter] seconds = [number of long-term
offline panels]
Total CPs checked = [total number of panels offline and/or with trouble
conditions]
In addition, various system events cause RISCO Cloud to send an email to the administrator. The
following table provides an explanation for these email messages.
Table 4: RISCO Cloud Administrator e-mails
E-mail Subject E-mail Body Explanation and Required Action
Primary RISCO Cloud DB
Server unreachable!
-or-
Backup RISCO Cloud DB
Server unreachable!
Backup RISCO Cloud DB
Server became reachable!
Inconsistent RISCO Cloud DB
metadata on primary DB
server!
Primary RISCO Cloud DB Server
unreachable!
-or-
Backup RISCO Cloud DB Server
unreachable!
Backup RISCO Cloud DB Server
became reachable!
[the textual data in the exception
generated when the metadata was
checked]
One of RISCO Cloud modules has detected a failure to
connect to the database.
Using the DB Servers Information page in the Web
Administration application (see p. 037, Table 11),
check the status of the connection to the primary and
backup databases.
If there is a problem with one of the database
connections, check the status of the DB service
master/slave using the services snap-in.
If the service is not running, enter the OS event viewer
and search for the errors that may have caused the
problem.
The connection to the Backup RISCO Cloud database
is restored.
Call RISCO’s technical support department.
-or-
Inconsistent RISCO Cloud DB
metadata on backup DB
server!
Page 68

E-mail Subject E-mail Body Explanation and Required Action
Web Service – [type] at URL =
[URL] is unreachable or
wrong!
Web Service – [type] at URL =
[URL] is ready
Web Service – [type] at URL =
The URL parameter is missing
in current configuration file!
[server current time] [URL] A Web request has not been answered by the IIS.
Enter the configuration file for the specific component
(i.e. the “type” that appears in the email), check that
the URL is correct by copying it in the Explorer
Address bar and check the outcome.
If you receive an IIS error check the virtual directory
integrity, permissions and the ASPX file for the
appropriate service type.
Enter the OS event viewer and search for the errors
that may have caused the problem.
Enter the correct URL in the appropriate Web
Configuration file or, if required, call RISCO’s
technical support department for assistance.
[server current time] [URL] The restore message that is sent to indicate that the
URL to a Web Service that was previously unreachable
is now OK.
[server current time] The URL
parameter is missing in current
configuration file!
The URL in the specified Web service is missing (i.e.
the line does not exist in the configuration file).
Edit the appropriate configuration file and type the
correct URL according to the IIS RISCO Cloud
components installation.
Web Service – [type] at URL =
The URL parameter is empty
in current configuration file!
Control panel [CPID] at IP
[Current IP] is offline.
Control panel [CPID] at IP
[Current IP] is online.
If required, call RISCO’s technical support department
for assistance.
[server current time] The URL
parameter is empty in current
configuration file!
[server current time] “I’m Alive” messages are not being received from the
[server current time] A control panel that was previously reported as
The URL in the specified Web service is empty (i.e. the
line exists in the configuration file but the URL has not
been entered).
Edit the appropriate configuration file and type the
correct URL according to the IIS RISCO Cloud
components installation.
If required, call RISCO’s technical support department
for assistance.
specified control panel for a pre-configured period.
“offline” is now back online.
Page 69

E-mail Subject E-mail Body Explanation and Required Action
SMS Send Error An error occurred while trying to
send SMS message!
SMS Error: [error code enumerator]
Incorrect Configuration
Parameters
No SMTP server specified in
configuration file!
-or-
No email address for sending
specified in configuration file!
-or-
No SMS server URL specified in
configuration file.
The RISCO Cloud is unable to send SMS messages.
This may happen because the SMS service is down or
not accessible.
Check the status of the SMS sending service using the
Services snap-in.
Make sure that the COM port used by the SMS
services is not configured for any other service or
device.
Check the connection between the SMS transmitter
and the server on which the SMS service is installed.
Check the SMS transmitter for any problem with its
functionality or SIM card.
If required, call RISCO’s technical support department
for assistance.
The RISCO Cloud is unable to send event forwarding
email or SMS messages.
In the case of error messages related to email sending,
check the integrity and existence of the SMTP address
at the gateway and RISCO Cloud admin SMTP
address.
In the case of error messages related to SMS sending,
edit the SMS configuration file and restart the SMS
sending service in the OS.
-or-
No SMS server Port specified in
configuration file.
-or-
The ESWS service is unable to
connect to the SMS service.
Socket Error An error occurred during setup of
socket!
SMS Error: [Error Code
Enumerator]
Primary CPWS is
unreachable!
-or-
Backup CPWS is
unreachable!
Primary CPWS is unreachable!
URL: [CPWS Primary URL]
-or-
Backup CPWS is unreachable!
URL: [CPWS Backup URL]
Check that the SMS IP address and port in the ESWS
wizard are correctly configured and that the SMS
service is running.
Call RISCO’s technical support department.
Call RISCO’s technical support department for
assistance.
Page 70

E-mail Subject E-mail Body Explanation and Required Action
Primary CPWS has just
became reachable!
-or-
Backup CPWS has just
became reachable!
Primary CPWS has just become
reachable! URL: [CPWS Primary
URL]
-or-
Backup CPWS has just become
reachable! URL: [CPWS Backup
URL]
The restore message that is sent to indicate that the
offline CP service is now OK.
Page 71

RISCO Group Limited Warranty
RISCO Group and its subsidiaries and affiliates warrants its products to be free from defects in materials
and workmanship under normal use for 24 months from the date of production. Because Seller does not
install or connect the product and because the product may be used in conjunction with products not
manufactured by the Seller, Seller cannot guarantee the performance of the security system which uses
this product. Seller's obligation and liability under this warranty is expressly limited to repairing and
replacing, at Seller's option, within a reasonable time after the date of delivery, any product not meeting
the specifications. Seller makes no other warranty, expressed or implied, and makes no warranty of
merchantability or of fitness for any particular purpose.
In no case shall seller be liable for any consequential or incidental damages for breach of this or any
other warranty, expressed or implied, or upon any other basis of liability whatsoever.
Seller's obligation under this warranty shall not include any transportation charges or costs of
installation or any liability for direct, indirect, or consequential damages or delay.
Seller does not represent that its product may not be compromised or circumvented; that the product
will prevent any personal injury or property loss by burglary, robbery, fire or otherwise; or that the
product will in all cases provide adequate warning or protection.
Seller, in no event shall be liable for any direct or indirect damages or any other losses occurred due to
any type of tampering, whether intentional or unintentional such as masking, painting or spraying on
the lenses, mirrors or any other part of the detector.
Buyer understands that a properly installed and maintained alarm may only reduce the risk of burglary,
robbery or fire without warning, but is not insurance or a guaranty that such event will not occur or that
there will be no personal injury or property loss as a result thereof.
Consequently seller shall have no liability for any personal injury, property damage or loss based on a
claim that the product fails to give warning. However, if seller is held liable, whether directly or
indirectly, for any loss or damage arising under this limited warranty or otherwise, regardless of cause
or origin, seller's maximum liability shall not exceed the purchase price of the product, which shall be
complete and exclusive remedy against seller.
No employee or representative of Seller is authorized to change this warranty in any way or grant any
other warranty.
WARNING: This product should be tested at least once a week.
Page 72

Contacting RISCO Group
RISCO Group is committed to customer service and product support. You can contact us through our
website www.riscogroup.com or as follows:
United Kingdom
Tel: +44-(0)-161-655-5500
technical@riscogroup.co.uk
Italy
Tel: +39-02-66590054
support@riscogroup.it
Spain
Tel: +34-91-490-2133
support-es@riscogroup.com
France
Tel: +33-164-73-28-50
support-fr@riscogroup.com
Belgium
Tel: +32-2522-7622
support-be@riscogroup.com
USA
Tel: +1-631-719-4400
support-usa@riscogroup.com
Brazil
Tel: +55-11-3661-8767
support-br@riscogroup.com
China (Shanghai)
Tel: +86-21-52-39-0066
support-cn@riscogroup.com
China (Shenzhen)
Tel: +86-755-82789285
E-mail: support-cn@riscogroup.com
Poland
Tel: +48-22-500-28-40
support-pl@riscogroup.com
Israel
Tel: +972-3-963-7777
support@riscogroup.com
All rights reserved.
No part of this document may be reproduced in any form without prior written permission from the
publisher.
RISCO Group 10/2012 5 I N 1973
 Loading...