

Page 1

Risco Group
ACUS - Access Control User Station
Quick Start Guide
Page 2
ACUS Quick Start Guide
About this Guide
Purpose
This guide has been written to help you quickly setup and configure the basic functionality of
the Access Control User Station (ACUS) application. It presents the functional capabilities
and basic operational details of the application and contains the procedures that you should
know for performing your business tasks rapidly and efficiently using this element of the
application.
Intended Audience
This guide is primarily intended for the users who will manage the access control system at
any premises.
Prerequisites for Use
The overall awareness of the Risco Access Control (RAC) system and the basic knowledge of
access control systems and security domain are necessary to use this guide.
Organization of the Guide
Information in this guide has been organized as follows:
Chapter Description
Introduction to ACUS
Logon to ACUS
Quick Start in ACUS
Events and Alarms Icons
Glossary
Contacts
Index
This section provides an overview of the product and ACUS
application.
This section describes the process to log on and log off ACUS.
The Quick Start Wizard that appears when you log on to ACUS
for the first time is described in detail.
This list describes the default icons for alarms and events that
appear in the Events List and Alarms List in ACUS.
This section provides the explanation of the terms that are used in
this guide.
This section provides the contact details of Risco Group.
Index of the terms, concepts and the tasks in the quick guide is
provided.
Uncontrolled when printed © RISCO Group i
Page 3
ACUS Quick Start Guide
Typographical Conventions
The following are the typographical conventions used in this guide:
Convention Indicates Example
Command and Screen
element names
URLs and Hyperlinks URLs and hyperlinks. http://www.riscogroup.com
<Text> Examples are placed in angular
Cross-Reference Indicates cross-references
“System Messages” Indicates messages displayed by the
Note
Buttons, check boxes, option
buttons, etc. Commands that you
choose from the menus or dialog
boxes appear in title case and in bold
font.
brackets. User needs to replace
them with appropriate options.
application.
Notes describe important information
that you should take into
consideration.
Click Next after choosing the
option Every one or Just Me
Replace localhost with <Server
Name>.
Refer to section 2 Getting
Started with ACUS.
The system displays a
message, “Person created
successfully”.
Note: If you do not select any
language, ACUS is
displayed in the default
language of the
computer.
Feedback and Suggestions
Home: http://www.riscogroup.com
Email: support@riscogroup.com
Uncontrolled when printed © RISCO Group ii
Page 4

ACUS Quick Start Guide
Contents
1 Introduction to ACUS ............................................................................................................ 7
1.1 What is ACUS? ...................................................................................................................... 7
1.2 Prerequisites (responsibility of the installer) ...................................................................... 7
1.3 Why use ACUS? .................................................................................................................... 7
1.4 Who will use ACUS? ............................................................................................................. 8
1.5 What are the dashboards used for? .................................................................................... 8
2 Logon to ACUS .................................................................................................................... 10
2.1 Logging on to ACUS ........................................................................................................... 10
2.1.1 For the First Time User ..................................................................................................... 12
2.2 Log off from ACUS .............................................................................................................. 12
3 Quick Start in ACUS ............................................................................................................ 13
3.1 Person Additional Information ........................................................................................... 14
3.2 Manage Categories .............................................................................................................. 16
3.3 Schedules and Special Days .............................................................................................. 17
3.4 Door Configurations ............................................................................................................ 21
3.5 Door Filters .......................................................................................................................... 21
3.6 Locations ............................................................................................................................. 24
3.7 Zones .................................................................................................................................... 25
3.8 Rules Management .............................................................................................................. 27
3.9 Entry Points ......................................................................................................................... 34
3.10 Visit Categories ................................................................................................................... 34
3.11 Users .................................................................................................................................... 35
3.12 Event and Alarm Configuration .......................................................................................... 39
A Events and Alarms Icons .................................................................................................... 47
B Glossary ............................................................................................................................... 51
Notes ......................................................................................................................... .................... 52
Notes ......................................................................................................................... .................... 53
RISCO Group Limited Warranty ................................................................................................. 54
Contacting RISCO Group ............................................................................................................ 55
Uncontrolled when printed © RISCO Group iii
Page 5

ACUS Quick Start Guide
List of Tables
TABLE 1: ADD PERSON ADDITIONAL INFORMATION....................................................................... 14
TABLE 2: ADD CATEGORY .......................................................................................................... 16
TABLE 3: ADD SCHEDULE ........................................................................................................... 17
TABLE 4: ASSIGN RULES ............................................................................................................ 32
TABLE 5: APPLY FILTER .............................................................................................................. 37
List of Figures
FIGURE 1: ACUS SPLASH SCREEN ................................................................................................... 10
FIGURE 2: ACUS LOGIN SCREEN ..................................................................................................... 10
FIGURE 3: ACUS HOME PAGE ......................................................................................................... 11
FIGURE 4: CHANGE PASSWORD ....................................................................................................... 12
FIGURE 5: LOGIN WIZARD................................................................................................................. 13
FIGURE 6: PERSON LAYOUT CONFIGURATION .................................................................................... 14
FIGURE 7: DEFINE CATEGORIES ....................................................................................................... 16
FIGURE 8: SCHEDULES AND SPECIAL DAYS ....................................................................................... 17
FIGURE 9: DOOR CONFIGURATION .................................................................................................... 21
FIGURE 10: FILTER .......................................................................................................................... 22
FIGURE 11: ADD DOOR FILTER ......................................................................................................... 22
FIGURE 12: LIST OF PROPERTIES FOR DOOR FILTER ......................................................................... 22
FIGURE 13: DOOR FILTER OPERAND ................................................................................................. 22
FIGURE 14: ADD ANOTHER CRITERIA ................................................................................................ 23
FIGURE 15: CRISIS LEVEL SELECTION ............................................................................................... 23
FIGURE 16: NEW CRITERIA ADDED ................................................................................................... 23
FIGURE 17: SHOW RESULT ............................................................................................................... 24
FIGURE 18: LOCATIONS .................................................................................................................... 24
FIGURE 19: ADD A CHILD LOCATION ................................................................................................. 24
FIGURE 20: ADD NEW NODE ............................................................................................................ 25
FIGURE 21: ZONE LIST ..................................................................................................................... 25
FIGURE 22: ADD ZONE ..................................................................................................................... 25
FIGURE 23: CATEGORY .................................................................................................................... 26
FIGURE 24: SEARCH PERSON FIXED RULES ...................................................................................... 27
FIGURE 25: RULES MANAGEMENT .................................................................................................... 27
FIGURE 26: ADD PERSONS FIXED RULES .......................................................................................... 28
FIGURE 27: WHO THIS RULE APPLIES TO – CATEGORIES ................................................................... 28
FIGURE 28: WHO THIS RULE APPLIES TO – LOCATION ....................................................................... 29
FIGURE 29: WHO THIS RULE APPLIES TO – FILTERS .......................................................................... 29
FIGURE 30: WHERE AND WHEN – DOORS ......................................................................................... 30
FIGURE 31: DOORS .......................................................................................................................... 30
FIGURE 32: WHERE AND WHEN – ZONES .......................................................................................... 31
FIGURE 33: WHERE AND WHEN – LOCATIONS ................................................................................... 31
FIGURE 34: WHERE AND WHEN – FILTERS ........................................................................................ 31
FIGURE 35: HOW TO ASSIGN RULE ................................................................................................... 32
FIGURE 36: ENTRY POINT ................................................................................................................ 34
FIGURE 37: VISIT CATEGORIES ......................................................................................................... 34
FIGURE 38: ADD USER ..................................................................................................................... 35
FIGURE 39: SELECT PROFILE ........................................................................................................... 36
FIGURE 40: LOGIN INFORMATION ...................................................................................................... 36
FIGURE 41: APPLY FILTER FOR USER ............................................................................................... 37
FIGURE 42: CATEGORY SELECTION FO R USERS ................................................................................ 38
FIGURE 43: ADVANCED FILTERS ....................................................................................................... 38
FIGURE 44: SECTIONS FOR NEW USER ............................................................................................. 38
FIGURE 45: NEW USER CREATED ..................................................................................................... 38
FIGURE 46: EVENTS AND ALARMS CONFIGURATION ........................................................................... 39
FIGURE 47: ADD EVENTS ................................................................................................................. 40
Uncontrolled when printed © RISCO Group iv
Page 6

ACUS Quick Start Guide
FIGURE 48: ALARM SETTINGS AND ALARM PROCEDURES ................................................................... 40
FIGURE 49: EVENT TOASTE R ............................................................................................................ 41
FIGURE 50: SELECT A SOUND FILE ................................................................................................... 41
FIGURE 51: COLOUR PALETTE .......................................................................................................... 41
FIGURE 52: ADD/EDIT ICONS ............................................................................................................ 41
FIGURE 53: DEFINE AUTOMATION ..................................................................................................... 42
FIGURE 54: SELECT AUTOMATION..................................................................................................... 42
FIGURE 55: MANAGE AUTOMATION ................................................................................................... 42
FIGURE 56: ALARM SETTINGS FOR AN EVENT .................................................................................... 43
FIGURE 57: IMMEDIATE BUTTONS ..................................................................................................... 44
FIGURE 58: ALARM PROCEDURES ..................................................................................................... 44
FIGURE 59: NOTIFICATION SETTINGS ................................................................................................ 45
FIGURE 60: NOTIFY USERS .............................................................................................................. 46
Total number of pages in the guide, including the cover page: 56
Uncontrolled when printed © RISCO Group v
Page 7
ACUS Quick Start Guide
List of Abbreviations
Abbreviation/ Acronym Expansion
ACCB Access Control Controller Board
ACCE Access Control Configuration Entities
ACIB Access Control Input Output Board
ACIS Access Control Installer Station
ACOS Access Control Operator Station
ACPE Access Control Physical Entity
ACUE Access Control User Entities
ACUS Access Control User Station
APB Anti-Pass-Back
ATB Anti-Time-Back
LDAP Light Directory Access Protocol
OTP One Time Password
PDF Portable Document Format
PIN Personal Identification Number
RAC RISCO Access Control System
REN Request to Enter
REX Request to Exit
RSP RISCO Service Platform
Uncontrolled when printed © RISCO Group vi
Page 8

ACUS Quick Start Guide
1 Introduction to ACUS
Access Control User Station (ACUS) application is a part of the Risco Access Control (RAC)
System.
1.1 What is ACUS?
The ACUS application serves the customer personal and allows the customer to configure,
monitor and apply routine day to day tasks of the RAC system that are in the customer’s work
scope. The application end-user is referred to as ‘User’. The ACUS application reflects the
three main activities:
• Office – Receptionist
• Security – Guard
• Settings – Security Officer
The account for the client is created in Access Control Operator Station (ACOS). The Main
User (default user for ACUS) is created when an account is created. The installer belonging
to an Installer Company installs registers and configures the firmware devices such as the
Proxy, Controller and Doors.
1.2 Prerequisites (responsibility of the installer)
Before you can log on to ACUS, ensure the following activities are completed:
• All firmware devices (Firmware devices include Proxy, Access Control Controller Board
(ACCB), Doors, Relays, Sensors and Readers) are created, registered and configured
through ACIS before handling over the system to ACUS User for use.
• All required sections are created. (A section is a logical configuration unit into which an
account can be divided. Sections are created by the installer using ACIS).
1.3 Why use ACUS?
After these activities are done, you will use ACUS to configure following entities:
• Persons
system is deployed) and those who visit the building. When you log on to ACUS, add
persons manually or import the person data in the system and assign cards and rules to
the person. Assign ID cards which will serve as identification for each person. For more
details, visit the chapter Managing Persons in the ACUS User Manual.
• Rules
conditions that decide the access provided or revoked for persons or categories. You can
define Person categories to which Access Rules will be assigned. You can create rules for
Persons based on categories, location, zones and doors. Using rules, you will be able to
define the access control pattern across doors and zones. You can assign schedules for
these rules, to decide when and how the access will be provided. For more details, visit the
chapter
: Access is managed for the persons working in the organization (where RAC
: Through ACUS, you manage access control for Persons in the building. Rules are
Managing Rules in the ACUS User Manual.
Uncontrolled when printed © RISCO Group 7
Page 9

ACUS Quick Start Guide
• Door Settings
generated (for example, Door Enabled, Forced Door Events, Door locked-unlocked,
Conditional Sensor turned On and so on) should be configured. While configuring door
settings, you may also assign schedule to the door, fixed and custom rules and authorized
persons who will have access to the door. For more details, visit the chapter Configuring
Doors in the ACUS User Manual.
• Relays and Sensors
• Events and Alarms Configuration
can view events for the situations that you selected. You can configure the events in
ACUS. Events are notifications that ACUS system receives from the firmware whenever
the actions take place. For example, you can configure in ACUS that an event should be
generated every time someone forcibly opens a door. For more details, visit the chapter
Configuring Alarms and Events in the ACUS User Manual.
ACUS allows you to apply filters to access for Doors, Events, Persons, Alarms and Zones.
Tasks which you will perform often, you can set automations in ACUS. The tasks will be
performed automatically based on the schedules.
Apart from managing access for persons, ACUS allows you to manage access for Visitors.
Visitors are persons who are not the part of the company however keep visiting now and then
for various purposes. You may provide permission to Persons to manage their own visits and
visitors. At a broad level, you can manage access for visitors and apply rules for visitor
access.
: The Door Side Settings such as the situations when the event should be
: Configuration of external Relays and Sensors in ACUS.
: After configuring the Persons, Doors, and Rules, you
When an account is created, the Main User ID is created. The Main user has access to
complete application and can perform any tasks in ACUS. The main user creates other user
ID’s and assigns profiles to them. The user’s access to ACUS (the functions that can be
available to the user) is decided by the user profile that the user belongs to.
1.4 Who will use ACUS?
The user profiles in ACUS are of the following types:
• Receptionist
Control system such as handling visitors, setting new appointments, managing existing
appointments and managing persons.
• Security Guard
operating on the RAC elements such as closing a door or activating a relay or a command
in the process of handling an alarm.
• Security Manager
managing persons and rules, managing other system users’ permissions, managing alarms
and events configurations, defining door groups and so on.
: Responsible for handling the office related routine tasks in the Access
: Responsible for monitoring events and handling alarms. This includes
: Responsible for the system configurations and settings including
1.5 What are the dashboards used for?
The ACUS application is also organized based on the user profiles. When you log on as a
Main User, you can view three dashboards, they are:
Uncontrolled when printed © RISCO Group 8
Page 10

ACUS Quick Start Guide
• Settings
: The Settings dashboard is used by the Security officer who is in charge of the
access control. The dashboard is used for system configurations and settings including
managing persons and rules, managing other system users’ permissions, managing alarms
and events configurations, defining door groups, defining zones, generating reports and so
on.
• Security
: The Security dashboard is used by the Security personnel, the guard in the
organization. The Security dashboard is used for viewing alarms and events, configuring
doors and zones and view maps of the location (if the appropriate license is available)
• Office
: The Office dashboard is used by the receptionist in the organization for person and
visitor management. You can also manage alarms and events from this dashboard.
If your company supports any third party application other that RAC system, you will be able
to create Third Party Users (for details, refer to chapter Adding Third Party/External Users
in the ACUS User Manual) who will be able to access certain functionalities in ACUS for
various purposes.
You can generate Predefined reports through ACUS. The reports can be for Persons, Events,
Doors, Visitors, Alarms and other configurations made in ACUS. Apart from the predefined
reports, you can customize and generate reports (if the appropriate license is available for the
account) for entities such as Doors and Zones, Persons, Events & Alarms, Configurations,
Locations, Sensors and Relays, Automation and so on.
In ACUS, you can customize certain screens and decide how they should appear in the
application. The default dashboard allows you to view certain activities on the home page.
Like all other RAC system application, ACUS supports localization for languages – English,
French, Italian and Hebrew.
The following sections describe the process to perform tasks in ACUS. For a general
understanding of the application and the user interface, see How to User ACUS in the ACUS
User Manual.
Uncontrolled when printed © RISCO Group 9
Page 11
ACUS Quick Start Guide
2 Logon to ACUS
After you have installed ACUS successfully, you can start using the application.
This chapter covers:
• 2.1 Logging on to ACUS
• 2.2 Log off from ACUS
2.1 Logging on to ACUS
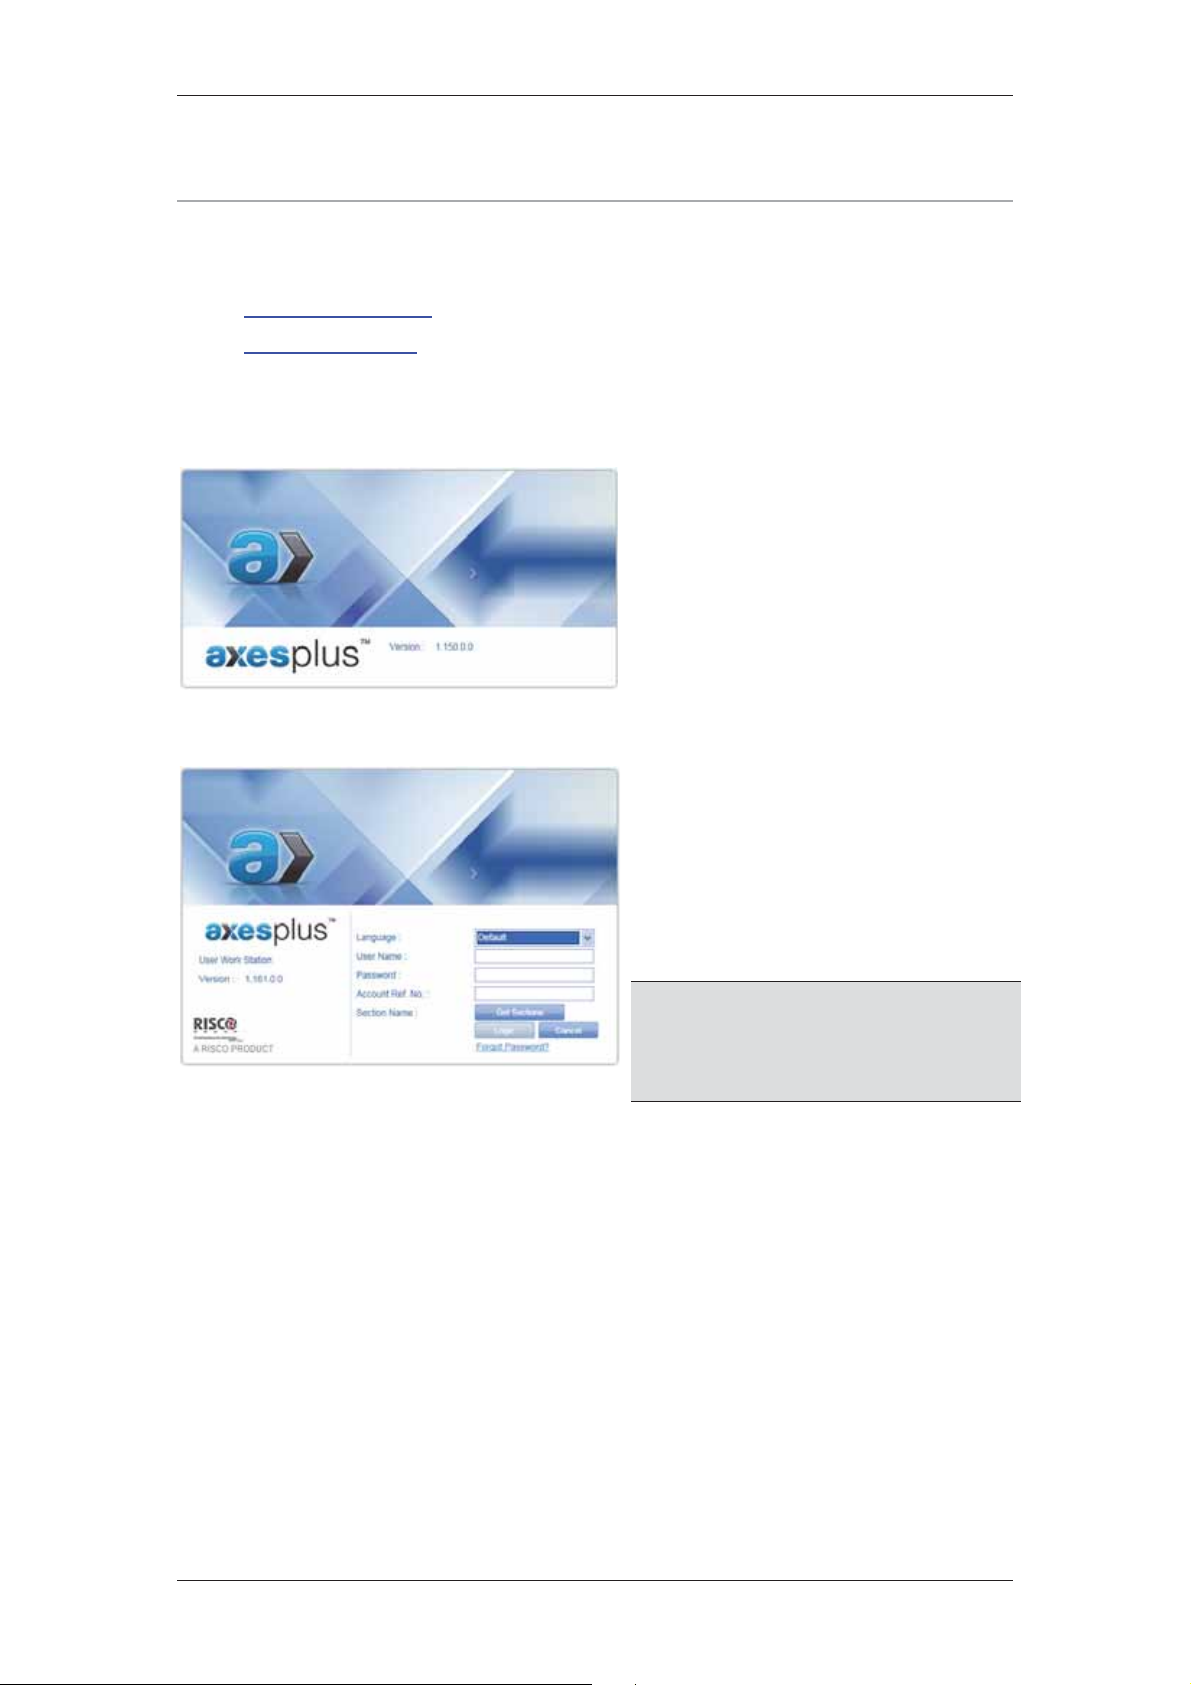
Figure 1: ACUS Splash Screen
1. Double-click the ACUS Client
icon/shortcut available on the
desktop. The ACUS splash
screen appears.
• Or
• Click Start → All Programs → Risco
Axes Plus → ACUS → ACUS Client.
The ACUS splash screen appears.
• The login screen appears.
2. Select the preferred language
in which you want to log on to
ACUS from the Language
drop-down list. The available
languages are English, French,
Italian and Hebrew.
Note: If you do not select any language,
ACUS is displayed in the default
Figure 2: ACUS Login Screen
3. Enter the user name and password in the User Name and Password fields. When
an account is created in ACOS, the Main User (default user profile with complete
rights to ACUS) is created. Log on to ACUS using the default logon credentials.
4. Enter the Account Reference Number. The account reference number is the
unique number provided to an account when an account is created in ACOS.
5. Click Get Sections. The list of sections created for the particular account appears
in the Section Name drop-down list. Sections are created in ACIS.
6. Select the section in which you want to perform all the tasks and click Login. The
ACUS dashboard appears.
Uncontrolled when printed © RISCO Group 10
language of the system as per the
regional settings where it is
installed.
Page 12
ACUS Quick Start Guide
Note: All configurations that are made will be applicable to this section only. If you have
forgotten your password to log on to ACUS, click Forgot Password link. A new
password will be sent to your e-mail address.
Vertical
collapsible bar
Figure 3: ACUS Home Page
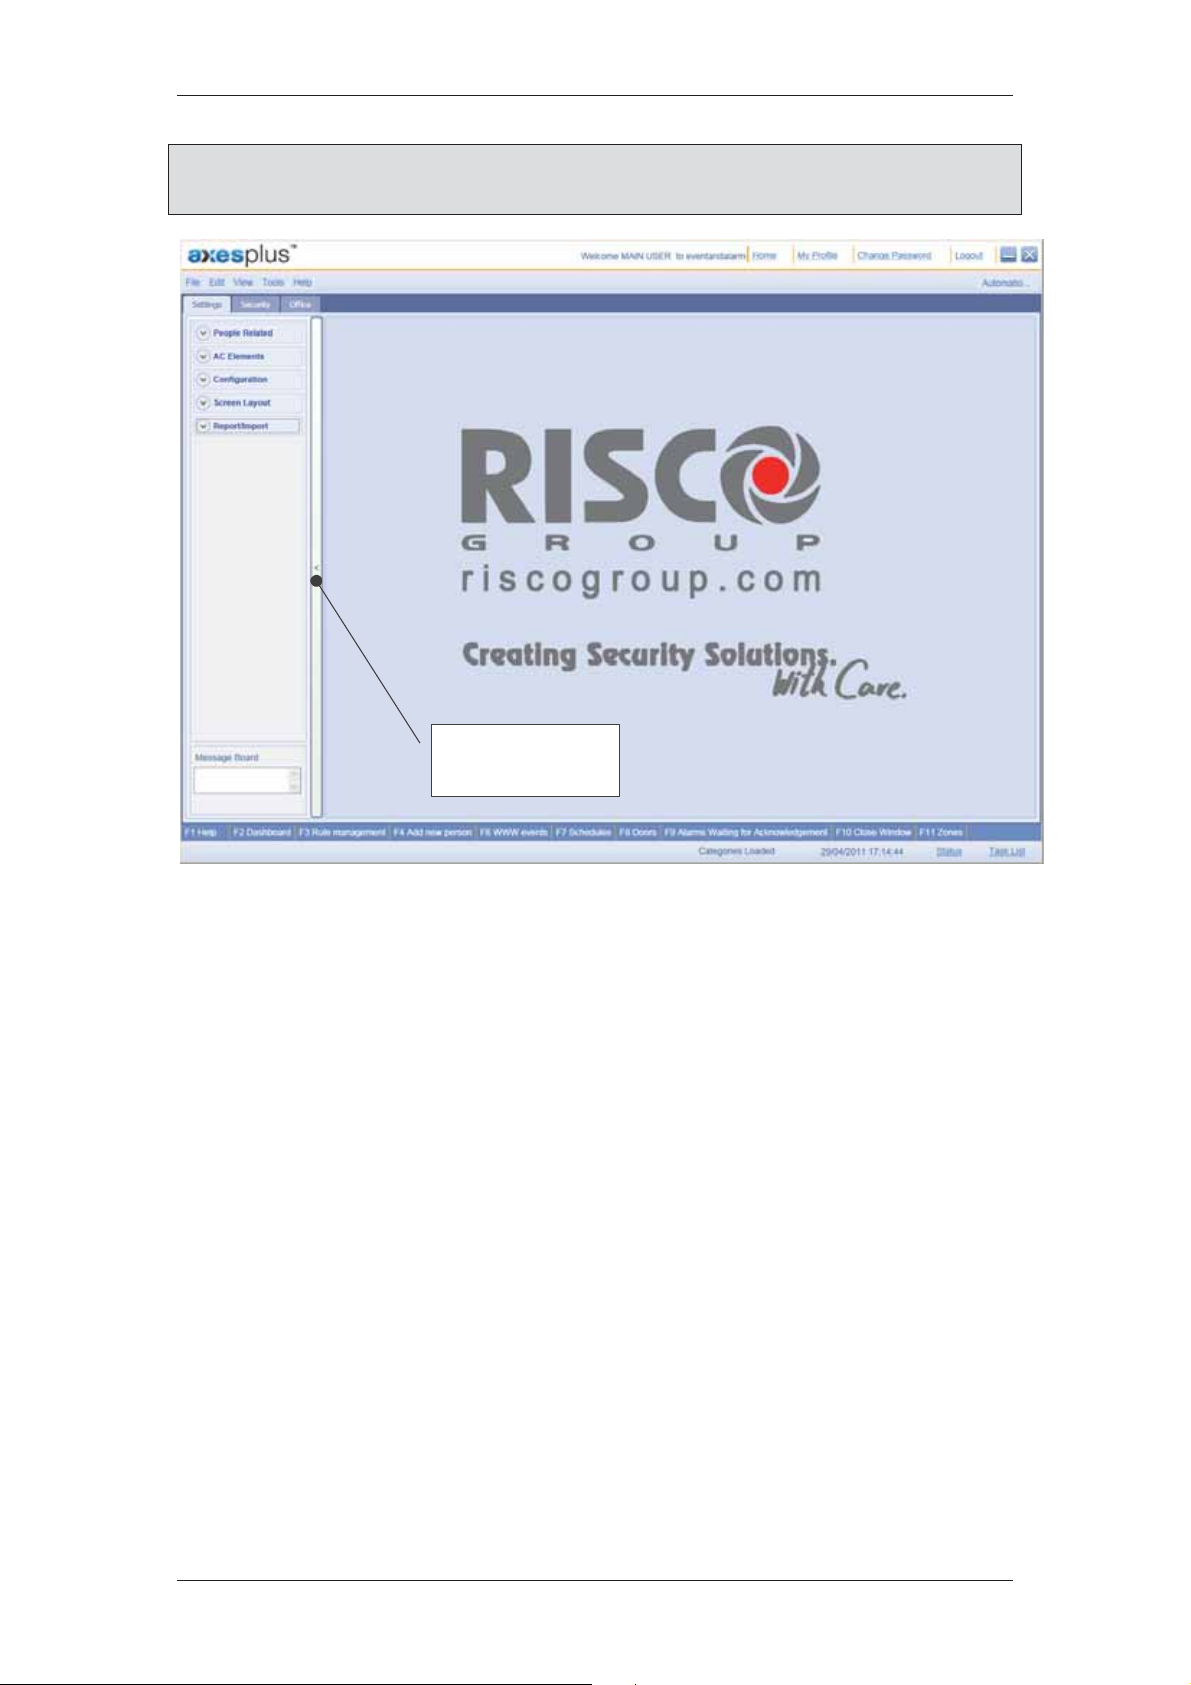
The product logo is displayed on the top-left corner. The Company name and logo appear in
the centre. The name of the logged on user is displayed on the title bar along with the name
of the section to which you have logged on. The links for Home, My Profile, Change
Password and Logout are available on the title bar. The current date and time appear on the
status bar. The hyperlinks for Status and Task List appear.
There is a provision to collapse the tabbed menu and view full screen. Click the collapsible
vertical bar next to the tabs to hide the tabbed function menu and display only the current
function screen.
On the status bar, you can see the status message – “Categories Loaded”. This indicates
that all default categories created for the person are loaded in the application.
The dashboard in ACUS appears according to your user profile. The Main User has access to
the complete application and can perform all tasks in ACUS.
Uncontrolled when printed © RISCO Group 11
Page 13
ACUS Quick Start Guide
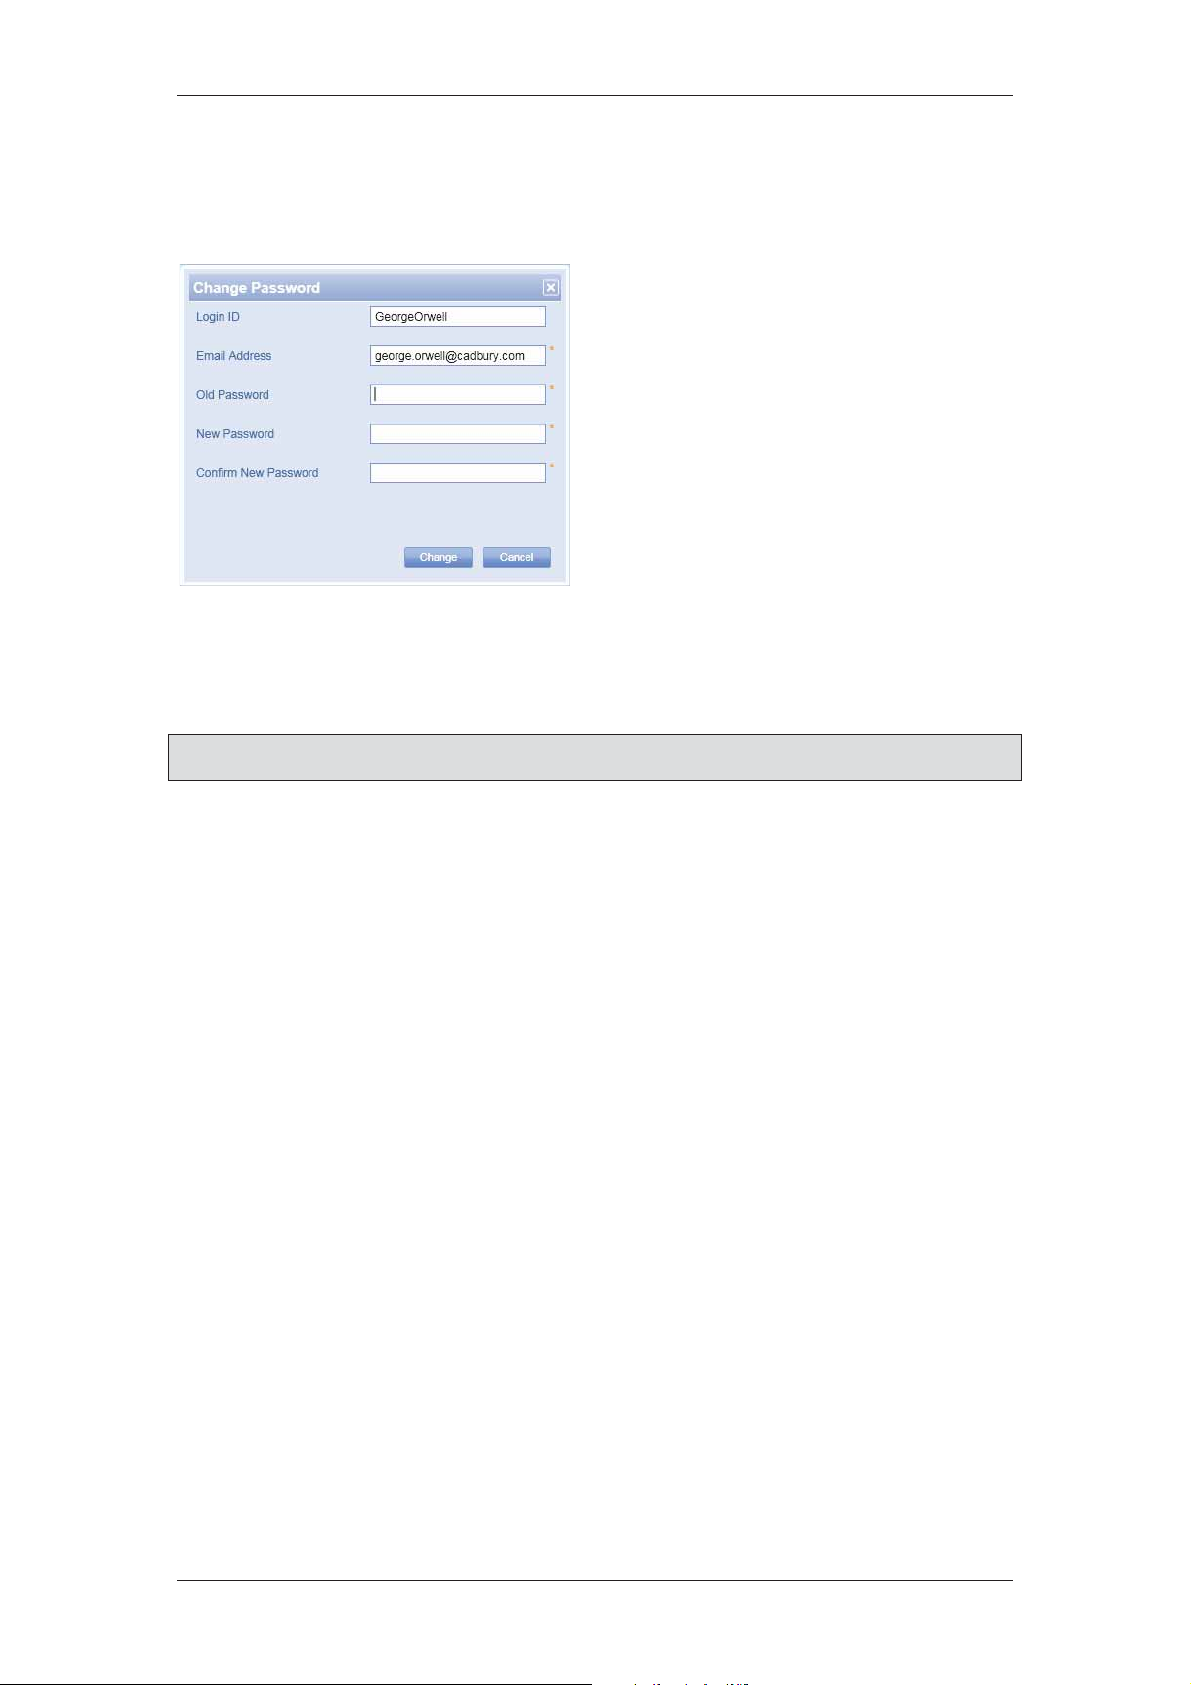
2.1.1 For the First Time User
If you are logging in for the first time, you will have to change your password after you first
successful logon. The Change Password dialog box appears after you click Login. The
Login ID and Email Address are displayed in the fields.
1. Enter the old password in the Old
Password field.
2. Enter the new password in the
New Password field.
3. Enter the new password again in
the Confirm New Password
field.
4. Click Change. The password is
changed. When you log on as a
main user for the first time to
ACUS, the Login Wizard appears.
Figure 4: Change Password
The Login Wizard is described in
section
3 Login Wizard in ACUS. For all
the other users, the ACUS home
page (as per the user profile)
appears.
Note: Click Cancel to close the Change Password dialog box and return to the ACUS home
page.
2.2 Log off from ACUS
1. Click Logout available on the top-right corner of the ACUS dashboard to log off
from ACUS.
Or
• On the menu bar, click File → click Logout. The Login window appears.
Or
• On the menu bar, click File → click Exit. The ACUS window is closed and you quit the
application.
Uncontrolled when printed © RISCO Group 12
Page 14
ACUS Quick Start Guide
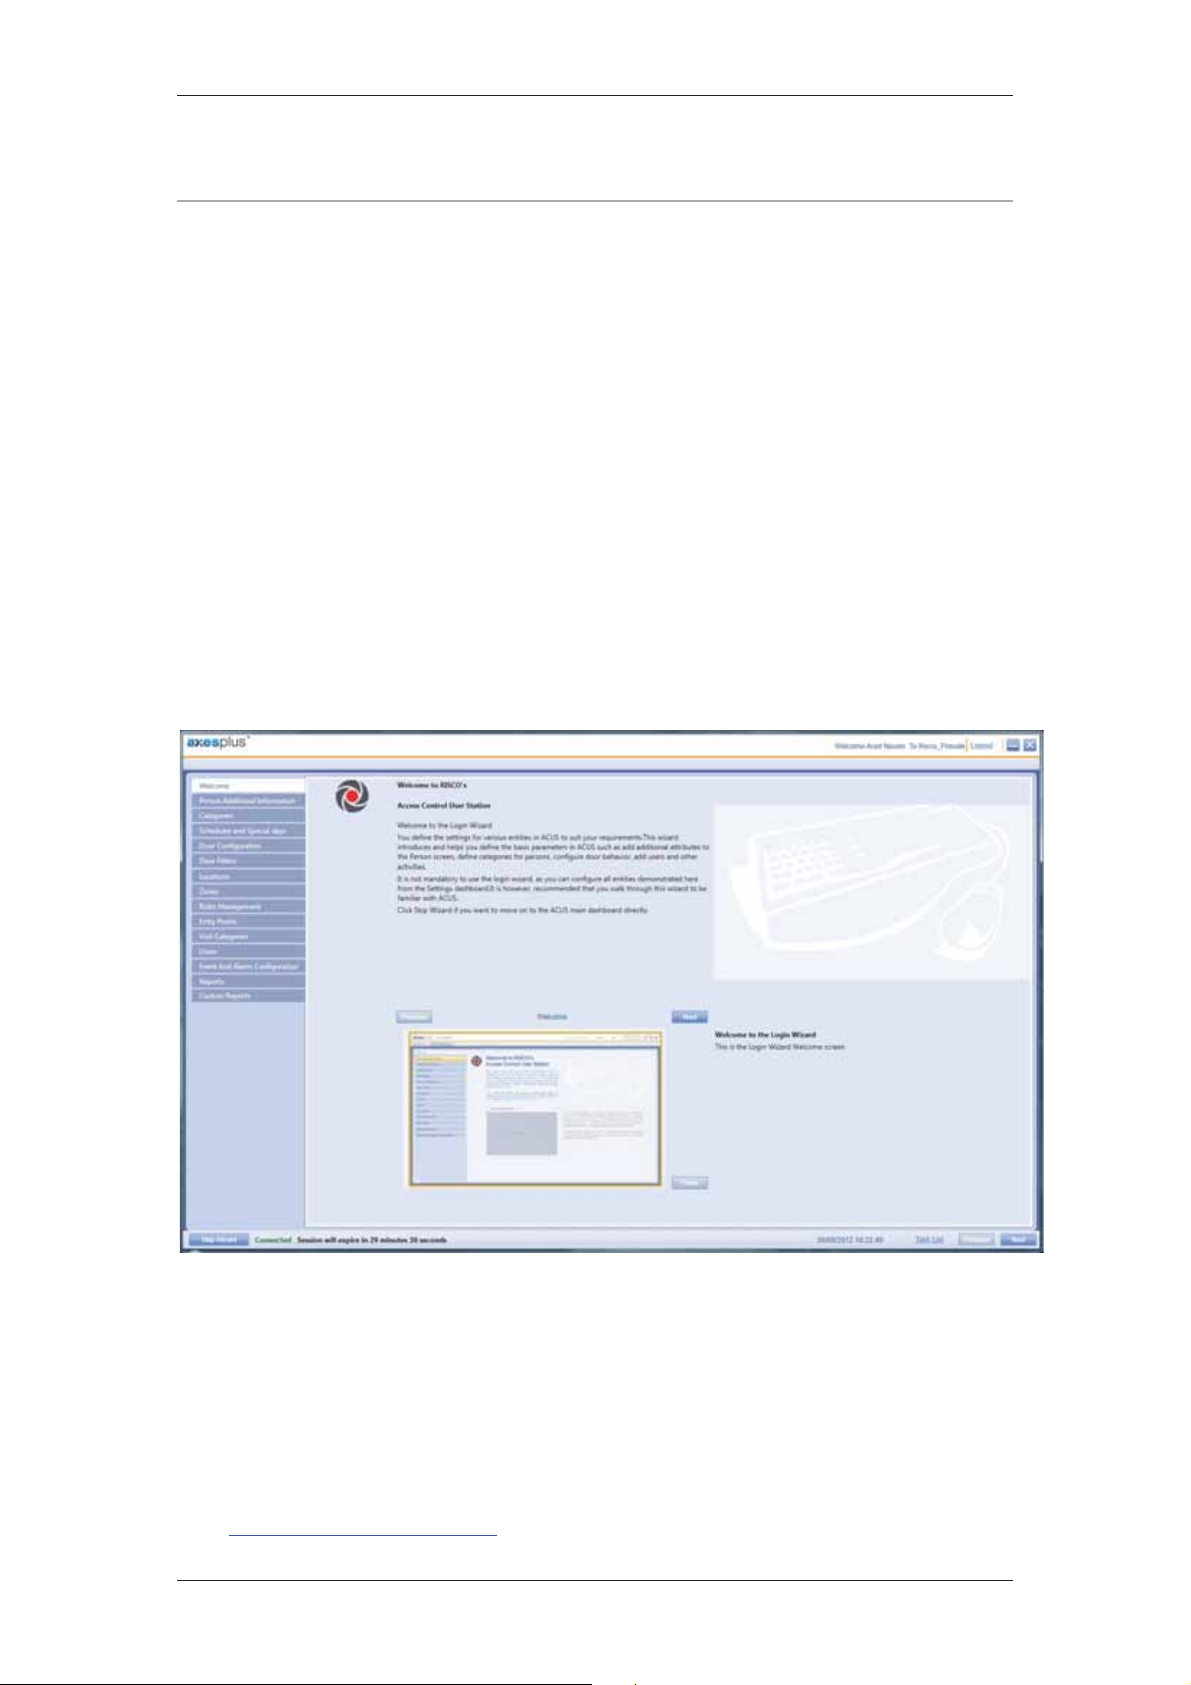
3 Quick Start in ACUS
When you log on to ACUS for the first time, the Logi
n Wizard appears to introduce you to the application and demonstrate the basic tasks that
you have to perform in ACUS. The Login Wizard allows you to define the basic parameters for
the particular section before moving to the main dashboard.
The wizard is displayed only if you are the Main User (default user) and have logged on to
ACUS for the first time.
It is not mandatory to use the Login Wizard, as you can configure all entities demonstrated
here from the Settings dashboard. It is however recommended that you initially walk through
this wizard to get familiar with ACUS. You may click Skip Wizard to move directly on to the
ACUS main dashboard.
To go to the Login Wizard:
• Logon to ACUS as a main user for the first time. The Login Wizard appears.
Or
• On the ACUS home page, click Settings → Tools → Login Wizard. The Login Wizard
appears.
Figure 5: Login Wizard
In the Login Wizard, the important tasks appear in the left-column. You can view and
understand the function of each of the menus that appear on the left. Click Next and
Previous to view the information. Click Zoom to zoom in the window. Use the tabs on the left
side of the screen to configure settings.
This guide includes quick start information about the following configuration tasks:
• 3.1 Person Additional Information
Uncontrolled when printed © RISCO Group 13
Page 15
ACUS Quick Start Guide
• 3.2 Manage Categories
• 3.3 Schedules and Special Days
• 3.4 Door Configurations
• 3.5 Door Filters
• 3.6 Locations
• 3.7 Zones
• 3.8 Rules
• 3.9 Entry Point
• 3.10 Visit Categories
• 3.11 Users
• 3.12 Event and Alarm Configuration
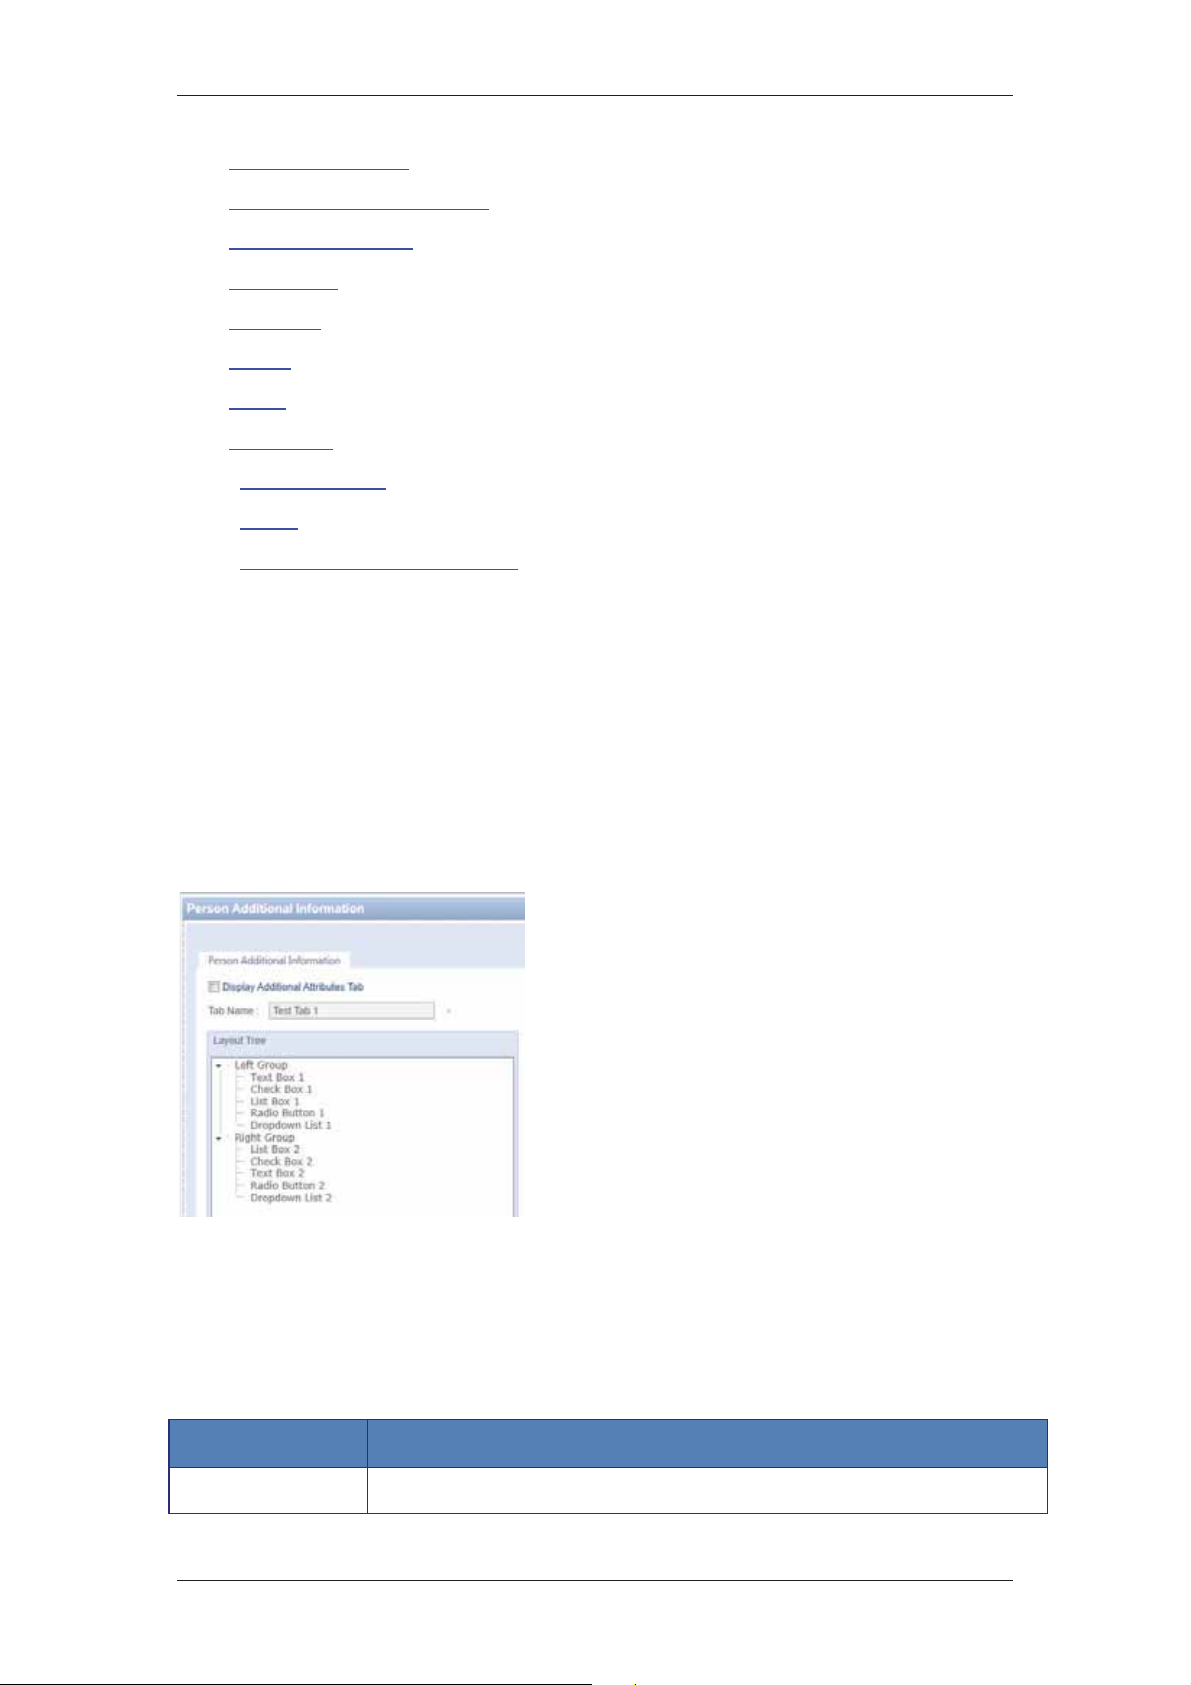
3.1 Person Additional Information
Personel working in the organization as well as those who visit the building are usually
refered to as Persons. You can add persons manually or import the person data into the
system. You can also assign cards and rules to a person. The assigned ID cards serve as
identification for each person in the system. For more details, visit the chapter Managing
Persons in the ACUS User Manual. The Person Additional Information tab allows you to
change and customize the way the Add Person dialog box appears in ACUS. You can add
additional attributes, rename, hide and delete existing attributes.
To customize person layout:
Figure 6: Person Layout Configuration
Table 1: Add Person Additional Information
Field Description/Action
1. On the Login Wizard Welcome page,
click Person Additional Information.
The Person Additional Information
dialog box appears.
2. Select Left Group and right-click and
select Add Additional Attribute. A New
Node is created under the Left Group. A
node having default attribute as Text box
gets created.
3. Select the Display Additional Attributes
Tab check box if you want to display it as
a new tab on the person screen.
4. Enter the name in the Tab Name field.
5. Enter the following details for the new
node in the Element Details area.
Label Enter the name of the attribute.
Uncontrolled when printed © RISCO Group 14
Page 16

ACUS Quick Start Guide
Field Description/Action
Field Type Select the field type from the drop-down list. You can either create a
check box, option button, text box, list box or drop-down list.
Type You can decide whether you want the field to be optional or mandatory.
Is Numeric Select this check box if you want the user to enter only a numeric value in
the field.
For example, if you select this check box and enter 123 in the particular
field on the Add Person dialog box, then the value will be considered as
one hundred and twenty-three.
Default Value You can enter any value that you want to be considered as default. When
the user enters the default value, ACUS will not accept the value and a
message to change the value will appear.
Include Valid
Character Range
Enable ID Scan
Feature
Enable Signature
Feature
Enable Biometric
Data Feature
Enter a character range for the new node. Enter the relevant data in the
minimum and maximum fields. User will not be able to enter any data
outside the range.
If you have selected the Is Numeric check box, you can specify the
number range for the new node.
Select this check box if you want to display this field on the person screen.
The user can select it to add the ID scan identification option while
creating the person.
This check box appears on the Cards and Authorizations tab in the
Add/Edit/Duplicate Person functionality.
Select this check box if you want to give the option to the user to use the
person’s signature for identification.
This check box appears on the Cards and Authorizations tab in the
Add/Edit/Duplicate Person functionality.
The biometric data such as thumbprint can be included for identification of
the person. If you select this check box, the user can add this as
identification criteria while creating a person.
This check box appears on the Cards and Authorizations tab in the
Add/Edit/Duplicate Person functionality.
6. Click Save. The message appears, “Person Additional Information updated
successfully”.
Note: You can only add an attribute under a group parent. For example, if you try to enter an
attribute under the Left group or Right Group, the system displays an error message,
“Additional attribute can be added only under group Parent”.
For more details on how to configure person layout, refer to the section, 5 Managing
Persons in the ACUS User Manual.
Uncontrolled when printed © RISCO Group 15
Page 17
ACUS Quick Start Guide
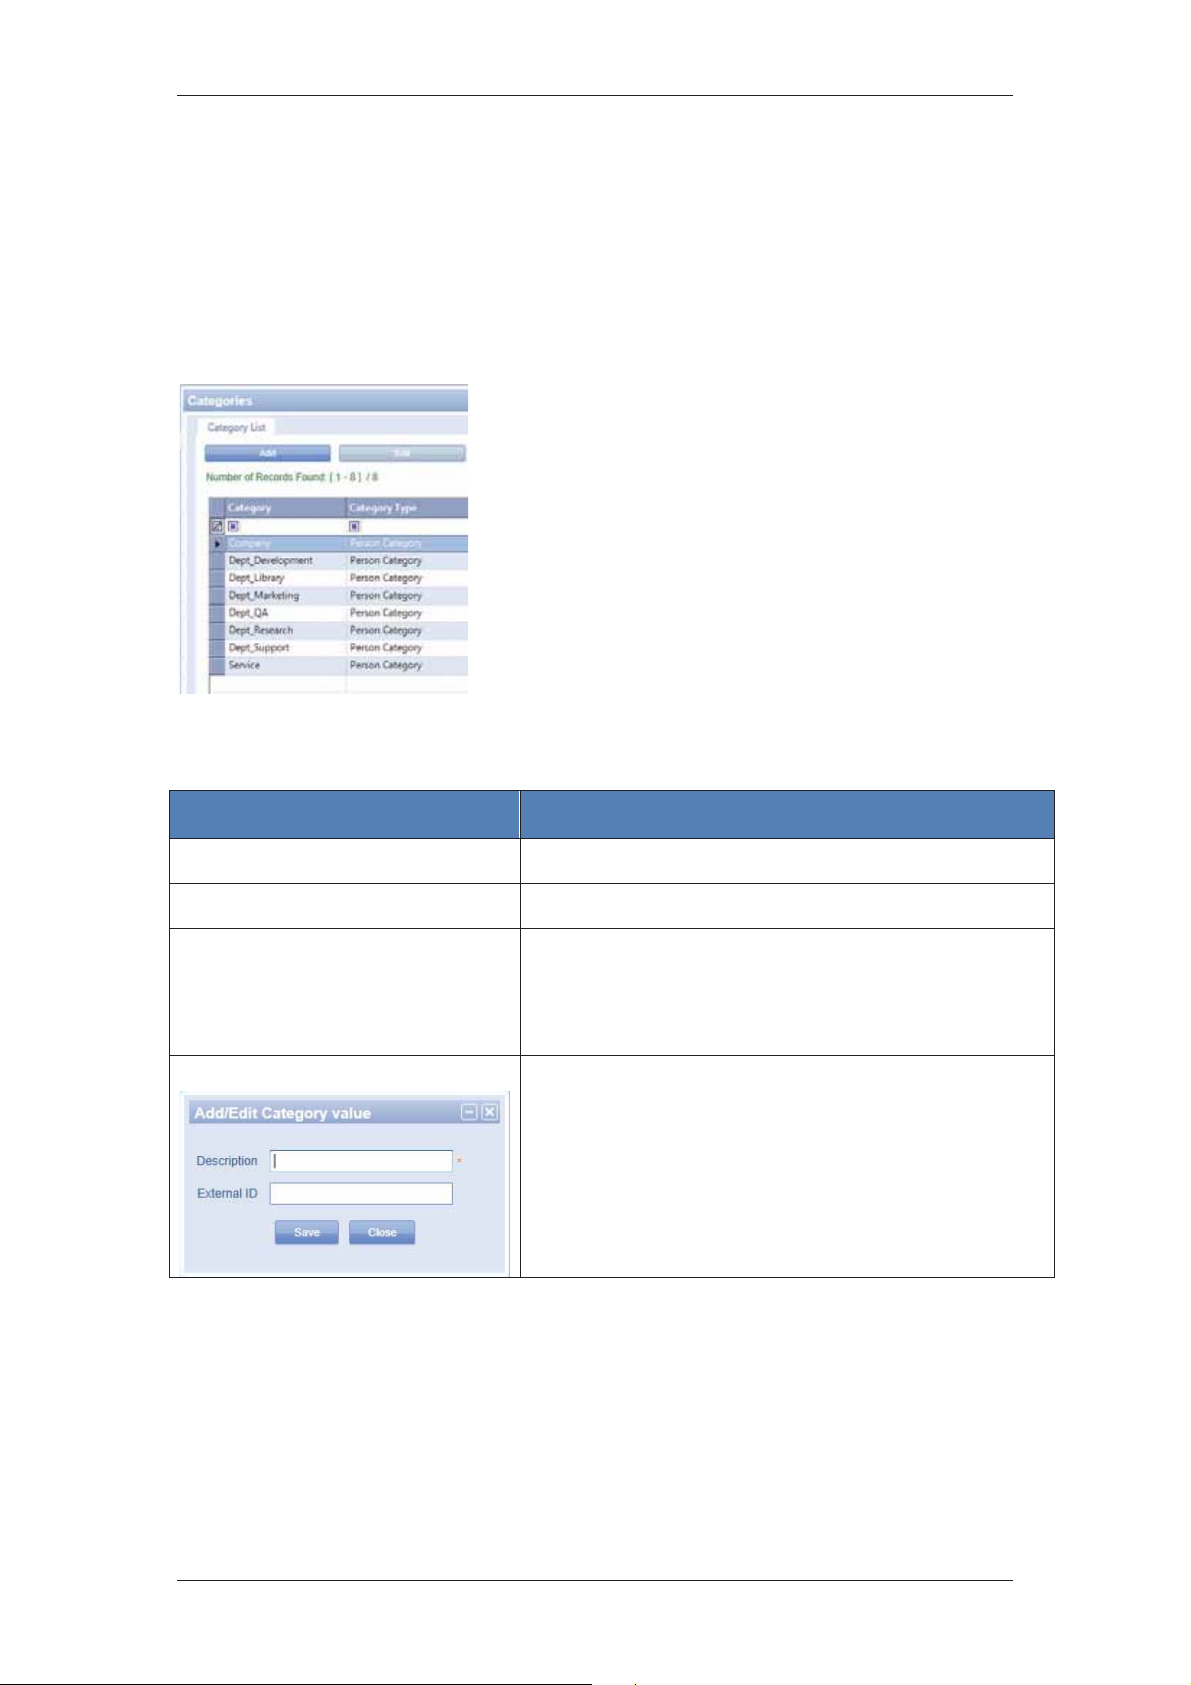
3.2 Manage Categories
Categories in ACUS are defined as groups. Each person in the sytem can be assigned to a
category. For example, there are categories defined for visitors. You need to identify the
category to which the visit that you are arranging belongs to. The Categories tab allows you to
define categories and assign them to persons. You can add, edit, duplicate and delete
categories.
To manage categories:
1. On the Login Wizard Welcome page, click
Categories. The Categories window appears.
2. Click Add. The New Category dialog box is
displayed. The Category List and New Category
tabs appear.
3. Enter the following details in the fields.
Figure 7: Define Categories
Table 2: Add Category
Field Name Description/ Procedure
Category Type
Name Enter the name of the category.
General Details
Add
Select Person from the category type drop-down list.
The general details of the category such as the name and
external ID are displayed in this list.
You can search for the categories using the search
criteria such as External ID and Name.
Click Add to add values in the category. If you have
added a new category as Industrial Structural Unit, then
add values in this category.
Enter the value name in the Description field.
Enter an external identification number in the External ID
field.
4. Click Save. The message appears, “Category created successfully”. The
category name appears in the Category List tab.
5. Click the Fixed Rule tab to assign rules to this category.
6. Click Add. The Add Person Fixed Rules dialog box appears. For details on how to
add rules to this category, refer to section 3.8 Rules Management .
7. Click the Persons tab to add persons to this category.
8. Click Add. The Add Person dialog box appears. For details on how to add
persons, refer to section 5 Managing Persons in the ACUS user Manual.
Uncontrolled when printed © RISCO Group 16
Page 18

ACUS Quick Start Guide
For more details on how to manage categories, refer to the Section, 5.12 Define Categories
in the ACUS User Manual.
3.3 Schedules and Special Days
Schedules in ACUS allow you to execute certain actions at a pre-configured time. You can
schedule some activities, which are predefined and occur frequently. There are two default
schedules in ACUS, ‘Always Open Schedule and ‘Always Closed Schedule. You can add,
edit, duplicate and delete schedules. ACUS also provides the capability to manage schedules
according to certain special days.
To manage schedules and special days:
1. On the Login Wizard Welcome page,
click Schedules and Special Days.
The Special Day dialog box appears.
The list of Schedules, Schedule Pattern
Type, Schedule Start Date and
Schedule End Date are displayed.
2. Click Add. The Add Schedule dialog
box appears.
3. In the Schedule Setting tab, enter the
following details on the screen.
Figure 8: Schedules and Special Days
Table 3: Add Schedule
Field Name Description/ Procedure
Schedule Name Enter the name of the schedule.
Private
Regular Day Schedule Select the check box to enable the regular day schedule.
Recurrence Pattern - Daily
Select this check box if you want to ensure that no other user
edits the schedule. If you are the main user, you can edit any
schedule.
Note: Even if it is marked as private, the private schedule can be
edited by the user who has created this user.
Uncontrolled when printed © RISCO Group 17
Page 19

ACUS Quick Start Guide
Field Name Description/ Procedure
If you click the Daily option button, you can refine further by
using criteria’s such as:
• Every Day: This includes all the days of the week. If you
click this option button, the schedule will be executed
everyday of the week
• Every Weekday: This includes Monday to Friday. This
excludes weekends. If you click this option button, the
schedule will be executed everyday from Monday to Friday.
• EveryDay(s): Enter the number of days that you want to
skip and perform the automation. For example, if you enter
1, this schedule will be executed every alternate day at the
given time slot.
Recurrence Pattern - Weekly
Recurrence Pattern - Monthly
If you click Weekly option button, you can refine further by the
criteria’s such as:
• Every Week: If you click this option button, you can execute
the schedule every week.
• Recur Every: You can specify the number of weeks after
which you want to execute the schedule. Enter the number
of week in the text box.
When you select the Weekly option button, the week day names
button are visible in the Schedule Time Slots area. You can
select the weekdays as per the schedule you want to apply.
Uncontrolled when printed © RISCO Group 18
Page 20

ACUS Quick Start Guide
Field Name Description/ Procedure
Recurrence Pattern - Yearly
If you click Monthly option button, you can refine further by the
criteria’s such as:
• Day of Every Month: Enter the particular date of the month
in which you want to execute automation. For example, you
can enter 12 of every 2 month, which means the automation
will be executed on the 12
th
day after every two months.
• The of every month: You can specify when you want to
execute automation using the First, Second, Third, Fourth
and Last option from one drop-down list and select the day
(from Monday to Sunday). You can further classify the
month using the Of Every Month text box. For example, you
can enter First Sunday of every 2 month which means that
the automation will be executed on the First Sunday after
every two months.
• Day of Every Month: Enter the day on which you want to
execute automation. The automation will be executed on the
particular day every month.
• Every Of Every Month: It is similar to The of every
month, instead of every alternate months, the automation
will be executed on the specified date, each month.
If you click Yearly option button, you can refine further by the
criteria’s such as:
• Every: Select the month from the drop-down list when you
want to execute automation. Enter the date of the selected
month on which you want to execute automation.
• TheOf: This is similar to the monthly selection. In Addition
you can specify the month too. For example, if you select
The Last Friday of March, the automation will be executed
on the last Friday of each March.
Schedule Time Slots
After you select the Recurrence pattern, select the Start time
and End time from the Schedule Time Slots section. You can
add up to 12 time slots for each schedule.
Click
to add more slots.
Special Day Schedule Select the check box to enable a schedule based on special
days.
Uncontrolled when printed © RISCO Group 19
Page 21

Field Name Description/ Procedure
Range of occurrence
ACUS Quick Start Guide
Start
No End Date Click No End Date option button if you do not want the schedule
End By
Translation Refer to section, 5 Managing Persons in the ACUS User
4. Click Save. The message appears, “Schedule created successfully”.
The schedule is saved. After the schedule is saved, the Fixed Rules, Custom Rules and
Graph tabs appear. There is no data in these tabs as you have just created a schedule and
there is no rule assigned to it. For details on how to assign rules and select a schedule, refer
to section
7 Configuring Doors in the ACUS User Manual.
For more details on how to define schedules and add special day groups, refer to the section,
11 Managing Schedules and Special Days in the ACUS User Manual.
Select the Start Date from the calendar.
Select the time when you want the automation to be executed
to expire.
Click End By option button if you want the schedule to be
expired on a particular day.
Select the Date and Time when the schedule has to be expired
from the drop-down lists.
Manual for details on how to translate the terms.
Uncontrolled when printed © RISCO Group 20
Page 22

ACUS Quick Start Guide
3.4 Door Configurations
A Door in ACUS represents a physical barrier blocking the entry and/or exit to a specific area.
It can be a door, a gate, a barricade, and turnstile. It can also be controlled electronically by
the system. Doors are created when the installer registers devices and creates sections using
the Access Control Installer Station (ACIS). For more details on how to create and assign
doors, refer to the ACIS User Manual.
In ACUS, you configure door settings in any particular section as per your requirement. The
Door Configuration function allows you to configure multiple doors at the same time as well as
assign schedules to Doors. You can only configure Door Settings; it is not possible to delete
doors from ACUS.
To configure doors:
On the Login Wizard Welcome page, click Door
Configuration. The Door Configurations dialog box
appears.
1. To search doors, enter the search criteria in the
Door Name text box and click
The door names matching the specified criteria
appear.
Note: Click the Zones tab and search doors according to
Figure 9: Door Configuration
2. Select the check boxes against the door names which you want to configure and
click
3. Select the PIN Code schedule that will be assigned to the doors from the PIN Code
Schedule drop-down list.
4. Select the Anti-Passback Schedule check box to enable anti-pass-back and
select a schedule from the schedule list.
5. Select the door open schedule from the Door Open Schedule drop-down list.
6. Select the door request to exit schedule from the RTX Schedule drop-down list.
7. Select the door request to enter schedule from the RTE Schedule drop-down list.
8. Click Save. The message appears, “Door updated successfully”.
to move the doors to the Selection area.
the Zones. This allows you to configure all the
doors in a particular zone at the same time.
Similarly, click the Locations tab to view all the
doors in a particular location. You may configure
the doors together.
(Search).
For more details on how to configure doors, refer to the section, 7 Configuring Doors in the
ACUS User Manual.
3.5 Door Filters
Door filters are used to restrict certain users from seeing unauthorized doors. The Door Filter
tab allows you to add filters for doors. Door filters return valid doors only. You may add
various criteria in the filter for restricting further.
To search door filter:
Uncontrolled when printed © RISCO Group 21
Page 23

1. On the Login Wizard Welcome page, click Door
Filter. The Door Filters dialog box appears.
2. Select the search category from the Search dropdown list and enter the criteria in the adjacent field.
For example, select Door Filter and enter “New”.
3. Click Search. The Door Filters matching the specified
criteria appear under the Door Filter in the left area of
Figure 10: Filter
the dialog box.
You may duplicate or delete filter from here. You can click
type of filters.
To add a door filter:
1. On the Login Wizard Welcome page, click Door
Filter. The Door Filters dialog box appears.
2. Click Add.
ACUS Quick Start Guide
to view the filters under each
3. Select Door Filter from the Filter Type drop-down
list.
4. Enter the door filter name in the Name field.
Figure 11: Add Door Filter
5. Select the Private check box to mark this filter
private. No other user apart from you will be able to
edit or delete this filter if it is marked private. Other
users will be able to view the filter only.
Note: Even if it is marked as private, the private filter can be edited by the user who has
created the current logged on user.
The criteria area allows you to add more conditions to the filters. You can maximum 12
criteria’s to any filter. To add criteria’s to the filter:
6. Select the property from the Property
list. For door filter, the properties
available are:
7. Click
to select the required
property from the list. For example,
select Alarm Status.
8. Click to select the operator.
Select =.
Figure 12: List of Properties for Door Filter
9. Click
to select the operand from
the list. The available options are
displayed in the following figure.
10. Select Forced from the list.
11. Click Add Criteria to add another criterion. The following figure
Figure 13: Door Filter Operand
appears.
Uncontrolled when printed © RISCO Group 22
Page 24

Figure 14: Add another Criteria
13. Click to select new property. Select Crisis Level.
ACUS Quick Start Guide
12. Select AND or OR to
consider this criteria
along or separate with
the earlier criteria.
14. Click
15. Click
Figure 15: Crisis Level Selection
Figure 16: New Criteria Added
to select new operator. Select Include Any.
The Selection dialog box appears.
16. Select the check boxes
against the crisis levels that
you require and move it to
the adjacent box.
17. Click OK. The selected
options are added to the
field.
18. Click Save. The message
appears, “Door Filter created
successfully”.
19. Once the filter is created,
click Show Results. The
results matching the
criteria’s added above to the
filter appear. For example, if
you have added the criteria
as Alarm Status = Forced or
Crisis Level as 4 and 5, then
the dialog box displays the
door names of the doors
which were forcibly opened
or were in Crisis Level 4 or
5.
Uncontrolled when printed © RISCO Group 23
Page 25

ACUS Quick Start Guide
20. Click Close to close the window.
Note: You may add up to 12 criteria’s for each filter.
Click to delete the criteria’s.
Figure 17: Show Result
For more details on how to filter doors, refer to the section, 19 Managing Filters in ACUS in
the ACUS User Manual.
3.6 Locations
A Loctaion in ACUS can be a country, state, company, department, floor or office. Whenever
an installer installs the access control system and creates a location, a main location is
automatically created. You can add sub-locations to this main location; however you cannot
delete this main location. You can delete, rename and add child locations to each of the other
locations. You can also drag and drop child locations to other locations, but you cannot move
the main location. Whenever you add a location in any other task, the location tree view
appears.
To add a new location:
1. On the Login Wizard Welcome page, click
Locations. The Locations dialog box appears.
2. Right-click the Loc_main_Section. You can add
child location, rename and delete the location.
Figure 18: Locations
3. Right-click and click Add Child. The location dialog
box appears.
Figure 19: Add a Child Location
Uncontrolled when printed © RISCO Group 24
Page 26

ACUS Quick Start Guide
4. Enter the name of the location that you want. For
example, enter France.
5. Click Save. The location is saved and the message
Figure 20: Add New Node
Note: You can drag and drop the location from the other
6. Click Translation. The Translation dialog box appears. You may add the
translations for the locations here. For more details on how to translate the terms,
refer to the section, 5 Managing Persons in the ACUS User Manual.
For more details on how to add locations, refer to the section, 6 Adding Locations in the
ACUS User Manual.
appears, “Location updated successfully”. The
new location is created under the <Main_Location>.
groups in the new location.
3.7 Zones
A Zone in ACUS is a physically controlled area in a section. A section is an area that divides
the account into logical configurable units. Each section can be divided into multiple zones.
These zones have doors which can be shared between two zones. The Zone tab allows you
to add, edit, delete and duplicate zones. You can also add a schedule to an existing zone.
To add a zone:
Figure 21: Zone List
1. On the Login Wizard Welcome page, click
Zones. The Zones dialog box appears.
2. Click Add. The Add Zone dialog box appears.
3. Enter the name of
the zone in the
Zone Name field.
4. In the General
Details tab, enter
the maximum
number of persons
that can access this
zone. For example,
if you enter 50 in
this field, then only
50 people can get
access to this zone.
Figure 22: Add Zone
Uncontrolled when printed © RISCO Group 25
Page 27

ACUS Quick Start Guide
5. Select the Block Zone if Maximum Reached check box to block the zone when
the maximum limit of persons accessing the zone is reached. For example, if you
have allowed access to only 50 persons in this zone, the zone will be blocked and
the door will not open, the moment 51st person tries to enter the zone using a card.
6. Select the schedule which you want to apply to the threshold events of this zone.
To select from the existing schedules use the Schedule to activate threshold
events drop-down list.
Note: You may click Add Schedule to add a new schedule. The Add New Schedule dialog
box appears. For details on how to add a schedule, refer to section 11 Managing
Schedules and Special Days in the ACUS User Manual.
The Event 1, Event 2 and Event 3 areas enable you to create conditions which will generate
events from ACUS.
7. In the Threshold Event 1 area, enter the minimum number of persons that you
want to enter in this zone in the Minimum1 field.
8. In the Threshold Event 1 area, enter the maximum number of persons that you
want to enter in this zone in the Maximum1 field. For example, if the maximum
number of persons in the zone is 15, enter 5 in the minimum 1 field and 15 in the
Maximum field.
Whenever less than 5 persons or more than 15 persons will enter the zone, an event will be
generated. You can configure up to three events for a zone.
9. Click the Category tab. The following figure
appears.
Note: The Category tab is only enabled if in General
Configuration dialog box, (Settings > Configurations >
General Configuration) you have selected the Count
Person Per Category check box and selected the
category from the Zone Category drop-down list.
Figure 23: Category
In the Category tab, the category values selected for the zone count from general
configuration are displayed. For example, in the General Configuration dialog box, if you
select Count Person Per Category check box and select the Zone Category as Service, then
the values of the category Service are displayed here. In this tab, you can indicate the zone
count for each category. For example, if you select the category Admin, and enter 4 in the
Maximum Persons column, then only four persons from the category Admin will be allowed
access to the zone. To enable the zone count function:
10. Select the check box against the categories for which you want to apply this
condition.
11. Enter the number of people allowed to access this zone in the Maximum Persons
column.
12. Select the Block Zone If Maximum Reached check box to ensure that once the
maximum number of persons specified for this category is in the zone, access for
the next person in the same category is blocked.
13. Click Save. The message appears, “Zone created successfully”. The zone name
is added to the list and displayed on the Zone List screen.
Uncontrolled when printed © RISCO Group 26
Page 28

ACUS Quick Start Guide
For more details on how to configure zones, refer to section, 7 Configuring Doors in the
ACUS User Manual.
3.8 Rules Management
Rules in ACUS are conditions that decide the access provided or revoked for persons or
categories. You can define Person categories to which Access Rules will be assigned. You
can create rules for Persons based on categories, location, zones and doors. Using rules, you
can define the access control pattern across doors and zones. You can also assign schedules
to these rules, to decide when and how the access will be provided.
Rules Management helps you to create, edit and delete different types of Rules. There are six
types of rules. Each screen has search facility. In addition, user can print the grid data. On
clicking Print, default configured printer will be detected and will print the grid data.
There are two types of rules that can be added for Persons or Visitors in this section:
• Fixed Rules: Fixed rules are assigned to multiple persons or visitors in the section.
• Custom Rules: Custom rules are customized and added only for an individual. You
can copy the rule and apply the rule to multiple persons/visitors.
You can also search for rules in cases where the required rule already exists.
To search rules:
1. On the Login Wizard Welcome page, click
Rules Management. The Rules Management
dialog box appears.
2. Select the search criteria from the Search
drop-down list and enter the relevant data in
the adjacent field. For example, select Rule
Name and enter rule name in the field.
3. Click
search criteria appear.
Figure 24: Search Person Fixed Rules
To add person fixed rule:
1. On the Login Wizard Welcome page, click
Rules Management. The Rules Management
dialog box appears. There are six tabs. By
default, the Persons Fixed Rules tab is
displayed.
(Search). The results matching the
2. Click Add. The Add Persons Fixed Rule
dialog appears.
Figure 25: Rules Management
Uncontrolled when printed © RISCO Group 27
Page 29

ACUS Quick Start Guide
3. Enter the name of the rule in the Rule Name
field. This is a mandatory field.
Who this Rule Applies to – Here you will be able to
define which persons the rule applies. To define rule you
can also select from Category / Location / Filters.
1. In the Who this Rule Applies to tab, under the
Persons tab, click the Search Persons option
button.
Note: It is mandatory to select the Persons to whom this
rule will be applied.
Figure 26: Add Persons Fixed Rules
2. Enter the search criteria in the adjacent text box and click (Search). The list of
Person Names matching the search criteria appear.
3. Select the check boxes against the persons whom you want to apply this rule and
click
to move the selected persons in the adjacent field.
Note: Click to move all persons appearing in the search results to the selection list box.
Click to move all the items (person names, here) back to the Persons tab.
4. Click Can option button to ensure that selected persons get access to the section
by this rule.
Or
5. Click Cannot option button if you want to restrict access to the selected persons to
access the section by this rule.
Note: Click All Persons to apply this rule to all persons in this section. When you click all
persons, the Categories, Location and Filter tabs are disabled.
To add rule for persons based on categories:
1. Click the Categories tab.
2. Enter the search criteria in the Search field and click
(Search). The list of categories matching the
search criteria appear.
3. Select the check box against the category value that
you want to apply this rule to and click
to move
the selected persons in the adjacent field.
4. Click Can option button to ensure that selected
Figure 27: Who this Rule Applies To – Categories
persons can access the section.
Or
Uncontrolled when printed © RISCO Group 28
Page 30

ACUS Quick Start Guide
5. Click Cannot option button if you do not want the selected persons to access the
section.
Note: Selecting the Can or Cannot option button determines if you can access the doors,
zones and locations specified in the Where and When tab.
To add rule for persons belonging to a locations:
1. Click the Locations tab.
2. Enter the search criteria in the Search field and
click
(Search). The location tree appears.
The location matching the search criteria is
available under the tree.
3. Expand the tree to select the location. Select the
check box against the location. The rule will be
applied to the persons in this location.
4. Move the preferred location to the adjacent area.
Figure 28: Who this Rule Applies To – Location
Note: When you select the check box against any location, you can click Ascendants to
mark all the locations above the selected location. Click Descendants to mark all the
locations below the selected location. Select the Mark All check box if you want to
mark all locations.
To add rule for persons based on filters:
1. Click the Filters tab.
2. Enter the search criteria
in the Search field and
click
(Search). The
person filters matching
the search criteria
appear.
3. Select the check boxes
against the filters and
click
to move them
in the adjacent field.
Figure 29: Who this Rule Applies To – Filters
Where and When - Here you can define to which Doors the Rule applies. You can Select
between the following options Doors, Zones, Locations or Filters from the Where section.
Followed by the When section that describes when this Rule is to be applied.
Uncontrolled when printed © RISCO Group 29
Page 31

ACUS Quick Start Guide
1. Click the Where and When tab.
2. In the Doors tab, click the Search option button.
3. Enter the search criteria to search doors in the
text box and click
(Search). The doors
matching the search criteria appear.
4. Select the doors to which you want to apply this
rule and click
to move them in the Selection
list box.
Figure 30: Where and When – Doors
5. Click Enter if you want the persons to only enter through this door.
6. Click Exit if you want the persons to only exit through this door.
7. Click Both for the persons to enter and exit the selected doors.
Note: If you select All Doors option, then all tabs (that is Zones, Locations, and Filters) will
be disabled.
8. Select the schedule to
be applied to the rule
from the Schedule dropdown list. You can add a
new schedule and edit
the existing schedules
too.
9. Click Add Schedule.
The Define Schedule
dialog box appears. For
details on how to add a
schedule, refer to
section 11 Managing
Schedules and Special
Days in the ACUS User
Manual.
Figure 31: Doors
10. Click Manage Schedule. The Edit Schedule dialog box appears. You can edit the
selected schedule from here. For details on how to edit a schedule, refer to section
11 Managing Schedules and Special Days in the ACUS User Manual.
Uncontrolled when printed © RISCO Group 30
Page 32

To add rule based on zones:
ACUS Quick Start Guide
1. Click the Zones tab.
2. Enter the search criteria in the Search field and click
(Search). The zones matching the search
criteria appear.
3. Select the check boxes against the zone names that
Figure 32: Where and When – Zones
To add rule based on locations:
you want to select and click
to move them in the
adjacent field.
4. The schedule is already selected. You can select
another schedule on which this rule will be added.
For details on how to add or manage schedule, refer
to section 11 Managing Schedules and Special
Days in the ACUS User Manual.
1. Click the Locations tab.
2. Enter the search criteria in the Search field and click
(Search). The location tree appears. The
location matching the search criteria is available
under the tree.
3. Expand the tree to select the location. Select the
check box against the location.
4. Move the preferred location to the adjacent area.
5. The schedule is already selected. You can select
another schedule on which this rule will be added.
For details on how to add or manage schedule, refer
to section 11 Managing Schedules and Special
Days in the ACUS User Manual.
Figure 33: Where and When – Locations
To add rule based on filters:
1. Click the Filters tab.
2. Enter the search criteria in the Search field and click
(Search). The filters matching the search criteria
appear.
3. Select the check boxes against the Filters that you
want to apply a rule on and click
to move them
in the adjacent field.
Figure 34: Where and When – Filters
To apply the Rule:
Uncontrolled when printed © RISCO Group 31
Page 33

Figure 35: How to Assign Rule
Table 4: Assign Rules
Name Default Enabled / Value Description
ACUS Quick Start Guide
1. Click the How
tab.
2. Enter the
following
details on the
screen.
Crisis Level Default crisis level is 1 Numbers of Crisis Levels check boxes are
displayed dynamically according to the
number of crisis levels defined in the General
Settings, Configuration.
Select the required Crisis Level. If crisis level
is not used, then it is disabled.
APB Enabled Not Enabled Select this check box to enable Anti-Pass-
Back for this Rule.
PIN Required Not Enabled When you select it, it applies that a Pin is
required for a Person to access.
Command to
execute
No Command Select a value from the drop-down. Values
provided are:
Bypass Conditional Sensor
Pulse Realy2
Pulse Relay3
Pulse Relay4
Activate Relay2
Activate Relay3
Activate Relay4
Uncontrolled when printed © RISCO Group 32
Page 34

ACUS Quick Start Guide
Name Default Enabled / Value Description
Escort Required Not Enabled This provides information for escorting.
combo box includes values as:
• Requires Escort
• Can only Escort
• Can Escort + Alone
The combo box will only be displayed when
user selects the Escort required check box.
Note: If you have not selected this check
box, then the Person need not escort the
visitor.
Key Pad
Commands
No Commands selected You can select any of the following to enable
keypad number for:
(0#) Normal Operation
(1#) FAI (free access inhibited)
(2#) FAF (free access forced)
(3#x) Execute Automation Keypad Number x
Here, X is the keypad number of the
Automation.
(4#) Turn Relay 4 ON
(5#) Turn Relay 4 OFF
(6#) Pulse ON Relay 2
(7#) Pulse ON Relay 3
(8#) Pulse ON Relay 4
Note: If you have selected the Cannot option button, then the How tab will only have Crisis
Level check boxes.
3. Click Save. The message appears, “Rule created successfully”.
Note: Click Cancel to close this window and return to the Rules Management window. You
can click Restore Default to restore the default settings for this rule.
For more details on how to manage rules, refer to section, 8 Managing Rules in the ACUS
User Manual.
Uncontrolled when printed © RISCO Group 33
Page 35

ACUS Quick Start Guide
3.9 Entry Points
Entry Points in ACUS are physical places from where a visitor will enter the premises. This
can be the meeting place for the person who will escort the visitor inside the section. The
Entry Points tab allows you to add a Visit in ACUS. Whenever you add a Visit, you are asked
to specify an Entry Point where the visitor will come/report.
To add an entry point:
1. Click Entry Point in the Login Wizard. The Entry
Point screen appears.
2. Select the Locations from the list and move them
to the adjacent area.
3. You can select the Mark All check box if you want
the entry point to have all the location.
4. Click Save. The system displays a message,
“Visitor Entry points updated successfully”.
When you add a visit from the Office dashboard,
you get the list of options selected for the Entry
Point.
Figure 36: Entry Point
3.10 Visit Categories
Visits Catergories in ACUS are specifically defined in for visitors. You need to identify the
category to which the visit that you are arranging belongs to. While adding a visit, you have to
select Visit Type and Visit Categories. You can also add more values in the list here.
1. On the Login Wizard Welcome page, click Visit Categories. The Visit
Categories dialog box appears.
Figure 37: Visit Categories
2. Click + Add Type Value. One new row for the type appears.
3. Enter the description of the Type in the Description field.
4. Click Save. The system displays a message, “Layout updated successfully”.
Uncontrolled when printed © RISCO Group 34
Page 36

ACUS Quick Start Guide
To add a Category:
• Click + Add Category Value. A new row appears.
• Enter the description of the category in the Description field.
• Click Save. The system displays a message, “Layout updated successfully”
Note: You can delete Visit Type and Visit Category by clicking (Delete). You may click
Translation to translate the types and category values in any language of your
selection. For more details on how to translate, refer to section, 5 Managing Persons
in the ACUS User Manual.
3.11 Users
A User in ACUS is a customer hired employee who uses the ACUS application using the AC
user station. Alarms and events can be reported to the user by the ACUS or via e-mail and
SMS. You can create new ACUS users and assign roles to them using this tab. There are
three types of user roles in ACUS namely, Receptionist, Security Guard and Security
Manager.
The ACUS home page appears according to the user profile of the logged on user. The Main
User creates other users and modifies the profile according to the requirement of the
organization. For example, as a Main User, you can provide access to the Receptionist to
both ‘Office’ and ‘Security’ tabs if the receptionist waits in the office till midnight and has to
manage security related activities.
You can also click
To add users:
Figure 38: Add User
(Print) to print the user list.
1. On the Login Wizard Welcome
page, click Users. The User List
dialog box appears.
2. Click Add. The Add User dialog
box appears.
3. Enter the name of the new user
in the name field.
4. Select the language from the
Language drop-down list.
5. Select the role of the user from
the Role drop-down list. The roles
available are Manager, Security
Officer, Receptionist, and
Guard.
6. Click Select Profile to select the
user profile. The Select Profile
dialog box appears.
Uncontrolled when printed © RISCO Group 35
Page 37

ACUS Quick Start Guide
7. Select the profile that you want to assign to this
user and click Select. The profile name
appears in the Profile field.
Note: The list of profiles appears as per the role selected
for the user. For example, if you select Manager or
Security Officer from Role drop-down list, then the
list of profiles will differ.
Note: If you want to change or edit the user profile, click
Edit Profile. The User Profile window appears. For
details on how to edit user profile, refer to 18
Managing ACUS Users and User Roles in the
ACUS User Manual.
Figure 39: Select Profile
8. Select the Audit Trailing check box if you
want to enable the audit function. When you
select this check box, all the changes that you
make to any entity in Users is recorded and
presented in a log.
In the Contact Details area, you can select the communication medium through which you
want to mark the user for notifying events.
9. Select the MarkForNotification check box if you want to ensure that the user’s
contact details appear in the list when someone clicks the Call Security Officer,
Call Guard, or Call Receptionist buttons on the dashboard.
10. Select the phone type from the Device Type drop-down list. For example, select
Office.
11. Enter the Office Phone Number in the adjacent field. You can provide maximum
three contact numbers that is Cell Phone, Office Number and Home contact
number.
12. Enter the email address of the user.
13. Click the Login Information tab.
14. Enter the login name that the user
will use to logon to ACUS. Do not
add any spaces in the Login Name
of the user.
15. Select the Login Enabled check
box to enable logging to ACUS.
16. Select the login schedule from the
Figure 40: Login Information
Login Schedule drop-down list.
17. Select the Password Always Active check box. The password for this user will
never expire.
18. In the Authentication Details area, click the authentication type such as
Database, LDAP or OTP from the options. Authentication type indicates the
Authentication used by ACUS to verify the user. If you click the OTP option button,
you have to provide the device number.
Uncontrolled when printed © RISCO Group 36
Page 38

ACUS Quick Start Guide
Note: For more details on Authentication Methods, refer to the Appendix C Glossary.
19. Click the Filter tab. You can
apply filter for Location, Door,
Event, Alarm, Person and
Zone.
20. Select the Apply this filter for
Automation, Door, Event,
Alarm, Person check box.
21. Enter the following details on
the screen.
Figure 41: Apply Filter for User
Table 5: Apply Filter
Field Name Description/Action
Mark All
Select the Mark All check box if you want to select all locations and
move to the adjacent area. All locations are selected. Click
to
move the locations to the adjacent field.
You can select any location that you want from the available list.
You can also select Mark All to select all locations. This ensures that
the user can view all locations.
Select any location node and click Ascendants to select all the
ascending locations above the selected location.
Select any location node and click Descendents to select all the
ascending locations above the selected location
22. Select the Apply this filter for Persons, Events check box to apply categories.
The user can view and edit only those categories.
Uncontrolled when printed © RISCO Group 37
Page 39

ACUS Quick Start Guide
23. Click (Search). The list of
categories in the section is
displayed. You may select the
Mark All Search Result to make
all categories in the list for the
user.
24. Select the check boxes against
Figure 42: Category Selection for Users
Figure 43: Advanced Filters
the categories and click
move to the adjacent area.
to
25. Click Advanced to apply filters to
the user. The Advanced Filters
dialog box appears. You may
apply filter for Person, Alarms,
Events, Doors, Zones and
Automations.
26. Select the check box against the filter options as
per your requirements and select the appropriate
filter from the drop-down list.
27. Click OK. The filters are applied.
28. Click the Sections tab. The following tab appears.
29. Enter the search criteria and click
(Search). The results matching the specified
criteria appear in the Sections area.
30. Select the section that you want the user to
be able to access and move to the Selected
Sections area. You may select the Selected
Sections check box to select all the sections
present in that area.
Figure 44: Sections for New User
31. Select the check boxes against the sections
and click Save.
The system displays a message. The Login ID and
password for using ACUS are displayed. Ensure
that you inform the user.
Figure 45: New User Created
32. Click Ok. A new user is created.
For more details on how to add users and customize roles, refer to section, 18 Managing
ACUS Users and User Roles in the ACUS User Manual.
Uncontrolled when printed © RISCO Group 38
Page 40

ACUS Quick Start Guide
3.12 Event and Alarm Configuration
Events in ACUS are notifications that the system receives from the firmware whenever the
actions take place. For example, you can configure in ACUS that an event should be
generated every time someone forcibly opens a door. After configuring the Persons, Doors,
and Rules, you can view events for the situations that you selected. All Events and Alarms
are configured through this screen. You can also define the system response, in case of any
event.
Event Category includes the following type of Events:
• Door Event
• Sensors Event
• Zone Event
• System Event
• Person Card Event
You may add, edit and delete the event configurations.
To add events:
1. On the Login Wizard Welcome page, click Event and
Alarm Configuration. The Events and Alarms
Configuration screen appears.
2. Click Add. The Events tab is enabled.
Figure 46: Events and Alarms Configuration
Uncontrolled when printed © RISCO Group 39
Page 41

Figure 47: Add Events
ACUS Quick Start Guide
3. The default event
name appears in the
Event Behavior field.
Enter the name of the
event for which you
want to configure
settings as per your
requirement.
4. Select the event
category name from
the Event Category
drop-down list. The
event categories are
Door, Sensors, Zone,
System and Person
Card events. Based
on the event category
selected, the Event
Types will be
generated.
5. Select the event type from the Event Type drop-down list. The default events for
each category are reflected here. For details on Event Types, refer to Appendix B
Events and Alarm Icons.
6. From the Applied to drop-down list, select the filter which would be applied to the
event.
Note: If the required filter is not available in the list, then click next to the Applied To
drop-down list. The Filter Edit dialog box appears where you may add a new filter. For
details, refer to 19 Manage Filters in ACUS in the ACUS User Manual.
The event settings tab is divided in three areas, Event Settings, Alarm Settings and Execute
Automation. In the event settings area, perform the following steps:
7. Select the Create an Alarm check box to
display an alarm alert message when the
event occurs. After you select the check
box, the Alarm Settings and Alarm
Procedures tab appear next to the Event
Settings tab. The Alarms Settings area
is enabled.
The details of configuring alarm settings and
procedures are discussed in detail in the sections
below.
Figure 48: Alarm Settings and Alarm Procedures
8. Select the Enable Notifications to sent emails or text messages to ACUS users
when this event occurs. The Notification Settings tab appears. For details, refer
to configuring notification settings, below
9. Select the Display in Events List check box to ensure that this event appears in
the Event List on the dashboard in the Security tab.
Uncontrolled when printed © RISCO Group 40
Page 42

ACUS Quick Start Guide
10. Select the Enable Toaster check box to ensure
that a toaster appears when this event occurs. A
toaster is a small alert window that appears on the
screen whenever this event occurs. The following
figure illustrates an event toaster.
Figure 49: Event Toaster
11. After you select the Display in Errors List check box, click the Error, Warning or
Information option button to display this event as an event, warning or information
in the Error List.
12. Select the Sound check box to assign a sound to the event. Every time the event
occurs a sound will notify the user of the event. The Select File button is enabled.
13. Click Select File. The folder
where ACUS files are installed
on your machine has a folder
named Event Sound Files. You
need to select the event sound
from the same folder.
14. Select a.Wav or.Wam sound file
15. Click OK. The sound file is
Figure 50: Select a Sound File
16. The event and alarm details appear in a row in the Alarm List
or Event List. To configure the colour of the row for this event,
click
. The Color palette appears.
17. Select the preferred colour from the palette.
18. Click OK. The colour appears next to the Row Colour field.
Figure 51: Colour Palette
19. Click . The Add/Edit icons dialog box appears.
from the folder and click Open to
upload the sound file in ACUS.
uploaded in ACUS.
20. Select an icon which you want to assign for this
event and click OK. The selected icon is
displayed in the Change Icon area.
Note: You may click Add New Image to add an image to
the icon list. The Change Icon button is enabled
only if you select Create an Alarm check box.
Figure 52: Add/Edit Icons
Uncontrolled when printed © RISCO Group 41
Page 43

ACUS Quick Start Guide
In the Alarm Setting area, perform the following steps:
21. Select the schedule from the Schedule drop-down list.
22. In the Reactivation Delay field, enter the time required for reactivation delay and
select minutes or seconds from the drop-down list.
23. In the Bold field, select Yes option button to make the text in the row bold.
In the Execute Automation area, perform the following steps:
24. Select the Execute Automation check box to
execute automation whenever this event occurs.
The Define Automation button is enabled.
25. Click Define Automation. The Define Automation
dialog box appears.
Figure 53: Define Automation
26. Click + Add Automation. A new row is added in
the dialog box.
27. Select the check box to enable the automation.
28. Select required automation from the drop-down list.
Figure 54: Select Automation
Note: You may click to edit the selected automation. For details on how to edit the
automation, refer to section 14 Using Automation in the ACUS User Manual.
29. Click Ok to save.
Note: If you add more than one automation, you can decide the priority by using the and
buttons. Automations will be executed in the order that they are arranged.
30. Click Manage Automation. The Automation dialog box appears.
Figure 55: Manage Automation
You may search, add, edit, duplicate and delete automations from here. For details, refer to
section 14 Using Automation in the ACUS User Manual.
Uncontrolled when printed © RISCO Group 42
Page 44

ACUS Quick Start Guide
31. Click Cancel, you return to the Define Automation dialog box.
32. Click Cancel. You return to the Events and Alarm Configuration screen.
To configure Alarm Settings:
1. Click the Alarm Settings tab.
2. In the Priority and Automation area,
select the default priority of the alarm
from the Default Priority drop-down
list.
3. In the Acknowledge Timeout field,
enter the time after which the
automation added to this alarm will be
executed automatically.
Figure 56: Alarm Settings for an Event
4. Select Minutes from the adjacent drop-down list.
5. Select the automation that should run after the alarm is acknowledged from the On
Timeout Execute drop-down list.
Note: In case you need to add a new automation, click Manage Automation to add, edit,
duplicate or delete automation. The Automation dialog box appears. For details, refer
to section 14 Using Automation in the ACUS User Manual.
6. Click the Use Default Map of Event source option button to display the Map of the
location from where the event is generated in the Alarm Handling Dashboard.
Or
Click Choose Map option button and select the required map from the drop-down list. This
map will appear when you handle alarms in the Alarm Handling Dashboard.
7. In the Additional Info area, enter any additional information about the event in the
Additional Information field.
8. Select the Show Event Description in Alarm Alert check box to display the
description on the alarm alert.
9. Select the Show Additional Information in Alarm Alert check box to display the
information added in the Additional Information field.
10. Select the Alarm Closure Description is Mandatory check box to ensure that a
description is added when the Event Closure is reported.
You report event closure in the Alarm Handling Dashboard. For details, refer to section 9
Monitoring Events and Alarms in the ACUS User Manual.
In the Alarm Pop up Automation Triggering Buttons area, you configure the buttons that
should appear on the alarm alert.
Uncontrolled when printed © RISCO Group 43
Page 45

ACUS Quick Start Guide
11. Click Add Button. A new row is
added in the area. You can add
as many buttons as you want.
12. Select the button name from
the drop-down list.
13. Select the automation that
should be executed when you
click this button on the alarm
alert from the adjacent dropdown list.
Figure 57: Immediate Buttons
Note: If you add more than one immediate button, you can decide the priority by using the
and buttons. The buttons will appear in the order that they are arranged.
Note: You may add new buttons to the list. To add new buttons, refer to section 10
Configuring Alarms and Events in the ACUS User Manual.
14. Click . The Automation dialog box appears where you can edit the selected
automation. Refer to section 14 Using Automation in the ACUS User Manual for
details on editing automation.
15. Apart from the automations in the list, if you want to add, edit, duplicate or delete
automation, then click Manage next to the Automations label. The Automation
dialog box appears where you can add, edit, duplicate and delete automations. For
details, refer to 14 Using Automation in the ACUS User Manual.
16. Click Save. The message appears, “Event Configuration created successfully”.
To configure alarm procedures:
Alarm
Procedure
drop-down list
Figure 58: Alarm Procedures
4. Select the adjacent check box to enable this procedure. The Automations dropdown list is enabled.
Automation
drop-down list
1. Click the Alarm
Procedures tab.
2. Click + Add Procedure
add a procedure. A new
row is added.
3. Select the alarm procedure
from the drop-down list.
to
5. Select the automation that should be executed when this procedure is implemented
from the Automation drop-down list.
Uncontrolled when printed © RISCO Group 44
Page 46

ACUS Quick Start Guide
Note: If you add more than one procedure, you can decide the priority by using the and
buttons. The procedures will be executed in the order that they are arranged.
You may add a new procedure to the list. To add a new procedure to the list, refer to section
10 Configuring Alarms and Events in the ACUS User Manual.
6. Click . The Automation dialog box appears where you can edit the selected
automation. Refer to section 14 Using Automation in the ACUS User Manual for
details on editing automation.
7. Apart from the automations in the list, if you want to add, edit, duplicate or delete
automation, then click Manage next to the Automations label. The Automation
dialog box appears where you can add, edit, duplicate and delete automations. For
details, refer to 14 Using Automation in the ACUS User Manual.
8. Click Save. The message appears, “Event Configuration created successfully”.
To notify users:
1. Click the Notification Settings
tab.
2. Select the schedule in which
the users will be notified from
the Notification Schedule
drop-down list.
3. Enter the message that should
be sent to the users in the
Custom Message field.
Figure 59: Notification Settings
4. In the Notification Recipients area, the list of ACUS users appears in the left-side
area. You may also search for users. To search, select the search category from
the Search drop-down list.
5. Enter the search criteria in the adjacent field and click
(Search). The user
names matching the search criteria appear in the Notify Users area.
Uncontrolled when printed © RISCO Group 45
Page 47

ACUS Quick Start Guide
6. Select the Notify Users
check box to notify all users
in the list.
7. Select the check boxes
against the user names
whom you want to notify
about this event.
Figure 60: Notify Users
8. Click
selected users to the Notify
Recipients area.
to move the
9. Select the Notify Recipients check box to notify all selected users.
10. Click Save. The message appears, “Event Configuration created successfully”.
For more details on how to configure Alarms and Events, refer to section 10 Configuring
Alarms and Events in the ACUS User Manual.
After making configurations as per your requirement, click Skip Wizard to return to ACUS
home.
Note: All fields marked with an asterisk (*) are mandatory. At any point in the time, you can
click Cancel to quit the action and return to the home page.
Uncontrolled when printed © RISCO Group 46
Page 48

ACUS Quick Start Guide
A Events and Alarms Icons
This list describes the default icons for alarms and events that appear in the Events List and
Alarms List in ACUS. You may add any image for any type of event or alarm.
Event Type Image Description
Access Granted (All conditions satisfied)
Free access active (Access Granted)
Panic Digit Pressed (Access Granted)
Access Granted after Can Confirm card presented
Access Granted
Request to Enter (REN) pressed
Request to Exit (REX) pressed
Access Granted Door Opened(to update zone)
Access Granted (Door in Unlock Mode)
Invalid Card (Access Denied)
Reader Not Found (Access Denied)
End of Information Validity Date on card invalid (Access
Denied)
Invalid PIN(Access Denied)
Card in blacklist (Access Denied)
Person start date invalid (Access Denied)
Person end date invalid (Access Denied)
Zone limits invalid (Access Denied)
Zone category limits invalid (Access Denied)
Anti-passback failed (Access Denied)
Anti-TimeBack failed (Access Denied)
Erroneous PIN (Access Denied)
Access Denied
Uncontrolled when printed © RISCO Group 47
Conditional sensor value incorrect (Access Denied)
Restrictive GAA found (Access Denied)
GAA invalid (Access Denied)
Door opening hours invalid (Access Denied)
Command Time-out(Access Denied)
Command Executed (Access Denied)
PIN Time-out (Access Denied)
Invalid command entered (Access Denied)
Need Confirming Card Presented (Access Denied)
Can Confirm Card Presented (Access Denied)
Can Confirm Error
Can Confirm Card Time out
Only Can Confirm Card Presented
Page 49

Event Type Image Description
Access Denied because door configuration not found
REN schedule invalid (Access Denied)
REX schedule invalid (Access Denied)
Access denied because of Airlock mode
Access Denied (Due to Door disable)
Person is Absent (Access Denied)
PIN time out event
R/W Card Read Failed
Access Denied - R/W Card - Invalid Write Key
Access Denied - R/W Card - Invalid End Sector
Access Denied - R/W Card - Write Failed (Card
Removed)
Access Denied - R/W Card - Write failed (Different Card)
ACUS Quick Start Guide
AC Failed
AC Restored
ACCB Connected
ACCB
Disconnected
ACIB
Disconnected
ACIB Reconnected
Active Proxy
Failed (Sent by
Backup Proxy)
Active Proxy
Reconnected
ACUS Local Client
Connected
ACUS Local Client
Disconnected
Keypad Command Executed
RSP Command Executed
AC Failed
AC Restored
ACCB is reconnected
ACCB is disconnected
ACIB is disconnected
ACIB is reconnected
Active Proxy Failed
Active Proxy Restored
Local Client Connected
Local Client Disconnected
AUX1 Low Output
Event
AUX1 Low Output
Event
Backup Proxy
Failed
Backup Proxy
Auxillary1 Supply Restored
Low Auxillary1 Supply
Backup Proxy Failed
Backup Proxy Reconnected
Reconnected
Uncontrolled when printed © RISCO Group 48
Page 50

Event Type Image Description
ACUS Quick Start Guide
Battery Low
Battery OK
Custom Relay
Status Change –
Activated
Custom Relay
Status Change –
Inactivated
Custom Sensor
Status - Active
Custom Sensor
Status - Inactive
Door Already
Open
Door Close
Door Lock
Door Mode
Changed
Battery Low
Battery OK
Custom Relay Status is Active
Custom Relay Status is Inactive
Custom Sensor Status is Active
Custom Sensor Status is Inactive
Door Already Open
Event for Door Close
Door Locked
Door Mode changed
Door Open
Door Unlock
Event Buffer 90
Percent Full
Event Buffer
Overflow
Forced Door
Input Voltage
Above Normal
Input Voltage
Normal
NTP Connected
NTP Disconnected
PMC
Disconnected
PMC Restored
Reader Status –
Connected
Events for Door Open
Door Unlocked
Event Buffer level 90%
Door opened forcibly
Door is opened forcibly
Input Voltage too high
Input Voltage Normal
NTP Connected
NTP Disconnected
Power Management Card is disconnected
Power Management Card is restored
Reader is connected to the system
Reader Status –
Disconnected
Reader is disconnected with the system
Uncontrolled when printed © RISCO Group 49
Page 51

Event Type Image Description
ACUS Quick Start Guide
Switching to GSM
Switching to PSTN
Switching to WAN
Tamper Sensor
Activated
Tamper Sensor
Inactivated
Switching to GSM
Switching to PSTN
Switching to LAN/WAN
Tamper Sensor Activated
Tamper Sensor Inactivated
Uncontrolled when printed © RISCO Group 50
Page 52

B Glossary
ACUS Quick Start Guide
A
ACWS Access Control Web Station is a Web based application developed as a
part o the Risco Access Control System.
ACCB Access control controller board is the board is developed as a part of
the RAC project.
It has:
Interface to two AC IO board
Interface to LAN network which connects it using a Proxy to the RSP
Servers
Programming storage and storage for historical events.
This board handles all AC logic.
It can work independently from the AC management station and the
RSP servers.
It they supervise the Readers, as well as the transducers and the
activators related to the access control.
Account An operator creates an account in the ACOS for each client. Each client
has only one account and can have multiple sections in the account.
ACIB Access Control Input Output Board is developed as part of RAC project.
It has:
Interface to AC Controller board (ACCB)
Interface to readers
Interface to physical inputs and outputs (Sensors and Relays)
Inputs and outputs to manage 2 complete doors
I
ACIS
ACOS
ACPE The Access Control Physical Entities are the entities that are managed
ACUS Access Control User Station is the application that serves the customer
AntiPassBack
Installer A manager who has administrator rights on the account. The installer is
Access Control Installer station is the interface between the installer
and the system
The interface between the operator and the system. The operator uses
this application to create an account, create an installer company and
create new operators. Operator can import and export language, reset
password and generate reports
by the installer. ACPE includes doors, relays, sensors, readers, ACCB
and ACIB.
personnel and allows the customer to configure, monitor and apply
routine day to day tasks of the Risco Access Control (RAC) system that
are in the customer’s scope of work.
The Anti-Pass-Back prevents a user from opening a door unless he/she
is registered in the system as present, in the zone corresponding to the
side of the door where he presents his card.
someone from the installer company.
The installer administrates the physical entities of the AC system and
has the rights to Create sections, View the entity properties, Create new
entities, Modify the entity properties, Add entities to it (if it is a group)
and Delete it.
L
Uncontrolled when printed © RISCO Group 51
LDAP The Light Weight Directory Access Protocol is an application protocol
that is used for authentication of the installer in ACIS. LDAP is based on
a client-server model. LDAP servers allow information about people,
organizations, and resources accessible to LDAP clients
Page 53

ACUS Quick Start Guide
M
O
P
R
Manager
Operator
Person The ACWS user is referred to as the Person. Usually the employee
Proxy Proxy provides a communication channel between the ACCB/ACIB and
RAC RISCO Access Control is the R&D code name of the new product and
REN A button allowing opening the door when it is in “Free access” mode. It
REX A button which generates some information when pushed. This element
RSP Risco Server Platform – A system which manages Risco applications
A person who gets management rights to manage entities of the
system
We have three manager types: Operator, Installer, User
A manager employed by Risco who operates the RAC system.
uses ACWS to plan visits, add visits, and manage the automation.
the RSP. This includes proxy to RSP (like events) and RSP to ACCB
(configuration updates) communication.
project.
allows persons to enter without presenting cards at certain period of the
day. It is connected to the FA sensor.
is useful when a passage direction is not controlled in both directions by
card; it then enables controlling the door opening.
It is connected to a REX sensor.
(such as the RAC, Detection application, CCTV, Fire and so on).
It comprises servers and physical entities installed at customer
premises and all the software which manages them.
Currently it handles only RAC.
S
T
U
Notes
RSS Site RSS Site is a format to provide frequently changing Web content. When
you provide the Website, the regular feeds of the changing content are
available on the website.
Section Part of the AC system. It comprises physical entities (ACPEs) and some
the configuration entities (ACCEs) which belong to them
Turnstile A turnstile gate allows only one person to pass at a time. It is a
revolving door with barriers placed in between, which enable only one
person at a time to cross the door
User
A user who uses the ACUS application Usually using the AC user
station (ACUS).
Alarms and events can be reported to the user by the ACUS or via e-
mail and SMS. The user is a customer hired employee.
Uncontrolled when printed © RISCO Group 52
Page 54

Notes
ACUS Quick Start Guide
Uncontrolled when printed © RISCO Group 53
Page 55

ACUS Quick Start Guide
RISCO Group Limited Warranty
RISCO Group and its subsidiaries and affiliates warrants its products to be free from defects
in materials and workmanship under normal use for 24 months from the date of production.
Because Seller does not install or connect the product and because the product may be used
in conjunction with products not manufactured by the Seller, Seller cannot guarantee the
performance of the security system which uses this product. Seller's obligation and liability
under this warranty is expressly limited to repairing and replacing, at Seller's option, within a
reasonable time after the date of delivery, any product not meeting the specifications. Seller
makes no other warranty, expressed or implied, and makes no warranty of merchantability or
of fitness for any particular purpose.
In no case shall seller be liable for any consequential or incidental damages for breach of this
or any other warranty, expressed or implied, or upon any other basis of liability whatsoever.
Seller's obligation under this warranty shall not include any transportation charges or costs of
installation or any liability for direct, indirect, or consequential damages or delay.
Seller does not represent that its product may not be compromised or circumvented; that the
product will prevent any personal injury or property loss by burglary, robbery, fire or
otherwise; or that the product will in all cases provide adequate warning or protection.
Seller, in no event shall be liable for any direct or indirect damages or any other losses
occurred due to any type of tampering, whether intentional or unintentional such as masking,
painting or spraying on the lenses, mirrors or any other part of the detector.
Buyer understands that a properly installed and maintained alarm may only reduce the risk of
burglary, robbery or fire without warning, but is not insurance or a guaranty that such event
will not occur or that there will be no personal injury or property loss as a result thereof.
Consequently seller shall have no liability for any personal injury, property damage or loss
based on a claim that the product fails to give warning. However, if seller is held liable,
whether directly or indirectly, for any loss or damage arising under this limited warranty or
otherwise, regardless of cause or origin, seller's maximum liability shall not exceed the
purchase price of the product, which shall be complete and exclusive remedy against seller.
No employee or representative of Seller is authorized to change this warranty in any way or
grant any other warranty.
WARNING: This product should be tested at least once a week.
Uncontrolled when printed © RISCO Group 54
Page 56

ACUS Quick Start Guide
Contacting RISCO Group
RISCO Group is committed to customer service and product support. You can contact us
through our website www.riscogroup.com or as follows:
United Kingdom
Tel: +44-(0)-161-655-5500
technical@riscogroup.co.uk
Italy
Tel: +39-02-66590054
support@riscogroup.it
Spain
Tel: +34-91-490-2133
support-es@riscogroup.com
France
Tel: +33-164-73-28-50
support-fr@riscogroup.com
Belgium
Tel: +32-2522-7622
support-be@riscogroup.com
Israel
USA
Tel: +1-631-719-4400
support-usa@riscogroup.com
Brazil
Tel: +55-11-3661-8767
support-br@riscogroup.com
China (Shanghai)
Tel: +86-21-52-39-0066
support-cn@riscogroup.com
China (Shenzhen)
Tel: +86-755-82789285
E-mail: support-cn@riscogroup.com
Poland
Tel: +48-22-500-28-40
support-pl@riscogroup.com
Tel: +972-3-963-7777
support@riscogroup.com
All rights reserved.
No part of this document may be reproduced in any form without prior written permission from
the publisher.
RISCO Group 02/2013
5IN2043
Uncontrolled when printed © RISCO Group 55
 Loading...