

Page 1

RISCO Group
Access Control Operator Station
User Manual
Page 2

User Manual for ACOS
About This Manual
Purpose
This manual has been written to help you understand and use Access Control Operator Station (ACOS)
application. It presents the functional capabilities and operational details of ACOS and contains the
procedures that you should know for performing your business tasks using this application.
Intended Audience
This manual is primarily intended for operators in Risco Group who will use the ACOS application to create
new accounts, installer companies and other account management related activities.
Prerequisites for Use
Basic understanding of the access control systems and security systems is essential for using this manual.
Knowledge of Risco Access Control System is essential to use this manual.
Organization of the Manual
This manual is organized as follows:
General Information about ACOS provides an overview of ACOS. It also details the hardware and software
requirements.
Getting Started takes you on a quick tour of ACOS and explains how to log on and log off from ACOS.
Create New Account describes how to create new accounts.
Configure Account provides the details on how to search, edit and configure an account.
Create Installers Companies describes how to create new installer companies.
Configure Installers describes how to search, edit and configure installer companies
Create Operators describes how to create other Operators
Configure Operators describes how to search, edit and configure Operators
Reset Password describes the process to reset password for operators.
Import/Export Language describes how to import and export multi-lingual localization data for ACOS,
ACIS, ACUS and ACWS applications.
System Access Report describes the process to view system access report.
Reports describe the reports that an operator available to the operator.
Contacts provides the contact details of Risco
Glossary provides the glossary of the terms used in this manual.
Index of the terms, concepts and tasks is provided in this section.
Uncontrolled when printed © RISCO Group i
Page 3
Typographical Conventions
The following typographical conventions are used in this manual:
Convention Indicates Example
User Manual for ACOS
Command and Screen
element names
URLs and Hyperlinks URLs and hyperlinks. http://www.riscogroup.com
<Text> Examples or samples are placed in
Cross-reference
“System Messages”
Note
Buttons, check boxes, radio buttons, etc.
Commands that you choose from the
menus or dialogue boxes appear in title
case and in bold font.
angular brackets. User needs to replace
them with appropriate options.
Cross-references are written in bold and
orange.
The system messages are written in
italics, bold and double quotes.
Notes for providing extra information
about the particular task appear in the
document.
Click Login. ACOS home page
appears.
Enter the URL in the form of http://www.<domain name>.com
For more details on software
requirements, refer to section 10
Importing and Exporting Multilingual files in ACOS.
The system displays a message,
“Account created successfully”
Note: At any point in time, click
Cancel to quit from the
screen and return to the
home page. Fields
marked with an asterisk
(*) are mandatory.
Feedback and Suggestions
Home: http://www.riscogroup.com
Email: support@riscogroup.com
Uncontrolled when printed © RISCO Group ii
Page 4

User Manual for ACOS
Contents
1 Introduction to ACOS ................................................................................................................... 1
1.1 Overview of the Activities in ACOS ........................................................................................................ 2
2 Getting Started with ACOS .......................................................................................................... 3
2.1 Before Using ACOS ............................................................................................................................... 3
2.2 Logging On to ACOS ............................................................................................................................. 3
2.3 Logging off from ACOS .......................................................................................................................... 6
2.4 ACOS Menu Bar .................................................................................................................................... 6
3 Creating a New Account ............................................................................................................... 8
3.1 Add a New Account ............................................................................................................................... 8
3.2 License Details of an Account ............................................................................................................. 11
3.3 Technical and Personal Contact Details .............................................................................................. 15
3.4 View Process Status ............................................................................................................................ 17
4 Configuring an Account ............................................................................................................. 19
4.1 Search Accounts ................................................................................................................................. 19
4.2 Configure Account ............................................................................................................................... 22
4.3 Delete an Account ............................................................................................................................... 25
5 Creating New Installer Company ............................................................................................... 27
5.1 Add an Installer Company ................................................................................................................... 27
6 Configuring an Installer Company ............................................................................................ 32
6.1 Search an Installer Company .............................................................................................................. 32
6.2 Configure an Installer Company .......................................................................................................... 35
6.3 Delete an Installer Company ............................................................................................................... 37
7 Creating a New Operator Profile ................................................................................................ 38
7.1 Add an New Operator Profile ............................................................................................................... 38
8 Configuring Operator Profile ..................................................................................................... 41
8.1 Search Operator .................................................................................................................................. 41
8.2 Configure Operator .............................................................................................................................. 43
8.3 Delete an Operator .............................................................................................................................. 45
9 Reset Password .......................................................................................................................... 47
9.1 Basic Search ....................................................................................................................................... 48
9.2 Advanced Search ................................................................................................................................ 48
9.3 Reset Password .................................................................................................................................. 50
10 Importing/Exporting Multi-Lingual Files in ACOS ................................................................... 52
Uncontrolled when printed © RISCO Group i
Page 5

User Manual for ACOS
11 Viewing System Access Report ................................................................................................ 59
12 Generating Reports..................................................................................................................... 60
12.1 Account Installer Company List Report................................................................................................ 62
12.2 Account License Report ....................................................................................................................... 63
12.3 Account Report .................................................................................................................................... 64
12.4 Installer Company Account Report ...................................................................................................... 66
12.5 Installer Company Installer Report ...................................................................................................... 66
12.6 Installer Company Report .................................................................................................................... 67
13 Creating New Server Type ......................................................................................................... 69
13.1 Create a New Server Type .................................................................................................................. 69
14 Configuring Server Type ....................................................................................................... ..... 70
14.1 Configure Server Type......................................................................................................................... 70
14.2 Delete Server Type Name ................................................................................................................... 71
Appendix ...................................................................................................................... ........................ 73
Glossary ...................................................................................................................... ......................... 75
Contact ................................................................................................... Error! Bookmark not defined.
Index ......................................................................................................................... ............................ 77
Notes ...................................................................................................... Error! Bookmark not defined.
RISCO Group Limited Warranty ........................................................................................................ 79
Contacting RISCO Group ................................................................................................................... 80
Total number of pages in the manual, including the cover page: 88
Uncontrolled when printed © RISCO Group ii
Page 6

User Manual for ACOS
List of Tables
TABLE 3: MENU BAR............................................................................................................................... 6
ABLE 4: ADD AN ACCOUNT................................................................................................................... 9
T
T
ABLE 6: ACCEPTABLE PHONE NUMBER FORMATS IN ACOS ............................................................. 73
List of Figures
FIGURE 1: LOG ON TO ACOS .................................................................................................................. 4
F
IGURE 2: ACOS HOME PAGE ................................................................................................................ 5
F
IGURE 3: CHANGE PASSWORD .............................................................................................................. 6
IGURE 4: ABOUT RISCO ......................................................................................................................... 7
F
F
IGURE 5: ABOUT RISCO ......................................................................................................................... 7
IGURE 6: CREATE A NEW ACCOUNT ..................................................................................................... 8
F
F
IGURE 7: LICENSE DETAILS ................................................................................................................. 12
IGURE 8: CONTACT DETAILS ............................................................................................................... 15
F
F
IGURE 9: FULL NAME .......................................................................................................................... 16
F
IGURE 10: ACCOUNT CREATED SUCCESSFULLY ................................................................................. 17
IGURE 11: PROCESS STATUS ............................................................................................................... 18
F
F
IGURE 12: CONFIGURE ACCOUNT ....................................................................................................... 19
IGURE 13: ADVANCED SEARCH ........................................................................................................... 21
F
F
IGURE 14: ADVANCED SEARCH - ACCOUNTS ...................................................................................... 21
F
IGURE 15: ADVANCED SEARCH - EXAMPLE ........................................................................................ 22
IGURE 16: CONFIGURE ACCOUNT ....................................................................................................... 23
F
F
IGURE 17: STATISTICS ......................................................................................................................... 24
IGURE 18: CONFIGURE ACCOUNT – SEARCH RESULTS ....................................................................... 26
F
F
IGURE 19: DELETE ACCOUNT .............................................................................................................. 26
F
IGURE 20: CREATE AN INSTALLER COMPANY .................................................................................... 27
IGURE 21: MAIN INSTALLER DETAILS ................................................................................................ 29
F
F
IGURE 22: FULL NAME ........................................................................................................................ 29
IGURE 23: INSTALLER COMPANY CREATED SUCCESSFULLY .............................................................. 30
F
F
IGURE 24: EMAIL SENT TO AN INSTALLER .......................................................................................... 31
F
IGURE 25: SEARCH INSTALLER COMPANY .......................................................................................... 32
IGURE 26: ADVANCED SEARCH - INSTALLER COMPANY .................................................................... 34
F
F
IGURE 27: ADVANCED SEARCH - RESULTS ......................................................................................... 34
IGURE 28: CONFIGURE INSTALLER COMPANY .................................................................................... 35
F
F
IGURE 29: MAIN INSTALLER DETAILS ................................................................................................ 36
F
IGURE 30: CONFIGURE INSTALLER COMPANY – SEARCH RESULTS .................................................... 37
F
IGURE 31: DELETE INSTALLER COMPANY .......................................................................................... 37
F
IGURE 32: CREATE A NEW OPERATOR ................................................................................................ 38
F
IGURE 33: FULL NAME ........................................................................................................................ 39
F
IGURE 34: OPERATOR CREDENTIALS .................................................................................................. 40
IGURE 35: EMAIL SENT TO AN OPERATOR ........................................................................................... 40
F
F
IGURE 36: SEARCH OPERATOR - BASIC ............................................................................................... 41
F
IGURE 37: ADVANCED SEARCH - OPERATORS .................................................................................... 42
IGURE 38: ADVANCED SEARCH - RESULTS ......................................................................................... 43
F
F
IGURE 39: CONFIGURE OPERATOR ...................................................................................................... 44
F
IGURE 40: CONFIGURE OPERATOR – SEARCH RESULTS ..................................................................... 45
F
IGURE 41: DELETE OPERATOR ............................................................................................................ 45
F
IGURE 42: RESET PASSWORD .............................................................................................................. 47
IGURE 43: ADVANCED SEARCH - RESET PASSWORD .......................................................................... 49
F
F
IGURE 44: SEARCH RESULTS – ADVANCED SEARCH .......................................................................... 50
Uncontrolled when printed © RISCO Group iii
Page 7

User Manual for ACOS
FIGURE 45: EMAIL EXAMPLE - RESET PASSWORD ................................................................................ 51
F
IGURE 46: IMPORT/EXPORT MULTI-LINGUAL FILES ........................................................................... 52
IGURE 47: SERVER TYPE ................................................................................................................... 53
F
F
IGURE 48: SAVE LANGUAGE FILE ....................................................................................................... 54
F
IGURE 49: EXPORTED FILE .................................................................................................................. 55
F
IGURE 50: IMPORT LANGUAGE FILE.................................................................................................... 56
F
IGURE 51: BROWSE AND SELECT FILE ................................................................................................ 57
F
IGURE 52: IMPORT FILE SELECTED ..................................................................................................... 57
F
IGURE 53: SYSTEM ACCESS REPORT ................................................................................................... 59
IGURE 54: ACOS – REPORTS .............................................................................................................. 60
F
F
IGURE 55: STATUS FOR REPORTS DOWNLOAD ................................................................................... 61
F
IGURE 56: REPORT TYPES ................................................................................................................... 62
F
IGURE 57: ACCOUNT INSTALLER COMPANY LIST REPORT ................................................................. 63
F
IGURE 58: ACCOUNTS LICENSE REPORT ............................................................................................. 64
IGURE 59: ACCOUNT REPORT ............................................................................................................. 65
F
F
IGURE 60: INSTALLER COMPANY ACCOUNT REPORT ......................................................................... 66
F
IGURE 61: INSTALLER COMPANY – INSTALLER REPORT .................................................................... 67
F
IGURE 62: INSTALLER COMPANY REPORT .......................................................................................... 68
F
IGURE 63: NEW SERVER TYPE ............................................................................................................ 69
IGURE 64: CONFIGURE SERVER TYPE ................................................................................................. 70
F
F
IGURE 65: CONFIGURE SERVER TYPE – DETAILS................................................................................ 71
IGURE 66: DELETE SERVER TYPE ........................................................................................................ 72
F
Uncontrolled when printed © RISCO Group iv
Page 8
User Manual for ACOS
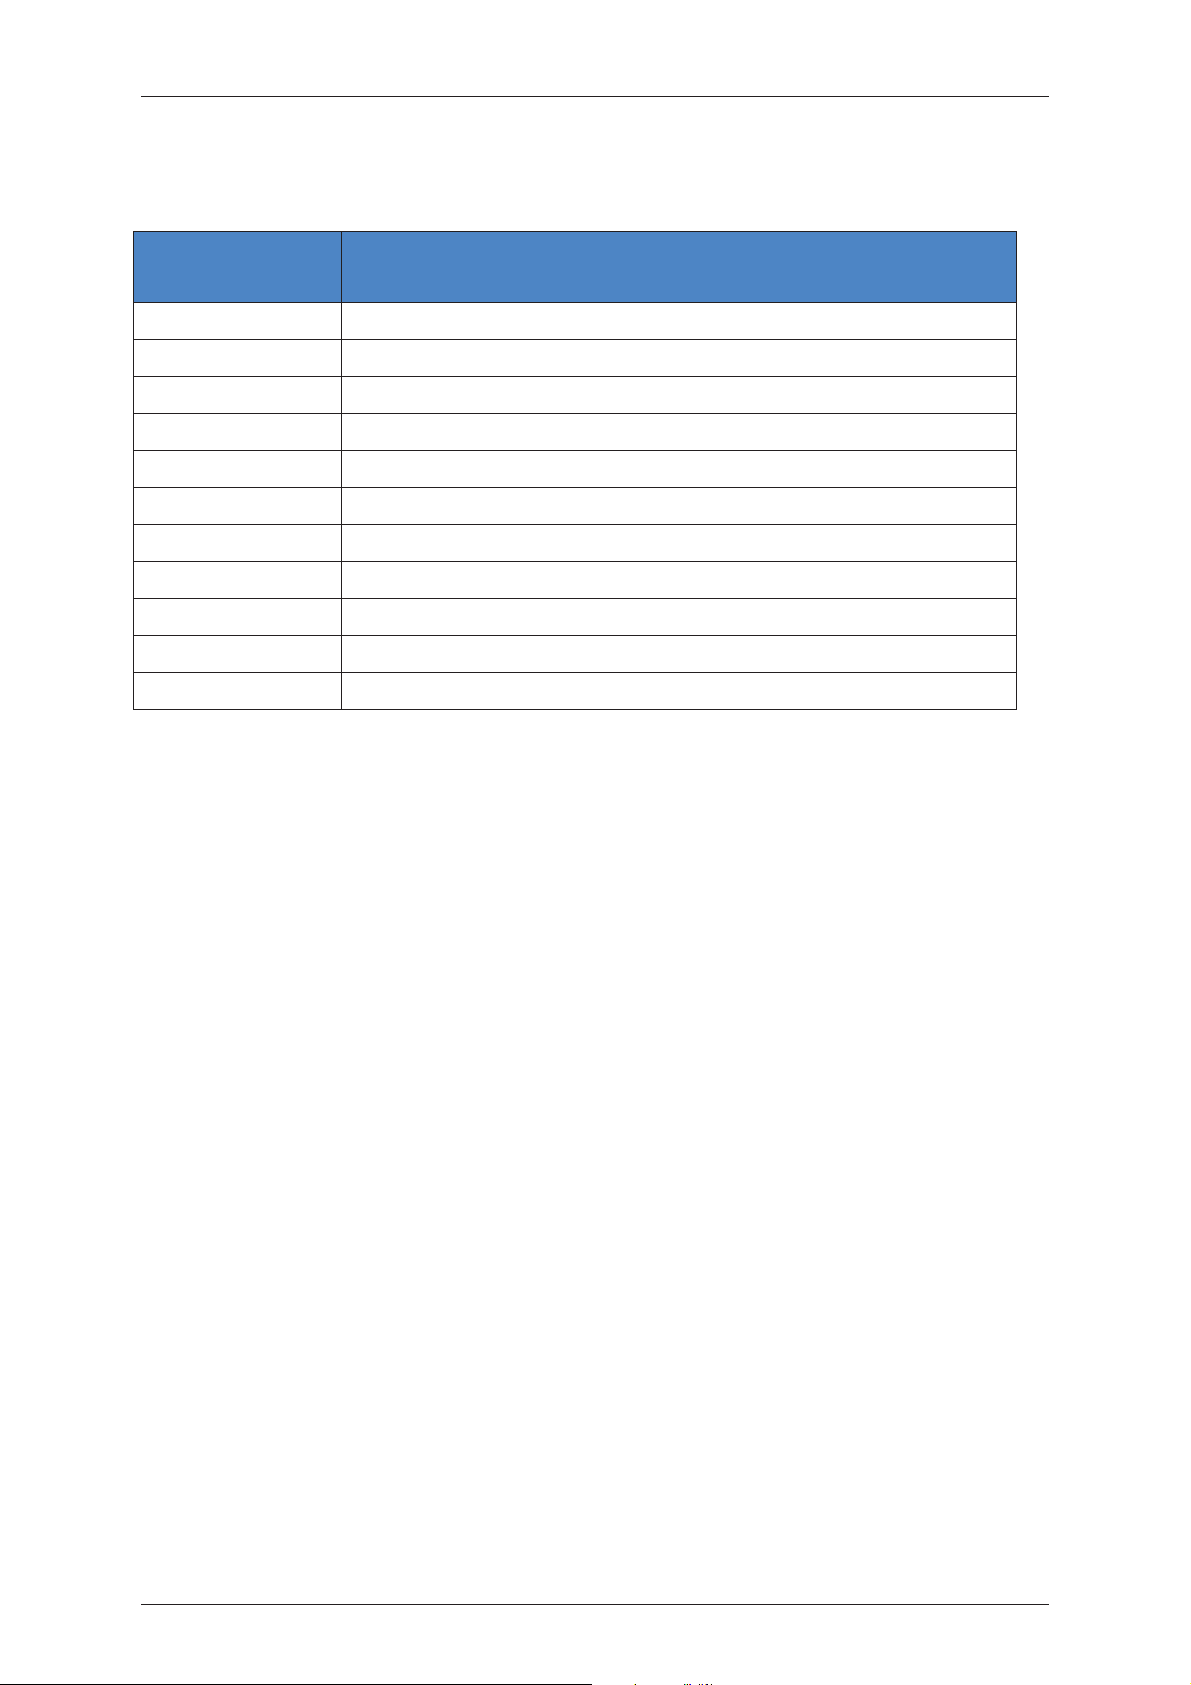
List of Abbreviations
Abbreviation/
Acronym
ACCB Access Control Controller Board
ACIS Access Control Installer Station
ACOS Access Control Operator Station
ACUS Access Control User Station
AMAC Account Management Autonomous Component
ID Identification Number
OS Operating System
RAC RISCO Access Control
RMAC Risco Management Autonomous Component
RSP RISCO Service Platform
URL Uniform Resource Locator
Expansion
Uncontrolled when printed © RISCO Group v
Page 9

User Manual for ACOS
1 Introduction to ACOS
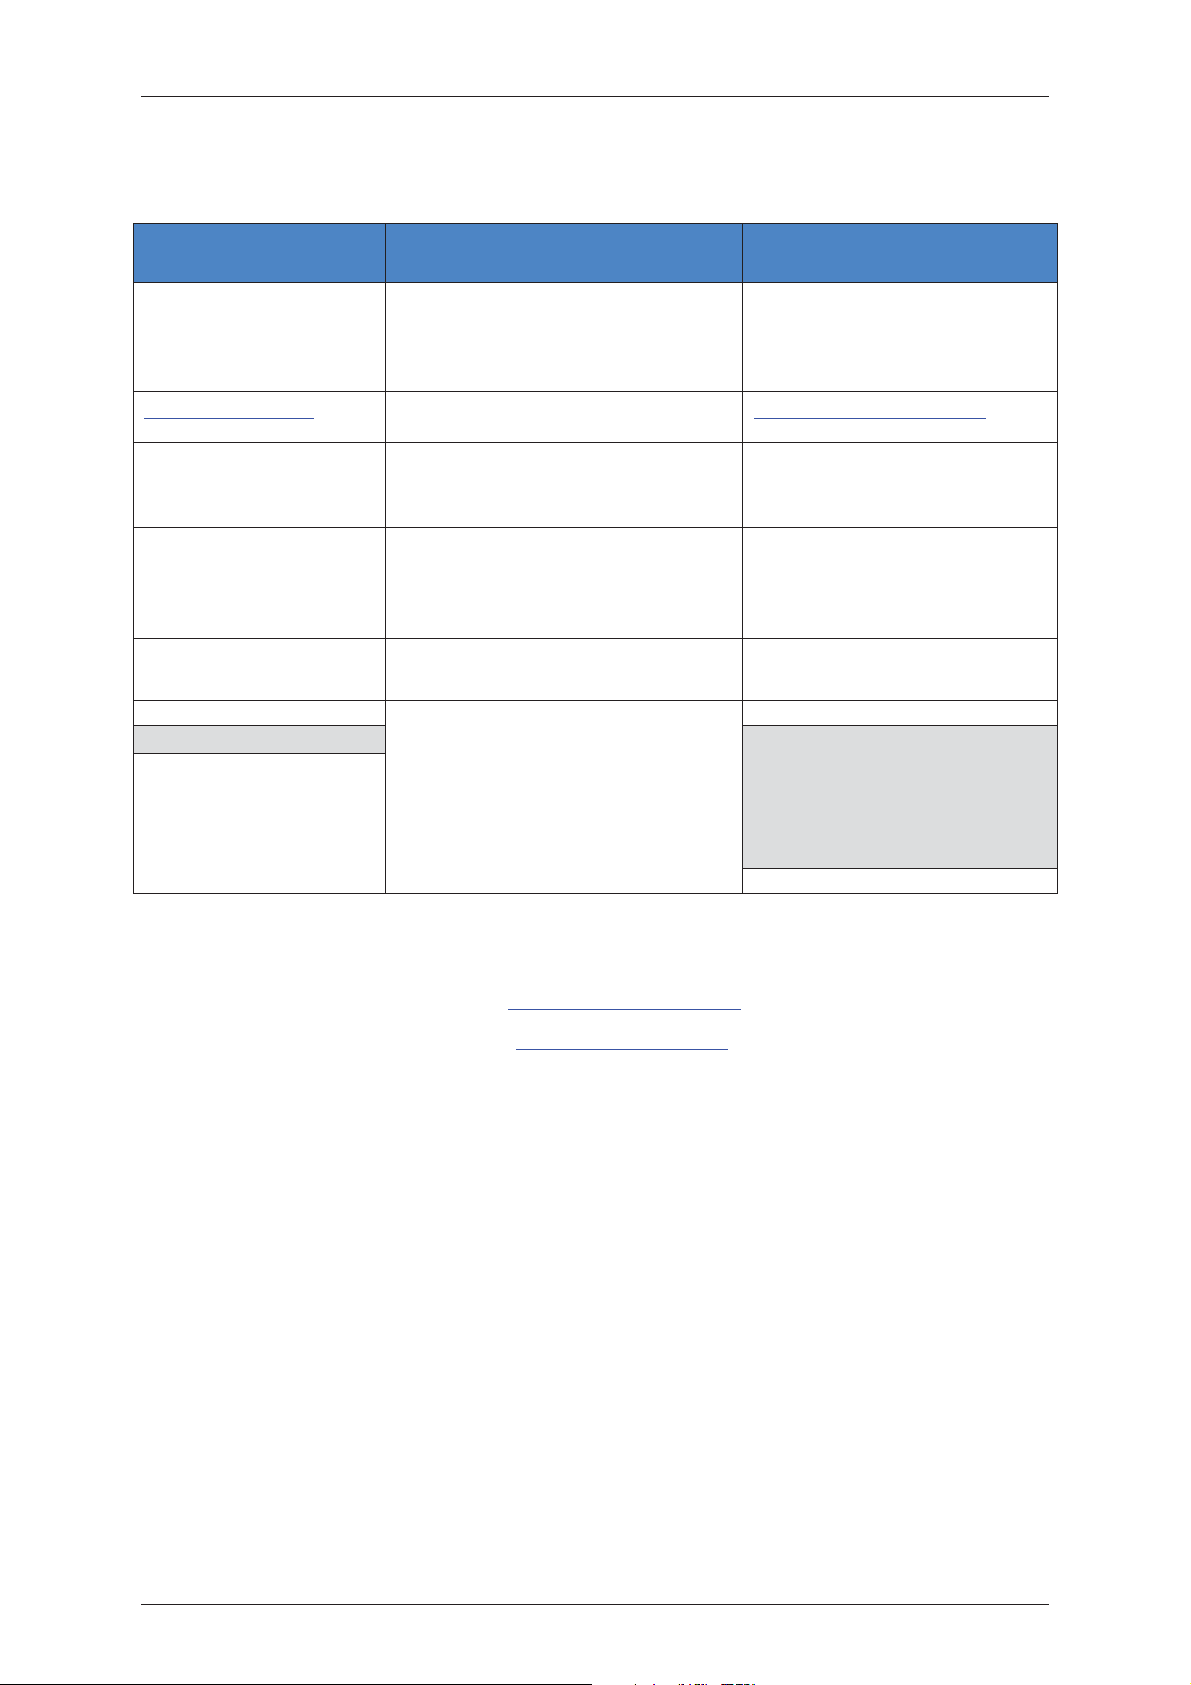
The Risco Access Control system (RAC) is a security system that can be used to control and manage access to
a site (building). The RAC system comprises several client applications. Their details are described in the
following table.
Application Name User Purpose
Access Control Operator Station
(ACOS)
Access Control Installer Station
(ACIS)
Access Control User Station
(ACUS)
Access Control Web Station
(ACWS)
Access Control Management
Station (ACMS)
Map Editor User
Operator
Installer
User
ACWS User
Manager
ACOS is used for client account
management.
ACIS is used to configure devices
at the client location and create
sections in an account.
ACUS is used to manage the
access control system at the
location.
ACWS is used for visitor
management and automation
execution
ACMS is used to view server
queue details and manage worker
handler threads.
Map Editor is used to create Maps
that will be used in the Access
Control System at the client site.
You will use ACOS to create and manage accounts. An account is created for a client who has purchased the
RAC system and wants to implement it within the premises. An Account is the physical location where RAC
System will be deployed and managed.
When you create an Account and assign an Installer Company to it, the Installer from the company sets up
the hardware at the location and configures the devices. When an operator creates an Installer Company, a
Main Installer is created who has access to ACIS (used to configure firmware devices) and all sections in the
particular account. (The premises of an account can be divided into sections depending upon requirement.
A section is an area that divides the account into logical configurable units.) When you create an account, a
Main User and a Main Section are created. Main User is the user profile created by default. The Main Section
is the logical configuration unit created in an account by default.
Each account has a unique identification number, (Account Reference Number) assigned to it. This Account
Reference Number serves as the most important identifier for the account and is required to log on to
ACUS and ACWS. This should be present in the Configuration file when the Installer configures firmware
devices.
When ACOS is installed, the Main Operator is created. The Main Operator can create other operators who
have access to ACOS.
ACOS is available in the following languages:
• English
• French
• Italian
Uncontrolled when printed © RISCO Group 1
Page 10

User Manual for ACOS
• Hebrew
When you select your preferred language and logon to ACOS, application is localised in that language.
1.1 Overview of the Activities in ACOS
You will use ACOS primarily for account creation and management. The activities that an operator performs
using ACOS are:
• Create New Account
• Configure/edit Account
• Create New Installer Company
• Configure/Edit Installer Company
• Create New Operator
• Configure/Edit Operator
• Reset Password
• Import/Export Multi-Lingual Data files
• View System Access Report
• Generate Reports
• Create New Server Type
• Configure Server Type
Each of these tasks is explained in the manual.
Uncontrolled when printed © RISCO Group 2
Page 11
User Manual for ACOS
2 Getting Started with ACOS
This section describes the process to log on and log off from ACOS. In addition, it describes all the
screen elements on the home page and the menu bar.
Before Using ACOS
Before using ACOS ensure that you have verified the following:
• ACOS is installed on the machine.
• You have the correct user name and password to log on to ACOS.
Logging On to ACOS
After ACOS is successfully installed, log on to the application.
To logon to ACOS:
1. Click Start → All Programs → Risco Axes Plus → ACOS → ACOS Client. The splash
screen for the application appears.
Or
• Double-click the ACOS icon created on the desktop after installation. The splash screen for
the application appears.
The Login screen appears after the splash screen.
Uncontrolled when printed © RISCO Group 3
Page 12
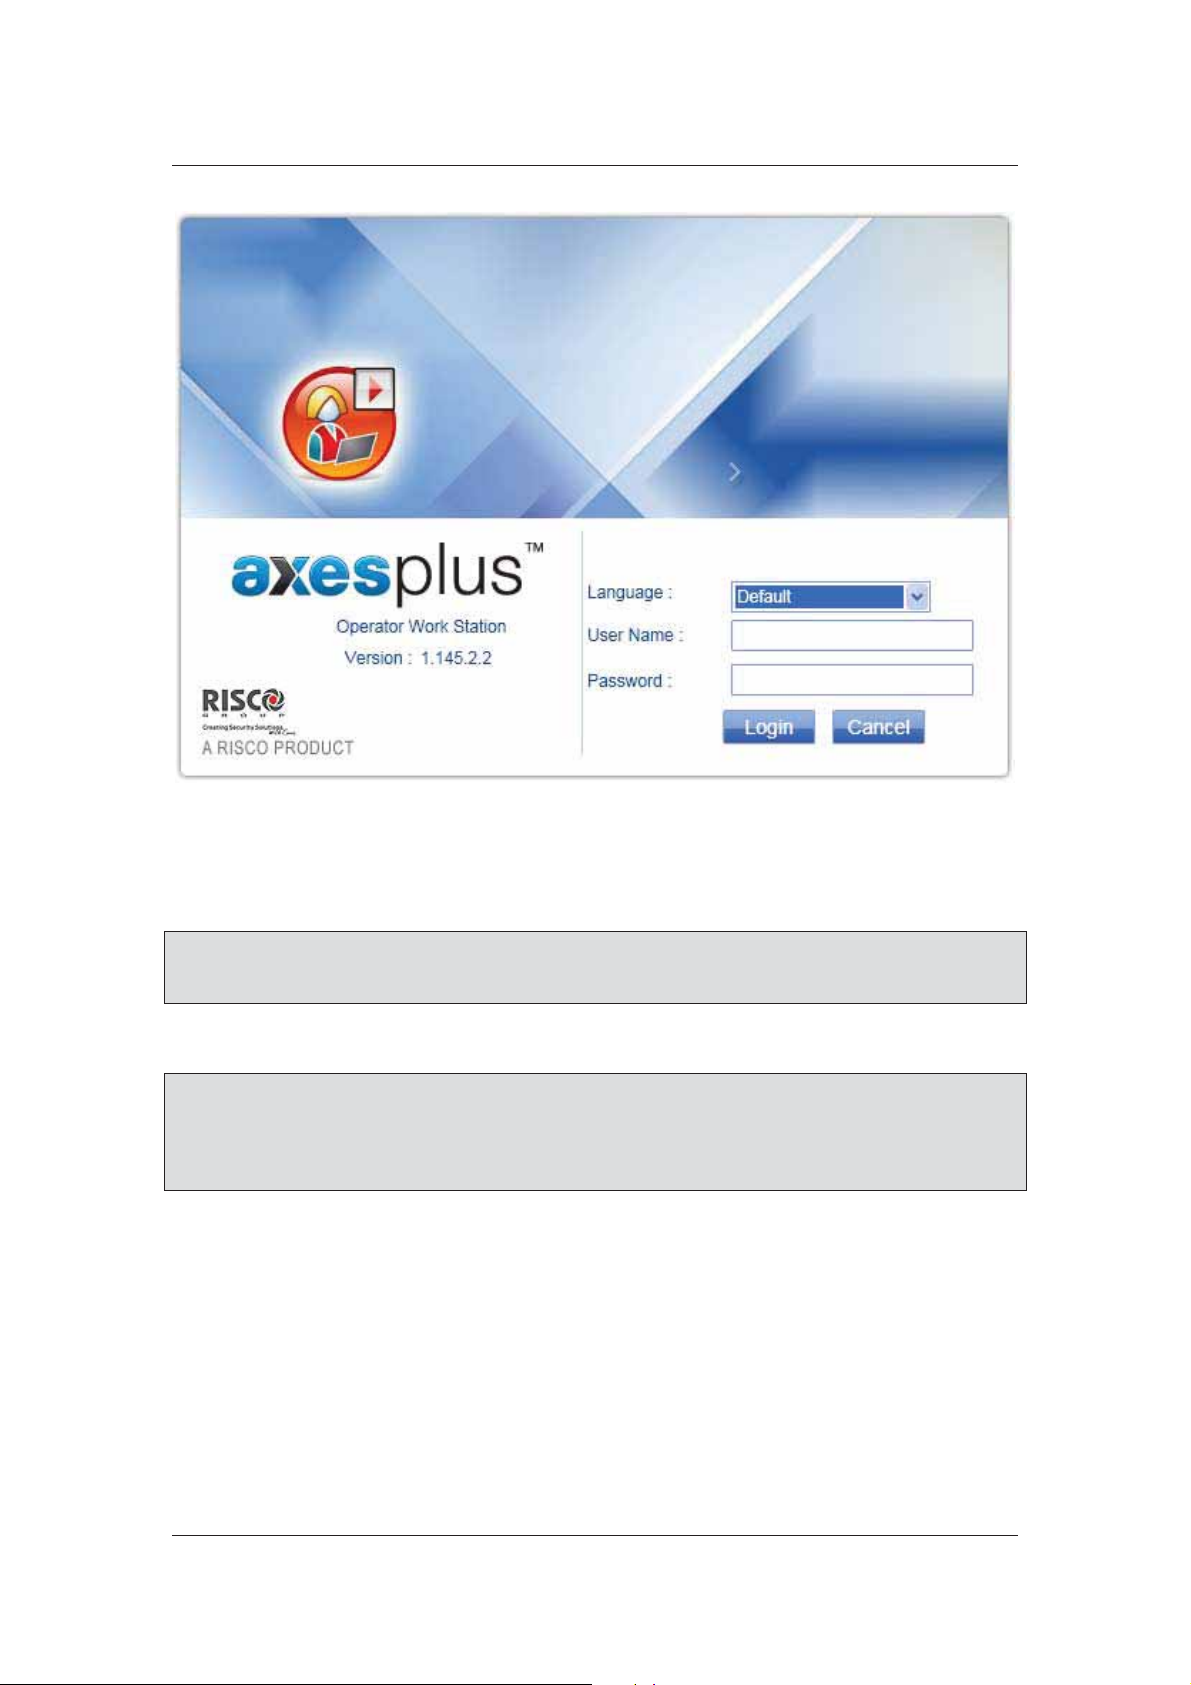
User Manual for ACOS
Figure 1: Log on to ACOS
2. Select the language from the drop-down list. The available languages are English, French,
Italian and Hebrew. Select the preferred language and the labels and data on the screen
appears in that language.
Note: If you do not select any language, then you logon to ACOS in the default language
selected for the logged on operator. The Default language for the Main Operator is the
default language of the machine where ACOS is installed.
3. Enter the user name and password in the User Name and Password fields respectively.
Note: The User Name is not case sensitive. You can enter the user name in lowercase or
uppercase. However, the Password is case-sensitive. When the operator is added in
ACOS, the login ID and Password is sent to the operator via email.
ACOS account is locked after three unsuccessful login attempts.
4. Click Login. ACOS home page appears.
Uncontrolled when printed © RISCO Group 4
Page 13
User Manual for ACOS
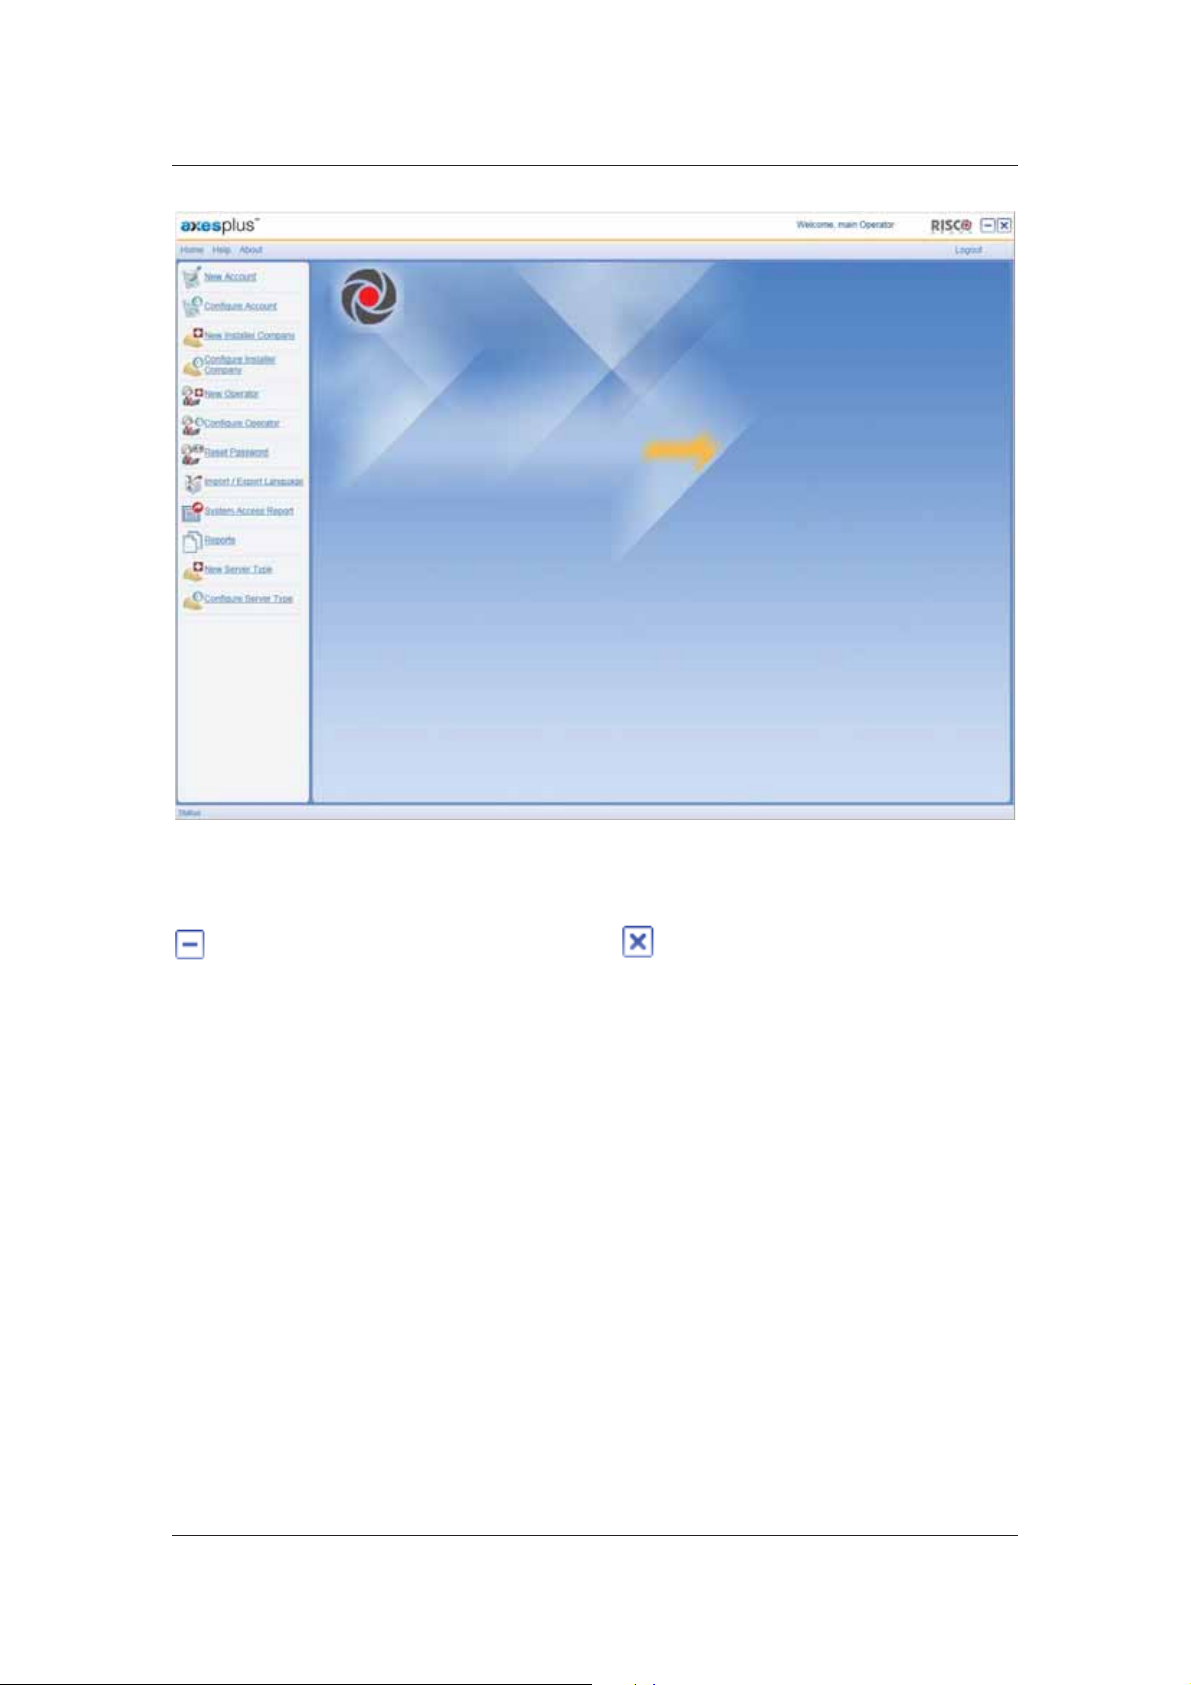
Figure 2: ACOS Home Page
When you logon to ACOS and the home page appears, the name of the logged on operator appears on
the upper-right corner of the screen. The product logo appears at the upper-left corner. You can click
(Minimize) to minimize the Window. You can click (Close) to close the Window.
2.2.1 For the First Time User
If you are logging in for the first time, you will have to change your password after you first successful
logon. The Change Password dialog box appears after you log on.
Uncontrolled when printed © RISCO Group 5
Page 14
User Manual for ACOS
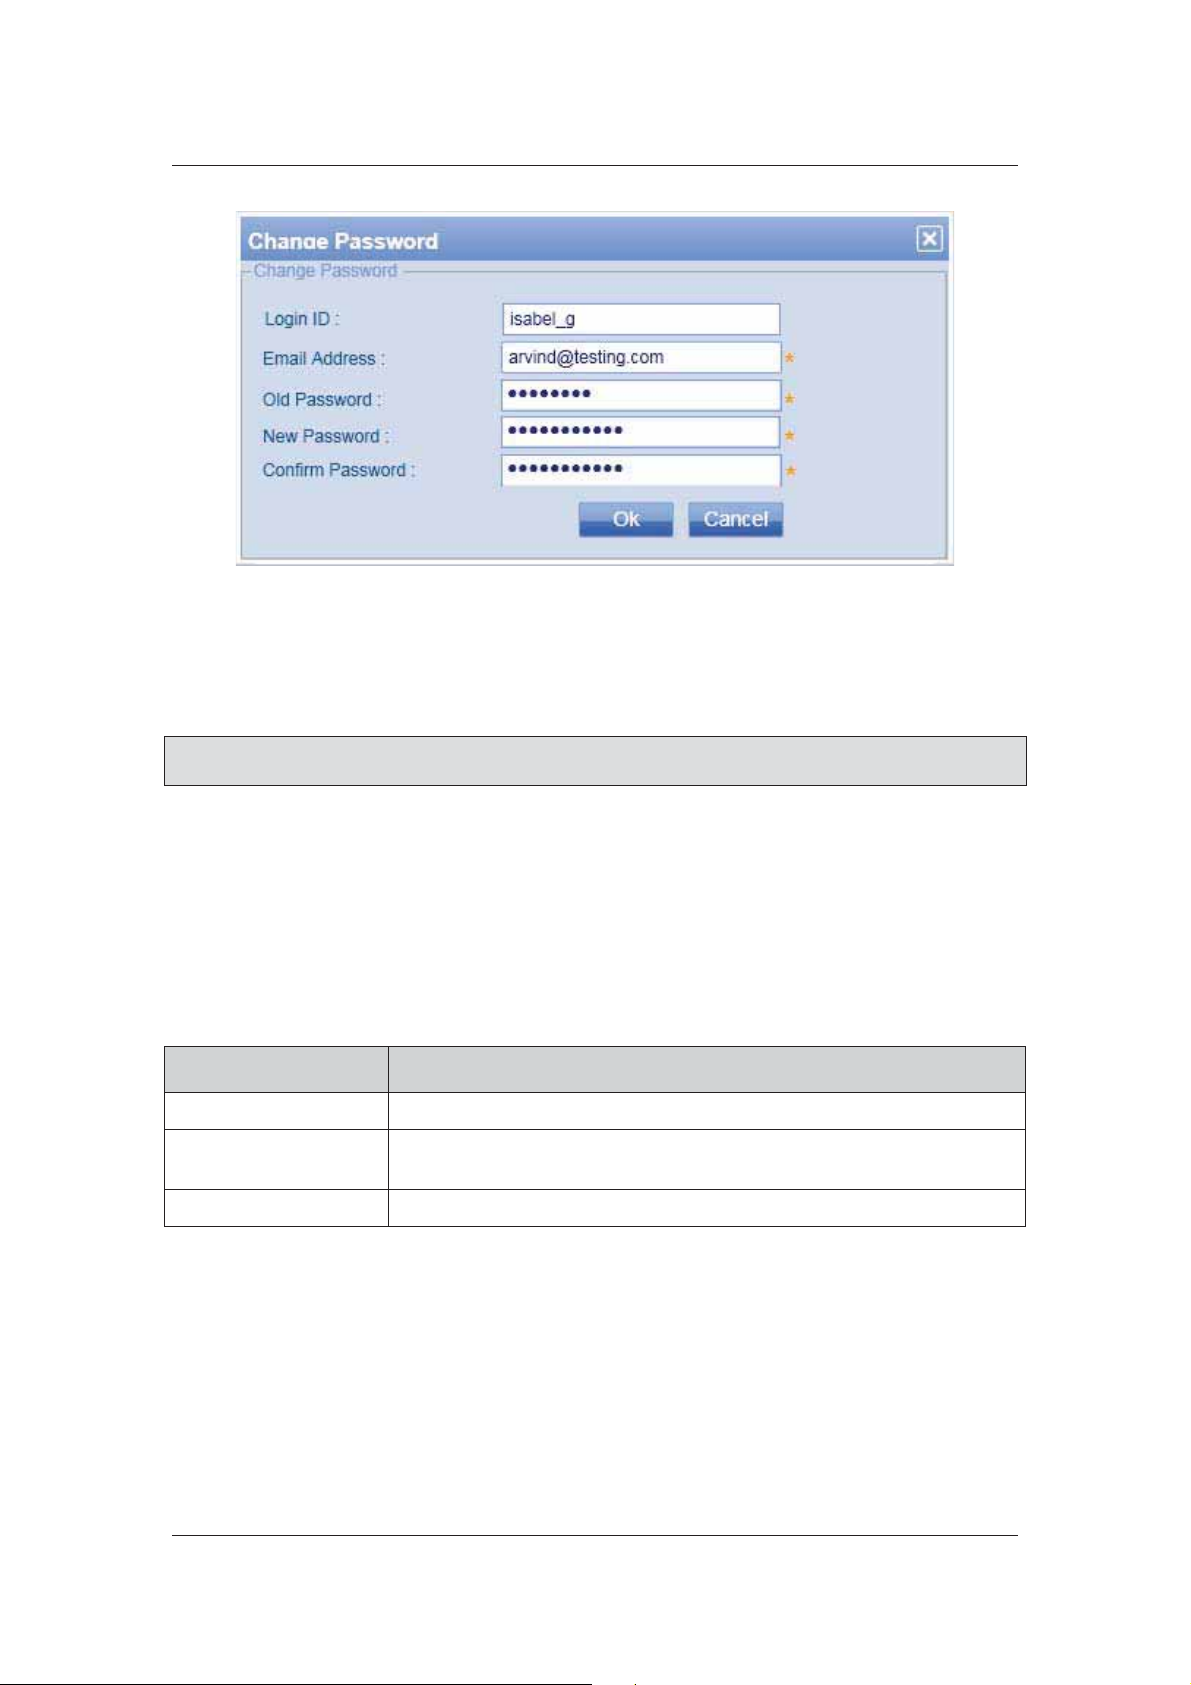
Figure 3: Change Password
1. The Login ID and Email Address are displayed by default. In the Old Password field, enter
your current password. Enter and confirm a new password in the New Password and
Confirm Password fields and click OK. The password is changed and ACOS Home Page
appears.
Note: The Change Password dialog box appears if you are logging on for the first time or your
password has been reset. You can click Cancel to quit logging on to ACOS.
2.3 Logging off from ACOS
To log off from ACOS, click the Logout link available at the upper-right corner of the Window.
2.4 ACOS Menu Bar
ACOS home page provides the following options.
Table 1: Menu Bar
Option Name Description
Home To return to the home page from anywhere in the application, click Home.
Help Click Help to view the online help for ACOS. You can also press F1 to view
online help.
About Click About to view the general information of ACOS.
You can view additional details about Risco and the Installer Company by clicking the About button.
To view additional details:
1. Click About. The following screen appears.
Uncontrolled when printed © RISCO Group 6
Page 15
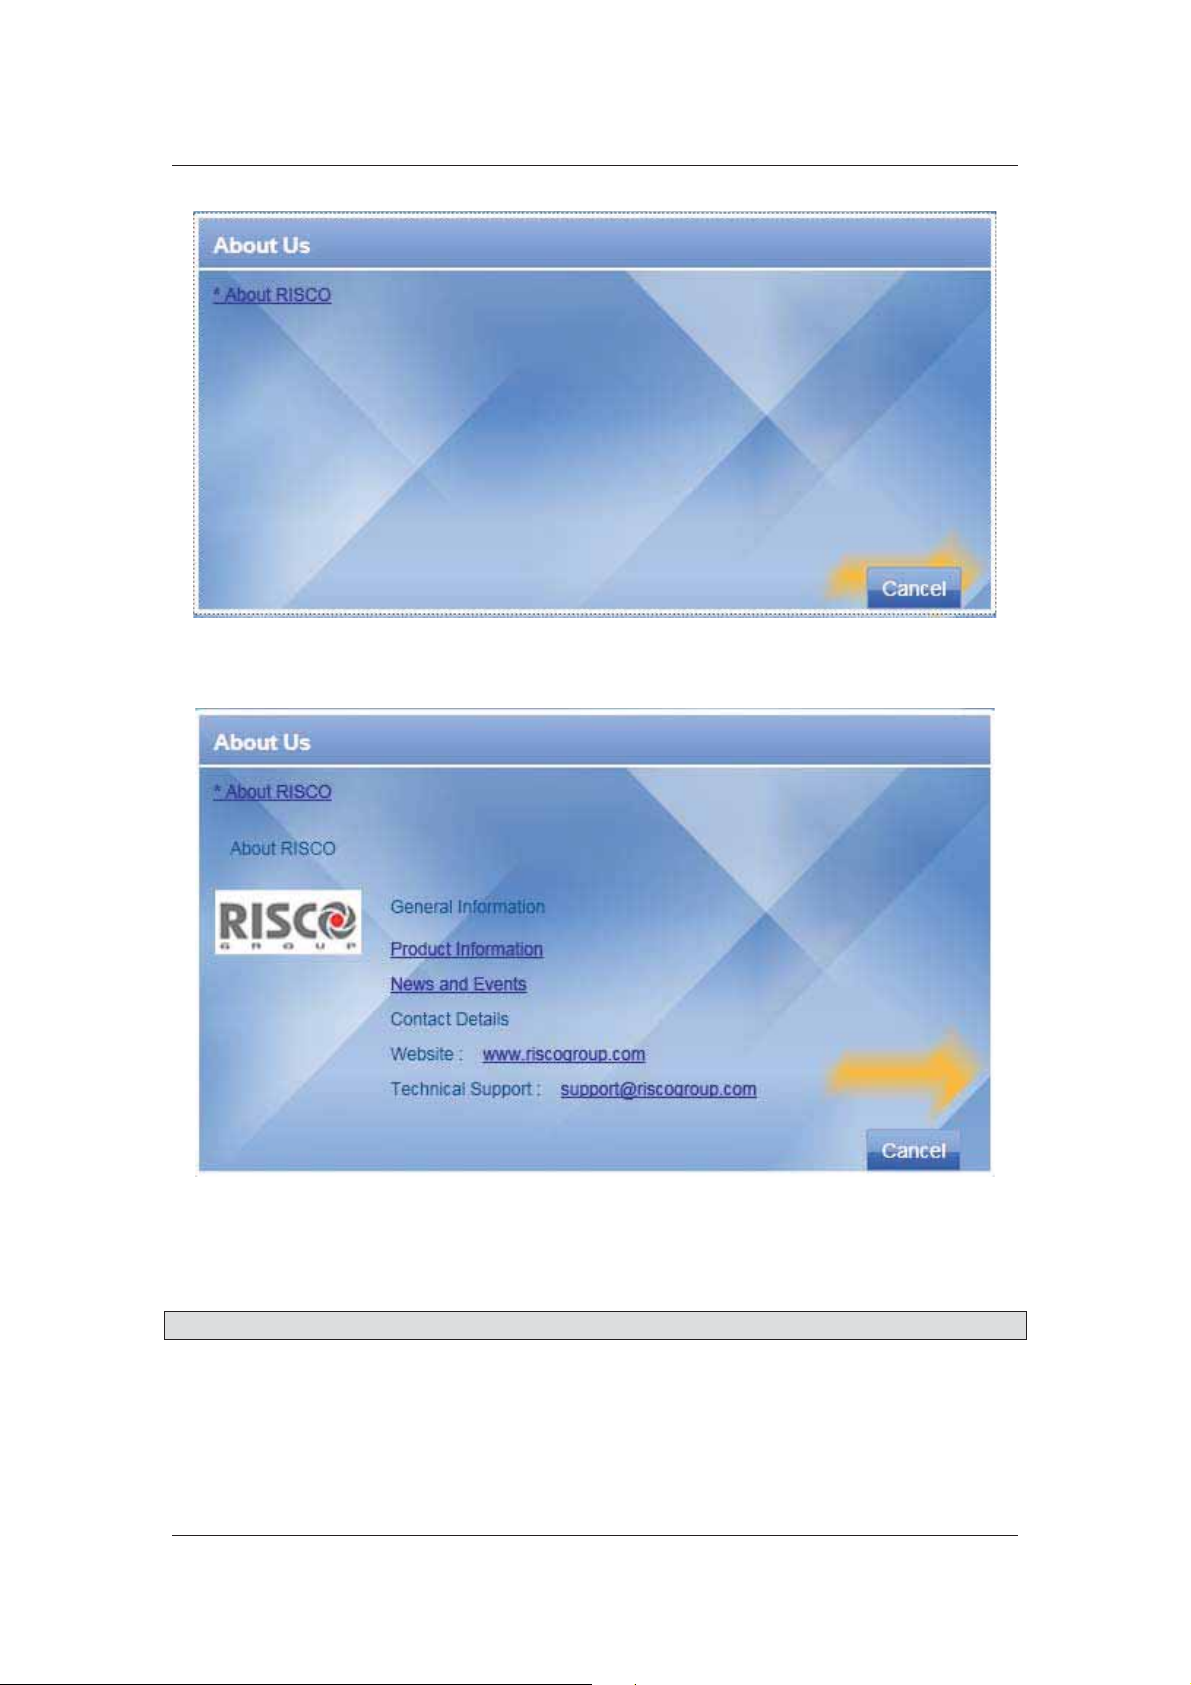
Figure 4: About Risco
2. Click About Risco, the details of Risco Group are displayed.
User Manual for ACOS
Figure 5: About Risco
The hyperlinks for Product Information, News and Events, Risco Website and Technical Support Email
Address are given. Click any of them to view the information.
Note: Click Cancel to quit this screen and return to the home page.
Uncontrolled when printed © RISCO Group 7
Page 16
User Manual for ACOS
3 Creating a New Account
Whenever any organization/company purchases the Risco access control system, an account for the
company is created in ACOS. Each client must have an account. The operator creates a new account
through ACOS and assigns an Account Reference Number to it. The Account Reference Number is a
unique identification number for each account.
3.1 Add a New Account
To create a new account:
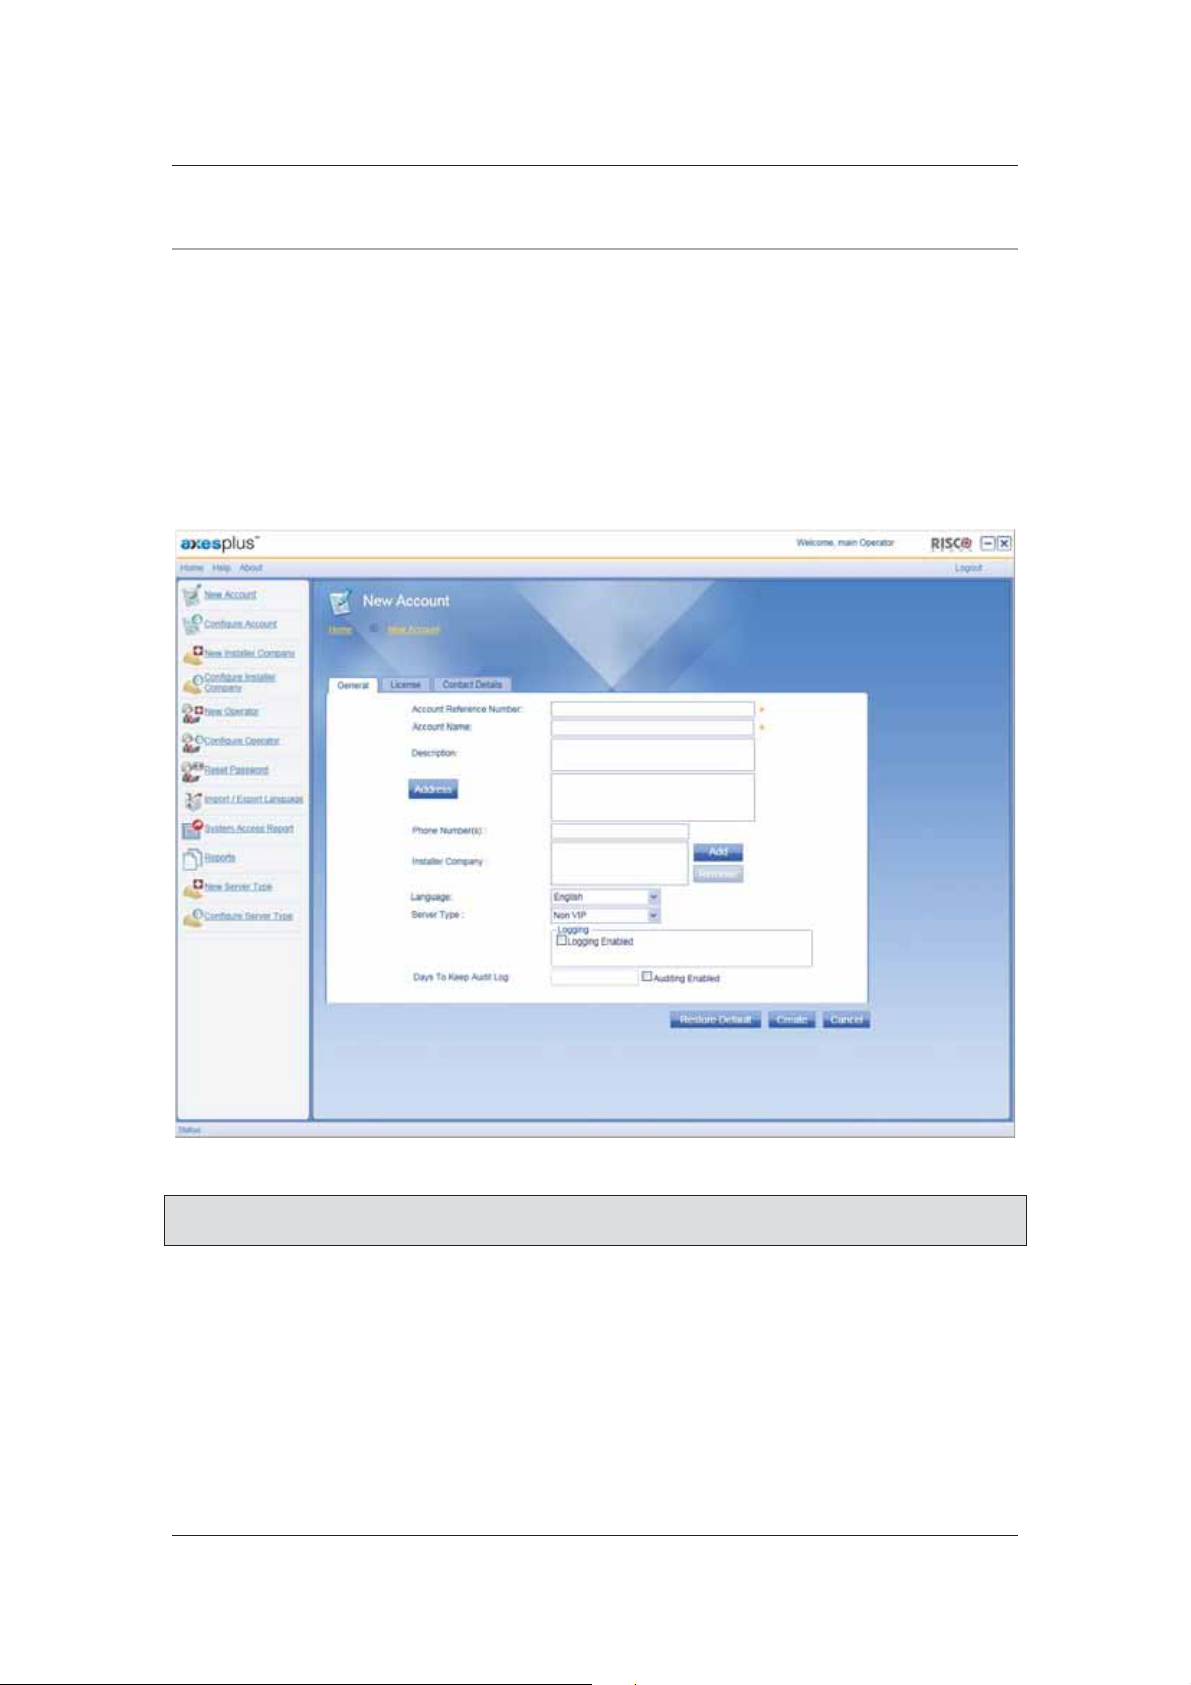
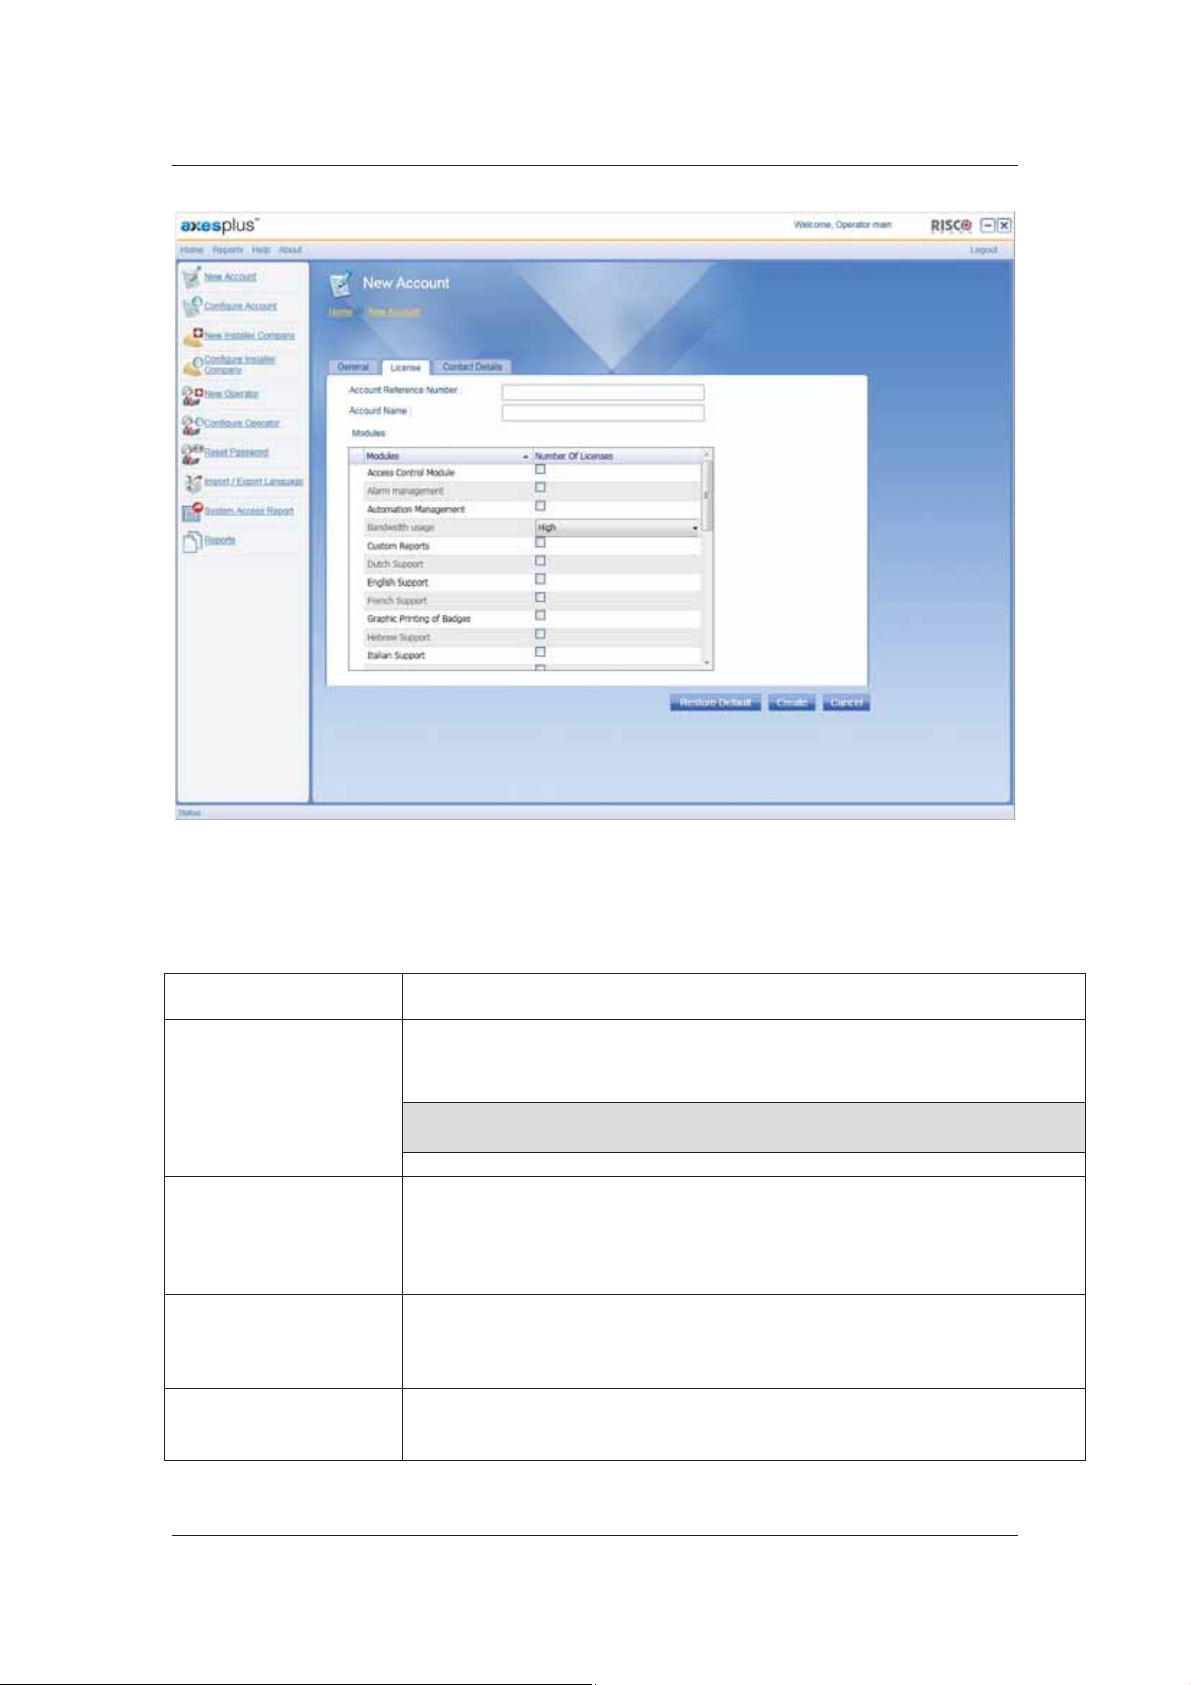
1. On ACOS Home page, click New Account. The New Account screen appears.
Figure 6: Create a New Account
Note: At any point in time, click Cancel to quit from the screen and return to the home page. All
fields marked with an asterisk (*) are mandatory.
2. Enter the following details on the screen in the General tab.
Uncontrolled when printed © RISCO Group 8
Page 17
User Manual for ACOS
Table 2: Add an Account
Field Name Description
Account Reference Number
Account Name
Description
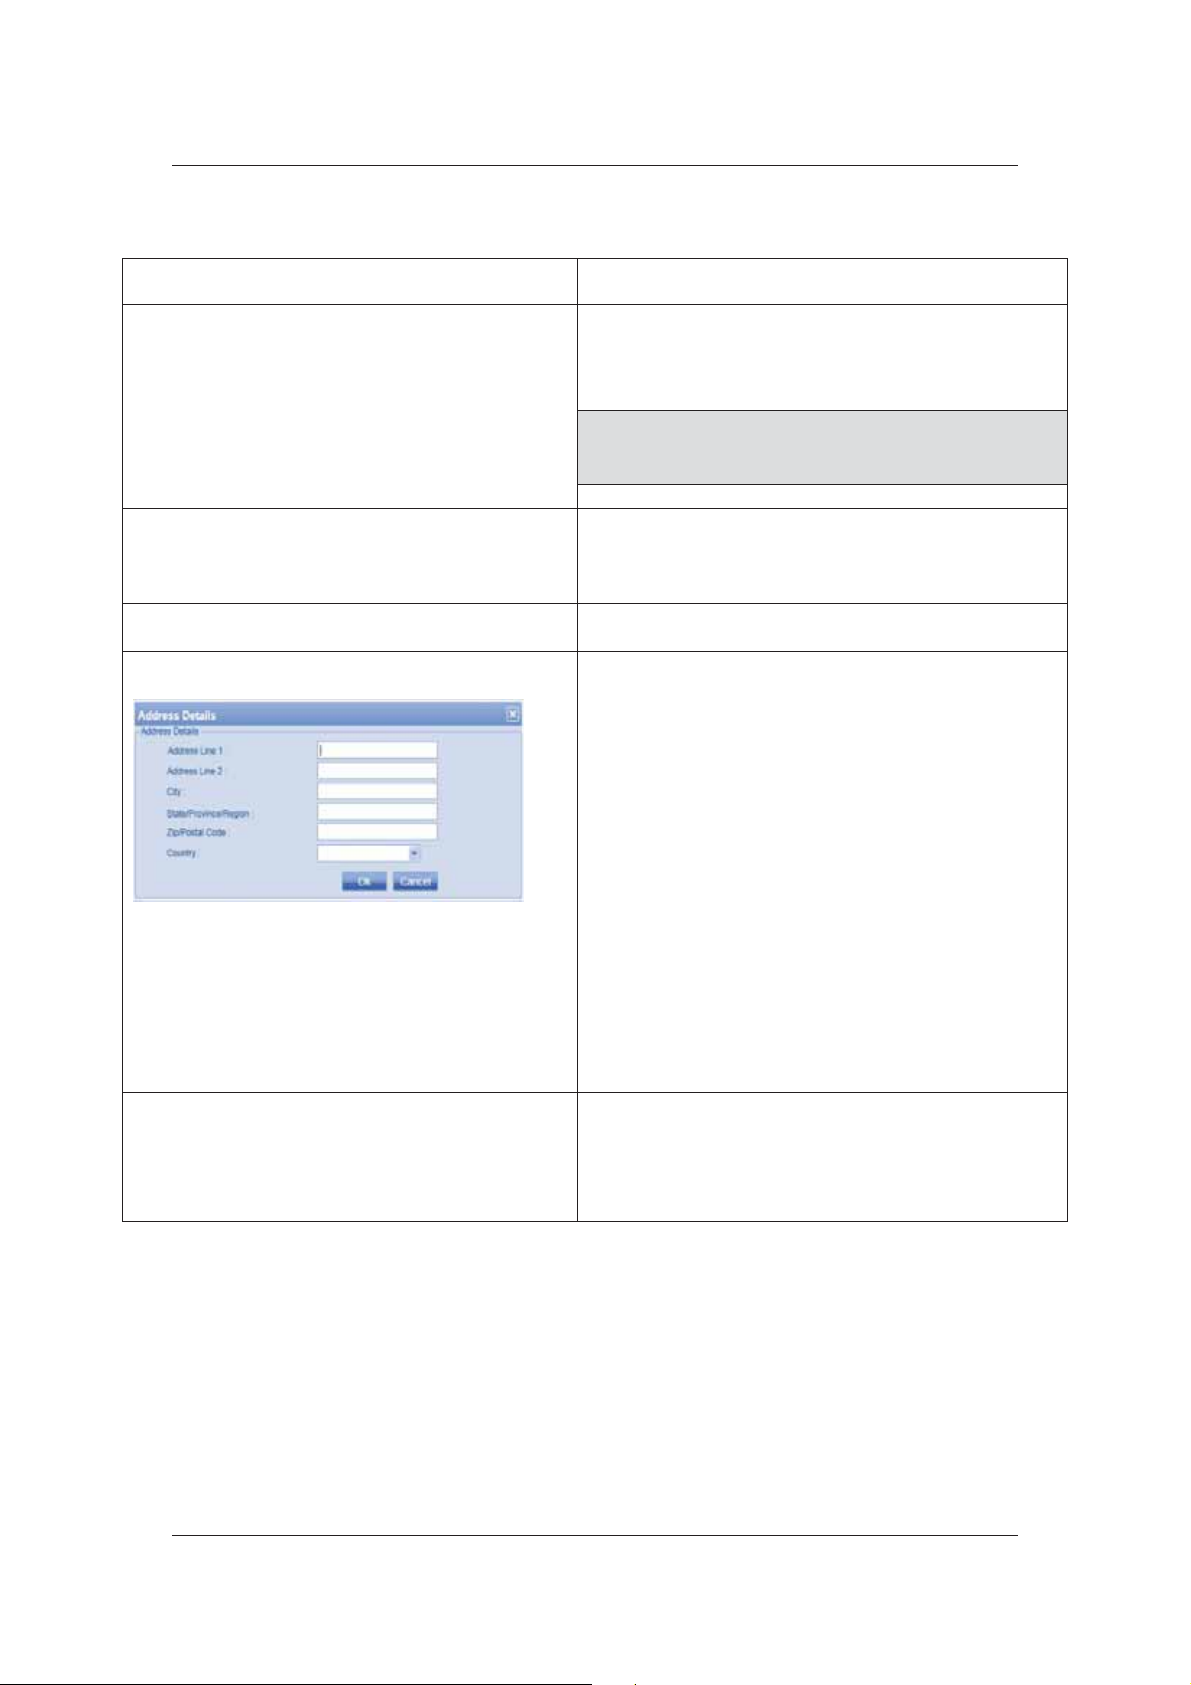
Address Details
Enter the account reference number. Each Account will
have a unique reference number. This is a mandatory
field.
Note: The Account Reference Number is the most
important identifier for an account and is used
to log on to ACUS and ACWS.
Enter the name of the company. This serves as the
account name. This is a mandatory field and the field
length should be between 1 and 100 characters.
Detailed description of the Account.
1. Click Address. The Address Details dialog box
appears.
2. Enter the address in Address Line 1 and Address Line
2 fields.
3. Enter the name of the City where the account is located
in the City field.
4. Enter the State, Province or Region Name where the
account is located in the State/Province/Region field.
5. Enter the Zip Code in the Zip/Postal Code field.
6. Select the country of the account from the Country
drop-down list.
7. Click OK. The address appears on the New Account
screen.
This is not a mandatory field.
Phone Number
Enter the phone number for the contact person in the
company.
Appendix provides the list of acceptable formats for
entering phone numbers in ACOS.
Uncontrolled when printed © RISCO Group 9
Page 18
User Manual for ACOS
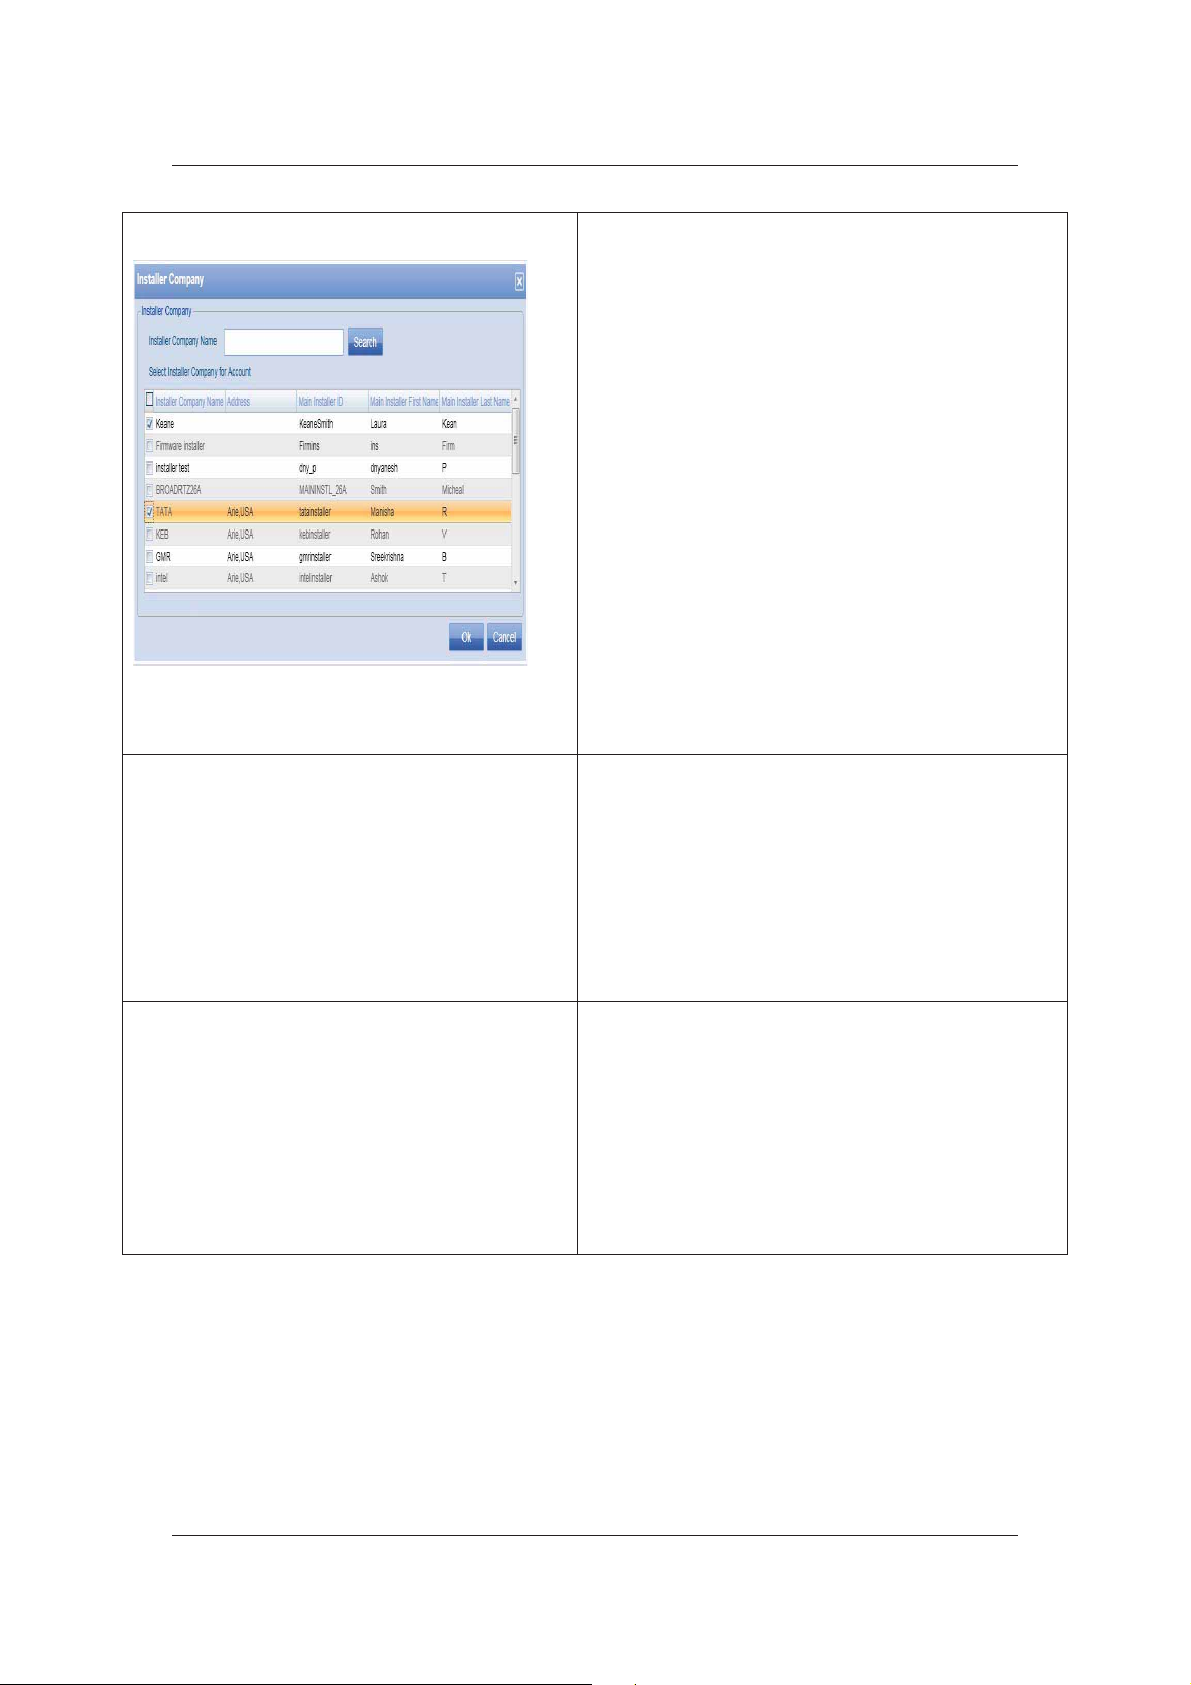
Installer Company
Language
1. Click Add. The Installer Company dialog box appears.
2. Conduct a blank search for these companies or type the
search criteria and click Search. The list of installer
companies matching the search criteria appears. The
details of the installer companies displayed are:
• Installer Company Name
• Address
• Main Installer ID
• Main Installer First Name
• Main Installer Last Name
2. Select the check box against the installer company that
you want to assign to this account.
3. Click OK. The Installer Company name appears in the
field.
You can assign multiple installer companies to a single
account.
Select the preferred language. The available languages
are English, French, Italian and Hebrew. The Account
Language will be used to create the Default Data in the
AMAC. The Language selected here will be the default
language of the main section and the main user created
for the account.
Server Type
For example, if you select Hebrew for an account, then
when the user logs on to ACUS, the home page and all
the labels and fields appear in Hebrew.
Select the AMAC server type used by the account from
the drop-down list. The server types available are:
• VIP: The account will be maintained on the
RISCO Server but will be a dedicated server for
such esteemed customers and the access to
these accounts will be on a priority basis.
• Non VIP: The account is maintained on the
RISCO Server. There could be multiple customer
accounts managed on the same server.
Uncontrolled when printed © RISCO Group 10
Page 19

User Manual for ACOS
Logging Select the Logging Enabled check box to enable logging
all transactions for the newly created account. You can
select either Database or Windows NT for the logging
activity as per the business requirement
Database: The error logging or any other information
logging through application will be made in database
tables.
Windows NT: This will indicate that the error logging or
any other information logging through application will be
done through the Windows NT (OS) logger.
Logging is enabled for ACUS only.
Days to Keep Audit Log
Auditing Enabled Select the Auditing Enabled check box if you want to
Enter the number of days that you want to maintain the
Audit Log.
Note: You can enter this data only if the Auditing
Enabled check box is selected.
enable auditing. All actions or configurations made by the
Installer and User are audited.
3.2 License Details of an Account
After you enter the details in the General tab, you must enter the licensing details for the account.
To enter License details:
1. Click the License tab. The License dialog box is displayed. The Account Reference
Number and Account Name appear by default.
Uncontrolled when printed © RISCO Group 11
Page 20
User Manual for ACOS
Figure 7: License Details
2. Select the check boxes against the required Licenses under the Number of Licences
column.
The available licences are:
Field Name Description
Access Control Module
Alarm management
Automation
Management
Select this check box to provide the Access Control Module license. If this license
is not provided, the user will not be able to logon to ACUS.
Note: If this license is not provided for an account, the users will not be able
to log on to ACUS. However, you can configure it later.
This license allows the client to enable the alarms function. User can manage
alarms through ACUS. An alarm will be triggered for Forced Door Entry, Broken
Door, Illegal Entry, Fire and so on. If this license is not available, then the user will
not be able to configure Alarms in ACUS.
This allows the user to automate certain actions in ACUS. The Automation module
is enabled. The user can pre-configure programs that can be run on a desired
time and schedule.
Bandwidth Usage For the Bandwidth Usage license, select High, Medium or Low based on the
requirement for the account.
Uncontrolled when printed © RISCO Group 12
Page 21

Field Name Description
User Manual for ACOS
Custom Reports
Graphic Printing of
Badges
Hebrew Support, Italian
Support, French
Support, English
Support
Logical Access Web
Service
There are two kind of reports:
• Predefined reports
• Custom reports
If you select this check box, the ACUS user can customize the report types and
generate reports in ACUS.
This allows the printing of cards. Displays the layout for the badges (cards). A
convenient layout may be chosen for the printing of individuals’ badge. If this
licence is not available, the user will not be able to access the Card Layout
function and will not be able to print cards.
Select the check boxes against the languages whose support will be available to
the RAC system applications. For example, if you select only English and French,
then the ACUS User will be able to logon and view the RAC system applications in
English and French languages only.
This license is used to find the location of the card holder with the help of a Web
service. In this Web service, we enter the details of the card holder and get the
present location of the card holder.
For example, If a user’s employee number is an attribute to search and in the Web
service, you enter the employee number, it will return you the present location of
the user (For example, zone 4).
Maps In Dashboards
Maximum Number of
Persons
Maximum Number of
Users
Number of Biometric
Readers
This license allows the company to create and view maps of the location where
RAC system is installed. It shows the plan of the location and the positions of the
Doors, Relays, Sensors, and Readers. Accessing the sensors will change the icon
for the sensor. It will be a pictorial representation.
Restricts the number of person ID’s from being created using ACUS. These
licenses will come into play while creating the cards for the individuals.
If the number of Person ID’s created in ACUS exceed the licence, then a warning
message is displayed that informs the user that the licence limit is being
exceeded. However, it allows the user to create more persons. The warning
message will keep appearing at regular intervals.
You may specify the number of users that will use ACUS application in the RAC
system.
This defines the number of required Biometric Readers.
Biometrics refers to methods for uniquely recognizing humans based upon one
or more intrinsic physical or behavioural traits. There are several forms of
biometric identification employed in access control: fingerprint, hand geometry,
iris and face recognition. Biometric Reader is a reader that identifies these human
attributes.
If the number of Biometric Readers used exceeds the licence, then a warning
message will appear each time a Biometric Reader is used in ACUS. The warning
Uncontrolled when printed © RISCO Group 13
Page 22

Field Name Description
message will inform the user that the licence is exceeded. It will however, allow
the user to use Biometric Readers.
User Manual for ACOS
Number of Doors
Number of Proxies
RAC Simultaneous Users
Real Time Event Export
Number of doors for the entry-exit movement at the location. Each account will
be provided with a license of using the access control system on a certain number
of doors.
If the number of doors used exceeds the licence, then a warning message will
appear each time a door is created in ACUS. The warning message will inform the
user that the licence is exceeded. It will however, allow the user to configure
doors. The warning message will keep appearing at regular intervals.
Controller and the Server communicate through proxy. Depending on the system
load, multiple proxies can be configured to accelerate the speed of response.
Accordingly, one can decide upon the number of proxies. We can leverage
creation of those many proxies as defined in this field.
If the number of Proxies registered exceeds the licence, then a warning message
will appear each time a proxy is registered in ACIS. The warning message will
inform the user that the licence is exceeded. It will, however, allow the user to
register Proxies.
This license value by default is 1. It defines the number of ACUS instances that can
be opened simultaneously.
For example, if the number of licenses for RAC Simultaneous Users is 2, then a
maximum of 2 instances of the ACUS application can be opened simultaneously
on the same machine.
The user will be able to export events using the Event Export function.
Real Time Validation
Web Service
This allows the user of ACUS to get the card details of the card holder with the
help of a third party interface.
SLA Usage For the SLA Usage license, select Platinum, Gold or Silver based on your
requirement.
Zone Management
This allows the user to add and configure Zones in a section.
Uncontrolled when printed © RISCO Group 14
Page 23
3.3 Technical and Personal Contact Details
To add contact details:
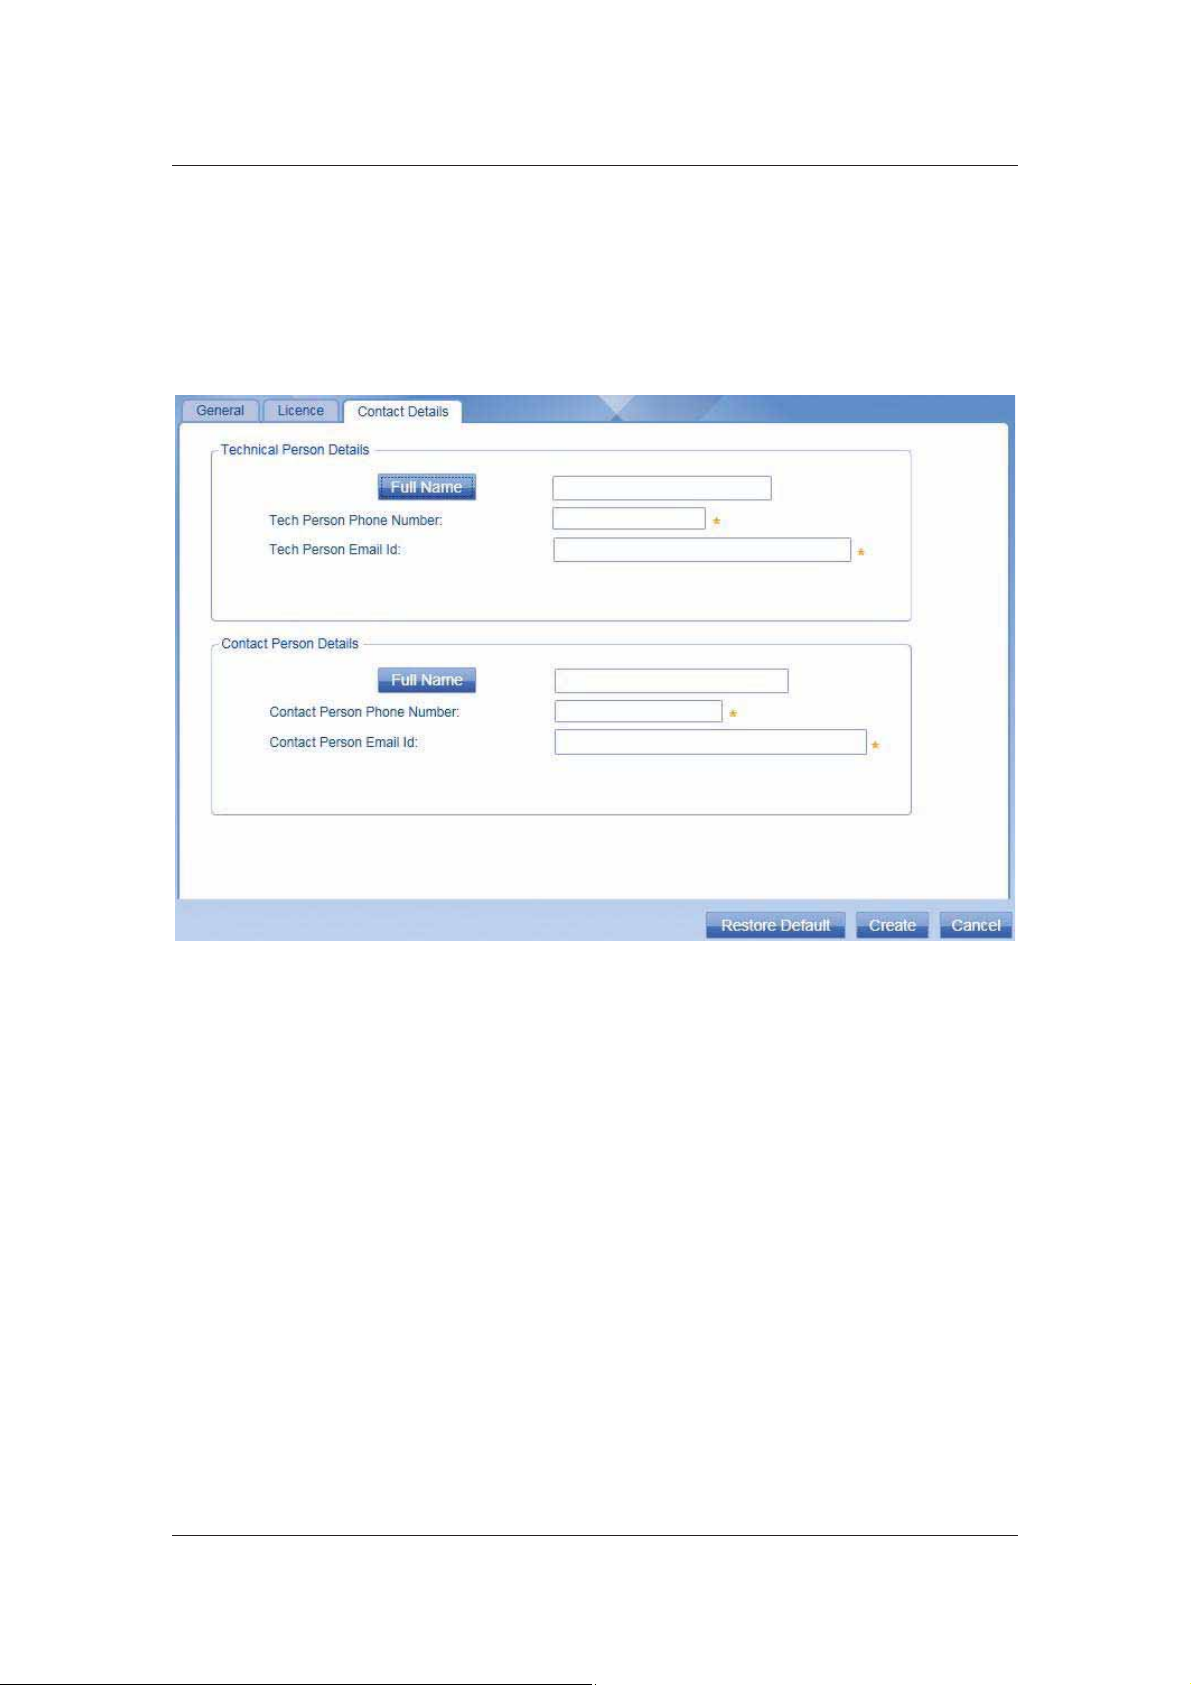
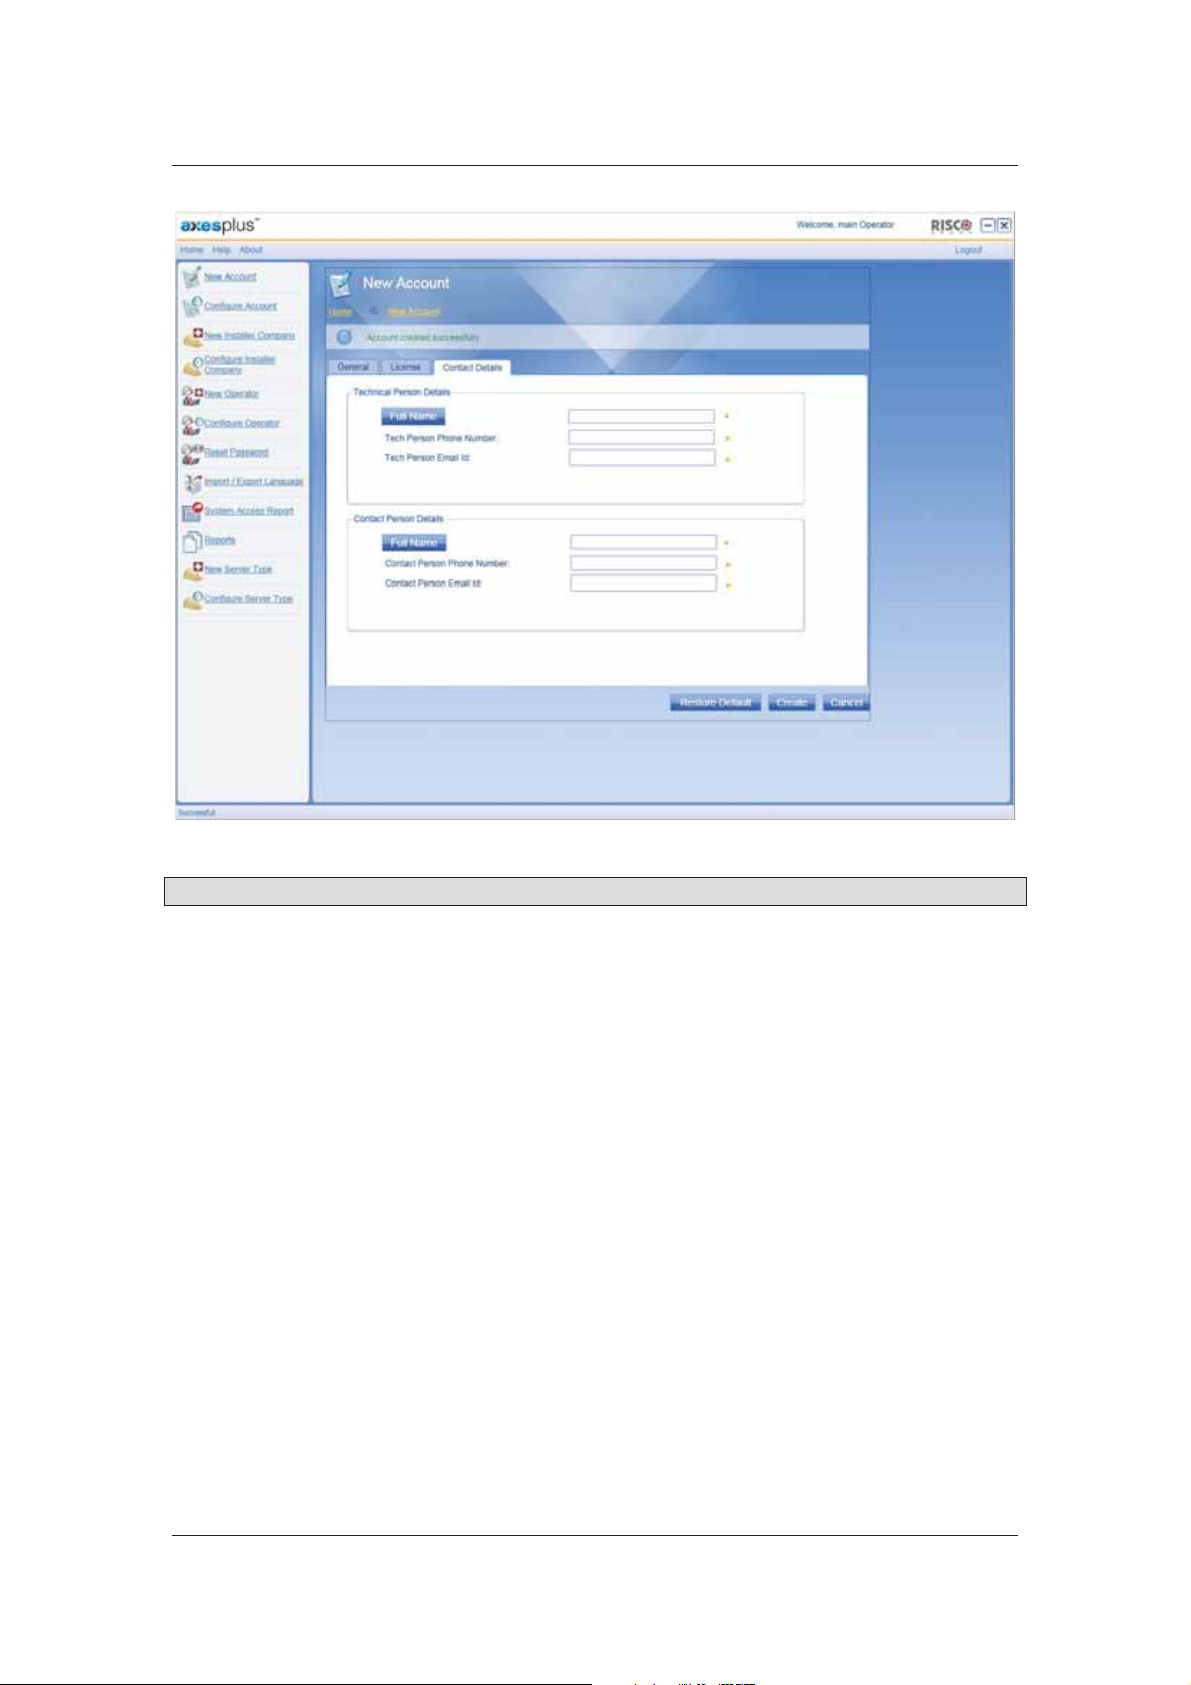
1. Click the Contact Details tab.
User Manual for ACOS
Figure 8: Contact Details
2. Click Full Name under the Technical Person Details. The Full Name dialog box appears.
Uncontrolled when printed © RISCO Group 15
Page 24
User Manual for ACOS
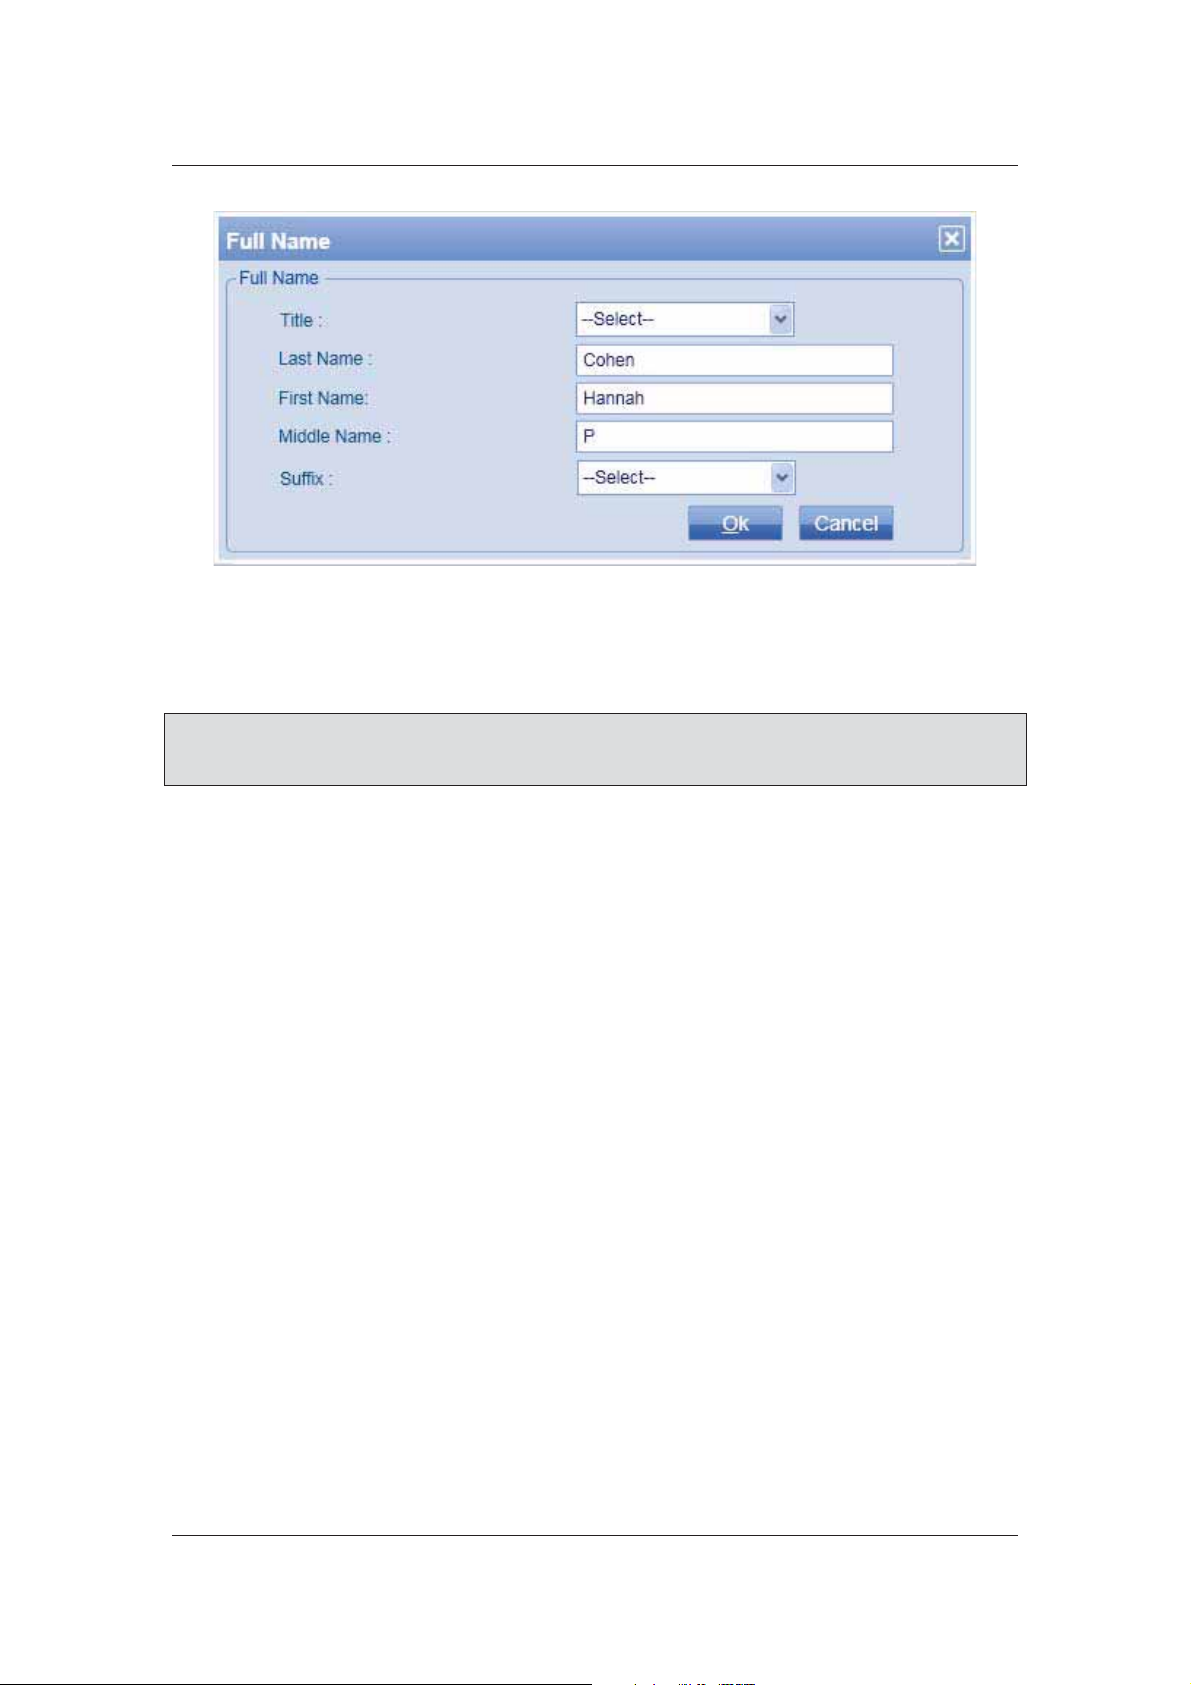
Figure 9: Full Name
3. Select the title from the Title drop-down list. Enter the last name, the first name and the
middle name in the Last Name, First Name and Middle Name fields. Select a suffix from
the drop-down list if required.
Note: You can also enter the Technical Person Contact name in the name field. The separator is
a space. For example, if you enter the name as HannahCohen, then it will be recognised
as only the last name by the system. Hence, use a space to separate the names.
4. Click OK. The Technical Person Contact Name is displayed in the name field on the screen.
5. Enter the Phone Number and Email ID in the respective fields. You can enter the phone
number in any format.
6. Similarly, enter the contact details for the contact person under Contact Person Details.
7. Click Create. The system displays a message, “Account created successfully”. The
status on the bottom-left corner of the screen changes to successful.
Uncontrolled when printed © RISCO Group 16
Page 25
User Manual for ACOS
Figure 10: Account Created Successfully
Note: You can click Restore Default to restore the default field values.
When an account is created, the Main User ID and Main Section are created. You can log on to ACUS
using the default login ID and Password.
3.4 View Process Status
You can click Status to view status of the task. For example, if you create an account and click Status,
the process status for account creation appears.
Uncontrolled when printed © RISCO Group 17
Page 26
User Manual for ACOS
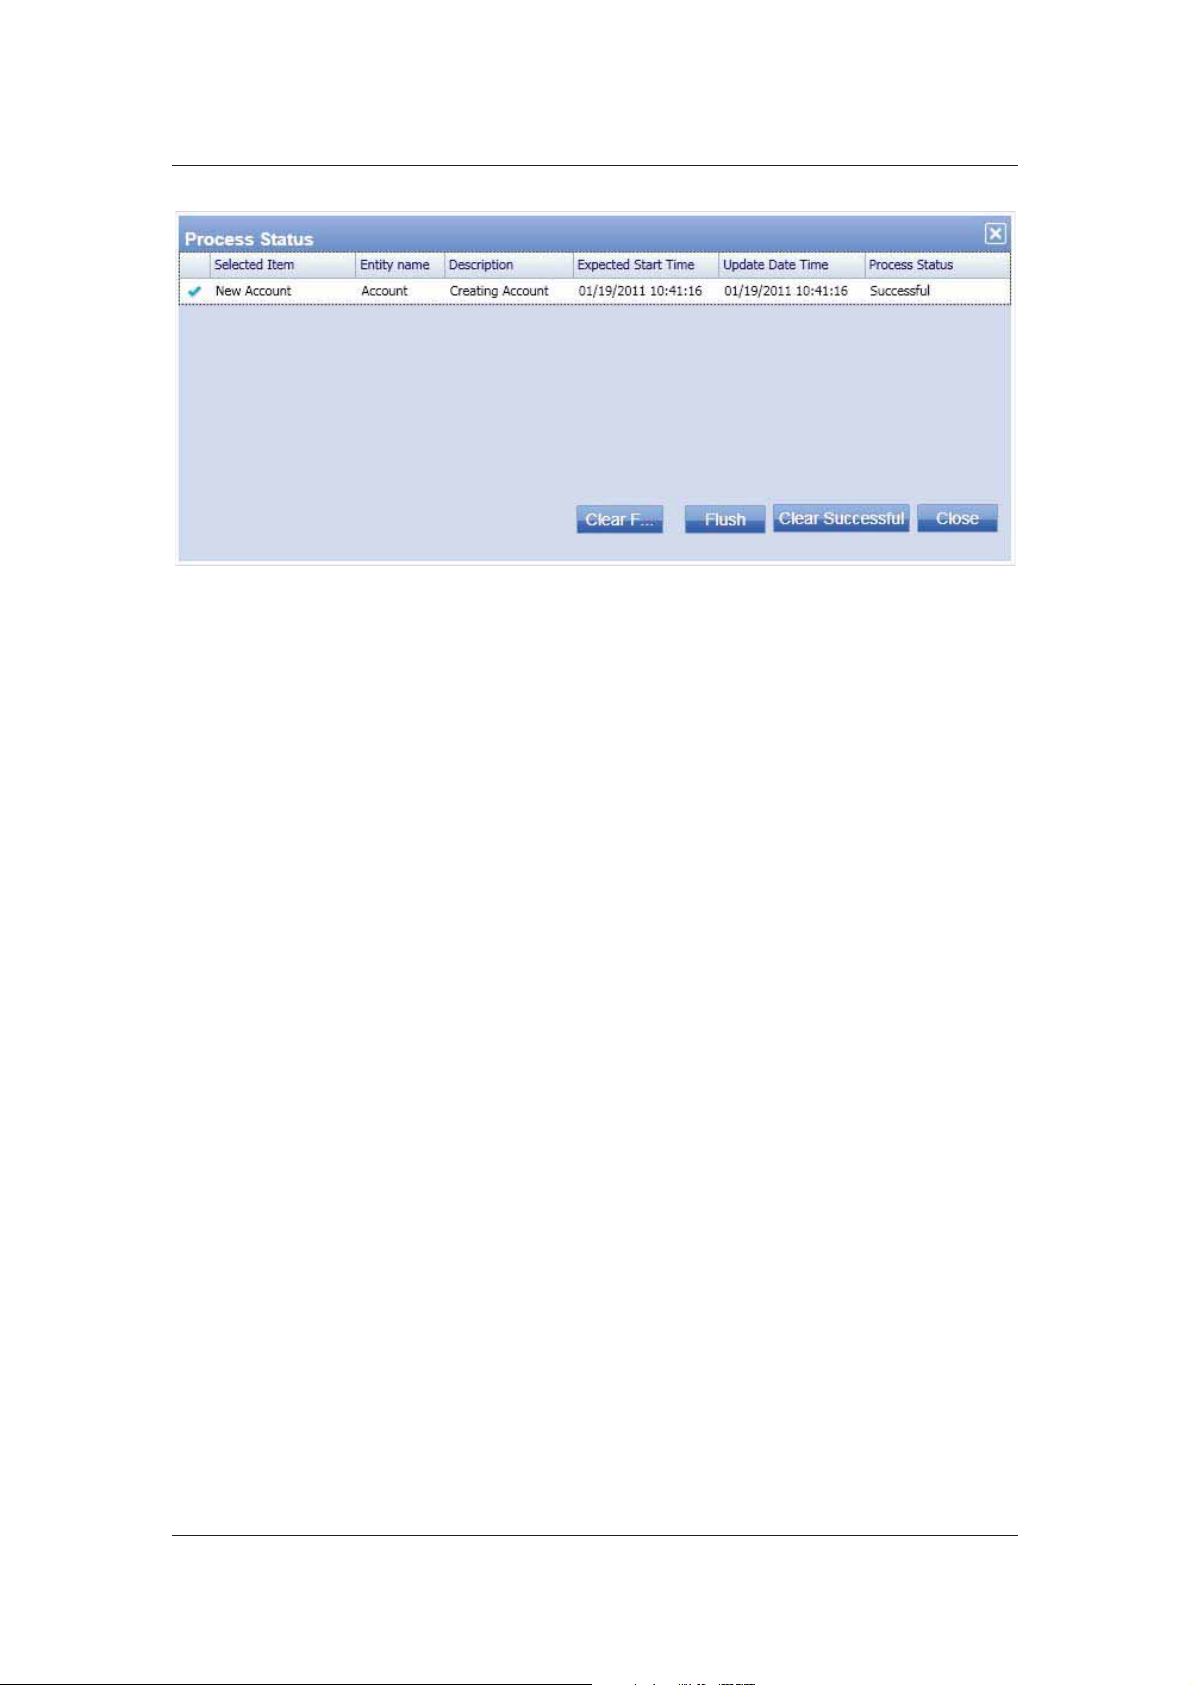
Figure 11: Process Status
The details such as Selected Item, Object Name, Description of the task that you performed; Expected
Start Date, Update Date and Time, Process Status and Progress details are displayed.
• Click Clear Failure to clear all the messages whose Process Status is ‘Fail’.
• Click Flush to clear all the status messages irrespective of the status.
• Click Clear Successful to clear all the messages whose Process Status is
‘Successful’.
• Click Close to close the window.
.
Uncontrolled when printed © RISCO Group 18
Page 27
User Manual for ACOS
4 Configuring an Account
You can configure and edit accounts after they have been created. Search for the accounts and then
configure them. The following section describes how to search for accounts for configuration.
4.1 Search Accounts
To search accounts:
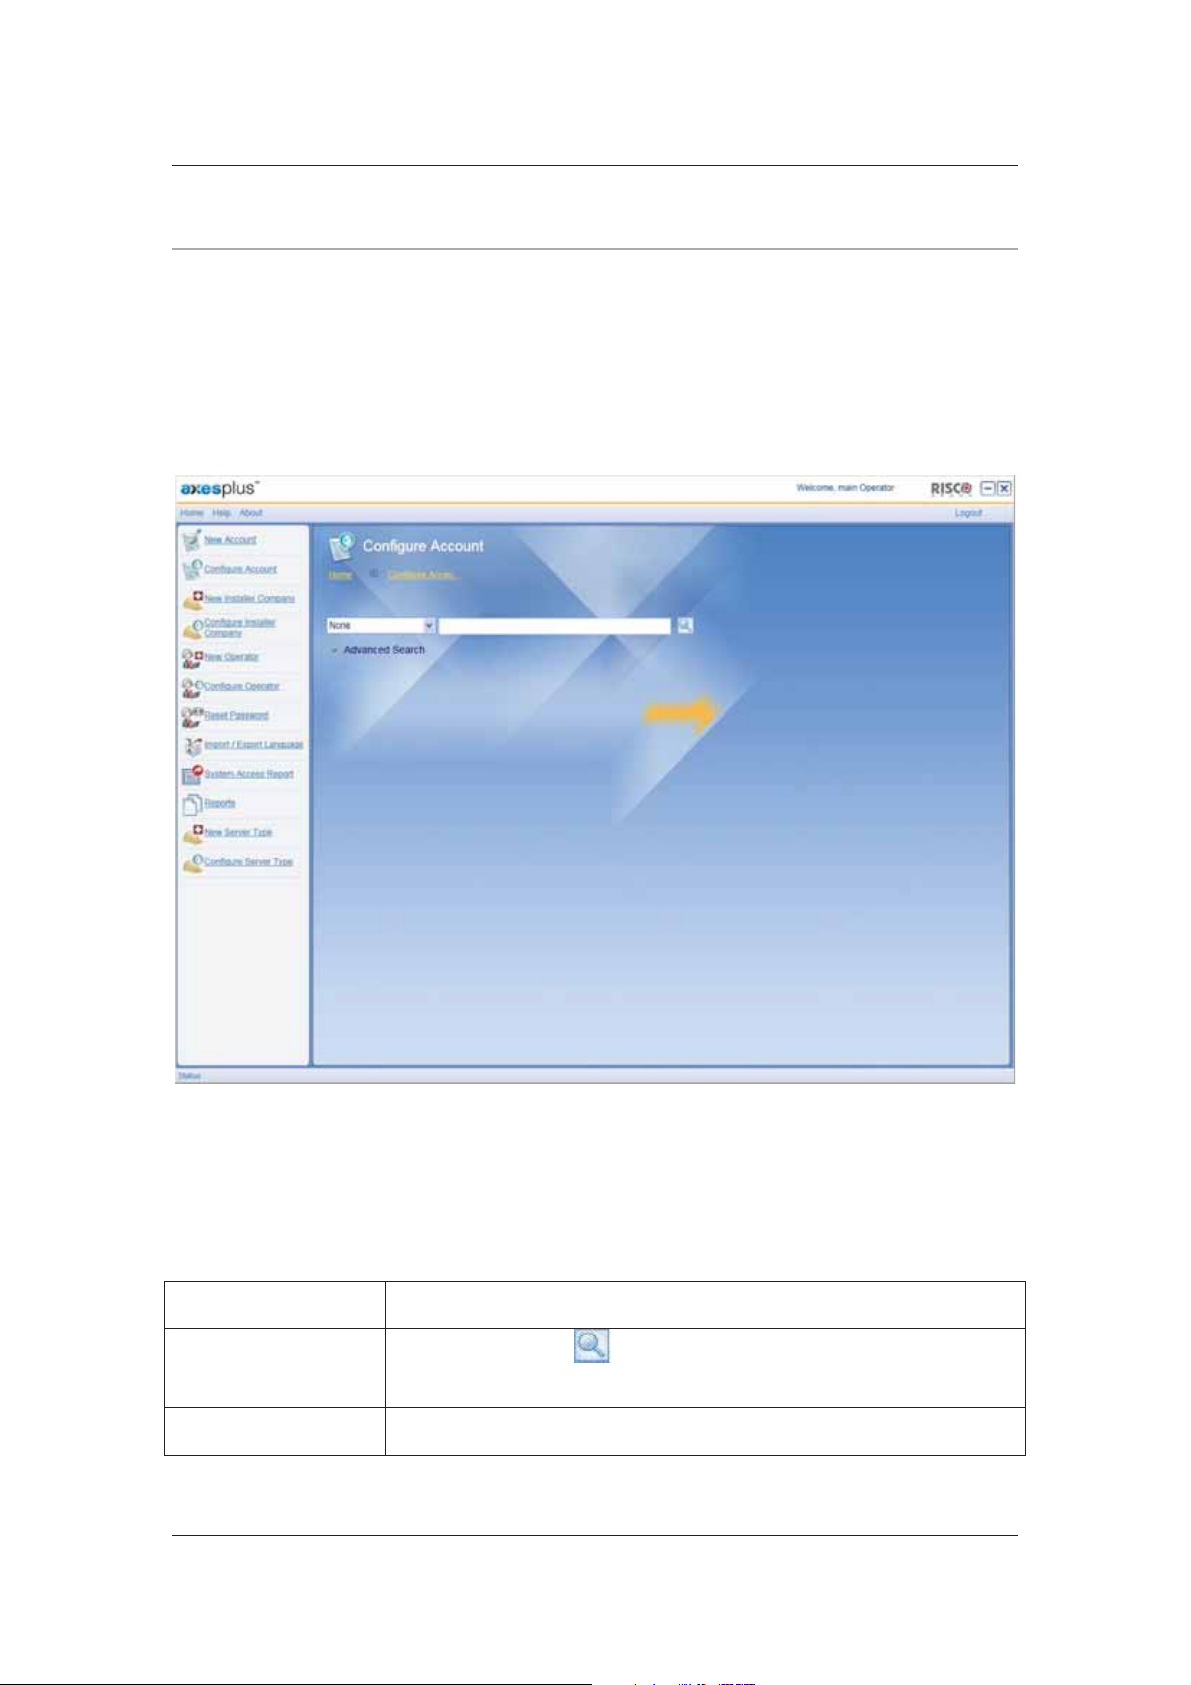
1. On the home page, click Configure Account. The Configure Account screen appears.
Figure 12: Configure Account
4.1.1 Basic Search
The Basic Search can be carried out using the following parameters. Select any of the parameters from
the drop-down list.
Field Name Description
None
All
Uncontrolled when printed © RISCO Group 19
Select None and click
displayed.
Select All from the drop-down list and enter the search criteria in the
(Search). All Accounts created in the system are
Page 28

User Manual for ACOS
adjacent field and click (Search). For example, select All and enter “a”.
The search will display all the Accounts whose Commercial Persona Name or
Technical Person Name or Account Ref No or Account Name contains the
letter “a”.
Comm. Person Name
Tech. Person Name
Account Ref. Number
Account Name
Select Comm. Person Name from the drop-down list and enter the search
criteria in the adjacent field and click
Comm. Person Name and enter “a”.
The search displays all the Accounts whose Commercial Person Name
contains the letter “a”.
Select Tech. Person Name from the drop-down list and enter the search
criteria in the adjacent field and click
Tech. Person Name and enter “a”.
The search displays all the Accounts whose Technical Person Name contains
the letter “a”.
Select Account Ref. Number from the drop-down list and enter the search
criteria in the adjacent field and click
Account Ref. Number and enter “a”.
The search displays all the Accounts whose Account Ref Number contains
the letter “a”.
Select Account Name from the drop-down list and enter the search criteria
in the adjacent field and click
Name and enter “a”.
(Search). For example, select Account
(Search). For example, select
(Search). For example, select
(Search). For example, select
The search displays all the Accounts whose Account Name contains the
letter “a”.
4.1.2 Advanced Search
You can search for an account using the advanced search. Advanced Search function offers you more
criteria’s for searching an account. For an advanced search:
1. Click Configure Account. The Configure Account screen appears.
Uncontrolled when printed © RISCO Group 20
Page 29

User Manual for ACOS
Figure 13: Advanced Search
2. Click Advanced Search.
Figure 14: Advanced Search - Accounts
3. Enter details in any available fields and click Search. For example, select the country name
as India from the Country drop-down list and click Search. The accounts that are based in
India will appear in the search result. You can also conduct a blank search.
Uncontrolled when printed © RISCO Group 21
Page 30

User Manual for ACOS
Figure 15: Advanced Search - Example
After the list of accounts appear, select the account that you want to configure and click Configure. You
can also delete an account from this screen.
4.2 Configure Account
To configure an existing account:
1. From the search results, select the account name that you want to configure and click
Configure. The General tab appears with the general details of the account.
Uncontrolled when printed © RISCO Group 22
Page 31

User Manual for ACOS
Figure 16: Configure Account
You can make changes to the General Details, and click the Licence, and Contact Details tabs to make
changes.
Note: At any point in time, you can click Cancel to quit the configuration. Fields marked with an
asterisk (*) are mandatory.
2. Click the Statistics tab. The number of licenses used in the particular account is displayed
in each of the fields.
Uncontrolled when printed © RISCO Group 23
Page 32

User Manual for ACOS
Figure 17: Statistics
The details displayed are:
Field Name Description
Number of Person
Number of Door
Number of Sections
Number of Proxies
Number of Controllers
Number of Cards
Number of Online
Events
SLA Usage
Bandwidth Usage
The number of persons added in this account is displayed.
The number of doors configured in this account is displayed.
The number of sections created in this account is displayed.
The number of proxies registered and configured in this account is
displayed
The number of controllers configured in this account is displayed.
The number of cards assigned to persons in this account is displayed
The number of online events in this account is displayed.
The SLA usage category is displayed. It can be Platinum, Gold or Silver
depending upon the Licence provided.
The Bandwidth Usage level is displayed. It can be High, Medium or Low
depending upon the Licence provided.
3. Click Apply. The system displays a message, “Account updated successfully”
Uncontrolled when printed © RISCO Group 24
Page 33

As per your requirement, you can click any of the buttons as described below.
Field Name Description
User Manual for ACOS
Undo Changes
Restore Default
OK
Delete
Cancel
Note: You can use the and buttons to go to the previous and next accounts and
configure them.
If you are not satisfied with the changes, click Undo Changes. This will not
save the changes and the original settings are restored.
The default field values are restored.
The changes are applied, saved and the window is closed. You return to
the home page.
The Account is deleted.
The Configure Account window is closed and you return to the home page.
The changes are not saved.
4.3 Delete an Account
There are two methods in which you can delete an account:
• While configuring an account, you may click Delete and the account is deleted. (For
details, refer to 4.2 Configure Account)
Or
• Delete account using the Configure Account function.
To delete an account:
1. Go to the Configure Account screen.
2. Search for an account that you want to delete. The results matching the search criteria
appear.
Uncontrolled when printed © RISCO Group 25
Page 34

User Manual for ACOS
Figure 18: Configure Account – Search Results
3. Select the account that you want to delete and click Delete. The following message
appears.
Figure 19: Delete Account
4. Click Yes. The Account is deleted from the system.
When an account is deleted, the firmware devices configured for that account are reset to Factory Reset
settings. All configured settings are deleted and you cannot access any RAC system applications.
Uncontrolled when printed © RISCO Group 26
Page 35

User Manual for ACOS
5 Creating New Installer Company
The installer (belonging to an Installer Company) installs the RAC system at the client site. You can
create installer companies in ACOS and assign them to accounts. Each installer company may have
access to multiple accounts. After the Installer Company is created, the Installers install the hardware
devices and configure the hardware and software to implement the RAC system. Only you can create
installer companies. When you create a new account, the account is assigned to an already created
installer company in ACOS.
5.1 Add an Installer Company
To create an installer company:
1. On ACOS home page, click New Installer Company. The New Installer Company dialog
box appears.
Figure 20: Create an Installer Company
Note: At any point in time, you can click Cancel to quit from the screen and return to the home
page. Fields marked with an asterisk (*) are mandatory.
2. Enter the following details to create an installer company.
Uncontrolled when printed © RISCO Group 27
Page 36

User Manual for ACOS
Field Name Description
Installer Company Reference Number
Installer Company Name
Address Details
Every Installer Company has a unique reference number
associated with it and every installer should know the installer
company reference for which he has the rights to do
installations. This is a mandatory alphanumeric field and the
field length can be between 1 and 255 characters.
Since this is a unique field in case of duplicate Reference
number , a message will appear with the following text:
“Reference ID exists. Please select another Reference ID"
A company which installs Risco systems at customer sites. An
installer company shall have one Main Installer, who has access
to all sections in the account and installs the RAC system at the
client site. An operator can assign any Installer Company to
manage any account. Multiple Installer Companies can be
assigned to a single account.
This is a mandatory field and the field length should be
between 1 and 100 characters
1. Click Address. The Address Details dialog box appears.
2. Enter the address in Address Line 1 and Address Line 2
fields.
3. Enter the name of the City where the account is located in
the City field.
4. Enter the State, Province or Region Name where the
account is located in the State/Province/Region field.
5. Enter the Zip Code in the Zip/Postal Code field.
6. Select the country of the account from the Country drop-
down list.
7. Click OK. The address appears on the New Account screen.
This is not a mandatory field.
Phone Number
Installer URL
Enter the phone number for the company in the field
http://www.<domain name>.<fixed length of maximum 3
characters> For example,
http://www.riscoinstallers.com
Browse Click Browse to upload the Installer Company Logo if available.
You can only upload JPEG, BMP or GIF image files.
Uncontrolled when printed © RISCO Group 28
Page 37

User Manual for ACOS
3. Click the Main Installer Details tab. When you create a new installer company, you create
a main installer who will log on to ACIS and perform the installation tasks. The Main
Installer can also create other installers.
Figure 21: Main Installer Details
4. Click Full Name. The Full Name dialog box appears.
Figure 22: Full Name
5. Select the title from the drop-down list. Enter the last name, the first name and the middle
name in the Last Name, First Name and Middle Name fields. Select a suffix from the dropdown list if required.
Uncontrolled when printed © RISCO Group 29
Page 38

User Manual for ACOS
Note: You can also enter the Main Installer name directly in the name field. The separator is a
space. For example, if you enter the name as AmiJosephWatson, then it will be recognised
as only the last name by the system. Hence, use a space to separate the names.
6. Click OK. The name of the Main Installer is displayed in the Name field on the screen.
7. Enter the Email address of the main installer in the Email Address field.
8. Enter the Login ID for the main installer in the Login ID field. This unique Identification
Number distinguishes each installer. The installer uses to log on to ACIS.
9. Enter the One Time Password (OTP) Device identification number in the OTP Device ID
field. OTP device is used for user authentication. The OTP Device is sent to the Installer
who uses it to logon to ACIS. This is a mandatory field and the value entered in OTP Device
ID field is validated with the data on OTP server. OTP Serial Number length should be
between 1 to 100 Characters. It could be an alpha-numeric value also. For example,
F797877, DIV0010, GQ145689.
10. Click Create. The system displays a message, “Installer Company created successfully”.
Figure 23: Installer Company Created Successfully
When an installer company is created successfully, then an email with the user name and OTP Device ID
is sent to installer’s email address specified in the Main Installers tab. For example, the following figure
illustrates the sample of an email sent to the installer.
Uncontrolled when printed © RISCO Group 30
Page 39

User Manual for ACOS
Figure 24: Email Sent to an Installer
The installer from the installer company uses ACIS to perform the RAC installation tasks.
Uncontrolled when printed © RISCO Group 31
Page 40

User Manual for ACOS
6 Configuring an Installer Company
You can configure and edit Installer Companies after they have been created. Search for the Installer
Companies and then configure them. The following section describes how to search for Installer
Companies for configuration.
6.1 Search an Installer Company
To search Installer Company:
1. Click Configure Installer Company. The Configure Installer Company screen appears.
Figure 25: Search Installer Company
You can carry out a basic search using the following par
from the drop-down list.
Field Name Description
None
All
Uncontrolled when printed © RISCO Group 32
Select None and click
operator are displayed.
Select All from the drop-down list and enter the search criteria in the adjacent
ammeters. Select any one of the categories
(Search). All Installer Companies created by the
Page 41

User Manual for ACOS
field and click (Search). For example, select All and enter “a”.
The search will display all the installer companies whose Installer Name, Main
Installer Login ID, and Installer Company Name contains the letter “a”.
Installer Name
OTP Device ID
Main Installer
Login ID
Inst. Comp. Ref.
Number
Inst. Comp Name.
Select Installer Name from the drop-down list and enter the search criteria in
the adjacent field and click
(Search). For example, select Installer Name
and enter “a”.
The installer companies whose names contain the letter “a” appear.
Select OTP Device ID from the drop-down list and enter the search criteria in the
adjacent field and click
(Search). For example, select OTP Device ID and
enter “10”. The list of Installer Companies whose OTP device ID contains 10
appears.
Select Main Installer Login ID from the drop-down list and enter the search
criteria in the adjacent field and click
(Search). For example, select Main
Installer Login ID and enter “a”.
The list of installer companies whose Login ID contains “a” appear.
Select Installer Company Reference Number from the drop-down list and
enter the search criteria in the adjacent field and click
(Search). For
example, select Installer Company Reference Number and enter “1”.
The list of installer companies whose Reference Number contains “1” appears.
Select Installer Company Name from the drop-down list and enter the search
criteria in the adjacent field and click
(Search). For example, select Installer
Company Name and enter “a”.
The list of Installer Companies whose names contain the letter “a” appears.
6.1.1 Advance Search Mechanism
You can search for account using an advanced search. Advanced Search function offers you more
criteria’s for searching an account. For an advanced search:
1. Click Configure Installer Company. The Configure Installer Company screen appears.
2. Click Advanced Search. The Advanced Search dialog box is displayed.
Uncontrolled when printed © RISCO Group 33
Page 42

User Manual for ACOS
Figure 26: Advanced Search - Installer Company
3. Enter the details in any of the fields in the Advanced Search screen and click Search. For
example, enter the Installer Company Name as “Risco Installers” and select the Country
as “Israel” and click Search. The installer company matching the specified criteria appears.
Figure 27: Advanced Search - Results
You have to select the installer company name to configure the installer company.
Uncontrolled when printed © RISCO Group 34
Page 43

User Manual for ACOS
6.2 Configure an Installer Company
To configure an Installer Company:
1. From the search results, select the company name that you want to configure and click
Configure. The Configure Installer Company screen appears with the details of the Installer
Company. The Accounts assigned to the Installer Company are displayed in the Accounts
Assigned to Installer Company area.
Figure 28: Configure Installer Company
2. In the General Details tab, make required or intended changes.
3. Click the Main Installer Details tab.
Uncontrolled when printed © RISCO Group 35
Page 44

User Manual for ACOS
Figure 29: Main Installer Details
4. Make changes wherever required. After an installer is created, immediately the login
credentials of the Main Installer are sent to the email ID of the Main Installer. You can click
Re-send to resend the email.
5. Click Apply. The changes are saved and the message, “Installer Company updated
successfully” appears.
As per your requirement, you can click any of the buttons as described below.
Field Name Description
Undo Changes
OK
Delete
Cancel
Note: You can use the and buttons to go to the previous and next Installer
Companies and configure them.
If you are not satisfied with the edits that you made, click Undo Changes. This
will not save the changes and the original settings are restored.
The changes are applied, saved and the window is closed. You return to the
home page.
The Installer Company is deleted.
The Configure Installer Company window is closed and you return to the home
page.
Uncontrolled when printed © RISCO Group 36
Page 45

User Manual for ACOS
6.3 Delete an Installer Company
To delete an installer company:
1. Go to the Configure Installer Company screen.
2. Search for an Installer Company that you want to delete. The results matching the search
criteria appear.
Figure 30: Configure Installer Company – Search Results
3. Select an Installer Company that you want to delete and click Delete. The message
appears.
Figure 31: Delete Installer Company
4. Click Yes. The Installer Company is deleted from the system. If this Installer Company is
assigned to any account, then it is removed from the account.
Uncontrolled when printed © RISCO Group 37
Page 46

User Manual for ACOS
7 Creating a New Operator Profile
The Main Operator can create other operators. All operators have complete access to ACOS application
and view the account and installer company details.
7.1 Add an New Operator Profile
To create a new operator:
1. On the home page, click New Operator. The New Operator screen appears.
Figure 32: Create a New Operator
2. Click Full Name. The Full Name dialog box appears.
Uncontrolled when printed © RISCO Group 38
Page 47

User Manual for ACOS
Figure 33: Full Name
3. Select the title from the list. Enter the Last Name, First Name and Middle Name. You can
also select the suffix from the list.
4. Click OK. The Name appears in the Name field on the screen.
5. Enter the email address of the operator.
6. Enter the Login ID of the operator.
Note: The Login ID should be between 5 to 30 characters.
7. Enter the Phone Number of the operator.
8. Select the preferred language for the operator. The available languages are English,
French, Italian and Hebrew.
9. In the Authentication Mechanism area, click the Database option button, the
authentication mechanism will be Database. You can click OTP option button, the OTP
Device ID field appears. Enter the OTP Device ID. The OTP device will be sent to the
Operator which will generate a one-time password every time the operator wants to log on
to ACOS.
Note: If the Authentication Mechanism is Database, then a system-generated Password will be
sent to operator along with the login Credentials. In this case, the operator will be asked to
change the password when logging for the first time.
If the Authentication Mechanism is OTP, then the OTP Device Number along with Login ID will
be sent to the Operator. On first time login, the Operator will not be asked to change the
Password.
By default, Database is selected.
10. Click Create. The system displays a message, “Operator created successfully” and the
dialog box with the operator’s credentials is displayed.
Uncontrolled when printed © RISCO Group 39
Page 48

User Manual for ACOS
Figure 34: Operator Credentials
11. Click OK. The random password is provided. The operator will be asked to change the
password at the first log on.
Note: At any point in time, you can click Cancel to quit from the screen and return to the home
page. Fields marked with an asterisk (*) are mandatory. You can click Restore Default to
reject the changes and restore the default field values.
After the operator is created, an email is sent to the operator informing the default username and
password. Following figure illustrates an example of the email sent to the operator.
Figure 35: Email sent to an Operator
Uncontrolled when printed © RISCO Group 40
Page 49

User Manual for ACOS
8 Configuring Operator Profile
You can edit and configure an operator after you create one. To configure an operator you need to
search operators from the system. The following sections describe how to search an operator using
basic and advanced search options and then configure the operator.
8.1 Search Operator
You can search an operator using either basic search or an advanced search. To perform a basic search:
1. On ACOS Home Page, click Configure Operator. The Configure Operator screen appears.
Figure 36: Search Operator - Basic
8.1.1 Basic Search
Select any of the categories from the drop-down list. The available options are:
Field Name Description
None
All
Uncontrolled when printed © RISCO Group 41
Select None and click
Select All and enter the search criteria in the adjacent field and click
(Search). All operators in the system appear.
Page 50

User Manual for ACOS
(Search). For example, enter “a” and click Search.
The Operators whose Last Name, First Name, Middle Name, Login ID’s or
Email Address contains the letter “a” appear.
Login ID Select Login ID and enter the search criteria in the adjacent field and click
(Search). For example, enter “a” and click Search.
The operators whose Login ID contains the letter “a” appears.
Operator Name Select Operator Name and enter the search criteria in the adjacent field and
click
The operators whose Last Name, First Name or Middle Name contains “a”
appears.
8.1.2 Advance Search
Advance Search offers more criteria to search operators in ACOS.
Figure 37: Advanced Search - Operators
1. Enter the details in any of the fields in the Advanced Search screen and click Search. For
example, enter the Operator Name as “Roberta” and click Search. The Operator matching
the specified criteria appears.
(Search). For example, enter “a” and click Search.
Uncontrolled when printed © RISCO Group 42
Page 51

User Manual for ACOS
Figure 38: Advanced Search - Results
You have to select the Operator Name to configure the Operator Name.
8.2 Configure Operator
To configure an operator:
1. From the search results, click the Operator Name that you want to configure. The
Configure Operator screen appears. The details of the operator are displayed.
Uncontrolled when printed © RISCO Group 43
Page 52

User Manual for ACOS
Figure 39: Configure Operator
2. Make changes wherever required.
After you have made changes, you can click any of the buttons as described below.
Field Name Description
Undo Changes
Restore Default
Apply
OK
Delete
Cancel
This will not save the changes and the original settings are restored.
The default field values are restored.
The changes are applied and saved.
The changes are applied, saved and the window is closed. You return to
the home page.
The Operator is deleted.
The Configure Operator window is closed and you return to the home
page.
Uncontrolled when printed © RISCO Group 44
Page 53

User Manual for ACOS
Note: You can use the and buttons to go to the previous and next Operators and
configure them.
8.3 Delete an Operator
To delete an Operator:
1. Go to the Configure Operator screen.
2. Search for an operator that you want to delete. The results matching the search criteria
appear.
Figure 40: Configure Operator – Search Results
3. Select an Operator that you want to delete and click Delete. The message appears.
Figure 41: Delete Operator
Uncontrolled when printed © RISCO Group 45
Page 54

4. Click Yes. The Operator is deleted from the system.
User Manual for ACOS
Uncontrolled when printed © RISCO Group 46
Page 55

User Manual for ACOS
9 Reset Password
As a main operator, you can reset password for other operators. You have to reset password in following
scenarios:
• The operator Login ID is locked after three failed attempts.
• Password expires for an operator.
To reset password:
1. On ACOS home page, click Reset Password. The Reset Password screen appears.
Figure 42: Reset Password
To reset password, you need to search the operators. You can perform a basic or an advanced search.
Uncontrolled when printed © RISCO Group 47
Page 56
User Manual for ACOS
9.1 Basic Search
You can search for an operator whose password needs to be reset using the following options.
Field Name Description
None
All
Login ID Select Login ID and enter the search criteria in the adjacent field and click
Operator Name Select Operator Name and enter the search criteria in the adjacent field and
Select None and click
Select All and enter the search criteria in the adjacent field and click
(Search). For example, enter “a” and click Search.
The Operators whose Last Name, First Name, Middle Name, Login ID’s or
Email Address contains the letter “a” appear.
(Search). For example, enter “a” and click Search.
The operators whose Login ID contains the letter “a” appears.
click
The operators whose Last Name, First Name or Middle Name contains “a”
appears.
(Search). For example, enter “a” and click Search.
(Search). All operators in the system appear.
9.2 Advanced Search
You may also search using the Advance search as follows. The advance search is an exact search. To
perform an advanced search:
1. Click Advanced Search. The advanced search criteria’s appear.
Uncontrolled when printed © RISCO Group 48
Page 57

User Manual for ACOS
Figure 43: Advanced Search - Reset Password
2. Enter either Operator Name or Login ID and click Search. For example, enter the letter
“R” in the Operator and Login ID field and click Search. The operators whose names or
Login ID contains the letter “R” appear.
Uncontrolled when printed © RISCO Group 49
Page 58

User Manual for ACOS
Figure 44: Search Results – Advanced Search
Note: You can click Reset to reset the field values and perform new search.
9.3 Reset Password
After you have searched operators using basic or advanced search options, you can select any operator
and reset password for the operator.
1. From the search results, select any operator and click Reset Password. When the
password is reset, the system displays a message, “Reset Password successful”.
When the password is reset, an email is sent to the operator notifying the new password. The following
figure illustrates the email that will be sent.
Uncontrolled when printed © RISCO Group 50
Page 59

User Manual for ACOS
Figure 45: Email Example - Reset Password
The operator can use the password to logon to ACOS. After you logon to ACOS using the new password,
the Change Password screen appears. You must change your password.
Uncontrolled when printed © RISCO Group 51
Page 60

User Manual for ACOS
10 Importing/Exporting Multi-Lingual Files in ACOS
You can import or export the localization data for ACOS, ACUS, ACIS and ACWS. For example, if you
want to change the labels that will appear in French to another dialect of French, you can export the
file, make changes and import it in ACOS and re-login to ensure that the changes are reflected. From
ACOS, you can edit the labels which will appear in a language that you select for other RAC system
applications − ACIS, ACUS and ACWS.
You can edit language using two methods.
• You can import a language file directly. However, the file should be in the appropriate
template as required in ACOS.
• You can export the language file from ACOS, edit and then import again in ACOS.
The changes will be reflected.
Note: You can only import or export localization data for ACOS, ACIS, ACUS, and ACWS from
ACOS.
To edit language:
1. On ACOS Home Page, click Import/Export Language. The Import/Export Language
screen appears.
Figure 46: Import/Export Multi-lingual Files
Uncontrolled when printed © RISCO Group 52
Page 61

User Manual for ACOS
2. Click the Export option button.
3. Select the Application Type from the drop-down list. For example, select ACOS. The
changes made in the language will reflect when you log on to ACOS.
Note: If you select ACUS, ACIS or ACWS, the server type drop-down list appears. You need to
select the type of server from the VIP and Non VIP options.
Figure 47: Server Type
4. In the Select Language area, select option button for any language that you require. For
example, select French.
5. Click Browse. The Save As dialog box appears.
Uncontrolled when printed © RISCO Group 53
Page 62

User Manual for ACOS
Figure 48: Save Language File
6. Enter a name and click Save to save the file anywhere on your local machine.
7. Click Export. The system displays a message, “Export to French_ACOS.xls successful”
8. Open the French_ACOS file. There are three sheets in the Microsoft Office Excel workbook
− Master Data_French, Error Messages_French, Screen Labels_French.
Uncontrolled when printed © RISCO Group 54
Page 63

User Manual for ACOS
Note: The Master Data sheet is for all common labels in ACOS. The Error Messages sheet
displays the error messages that occur in ACOS in French. The Screen Labels sheet
covers all the labels in ACOS application.
Figure 49: Exported File
9. Go to the MasterData_French sheet.
Note: You can only edit the Translation Text column. Do not change any data in the Translation
ID, Translation Value, List Name and Translation Proxy ID columns as it will lead to data
corruption in the system.
10. Change any of the labels that you want and save the file. For example, change Mlle to
Mademoiselle and save the file.
11. On the Import/Export screen in ACOS, click Import option button.
Uncontrolled when printed © RISCO Group 55
Page 64

User Manual for ACOS
Figure 50: Import Language File
12. Select ACOS from the Application Type drop-down list. If you have selected any other
application while exporting the file, select that particular application.
13. Select the French option button. You can select the language in which you had exported
the file and made changes.
14. Click Browse and select the excel workbook in which you made the changes.
Uncontrolled when printed © RISCO Group 56
Page 65

Figure 51: Browse and Select File
User Manual for ACOS
15. Select the file and click Open. The file name appears in the Browse File section in ACOS.
Figure 52: Import File Selected
Uncontrolled when printed © RISCO Group 57
Page 66

User Manual for ACOS
16. Click Import. The system displays a message, “French.xls is successfully imported into
database. To see the changes please login again”
17. Log out and log on to ACOS to view the changes.
Note: When you import localisation data for ACIS and ACWS for any language*, for example,
French, ensure that you delete the .bin files from the CultureResource folder. The folder is
located at the machine where ACIS and ACWS are installed (at the following path):
ACIS path: Inetpub\wwwroot\ACIS\Pages\CultureResources
ACWS path: Inetpub\wwwroot\ACWS\Pages\CultureResources
Here, you must delete the three .bin files namely, Entitiesfr-FR.bin, Errorfr-FR.bin and fr-
FR.bin
FR = French, EN= English, IT= Italian, HR = Hebrew, DT = Dutch.
*Delete the files according to the language selected for import.
After the files are deleted, you must reset IIS Service using iisreset command or recycle the
application pool from IIS.
Note: Select the language for which language file has been imported in ACOS and then log on.
For example, if you made changes in the French language file and imported in ACOS,
select French from the language drop-down list and log on to view the changes.
Uncontrolled when printed © RISCO Group 58
Page 67

User Manual for ACOS
11 Viewing System Access Report
The system Access Report provides details of the incorrect login attempts by operators in ACOS. The
system shall maintain an accessible list of all failed attempted accesses during the last 24 hours.
To view System Access Report:
1. On ACOS home page, click System Access Report. The details of incorrect login appear.
Figure 53: System Access Report
The details displayed are the Login ID, Status, Date and Time. You can sort the data according to the
Login ID, Status, Date and Time columns.
Uncontrolled when printed © RISCO Group 59
Page 68

User Manual for ACOS
12 Generating Reports
In ACOS, you can generate reports for accounts and installers. You can generate six reports. You cannot
view the reports in the application. You need to download the reports and save it on your local machine
to view them. The reports available are:
• Account Installer Company List
• Account License Report
• Account Report
• Installer Company Account Report
• Installer Company Installer Report
• Installer Company Report
To download and view ACOS reports:
1. On ACOS home page, click Reports. The Save as dialog box appears.
Figure 54: ACOS – Reports
2. Select a location and click Save to save the reports on your local machine. The six reports
are saved in the folder.
Uncontrolled when printed © RISCO Group 60
Page 69

User Manual for ACOS
Note: You can only generate reports in .csv format.
If you click the Status link at the left-bottom corner of the screen, the following screen is displayed.
Figure 55: Status for Reports Download
The Progress column displays that six reports are generated.
After you save the report, go to the location where you have saved and open the report. The report
opens with Microsoft Office Excel. The details of each report are described in the following sections.
To view the reports:
1. Go to the location where the reports are downloaded on your local machine.
Uncontrolled when printed © RISCO Group 61
Page 70

User Manual for ACOS
Figure 56: Report Types
Section 12.1 to 12. 6 illustrate the reports and the data that they contain.
12.1 Account Installer Company List Report
The Account Installer Company List report provides the details of the accounts created by the operator
and the installer companies assigned to each account.
Uncontrolled when printed © RISCO Group 62
Page 71

User Manual for ACOS
Figure 57: Account Installer Company List Report
The details described in the report are:
• Account Reference ID
• Account Name
• Installer Company Reference ID
• Installer Company Name
12.2 Account License Report
The Account Licence Report describes the licences provided to each account. The details described in
the report are:
• Account Reference ID
• Account Name
• License Module
• Number of Licenses
• Number of Licences Used
Uncontrolled when printed © RISCO Group 63
Page 72

User Manual for ACOS
Figure 58: Accounts License Report
The data in the report is generated based on the Licence Module. You can sort it according to the
Account.
12.3 Account Report
The Account Report displays all the details of each account created in ACOS. The report is displayed in
the following format.
Uncontrolled when printed © RISCO Group 64
Page 73

User Manual for ACOS
Figure 59: Account Report
The Account Report displays the details about the Account and its Logging details. It also provides data
on the technical personal and the Contact personal. The details described are:
• Account Reference ID
• Account Name
• Account Description
• Account Address
• Phone Number
• Server Type
• Logging To Database
• Logging To File
• Logging To NT Viewer
• Technical Person Name
• Technical Person Phone Number
• Tech Person Email Address
• Contact Person Name
Uncontrolled when printed © RISCO Group 65
Page 74
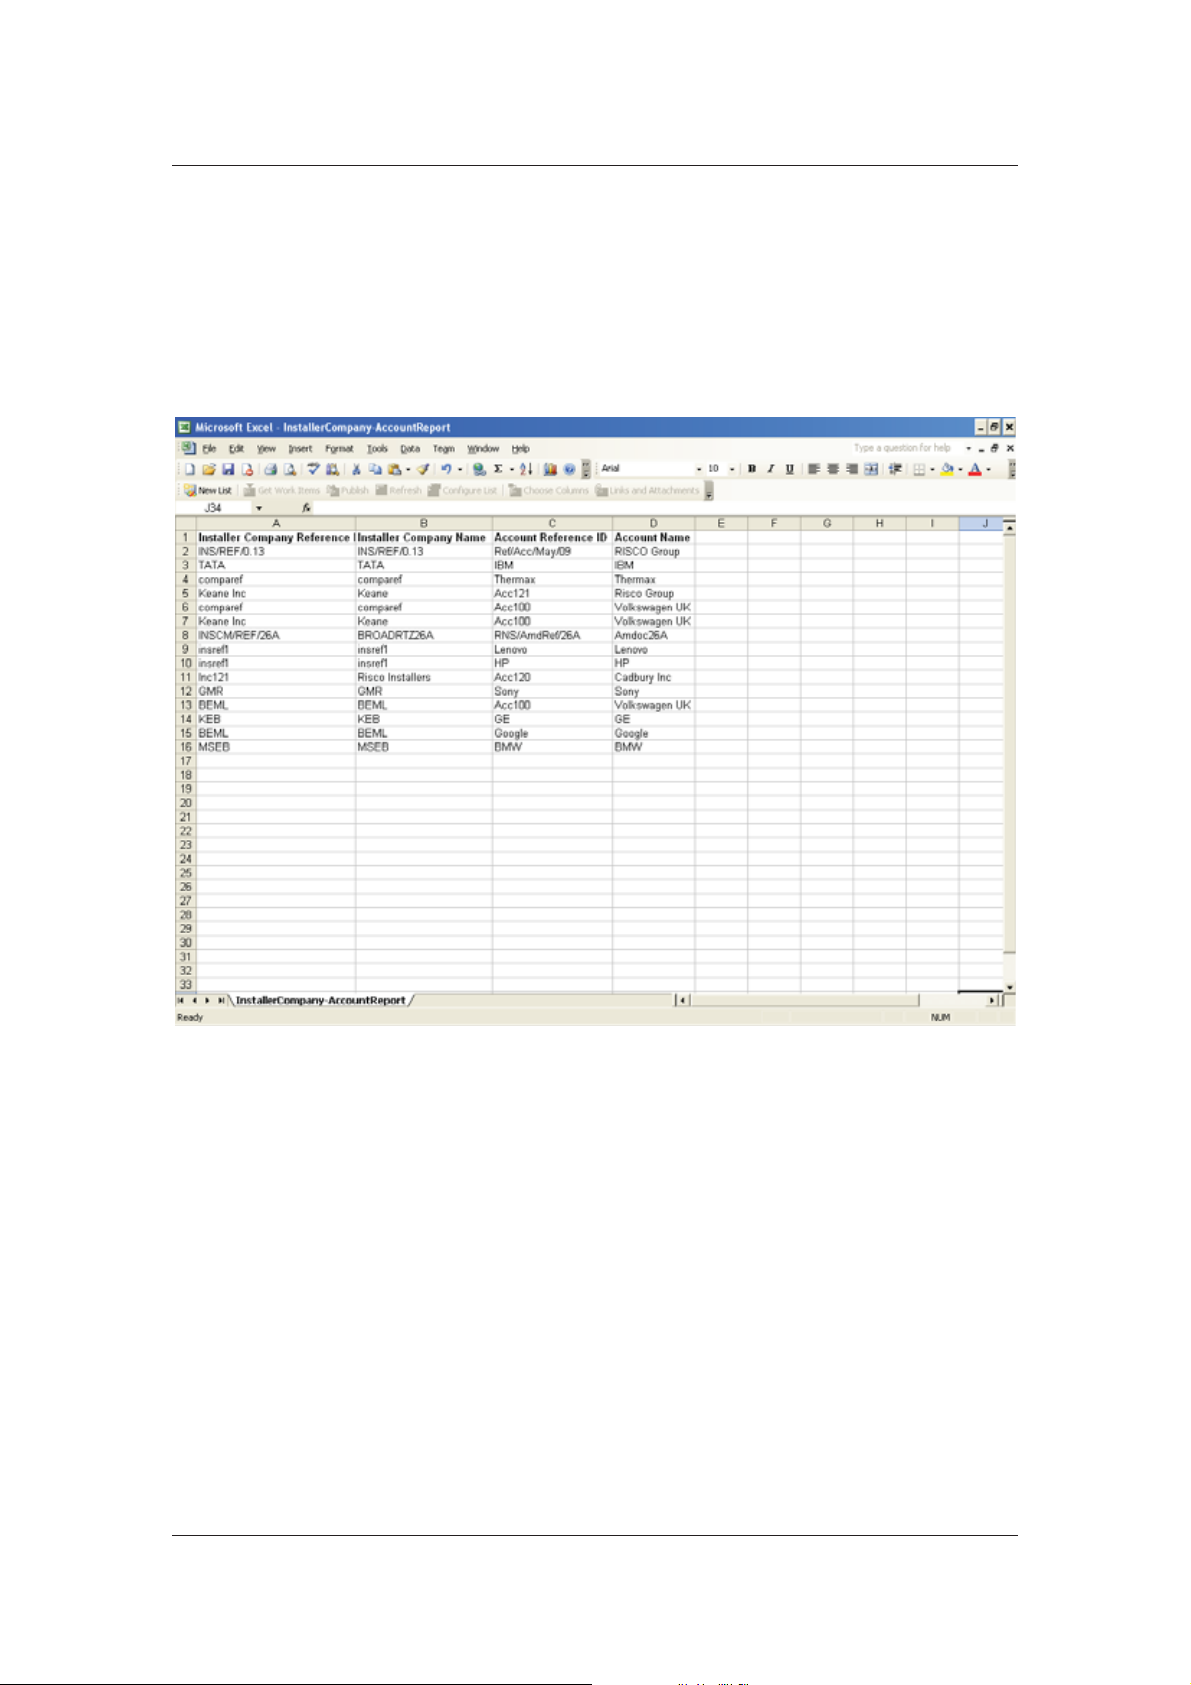
User Manual for ACOS
• Contact Person Phone Number
• Contact Person Email Address
12.4 Installer Company Account Report
The Installer Company Account Report provides the details of the Installer Company and the accounts
assigned to each installer company. The report is displayed in the following format.
Figure 60: Installer Company Account Report
The details are:
• Installer Company Reference ID
• Installer Company Name
• Account Reference ID
• Account Name
12.5 Installer Company Installer Report
The report provides details of the Installer Company and the main installer. The report is displayed in
the following format.
Uncontrolled when printed © RISCO Group 66
Page 75

User Manual for ACOS
Figure 61: Installer Company – Installer Report
The details in the report are:
• Installer Company Reference ID
• Installer Company Name
• Installer
• Login ID
• OTP Device Serial Number
12.6 Installer Company Report
The details of the Installer Company are provided. The report is displayed in the following format.
Uncontrolled when printed © RISCO Group 67
Page 76

User Manual for ACOS
Figure 62: Installer Company Report
The details displayed in the report are:
• Installer Company Reference ID
• Installer Company
• Address
• Phone Number
• Main Installer Name
• Email Address
• Login ID
• Main Installer Phone Number
• OTP Device ID
Uncontrolled when printed © RISCO Group 68
Page 77

User Manual for ACOS
13 Creating New Server Type
There are two server types available by default in ACOS – VIP and Non VIP. Apart from these, based on
the account holder’s requirement, you may add new server types for accounts in ACOS. These will be
available in the Server Type drop-down lost while creating a new account. You need to provide required
AMAC server and DCC details for creating a new server type.
13.1 Create a New Server Type
To create a server type:
1. On the ACOS home page, click New Server Type. The New Server Type dialog box
appears.
Figure 63: New Server Type
2. Enter the name of the server type in the Server Type Name field.
3. In the AMAC Exec Server Details area, enter the server name in the Server Name field.
4. Enter the IP Address for the server in the Server IP Address field.
5. Enter the server domain name in the Server Domain field.
Uncontrolled when printed © RISCO Group 69
Page 78

User Manual for ACOS
14 Configuring Server Type
After the server type is created, it is visible in the New Account screen (Server Type drop-down list). You
may edit the server types as per your requirement.
14.1 Configure Server Type
To configure server type:
1. On the ACOS home page, click Configure Server Type. The Configure Server Type
screen appears.
Figure 64: Configure Server Type
2. Enter the server type name that you want to configure in the Server Type Name field and
click
Note: You may click to conduct a blank search. All Server Types will be displayed.
3. Select the server type name that you want to configure and click Configure. The Server
Type details are displayed.
Uncontrolled when printed © RISCO Group 70
(Search). The Server Types matching the search criteria appear.
Page 79

User Manual for ACOS
Figure 65: Configure Server Type – Details
4. Make changes wherever required and click Apply. The message appears, “Server Type
updated successfully”.
5. Click Cancel to return to the ACOS home page.
14.2 Delete Server Type Name
To delete server type:
1. On the ACOS home page, click Configure Server Type. The Configure Server Type
screen appears.
2. Enter the server type name in the Server Type Name field and click
Server Types matching the search criteria appear.
(Search). The
Uncontrolled when printed © RISCO Group 71
Page 80

User Manual for ACOS
3. Select the Server Type that you want to delete and click Configure. The Server Type
details appear.
4. Click Delete. The Delete Server Type dialog box appears.
Figure 66: Delete Server Type
5. Click Yes. The server type is deleted and the message appears, “Server Type deleted
successfully”.
Note: You can only edit the VIP and Non VIP server types. You cannot delete them from ACOS.
Uncontrolled when printed © RISCO Group 72
Page 81

User Manual for ACOS
Appendix
When you create an account, the contact details of the Technical and Contact Person in the account are
acceptable in certain formats.
The Phone Number formats supported in ACOS are:
Table 3: Acceptable Phone Number Formats in ACOS
+91-80-1234567 +91 80 1234567 +91 80-1234567
+91-80 1234567 +91.80.1234567 +91.80-1234567
+91-80.1234567 (91)80-1234567 (91)80 1234567
(91)80.1234567 +91-80-12345678 +91 80 12345678
+91 80-12345678 +91-80 12345678 +91.80.12345678
+91.80-12345678 +91-80.12345678 (91)80-12345678
(91)80 12345678 (91)80.12345678 +91-484-1234567
+91 484 1234567 +91 484-1234567 +91-484 1234567
+91.484.1234567 +91.484-1234567 +91-484.1234567
(91)484-1234567 (91)484 1234567 (91)484.1234567
+91-484-12345678 +91 484 12345678 +91 484-12345678
+91-484 12345678 +91.484.12345678 +91.484-12345678
+91-484.12345678 (91)484-12345678 (91)484 12345678
(91)484.12345678 +123-123-1234 +123 123 1234
+123 123-1234 +123-123 1234 +123.123.1234
+123.123-1234 +123-123.1234 (123)123-1234
(123)123 1234 (123)123.1234 +123-123-1234
+123 123 1234 +123 123-1234 +123-123 1234
+123.123.1234 +123.123-1234 +123-123.1234
(123)123-1234 (123)123 1234 (123)123.1234
123-123-1234 123 123 1234 123 123-1234
123-123 1234 123.123.1234 123.123-1234
123-123.1234 123-123-1234 (001)456-789-1234
Uncontrolled when printed © RISCO Group 73
Page 82

User Manual for ACOS
001-456-789-1234 4841801234 +91.1234567890
+91-1234567890 +91 1234567890 1-561-555-1212
1234567890 1234-1234567 123-12345678 (05)12341234
Uncontrolled when printed © RISCO Group 74
Page 83

Glossary
User Manual for ACOS
A
Account
Account Reference
Number
ACIS
ACOS
ACUS This application is developed as part of RAC system.
An Account is the physical location where RAC System will be
deployed and managed. Each client will have an account which
will be assigned an Account Reference Number which is a unique
reference number.
Each account is assigned an Account reference Number, which is
a unique identifier for the account. The Account Reference
Number is used while using ACUS and ACWS application.
The interface between the Installer and the RAC System. The
ACIS user is known as Installer. The installer uses ACIS to install
and configure the RAC at client site.
The interface between the Operator and the RAC system.
Operator uses ACOS to create a company account where
the RAC system will be implemented.
It will be smart client (or browser application)
This is the interface between the user and the system. It is used
to:
• Define AC logic
• Monitor AC events
I
• Handle AC Alarms
The access to the station is usually protected by a password.
AMAC Account Management Autonomous Component is a service that
is used to run ACOS.
Installer
Installer Company The Company that is responsible for installing hardware for the
A manager who has administrator rights on the account.
Installer administrates the physical entities of the AC system.
He can have the rights to:
• Create Sections
• View the entity properties
• Create new entities
• Modify the entity properties
• Add entities to it (if it is a group)
• Delete Sections
The Installer is usually employed by the installer company.
RAC system and configuring it. Risco assigns Installer Companies
Uncontrolled when printed © RISCO Group 75
Page 84

User Manual for ACOS
to each account which will install the RAC system at the client
site.
M
O
R
Main Installer When an operator creates an Installer Company in ACOS, the
Main Installer user profile is created. The Main Installer has
complete access to the particular account and all sections in the
account. The Main installer can add other installers for the
particular account.
Main Operator When ACOS is installed, the Main Operator user profile is created
by default. The Main Operator has complete access to ACOS.
Apart from creating new operators, the main operator can reset
password for all ACOS operators.
Main Section When an account is created, the main section is created by
default. The main section cannot be deleted.
Main User When an account is created, the Main User profile is created. The
Main User has complete access to ACUS and can create other
users.
Operator ACOS user is known as an Operator. An operator is a manager
employed by Risco who operates the RSP System.
OTP
A one-time password (OTP) is a password that is only valid for a
single login session or transaction.
RAC RISCO Access Control System is the name of the new Risco
product.
S
RMAC Risco Management Autonomous Component
RSP RISCO Service Platform is Risco Server Platform – A system which
manages Risco applications (for example, RAC system, Detection
application, CCTV, Fire).
It is comprised of servers and physical entities installed at
customer premises and all the software which manages them.
Currently it will handle only RAC system.
Section A section is an area that divides the account into logical
configurable units.
Uncontrolled when printed © RISCO Group 76
Page 85

Index
User Manual for ACOS
A
About.......................................................................... 6
ACCB ......................................................................... v
Access Control Module ........................................... 12
Account ...................................................................... 1
Account Installer Company List Report .................... 62
Account License Report ............................................ 63
Account Reference Number ................................... 1, 9
Account Report ......................................................... 64
ACIS ........................................................................... 1
ACMS ......................................................................... 1
ACOS.......................................................................... 1
ACUS.......................................................................... 1
ACWS ......................................................................... 1
Add a New Account .................................................... 8
Add an Installer Company ........................................ 26
Add an New Operator Profile ................................... 38
Alarm management ................................................ 12
AMAC ........................................................................ v
Auditing Enabled .................................................... 11
Authentication Mechanism ....................................... 39
Automation Management ....................................... 12
B
Biometric Reader ...................................................... 13
Biometrics ................................................................. 13
C
Change Password ...................................................... 6
Configure Account .................................................... 21
Configure an Installer Company ............................... 33
Configure Operator ................................................... 43
Configuring Server Type .......................................... 70
Creating New Server Type ........................................ 69
Custom Reports....................................................... 13
D
G
Generating Reports ................................................... 60
Graphic Printing of Badges ................................... 13
I
Import or Export the localization data ...................... 52
Installer Company ............................................... 1, 10
Installer Company Account Report .......................... 66
Installer Company Installer Report .......................... 67
Installer Company Reference Number ................. 27
Installer Company Report ........................................ 67
L
License ..................................................................... 11
Logging Enabled ..................................................... 11
Logical Access Web Service ................................... 13
Logout ....................................................................... 6
M
Main Installer ............................................................ 1
Main Installer Details ............................................. 28
Map Editor ................................................................. 1
Maps In Dashboards .............................................. 13
Master Data sheet ..................................................... 55
Maximum Number of Persons .............................. 13
Maximum Number of Users .................................. 13
Menu Bar.................................................................... 6
N
Non VIP ................................................................... 10
Number of Biometric Readers ............................... 13
Number of Doors .................................................... 14
Number of Proxies .................................................. 14
Delete an Account ..................................................... 24
Delete an Installer Company ..................................... 36
Delete an Operator .................................................... 45
O
OTP .................................................................... 29, 39
F
Flush ......................................................................... 17
Uncontrolled when printed © RISCO Group 77
P
Phone Number formats ............................................. 73
Page 86

User Manual for ACOS
R
RAC Simultaneous Users ....................................... 14
Real Time Event Export ......................................... 14
Real Time Validation Web Service ........................ 14
Reset ......................................................................... 50
Reset Password ................................................... 47, 50
Restore Default ........................................................ 16
RMAC ........................................................................ v
RSP ............................................................................. v
S
Search Accounts ....................................................... 18
Search an Installer Company .................................... 31
Search Operator ........................................................ 41
section ......................................................................... 1
Server Type ....................................................... 10, 53
Statistics .................................................................. 22
system Access Report ............................................... 59
T
Technical and Personal Contact Details ................... 14
V
View Process Status ................................................. 16
VIP ........................................................................... 10
Z
Zone Management .................................................. 14
Uncontrolled when printed © RISCO Group 78
Page 87

User Manual for ACOS
RISCO Group Limited Warranty
RISCO Group and its subsidiaries and affiliates warrants its products to be free from defects in materials
and workmanship under normal use for 24 months from the date of production. Because Seller does not
install or connect the product and because the product may be used in conjunction with products not
manufactured by the Seller, Seller cannot guarantee the performance of the security system which uses
this product. Seller's obligation and liability under this warranty is expressly limited to repairing and
replacing, at Seller's option, within a reasonable time after the date of delivery, any product not meeting
the specifications. Seller makes no other warranty, expressed or implied, and makes no warranty of
merchantability or of fitness for any particular purpose.
In no case shall seller be liable for any consequential or incidental damages for breach of this or any
other warranty, expressed or implied, or upon any other basis of liability whatsoever.
Seller's obligation under this warranty shall not include any transportation charges or costs of
installation or any liability for direct, indirect, or consequential damages or delay.
Seller does not represent that its product may not be compromised or circumvented; that the product
will prevent any personal injury or property loss by burglary, robbery, fire or otherwise; or that the
product will in all cases provide adequate warning or protection.
Seller, in no event shall be liable for any direct or indirect damages or any other losses occurred due to
any type of tampering, whether intentional or unintentional such as masking, painting or spraying on
the lenses, mirrors or any other part of the detector.
Buyer understands that a properly installed and maintained alarm may only reduce the risk of burglary,
robbery or fire without warning, but is not insurance or a guaranty that such event will not occur or that
there will be no personal injury or property loss as a result thereof.
Consequently seller shall have no liability for any personal injury, property damage or loss based on a
claim that the product fails to give warning. However, if seller is held liable, whether directly or
indirectly, for any loss or damage arising under this limited warranty or otherwise, regardless of cause or
origin, seller's maximum liability shall not exceed the purchase price of the product, which shall be
complete and exclusive remedy against seller.
No employee or representative of Seller is authorized to change this warranty in any way or grant any
other warranty.
WARNING: This product should be tested at least once a week.
Uncontrolled when printed © RISCO Group 79
Page 88

User Manual for ACOS
Contacting RISCO Group
RISCO Group is committed to customer service and product support. You can contact us through our
website www.riscogroup.com or as follows:
United Kingdom
Tel: +44-(0)-161-655-5500
technical@riscogroup.co.uk
Italy
Tel: +39-02-66590054
support@riscogroup.it
Spain
Tel: +34-91-490-2133
support-es@riscogroup.com
France
Tel: +33-164-73-28-50
support-fr@riscogroup.com
Belgium
Tel: +32-2522-7622
support-be@riscogroup.com
Israel
USA
Tel: +1-631-719-4400
support-usa@riscogroup.com
Brazil
Tel: +55-11-3661-8767
support-br@riscogroup.com
China (Shanghai)
Tel: +86-21-52-39-0066
support-cn@riscogroup.com
China (Shenzhen)
Tel: +86-755-82789285
E-mail: support-cn@riscogroup.com
Poland
Tel: +48-22-500-28-40
support-pl@riscogroup.com
Tel: +972-3-963-7777
support@riscogroup.com
All rights reserved.
No part of this document may be reproduced in any form without prior written permission from the
publisher.
RISCO Group 02/2013 5IN2033
Uncontrolled when printed © RISCO Group 80
 Loading...