

Ricoh XR-M, XR-X Owner's Manual
Ricoh XR-M/XR-X
The these two cameras are identical, the XR-X is European
This camera manual library is for reference and historical purposes, all rights reserved.
This page is copyright by . M. Butkus, N.J.
This page may not be sold or distributed without the expressed permission of the producer
This is the full text and images from the manual. This may take 3 full minutes for all images to appear.
If they do not all appear, try clicking the browser "refresh" or "reload button".
If you find this manual useful, how about a donation of $3 to:
M. Butkus, 29 Lake Ave., High Bridge, NJ 08829-1701 ?
This will allow me to continue to purchase new manuals and their shipping.
It'll make you feel better, won't it?
If you use Pay Pal, use the link below. Use the above address for a check, M.O. or cash.
Back to main Chinon site
TABLE OF CONTENTS
1. Attaching the Strap - 9
2. Inserting Batteries - 11
3. Mounting and Removing the Lens - 12
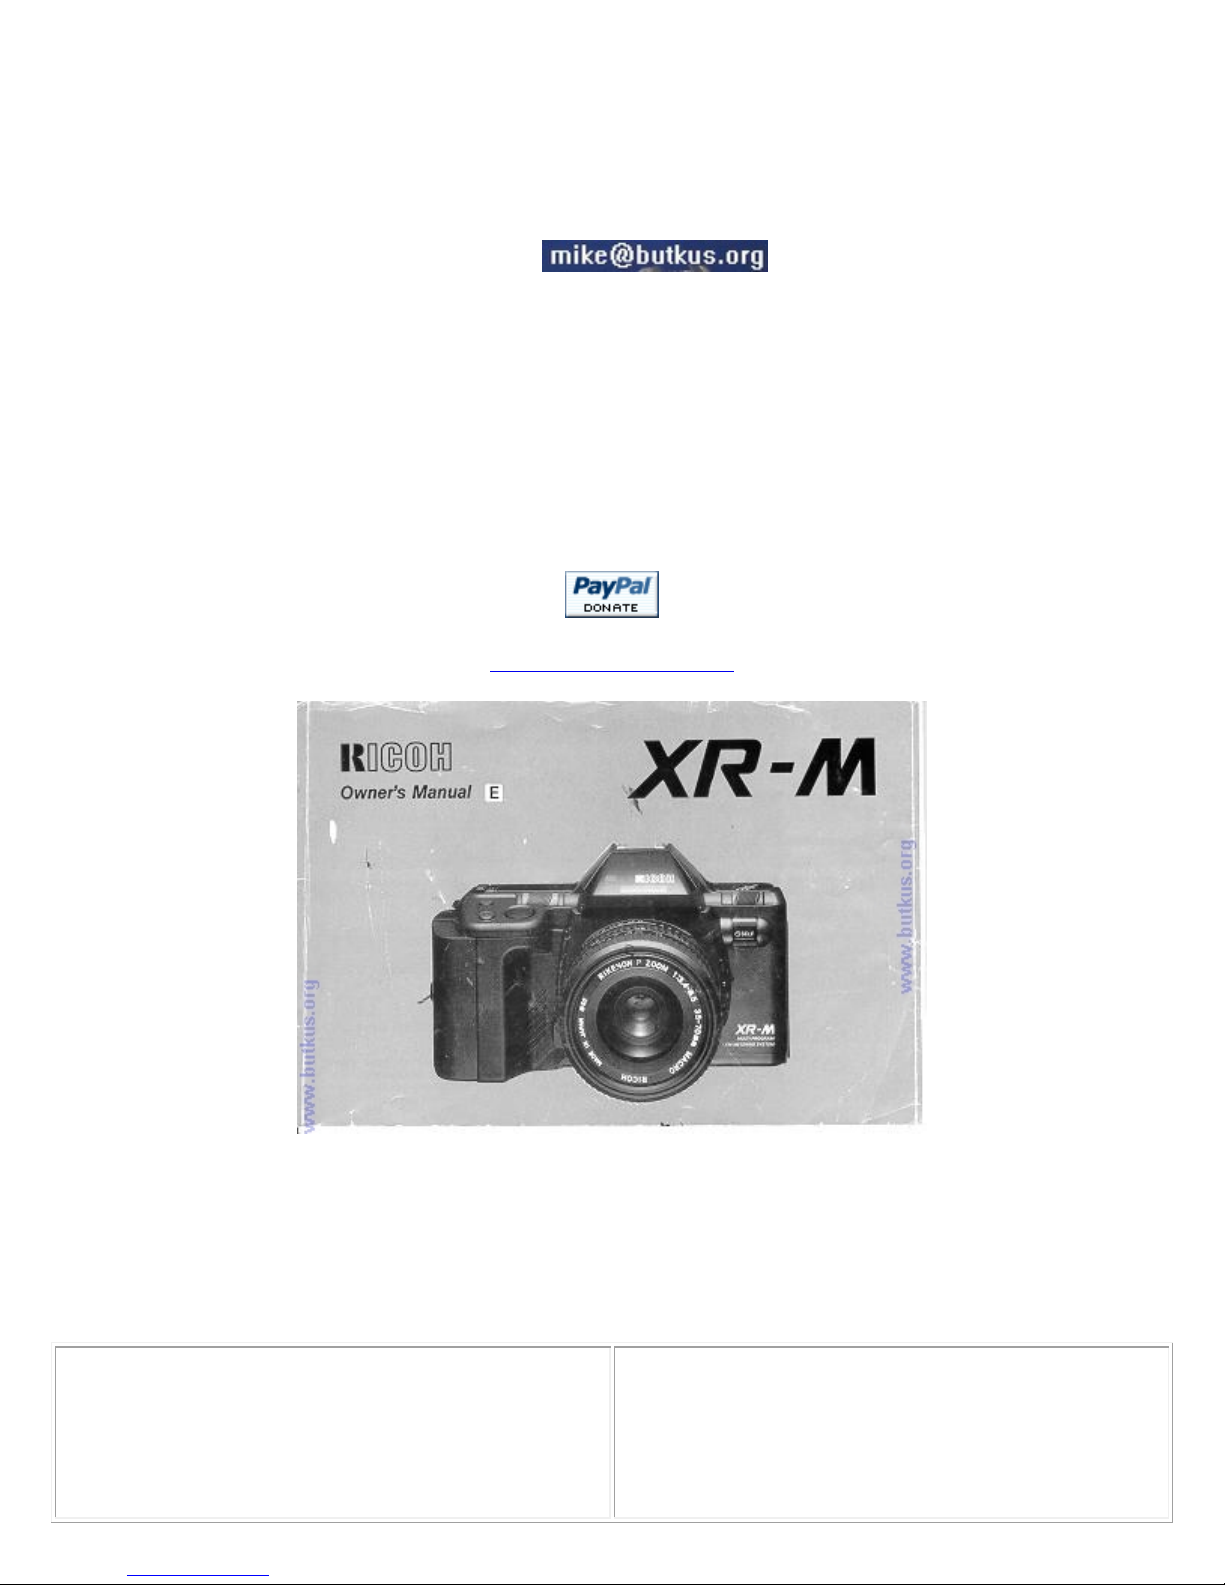
25. Reset Button
26. AE Lock
27. Exposure Compensation - 58

4. Setting Lens to the "P" Position - 14
28. Interval Timer Photography - 60
5. Power On/Off Switch - 15
6. Monitoring Condition of Batteries - 16
7. Loading the Film - 18
8. Setting the Film ISO Speed - 21
9. Indications in Viewfinder - 23
10. How to Hold Your Camera - 24
11. Setting the Program for AE Photography
12. Focusing
13. Depth-of-Field Preview
14. Infrared Mark
15. Rewinding the Film
29. Left Hand Shutter Release - 61
30. B (Bulb) Setting - 62
31. More Exciting Applications for the Camera with
Speedlite PX/300P/260P - 64
32. Flash Photography with Other Ricoh Flash
Units - 66
33. Flash Photography with Speedlite PX plus 300P
- 67
34. Flash Photography with Non-dedicated Flash
Units - 68
35. Flash in Daylight - 69
36. Shutter Bias Flash AE - 73
37. P-mount Adapter - 74
16. Self-timer Photography
17. Programmed Flash Photography (Using the
Optional Speedlite PX)
18. Safety Lock (Up or Down Button)
19. How to Use the Multi-programs
20. Aperture-priority AE Photography
21. Shutter-bias Program AE Photography
22. Full Manual Photography
23. TV Mode
24. Exposure Metering Systems
38. Dioptric Lenses - 75
39. Super Data Back 4 - 76
40. Data Back 3 - 76
41. Interchangeable Viewfinder Screens - 77
42. Speedlite PX - 78
43. XR Speedlite 300P - 78
44. Speedlite 260P - 79
45. Speedlite 200 - 79
46. Care of Batteries - 80
47. Proper Care of Your Camera - 81
48. Major Specifications - 82
<<< update - I have been told a Olympus and Pentax eyecups and other accessories will work on XR cameras >>>
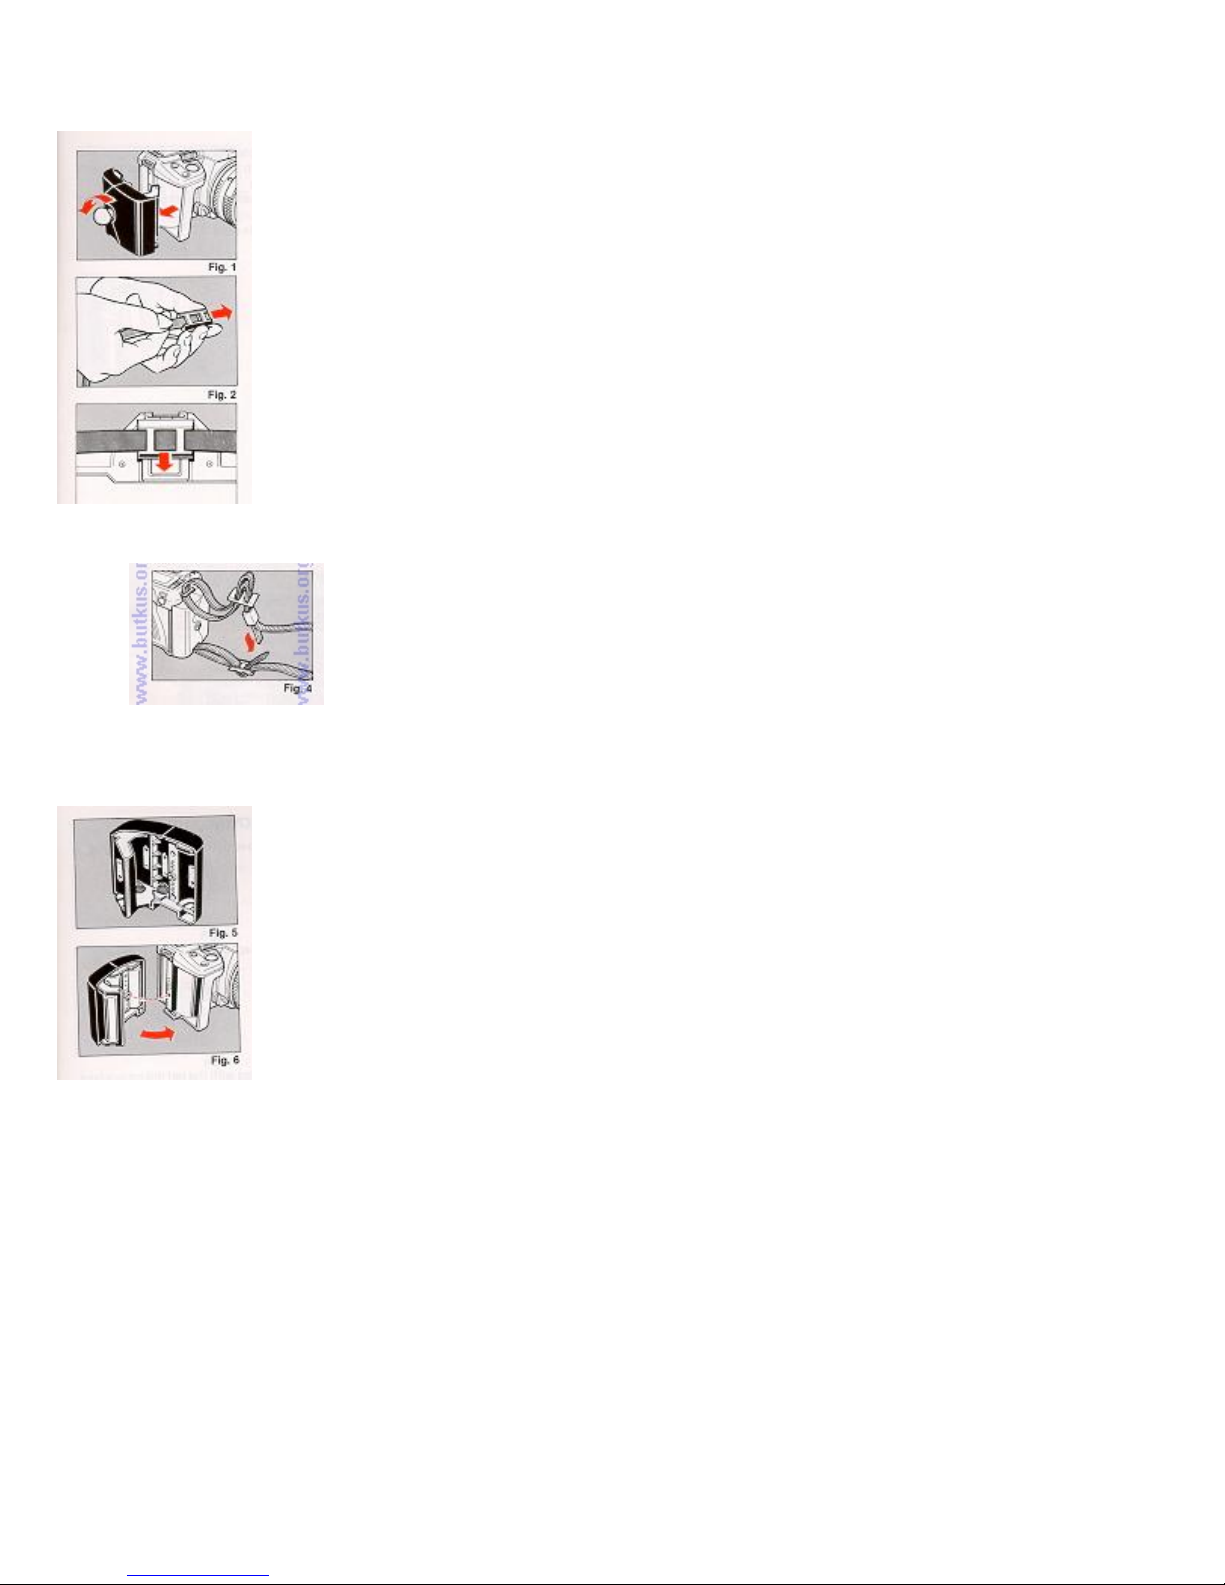
1. ATTACHING THE STRAP
1. Remove the Battery Holder by turning the Battery Holder Screw counter
clockwise with a coin. (Fig. 1)
2. Slip the Viewfinder Cap on to the strap. (Fig. 2) Slip Cap over Viewfinder. (Fig.
3)
Adjust strap so that it extends about 25 cm (10 I) from Viewfinder.
3. Run the strap down through the Upper Strap Lug until it protrudes about 8 cm
(3") from the lug. Then feed the end through the Buckle. (Fig. 4.)
4. Remove Viewfinder Cap off camera, straighten out strap and attach other end
to Lower Lug in a similar manner.
4www.butkus.org
5. Adjust the strap length as desired.
2. INSERTING BATTERIES
1. Insert four fresh batteries into the Battery Holder, first checking that the + and on each battery are lined up correctly according to the polarity diagram inside the
Battery Holder. (Fig. 5)
2. Secure the Battery Holder to the camera body by turning the Battery Holder
Screw clockwise with a coin. (Fig. 6)
Battery Choices:
* Four Penlight (AA/AAA) manganese batteries, alkaline batteries or nickel cadmium batteries.
(We recommend Alkaline batteries.)
* Condition of batteries should be monitored frequently. See Section 6 for details.
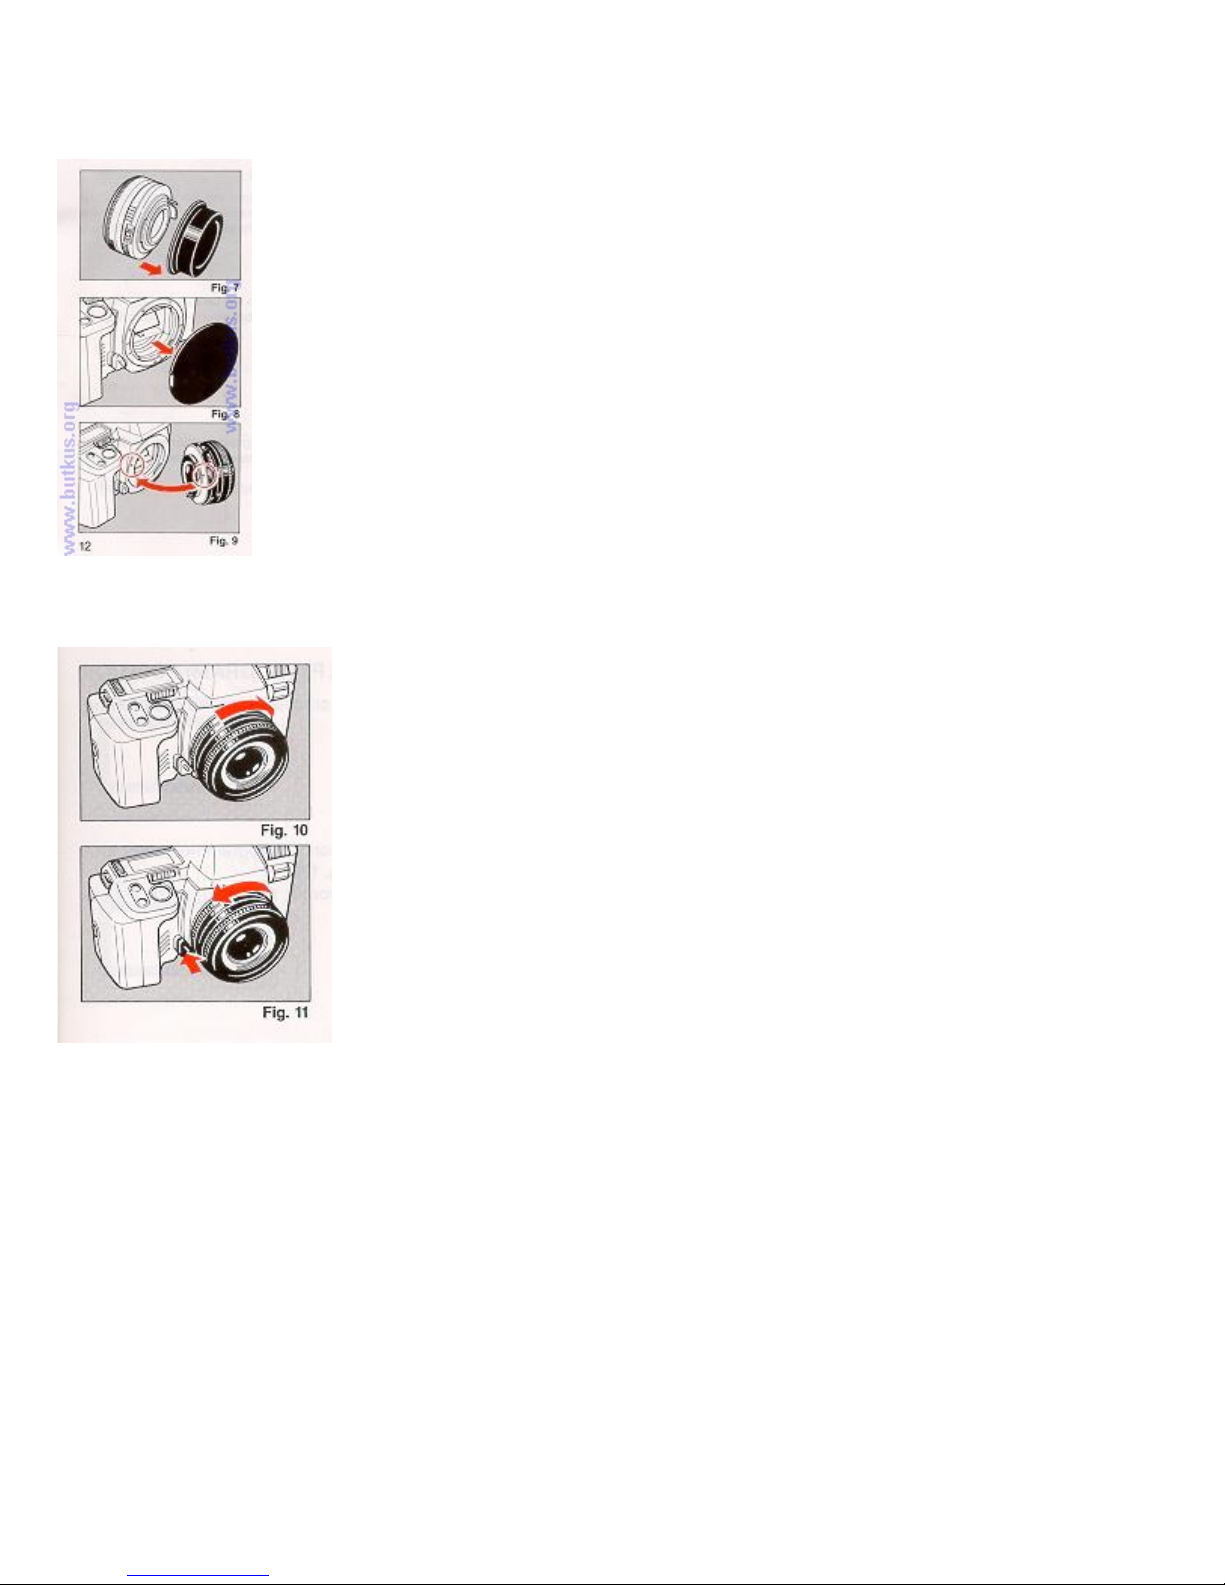
3. MOUNTING AND REMOVING THE LENS
1. Pull off the Back Lens Cap to remove it from the lens. (Fit
2. Pull off the Camera Body Cap. (Fig. 8)
3. Align the red dot on the camera with the red dot on the 1' and mount the lens
on the camera (Fig. 9)
4. Turn the lens in the direction shown by the arrow until it clicks into place.
(Fig. 10)
5. To remove the lens, depress Lens Release Button, then turn the lens in
the direction shown by the arrow. (Fig. 11)
* Conventional K mount lenses can be used in Aperture priority and
Manual Modes but cannot be used for Programmed AE Photography.
* For best results, use Ricoh original equipment lens. Proper performance
of camera may not always be assured with other lenses.
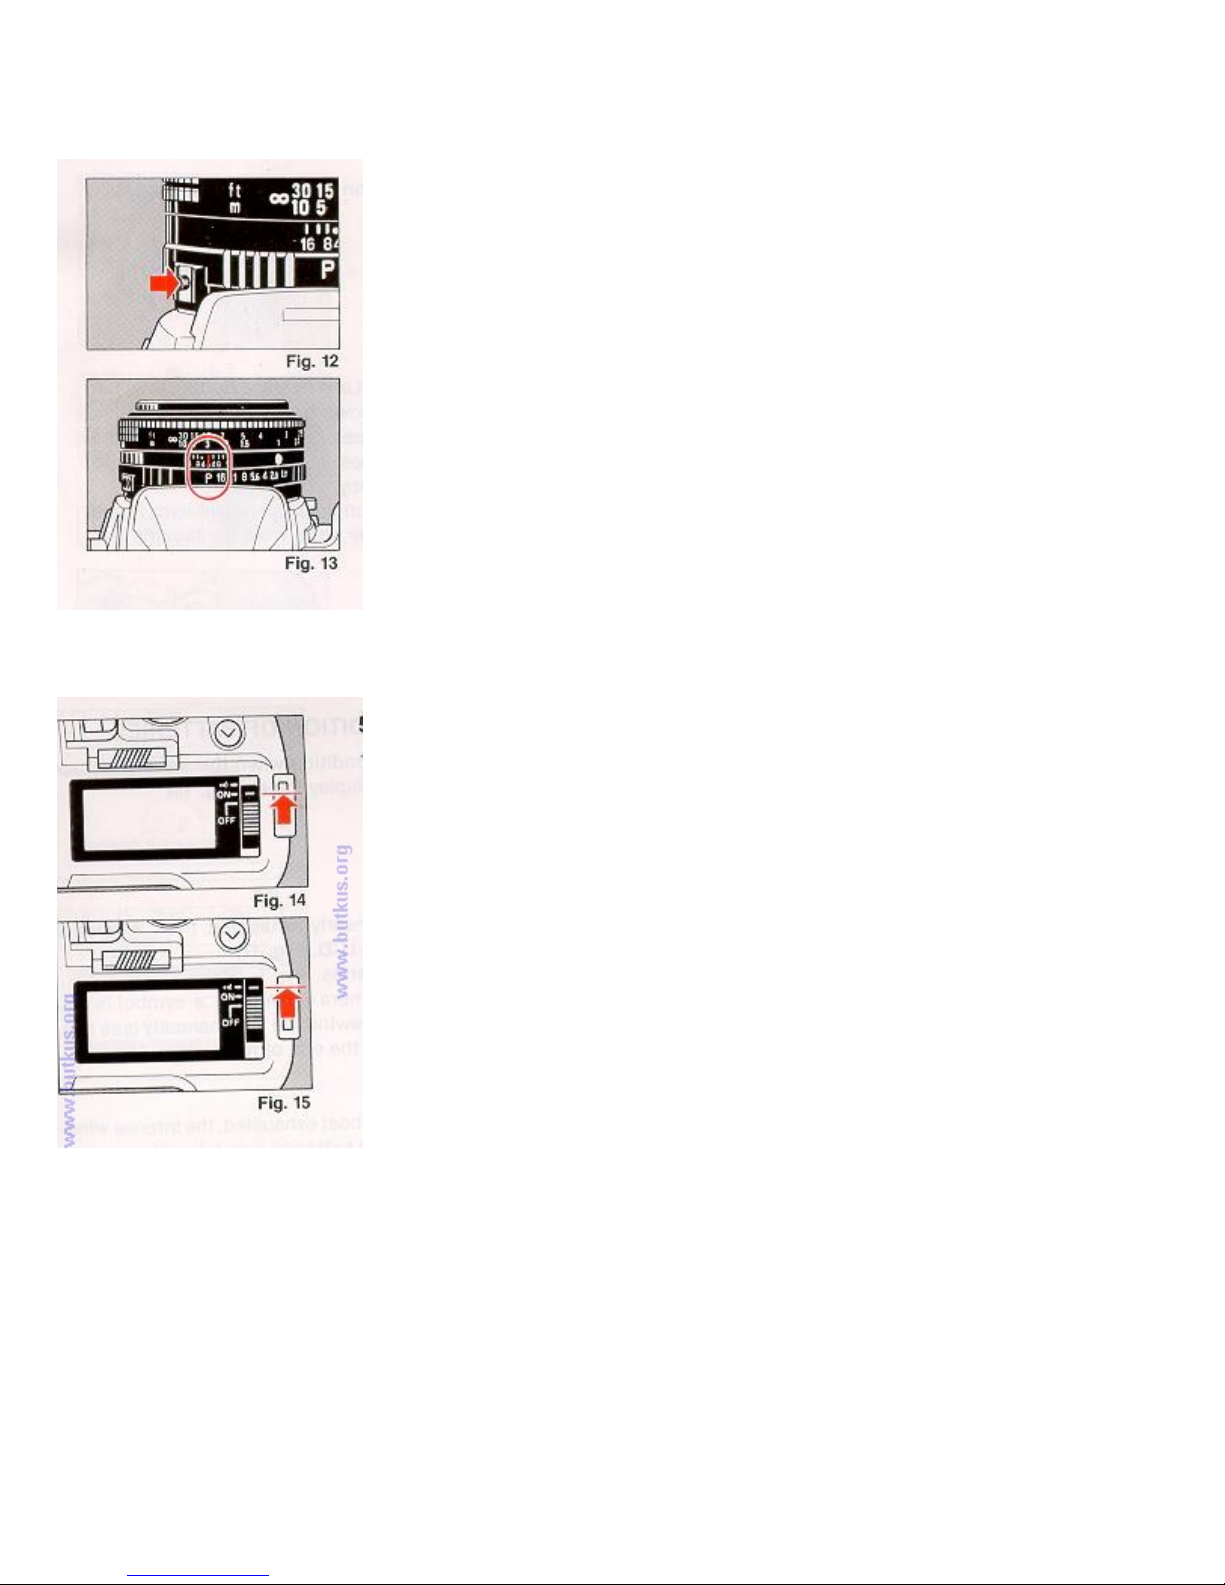
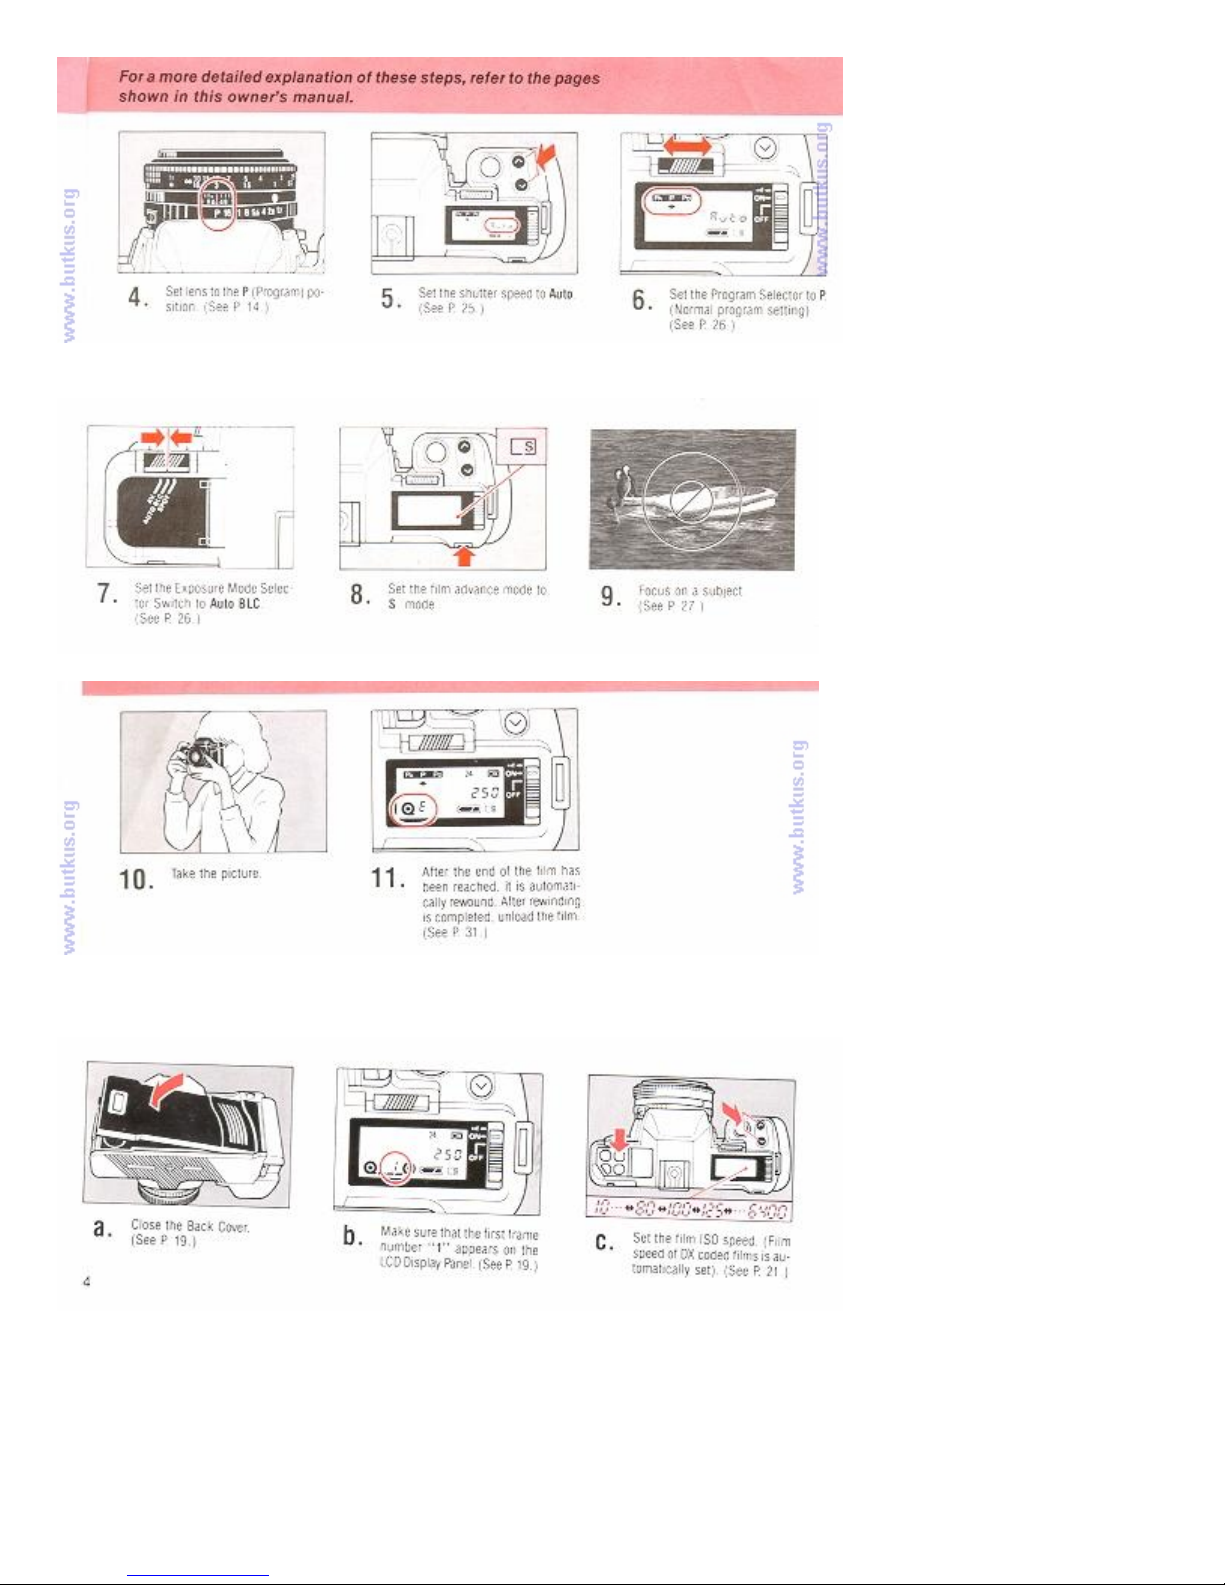
4. SETTING LENS TO THE P (PROGRAM) POSITION
1. While the P Lock Button is pressed, turn the F-stop Ring. (Fig. 12)
2. Set it to the locked P position for programmed automatic exposure
photography. (Fig. 13) I
* To unlock the F-stop ring from P. turn it while the P Lock | Button is
depressed.
5. POWER ON/OFF SWITCH
1. Slide the Power On/Off Switch to ON. (Fig. 14)
* If you slide the Power On/Off Switch to the sound mark ·1)), a beep
will be heard whenever the mode is changed, the self- timer is used,
etc. Then you can audibly know that your operation has been made
correctly. (Fig. 15)
* The camera is designed to shut off the main power supply
automatically to save battery energy when the camera is not in use for
about 30 sees. even if the Power On/Off Switch is left ON. This will turn
off the top LCD Display, but the information contained in camera
memory will be retained. Lightly press the Shutter Release Button to
turn on the power and update the LCD Display. For maximum battery
life, always turn the Power On/Off Switch to the OFF position when the
camera is stored.
4www.butkus.org
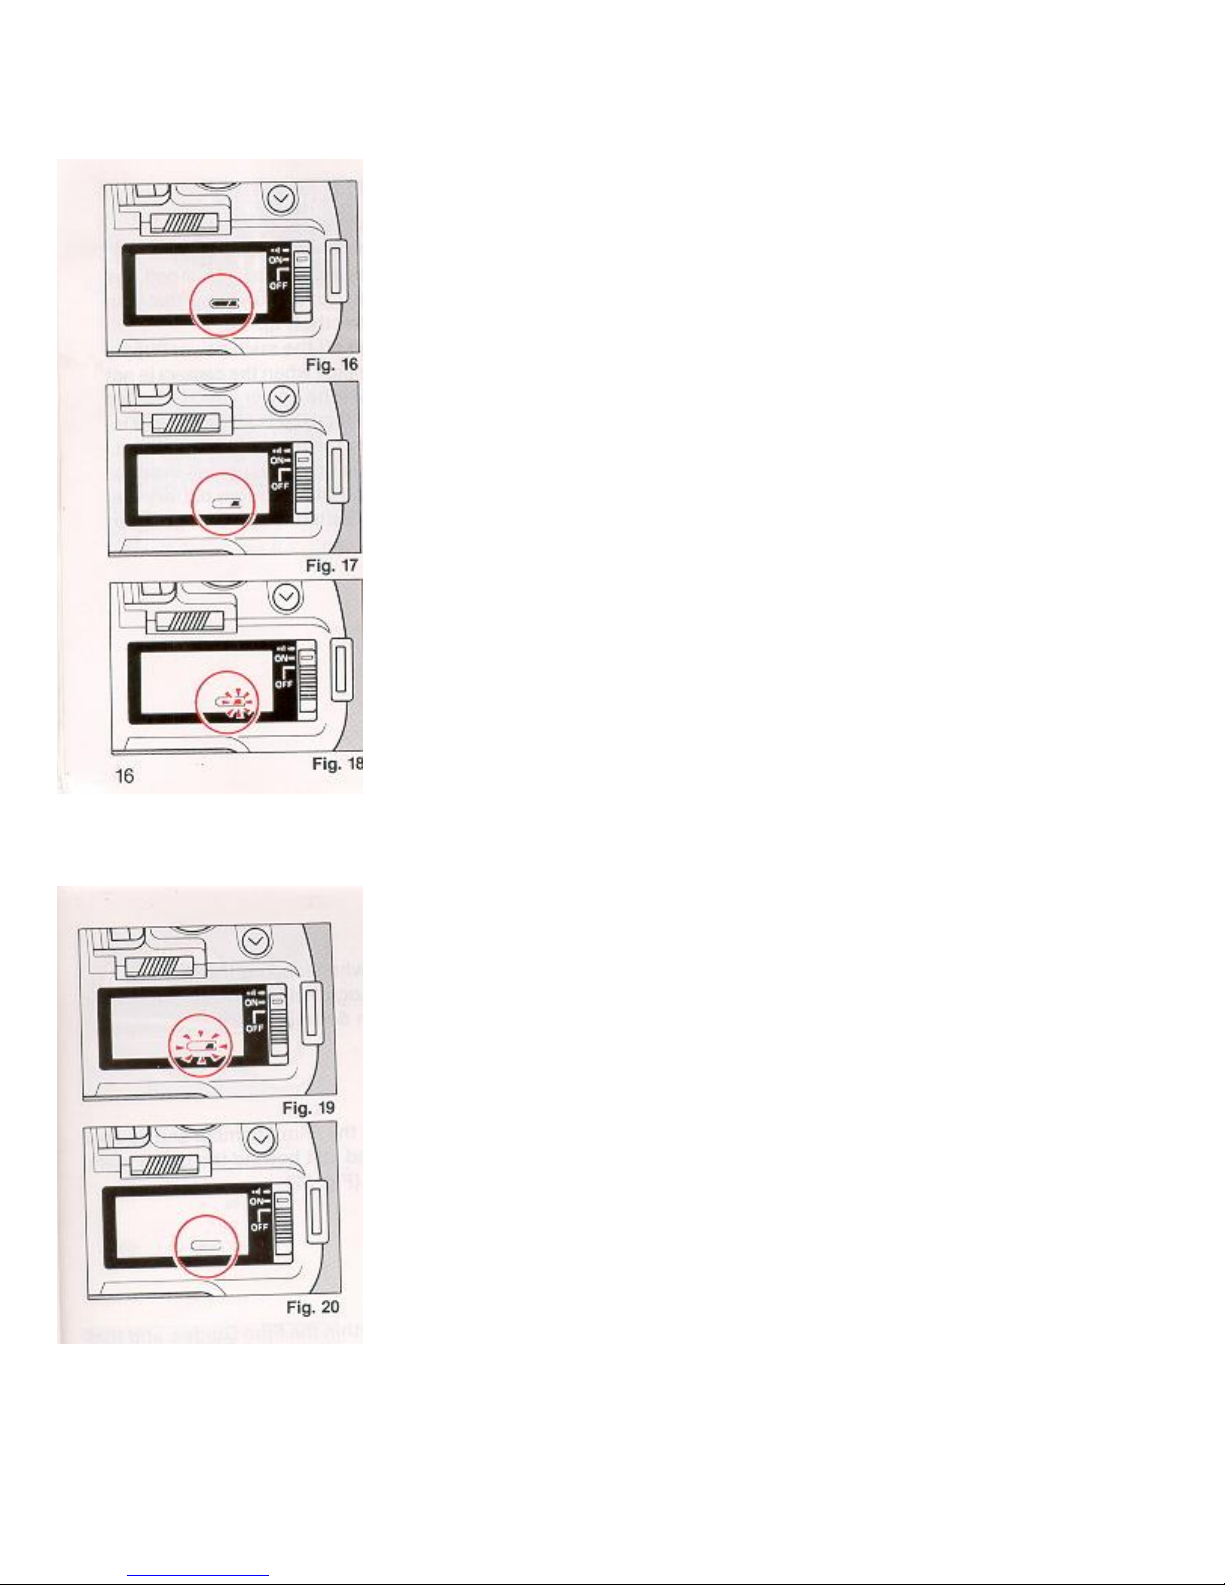
6. MONITORING CONDITION OF BATTERIES
1. Batteries are in good condition when the (full battery icon) symbol
appears on the top LCD Display Panel. (Fig. 16)
2. When the batteries are nearly exhausted, the (blank battery icon)
symbol | will be displayed on top LCD. (Fig. 17) Replace with fresh
batteries.
* If a Non-DX film is in camera when the (blank battery icon) symbol is
displayed, you may have to rewind the film manually
(see section 15) when you reach the end of roll.
3. When the batteries are almost exhausted, the interval winding starts
to conserve the batteries remaining life by winding for 2 sec. and
shutting off for 0.5 sec. in sequence. The (blank battery icon) symbol will
blink in LCD Display Panel. (Fig. 18) If the battery outline ~ is flashing do
not use flash until batteries are replaced. (Fig. 19)
4. When the batteries are virtually dead, the c symbol will appear in the
LCD Display Panel. Replace with new batteries. (Fig. 20)
* If the c symbol lights for about one minute, then disappears, the battery
is only capable of retaining camera memory. However, do not remove
old batteries until you are ready to replace them with fresh ones.
The memory of the photography mode will be retained for about 30 minutes without batteries. If you
replace with new batteries within that 30 minutes, the display of the photography mode left in the camera
memory will again appear in LCD Display Panel.
* Cold temperatures will reduce battery efficiency. In freezing weather, the symbol may turn off
and only the (low battery icon) symbol may show on the LCD Display Panel. If you are taking
pictures in cold weather, keep the batteries warm and insert them just before shooting.
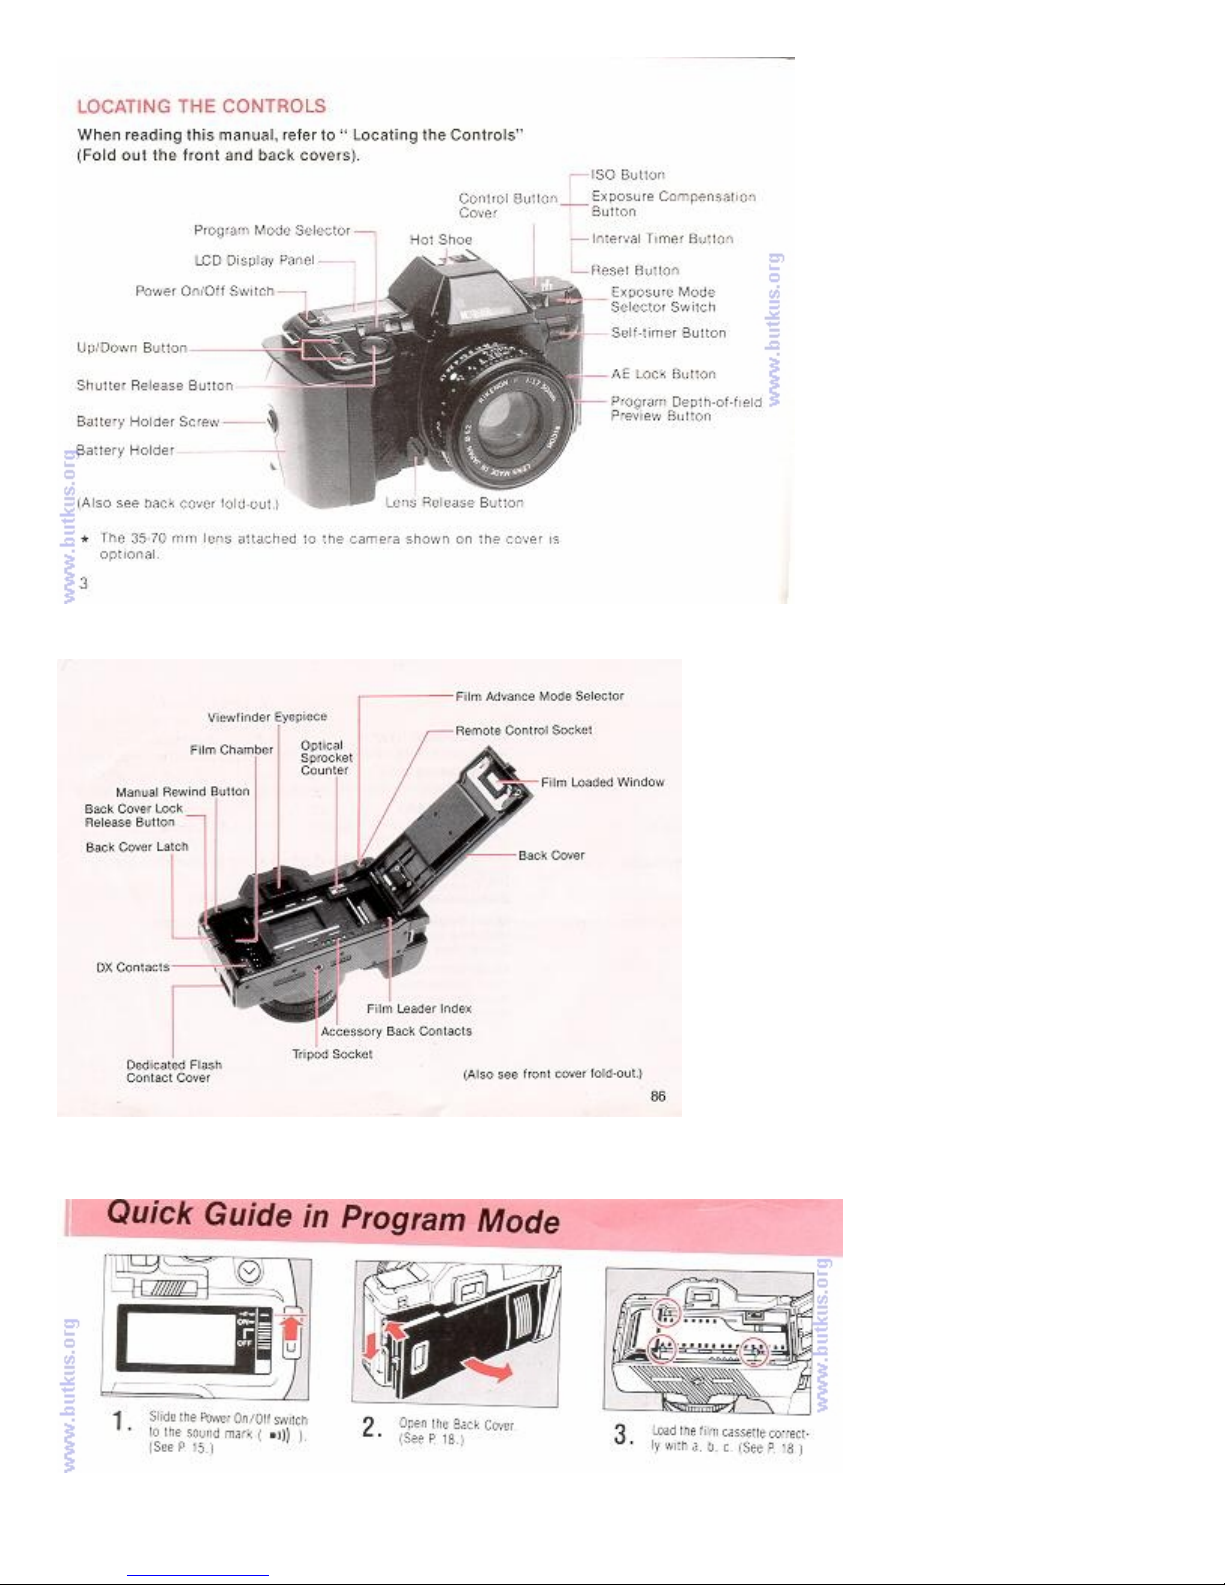
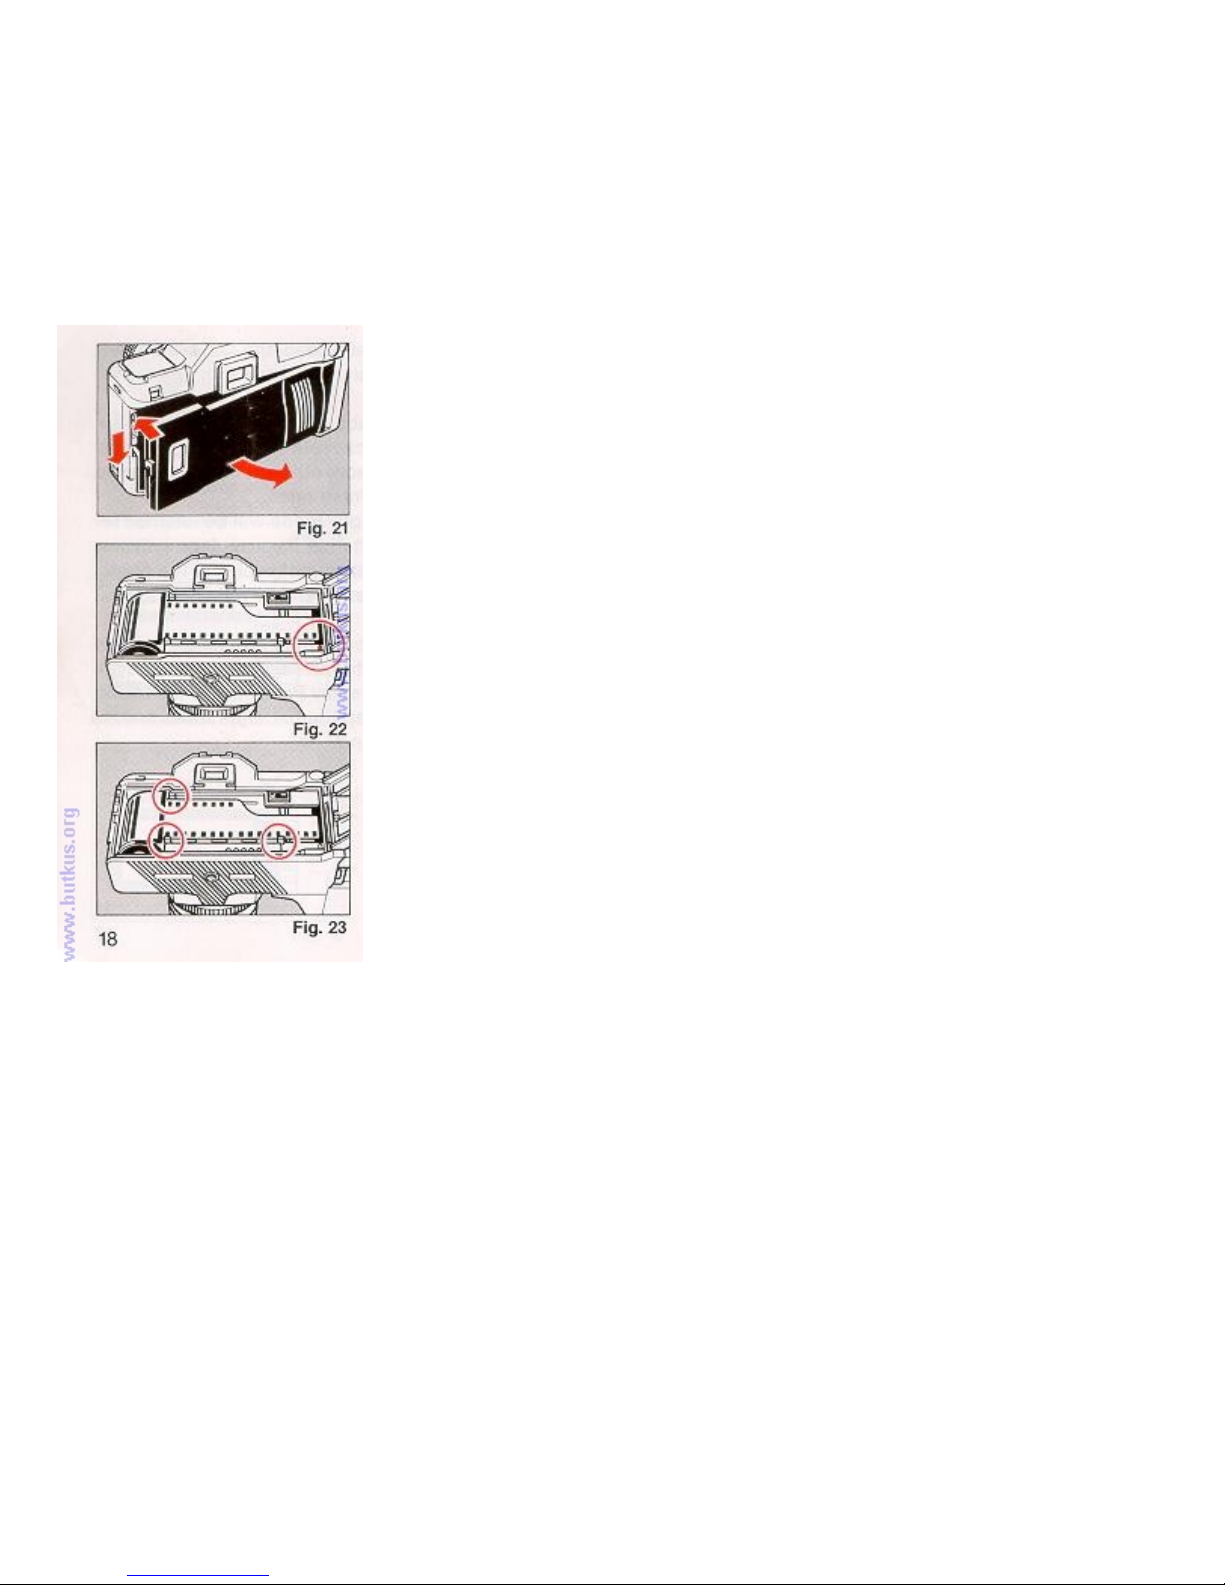
7. LOADING THE FILM
Always avoid direct sunlight when loading the film.
1. Depress the Back Cover Lock Release (Red) Button and slide
the Back Cover Latch down. (Fig. 21)
2. Load the Film Cassette into the Film Chamber and pull out
enough film leader to extend just beyond the green mark,
against the Take-up Spool. (Fig. 22)
3. Make sure that the film is within the Film Guides, and that the
upper sprocket edge is under the Guide Plate. (Fig. 23)
4. Close the Back Cover so that the Back Cover Latch snaps
shut. (Fig. 24) The film will now automatically advance until
number "1" appears on the top LCD Display Panel. (Fig. 25)
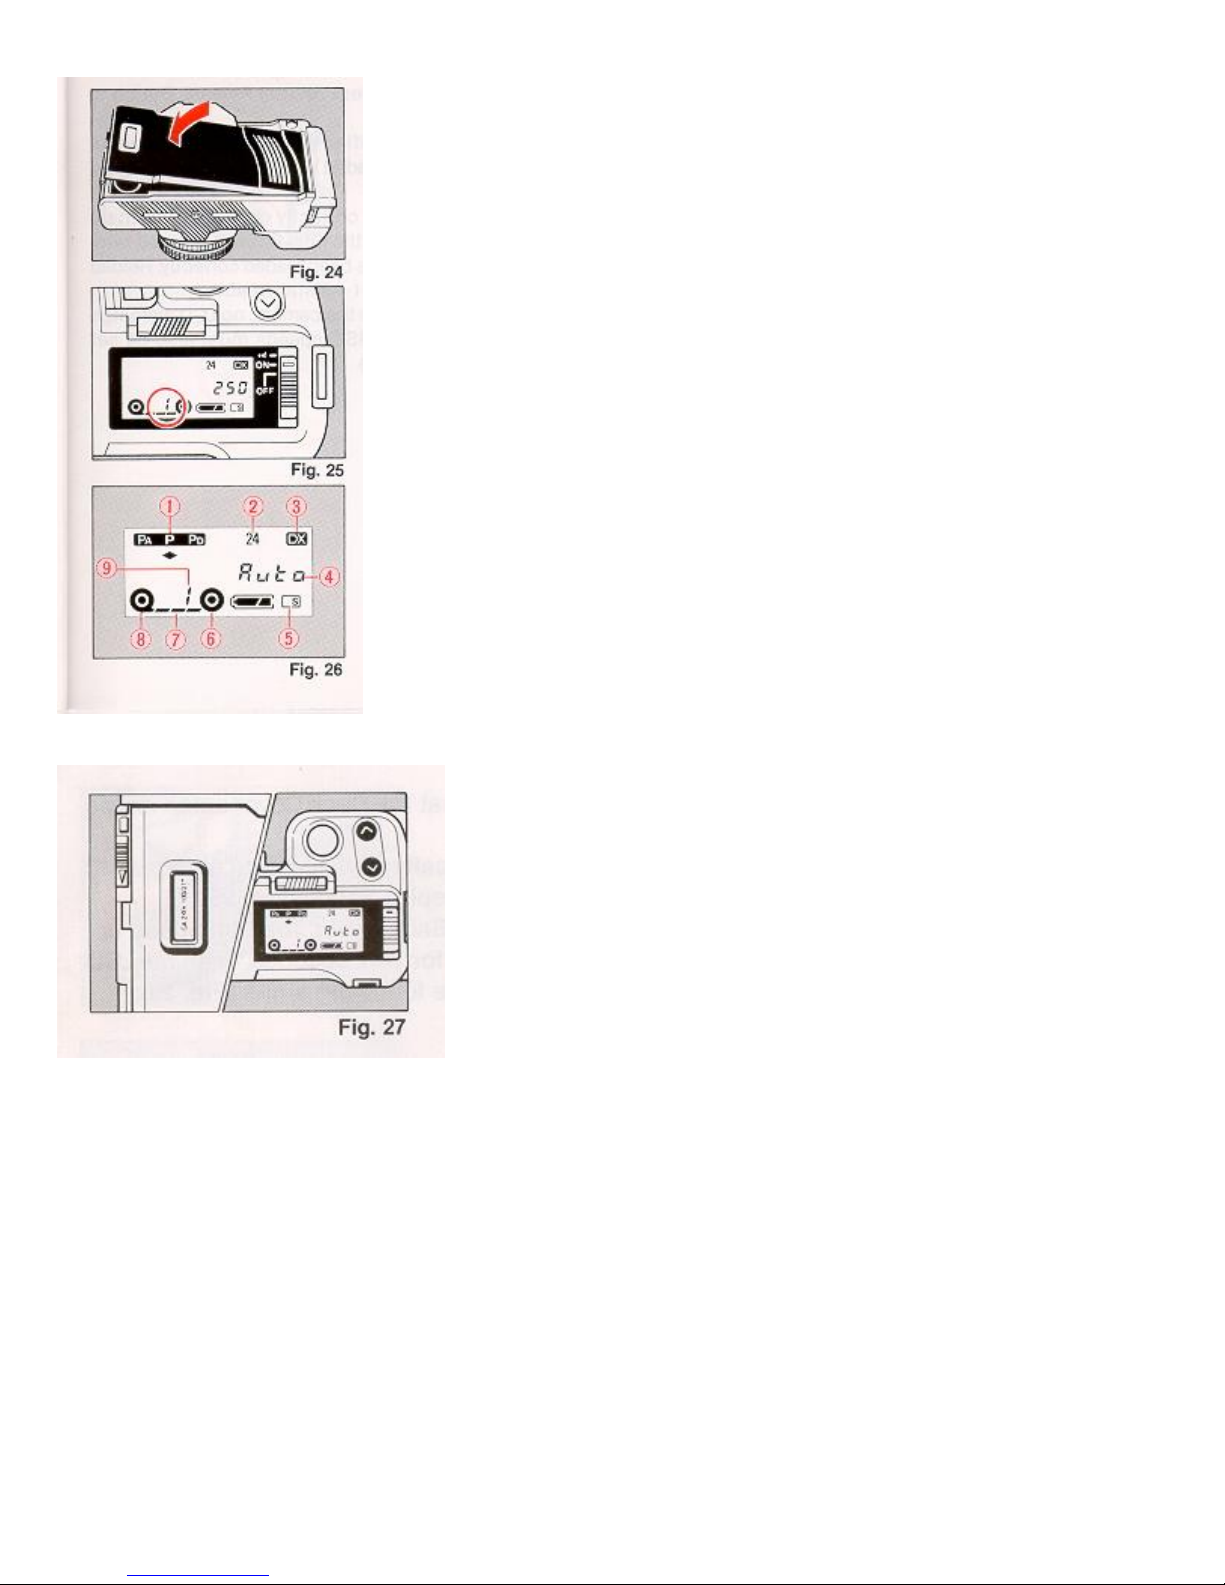
5. As soon as you close the Back Cover, the film speed appears on LCD
Display Panel for 1—2 seconds. Then the LCD Display Panel will show
the following signs (Fig. 26):
(1) Program mode
(2) Total number of exposures on film roll loaded
(3) DX verification
(4) Shutter SPEED
(5) Film advance mode (C/S)
(6) Film taken up onto Film Take-up Spool
(7) Film advance symbols (these symbols will flash in sequence
toward the right to tell you the film is winding)
(8) Film Cassette loaded symbol
(9) Exposure Counter
* If display shuts off, lightly press Shutter Release Button to
update LCD.
* LCD display data can be verified by checking the information
visible through Film Loaded Window on camera back. (Fig. 27)
6. If the film has not advanced correctly or was not taken up onto the Film Take-up Spool, the Film
Cassette loaded symbol will blink until the film has been loaded correctly. Reload the film by repeating
steps 1 - 5 shown above.
If Non-DX films are loaded in the camera, no LCD warnings will be observed.
(The film ISO speeds must also be set manually. See next section.)
4www.butkus.org
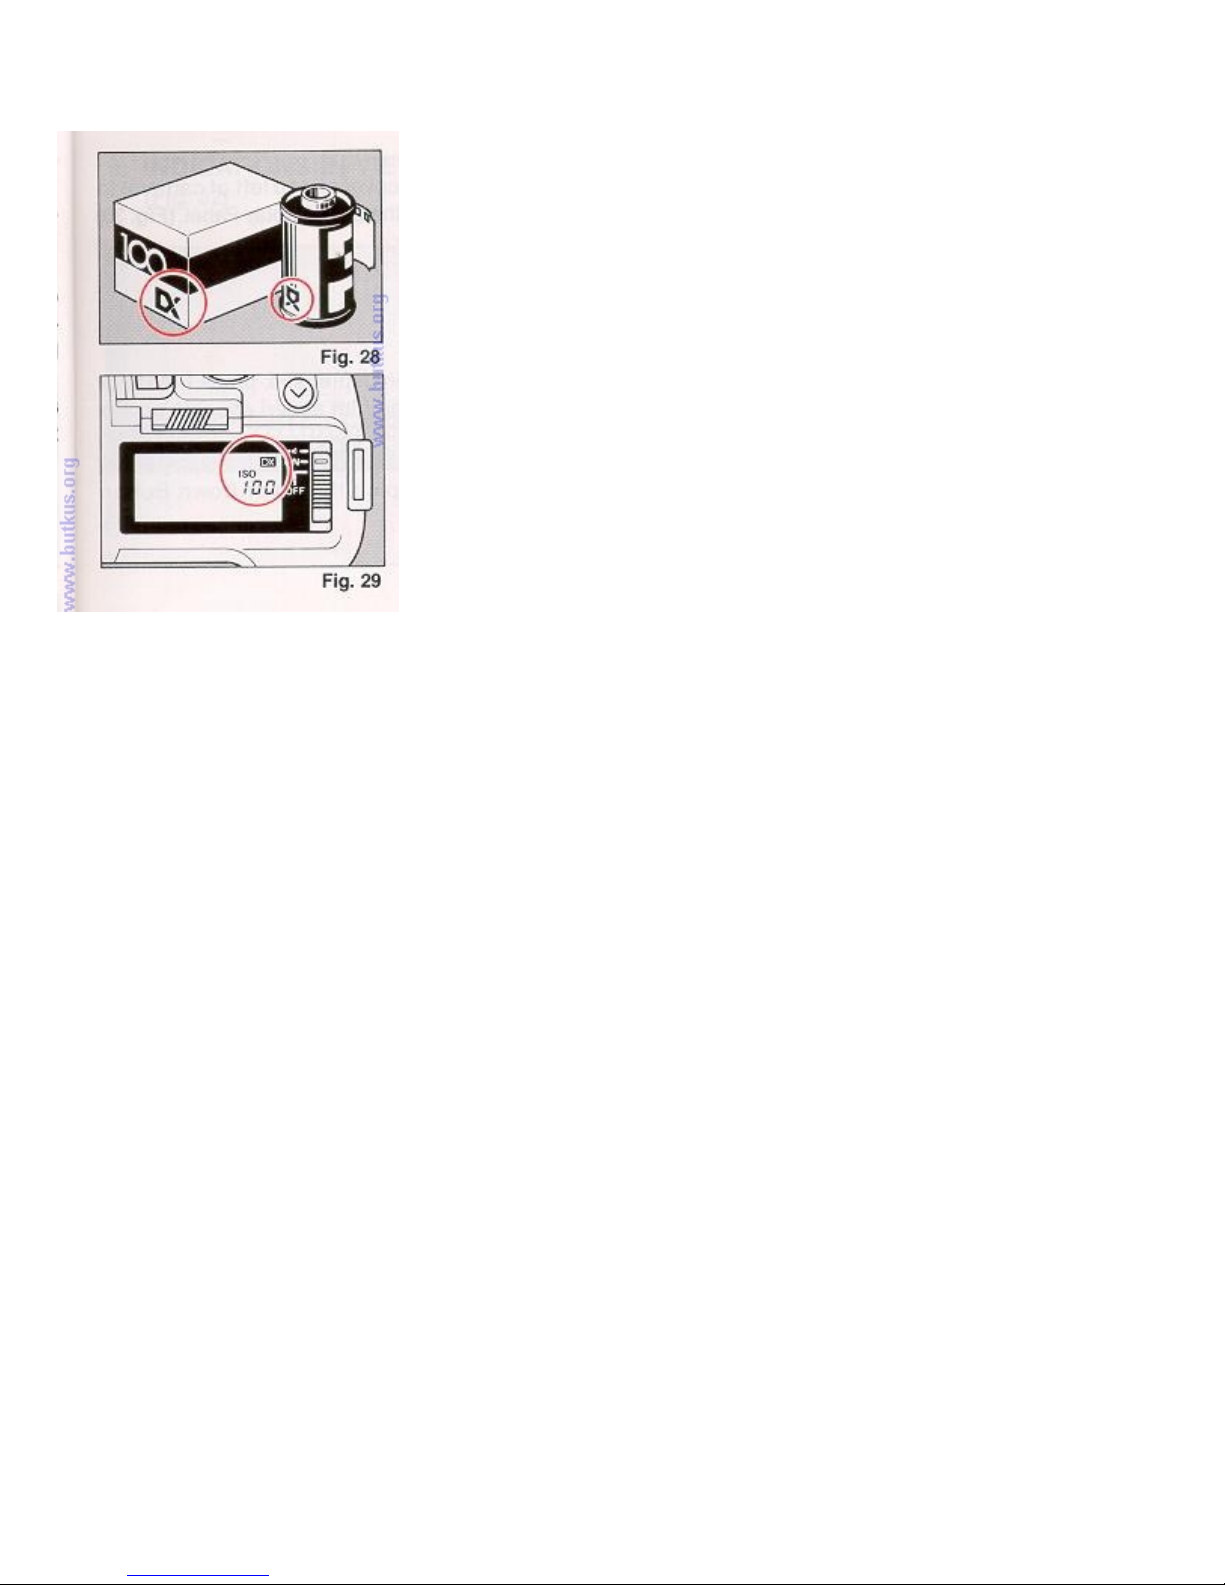
8. SETTING THE FILM ISO SPEED
DX coded films are provided with black-and-silver patterns
corresponding to film speed and number of exposure on roll. The
camera reads this pattern and automatically sets itself for DX films
with speeds ranging from ISO 12 to 6400. (Fig. 28)
DX films
1. The film speed and the "DX" verification symbols are briefly displayed on LCD Display Panel.
(Fig. 29)
* For advanced applications, you may wish to raise or lower the ISO speed of a DX coded film.
This may be done by using the Exposure Compensation Adjustment Button. See Section 27 for
details.
Non DX films
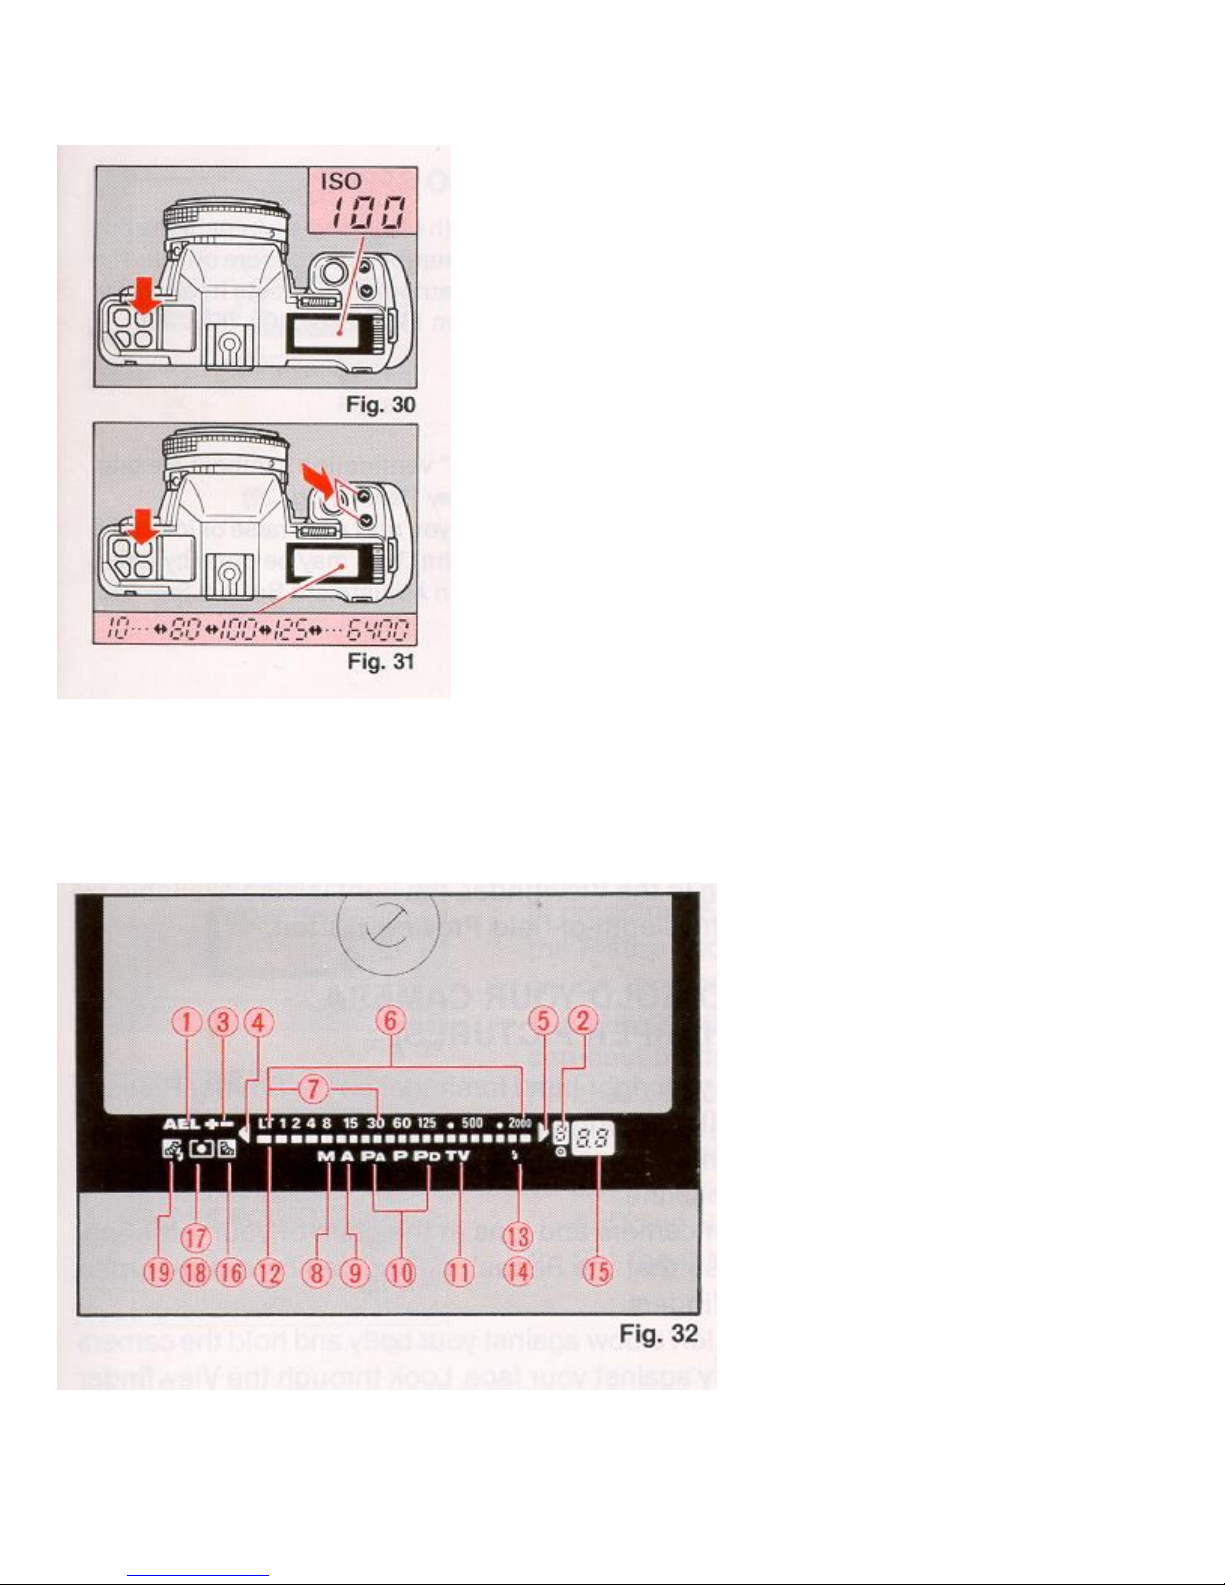
1. Press the ISO Button (under cover on top left of camera) to
display the film ISO speed in the LCD Display Panel. (Fig. 30)
2. While keeping the ISO Button depressed, press the Up or
Down Button until the desired film speed appears on the LCD
Display panel. (Fig. 31)
* The digits of the film speed shown on the LCD Display Panel
can be changed fast by keeping the Up or Down Button
depressed.
9. INDICATION IN THE VIEWFINDER

1. Blinking AE Lock Indicator
2. Subtractive Film Counter Display (displays the
last 9 frames with DX-coded films)
10. Program Mode
11. TV Mode
12. Shutter Speed Indicator
3. Blinking Exposure Compensation Indicator
4. Blinking Underexposure Indicator
5. Blinking Overexposure Indicator
6. Shutter Speed Scale
7. Slow Shutter Speed Zone (orange)
8. Manual Mode
9. Aperture Priority Mode
* Viewfinder illumination
An auxiliary light turns on automatically when finder LCD is dark and difficult to see. If you can not easily
see the LCD information in the Viewfinder, the light is also available by pressing the Depth-of-field
Preview Button.
13. Flash Ready Indicator (lights)
14. Correct Auto Flash Indicator
15. Aperture Readout (Program Mode)
16. (Box with image of sun on right): Auto Backlight
Indicator
17. (Box with dot in center): Spot Metering Indicator
18. (Box, empty): Averaged Metering Indicator
19. (Box with sun on left side): Fill Flash Indicator
10. HOW TO HOLD YOUR CAMERA
(FOR SHARPER PICTURES)
1. Lightly put your right-hand forefinger on the Shutter Release Button while
holding the camera body with other fingers.
2. Make your right arm comfortable, but keep it as close to your body as
possible.
3. Cradle your camera and lens in the palm of your left hand, holding it so that
the Focusing Ring can be easily turned with your fingers.
4. Brace your left elbow against your body and hold the camera comfortably
against your face. Look through the Viewfinder to compose your picture.
* It is important to practice correct shooting position to avoid blurred or tilted pictures. (Figs. 33,
34)
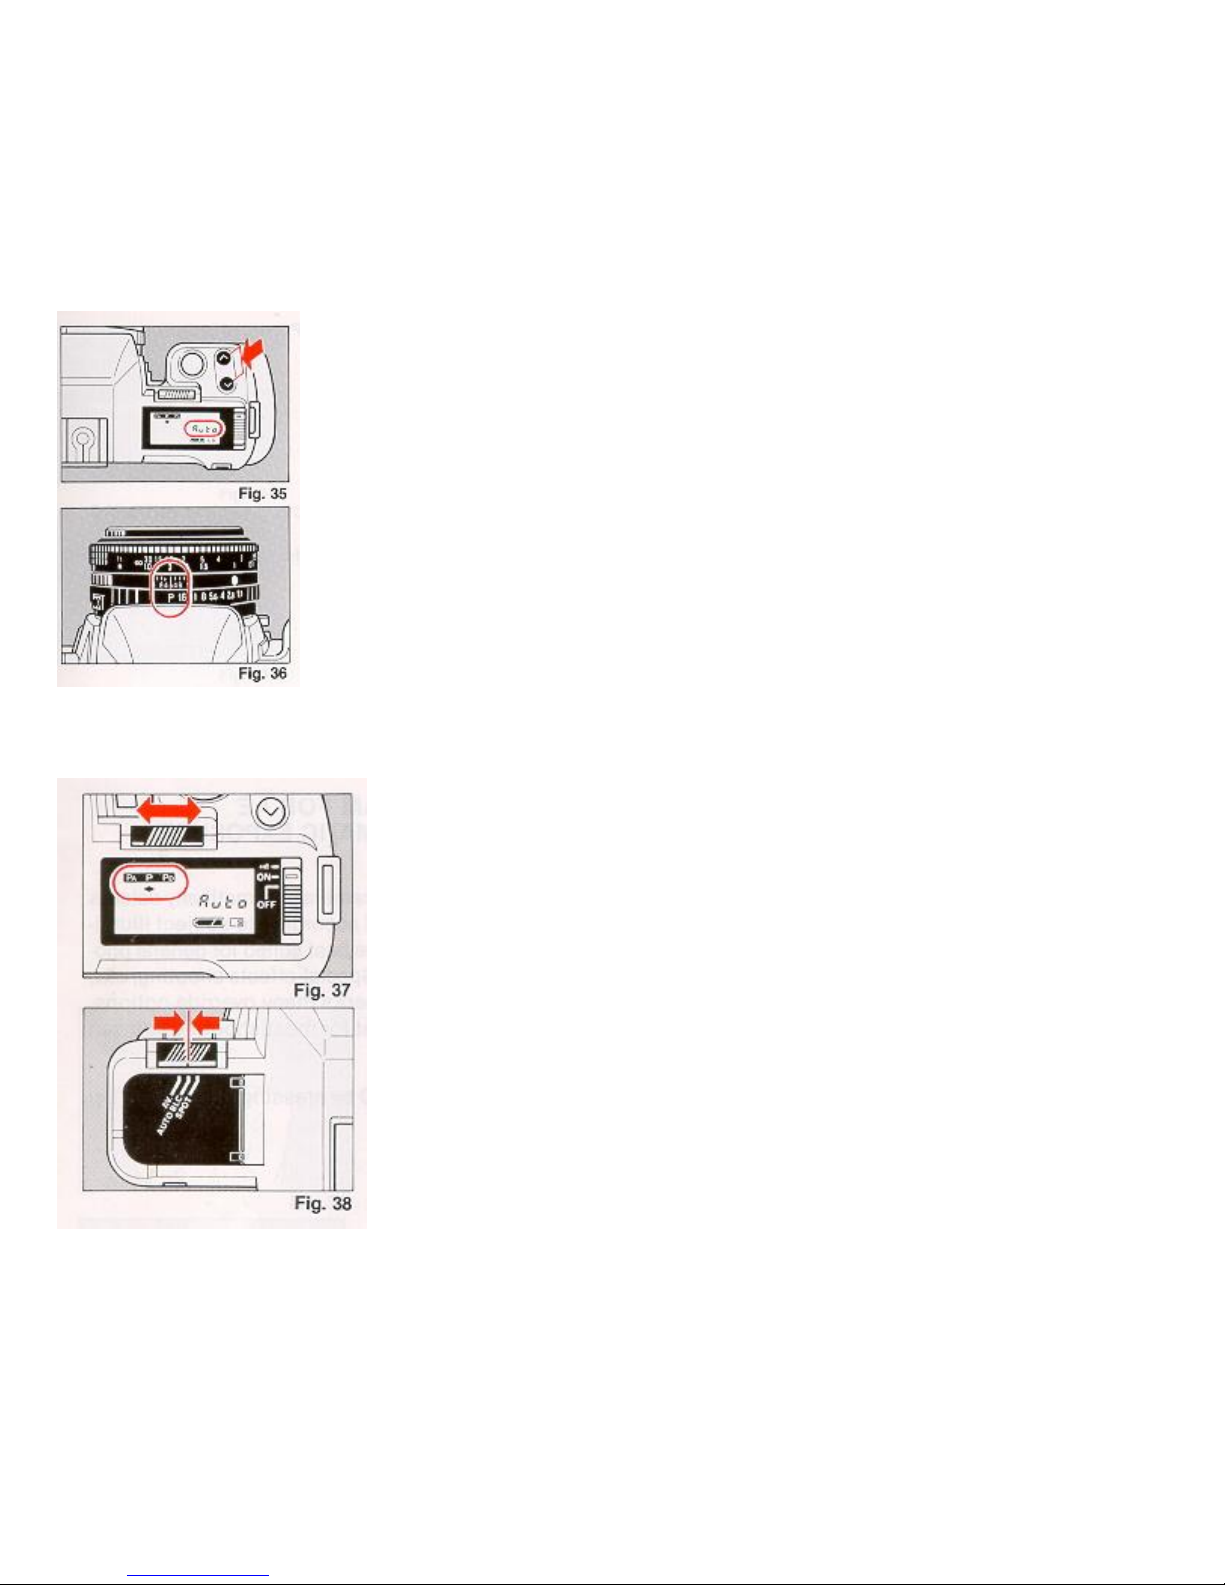
11. SETTING THE PROGRAM FOR AE (PROGRAMMED
AUTOMATIC EXPOSURE) PHOTOGRAPHY
In program AE photography, the camera automatically selects the F-stop and the shutter speed
according to subject illumination. Programmed exposures are best suited for general photography of
people and scenery. Special-effects shooting, etc., can best be done using the camera's many override
options. Please keep in mind however that for most shooting you can just focus and shoot.
1. Set the shutter speed to AUTO by pressing/holding the Up or Down Button.
(Fig. 35)
2. Set the lens to P. (Fig. 36)4www.butkus.org
3. Set the Program Selector to P (normal program setting). (Fig. 37)
4. Set the Exposure Mode Selector Switch to AUTO BLC. (Fig. 38)
* Refer to the Sections 19 - 23 for more advanced shooting modes.
 Loading...