

Page 1
Digital Camera
Start Guide
Thank you for purchasing the RICOH WG-M2
digital camera.
This Start Guide provides information on how to
get your RICOH WG-M2 ready for use and its
basic operations. To ensure proper operation,
please read this Start Guide before using the
camera.
For details on how to use the various shooting
methods and settings, please refer to the
Operating Manual (PDF) posted on our website.
Refer to p.39 for details on the Operating Manual.
Page 2
List of accessories
Rechargeable lithium-ion battery
D-LI68
Lens protector
O-LP1631
• The lens protector O-LP1631 is attached at delivery.
• To maintain the waterproof and dustproof performance, be sure to keep the lens protector on.
Power adapter
D-PA164
Regarding Waterproof Design
Underwater lens protector
O-LP1632
USB cable
I-USB157
Start Guide
Page 3

Table of contents
Names of parts ......................................................3
LCD screen display ..............................................5
Screen display of playback mode ....................... 6
About the button functions .................................7
In shooting mode ........................................................... 7
In playback mode ........................................................... 8
Attaching and removing the lens protector .......9
How to remove the lens protector .................................. 9
How to attach the lens protector .................................. 10
Installing a memory card and battery ............... 10
Charging the battery ..........................................12
Turning the camera on and off ..........................13
To turn the camera on ................................................. 13
To turn the camera off ................................................. 13
Initial settings .....................................................13
Language settings ....................................................... 13
Date adjustment ........................................................... 14
Settings menu list ...............................................15
T List of shooting modes ............................................ 15
s List of shooting settings ........................................... 16
x List of general settings ............................................ 17
Shooting mode settings .....................................18
Setting the camera functions ............................19
Shooting movies and still images ..................... 20
Playing back movies and still images ..............20
Deleting movies and still images ......................22
Connecting the camera and a communication
device ..................................................................22
Preparing the camera .................................................. 23
Setting communication devices (for Android) .............. 23
Setting communication devices (for iOS) ..................... 24
Main Specifications ............................................25
Using your camera safely .................................. 29
Care to be taken during handling .....................30
Regarding waterproof, dustproof, and
shockproof design .............................................32
Precautions before using the camera in the water ....... 32
Precautions when using the camera in the water ........ 33
Precautions after using the camera in the water .......... 33
WARRANTY POLICY ..........................................35
Information on the Operating Manual ...............39
1
Page 4

There is a possibility that the illustrations and the screen display
in this manual are different from the actual ones.
Regarding copyrights
Images taken with this camera that are for anything other
than personal enjoyment cannot be used without permission
according to the rights as specified in the Copyright Act.
Please take care, as there are cases where limitations are
placed on taking pictures even for personal enjoyment
during demonstrations, performances or of items on display.
Images taken with the purpose of obtaining copyrights also
cannot be used outside the scope of use of the copyright as
laid out in the Copyright Act, and care should be taken here
also.
To users of this camera
• Do not use or store this camera in the vicinity of equipment
that generates strong electromagnetic radiation or
magnetic fields. Strong static charges or the magnetic
fields produced by equipment such as radio transmitters
could interfere with the display, damage the stored data,
or affect the camera’s internal circuitry and cause camera
misoperation.
• The liquid crystal panel used for the display is
manufactured using extremely high precision technology.
Although the level of functioning pixels is 99.99% or better,
you should be aware that 0.01% or fewer of the pixels may
not illuminate or may illuminate when they should not.
However, this has no effect on the recorded image.
• In this manual, the generic term “computer(s)” refers to
either a Windows PC or a Macintosh.
• In this manual, the term “battery(ies)” refers to any type of
batteries used for this camera and its accessories.
2
Page 5
Names of parts
1
9
2
8
7
6
4
1 Strap lug
53
2 LCD screen
3 Power lamp
4 Alignment points
5 Lens protector
6 Microphone
7 Playback button/direction button (upper)
8 OK button
9 Wi-Fi button/direction button (lower)
3
Page 6
i
h
g
f
j
0
a b
k l
m
c
d
e
0 Video recording button/shutter button
a Power button/delete button
b MENU button
c Battery/card cover
d Release latch
e Lock lever
f Positioning hole
g Tripod socket
h Speaker
i Lens protector lock
j HDMI terminal
k MicroSD card slot
l USB terminal
m Battery lock lever
4
Page 7
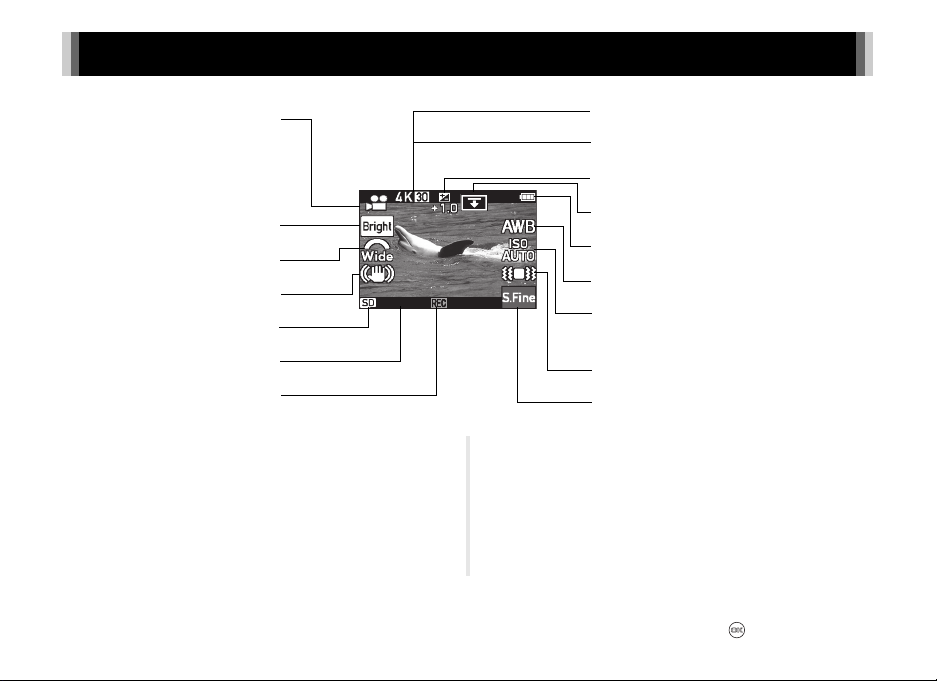
LCD screen display
1
2
3
4
5
6
7
1 Shooting mode 9 Recorded Pixels
2 Image Effect Modes
3 Angle of View
4 Movie SR
5 Internal memory/memory card display
6 Remaining recordable time/image storage capacity
7 Icon while recording movies (blinks while recording movies)
8 Recorded Pixels (Movie)
56:00
10 EV Compensation
11 LCD Orientation
12 Battery level indicator
13 White Balance
14 Sensitivity
15 Vibration
16 Quality Level (Movie)
8
9
10
11
12
13
14
15
16
t Memo
• Depending on the shooting mode, some information may not be displayed.
• Some icons will disappear if no button is pressed for four seconds. All icons will reappear if you press the button.
5
Page 8

Screen display of playback mode
1
2
3
1 Recorded Pixels (Movie) 5 Z is displayed when playing back movies shot in [Extended Movie Recording].
2 Recorded Pixels
3 Playback mode display
4 Image number/total number of images
6 Internal memory/memory card display
7 Battery level indicator
8 Guide display (movie)
9 Guide display (still image)
1/1234
4
5
6
7
8
9
t Memo
• The [Power Saving] function is not available in playback mode.
6
Page 9
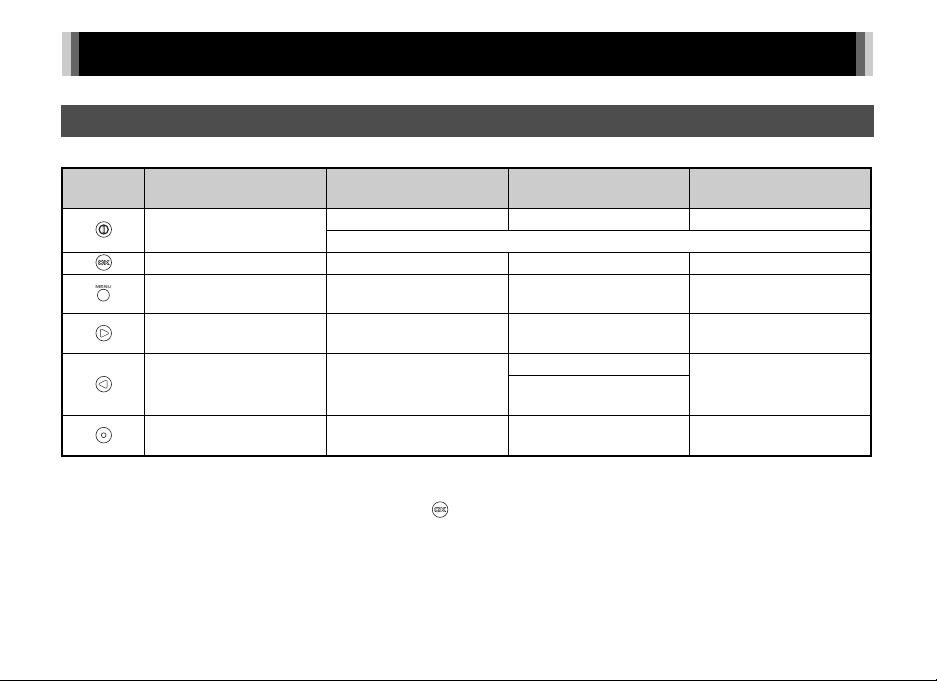
About the button functions
In shooting mode
–: Button operations (short push) disabled
Buttons Name
Power button/delete
button
OK button Confirms a selection Displays hidden icons –
Menu button Cancels the setting Displays the settings menu –
Playback button /dir ection
button (upper)
Wi-Fi button/direction
button (lower)
Video recording button/
shutter button
While in the settings menu
display
–––
Changes the menu
Changes the menu
Displays the shooting
screen
t Memo
• If [Power Saving] is set, the LCD screen automatically turns off, to reduce battery consumption, if no camera operations are
performed during a specified period of time. Pressing the button turns it back on.
While in the shooting screen
display
Press and hold: turns the power off
Displays the playback
screen
–
Press and hold: enables/
disables the Wi-Fi function
Shoots movies/still images Stops recording
While recording
–
–
7
Page 10

In playback mode
Buttons Name
8
Power button/delete
button
OK button
Menu button
Playback button /dir ection
button (upper)
Wi-Fi button/direction
button (lower)
Video recording button/
shutter button
While in the playback
screen display
Deletes the image –
Press and hold: turns the power off
Starts movie playback
(unavailable during still
image display)
Displays the [Edit Funct ions]
screen
Displays the previous image
Displays the next image
Temporarily stops playback Restarts playback
Press and hold: fastreverses
Press and hold: plays back
in fast-forward
Displays the shooting screen
When playing back a movie
During playback While temporarily stopped
Stops playback
– Reverses frames
– Advances frames
Press and hold: returns to
the first frame
Press and hold: a dvances to
the last frame
Page 11
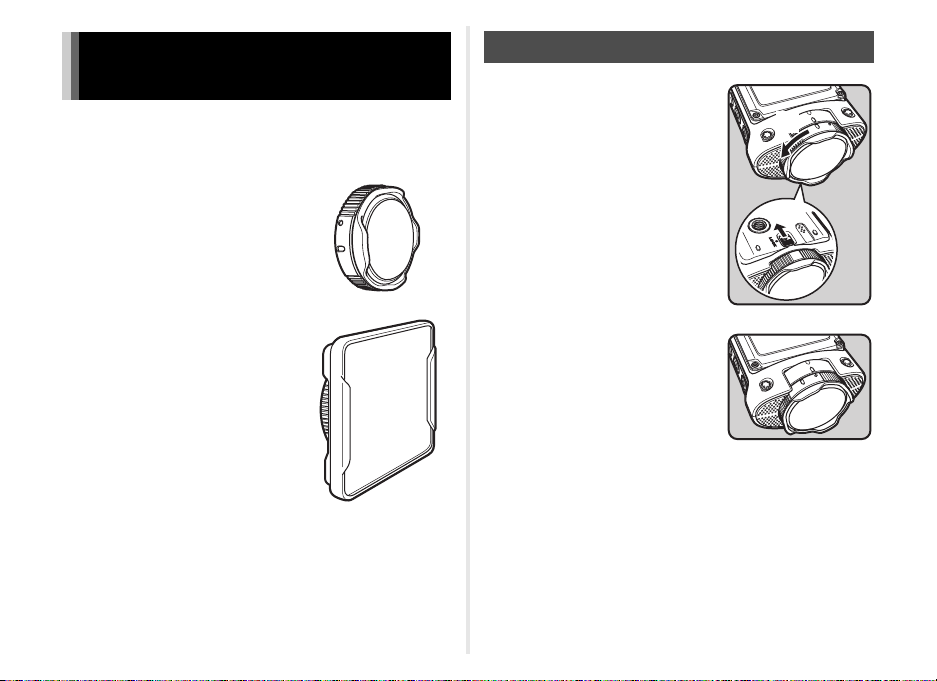
Attaching and removing the lens protector
The camera comes with two types of lens protectors. To
maintain the waterproof and dustproof performance, be sure to
keep the lens protector on.
Lens protector O-LP1631
Use for regular shooting.
Underwater lens protector
O-LP1632
Use for underwater shooting.
t Memo
• Use the appropriate lens protector for each shooting.
• When shooting underwater, the angle of view is narrower
than the regular shooting.
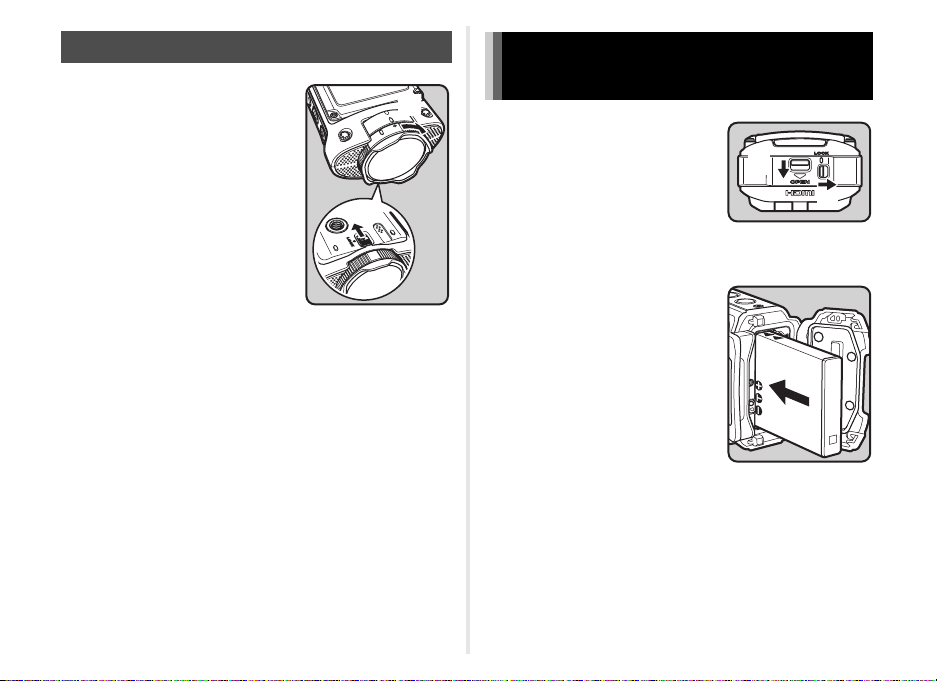
How to remove the lens protector
1 While pressing on the lens
protector lock on the back
of the camera in the
direction of arrow 1,
rotate the ring of the lens
protector in the direction
of arrow 2.
2 You can remove the lens
protector when the
alignment points for the
lens protector form a
straight line.
2
1
9
Page 12
How to attach the lens protector
1 While pressing on the lens
protector lock on the back
of the camera in the
direction of arrow 1, align
the alignment points on
the camera and the lens
protector and slide it in.
2
1
2 Rotate the lens protector in
the direction of arrow 2
until it clicks.
u Caution
• Condensation may form inside the lens protector if the
camera is subjected to rapid temperature changes, such as
when moving from the cold outdoors (low temperature
environment) into a warm room (high temperature
environment). Remove the lens protector and wipe it all off
with a dry, lint-free cloth, and then put the lens protector back
on.
Installing a memory card and battery
1 Slide the lock lever in the
direction of 1 and release
the lock.
Slide the release latch in
the direction of 2 and
open the battery/card
cover.
2
2 Confirm the positive and
negative terminals of the
battery. While pressing the
battery lock lever outward
using the side of the
battery, insert the battery
correctly.
1
10
Page 13

3 While the camera is turned
off, slowly insert the
memory card into the
microSD card slot in the
direction of the arrow.
4 Close the battery/card cover.
Close the battery/card cover until it clicks.
Next, move the lock lever to the left side and lock the
release latch.
u Caution
• Do not apply excessive force when opening and closing the
battery/card cover because the waterproof seal may peel off.
If the seal is not in the correct position, the camera will not be
waterproof.
• If the battery/card cover is not locked securely, water, sand,
or dirt may get into the camera.
• This camera uses a specifically designed D-LI68
rechargeable lithium-ion battery. Use of any other type of
battery may damage the camera and cause malfunctions.
• Insert the battery correctly. If the battery is not inserted
correctly, it may cause malfunctions.
• When storing the battery for more than 6 months, charge the
battery for 30 minutes using the power adapter and store the
battery separately. Be sure to recharge the battery every 6 to
12 months. Storing the battery below room temperature is
ideal. Avoid storing it in high temperatures.
• The date and time may be reset to the default settings if the
camera is left without the battery for a long time.
• Be careful as the camera or the battery may become hot
when the camera is used continuously for a long period of
time.
• Allow the camera to dry completely before changing the
battery or memory card. Avoid changing the battery or
memory card where the camera is likely to get wet or dirty,
and make sure that your hands are dry.
• Be sure to use this camera to format (initialize) a memory
card that is unused or has been previously used on other
cameras or digital devices. Refer to the Operating Manual
(PDF) (p.39) for instructions on formatting cards.
• Make sure that the camera is turned off before inserting or
removing the battery or memory card.
t Memo
• The camera does not come with a memory card. You must
purchase one separately. (Use a microSD card of Speed
Class 10 or higher. For d movies set to z, use a microSDXC
card of UHS-I Speed Class 3.)
• To remove the memory card, first open the battery/card
cover. Press the card in lightly with your finger until the card
pops out, then pull it straight out.
11
Page 14
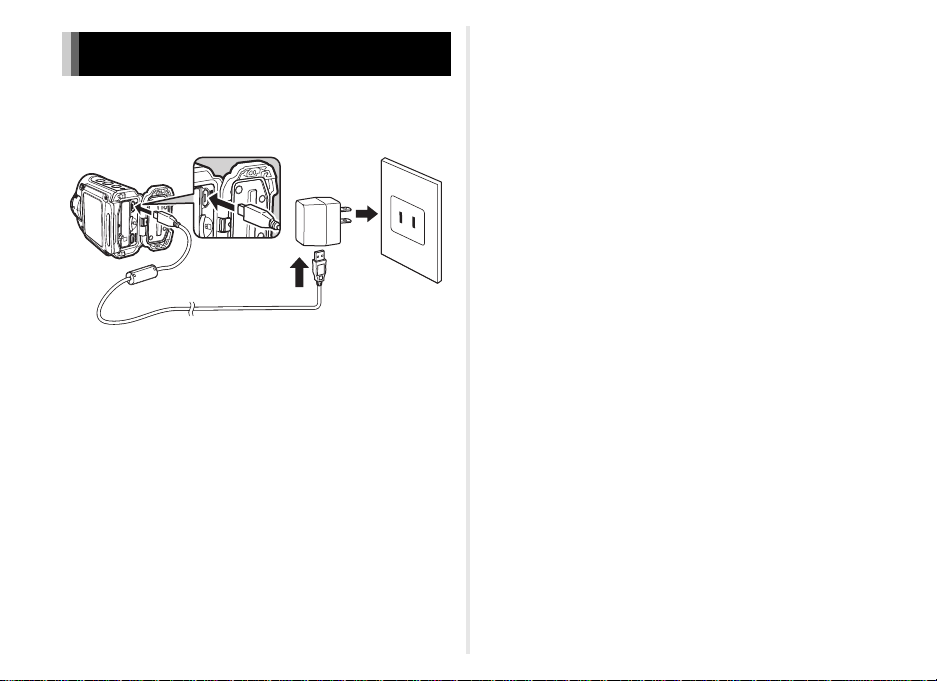
Charging the battery
Connect the supplied power adapter (D-PA164) to the camera
and charge the battery before using the camera for the first time
or if you have not used it for a long time.
1 While the camera is turned off, connect the USB
cable to the camera's USB terminal and the
power adapter.
2 Plug the power adapter into the power outlet to
start charging.
The power lamp blinks while charging.
When charging is finished, the power lamp turns off.
u Caution
• Do not use the supplied power adapter (D-PA164) for any
other purpose than that of connecting to this camera and
charging the designated battery. Doing otherwise may cause
a connected device to be damaged or overheated.
• The battery has reached the end of its service life when it
starts to run down soon after being charged. Replace it with a
new battery.
• If the power lamp does not light even if the camera is
connected to a power outlet, the battery is faulty. Replace it
with a new battery.
t Memo
• Charging time is a maximum of about 130 minutes (this may
vary depending on ambient temperature and charging
conditions). Charge the battery in a range from 0°C to 40°C
(32°F to 104°F).
• Battery performance may deteriorate as temperature
decreases. When using the camera in cold regions, we
recommend carrying a spare battery in your pocket to keep it
warm. Battery performance will recover when the
temperature returns to normal.
• Be sure to take a spare battery with you when traveling
abroad or to a cold region, or if you intend to take a lot of
pictures.
12
Page 15

Turning the camera on and off
Initial settings
To turn the camera on
Press and hold the button to turn the camera on.
The first time you turn the camera on, the [Language/u]
screen appears. (p.13)
To turn the camera off
Press and hold the button to turn the camera off.
t Memo
• When [Auto Power Off] is on, the camera is turned off
automatically if no button operations are done for three
minutes.
Do the initial settings to use your camera for the first time after
purchasing it.
Language settings
1 Turn the camera on.
The [Language/u]
screen appears.
2 Press the button or
the button. Select
the desired language
and press the
button.
[Initial Setting] screen
appears after you have set
the language.
Language
İ࡞ࢊ
Initial Setting
Language
Settings complete
ུࢊ
English
Français
OK
İ࡞ࢊ
English
3 Press the button or the button. Select
[Settings complete] and press the button.
The [Date Adjustment] screen appears.
Next, set the date and time.
13
Page 16

Date adjustment
1 Press the button or the button. Select the
date display style and press the button.
Choose from [mm/dd/yy], [dd/mm/yy] or [yy/mm/dd].
2 Press the button or the button. Select [24
h] (24-hour clock) or [12h] (12-hour clock) and
press the button.
3 Press the button or the button. Set
"month" and press the button.
The set up procedure differs depending on the display style
set in step 1.
4 Set the date, year and time in the same way as in
step 3.
The frame moves to [Settings complete].
t Memo
• To change the language, date, or time you have setup, refer
to the Operating Manual (PDF). (p.39)
5 Press the button.
The initial settings are
complete and the shooting
screen appears.
u Caution
• You can shoot pictures while doing the initial settings by
pressing the button, but the settings you have made so
far are canceled. In this case, the initial setting screen
reappears the next time you turn the camera on.
Date Adjustment
mm/dd/yy
Settings complete
Cancel
14
12h
10 : 30
2016 03/03 /
AM
OK
Page 17

Settings menu list
This list shows the items that can be set on the settings menu screen and their details.
T List of shooting modes
You can set the shooting mode for movies and still images.
Item Details Default setting
Still Image You can shoot still images.
Underwater Still Image You can shoot still images underwater to capture the blueness of the sea.
Burst Shooting
Movie You can shoot movies.
Underwater Movie You can shoot movies underwater to capture the blueness of the sea.
Time-Lapse Movie You can shoot movies at 30, 60, or 150 times the speed.
Extended Movie Recording
High Speed Movie
You can shoot still images continuously while the shutter button is
pressed.
You can shoot movies continuously, while movie files are created for
each set recording time, until stopped manually.
You can shoot movies of high frame rate (120 fps) and play them back in
slow motion.
Movie
15
Page 18

s List of shooting settings
You can set the functions for shooting movies and still images. Some functions may not be available or may not function fully
depending on the selected [Rec. Mode].
Item Details Default setting
Image Effect Modes You can change image enhancements, such as tone, and shoot. n (Bright)
EV Compensation You can adjust the brightness of the whole image being shot. 5 (±0.0)
White Balance
AE Metering
Sensitivity You can set the ISO sensitivity. k (Auto)
Angle of View You can set the angle of view for shooting. b (Wide)
LCD Orientation
Recorded Pixels You can set the recorded pixels for still images. n (3264 x 2448)
Recorded Pixels (Movie)
Quality Level (Movie) You can set the quality level of the movie. Y (Fine)
Movie SR You can set whether or not to use shake reduction for movies. r (Off)
Wind Suppression
You can match the lighting conditions during shooting and adjust the
color.
You can set the area of the screen where the brightness is metered to
determine the exposure.
You can set the orientation of the camera depending on its alignment
when it is mounted.
You can set the recorded pixels (combination of number of pixels and
frame rate) for movies.
You can set whether or not to reduce the sound of wind while shooting
movies.
s (Auto)
a (Multi-segment
metering)
1 (0°)
d (3840 x 2160)
X (On)
16
Page 19

x List of general settings
You can set the general settings for the camera.
Item Details Default setting
Operation
Volume
Sound
Date Adjustment You can set the date and time.
Language/W You can set the language displayed in messages and on menus. According to initial setting
USB Connection
Wi-Fi
Brightness Level You can set the brightness of the LCD screen. 3
Power Saving You can set the time it takes until the camera enters Power Saving mode. 15 sec.
Auto Power Off
Reset You can return the camera's settings to the factory settings. Cancel
Delete All You can delete all saved movies and still images. Cancel
Format You can format the internal memory or memory card. Cancel
Vibration You can set whether or not to use the vibration function. On
Certifications You can display the certifications for the wireless LAN. -
You can set the volume of operation sounds and playback sounds, as
well as the sounds for the shutter and operations.
You can set the way to connect the camera to a computer using the USB
cable.
You can set whether to enable or disable the Wi-Fi function. You can also
display or reset communication information in Wi-Fi mode.
You can set whether or not to automatically turn off the camera when
there are no operations for a fixed time.
Playback
Volume
Operation
Sound
Shutter Sound 1
Date Format
(date)
Date Format
(time)
Action Mode Off
2
2
1
According to
initial setting
24h
MSC
On
17
Page 20

Shooting mode settings
You can set the shooting mode for movies and still images.
1 Press the button on the shooting screen.
The settings menu is displayed.
2 Press the button or
the button. Select
T [Rec. Mode] and
press the button.
The [Rec. Mode] screen
appears.
See “List of shooting
modes” (p.15) for the
shooting modes that can be selected.
3 Press the button or
the button. Select
the shooting mode
and press the
button.
This brings you back to the
shooting screen.
If you selected [Time-Lapse
Movie] or [Extended Movie
Recording], proceed to step
4.
Rec. Mode
Movie
4 For [Time-Lapse Movie], select the speed. For
[Extended Movie Recording], select the
recording time. Press the button.
Shooting mode Icon Details
You can shoot movies at 30
c
times the speed.
Time-Lapse Movie
OK
Extended Movie
Recording
t Memo
• The current settings for the [Rec. Mode] are saved even when
the camera is turned off.
• By pressing the button while doing settings, you return to
the previous screen with the existing settings.
• The available recording time for [Extended Movie Recording]
OK
differs depending on the [Recorded Pixels (Movie)] (p.16).
For details, refer to the Operating Manual (PDF). (p.39)
You can shoot movies at 60
C
times the speed.
You can shoot movies at
B
150 times the speed.
Set the recording time to 5
E
minutes.
Set the recording time to 10
D
minutes.
Set the recording time to 25
e
minutes.
18
Page 21

Setting the camera functions
You can set items in [Shooting Settings] and [Setting].
1 Press the button on the shooting screen.
The settings menu is displayed.
• The current settings for the [Shooting Settings] and [Setting]
are saved even when the camera is turned off. However, the
settings may not be saved, depending on the [Rec. Mode]
(p.15) selected.
2 Press the button or
the button. Select
s [Shooting Settings]
or x [Setting] and
press the button.
The selected settings menu
is displayed.
See “List of shooting settings” (p.16) or “List of general
settings” (p.17) for the setting items that can be selected.
Shooting Settings
OK
3 Set each item.
Refer to the Operating Manual (PDF) (p.39) for instructions
on the setting method for shooting setting or general
setting.
4 Press the button.
This brings you back to the shooting screen.
t Memo
• Some functions may not be available or may not function fully
depending on the selected [Rec. Mode]. For details, refer to
the Operating Manual (PDF). (p.39)
• By pressing the button while doing settings, you return to
the previous screen with the existing settings.
19
Page 22

Shooting movies and still images
00: 00 :4 7
2 /
123 4
Select the shooting mode according to the subject or scene and
shoot movies or still images.
t Memo
• Pressing the button in any shooting mode brings you
back to the shooting screen if the camera enters [Power
Saving] mode and the LCD screen is turned off.
• Attach the supplied underwater lens protector (O-LP1632)
when shooting underwater still images. (p.9)
1 Set the shooting
mode. (p.18)
The shooting screen
appears.
00:01
When shooting movies
2 Press the button to shoot movies or still
images.
Press the button again to finish recording.
Playing back movies and still images
1 Press the button on the shooting screen.
This changes the screen to playback mode and the last still
image or movie shot is displayed.
2 Press the button
or the button.
Select an image
saved on either the
memory card or the
internal memory to
display it.
Press the button to
start the movie playback.
The operations guide is displayed on the screen during
movie playback.
Pressing the button brings you back to the shooting
screen.
u Caution
• The [Power Saving] function is not available in playback
mode.
t Memo
• [No image] is displayed on the screen if there are no movies
or still images saved on the internal memory or the memory
card.
Operations guide
1234
1/ 1234
00:00:47
00:00:47
During movie playback
20
Page 23

Operations that can be performed during movie
90
00: 00 :4 7
playback
Pressing the button: Pauses playback
Press and hold the
Fast-reverses
button:
Press and hold the
Fast-forwards playback
button:
Pressing the button: Stops playback
Operations that can be performed while paused
1/ 1234
90
00:00:47
00:00:47
While paused
Pressing the button: Restarts playback
Pressing the button: Reverses frames
Pressing the button: Advances frames
Press and hold the
Returns to the first frame
button:
Press and hold the
button:
Advances to the last
frame
u Caution
• The [Power Saving] function is not available in playback
mode.
t Memo
• When reversing frames, the first frame of every 30 frames
appears with each press of the button. For example,
when you reverse frames between the second frame and the
31st frame, the first frame appears, and when you reverse
frames between the 32nd and 61st, the 31st frame appears.
• Sound is not played back during fast-reverse or fast-forward
playback.
• The movie is played back at normal speed when you release
the button or button during fast-reverse or fastforward playback.
• [No image] is displayed on the screen if there are no movies
or still images saved on the internal memory or the memory
card.
21
Page 24

Deleting movies and still images
OK
1/ 123 4
1 Change to playback mode. (p.20)
2 Press the button or the button. This
displays the movie or still image to be deleted.
3 Press the button.
The delete screen appears.
1/ 1234
Delete
Cancel
4 Press the button or the button. Select
[Delete] and press the button.
After [Deleting] appea rs blinking on the screen, the movie or
still image is deleted.
To cancel the deletion of a movie or still image, select
[Cancel] and press the button. You can also cancel
deletion by pressing the button.
u Caution
• Deleted movies and still images cannot be restored.
Connecting the camera and a communication device
The following functions can be used by directly connecting the
camera to a communication device via Wi-Fi and using the
dedicated application “Image Sync”.
Remote
shooting
Image view
OK
Image Sync is compatible with iOS and Android. It can be
downloaded from th e App Store or Google Play. For compatible
OS and other details, refer to the download site.
t Memo
• The Image Sync screenshots used in this manual may differ
from the actual display. The screen layout and elements may
be also changed due to causes such as the version upgrade
of the application.
• For details on how to operate the communication device,
refer to the operating manual of the device.
You can display the live view image of the
camera on the communication device and
control the shooting and exposure settings
by operating the communication device.
You can display the images saved on the
memory card inserted into the camera on the
communication device, allowing images to
be imported to the communication device.
22
Page 25

Preparing the camera
1 Press and hold the
button in shooting
mode and enable the
wireless LAN (Wi-Fi).
After the waiting for
connection screen appears,
the Wi-Fi function is
enabled.
Setting communication devices (for Android)
SSID
RICOH
_
Password
0
4 Tap [RICOH_XXXXX] on
the [Network List].
The [Enter Password] screen
appears.
1 Enable the wireless LAN (Wi-Fi) function on the
communication device.
2 Start Image Sync on the communication device.
The NFC connection screen appears on the communication
device.
3 Tap [Choose a Network].
The [Choose a Network] screen
appears on the communication
device.
t Memo
• For details on how to use Image
Sync, refer to the Operating Manual
(PDF). (p.39)
5 Enter the password, and
tap [Connect].
The camera is connected to the
communication device and the
list of images appears on the
Image Sync screen.
t Memo
• To check the default password, refer to the Operating Manual
(PDF). (p.39)
23
Page 26

Setting communication devices (for iOS)
1 Enable the wireless LAN (Wi-Fi) function on the
communication device.
2 Tap [RICOH_XXXXX] from the list of detected
networks.
3 Enter the password, and
tap [Join].
The camera and communication
device are connected via Wi-Fi.
4 Start Image Sync on the communication device.
The list of images appears.
24
Page 27

Main Specifications
Type Compact digital camera
Number of
Effective Pixels
Image Sensor 1/2.3 inch CMOS
Number of
Recorded Pixels
Sensitivity
(Standard Output)
File Formats
Quality Level
Storage Media Built-in memory (approx. 68 MB), microSD/microSDHC/microSDXC memory card
Approx. 8 megapixels
Still n(3264 x 2448), M(3264 x1840), m(2448 x 2448), L(2592 x 1944), l(2592 x 1464)
Movie
AUTO (200 to 1600), Auto high (200 to 6400), Manual (200, 400, 800, 1600, 3200, 6400)
Still JPEG (Exif 2.3), DCF 2.0, PRINT Image Matching III
Movie MPEG-4 AVC/H.264 (MOV), PCM system, stereo sound
Still Fixed at Y(Fine), unchangeable
Movie Y(Fine), z(Super fine) *Fixed to Y when shooting mode is anything other than [Movie].
d(3840 x 2160•30 fps), c(1920 x 1080•60 fps), b(1920 x 1080•30 fps), e(1280 x 720•120 fps),
h(1280 x 720•60 fps), g(1280 x 720•30 fps)
25
Page 28

White Balance Auto, Auto outdoor, Manual
Lens
Movie SR
(Shake
Reduction)
Display 1.5 inch LCD, approx. 115,000 dots
Playback Modes Playback still images, Image Copy, Playback movies, Edit movies (Save as Still Image, Divide Movies)
Exposure Control
Shooting Mode
Shutter Speed 1/24000 sec. - 1/4 sec.
Power Source Rechargeable lithium-ion battery D-LI68
Focal Length 1.6 mm (equivalent to approx. 14 mm in 35 mm format)
Focus Range 20 cm to ∞
Brightness F2.0
Lens
Construction
Maximum
Angle of View
(Diagonal)
Movie
AE Metering Multi-segment metering, Spot AE metering
EV
Compensation
Still Image, Underwater Still Image, Burst Shooting, Movie, Underwater Movie, Time-Lapse Movie, Extended Movie Recording, High
Speed Movie
8 elements in 8 groups (6 aspherical elements) *when lens protector O-LP1631 is attached
Still
Wide: approx. 202°
Narrow: approx. 150°
Movie
Wide: approx. 204°
Narrow: approx. 151° *when lens protector O-LP1631 is attached
Electronic Movie Shake Reduction (Movie SR)
*Available only when Angle of View is set to c (Narrow) in movie recording.
*When Movie SR is on, the angle of view is reduced.
±2 EV (can be set in 1/2 EV steps)
26
Page 29

Image Storage
Capacity
Approx. 450
pictures
Playback Time
Approx. 160
Battery Life
Interfaces USB 2.0 (Micro-B), HDMI output terminal (Type D)
Wireless Interface Standard : 802.11 b/g/n, Frequency : 2.4 GHz band , Security : WPA2
Waterproof and
Dustproof Rating
Impact
Resistance Rating
Dimensions
Weight
Accessories
min.
(for d with Y
movie s)
Movie
Recording
Time
Approx. 90 min.
(for d with Y
movie s)
JIS waterproof grade 8 and JIS dustproof grade 6 (IP68) Continuous underwater shooting possible for 2 hours at depth of 20 m.
Our drop test (2 m height onto a 5 cm thick plywood surface) complying with MIL-Standard 810F Method 516.5-Shock testing.
• Waterproof performance is not guaranteed if the camera is exposed to impact such as being dropped or hit.
• The camera is not guaranteed to be free of trouble or damages under every condition.
Approx. 57.4 (W) x 34.1 (H) x 77.8 (D) mm (approx. 2.3 (W) x 1.3 (H) x 3.1 (D) inches) (excluding operating or protruding parts)
*when lens protector O-LP1631 is attached
Approx. 136 g / 4.8 oz. (including battery, microSD memory card, and Lens protector O-LP1631)
Approx. 114 g / 4.0 oz. (excluding battery, microSD memory card, and Lens protector O-LP1631)
Rechargeable lithium-ion battery D-LI68, Power adapter D-PA164, USB cable I-USB157, Lens protector O-LP1631, Underwater lens
protector O-LP1632, Start Guide, Regarding Waterproof Design
Recording capacity shows the approximate number of shots recorded during CIPA-compliant testing (at 23°C
(73.4°F) with display on). Actual performance may vary according to operating conditions.
According to the results of in-house testing.
According to the results of in-house testing.
27
Page 30

Image storage capacity and recordable time
Still image
Recorded pixels Internal memory Memory card (8 GB)
n (3264 x 2448) 38 4199
M (3264 x1840) 46 5092
m (2448 x 2448) 46 5092
L (2592 x 1944) 53 5838
l (2592 x 1464) 69....................................7479
• The image storage capacity is for reference only. The actual image storage capacity may vary depending on the memory card and the subject.
Movie
Recorded pixels
d (3840 x 2160•30 fps) - - 10 min. 19 sec. 17 min. 6 sec.
c (1920 x 1080•60 fps) 12 sec. 18 sec. 24 min. 9 sec. 35 min. 55 sec.
b (1920 x 1080•30 fps) 22 sec. 33 sec. 44 min. 18 sec. 1 hr. 4 min. 18 sec.
e (1280 x 720•120 fps) 14 sec. 21 sec. 28 min. 4 sec. 41 min. 31 sec.
h (1280 x 720•60 fps) 22 sec. 33 sec. 44 min. 18 sec. 1 hr. 4 min. 18 sec.
g (1280 x 720•30 fps) 36 sec. 52 sec. 1 hr. 11 min. 11 sec. 1 hr. 42 min. 14 sec.
• The above figures are based on our standard shooting conditions and may vary depending on the subject, shooting conditions, and type of the memory
card used.
• The consecutive recordable time or recordable size per shooting is up to 25 minutes or 4 GB.
• The recordable time for e (1280 x 720•120 fps) per shooting is up to 4 minutes.
z (Super fine) Y (Fine) z (Super fine) Y (Fine)
Internal memory Memory card (8 GB)
28
Page 31

Using your camera safely
We have paid close attention to the safety of this camera. When using this
camera, we request your special attention regarding items marked with the
following symbols.
Warning
Caution
About the camera
Warning
• Do not attempt to take the camera apart or modify the camera. High
voltages are present within the camera, and there is a danger of electric
shock if the camera is taken apart.
• If the inside of the camera should become exposed as a result of, for
example, the camera being dropped, please do not under any
circumstances touch such exposed portions, as there is a danger of
receiving an electric shock.
• Wrapping the strap around a neck is dangerous. Take care that small
children do not hang the strap around their necks.
• If any irregularities occur during use, such as smoke or a strange odor,
stop use immediately, remove the battery or the AC adapter, and contact
your nearest service center. Continued use can cause a fire or electric
shock.
Caution
• Some portions of the camera heat up during use, so please take care,
as there is a risk of low temperature burns if such portions are held for
long periods of time.
• Should the LCD screen be damaged, be careful of glass fragments.
Also, be careful not to allow the liquid crystal to get on your skin, in your
eyes, or in your mouth.
This symbol indicates that ignoring this item
could cause serious personal injuries.
This symbol indicates that ignoring this item
could cause minor or medium personal injuries,
or loss of property.
• Depending on your individual factors or physical condition, the use of the
camera may cause itching, rashes or blisters. In case of any
abnormality, stop using the camera and get medical attention
immediately.
About the power adapter and the AC adapter
Warning
• Always use the power adapter or AC adapter exclusively developed for
this camera, with the specified power and voltage. Using a power
adapter or AC adapter not exclusive to this camera, or using the
exclusive power adapter or AC adapter with an unspecified power or
voltage can cause a fire, electric shock, or camera breakdown. The
specified voltage is 100-240V AC.
• Do not disassemble or modify the product. This can cause a fire or
electric shock.
• If the generation of smoke or strange odor from the product or other
abnormality occurs, immediately discontinue its use and consult your
nearest service center. Continued use can cause a fire or electric shock.
• If water should happen to get inside the product, consult your nearest
service center. Continued use can cause a fire or electric shock.
• If you see a lightning flash or hear thunder during use of the power
adapter or AC adapter, unplug the AC plug and discontinue use.
Continued use can cause damage to the product, fire, or electric shock.
• Wipe off the AC plug if it becomes covered with dust. Accumulated dust
may cause a fire.
Caution
• Do not place or drop heavy objects on or forcefully bend the USB cable
or AC plug cord. Doing so may damage the cable/cord. Should the
cable/cord be damaged, consult your nearest service center.
• Do not touch or short-circuit the terminal area of the power adapter or
AC adapter while the adapter is plugged in.
• Do not handle the AC plug with wet hands. This can cause an electric
shock.
• Do not subject the product to strong impacts or allow it to drop onto a
hard surface. This can cause a malfunction.
• Do not use the power adapter to charge a battery other than a
rechargeable lithium-ion battery D-LI68. This can cause overheating,
explosion, or connected device failure.
• To reduce the risk of hazards, use only a CSA/UL certified power supply
cord set, cord is Type SPT-2 or heavier, minimum NO.18 AWG copper,
29
Page 32

one end with a molded-on male attachment plug cap (with a specified
NEMA configuration), and the other is provided with a molded-on female
connector body (with a specified IEC nonindustrial type configuration) or
the equivalent.
About the battery
Warning
• Be sure to store the battery out of the reach of small children. Placing it
in their mouths may cause an electric shock.
• If any leakage from the battery should come in contact with your eyes, it
may cause a loss of sight. Flush your eyes with clean water and get
medical attention immediately. Do not rub them.
Caution
• Only use the specified battery with this camera. Use of other batteries
may cause an explosion or fire.
• Do not disassemble the battery. Disassembling the battery may cause
an explosion or leakage.
• Remove the battery from the camera immediately if it becomes hot or
begins to smoke. Be careful not to burn yourself during removal.
• Keep wires, hairpins, and other metal objects away from the + and contacts of the battery.
• Do not short the battery or dispose of the battery in fire. This can cause
an explosion or fire.
• If any leakage from the battery should come in contact with skin or
clothes, it may cause irritation to the skin. Wash the affected areas
thoroughly with water.
• Precautions for D-LI68 Battery Usage:
- USE SPECIFIED CHARGER ONLY.
- DO NOT INCINERATE.
- DO NOT DISASSEMBLE.
- DO NOT SHORT CIRCUIT.
- DO NOT EXPOSE TO HIGH TEMP.
(140°F / 60°C)
30
Keep the camera and its accessories out of the
reach of small children
Warning
Be sure to keep the camera and its accessories out of the reach of small
children.
1. Injuries may result from the product falling or from unexpected
movement.
2. Suffocation may result from wrapping the strap around the neck.
3. Small accessories such as the battery or a microSD card may be
swallowed. Seek medical attention immediately if an accessory is
accidentally swallowed.
Care to be taken during handling
Before using your camera
• When the camera has not been used for a long tim e, confirm that it is still
working properly, particularly prior to taking important pictures (such as
at a wedding or when traveling). Contents of the recording cannot be
guaranteed if recording, playback or transferring your data to a
computer, etc. is not possible due to a malfunction of your camera or
recording media (microSD card), etc.
• The lens on this camera is not interchangeable. The lens is not
removable.
About the battery and power adapter
• To keep the battery in optimum condition, avoid storing it in a fully
charged state or in high temperatures.
• If the battery is left inserted and the camera is not used for a long time,
the battery will over-discharge and shorten the battery’s life.
• Charging the battery a day before use or on the day of use is
recommended.
• The power adapter supplied with the camera is designed for exclusive
use with this camera. Do not use it with other devices.
Page 33

Precautions on carrying and using your camera
• Hot and humid places should be avoided. Particular care should be
taken regarding vehicles, which can become very hot inside.
• Ensure that the camera is not subjected to substantial vibrations,
shocks, or pressure as this may cause damage, malfunction, or a loss in
waterproof performance. Place the camera on a cushion for protection
when the camera is subjected to the vibrations of a motorbike, car, ship,
etc. If the camera is subjected to substantial vibrations, shocks, or
pressure, take your camera to your nearest service center and have it
checked.
• The temperature range in which the camera can be used is -10°C to
40°C (14°F to 104°F).
• The LCD screen will become black at high temperatures, but will return
to normal at normal temperatures.
• The response speed of the LCD screen becomes slow at low
temperatures. This is due to the properties of the liquid crystal and is not
a malfunction.
• Sudden temperature changes will cause condensation on the inside and
outside of the camera. Place the camera in your bag or a plastic bag,
and remove it after the temperature of the camera and surroundings are
equalized.
• Avoid contact with garbage, mud, sand, dust, water, toxic gases, or salt.
These could cause the camera to breakdown. Wipe the camera to dry
off any rain or water drops.
• Do not press the LCD screen with excessive force. This could cause it
to break or malfunction.
• Be careful not to sit down with the camera in your back pocket as this
may damage the exterior of the camera or the LCD screen.
• When using a tripod with the camera, be careful not to overtighten the
screw in the tripod socket on the camera.
Cleaning your camera
• Do not clean the camera with organic solvents such as thinner, alcohol
or benzine.
• Use a lens brush to remove dust accumulated on the lens. Never use a
spray blower for cleaning as it may damage the lens.
Storing your camera
• Avoid storing the camera where pesticides and chemicals are handled.
Remove the camera from its case and store it in a well-ventilated place
to prevent the camera from becoming moldy during storage.
• Avoid using or storing the camera where it may be exposed to static
electricity or electrical interference.
• Avoid using or storing the camera in dire ct sunlight or in locations where
it may be exposed to rapid changes in temperature or to condensation.
• Periodic inspections are recommended every one to two years to
maintain high performance.
Other precautions
• Care should be taken when removing the microSD card immediately
after using the camera, as the card may be hot.
• Keep the battery/card cover closed and do not remove the microSD card
or turn the camera off while the data is being played back or saved to the
card, or the camera is connected to a computer with the USB cable, as
this may cause the data to be lost or the card to be damaged.
• Do not bend the microSD card or subject it to violent impact. Keep it
away from water and store away from high temperature.
• Do not remove the microSD card during formatting as this may damage
the card and render it unusable.
• The data on the microSD card may be lost in the following
circumstances. We do not accept any liability for data that is deleted
(1) when the microSD card is mishandled by the user.
(2) when the microSD card is exposed to static electricity or electrical
interference.
(3) when the microSD card has not been used for a long time.
(4) when the microSD card is ejected or the battery is removed while the
card is being accessed.
• If it is not used for a long time, the data on the card may become
unreadable. Be sure to regularly make a backup of important data on a
computer.
• When using a microSD card with a slow recording speed, recording may
stop while recording a movie even if there is adequate space in the
memory, or image capture or playback may take a long time.
• Be sure to format microSD cards that are unused or have been used on
another camera.
31
Page 34

• Please note that deleting data, or formatting the microSD cards or the
built-in memory does not completely erase the original data. Deleted
files can sometimes be recovered using commercially available
software. It is user’s responsibility to ensure the privacy of such data.
• The data on your microSD card should be managed at your own risk.
Regarding waterproof, dustproof, and shockproof design
• This camera is provided with a waterproof/dustproof design complying
with JIS waterproof grade 8 and JIS dustproof grade 6 (equivalent to
IP68).
• The camera satisfies our drop test (2 m height onto a 5 cm thick plywood
surface) complying with MIL-Standard 810F Method 516.5-Shock
testing.
• The camera satisfies our test for the waterproof, dustproof, and
shockproof performance, but this does not guarantee it will remain free
of trouble or damages.
• Waterproof performance is not guaranteed if the camera is exposed to
impact such as being dropped or hit.
• To maintain the waterproof and dustproof performance, be sure to keep
the lens protector on.
Precautions before using the camera in the water
Check the following before going near the water
• Make sure that there are no cracks or scratches on the rubber seal of
the battery/card cover.
Rubber seal
Battery/card cover
• Make sure that there are no foreign objects (dust, sand, hair, lint or
liquid) on the rubber seal or the contact surface before closing the
battery/card cover. Wipe off any foreign objects with a clean lint-free
cloth.
• Close the battery/card cover properly until it clicks. Otherwise water may
get in and damage the camera.
Be careful near the water
• Avoid opening the battery/card cover when near the waterside or with
wet hands. When changing the battery or the microSD card, avoid
places where the camera is likely to get wet or dirty, and make sure that
the camera and your hands are completely dry.
• The camera will sink if dropped in water, so be sure to attach the strap
to the camera and wrap it around your wrist when using the camera in
or near water.
• To enhance the waterproof performance of the camera, the front of the
lens is protected by glass. The glass should be kept clean at all times,
as any dirt or water on the glass will affect the quality of pictures taken.
32
Page 35

Precautions when using the camera in the water
• Do not use the camera deeper than 20 meters underwater. Do not use
the camera underwater for more than 120 minutes consecutively.
• Do not open the battery/card cover underwater.
• Do not use the camera in hot water or in a hot spring.
• Do not apply excessive force to the camera, for example diving into
water with it. Doing so may compromise the waterproof performance of
the camera or cause the cover to open.
• Do not leave the camera on the sand at the beach, as this may cause
the camera to exceed the upper limit of its operational temperature
range, or cause the speaker or microphone to become blocked with
sand.
• Avoid subjecting the camera to substantial vibrations, shocks, or
pressure as this may cause a loss in waterproof performance. If the
camera is subjected to substantial vibrations, shocks or pressure, take
your camera to your nearest service center and have it checked.
• Avoid getting sunscreen or sun oil on the camera as it may cause
discoloration of the surface. If any oil gets on the camera, wash it off
immediately with warm water.
• Sudden and extreme changes in temperature may cause condensation
to form in and on the camera. Keep the camera in a bag or case to
reduce the difference in temperature.
Precautions after using the camera in the water
• Do not open the battery/card cover if the camera is wet. Wipe off any
water with a clean lint-free cloth.
• The inside surface of the cover may get wet when it is opened. Wipe off
any water that is on the cover.
• Wiping off the camera while there is sand or dust on it may scratch the
surface of the camera. Make sure that the battery/card cover is firmly
closed before washing the camera in tap water. After washing the
camera, dry it with a soft cloth.
• Wipe off any dirt or sand on the waterproof seal or the contact surface.
The camera’s waterproof performance may be compromised by a loose
seal, or cracks or dents on the seal or the contact surface. If there is any
such damage, contact your nearest service center.
• If the camera becomes very dirty or after it has been used in the sea,
make sure that it is turned off and the battery/card cover is firmly closed
before rinsing it under running tap water or leaving it in a bowl of clean
water for a short time (2 or 3 minutes).
• Avoid cleaning with agents such as soapy water, mild detergents, or
alcohol as this may compromise the waterproof performance of the
camera.
• To maintain the waterproof performance of the camera, you are
recommended to change the waterproof seal once a year. Contact your
nearest service center regarding changing the seal. (A charge will be
made.)
• The camera’s accessories are not waterproof (except for the underwater
lens protector O-LP1632).
About the wireless LAN function
• Do not use the camera in a place where electrical products, AV/OA
devices, and so on generate magnetic fields and electromagnetic
waves.
• If the camera is affected by magnetic fields and electromagnetic waves,
it may not be able to communicate.
• If the camera is used near a TV or a radio, poor reception or TV screen
glitch may occur.
• If there are multiple wireless LAN access points near the camera and the
same channel is used, search operation may not be executed correctly.
• The security of your data stored, sent or received is your own
responsibility.
33
Page 36

In the frequency band used by the camera, along with industrial,
scientific, and medical devices such as a microwave oven, premises
radio stations (wireless stations requiring license) and specified low
power radio stations (wireless stations not requiring license) for
mobile object identification used in factory production lines, etc., and
amateur radio stations (wireless stations requiring license) are
operated.
1. Before using the camera, confirm that premises radio stations
and specified low power radio stations for mobile object
identification and amateur radio stations are not operated in the
vicinity.
2. In the event that the camera causes harmful radio wave
interference to premises radio stations for mobile object
identification, immediately change the frequency being used to
avoid interference.
3. If you have other troubles such that the camera causes harmful
radio wave interference to specified low power radio stations for
mobile object identification or to amateur radio stations, contact
your nearest service center.
This camera conforms to the technical standards under the Radio Law and
Telecommunications Business Law and the certification of conformance to
technical standards can be displayed on the monitor.
How to display certifications
The certification marks of conformance to wireless technical standards
can be displayed from [Certifications] of the [Setting] menu. For details,
refer to the Operating Manual (PDF). (p.39)
Trademarks
• microSDXC logo is a trademark of SD-3C, LLC.
• Microsoft, Windows, Windows Vista, and Photosynth are registered
trademarks of Microsoft Corporation in the United States of America and
other countries.
• Macintosh, OS X, QuickTime, iPhone, and App Store are trademarks of
Apple Inc., registered in the U.S. and other countries.
• Intel and Intel Core are trademarks of Intel Corporation in the U.S. and/
or other countries.
• Wi-Fi is a registered trademark of Wi-Fi Alliance.
• IOS is a trademark or registered trademark of Cisco in the U.S. and
other countries and is used under license.
• Facebook is a registered trademark of Facebook, Inc.
• Twitter is a registered trademark of Twitter, Inc.
• Tumblr is a registered trademark of Tumblr, Inc.
• Google, Google Play, and Android are trademarks or registered
trademarks of Google Inc.
• HDMI, the HDMI logo, and High-Definition Multimedia Interface are
trademarks or registered trademarks of HDMI Licensing, LLC in the
United States and/or other countries.
• This product is licensed under the AVC Patent Portfolio License for the
personal use of a consumer or other uses in which it does not receive
remuneration to
(i) encode video in compliance with the AVC standard (“AVC video”)
and/or
(ii) decode AVC video that was encoded by a consumer engaged in a
personal activity and/or was obtained from a video provider licensed to
provide AVC video. No license is granted or shall be implied for any
other use.
Additional information may be obtained from MPEG LA, LLC.
See http://www.mpegla.com.
• All other trademarks are the property of their respective owners.
34
Page 37

WARRANTY POLICY
All our cameras purchased through authorized bona fide
photographic distribution channels are guaranteed against
defects of material or workmanship for a period of twelve
months from the date of your purchase. Service will be
rendered, and defective parts will be replaced without cost to
you within that period, provided the camera does not show
evidence of impact, sand or liquid damage, mishandling,
tampering, battery or chemical corrosion, operation contrary to
operating instructions, or modification by an unauthorized repair
shop. The manufacturer or its authorized representatives shall
not be liable for any repair or alterations except thos e made with
its written consent and shall not be liable for damages from
delay or loss of use or from other indirect or consequential
damages of any kind, whether caused by defective material or
workmanship or otherwise; and it is expressly agreed that the
liability of the manufacturer or its representatives under all
guarantees or warranties, whether expressed or implied, is
strictly limited to the replacement of parts as hereinbefore
provided. No refunds will be made on repairs by non-authorized
service facilities.
Procedure During 12-month Warranty Period
Any camera which proves defective during the 12-month
warranty period sho uld be returned to the dealer from w hom you
purchased the camera or to the manufacturer. If there are no
representatives of the manufacturer in your country, send the
camera to the manufacturer, with postage prepaid. In this case,
it will take a considerable length of time before the camera can
be returned to you owing to the complicated customs
procedures required. If the camera is covered by warranty,
repairs will be made and parts replaced free of charge, and the
35
Page 38

camera will be returned to you upon completion of servicing. If
the camera is not covered by warranty, regular charges of the
manufacturer or of its representatives will apply. Shipping
charges are to be borne by the owner. If your camera was
purchased outside of the country where you wish to have it
serviced during the warranty period, regular handling and
servicing fees may be charged by the manufacturer’s
representatives in that country. Notwithstanding this, your
camera returned to the manufacturer will be serviced free of
charge according to this procedure and warranty policy. In any
case, however, shipping charges and customs clearance fees
to be borne by the sender. To prove the date of your purchase
when required, please keep the receipt or bills covering the
purchase of your camera for at least a year. Before sending
your camera for servicing, please make sure that you are
sending it to the manufacturer’s authorized representatives or
their approved repair shops, unless you are sending it directly
to the manufacturer. Always obtain a quotation for the service
charge, and only after you accept the quoted service charge,
instruct the service station to proceed with the servicing.
• This warranty policy does not affect the customer’s
statutory rights.
• The local warranty policies available from our
distributors in some countries can supersede this
warranty policy. Therefore, we recommend that you
review the warranty card supplied with your product at
the time of purchase, or contact our distributor in your
country for more information and to receive a copy of
the warranty policy.
For customers in USA
STATEMENT OF FCC COMPLIANCE
This device complies with Part 15 of the FCC Rules. Operation
is subject to the following two conditions: (1) This device may
not cause harmful interference, and (2) this device must accept
any interference received, including interference that may
cause undesired operation.
Changes or modifications not approved by the party responsible
for compliance could void the user’s authority to operate the
equipment.
This equipment has been tested and found to comply with the
limits for a Class B digital device, pursuant to part 15 of the FCC
Rules.
These limits are designed to provide reasonable protection
against harmful interference in a residential installation. This
equipment generates, uses and can radiate radio frequency
energy and, if not installed and used in accordance with the
instructions, may cause harmful interference to radio
communications. However, there is no guarantee that
interference will not occur in a particular installation.
If this equipment does cause harmful interference to radio or
television reception, which can be determined by turning the
equipment off and on, the user is encouraged to try to correct
the interference by one or more of the following measures:
• Reorient or relocate the receiving antenna.
• Increase the separation between the equipment and
receiver.
• Connect the equipment into an outlet on a circuit different
from that to which the receiver is connected.
* Consult the dealer or an experienced radio/TV technician for
help.
36
Page 39

FOR CALIFORNIA, U.S.A. ONLY
Perchlorate Material-special handling may apply. The lithium
battery used in this camera contains perchlorate material, which
may require special handling.
See www.dtsc.ca.gov/hazardouswaste/perchlorate
Declaration of Conformity
According to 47CFR, Parts 2 and 15 for
Class B Personal Computers and Peripherals
We: RICOH IMAGING AMERICAS
Located at: 633 17 Street, Suite 2600,
Declare under sole responsibility that the product identified
herein complies with 47CFR Parts 2 and 15 of the FCC rules as
a Class B digital device. Each product marketed is identical to
the representative unit tested and found to be compliant with the
standards. Records maintained continue to reflect the
equipment being produced can be expected to be within the
variation accepted, due to quantity production and testing on the
statistical basis as required by 47CFR §2.909. Operation is
subject to the following two conditions: (1) This device may not
cause harmful interference, and (2) This device must accept
any interference received, including interference that may
cause undesired operation. The above named party is
responsible for ensuring that the equipment complies with the
standards of 47CFR §15.101 to §15.109.
Product Name: Digital Camera
Model Number: RICOH WG-M2
Contact person: Customer Service Manager
Date and Place: January, 2016, Colorado
CORPORATION
th
Denver, Colorado 80202, U.S.A.
Phone: 800-877-0155
Fax: 303-790-1131
For customers in Canada
This Class B digital apparatus complies with Canadian ICES003 (B).
The available scientific evidence does not show that any health
problems are associated with using low power wireless devices.
There is no proof, however, that these low power wireless
devices are absolutely safe. Low power wireless devices emit
low levels of radio frequency energy (RF) in the microwave
range while being used. Whereas high levels of RF can produce
health effects (by heating tissue), exposure of low-level RF that
does not produce heating effects causes no known adverse
health effects. Many studies of low-level RF exposures have not
found any biological effects. Some studies have suggested that
some biological effects might occur, but such findings have not
been confirmed by additional research. RICOH WG-M2 has
been tested and found to comply with IC radiation exposure
limits set forth for an uncontrolled environment and meets RSS102 of the IC radio frequency (RF) Exposure rules.
Pour les utilisateurs au Canada
Cet appareil numérique de la classe B est conforme à la norme
NMB-003 (B) du Canada.
Les connaissances scientifiques dont nous disposons n’ont mis
en évidence aucun problème de santé associé à l’usage des
appareils sans fil à faible puissance. Nous ne sommes
cependant pas en mesure de prouver que ces appareils sans fil
à faible puissance sont entièrement sans danger. Les appareils
sans fil à faible puissance émettent une énergie fréquence
radioélectrique (RF) très faible dans le spectre des micro-ondes
lorsqu’ils sont utilisés. Alors qu’une dose élevée de RF peut
37
Page 40

avoir des effets sur la santé (en chauffant les tissus),
l’exposition à de faibles RF qui ne produisent pas de chaleur n’a
pas de mauvais effets connus sur la santé. De nombreuses
études ont été menées sur les expositions aux RF faibles et
n’ont découvert aucun effet biologique. Certaines études ont
suggéré qu’il pouvait y avoir certains effets biologiques, mais
ces résultats n’ont pas été confirmés par des recherches
supplémentaires. RICOH WG-M2 a été testé et jugé conforme
aux limites d’exposition aux rayonnements IC énoncées pour
un environnement non contrôlé et respecte les règles
d’exposition aux fréquences radioélectriques (RF) CNR-102 de
l’IC.
Information for Users on Collection and Disposal of
Old Equipment and Used Batteries
1. In the European Union
These symbols on the products, packaging and/
or accompanying documents mean that used
electrical and electro nic equipment and batteries
should not be mixed with general household
waste.
Used electrical/electronic equipment and
batteries must be treated separately and in
accordance with legislation that requires proper
treatment, recovery and recycling of these
products.
By disposing of these products correctly you will
help ensure that the waste undergoes the
necessary treatment, recovery and recycling
and thus prevent potential negative effects on
the environment and human health which could
otherwise arise due to inappropriate waste
handling.
If a chemical symbol is added beneath the symbol shown
above, in accordance with the Battery Directive, this indicates
that a heavy metal (Hg = Mercury, Cd = Cadmium, Pb = Lead)
is present in the battery at a concentration above an applicable
threshold specified in the Battery Directive.
For more information about collection and recycling of used
products, please contact your local authorities, your waste
disposal service or the point of sale where you purchased the
products.
38
Page 41

2. In other countries outside the EU
These symbols are only valid in the European Union. If you wish
to discard used products, please contact your local authorities
or dealer and ask for the correct method of disposal.
For Switzerland: Used electrical/electronic equipment can be
returned free of charge to the dealer, even when you don’t
purchase a new product. Further collection facilities are listed
on the home page of www.swico.ch
The CE Mark is a Directive conformity mark of the
European Union.
or www.sens.ch.
Information on the Operating Manual
An Operating Manual (PDF) containing information on how to
use this camera is available. Please download it from our
website.
Operating Manual Download:
http://www.ricoh-imaging.com/
manuals/
39
Page 42

Memo
Page 43

Regarding User Registration http://www.ricoh-imaging.com/registration/
In order to better serve you, we request that you complete the user registration, which can be found on our website. Thank you
for your cooperation.
Page 44

RICOH IMAGING COMPANY, LTD.
1-3-6, Nakamagome, Ohta-ku, Tokyo 143-8555, JAPAN
(http://www.ricoh-imaging.co.jp)
RICOH IMAGING EUROPE
S.A.S.
Parc Tertiaire SILIC 7-9, avenue Robert Schuman - B.P. 70102, 94513
Rungis Cedex, FRANCE
(http://www.ricoh-imaging.eu)
RICOH IMAGING AMERICAS
CORPORATION
RICOH IMAGING CANADA
INC.
RICOH IMAGING CHINA CO.,
LTD.
633 17th Street, Suite 2600, Denver, Colorado 80202, U.S.A.
(http://www.us.ricoh-imaging.com)
5520 Explorer Drive Suite 300, Mississauga, Ontario, L4W 5L1, CANADA
(http://www.ricoh-imaging.ca)
23D, Jun Yao International Plaza, 789 Zhaojiabang Road, Xu Hui District,
Shanghai, 200032, CHINA
(http://www.ricoh-imaging.com.cn)
http://www.ricoh-imaging.co.jp/english
This contact information may change without notice.
Please check the latest information on our websites.
• Specifications and external dimensions are subject to change without notice.
55374 R01BAL15 Printed in Indonesia
Copyright © RICOH IMAGING COMPANY, LTD. 2015
 Loading...