

Page 1

series
User Guide
for “RICOH
Printer”
Overview
Windows version
Mac version
Android/iOS version
Troubleshooting
Page 2

Page 3

TABLE OF CONTENTS
How to Read the Manual ............................................................................................................................... 2
1. Over view
Introduction to “RICOH Printer” .................................................................................................................... 4
Operating environments ................................................................................................................................. 4
2. Windows version
Installation ........................................................................................................................................................ 5
Starting the program ....................................................................................................................................... 6
Functions Page ................................................................................................................................................. 8
Print .................................................................................................................................................................10
Copy (Supported on SP 150SU/SP 150SUw only) .................................................................................. 13
Scan (Supported on SP 150SU/SP 150SUw only) ..................................................................................18
Settings ........................................................................................................................................................... 21
3. Mac version
Installation ......................................................................................................................................................26
Copy (Supported on SP 150SU/SP 150SUw only) ..................................................................................26
Setting (Supported on SP 150w/SP 150SUw only) .................................................................................28
4. Android/iOS version
Installation ......................................................................................................................................................29
Starting the program .....................................................................................................................................29
Functions Page ...............................................................................................................................................31
Print .................................................................................................................................................................32
Copy (Supported on SP 150SU/SP 150SUw only) ..................................................................................33
Scan (Supported on SP 150SU/SP 150SUw only) ..................................................................................35
Settings ...........................................................................................................................................................36
5. Troubleshooting
Common problems encountered .................................................................................................................42
Error Messages on the Screen .................................................................................................................... 44
Error Codes on the Screen ...........................................................................................................................45
Tips to Avoid Paper Jams ..............................................................................................................................46
1
Page 4
How to Read the Manual
Symbols Used in the Manual
The symbols used in this manual have the following meanings.
Indicates an explanation containing points to pay attention to when operating the software, restrictions, or other information. Be sure to read the explanation.
Indicates an explanation containing information that is useful to know, a supplementary operating
procedure, or other information.
Indicates reference information that may be helpful.
[ ]
Indicates a screen item or button name.
Introduction
This manual contains detailed instructions and notes on the operation and use of this machine. For
your safety and benet, read this manual carefully before using the machine. Keep this manual in a
handy place for quick reference.
Legal Prohibition
Do not copy or print any item for which reproduction is prohibited by law.
Copying or printing the following items is generally prohibited by local law:
bank notes, revenue stamps, bonds, stock certicates, bank drafts, checks, passports, driver’s
licenses.
The preceding list is meant as a guide only and is not inclusive. We assume no responsibility for its
completeness or accuracy. If you have any questions concerning the legality of copying or printing
certain items, consult with your legal advisor.
This machine is equipped with a function that prevents making counterfeit bank bills. Due to this function the original images similar to bank bills may not be copied properly.
2
Page 5

Disclaimer
Contents of this manual are subject to change without prior notice. In no event will the company be
liable for direct, indirect, special, incidental, or consequential damages as a result of handling or
operating the machine.
To the maximum extent permitted by applicable laws, in no event will the manufacturer be liable for
any damages whatsoever arising out of failures of this machine, losses of the registered data, or the
use or non-use of this product and operation manuals provided with it.
Make sure that you always copy or have backups of the data registered in this machine. Documents
or data might be erased due to your operational errors or malfunctions of the machine.
In no event will the manufacturer be responsible for any documents created by you using this machine
or any results from the data executed by you.
For good output quality, the manufacturer recommends that you use genuine toner from the manufacturer.
The manufacturer shall not be responsible for any damage or expense that might result from the use
of parts other than genuine parts from the manufacturer with your ofce products.
Two kinds of size notation are employed in this manual.
Some illustrations or explanations in this guide may differ from your product due to improvement or
change in the product.
3
Page 6

1. Overview
1. Overview
Introduction to “RICOH Printer”
“RICOH Printer” is a software specially designed for this series of RICOH printers. As an improvement over using the conventional control panel on the printer, “RICOH Printer” lets you control the
printer from your computer or tablet for a seamless, integrated user experience.
Operating environments
“RICOH Printer” is compatible with
• 32-bit and 64-bit Windows Vista/7/8/8.1/10, Windows Server 2003/2008, and 64-bit
Windows Server 2008 R2/Server 2012/Server 2012 R2 operating systems
• Mac OS X 10.8 or later
• Linux
4
Page 7
2. Windows version
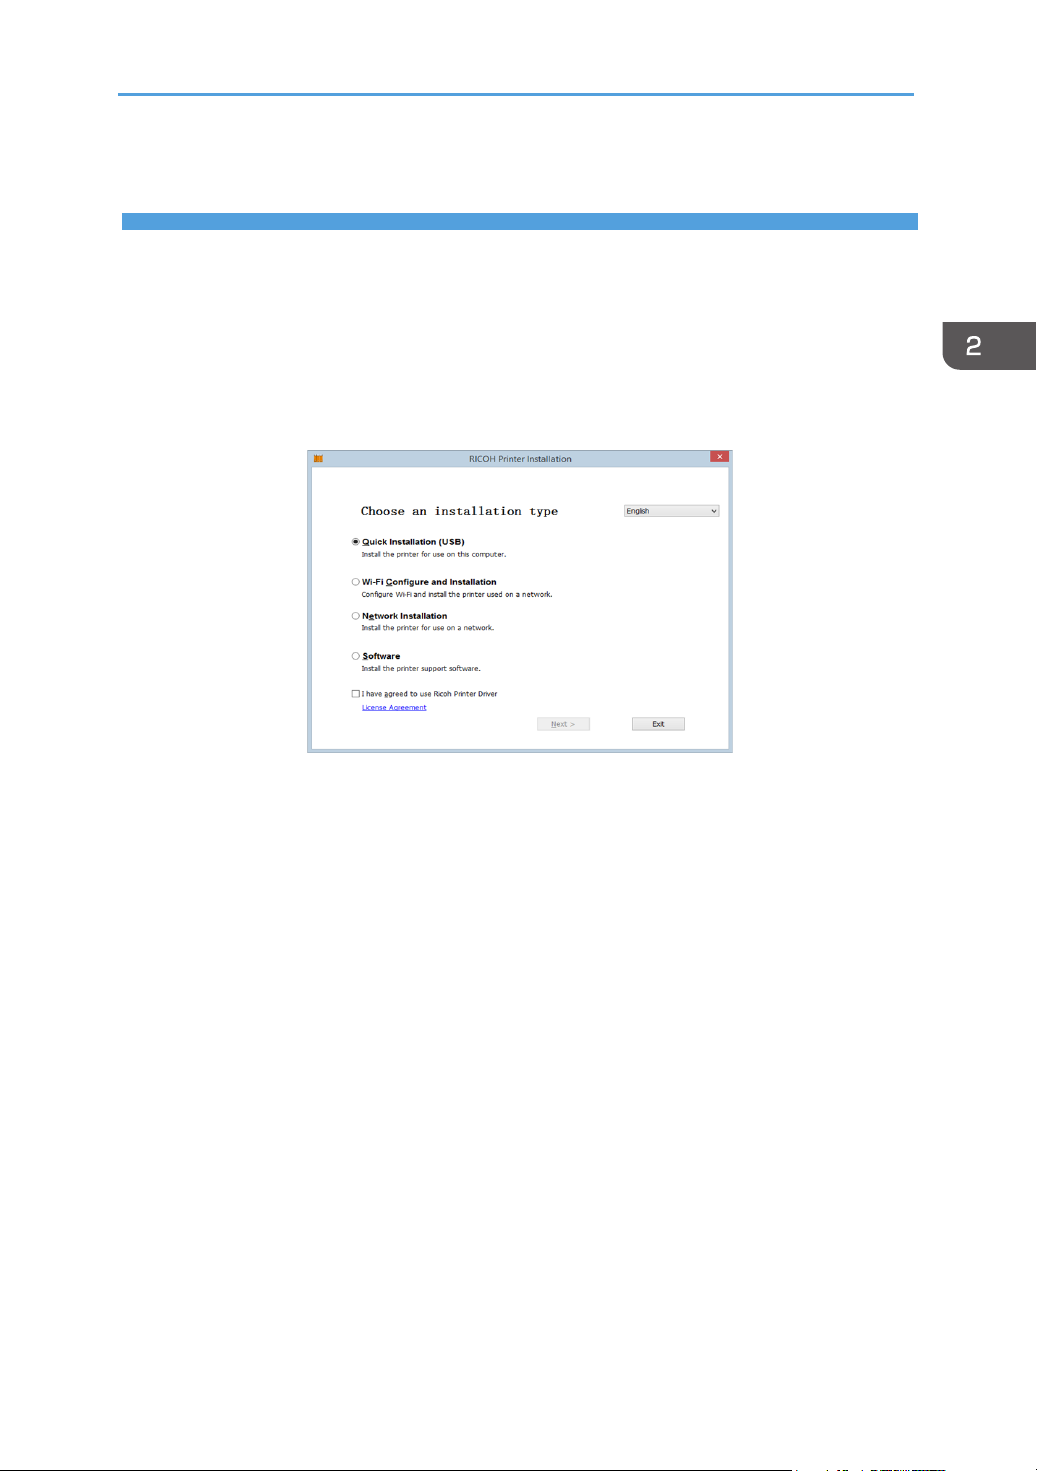
Installation
Install the software on your computer in any of the following ways:
• Run the installation program in the CD ROM provided with the printer, and then select the appropriate installation option.
• Download and install the software from the RICOH ofcial website at:
http://www.ricoh.com/printers/sp150/support/gateway/
5
Page 8
2. Windows version
Starting the program
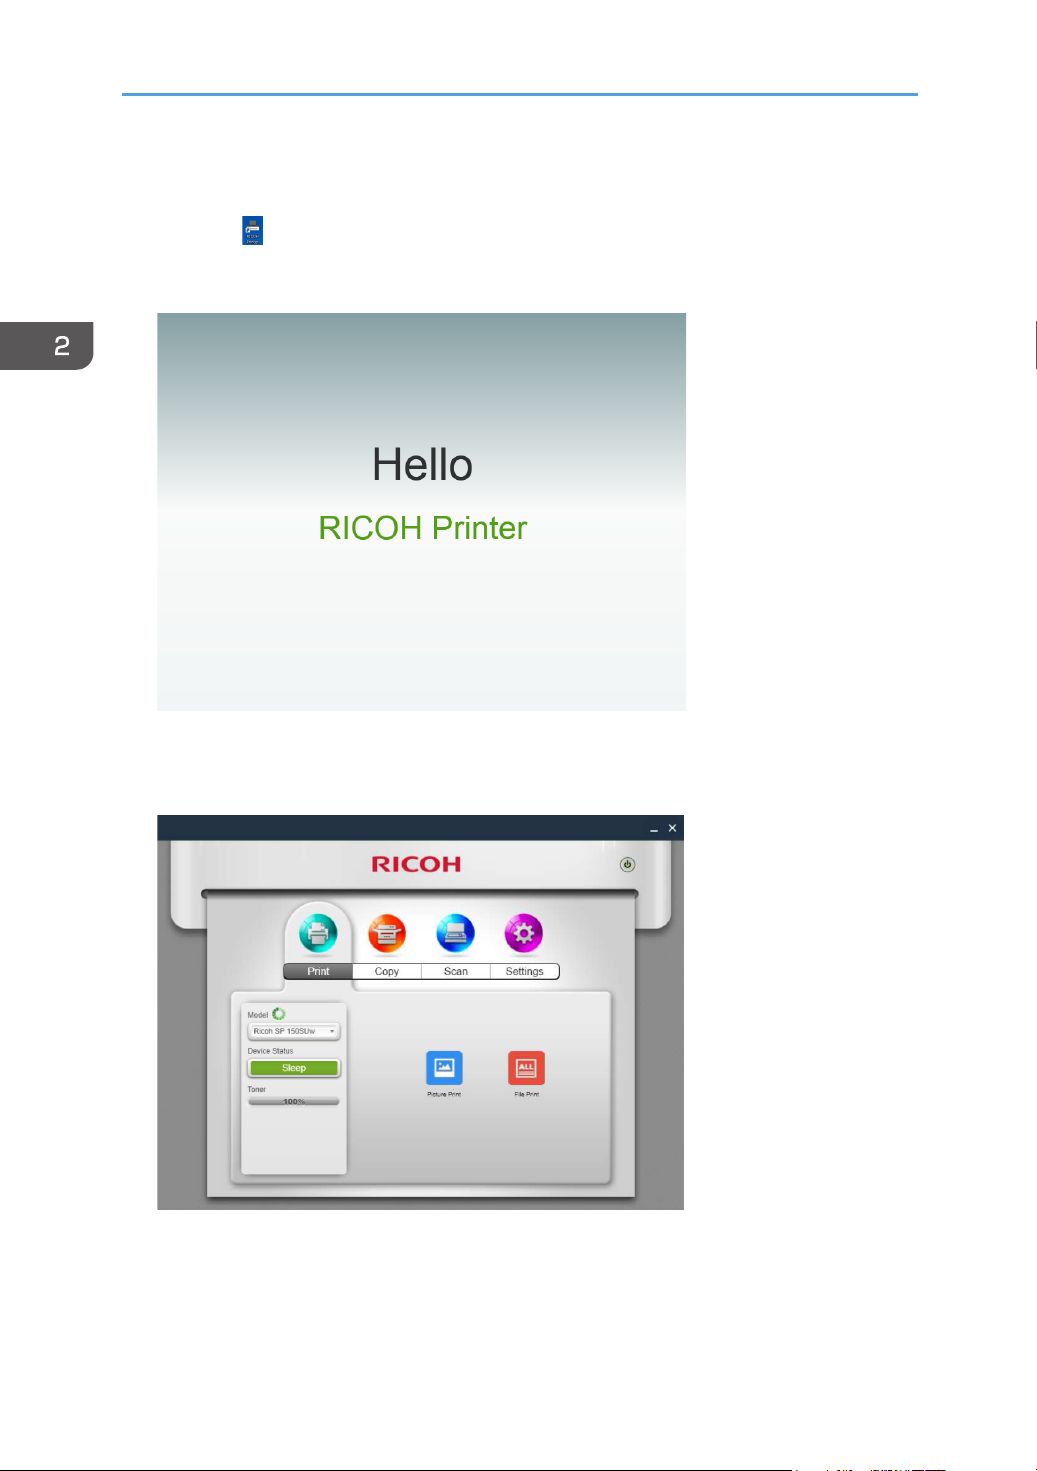
1. Click the
starts, it displays the welcome screen below and begins searching for available
printers in the background.
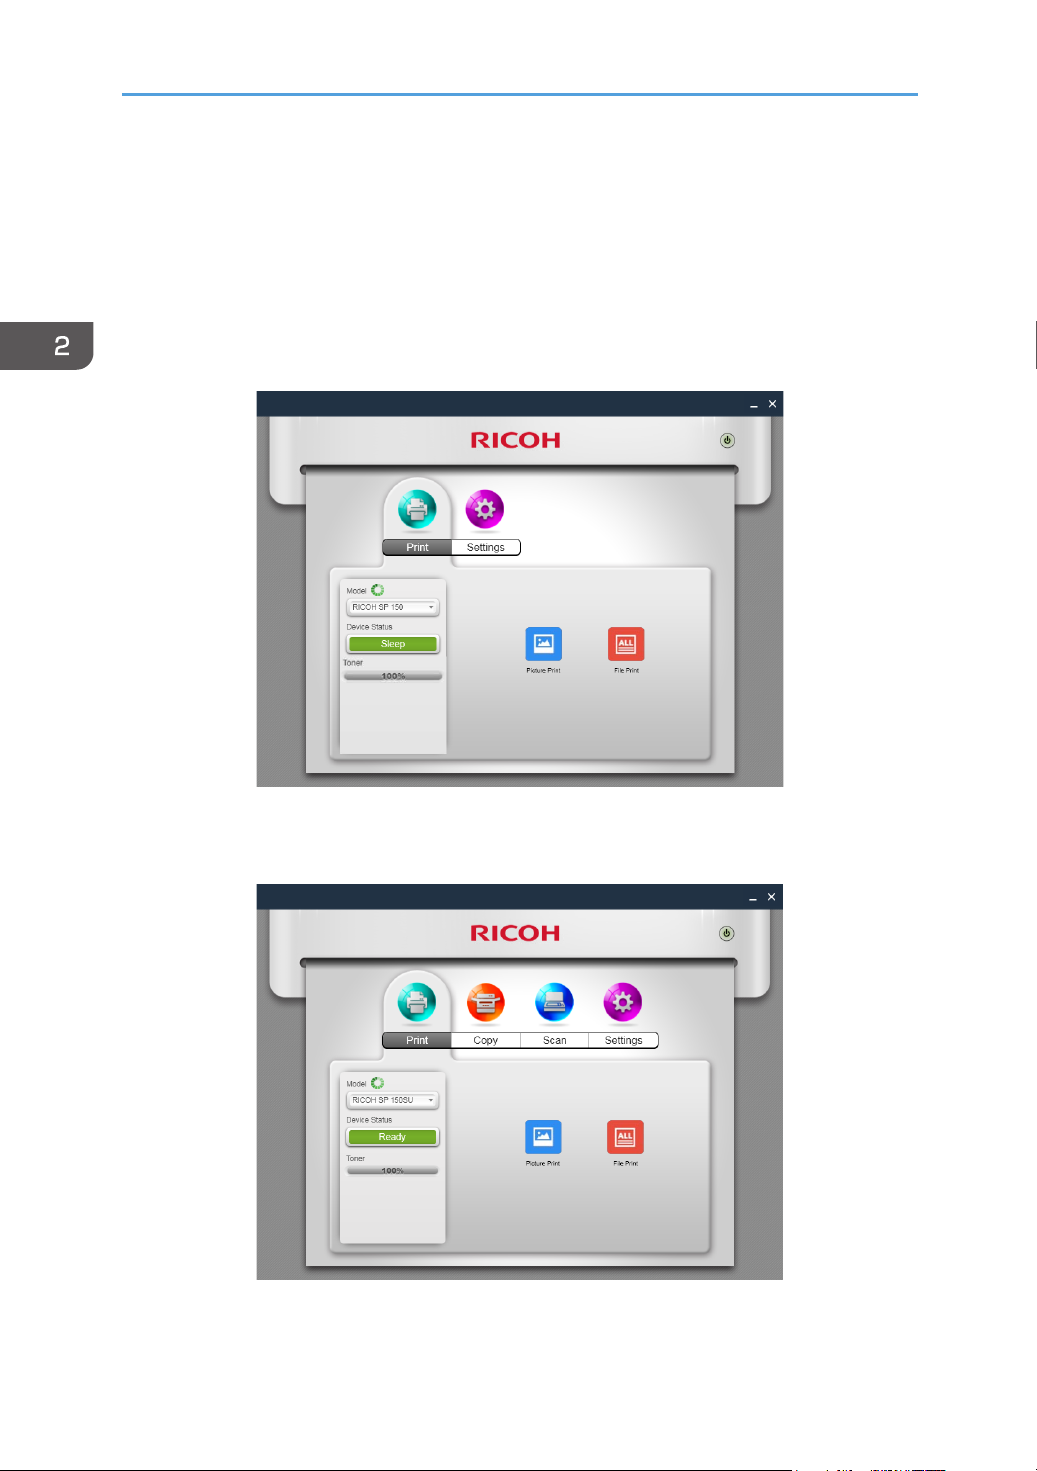
2. The program rst searches for available printers and displays them as a list.
Next, it checks if the rst printer on the list is online. If so, a functions page specic to the printer’s model is displayed. The rst page is the Print page.
icon on the desktop to open “RICOH Printer”. After the program
6
Page 9
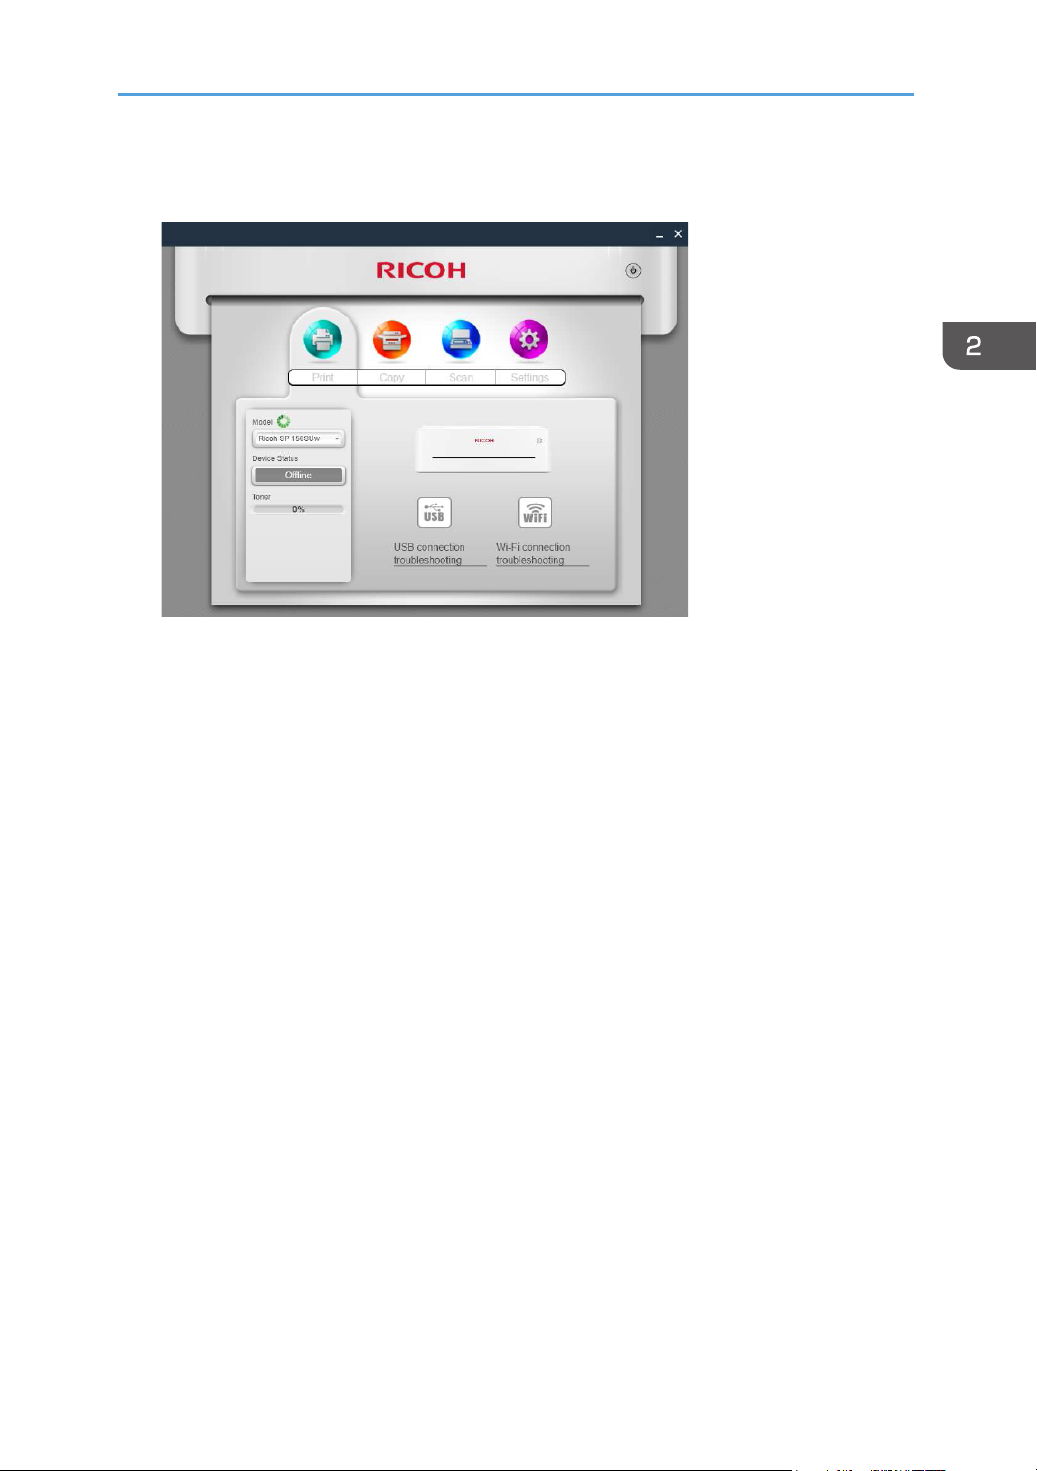
3. If no online printers are found, the program will prompt you to check for connection errors before searching for available printers again.
7
Page 10
2. Windows version
Functions Page
Select and click a function icon (Print, Copy, Scan, Settings) from the top of the main page to display
the page corresponding to the function selected.
The Model dropdown list shows all printers in the system’s “Devices and Printers” that are compatible
with “RICOH Printer”.
If a single-function printer (SP 150/SP 150 w) is selected, the Print and Settings icons will display.
If an Multi-Function Laser Printer (SP 150SU/SP 150SUw) is selected, the full list of functions will
display.
8
Page 11
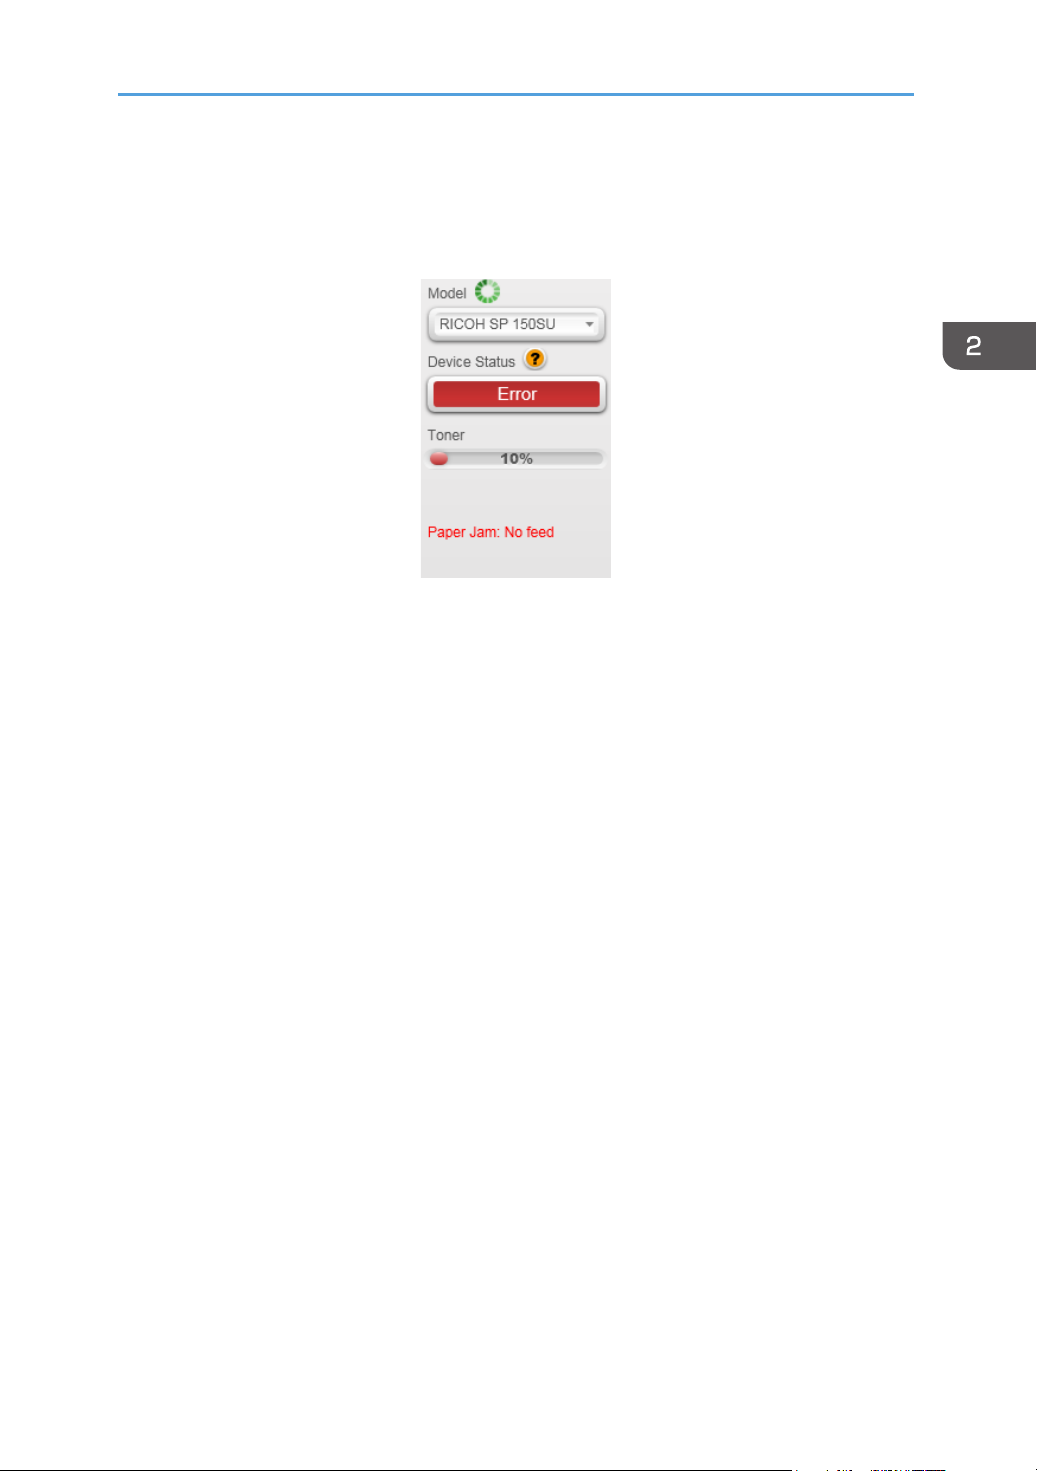
The Status page shows the current status of the printer, which can be Ready, Busy, Sleep, Error or
Ofine. The printer’s status is described in words at the bottom of the window. When the printer encounters an error, these words will be in red. If a question mark appears next to “Device Status”, click
it and troubleshoot the error as instructed by the animation.
9
Page 12
2. Windows version
Picture Print
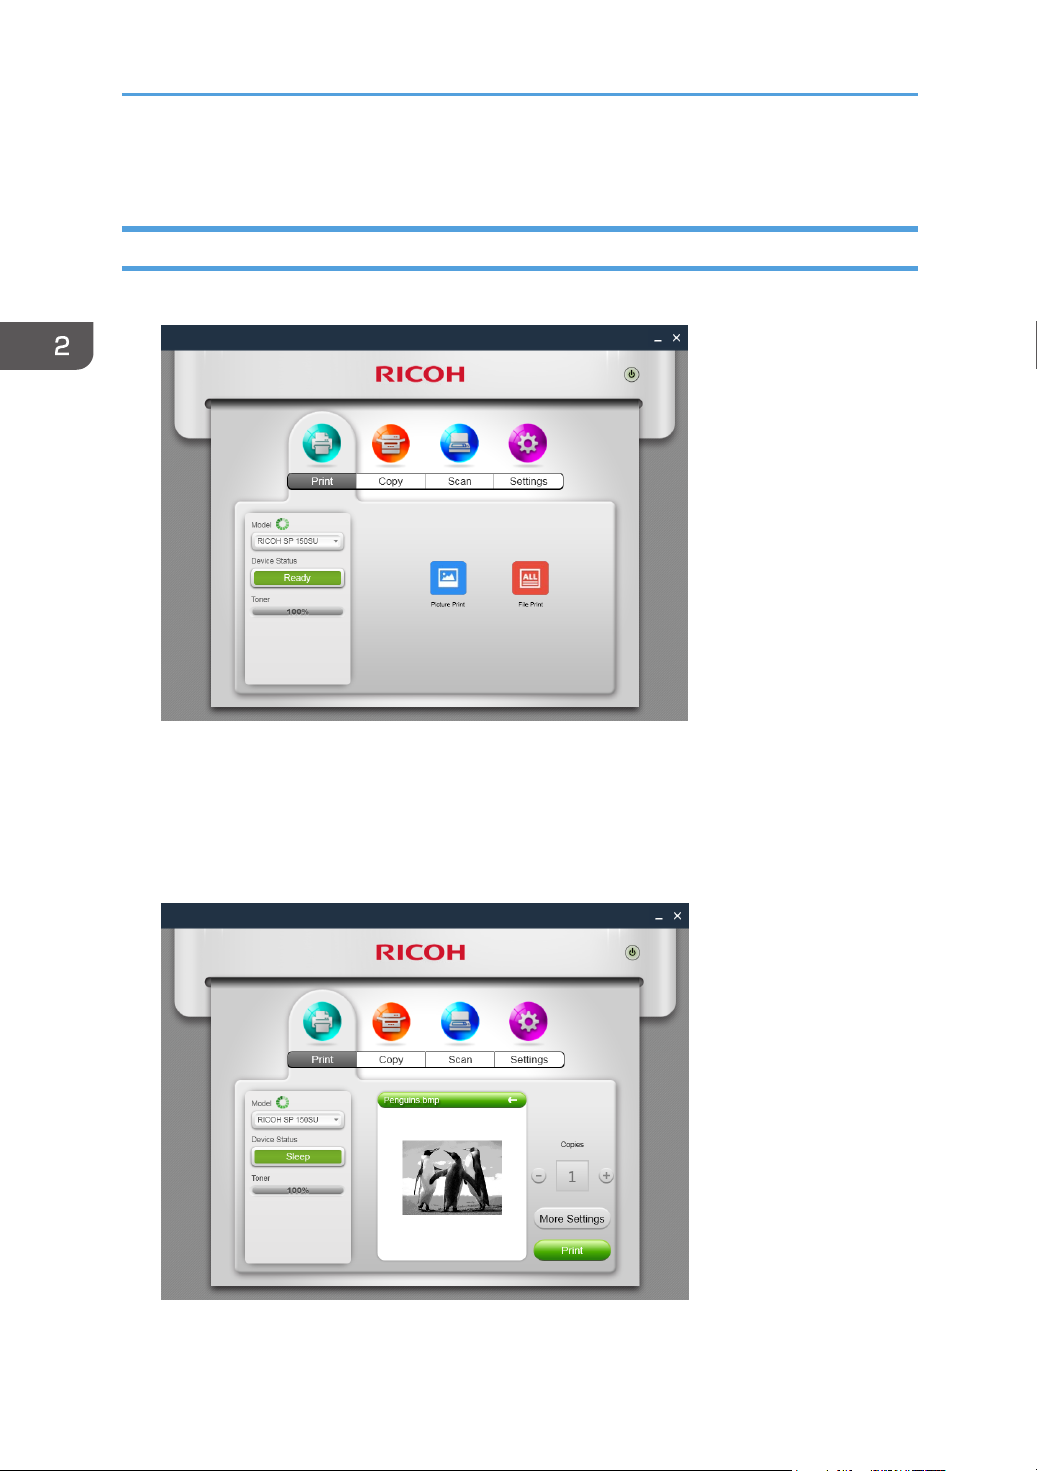
1. Click [Picture Print] on the Print page to enter the picture selection page.
2. You can select a single or multiple images for printing from the picture selection
page. The program supports the printing of images in TIFF, BMP, PNG and JPEG
formats.
Click the [OK] button after selecting the le to go to the Print page. On the Print
page, set the printing parameters required, then click the [Print] button to start
printing.
10
Page 13

File Print
1. Click [File Print] on the Print page to enter the le selection page.
2. From the le selection page, select the le you want to print. If the Windows sys-
tem does not support the printing of the selected le, the user will be notied.
3. Click the [OK] button after selecting the le to go to the Print page. On the Print
page, set the printing parameters required, then click the [Print] button to start
printing. If the selected le cannot be previewed, the preview window will show
[Unable to preview].
11
Page 14
2. Windows version
Manual Duplex Printing
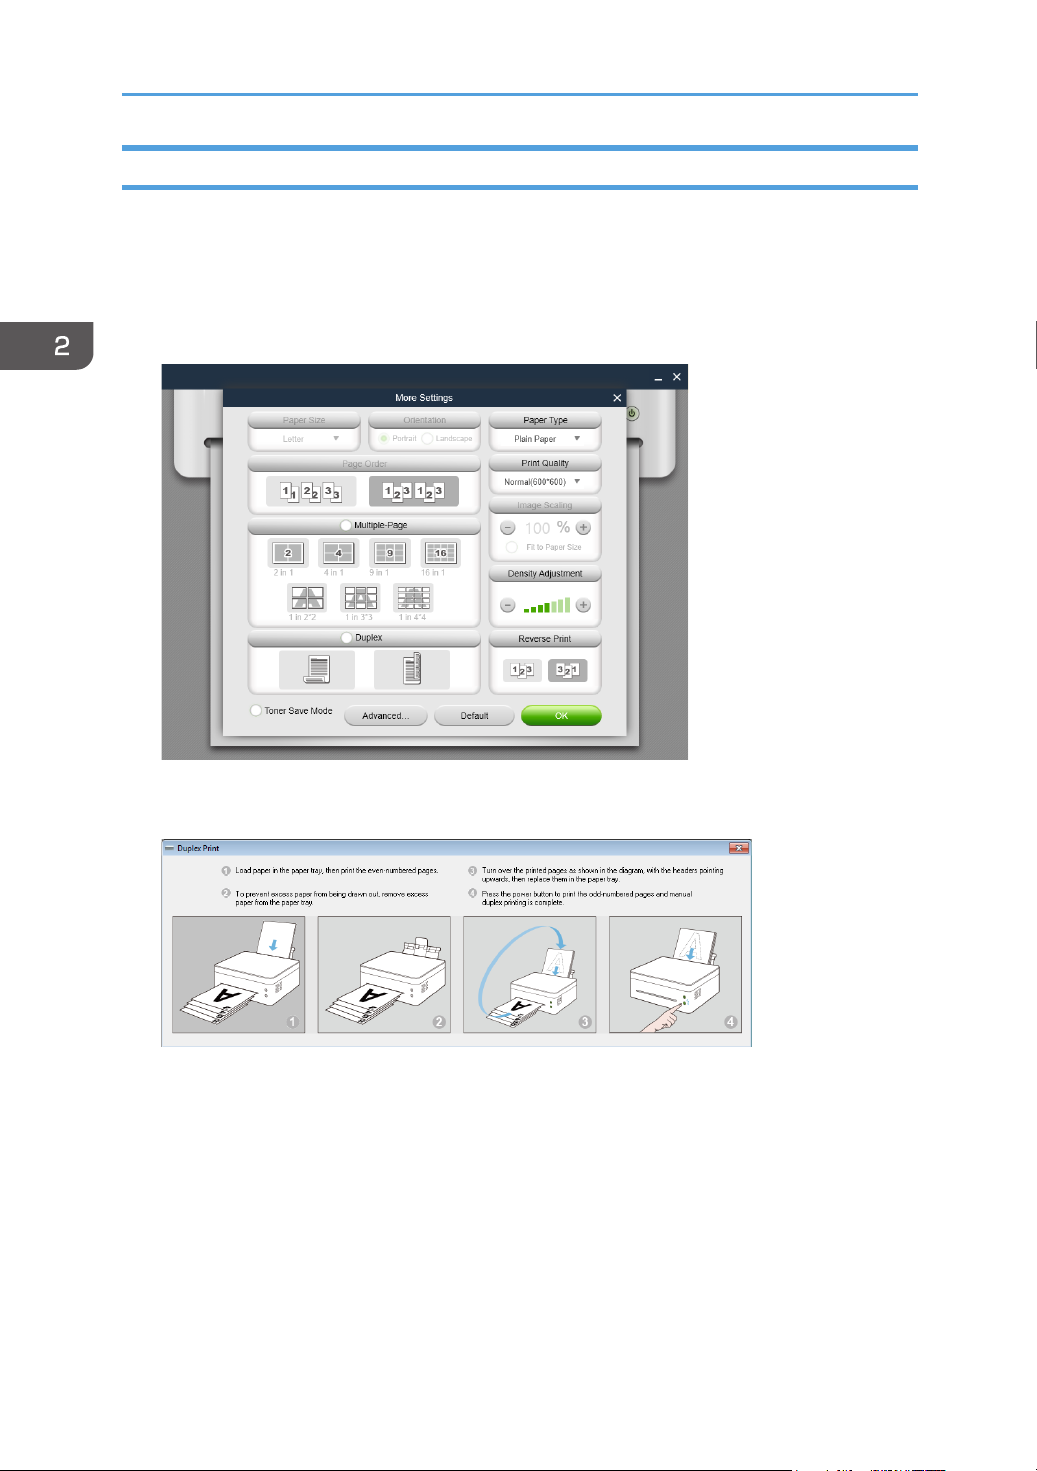
If you wish to print more than 2 pages, you can choose to use manual duplex printing.
1. After selecting your print content, click the [More Settings] button on the Print
page.
2. In the More Settings page, check the [Duplex] option and select the type of
duplex printing, then click [OK].
3. On the Print page, click the [Print] button. The duplex printing window will display and the printer will begin printing the even-numbered pages;
4. After the even-numbered pages are printed, remove all excess paper from the
paper tray as instructed on screen, then turn over the printed pages. Press the
Power button on the printer to print the odd-numbered pages.
5. Manual duplex printing is complete.
12
Page 15
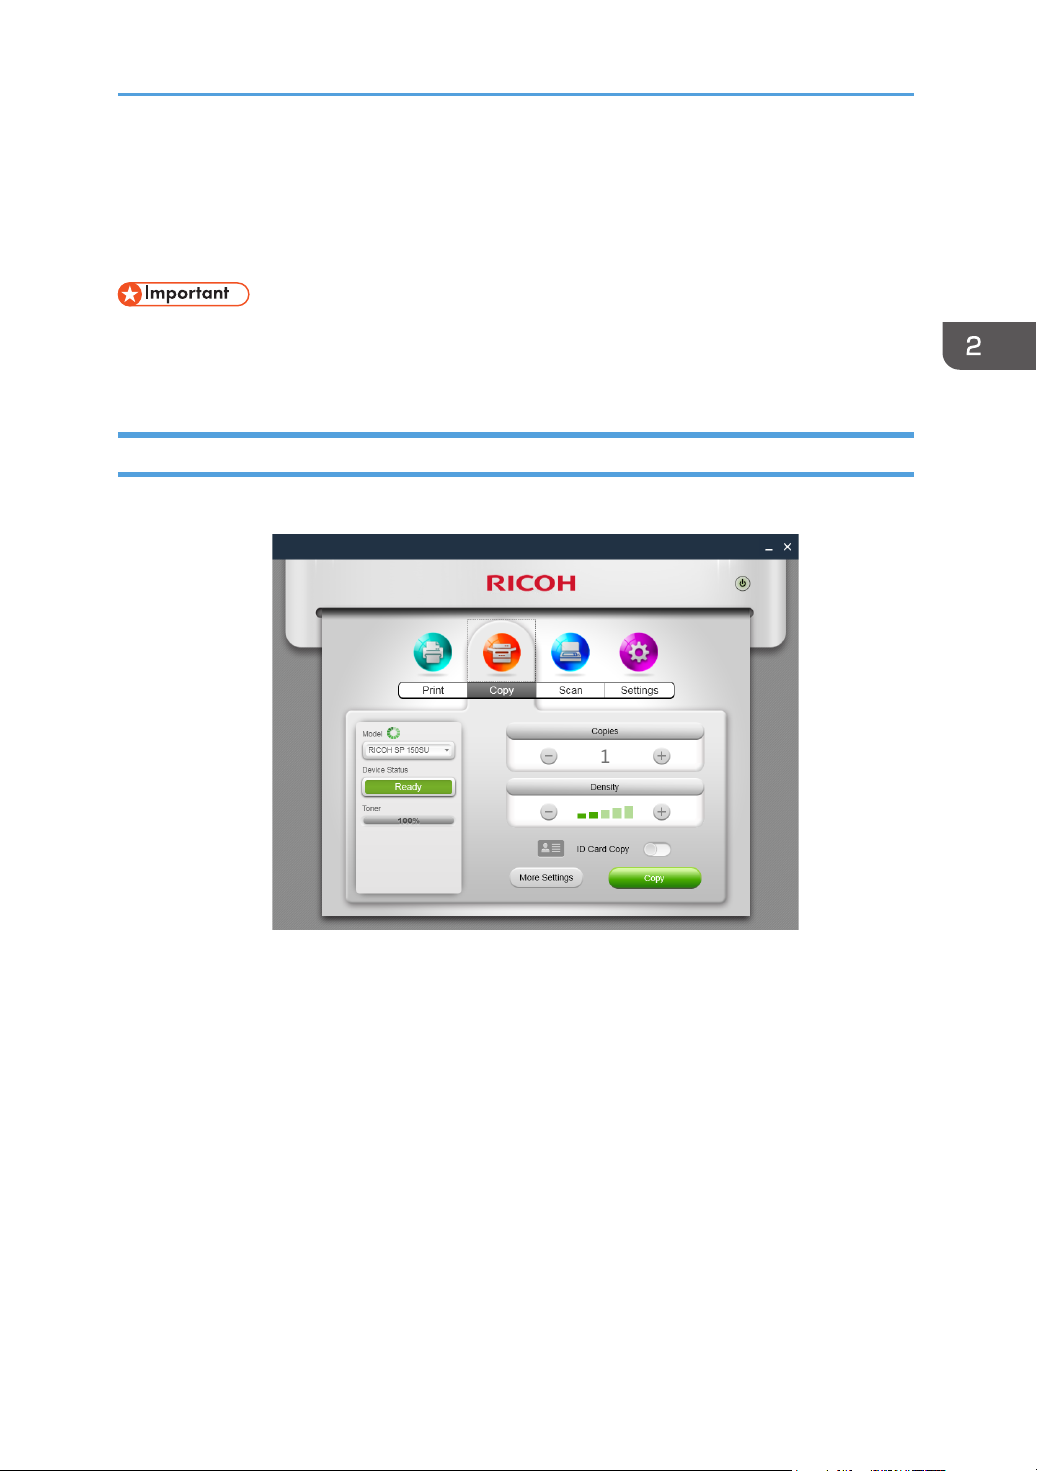
Copy (Supported on SP 150SU/SP 150SUw only)
• The settings made with this application will only apply when the printer is operated using the
application. For example, even if you press the Start key on the printer after setting Combine
Printing using this application, Combine Printing will not be executed. In this case, click the
[Copy] button on the app.
Regular Copy
On the Copy page, set all the required parameters, and then click the [Copy] button.
13
Page 16

2. Windows version
ID Card Copy
To copy both the front and back of an ID card on the same page of A4 paper, do the following:
1. On the Copy page, toggle the ID Card Copy switch to the right, then click the [ID
Card Copy] button.
2. Place the front of the ID card on the printer as instructed by the animation on the
screen, and then click the [OK] button.
14
Page 17

3. After the front of the ID card is copied, 2 green LED lights on the printer will start
ashing. Within 1 minute, replace the ID card with its back downwards in the
original position, then press the Start button on the printer.
4. ID Card Copy is complete.
15
Page 18

2. Windows version
N in 1 Copy
To copy multiple pages onto a single sheet of paper, do the following:
1. On the Copy page, click the [More Settings] button. On the More Setting page,
check the [N in 1 copy] option, and then click the [OK] button.
2. Click the [Copy] button on Functions Page and place the rst page of the original document on the printer as instructed by the animation on the screen, and
then click the [OK] button.
16
Page 19

3. When the rst page of the original document is copied, 2 green LED lights on
the printer will start ashing. Within 1 minute, place the next page of the orig-
inal document on the printer as instructed in the popup animation, and then
press the Start button on the printer. Repeat the above steps until the document
is printed.
4. N in 1 copy is complete.
17
Page 20

2. Windows version
Scan (Supported on SP 150SU/SP 150SUw only)
Scanning
Place the document to be scanned on the scanning area of the printer, and then do the following:
1. After setting the scan parameters on the Scan page, click the [Scan] button.
2. The scanning progress is shown on the screen.
18
Page 21

3. After scanning, you can check the scanned images on the Scan page.
4. Double-click an image to browse, rotate or print it.
19
Page 22
2. Windows version
Settings
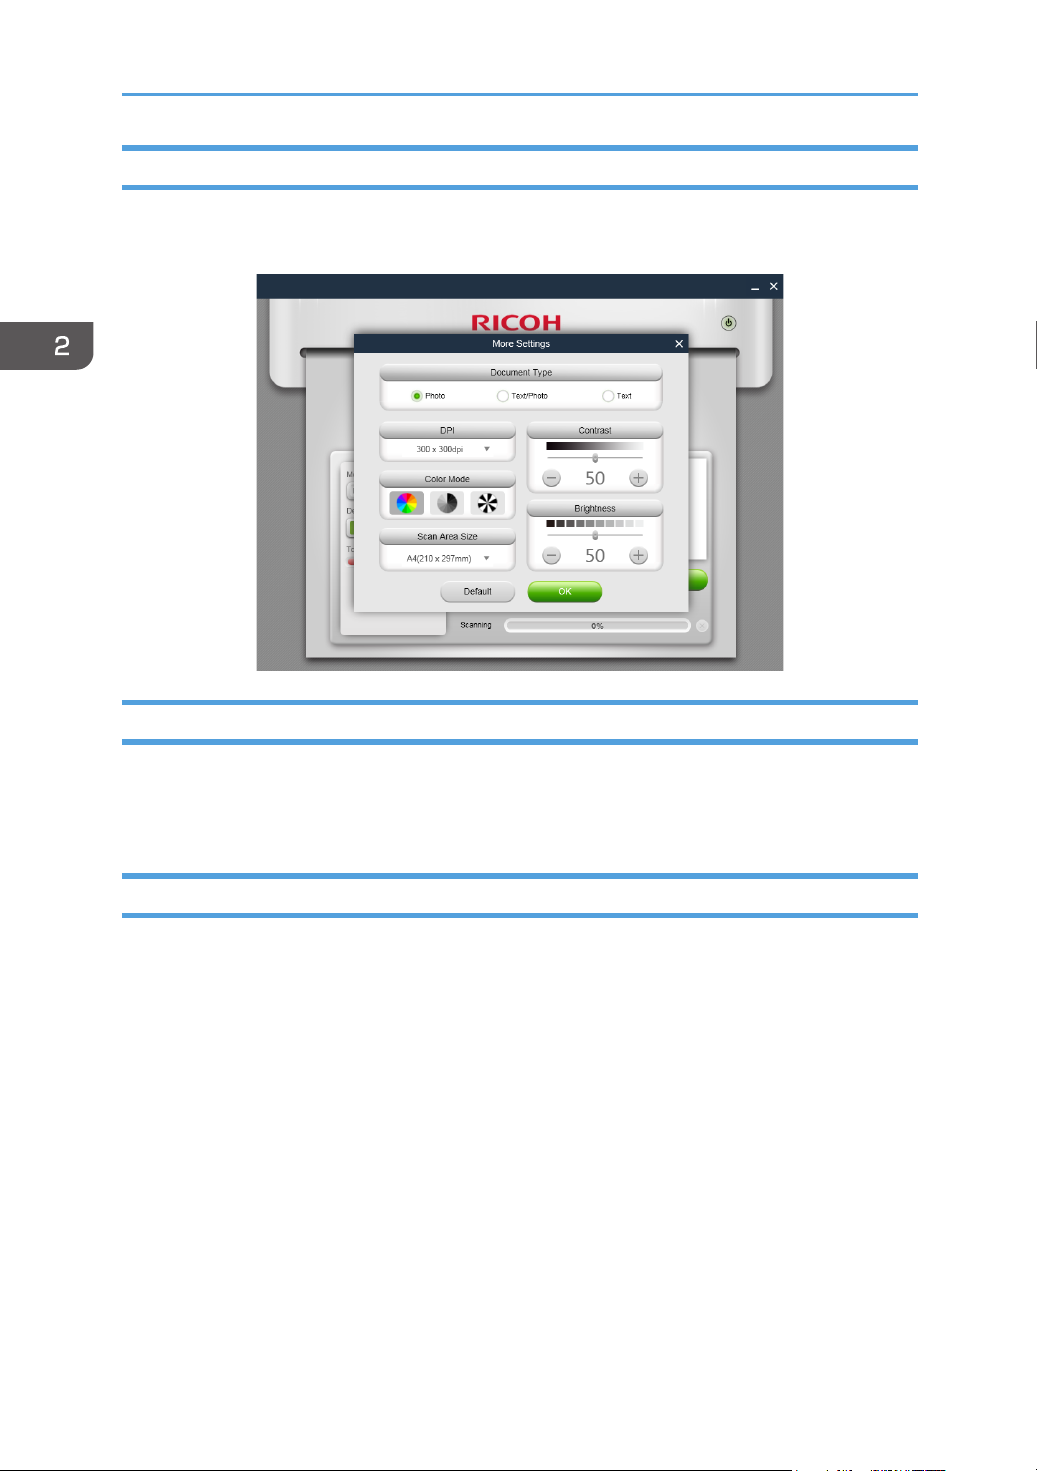
You can set the required scan parameters before scanning. Click the [More Settings] button, select
the required scan options, and then click the [OK] button.
Saving
Click the [Save] button to save the selected scanned image(s). If a single picture is selected, the
picture may be saved in JPG, TIF or PDF format; if multiple pictures are selected, the pictures may be
saved in TIF or PDF formats. The pictures will be saved in the order indicated by the numbers on their
top right hand corners.
Printing
Click the [Print] button to go to the Print page. If no image has been chosen, this button cannot be
selected.
20
Page 23

Settings
Setting Printer Wi-Fi (Supported on SP 150w and SP 150SUw only)
Select a wireless network from the list, enter the corresponding password, and then click “Connect”
to congure the wireless settings for the printer.
Toggle the WLAN switch to turn on or turn off Wi-Fi. The printer must be restarted for any change in
Wi-Fi status to take effect.
21
Page 24

2. Windows version
Setting Printer IP Address (Supported on SP 150w and SP 150SUw only)
You can choose to obtain the printer’s IP address, or set a xed IP address for the printer. To set a xed IP address for the printer, consult your network administrator for assistance.
Setting Soft AP (Supported on SP 150w and SP 150SUw only)
Enter the Service Set Identier (SSID) and password for the Soft AP network, then toggle the ON/
OFF switch to turn on or off Soft AP. The printer must be restarted for any change in Soft AP status to
take effect.
22
Page 25

Power Save
Use this function to set the idle time after which the printer goes to sleep. The idle time can be between 1 minute to 30 minutes.
23
Page 26

2. Windows version
More Settings
Use this function to set specic parameters for the printer. Unless necessary, do not change the value
for any of the options.
24
Page 27

Modify Password
Use this function to change the administrator’s password. The administrator’s password is mainly for
identity authentication purpose.
If authentication fails, you will be informed that the password is wrong and be prompted for the right
password. You may re-enter the password for an unlimited number of times. After successful authentication, you can change the parameters on the Wi-Fi, Soft AP, TCP/IP, Power Save, and More Settings pages. After administrator authentication, you will not be prompted for passwords in subsequent
settings operations.
The initial administrator password is 888888.
25
Page 28

3. Mac version
3. Mac version
Installation
Install the software by running the installation program on the CD-ROM provided with the printer.
Copy (Supported on SP 150SU/SP 150SUw only)
• The settings made with this application will only apply when the printer is operated using the
application. For example, even if you press the Start key on the printer after setting Combine
Printing using this application, Combine Printing will not be executed. In this case, click the
[Copy] button on the app.
Regular Copy
On the Copy page, set all the required parameters, and then click the [Copy] button.
26
Page 29

ID Card Copy
To copy both the front and back of an ID card on the same page of A4 paper, do the following:
1. Place the ID card with its front facing downwards on the left-center region of the
scanning panel.
2. Click the [ID Card Copy] button on the Copy page, the [Copy] button turns orange, then click the [Copy] button.
3. When two LED lights on the printer starts to ash, it indicates that the front of the
ID card has been scanned. Turn the ID card over, replace it in its
original position, then press the Start button on the printer.
4. ID Card Copy is complete.
27
Page 30

3. Mac version
Setting (Supported on SP 150w/SP 150SUw only)
Wi-Fi Settings (Supported on SP 150w and SP 150SUw only)
Select a wireless network from the dropdown list, enter the corresponding password, and then click
[Apply] to congure the wireless settings for the printer.
28
Page 31

4. Android/iOS version
Installation
Install the software that is available on the RICOH ofcial website at:
http://www.ricoh.com/printers/sp150/support/gateway/
Starting the program
1. Tap the
gins searching for available printers.
icon to open “RICOH Printer”. It displays the screen below and be-
29
Page 32

4. Android/iOS version
2. If an online printer is found, the function page is displayed.
3. If no online printers are found, the program will prompt you to search for available printers again.
30
Page 33

Functions Page
Select and tap a function icon (Print, Copy, Scan, Settings) at the bottom of the page to display the
page corresponding to the function selected.
If a single-function printer (SP 150/SP 150w) is selected, Print and Settings icons are only available.
If a Multi-Function Laser Printer (SP 150SU/SP 150SUw) is selected, all the icons are available.
31
Page 34

4. Android/iOS version
Regular Print
1. Tap [Please select print les...] to enter the le selection page.
2. Select a le you want to print on the le selection page.
3. After selecting a le, set the printing parameters required. Preview the le by
tapping the [Preview] button as necessary, then tap the [Print] button to start
printing.
Duplex Printing
1. After selecting the document to print, tap [Duplex] on the Print page.
2. On the [Duplex] page, select an option.
3. Tap the [Print] button on Functions Page. The printer will print the even-numbered pages.
4. After the even-numbered pages are printed, remove all excess papers from
the paper tray. Turn over the printed papers and place them on the paper tray.
Press the Power button on the printer to print the odd-numbered pages.
5. Manual duplex printing is complete.
32
Page 35
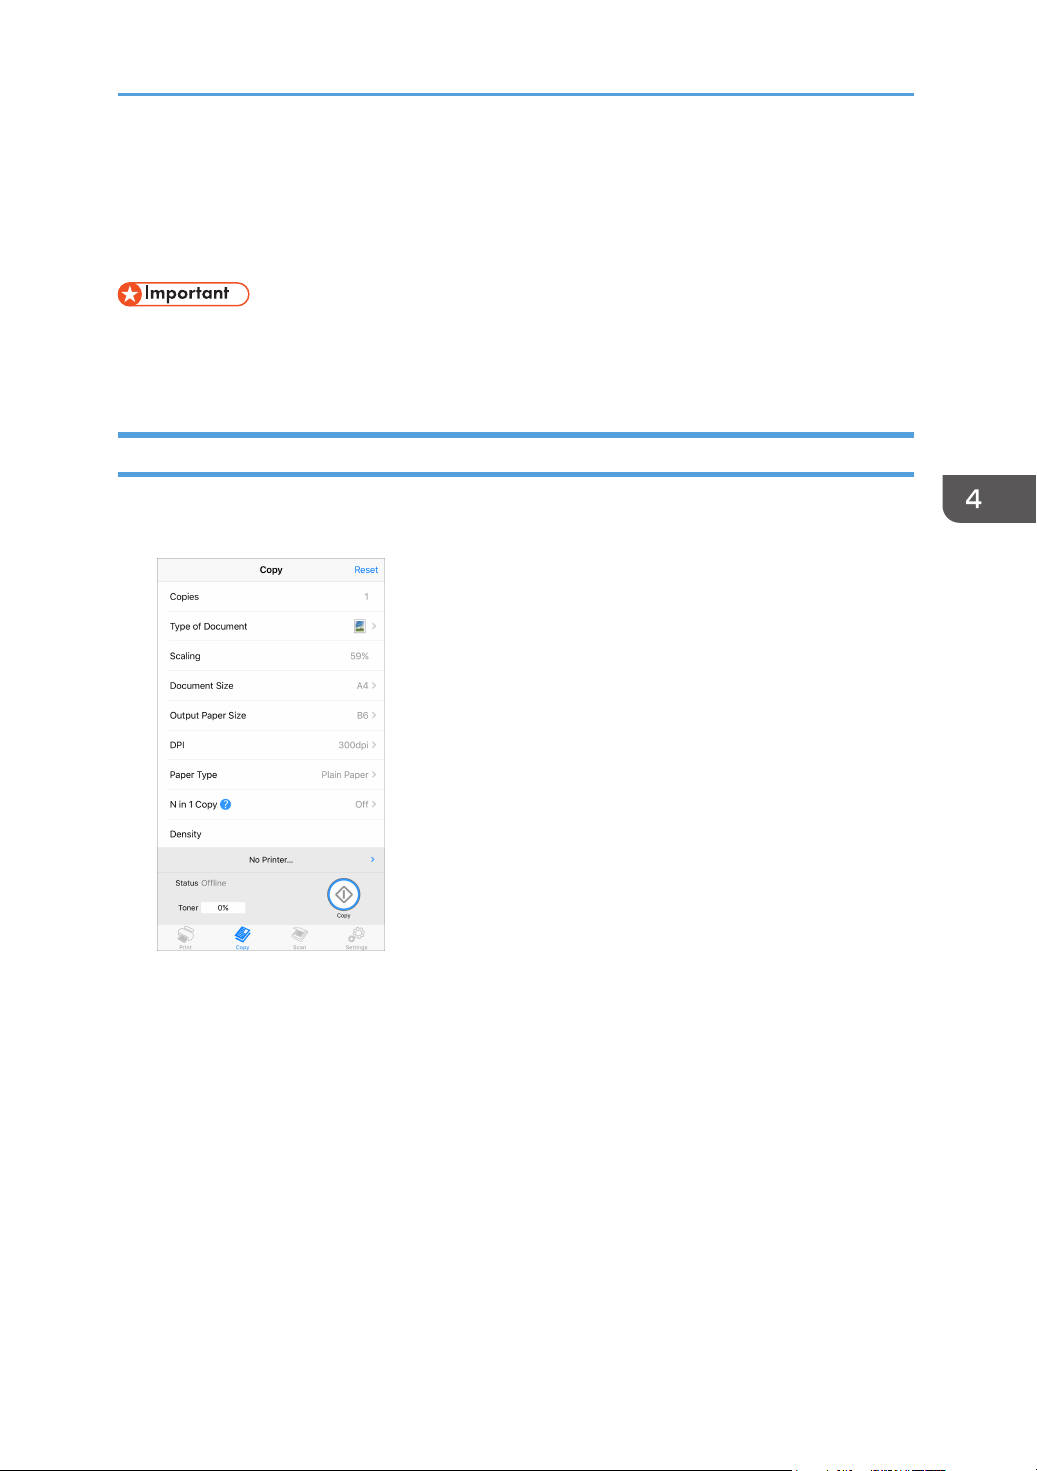
Copy (Supported on SP 150SU/SP 150SUw only)
• The settings made with this application will only apply when the printer is operated using the
application. For example, even if you press the Start key on the printer after setting Combine
Printing using this application, Combine Printing will not be executed. In this case, tap the [Copy]
button on the application.
Regular Copy
1. On the Copy page, set all the required parameters, and then tap the [Copy]
button.
33
Page 36

4. Android/iOS version
N in 1 Copy
To copy multiple pages onto a single sheet of paper, do the following:
1. On the Copy page, tap [N in 1].
2. On the [N in 1] page, select an option.
3. Tap the [Copy] button on Functions Page and place the rst page of the original
document on the printer, and then tap the [OK] button.
4. After the rst page of the original document is copied, LED on the printer will
start ashing. Within 1 minute, place the next page of the original document on
the printer, and then press the Start button on the printer. Repeat the steps until
all the documents are printed.
5. N in 1 copy is complete.
34
Page 37

Scan (Supported on SP 150SU/SP 150SUw only)
Scanning
Place the document to be scanned on the scanning area of the printer, and then do the following:
1. On the Scan page, set all the required parameters, and then tap the [Scan]
button.
2. The preview is displayed. Pinch in/out and scroll the screen to adjust the image
display, and tap
3. Tap (Scan) to scan the image or (Save) to save the image.
(Rotate) to rotate the image as necessary.
35
Page 38

4. Android/iOS version
Settings
Setting Printer Wi-Fi (Supported on SP 150w and SP 150SUw only)
1. On the Settings page, tap [Wi-Fi].
2. Toggle the [WLAN] switch to turn on or off Wi-Fi. The printer must be restarted
for any change in Wi-Fi status to take effect.
3. If the Wi-Fi function is turned on, select a wireless network from the list, enter
the corresponding password, and then tap “Connect” to establish the connection.
36
Page 39

Setting Soft AP (Supported on SP 150w and SP 150SUw only)
1. On the Settings page, tap [Soft AP].
2. Toggle the [Soft AP] switch to turn on or off Soft AP. The printer must be restarted for any change in Soft AP status to take effect.
3. If the Soft AP function is turned on, enter the Service Set Identier (SSID) and
password for the Soft AP network. Tap [Done] to save the setting.
37
Page 40

4. Android/iOS version
Setting Printer IP Address (Supported on SP 150w and SP 150SUw only)
You can choose to obtain the printer’s IP address, or set a xed IP address for the printer. To set a
xed IP address for the printer, consult your network administrator for assistance.
1. On the Settings page, tap [TCP/IP].
2. Toggle the [Use Manual Address] switch to turn on the “Static” method. The
printer must be restarted for any change in IP address setting status to take
effect.
3. If the “Static” method is turned on, specify the [IP Address], [Submask], and
[Gateway] settings. Tap [Done] to save the setting.
38
Page 41

Power Save
Use this function to set the idle time after which the printer goes to sleep.
1. On the Settings page, tap [Power Save].
2. Set idle time between 1 to 30 minutes. Tap [Done] to save the setting. The printer must
be restarted for the power save setting change to take effect.
39
Page 42

4. Android/iOS version
Advanced Settings
Use this function to set specic parameters for the printer. Unless necessary, do not change the value
for any of the options.
1. On the Settings page, tap [Advanced Settings].
2. Specify the parameters as necessary. The printer must be restarted for any
change in advanced settings to take effect.
40
Page 43

Modifying the Password
Use this function to change the administrator’s password. The administrator’s password is mainly for
identity authentication purpose.
If authentication fails, you will be informed that the password is wrong and be prompted for the right
password. You may re-enter the password for an unlimited number of times. After successful authentication, you can change the parameters on the Wi-Fi, Soft AP, IP Address, Power Save, and Advanced Settings pages. After administrator authentication, you will not be prompted for passwords in
subsequent settings operations.
The initial administrator password is 888888.
1. On the Settings page, tap [Modify Password].
2. Specify the password. Tap [Done] to save the setting. The printer must be restarted for the administrator password change to take effect.
41
Page 44

Troubleshooting
5. Troubleshooting
Common problems encountered
Unable to connect to the printer
Under such circumstances, “RICOH Printer” (Windows) will display the page below. Follow the
instructions on screen to troubleshoot network connection problems, and then search for available
printers again.
Administrator’s password is lost
Restore the printer to its factory settings (refer to the user manual), and then enter the default password “888888”. After administrator authentication, edit the relevant parameters.
Settings have been congured successfully, but the printer is not responding
When turning on/off Wi-Fi or Soft AP, the printer must be restarted for the change to take effect.
“RICOH Printer” (Windows) can connect to the printer, but the program does
not work properly
Re-install the printer drivers, and then restart “RICOH Printer” (Windows).
42
Page 45

Files in some formats cannot be printed using “RICOH Printer” (Windows).
Right click the les in these formats, and then check if the [Print] option is available on the right-click
menu. If the [Print] option is not available, the le format is not supported by “RICOH Printer”.
Toner is at 0%, and the printer cannot be used
Replace the empty toner cartridge with a new cartridge.
To purchase consumables, locate the dealer nearest to you.
Printer malfunctions and cannot be used
If the printer malfunctions during operation, the type of error will be shown in the notications bar on
the left of the “RICOH Printer” window. Some errors can be eliminated by restarting the printer. Other
errors require the assistance of professional maintenance personnel.
Find the service center nearest to you through any of the above ways to have your printer repaired.
You can then resume the use of your printer in the soonest possible time.
43
Page 46

Troubleshooting
Error Messages on the Screen
Message Causes Solutions
Open the maintenance cover, remove the
toner cartridge, then remove the jammed
paper.
Do not expose the toner cartridge to
light.
1. Load paper onto the tray, then press
2. Remove some paper from the tray,
3. Remove all paper from the tray, re-
4. Remove the curl, then load the paper
5. Use supported paper. See “Supported
Paper Jam: Paper Remained
Paper Jam: No feed
Jammed paper still remaining inside.
• Paper tray empt y.
• Too much paper loaded
on the tray.
• Paper not loaded correctly.
• Paper curl.
• Use of unsupported
paper.
the power key
then press the power key (Max capacity: 50 sheets)
verse the direction and load the paper
again. Adjust the side fence, then press
the power key.
again.
Paper”, User Guide.
Paper Jam: Regist
• Use of unsupported
paper.
Paper Jam: Inner
Paper Jam: Exit
Cover Open The cover is open. Close the cover.
No Toner Cartridge
PDL Memory Overow PDL memory overow Press the power key to clear this error.
Toner End
• Incorrect paper type
setting.
• Paper is damp or wrinkled.
• Use of folded paper.
• Paper curl.
• A toner cartridge has not
been installed.
• The toner cartridge is not
set correctly.
The toner cartridge is
empt y.
Pull out the jammed paper carefully.
Open the maintenance cover, remove the
toner cartridge, then remove the jammed
paper carefully. Set the toner cartridge
back into the machine, then close the
maintenance cover.
Do not expose the cartridge to light for
more than 5 minutes.
Open the maintenance cover, lift up the
pressure release lever, then pull out the
jammed paper carefully. Push down the
pressure release lever, then close the
maintenance cover.
1. Insert a toner cartridge.
2. Open the maintenance cover, pull out
the toner cartridge and insert it again.
Replace the toner cartridge.
44
Page 47

Error Codes on the Screen
Error Code Causes Solutions
SC202
SC203
SC204
SC 491
SC 5 01 Power supply unit error.
SC520 Main motor error.
SC530 Fan motor error.
SC541
SC542
SC543
SC544
SC545
SC559
Laser unit error.
High voltage power unit
error.
Fusing unit error.
Please try switching the power off and on
to clear the error.
Contact a dealer or RICOH technical
support if the error continues to occur.
SC560 Low voltage.
SC497 Thermistor error.
SC688 Main board error.
SC10 01 Scanner error.
SC1002 Wi-Fi unit error.
SC1006 DMA error.
45
Page 48

Troubleshooting
Tips to Avoid Paper Jams
• The occurrence of paper jams can be signicantly reduced by using the recommended types
of print media. In the event of paper jams, follow the instructions described in “Removing Paper
Jams” in the User Guide.
• Load paper as instructed in the section on “Loading Paper” in the User Guide. Adjust the position of the paper guide properly.
• Do not overload the feed tray.
• Do not attempt to remove paper from the feed tray when the printer is printing.
• Bend the sheets back and forth, fan the stack and atten the paper before loading it.
• Do not use corrugated, folded, wet or curled paper.
• Do not mix different types of paper in the same feed tray.
• Use only recommended print media. See “Loading Paper” in the User Guide.
• Store the print media in a suitable environment.
• Choose the correct paper type from the printer driver.
• Do not remove the paper from the tray when printing.
• The jammed sheet of paper will likely be covered with unused toner. Be careful not to get it on
your hands or clothes.
• Toner on prints made immediately after removing a paper jam may be insufciently fused and
can smudge. Make test prints until smudges no longer appear.
• Do not force a jammed paper out of the printer as it may tear. Torn pieces left inside the machine
will cause further jams and possibly damage the machine.
• Paper jams may lead to missing pages. Check whether there are any missing pages in the print
job and, if yes, re-print the missing pages.
• Jammed paper may have oating toner. Be careful not to stain your clothes and hands when
removing jammed paper.
• Do not pull out jammed paper strongly. Jammed paper may be torn and remain inside the machine.
• Try opening and closing the maintenance cover or switching the power on and off. The machine
may eject the jammed paper automatically.
46
EN
GB M290-8632A
Page 49

© 2016
Page 50

M290- 8632A
 Loading...