

Ricoh InfoPrint 1540, InfoPrint 1560, InfoPrint 1580 User Manual

InfoPrint 1540 MFP, InfoPrint 1560 MFP,
InfoPrint 1580 MFP
MT(4543)
Finisher Guide
G510-7332-00


InfoPrint 1540 MFP, InfoPrint 1560 MFP,
InfoPrint 1580 MFP
MT(4543)
Finisher Guide
G510-7332-00

Contents
Getting started...............................................................................................................5
Booklet finisher overview.....................................................................................................................5
Supported finishing features................................................................................................................5
Downloading printer drivers.................................................................................................................7
Using the finisher...........................................................................................................8
Setting the default paper source.........................................................................................................8
Stapling................................................................................................................................................8
Using staple finishing....................................................................................................................................8
Stapling copy jobs ........................................................................................................................................9
Hole punching......................................................................................................................................9
Loading paper for letter or A4 hole-punch finishing...................................................................................... 9
Using hole punch finishing............................................................................................................................9
Hole-punching copy jobs ............................................................................................................................10
Folding...............................................................................................................................................10
Using fold finishing .....................................................................................................................................10
Folding copy jobs........................................................................................................................................11
Offsetting...........................................................................................................................................11
Offsetting print jobs.....................................................................................................................................11
Creating booklets...............................................................................................................................12
Loading paper in the short-edge orientation............................................................................................... 12
Setting the Paper Size and Paper Type .....................................................................................................14
Creating booklets........................................................................................................................................14
Creating booklets from a copy job ..............................................................................................................15
Creating booklets with special covers from a copy job............................................................................... 16
Paper guide..................................................................................................................18
Paper capacities................................................................................................................................18
Supported paper weights and types..................................................................................................18
Using letterhead with an installed finisher.........................................................................................18
Maintaining the finisher...............................................................................................21
Replacing the general finishing staples.............................................................................................21
Replacing the advanced booklet staples...........................................................................................24
Emptying the hole punch box............................................................................................................26
Understanding the finisher menus and messages...................................................28
Finisher menus..................................................................................................................................28
Finishing menu ...........................................................................................................................................28
Bin Setup menu ..........................................................................................................................................31
3

Custom Bin Names menu...........................................................................................................................31
Finisher messages............................................................................................................................32
289 Staple error <x>................................................................................................................................... 32
991.06 error ................................................................................................................................................32
Empty hole punch box ................................................................................................................................33
Incompatible settings.................................................................................................................................. 33
Insert hole punch box .................................................................................................................................33
Load staples <x> ........................................................................................................................................33
Staples <x> empty or misfed ......................................................................................................................33
Staples <x> low or missing......................................................................................................................... 34
Troubleshooting...........................................................................................................35
Clearing finisher jams........................................................................................................................35
283–284 and 287–288 paper jams............................................................................................................. 35
284–286 paper jams................................................................................................................................... 37
289 staple jam ............................................................................................................................................38
Finisher..............................................................................................................................................42
Make sure the connection between the finisher and the printer is secure .................................................42
Make sure you are using a paper size that is compatible with the finisher exit bins ..................................42
Finishing jobs are not routed to the booklet-maker...........................................................................43
Make sure the paper is loaded in the correct orientation............................................................................43
Make sure the paper size is supported by the booklet maker ....................................................................43
Notices..........................................................................................................................44
Edition notice.....................................................................................................................................44
Index..............................................................................................................................46
4

Getting started
Booklet finisher overview
Standard Bin
1
Bin 1
2
1
2
3
4
Bin 2
3
Bin 3
4
Supported finishing features
The Standard Bin supports offset finishing. Finishing options are not supported for Bin 1.
These finishing features are available for Bin 2:
• Punch—Two- and three-hole punch or two- and four-hole punch settings
• Single staple—One staple (front or rear)
Note: The printer requires paper loaded in the long-edge orientation when this setting is selected for the
landscape orientation.
• Dual staple—Two staples
5
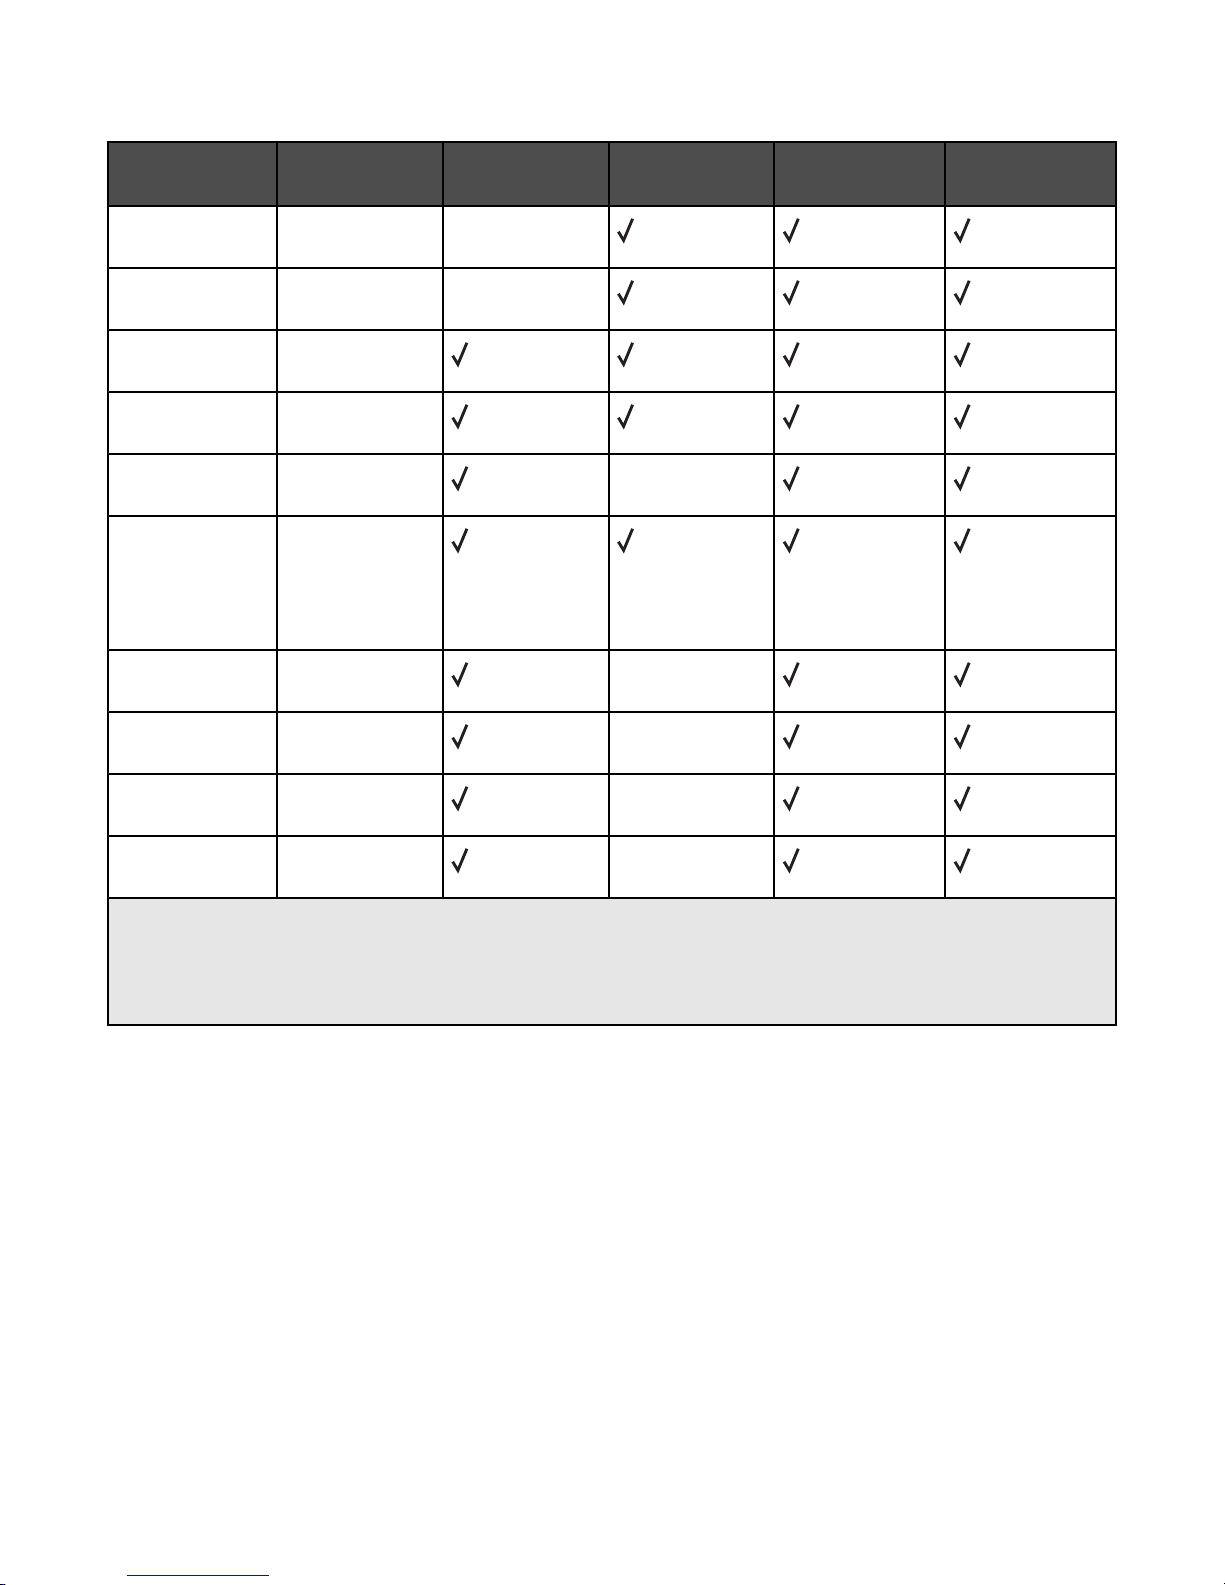
Bin 2 finishing features for supported paper sizes
Paper size Dimensions Punch—Top
*
edge
JIS B5
182 x 257 mm
X
(7.2 x 10.1 in.)
Executive
184 x 267 mm
X
(7.3 x 10.5 in.)
A4
210 x 297 mm
(8.3 x 11.7 in.)
Letter
216 x 279 mm
(8.5 x 11 in.)
JIS B4
257 x 364 mm
(10.1 x 14.3 in.)
Universal
***
98.4 x 89 mm
(3.9 x 3.5 in.) up
to
297 x 431.8 mm
(11.7 x 17 in.)
Folio
216 x 330 mm
(8.5 x 13 in.)
Legal
216 x 356 mm
(8.5 x 14 in.)
Punch—Long
**
edge
X
X
X
Offset Single/dual
staple
Tabloid
279 x 432 mm
X
(11 x 17 in.)
A3
297 x 420 mm
X
(11.7 x 16.5 in.)
*
The Paper must be loaded in the short-edge orientation for a top-edge hole punch.
**
The Paper must be loaded in the long-edge orientation for a long-edge hole punch.
***
For the Universal paper size, the finishing edge must be at least 9 in. (229 mm) for a 3-hole punch and 10 in.
(254 mm) for a 4-hole punch.
These finishing features are available for Bin 3 (booklet maker):
• Bi fold—Each page is individually folded and stacked separately.
• Booklet fold—A multiple-page job is folded along the center into a single booklet.
• Saddle stitch—A booklet-fold print job is stapled along the center fold.
Note: All jobs receiving finishing from the booklet maker must be loaded in the short-edge orientation. When paper
is loaded in the short-edge orientation, the short edge of the paper enters the printer first.
6
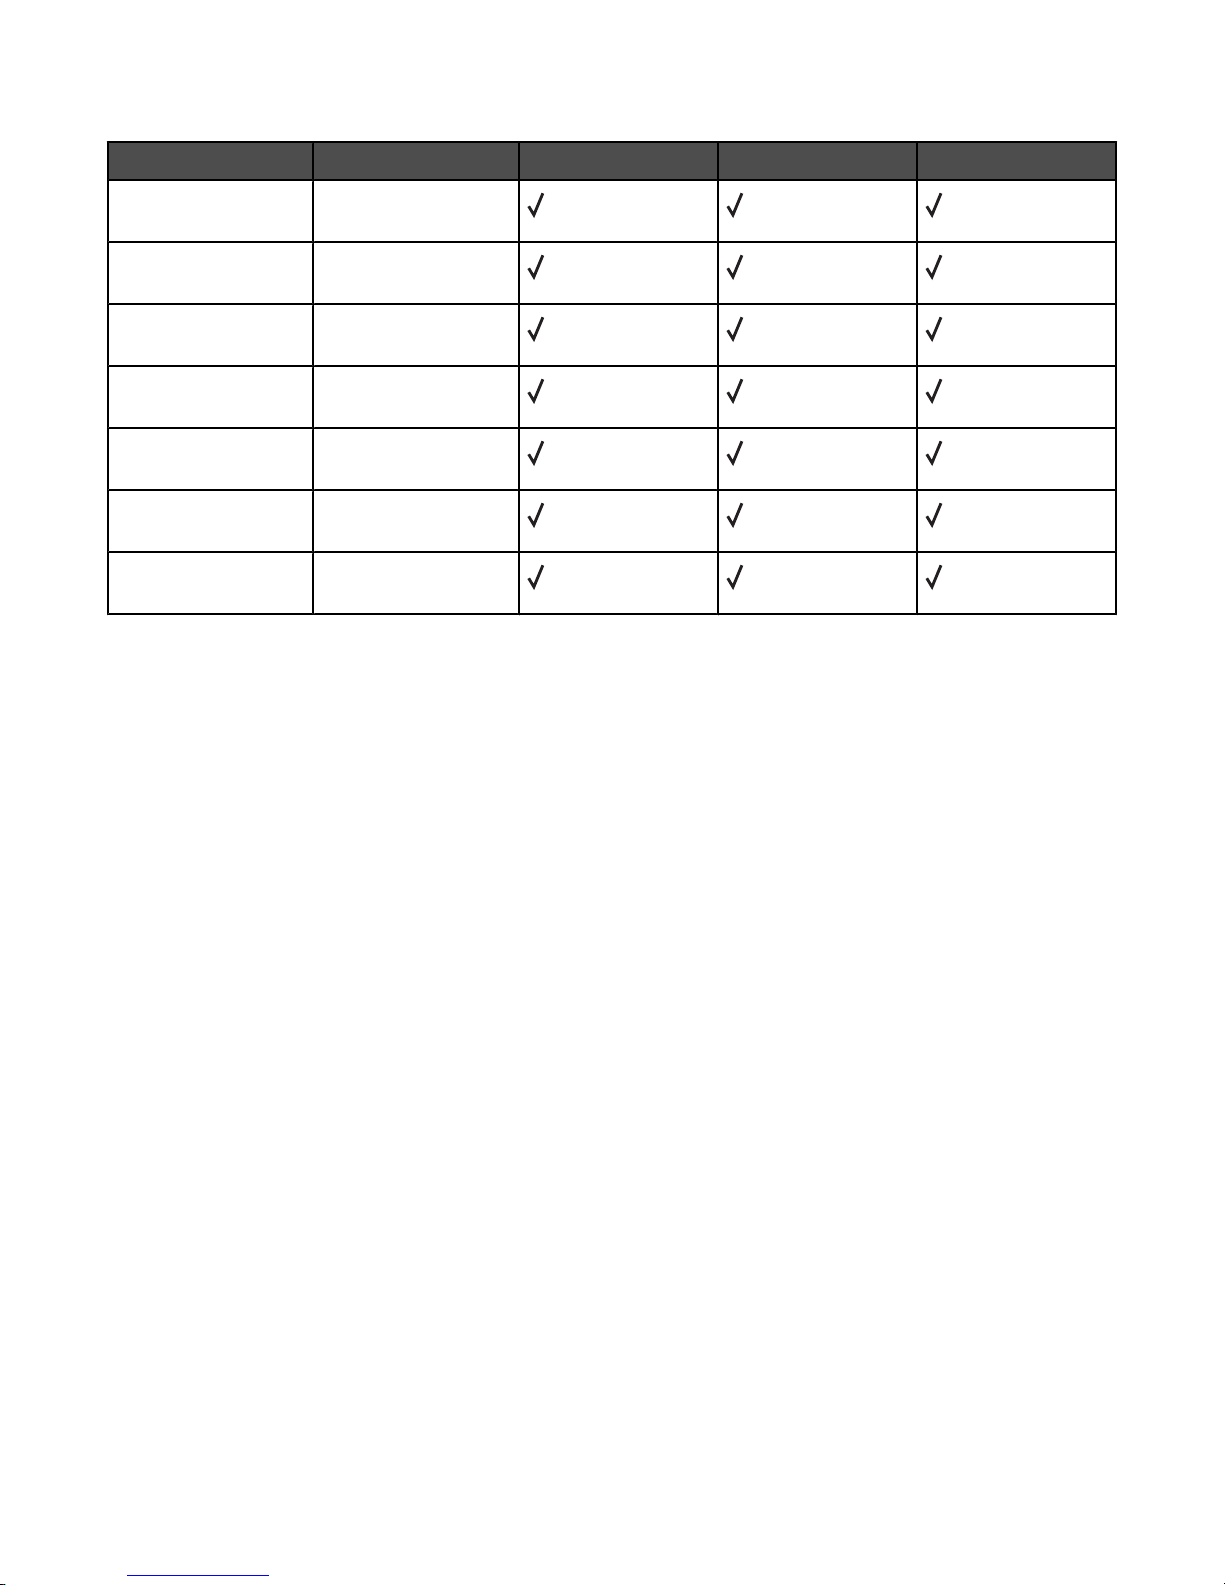
Bin 3 finishing features for supported paper sizes
Paper size Dimensions Bi fold Booklet fold Saddle stitch
A4
Folio
Letter
Legal
JIS B4
Tabloid
A3
210 x 297 mm
(8.3 x 11.7 in.)
216 x 330 mm
(8.5 x 13 in.)
216 x 279 mm
(8.5 x 11 in.)
216 x 356 mm
(8.5 x 14 in.)
257 x 364 mm
(10.1 x 14.3 in.)
279 x 432 mm
(11 x 17 in.)
297 x 420 mm
(11.7 x 16.5 in.)
Downloading printer drivers
1 Visit the product Web site to download the driver for your printer.
2 Contact the place where you purchased the printer if you need assistance.
7

Using the finisher
Finishing jobs may originate from copy jobs at the printer or files sent from a computer. This chapter describes
finishing tasks for jobs sent to the printer from a computer and copy jobs initiated from the printer.
Notes:
• If a finishing option such as Staple, Offset, Hole punch, or Fold is unavailable, select a different bin from the
Output bin menu. To access the menu, click Properties
• Files printed directly from a flash drive inserted into the USB port on the front of the printer will receive only the
finishing options that are enabled from the Finishing menu. These are the default settings for every print job.
Setting the default paper source
Use the printer menus to specify a default paper source. The printer uses the default source when Automatically
select is chosen from the Print Properties “Paper tray” menu or when a job is initiated from the printer and multiple
trays contain the same paper size and type specified by the job.
1 On the home screen, touch .
2 Touch Paper Menu.
3 Touch Default Source.
4 Touch repeatedly until the correct paper tray appears.
Paper Output bin menu.
5 Touch Submit.
The settings are updated.
Stapling
Using staple finishing
1 With a document open, click File
2 Select the Paper tab, and then click the Staple button.
Note: If the Staple button is unavailable, select a different output bin from the Output bin menu.
3 Click More Finishing Options.
The Finishing Options dialog appears.
4 Select a staple position, and then click OK repeatedly until the Properties dialog closes.
• Front—Places the staple through the upper-left corner of the pages
• Back—Places the staple through the lower-right corner of the pages
• Dual—Places two staples along the left edge of the pages
The finishing job is sent.
Print Properties.
8
Stapling copy jobs
1 Load an original document faceup in the ADF or facedown on the scanner glass.
2 On the home screen, touch Copy.
The copy screen appears.
3 Change the copy settings as needed.
4 Touch Copy from, and then touch the size of the original document.
5 Touch Copy to, and then touch the icon that shows the tray you want.
6 Touch Finishing.
7 Touch the icon that shows the staple position you want.
Note: Saddle stitch stapling is available only from the Create Booklet/Saddle stitch menu.
8 Touch .
9 Touch Done to return to the Finishing menu.
Hole punching
Loading paper for letter or A4 hole-punch finishing
Paper loaded in the short-edge orientation will receive the hole punch on the top edge of the paper. Paper loaded
in the long-edge orientation will receive the hole punch on the long edge of the paper.
If multiple trays contain letter- or A4-size paper, set the default paper source to a tray that contains paper loaded in
the correct orientation or select the correct tray from the Print Properties “Paper tray” menu.
Short-edge orientation Long-edge orientation
ABC
ABC
Using hole punch finishing
1 With a document open, click File
2 Select the Paper tab, and then click the Hole punch button.
Note: If the Hole punch button is unavailable, select a different output bin from the Output bin menu.
Print Properties.
3 Click More Finishing Options.
The Finishing Options dialog appears.
9

4 Select the number of holes to punch, and then click OK repeatedly until the Properties dialog closes.
• 2-hole punch—Punches two holes along the top edge of the paper
• 3-hole punch—Punches three holes along the left long edge of the paper
• 4-hole punch—Punches four holes along the left long edge of the paper
The finishing job is sent.
Hole-punching copy jobs
1 Make sure the paper is loaded in the correct orientation.
Note: Load the paper short-edge first for a top-edge hole punch, or load it long-edge first for a long-edge hole
punch. For more information, see “Supported finishing features” on page 5.
2 Load an original document faceup in the ADF or facedown on the scanner glass.
3 On the home screen, touch Copy.
The copy screen appears.
4 Change the copy settings as needed.
5 Touch Copy from, and then touch the size of the original document.
6 Touch Copy to, and then touch the tray that contains the paper that is loaded in the correct orientation.
7 Touch Finishing.
8 Touch the icon that shows the hole-punch number and position you want.
9 Touch .
10 Touch Done to return to the Finishing menu.
Folding
Fold finishing may be selected from Print Properties for jobs originating from a computer.
For copy jobs, fold finishing can be accessed from the home screen by touching Copy Finishing Create
Booklet/Saddle Stitch. The paper in the paper source for fold finishing copy jobs must be loaded in the short-edge
orientation. For more information, see “Loading paper in the short-edge orientation” on page 12.
Using fold finishing
1 With a document open, click File
2 Select the Paper tab, and then select a tray from the Paper tray menu.
Note: The selected tray must contain paper loaded in the correct orientation.
3 Click Fold, and then click More finishing options.
The Finishing Options dialog appears.
4 Select a fold position, and then click OK repeatedly until the Print Properties dialog closes.
• Fold—Folds up to five sheets in half
Print Properties.
Note: Jobs greater than five sheets will be folded and nested.
• Fold and center staple—Folds the sheets in half and places two staples along the fold (saddle stitch)
• Fold individual pages—Folds each sheet individually
10

The finishing job is sent.
Folding copy jobs
1 Load the paper in the short-edge orientation in a 500-sheet tray or the multipurpose feeder.
Note: Letter- or A4-size paper must be loaded in a 500-sheet tray in the short-edge orientation.
2 Set the default paper source to a 500-sheet tray that has paper loaded in the short-edge orientation. For more
information, see “Setting the default paper source” on page 8.
3 Load an original document faceup in the ADF.
4 On the home screen, touch Copy.
The copy screen appears.
5 Change the copy settings as needed.
6 Touch Copy from, and then touch the size of the original document.
7 Touch Copy to, and then touch the tray that contains the short-edge oriented paper.
8 Touch Finishing.
9 Touch Fold Individual Pages.
10 Touch .
11 Touch Done to return to the Finishing menu.
Offsetting
Offsetting print jobs
Offsetting stacks copies into staggered sets in the specified output bin. Offset finishing is not supported for all output
bins. If Offset is not supported by the selected bin, choose another bin from the Output bin menu.
1 With a document open, click File
2 Select the Paper tab, and then click the Offset button.
The finishing job is sent.
Print Properties.
11
Creating booklets
The finisher can create stapled booklets of up to 15 sheets including the cover page. Booklet jobs greater than 15
total sheets will be folded without stapling and nested in the booklet maker output bin.
Notes:
• Files printed directly from a flash drive inserted into the USB port on the front of the printer will receive only the
finishing options that are enabled from the Finishing menu. These are the default settings for every print job.
• Booklet creation cannot be enabled as a default finishing option from the Finishing menu; therefore, booklets
cannot be created directly from a flash drive.
Loading paper in the short-edge orientation
Jobs that request top-edge hole punch, folding, or booklet finishing must draw from a paper source that has paper
loaded in the short-edge orientation. Supported paper types may be loaded in the short-edge orientation in a
500-sheet tray or the multipurpose feeder. Letter or A4 jobs must be loaded in a 500-sheet tray in the short-edge
orientation.
All supported paper sizes may be loaded in the short-edge orientation in a 500-sheet tray.
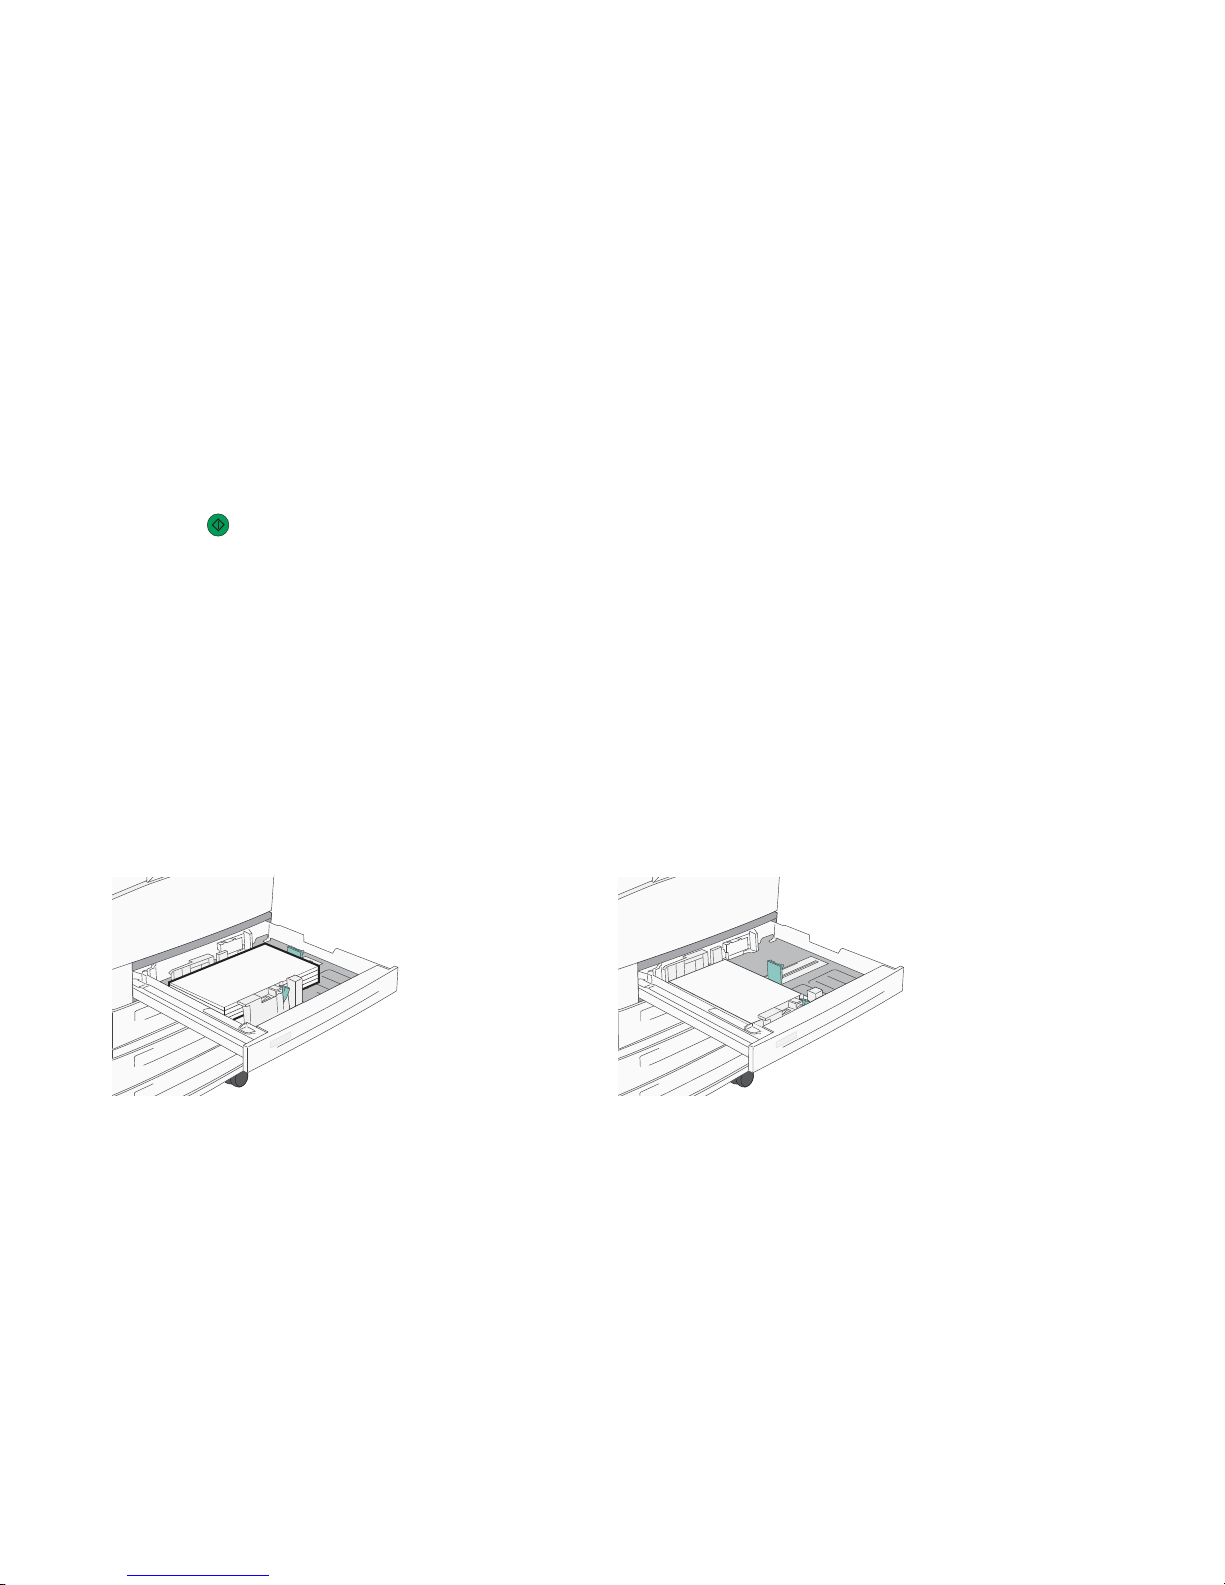
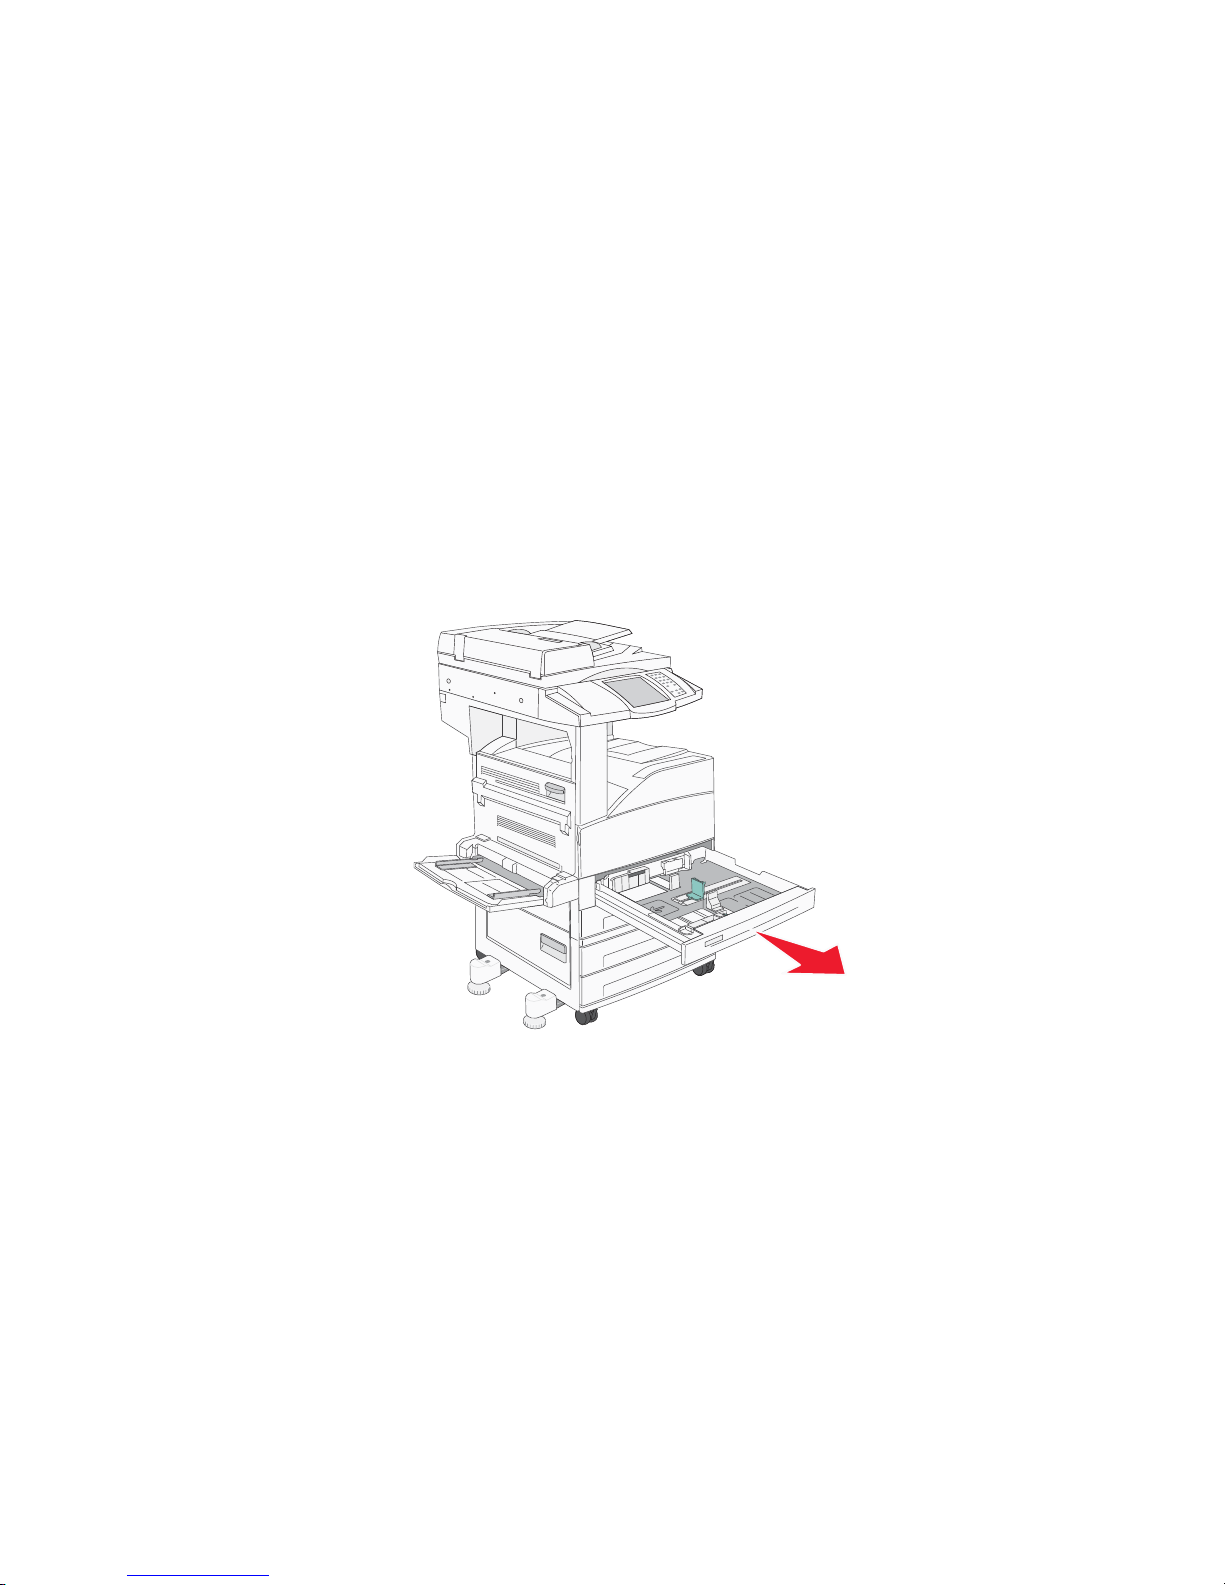
1 Grasp the handle, and then pull the tray out.
12
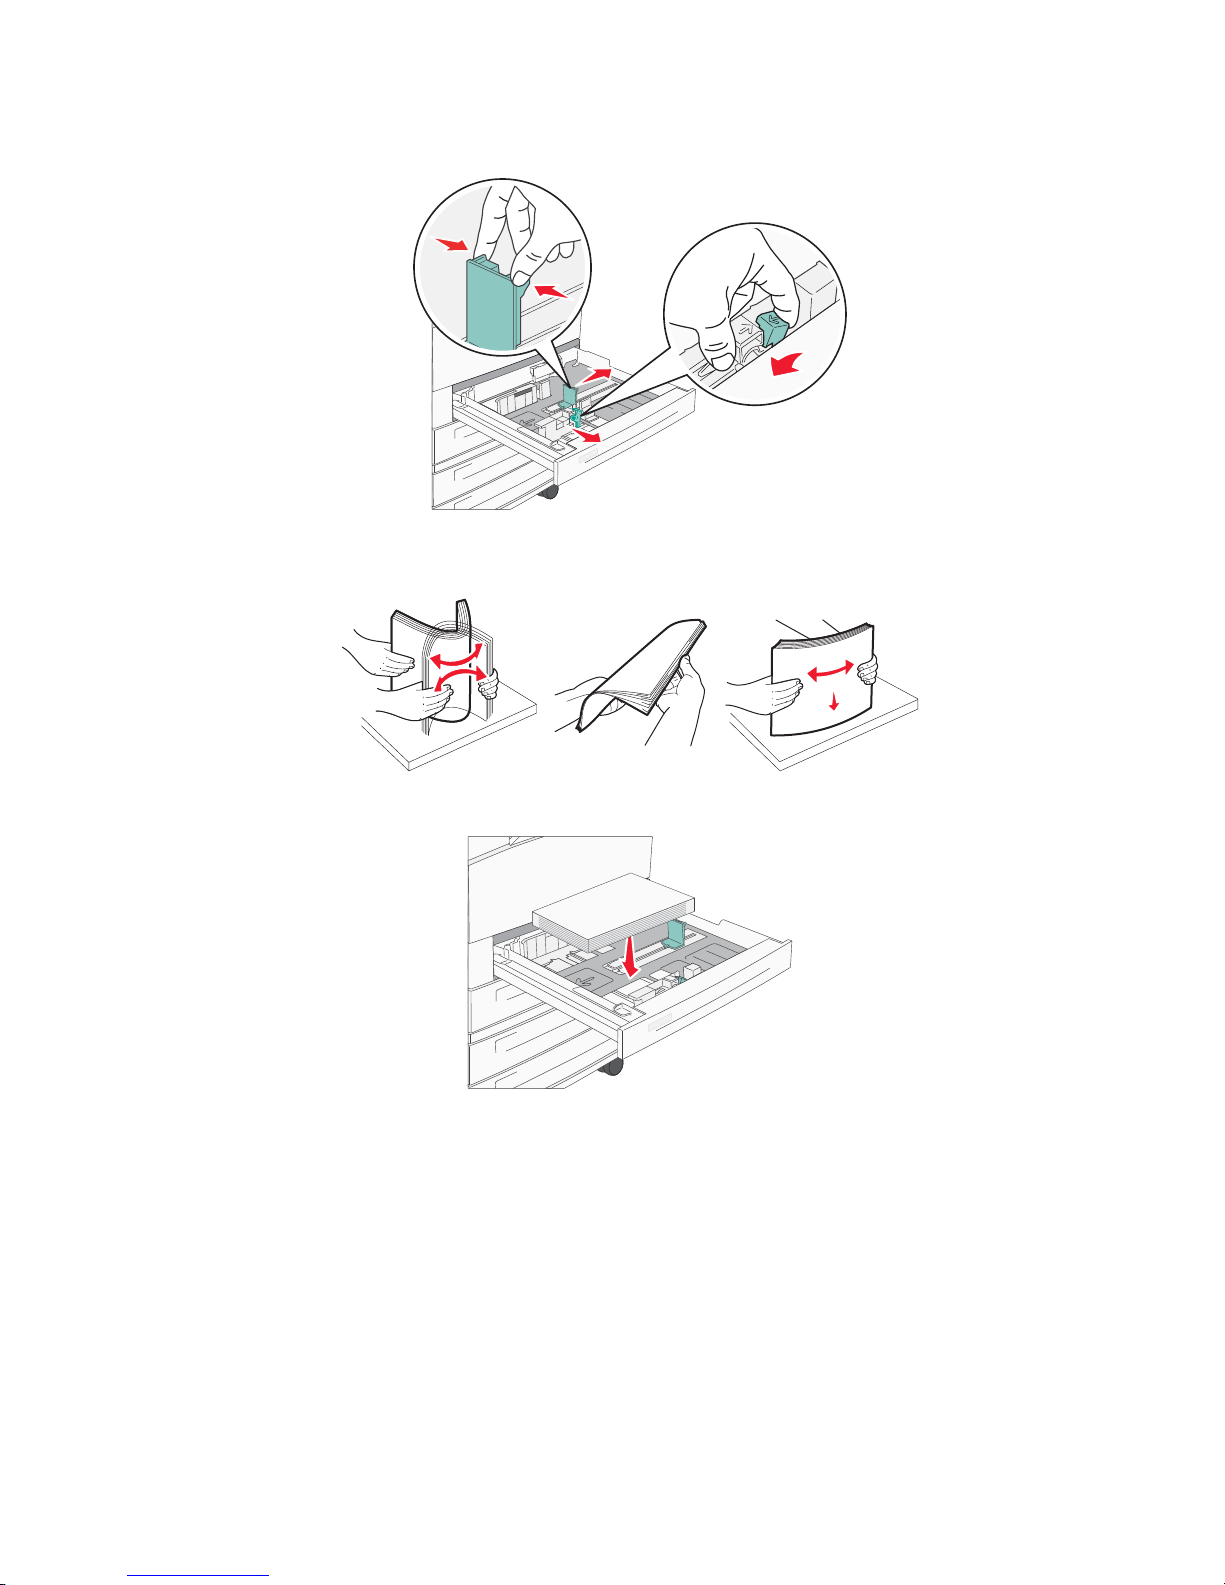
2 Squeeze the width and length guide tabs together as shown, and then move guides to the correct position for
the paper size being loaded.
3 Flex the sheets back and forth to loosen them, and then fan them. Do not fold or crease the paper. Straighten
the edges on a level surface.
4 Load the paper in the short-edge orientation.
5 Make sure the paper guides are secure against the edges of the paper.
6 Insert the tray.
7 If a different type of paper was loaded than the type previously loaded in the tray, change the Paper Type setting
for the tray from the control panel.
13

Setting the Paper Size and Paper Type
The Paper Size setting is determined by the position of the paper guides in the tray for all trays except the
multipurpose feeder. The Paper Size setting for the multipurpose feeder must be set manually. The factory default
Paper Type setting is Plain Paper. The Paper Type setting must be set manually for all trays that do not contain plain
paper.
1 Make sure the printer is on and Ready appears.
2 From the control panel, touch .
3 Touch Paper Menu.
4 Touch Paper Size/Type.
5 Touch the tray number, or touch MP Feeder Size.
6 Touch repeatedly until the desired size appears.
7 Touch Submit.
Creating booklets
Jobs that request booklet finishing must use paper loaded in the short-edge orientation. For more information, see
“Loading paper in the short-edge orientation” on page 12. Two paper sources are required for booklet jobs that use
a type of paper for the cover that is different from the type of paper used for the booklet pages.
1 Load the paper.
a Load the paper for the booklet pages in the short-edge orientation.
b If the job requires a cover that is a different paper type than the booklet pages, load the paper for the cover
in the short-edge orientation in another tray.
2 With a document open, click File
Print Properties.
3 Specify the paper settings for the booklet pages.
a Select the Paper tab.
b From the Paper tray menu, select the tray that contains the paper for the booklet pages.
c From the Paper type menu, select the paper type of the booklet pages.
4 Select the Page Layout tab, and then click the More Page Layout Options button.
The More Page Layout Options dialog appears.
5 Select Use booklet options, and then click the Settings button.
The Booklet Settings dialog appears.
6 Specify finishing for the booklet:
a Specify fold and staple settings:
• Select No fold or center staple to print the booklet without folding or stapling.
• Select Booklet fold to fold the pages into a booklet without stapling.
• Select Booklet fold and center staple to fold the pages into a booklet with stapling.
14
 Loading...