

Ricoh InfoPrint 1532, InfoPrint 1572dn, InfoPrint 1572n, InfoPrint 1552, InfoPrint 1572 User Manual

InfoPrint 1532, 1 552 & 1572
MT(4536-4537-4538)
User’s Gui d e
S510-4879-00

2
Edition: March 2005
The following paragraph does not apply to any country where such provisions are inconsistent with local law: LEXMARK
INTERNATIONAL, INC., PROVIDES THIS PUBLICATION “AS IS” WITHOUT WARRANTY OF ANY KIND, EITHER EXPRESS OR
IMPLIED, INCLUDING, BUT NOT LIMITED TO, THE IMPLIED WARRANTIES OF MERCHANTABILITY OR FITNESS FOR A
PARTICULAR PURPOSE. Some states do not allow disclaimer of express or implied warranties in certain transactions; therefore, this
statement may not apply to you.
This publication could include technical inaccuracies or typographical errors. Changes are periodically made to the information herein;
these changes will be incorporated in later editions. Improvements or changes in the products or the programs described may be made
at any time.
References in this publication to products, programs, or services do not imply the manufacturer intends to make these available in all
countries in which it operates. Any reference to a product, program, or service is not intended to state or imply that only that product,
program, or service may be used. Any functionally equivalent product, program, or service that does not infringe any existing intellectual
property right may be used instead. Evaluation and verification of operation in conjunction with other products, programs, or services,
except those expressly designated by the manufacturer, are the user’s responsibility.
Safety information
• Connect the power cord to a properly grounded electrical outlet that is near the product and easily accessible.
CAUTION: Do not set up this product or make any electrical or cabling connections, such as the power cord or telephone, during
a lightning storm.
• Refer service or repairs, other than those described in the operating instructions, to a professional service person.
• This product is designed, tested, and approved to meet strict global safety standards with the use of specific Lexmark components.
The safety features of some parts may not always be obvious. Lexmark is not responsible for the use of other replacement parts.
• Your product uses a laser.
CAUTION: Use of controls or adjustments or performance of procedures other than those specified herein may result in hazardous
radiation exposure.
• Your product uses a printing process that heats the print media, and the heat may cause the media to release emissions. You must
understand the section in your operating instructions that discusses the guidelines for selecting print media to avoid the possibility
of harmful emissions.

3
Contents
Chapter 1: Learning about the printer .............................................................................. 6
Identifying printers ........................................................................................................................................... 6
Understanding the printer operator panel ........................................................................................................ 9
Chapter 2: Installing drivers for local printing ............................................................... 11
Windows ........................................................................................................................................................11
Macintosh ...................................................................................................................................................... 15
UNIX/Linux ..................................................................................................................................................... 16
Chapter 3: Installing drivers for network printing ......................................................... 17
Printing a network setup page ....................................................................................................................... 17
Assigning a printer IP address .......................................................................................................................17
Verifying the IP settings .................................................................................................................................18
Windows ........................................................................................................................................................18
Macintosh ...................................................................................................................................................... 22
UNIX/Linux ..................................................................................................................................................... 24
NetWare .........................................................................................................................................................24
Chapter 4: Installing and removing options ................................................................... 25
Installing input options ................................................................................................................................... 25
Installing a duplex unit ................................................................................................................................... 27
Installing memory or option cards ..................................................................................................................28
Accessing the printer system board ............................................................................................................... 28
Installing or removing a memory card ............................................................................................................ 30
Installing or removing a flash memory or firmware card ................................................................................32
Installing an option card .................................................................................................................................34
Replacing the shield ...................................................................................................................................... 35
Chapter 5: Printing ............................................................................................................ 36
Sending a job to print ..................................................................................................................................... 36
Printing from a USB flash memory device ..................................................................................................... 36
Canceling a print job ......................................................................................................................................38
Printing the menu settings page ....................................................................................................................39
Printing a network setup page ....................................................................................................................... 39
Printing a font sample list ............................................................................................................................... 40
Printing a directory list ................................................................................................................................... 40
Printing confidential and held jobs ................................................................................................................. 40
Printing on specialty media ............................................................................................................................ 43
Loading standard trays and optional trays .....................................................................................................44

4
Contents
Setting the Paper Type and Paper Size ........................................................................................................ 47
Loading the multipurpose feeder ................................................................................................................... 48
Loading the 2000-sheet drawer ..................................................................................................................... 53
Loading the envelope feeder ......................................................................................................................... 55
Linking trays ................................................................................................................................................... 57
Identifying and linking output bins .................................................................................................................. 58
Chapter 6: Understanding paper and specialty media guidelines ............................... 60
Supported print media ................................................................................................................................... 60
Selecting print media ..................................................................................................................................... 69
Storing print media .........................................................................................................................................72
Avoiding jams ................................................................................................................................................ 73
Chapter 7: Maintaining the printer .................................................................................. 74
Determining the status of supplies ................................................................................................................. 75
Conserving supplies ...................................................................................................................................... 75
Ordering supplies ...........................................................................................................................................76
Moving the printer ..........................................................................................................................................77
Chapter 8: Clearing jams .................................................................................................. 78
Identifying jams .............................................................................................................................................. 78
Access doors and trays ................................................................................................................................. 79
Understanding jam messages ....................................................................................................................... 80
Clearing printer jams ......................................................................................................................................80
Clearing staple jams ...................................................................................................................................... 91
Chapter 9: Administrative support .................................................................................. 94
Adjusting operator panel brightness and contrast ......................................................................................... 94
Disabling operator panel menus .................................................................................................................... 94
Enabling operator panel menus .....................................................................................................................95
Restoring factory default settings ..................................................................................................................95
Adjusting Power Saver .................................................................................................................................. 96
Disabling Power Saver .................................................................................................................................. 96
Encrypting the disk ........................................................................................................................................ 97
Setting security using the Embedded Web Server (EWS) .............................................................................97
Chapter 10: Troubleshooting ......................................................................................... 101
Understanding printer messages .................................................................................................................101
Checking an unresponsive printer ...............................................................................................................101
Printing multi-language PDFs ...................................................................................................................... 102
Solving printing problems ............................................................................................................................ 102
Solving option problems .............................................................................................................................. 104
Solving paper feed problems ....................................................................................................................... 106
Print quality troubleshooting ........................................................................................................................107
Solving print quality problems ......................................................................................................................107

5
Contents
Notices .............................................................................................................................. 111
Trademarks .................................................................................................................................................. 112
Licensing notice ...........................................................................................................................................112
Conventions .................................................................................................................................................112
Static sensitivity notice ................................................................................................................................. 113
Electronic emission notices .........................................................................................................................113
Noise emission levels ..................................................................................................................................115
Waste from Electrical and Electronic Equipment (WEEE) directive ............................................................. 115
Laser advisory label ..................................................................................................................................... 115
Laser notice .................................................................................................................................................116
Index .................................................................................................................................. 117
Learning about the printer
6
1
Learning about the printer
Identifying printers
Use the following table to determine the features and options of the printer.
The illustrations aid you in determining the installation location of options attached to the printer. For more information
about installing input options, see Installing and removing options or the instructions that came with the option.
Models
The printer is available in three base models. The following table indicates some of the differences between the models.
CAUTION: Do not set up this product or make any electrical or cabling connections, such as the power cord or
telephone, during a lightning storm.
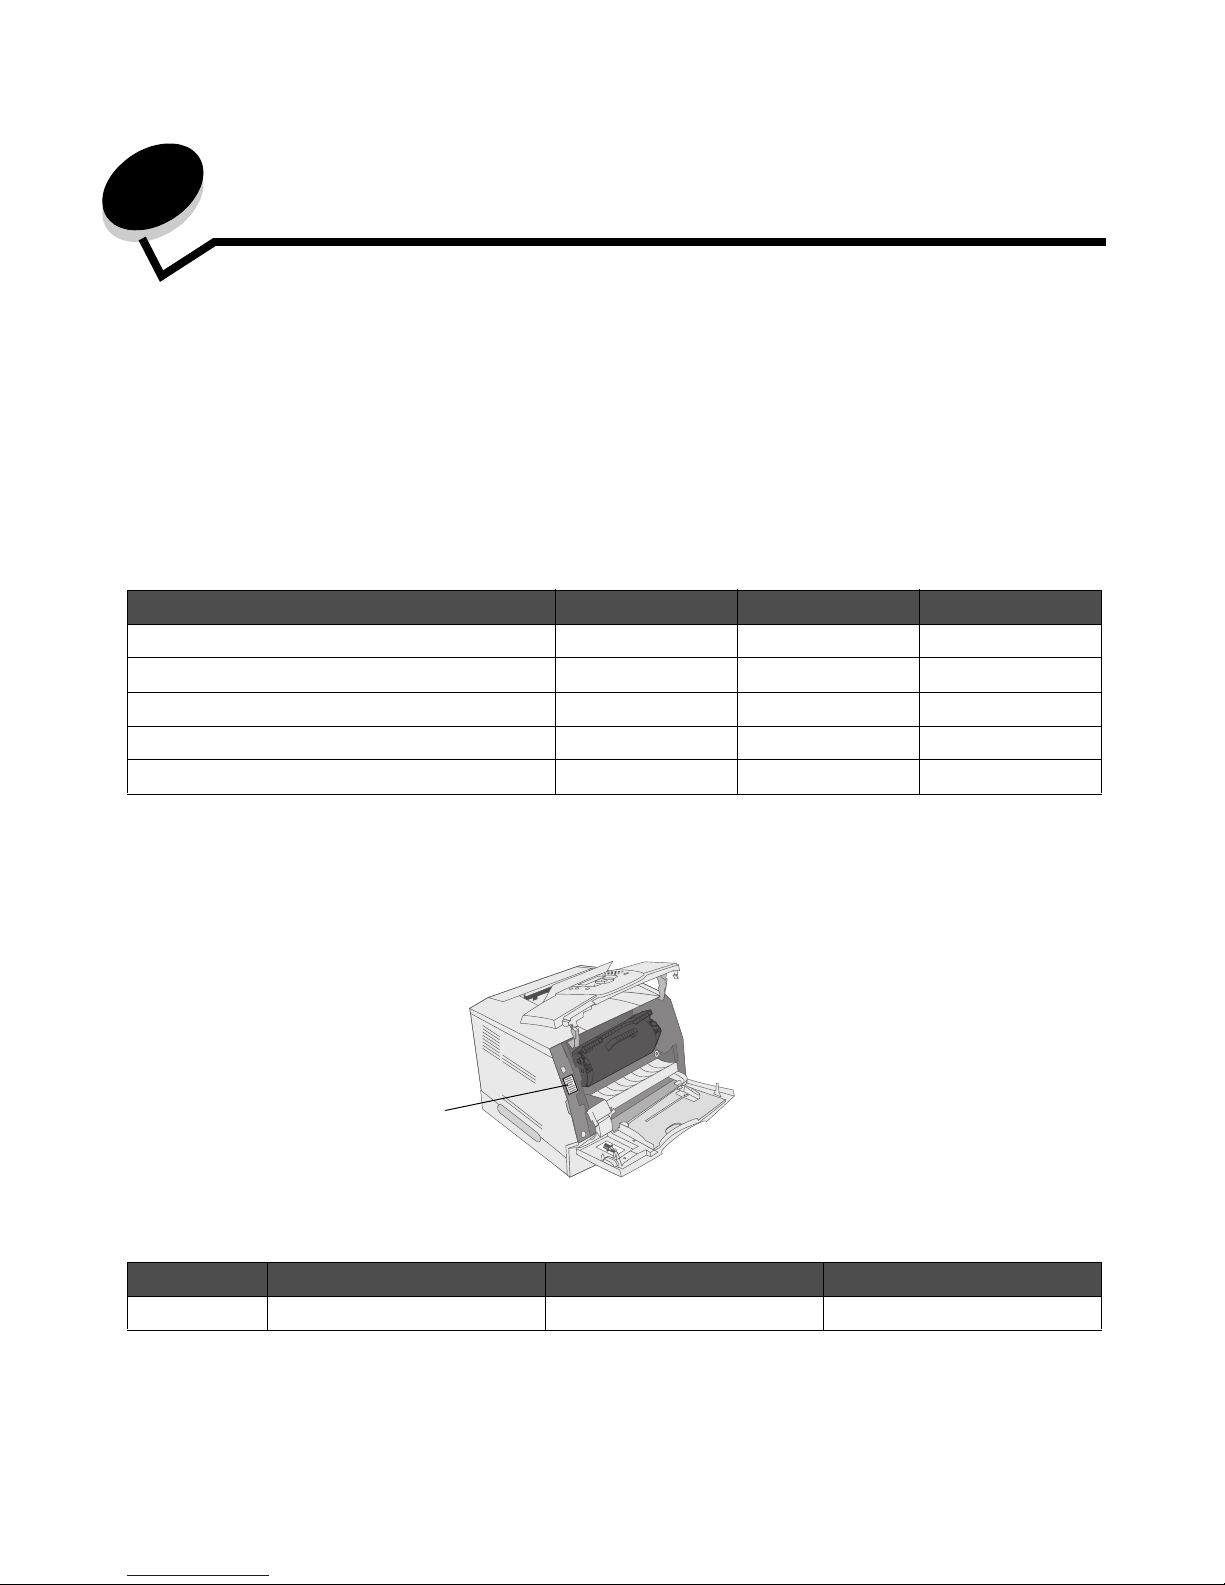
To identify the printer model, look for the type model of the printer. The type model is located on the label under the printer
top cover.
Model I Model II Model III
Input capacity 250 sheets 500 sheets 500 sheets
Output capacity 250 sheets 500 sheets 500 sheets
Standard memory, non network/network 64MB/64MB 64MB/128MB 128MB/128MB
Maximum memory capacity, non network/network 576MB/576MB 576MB/640MB 640MB/640MB
Option card connectors 1 2 2
Model I Model II Model III
Model type 4061-000, 4061-010, or 4536 4061-200, 4061-210, or 4537 4061-400, 4061-410, or 4538
Label
Identifying printers
7
Learning about the printer
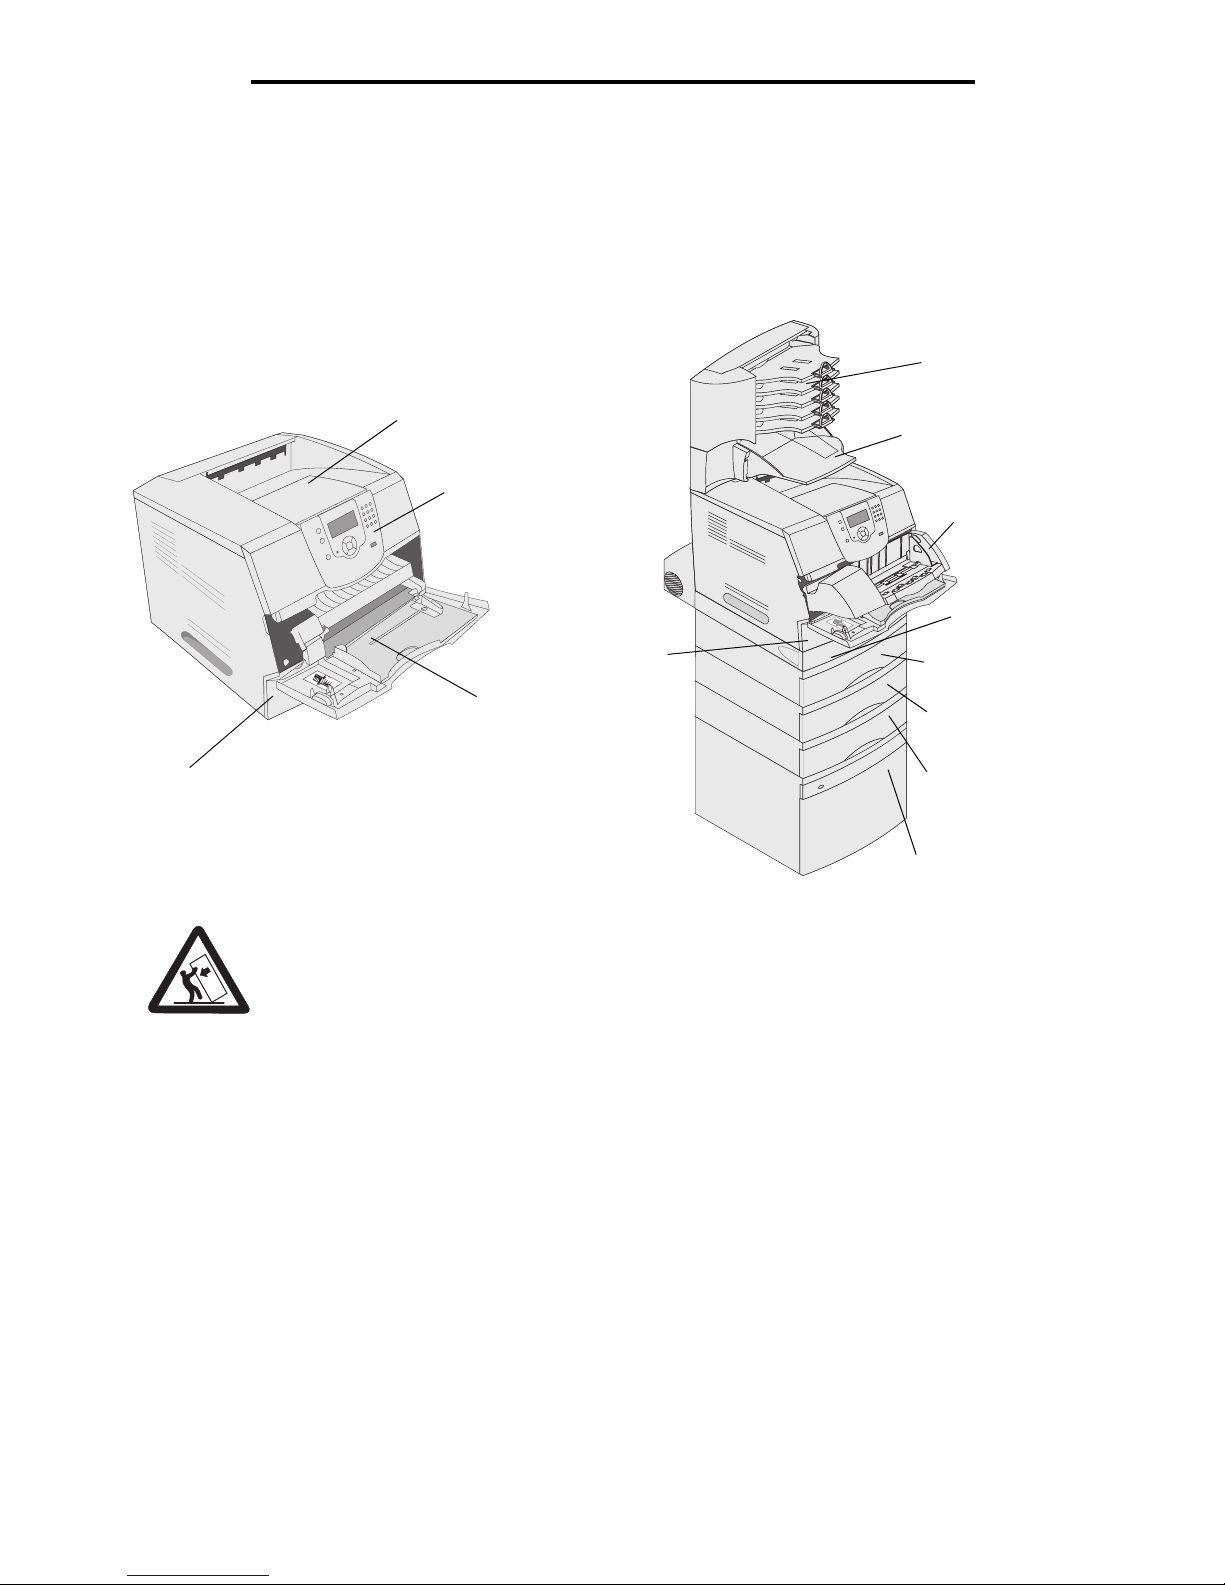
Configured models
The following illustrations show a standard network and fully configured printer. If you attach print media handling options to
the printer, it may look more like the fully configured model. Items denoted with an asterisk (*) are options.
Floor-mounted configurations require additional furniture for stability. You must use either a printer stand or printer base if
you are using a 2000-sheet drawer, a duplex unit and an input option, or more than one input option. If you purchased a
multifunction printer (MFP) that scans, copies, and faxes, you may need additional furniture.
Standard output bin
Operator panel
Tray 1
(integrated tray
or standard tray)
Tray 5*
(2000-sheet drawer)
5-bin Mailbox*
Output expander*
Envelope feeder*
Duplex unit*
Standard network Fully configured
Multipurpose feeder
Tray 1
(integrated tray or standard tray)
Tray 2*
(250 or 500 sheets)
Tray 3*
(250 or 500 sheets)
Tray 4*
(250 or 500 sheets)
The standard tray holds 250 sheets for Model I and 500
sheets for Model II and Model III.
Identifying printers
8
Learning about the printer
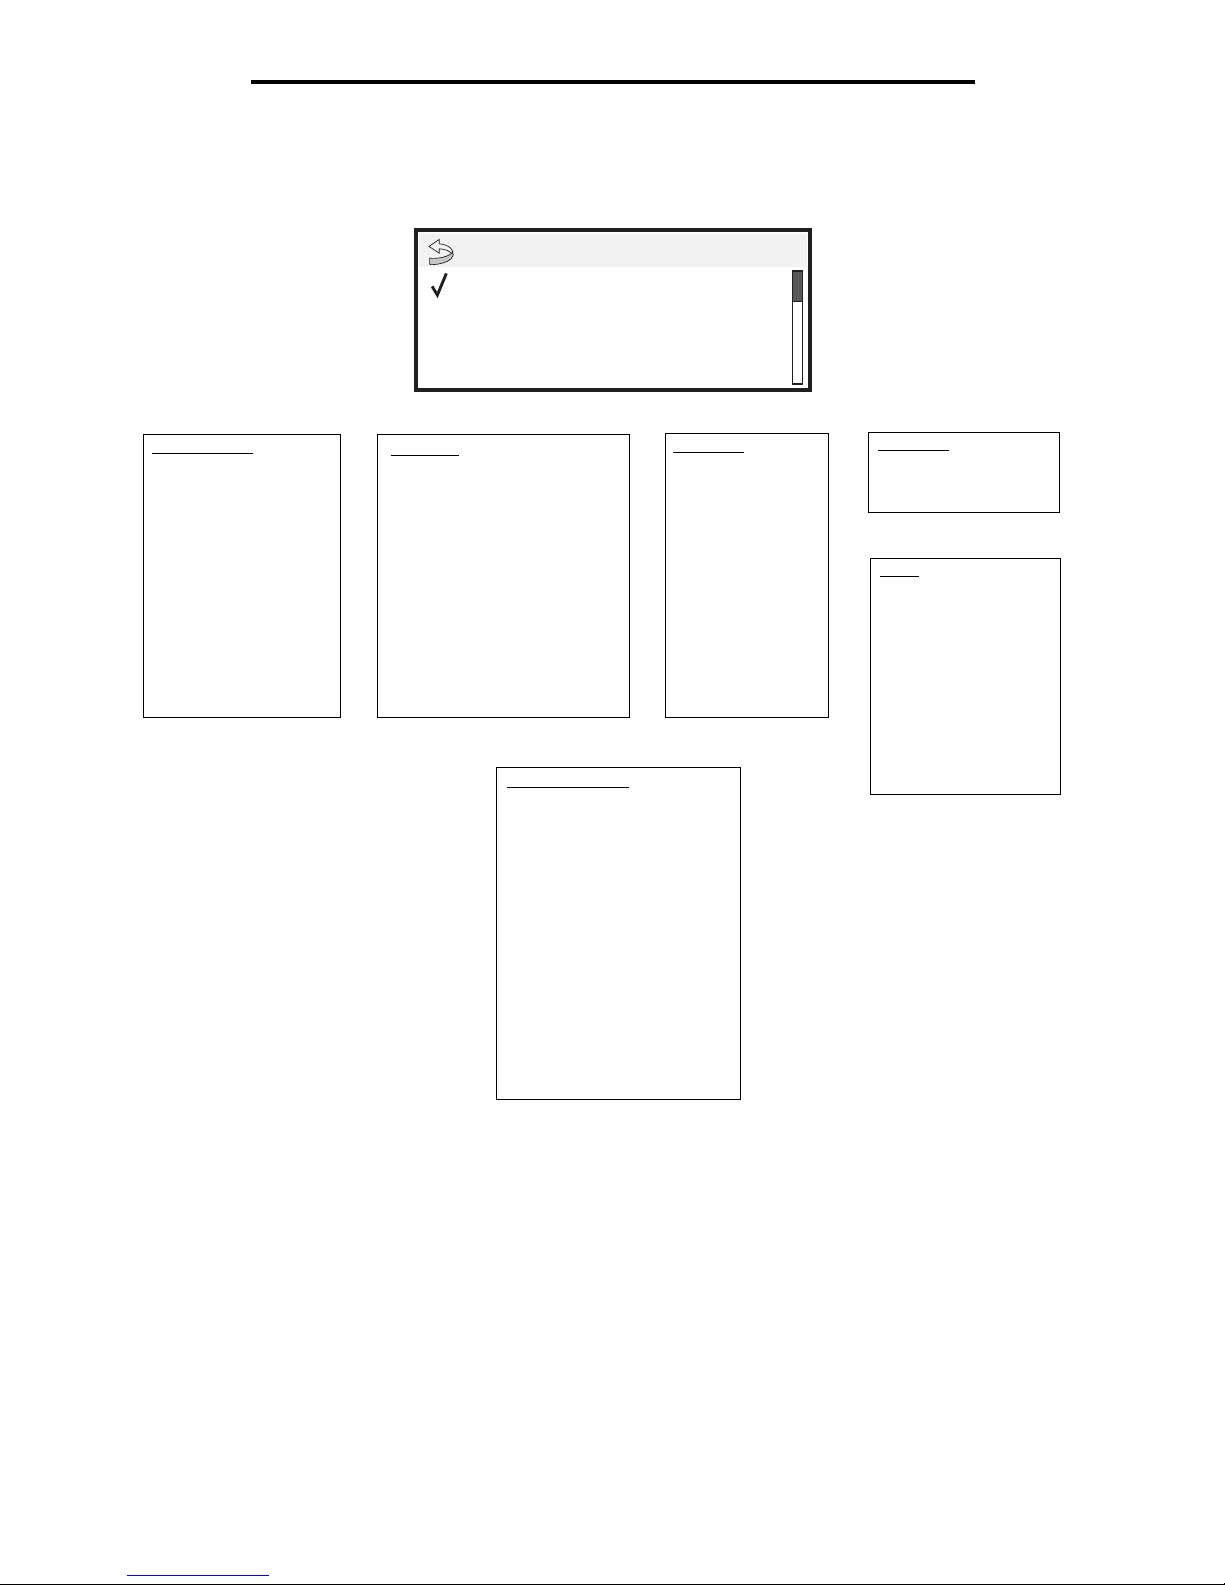
A number of menus are available to make it easy for you to change printer settings. The diagram shows the menu index on
the operator panel and the menus and items available under each menu. For more information about menus and menu
items, see the Menus and Messages book on the publications CD.
Paper Menu
Default Source
Paper Size/Type
Configure MP
Envelope Enhance
Substitute Size
Paper Texture
Paper Weight
Paper Loading
Custom Types
Universal Setup
Bin Setup
Reports
Menu Settings Page
Device Statistics
Network Setup Page
Network <x> Setup Page
Profiles List
NetWare Setup Page
Print Fonts
Print Directory
Settings
Setup Menu
Finishing Menu
Quality Menu
Utilities Menu
PDF Menu
PostScript Menu
PCL Emul Menu
HTML Menu
Image Menu
Security
Max Invalid PIN
Job Expiration
Network/Ports
IPv6
TCP/IP
Standard Network
Network <x>
Standard USB
USB <x>
Parallel
Parallel <x>
Serial <x>
NetWare
AppleTalk
LexLink
Help
Print All
Print Quality
Printing Guide
Media Guide
Menu Map
Information Guide
Connection Guide
Moving Guide
Paper Menu
Reports
Settings
Menu
Understanding the printer operator panel
9
Learning about the printer
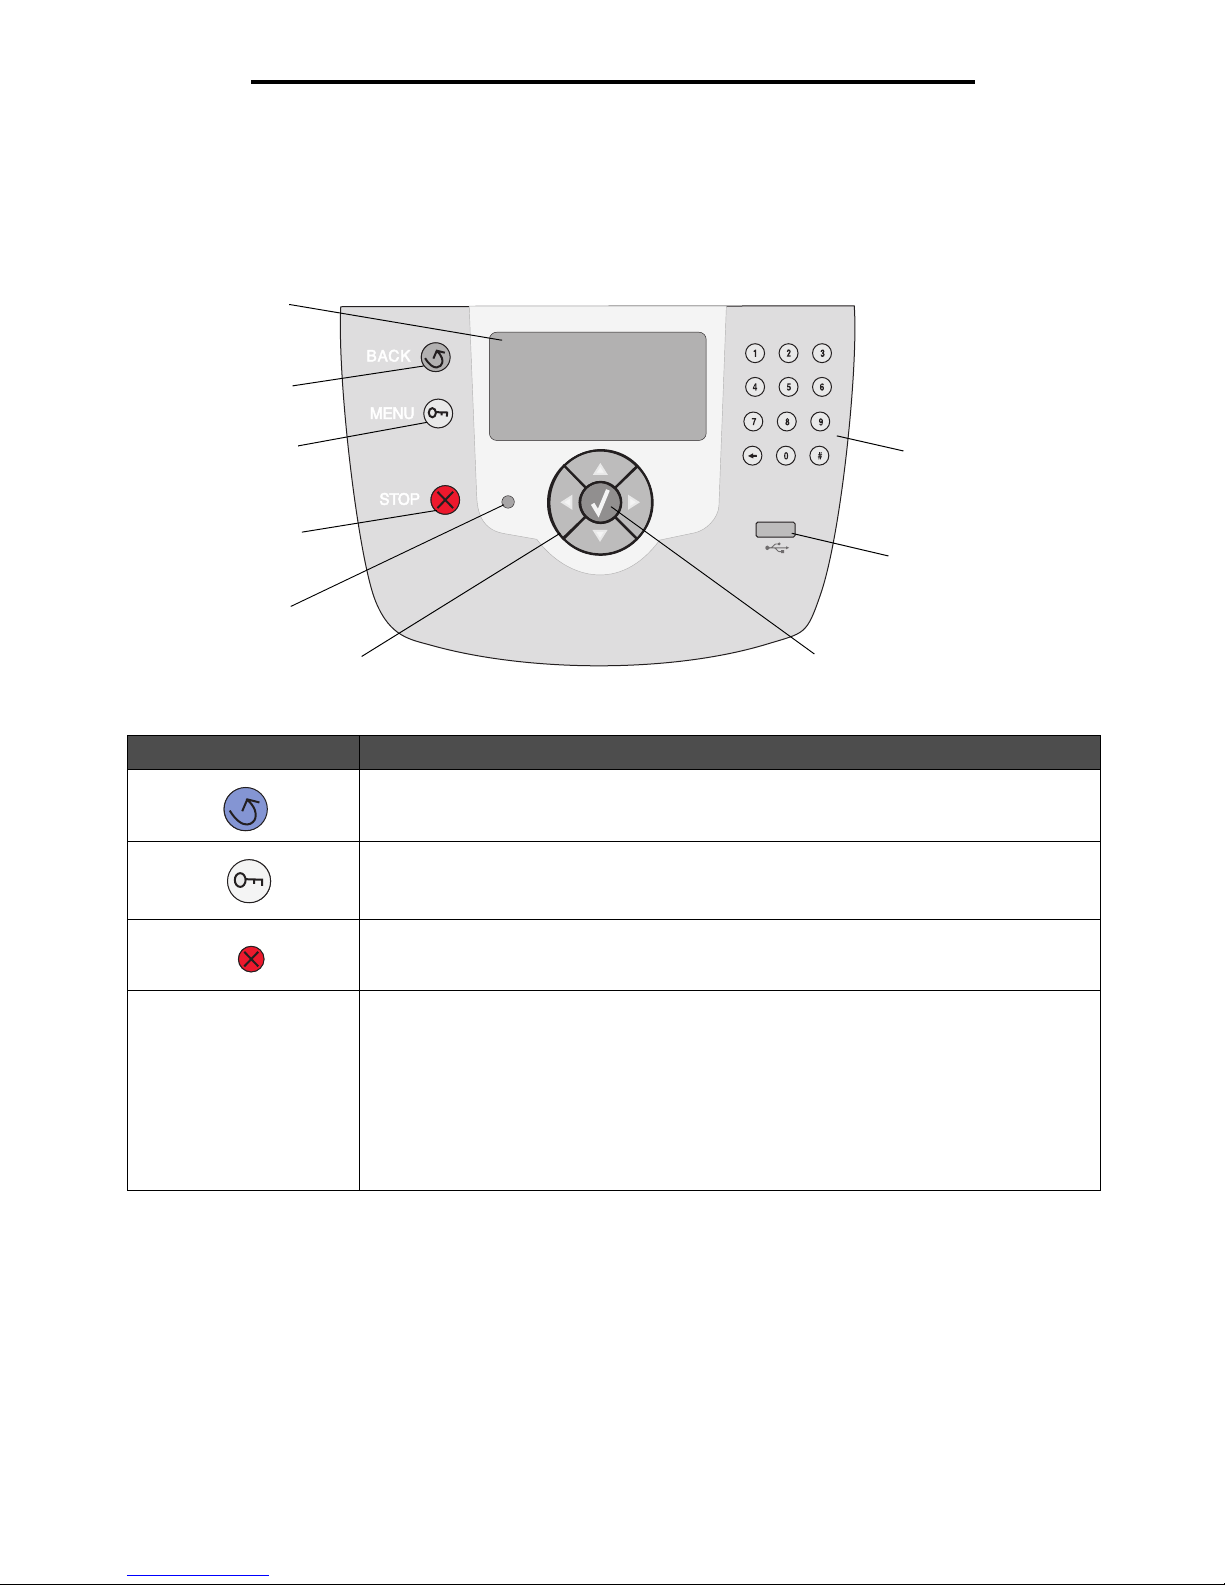
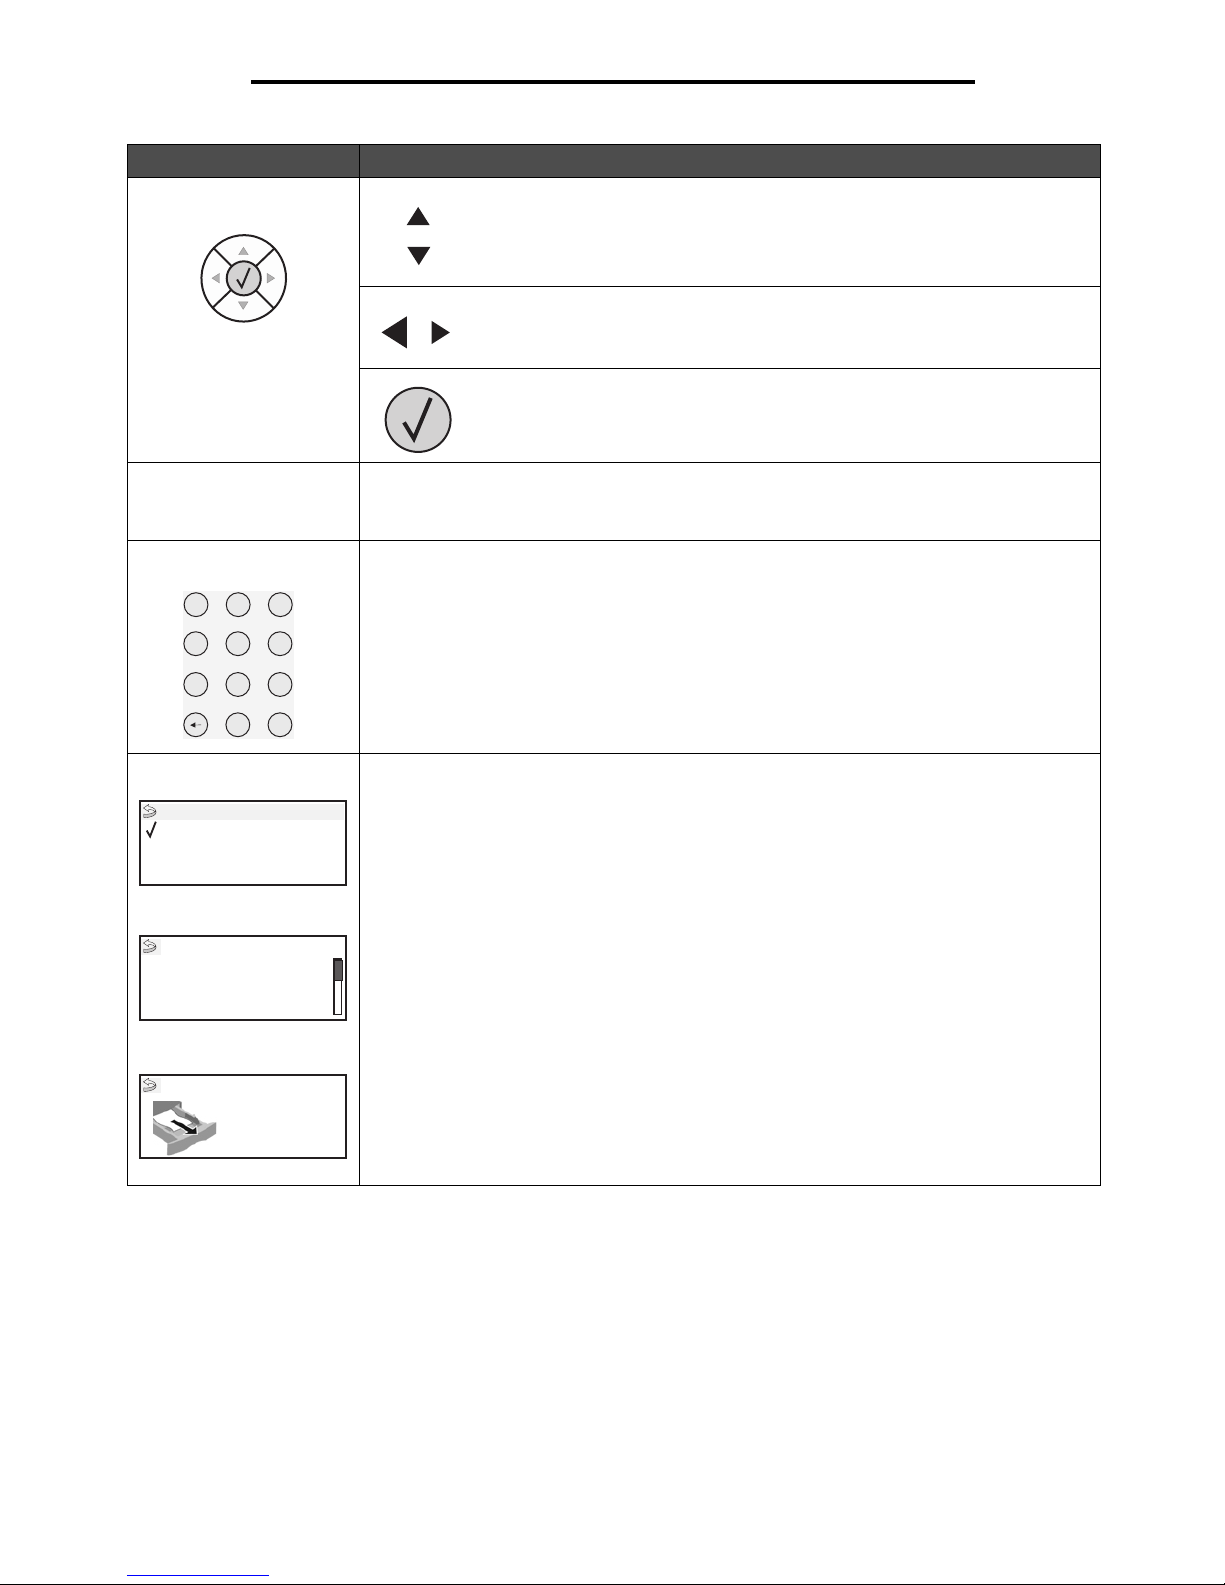
Understanding the printer operator panel
The operator panel on the printer is a 4-line back-lit gray scale display that can show both graphics and text. The Back,
Menu, and Stop buttons are located to the left of the display, the navigation buttons are located below the display, and the
numeric pad is located to the right of the display.
The use of the buttons and the layout of the display panel are described in the following table.
Button Function
Back
Returns to the last screen you viewed.
Note: Changes made on a screen will not be applied if you press the Back button.
Menu
Opens the menu index.
Note: The printer must be in the Ready state to access the menu index. A message
indicating the menus are unavailable will appear if the printer is not ready.
Stop
Stops the mechanical operation of the printer. After pressing Stop, the message Stopping
appears. When the printer has stopped, the status line in the operator panel will show
Stopped, and a list of options appears.
Indicator light
A two-tone LED is used on the operator panel, one color is green and the other is red. The
lights indicate whether the printer power is on, the printer is busy, idle, processing a job, or
requires operator intervention.
Status Indicates
Off Power is off.
Solid green Printer is on, but idle.
Blinking green Printer is warming up, processing data, or printing a job.
Solid red Operator intervention is required.
Back
Menu
Stop
Navigation buttons
Numeric pad
Display
Indicator light
USB Direct interface
Select
Understanding the printer operator panel
10
Learning about the printer
The Up or Down buttons are used to move up and down lists.
When navigating through a list using the Up or Down button, the cursor
moves one line at a time. Pressing the Down button at the bottom of the
screen changes the screen to the next whole page.
The Left or Right buttons are used to move within a screen such as moving
from one menu index item to another. They are also used to scroll through
text that will not fit on the screen.
The Select button is used to initiate action on a selection. Press Select when
the cursor appears next to the selection you want such as following a link,
submitting a configuration item, or when you want to start or cancel a job.
USB Direct interface The host USB Direct interface on the operator panel is used to plug in a USB flash memory
device and print PDF files.
Note: A USB port is located on the back of the printer to connect a PC or other peripheral.
The numeric pad consists of numbers, a pound '#' sign, and a backspace button. The 5
button has a raised bump for non-visual orientation.
The numbers are used to enter numeric values for items like quantities or PINs. The
backspace is used to delete the number to the left of the cursor. Pressing the backspace
multiple times will delete additional entries.
Note: The pound '#' sign is not used.
The display panel shows messages and graphics describing the current state of the printer
and indicating possible printer problems you must resolve.
The top line of the display is the header line. If applicable, it will contain the graphic
indicating the Back button can be used. It will also display the current status and the
Supplies (Warnings) status. If multiple warnings are present, each warning will be separated
by a comma.
The other three lines of the display are the body of the screen. This is where you view
printer status, supplies messages, show-me screens, and make selections.
Button Function
Navigation buttons
1
2
3
4
5
6
7
8
9
0
#
Numeric pad
Display panel
Ready
Tray 1 low
View Supplies
Status / Supplies
Tell me more screen
Some held jobs were not
restored.
Show me screen
Remove tray;
remove print media

Installing drivers for local printing
11
2
Installing drivers for local printing
A local printer is a printer attached to the computer using a USB or parallel cable. The local printer is intended to be used by
the computer to which it is attached. If attaching a local printer, you must install the printer driver on the computer before
setting up the printer.
The printer driver is software that lets the computer communicate with the printer.
The procedure to install drivers depends on the operating system used. Use the following table to find driver installation
instructions for the particular operating system. For additional help, see the documentation that shipped with the computer
and your software.
Windows
Some Windows operating systems may already include a printer driver that is compatible with the printer.
Note: Installing a custom driver will not replace the system driver. A separate printer object will be created
and appear in the Printers folder.
Use the drivers CD that shipped with the printer to install the custom printer driver and obtain enhanced printer features and
functionality.
Using Windows Server 2003, Windows 2000, Windows XP, Windows 98 SE,
Windows Me, or Windows NT
Note: Install the printer software before connecting the USB cable.
1 Insert the drivers CD.
If the CD does not launch automatically, click Start
Æ Run, and type D:\Setup.exe in the Run dialog (where D is
the letter of the CD-ROM drive).
Note: USB support is not available for Windows NT operating systems. To use a Windows NT operating
system, you must have an optional Parallel 1284-B Interface Card installed and use a parallel cable.
Operating system Go to page
Windows 11
Windows Server 2003, Windows 2000, Windows XP, Windows 98 SE, Windows Me,
Windows NT 4.x
11
Windows 95 and Windows 98 (first edition) 12
Serial printing 13
Macintosh 15
UNIX/Linux 16

Windows
12
Installing drivers for local printing
2 Click Install Printer and Software.
Note: Some Windows operating systems require administrative access to install printer drivers on the
computer.
3 Click Agree to accept the license agreement.
4 Select Suggested, and click Next.
The Suggested option is the default installation for local and network-attached setup. To install utilities, change
settings, or customize device drivers, select Custom, and follow the instructions on the screen.
5 Select Local Attach, and click Finish.
Follow the instructions on the screen. It may take some time for the drivers files to load.
6 Close the drivers CD installer application.
7 Connect the USB cable, and turn on the printer.
The Plug and Play screen appears, and a printer object is created in the Printers folder of your computer.
Note: USB support is not available for Windows NT operating systems. To use a Windows NT operating
system, you must have an optional Parallel 1284-B Interface Card installed and use a parallel cable.
The Plug and Play screen will not appear for Windows NT.
Using Windows 95 and Windows 98 (first edition)
1 Turn on the computer.
2 Insert the drivers CD. If the CD launches automatically, click Exit to return to the Add Printer Wizard.
3 Click Start Æ Settings Æ Printers, and double-click Add Printer.
Note: USB support is not available for Windows 95 and Windows 98 (first edition) operating systems.
4 When prompted, select Local printer.
5 Click Have Disk.
Note: Some Windows operating systems require administrative access to install printer drivers on the
computer.
6 Specify the location of the custom printer driver on the drivers CD.
The path should be similar to the following:
D:\Drivers\Print\Win_9xMe\<language>
Where D is the letter of the CD-ROM drive.
7 Click OK.
It may take some time for the drivers to load.
8 Close the drivers CD.

Windows
13
Installing drivers for local printing
Serial printing
With serial printing, data is transferred one bit at a time. Although serial printing is usually slower than parallel printing, it is
the preferred option when there is a great deal of distance between the printer and computer, or when a parallel interface is
not available.
Note: A serial interface card is required and can be purchased separately.
Before you can print, you must establish communication between the printer and computer. To do this:
1 Set serial parameters in the printer.
2 Install a printer driver on the attached computer.
3 Match the serial settings in the COM port.
Setting parameters in the printer
1 Press on the operator panel.
2 Press until Reports appears, and then press .
Note: For information about serial menus and messages, see the publications CD that shipped with the
printer.
3 Press until Menu Settings Page appears, and then press .
The printer returns to Ready.
4 Press .
5 Press until Network/Ports appears, and then press .
6 Press until Serial or Serial Option X appears, and then press .
(x) is the number of the serial port.
7 Press until <Parameter> appears (where <Parameter> is the parameter required for a change), and then
press .
8 Press until <Setting> appears (where <Setting> is the setting required for a change), and
then press .
Note the following restrictions:
• Maximum baud rate supported is 115,200.
• Data Bits must be set to 7 or 8.
• Parity must be set to Even, Odd, or None.
• Stop Bits must be set to 2.
• Flow Control recommended protocol setting is Xon/Xoff.
9 Press .
The printer returns to Serial or Serial x.
10 Print a Menu Settings page, and verify the serial parameters are correct.
Note: Keep this page for later use.
a Press on the operator panel.
b Press until Reports appears, and then press .
c Press until Menu Settings Page appears, and then press .

Windows
14
Installing drivers for local printing
d Look under the Standard Serial (or Serial Option X if a serial interface card is installed) heading to find the
serial parameters.
Installing a printer driver
A printer driver must be installed on the computer that is connected to the printer.
Note: Windows 95 and Windows 98 (first edition) users should follow the installation directions in Using
Windows 95 and Windows 98 (first edition).
1 Insert the drivers CD. It should launch automatically. If the CD does not launch automatically, click Start Æ Run,
and type the following in the Run dialog:
D:\Setup.exe
Where D is the letter of the CD-ROM drive.
2 Click Install Printer and Software.
3 Click Agree to accept the Printer Software License Agreement.
4 Select Custom, and click Next.
5 Select Components, and click Next.
6 Select Local, and click Next.
7 Select the printer from the list, and click Add Printer.
8 Expand the printer item listed below Selected Components.
9 Click PORT: <LPT1>, and select the desired communications port (COM1 or COM2).
10 Click Finish to complete the printer software installation.
Setting parameters in the communications (COM) port
After the printer driver is installed, set the serial parameters in the communications port assigned to the printer driver.
The serial parameters in the communications port must exactly match the serial parameters set in the printer.
1 Click Start Æ Settings Æ Control Panel, and double-click System.
2 On the Device Manager tab, click + to expand the list of available ports.
3 Select the communications port assigned to the printer (COM1 or COM2).
4 Click Properties.
5 On the Port Settings tab, set the serial parameters to the exact same serial parameters in the printer.
Look for the printer settings under the Serial Standard (or Serial Option X) heading on the previously printed Menu
Settings page.
6 Click OK, and close all the windows.
7 Print a test page to verify printer installation.
a Click Start
Æ Settings Æ Printers.
b Select the newly added printer.
c Click File
Æ Properties.
d Click Print Test Page. When a test page prints successfully, printer setup is complete.
Note: Your operating system may require different setup procedures. If the test page does not print, see
your operating system Help.

Macintosh
15
Installing drivers for local printing
Macintosh
Mac OS 9.x or later is required for USB printing. To print locally to a USB-attached printer, create a desktop printer icon
(Mac OS 9) or create a queue in Print Center / Printer Setup Utility (Mac OS X).
Creating a queue in Print Center / Printer Setup Utility (Mac OS X)
1 Install a PostScript Printer Description (PPD) file on the computer.
a Insert the drivers CD.
b Double-click the installer package for the printer.
Note: A PPD file provides detailed information about the capabilities of a printer to the Macintosh computer.
c Click Continue on the Welcome screen and again after viewing the Readme file.
d Click Continue after viewing the license agreement, and click Agree to accept the terms of the agreement.
e Select a Destination, and click Continue.
f On the Easy Install screen, click Install.
g Enter the password, and click OK. All the necessary software is installed on the computer.
h Click Close when installation is complete.
2 Open Finder, click Applications, and click Utilities.
3 Double-click Print Center or Printer Setup Utility.
4 Do one of the following:
• If the USB-attached printer appears in the Printer List, quit Print Center or Printer Setup Utility. A queue has
been created for the printer.
• If the USB-attached printer does not appear in the Printer List, make sure the USB cable is properly
connected and the printer is turned on. After the printer appears in the Printer List, quit Print Center or Printer
Setup Utility.
Creating a desktop printer icon (Mac OS 9.x)
1 Install a PostScript Printer Description (PPD) file on the computer.
a Insert the drivers CD.
b Double-click Classic, and double-click the installer package for the printer.
Note: A PPD file provides detailed information about the capabilities of a printer to the Macintosh computer.
c Choose the appropriate language, and click Continue.
d Click Continue after viewing the Readme file.
e Click Continue after viewing the license agreement, and click Agree to accept the terms of the agreement.
f On the Installation Type screen, click Install. All the necessary files are installed on the computer.
g Click Close when installation is complete.
2 Do one of the following:
• Mac OS 9.0: Open Apple LaserWriter.
• Mac OS 9.1—9.x: Open Applications, and click Utilities.
3 Double-click Desktop Printer Utility.

UNIX/Linux
16
Installing drivers for local printing
4 Select Printer (USB), and click OK.
5 In the USB Printer Selection section, click Change.
If the printer does not appear in the USB Printer Selection list, make sure the USB cable is properly connected,
and the printer is turned on.
6 Select the name of the printer, and click OK. The printer appears in the original Printer (USB) window.
7 In the PostScript Printer Description (PPD) File section, click Auto Setup. Make sure the printer PPD matches the
printer.
8 Click Create, and click Save.
9 Specify a printer name, and click Save. The printer is now saved as a desktop printer.
UNIX/Linux
Local printing is supported on many UNIX and Linux platforms, such as Sun Solaris and Red Hat.
If the drivers CD does not contain any UNIX/Linux printer driver packages, contact the place where you bought the printer
to see if the printer is supported.
Some printer driver packages are available on the drivers CD. The UNIX/Linux User’s Guide in each package gives
detailed instructions for installing and using printers in UNIX and Linux environments.
All the printer driver packages support local printing using a parallel connection. The driver package for Sun Solaris
supports USB connections to Sun Ray appliances and Sun workstations.

Installing drivers for network printing
17
3
Installing drivers for network printing
Printing a network setup page
If the printer is attached to a network, print a network setup page on the printer to verify the network connection. This page
also provides important information to configure the printer for network printing.
1 Make sure the printer is on.
2 Press on the operator panel.
3 Press until Reports appears, and then press .
4 Press until Network Setup Page appears, and then press .
Note: If an optional print server is installed, Print Net1 Setup appears on the display.
5 Check the first section on the network setup page, and confirm that Status is “Connected.”
If Status is “Not Connected,” the LAN drop may not be active, or the network cable may be malfunctioning.
Consult a system support person for a solution, and print another network setup page to verify the printer is
connected to the network.
Assigning a printer IP address
If the network is using DHCP, an IP address is automatically assigned connecting the network cable to the printer.
1 Look for the address under the “TCP/IP” heading on the network setup page printed in Printing a network setup
page.
2 Go to Verifying the IP settings, and begin with step 2.
If the network is not using DHCP, then manually assign an IP address to the printer. One of the easiest ways is to use the
operator panel:
1 Press on the operator panel.
2 Press until Network/Ports appears, and then press .
3 Press until TCP/IP appears, and then press .
Standard Network appears if the printer has a network port on the printer system board. If a print server is
installed, you see Network Option 1.
4 Press until Address appears, and then press .
5 Using the numeric pad, enter the IP address. When the address is entered, press .
Submitting Selection appears briefly.
6 Press until Netmask appears, and then press .
7 Using the numeric pad, enter the IP netmask. When the address is entered, press .
Submitting Selection appears briefly.
8 Press until Gateway appears, and then press .

Verifying the IP settings
18
Installing drivers for network printing
9 Using the numeric pad, enter the IP gateway. When the address is entered, press .
Submitting Selection appears briefly.
10 Press until the printer returns to Ready.
Verifying the IP settings
1 Print another network setup page. Look under the “TCP/IP” heading, and make sure the IP address, netmask, and
gateway are correct. See Printing a network setup page if you need help.
2 Ping the printer, and verify that it responds. At a command prompt on a network computer, type ping followed by
the new printer IP address (for example, 192.168.0.11).
Note: On Windows computers, click Start
Æ Programs Æ Command prompt (or Accessories Æ
Command prompt if using Windows 2000).
If the printer is active on the network, a reply is sent.
After the TCP/IP settings are assigned and verified, install the printer on each network computer.
Windows
In Windows environments, network printers can be configured for direct printing or shared printing. Both network printing
methods require the installation of a printer driver and the creation of a network printer port.
Supported printer drivers
• Custom printer driver
Custom drivers are available on the drivers CD.
Supported network printer ports
• Microsoft Standard TCP/IP port–Windows 2000, Windows XP, and Windows Server 2003
• LPR–Windows NT 4.0
• Printer network ports–Windows 98 SE/Me, Windows 2000, Windows XP, and Windows Server 2003
For basic printer functionality, install a printer driver, and use a system network printer port, such as an LPR or a Standard
TCP/IP port. The printer driver and port let you maintain a consistent user interface for use with all the printers on the
network. Using a custom network port provides enhanced functionality, such as printer status alerts.

Windows
19
Installing drivers for network printing
Follow the steps for your printing configuration and operating system to configure the network printer:
Direct printing using Windows 98 SE, Me, Windows NT 4.0, Windows 2000,
Windows XP, or Windows Server 2003
To install a custom printer driver and network port:
1 Launch the drivers CD.
2 Click Install Printer and Software.
3 Click Agree to accept the license agreement.
4 Select Suggested, and click Next.
5 Select Network Attach, and click Next.
6 Select the printer model from the list, and click Next.
7 Select the printer port from the list, and click Finish to complete the installation.
If the printer port is not listed:
a Click Add Port.
b Select Enhanced TCP/IP Network Port, and enter the information to create the port.
c Enter a port name.
This can be any name to associate with the printer, such as Monochrome1-lab4. After the port is created, this
name appears in the list of available ports.
d Enter the IP address in the text box.
Note: If the IP address is unknown, print a network setup page, and look under the TCP/IP heading. For
help, see Printing a network setup page and Verifying the IP settings.
8 Print a test page to verify printer installation.
Printing configuration Operating system Go to page
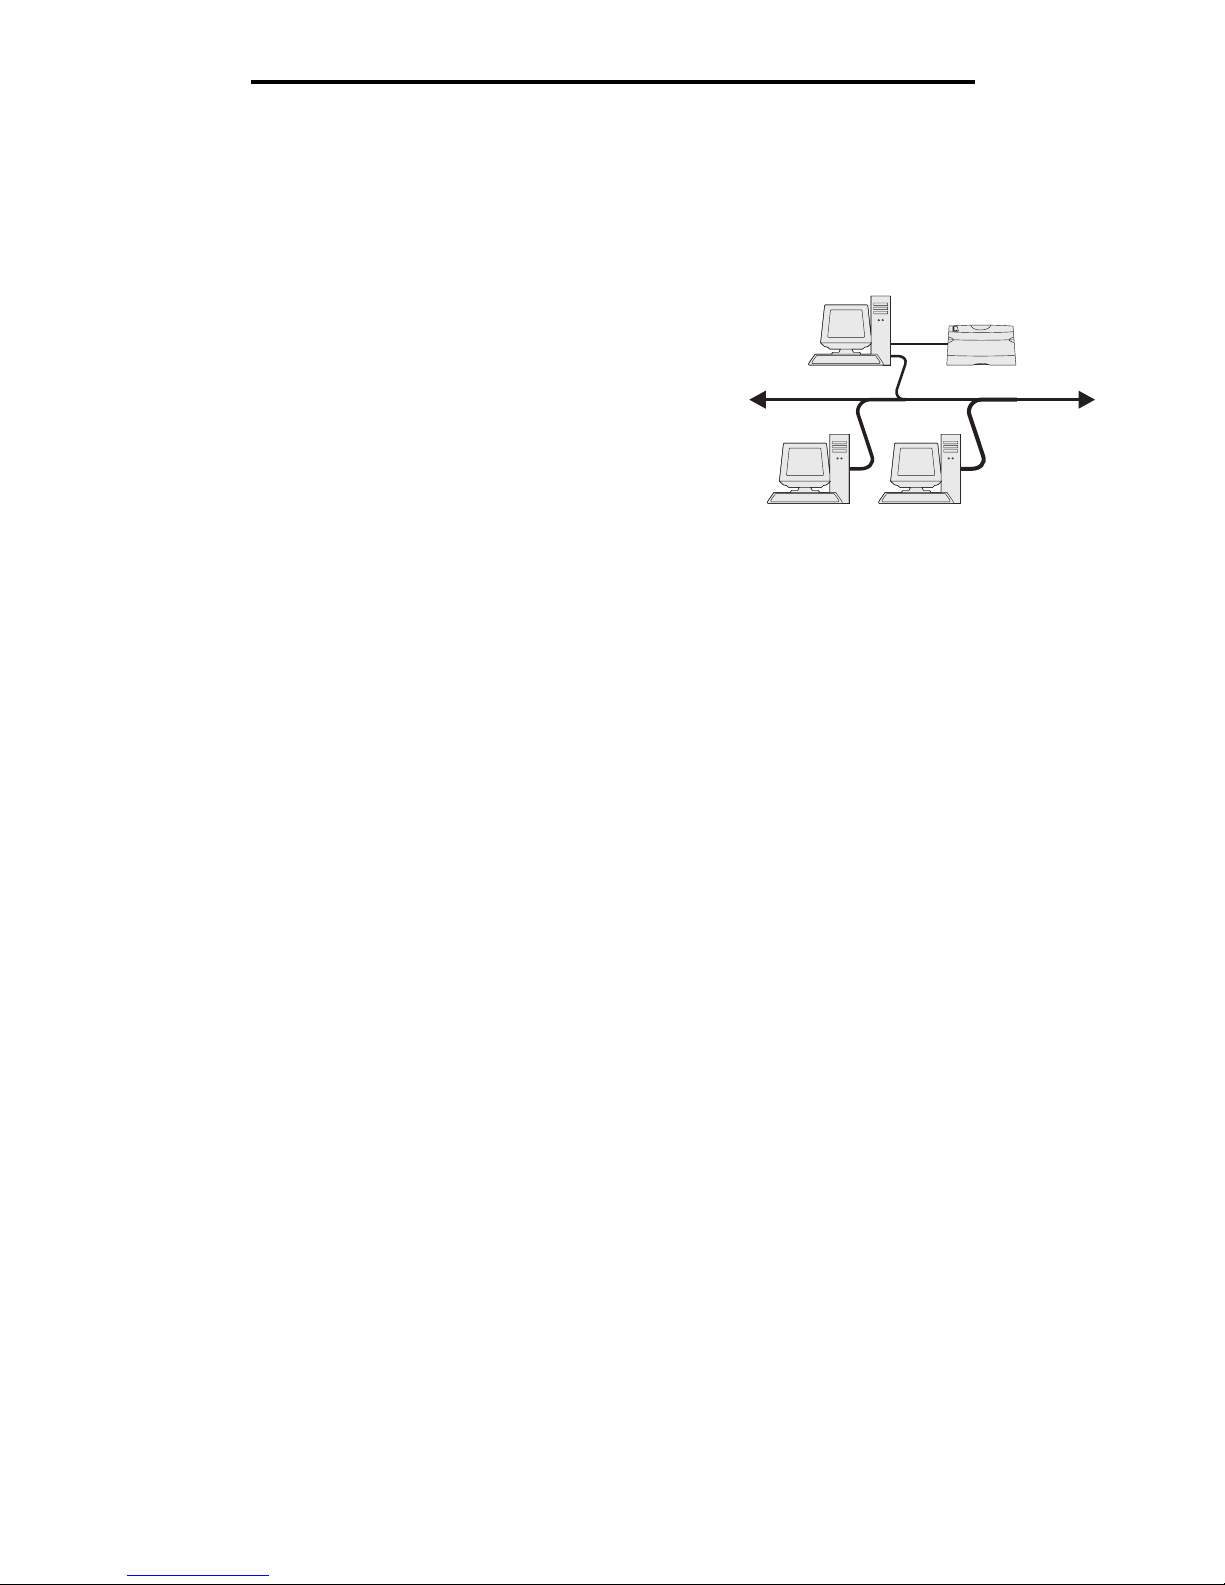
Direct
• Printer is connected directly to the network using a network cable,
such as Ethernet.
• Printer drivers are typically installed on each network computer.
Windows 98 SE,
Windows NT 4.0,
Windows Me, Windows 2000,
Windows XP, or
Windows Server 2003
19
Shared
• Printer is connected to one of the computers on the network using a
local cable, such as USB.
• Printer drivers are installed on the computer attached to the printer.
• During driver installation, the printer is set up to be “shared” so that
other network computers can print to it.
Windows NT 4.0,
Windows 2000, Windows XP,
or Windows Server 2003
20
Printer
Clients
Windows
20
Installing drivers for network printing
Shared printing using Windows NT 4.0, Windows 2000, Windows XP, or
Windows Server 2003
Note: Install the printer software before connecting the USB, parallel, or serial cable.
After connecting the printer to a Windows NT 4.0, Windows 2000,
Windows XP, or Windows Server 2003 computer (which will act as a server),
follow these steps to configure the network printer for shared printing:
1 Install a custom printer driver.
a Launch the drivers CD.
b Click Install Printer and Software.
c Click Agree to accept the license agreement.
d Select Suggested, and click Next.
The Suggested option is the default installation for local and
network-attached setup. To install utilities, change settings, or customize device drivers, select Custom, and
follow the instructions on the screen.
e Select Local Attach, and click Finish.
Follow the instructions on the screen. It may take some time for the drivers to load.
f Close the drivers CD installer application.
g Connect the USB cable, and turn on the printer.
The Plug and Play screen appears, and a printer object is created in the Printers folder of the computer. The
printer is shared in step 2: “Share the printer on the network.”
Note: USB support is not available for Windows NT operating systems. Use a parallel cable instead. The
Plug and Play screen will not appear for Windows NT.
h Print a test page to verify printer installation.
2 Share the printer on the network.
a Click Start Æ Settings Æ Printers.
b Select the newly added printer.
c Click File
Æ Sharing.
d Select the Shared as check box, and enter a name in the text box.
e In the Alternate Drivers section, select the operating systems of all the network clients that will print to the
printer.
f Click OK.
Note: If files are missing, prompts may appear to request the server operating system CD.
g Check the following to make sure the printer was successfully shared.
• The printer object in the Printers folder now has a shared indicator. For example, in Windows NT 4.0, a
hand appears under the printer object.
• Browse Network Neighborhood. Find the host name of the server, and look for the shared name
assigned to the printer.
Server
Clients
Printer

Windows
21
Installing drivers for network printing
Install the printer driver (or subset) on network clients
Using the point and print method
Note: This method is usually the best use of system resources. The server handles driver modifications and
the print job processing. This lets network clients return to applications much faster.
With this method, a subset of driver information is copied from the server to the client computer. This is just enough
information to send a print job to the printer.
1 Double-click Network Neighborhood on the Windows desktop of the client computer.
2 Locate the host name of the server computer, and double-click the host name.
3 Right-click the shared printer name, and click Install.
Wait a few minutes for the driver information to be copied from the server computer to the client computer and for
a new printer object to be added to the Printers folder. The time this takes varies based on network traffic and
other factors.
4 Close Network Neighborhood.
5 Print a test page to verify printer installation.
Using the peer-to-peer method
With this method, the printer driver is fully installed on each client computer. Network clients retain control of driver
modifications. The client computer handles the print job processing.
1 Click Start Æ Settings Æ Printers.
2 Click Add Printer to launch the Add Printer wizard.
3 Click Next.
4 Click Network Printer, and click Next.
5 Enter the printer name or URL (if on the Internet or an intranet), and click Next.
If the printer name or URL is unknown, leave the text box blank, and click Next.
6 Select the network printer from the Shared printers list. If the printer is not listed, enter the path of the printer in the
text box.
The path looks similar to the following:
\\<server host name>\<shared printer name>
Note: If this is a new printer, prompts may occur to install a printer driver. If no system driver is available,
provide a path to available drivers.
The server host name is the name of the server computer that identifies it to the network. The shared printer name
is the name assigned during the server installation process.
7 Click OK.
8 Select whether this printer will be the default printer for the client, and click Finish.
9 Print a test page to verify printer installation.
Note: Your operating system may require different setup procedures. If the test page does not print, see
your operating system Help.

Macintosh
22
Installing drivers for network printing
Configuring Drag‘N’Print
Note: Drag’N’Print™ support is not available for all printers.
For detailed configuration instructions, launch the drivers CD, click View Documentation, and click Software and utilities.
Macintosh
Note: A PostScript Printer Description (PPD) file provides detailed information about the capabilities of a
printer to UNIX or Macintosh computers.
To print to a network printer, each Macintosh user must install a custom PostScript Printer Description (PPD) file, and either
create a desktop printer on the computer (Mac OS 9.x) or create a print queue in Print Center (Mac OS X).
Mac OS X
Step 1: Install a custom PPD file
1 Install a PostScript Printer Description (PPD) file on the computer.
a Insert the drivers CD.
b Double-click the installer package for the printer.
Note: A PPD file provides detailed information about the capabilities of a printer to the Macintosh computer.
c Click Continue on the Welcome screen and again after viewing the Readme file.
d Click Continue after viewing the license agreement, and click Agree to accept the terms of the agreement.
e Select a Destination, and click Continue.
f On the Easy Install screen, click Install.
g Enter the password, and click OK. All the necessary software is installed on the computer.
h Click Close when installation is complete.
Step 2: Create a print queue in Print Center or Printer Setup Utility
Using AppleTalk Printing
Follow these steps to create a print queue using AppleTalk Printing.
1 Open Finder, click Applications, and click Utilities.
2 Double-click Print Center or Printer Setup Utility.
3 Choose Add Printer from the “Printers” menu.
4 Choose AppleTalk from the pop-up menu.
Note: Look on the network setup page under the “AppleTalk” heading to know which zone or printer to
select.
5 Select the AppleTalk zone from the list.
6 Select the new printer from the list, and click Add.

Macintosh
23
Installing drivers for network printing
7 Verify printer installation:
a Open Finder, click Applications, and click TextEd it.
b Choose Print from the “File” menu.
c Choose Summary from the “Copies & Pages” pop-up menu.
Note: To know which zone or printer to select, look on the Network Setup page under the “AppleTalk”
heading to find the default name of the printer.
• If the PPD file displayed in the Summary window is correct for the printer, then printer setup is complete.
• If the PPD file displayed in the Summary window is not correct for the printer, delete the printer from the
printer list in Print Center or Printer Setup Utility, and repeat Step 1: Install a custom PPD file.
Using IP Printing
Follow these steps to create a print queue using IP Printing. To create an AppleTalk print queue, see Step 2: Create a print
queue in Print Center or Printer Setup Utility.
1 Open Finder, click Applications, and click Utilities.
2 Double-click Print Center or Printer Setup Utility.
3 Choose Add Printer from the “Printers” menu.
4 Choose IP Printing from the pop-up menu.
5 Enter the IP address or the printer DNS name in the Printer Address box.
6 Choose the printer manufacturer from the “Printer Model” pop-up menu.
7 Select the new printer from the list, and click Add.
8 Verify printer installation:
a Open Finder, click Applications, and click Text Edit.
b Choose Print from the “File” menu.
c Choose Summary from the “Copies & Pages” pop-up menu.
d Do one of the following:
• If the PPD file displayed in the Summary window is correct for the printer, then printer setup is complete.
• If the PPD file displayed in the Summary window is not correct for the printer, delete the printer from the
printer list in Print Center or Printer Setup Utility, and repeat Step 1: Install a custom PPD file.
Mac OS 9.x
Step 1: Install a custom PPD file
1 Insert the drivers CD.
a Double-click Classic, and double-click the installer package for the printer.
Note: A PPD file provides detailed information about the capabilities of a printer to the Macintosh computer.
b Choose the appropriate language, and click Continue.
c Click Continue after viewing the Readme file.
d Click Continue after viewing the license agreement, and click Agree to accept the terms of the agreement.
e On the Easy Install screen, click Install. All the necessary files are installed on the computer.
f Click Close when installation is complete.

UNIX/Linux
24
Installing drivers for network printing
Step 2: Create a desktop printer
1 In the Chooser, select the LaserWriter 8 driver.
2 For a routed network, select the default zone from the list. If you don’t know which zone to select, look on the
Network Setup page under AppleTalk for Zone.
3 Select the new printer from the list.
4 To know which printer to select, look on the Network Setup page under the “AppleTalk” heading to find the default
name of the printer.
5 Click Create.
6 Make sure there is an icon next to the printer name in the Chooser.
7 Close the Chooser window.
8 Verify printer installation.
a Click the newly created desktop printer icon.
b Choose Printing
Æ Change Setup.
— If the PPD file displayed in the PostScript Printer Description (PPD) file portion of the menu is correct for the
printer, printer setup is complete.
— If the PPD file displayed in the PostScript Printer Description (PPD) file portion of the menu is not correct for
the printer, repeat Step 1: Install a custom PPD file.
UNIX/Linux
The printer supports both UNIX and Linux network environments.
For the latest information about installing a network printer in a UNIX or Linux environment, launch the drivers CD, and click
View Documentation.
NetWare
The printer supports Novell Distributed Print Services (NDPS/iPrint). For the latest information about installing a network
printer in a NetWare environment, launch the drivers CD, and click View Documentation.

Installing and removing options
25
4
Installing and removing options
Installing input options
Order of installation
Floor-mounted configurations require additional furniture. You must use either a printer stand or printer base if you are
using a 2000-sheet drawer, a duplex unit and an input option, or more than one input option. If you purchased an MFP that
scans, copies, and faxes, you may need additional furniture. Install the printer and any options you have purchased in the
following order:
CAUTION: If you are installing options after setting up the printer, turn the printer off and unplug the power cord
before continuing.
• Printer stand or printer base
• 2000-sheet drawer
• 250-sheet or 500-sheet drawer
• Duplex unit
• Printer
CAUTION: The printer requires two people to lift it safely.
For information on installing a printer stand, printer base, or 2000-sheet drawer, see the instructions included with the
option.
Installing input options
26
Installing and removing options
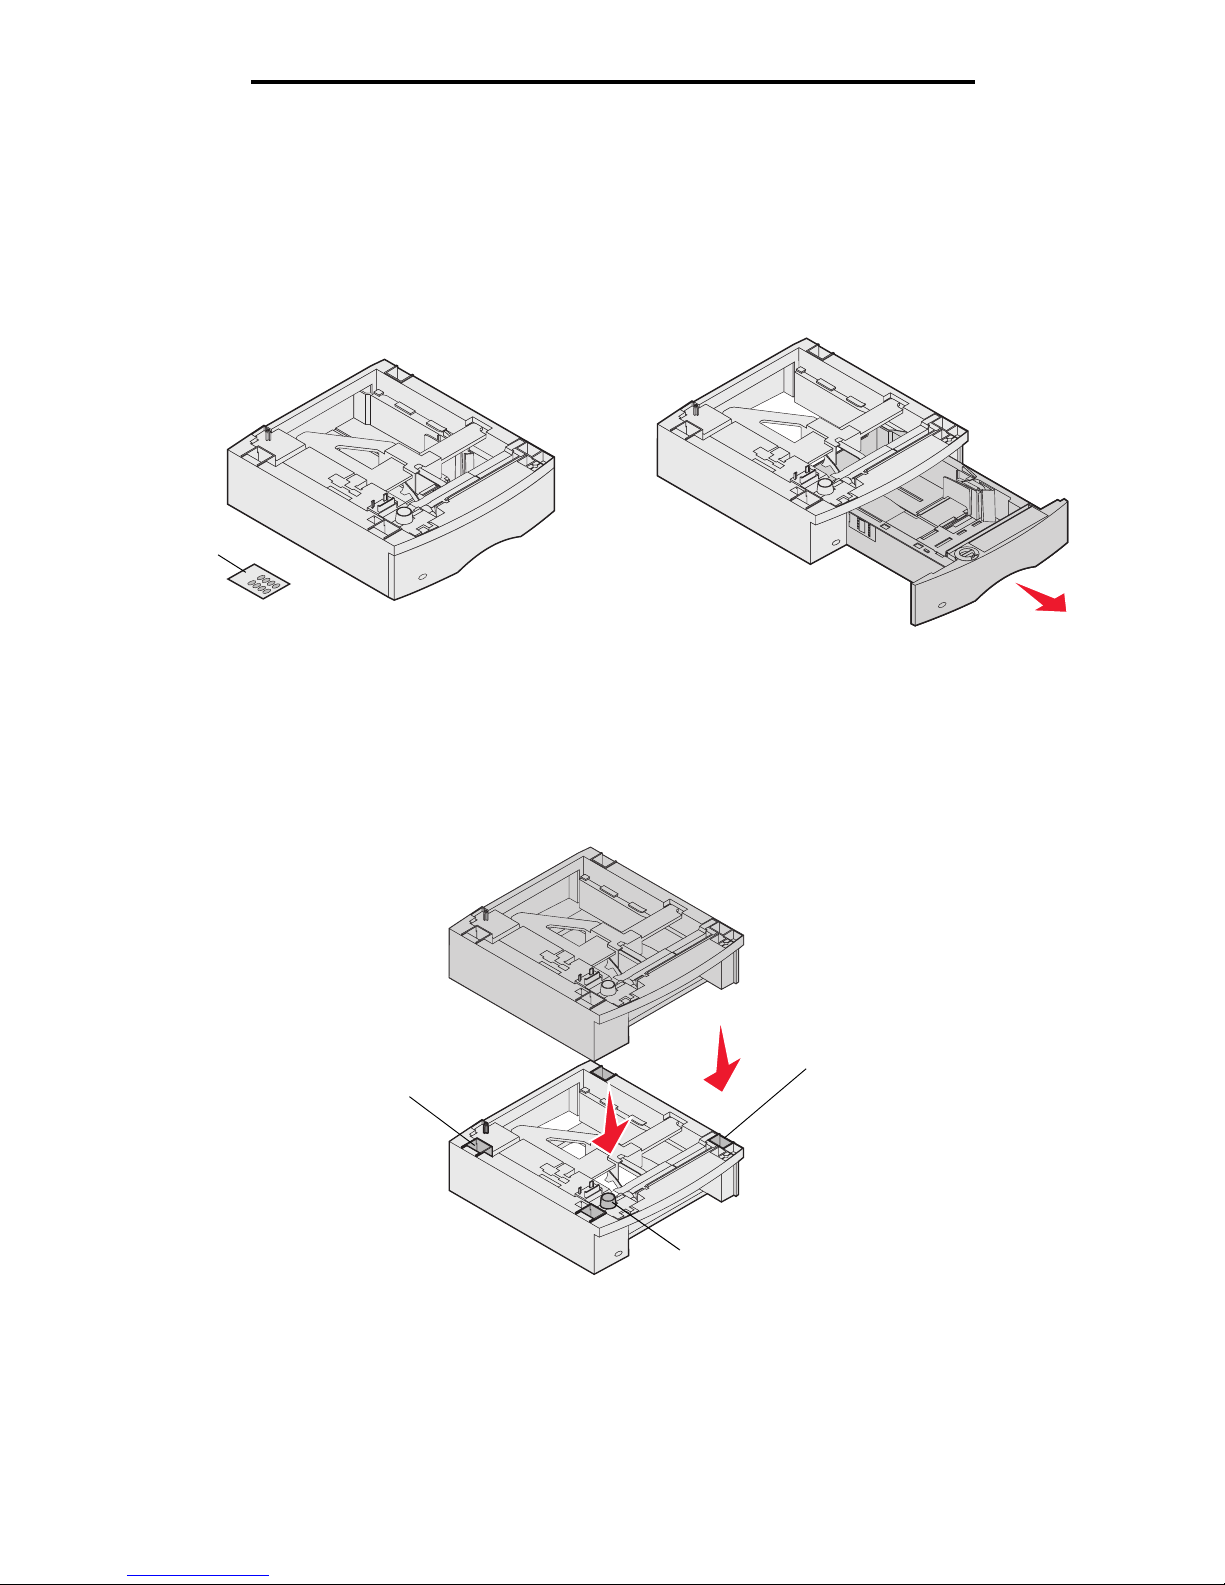
Installing a 250-sheet or 500-sheet drawer
Optional drawers attach under the printer and optional duplex unit. The printer automatically recognizes any drawer that is
installed.
A drawer consists of a tray and a support unit. The 250-sheet drawer and the 500-sheet drawer are installed the same way.
1 Remove the tray from the support unit. Remove all packing material and tape from both the support unit and the
tray.
2 Place the support unit on top of any previously installed drawers, or the table or printer cabinet where you plan to
use the printer.
The tab, round peg, and square holes on top of any drawer help you position the support unit so the edges are
aligned properly. Make sure the support unit is securely in place.
3 Attach another optional drawer, a duplex unit, or the printer.
You can attach a label to the trays to indicate the tray number.
Decals
Square hole
Round peg
Ta b
Installing a duplex unit
27
Installing and removing options
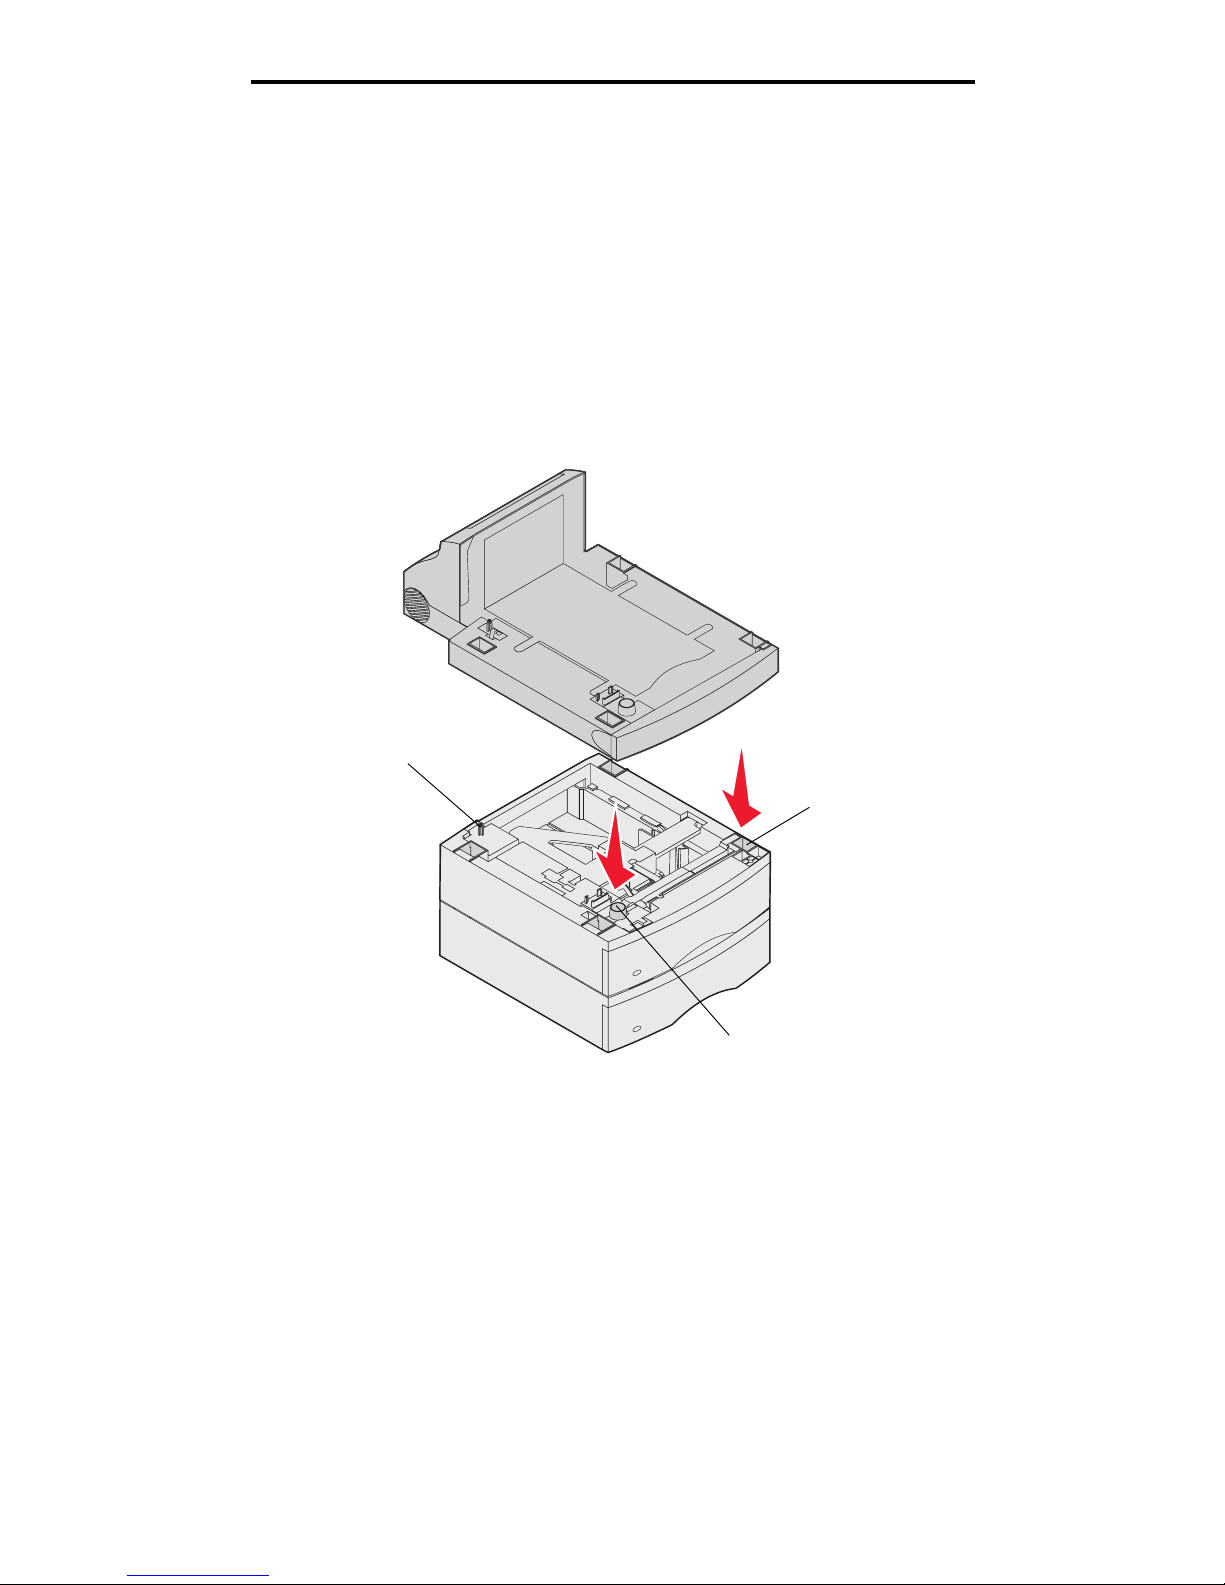
Installing a duplex unit
The duplex unit attaches under the printer, below the standard tray and above any drawers.
Note: Two optional duplex units are available. The 250-sheet duplex unit only works with printers that have
a 250-sheet standard tray, and the 500-sheet duplex unit only works with printers that have a 500sheet standard tray. Make sure you have the appropriate duplex unit for the tray size installed in the
printer.
1 Place the duplex unit on top of any installed drawers or the table or printer cabinet where you plan to use the
printer.
The tab, round peg, and square holes on top of any drawer help you position the duplex unit so the edges are
aligned properly. Make sure it is securely in place.
Square hole
Round peg
Ta b
Installing memory or option cards
28
Installing and removing options
Installing memory or option cards
CAUTION: If you are installing memory or option cards sometime after setting up the printer, turn the printer off
and unplug the power cord before continuing.
You can customize the printer memory capacity and connectivity by adding optional cards. The instructions in this section
help you install any of the following options:
• Memory cards
— Printer memory
— Flash memory
• Firmware cards
— Bar Code
— IPDS and SCS/TNe
— PrintCryption™
• Other options
— Printer hard disk
— RS-232 serial interface card
— Parallel 1284-C interface card
— Internal print servers (also called internal network adapters or INAs)
Accessing the printer system board
You must access the printer system board to install printer memory, flash memory, a firmware card, or an option card.
Note: Use a Phillips screwdriver to remove the system board access cover.
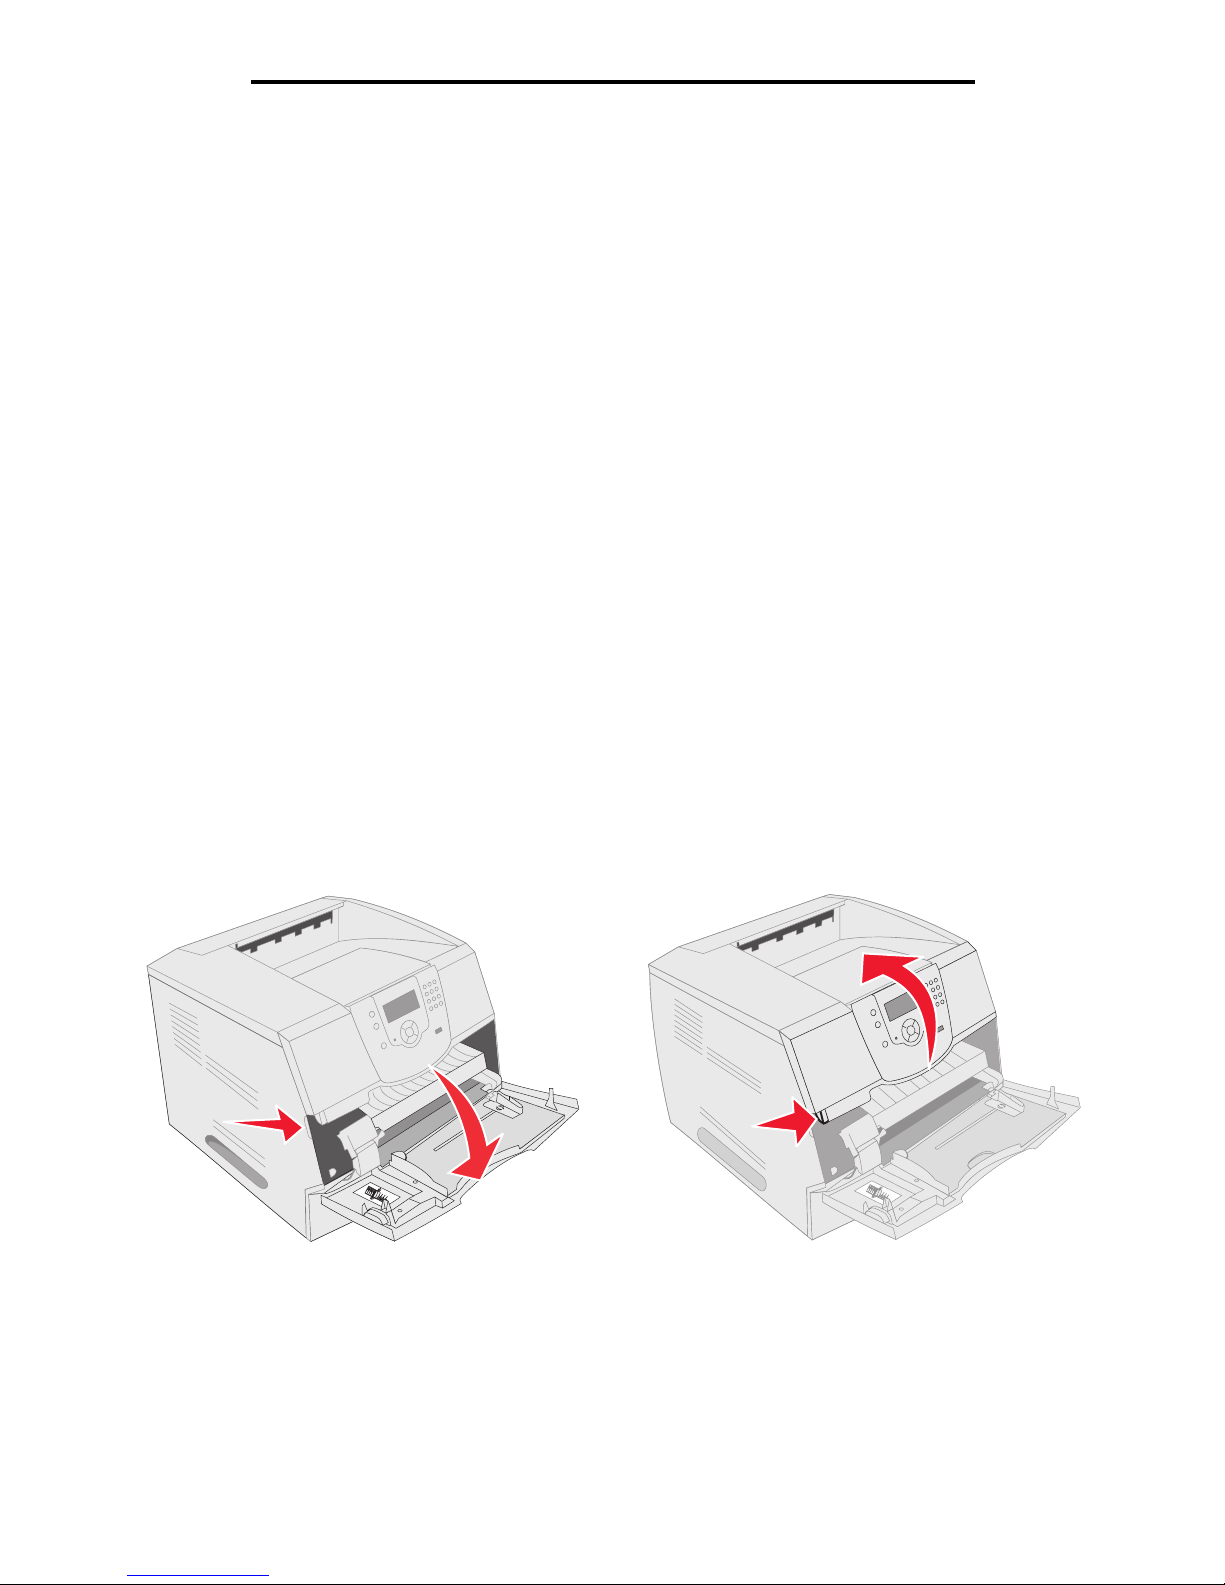
1 Push the release latch, and lower the multipurpose feeder.
2 Push the release latch, and open the top front cover.

Accessing the printer system board
29
Installing and removing options
3 Press both side door latches, and open the side door.
4 Loosen, but do not remove, the six screws on the shield.
5 Slide the shield to the right, and then remove it.
Installing or removing a memory card
30
Installing and removing options
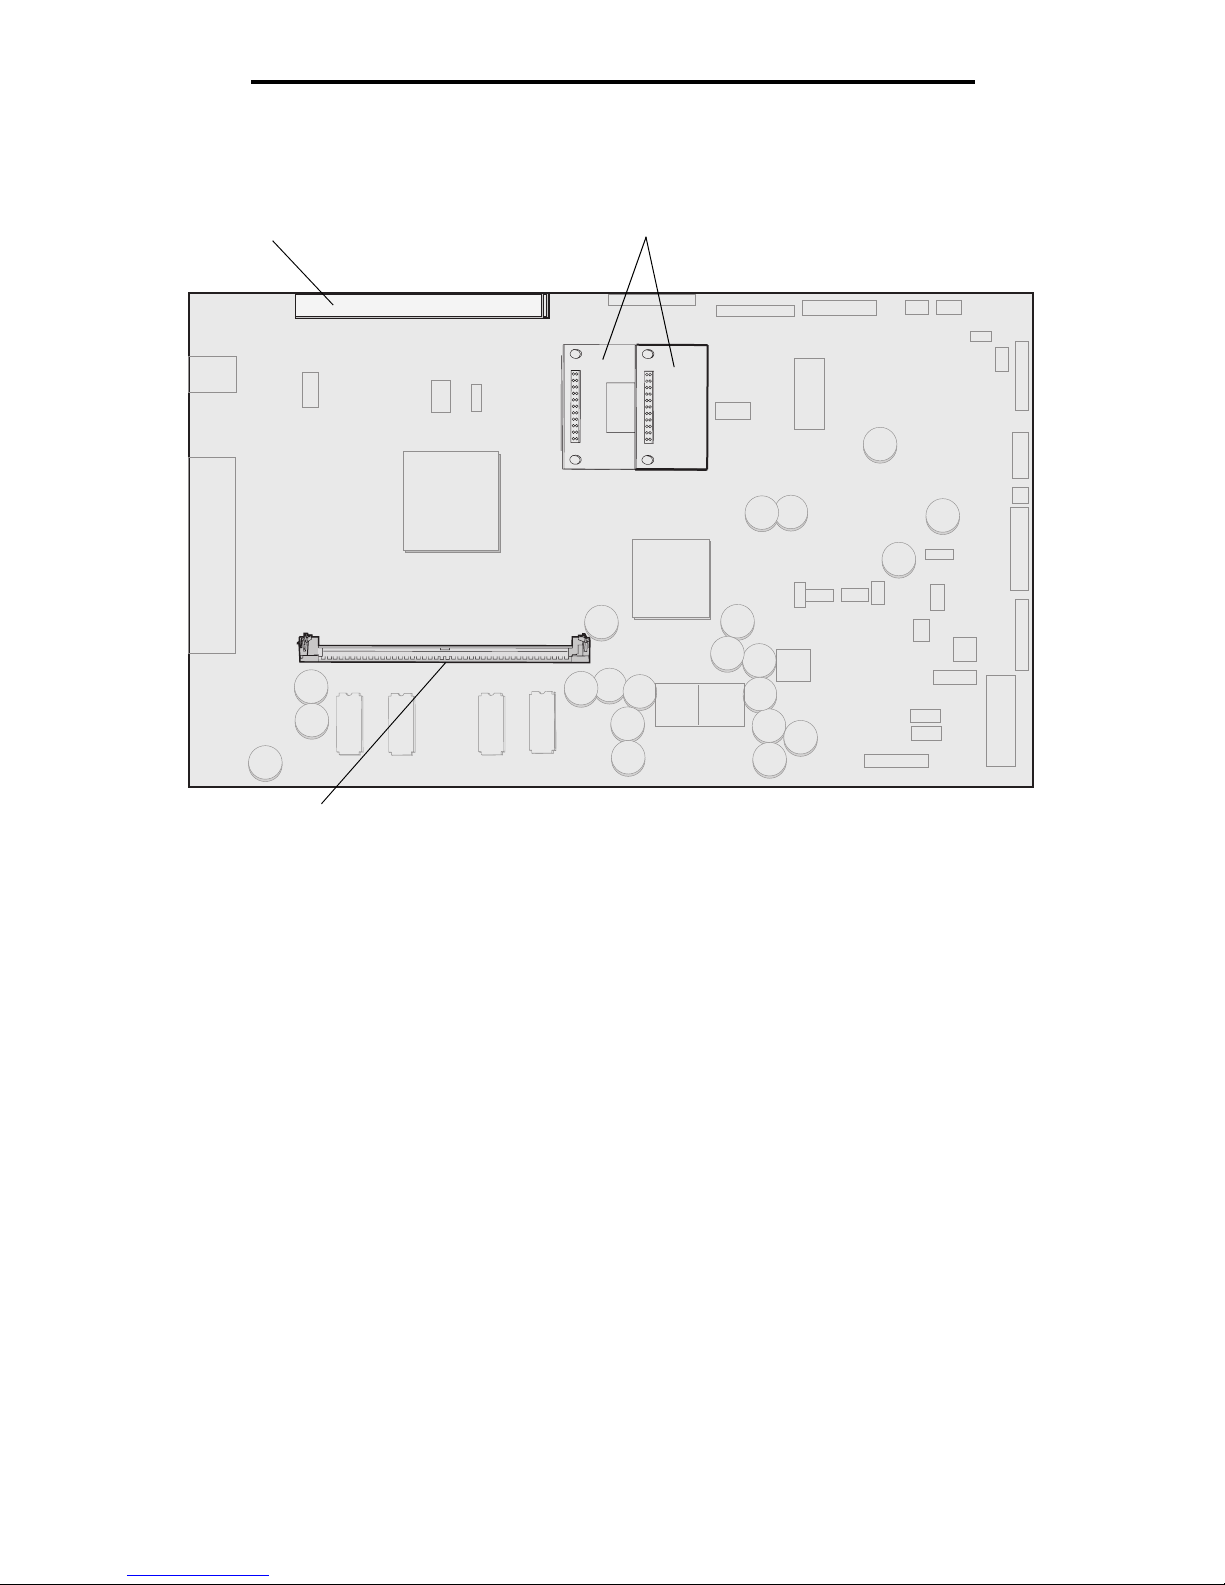
6 Set the shield aside.
Use the illustration to locate the connector for the card you want to install.
Installing or removing a memory card
Installation
Note: Printer memory cards designed for other printers may not work with the printer.
1 Remove the system board access cover. (See Accessing the printer system board.)
Warning: Printer memory cards are easily damaged by static electricity. Touch something metal such as the
printer frame before you touch a memory card.
2 Push open the latches on both ends of the memory card connector.
3 Unpack the memory card.
Avoid touching the connection points along the edge of the card. Save the packaging.
4 Align the notches on the bottom of the card with the notches on the connector.
5 Push the memory card firmly into the connector until the latches on either end of the connector snap into place.
It may require some force to fully seat the card.
Option card connector
Memory card connector
Flash and firmware card connectors
 Loading...