

Page 1
User Guide
Getting Started
Selected Version
Copy
Fax
Print
Scan
Document Server
Web Image Monitor
Adding Paper and Toner
Troubleshooting
Specifications for The Machine
Legal and Contact Information
For information not found in this manuals,
see the online manuals available on our
web site (https://www.ricoh.com/) or via the
control panel.
For safe and correct use, be sure to read Safety Information before
using the machine.
Page 2

Page 3

How to Read the Manuals
Symbols Used in the Manuals
This manual uses the following symbols:
Indicates points to pay attention to when using the machine, and explanations of likely causes of paper
misfeeds, damage to originals, or loss of data. Be sure to read these explanations.
Indicates supplementary explanations of the machine's functions, and instructions on resolving user
errors.
[ ]
Indicates the names of keys on the machine's display or control panels.
1
Page 4

TABLE OF CONTENTS
How to Read the Manuals.................................................................................................................................1
Symbols Used in the Manuals.......................................................................................................................1
1. Getting Started
Turning On and Off the Power........................................................................................................................11
Turning On the Main Power........................................................................................................................11
Turning Off the Main Power........................................................................................................................12
Energy Saving Mode...................................................................................................................................12
Guide to Names and Functions of Components............................................................................................14
Front and Left View...................................................................................................................................... 14
Front and Right View....................................................................................................................................16
Rear and Left View (mainly Europe) (mainly North America)..........................17
Rear and Left View (mainly Asia)........................................................................................... 18
Names and Functions of the Control Panel....................................................................................................20
Touch Panel/Interface.................................................................................................................................20
LED Indicators...............................................................................................................................................21
Changing the Display Language.................................................................................................................... 23
Confirming the Functions that Are Added in RICOH Always Current Technology.....................................24
Confirming the Version of RICOH Always Current Technology Implemented on the Machine............24
List of New Functions................................................................................................................................... 24
How to Use the Home Screen.........................................................................................................................27
Intuitive Screen Operation Using Fingertips.............................................................................................. 29
How to Use the Copy Screen..........................................................................................................................32
How to Use the Copy Screen (Standard)..................................................................................................32
How to Use the Copy Screen (No Scrolling Screen)............................................................................... 34
Changing the Layout or Display of the Keys of the Copy Function......................................................... 35
How to Use the Fax Screen.............................................................................................................................37
Customizing the [Send Settings] Screen.................................................................................................... 37
How to Use the Scanner Screen..................................................................................................................... 40
Customizing the [Send Settings] Screen.................................................................................................... 40
Adding a Frequently Used Application or Widget to the Home Screen.....................................................43
Adding an Icon/Widget to the Home Screen.......................................................................................... 44
Creating a Folder to Organize Icons......................................................................................................... 44
Registering Frequently Used Settings as a Program......................................................................................46
2
Page 5

Registering Settings as a Program.............................................................................................................. 47
Changing the Contents of the Program......................................................................................................48
Logging In from the Control Panel.................................................................................................................. 51
Logging In by Entering the User Name and Password.............................................................................52
Logging In Using an IC Card......................................................................................................................53
Logging In Using a Mobile Device.............................................................................................................54
Authenticating Using the User Code.......................................................................................................... 55
Changing the Login Password.................................................................................................................... 55
Placing an Original on the Exposure Glass................................................................................................... 58
Placing an Original in the Auto Document Feeder (ADF).............................................................................60
Placing Originals in the ARDF.....................................................................................................................61
Placing Originals in the One-pass Duplex Scanning ADF....................................................................... 63
2. Copy
Basic Procedure for Copying Documents...................................................................................................... 67
Reserving a Copy Job While Executing Another Copy Job.....................................................................68
Making Enlarged or Reduced Copies............................................................................................................70
Specifying a Copy Ratio or Size................................................................................................................ 70
Enlarging or Reducing According to the Paper Size................................................................................ 72
Reducing Slightly to Increase the Margins................................................................................................ 74
Duplex Copying............................................................................................................................................... 76
Combining and Copying a Multi-page Original onto a Single Sheet of Paper.........................................79
Copying Onto Envelopes................................................................................................................................ 82
Copying Onto Envelopes in the Bypass Tray............................................................................................ 82
Copying Onto Envelopes in the Paper Tray.............................................................................................. 83
Copying in Page Order or for Each Page Number...................................................................................... 85
3. Fax
Basic Procedure for Transmitting Faxes..........................................................................................................89
Registering Fax Numbers in the Address Book..............................................................................................92
Registering a Fax Number and Send Conditions......................................................................................92
Changing/Deleting the Registered Data Such as Fax Number.............................................................. 94
Displaying a Preview before Sending a Fax..................................................................................................95
Viewing the Transmission Result of Sent Faxes.............................................................................................. 97
Confirming the Information on the Fax Screen..........................................................................................97
3
Page 6

Checking the Result in Communication Result Report............................................................................... 98
Checking the Result in Immediate TX Result Report...................................................................................99
Checking the Result in Communication Failure Report............................................................................. 99
Checking the Result in Error Report............................................................................................................ 99
Viewing Memory Storage Report...............................................................................................................99
Checking by E-mail................................................................................................................................... 100
Confirming the Information in Web Image Monitor...............................................................................101
4. Print
Installing the Printer Driver by Using Device Software Manager Installer................................................ 103
Installing Device Software Manager from the CD-ROM.......................................................................103
Installing Device Software Manager from the Downloaded File..........................................................105
Installing the Printer Driver for Network Connection (Windows)...............................................................109
Installing the PCL 6 Printer Driver from the CD-ROM.............................................................................109
Installing the PostScript 3 Printer Driver from the CD-ROM...................................................................112
Installing the PCL 6/PostScript 3 Printer Driver from the Downloaded File..........................................114
If the Machine Cannot Be Found............................................................................................................. 115
Installing the Printer Driver for Network Connection (OS X/macOS)...................................................... 119
Installing the PPD file................................................................................................................................. 119
Registering the Machine in [Print & Scan] or [Printers & Scanners]...................................................... 120
Specifying the Option Settings................................................................................................................. 123
Basic Procedure for Printing Documents...................................................................................................... 125
Printing a Document in Windows.............................................................................................................125
Printing a Document in OS X/macOS.....................................................................................................127
Printing on Both Sides of Paper.................................................................................................................... 130
Specifying 2-sided Print (Windows)........................................................................................................ 130
Specifying 2-sided Print (OS X/macOS)................................................................................................131
Combining and Printing Multiple Pages on a Single Sheet of Paper........................................................ 132
Specifying the Combine 2 Originals Function (Windows).................................................................... 132
Specifying the Combine 2 Originals Function (OS X/macOS)............................................................ 133
Printing on Envelopes.................................................................................................................................... 134
Printing Documents Stored in the Printer from the Control Panel............................................................... 138
Printing from a USB Flash Memory Device or SD Card Directly............................................................... 139
Printable File Formats................................................................................................................................ 139
4
Page 7

Printing from a Memory Storage Device or Scan Application.............................................................. 140
5. Scan
Scanning Documents and Sending the Scanned Data by E-mail..............................................................143
Basic Procedure for Sending an E-mail................................................................................................... 143
Registering the E-mail Destination Specified When Sending an E-mail in the Address Book.............145
Scanning Documents and Sending the Scanned Data to a Folder........................................................... 148
Printing the Check Sheet........................................................................................................................... 148
Confirming the Computer Information (Windows)................................................................................. 149
Creating a Shared Folder (Windows).....................................................................................................150
Confirming the Computer Information (OS X/macOS).........................................................................153
Creating a Shared Folder (OS X/macOS).............................................................................................153
Registering the Created Shared Folder in the Address Book................................................................ 155
Basic Procedure for Performing Send to Folder......................................................................................157
Scanning an Original with Suitable Quality and Density...........................................................................159
Specifying the File Type or File Name When Scanning a Document....................................................... 162
6. Document Server
Storing Documents in Document Server.......................................................................................................165
Printing Documents in Document Server...................................................................................................... 167
Printing a Document with the Settings Specified When Scanned..........................................................167
Changing the Print Settings to Print a Document.....................................................................................168
Specifying a Page to Print.........................................................................................................................170
7. Web Image Monitor
Using Web Image Monitor...........................................................................................................................173
What You Can Do on the Web Image Monitor..................................................................................... 174
Web Image Monitor Screen.................................................................................................................... 175
Specifying Web Image Monitor Help.....................................................................................................176
8. Adding Paper and Toner
Loading Paper into the Paper Tray...............................................................................................................179
Loading Paper into Tray 1 to 4................................................................................................................ 180
Loading Paper into the Bypass Tray........................................................................................................ 184
Loading Paper into Tray 3 (LCT).............................................................................................................. 189
Loading Paper into the Large Capacity Tray (LCT)................................................................................ 191
Specifying the Paper Size That Is Not Automatically Detected.............................................................191
5
Page 8

Recommended Paper Sizes and Types........................................................................................................194
Tray 1......................................................................................................................................................... 194
Tray 2......................................................................................................................................................... 195
Lower Paper Trays (Trays 3, 4)................................................................................................................196
Bypass Tray................................................................................................................................................198
Tray 3 (LCT)............................................................................................................................................... 200
Large Capacity Tray (LCT)........................................................................................................................201
Notes on Special Paper............................................................................................................................201
Paper Thickness for Each Paper Weight..................................................................................................202
Unusable Paper......................................................................................................................................... 202
Paper Storage............................................................................................................................................204
Saving Printouts......................................................................................................................................... 204
Thick Paper Orientation and Recommended Status................................................................................... 205
Envelope Orientation and Recommended Status....................................................................................... 206
Using the Copy Function...........................................................................................................................207
Using the Printer Function..........................................................................................................................207
Loading Orientation-fixed Paper or Two-sided Paper............................................................................... 209
Copying onto Letterhead Paper...............................................................................................................209
Printing onto Letterhead Paper Using the Printer Driver..........................................................................210
Recommended Original Size and Weight.................................................................................................. 212
Sizes Detectable with Auto Paper Select.....................................................................................................214
Replacing the Toner.......................................................................................................................................216
Precautions When Storing Toner..............................................................................................................217
Precautions When Replacing the Toner.................................................................................................. 218
Disposing Exhausted Toners.....................................................................................................................219
Replacing the Waste Toner Bottle................................................................................................................ 220
Precautions When Replacing the Waste Toner Bottle............................................................................220
Disposing the Used Waste Toner Bottle.................................................................................................. 222
9. Troubleshooting
Alert Sounds...................................................................................................................................................223
Checking the Indicators, Icons, and Messages on the Control Panel.......................................................225
When an Icon is Displayed with a Message.......................................................................................... 225
When the [Check Status] Indicator is lit or flashing................................................................................227
6
Page 9

When the Machine Cannot Be Operated...................................................................................................229
When the Machine Does Not Respond Correctly to an Operation on the Control Panel..................229
When the Machine Does Not Respond Correctly to an Operation from a Computer....................... 233
When a Message Is Displayed and the Machine Cannot Be Operated................................................. 235
When a Message Appears While Using the Copy Function.....................................................................238
When a Message Is Displayed While Using Document Server................................................................ 240
When a Message Is Displayed While Using the Fax Function..................................................................242
Messages Displayed During Operation or When Sending/Receiving a Fax Cannot Be Performed.......
.................................................................................................................................................................... 242
Messages Displayed When the Machine Cannot Connect to the Network........................................244
Messages Displayed When the Remote Fax Function Is Unavailable..................................................252
When a Message Appears While Using the Printer Function....................................................................256
Messages Displayed without Error Codes.............................................................................................. 256
Messages Displayed with Error Codes................................................................................................... 269
When a Message Is Displayed While Using the Scanner Function..........................................................271
Messages Displayed on the Control Panel............................................................................................. 271
Messages Displayed on the Computer................................................................................................... 277
When Other Messages Are Displayed........................................................................................................283
Messages Displayed When Machine Login Fails.................................................................................. 285
Messages Displayed When Logging in to the Machine Using an IC Card Fails.................................292
Messages Displayed When the LDAP Server is Unavailable................................................................292
Messages Displayed When There Is a Problem with the Certificate.................................................... 294
Messages Displayed When an Application Site Cannot Be Used....................................................... 295
10. Specifications for The Machine
Model-Specific Information.......................................................................................................................... 297
List of Specifications.......................................................................................................................................298
Specifications for the Main Unit............................................................................................................... 298
Specifications for the Document Server...................................................................................................321
Specifications for Facsimile.......................................................................................................................321
Specifications for Printer........................................................................................................................... 327
Specifications for Scanner........................................................................................................................330
Specifications for One-pass Duplex Scanning ADF...............................................................................334
Specifications for Auto Reverse Document Feeder (ARDF)....................................................................335
7
Page 10

Specifications for Internal Finisher SR3250............................................................................................336
Specifications for Finisher SR3260..........................................................................................................338
Specifications for Booklet Finisher SR3270............................................................................................340
Specifications for Finisher SR3280..........................................................................................................343
Specifications for Booklet Finisher SR3290............................................................................................345
Specifications for Internal Finisher SR3300............................................................................................348
Specifications for Internal Multi-Folding Unit..........................................................................................349
Specifications for External Tray................................................................................................................351
Specifications for Internal Shift Tray.........................................................................................................352
Specifications for Internal Tray 2............................................................................................................. 353
Specifications for Bridge Unit...................................................................................................................353
Specifications for Punch Unit (Internal Finisher SR3250).......................................................................354
Specifications for Punch Unit (Finisher SR3260, Booklet Finisher SR3270)........................................ 355
Specifications for Punch Unit (Finisher SR3280, Booklet Finisher SR3290)........................................ 356
Specifications for Lower Paper Tray........................................................................................................ 357
Specifications for Lower Paper Trays.......................................................................................................357
Specifications for Tray 3 (LCT)................................................................................................................. 358
Specifications for Large Capacity Tray (LCT)..........................................................................................358
Specifications for IEEE 1284 Interface Board........................................................................................ 359
Specifications for Wireless LAN Board................................................................................................... 359
Specifications for Device Server Option................................................................................................. 360
The Setting Values of the Transmission Function..........................................................................................361
Send Email................................................................................................................................................. 361
Send to Folder........................................................................................................................................... 362
Broadcast Transmission.............................................................................................................................363
Printable Area and Margin...........................................................................................................................364
Machine Options...........................................................................................................................................366
Guide to Functions of the Machine’s External Options..........................................................................366
Guide to Functions of the Machine’s Internal Options...........................................................................372
Functions Requiring Optional Configurations..............................................................................................374
Copy Function............................................................................................................................................374
Facsimile Functions....................................................................................................................................376
Printer Function.......................................................................................................................................... 379
8
Page 11

Scanner Function.......................................................................................................................................381
Interface..................................................................................................................................................... 382
Function Compatibility...................................................................................................................................383
11. Legal and Contact Information
Environmental Regulations............................................................................................................................385
ENERGY STAR Program........................................................................................................................... 385
Energy Saving Functions...........................................................................................................................385
User Information on Electrical and Electronic Equipment (mainly Europe)...................... 387
Note for the Battery and/or Accumulator Symbol (For EU countries only) (mainly Europe)
.................................................................................................................................................................... 388
Environmental Advice for Users (mainly Europe)............................................................... 389
Notes to users in the state of California (Notes to Users in USA) (mainly North America)....
.................................................................................................................................................................... 389
Trademarks.....................................................................................................................................................390
9
Page 12

10
Page 13
1. Getting Started
DZB636
Turning On and Off the Power
To turn the machine on and off, press the main power switch on the right of the machine.
• When you are using the fax function on the machine, do not turn the power off under normal
operation. If the power is turned off, data stored in the fax memory will be lost in about one hour
after the machine is turned off. If you have to turn the power off or unplug the power cord for some
reason, make sure 100% is shown as available memory on the screen for the fax function.
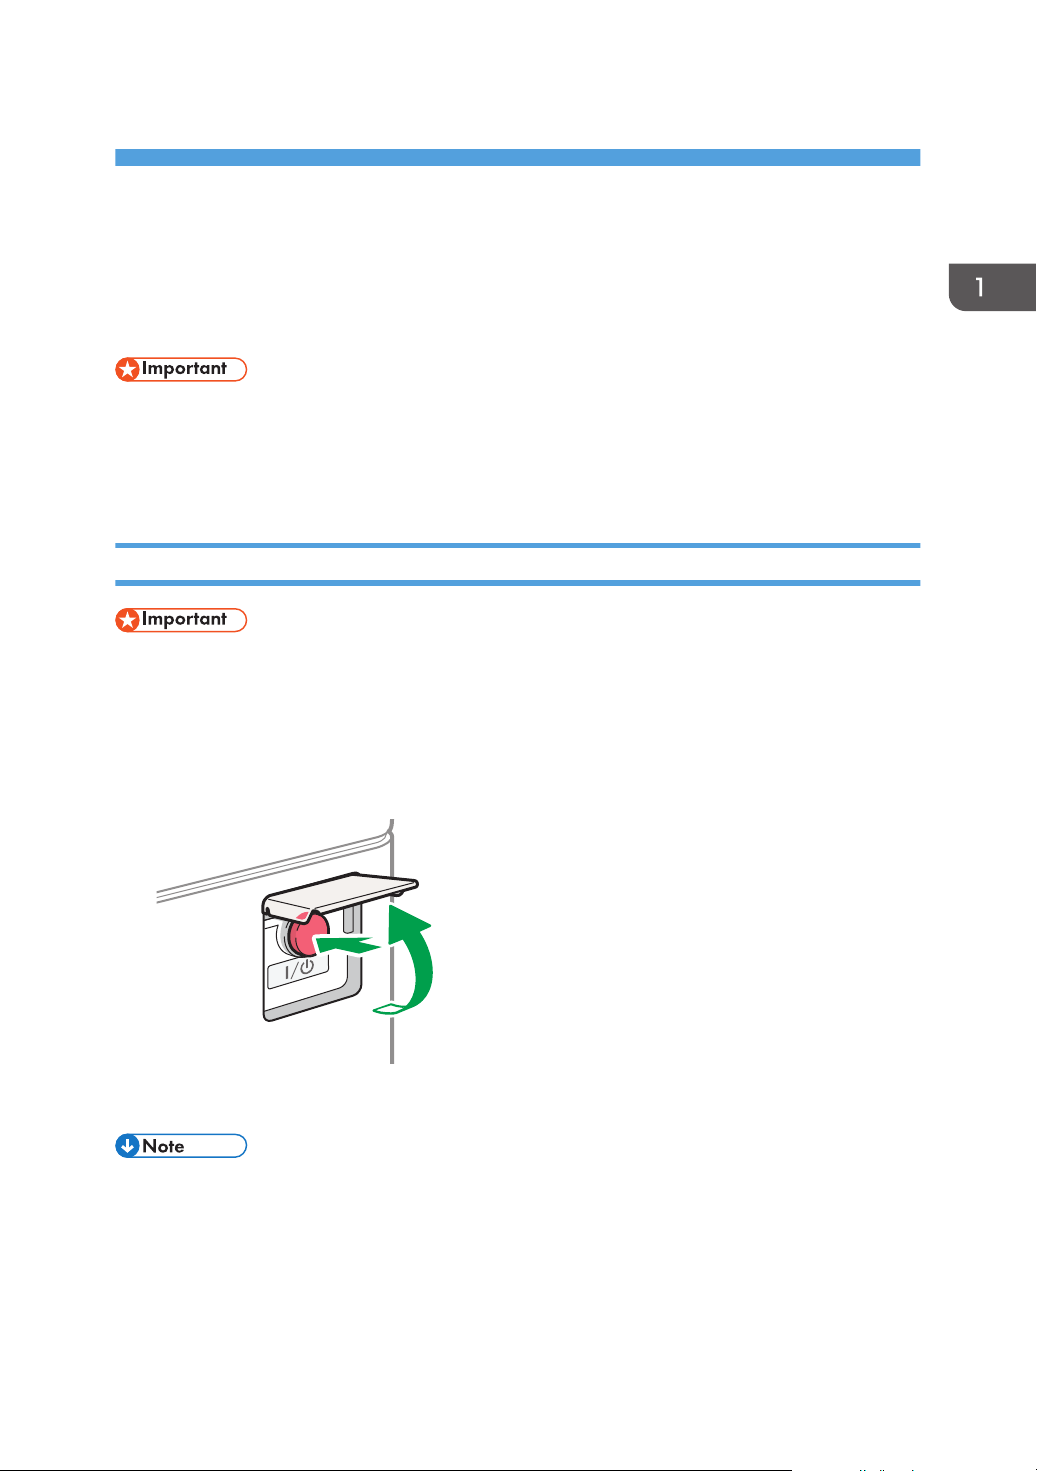
Turning On the Main Power
• Do not press the main power switch soon after you press the main power of the machine. When
you turn the power on or off, wait at least 10 seconds after confirming that the main power
indicator on the control panel has turned on or off.
1. Make sure the power cord is firmly plugged into the wall outlet.
2. Open the cover of the main power switch, and push the main power switch.
The main power indicator on the right side of the control panel turns on.
• When the power is turned on, the screen may show that the machine is performing an auto restart.
Do not turn off the main power while the machine is processing. It takes about five minutes until the
machine restarts.
11
Page 14

DZB636
1. Getting Started
Turning Off the Main Power
• Do not turn off the power while the machine is in operation. To turn the power off, confirm that the
operation is finished.
• Do not hold down the main power switch while turning off the main power. Doing so forcibly turns
off the machine’s power and may damage the hard disk or memory and cause malfunctions.
• Do not press the main power switch soon after pressing the main power switch on the machine.
When you turn the power on or off, wait at least 10 seconds after confirming that the main power
indicator on the control panel has turned on or off.
1. Open the cover of the main power switch, and push the main power switch.
The main power indicator on the right side of the control panel turns off. The main power turns off
automatically after the machine has shut down properly.
Energy Saving Mode
When the machine is not operated for a specified period of time, the machine enters the "Energy Saver
Mode" automatically. "Energy Save mode" has two modes, "Fusing Unit Off mode" and "Sleep mode",
and the machine enters the Fusing Unit Off mode first. In the factory default, the machine is configured to
use both modes.
Fusing Unit Off Mode
Because the heater of the fusing unit is turned off but the screen of the control panel is still
displayed, the power consumption decreases, but you can start operation promptly. If you do not
operate the machine for a specified period of time, the machine emits a clicking sound and enters
Fusing Unit Off mode.
• You can specify whether to enable the Fusing Unit Off mode and the time to wait before the
machine enters Fusing Unit Off mode under [Fusing Unit Off Mode (Energy Saving) On/Off].
See "Timer Settings", User Guide (Full Version).
12
Page 15

Turning On and Off the Power
• See below when [Standard] is specified as the screen type of [Settings]. The names of the
setting items may differ from the [Classic] screen type.
See "Date/Time/Timer", User Guide (Full Version).
For details, see "Settings Menu Compatibility List (Classic to Standard Settings)", User Guide
(Full Version).
• In this mode, you can scan documents, send faxes, receive faxes into memory, change the
machine settings on the control panel, and perform other operations that do not require
printing.
Sleep Mode
In this mode, the display of the control panel turns off and the main power indicator blinks slowly.
Power consumption is minimized. When you do not operate the machine for a specified period of
time or press [Energy Save] ( ), the machine enters Sleep mode.
• You can specify the amount of time that the machine waits before entering Sleep mode under
[Sleep Mode Timer].
See "Timer Settings", User Guide (Full Version).
• See below when [Standard] is specified as the screen type of [Settings]. The names of the
setting items may differ from the [Classic] screen type.
See "Date/Time/Timer", User Guide (Full Version).
For details, see "Settings Menu Compatibility List (Classic to Standard Settings)", User Guide
(Full Version).
• The machine recovers from Sleep mode when you perform one of the following:
• Lift the ADF.
• Place an original in the ADF.
• Touch the display of the control panel.
• Approach the machine and are detected by the human detection sensor.
See "Recovering from Sleep Mode When a Person Approaches the Machine", User
Guide (Full Version).
• The energy saving functions are disabled when an error occurs or while an operation is in
progress.
• When the machine recovers from Sleep mode using the human detection sensor, the main power
indicator turns on. Even if Sleep mode is canceled, the operation screen is not displayed until you
touch the touch panel.
13
Page 16
1
2
34
6
7
5
8
9
DZB161
10
1. Getting Started
Guide to Names and Functions of Components
• Do not obstruct the machine's vents. Doing so risks fire caused by overheated internal
components.
Region A and Region B symbols
(mainly Europe and Asia), (mainly Europe), or (mainly Asia)
(mainly North America)
Differences in the functions of Region A and Region B models are indicated by two symbols.
Read the information indicated by the symbol that corresponds to the region of the model you are
using.
For details about which symbol corresponds to the model you are using, see page 297 "ModelSpecific Information".
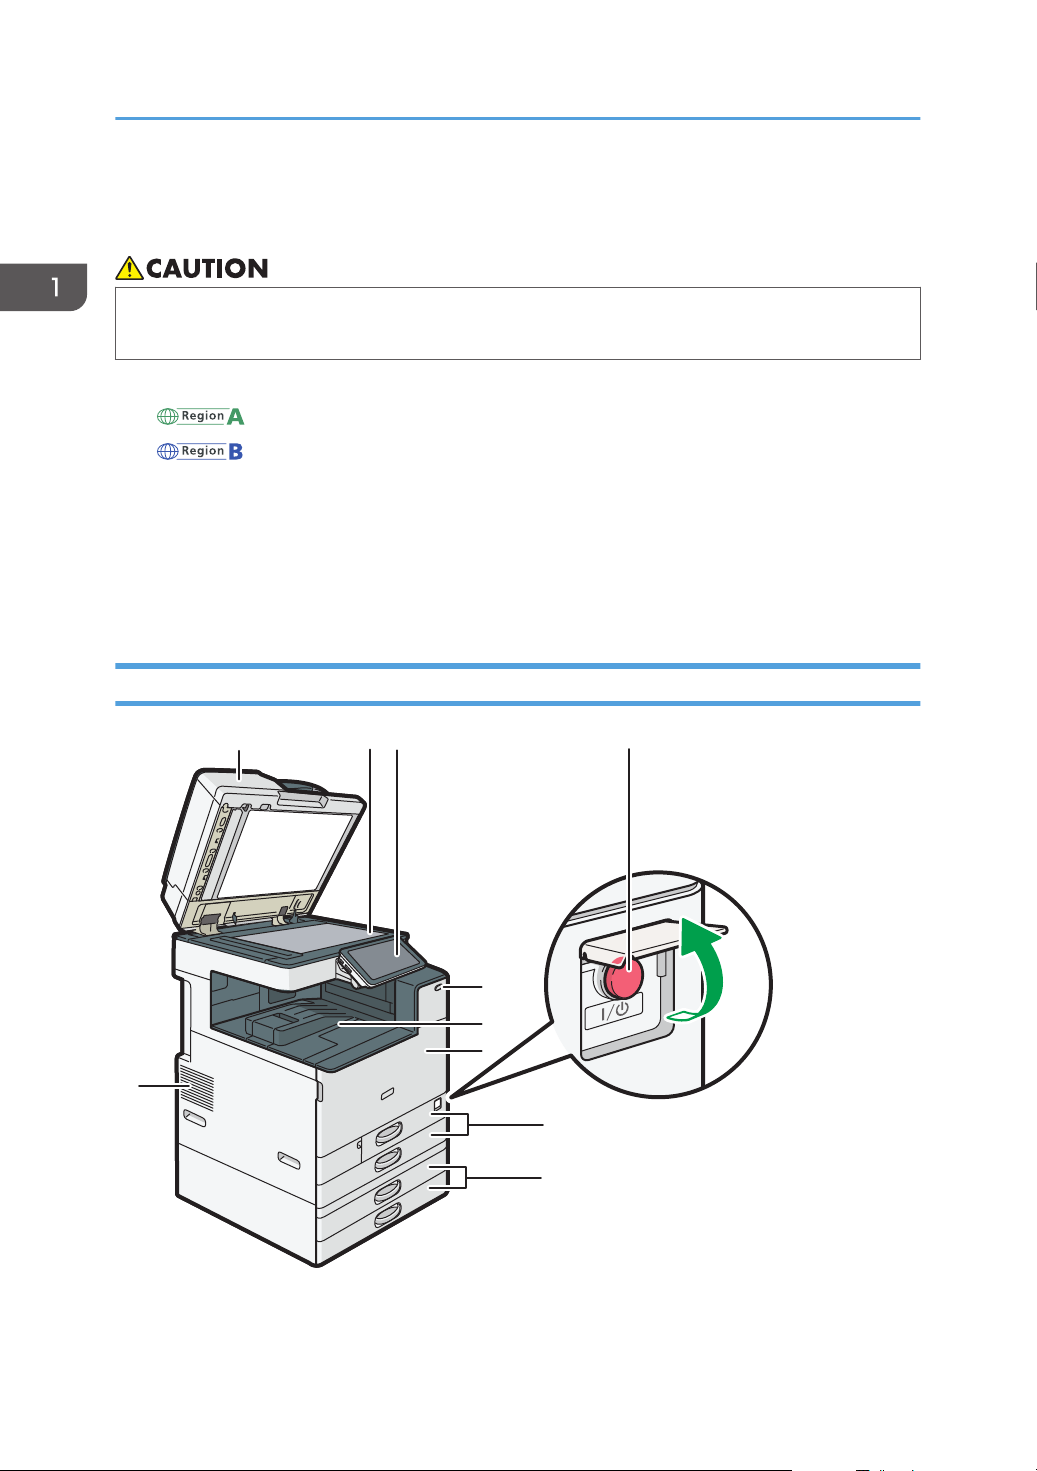
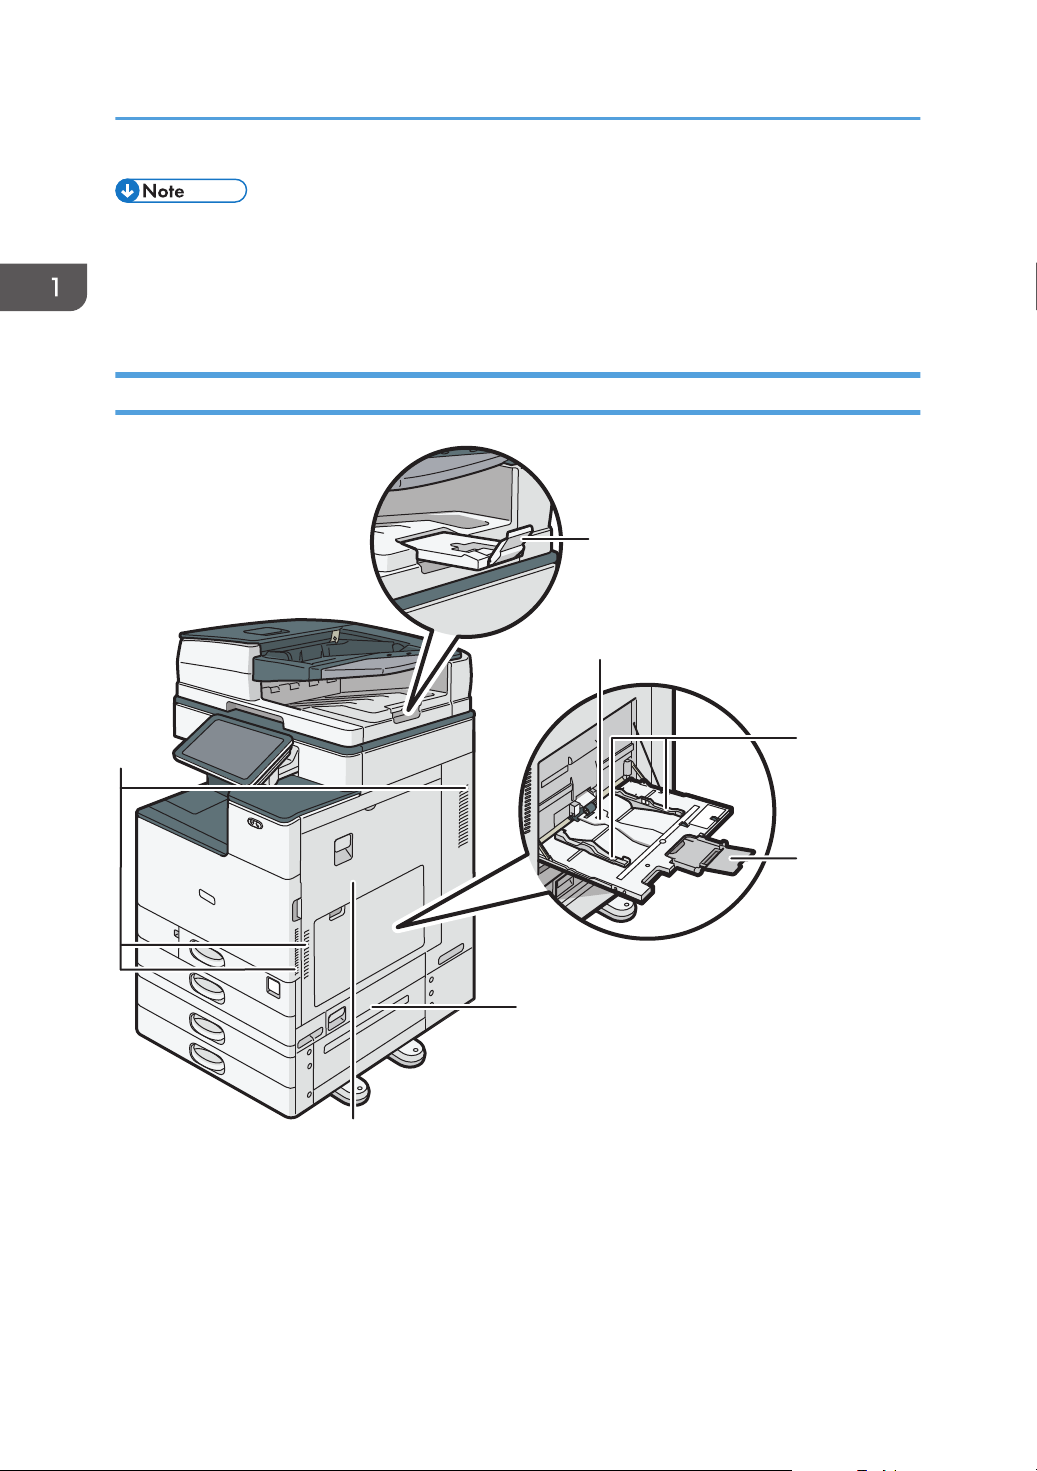
Front and Left View
14
1. Exposure glass cover/Auto Document Feeder (ADF)
Lower the cover over originals placed on the exposure glass.
Page 17
DZW798
Guide to Names and Functions of Components
If you load a stack of originals in the ADF, the ADF will automatically feed the originals one by one.
2. Exposure glass
Place originals facedown here.
page 58 "Placing an Original on the Exposure Glass"
3. Control panel
page 20 "Names and Functions of the Control Panel"
4. Main power switch
To turn the power on and off, open the cover of the main power switch and press the main power switch.
page 11 "Turning On and Off the Power"
5. Human detection sensor
Detects a person approaching the machine.
See "Recovering from Sleep Mode When a Person Approaches the Machine", User Guide (Full Version).
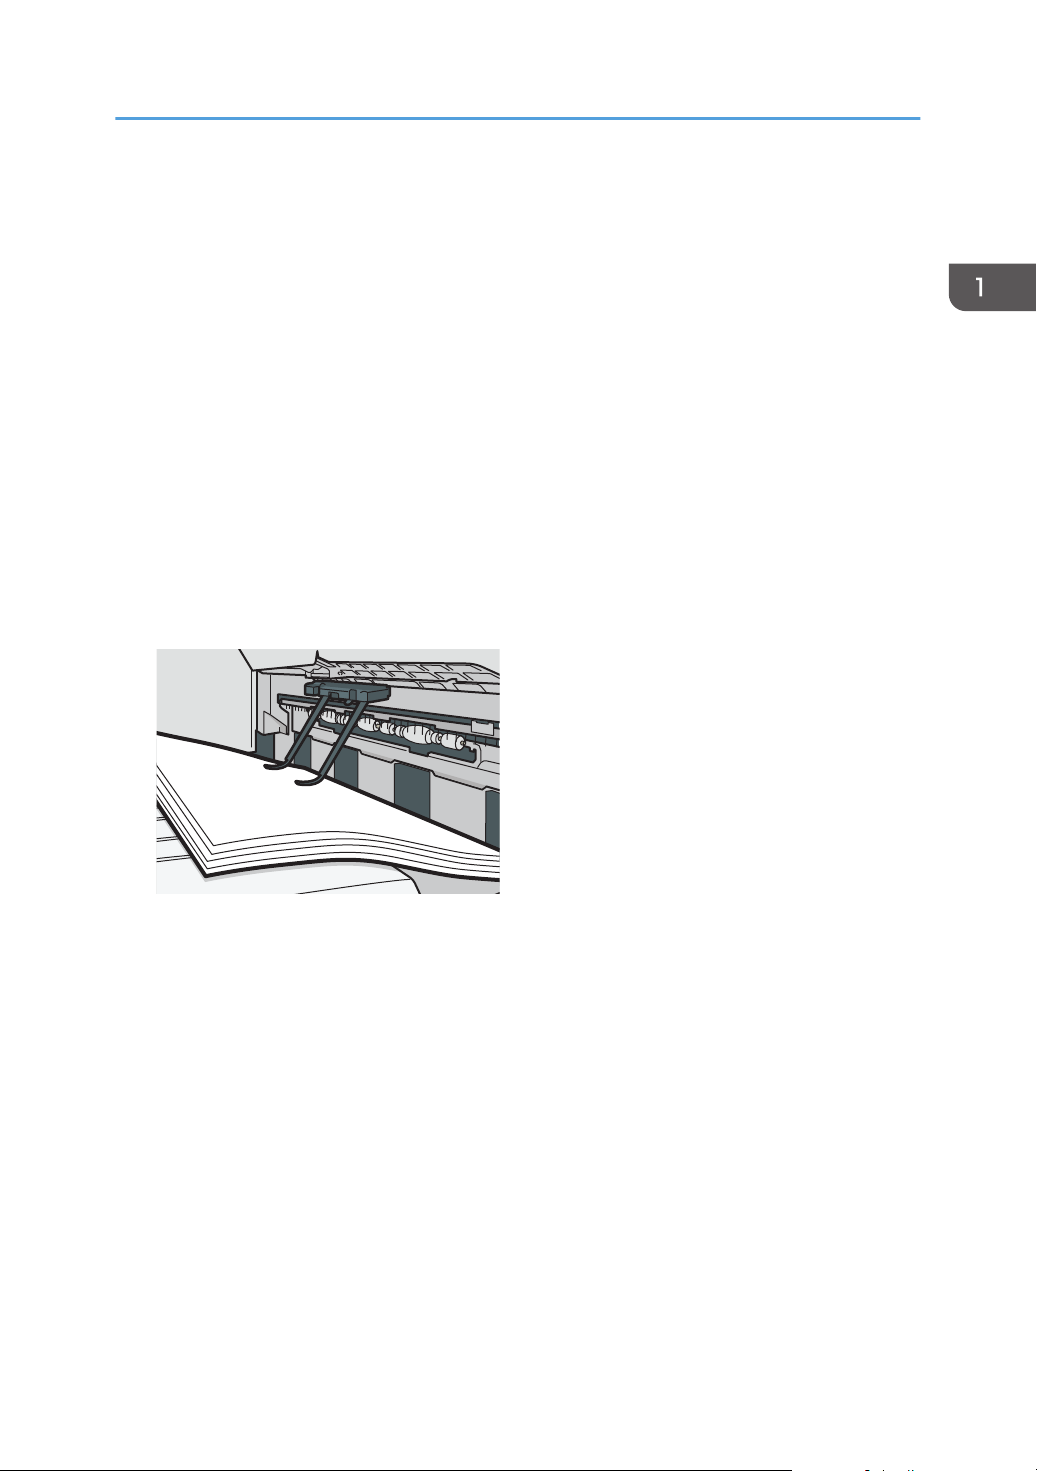
6. Internal tray 1
Copied/printed paper and received fax pages are delivered here. And the paper is output under the paper
holder attached inside the internal tray.
7. Front cover
Open to access the inside of the machine.
page 216 "Replacing the Toner"
8. Paper trays (Trays 1, 2)
Standard paper trays. Load paper here.
page 179 "Loading Paper into the Paper Tray"
9. Lower paper trays (Trays 3, 4)
Optional paper trays. Load paper here.
page 179 "Loading Paper into the Paper Tray"
10. Vents
Holes for ventilating the inside the machine to prevent the internal components from overheating.
After large-volume printing, the ventilation fan may continue to work to lower the temperature inside the
machine.
15
Page 18
EDM162
1
7
2
3
4
5
6
1. Getting Started
• Note the following when using the paper holder of the internal tray:
• Once you have drawn out the output sheet on the top of the internal tray, do not push the
sheet back under the paper holder. The paper holder does not work on the output sheet
properly and may cause a paper jam.
Front and Right View
1. ADF tray extender
Pull this extender out to prevent originals larger than B4 or 81/2 × 14 size from falling.
2. Bypass Tray
Use the tray to copy or print on OHP transparencies, adhesive labels, and paper that cannot be loaded in the
paper trays.
page 184 "Loading Paper into the Bypass Tray"
16
Page 19
DZC163
4
1
2
3
Guide to Names and Functions of Components
3. Paper guides
When loading paper in the bypass tray, align the paper guides with the edges of the paper.
4. Extender
Pull this extender out when loading paper larger than A4 , 81/2 × 11.
5. Lower right cover
Open this cover to remove jammed paper.
6. Right cover
Open this cover to remove jammed paper.
7. Vents
Holes for ventilating the inside the machine to prevent the internal components from overheat.
After large-volume printing, the ventilation fan may continue to work to lower the temperature inside the
machine.
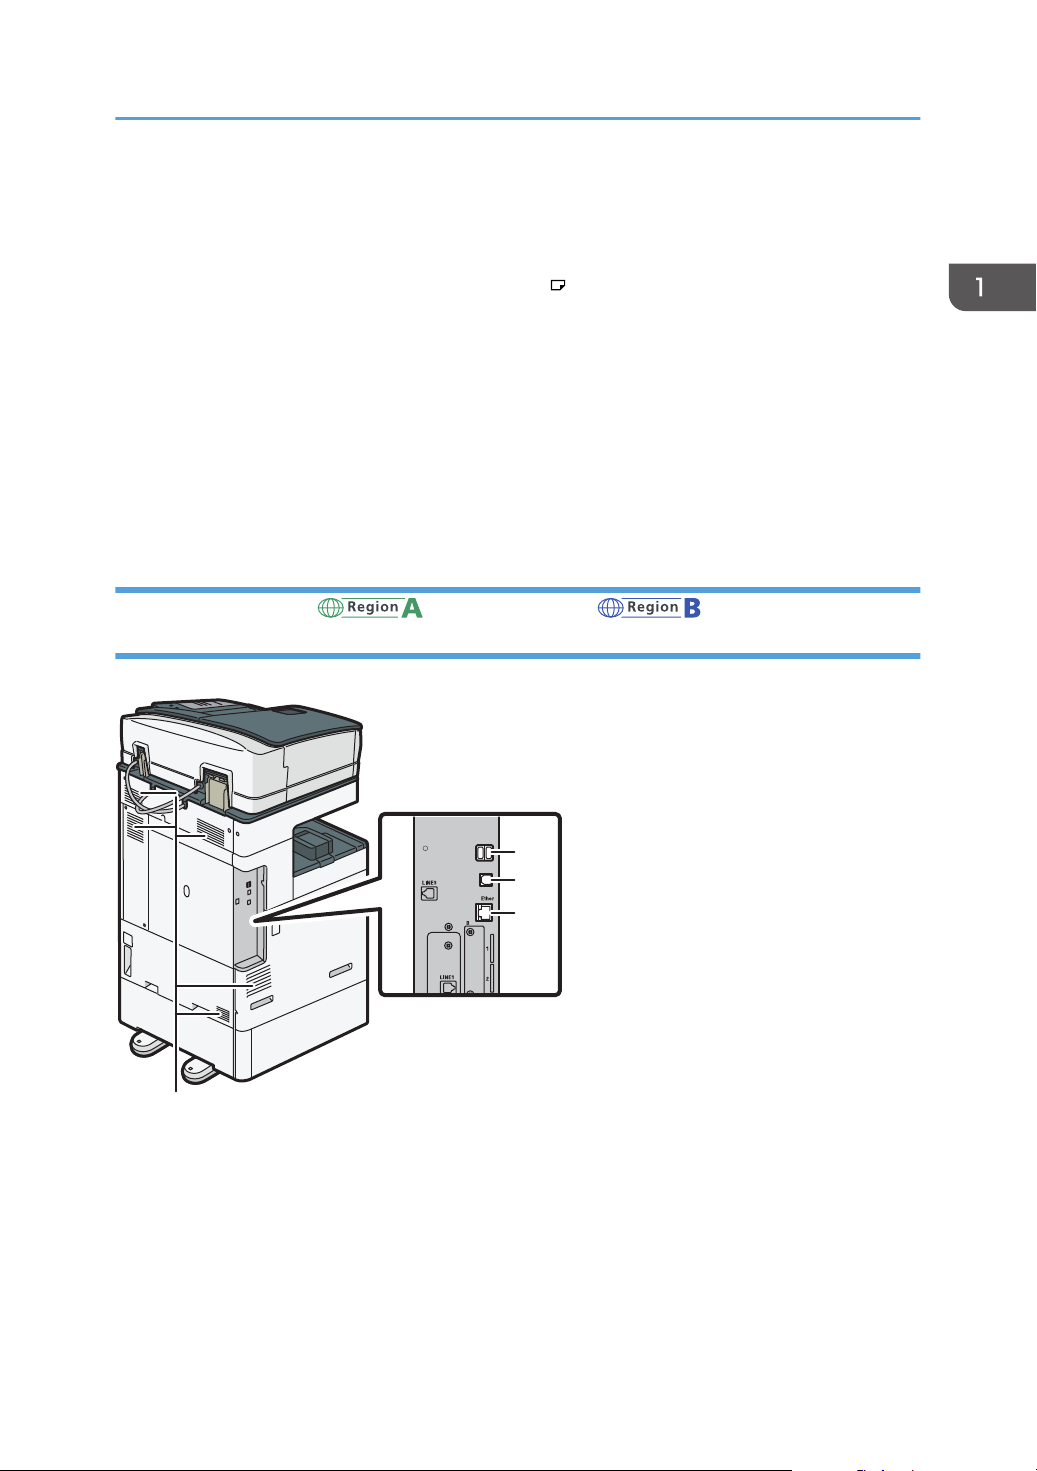
Rear and Left View (mainly Europe) (mainly North America)
1. USB2.0 Interface Type A
Use the port to connect the IC card authentication device.
2. USB2.0 Interface Type B
Use the port to connect the machine and the computer with the USB cable.
17
Page 20
DZC160
5
4
1
2
3
1. Getting Started
3. Ethernet interface
Used the port to connect the machine to the network or to use the remote management service (RICOH
@Remote) over the Internet.
4. Vents
Holes for ventilating the inside the machine to prevent the internal components from overheat.
After large-volume printing, the ventilation fan may continue to work to lower the temperature inside the
machine.
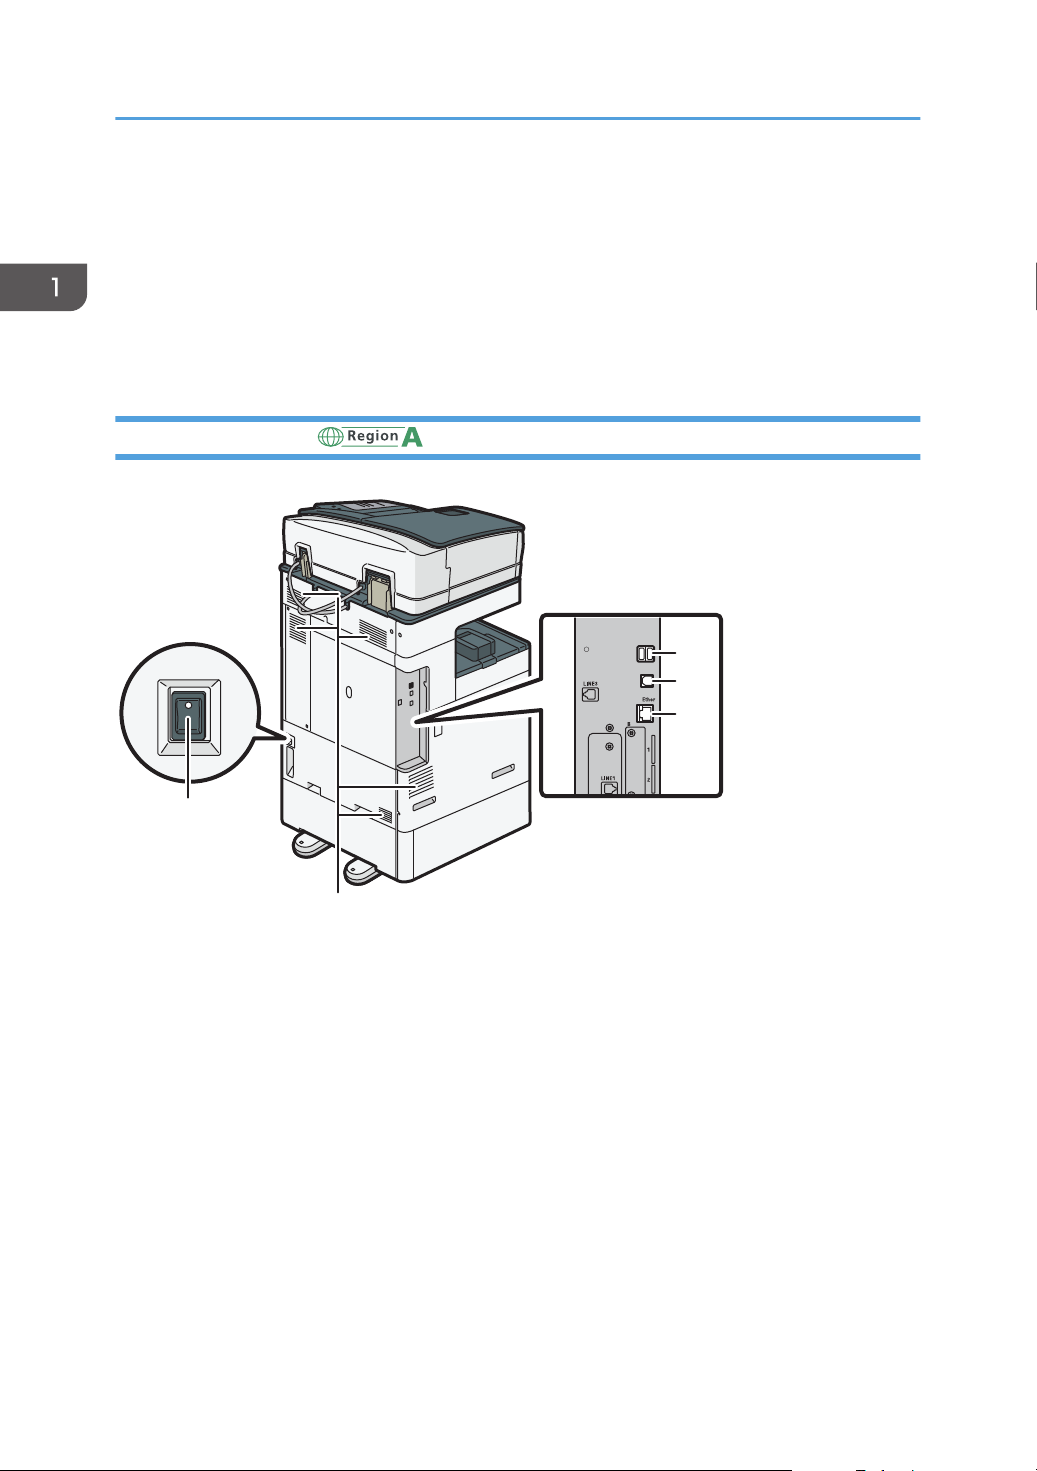
Rear and Left View (mainly Asia)
18
1. USB2.0 Interface Type A
Use the port to connect the IC card authentication device.
2. USB2.0 Interface Type B
Use the port to connect the machine and the computer with the USB cable.
3. Ethernet interface
Used the port to connect the machine to the network or to use the remote management service (RICOH
@Remote) over the Internet.
4. Vents
Holes for ventilating the inside the machine to prevent the internal components from overheat.
After large-volume printing, the ventilation fan may continue to work to lower the temperature inside the
machine.
Page 21

Guide to Names and Functions of Components
5. Anti-humidity heater switch
Turn the switch "On" to prevent paper from absorbing moisture and maintain print quality. Use this feature
when using the machine in a high-humidity or low-temperature environment.
19
Page 22
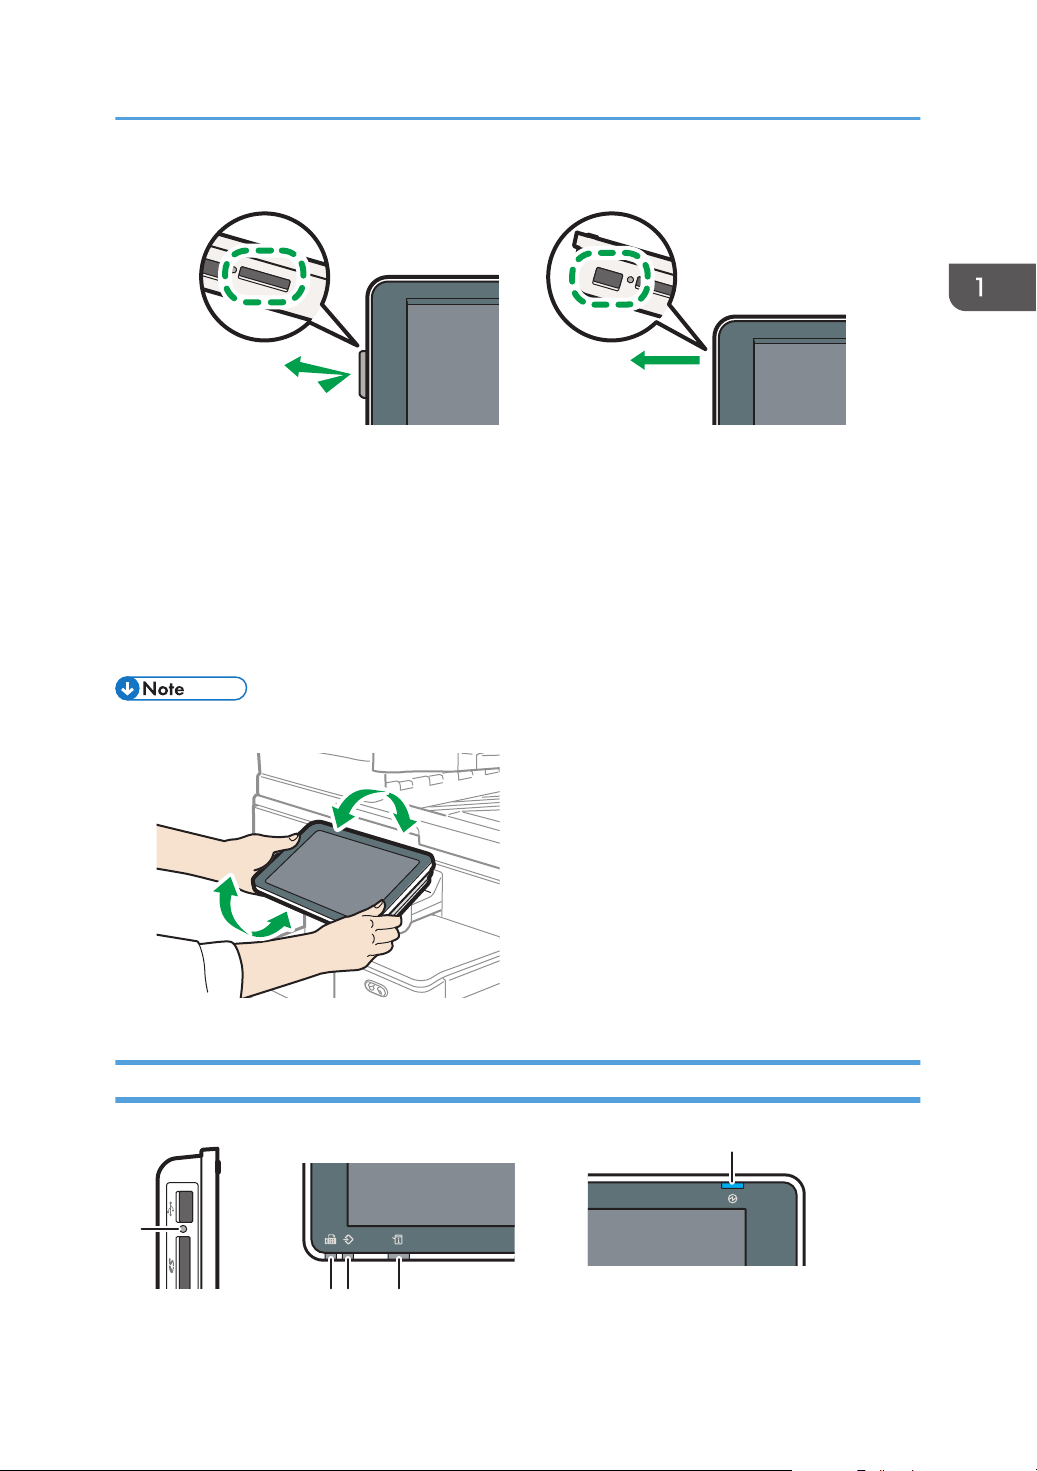
DZB165
3
21
1. Getting Started
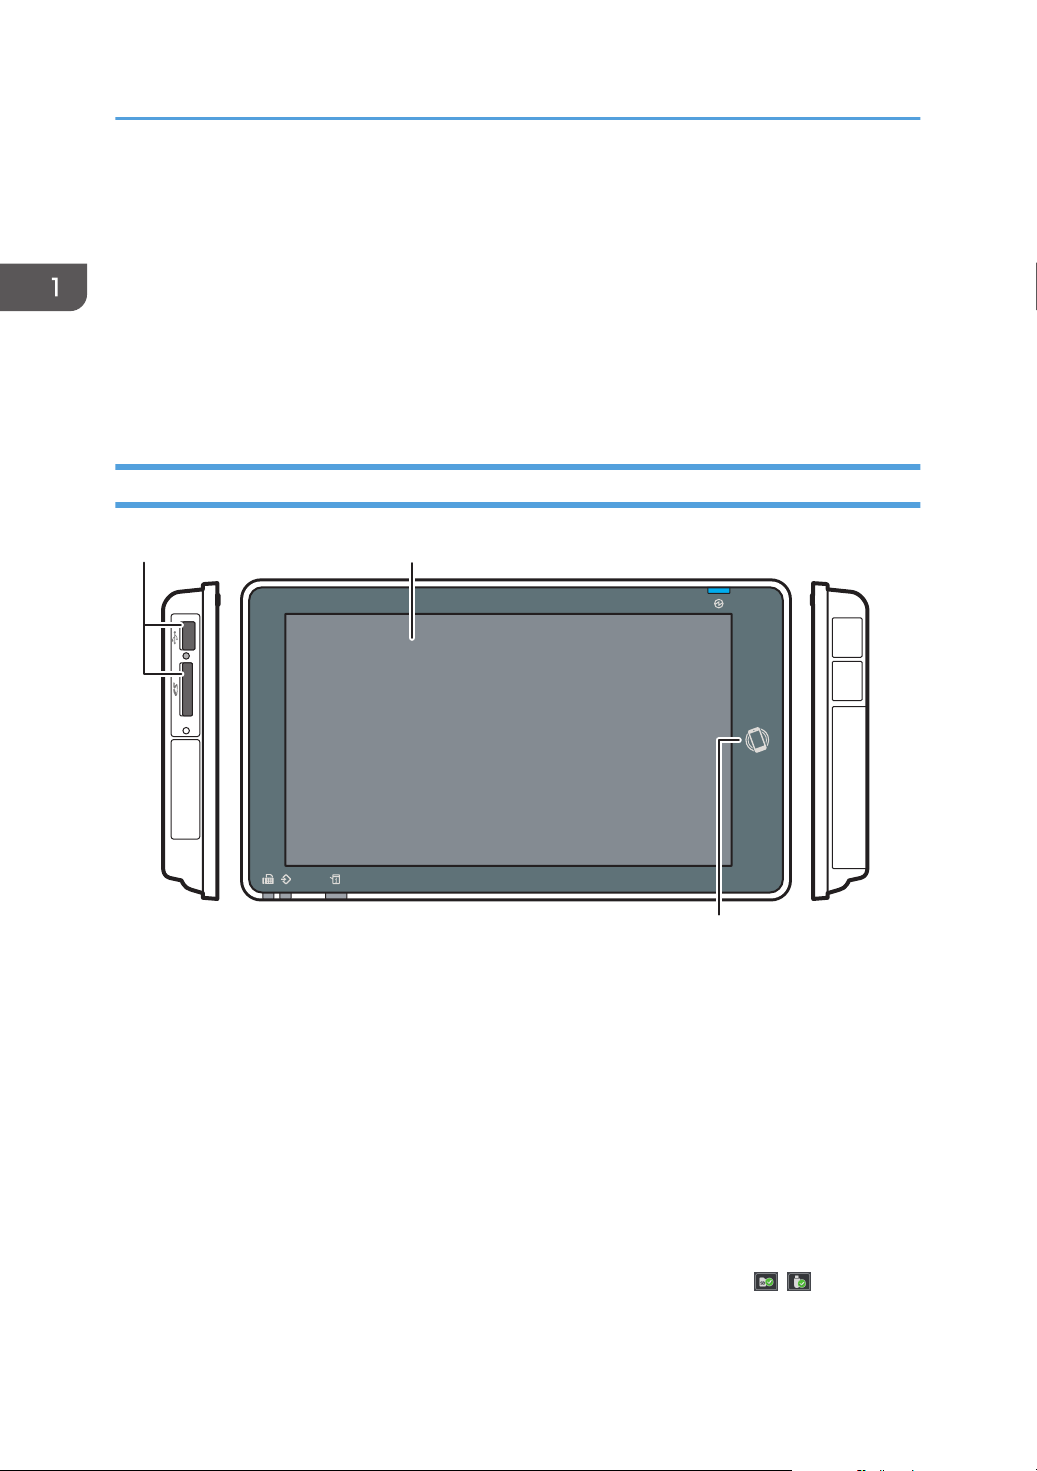
Names and Functions of the Control Panel
The touch panel (Smart Operation Panel) that displays the operation screen of the machine is referred to
as the "Control Panel".
• On both sides of the control panel, interfaces for connecting external devices and slots to insert an
SD card/USB flash memory device are provided.
• Even when the screen is turned off, the LED indicators on the frame of the control panel show the
status of the machine.
Touch Panel/Interface
20
1. Media slots
Insert an SD card or USB flash memory device. You can store the scanned data or print the file stored on the
media.
• Use an SD memory card or SDHC memory card with a maximum capacity of 32 GB. You cannot use an
SDXC memory card.
• Use the media formatted in FAT16 or FAT32.
• Certain types of USB flash memory devices cannot be used in the machine.
• A USB extension cable, hub, or card reader cannot be used.
• If the power of the machine is turned off or the media is removed from the machine while the machine is
reading the data in the media, check the data in the media.
• Before removing the media from the slot, press the icon displayed on the screen ( / ) to cancel the
connection.
Page 23
DZW174
DZB166
DZB164
1
5
32 4
Names and Functions of the Control Panel
2. Touch Panel
Displays the Home screen, operation screen of applications, and messages. Operate with the fingertips.
page 27 "How to Use the Home Screen"
page 29 "Intuitive Screen Operation Using Fingertips"
3. NFC tag
Used to connect the machine and a smart device with the RICOH Smart Device Connector.
See "Using the Machine Functions from a Mobile Device", User Guide (Full Version).
• You can adjust the angle of the control panel to improve visibility.
LED Indicators
21
Page 24

1. Getting Started
1. Media access indicator
Flashes when data is being read from or written to an SD card
While the machine is accessing the SD card or USB flash memory device, do not turn the power off or remove
the media.
2. Fax indicator
Indicates the status of the fax function.
• Flashing: transmitting and receiving data
• Lit: receiving data (Substitute RX File/Memory Lock Reception/Personal Box)
3. Data In indicator
Flashes when the machine is receiving data sent from the printer driver or LAN-Fax driver.
4. Status indicator
Indicates the status of the system. Stays lit when an error occurs or toner runs out.
page 225 "Checking the Indicators, Icons, and Messages on the Control Panel"
5. Main power indicator
The main power indicator lights up when you turn on the main power switch. In Sleep mode, it flickers slowly.
22
Page 25
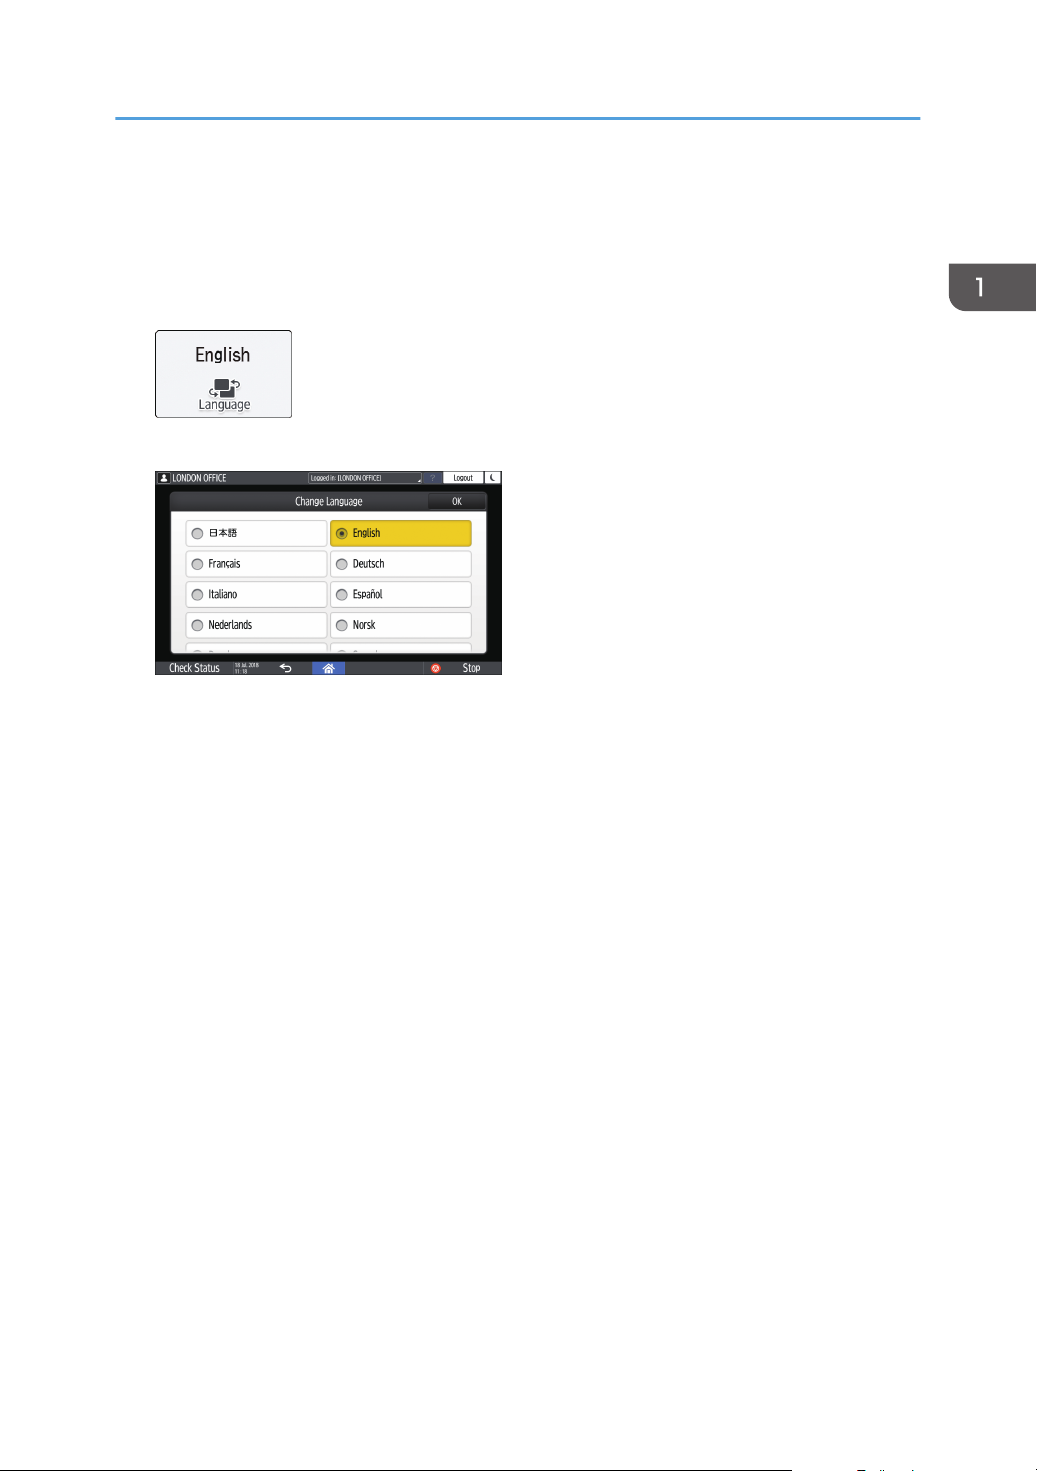
Changing the Display Language
You can change the language used on the display. English is set as default.
1. On the Home screen, press the change language widget.
2. Select the language you want to display.
Changing the Display Language
3. Press [OK].
23
Page 26
EDS004
1. Getting Started
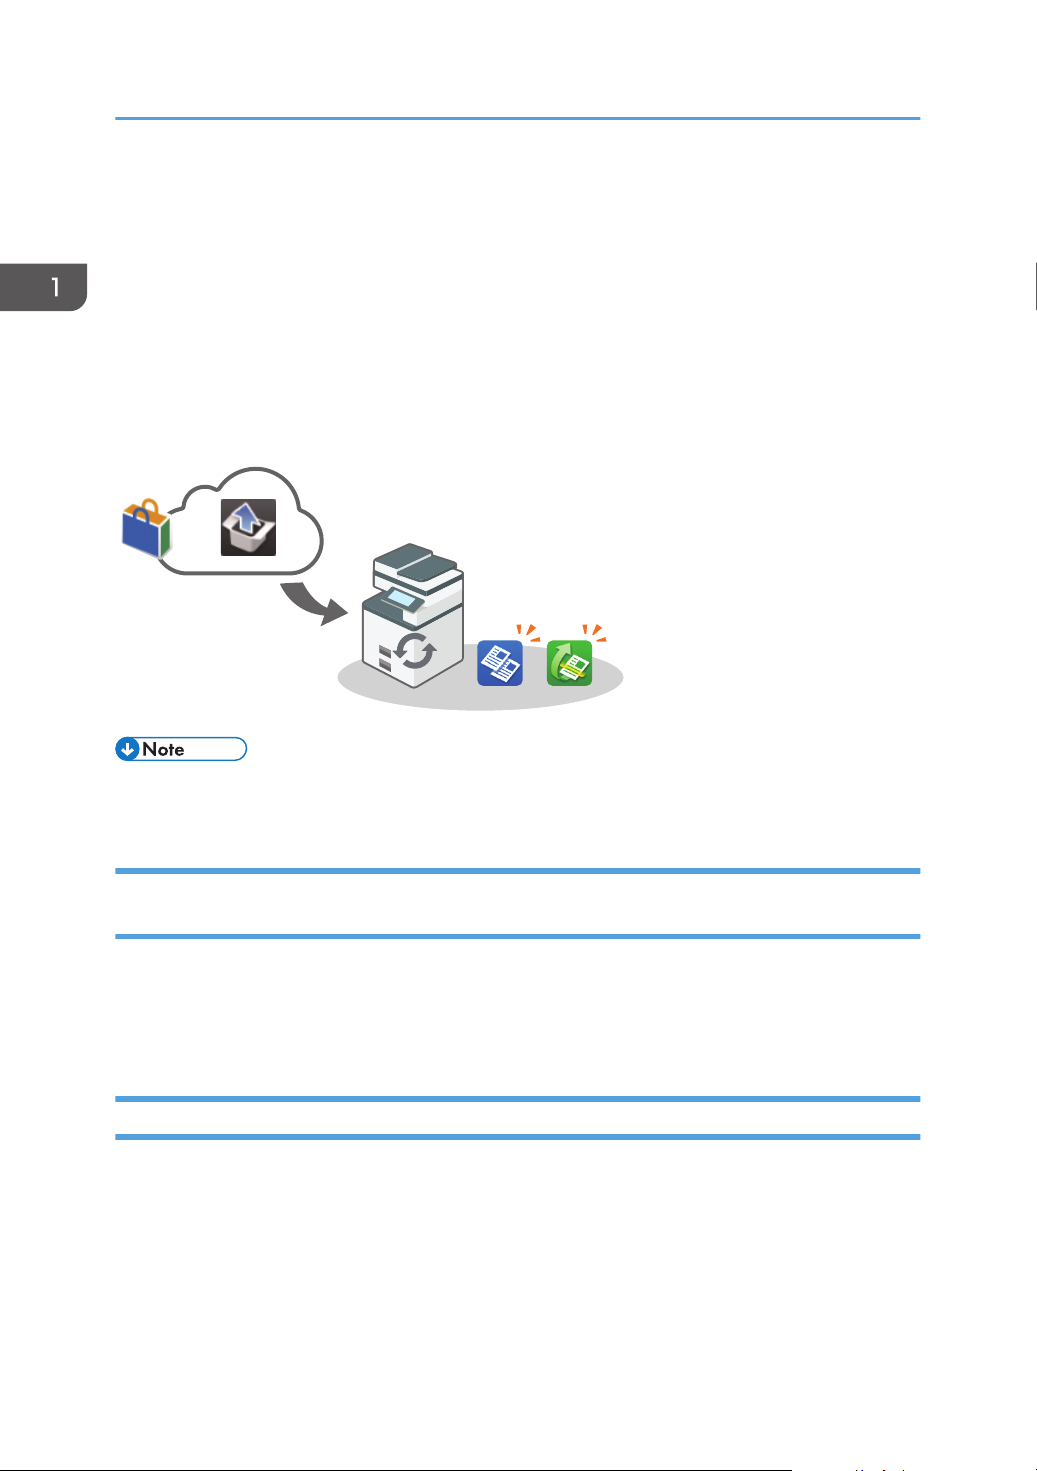
Confirming the Functions that Are Added in RICOH Always Current Technology
You can install the upgrade package for the machine's functions by RICOH Always Current Technology.
You can apply the latest functions developed after purchase and security updates.
To install the latest version of RICOH Always Current Technology, access the Application Site from the
control panel of the machine.
• For details about installing RICOH Always Current Technology, see the Operating Instructions for
Application Site.
Confirming the Version of RICOH Always Current Technology Implemented on the Machine
1. Press [Maintnc./Inquiry/Mach. Info] on the [Check Status] screen.
2. Press [Inquiry].
3. Check the version of the machine under the machine information.
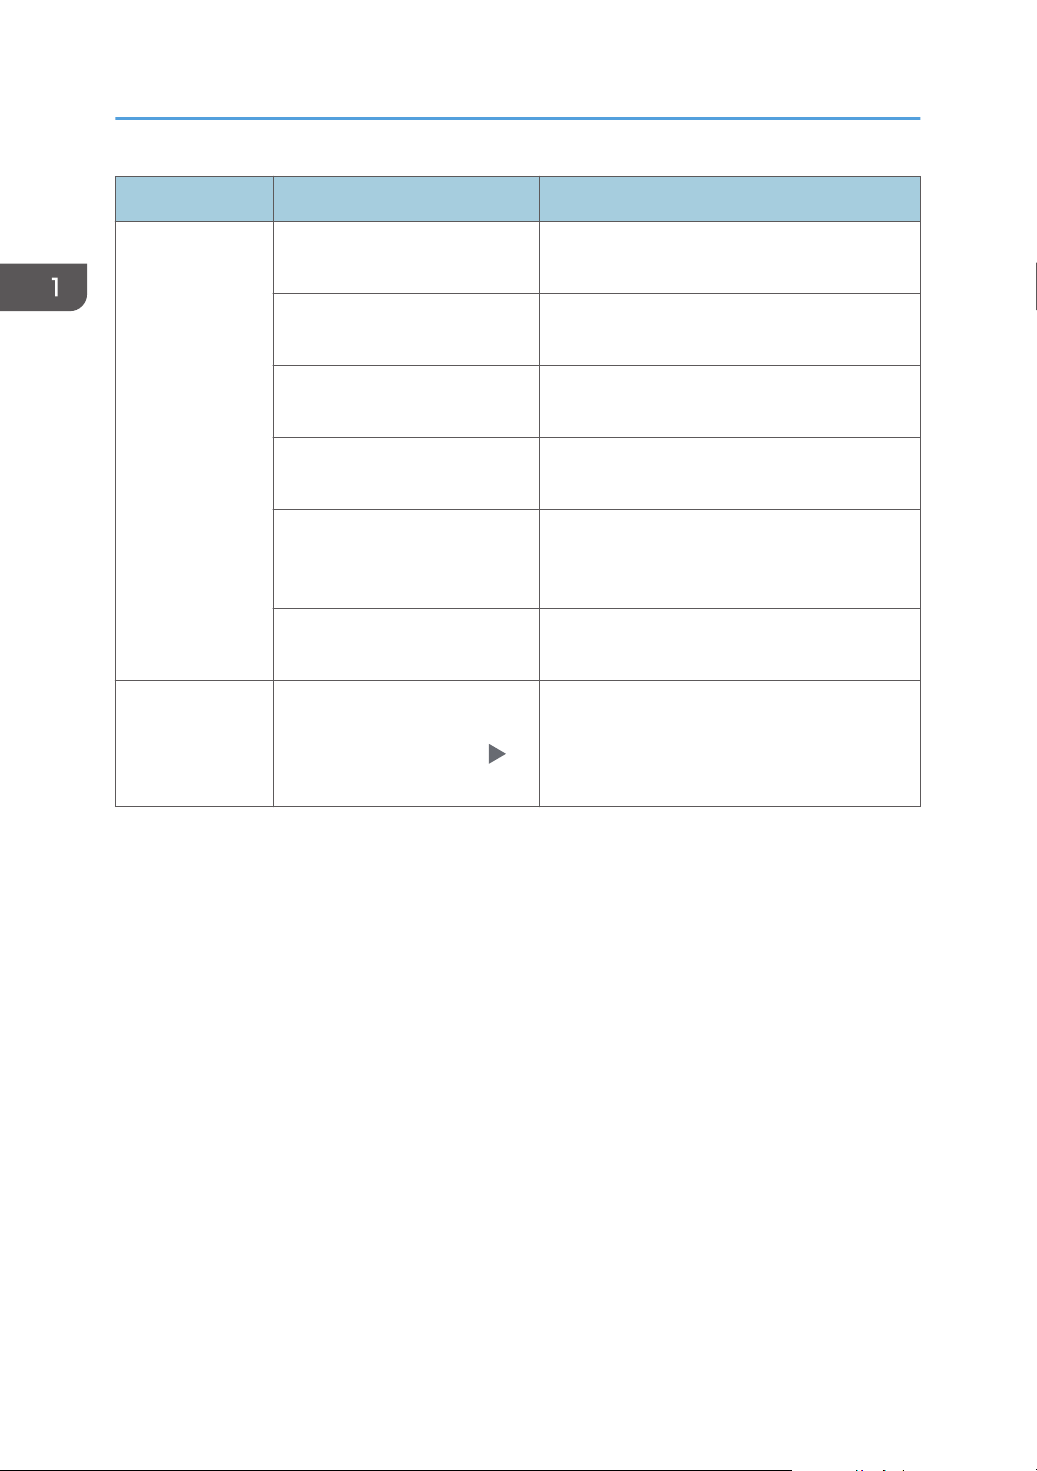
List of New Functions
The new functions are added together with each version of RICOH Always Current Technology.
See below for the functions added in RICOH Always Current Technology.
24
Page 27

Confirming the Functions that Are Added in RICOH Always Current Technology
Version 1.1
Application Added Function Reference
Settings The following functions are
added:
• You can now switch
between different screen
types.
• You can now change the
type of notification sound
of the Copier function.
• Copy: Job Done
Sound
• Copy: Forgot
Original Sound
• You can now specify the
sound to notify the user
when an original is left
unattended on the
machine (Scanner: Forgot
Original Sound).
Address Book An address book management
function is added.
See "How to Use the Settings Screen", User
Guide (Full Version).
See "Sound", User Guide (Full Version).
See "Management", User Guide (Full Version).
25
Page 28
1. Getting Started
Application Added Function Reference
Copier The following functions are
added:
• Reserve (Job Preset) See "Basic Procedure for Copying
Documents", User Guide (Full Version).
• Positive / Negative See "Inverting the Brightness of the Original
When Copying", User Guide (Full Version).
• Mirror Image See "Flipping the Original Horizontally When
Copying", User Guide (Full Version).
• Image Repeat See "Repeating the Original Image over the
Entire Area of Paper When Copying", User
Guide (Full Version).
• Slip Sheet See "Inserting Slip Sheets Between Pages
When Copying", User Guide (Full Version).
Fax The "Reception File Storage
Location" function is added
under [Reception Settings]
[Reception File Settings].
See "Reception Settings (Standard)", User
Guide (Full Version).
26
Page 29
DZC140
1 234 5
6
7
8
910111214 136
15
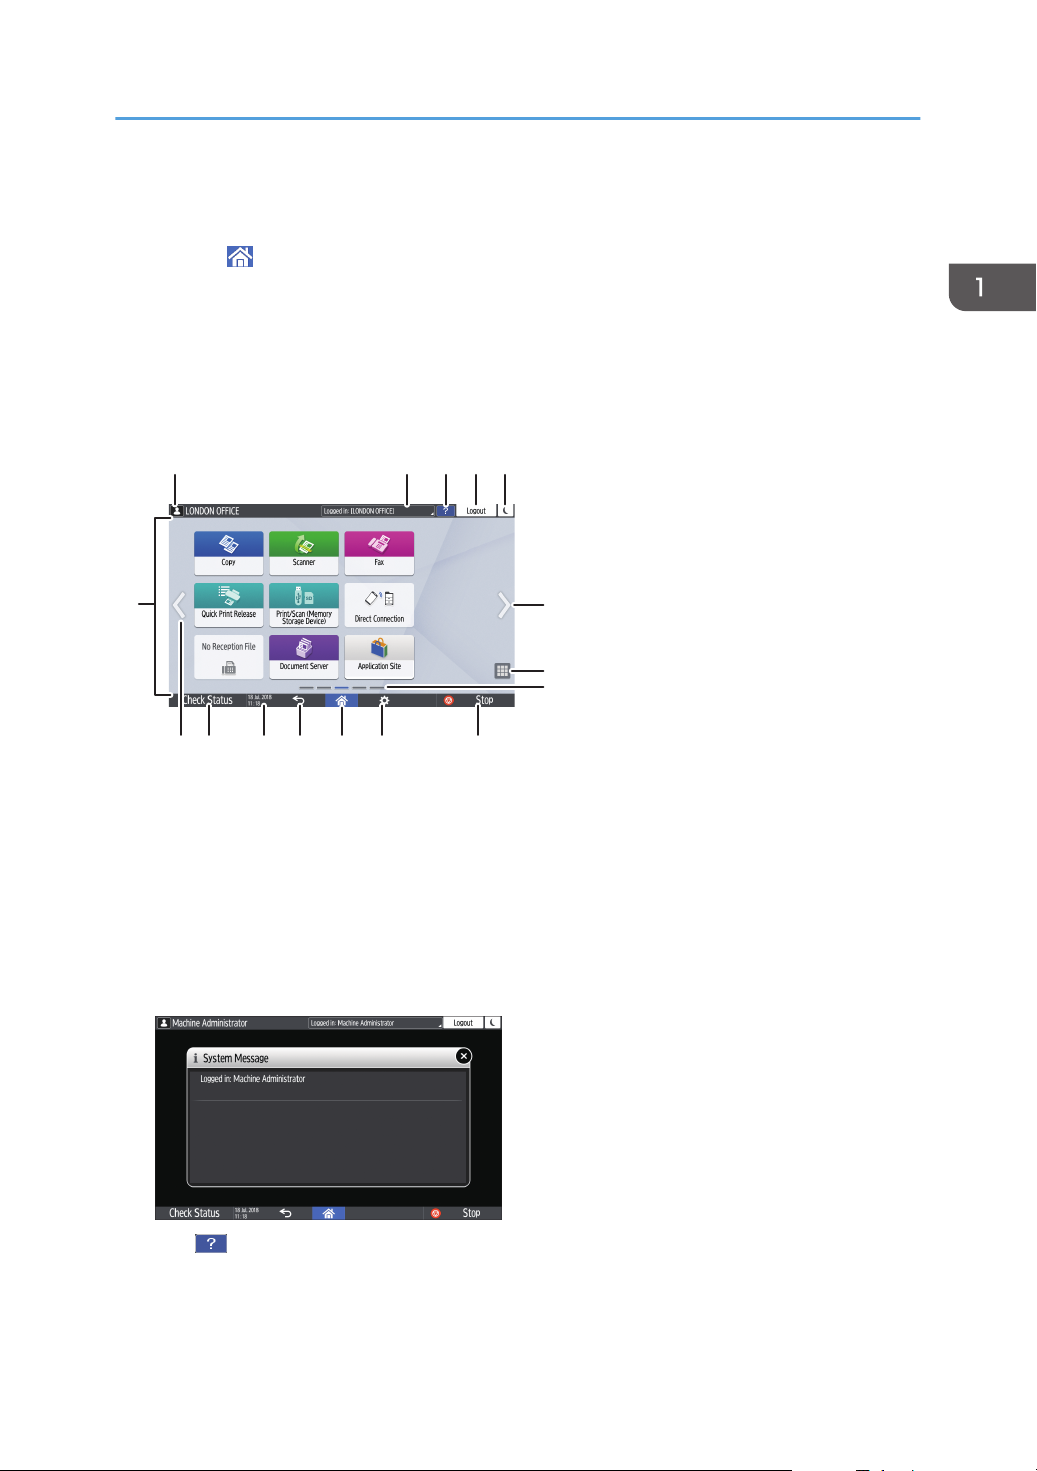
How to Use the Home Screen
How to Use the Home Screen
Press [Home] ( ) at the bottom center of the screen to display the Home screen on which icons for
each function are shown. On the Home screen, you can register frequently used shortcuts and widgets.
• Touch the Home screen to operate it.
page 29 "Intuitive Screen Operation Using Fingertips"
• You can add or delete icons and widgets, and change their order.
page 43 "Adding a Frequently Used Application or Widget to the Home Screen"
1. Login icon
This icon is displayed when users are logged in. When you press the icon, the names of the users who are
currently logged in are displayed.
2. System message
Displays system and application messages. If there are two or more messages, they will be displayed
alternately.
If a message indicating that the toner has run out or an error has occurred is displayed, press the message to
display the system message list to check the contents.
3. Help
This icon is displayed when Help is available for the displayed screen or errors occurring when the machine is
connected to the Internet.
Specify [Cookie] in the control panel browser to [ON] to display Help properly.
27
Page 30
DZC180
1. Getting Started
See "Browser Settings", User Guide (Full Version).
4. [Login]/[Logout]
These keys are displayed when user authentication is enabled. Press the keys to log in to or log out from the
machine.
page 51 "Logging In from the Control Panel"
5. [Energy Save]
Press to enter or exit Sleep mode.
page 12 "Energy Saving Mode"
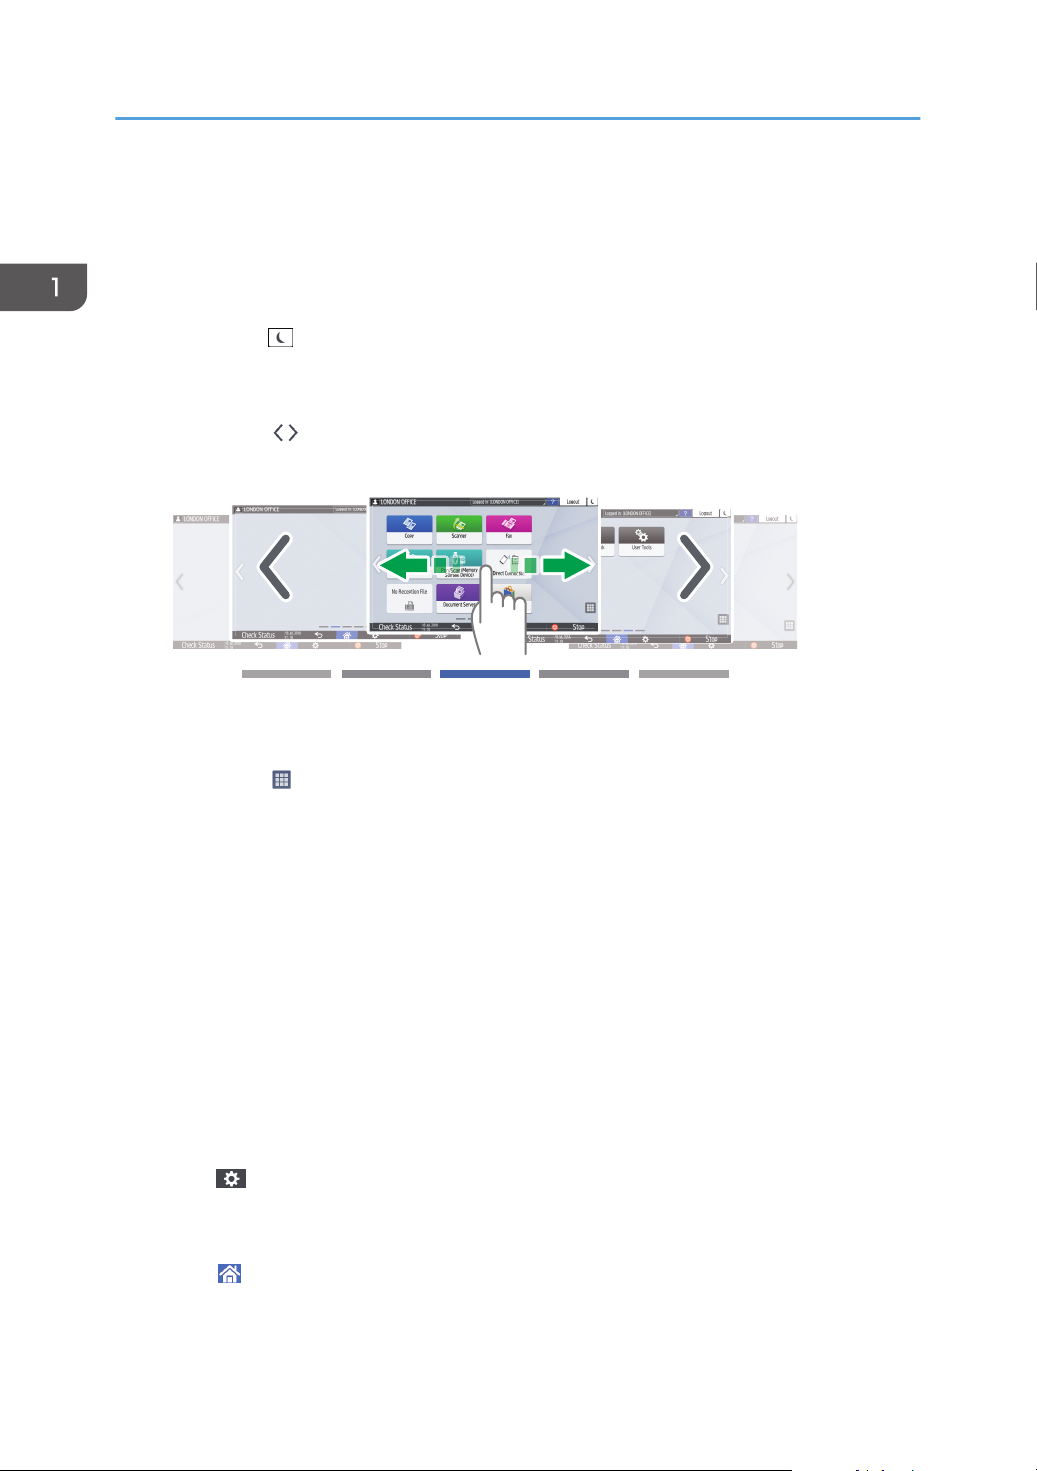
6. Switch Screens
Press to scroll the screens right and left. The Home screen has 5 screens.
You can switch between the screens by flicking.
page 29 "Intuitive Screen Operation Using Fingertips"
7. Application list
Press to display applications that are not displayed on the Home screen.
page 43 "Adding a Frequently Used Application or Widget to the Home Screen"
8. Current display position
Shows which of the five screens is currently displayed.
9. [Stop]
Press to stop scanning or printing.
You can change the setting to stop only a job in progress with [Stop Key to Suspend Print Job].
See "Administrator Tools (System Settings)", User Guide (Full Version).
See below when [Standard] is specified as the screen type of [Settings]. The names of the setting items may
differ from the [Classic] screen type.
See "Machine", User Guide (Full Version).
For details, see "Settings Menu Compatibility List (Classic to Standard Settings)", User Guide (Full Version).
10. [Menu]
Displayed if a menu is available in the currently selected application.
On the Home screen, press to restore the icons to their factory default positions.
11. [Home]
Press to display the Home screen.
28
Page 31

How to Use the Home Screen
12. [Back]
Press to return to the previous screen.
13. Date/Time and Toner remaining
The current date and time is displayed.
To display the information about Toner remaining, specify [Display Time/Remaining Toner] of [Screen
Features Settings] to [Remaining Toner].
The procedure is described using the [Classic] screen type of [Settings] as an example. When you are using
the [Standard] screen type, specify the settings in the screen below.
• [System Settings] [Display/Input] [Display]
The names of the setting items may differ on the setting screen for [Classic] and [Standard] screen types.
For details, see "Settings Menu Compatibility List (Classic to Standard Settings)", User Guide (Full Version).
14. [Check Status]
Press to check the following system statuses of the machine. This lights up in red when an error occurs.
• Machine’s status
Indicates the error status and network status.
• Operational status of each function
Status of functions such as Copy or Scanner
• Current jobs
• Job history
• Machine’s maintenance information
See "Checking the Machine Status from the Control Panel", User Guide (Full Version).
15. Icon display area
Displays the icons and widgets.
• You can change the screen displayed when the power is turned on under [Function Priority].
• See "Displaying Frequently Used Functions on the First Screen", User Guide (Full Version).
• When you press [Menu] [Reset Home Screen] with the Embedded Software Architecture
application being installed in the machine, the application icons are not deleted.
Intuitive Screen Operation Using Fingertips
On the Home screen or application screen, you can perform the following operations by touching the
screen with your fingertips.
Flick (for switching between screens)
Touch and slide your finger on the screen quickly left or right to switch between the screens.
29
Page 32

DZB181
DZB182
DZB183
1. Getting Started
Drag (for moving an icon)
Press and hold an icon, and then slide your finger while pressing on the screen to move the icon.
Long tap (for displaying the available menu screen)
Press and hold on a blank area on the screen to display the menu screen.
On the Home screen you can add a folder or change the wallpaper from the menu.
In some applications, you can also use the following actions to operate the screen:
Pinch-in (for zooming out the screen)
Touch the screen with your thumb and forefinger, and pinch them together. This feature is useful
when previewing files and images.
30
Page 33

DZB185
DZB184
How to Use the Home Screen
Pinch-out (for zooming in the screen)
Touch the screen with your thumb and forefinger, and spread them apart. You can also zoom in the
screen by tapping the screen twice quickly. When you quickly tap the screen twice again, the
screen returns to full display. This feature is useful when previewing files and images.
31
Page 34

DZX020
1. Getting Started
How to Use the Copy Screen
You can select from one of two types for the Copy screen:
Standard (factory-default)
The basic functions that are used frequently are displayed with big keys. Scroll down the screen to
see the keys used to configure the functions for finishing or editing.
No Scrolling Screen
You can see all the function keys on a single screen. You do not need to scroll through the screens
to select a function.
• To switch the screen type, press [Menu]( ) [Screen Settings] [Select Screen Layout] on the
Copy screen.
• You can use the same functions on either screen.
• When the administrator has configured user authentication and User's Own Customization is
enabled, each login user can change the screen type.
How to Use the Copy Screen (Standard)
You can customize the layout and how the keys are displayed on the Copy screen in Standard. For
details, see page 35 "Changing the Layout or Display of the Keys of the Copy Function".
32
Page 35

1
7
2
3
4
5
6
DZX022
How to Use the Copy Screen
1. Copy function keys
Press a key to select the function to assign to the key. Flick up and down on the screen to display the keys out
of the visible area. The keys with assigned functions are displayed in yellow or with in the upper left corner.
Depending on the assigned function, the display of the key changes according to the specified setting.
2. [Reset]
Reset the settings configured on the Copy screen.
3. Preview of the current setting status
Displays an image representing the settings configured on the Copy screen. Press the image to display the list
of the settings.
4. [Sample Copy]
Press to make a partial copy as a test before proceeding to copy the rest of the original.
See "Making a Partial Copy as a Test and Copying the Rest of the Original", User Guide (Full Version).
5. [Start]
Press to perform copying.
33
Page 36

1
7
2
3
4
5
6
DZX024
1. Getting Started
6. Other keys for Copy function
Press to select the functions whose keys are out of the visible area of the screen. The key of the function that is
currently configured is displayed with in the upper left corner.
7. Select One Touch Job
You can see the preset settings in the machine or the job history. When user authentication is configured,
display the history of the executed jobs for each login user. When selecting a job history, its settings are
displayed on the current Copy screen. You can use the same settings as a previous job by selecting the job
history.
How to Use the Copy Screen (No Scrolling Screen)
1. Copy function keys
Press a key to select the function to assign to the key. The keys with assigned functions are displayed in yellow.
To see the display area in the illustration below, press or flick to the left or right.
2. [Reset]
Reset the settings configured on the Copy screen.
3. Preview of the current setting status
Displays an image representing the quantity and the settings configured on the Copy screen. Press [Quantity]
to display the number keys. Press the image to display the list of the settings.
4. [Sample Copy]
Press to make a partial copy as a test before proceeding to copy the rest of the original.
See "Making a Partial Copy as a Test and Copying the Rest of the Original", User Guide (Full Version).
5. [Start]
Press to perform copying.
6. Other keys for Copy function
Press to select the functions whose keys are out of the visible area of the screen. The key of the function that is
currently configured is displayed with in the upper left corner.
34
Page 37

µ
²±
³
DZX026
´
How to Use the Copy Screen
7. Select One Touch Job
You can see the preset settings in the machine or the job history. When user authentication is configured,
display the history of the executed jobs for each authenticated user. When selecting a job history, its settings
are displayed on the current Copy screen. You can use the same settings as a previous job by selecting the job
history.
Changing the Layout or Display of the Keys of the Copy Function
You can customize the layout and how the Copy function keys are displayed on the Copy screen in
Standard mode (Arranging keys mode).
When the administrator has configured user authentication and User's Own Customization is enabled,
each login user can customize the layout.
Switching to change the key layout mode
On the Copy screen, press and hold one of the keys until the screen changes, and then press [OK]
to display the screen of the arranging keys mode.
Changing the key layout
Press and hold the key to move, drag it to the location to display, and then press [OK].
Hiding a key
Press and hold the key to hide, drag it to "Hide the Keys", and then press [OK].
35
Page 38

DZX027
DZX028
1. Getting Started
Displaying a hidden key
Press "Hidden Key List" to display the hidden keys. Press and hold the key to display, drag it to the
location to display, and then press [OK].
Confirming the initial placement of the keys
Press [Menu](
) [Screen Settings] [Temporarily Restore Initial Key Layout] on the Copy
screen. After confirming, press [Back].
Resetting the key layout to the default
Press [Menu]( ) [Screen Settings] [Restore Initial Key Layout] [Restore] on the Copy
screen.
36
Page 39

1
3
5
4
DZX895
2
How to Use the Fax Screen
How to Use the Fax Screen
There are five kinds of functions and settings on the Fax screen.
1. Destination type selection
Switch the destination type between [Fax] (including IP-Fax) and [Internet Fax]. The items displayed in the
address book and destination entry screen for manual entry change also when you switch the destination type.
2. Transmission/reception information confirmation
Browse and print the received documents that are stored in the memory or on the hard disk drive of the
machine. You can also browse and print the transmission and reception history.
3. Transmission settings
You can specify the additional features to use when sending a fax, configure the scan settings appropriately
for the original to scan, and display a preview before sending the fax. You can also check the settings that are
currently specified and the remaining amount of memory.
4. Destination specification
You can select an address registered in the address book through one-touch operation. Press
destination by using various other methods such as by entering manually or selecting from the history. You can
also register a new destination in the address book.
5. Job history
Job history of the executed jobs is displayed. When user authentication is set, the job history of each
authenticated user is displayed. When you select a job history, the setting will be applied on the current Fax
screen. This feature is convenient when you are using the same setting repeatedly.
to specify a
Customizing the [Send Settings] Screen
Press and hold a key on the [Send Settings] screen to customize the layout of the keys.
When the administrator has enabled user authentication and User's Own Customization, the screen can
be customized for each user.
37
Page 40

µ
²±
³
DZX026
´
DZX027
1. Getting Started
Switching to change the key layout mode
Long-press any key and press [OK] on the screen below to switch to the key sorting mode and
enable changing of the key layout.
Changing the key layout
Long-press a key to change the layout, drag it to a new location, and then press [OK].
Hiding a key
Long-press a key to hide, drag it to [Hide the Keys] (Trash icon), and then press [OK].
Displaying a hidden key
Press "Hidden Key List" to display the hidden keys. Press and hold the key to display, drag it to the
location to display, and then press [OK].
38
Page 41

DZX028
How to Use the Fax Screen
Confirming the initial placement of the keys
Press [Menu]( ) [Screen Settings] [Temporarily Restore Initial Key Layout] on the Fax
screen. After confirming, press [Back].
Resetting the key layout to the default
Press [Menu]( ) [Screen Settings] [Restore Initial Key Layout] [Restore] on the Fax
screen.
39
Page 42

1
3
4
DZX898
2
5
1. Getting Started
How to Use the Scanner Screen
There are five kinds of functions and settings on the Scanner screen.
1. Destination type selection
You can switch between [Scan to Email] and [Scan to Folder]. The items displayed in the address book and
destination entry screen for manual entry also change when you switch the destination type.
2. Scan Files Status
You can browse the transmission history of the sent documents and cancel sending of a document waiting in
the queue. The transmission file status may not be displayed depending on the security settings.
3. Transmission settings
You can specify the scan settings according to the type of document to scan and the purpose of the scanned
data, and display a preview before sending the data.
4. Destination specification
You can select a destination registered in the address book through one-touch operation. Press
destination by using various other methods such as by entering manually or selecting from the history. You can
also register a new destination in the address book.
5. One Touch Job Settings
You can see the preset settings in the machine or the job history. When user authentication is set, the job
history of each authenticated user is displayed. When you select a job history, the setting will be applied on
the current Scanner screen. This feature is convenient when you are using the same setting repeatedly.
to specify a
Customizing the [Send Settings] Screen
Press and hold a key on the [Send Settings] screen to customize the layout of the keys.
When the administrator has enabled user authentication and User's Own Customization, the screen can
be customized for each user.
Switching to change the key layout mode
Long-press any key and press [OK] on the screen below to switch to the key sorting mode and
enable changing of the key layout.
40
Page 43

µ
²±
³
DZX026
´
DZX027
How to Use the Scanner Screen
Changing the key layout
Long-press a key to change the layout, drag it to a new location, and then press [OK].
Hiding a key
Long-press a key to hide, drag it to [Hide the Keys] (Trash icon), and then press [OK].
Displaying a hidden key
Press "Hidden Key List" to display the hidden keys. Press and hold the key to display, drag it to the
location to display, and then press [OK].
41
Page 44

DZX028
1. Getting Started
Confirming the initial placement of the keys
Press [Menu]( ) [Screen Settings] [Temporarily Restore Initial Key Layout] on the Scanner
screen. After confirming, press [Back].
Resetting the key layout to the default
Press [Menu]( ) [Screen Settings] [Restore Initial Key Layout] [Restore] on the Scanner
screen.
42
Page 45

DZC186
Adding a Frequently Used Application or Widget to the Home Screen
Adding a Frequently Used Application or
Widget to the Home Screen
You can use a frequently used icon or widget easily by adding it to the Home screen. You can organize
the icons on the Home screen as you like by changing their order or using folders.
• Add an icon or widget from the application list screen.
• Each page of the Home screen can display up to 12 icons, widgets or folders, for a total of 60
items. A folder can hold up to 80 icons.
• You can add the following items to the Home screen: shortcuts of bookmarks in the browser on the
screen and programs registered in the Copy, Fax or Scanner.
• You cannot add a shortcut of a program registered by the document server function to the Home
screen.
• When you have set user authentication, log in and customize it. Each user can register their own
Home screen.
• A shortcut, folder, or widget cannot be created or moved if there is no space on the Home screen.
In this case, delete one of the registered items, and then perform the same operation.
• The names of icons and widgets are displayed up to 20 double-byte or 30 single-byte characters.
Names composed of 21 or more double-byte characters are displayed with "...", indicating the
20th and later characters.
43
Page 46

DZC187
1. Getting Started
Adding an Icon/Widget to the Home Screen
1. Press the application list icon on the Home screen.
2. Press and hold the icon or widget to be added to the application list screen.
• Select the [WIDGET] tab to add a widget, or select the [PROGRAM] tab to add a program.
3. After the screen changes to the Home screen, move the icon or widget to the desired
position and release it.
To add a classic application or program, select the type of application or program from the
displayed menu.
Creating a Folder to Organize Icons
1. Press and hold a spot on the Home screen where you want to create a folder.
44
Page 47

DZC188
Adding a Frequently Used Application or Widget to the Home Screen
2. When the "Add to Home Screen" screen is displayed, press [Folder].
3. Open the created folder, press and hold its title, and then change the folder name.
You can enter up to 30 characters for a folder name.
4. Drag the icon and release it over the folder.
45
Page 48

DZX153
1. Getting Started
Registering Frequently Used Settings as a Program
You can register a "program" made of a combination of the functions used in the Copy, Fax, or
Scanner, such as the scan setting, output setting, and address.
• You can load the registered program easily from the application screen.
• When you press the icon of a program on the Home screen, the machine applies the settings and
performs the function registered in the program automatically.
• You can register the following number of items as programs.
• Copy: 25 items
• Fax: 100 items
• Scanner: 100 items
• You cannot register the following settings as a program:
• Copy
[Orientation] of [2 Sided/Combine]
• Fax
[Subject], [Sender]
• Scanner
[Sender], [PDF Security Settings], [Start Number]
• You can register a destination on the program of the scanner function only when [Program Setting
for Destination] of [Scanner Settings] is set to [Include Destinations].
• "General Settings (Scanner Settings)", User Guide (Full Version)
• See below when [Standard] is specified as the screen type of [Settings]. The names of the setting
items may differ from the [Classic] screen type.
46
• See "Others (Scanner Settings)", User Guide (Full Version).
Page 49

DZX154
Registering Frequently Used Settings as a Program
• For details, see "Settings Menu Compatibility List (Classic to Standard Settings)", User Guide (Full
Version).
• When [Program Setting for Destination] of [Scanner Settings] is set to [Exclude Destinations], the
destination registered on the recalled program in the scanner function is not displayed.
• A folder destination with a destination protection code cannot be registered on a program of the
scanner function.
Registering Settings as a Program
First, configure the settings to be registered on the Copy, Fax, or Scanner screen, and then register them.
1. On the Home screen, press [Copy], [Fax], or [Scanner].
2. Specify scan and output settings to be registered as a program.
3. Press [Menu] ( ).
4. Press [Set Current Settings to Program].
47
Page 50

1. Getting Started
5. Press a program number to register the settings.
6. Enter a program name and select an icon, and then press [OK].
7. Press [Place].
The selected icon is displayed on the Home screen.
8. Press [Exit].
Changing the Contents of the Program
You can change a part of the program and overwrite it or change the contents and register them as a
new program.
1. On the Home screen, press [Copy], [Fax], or [Scanner].
48
Page 51

2. Press [Menu] ( ), and then press [Recall Program].
DZX153
DZX154
3. Press the program number to be changed.
Registering Frequently Used Settings as a Program
4. Change the scan and output settings.
5. Press [Menu] ( ), and then press [Set Current Settings to Program].
6. Select a program number to register the changed settings.
• To overwrite the program, select the number of the loaded program.
• To register the contents as a new program, select a number that is not programmed.
49
Page 52

1. Getting Started
7. Enter a program name and select an icon.
8. Press [OK].
• To change the icon or program name or to delete the program, press [Menu] ( ) and operate
from [Edit/Delete Program].
50
Page 53

Logging In from the Control Panel
Logging In from the Control Panel
When the machine is configured by the administrator to restrict use by unauthorized users, you must
authenticate your login information before starting the operation.
The authentication methods are described below.
• When Basic Authentication, Windows Authentication, or LDAP Authentication is configured on the
machine, enter the user name and password for authentication to log in to the machine before
starting operation.
• Depending on the machine settings, you can use an IC card or mobile device for authentication.
• If user code authentication is specified, you may need to enter the user code to operate the
restricted application.
To prevent use of the machine by an unauthorized person, always log out when you have finished using
the machine. While a user is logged in, the name of the user is displayed in the system message.
51
Page 54

DZC190
DZC191
1. Getting Started
• If the machine is not used for a specified period, the user is automatically logged out (Auto Logout).
The default setting for Auto Logout is 3 minutes. The period of Auto Logout can be changed by
[Auto Logout Timer] of [System Settings] or the Auto Logout setting can be disabled.
• See "Timer Settings", User Guide (Full Version).
• See below when [Standard] is specified as the screen type of [Settings]. The names of the setting
items may differ from the [Classic] screen type.
• See "Date/Time/Timer", User Guide (Full Version).
• For details, see "Settings Menu Compatibility List (Classic to Standard Settings)", User Guide (Full
Version).
• Ask the administrator for the login user name, login password, and user code.
• See "Verifying Users to Operate the Machine (User Authentication)", User Guide (Full Version).
Logging In by Entering the User Name and Password
Enter the authentication information using the keyboard displayed on the control panel.
1. Press [Login] at the top right on the screen.
2. Press [User Name].
3. Enter the login user name, and then press [Done].
52
4. Press [Password].
Page 55

DZC192
DZB640
Logging In from the Control Panel
5. Enter the login password, and then press [Done].
6. Press [Login].
• If an incorrect password is entered a specified number of times, login with the same name is
disabled (Lockout Function). The default setting for unsuccessful attempts before a user is locked out
is five. If the user is locked out, the administrator must release the lockout.
• To log out from the machine, press [Logout] at the top right on the screen, and then press [Execute].
Logging In Using an IC Card
Hold an IC card over the card reader to the right of the control panel. If the card is not registered on the
machine, enter the authentication information and register the card.
1. Hold an IC card over the card reader.
• When the card is registered on the machine, login operation finishes.
• When the card is not registered, the registration screen is displayed. Proceed to the next step
to register the card.
2. Enter the Login User Name and Login Password, and then press [Register].
3. Hold the IC card over the card reader again.
53
Page 56

1. Getting Started
• To log out, hold the IC card over the card reader or press [Logout] at the top right on the screen.
• If another user holds the IC card over the card reader while you are still logged in, you are
automatically logged out and the new user logs in.
Logging In Using a Mobile Device
Log in to the machine using the RICOH Smart Device Connector app on your mobile device. You need a
mobile device that supports Bluetooth Low Energy (BLE).
1. Enable the Bluetooth function on your mobile device.
2. Start the RICOH Smart Device Connector application on the mobile device, and then flick
left or right to display the login screen.
54
3. Press [NEXT].
Page 57

DZC193
Logging In from the Control Panel
4. Display the login screen on the control panel of the machine, and hold the mobile device
over the Bluetooth label.
• To log out from the machine, hold the mobile device over the Bluetooth label on the control panel
or press [Logout] at the top right on the screen.
• If another user holds a mobile device over the card reader while you are still logged in, you are
automatically logged out and the new user logs in.
Authenticating Using the User Code
When User Code Authentication is specified as the authentication method on the machine, enter the user
code before operating an application.
1. Enter the user code, and then press [OK].
• When you finish the operation of the application, press [Energy Save] ( ) or press and hold
[Reset] to release the authentication status.
Changing the Login Password
When Basic Authentication, Windows Authentication, or LDAP Authentication is configured on the
machine, change the password periodically to prevent use of the machine by an unauthorized person.
Passwords can contain the following characters. Make the password difficult to guess.
55
Page 58

EDN012
DZX016
1. Getting Started
• Uppercase letters: A to Z (26 characters)
• Lowercase letters: a to z (26 characters)
• Numbers: 0 to 9 (10 characters)
• Symbols: (space) ! “ # $ % & ‘ ( ) * + , – . / : ; < = > ? @ [ \ ] ^ _ ` { | } ~ (33 characters)
1. Log in to the machine.
2. Press [Address Book] on the Home screen.
3. Select the login user from the address book, and then press [Edit].
The items displayed on the screen vary depending on the version of RICOH Always Current
Technology that is implemented on the machine.
4. Press the [User Management / Others] tab [User Management].
56
Page 59

5. Enter the new login password, and then press [OK].
DZX187
You can enter up to 128 characters.
6. Press [Settings].
Logging In from the Control Panel
7. After completing the procedure, press [Home] (
).
57
Page 60

DZW102
1. Getting Started
Placing an Original on the Exposure Glass
Use the exposure glass to scan originals that cannot be placed in the auto document feeder (ADF), such
as books and license cards.
• When lowering the ADF, do not place your hands on the hinges and exposure glass. Your
hands or fingers are caught, which can result in injury.
• Do not lift the ADF forcefully. The cover of the ADF might open and cause injury. The ADF, or its
hinges may also become damaged.
1. Lift the ADF.
Lift the ADF by more than 30 degrees to detect the document size automatically when placing an
original on the exposure glass.
2. Place the original face down and aligned to the mark on the upper left corner of the scan
area.
58
page 212 "Recommended Original Size and Weight"
page 214 "Sizes Detectable with Auto Paper Select"
3. Lower the ADF.
• When you place a thick book or three-dimensional original on the exposure glass and lower the
ADF, the back side of the ADF rises up to accommodate the original.
Page 61

DZW103
DZB639
Placing an Original on the Exposure Glass
• Do not open or close the ADF with your hands placed in the space between the ADF and exposure
glass.
59
Page 62

DZW104
DZW105
1. Getting Started
Placing an Original in the Auto Document Feeder (ADF)
The ADF automatically scans multiple sheets of originals or two-sided originals at one time.
There are two types of ADF as follows:
Auto Reverse Document Feeder (ARDF)
When scanning a two-sided original, the machine scans the front side of the original first, and then
turns it over to scan the back side.
One-pass duplex scanning ADF
When scanning a two-sided original, the machine scans the front and back sides of the two-sided
original at one time.
• For details about the sizes of originals that you can place in the ADF, see the following:
page 212 "Recommended Original Size and Weight"
page 214 "Sizes Detectable with Auto Paper Select"
• If the originals described below are placed in the ADF, it may cause misfeeds, white lines, or
black lines, or result in damage to the originals. Place these originals on the exposure glass.
• Stapled or clipped originals
60
Page 63

DZW106
Placing an Original in the Auto Document Feeder (ADF)
• Perforated or torn originals
• Curled, folded, or creased originals
• Pasted originals
• Originals with adhesive tape, glue or paste stuck to them
• Originals with any kind of coating, such as thermal paper, art paper, aluminum foil,
carbon paper, or conductive paper
• Originals with perforated lines
• Originals with indexes, tags, or other projecting parts
• Sticky originals such as translucent paper
• Thin or highly flexible originals
• Thick originals such as postcards
• Bound originals such as books
• Transparent originals such as transparencies or translucent paper
page 58 "Placing an Original on the Exposure Glass"
• When loading an original written by pencil on the ADF, the original may be dirty from by
being scraped.
• Correct an original that tends to curl before setting on the machine.
• Take care so that multiple originals do not stick to each other and are not fed at once.
• Do not set an original that is wet with correcting fluid or ink. The scanning glass will be stained
and the stain will be scanned with the original.
Placing Originals in the ARDF
• Do not block the sensors with your hand. Be sure to load the originals neatly and do not push them
into the ADF forcibly. It may cause paper misfeeds or paper size error.
61
Page 64

DZW107
DZX108
1. Getting Started
1. Adjust the original guide to the original size.
2. Place the aligned originals squarely face up in the ARDF.
Place the originals with the first page facing up.
Fan sheets before loading so that multiple papers do not stick to each other and are not fed at
once.
Do not stack the originals beyond the limit mark.
62
• To scan originals larger than B4 or 81/2 × 14 size, raise the ADF’s extender on the ADF
output tray.
Page 65

DZW795
DZW109
DZW110
Placing an Original in the Auto Document Feeder (ADF)
• When using the ARDF to scan originals with a paper weight less than 42 g/m2 (11 lb. Bond),
move the slide tray on the original output tray to the left side. When the slide tray of the Auto
Reversible Document Feeder (ARDF) is in the left, the amount of output paper will be low. After
scanning a thin original, return the slide tray to the previous position.
Placing Originals in the One-pass Duplex Scanning ADF
• Do not block the sensors with your hand. Be sure to load the originals neatly and do not push them
into the ADF forcibly. It may cause paper misfeeds or paper size error.
63
Page 66

DZW111
DZX112
1. Getting Started
1. Adjust the original guide to the original size.
2. Place the aligned originals squarely face up in the one-pass duplex scanning ADF.
Place the originals with the first page facing up.
Fan sheets before loading so that multiple papers do not stick to each other and are not fed at
once.
Do not stack the originals beyond the limit mark.
64
• To scan originals larger than B4 or 81/2 × 14 size, pull out the ADF’s extender on the original
output tray, and then raise the stopper.
Page 67

DZW113
DZW181
DZW182
Placing an Original in the Auto Document Feeder (ADF)
• To scan originals that are smaller than A6 size, attach the small size paper unit as follows:
1. Open the ADF cover.
2. Engage the two projections of the small size paper unit with the holes on the one-pass
duplex scanning ADF.
3. Close the ADF cover.
65
Page 68

1. Getting Started
66
Page 69

2. Copy
DZC207
Basic Procedure for Copying Documents
Set the original on the exposure glass or auto document feeder (ADF) to make a copy.
• If the previous setting is still active, press [Reset] before copying.
1. Press [Copy] on the Home screen.
2. Place the original.
See "Placing an Original on the Scanner", User Guide (Full Version).
3. Select the color mode on the Copy screen.
4. Press [+] or [-] in [Quantity] to specify the number of copies.
You can enter this using the keyboard after pressing [Quantity] or a number.
5. Press [Paper Select] and select the paper to use as necessary.
• When you select [Auto Paper Select], the paper suitable for the original is selected
automatically. When the orientations of the original and paper in the paper tray do not
match, the machine rotates the copied image 90 degrees automatically. However, the copied
67
Page 70

2. Copy
image may not be rotated depending on the settings or types of Finishing, staple or punch, for
example.
• If the size of the original is not detected properly or when you make a copy on paper of a
special size, specify the paper tray in which the paper to use is loaded.
6. Press [Start].
• When the [Check the orientation of the original every time after pressing Start] check box is
selected in [Select the original's orientation], the screen below is displayed. Select the original
orientation as necessary. If you do not need to select this each time, clear the check box.
• When you place the original on the ADF, the process of copying the original starts.
• When you place the original on the exposure glass, the copy process starts according to the
setting contents. To make a copy of the second page or back side of the original, place the
original accordingly on the exposure glass, and then press [Start]. Press [Finish Scn] after
scanning all originals if necessary according to the setting contents.
• Originals scanned when no paper is loaded or when an error has occurred will be copied
automatically when the machine is ready to execute copying.
Reserving a Copy Job While Executing Another Copy Job
When [Reserve] is displayed on the execution screen of the current copy job, you can scan the original
of another copy job to execute after the current job is completed (Job Preset).
You can make reservations for up to eight jobs each in the Copier and Document Server functions.
• This function is available on machines implemented with RICOH Always Current Technology v1.1
or later.
68
Page 71

EDN033
Basic Procedure for Copying Documents
1. Press [Reserve] on the execution screen of a copy job.
2. Place a new original to scan on the machine.
See "Placing an Original on the Scanner", User Guide (Full Version).
3. Specify 2 sided, Combine, Sort, and other copy settings if necessary.
page 76 "Duplex Copying"
page 79 "Combining and Copying a Multi-page Original onto a Single Sheet of Paper"
page 85 "Copying in Page Order or for Each Page Number"
4. Press [Reserve Start].
The machine starts scanning the placed original.
After the current copy job is completed, the reserved copy job starts automatically.
• To display the Job Confirmation screen, press [Job Confirmation]. You can delete the reserved job
or view the preview image on the screen.
69
Page 72

DZB222
DZB224
DZB225
DZB223
2. Copy
Making Enlarged or Reduced Copies
You can enlarge or reduce the original when copying with the following methods:
• Enlarging or reducing at a specified reduction ratio or into a specified size (Zoom/Reduce/
Enlarge/Size Magnification)
• Enlarging or reducing according to the paper size (Auto Reduce/Enlarge)
• Reducing slightly (Create Margin)
Specifying a Copy Ratio or Size
1. Press [Copy] on the Home screen.
2. Place the original.
See "Placing an Original on the Scanner", User Guide (Full Version).
The base point of reduce/enlarge is different for the exposure glass and Auto Document Feeder
(ADF) as shown in the following table:
Setting position Base point Enlarge Reduce
Enlarged or reduced from the
top left.
Exposure glass
Enlarged or reduced from the
bottom left
Auto document
feeder (ADF)
70
Page 73

DZC234
Making Enlarged or Reduced Copies
When you set a 2-sided original in the One-pass duplex scanning ADF, the top right corner of the
original will be the base point for the enlargement/reduction of the reverse side. To enlarge or
reduce from the same point, set the original on the exposure glass and perform 2-sided copy.
3. Press [Copy Ratio] and select a copy ratio or size.
To specify a copy ratio or size other than the displayed setting, press [Others] and perform the
following procedure.
Specifying a copy ratio (Zoom/Reduce/Enlarge)
Enter a value or select the copy ratio.
Specifying a size (Size Magnification)
Press [Specify Copy Size] and enter the length of the original and copied image.
4. Press [Start].
• You can change the options of the copy ratio that is displayed on the Copy screen when pressing
[Copy Ratio]. You can also change the enlargement and reduction ratios that appear when [Copy
Ratio] [Others] is pressed on the Copy screen.
71
Page 74

DZC235
DZB236
2. Copy
• See "Reproduction Ratio", User Guide (Full Version).
• See below when [Standard] is specified as the screen type of [Settings]. The names of the setting
items may differ from the [Classic] screen type.
• See "Reduce / Enlarge", User Guide (Full Version).
• For details, see "Settings Menu Compatibility List (Classic to Standard Settings)", User Guide (Full
Version).
Enlarging or Reducing According to the Paper Size
The original is enlarged or reduced to fit on the specified paper size (Scale to Paper Size)
The document sizes that can be detected automatically are shown in the table below. To copy a
document whose size is not listed in the table, specify [Original Size] on the Copy screen.
(mainly Europe and Asia)
Original size A3 B4 JIS A4 B5 JIS A5 B6 JIS
Exposure glass
*1
11 ×1781/
- - - -
2
× 11
ADF
Portrait orientation ( ) only
*1
81/
× 13
2
72
Page 75

(mainly North America)
DZC237
Making Enlarged or Reduced Copies
Original size
11 ×1781/
× 14
81/
2
×
2
132/
81/
× 11
5
51/
2
2
81/
10 ×
×
2
14
71/
×
101/
2
4
Exposure glass - - - -
ADF
1. Press [Copy] on the Home screen.
2. Place the original.
See "Placing an Original on the Scanner", User Guide (Full Version).
3. On the Copy screen, press [Copy Ratio] and [Fit to Paper Size].
A3 A4
4. Select the tray loaded with the paper to use.
73
Page 76

DZB240
2. Copy
When the orientations of the original and paper in the paper tray do not match, the machine
rotates the copied image automatically. To reduce an original of A3 (11 × 17) size to A4 (81/2 ×
11) size, for example, you can select either A4 (81/2 × 11) or A4 (81/2 × 11) .
5. Press [Start].
Reducing Slightly to Increase the Margins
The original is reduced to 93% in size and printed in the center of the paper. This setting is useful if you
want to copy an original to a paper of the same size without the edges being slightly cropped when
copied in full size or to increase the margins.
1. Press [Copy] on the Home screen.
2. Place the original.
See "Placing an Original on the Scanner", User Guide (Full Version).
3. On the Copy screen, press [Create Margin].
• If the key is not displayed, register [Create Margin], by using [Customize Function: Copy
(Standard Mode)] or [Customize Function: Copy (All View Mode)].
• See "General Features (Copier / Document Server Settings)", User Guide (Full Version).
• See below when [Standard] is specified as the screen type of [Settings]. The names of the
setting items may differ from the [Classic] screen type.
See "Others (Copier / Document Server Settings)", User Guide (Full Version).
For details, see "Settings Menu Compatibility List (Classic to Standard Settings)", User Guide
(Full Version).
4. Press [Start].
• You can change the copy ratio of [Create Margin] to a value other than 93%.
74
Page 77

Making Enlarged or Reduced Copies
• See "Reproduction Ratio", User Guide (Full Version).
• See below when [Standard] is specified as the screen type of [Settings]. The names of the setting
items may differ from the [Classic] screen type.
• See "Reduce / Enlarge", User Guide (Full Version).
• For details, see "Settings Menu Compatibility List (Classic to Standard Settings)", User Guide (Full
Version).
75
Page 78

DZB251
2. Copy
Duplex Copying
You can copy two 1-sided pages or one 2-sided page onto the front and back sides of a single sheet of
paper.
The size of the original that can be copied differs from that of the 1-sided copy.
page 212 "Recommended Original Size and Weight"
1. Press [Copy] on the Home screen.
76
2. Press [1 Sided 2 Sided] or [2 Sided 2 Sided] on the Copy screen.
Duplex Copying with the Settings Other Than Those Displayed on the Keys
1. Press [2Sd/Comb/Series].
2. Press [2 Sided/Combine].
3. Specify the original and print side settings.
Page 79

DZC252
• Original Direction: Specify the orientation to place the originals.
• Original Setting: Specify the condition of the originals to copy (1 sided/2 sided
(Page Opening Direction)).
• Print Side Setting: Select the finish from [Open to Right/Left] or [Open to Top].
4. Press [OK].
3. Place the original.
See "Placing an Original on the Scanner", User Guide (Full Version).
4. Press [Start].
Duplex Copying
• When placing the originals on the exposure glass, press [Finish Scn] after scanning all of the
originals if necessary according to the setting contents and number of originals.
• You can specify the margins when copying a 1-sided original onto both sides of paper.
• See "Edit", User Guide (Full Version).
• See below when [Standard] is specified as the screen type of [Settings]. The names of the setting
items may differ from the [Classic] screen type.
• See "Edit / Stamp", User Guide (Full Version).
• For details, see "Settings Menu Compatibility List (Classic to Standard Settings)", User Guide (Full
Version).
• You cannot perform Duplex Copy onto the following paper types:
• Translucent paper
• Label paper (adhesive labels)
• Transparency
• Envelopes
• Coated paper
• You can change the setting contents of the two-sided copy key on the Copy screen.
• See "General Features (Copier / Document Server Settings)", User Guide (Full Version).
77
Page 80

2. Copy
• See below when [Standard] is specified as the screen type of [Settings]. The names of the setting
items may differ from the [Classic] screen type.
• See "Others (Copier / Document Server Settings)", User Guide (Full Version).
• For details, see "Settings Menu Compatibility List (Classic to Standard Settings)", User Guide (Full
Version).
• Use the [Series] function to copy the front and back sides of a two-sided original onto one side of a
sheet page by page.
• See "Copying Facing Pages of a Book Type Original or Two-sided Original", User Guide (Full
Version).
78
Page 81

3
2
1
3
21
3
1
2
DZB253
DZB254
DZB256
21
DZB257
4
1
DZB258
1
8
DZB255
DZB259
2
1
DZB260
4
1
DZB261
1
8
Combining and Copying a Multi-page Original onto a Single Sheet of Paper
Combining and Copying a Multi-page Original
onto a Single Sheet of Paper
You can copy multiple sheets in an original onto one side or both sides of a sheet of paper to save
paper.
The arrangement of copied pages and copy ratio varies depending on the original orientation and
combined pages.
Original Orientation Combine 2 pages Combine 4 pages Combine 8 pages
1. Press [Copy] on the Home screen.
2. On the Copy screen, press [1sided Comb 2orig].
To combine with the settings other than those displayed on the keys
1. Press [2Sd/Comb/Series].
2. Press [2 Sided/Combine].
79
Page 82

DZB262
3
4
2
1
DZB263
3
4
2
1
2. Copy
3. Specify about the original, print side, and combining.
• Original Direction: Specify the orientation to place the originals.
• Original Setting: Specify the condition of the originals to copy (1 sided/2 sided
(Page Opening Direction)).
• Print Side Setting: Specify the condition of the copied sheet (1 sided/2 sided (Page
Opening Direction)).
• Combine Settings: Specify the number of pages to combine on one side of a sheet.
3. Press [Paper Select] and select the paper to copy onto.
4. Place an original.
See "Placing an Original on the Scanner", User Guide (Full Version).
To position the right-page first and then the left page when copying an original written
longitudinally, place the original upside down in the ADF.
Example: Combining 2 Pages
Orientation Results
80
Page 83

Combining and Copying a Multi-page Original onto a Single Sheet of Paper
5. Press [Start].
When placing the originals on the exposure glass, press [Finish Scn] after scanning all of the
originals if necessary according to the number of originals.
• The minimum copy ratio in the Combine function is 25%. For example, if you copy an A3 (11 ×
17)-size original onto A4 (81/2 × 11)-size paper with [1sided Comb 4orig], the copy ratio
becomes less than 25% and parts of the image might not be copied.
• [Erase Original Shadow in Combine]: Determine whether to erase the boundary margin
around each original to maintain the margin
• [Copy Order in Combine]: The order of combined images
• [Separation Line in Combine]: The separation line between combined pages
See "Edit", User Guide (Full Version).
• See below when [Standard] is specified as the screen type of [Settings]. The names of the
setting items may differ from the [Classic] screen type.
See "2 Sided / Combine", User Guide (Full Version).
For details, see "Settings Menu Compatibility List (Classic to Standard Settings)", User Guide
(Full Version).
• You can change the setting contents of the Combine key on the Copy screen.
• See "General Features (Copier / Document Server Settings)", User Guide (Full Version).
• See below when [Standard] is specified as the screen type of [Settings]. The names of the setting
items may differ from the [Classic] screen type.
• See "Others (Copier / Document Server Settings)", User Guide (Full Version).
• For details, see "Settings Menu Compatibility List (Classic to Standard Settings)", User Guide (Full
Version).
81
Page 84

DZC265
2. Copy
Copying Onto Envelopes
To copy onto envelopes that are not usually used, set them in the bypass tray. If you copy onto
envelopes frequently, set them in the paper tray.
Copying Onto Envelopes in the Bypass Tray
• The Duplex Copy function cannot be used for envelopes. If Duplex Copy is specified, press the
[Reset] key to cancel the setting.
1. Press [Copy] on the Home screen.
2. Set the envelope in the bypass tray with the copying side face down.
page 206 "Envelope Orientation and Recommended Status"
The "Bypass Tray Paper Settings" screen is displayed.
3. Press [Change Setting].
When envelopes are set in the bypass tray, the type and size are not detected automatically.
Specify the type and size of the paper manually.
4. Select [Envelope], and then proceed to the next screen.
82
Page 85

DZB274
Copying Onto Envelopes
To change the envelope weight, press [ChngThickness] to specify the weight.
5. Check that the selected envelope size is correct, and then press [OK].
• If the selected envelope size is not the same as the actual size, select the correct envelope
size.
• When you select [Custom Size], enter the envelope size. When the envelope is set with the
flap opened, be sure to include the width of the flap.
6. Place the original on the exposure glass.
page 206 "Envelope Orientation and Recommended Status"
7. Press [Start].
Copying Onto Envelopes in the Paper Tray
• The Duplex Copy function cannot be used for envelopes. If Duplex Copy is specified, press the
[Reset] key to cancel the setting.
1. Set the envelopes in the paper tray
page 206 "Envelope Orientation and Recommended Status"
2. Press [Copy] on the Home screen.
83
Page 86

DZC270
2. Copy
3. Press [Paper Select] on the Copy screen.
4. Select the paper tray in which the envelopes are set.
5. Place the original on the exposure glass.
page 206 "Envelope Orientation and Recommended Status"
6. Press [Start].
84
Page 87

DZB241
3
3
2
2
1
3
2
1
1
DZB242
3
2
1
1
2
2
3
3
1
DZB243
3
3
2
2
1
1
3
2
1
Copying in Page Order or for Each Page Number
Copying in Page Order or for Each Page
Number
When copying two or more copies of multi-page originals, you can specify the page order as described
below.
Sort
Copies in the order of the original.
Stack
Groups together copies of each page in a multi-page original.
Rotate Sort
Copies in the order of the original and outputs by rotating each copy set. Each copy set is output
lengthwise and breadthwise alternately to identify each set.
To specify rotate sort, use two paper trays and set the same size and type of paper in the trays in
different orientations, vertically ( ) and horizontally ( ). When the paper cannot be set in vertical
( ) orientation, you cannot specify Rotate Sort.
• An optional unit such as the shift tray or finisher is required to use this function.
• page 374 "Functions Requiring Optional Configurations"
85
Page 88

2. Copy
1. Press [Copy] on the Home screen.
2. Place the original.
See "Placing an Original on the Scanner", User Guide (Full Version).
3. Press [Sort/Stack] on the Copy screen.
If the key is not displayed, select it from [Finishing].
If the optional equipment that can stack the copied sheets is not attached to the machine, only
[Sort] is displayed on the key.
4. Select the function to specify.
86
5. Press [Start].
• When selecting [Sort] or [Rotate Sort] and placing an original on the exposure glass, a single
set of copies is made. After scanning all of the originals, press [Finish Scn] to copy the rest of
the sets.
• If you specify sort or stack with the finisher or internal shift tray installed, the output sheets will be
shifted by each set.
• You can change the action to perform when paper or memory runs out during sorting under [Rotate
Sort: Auto Paper Continue] or [Memory Full Auto Scan Restart].
• See "Input / Output", User Guide (Full Version).
• See below when [Standard] is specified as the screen type of [Settings]. The names of the setting
items may differ from the [Classic] screen type.
• See "Finishing", User Guide (Full Version).
Page 89

Copying in Page Order or for Each Page Number
• For details, see "Settings Menu Compatibility List (Classic to Standard Settings)", User Guide (Full
Version).
87
Page 90

2. Copy
88
Page 91

3. Fax
DZC300
DZC301
Basic Procedure for Transmitting Faxes
The machine scans an original to transmit it by fax into the machine's memory before establishing a
communication with the destination (Memory Transmission).
You can also transmit a fax while confirming the status of the fax destination.
See "Sending a Fax While Scanning the Original", User Guide (Full Version).
1. Press [Fax] on the Home screen.
2. Check that [Fax] and [Memory Transmission] are displayed on the fax screen.
3. Place the original in the ADF or on the exposure glass.
See "Setting an Original to Send by Fax on the Scanner", User Guide (Full Version).
4. Press [Settings], and then specify the scan settings.
See "Sending a Fax at the Image Quality Suitable for the Original", User Guide (Full Version).
5. Specify the destination.
• To enter the fax number manually, select the destination from the destination history, or search
for the destination in the address book, press , and specify the destination.
89
Page 92

DZC302
DZC303
3. Fax
You can select only the destination entered using the numeric keypad from the history.
• To specify the destination again, press .
6. On the [Settings] screen, specify the [Sender] as necessary.
• When a login user is operating the machine, the login user becomes the sender.
To receive a transmission result by e-mail, select [Email Transmission Results]. The e-mail
address that you selected the [Register as both a destination and a sender] check box when
registering the address will be used as the e-mail address of the sender.
See "Registering E-mail Addresses in the Address Book", User Guide (Full Version).
• To print the sender's name on the page received at the destination, select [Stamp Sender
Name].
7. Press [Start].
To cancel transmission after scanning the original, press [Stop] and operate in [Job Status]
[Transmission Standby File].
See "Confirming and Handling a Document in the Fax Queue", User Guide (Full Version).
• If the telephone line you are connected to requires time to connect to the public line after you dial
the external number, enter a [Pause] after entering the number to specify the time to wait before
dialing the number. The machine pauses for about two seconds for each single [Pause] entered.
• To use tone-dialing in a pulse-dialing environment, press [Tone]. A tone signal is generated for
every number you enter afterward.
90
Page 93

Basic Procedure for Transmitting Faxes
• You can perform Immediate transmission only when the total number of destinations specified for
all documents exceeds the maximum value.
• The communication that has been initiated first is displayed on the screen when performing three
simultaneous communications.
91
Page 94

EDN022
3. Fax
Registering Fax Numbers in the Address Book
By registering the destinations to which you frequently send faxes together with the send conditions in the
address book, you can easily send faxes.
Registering a Fax Number and Send Conditions
1. Press [Address Book] on the Home screen.
2. Press [Register] on the Address Book screen.
92
The items displayed on the screen vary depending on the version of RICOH Always Current
Technology that is implemented on the machine.
3. Enter the information of the destination on the [Name] tab, and then select a title to
classify it.
Page 95

4. Press [Destinations] tab [Fax].
DZC135
DZC131
5. Specify the Fax Destinations and send conditions.
Registering Fax Numbers in the Address Book
• Select Line: Select the line to use.
• International Transmission Mode: Specify whether to reduce errors occurring when sending
abroad.
• Fax Header: Select the name of the sender printed on the reception sheet of the destination.
Register the fax header in advance.
See "Printing the Destination Name, Fax Header, and Standard Message on the Fax
Received at the Destination", User Guide (Full Version).
• Label Insertion: Specify the name (title + name) and fixed phrase printed on the reception
sheet of the destination.
See "Printing the Destination Name, Fax Header, and Standard Message on the Fax
Received at the Destination", User Guide (Full Version).
6. Press the [User Management / Others] tab, and specify the required settings.
93
Page 96

EDN013
3. Fax
• User Management: Enter the authentication information to login and use the machine.
• Registration Destination Group: Select a group to which this destination belongs as necessary.
Register the group in advance.
See "Registering Groups in the Address Book", User Guide (Full Version).
• Display Priority: When the destinations are sorted in the order of priority, a destination with
higher priority is displayed prior to that with lower priority. The destinations with the same
priority are displayed in the order of registration.
• Destination Protection: Select this check box to require entering of the protection code to
select the destination.
See "Using the Protection Function to Prevent the Misuse of Addresses", User Guide (Full
Version).
7. Press [OK].
8. After completing the procedure, press [Home] ( ).
Changing/Deleting the Registered Data Such as Fax Number
If you delete the destination used for the personal box, file transmission will fail. Exclude the destination
from the personal box before deleting it.
1. Press [Address Book] on the Home screen.
2. Select the destination to change or delete on the Address Book screen.
The items displayed on the screen vary depending on the version of RICOH Always Current
Technology that is implemented on the machine.
You can delete multiple destinations at one time.
94
3. Press [Edit] or [Delete] to change or delete the destination information.
4. When changing or deleting is complete, press [Home] ( ).
Page 97

Displaying a Preview before Sending a Fax
Displaying a Preview before Sending a Fax
You can display the preview of the scanned document on the display of the machine to check if it is
scanned as specified.
This function cannot be used when sending a fax while using any of the following:
• Immediate Transmission
• On-hook dialing
• Manual dialing
To display the preview in the correct orientation, specify the [Original Orientation] in [Settings] correctly.
1. Press [Fax] on the Home screen.
2. Place the original in the Auto Document Feeder (ADF) or on the exposure glass.
See "Setting an Original to Send by Fax on the Scanner", User Guide (Full Version).
3. On the fax screen, press [Settings]
the original, and then press [Preview].
4. Configure the scan settings.
See "Sending a Fax at the Image Quality Suitable for the Original", User Guide (Full Version).
5. Specify the destination on the fax screen, and then press [Start].
6. Check the preview.
[Original Orientation] to specify the orientation of
95
Page 98

3. Fax
• Flick the image left or right to switch between the pages.
• Pinch in or out on the image to zoom in or out.
7. Press [Transmit].
To cancel transmission and perform the procedure from scanning the original again, press
[Cancel].
96
Page 99

DZC304
Viewing the Transmission Result of Sent Faxes
Viewing the Transmission Result of Sent Faxes
You can check the result of a fax transmission on the fax screen, in various reports, or on the screen of a
computer.
The following reports are printed according to the transmission result or the settings:
• Communication Result Report: The result of Memory Transmission is printed.
• Immediate TX Result Report: The result of Immediate Transmission is printed.
• Communication Failure Report: This report is printed when a fax could not be sent to all specified
destinations by Memory Transmission.
• Error Report: This report is printed when sending a fax by Immediate Transmission failed.
• Memory Storage Report: This report is printed when the scanned document could not be stored in
the memory.
• The fax transmission results can also be confirmed in Records.
• See "Viewing the History of Sent and Received Faxes", User Guide (Full Version).
• Specify [Notification of Results] when sending a fax to receive the transmission result by e-mail.
• See "Checking by E-mail", User Guide (Full Version).
Confirming the Information on the Fax Screen
Press [Job Status] [Transmission File Status] on the fax screen to view the information.
1. Press [Fax] on the Home screen.
2. Press [Job Status] on the fax screen.
97
Page 100

3. Fax
3. Press [Transmission Result], and select the transmission result to display.
• Display All
Displays the transmission results from among the total number of both transmission and
reception results, which cannot exceed 1,000.
• Display per User
Press this to display the result of transmissions performed by a specific user. Select the user to
display the results and press [Display].
• Display Specified Period
Press this to display the result of transmissions performed in the specified period. Specify the
period by entering the start and end dates or selecting from the calendar displayed on the
screen, and press [Display].
4. Check the transmission results and press [Exit].
• "--LAN-Fax -->" is shown as the result of transmission to the machine when you send a fax
from your computer. For the result of transmission to the destination, refer to the transmission
result of the same document number.
• The destination may be displayed as "*" depending on the security settings.
• In a field for an e-mail that was encrypted and distributed or forwarded, the encryption icon
( ) is displayed.
• To display the result of the transmission that is completed while displaying the transmission
results, close the transmission result screen and open it again.
• You cannot confirm or change an outgoing document in LAN-Fax, document waiting, or
document whose status is "Sending".
Checking the Result in Communication Result Report
In the factory default setting, the machine is configured not to print the report automatically. Specify Auto
Print to print the report every time you send a document by Memory Transmission. When more than one
destination is specified, the report is printed after transmitting the fax to all destinations is completed.
98
 Loading...