

Page 1
User Guide
Getting Started
Selected Version
Copy
Fax
Print
Scan
Document Server
Web Image Monitor
Adding Paper and Toner
Troubleshooting
Specifications for the Machine
Legal and Contact Information
For information not found in this manual,
see the online manuals available on our
web site (https://www.ricoh.com/) or via the
control panel.
For safe and correct use, be sure to read Safety Information before
using the machine.
Page 2

Page 3

How to Read the Manuals
Symbols Used in the Manuals
This manual uses the following symbols:
Indicates points to pay attention to when using functions. This symbol indicates points that may result in
the product or service becoming unusable or result in the loss of data if the instructions are not obeyed.
Be sure to read these explanations.
Indicates supplementary explanations of the machine's functions, and instructions on resolving user
errors.
[ ]
Indicates the names of keys or buttons on the product or display.
1
Page 4

TABLE OF CONTENTS
How to Read the Manuals.................................................................................................................................1
Symbols Used in the Manuals.......................................................................................................................1
1. Getting Started
Turning On and Off the Power.......................................................................................................................... 9
Turning On the Main Power.......................................................................................................................... 9
Turning Off the Main Power........................................................................................................................10
Energy Saving Mode...................................................................................................................................10
Guide to Names and Functions of Components............................................................................................12
Exterior: Front and Left View....................................................................................................................... 12
Exterior: Front and Right View.....................................................................................................................14
Exterior: Rear and Left View........................................................................................................................16
Interior: Front View.......................................................................................................................................18
Names and Functions of the Control Panel....................................................................................................19
Touch Panel/Interface.................................................................................................................................19
LED Indicators...............................................................................................................................................20
Order of Option Installation............................................................................................................................22
Attaching the Paper Feed Unit........................................................................................................................ 23
Installing the Wireless LAN Interface Board.................................................................................................. 26
Installing the IEEE 1284 Interface Board.......................................................................................................28
Installing the Device Server Option................................................................................................................ 30
Installing the File Format Converter................................................................................................................ 33
Installing SD Card Options..............................................................................................................................35
Changing the Display Language.................................................................................................................... 38
How to Use the Home Screen.........................................................................................................................39
Intuitive Screen Operation Using Fingertips.............................................................................................. 41
How to Use the Copy Screen..........................................................................................................................44
How to Use the Copy Screen (Standard View)........................................................................................ 44
How to Use the Copy Screen (Full View).................................................................................................. 46
Changing the Layout or Display of the Keys of the Copy Function......................................................... 47
How to Use the Fax Screen.............................................................................................................................49
Customizing the [Settings] Screen.............................................................................................................. 49
How to Use the Scanner Screen..................................................................................................................... 52
Customizing the [Send Settings] Screen.................................................................................................... 52
2
Page 5

Adding a Frequently Used Application or Widget to the Home Screen.....................................................55
Adding an Icon/Widget to the Home Screen.......................................................................................... 56
Moving or Deleting Icons and Widgets.....................................................................................................56
Creating a Folder to Organize Icons......................................................................................................... 57
Registering Frequently Used Settings as a Program......................................................................................58
Registering Settings as a Program.............................................................................................................. 59
Changing the Contents of the Program......................................................................................................60
Logging In from the Control Panel.................................................................................................................. 62
Logging In by Entering the User Name and Password.............................................................................63
Logging In Using an IC Card......................................................................................................................64
Logging In Using a Mobile Device.............................................................................................................65
Authenticating Using the User Code.......................................................................................................... 66
Changing the Login Password.................................................................................................................... 66
Placing an Original on the Exposure Glass................................................................................................... 69
Placing an Original in the Auto Document Feeder (ADF).............................................................................71
2. Copy
Basic Procedure for Copying Documents...................................................................................................... 75
Making Enlarged or Reduced Copies............................................................................................................77
Specifying a Copy Ratio or Size................................................................................................................ 77
Enlarging or Reducing According to the Paper Size................................................................................ 79
Reducing Slightly to Increase the Margins................................................................................................ 80
Duplex Copying............................................................................................................................................... 82
Combining and Copying a Multi-page Original onto a Single Sheet of Paper.........................................84
Copying Onto Envelopes................................................................................................................................ 87
Copying Onto Envelopes in the Bypass Tray............................................................................................ 87
Copying Onto Envelopes in the Paper Tray.............................................................................................. 88
Copying in Page Order or for Each Page Number...................................................................................... 90
3. Fax
Basic Procedure for Transmitting Faxes..........................................................................................................93
Registering Fax Numbers in the Address Book..............................................................................................96
Registering a Fax Number and Send Conditions......................................................................................96
Changing/Deleting the Registered Data Such as Fax Number.............................................................. 98
Displaying a Preview before Sending a Fax..................................................................................................99
3
Page 6

Viewing the Transmission Result of Sent Faxes............................................................................................101
Confirming the Information on the Fax Screen....................................................................................... 101
Checking the Result in Communication Result Report.............................................................................103
Checking the Result in Immediate TX Result Report................................................................................ 103
Checking the Result in Communication Failure Report...........................................................................103
Checking the Result in Error Report..........................................................................................................103
Viewing Memory Storage Report............................................................................................................ 103
Checking by E-mail................................................................................................................................... 104
Confirming the Information in Web Image Monitor...............................................................................105
4. Print
Installing the Printer Driver by Using Device Software Manager Installer................................................ 107
Installing Device Software Manager from the CD-ROM.......................................................................107
Installing Device Software Manager from the Downloaded File..........................................................109
Installing the Printer Driver for Network Connection (Windows)...............................................................113
Installing the PCL 6 Printer Driver from the CD-ROM.............................................................................113
Installing the PostScript 3 Printer Driver from the CD-ROM...................................................................116
Installing the PCL 6/PostScript 3 Printer Driver from the Downloaded File..........................................118
If the Machine Cannot Be Found............................................................................................................. 119
Installing the Printer Driver for Network Connection (OS X/macOS)...................................................... 123
Installing the PPD file................................................................................................................................. 123
Registering the Machine in [Print & Scan] or [Printers & Scanners]...................................................... 124
Specifying the Option Settings................................................................................................................. 127
Basic Procedure for Printing Documents...................................................................................................... 129
Printing a Document in Windows.............................................................................................................129
Printing a Document in OS X/macOS.....................................................................................................131
Printing on Both Sides of Paper.................................................................................................................... 134
Specifying 2-sided Print (Windows)........................................................................................................ 134
Specifying 2-sided Print (OS X/macOS)................................................................................................135
Combining and Printing Multiple Pages on a Single Sheet of Paper........................................................ 136
Specifying the Combine 2 Originals Function (Windows).................................................................... 136
Specifying the Combine 2 Originals Function (OS X/macOS)............................................................ 137
Printing on Envelopes.................................................................................................................................... 138
Printing Documents Stored in the Printer from the Control Panel............................................................... 141
4
Page 7

Printing from a USB Flash Memory Device or SD Card Directly............................................................... 142
Printable File Formats................................................................................................................................ 142
Printing from a Memory Storage Device.................................................................................................143
5. Scan
Scanning Documents and Sending the Scanned Data by E-mail..............................................................145
Basic Procedure for Sending an E-mail................................................................................................... 145
Registering the E-mail Destination Specified When Sending an E-mail in the Address Book.............147
Scanning Documents and Sending the Scanned Data to a Folder........................................................... 150
Printing the Check Sheet........................................................................................................................... 150
Confirming the Computer Information (Windows)................................................................................. 151
Creating a Shared Folder (Windows).....................................................................................................152
Confirming the Computer Information (OS X/macOS).........................................................................155
Creating a Shared Folder (OS X/macOS).............................................................................................155
Registering the Created Shared Folder in the Address Book................................................................ 157
Basic Procedure for Performing Send to Folder......................................................................................159
Scanning an Original with Suitable Quality and Density...........................................................................161
Specifying the File Type or File Name When Scanning a Document....................................................... 164
6. Document Server
Storing Documents in Document Server.......................................................................................................167
Printing Documents in Document Server...................................................................................................... 169
Printing a Document with the Settings Specified When Scanned..........................................................169
Changing the Print Settings to Print a Document.....................................................................................170
Specifying a Page to Print.........................................................................................................................172
7. Web Image Monitor
Using Web Image Monitor...........................................................................................................................175
What You Can Do on the Web Image Monitor..................................................................................... 176
Web Image Monitor Screen.................................................................................................................... 177
Specifying Web Image Monitor Help.....................................................................................................178
8. Adding Paper and Toner
Loading Paper into the Paper Tray...............................................................................................................181
Loading Paper into Tray 1 to 5................................................................................................................ 181
Loading Paper into the Bypass Tray........................................................................................................ 186
Specifying Regular Sizes Using the Control Panel................................................................................. 187
5
Page 8

Specifying a Custom Size Paper Using the Control Panel..................................................................... 188
Specifying Paper Type and Thickness Settings....................................................................................... 188
Recommended Paper Sizes and Types........................................................................................................190
Tray 1......................................................................................................................................................... 190
Paper Feed Unit.........................................................................................................................................191
Bypass Tray................................................................................................................................................192
Notes on Special Paper............................................................................................................................193
Paper Thickness for Each Paper Weight..................................................................................................193
Unusable Paper......................................................................................................................................... 194
Paper Storage............................................................................................................................................195
Saving Printouts......................................................................................................................................... 195
Thick Paper Orientation and Recommended Status................................................................................... 197
Envelope Orientation and Recommended Status....................................................................................... 198
Using the Copy Function...........................................................................................................................199
Using the Printer Function..........................................................................................................................199
Loading Orientation-fixed Paper or Two-sided Paper............................................................................... 200
Copying onto Letterhead Paper...............................................................................................................200
Printing onto Letterhead Paper Using the Printer Driver..........................................................................201
Recommended Original Size and Weight.................................................................................................. 202
Replacing the Toner.......................................................................................................................................203
Watching the Video for Replacing the Toner..........................................................................................203
How to Replace the Toner........................................................................................................................ 204
Precautions When Storing Toner..............................................................................................................207
Precautions When Replacing the Toner.................................................................................................. 207
Disposing Exhausted Toners.....................................................................................................................209
Replacing the Waste Toner Bottle................................................................................................................ 210
Watching the Video for Replacing the Waste Toner Bottle................................................................... 210
How to Replace the Waste Toner Bottle................................................................................................. 211
Precautions When Replacing the Waste Toner Bottle............................................................................213
Disposing the Used Waste Toner Bottle.................................................................................................. 215
9. Troubleshooting
Alert Sounds...................................................................................................................................................217
Checking the Indicators, Icons, and Messages on the Control Panel.......................................................219
6
Page 9

When an Icon Is Displayed with a Message.......................................................................................... 219
When the [Check Status] Indicator Is Lit or Flashing.............................................................................. 221
When the Machine Cannot Be Operated...................................................................................................222
When the Machine Does Not Respond Correctly to an Operation on the Control Panel..................222
When the Machine Does Not Respond Correctly to an Operation from a Computer....................... 226
When a Message Appears and the Machine Cannot Be Operated........................................................228
When a Message Appears While Using the Copy Function.....................................................................231
When a Message Appears While Using Document Server...................................................................... 232
When a Message Appears While Using the Fax Function........................................................................233
Messages that Appear During Operation or When Sending/Receiving a Fax Cannot Be Performed....
.................................................................................................................................................................... 233
Messages that Appear When the Machine Cannot Connect to the Network.....................................234
Messages that Appear When the Remote Fax Function Is Unavailable.............................................. 243
When a Message Appears While Using the Printer Function....................................................................248
Messages that Appear without Error Codes...........................................................................................248
Messages that Appear with Error Codes................................................................................................ 260
When a Message Appears While Using the Scanner Function................................................................ 262
Messages that Appear on the Control Panel..........................................................................................262
Messages that Appear on the Computer................................................................................................ 269
When Other Messages Appear...................................................................................................................276
Messages that Appear When Machine Login Fails............................................................................... 279
Messages that Appear When Logging in to the Machine Using an IC Card Fails............................. 285
Messages that Appear When the LDAP Server Is Unavailable............................................................ 286
Messages that Appear When There Is a Problem with the Certificate................................................. 287
Messages that Appear When an Application Site Cannot Be Used.................................................... 289
When Paper or an Original Is Jammed....................................................................................................... 290
If Paper Jams Occur Frequently............................................................................................................... 291
10. Specifications for the Machine
Model-Specific Information.......................................................................................................................... 295
List of Specifications.......................................................................................................................................296
Specifications for the Main Unit............................................................................................................... 296
Specifications for the Document Server...................................................................................................303
Specifications for Facsimile.......................................................................................................................303
7
Page 10

Specifications for Printer........................................................................................................................... 309
Specifications for Scanner........................................................................................................................311
Specifications for the ADF.........................................................................................................................315
Specifications for Paper Feed Unit...........................................................................................................315
Specifications for IEEE 1284 Interface Board........................................................................................ 316
Specifications for Wireless LAN Board................................................................................................... 316
Specifications for Device Server Option................................................................................................. 317
The Setting Values of the Transmission Function..........................................................................................318
Send Email................................................................................................................................................. 318
Send to Folder........................................................................................................................................... 319
Broadcast Transmission.............................................................................................................................320
Printable Area and Margin...........................................................................................................................321
Machine Options...........................................................................................................................................322
Guide to Functions of the Machine’s External Options..........................................................................322
Guide to Functions of the Machine’s Internal Options...........................................................................322
Functions Requiring Optional Configurations..............................................................................................325
Copy Function............................................................................................................................................325
Facsimile Functions....................................................................................................................................325
Printer Function.......................................................................................................................................... 326
Scanner Function.......................................................................................................................................326
Others.........................................................................................................................................................326
Function Compatibility...................................................................................................................................328
11. Legal and Contact Information
Environmental Regulations............................................................................................................................331
ENERGY STAR Program........................................................................................................................... 331
Energy Saving Functions...........................................................................................................................331
User Information on Electrical and Electronic Equipment (mainly Europe)...................... 332
Note for the Battery and/or Accumulator Symbol (For EU countries only) (mainly Europe)
.................................................................................................................................................................... 333
Environmental Advice for Users (mainly Europe)............................................................... 334
Notes to users in the state of California (Notes to Users in USA) (mainly North America)....
.................................................................................................................................................................... 334
Trademarks (User Guide)..............................................................................................................................335
8
Page 11

1. Getting Started
EAT066
Turning On and Off the Power
To turn the machine on and off, press the main power switch on the right of the machine.
• When you are using the fax function on the machine, do not turn the power off under normal
operation. If the power is turned off, data stored in the fax memory will be lost in about one hour
after the machine is turned off. If you have to turn the power off or unplug the power cord for some
reason, make sure 100% is shown as available memory on the screen for the fax function.
Turning On the Main Power
• When you push the main power switch, wait at least 10 seconds after it is confirmed that the main
power indicator has lit up or gone out.
1. Make sure the power cord is firmly plugged into the wall outlet.
2. Push the main power switch.
The main power indicator goes on.
Application icons appear on the [Home] screen as the applications start running.
• When the power is turned on, the screen may show that the machine is performing an auto restart.
Do not turn off the main power while the machine is processing. It takes about five minutes until the
machine restarts.
9
Page 12

EAT066
1. Getting Started
Turning Off the Main Power
• Do not turn off the power while the machine is in operation. To turn the power off, confirm that the
operation is finished.
• Do not hold down the main power switch while turning off the main power. Doing so forcibly turns
off the machine’s power and may damage the hard disk or memory and cause malfunctions.
• Do not press the main power switch soon after pressing the main power switch on the machine.
When you turn the power on or off, wait at least 10 seconds after confirming that the main power
indicator on the control panel has turned on or off.
1. Push the main power switch.
The main power indicator on the right side of the control panel turns off. The main power turns off
automatically after the machine has shut down properly. If the screen on the control panel does not
disappear, contact your service representative.
Energy Saving Mode
When the machine is not operated for a specified period of time, the machine enters the "Energy Saver
Mode" automatically. "Energy Save mode" has two modes, "Low Power mode" and "Sleep mode". In
the factory default, the machine is configured to use "Sleep mode".
Low Power Mode
If you do not use the machine for a certain period after an operation, the display will turn off and
the machine goes into Low Power mode. The machine uses less electricity in Low Power mode.
You can change the amount of time that the machine waits before switching to Low Power mode
under [Low Power Mode Timer].
See "Timer Settings", User Guide (Full Version).
10
Page 13

Turning On and Off the Power
You can change the machine's settings to enter Low Power mode when you press the [Energy Save]
of [Energy Saver Key to Change Mode] under [Settings] [System Settings] [Administrator
Tools].
See "Timer Settings", User Guide (Full Version).
To exit Low Power mode, do one of the following:
• Lift the ADF
• Place an original in the ADF
• Load paper in the bypass tray
• Touch the display panel
• Start Print Jobs
• Open any cover
• Open any paper tray
Sleep Mode
In this mode, the display of the control panel turns off and the main power indicator blinks slowly.
Power consumption is minimized. When you do not operate the machine for a specified period of
time or press [Energy Save] ( ), the machine enters Sleep mode.
• You can specify the amount of time that the machine waits before entering Sleep mode under
[Sleep Mode Timer] or [Weekly Timer].
Under [Weekly Timer], you can specify the times and the days of the week that the machine
enters Sleep mode.
Only the administrator can specify [Weekly Timer] when administrator authentication is
enabled.
See "Timer Settings", User Guide (Full Version).
• The machine recovers from Sleep mode when you perform one of the following:
• Lift the ADF.
• Place an original in the ADF.
• Touch the display of the control panel.
• The energy saving functions are disabled when an error occurs or while an operation is in
progress.
11
Page 14

EAT311
1
2
3
4
78
10
11
5
9
6
1. Getting Started
Guide to Names and Functions of Components
• Do not obstruct the machine's vents. Doing so can result in fire as the internal components are
overheated.
Region A and Region B symbols
(mainly Europe and Asia), (mainly Europe), or (mainly Asia)
(mainly North America)
Differences in the functions of Region A and Region B models are indicated by two symbols.
Read the information indicated by the symbol that corresponds to the region of the model you are
using.
page 295 "Model-Specific Information"
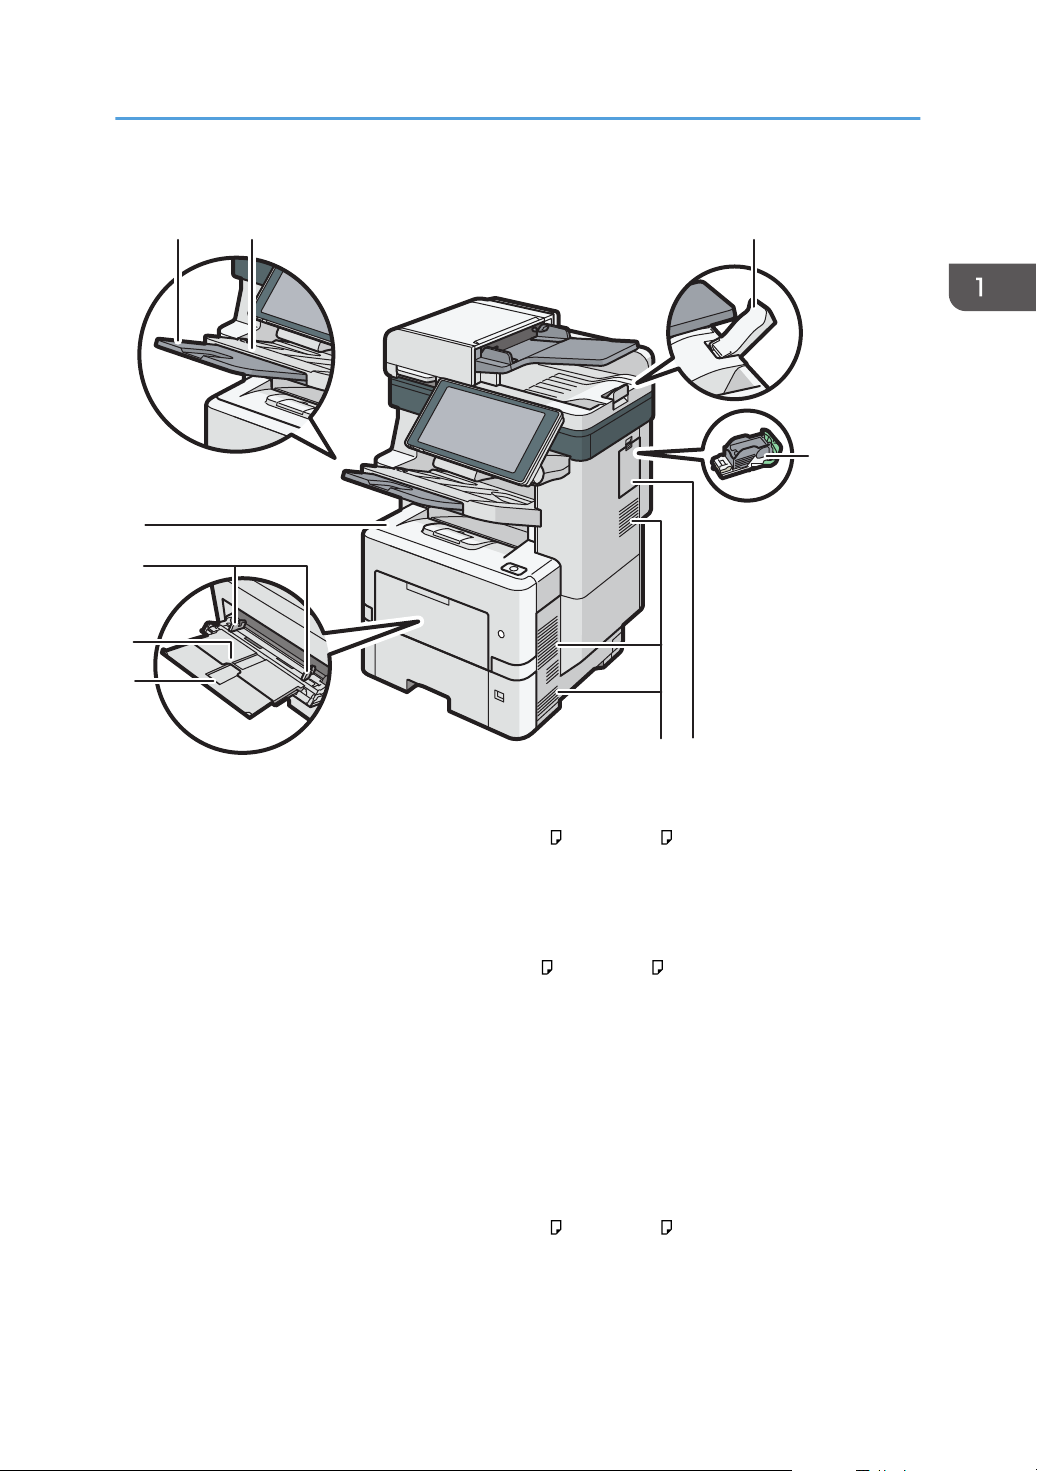
Exterior: Front and Left View
12
1. Auto Document Feeder (ADF)
Lower the cover over originals placed on the exposure glass.
Page 15

Guide to Names and Functions of Components
If you load a stack of originals in the ADF, the ADF will automatically feed the originals one by one.
2. Exposure glass
Place originals facedown here.
See "Printing Documents in Order of Priority", User Guide (Full Version).
3. Control panel
page 19 "Names and Functions of the Control Panel"
4. Tray extension
Pull this fence to prevent paper from falling off.
5. Main power switch
To turn the power on and off, press the main power switch.
page 9 "Turning On and Off the Power"
6. Paper size dial
Use this dial to specify the paper size. To use a paper size that is not indicated on the paper size dial, set the
dial to " ". If this is the case, set the paper size using the control panel.
7. Paper tray
Standard paper tray. Load paper here.
page 181 "Loading Paper into the Paper Tray"
8. Left cover
Open to access the waste toner bottle.
page 210 "Replacing the Waste Toner Bottle"
9. Waste toner bottle
Waste toner is collected here. Replace the bottle when it is full.
10. Vents
Holes for ventilating the inside the machine to prevent the internal components from overheating.
11. Standard tray
Copied/printed paper and received fax pages are delivered here.
13
Page 16

EAT312
2
1
3
4
5
6
1. Getting Started
Exterior: Front and Right View
IM 550F/IM 600F
1. ADF tray extender
Pull this extender out to prevent originals larger than A4
2. Vents
or 81/2 × 11 from falling.
Holes for ventilating the inside the machine to prevent the internal components from overheat.
3. Extender for the bypass tray
Pull this extender out when loading paper larger than A4 or 81/2 × 11 .
4. Bypass tray
Use the tray to copy or print on OHP transparencies, adhesive labels, and paper that cannot be loaded in the
paper trays.
page 186 "Loading Paper into the Bypass Tray"
5. Paper guides
When loading paper in the bypass tray, align the paper guides with the edges of the paper.
6. Front cover
Open to access the inside of the machine and remove jammed paper.
Open here to replace the print cartridge.
14
Page 17
IM 600SRF
EAT313
3
7
8
9
10
4
1 2
65
Guide to Names and Functions of Components
1. Extender for the finisher shift tray
Pull this extender out when loading paper larger than A4
or 81/2 × 11 .
2. Finisher shift tray
Sorted or stapled papers are delivered here.
3. ADF tray extender
Pull this extender out to prevent originals larger than A4 or 81/2 × 11 from falling.
4. Staple cartridge
Staple cartridge for the finisher. Replace the cartridge when the staples run out.
5. Right cover
Open this cover to replace the staple cartridge.
6. Vents
Holes for ventilating the inside the machine to prevent the internal components from overheating.
7. Extender for the bypass tray
Pull this extender out when loading paper larger than A4 or 81/2 × 11 .
8. Bypass tray
Use the tray to copy or print on OHP transparencies, adhesive labels, and paper that cannot be loaded paper
trays.
15
Page 18

1
6
5
4
3
2
EAT314
1. Getting Started
page 186 "Loading Paper into the Bypass Tray"
9. Paper guides
When loading paper in the bypass tray, align the paper guides with the edges of the paper.
10. Front cover
Open to access the inside of the machine and remove jammed paper.
Open here to replace the print cartridge.
Exterior: Rear and Left View
IM 550F/IM 600F
1. Vents
Holes for ventilating the inside the machine to prevent the internal components from overheat.
After large-volume printing, the ventilation fan may continue to work to lower the temperature inside the
machine.
2. Rear Cover
Open to access the inside of the machine.
3. USB2.0 Interface Type A
Use the port to connect the IC card authentication device.
4. USB2.0 Interface Type B
Use the port to connect the machine and the computer with the USB cable.
5. Ethernet port
Use a network interface cable to connect the machine to a network.
16
Page 19

1
EAT335
7
6
5
4
23
Guide to Names and Functions of Components
6. Optional interface board slot
Optional interface boards can be inserted.
Insert an optional wireless LAN interface board, IEEE 1284 interface board, Device server or File format
converter.
IM 600SRF
1. Vents
Holes for ventilating the inside the machine to prevent the internal components from overheat.
After large-volume printing, the ventilation fan may continue to work to lower the temperature inside the
machine.
2. Rear cover
Open to access the inside of the machine.
3. Rear upper cover
Open to remove jammed paper.
4. USB2.0 Interface Type A
Use the port to connect the IC card authentication device.
5. USB2.0 Interface Type B
Use the port to connect the machine and the computer with the USB cable.
6. Ethernet port
Use a network interface cable to connect the machine to a network.
7. Optional interface board slot
Optional interface boards can be inserted.
Insert an optional wireless LAN interface board, IEEE 1284 interface board, Device server or File format
converter.
17
Page 20

EAT315
1
1. Getting Started
• The fan inside the machine near the vents may continue running to cool the machine after a print
job.
• page 276 "When Other Messages Appear"
Interior: Front View
18
1. Print cartridge
Messages appear on the screen when the print cartridge needs to be replaced, or a new cartridge needs to
be prepared.
page 203 "Replacing the Toner"
Page 21

DZB165
3
21
Names and Functions of the Control Panel
Names and Functions of the Control Panel
The touch panel (Smart Operation Panel) that displays the operation screen of the machine is referred to
as the "Control Panel".
• On the left side of the control panel, interfaces for connecting external devices and slots to insert an
SD card/USB flash memory device are provided.
• Even when the screen is turned off, the LED indicators on the frame of the control panel show the
status of the machine.
Touch Panel/Interface
1. Media slots
Insert an SD card or USB flash memory device. You can store the scanned data or print the file stored on the
media.
• Use an SD memory card or SDHC memory card with a maximum capacity of 32 GB. You cannot use an
SDXC memory card.
• Use the media formatted in FAT16 or FAT32.
• Certain types of USB flash memory devices cannot be used in the machine.
• A USB extension cable, hub, or card reader cannot be used.
• If the power of the machine is turned off or the media is removed from the machine while the machine is
reading the data in the media, check the data in the media.
• Before removing the media from the slot, press the icon displayed on the screen ( / ) to cancel the
connection.
19
Page 22

DZW174
EAT317
DZB164
1
5
32 4
1. Getting Started
2. Touch Panel
Displays the Home screen, operation screen of applications, and messages. Operate with the fingertips.
page 39 "How to Use the Home Screen"
page 41 "Intuitive Screen Operation Using Fingertips"
3. NFC tag
Used to connect the machine and a smart device with the RICOH Smart Device Connector.
See "Using the Machine Functions from a Mobile Device", User Guide (Full Version).
• You can adjust the angle of the control panel to improve visibility.
LED Indicators
20
Page 23

Names and Functions of the Control Panel
1. Media access indicator
Flashes when data is being read from or written to an SD card
While the machine is accessing the SD card or USB flash memory device, do not turn the power off or remove
the media.
2. Fax indicator
Indicates the status of the fax function.
• Flashing: transmitting and receiving data
• Lit: receiving data (Substitute RX File/Memory Lock Reception/Personal Box)
3. Data In indicator
Flashes when the machine is receiving data sent from the printer driver or LAN-Fax driver.
4. Status indicator
Indicates the status of the system. Stays lit when an error occurs or toner runs out.
page 219 "Checking the Indicators, Icons, and Messages on the Control Panel"
5. Main power indicator
The main power indicator lights up when you turn on the main power switch. In Sleep mode, it flickers slowly.
21
Page 24

1. Getting Started
Order of Option Installation
When installing multiple options, the following order is recommended:
1. Attach the paper feed unit.
Attach the paper feed unit to the bottom of the machine.
You can attach up to four paper feed units. Up to 2,000 sheets of paper can be loaded.
2. Install the caster table.
3. Install the optional interface board.
Install in the slot of the machine.
Only one interface board can be installed.
4. Install the file format converter.
5. Insert SD card options.
Insert in the SD card slot of the machine.
There are two slots for SD cards.
Each slot supports different types of SD cards.
If you want to use two or more SD cards that can be inserted in the same slot, contact your sales or
service representative.
22
Page 25
EAT135
Attaching the Paper Feed Unit
Attaching the Paper Feed Unit
You can install a paper feed unit.
• Do not handle the power cord plug with wet hands. Doing so can result in electric shock.
• The machine weighs as follows.
• IM 550F/600F: approximately 29 kg (64 lb.)
• IM 600SRF: approximately 40 kg (88 lb.)
• When moving the machine, use the inset grips on both sides, and lift slowly in pairs. The
machine will break or cause injury if dropped.
• Lifting the paper feed unit carelessly or dropping may cause injury.
• When moving the machine, make sure to unplug the power cord from the wall outlet and
confirm that line cords and other connecting cables have been removed. Otherwise, the power
cord is damaged, possibly resulting in fire or electric shock.
• Do not place the machine directly on the floor.
• When attaching multiple options, attach the paper feed unit first.
• To attach two or more paper feed units at the same time, first stack them one upon the other, and
then attach them as a single unit.
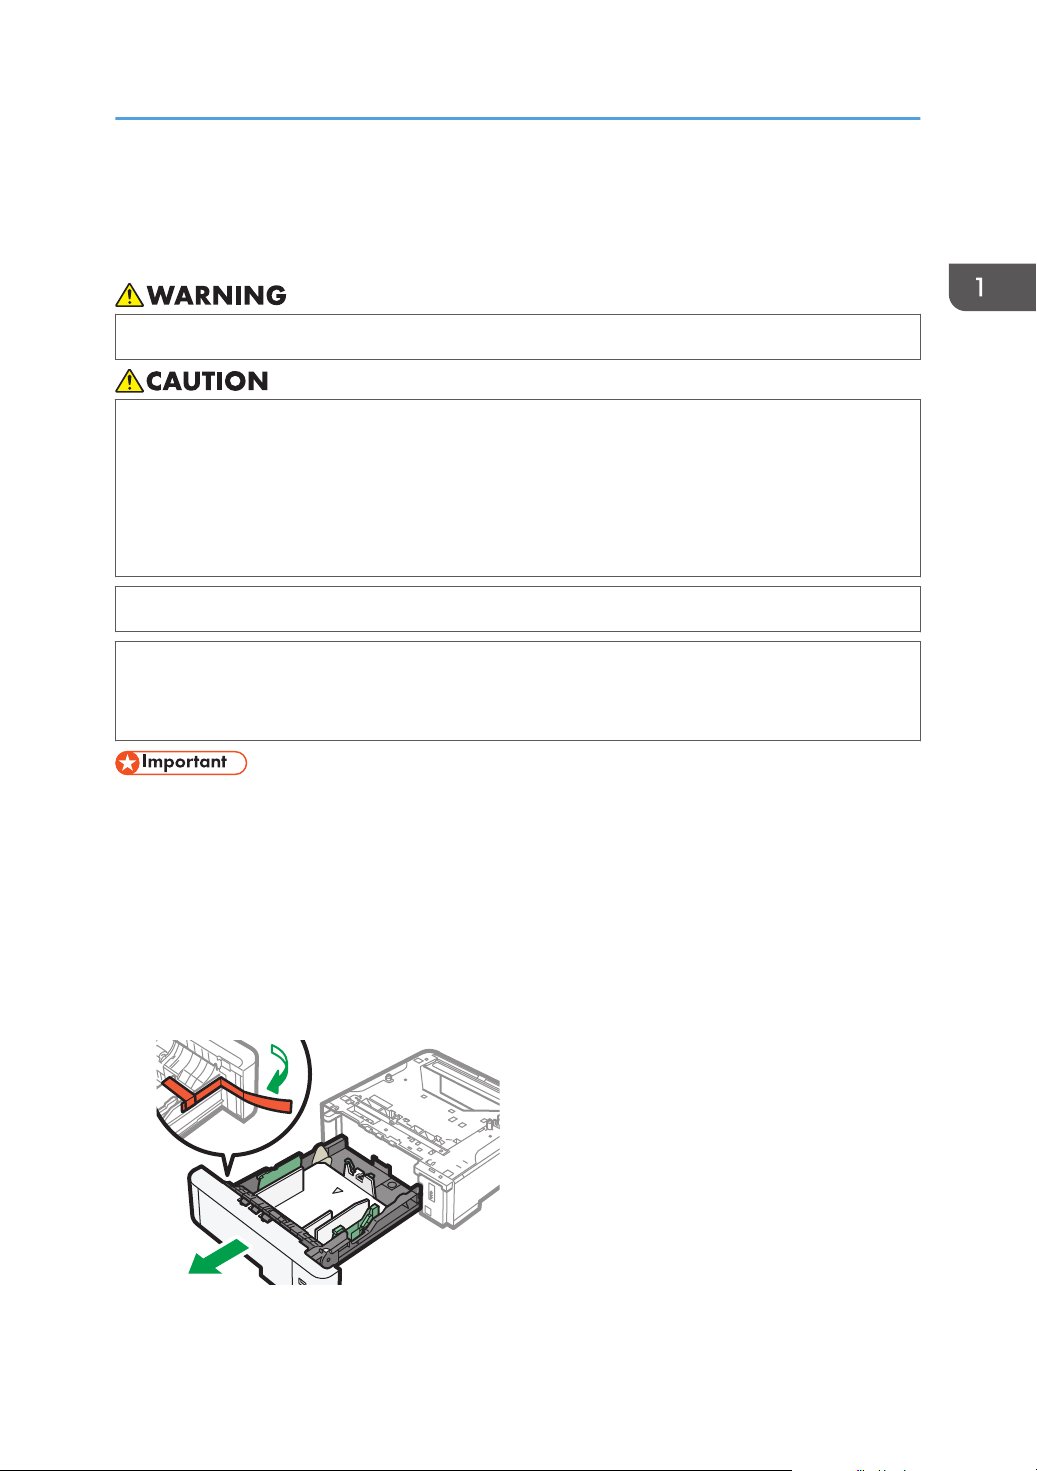
• Before turning on the power, remove the packaging material from the paper feed unit.
1. Turn the machine off and unplug the power cord.
2. Remove the packaging, adhesive tapes, and a plastic sheet from the paper feed unit.
23
Page 26

EAT136
2
1
EAT137
1. Getting Started
3. Lift the machine using the inset grips on both sides of the machine in pairs.
Lifting the machine requires two people.
When moving the machine, do not touch the following parts:
• The operation panel, the ADF, and parts around them
• Convex parts on the right side of the machine
• Places indicated on the labels attached to the machine
• The bottom of the optional paper tray
4. There are two upright pins on the optional paper feed unit. Align them with the holes on
the underside of the machine, and then carefully lower the machine.
5. Plug in the power cord, and then turn on the machine.
6. Print the configuration page to confirm that the unit was attached correctly.
• To check whether the optional paper feed unit was correctly attached, print the configuration page,
and check "Attached Equipment" on the configuration page. If the unit was attached correctly,
"Tray 2", "Tray 3", "Tray 4", and "Tray 5" will appear.
• See "List / Test Print", User Guide (Full Version).
24
Page 27

Attaching the Paper Feed Unit
• If the optional paper feed unit was not installed properly, repeat the procedure from the beginning.
If it cannot be installed correctly even after trying the installation a second time, contact your sales
or service representative.
• To use the paper feed unit, configure the machine options in "Accessories" in the printer driver.
• See "Specifying the Option Configuration or Paper Settings Manually", User Guide (Full Version).
25
Page 28
EAT219
EAT220
1. Getting Started
Installing the Wireless LAN Interface Board
• Before beginning work, ground yourself by touching something metal to discharge any static
electricity. Static electricity can damage the interface units.
• Do not subject the Wireless LAN interface board to physical shocks.
1. Check the contents of the package.
2. Turn the machine off and unplug the power cord.
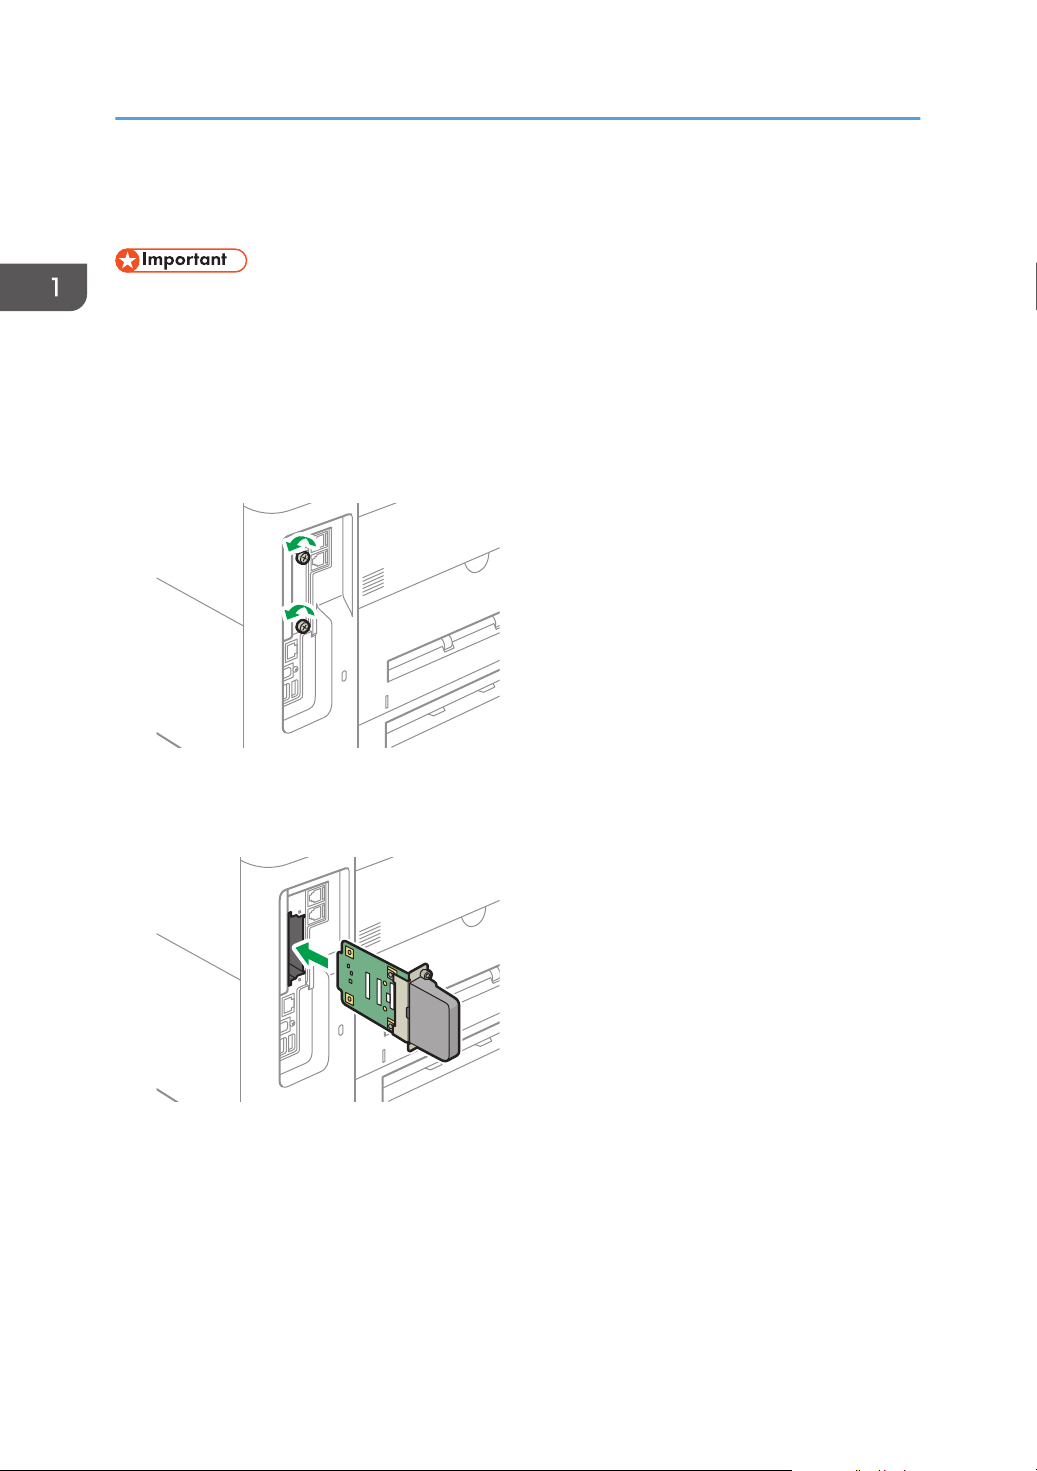
3. Loosen the two screws and remove the slot cover.
The removed cover will not be reused.
4. Fully insert the interface board.
Check that the interface board is firmly connected to the controller board.
26
Page 29

EAT221
Installing the Wireless LAN Interface Board
5. Tighten the two screws to secure the interface board.
6. Plug in the power cord, and then turn on the machine.
7. Print the configuration page to confirm that the board was attached correctly.
• Check that the board was correctly installed by printing the configuration page. If it is correctly
installed, "Wireless LAN" will appear for "Device Connection" on the configuration page.
• See "List / Test Print", User Guide (Full Version).
• If the board was not installed properly, repeat the procedure from the beginning. If it cannot be
installed correctly even after trying the installation a second time, contact your sales or service
representative.
• Before using the board, you must configure settings from the control panel.
• See "Connecting to a Wireless LAN", User Guide (Full Version).
27
Page 30

EAT219
EAT224
1. Getting Started
Installing the IEEE 1284 Interface Board
• Before beginning work, ground yourself by touching something metal to discharge any static
electricity. Static electricity can damage the interface units.
• Do not subject the IEEE 1284 interface board to physical shocks.
1. Check the contents of the package.
2. Turn the machine off and unplug the power cord.
3. Loosen the two screws and remove the slot cover.
The removed cover will not be reused.
4. Fully insert the IEEE 1284 interface board.
Check that the IEEE 1284 interface board is firmly connected to the controller board.
28
Page 31

EAT225
Installing the IEEE 1284 Interface Board
5. Tighten the two screws to secure the interface board.
6. Plug in the power cord, and then turn on the machine.
7. Print the configuration page to confirm that the board was attached correctly.
• Check that the board was correctly installed by printing the configuration page. If it is correctly
installed, "Parallel Interface" will appear for "Device Connection" on the configuration page.
• See "List / Test Print", User Guide (Full Version).
• If the board was not installed properly, repeat the procedure from the beginning. If it cannot be
installed correctly even after trying the installation a second time, contact your sales or service
representative.
29
Page 32

EAT219
EAT222
1. Getting Started
Installing the Device Server Option
• (mainly North America)
If you want to use the device server option, contact your service representative.
• Before beginning work, ground yourself by touching something metal to discharge any static
electricity. Static electricity can damage the interface units.
• Do not subject the Device Server Option to physical shocks.
The optional device server option is an interface board that adds an Ethernet port to the machine.
With this option installed, two Ethernet cables can be connected at the same time using the standard port
on the machine and an additional port on the device server option. You can assign different IP
addresses to each port, so the machine can print jobs from different network segments.
Procedure for installing the device server option
1. Check the contents of the package.
2. Turn the machine off and unplug the power cord.
3. Loosen the two screws and remove the slot cover.
The removed cover will not be reused.
4. Fully insert the interface board.
30
Page 33

EAT223
EAT251
Installing the Device Server Option
Check that the interface board is firmly connected to the controller board.
5. Tighten the two screws to secure the interface board.
6. Connect the device server option to the machine.
For details, see the Setup Guide provided with the device server option.
Configuring settings
After installing and connecting the device server option to the machine, configure the machine
settings.
• When using the device server option, set [Energy Saver Mode to Disable Print Server] to [Disable
Mode] to prevent the machine from entering Energy Saver mode. Otherwise, the device server
option loses communication with the network while the machine is in Energy Saver mode, and the
machine cannot receive print jobs.
1. Press [Settings] on the Home screen.
2. Press [Machine Features Settings].
3. Press [System Settings] the [Administrator Tools] tab [Energy Saver Mode to
Disable Print Server].
31
Page 34

1. Getting Started
4. Press [Disable Mode].
5. Press [OK].
6. After completing the procedure, press [Home] ( ).
32
Page 35

EAT219
EAT226
Installing the File Format Converter
Installing the File Format Converter
• Before beginning work, ground yourself by touching something metal to discharge any static
electricity. Static electricity can damage the interface units.
• Do not subject the File Format Converter to physical shocks.
1. Check the contents of the package.
2. Turn the machine off and unplug the power cord.
3. Loosen the two screws and remove the slot cover.
The removed cover will not be reused.
4. Fully insert the file format converter.
Check that the file format converter is firmly connected to the controller board.
33
Page 36

EAT227
1. Getting Started
5. Tighten two screws to secure the file format converter.
6. Plug in the power cord, and then turn on the machine.
7. Print the configuration page to confirm that the board was attached correctly.
• If the board was not installed properly, repeat the procedure from the beginning. If it cannot be
installed correctly even after trying the installation a second time, contact your sales or service
representative.
34
Page 37

EAT228
EAT229
Installing SD Card Options
Installing SD Card Options
• Keep SD cards out of reach of children. If a child accidentally swallows an SD card, consult a
doctor immediately.
• Do not subject the card to physical shocks.
1. Turn the machine off and unplug the power cord.
2. Open the rear cover.
3. Unhook the tab on the interface cover, which is located on the side of the rear cover.
35
Page 38

EAT230
EAT231
EAT232
1. Getting Started
4. Unhook the two tabs on the outside of the interface cover.
5. Insert the SD card into the slot until it clicks.
36
If you insert only one SD card, use the upper slot. If you insert two SD cards simultaneously, use
both slots. If you insert the optional VM card, use only the lower slot.
If you want to use two or more SD cards simultaneously, contact your service representative.
If you use a commercially available SD card for back up the address book, insert the SD card to
the lower slot.
6. Hook the two tabs on the outside of the interface cover.
Page 39

EAT233
EAT234
Installing SD Card Options
7. Hook the tab on the interface cover, which is located on the side of the rear cover.
8. Close the rear cover.
9. Plug in the power cord, and then turn on the machine.
10. Check that the SD card was installed correctly.
• You can confirm that the SD card was installed correctly by checking the control panel menu or
configuration page.
• XPS card/PostScript 3 unit: Printing the configuration page, if the card is installed properly,
corresponding option's name will appear for "Printer Language" in "System Reference".
• See "List / Test Print", User Guide (Full Version).
• VM card: Extended Feature Settings appears in Machine Features Settings.
• Fax connection unit: The menu for fax connection will appear in Fax Settings.
• OCR unit: The menu for OCR will appear in the PDF settings on the Scanner screen.
• If the card is not installed properly, repeat the procedure from the beginning. If it cannot be
installed correctly even after trying the installation a second time, contact your sales or service
representative.
• Do not touch the card while the machine is in use. It may come loose, even if pushed only slightly.
The slot cover must be reattached.
37
Page 40

1. Getting Started
Changing the Display Language
You can change the language used on the display. English is set as default.
1. On the Home screen, press the change language widget.
2. Select the language you want to display.
3. Press [OK].
38
Page 41

DZC140
1 234 5
6
7
8
910111214 136
15
How to Use the Home Screen
How to Use the Home Screen
Press [Home] ( ) at the bottom center of the screen to display the Home screen on which icons for
each function are shown. On the Home screen, you can register frequently used shortcuts and widgets.
• Touch the Home screen to operate it.
page 41 "Intuitive Screen Operation Using Fingertips"
• You can add or delete icons and widgets, and change their order.
page 55 "Adding a Frequently Used Application or Widget to the Home Screen"
1. Login icon
This icon is displayed when users are logged in. When you press the icon, the names of the users who are
currently logged in are displayed.
2. System message
Displays system and application messages. If there are two or more messages, they will be displayed
alternately.
If a message indicating that the toner has run out or an error has occurred is displayed, press the message to
display the system message list to check the contents.
3. Help
This icon is displayed when Help is available for the displayed screen or errors occurring when the machine is
connected to the Internet.
Specify [Cookie] in the control panel browser to [ON] to display Help properly.
39
Page 42

DZC180
1. Getting Started
See "Browser Settings", User Guide (Full Version).
4. [Login]/[Logout]
These keys are displayed when user authentication is enabled. Press the keys to log in to or log out from the
machine.
page 62 "Logging In from the Control Panel"
5. [Energy Save]
Press to enter or exit Sleep mode or Low Power mode.
page 10 "Energy Saving Mode"
6. Switch Screens
Press to scroll the screens right and left. The Home screen has 5 screens.
You can switch between the screens by flicking.
page 41 "Intuitive Screen Operation Using Fingertips"
7. Application list
Press to display applications that are not displayed on the Home screen.
page 55 "Adding a Frequently Used Application or Widget to the Home Screen"
8. Current display position
Shows which of the five screens is currently displayed.
9. [Stop]
Press to stop scanning or printing.
You can change the setting to stop only a job in progress with [Stop Key to Suspend Print Job].
See "Administrator Tools (System Settings)", User Guide (Full Version).
10. [Menu]
Displayed if a menu is available in the currently selected application.
On the Home screen, press to restore the icons to their factory default positions.
11. [Home]
Press to display the Home screen.
12. [Return]
Press to return to the previous screen.
13. Date/Time and Toner remaining
The current date and time is displayed.
40
Page 43

DZB181
How to Use the Home Screen
To display the information about Toner remaining, specify [Display Time/Remaining Toner] to [Remaining
Toner] of [Screen Features Settings] [Screen Device Settings] [System Bar Settings (Top / Bottom of
Screen)].
14. [Check Status]
Press to check the following system statuses of the machine. This lights up in red when an error occurs.
• Machine’s status
Indicates the error status and network status.
• Operational status of each function
Status of functions such as Copy or Scanner
• Current jobs
• Job history
• Machine’s maintenance information
See "Checking the Machine Status from the Control Panel", User Guide (Full Version).
15. Icon display area
Displays the icons and widgets.
• You can change the screen displayed when the power is turned on under [Function Priority].
• See "Displaying Frequently Used Functions on the First Screen", User Guide (Full Version).
• When you press [Menu]
[Reset Home Screen] with the Embedded Software Architecture
application being installed in the machine, the application icons are not deleted.
Intuitive Screen Operation Using Fingertips
On the Home screen or application screen, you can perform the following operations by touching the
screen with your fingertips.
Flick (for switching between screens)
Touch and slide your finger on the screen quickly left or right to switch between the screens.
41
Page 44

DZB182
DZB183
DZB185
1. Getting Started
Drag (for moving an icon)
Press and hold an icon, and then slide your finger while pressing on the screen to move the icon.
Long tap (for displaying the available menu screen)
Press and hold on a blank area on the screen to display the menu screen.
On the Home screen you can add a folder or change the wallpaper from the menu.
In some applications, you can also use the following actions to operate the screen:
Pinch-in (for zooming out the screen)
Touch the screen with your thumb and forefinger, and pinch them together. This feature is useful
when previewing files and images.
42
Page 45

DZB184
How to Use the Home Screen
Pinch-out (for zooming in the screen)
Touch the screen with your thumb and forefinger, and spread them apart. You can also zoom in the
screen by tapping the screen twice quickly. When you quickly tap the screen twice again, the
screen returns to full display. This feature is useful when previewing files and images.
43
Page 46

EAT355
1. Getting Started
How to Use the Copy Screen
You can select from one of two types for the Copy screen.
Standard View (factory-default)
The basic functions that are used frequently are displayed with big keys. Scroll down the screen to
see the keys used to configure the functions for finishing or editing.
Full View
You can see all the function keys on a single screen. You do not need to scroll through the screens
to select a function.
• To switch the screen type, press [Menu] ( ) [Screen Settings] [Switch Screen Type], and
then select [Standard View] or [Full View] on the Copy screen.
• You can use the same functions on either screen.
• When the administrator has configured user authentication and User's Own Customization is
enabled, each login user can change the screen type.
How to Use the Copy Screen (Standard View)
You can customize the layout and how the keys are displayed on the Copy screen in Standard View.
page 47 "Changing the Layout or Display of the Keys of the Copy Function"
44
Page 47

1
7
2
3
4
5
6
EAT356
How to Use the Copy Screen
1. Copy function keys
Press a key to select the function to assign to the key. Flick up and down on the screen to display the keys out
of the visible area. The keys with assigned functions are displayed in yellow or with in the upper left corner.
Depending on the assigned function, the display of the key changes according to the specified setting.
2. [Reset]
Reset the settings configured on the Copy screen.
3. Preview of the current setting status
Displays an image representing the settings configured on the Copy screen. Press the image to display the list
of the settings.
4. [Sample Copy]
Press to make a partial copy as a test before proceeding to copy the rest of the original.
See "Making a Partial Copy as a Test and Copying the Rest of the Original", User Guide (Full Version).
5. [Start]
Press to perform copying.
45
Page 48

1
7
2
3
4
5
6
EAT357
1. Getting Started
6. Other keys for Copy function
Press to select the functions whose keys are out of the visible area of the screen. The key of the function that is
currently configured is displayed with in the upper left corner.
7. Select One Touch Job
You can see the preset settings in the machine or the job history. When user authentication is configured,
display the history of the executed jobs for each login user. When selecting a job history, its settings are
displayed on the current Copy screen. You can use the same settings as a previous job by selecting the job
history.
How to Use the Copy Screen (Full View)
1. Copy function keys
Press a key to select the function to assign to the key. The keys with assigned functions are displayed in yellow.
To see the display area in the illustration below, press or flick to the left or right.
2. [Reset]
Reset the settings configured on the Copy screen.
3. Preview of the current setting status
Displays an image representing the quantity and the settings configured on the Copy screen. Press [Quantity]
to display the number keys. Press the image to display the list of the settings.
4. [Sample Copy]
Press to make a partial copy as a test before proceeding to copy the rest of the original.
See "Making a Partial Copy as a Test and Copying the Rest of the Original", User Guide (Full Version).
5. [Start]
Press to perform copying.
46
Page 49

µ
²±
³
DZX026
´
How to Use the Copy Screen
6. Other keys for Copy function
Press to select the functions whose keys are out of the visible area of the screen. The key of the function that is
currently configured is displayed with in the upper left corner.
7. Select One Touch Job
You can see the preset settings in the machine or the job history. When user authentication is configured,
display the history of the executed jobs for each authenticated user. When selecting a job history, its settings
are displayed on the current Copy screen. You can use the same settings as a previous job by selecting the job
history.
Changing the Layout or Display of the Keys of the Copy Function
You can customize the layout and how the Copy function keys are displayed on the Copy screen in
Standard View mode (Arranging keys mode).
When the administrator has configured user authentication and User's Own Customization is enabled,
each login user can customize the layout.
Switching to change the key layout mode
On the Copy screen, press and hold one of the keys until the screen changes, and then press [OK]
to display the screen of the arranging keys mode.
Changing the key layout
Press and hold the key to move, drag it to the location to display, and then press [OK].
You can also display the screen of the arranging keys mode by pressing [Menu] ( ) [Change
Key Layout] [Change Key Layout].
47
Page 50

DZX027
DZX028
1. Getting Started
Hiding a key
Press and hold the key to hide, drag it to "Hide the Keys", and then press [OK].
Displaying a hidden key
Press "Hidden Key List" to display the hidden keys. Press and hold the key to display, drag it to the
location to display, and then press [OK].
Confirming the initial placement of the keys
Press [Menu] (
) [Screen Settings] [Temporarily Restore Initial Key Layout] on the Copy
screen. After confirming, press [Back].
Resetting the key layout to the default
Press [Menu] ( ) [Screen Settings] [Restore Initial Key Layout] [Restore] on the Copy
screen.
48
Page 51

1
3
5
4
DZX895
2
How to Use the Fax Screen
How to Use the Fax Screen
There are five kinds of functions and settings on the Fax screen.
1. Destination type selection
Switch the destination type between [Fax] (including IP-Fax) and [Internet Fax]. The items displayed in the
address book and destination entry screen for manual entry change also when you switch the destination type.
2. Transmission/reception information confirmation
Browse and print the received documents that are stored in the memory or on the hard disk drive of the
machine. You can also browse and print the transmission and reception history.
3. Transmission settings
You can specify the additional features to use when sending a fax, configure the scan settings appropriately
for the original to scan, and display a preview before sending the fax. You can also check the settings that are
currently specified and the remaining amount of memory.
4. Destination specification
You can select an address registered in the address book through one-touch operation. Press
destination by using various other methods such as by entering manually or selecting from the history. You can
also register a new destination in the address book.
5. Job history
Job history of the executed jobs is displayed. When user authentication is set, the job history of each
authenticated user is displayed. When you select a job history, the setting will be applied on the current Fax
screen. This feature is convenient when you are using the same setting repeatedly.
to specify a
Customizing the [Settings] Screen
Press and hold a key on the [Settings] screen to customize the layout of the keys.
When the administrator has enabled user authentication and User's Own Customization, the screen can
be customized for each user.
49
Page 52

µ
²±
³
DZX026
´
DZX027
1. Getting Started
Switching to change the key layout mode
Long-press any key and press [OK] on the screen below to switch to the key sorting mode and
enable changing of the key layout.
Changing the key layout
Long-press a key to change the layout, drag it to a new location, and then press [OK].
50
You can also display the screen of the arranging keys mode by pressing [Menu] ( ) [Change
Key Layout] [Change Key Layout].
Hiding a key
Long-press a key to hide, drag it to [Hide the Keys], and then press [OK].
Page 53

DZX028
How to Use the Fax Screen
Displaying a hidden key
Press "Hidden Key List" to display the hidden keys. Press and hold the key to display, drag it to the
location to display, and then press [OK].
Confirming the initial placement of the keys
Press [Menu] ( ) [Change Key Layout] [Check the key layout of the factory defaults] on
the Fax screen. After confirming, press [Back].
Resetting the key layout to the default
Press [Menu] ( ) [Change Key Layout] [Reset Layout] [Restore] on the Fax screen.
51
Page 54

1
3
4
EAT358
2
5
1. Getting Started
How to Use the Scanner Screen
There are five kinds of functions and settings on the Scanner screen.
1. Destination type selection
You can switch between [Scan to Email] and [Scan to Folder]. The items displayed in the address book and
destination entry screen for manual entry also change when you switch the destination type.
2. Scan Files Status
You can browse the transmission history of the sent documents and cancel sending of a document waiting in
the queue. The transmission file status may not be displayed depending on the security settings.
3. Transmission settings
You can specify the scan settings according to the type of document to scan and the purpose of the scanned
data, and display a preview before sending the data.
4. Destination specification
You can select a destination registered in the address book through one-touch operation. Press
destination by using various other methods such as by entering manually or selecting from the history. You can
also register a new destination in the address book.
5. Select One Touch Job
You can see the preset settings in the machine or the job history. When user authentication is set, the job
history of each authenticated user is displayed. When you select a job history, the setting will be applied on
the current Scanner screen. This feature is convenient when you are using the same setting repeatedly.
to specify a
Customizing the [Send Settings] Screen
Press and hold a key on the [Send Settings] screen to customize the layout of the keys.
When the administrator has enabled user authentication and User's Own Customization, the screen can
be customized for each user.
Switching to change the key layout mode
Long-press any key and press [OK] on the screen below to switch to the key sorting mode and
enable changing of the key layout.
52
Page 55

µ
²±
³
DZX026
´
DZX027
How to Use the Scanner Screen
Changing the key layout
Long-press a key to change the layout, drag it to a new location, and then press [OK].
You can also display the screen of the arranging keys mode by pressing [Menu] ( ) [Change
Key Layout] [Change Key Layout].
Hiding a key
Long-press a key to hide, drag it to [Hide the Keys], and then press [OK].
Displaying a hidden key
Press "Hidden Key List" to display the hidden keys. Press and hold the key to display, drag it to the
location to display, and then press [OK].
53
Page 56

DZX028
1. Getting Started
Confirming the initial placement of the keys
Press [Menu] ( ) [Change Key Layout] [Check the key layout of the factory defaults] on
the Scanner screen. After confirming, press [Back].
Resetting the key layout to the default
Press [Menu] ( ) [Change Key Layout] [Reset Layout] [Restore] on the Scanner screen.
54
Page 57

DZC186
Adding a Frequently Used Application or Widget to the Home Screen
Adding a Frequently Used Application or
Widget to the Home Screen
You can use a frequently used icon or widget easily by adding it to the Home screen. You can organize
the icons on the Home screen as you like by changing their order or using folders.
• Add an icon or widget from the application list screen.
• Each page of the Home screen can display up to 12 icons, widgets or folders, for a total of 60
items. A folder can hold up to 80 icons.
• You can add the following items to the Home screen: shortcuts of bookmarks in the browser on the
screen and programs registered in the Copy, Fax or Scanner.
• You cannot add a shortcut of a program registered by the document server function to the Home
screen.
• When you have set user authentication, log in and customize it. Each user can register their own
Home screen.
• A shortcut, folder, or widget cannot be created or moved if there is no space on the Home screen.
In this case, delete one of the registered items, and then perform the same operation.
• The names of icons and widgets are displayed up to 20 double-byte or 30 single-byte characters.
Names composed of 21 or more double-byte characters are displayed with "...", indicating the
20th and later characters.
55
Page 58

DZC187
1. Getting Started
Adding an Icon/Widget to the Home Screen
1. Press the application list icon on the Home screen.
2. Press and hold the icon or widget to be added to the application list screen.
• Select the [Widget] tab to add a widget, or select the [Program] tab to add a program.
3. After the screen changes to the Home screen, move the icon or widget to the desired
position and release it.
To add a classic application or program, select the type of application or program from the
displayed menu.
Moving or Deleting Icons and Widgets
• To move an icon or widget, press and hold the icon and move it to the desired position, and then
release it.
56
Page 59

DZC188
Adding a Frequently Used Application or Widget to the Home Screen
• To delete an icon or widget, press and hold the icon and move it to the trash icon, and then release
it.
• When you delete a shortcut icon of a function or program from the Home screen, the function or
program is not deleted.
• To reset the Home screen, perform the following procedure.
1. Press [Menu] ( ) on the bottom center of the Home screen.
2. Press [Reset Home Screen].
3. Press [OK] in the displayed message.
Creating a Folder to Organize Icons
1. Press and hold a spot on the Home screen where you want to create a folder.
2. When the "Add to Home Screen" screen is displayed, press [Folder].
3. Open the created folder, press and hold its title, and then change the folder name.
You can enter up to 30 characters for a folder name.
4. Drag the icon and release it over the folder.
57
Page 60

EAT366
1. Getting Started
Registering Frequently Used Settings as a Program
You can register a "program" made of a combination of the functions used in the Copy, Fax, or
Scanner, such as the scan setting, output setting, and address.
• You can load the registered program easily from the application screen.
• When you press the icon of a program on the Home screen, the machine applies the settings and
performs the function registered in the program automatically.
• You can register the following number of items as programs.
• Copy: 25 items
• Fax: 100 items
• Scanner: 100 items
• You cannot register the following settings as a program:
• Copy
[Orientation] of [2 Sided/Combine]
• Fax
[Subject], [Sender]
• Scanner
[Sender], [PDF Security Settings], [Start Number]
• You can register a destination on the program of the scanner function only when [Program Setting
for Destinations] of [Scanner Settings] is set to [Include Destinations].
• See "General Settings (Scanner Settings)", User Guide (Full Version).
• When [Program Setting for Destinations] of [Scanner Settings] is set to [Exclude Destinations], the
destination registered on the recalled program in the scanner function is not displayed.
58
• A folder destination with a destination protection code cannot be registered on a program of the
scanner function.
Page 61

EAT367
Registering Frequently Used Settings as a Program
Registering Settings as a Program
First, configure the settings to be registered on the Copy, Fax, or Scanner screen, and then register them.
1. On the Home screen, press [Copy], [Fax], or [Scanner].
2. Specify scan and output settings to be registered as a program.
3. Press [Menu] ( ).
4. Press [Set Current Settings to Program].
5. Press a program number to register the settings.
6. Enter a program name and select an icon, and then press [OK].
7. Press [Place].
The selected icon is displayed on the Home screen.
59
Page 62

EAT368
1. Getting Started
8. Press [Exit].
Changing the Contents of the Program
You can change a part of the program and overwrite it or change the contents and register them as a
new program.
1. On the Home screen, press [Copy], [Fax], or [Scanner].
2. Press [Menu] ( ), and then press [Recall Program].
3. Press the program number to be changed.
4. Change the scan and output settings.
60
Page 63

EAT367
Registering Frequently Used Settings as a Program
5. Press [Menu] ( ), and then press [Set Current Settings to Program].
6. Select a program number to register the changed settings.
• To overwrite the program, select the number of the loaded program.
• To register the contents as a new program, select a number that is not programmed.
7. Press [Program] in the displayed message.
8. Enter a program name and select an icon.
9. Press [OK].
10. Press [Place].
11. Press [Exit].
• To change the icon or program name or to delete the program, press [Menu] ( ) and operate
from [Edit / Delete program].
61
Page 64

1. Getting Started
Logging In from the Control Panel
When the machine is configured by the administrator to restrict use by unauthorized users, you must
authenticate your login information before starting the operation.
The authentication methods are described below.
• When Basic Authentication, Windows Authentication, or LDAP Authentication is configured on the
machine, enter the user name and password for authentication to log in to the machine before
starting operation.
• Depending on the machine settings, you can use an IC card or mobile device for authentication.
• If user code authentication is specified, you may need to enter the user code to operate the
restricted application.
To prevent use of the machine by an unauthorized person, always log out when you have finished using
the machine.
While a user is logged in, the name of the user is displayed in the system message.
62
Page 65

DZC190
DZC191
Logging In from the Control Panel
• If the machine is not used for a specified period, the user is automatically logged out (Auto Logout).
The default setting for Auto Logout is 3 minutes. The period of Auto Logout can be changed by
[Auto Logout Timer] of [System Settings] or the Auto Logout setting can be disabled.
• See "Timer Settings", User Guide (Full Version).
• Ask the administrator for the login user name, login password, and user code.
Logging In by Entering the User Name and Password
Enter the authentication information using the keyboard displayed on the control panel.
1. Press [Login] at the top right on the screen.
2. Press [User Name].
3. Enter the login user name, and then press [Done].
4. Press [Password].
5. Enter the login password, and then press [Done].
6. Press [Login].
• If an incorrect password is entered a specified number of times, login with the same name is
disabled (Lockout Function). The default setting for unsuccessful attempts before a user is locked out
is five. If the user is locked out, the administrator must release the lockout.
63
Page 66

DZC192
DZB640
1. Getting Started
• To log out from the machine, press [Logout] at the top right on the screen, and then press [OK].
Logging In Using an IC Card
Hold an IC card over the card reader on the right side of the machine. If the card is not registered on the
machine, enter the authentication information and register the card.
1. Hold an IC card over the card reader.
64
• When the card is registered on the machine, login operation finishes.
• When the card is not registered, the registration screen is displayed. Proceed to the next step
to register the card.
2. Enter the Login User Name and Login Password, and then press [Register].
3. Hold the IC card over the card reader again.
• To log out, hold the IC card over the card reader or press [Logout] at the top right on the screen.
• If another user holds the IC card over the card reader while you are still logged in, you are
automatically logged out and the new user logs in.
Page 67

Logging In from the Control Panel
Logging In Using a Mobile Device
Log in to the machine using the RICOH Smart Device Connector app on your mobile device. You need a
mobile device that supports Bluetooth Low Energy (BLE).
1. Enable the Bluetooth function on your mobile device.
2. Start the RICOH Smart Device Connector application on the mobile device, and then flick
left or right to display the login screen.
3. Press [NEXT].
65
Page 68

EAT360
1. Getting Started
4. Display the login screen on the control panel of the machine, and hold the mobile device
over the Bluetooth label.
• To log out from the machine, hold the mobile device over the Bluetooth label on the control panel
or press [Logout] at the top right on the screen.
• If another user holds a mobile device over the card reader while you are still logged in, you are
automatically logged out and the new user logs in.
Authenticating Using the User Code
When User Code Authentication is specified as the authentication method on the machine, enter the user
code before operating an application.
1. Enter the user code, and then press [OK].
• When you finish the operation of the application, press [Energy Save] ( ) or press and hold
[Reset] to release the authentication status.
Changing the Login Password
When Basic Authentication, Windows Authentication, or LDAP Authentication is configured on the
machine, change the password periodically to prevent use of the machine by an unauthorized person.
Passwords can contain the following characters. Make the password difficult to guess.
66
Page 69

DZX006
DZX016
DZX187
Logging In from the Control Panel
• Uppercase letters: A to Z (26 characters)
• Lowercase letters: a to z (26 characters)
• Numbers: 0 to 9 (10 characters)
• Symbols: (space) ! “ # $ % & ‘ ( ) * + , – . / : ; < = > ? @ [ \ ] ^ _ ` { | } ~ (33 characters)
Changing the login password using the control panel
1. Log in to the machine.
2. Press [Address Book] on the Home screen.
3. Select the login user from the address book, and then press [Edit].
4. Press the [User Management / Others] tab [User Management].
5. Enter the new login password, and then press [OK].
67
Page 70

1. Getting Started
You can enter up to 128 characters.
6. Press [OK].
7. After completing the procedure, press [Home] ( ).
You can change the login password in Web Image Monitor.
See "Changing the Login Password Using Web Image Monitor", User Guide (Full Version).
68
Page 71

EAT318
Placing an Original on the Exposure Glass
Placing an Original on the Exposure Glass
Use the exposure glass to scan originals that cannot be placed in the auto document feeder (ADF), such
as books and license cards.
• When lowering the ADF, do not place your hands on the hinges and exposure glass. Your
hands or fingers are caught, which can result in injury.
• Do not lift the ADF forcefully. The cover of the ADF might open and cause injury. The ADF, or its
hinges may also become damaged.
1. Lift the ADF.
2. Place the original face down and aligned to the mark on the upper left corner of the scan
area.
page 202 "Recommended Original Size and Weight"
3. Lower the ADF.
• When you place a thick book or three-dimensional original on the exposure glass and lower the
ADF, the back side of the ADF rises up to accommodate the original.
69
Page 72

EAT319
EAT320
1. Getting Started
• Do not open or close the ADF with your hands placed in the space between the ADF and exposure
glass.
• The machine cannot detect the size of the original automatically. Specify the original size.
• See "Setting an Original to Send by Fax on the Scanner", User Guide (Full Version).
70
Page 73

Placing an Original in the Auto Document Feeder (ADF)
Placing an Original in the Auto Document
Feeder (ADF)
The ADF automatically scans multiple sheets of originals or two-sided originals at one time.
• Once originals start to feed in, do not push or pull them.
• Do not mix different size originals.
• For details about the sizes of originals that you can place in the ADF, see the following:
page 202 "Recommended Original Size and Weight"
• If the originals described below are placed in the ADF, it may cause misfeeds, white lines, or black
lines, or result in damage to the originals. Place these originals on the exposure glass.
• Stapled or clipped originals
• Perforated or torn originals
• Curled, folded, or creased originals
• Pasted originals
• Originals with adhesive tape, glue or paste stuck to them
• Originals with any kind of coating, such as thermal paper, art paper, aluminum foil, carbon
paper, or conductive paper
• Originals with perforated lines
• Originals with indexes, tags, or other projecting parts
• Sticky originals such as translucent paper
• Thin or highly flexible originals
• Thick originals such as postcards
• Bound originals such as books
• Transparent originals such as transparencies or translucent paper
See "Printing Documents in Order of Priority", User Guide (Full Version).
• When loading an original written by pencil on the ADF, the original may be dirty from by being
scraped.
• Correct an original that tends to curl before setting on the machine.
• Take care so that multiple originals do not stick to each other and are not fed at once.
• Do not set an original that is wet with correcting fluid or ink. The scanning glass will be stained and
the stain will be scanned with the original.
• Do not open the ADF's cover until the scanned originals are ejected into the original output tray.
Doing so may cause a malfunction.
71
Page 74

EAT321
A
EAT322
EAT323
1. Getting Started
• If you push originals into the ADF, a paper jam may occur. If a paper jam occurs, open the cover
of the ADF and reduce the number of original pages that you place on the ADF. Alternatively, open
the cover of the ADF and place the originals but do not push them forcibly.
1. Adjust the original guide A to the original size.
2. Place the aligned originals squarely face up in the ADF.
Place the originals with the first page facing up.
72
Fan sheets before loading so that multiple papers do not stick to each other and are not fed at
once.
Do not stack the originals beyond the limit mark.
Page 75

EAT324
Placing an Original in the Auto Document Feeder (ADF)
• To scan originals larger than A4 or 81/2 × 11 , pull out the ADF’s extender on the original
output tray.
• The machine cannot detect the size of the original automatically. Specify the original size.
• See "Setting an Original to Send by Fax on the Scanner", User Guide (Full Version).
73
Page 76

1. Getting Started
74
Page 77

2. Copy
DZC207
Basic Procedure for Copying Documents
Set the original on the exposure glass or in the Auto Document Feeder (ADF) to make a copy.
• If the previous setting is still active, press [Reset] before copying.
1. Press [Copy] on the Home screen.
2. Place the original.
See "Placing an Original on the Scanner", User Guide (Full Version).
3. On the Copy screen, press [Original Size].
If the key is not displayed, select it from [Original Setting].
4. Specify the original size.
The size of originals can be specified by the following three methods:
• Using the paper tray settings
When [Use Paper Tray Settings] is selected, the machine scans the originals based on the size
of the paper loaded in the selected tray.
• Selecting regular sizes
The user selects the size of the originals from the regular sizes.
• Specifying custom sizes
The user specifies both the horizontal and vertical size of the originals.
See "Copying a Custom Size Original", User Guide (Full Version).
5. Press [ ] or [ ] in [Quantity] to specify the number of copies.
75
Page 78

2. Copy
You can enter this using the keyboard after pressing [Quantity] or a number.
6. Press the key for selecting a paper tray and specify the paper to use.
• If you do not want to use other trays when paper runs out, set the machine so it does not
automatically select other trays.
See "Tray Paper Settings", User Guide (Full Version).
• To prevent the machine from selecting other trays automatically, disable auto tray switching.
See "General Features (Copier/Document Server Settings)", User Guide (Full Version).
7. Press [Start].
• When the [Check the orientation of the original every time after pressing Start] check box is
selected in [Select the original's orientation], and 2-sided, staple, or a function in [Edit /
Stamp] is specified, the screen below appears. Select the original orientation as necessary. If
you do not need to select this each time, clear the check box.
76
• When you place the original in the ADF, the process of copying the original starts.
• When you place the original on the exposure glass, the copy process starts according to the
setting contents. To make a copy of the second page or back side of the original, place the
original accordingly on the exposure glass, and then press [Start]. Press [Finish Scn] after
scanning all originals if necessary according to the setting contents.
• Originals scanned when no paper is loaded or when an error has occurred will be copied
automatically when the machine is ready to execute copying.
• The machine cannot detect the size of the original automatically.
Page 79

DZB222
DZB224
DZB225
DZB223
Making Enlarged or Reduced Copies
Making Enlarged or Reduced Copies
You can enlarge or reduce the original when copying with the following methods:
• Enlarging or reducing at a specified reduction ratio or into a specified size (Zoom/Reduce/
Enlarge/Size Magnification)
• Enlarging or reducing according to the paper size (Auto Reduce/Enlarge)
• Reducing slightly (Create Margin)
Specifying a Copy Ratio or Size
1. Press [Copy] on the Home screen.
2. Place the original.
See "Placing an Original on the Scanner", User Guide (Full Version).
The base point of reduce/enlarge is different for the exposure glass and Auto Document Feeder
(ADF) as shown in the following table:
Setting position Base point Enlarge Reduce
Enlarged or reduced from the
top left.
Exposure glass
Enlarged or reduced from the
bottom left
Auto Document
Feeder (ADF)
77
Page 80

EAT411
2. Copy
When you set a 2-sided original in the ADF, the top right corner of the original will be the base
point for the enlargement/reduction of the reverse side. To enlarge or reduce from the same point,
set the original on the exposure glass and perform 2-sided copy.
3. Press [Copy Ratio] and select a copy ratio or size.
To specify a copy ratio or size other than the displayed setting, press [Others] and perform the
following procedure.
Specifying a copy ratio (Zoom/Reduce/Enlarge)
Enter a value or select the copy ratio.
Specifying a size (Size Magnification)
Press [Specify Copy Size] and enter the length of the original and copied image.
4. Press [Start].
• You can change the copy ratio options that appear when you press [Copy Ratio] on the Copy
screen. You can also change the enlargement and reduction ratios that appear when you press
[Copy Ratio] [Others] on the Copy screen.
78
Page 81

EAT412
DZB236
Making Enlarged or Reduced Copies
• See "Reproduction Ratio", User Guide (Full Version).
Enlarging or Reducing According to the Paper Size
The original is enlarged or reduced to fit on the specified paper size (Scale to Paper Size)
1. Press [Copy] on the Home screen.
2. Place the original.
See "Placing an Original on the Scanner", User Guide (Full Version).
3. On the Copy screen, press [Original Size].
If the key is not displayed, select it from [Original Setting].
4. Specify the original size.
79
Page 82

EAT413
DZB240
2. Copy
5. On the Copy screen, press [Copy Ratio] and [Fit to Paper Size].
6. Select the tray loaded with the paper to use.
When the orientations of the original and paper in the paper tray do not match, the machine
rotates the copied image automatically. To reduce an original of A4 (81/2 × 11) size to A5 (51/
× 81/2) size, for example, you can select either A5 (51/2 × 81/2) or A5 (51/2 × 81/2) .
7. Press [Start].
Reducing Slightly to Increase the Margins
The original is reduced to 93% in size and printed in the center of the paper. This setting is useful when
you want to increase margins on a copy or to copy an original in full size onto paper of the same size
without the edges being slightly cropped.
2
80
Page 83

Making Enlarged or Reduced Copies
1. Press [Copy] on the Home screen.
2. Place the original.
See "Placing an Original on the Scanner", User Guide (Full Version).
3. On the Copy screen, press [Create Margin].
[Create Margin] is not displayed in the default setting. Change the setting in [Copier / Document
Server Settings] the [General Features] tab [Customize Function: Copy (Standard Mode)] or
[Customize Function: Copy (All View Mode)] to display the key.
See "General Features (Copier/Document Server Settings)", User Guide (Full Version).
4. Press [Start].
• You can change the copy ratio of [Create Margin] to a value other than 93%.
• See "Reproduction Ratio", User Guide (Full Version).
81
Page 84

DZB251
2. Copy
Duplex Copying
You can copy two 1-sided pages or one 2-sided page onto the front and back sides of a single sheet of
paper.
The size of the original that can be copied differs from that of the 1-sided copy.
page 202 "Recommended Original Size and Weight"
1. Press [Copy] on the Home screen.
82
2. Press [1 sided 2 sided] or [2 sided 2 sided] on the Copy screen.
• 1 sided 2 sided
• 2 sided 2 sided
Duplex Copying with the Settings Other Than Those Displayed on the Keys
1. Press [2 Sided/Combine].
2. Specify the original and print side settings.
Page 85

DZC252
• Original Direction: Specify the orientation to place the originals.
• Original Setting: Specify the condition of the originals to copy (1 sided/2 sided
(page opening direction)).
• Print Side Setting: Select the finish from [Open to Right/Left] or [Open to Top].
3. Press [OK].
3. Place the original.
See "Placing an Original on the Scanner", User Guide (Full Version).
4. Press [Start].
Duplex Copying
When placing the originals on the exposure glass, press [Finish Scn] after scanning all of the
originals if necessary according to the setting contents and number of originals.
• You can specify the margins when copying a 1-sided original onto both sides of paper.
• See "Edit", User Guide (Full Version).
• You cannot perform Duplex Copy onto the following paper types:
• Label paper (adhesive labels)
• Transparency
• Envelopes
• You can change the setting contents of the two-sided copy key on the Copy screen.
• See "General Features (Copier/Document Server Settings)", User Guide (Full Version).
• Use the [Series] function to copy the front and back sides of a two-sided original onto one side of a
sheet page by page.
• See "Copying Facing Pages of a Book Type Original or Two-sided Original", User Guide (Full
Version).
83
Page 86

3
2
1
3
21
3
1
2
DZB253
DZB254
DZB256
21
DZB257
4
1
DZB258
1
8
DZB255
DZB259
2
1
DZB260
4
1
DZB261
1
8
2. Copy
Combining and Copying a Multi-page Original onto a Single Sheet of Paper
You can copy multiple sheets in an original onto one side or both sides of a sheet of paper to save
paper.
The arrangement of copied pages and copy ratio varies depending on the original orientation and
combined pages.
Original Orientation Combine 2 pages Combine 4 pages Combine 8 pages
1. Press [Copy] on the Home screen.
2. On the Copy screen, press [1sided Comb 2orig].
To combine with the settings other than those displayed on the keys
1. Press [2 Sided/Combine].
84
Page 87

DZB262
3
4
2
1
DZB263
3
4
2
1
Combining and Copying a Multi-page Original onto a Single Sheet of Paper
2. Specify about the original, print side, and combining.
• Original Direction: Specify the orientation to place the originals.
• Original Setting: Specify the condition of the originals to copy (1 sided/2 sided
(page opening direction)).
• Print Side Setting: Specify the condition of the copied sheet (1 sided/2 sided (page
opening direction)).
• Combine Settings: Specify the number of pages to combine on one side of a sheet.
3. Press the key for selecting a paper tray and specify the paper to use.
4. Place an original.
See "Placing an Original on the Scanner", User Guide (Full Version).
To position the right page first and then the left page when copying an original that reads from right
to left, place the original upside down in the ADF.
Example: Combining 2 Pages
Orientation Results
85
Page 88

2. Copy
5. Press [Start].
When placing the originals on the exposure glass, press [Finish Scn] after scanning all of the
originals if necessary according to the number of originals.
• The minimum copy ratio in the Combine function is 25%. For example, if you copy an A4 (81/2 ×
11)-size original onto A5 (51/2 × 81/2)-size paper with [1sided Comb 4orig], the copy ratio
becomes less than 25% and parts of the image might not be copied.
• You can configure the following settings in the [Edit] screen:
• [Erase Original Shadow in Combine]: Determine whether to erase the boundary margin
around each original to maintain the margin.
• [Copy Order in Combine]: Specify the order of combined images.
• [Separation Line in Combine]: Set whether to draw a separation line between combined
pages.
• See "Edit", User Guide (Full Version).
• You can change the setting contents of the Combine key on the Copy screen.
• See "General Features (Copier/Document Server Settings)", User Guide (Full Version).
86
Page 89

EAT414
Copying Onto Envelopes
Copying Onto Envelopes
To copy onto envelopes that are not usually used, set them in the bypass tray. If you copy onto
envelopes frequently, set them in the paper tray.
Copying Onto Envelopes in the Bypass Tray
• The Duplex Copy function cannot be used for envelopes. If Duplex Copy is specified, press the key
to cancel the setting.
1. Press [Copy] on the Home screen.
2. Set the envelope in the bypass tray with the copying side face up.
page 198 "Envelope Orientation and Recommended Status"
The "Bypass Tray Paper Settings" screen is displayed.
3. Press [Change Setting].
4. Select [Envelope], and then proceed to the next screen.
To change the envelope weight, press [ChngThickness] to specify the weight.
87
Page 90

2. Copy
5. Specify the envelope size, and then press [OK] twice.
When you select [Custom Size], enter the envelope size.
6. Place the original on the exposure glass.
page 198 "Envelope Orientation and Recommended Status"
7. Press [Start].
Copying Onto Envelopes in the Paper Tray
• The Duplex Copy function cannot be used for envelopes. If Duplex Copy is specified, press the key
to cancel the setting.
1. Set the envelopes in the paper tray.
page 198 "Envelope Orientation and Recommended Status"
2. Press [Copy] on the Home screen.
3. Press the key for selecting a paper tray and specify the paper to use.
88
Page 91

4. Select the paper tray in which the envelopes are set.
DZC270
5. Place the original on the exposure glass.
page 198 "Envelope Orientation and Recommended Status"
6. Press [Start].
Copying Onto Envelopes
89
Page 92

DZB241
3
3
2
2
1
3
2
1
1
DZB242
3
2
1
1
2
2
3
3
1
DZC207
2. Copy
Copying in Page Order or for Each Page Number
When copying two or more copies of multi-page originals, you can specify the page order as described
below.
Sort
Copies in the order of the original.
Stack
Groups together copies of each page in a multi-page original.
1. Press [Copy] on the Home screen.
2. Place the original.
See "Placing an Original on the Scanner", User Guide (Full Version).
3. Press [ ] or [ ] under [Quantity] on the Copy screen to specify the number of copies.
You can enter this using the keyboard after pressing [Quantity] or a number.
90
Page 93

Copying in Page Order or for Each Page Number
4. Press [Sort/Stack] on the Copy screen.
If the key is not displayed, select it from [Finishing].
5. Select the function to specify.
6. Press [Start].
When selecting [Sort] and placing an original on the exposure glass, a single set of copies is
made. After scanning all of the originals, press [Finish Scn] to copy the rest of the sets.
• When you are using IM 600SRF, the sets of printouts are shifted as they are output.
• You can change the action to perform when paper or memory runs out during sorting under
[Memory Full Auto Scan Restart].
• See "Input / Output", User Guide (Full Version).
91
Page 94

2. Copy
92
Page 95

3. Fax
DZC300
DZC301
Basic Procedure for Transmitting Faxes
The machine scans an original to transmit it by fax into the machine's memory before establishing a
communication with the destination (Memory Transmission).
You can also transmit a fax while confirming the status of the fax destination.
See "Sending a Fax While Scanning the Original", User Guide (Full Version).
1. Press [Fax] on the Home screen.
2. Check that [Fax] and [Memory Transmission] are displayed on the fax screen.
3. Place the original in the ADF or on the exposure glass.
See "Setting an Original to Send by Fax on the Scanner", User Guide (Full Version).
4. Press [Settings], and then specify the scan settings.
See "Sending a Fax at the Image Quality Suitable for the Original", User Guide (Full Version).
5. Specify the destination.
• To enter the fax number manually, select the destination from the destination history, or search
for the destination in the address book, press , and specify the destination.
93
Page 96

EAT512
DZC303
3. Fax
You can select only the destination entered using the numeric keypad from the history.
• To specify the destination again, press .
6. On the [Settings] screen, specify the [Sender] as necessary.
• When a login user is operating the machine, the login user becomes the sender.
To receive a transmission result by e-mail, select [Notification of Result]. The e-mail address
that you selected the [Use as Sender] check box when registering the address will be used as
the e-mail address of the sender.
See "Registering E-mail Addresses in the Address Book", User Guide (Full Version).
• To print the sender's name on the page received at the destination, select [Stamp Sender
Name].
7. Press [Start].
To cancel transmission after scanning the original, press [Stop] and operate in [Job Status]
[Transmission Standby File].
See "Confirming and Handling a Document in the Fax Queue", User Guide (Full Version).
• If the telephone line you are connected to requires time to connect to the public line after you dial
the external number, enter a [Pause] after entering the number to specify the time to wait before
dialing the number. The machine pauses for about two seconds for each single [Pause] entered.
• To use tone-dialing in a pulse-dialing environment, press [Tone]. A tone signal is generated for
every number you enter afterward.
94
Page 97

Basic Procedure for Transmitting Faxes
• You can perform Immediate transmission only when the total number of destinations specified for
all documents exceeds the maximum value.
• During Immediate transmission, the machine cannot scan an original.
• The communication that has been initiated first is displayed on the screen when performing three
simultaneous communications.
• For the maximum values of the following items, see "List of Maximum Values for Each Setting Item",
User Guide (Full Version):
• Number of documents that can be stored in memory when using Memory Transmission
• Number of pages of documents that can be stored in the memory (ITU-T No.1 chart,
resolution "Standard", standard document comprising texts)
• Number of destinations that can be specified for a document when distributing by Broadcast
Transmission
• Number of destinations that can be specified for any document
• Number of destinations that can be held in the destination history
• Number of characters/digits in a destination that can be entered manually
95
Page 98

DZC128
3. Fax
Registering Fax Numbers in the Address Book
By registering the destinations to which you frequently send faxes together with the send conditions in the
address book, you can easily send faxes.
Registering a Fax Number and Send Conditions
1. Press [Address Book] on the Home screen.
2. Press [Register] on the Address Book screen.
96
3. Enter the information of the destination on the [Name] tab, and then select a title to
classify it.
Page 99

4. Press the [Destinations] tab [Fax].
DZC135
DZC131
5. Specify the Fax Destinations and send conditions.
Registering Fax Numbers in the Address Book
• Select Line: Select the line to use.
• International Transmission Mode: Specify whether to reduce errors occurring when sending
abroad.
• Fax Header: Select the name of the sender printed on the reception sheet of the destination.
Register the fax header in advance.
See "Printing the Destination Name, Fax Header, and Standard Message on the Fax
Received at the Destination", User Guide (Full Version).
• Label Insertion: Specify the name (title + name) and fixed phrase printed on the reception
sheet of the destination.
See "Printing the Destination Name, Fax Header, and Standard Message on the Fax
Received at the Destination", User Guide (Full Version).
6. Press the [User Management / Others] tab, and specify the required settings.
97
Page 100

DZC132
3. Fax
• User Management: Enter the authentication information to login and use the machine.
• Registration Destination Group: Select a group to which this destination belongs as necessary.
Register the group in advance.
See "Registering Groups in the Address Book", User Guide (Full Version).
• Display Priority: When the destinations are sorted in the order of priority, a destination with
higher priority is displayed prior to that with lower priority. The destinations with the same
priority are displayed in the order of registration.
• Destination Protection: Select this check box to require entering of the protection code to
select the destination.
See "Using the Protection Function to Prevent the Misuse of Addresses", User Guide (Full
Version).
7. Press [OK].
8. After completing the procedure, press [Home] ( ).
Changing/Deleting the Registered Data Such as Fax Number
If you delete the destination used for the personal box, file transmission will fail. Exclude the destination
from the personal box before deleting it.
1. Press [Address Book] on the Home screen.
2. Select the destination to change or delete on the Address Book screen.
You can delete multiple destinations at one time.
3. Press [Edit] or [Delete] to change or delete the destination information.
4. When changing or deleting is complete, press [Home] ( ).
98
 Loading...