

Page 1

Appendix
Troubleshooting....................128
Error Messages .....................131
Using Your Camera in Other
Countries ............................... 133
Recording Capacities ........... 134
Accessories ........................... 135
Handling Precautions ...........136
Care and Storage .................. 137
Specifications........................138
About the Warranty and
Servicing ................................ 140
Index.......................................142
Functional Index.........................142
Alphabetical Index......................146
Page 2
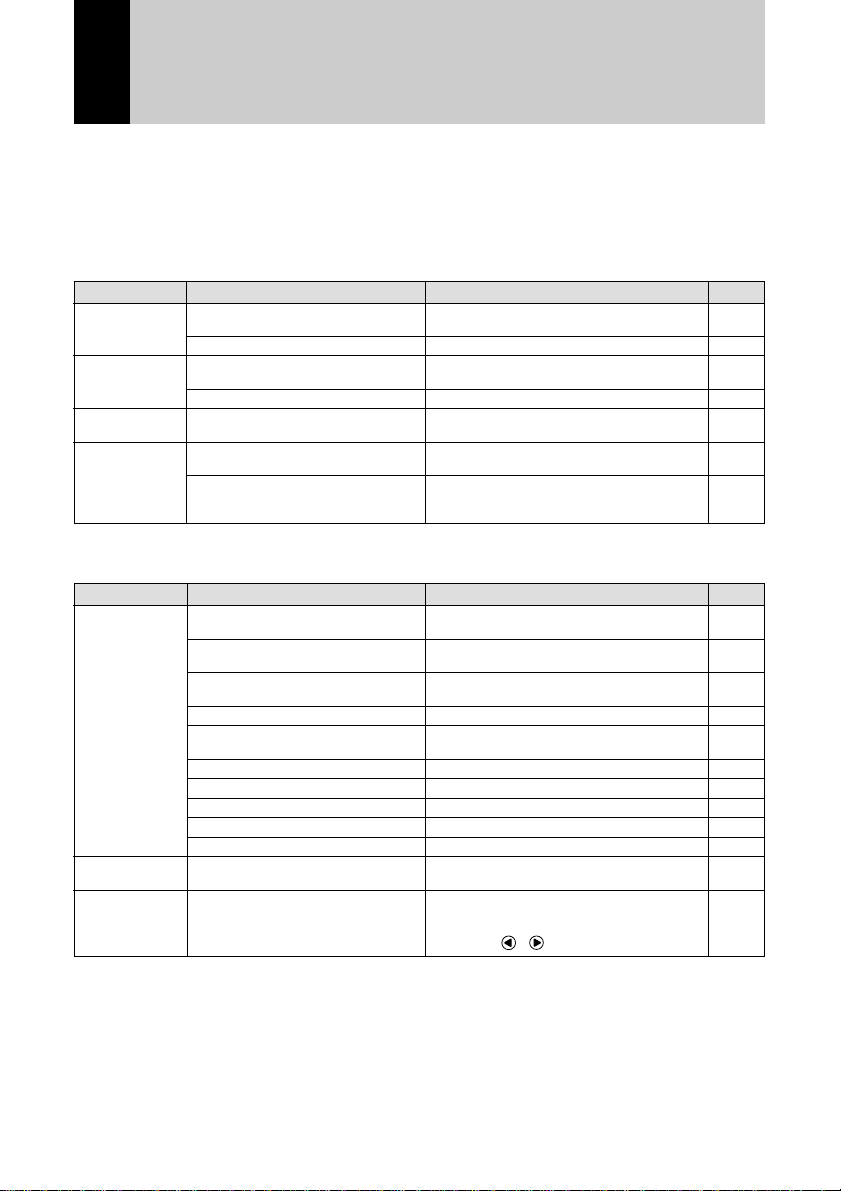
Troubleshooting
Refer to the pointers listed below before submitting the equipment for repairs. If
the problem persists after trying the suggestions, contact your nearest Ricoh
service office.
■ Power Source
Problem
Power will not
come on
Power cuts out
Battery will not
charge
Battery quickly
consumed
Battery not loaded or battery
exhausted
AC adapter not properly connected
No operation performed so auto
power off function was activated
Battery exhausted
Battery at end of service life
Camera operated in extremely high
or low temperature environment
Camera operated in dark
environment requiring frequent use
of flash
■ Recording and Playback
Problem
Shutter release
button pressed
but no file
recorded
Cannot confirm
shot image
No image on
LCD monitor
Battery not loaded or battery
exhausted
No power, or mode dial not set to
recording mode.
Shutter release button not fully
pressed (pressed halfway)
Card not formatted
No memory space on card
No space in internal memory
Card at end of service life
Self-timer on
Flash charging
Card card contact surface dirty
LCD confirmation time too short
No power or LCD monitor is dark
Cause
Cause
Insert battery correctly or charge battery.
Connect correctly.
Switch camera on again.
Charge battery.
Replace with new battery.
Insert battery correctly or charge battery.
Switch on and set mode dial to recording
mode.
Press shutter release button all the way.
Format card.
Delete unnecessary files or insert new card.
Delete unnecessary files.
Insert new card.
Disengage self-timer mode.
Wait until flash LED stops blinking.
Clean with soft dry cloth.
Increase LCD confirmation time.
Switch on and press DISPLAY button to
display image on LCD monitor or press
DISPLAY button 2 seconds or more and
adjust with
Remedy
–
–
Remedy
· buttons.
Page
P.15
P.16
P.18
P.24
P.15
P.16
–
–
Page
P.15
P.16
P.24
P.25
P.47
P.35
P.20
P.103
P.103
P.20
P.62
P.48
–
P.109
P.41
P.37
128
Page 3
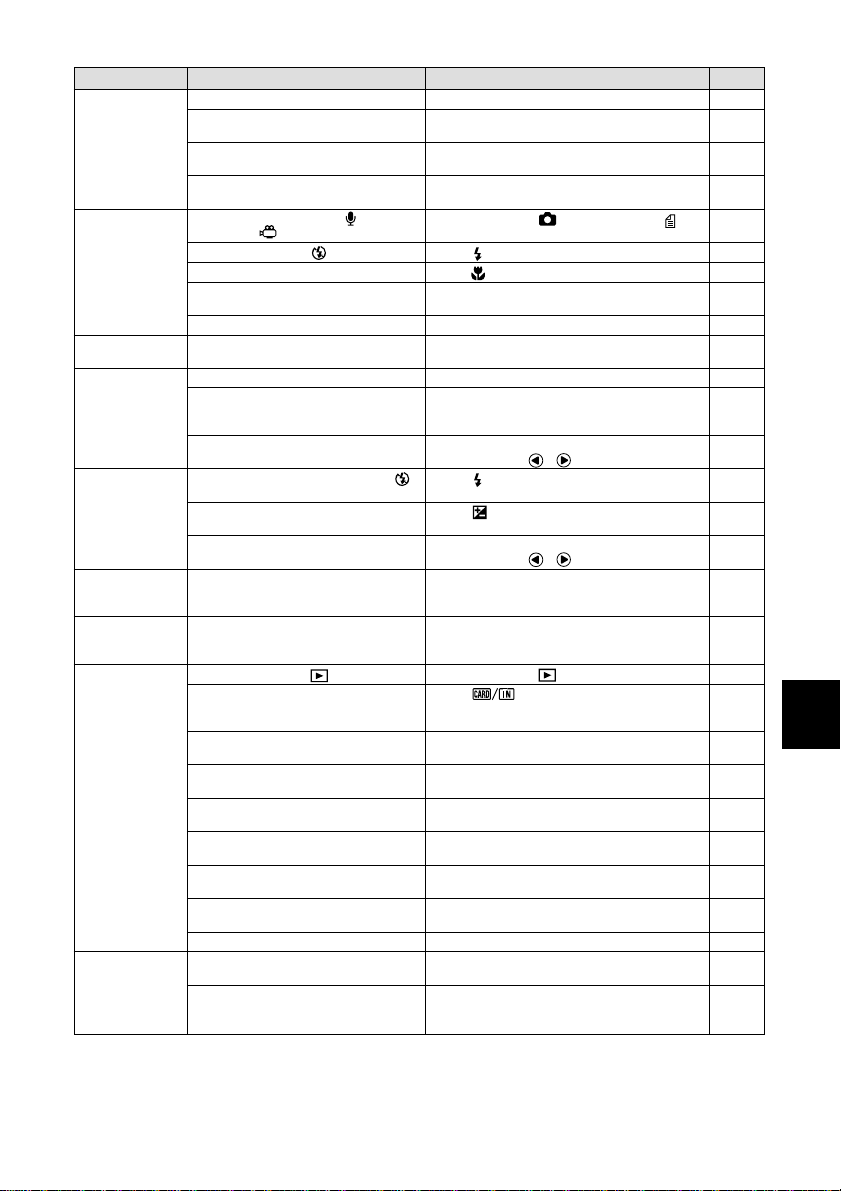
Problem
Autofocus is on
but camera not
focusing
Flash will not
fire or will not
charge
Image dark
even with flash
Image is too
bright
Image is too
dark
Unnatural
coloration of
image
Date and other
recording data
not displayed
No playback or
image will not
appear
Playback is not
clear
Dirty lens or AF viewfinder
Subject not in center of shooting
scope
Subject difficult to focus on
Distance to subject is too close
Recording mode set on
Memo) or
Flash mode set on
Camera set on macro mode
White balance set to mode other
than auto
Battery exhausted
Distance to subject more than
approx. 2.5 m
Subject is too close
Overexposed
LCD brightness setting not correctly
adjusted
Shot in low light with flash set to
(flash off)
Underexposed
LCD brightness setting not correctly
adjusted
Shooting conditions difficult for auto
white balance mode
Screen display set to [No display]
Camera not set to
Incorrect playback source
Card not inserted, or inserted card
does not contain any files
Card not formatted with this camera
Card contains incorrectly recorded
files
Card contains files in format not
supported by this camera
AV interface cable not properly
connected
Source of interference, such as
electric motor, nearby
Card contact surface dirty
Error in internal memory of camera
Error in card
Cause
(Motion Picture)
(Voice
(flash off)
(Play) mode
Clean lens or viewfinder.
Use focus lock.
Use focus lock or switch to manual focus.
Set macro mode.
Set mode dial to
(Text) mode.
Press
Press
Press WB button to switch white balance to
auto mode.
Charge battery.
Move closer to subject.
Set flash to flash off mode.
Adjust exposure compensation from
recording menu. Set time exposure mode
to OFF.
Press DISPLAY button 2 seconds or more
and adjust with
Press
Press
compensation.
Press DISPLAY button 2 seconds or more
and adjust with
Place a white object near subject, use
flash, or select manual white balance
mode.
Press DISPLAY button to switch display
mode.
Set mode dial to
Press
source. Switch to another folder containing
files.
Insert card containing recorded images.
Use card that has been formatted and
recorded with this camera.
Insert card containing properly recorded
images.
Check format type.
Connect properly.
Move camera away from source of
interference.
Clean with soft, dry cloth.
Copy required files from internal memory
onto card and format internal memory.
Test camera with another card. If second
card displays well, problem is with card not
camera. Do not use this card.
Remedy
(Still Picture) or
button to cancel flash off mode.
button to cancel macro mode.
· buttons.
button to cancel flash off mode.
button to adjust exposure
· buttons.
(Play).
button to change playback
Page
–
P.49
P.49
P.64
P.63
P.47
P.50
P.55
P.63
P.59
P.15
P.63
P.55
P.58
P.77
P.37
P.55
P.58
P.37
P.59
P.41
P.85
P.82
P.43
P.82
P.20
P.35
P.20
P.82
P.86
–
–
P.35
P.88
–
Appendix
129
Page 4
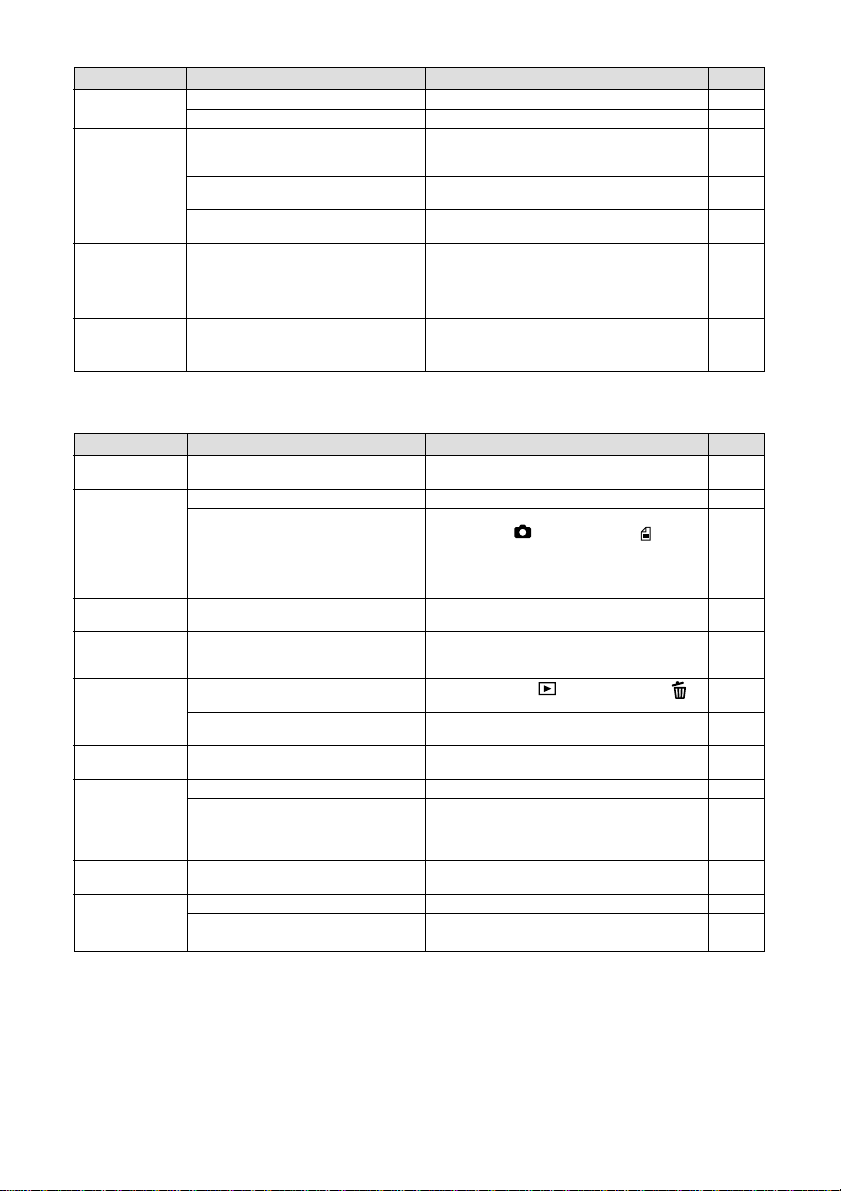
Problem
Display shut off
Remote control
unit (optional)
will not work
LCD monitor
brightness
changes during
autofocus
operation
Vertical lines
appear on
image
Battery is exhausted
Auto power off activated
Obstruction between remote control
unit and camera sensor
Remote control transmitter or
camera sensor is dirty
Remote control lithium battery is
exhausted
Area captured by autofocus field
and surrounding area have different
light levels or location is dark
Phenomenon occurring with bright
subject, known as smear
phenomenon
■ Miscellaneous
Problem
Card will not go
into slot
Camera will not
operate in
response to
buttons
Date and time
are wrong
Date and time
were set but
disappeared
File will not
erase, or card
will not format
Mode settings
have changed
Auto power off
will not activate.
Beep will not
sound
No image on
TV screen
Card incorrectly oriented
Battery exhausted
Camera malfunction
Date/time setting is incorrect
Battery removed
Erase menu not displayed
File protected
Keep settings mode not enabled
Auto power off setting is disabled
Camera powered by AC adapter
(auto power off is automatically
disabled when powered by AC
adapter)
Beep disabled
Incorrect video-out signal method.
Incorrect video I/O switch setting on
video equipment
Cause
Cause
Charge battery.
Switch power on again.
Remove obstruction.
* Remote control reception at front side of
camera.
Clean.
Replace with new lithium battery.
No malfunction.
No malfunction.
Insert correctly.
Charge battery.
Switch off power, switch on again and set
mode dial to
If problem persists, reset.
1.Remove battery from camera, switch
power on and reload battery.
2.Try operating again.
Set correct date and time.
Date setting is reset if battery is removed
for approx. 20 days. Set date again.
Set mode dial to
button.
Cancel protect setting.
Enable keep settings mode.
Enable setting.
Set beep sound to [ON].
Select correct video-out signal method.
Check video I/O switch setting on video
equipment.
Remedy
Remedy
(Still Picture) or (Text).
(Play) and press
–
Page
P.15
P.24
–
–
–
–
–
Page
P.20
P.15
–
P.31
P.31
P.103
P.92
P.108
P.110
–
P.111
P.114
–
130
Page 5
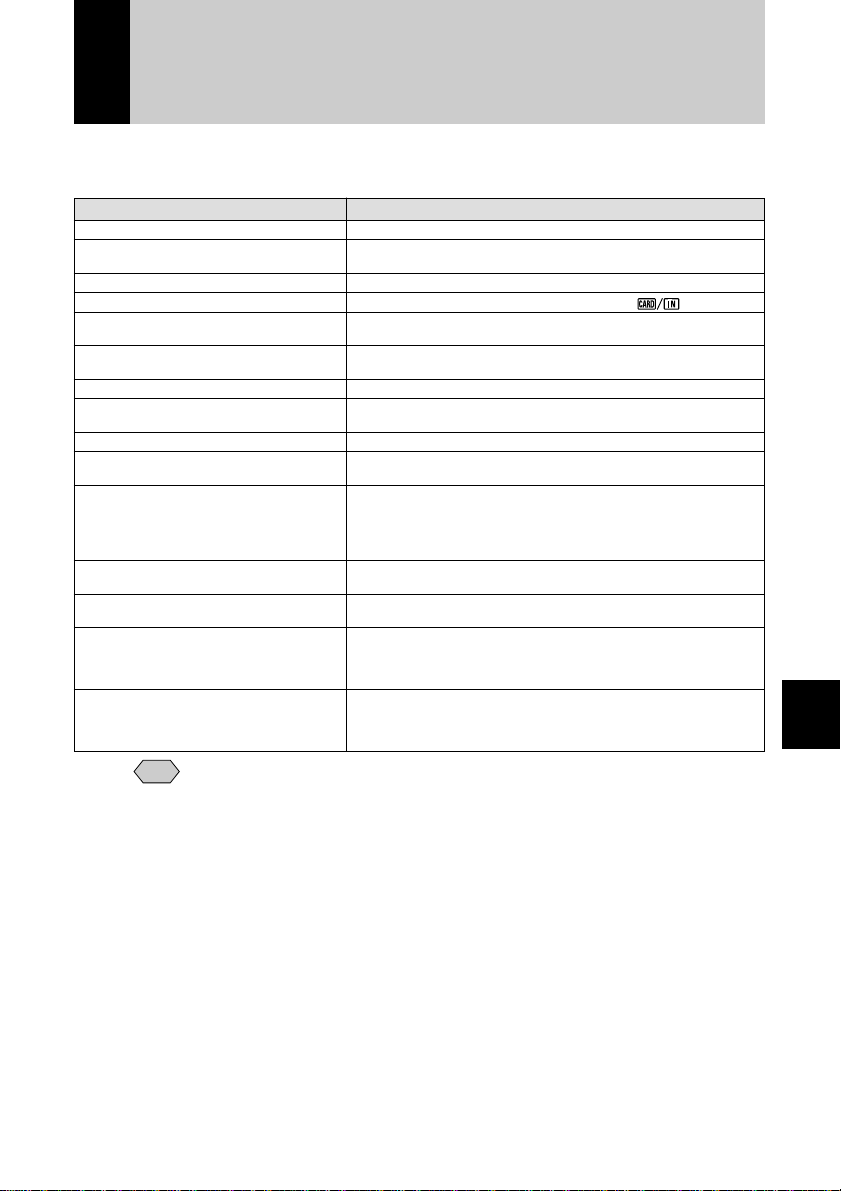
Error Messages
If an error message is displayed on the LCD monitor or LCD panel, follow the
procedures below.
System error occurs
Unable to change memory
Insufficient memory
Change to card
Format required
Format internal memory
Card is unavailable
Format error
UNMATCHED FILE
No file
Insufficient memory. Continue copy?
File number over. Cannot save.
Exceeded DPOF limit. Set up to 999.
Failed to create DPOF files
Failed to read DPOF files
Error Message
• If the error message continues to be displayed after the above
Note
procedures have been followed, open the terminal cover and press the
reset switch (P.6) with the tip of a propelling pencil or similar object.
The settings will return to the factory default settings.
If the error message is still displayed, contact the store where
purchased or your nearest Ricoh service office.
Turn the power off and on.
Storage memory can not be switched due to some reason. Check
content of storage memory or format storage memory.
Erase unwanted files or format to obtain sufficient memory space.
Change the storage memory to card by using .
Format of selected storage memory damaged. Format storage
memory.
Internal memory damaged. Format it by pressing shutter release
button.
Card damaged. Format.
Format again. If formatting is not completed, memory error
occurs. Avoid using the storage memory.
Unplayable file was selected.
No recorded files in specified folder. Change folder or select
storage memory that contains files.
Exceeded memory capacity. Perform one of following and copy
again:
• Delete unnecessary copy source,
• Delete unnecessary files in destination, or
• Format storage memory.
File number exceeded limit. Delete unnecessary files or use
another memory card.
Number of index print or number of specified print exceeded limit.
Reset DPOF settings of some files.
DPOF settings cannot be saved. Delete unnecessary files before
repeating operation. If message still appears, memory may be
damaged. Make a backup file of files saved in memory and
format memory.
DPOF settings are unreadable. Reset all DPOF settings before
repeating operation. If message still appears, memory may be
damaged. Make a backup file of files saved in madia and format
memory.
Remedy
Appendix
131
Page 6

MEMO
132
Page 7

Using Your Camera in Other Countries
Ricoh AC-3 AC adapter (optional)
• The adapter can be used in regions where the voltage ranges from 100 V
to 240 V and the frequency is 50Hz/60Hz.
• Some countries use electrical outlets which have different shapes. Inquire
at your travel agent about the necessary plug adapter for the country of
your destination before you leave.
Using a Local TV Receiver for Playing Pictures
• You can play back images taken with this camera on a TV reciever (or
monitor) equipped with an video input terminal. Use the AV interface cable
supplied.
• This camera supports both NTSC and PAL television systems. Switch the
camera’s video system to meet the local environment. → P.116 “Changing
the Video-out Signal Method”
• If you plan to take the camera abroad with you, check the local television
system beforehand.
133
Appendix
Page 8

Recording Capacities
The table below gives approximate recording picture counts by CF card
capacity, image quality and size.
16 MB 32 MB 48 MB 64 MB 96 MB 128 MB 192 MB
13 26 40 53 80 107 160
26 52 79 105 158 211 316
Still picture
(no. of
images)
Text (no.
of images)
Motion picture (minutes)
Voice memo (minutes) 33:06 66:29 99:46 133:10 199:40 266:50 399:50
• Recording picture counts vary depending on the kind of CF cards,
Note
even when they have the same capacity.
• Maximum recording time of the motion picture is 10 minutes per file.
* Sizes (no. of pixels) are as follows:
: 2048 × 1536 pixels
: 1024 × 768 pixels
: 640 × 480 pixels
51 102 153 205 308 411 616
25 710152030
38 77 116 156 234 312 468
74 149 224 300 450 601 900
161 324 487 650 975 1,303 1,951
51 102 153 205 308 411 616
138 278 417 557 836 1,116 1,672
1:20 2:42
4:03 5:24 8:07 10:00 10:00
* Image qualities (compression rates) are as follows:
: Fine
: Normal
: Economy
: Non-compressed
134
Page 9

Accessories
Item Model Remarks
AC adapter AC-3 Used to supply power directly from a
household electrical outlet.
→ P.18 “Connecting an AC Adapter”
Battery charger BJ-1 Used to charge the battery for
powering the camera
Rechargeable lithium ion battery
Remote control unit For remote operation of the
• For Ricoh compatible products, see the separate list of Compatible
Note
Products.
DB-20L Battery for powering the camera.
DR-3/
DR-4
camera’s recording and playback
functions.
135
Appendix
Page 10

Handling Precautions
● This camera is not waterproof. Keep away from water, rain, beverages, etc. If
any liquid gets into the camera, consult your nearest Ricoh service office.
● Be careful not to drop the camera or subject it to impact.
● To avoid overheating, do not use the flash more than is necessary in
continuous shots.
● Do not look through the viewfinder directly at the sun or intense light.
● Do not fire the flash close to a baby’s eyes as this may cause impaired
eyesight.
● Do not fire the flash at anyone driving a vehicle as this may cause a traffic
accident.
● Exercise caution to prevent sand or dust from getting into the camera in
environments such as beaches or work sites.
● Do not leave the camera for any length of time in particularly hot or humid
places, such as in an automobile with the windows closed, at the beach or in
a bathroom.
● Check that the camera is switched off before attaching the AC adapter
(optional).
● The LCD monitor may contain some pixels that always or never illuminate,
and the brightness of some areas of the monitor may appear uneven. These
are typical LCD performance characteristics and do not constitute
malfunctions.
● Do not apply unreasonable force to the terminal cover or battery cover.
● Do not lift the camera by the LCD monitor, terminal cover or battery cover.
● Do not apply unreasonable force to open or turn the LCD monitor.
● Be careful not to hit the lens unit or LCD monitor while carrying the camera.
Keep the LCD monitor closed when carrying the camera.
● Extreme temperature differences may cause condensation to form inside the
camera body and lens unit, reducing performance. To avoid this, place the
camera in a plastic bag and let it slowly acclimatize to the new temperature
before exposing it.
136
Potential Causes of Condensation
• Suddenly transporting the camera from a cold to a warm place
• Storing or using the camera in places subject to high humidity
• Bringing the camera into a recently heated room or leaving it directly in the
path of an air conditioner
Page 11

Care and Storage
■ Care
● Fingerprints or dirt on the lens or AF viewfinder will reduce the quality of the
image, so take care not to get them dirty.
● Do not wipe dust or smears off the lens or AF viewfinder with your fingers.
Use a lens blower, readily available at most photographic suppliers, to blow
dust off, or a soft cloth and wipe lightly.
● Be sure to clean the lens after use at the beach or in the vicinity of chemicals.
● If the camera should malfunction, contact your nearest Ricoh service office.
This product generates high voltages and disassembly is hazardous. Under
no circumstances should you attempt to disassemble it yourself.
● Never use solvents, benzine, insecticides or other volatile substances on the
equipment as this may cause deformation or flaking of the paint.
● Be careful not to let anything rub against the LCD monitor or LCD panel as
they are easily scratched.
● To clean the LCD monitor or LCD panel, wipe gently with a soft cloth that has
been moistened in diluted detergent and well wrung. Wipe off any moisture
with a soft, dry cloth.
CAUTION
(1)Remove the battery or AC adapter before cleaning the camera.
(2)Pay attention to the following points when cleaning the LCD panel.
• The condensation may occur inside the touch screen due to the heat
generated by the backlight of the LCD monitor, when you wipe the touch
screen with the solvent. Do not forget to turn the power off before cleaning
the camera.
• When cleaning the camera, do not touch the edges of the LCD monitor.
Otherwise the solvent can get into the camera resulting in the misoperation
of the camera.
Appendix
■ Storage
To prevent possible failures, avoid storing the camera in places that are:
● hot and damp, or subject to sharp temperature or humidity changes
● sandy or dusty
● subject to strong vibration
● in contact with chemicals, such as insecticides, or rubber or PVC products,
for an extended period of time
● Near sources of strong electromagnetism (such as monitors and transformer
magnets).
137
Page 12

138
Specifications
■ General
● Video Signal Protocol : NTSC/PAL
● Power Source Voltage : Battery: 3.7 V
● Dimensions (W × H × D) : 141.9 × 78.2 × 30.3 mm (5.6” × 3.1” × 1.2”)
● Weight : Approx. 295 g (10.4 oz) (excluding battery)
●
Operating Range – Temperature
● Operating Range – Humidity :85 % or less
● Storage Temperature Range : –20°C ~ 60°C (–4°F to 140°F)
■ Camera
● CCD : 3,240,000 effective pixels (total 3,340,000 pixels)
● Lens : Zoom lens F:2.6~3.4
• Focal length : f:7.3 ~ 21.9 mm (equivalent to 35 ~ 105 mm in 35
• Minimum shooting range : Approx. 24 cm (9.4”) (wide angle)
• Macro shooting range : Approx. 1 ~ 24 cm (0.4” to 9.4”)
● Viewfinder
• Type : Real image
• Magnification : Telephoto 0.81 ×, wide angle 0.3 ×
• Diopter adjustment : Yes (–2 ~ +1 dpt)
● Monitor
• Display size : 2.0"
• Display type : Backlight low-temperature polysilicon TFT color
• No. of pixels :Approx. 200,000 pixels
● White balance : Auto/Preset (daylight, overcast, fluorescent light,
● Exposure Compensation
• Exposure metering system : Center weighted/Multi-pattern/Spot
•
Exposure value memory system
• Metering : TTL CCD method
• Flash automatic exposure : Yes (daylight synchro)
• Shutter speed : 1 ~ 1/2000 seconds for still pictures in normal
• ISO sensitivity : AUTO (ISO 150~200), ISO 200, ISO 400, ISO 800
● Distance Adjustment
• Mode :Auto/Manual/Fixed (2.5 m <SNAP>, ∞)
• Autofocus method : Normal shooting: external passive CCD method;
• Autofocus range : Normal shooting: approx. 24 cm (9.4”) ~ infinity;
● Built-in Flash
• Type : Auto
• Range : Approx. 0.6 ~ 2.5 m
• Modes : Flash off/Forced flash/Auto /Slow synchro/Red-
: AC: 5 V
(excluding projections)
:0°C to 40°C (32°F to 104°F)
mm format)
LCD
tungsten light)/Manual
: Auto backlighting correction
: Manual compensation ±2.0 EV (in 0.25 EV steps)
Recording mode
1, 2, 4, 8 seconds for stil pictures in time
exposure mode
Macro: CCD method (Text mode: CCD method)
Macro: about 1 ~ 24 cm (0.4” to 9.4”)
eye reduction
Page 13

■ Image Data Recording and Playback
● Image Resolution
• Still picture :2048 × 1536, 1024 × 768, 640 × 480 pixels
• Text : 2048 × 1536, 1024 × 768 pixels
• Motion picture : 320 × 240 pixels
■ File Format
• Still picture :Compressed: JPEG (Exif2.1); Non-Compressed:
TIFF (YUV)
• Text : TIFF (G4 MMR system)
• Motion picture : AVI (Conforms to Open DML Motion JPEG
format) 15 frames/second
• Voice memo : WAV (Exif2.1)
● Camera File System Standard : DCF * DCF stands for “Design rule for Camera
File system” standardized by JEITA
● Compression Format : Conforms to JPEG baseline method
● File Sizes
• 2048 × 1536 : F: approx. 1.18 MB, N: approx. 597 KB,
E: approx. 302 KB, NC: approx. 6.33 MB
• 1024 × 768 : F: approx. 400 KB, N: approx. 204 KB,
• 640 × 480 : N: 84 KB
■ Input/Output Terminal
● Power input : 5 V (AC adapter)
● Video output : 1.0 Vp-p (75 Ω)
● USB : mini-B
■ Body
● Tripod Screw Hole : Yes (1/4-20 UNC)
: Length: less than 6.0 mm (0.24”)
■ Power Supply
● Main Battery
• Type :Rechargeable lithium ion battery
• Voltage : 3.7 V (1 battery)
■ Keep Date Setting : Approx. 20 days
■ Internal Memory
• Capacity :8 MB (Maximum recordable area: 7 MB)
■ Compatible Memory Cards for Recording and Playback
● Type of Memory : CF card, Microdrive
• Operating voltage : 3.3 V
■ Communication, etc.
● Dial-up function : <protocol> PPP
● E-mail :<protocol> Internet mail (POP3/SMTP),
<attachment> MIME
Appendix
139
Page 14

About the Warranty and Servicing
1.This product is backed by a one-year limited warranty. During the warranty
period, which starts from the date of purchase, any defective parts will be
repaired free of charge. In the event of a camera malfunction, contact the
dealer from which you purchased the camera or your nearest Ricoh service
office. Please note that you will be not be reimbursed for the cost of bringing
the camera to the Ricoh service office.
2.This warranty does not cover any damage resulting from:
failure to follow the instructions in the instruction manual;
➀
repair, modification or overhaul not conducted by an authorized service
➁
center listed in the instruction manual;
fire or natural disaster;
➂
improper storage, such as exposing the camera to high temperatures,
➃
humidity, or mothballs; storing it with a leaking battery; storing the
camera in a dirty condition so that it becomes moldy; or otherwise
insufficiently caring for the camera;
Submergence; exposure to floods or spilled alcoholic or other beverages;
➄
allowing sand or mud to enter the camera; exposure to physical shocks;
or dropping of the camera.
3.After a full year has passed from the purchase date, you will be liable for all
repair fees, including those incurred at an authorized service center.
4.You will be liable for all repair fees, even within the warranty period, if the
warranty card is not attached or if the distributor’s name or the purchase
date have been changed or are not indicated on the card.
5.Expenses for overhaul and thorough inspection by special request of the
customer will be charged to the customer, whether or not they are incurred
during the warranty period.
6.This warranty only applies to the camera and not to the accessories, such
as the case and strap, nor does it apply to the battery and other
consumables provided.
7.Any consequential damages arising from failure of the camera, such as
expenses incurred in taking pictures or loss of expected profit, will not be
reimbursed whether they occur during the warranty period or not.
8.The above provisions refer to repairs offered free of charge, and do not limit
your legal rights. The intention of the above provisions is also described in
the warranty card provided with this camera.
9.Parts essential to the servicing of the camera (that is, components required
to maintain the functions and quality of the camera) will be available for a
period of seven years after the camera is discontinued. However, as some
parts are kept for a longer period, do not hesitate to contact your distributor
or nearest Ricoh service office even after the seven-year period.
10.Please note that if the camera is seriously damaged by flooding,
submergence, infiltration of sand or mud, violent shocks or dropping, the
camera may not be repairable, and restoration to its original condition may
be determined to be impossible.
140
Page 15

• Before sending the camera in for repair, check the battery and read
Note
the instruction manual again to ensure proper operation.
• Some repairs require a significant amount of time to be completed.
• When sending the camera to a service center, please include a note
which describes the defective part and the problem as precisely as
possible.
• Remove all accessories not related to the problem before sending the
camera to the service center.
• Before taking any important pictures (such as at weddings, on trips
abroad, etc.), test the camera to check operation and ensure proper
functioning. We recommend that you keep this manual and spare
battery on hand.
141
Appendix
Page 16

Index
Functional Index
SET Mode (Setup)
◆ CAMERA SETTINGS
... KEEP SETTINGS....... Camera.................................. P.108
... LCD CONFIRM. ......... Camera.................................. P.109
... AUTO POWER OFF... Camera.................................. P.110
... BEEP SOUND............ Camera.................................. P.111
... POWER SAVE........... Camera .................................. P.112
... DATE SETTINGS....... Camera.................................. P.31
... LANGUAGE ............... Camera.................................. P.113
... VIDEO OUT MODE.... Camera.................................. P.114
... SIGNATURE .............. Camera.................................. P.115
... OWNER INFO............ Camera.................................. P.34
... SEQUENTIAL NO...... Camera .................................. P.116
... POWER BY LCD........ Camera.................................. P.117
... INITIALIZE ................. Camera.................................. P.118
◆ COMMUNICATION SETTINGS
... DIAL UP ACCT. ......... Communication/Internet........... P.24
... PRESET MEMO......... Communication/Internet........... P.42
... EMAIL SETTINGS ..... Communication/Internet........... P.34
... DIRECT UPLOAD...... Communication/Internet........... P.48
... ADDRESS BOOK ...... Communication/Internet........... P.39
142
Page 17

... FTP UPLOAD............. Communication/Internet......... P.51
... QUICK SEND............. Communication/Internet......... P.44
... NETWORK.................
... PC CONNECTION.....
... MODEM SETTING..... Communication/Internet......... P.60
Connecting to a Psersonal Computer .....
Connecting to a Psersonal Computer .....
P.158
P.156
◆ FORMAT................................................... Camera.................................. P.35
Recording Mode
◆ MENU Button
... CONT. MODE ............ Camera.................................. P.52
... SELF-TIMER.............. Camera.................................. P.62
... VOICE MEMO............ Camera.................................. P.54
... FOCUS....................... Camera.................................. P.64
... REDEYE REDUC....... Camera.................................. P.66
... FLASH STRENGTH... Camera.................................. P.55
... DATE IMPRINT.......... Camera.................................. P.67
... SPLIT-SCREEN ......... Camera .................................. P.68
... SHARPNESS ............. Camera .................................. P.71
... MONOCHROME ........ Camera .................................. P.72
◆ Ô Button ............
... INTERVAL.................. Camera.................................. P.73
... AUTO BRACKET ....... Camera.................................. P.74
... ISO SETTING ............ Camera .................................. P.75
... PHOTOMETRY.......... Camera.................................. P.76
... TIME EXPOSURE...... Camera.................................. P.77
... SIGNATURE .............. Camera.................................. P.78
Image Capture Guide List.... Connecting to a Psersonal Computer .
P.106
143
Appendix
Page 18

Play Mode ( )
◆ MENU Button
... SEND ......................... Communication/Internet...... P.70, 73
... QUICK SEND............. Communication/Internet...... P.68
... COPY......................... Camera ...............................P.88
... PROTECT.................. Camera ...............................P.92
... AUTO PLAYBACK ..... Camera ............................... P.95
... DPOF SETTING......... Camera ...............................P.96
... VOICE MEMO............ Camera ...............................P.102
◆ Ô Button
... NEW HTML FILE ....... Communication/Internet......P.101
...
NEW HTML + FTP UPLOAD .....
... FTP UPLOAD............. Communication/Internet......P.104
... DELETE HTML FILE .. Communication/Internet......P.103
Communication/Internet...... P.101
◆ Button ............ Deleting ...................... Camera ...............................P.103
144
Page 19

PC Mode ( )
Communication Mode ( )
... E-MAIL ....................... Communication/Internet........... P.83
... DIRECT UPLOAD...... Communication/Internet........... P.94
Connecting to a Personal Computer
Appendix
145
Page 20

Alphabetical Index
A
AC adapter .......................................... 18
AF LED................................................ 47
Auto bracket ........................................ 74
Auto focus lamp .................................. 47
Auto playback...................................... 95
Auto power off ................................... 110
B
Battery
Charging ....................................... 15
Loading ......................................... 16
Beep sound ....................................... 111
C
Camera
How to hold ................................... 37
Parts & names ................................. 6
Turning off ..................................... 24
Turning on ..................................... 24
Camera information
Date and time................................ 31
Date and time setting .................... 31
Camera settings
Initializing .................................... 118
Character input.................................... 30
Check box ........................................... 29
Close-up shooting ............................... 63
Continuous shooting file
Playing........................................... 82
Continuous Shooting mode................. 52
Contrast
LCD monitor .................................. 37
Copy.................................................... 88
D
Date imprinting .................................... 67
Digital printing service ......................... 96
Digital zoom ........................................ 46
Display language............................... 113
DPOF .................................................. 96
E
Error Message................................... 131
Exposure compensation ..................... 58
Exposure metering system.................. 76
F
File
Copying......................................... 88
Deleting
Selected file ........................... 103
Single file ............................... 104
Magnifying..................................... 88
Flash LED ........................................... 48
Flash modes........................................ 55
Focus lock shooting ............................ 49
Focus shooting.................................... 64
Folder
Deleting ....................................... 107
Selecting ....................................... 43
I
Image
Protecting ...................................... 92
Image quality mode............................. 44
Information display
LCD monitor .................................. 26
LCD panel ..................................... 26
Interval (time-lapse) ............................ 73
Interval time-lapse recording............... 73
ISO sensitivity ..................................... 75
Items
How to select................................. 28
K
Keep settings .................................... 108
L
LCD confirmation time....................... 109
LCD monitor ..................................26, 45
LCD monitor brightness
Adjusting ....................................... 37
LCD monitor display
Play mode ..................................... 85
146
Page 21

Recording mode ........................... 41
LCD panel ........................................... 26
Lens cap.............................................. 14
M
Macro mode ........................................ 63
Manual focus....................................... 64
Memory card ....................................... 20
Mode dial............................................. 25
Monochrome mode ............................. 72
Motion Picture mode ........................... 52
N
NC (Non-compressed) mode .............. 44
O
Owner information
Registering .................................... 34
P
PIC button ........................................... 44
Playback.............................................. 82
Recorded images.......................... 82
Power on
When the LCD monitor is opened 117
Protect................................................. 92
Canceling the setting .................... 94
R
Redeye reduction mode ...................... 66
Remote control
Deleting ....................................... 124
DR-3 ............................................ 123
DR-4 ............................................ 120
Playback..............................121, 124
Shooting ...................................... 120
S
Self-Timer............................................ 62
Settings
Initializing .................................... 118
Sharpness ........................................... 71
Shutter release button...................38, 47
Signature imprint mode ....................... 78
Spin box .............................................. 29
Split-screen shooting........................... 68
Still picture file
Playing........................................... 82
Still Picture mode ................................ 47
Still pictures with voice memo ............. 54
Storage memory
Formatting ..................................... 35
Inserting ........................................ 20
Removing ...................................... 21
Selecting ....................................... 42
T
Text file
Playing........................................... 82
Text mode ........................................... 50
Text with voice memo ......................... 54
Thumbnail playback ............................ 87
Time exposure mode .......................... 77
V
Video-out signal method ................... 114
Viewfinder .....................................37, 45
Viewfinder diopter
Adjusting ....................................... 36
Voice Memo file
Playing........................................... 83
Voice memo mode .............................. 51
W
White balance mode ........................... 59
Z
Zoom lever .......................................... 46
Zoom playback.................................... 88
147
Appendix
Page 22

Declaration of Conformity
“The Product complies with the requirements of the EMC Directive 89/336/EEC.”
148
Page 23

INFORMA TION TO THE USER
USA FCC Part15 Class B
The equipment has been tested and found to comply with the limits for a Class B
digital device, pursuant to part 15 of the FCC Rules. These limits are designed to
provide reasonable protection against harmful interference in a residential installation. This equipment generates, user, and can radiate radio frequency energy and if
not installed and used in accordance with the instructions, may cause harmful
interference to radio communications. However, there is no guarantee that interference will not occur in a particular installation. In this equipment does cause harmful
interference to radio or television reception, which can be determined by turning the
equipment off and on, the user is encouraged to try to correct the interference by
one or more of the following measures:
– Reorient or relocate the receiving antenna.
– Increase the separation between the equipment and receiver.
– Connect the equipment to outlet on a circuit different from that to which the
receiver is connected.
– Consult the dealer or an experienced radio/TV technician for help. (FCC 15.105B)
Changes or modifications not expressly approved by the party responsible for
compliance could void the user’s authority to operate the equipment. (FCC 15.21)
Properly shielded and grounded cables and connectors must be used for connection to a host computer in order to comply with FCC emission limits. (FCC 15.27)
An AC adapter with a ferrite core must be used for RF interference suppression.
COMPLIANCE INFORMATION STATEMENT
Product Name: IMAGE CAPTURING DEVICE
Model Number: RDC-i500
This device complies with Part 15 of the FCC Rules.
Operation is subject to the following two conditions:
(1) This device may not cause harmful interference, and
(2) This device must accept any interference received, including
interference that may cause undesired operation.
Appendix
RICOH CORPORATION
5 Dedrick Place, West Caldwell NJ, 07006 Tel.: 1-800-225-1899
Note to Users in Canada
Note: This Class B digital apparatus complies with Canadian ICES-003
Remarque Concernant les Utilisateurs au Canada
Avertissement: Cet appareil numerique de la classe B est conforme a la norme
NMB-003 du Canada
IMPORTANT SAFETY INSTRUCTIONS-SAVE THESE INSTRUCTIONS DANGERTO REDUCE THE RISK OF FIRE OR ELECTRIC SHOCK, CAREFULLY FOLLOW
THESE INSTRUCTIONS.
149
Page 24

MEMO
150
Page 25

Ricoh Service Offices
3-2-3, Shin-yokohama
Kohoku-ku, Yokohama-shi
222-8530, Japan
http://www.ricoh.co.jp/r_dc
Ricoh Factory Service Center
3235 Sunrise Blvd.,
Suite2 Rancho Cordova,
CA 95742
http://www.ricohzone.com/
Ricoh Europe B.V.
Photo Products Division
P.O. Box 75640
1118 ZR Schiphol
The Netherlands
http://www.ricoh-red.com/
htttp://www.ricoh-europe.com/
E-mail:camera@ricoh.nl
Ricoh Europe B.V.
Düsseldorf Branch
Photo Products Division
Oberrather Straße 6
D-40472 Düsseldorf
Germany
Ricoh Photo Products (Asia), Ltd.
Unit D, E & F
24/F., China Overseas Building
139 Hennessy Road, Wan Chai
Hong Kong
Ricoh Australia Pty. Ltd.
8 Rodborough Road
Frenchs Forrest, N.S.W. 2086
Australia
http://www.ricoh.com.au
Page 26

RICOH CO., LTD.
3-2-3, Shin-yokohama
Kohoku-ku, Yokohama-shi
222-8530, Japan
L2172551
 Loading...