

Page 1

Adobe® Acrobat® Search
• Tools and commands
• Using Acrobat Search
• Selecting indexes to search
• Defining search queries
• Viewing documents returned
from a search
• Troubleshooting
Online Guide
Page 2
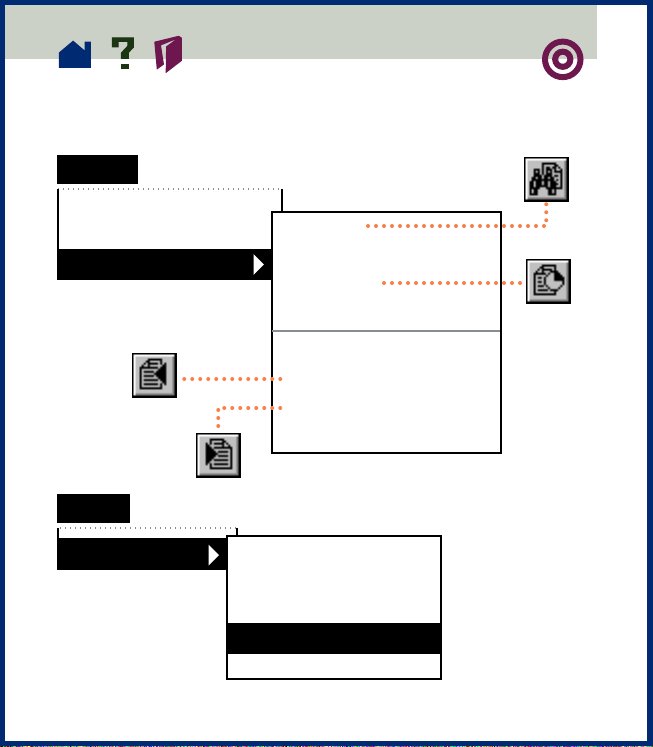
Tools and commands
Tools
Find Next Note
Summarize Notes
Search
View
ing
Viewi
ng
File
Preferences
Search-
Query...
Selecting
Indexes...
To view
Results...
Using the Word
Word Assistant...
Previous Document
Viewing docu-
Previous
View-
Next
Vie
Next Document
Viewing docu-
General...
Notes...
Full Screen...
Chang-
Search...
Weblink...
Searc
hing
To
view
Page 3

Using Acrobat Search
You use the Search command in Acrobat Exchange
or Acrobat Reader to perform full-text searches of
PDF document collections indexed with Acrobat
Catalog. The Search command also has powerful
tools for limiting and expanding the definition of
the term for which you are searching.
full-text
A
in a document or collection of documents. Searches
of full-text indexes are very quick; by contrast, the
Find command works with a single document and
reads every word on every page, a much slower
process.
index is a searchable database of all text
Searching a full-text index
Expanding a search
Limiting a search
Changing search preferences
Page 4
Searching a full-text index
Performing a search is a four-step process:
1
Select the indexes you want to search.
2
Define a search query, and list documents that match
the query. (A
define the information you want.)
3
Choose documents to view from the list.
4
View occurrences of the text in the documents.
Instructions for performing these steps follow.
To perform a full-text search:
1
Choose Tools > Search > Indexes to list the document-collection indexes currently selected, add or deselect indexes as necessary, and click OK. For details, see
search query
Selecting indexes to search
is text and other items that
.
Page 5
2
Choose Tools > Search > Query or click the Search
Query button v on the toolbar to open the Search
window. Type the text you want to find in the Find
Results Containing Text box, and click Search.
The text can be a single word, a number, a term, or
a phrase. (For details, see
phrase
is hidden and documents that match your search
query are listed in rank order in the Search Results
window.
3
the relevant information, probably the first document
in the list. (For details, see
ranking
the text you typed.
.) When you click Search, the Search window
Double-click a document that seems likely to contain
.) The document opens on the first match for
Searching for a term or
Interpreting relevance
Page 6

4
Use the Search Next button y and Search Previous
button x to go to other matches in the document.
Or choose another document to view. See
documents returned from a search
Alternatively, redefine the query by typing new text
or by using other techniques to
to more documents or to
documents. If you want to do this without having to
redisplay the Search windows,
preference
that hides it “on view.”
limit the search
expand the search
change the default
Viewing
for details.
to fewer
Page 7

Expanding a search
If a search returns too few documents or no
documents at all, make sure you are searching the
appropriate indexes. Also, make sure that settings
left over from a previous search aren’t limiting the
current one.
Then try any of these query techniques:
•
Wild-card
the number of matches for the text.
characters in the search text increase
•
A Boolean
returns documents containing either word.
•
The
share a stem with a search word.
•
The
of proper names.
•
The
meanings similar to the meaning of a search word.
For details, see
OR
operator between two words
Word Stemming option
Sounds Like option
Thesaurus option
finds different spellings
finds words that have
Defining search queries
finds words that
.
Page 8
Limiting a search
If a search returns too many documents or provides
too many matches in individual documents, try any
of these query techniques:
•
Refining
by a previous search, which may be a small set of the
documents actually indexed.
•
A Boolean
documents containing the word.
a search confines it to documents returned
NOT
operator before a word excludes
•
A Boolean
only documents containing both words.
•
The
words must be close to each other—within three pages
or fewer.
The
•
the same capitalization as the text you type.
AND
operator between two words returns
Proximity option
limits AND searches so that
Match Case option
finds text only when it has
Page 9

•
Using
ments with those values.
Document Info
field values returns only docu-
•
Using a
or modified within that range.
For details, see
date range
Defining search queries
returns only documents created
.
Page 10

Changing search preferences
You may need to change the default settings in the
Search Preferences dialog box
following page.
To change search preferences:
1
Choose File > Preferences > Search.
2
Change preferences in the dialog box as necessary.
3
Click OK.
illustrated on the
Page 11
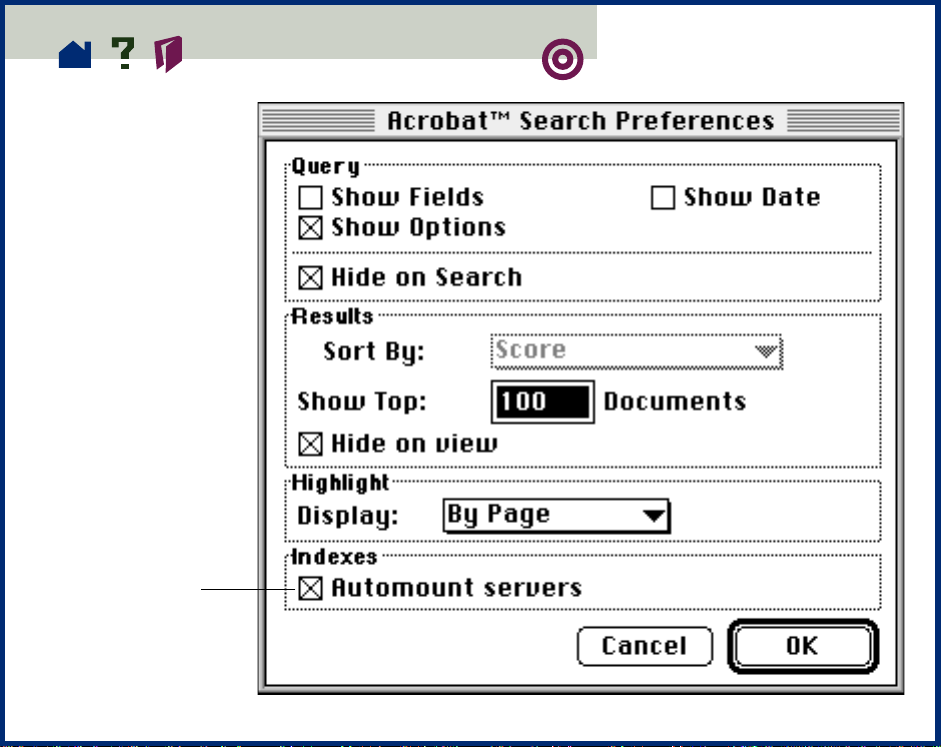
Search Preferences dialog box
Click any preference
for information on
that preference. The
illustration shows the
default settings.
The Automount
servers preference
is available only
on a Macintosh.
Searching with Searching with
Using search op-
Viewing documents returned from a search
Page 12
Selecting indexes to search
Choosing Tools > Search > Indexes lists the available indexes. On a Macintosh, the list may also
include indexes on currently unavailable file server
volumes or CD-ROMs.
To be searchable, an index must be in the search list
and it must be selected. When you add an index to
the list, it is automatically selected. You can deselect or reselect it for specific searches or remove it
from the list altogether. You can view a description
of any index in the list.
Opening a PDF document associated with an index
automatically makes the index searchable. See the
Acrobat Exchange Guide
for details.
Page 13

To add an index to the search list:
1
Choose Tools > Search > Indexes. (If the Search
window is open, click the Indexes button in it instead.)
2
Click Add.
3
Locate and select the index you want to use. Acrobat
index-definition filenames usually end with .pdx.
4
Double-click the name of the index you want to use.
The new index is added to the search list.
To select or deselect an index:
In the Index Selection dialog box, click the box of
any index whose status you want to change and
click OK.
Note:
Dimmed indexes are currently unavailable
for searching, usually because the network connection has been lost. See
Troubleshooting
for more
information.
Page 14

To remove an index from the search list:
1
In the Index Selection dialog box, highlight the name
of the index you want to remove.
2
Click Remove.
3
Click OK.
To view a description of an index:
1
In the Index Selection dialog box, highlight the name
of the index you want information about.
2
Click Info to view the information.
3
Click OK.
Page 15

Defining search queries
You can search for a word, a number, a term, or a
phrase made up of several terms. You can also use
the other techniques listed below to define a search
query.
Searching for a term or phrase
Searching with wild-card characters
Refining a search
Searching with Document Info fields
Searching with document creation and
modification dates
Using search options (Word Stemming,
Sounds Like, Thesaurus, Match Case,
Proximity)
Searching with Boolean expressions
(AND, OR, and NOT)
Page 16

Searching for a term or phrase
To find matches for a single term, type the term in
the text box labeled Find Results Containing Text
and click Search. The term can be a word, a word
wild-card
with
letters, numbers, and symbols.
To find matches for a phrase, type the phrase and
click Search.
characters, or any combination of
•
If the phrase includes the word
in its ordinary sense (not as a
the phrase in quotes. The search phrase
and, or
Boolean operator
“once or twice”
finds all occurrences of the phrase
not all occurrences of
twice
as it would without the quotes.
once
and all occurrences of
once or twice
, or
not
used
)
, put
,
Page 17

•
If the phrase includes punctuation (other than the
apostrophe) or special characters such as @ and *, they
are ignored. For example, either of the terms
son-in-law, son in law
finds all occurrences of both
son-in-law
and
son in
law.
When a word such as an or
•
index, you cannot search for the word or for a phrase
that includes it. The author of the index can give you a
list of such stopwords and tell you whether numbers
have been excluded.
For more information about phrases in quotes,
ignored characters, stopwords, and excluded numbers, see
exclusions
Working around stopwords and other
.
the
is excluded from an
Page 18
Working around stopwords and other exclusions
If you are unsuccessful searching for a phrase that
includes a common word such as
be a stopword.
If the unsuccessful search phrase includes a number, numbers may also have been excluded from
the index.
If you are unsuccessful searching for an alphanumeric term that includes a separator character such
as a symbol or mark of punctuation, it is probably
because numbers also have been excluded. Acrobat
Catalog regularly excludes separator characters
from indexes, and in the process sometimes
reduces alphanumeric terms such as phone
numbers to numbers.
to or that, it may
Page 19

In these cases, do the following:
• Try constructing a search phrase that doesn’t include
a number, alphanumeric term, or possible stopword.
• If you can, get information about exclusions from the
publisher of the index. Get a stopword list from the
publisher.
For details, see the following:
How Acrobat Catalog treats separator
characters
How Acrobat Catalog excludes numbers
Page 20

How Acrobat Catalog treats separator characters
Separator characters include all symbols, the space
character, and most punctuation characters: periods, commas, colons, semicolons, exclamation
points, question marks, parentheses, and quotation
marks, but not apostrophes.
When indexing a PDF document, Acrobat Catalog
uses separator characters to recognize where one
term ends and the next term starts. For example, in
the sentence
We have nothing to fear but fear itself.
the Catalog program uses the space characters
and the period to identify seven terms: we, have,
nothing, to, fear, but, and itself.
The program then discards the separator characters. The space and period don’t appear in the
index.
Page 21

Unless the discarded separator characters appear in
an alphanumeric term, they have no effect
on searches, because these characters are also
removed from search terms in Acrobat Search. For
details, see How Acrobat Search treats separator
characters
.
Page 22

How Acrobat Search treats separator characters
Separator characters are automatically removed
from the search terms you enter as well as from
indexes created in Acrobat Catalog, so using these
characters in searches usually produces no effect.
For example, the phone number
(415)555-1212
in a PDF document become a three-number phrase
in the index:
415 555 1212
But searching for the phone number (415)555-1212
finds the phrase 415 555 1212 unless numbers are
excluded from the index, because the parentheses
and hyphen are disregarded for purposes of the
search.
Page 23

How Acrobat Catalog excludes numbers
Index publishers can exclude numbers from Acrobat
Catalog indexes. Acrobat Catalog defines a number
to be a sequence of one or more numeric digits
[0 through 9] that are
• Optionally preceded by a minus sign [-].
• Optionally separated by one or more commas [,] or
periods [.].
• Optionally containing a decimal point, which can be a
period [.] or a comma [,].
Here are some examples of the kinds of numbers
that Acrobat Catalog can exclude from an index:
23 23.54671 -37.1 3,012,222
44.223.835,5
Page 24

Note that alphanumeric terms made up of numbers
and separator characters such as $ can also be
excluded, because the Catalog program removes
the separator characters before determining
whether the remaining characters constitute a
number. For example,
($3,000.23)
becomes 3,000.23, which may be excluded as
a number.
Page 25

Searching with wild-card characters
You can use wild-card characters to find all the
words that contain a word fragment or all the terms
that match an arbitrary character pattern:
* asterisk, matches zero, one, or more characters
? question mark, matches any one character
You can use wild-card characters in a term that is
part of a Boolean expression. You can also use wild
cards to specify Document Info field values. You
cannot use wild cards to represent separator characters such as the hyphen [-] and the slash [/].
Page 26

Wild-card examples
geo* matches geodesic, Geoffrey, and geothermal
*nym matches antonym, homonym, and synonym
?ight matches fight and sight but not bright
555-???? matches all seven-digit phone numbers with the
555 prefix
pr?m* matches premature, prim, and primate
Page 27
Refining a search
If you want to limit the search, you may also want
to refine it—confine the search to the documents
listed in the previous search. For example, you
might first find all the documents that contain the
phrase Anaconda project. Then, using the Refine
option, you could search for the word cost in those
documents only.
To refine a search:
1 Start with the Search Results window open, showing
the result of a previous search. If the Search window is
hidden, display it by choosing Tools > Search > Query
or by clicking the Search Query button
toolbar.
v
on the
Page 28

2 In the Search window, change or replace the query
that produced the list of documents.
3 Press Ctrl (Windows. OS/2, UNIX) or Option
(Macintosh). The button label will change from Search
to Refine. Click Refine. This produces a Search Results
list composed of documents that are a subset of the
previous list and that match the new query.
Page 29

Searching with Document Info fields
Searching with Document Info fields
Using wild-card characters in fields
Using Boolean expressions in fields
Using operators for document information
Searching with two or more fields
Page 30

Searching with Document Info fields
If the PDF documents you are searching are provided with Document Info values, you can use the
Document Info fields in the Search window to limit
the results of your searches to documents that
contain specific values.
The standard Document Info fields in PDF documents are Title, Subject, Author, and Keywords.
For example, you could limit the search of an index
of literature to just those documents with an Author
field containing
containing king.
Shakespeare and a Title field
Page 31

To add the Document Info fields to the Search
window, choose File > Preferences > Search and
select Show Fields.
You may see additional custom fields if the creator
of the PDF document included them.
If you want to keep the Search window small, you
can hide (or keep hidden) the Document Info fields
and
type their names in the Find Results Containing
Text box.
When you enter a Document Info field value and no
search text, all documents with fields that contain
the value are returned.
Page 32

Using wild-card characters in fields
You can use wild-card characters in Document Info
fields. For example, if you enter
Sm?th*
in the Author field, documents with Author field values that include Smith, Smyth, and Smythe can be
returned with subsequent searches.
See Searching with wild-card characters for details.
Page 33

Using Boolean expressions in fields
You can use Boolean expressions in Document Info
fields. For example, if you enter
Shakespeare or Milton
in the Author field, only documents that include
either Shakespeare or Milton in the Author field are
found.
See Searching with Boolean expressions for details.
Page 34

Using operators for document information
You can use operators in Document Info field values
to expand or limit the search.
Operator Meaning
= matches exactly (for text, numeric, and
date values)
~ contains (for text values)
!= does not contain (for text, numeric, and
date values)
< is less than (for date or numeric values)
<= is less than or equal to (for date or
numeric values)
> is greater than (for date or numeric
values)
>= is greater than or equal to (for date or
numeric values)
Page 35

You can use only the first three operators (=, ~, !=)
with text. (The standard Document Info fields—
Title, Subject, Author, and Keywords—are all text
fields.) For example,
~ Guide
in the Title field would find the Acrobat Exchange
Guide, the Acrobat Search Guide, and so on.
The four comparison operators (<, <=, >, and >=)
can be used only with values of the same type. For
example, a date value can be compared only with
another date value.
Page 36

Searching with two or more fields
Entering values for two or more fields specifies
an AND condition. For example, if you enter
~ Samuelson in the Author field, ~ cost analysis
in the Subject field, and ~ spreadsheet in the
Keywords field, only documents that contain all
these values in these fields are returned from
subsequent searches.
For OR conditions and NOT conditions between
fields, you can use the Find Results Containing Text
text box. For example,
(Author ~ Raskin) NOT (Keywords ~ presentation)
finds all documents whose Author fields contain
Raskin and whose Keywords fields do not contain
presentation. You can also specify an AND condi-
tion with this method.
Page 37

Searching with document creation
and modification dates
You can use the Date Info fields in the Search window to limit search results to just those documents
that were created or modified in a specific time
period. To add the Date Info fields to the Search
window, choose File > Preferences > Search and
select Show Date.
If you want to keep the Search window small, you
can hide (or keep hidden) the Date Info fields and
type their names in the Find Results Containing
Text box.
When you enter a Date Info field value and no search
text, all documents with Date Info fields that contain the value are returned.
Page 38

To specify a date:
1 Click the Month, Day, or Year field.
2 Enter a number or use the Up and Down Arrows to
select a value.
To limit a search to documents created or
modified after a specific date:
Specify the After date, and leave the Before date
blank.
To limit a search to documents that were created
or modified before a specific date:
Specify the Before date, and leave the After date
blank.
To clear the date fields:
Click Clear.
Page 39

To use both the creation and modification dates:
Entering time periods for both creation and modification dates specifies an AND condition. Only
documents created in the specified period and
modified in the specified period are returned from
a search.
Page 40

Typing field and options names
Instead of displaying Document Info fields, Date
Info fields, or Options in the Search window, you
can keep the Search window small and type fields
and options in the Find Results Containing Text
box. Along with the field names, you need to use
operators such as = (equals) and > (greater than,
after).
• For Document Info fields, type Title, Subject, Author,
Keywords, Producer, or Creator. For example:
Author = Shakespeare
•
For Document Info fields, type CreationDate or
ModificationDate. For example, for a creation date
after October 9, 1996, type the following:
CreationDate > 10/9/96
Page 41

• For options, type /st (stemming), /so (sounds like),
/th (thesaurus), /ca (match case), or /pr (proximity). For
example, find synonyms for publish with
publish /th
Page 42

Using search options
Using search options
Word Stemming option
Thesaurus option
Sounds Like option
Match Case option
Proximity option
Using the Word Assistant
Page 43

Using search options
The options in the Search window expand or limit
the results of searches with single terms and
phrases
appear in the window by default. To restore them to
the window if the default has been changed, choose
File > Preferences > Search and select Show
Options.
If you want to keep the Search window small, you
can hide (or keep hidden) the options and
names
• Word Stemming finds words that share a stem with
the search word.
• Thesaurus finds words that have meanings similar to
the meaning of the search word.
and with Boolean expressions. The options
type their
in the Find Results Containing Text box.
Page 44

• Sounds Like finds different spellings of proper
names.
• Match Case finds text only when it has the same
capitalization as the text you type.
• Proximity limits AND searches so that words must be
within three pages of each other.
The Word Stemming, Thesaurus, and Sounds Like
options expand searches. (Before you perform a
search with one of these options, you can see the
effects of using it with the Word Assistant.) The
Match Case and Proximity options limit
searches.
Page 45

Word Stemming option
The Word Stemming option expands the search by
finding words that share a word stem with the
search word you type. For example, with Word
Stemming selected, searching for building finds
build and builds as well as building.
Before searching with the Word Stemming option,
consider using the Word Assistant to see whether
the option would find too many irrelevant words to
be practical.
The Word Stemming option
• Applies to single words, not phrases
• Does not apply to words that contain wild-card
characters
Page 46

• Finds words that end in ing, ed, s, ion, and so on
(but not er)
• Cannot be used with the Match Case option
If selecting the Word Stemming option seems to
have no effect, the index you are searching probably was not built with the Word Stemming
option.
Page 47

Thesaurus option
The Thesaurus option expands the search by finding
words with meanings similar to the meaning of the
search word. For example, with Thesaurus selected,
searching for begin finds start.
Searching for begin with the Thesaurus option also
finds attack and produce. Before searching with the
option, consider using the Word Assistant to see
whether the option finds relevant words.
The Thesaurus option
• Applies to single words, not phrases
• Does not apply to words that contain wild-card
characters
Cannot be used with the Match Case option
•
• Finds only the similar words that appear in the docu-
ments you are searching, not all the similar words you
might find in a complete Thesaurus
Page 48

Sounds Like option
The Sounds Like option expands the search for a
proper name by finding words that begin with the
same letter as a search word and that share some
phonetic feature with it. For example, with Sounds
Like selected, searching for Smith also finds Smyth
and Smythe.
Searching for Smith with the Sounds Like option
also finds send and somewhat. Before searching
with the option, consider using the Word Assistant
to see whether the option finds relevant words.
The Sounds Like option
• Applies to single words, not phrases
• Does not apply to words that contain wild-card
characters
Page 49

• Cannot be used with the Match Case option
If selecting the Sounds Like option seems to have no
effect, the index you are searching probably was not
built with the Sounds Like option.
Page 50

Match Case option
The Match Case option limits the results of the
search by finding only those documents that contain words with the same capitalization as the
search word or phrase you type. With Match Case
selected, for example, searching for He finds all
occurrences of He, the symbol for Helium, but not
occurrences of he, the common pronoun.
You can use the Match Case option with a Boolean
expression
. Characters matched by wild-card characters
ters
can be either uppercase or lowercase.
You cannot use the Match Case option with the Word
Stemming, Thesaurus, or Sounds Like option.
If selecting the Match Case option seems to have no
effect, the index you are searching probably was not
built with the option.
or with terms that use wild-card charac-
Page 51

Proximity option
The Proximity option limits the results of simple
AND searches to one pair of matches per document
—the pair closest together. The two matches must
be within three pages or fewer of each other. The
option is useful for locating a document that concentrates on some topic of interest. For example,
searching a group of travel guides for information
about Hawaiian cruises with
Hawaii AND cruise
would be less likely to locate information about
cruises to other parts of the world or about shore
visits to Hawaii if the Proximity option was used.
The Proximity option also affects relevance ranking
in searches. When you use it, the closer the matches
are within a document, the higher the ranking for
the document.
Proximity won’t work with complex AND searches—
for example, Hawaii AND (cruise OR fly).
Page 52

Using the Word Assistant
Use the Word Assistant to build a list of terms that
will appear when the search of a document uses the
Sounds Like, Word Stemming, or Thesaurus option.
The list will show you whether the option you are
using is likely to be helpful in the search.
If the list is too long or full of irrelevant words, you
can quickly construct a list of words to find with the
option turned off by copying words from the Word
Assistant dialog box and pasting them into the
Search window.
To look up the effects of a search option on a
search word:
1 Choose Tools > Search > Word Assistant.
2 To check the available indexes and change the selec-
tion of indexes, click Indexes to display the Index Selection dialog box and
3 Select the search option from the Assist menu.
select the indexes you want to use.
Page 53

4 Enter the search word in the Word text box.
5 Click Look Up. All the words that will be found in a
search for this word with this option are listed.
To search with words copied from the Word
Assistant dialog box:
1 If the Search window is closed, click the Search Query
button v on the toolbar to open it.
2 Use the Word Assistant to look up the effects of a
search option on a search word. And to display a list of
related words.
3 In the list, double-click a word that you want to use
in a search. The word appears in the Word text box.
4 Double-click the word to select it, and copy it to the
Clipboard.
Page 54

5 In the Search window, click the Find text box and
paste the selected word into the text box.
6 Repeat steps 3 through 5 for each word you want to
use; separate each pair of words in the Find text box
with AND or OR.
Page 55

Searching with Boolean expressions
You can use AND, OR, and NOT operators to build
a Boolean expression that will search for specific
words.
You can also use Boolean expressions in Document
field text boxes to specify a combination of
Info
field values in a search.
Searching with Boolean AND
Searching with Boolean OR
Searching with Boolean NOT
Combining Boolean operators
Using operator names and symbols literally
Page 56

Searching with Boolean AND
Use AND to find documents containing two or more
search terms. For example,
installation AND instructions
finds only those documents that contain both
installation and instructions.
You can also use the ampersand [&] to specify an
AND search. For example,
installation & instructions
Choosing the Proximity option changes the way
AND searches work. Without the Proximity option,
items in an AND search can be anywhere in a document. With the Proximity option, items in an AND
search must be within three pages of each other to
be found.
Page 57

Searching with Boolean OR
Use OR to find documents containing any of two or
more search terms. For example,
television OR tv
finds all documents that contain either or both
television and tv.
You can also use a comma [,] or a vertical bar [|] to
separate items in an OR search. For example:
television, tv
and
television | tv
Although any document that contains any item used
with an OR operator is returned from a search,
documents that contain both items rank higher in
the Search Results list. See Interpreting relevance
ranking
for more information.
Page 58

Searching with Boolean NOT
Use NOT to exclude documents that contain a
search term. For example,
not quarterly
finds all documents that do not contain the word
quarterly.
You can also use an exclamation point [!] to specify
a NOT search. (Be sure to place a space between
the exclamation point and the search item.) For
example:
! quarterly
Page 59

Combining Boolean operators
Be careful when combining operators to build Boolean expressions. Unless you work with Boolean
expressions frequently, it is easy to build an expression that does not mean what you think it means.
• When NOT is used with either or both of the AND and
OR operators, it is evaluated before either the AND or
OR. For example,
evolution AND NOT darwin
finds all documents that contain the word evolution
but not the word darwin.
• When you combine AND and OR in the same expres-
sion, AND is evaluated before OR. For example,
darwin OR origin AND species
finds all documents that contain darwin or that
contain both origin and species.
Page 60

• You can use parentheses to change the default order
of evaluation for Boolean operators. For example,
(darwin OR origin) AND species
finds all documents that contain either darwin and
species or that contain origin and species. Paren-
theses can be nested.
Page 61

Using operator names and symbols literally
When you use a literal phrase that contains an operator name, a symbol for an operator name (such as
& for AND), or parentheses, the phrase must be
enclosed in quotation marks. For example:
“cats and dogs”
finds all documents that contain the phrase cats
and dogs
word cats or the word dogs. The phrase
cats & dogs
also needs quotes to be interpreted literally.
, not all documents that contain either the
Page 62

In addition to and, or, not, and parentheses, the
symbols that require quotation marks are & (ampersand, for AND), | and, (vertical bar and comma, for
OR), and ! (exclamation point, for NOT). However,
quoted search phrases that contain parentheses or
vertical bars can produce unexpected results. For
details, see How Acrobat Catalog treats separator
characters
.
Page 63

Viewing documents returned from a search
A search returns a list of indexed documents containing
items that match your search query, displaying the list
in the Search Results window. When you open a document in the list, you view only pages containing
matches. All matches on a page are highlighted
unless you change the default.
Documents more likely to contain relevant information are listed first, and the relevance ranking of
each document is indicated by an icon. For details,
Interpreting relevance ranking.
see
To view a document returned from the search:
1 Double-click the document name to open the
document.
2 Use the Search buttons on the toolbar to view all the
occurrences of matches for your query.
Page 64

• To highlight the next occurrence of a match in the
document, click the Search Next button y.
• To highlight the previous occurrence of a match in
a document, click the Search Previous button
To view another returned document:
Choose one of the following:
x
.
• To highlight the first occurrence of a match in
the next document listed or previous document
listed, click the Search Next button y or Search
Previous button x while pressing the Shift key.
Or choose Tools > Search > Next Document or
Tools > Search > Previous Document.
• To view any other document listed, click the Search
Results button w to redisplay the list, or choose
Tools > Search > Results; then double-click the
document name.
If you want to keep the Results list visible, deselect
the Hide on View preference.
Page 65

Interpreting relevance ranking
A relevance ranking is assigned to each document
returned from a search. A document’s relevance
ranking indicates how likely it is that the document
contains the information you are searching for.
Search uses five icons to indicate relevance ranking:
From left (full circle) to right (empty circle), they
rank documents from highest to lowest likelihood of
containing relevant information.
• With ordinary search text, the relevance ranking indi-
cates how frequently the search word appears in the
document, both in absolute terms and relative to the
number of other words in the document.
Page 66

• When you use a Boolean OR operator between two
words or phrases in a search, documents that contain
both the items have a relevance ranking higher than
documents that contain just one of them.
• When you use the Proximity option, the closer the
occurrences of matches for your query are within a
document, the higher the relevance ranking for the
document.
Page 67

1996 Adobe Systems Incorporated. All rights reserved.
Adobe Acrobat 3.0 Search Online Guide
This manual, as well as the software described in it, is furnished under license
and may be used or copied only in accordance with the terms of such license.
The content of this manual is furnished for informational use only, is subject to
change without notice, and should not be construed as a commitment by Adobe
Systems Incorporated. Adobe Systems Incorporated assumes no responsibility
or liability for any errors or inaccuracies that may appear in this book.
The copyrighted software that accompanies this manual is licensed to the End
User for use only in strict accordance with the End User License Agreement,
which the Licensee should read carefully before commencing use of the software. Except as permitted by such license, no part of this publication may be
reproduced, stored in a retrieval system, or transmitted, in any form or by any
means, electronic, mechanical, recording, or otherwise, without the prior written permission of Adobe Systems Incorporated.
Adobe, the Adobe logo, Acrobat, Acrobat Capture, the Acrobat logo, Distiller,
Acrobat Exchange, Adobe Type Manager, PostScript, and the tagline “If you
can dream it, you can do it” are trademarks of Adobe Systems Incorporated.
Microsoft and Windows are registered trademarks and ActiveX and Windows NT
are trademarks of Microsoft Corporation in the U.S. and other countries. Apple,
Macintosh, Power Macintosh, and QuickTime are registered trademarks and
AppleScript and TrueType are trademarks of Apple Computer, Inc. Lotus Notes
is a registered trademark of Lotus Development Corporation. Netscape and
Netscape Navigator are trademarks of Netscape Communications Corporation.
UNIX is a registered trademark in the U.S. and other countries, licensed exclusively through X/Open Company, Ltd. Pentium is a trademark of Intel Corporation. All other products or name brands are trademarks of their respective
owners.
This product contains an implementation of the LZW algorithm licensed under
U.S. Patent 4,558,302.
Page 68

This software includes software licensed from Verity, Inc., copyright 1994. All
rights reserved. The address of Verity, Inc., is 894 Ross Drive, Sunnyvale, California 94089. Verity ® and TOPIC ® are registered trademarks of Verity, Inc. in
the United States and other countries. English Electronic Thesaurus copyright
1993 by INSO Corporation. Adapted from the Oxford Thesaurus copyright 1991
by Oxford University Press and from Roget's II: The New Thesaurus copyright
1980 by Houghton Mifflin Company. All rights reserved. Reproduction or disassembly of embodied programs and databases prohibited.
1994 This software includes software licensed from RSA Data Security, Inc.
Written and designed at Adobe Systems Incorporated, 345 Park Ave., San Jose,
CA 95110-2704.
Adobe Systems Europe Limited, Adobe House, 5 Mid New Cultins, Edinburgh
EH11 4DU, Scotland, United Kingdom
Adobe Systems Co., Ltd., Yebisu Garden Place Tower, 4-20-3 Ebisu, Shibuya-ku,
Tokyo 150, Japan
For defense agencies: Restricted Rights Legend. Use, reproduction, or disclosure
is subject to restrictions set forth in subparagraph (c)(1)(ii) of the Rights in Technical Data and Computer Software clause at 252.227-7013.
For civilian agencies: Restricted Rights Legend. Use, reproduction, or disclosure
is subject to restrictions set forth in subparagraphs (a) through (d) of the commercial Computer Software Restricted Rights clause at 52.227-19 and the limitations set forth in Adobe’s standard commercial agreement for this software.
Unpublished rights reserved under the copyright laws of the United States.
(9/96)
Page 69

How to use this online guide
Page back or page forward.
Undoes a change of page or view, or redoes a
change (Go Back/Go Forward).
Go to the Contents.
Go to the Index.
Go to the how-to page (this page).
Go to the “parent” of the current topic.
text
For instructions on printing this guide, go to the next page.
Go to the indicated topic.
Go to the next page of a continued topic.
End of a continued topic.
Page 70

How to print this online guide
You can print separate topics or the entire guide.
Since the pages of the guide have been made small
for online viewing, Windows and Macintosh users
may prefer to print them two to a page of paper—
”two up.”
To print pages two up:
1 Choose File > Print Setup (Windows) or File > Page
Setup (Macintosh).
2 Follow the instructions for your platform:
• In Windows, click Options, select 2 up on the Paper
tab, click OK to return to the Print Setup dialog box, and
click OK again to close it.
Page 71

• On a Macintosh, choose 2 Up from the Layout menu
and click OK.
Note: If you can’t perform step 2, you may not be
using an Adobe or PostScript printer driver. If you
are and you still can’t perform the step, install the
Adobe printer driver on the Acrobat CD-ROM. See
the Acrobat Getting Started guide for installation
instructions.
3 Choose File > Print.
4 Indicate the page range.
Click OK (Windows) or Print (Macintosh).
 Loading...