

Page 1
Operating Instructions
Software Guide
Preparing for Printing
1
Setting Up the Printer Driver
2
Other Print Operations
3
Direct Printing from a Digital Camera (PictBridge)
4
Monitoring and Configuring the Printer
5
Using a Print Server
6
Special Operations under Windows
7
Mac OS Configuration
8
Appendix
9
Read this manual carefully before you use this machine and keep it handy for future reference. For safe and correct use, be sure to read “Safety
Information” before using the machine.
Page 2

Introduction
This manual contains detailed instructions and notes on the operation and use of this machine. For your
safety and benefit, read this manual carefully before using the machine. Keep this manual in a handy
place for quick reference.
Important
Contents of this manual are subject to change without prior notice. In no event will the company be liable for direct, indirect, special, incidental, or consequential damages as a result of handling or operating the machine.
Do not copy or print any item for which reproduction is prohibited by law.
Copying or printing the following items is generally prohibited by local law:
bank notes, revenue stamps, bonds, stock certificates, bank drafts, checks, passports, driver's licenses.
The preceding list is meant as a guide only and is not inclusive. We assume no responsibility for its
completeness or accuracy. If you have any questions concerning the legality of copying or printing certain items, consult with your legal advisor.
Caution:
Use of controls or adjustments or performance of procedures other than those specified in this manual
might result in hazardous radiation exposure.
Trademarks
Microsoft, Windows, Windows Server, and Windows Vista are registered trademarks of Microsoft Corporation in the United States and/or other countries.
Adobe®, PageMaker® and PostScript® are registered trademarks of Adobe Systems Incorporated.
®
is a registered trademark of Hewlett-Packard Company.
PCL
Citrix® and MetaFrame® are registered trademarks of Citrix Systems, Inc
NetWare are registered trademarks of Novell, Inc.
Apple, AppleTalk, EtherTalk, Macintosh, Mac OS and TrueType are trademarks of Apple Computer,
Inc., registered in the U.S. and other countries.
Netscape and Netscape Navigator are registered trademarks of Netscape Communications Corporation.
PictBridge is a trademark.
Other product names used herein are for identification purposes only and might be trademarks of their
respective companies. We disclaim any and all rights in those marks.
The proper names of the Windows operating systems are as follows:
• The product names of Windows 2000 are as follows:
Microsoft
Microsoft
Microsoft
• The product names of Windows XP are as follows:
Microsoft
Microsoft
• The product names of Windows Vista are as follows:
Microsoft
Microsoft
Microsoft
Microsoft
Microsoft
• The product names of Windows Server 2003 are as follows:
Microsoft
Microsoft
Microsoft
®
Windows® 2000 Professional
®
Windows® 2000 Server
®
Windows® 2000 Advanced Server
®
Windows® XP Professional
®
Windows® XP Home Edition
®
Windows Vista® Ultimate
®
Windows Vista® Enterprise
®
Windows Vista® Business
®
Windows Vista® Home Premium
®
Windows Vista® Home Basic
®
Windows Server® 2003 Standard Edition
®
Windows Server® 2003 Enterprise Edition
®
Windows Server® 2003 Web Edition
• The product names of Windows Server 2003 R2 are as follows:
Microsoft® Windows Server® 2003 R2 Standard Edition
Microsoft
®
Windows Server® 2003 R2 Enterprise Edition
Note
❒ PostScript 3 in this manual stands for "Adobe PostScript 3 Emulation".
Notes:
Some illustrations in this manual might be slightly different from the machine.
Certain options might not be available in some countries. For details, please contact your local dealer.
Depending on which country you are in, certain units may be optional. For details, please contact your local dealer.
Page 3

Manuals for This Printer
For particular functions, see the relevant parts of the manual.
❖ Safety Information
Provides information on safe usage of this machine. To avoid injury and prevent damage to the machine, be sure to read this.
❖ Quick Installation Guide
Contains procedures for removing the printer from its box and connecting it
to a computer.
❖ Hardware Guide
Contains information about paper and procedures such as installing options,
replacing consumables, responding to error messages, and resolving jams.
❖ Software Guide (This manual)
Contains procedures for using this machine in a network environment and
utilizing the software.
i
Page 4
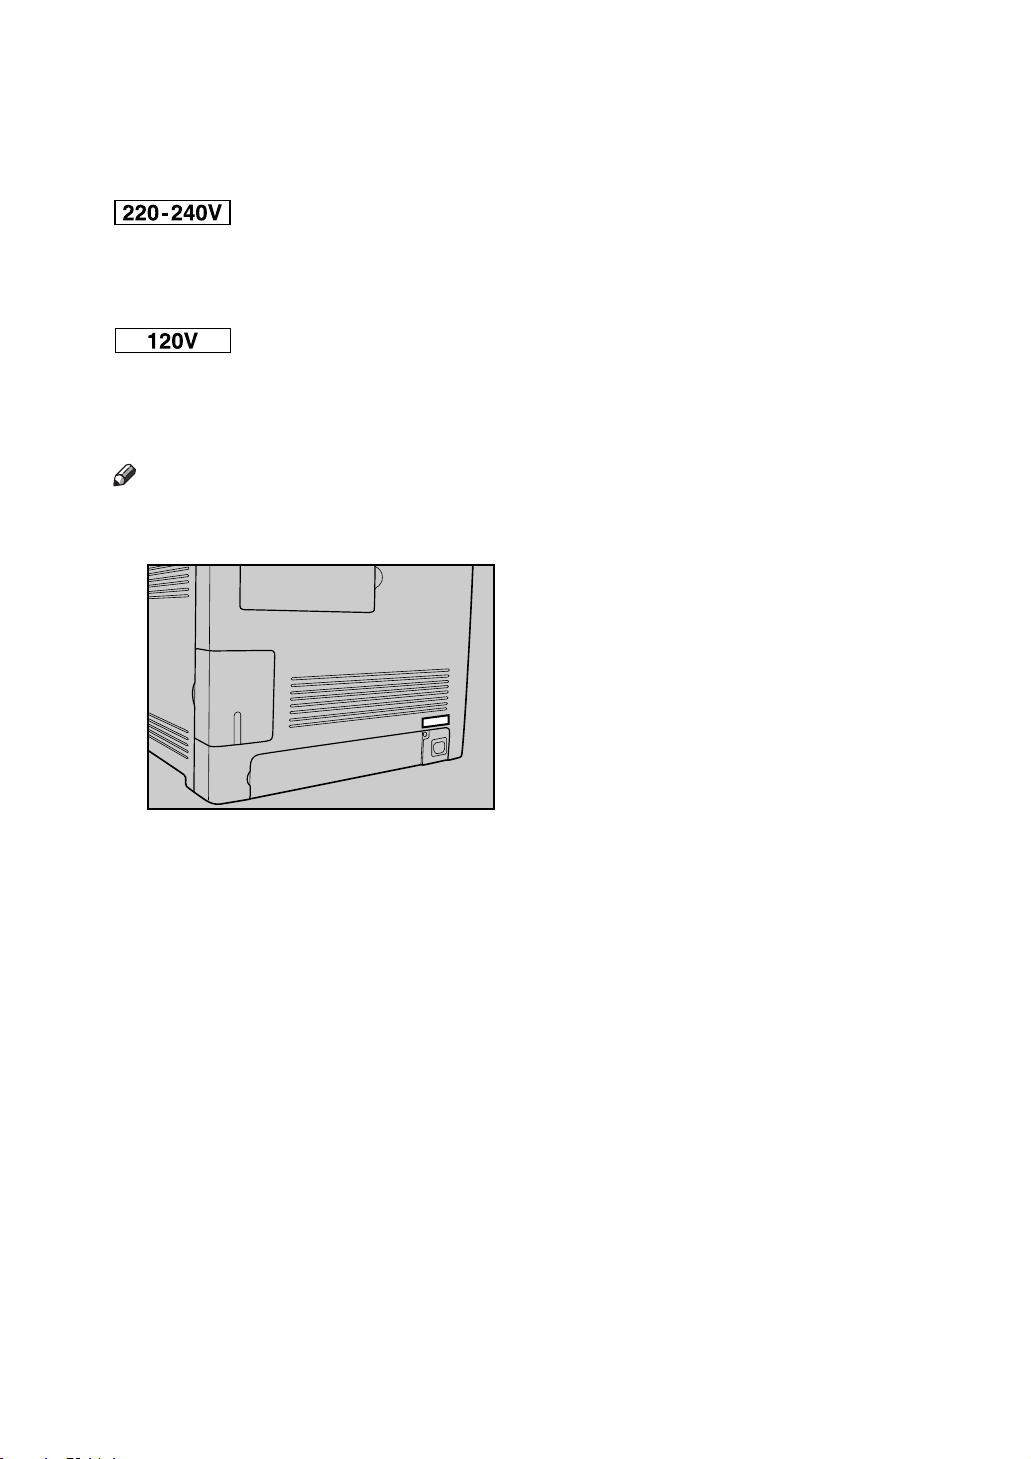
Description for the Specified Model
In this manual, the following items explain about the printer for the specified
models:
This explains about the 220–240 V model printer. You can identify the model by
checking the label on the rear of the printer.
Read if you purchase this model.
This explains about the 120 V model printer. You can identify the model by
checking the label on the rear of the printer.
Read if you purchase this model.
Note
❒ You can identify the printer's model by checking the label on the rear of the
printer as shown.
ASH074S
ii
Page 5
How to Read This Manual
Symbols
This manual uses the following symbols:
Indicates important safety notes.
Ignoring these notes could result in serious injury or death. Be sure to read these
notes. They can be found in the “Safety Information” section of About This Printer.
Indicates important safety notes.
Ignoring these notes could result in moderate or minor injury, or damage to the
machine or to property. Be sure to read these notes. They can be found in the
“Safety Information” section of About This Printer.
Indicates points to pay attention to when using the machine, and explanations
of likely causes of paper misfeeds, damage to originals, or loss of data. Be sure
to read these explanations.
Indicates supplementary explanations of the printer’s functions, and instructions on resolving user errors.
This symbol is located at the end of sections. It indicates where you can find further relevant information.
[ ]
Indicates the names of keys that appear on the printer’s display panel.
{ }
Indicates the names of keys on the printer’s control panel.
iii
Page 6

TABLE OF CONTENTS
Manuals for This Printer.........................................................................................i
Description for the Specified Model.....................................................................ii
How to Read This Manual ....................................................................................iii
Symbols .................................................................................................................... iii
1. Preparing for Printing
Confirming the Connection Method.....................................................................1
Network Connection...................................................................................................1
Local Connection .......................................................................................................2
Installing the Printer Driver in a Network Environment .....................................3
Installing the PCL Printer Driver.................................................................................3
Installing the PostScript 3 Printer Driver ....................................................................7
Installing the Printer Driver to Use As a Windows Network Printer ............................9
Installing the Printer Driver Using USB .............................................................10
Installing the PCL Printer Driver...............................................................................10
Installing the PostScript 3 Printer Driver (Windows 2000) .......................................12
Installing the PostScript 3 Printer Driver (Windows XP and Windows Server 2003/2003 R2)... 13
Installing the PostScript 3 Printer Driver (Windows Vista) .......................................14
Troubleshooting USB ...............................................................................................15
If a Message Appears during Installation.......................................................... 16
Making Option Settings for the Printer..............................................................17
Conditions for Bidirectional Communication ............................................................17
If Bidirectional Communication Is Disabled..............................................................18
2. Setting Up the Printer Driver
PCL - Accessing the Printer Properties.............................................................19
Windows 2000 - Making Printer Settings .................................................................19
Windows XP and Windows Server 2003/2003 R2 - Making Printer Settings...........21
Windows Vista- Making Printer Settings ..................................................................23
PostScript 3 - Setting Up for Printing ................................................................25
Windows 2000 - Accessing the Printer Properties ...................................................25
Windows XP and Windows Server 2003/2003 R2 - Making Printer Settings...........27
Windows Vista - Making Printer Settings .................................................................29
3. Other Print Operations
Form Feed.............................................................................................................31
Performing Form Feed .............................................................................................31
Canceling a Print Job ...............................................................................................31
Canceling a Print Job ..........................................................................................32
Canceling a Print Job Using the Control Panel ........................................................32
Windows - Canceling a Print Job from the Computer ..............................................32
Collate ...................................................................................................................33
Cover.....................................................................................................................34
Watermark ............................................................................................................35
Manual Duplex......................................................................................................36
Memory Capacity and Paper Size.......................................................................37
iv
Page 7

4. Direct Printing from a Digital Camera (PictBridge)
What Is PictBridge? .............................................................................................39
PictBridge Printing ..............................................................................................40
What Can Be Done on This Printer ....................................................................41
Paper Size................................................................................................................41
Image Print Size.......................................................................................................41
Exiting PictBridge ................................................................................................42
When PictBridge Printing Does Not Work.........................................................43
5. Monitoring and Configuring the Printer
Using Web Image Monitor...................................................................................45
Displaying Top Page ................................................................................................46
Displaying the Printer Status....................................................................................47
About Menu and Mode.............................................................................................47
Access in the Administrator Mode............................................................................49
Configuring the Printer Settings ...............................................................................49
Changing the Login Information...............................................................................52
Displaying Web Image Monitor Help........................................................................52
Using Smart Organizing Monitor........................................................................53
Installing Smart Organizing Monitor.........................................................................53
Displaying the Smart Organizing Monitor Dialog Box ..............................................54
Displaying the Printer Status....................................................................................54
Displaying the Printer Information ............................................................................56
Printer Configuration ................................................................................................58
Printer Status Notification by E-Mail..................................................................61
Mail Authentication...................................................................................................62
SNMP.....................................................................................................................63
Reading the Configuration Page ........................................................................64
6. Using a Print Server
Preparing Print Server.........................................................................................67
7. Special Operations under Windows
Printing Files Directly from Windows ................................................................69
Setup........................................................................................................................69
Using a Host Name Instead of an IPv4 Address ......................................................70
Printing Commands.................................................................................................. 71
v
Page 8

8. Mac OS Configuration
Installing the PostScript 3 Printer Driver........................................................... 73
Specifying the Printer..........................................................................................74
Using USB................................................................................................................74
Using TCP/IP ...........................................................................................................74
Setting Up the PPD File .......................................................................................76
Setting Up Options ..............................................................................................77
Set Up for Printing ...............................................................................................78
Making paper settings from an application...............................................................78
Setting up for printing from an application................................................................78
Canceling a Print Job from the Computer.........................................................79
Changing to EtherTalk.........................................................................................80
Configuring the Printer........................................................................................81
Using PostScript 3 ...............................................................................................82
Using Smart Organizing Monitor........................................................................85
Installing Smart Organizing Monitor.........................................................................85
Displaying the Smart Organizing Monitor Dialog Box ..............................................86
Displaying the Printer Status....................................................................................86
Displaying the Printer Information ............................................................................86
Printer Configuration ................................................................................................88
9. Appendix
Software and Utilities Included on the CD-ROM............................................... 91
Printer Drivers for this Printer...................................................................................91
Smart Organizing Monitor ........................................................................................92
Cautions to Take When Using in a Network......................................................93
Using DHCP.............................................................................................................93
Using Adobe PageMaker Version 6.0, 6.5, or 7.0.............................................. 94
When Using Windows Terminal Service/MetaFrame........................................95
Operating Environment ............................................................................................95
Supported Printer Drivers.........................................................................................95
Limitations ................................................................................................................96
INDEX......................................................................................................... 97
vi
Page 9
1. Preparing for Printing
Confirming the Connection Method
This printer supports network and local connection.
Before installing the printer driver, check how the printer is connected. Follow
the driver installation procedure that is appropriate to the connection method.
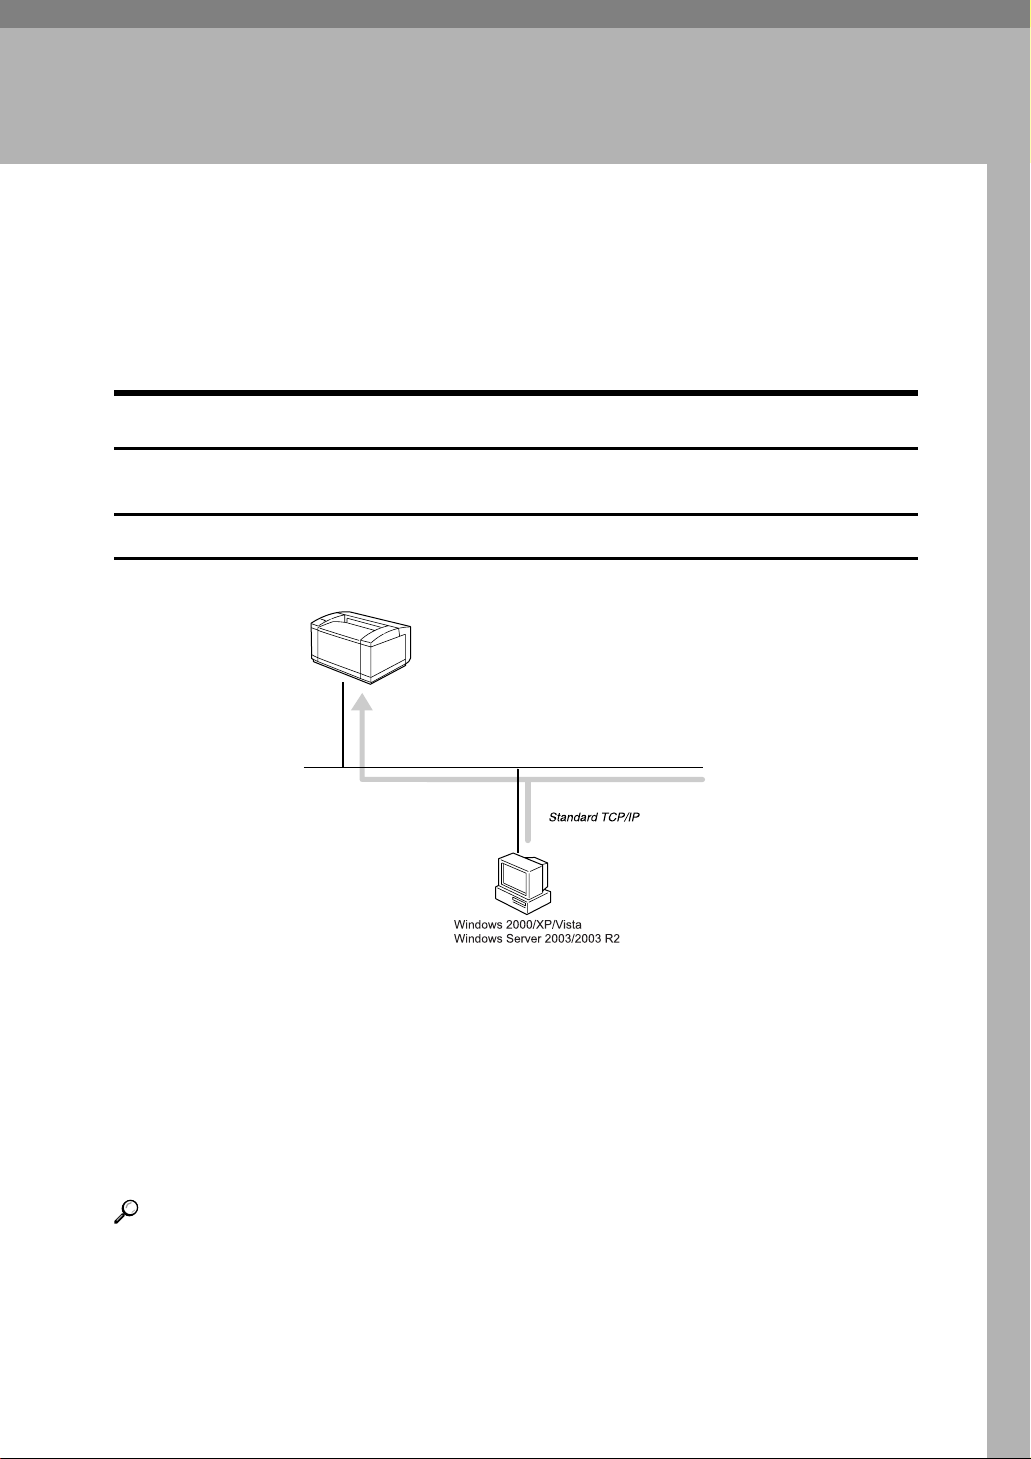
Network Connection
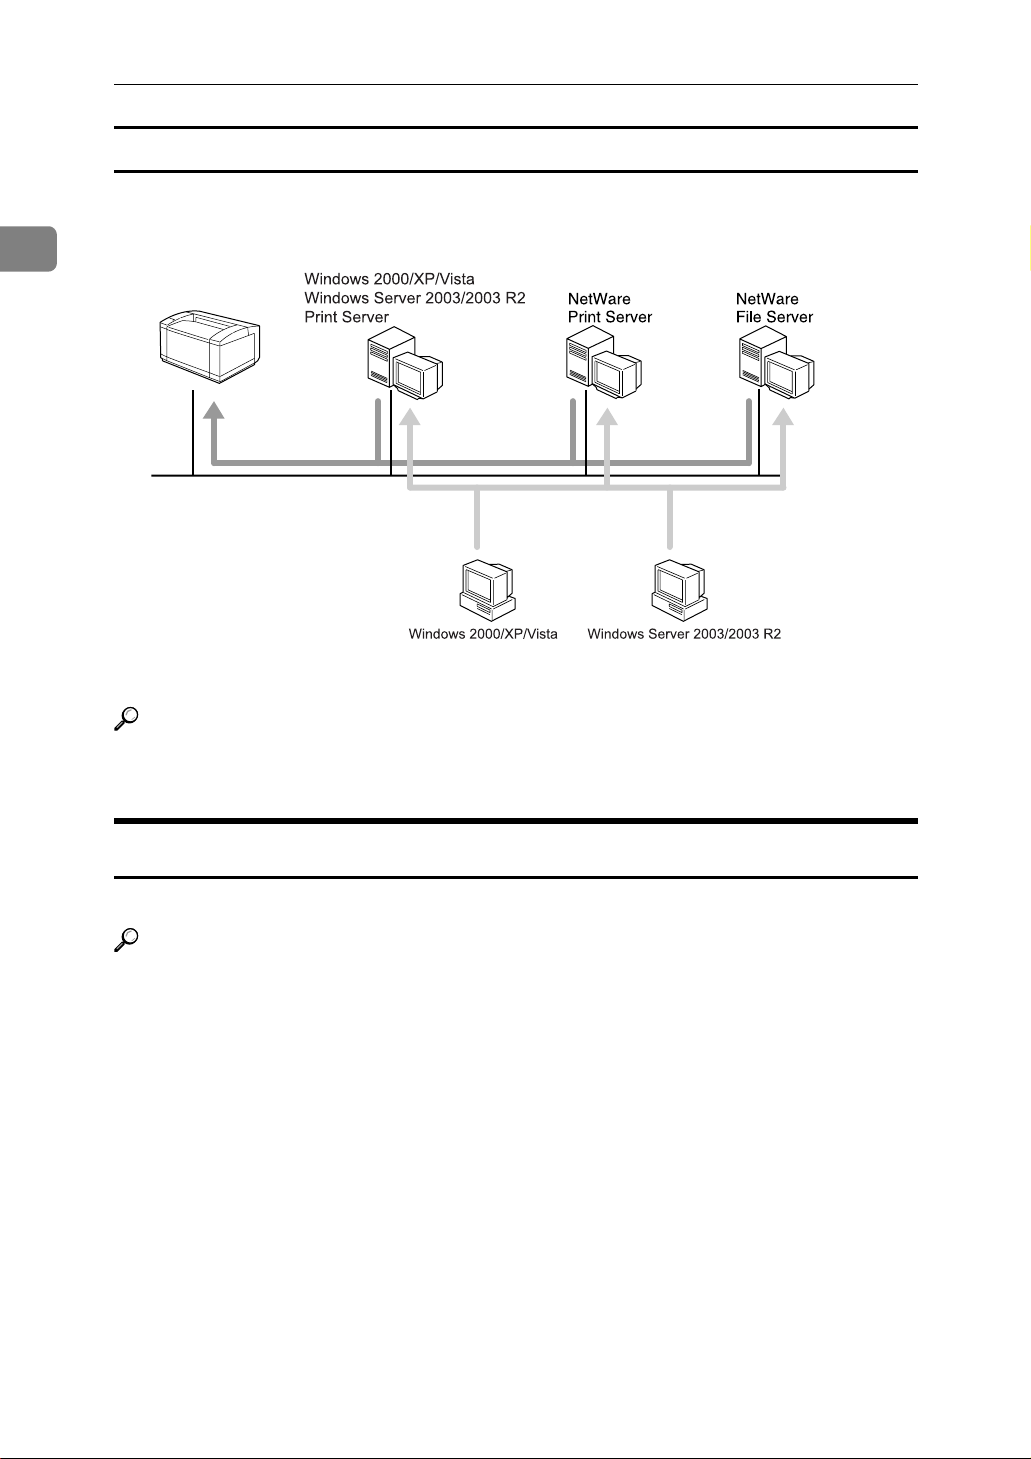
This printer can be used as a Windows printing port or network printer.
Using this printer as the Windows printing port
Network connections can be established via Ethernet.
ASH100S
❖ Operating system
Windows 2000/XP/Vista, and Windows Server 2003/2003 R2
❖ Connection method
Ethernet (10baseT/100baseTX)
❖ Available ports
Standard TCP/IP
Reference
For details about how to use this printer as the Windows printing port, see p.3
“Installing the Printer Driver in a Network Environment”.
1
Page 10
1
Preparing for Printing
Using as a network printer
This printer can be used as the Windows network printer, the NetWare print
server, or the NetWare remote printer.
Reference
For details about how to use this printer as a Windows network printer, see
p.9 “Installing the Printer Driver to Use As a Windows Network Printer”.
Local Connection
Local connections can be established via USB connections.
Reference
For details about how to install the printer driver, see p.10 “Installing the
Printer Driver Using USB”.
ASH110S
2
Page 11

Installing the Printer Driver in a Network Environment
Installing the Printer Driver in a Network
Environment
This section explains how to install the printer driver that allows you to use this
printer in a network environment.
Installing the PCL Printer Driver
The following four steps are required to use this printer in the network environment.
A Print the test page
B Install Smart Organizing Monitor
C Specify the printer's IP address
D Install the printer driver
Printing a test page
To install the printer driver, you must first specify the printer's IP address.
Before specifying it, you must obtain the printer's MAC address, which is printed on the test page.
A Turn the printer's power switch to off, and then wait a few seconds.
B While pressing down the {Job Reset} key, turn the printer's power switch
back to on, and then keep the key pressed down until the Alert indicator
flashes once.
1
C Printing starts when the printer is fully warmed up.
Installing Smart Organizing Monitor
You can specify the printer's IP address using Smart Organizing Monitor.
Smart Organizing Monitor can be installed from the CD-ROM provided with
this printer.
A Quit all applications currently running.
B Insert the CD-ROM into the CD-ROM drive.
The installer starts.
C Select an interface language, and then click [OK].
The default interface language is English.
D Click [Smart Organizing Monitor].
3
Page 12

1
Preparing for Printing
E Select a language for Smart Organizing Monitor, and then click [OK].
The [Smart Organizing Monitor Setup] dialog box appears.
F Click [Next >].
The software license agreement appears.
G After reading the agreement, click [Yes].
The [Select Destination Folder] dialog box appears.
H Click [Next >].
Click [Browse...], if you want to change the destination folder.
I In the [Select Program Folder] dialog box, click [Next >].
J When the [Setup Complete] dialog box appears, click [Finish].
To continue the installation, leave the [Printer Driver and Utilities] dialog box
open.
Note
❒ Smart Organizing Monitor will appear in the language selected in step 5,
not the language selected in step 3.
Specifying the printer's IP address
Use the following procedure to specify the printer's IP address using Smart Organizing Monitor.
Important
❒ To perform the following procedure, you must first return the printer's set-
tings to its factory-set defaults. To do this: first turn the printer's power switch
to off, wait a few seconds and then, while pressing down the {Job Reset} and
{Stop/Start} keys, turn the printer's power switch back to on and keep both
keys pressed down until the Alert and Ready indicators light up.
A Connect the printer and computer using an Ethernet cable.
B On the [Start] menu, point to [Programs], and then point to [Smart Organizing
Monitor for PCL] > [Smart Organizing Monitor for PCL Status].
The [Smart Organizing Monitor] dialog box appears.
In a Windows XP/Vista or Windows Server 2003/2003 R2 environment,
point to [All Programs] on the [Start] menu, and then point to [Smart Organizing
Monitor for PCL] > [Smart Organizing Monitor for PCL Status].
C Click [IP Address].
The [IP Address Setting] dialog box appears.
4
Page 13

Installing the Printer Driver in a Network Environment
D In the [MAC Address] box, enter the printer’s MAC address that was printed
on the test page. Then, in the [IP Address] box, enter the IP address you want
to set for the printer.
Enter the subnet mask and gateway address if necessary.
E Click [OK].
A confirmation message appears.
F Click [OK].
G Click [Close] to close the Smart Organizing Monitor dialog box.
Installing the printer driver
Use the following procedure to install the printer driver.
A On the [Printer Drivers and Utilities] dialog box, click [PCL 6 Printer Driver].
If you have already closed the [Printer Drivers and Utilities] dialog box, launch
“Setup.exe” from the CD-ROM root directory.
1
The software license agreement appears.
B After reading the agreement, click [I accept the agreement.], and then click
[Next >].
C In the dialog box that appears, click [Add a new printer], select the [Search for
network printers.] check box, and then click [Next >].
If the search fails, the printer driver is installed via port LPT1.
Check the port settings and printer's IP address again, before reconfiguring
the settings.
D When the list of found printers appears, click this printer (whose IP ad-
dress you specified before the installation), and then click [Next >].
E Double-click the printer name to display the printer's settings, change the
settings as required, and then click [Continue].
F If a message appears informing you that the installation was successfully
completed, click [Finish].
5
Page 14

1
Preparing for Printing
Note
❒ When you click [Finish], the [Digital Signature Not Found] dialog box might
appear. To continue the installation, click [Yes].
❒ Auto Run might not work under certain operating system settings. If this
is the case, launch “Setup.exe” from the CD-ROM root directory.
❒ To stop the selected software installing, click [Cancel] before the installa-
tion is complete.
❒ A message appears if there is a newer version of the printer driver already
installed. If there is, you cannot install the printer driver using Auto Run.
If you still want to install the printer driver, use [Add Printer]. See p.16 “If a
Message Appears during Installation”.
Reference
For details about reconfiguring the printer settings, when the search for
network printer fails, see p.6 “If the network printer search fails”.
For details about the network connection, see Hardware Guide.
If the network printer search fails
This section explains how to reconfigure the settings if the network printer
search fails during the installation.
Before reconfiguring the settings, print a test page to obtain the printer's IP address, and then configure the necessary settings.
❖ Reconfigure the printer's IP address
For details about reconfiguring the printer's IP address, see p.4 “Specifying
the printer's IP address”
❖ Reconfigure the port settings
A On the [Start] menu, open the [Printers] window.
B Click the icon of this printer. On the [File] menu, click [Properties].
The printer properties appears.
C Click the [Ports] tab, and then click [Add Port].
D Click [Standard TCP/IP Port], and then click [New Port...].
The Add Standard TCP/IP Printer Port Wizard appears.
E Click [Next >]
F Enter the printer's IP address that is printed on the test page, and then click
[Next >].
G Click [Finish].
6
Page 15

Installing the Printer Driver in a Network Environment
Installing the PostScript 3 Printer Driver
Important
❒ Before installing the PostScript 3 printer driver, print the test page to obtain
the printer's IP address. For details, see p.3 “Printing a test page”.
❒ To install this printer driver, you must have an account that has Manage
Printers permission. Log on as an Administrators or Power Users group
member.
A Quit all applications currently running.
B Insert the CD-ROM into the CD-ROM drive.
The installer starts.
C Select an interface language, and then click [OK].
The default interface language is English.
D Click [PostScript 3 Printer Driver].
The Add Printer Wizard starts.
1
E Click [Next >].
F Click [Local printer], and then click [Next >].
In a Windows Vista environment, click [Add a local printer].
G Click [Create a new port].
H Click [Standard TCP/IP Port], and then click [Next >].
The [Add Standard TCP/IP Printer Port Wizard] dialog box appears.
I Enter the printer's IPv4 address in the [Port Name] box, and then click [OK].
The IPv4 address you enter here is the address you have checked on the configuration page.
In a Windows Vista environment, make the following settings in the dialog
box that appears, and then click [Next >].
A In [Device Type] list, select an item.
You can select [Autodetect], [TCP/IP Device], or [Web Services Device].
B Enter an IP address in the [Hostname or IP address:] box.
C If necessary, enter an port name in the [Port name] box.
J Click [Finish].
K Check that the name of this printer whose driver you want to install is se-
lected, and then click [Next >].
7
Page 16

1
Preparing for Printing
L Change the printer name if you want, and then click [Next >].
Select the [Yes] check box to configure the printer as default.
M Specify whether or not to share this printer, and then click [Next >].
N Specify whether or not to print a test page, and then click [Next >].
O Click [Finish].
The printer driver installation starts.
Note
❒ When you click [Finish], the [Digital Signature Not Found] dialog box may ap-
pear. To continue the installation, click [Yes].
❒ Auto Run might not work under certain operating system settings. If this
is the case, launch “Setup.exe” from the CD-ROM root directory.
❒ The printer driver in the selected language will be installed.
❒ To stop the selected software installation, click [Cancel] before the installa-
tion is complete.
Reference
For details about checking the printer's IP address, see p.3 “Printing a test
page”.
For details about reconfiguring the printer settings when the network
printer search fails, see p.6 “If the network printer search fails”.
8
Page 17

Installing the Printer Driver in a Network Environment
Installing the Printer Driver to Use As a Windows Network Printer
This section explains how to install the printer driver for using this printer as a
Windows network printer.
Important
❒ Before you can make the following settings, you must configure this printer
as a Windows network printer. For details about configuring a Windows network printer, see p.67 “Using a Print Server”.
The following example procedure explains installing the printer driver under
Windows XP.
For details, see Windows Help.
A On the [Start] menu, click [Control Panel].
B Click [Printers and Other Hardware], and then click your computer's [Printers and
Faxes] folder.
C Click [Add a printer].
1
The Add Printer Wizard appears.
D Select [A network printer, or printer attached to another computer], and then click
[Next >].
E Select [Connect to this printer], and then click [Next >].
F Select this printer from the list of the shared printers, and then click [Next >].
G Select whether or not to use this printer as the default printer, and then
click [Next >].
H Click [Finish].
9
Page 18

1
Preparing for Printing
Installing the Printer Driver Using USB
This section explains how to install the printer drivers using USB.
The printer drivers can be installed from the CD-ROM provided with this printer.
Installing the PCL Printer Driver
Important
❒ To install this printer driver, you must have an account that has Manage
Printers permission. For this, log on as an Administrators or Power Users
group member.
A Close all applications currently running.
B Check the following:
• The printer's USB cable is disconnected
• The printer’s main power switch is turned to off
C Insert the CD-ROM into the CD-ROM drive.
The installer starts.
D Select the interface language, and then click [OK].
E Click [PCL 6 Printer Driver].
The software license agreement appears.
F After reading the agreement, click [I accept the agreement.], and then click
[Next >].
G In the [Method to install printer driver] dialog box, clear the [Search for network
printers.] check box, select the [Connect a printer using a USB cable.] check box,
and then click [Next >].
H Select this printer, and then click [Next >].
A message appears, asking you to check that the USB cable is not connected
and the printer's main power switch is turned to off.
I Check the USB cable and the printer status, and then click [Next >].
J When the [<Auto-detect USB Port>] dialog box appears, connect this printer to
the computer using a USB cable, and then turn the printer's main power
switch to on.
USB auto detection begins.
K When the dialog box asking you to use this printer as the default printer ap-
pears, click either key.
10
Page 19

Installing the Printer Driver Using USB
L When a message appears informing you that the installation was success-
fully completed, click [Finish].
Note
❒ In a Windows Vista environment, depending on security settings, the [User
Account Control] dialog box might appear after you insert the CD-ROM. If
this is the case, click [Allow].
❒ If the printer driver is already installed, plug and play is enabled and the
printer connected to the USB port appears automatically in the [Printers]
window.
❒ When USB is first used, plug and play starts. Then the [New Hardware
Found], [Device Driver Wizard], or [Add New Hardware Wizard] dialog box ap-
pears, depending on the operating system.
❒ To disable Auto Run, press the left the {Shift} key when inserting the CD-
ROM into the drive and keep it pressed until the computer finishes reading
from the CD-ROM.
❒ The number after “USB” varies depending on the number of printers con-
nected.
❒ A message appears if the printer connection fails. Check the USB cable is
connected and the printer's main power switch is turned to on, and then
click [Retry].
❒ To stop USB auto detection, click [Stop Auto-detecting].
1
❒ The USB port is available only for the printer driver that is installed first.
To install additional drivers for this printer, install them using other ports
(such as LPT1). Then, after the installation, change the port settings to the
specified USB port.
11
Page 20

1
Preparing for Printing
Installing the PostScript 3 Printer Driver (Windows 2000)
Important
❒ To install this printer driver, you must have an account that has Manage Print-
ers permission. Log on as an administrator or Power Users group member.
If the printer driver has already been installed, plug and play is enabled, and the
icon of the printer connected to the “USB” port is added to the [Printers] window.
If the printer driver is not installed, follow the plug-and-play instructions of the
printer to install it from the CD-ROM provided.
A Check the printer's power switch is turned to off.
B Connect the printer and computer using the USB cable.
Connect the USB cable firmly.
C Turn the printer's power switch back to on.
The Plug and Play is enabled and the [Found New Hardware Wizard] dialog box
appears, and USB Printing Support is installed automatically.
D In the [Found New Hardware Wizard] dialog box, click [Search for a suitable driver
for my device (recommended)], and then click [Next >].
E Select the [Specify location] check box, and then click [Next >].
F Insert the CD-ROM into the CD-ROM drive.
When Auto Run starts, click [Exit].
G Specify the location where the source files of the printer driver is stored.
If the CD-ROM drive is D, the source files of the PostScript printer driver are
stored in the following location:
D:\DRIVERS\PS\XP_VISTA\(Language)\DISK1
H Check the printer driver location, and then click [OK].
I Click [Next >].
J Click [Finish].
If the printer driver has already been installed, plug and play is enabled, and the
12
icon of the printer connected to the “USB001” port is added to the
Note
❒ To disable Auto Run, press the {Shift} key when inserting the CD-ROM
into the drive and keep it pressed until the computer finishes reading from
the CD-ROM.
❒
The number after “USB” varies depending on the number of printers connected.
❒ The USB port is available only for the printer driver that is installed first.
To install additional drivers for this printer, install them using other ports
(such as LPT1). Then, after the installation, change the port settings to the
specified USB port.
[
Printers] window.
Page 21

Installing the Printer Driver Using USB
Installing the PostScript 3 Printer Driver (Windows XP and Windows Server 2003/2003 R2)
Important
❒ To install this printer driver, you must have an account that has Manage Print-
ers permission. Log on as an administrator or Power Users group member.
If the printer driver has already been installed, plug and play is enabled, and the
icon of the printer connected to the “USB” port is added to the [Printers] window.
If the printer driver is not installed, follow the plug-and-play instructions of the
printer to install it from the CD-ROM provided.
A Check the printer's power switch is turned to off.
B Connect the printer and computer using the USB cable.
Connect the USB cable firmly.
C Turn the printer's power switch back to on.
The Plug and Play is enabled and the [Found New Hardware Wizard] dialog box
appears, and USB Printing Support is installed automatically.
D In the [Found New Hardware Wizard] dialog box, click [Install from a list or specific
location (Advanced)], and then click [Next >].
E Select the [Specify location] check box, and then click [Next >].
F Insert the CD-ROM into the CD-ROM drive.
When Auto Run starts, click [Exit].
1
G Specify the location where the source files of the printer driver is stored.
If the CD-ROM drive is D, the source files of the PostScript printer driver are
stored in the following location:
D:\DRIVERS\PS\XP_VISTA\(Language)\DISK1
H Check the printer driver location, and then click [OK].
I Click [Next >].
J Click [Finish].
If the printer driver has already been installed, plug and play is enabled, and the
icon of the printer connected to the “USB001” port is added to the
Note
❒ To disable Auto Run, press the {Shift} key when inserting the CD-ROM
into the drive and keep it pressed until the computer finishes reading from
the CD-ROM.
❒
The number after “USB” varies depending on the number of printers connected.
❒ The USB port is available only for the printer driver that is installed first.
To install additional drivers for this printer, install them using other ports
(such as LPT1). Then, after the installation, change the port settings to the
specified USB port.
[
Printers] window.
13
Page 22

1
Preparing for Printing
Installing the PostScript 3 Printer Driver (Windows Vista)
Important
❒ To install this printer driver, you must have an account that has Manage Print-
ers permission. Log on as an administrator or Power Users group member.
If the printer driver is already installed and plug and play is enabled, the icon of
the printer connected to the “usb” port appears in the [Printers] window.
The printer drivers can be installed from the CD-ROM provided with this machine.
If the printer driver is not already installed, follow the printer's plug-and-play
instructions to install it from the provided CD-ROM.
A Connect the printer and computer using the USB cable.
Connect the USB cable firmly.
The [Found New Hardware] dialog box appears.
B Click [Locate and install driver software (Recommended)].
If the [User Account Control] dialog box appears, click [Continue].
C Click [Don't search online].
A message prompting you to insert the provided CD-ROM appears.
D Insert the provided CD-ROM into the computer's CD-ROM drive.
The printer driver search begins, and a list of printer drivers appears.
E Select the printer driver you want to use, and then click [Next].
If the [Windows can't verify the publisher of this driver software] message appears,
click [Install this driver software anyway].
F Click [Close].
If the installation is successful, the icon of the printer connected to the
“USB001” port appears in the [Printers] window.
Note
❒ To disable Auto Run, press the {Shift} key when inserting the CD-ROM
into the drive and keep it pressed until the computer finishes reading from
the CD-ROM.
❒ The number after “USB” varies depending on the number of printers con-
nected.
❒ The USB port is available only for the printer driver that is installed first.
To install additional drivers for this printer, install them using other ports
(such as LPT1). Then, after the installation, change the port settings to the
specified USB port.
14
Page 23
Troubleshooting USB
Problem Solutions
Installing the Printer Driver Using USB
The printer is not recognized automatically.
Windows has already configured
the USB settings.
Turn off the power of the printer, reconnect the USB cable,
and then turn it on again.
Open Windows' Device Manager, and then, under [Univer-
sal Serial Bus controllers], remove any conflicting devices.
Conflicting devices have a [!] or [?] icon by them. Take
care not to accidentally remove required devices. For details, see Windows Help.
When using Windows 2000/XP/Vista or Windows Server 2003/2003 R2, an erroneous device is displayed under
[USB Controller] in the [Device Manager] dialog box.
1
15
Page 24

1
Preparing for Printing
If a Message Appears during Installation
When a message that shows the number 58 or 34 appears during the installation,
the printer driver can not be installed using Auto Run. Please use [Add Printer] or
[Install Printer] to install the printer driver.
For Windows 2000
A On the [Start] menu, point to [Settings], and then click [Printers].
B Double-click the Add Printer icon.
C Follow the instructions in the Add Printer Wizard.
For Windows XP Professional and Windows Server 2003/2003 R2:
A On the [Start] menu, click [Printers and Faxes].
B Click [Install Printer].
C Follow the instructions in the Add Printer Wizard.
For Windows XP Home Editions:
A On the [Start] menu, click [Control Panel].
B Click [Printers and Other Hardware].
C Click [Printers and Faxes].
D Click [Install Printer].
E Follow the instructions in the Add Printer Wizard.
For Windows Vista:
A On the [Start] menu, click [Control Panel].
B Click [Printer] in “Hardware and Sound”.
C Click [Add a printer].
D Follow the instructions in the Add Printer Wizard.
16
Page 25

Making Option Settings for the Printer
Making Option Settings for the Printer
Make option settings for the printer using the printer driver when bidirectional
communication is disabled.
Reference
For details about making option settings for the printer, see p.18 “If Bidirectional Communication Is Disabled”.
Conditions for Bidirectional Communication
Bidirectional communication allows information about paper settings to be automatically sent from the printer. You can check printer status from your computer.
• Bidirectional communication is supported by Windows 2000/XP/Vista, and
Windows Server 2003/2003 R2.
To support bidirectional communication, the following conditions must be met:
1
❖ When connected with the network
The printer must be connected via standard TCP/IP port, and the default
name has not been changed.
❖ When connected with USB
The printer must be connected to the computer's USB port using the USB interface cable.
The computer must support bidirectional communication.
Note
❒ The PostScript printer driver does not support bidirectional communications.
❒ The PCL printer drivers support bidirectional communications. You can up-
date printer status manually.
17
Page 26

Preparing for Printing
If Bidirectional Communication Is Disabled
Set up option settings when bidirectional communications are disabled.
1
Important
❒ Manage Printers permission is required to change the printer properties in
the [Printers] folder. Log on as an Administrators or Power Users group member.
❒ Make sure that [Enable bidirectional support] is selected on the [Ports] tab in the
printer properties dialog box. Printing is possible only if this check box is selected.
A
On the [Start] menu, point to [Settings], and then click [Printers].
The [Printers] window appears.
When using Windows XP, and Windows Server 2003/2003 R2, click [Printers
and Faxes] on the [Start] menu. The [Printers and Faxes] window appears.
When using Windows Vista, click [Control Panel] on the [Start] menu, and then
click [Printer]. The [Printer] window appears.
B
Click the icon of the printer you want to use.
C
On the [File] menu, click [Properties].
D
Click the [Accessories] tab.
If you are using the PostScript 3 printer driver, click the [Device Settings] tab.
18
E
Select options installed from the [Options] area, and then make the necessary settings.
F
Select the total amount of the memory in [Total Memory:], when the optional
SDRAM module is added.
G
Under [Paper Size Settings], click and highlight the tray to be used, select the
appropriate size , and then click [Update].
H
Click [OK] to close the printer properties dialog box.
Page 27
2. Setting Up the Printer Driver
PCL - Accessing the Printer Properties
This section explains about accessing the printer properties and make the printer
settings.
Windows 2000 - Making Printer Settings
Making the printer default settings- the [Printer] window
Important
❒ To change the printer default settings including option configuration settings,
log on using an account that has Manage Printers permission. Members of the
Administrators and Power Users groups have Manage Printers permission
by default.
❒ You cannot change the printer default settings for each user. Settings made in
the printer properties dialog box are applied to all users.
A On the [Start] menu, point to [Settings], and then click [Printers].
The [Printers] window appears.
B Click the icon of the printer you want to use.
C On the [File] menu, click [Properties].
The printer properties dialog box appears.
D Make the necessary settings, and then click [OK].
Note
❒ Settings you make here are used as the default settings for all applications.
❒ Do not make a setting for [Form to Tray Assignment].
Reference
For details about settings, see the printer driver Help.
19
Page 28

2
Setting Up the Printer Driver
Making the printer default settings - Printing Preferences
Important
❒ You cannot change the printer default settings for each user. Settings made in
the printer properties dialog box are applied to all users.
A On the [Start] menu, point to [Settings], and then click [Printers].
The [Printers] window appears.
B Click the icon of the printer you want to use.
C On the [File] menu, click [Printing Preferences...].
The [Printing Preferences] dialog box appears.
D Make the necessary settings, and then click [OK].
Note
❒ Settings you make here are used as the default settings for all applications.
Reference
For details about settings, see the printer driver Help.
Making printer settings from an application
You can make printer settings for a specific application.
To make printer settings for a specific application, open the [Printing Preferences]
dialog box from that application. The following explains how to make settings
for the WordPad application provided with Windows 2000.
A On the [File] menu, click [Print...].
The [Print] dialog box appears.
B Select the printer you want to use in the [Select Printer] list.
C Make the necessary settings, and then click [Apply] to start printing.
Note
❒ The procedure to open the [Printing Preferences] dialog box may vary de-
pending on the application. For details, see the manuals provided with the
application you use.
❒ Any settings you make in the procedure above are valid for the current ap-
plication only.
❒ General users can change the properties displayed in the [Print] dialog box
of an application. Settings made here are used as defaults when printing
from this application.
20
Reference
For details about settings, see the printer driver Help.
Page 29

PCL - Accessing the Printer Properties
Windows XP and Windows Server 2003/2003 R2 - Making Printer Settings
Making the printer default settings - the [Printers and Faxes] window
Important
❒ To change the printer default settings including option configuration settings,
log on using an account that has Manage Printers permission. Members of the
Administrators and Power Users groups have Manage Printers permission
by default.
❒ You cannot change the printer default settings for each user. Settings made in
the printer properties dialog box are applied to all users.
A On the [Start] menu, click [Printers and Faxes].
The [Printers and Faxes] window appears.
B Click the icon of the printer you want to use.
C On the [File] menu, click [Properties].
The printer properties dialog box appears.
2
D Make the necessary settings, and then click [OK].
Note
❒ Settings you make here are used as the default settings for all applications.
❒ Do not make a setting for [Form to Tray Assignment].
Reference
For details about settings, see the printer driver Help.
21
Page 30

2
Setting Up the Printer Driver
Making the printer default settings - Printing Preferences
Important
❒ You cannot change the printer default settings for each user. Settings made in
the printer properties dialog box are applied to all users.
A On the [Start] menu, click [Printers and Faxes].
The [Printers and Faxes] window appears.
B Click the icon of the printer you want to use.
C On the [File] menu, click [Printing Preferences...].
The [Printing Preferences] dialog box appears.
D Make the necessary settings, and then click [OK].
Note
❒ Settings you make here are used as the default settings for all applications.
Reference
For details about settings, see the printer driver Help.
Making printer settings from an application
You can make printer settings for a specific application.
To make printer settings for a specific application, open the [Printing Preferences]
dialog box from that application. The following explains how to make settings
for the WordPad application provided with Windows XP.
A On the [File] menu, click [Print...].
The [Print] dialog box appears.
B Select the printer you want to use in the [Select Printer] list, and then click
[Preferences].
C Make the necessary settings, and then click [OK] to start printing.
Note
❒ The procedure to open the [Printing Preferences] dialog box may vary de-
pending on the application. For details, see the manuals provided with the
application you use.
❒ Any settings you make in the procedure above are valid for the current ap-
plication only.
❒ General users can change the properties displayed in the [Print] dialog box
of an application. Settings made here are used as defaults when printing
from this application.
22
Reference
For details about settings, see the printer driver Help.
Page 31

PCL - Accessing the Printer Properties
Windows Vista- Making Printer Settings
Making the printer default settings - the [Printer] window
Important
❒ To change the printer default settings including option configuration settings,
log on using an account that has Manage Printers permission. Members of the
Administrators and Power Users groups have Manage Printers permission
by default.
❒ You cannot change the printer default settings for each user. Settings made in
the printer properties dialog box are applied to all users.
A On the [Start] menu, click [Control Panel].
The [Control Panel] window appears.
B Click [Printer] in “Hardware and Sound”.
C
Right-click the icon of the printer you want to use, and then click the [Properties].
The printer properties dialog box appears.
2
D Make the necessary settings, and then click [OK].
Note
❒ Settings you make here are used as the default settings for all applications.
❒ Do not make a setting for [Form to Tray Assignment].
Reference
For details about settings, see the printer driver Help.
23
Page 32

2
Setting Up the Printer Driver
Making the printer default settings - Printing Preferences
Important
❒ You cannot change the printer default settings for each user. Settings made in
the printer properties dialog box are applied to all users.
A On the [Start] menu, click [Control Panel].
The [Control Panel] window appears.
B Click [Printer] in “Hardware and Sound”.
C Right-click the icon of the printer you want to use, and then click [Printing
Preferences...].
The [Printing Preferences] dialog box appears.
D Make the necessary settings, and then click [OK].
Note
❒ Settings you make here are used as the default settings for all applications.
Reference
For details about settings, see the printer driver Help.
Making printer settings from an application
You can make printer settings for a specific application.
To make printer settings for a specific application, open the [Printing Preferences]
dialog box from that application. The following explains how to make settings
for the WordPad application provided with Windows Vista.
A On the [File] menu, click [Print...].
The [Print] dialog box appears.
B Select the printer you want to use in the [Select Printer] list.
C Make the necessary settings, and then click [Apply] to start printing.
Note
❒ The procedure to open the [Printing Preferences] dialog box may vary de-
pending on the application. For details, see the manuals provided with the
application you use.
❒ Any settings you make in the procedure above are valid for the current ap-
plication only.
❒ General users can change the properties displayed in the [Print] dialog box
of an application. Settings made here are used as defaults when printing
from this application.
24
Reference
For details about settings, see the printer driver Help.
Page 33

PostScript 3 - Setting Up for Printing
PostScript 3 - Setting Up for Printing
Windows 2000 - Accessing the Printer Properties
Making the printer default settings - The printer properties
Important
❒ To change the printer default settings including option configuration settings,
log on using an account that has Manage Printers permission. Members of the
Administrators and Power Users groups have Manage Printers permission
by default.
❒ You cannot change the printer default settings for each user. Settings made in
the printer properties dialog box are applied to all users.
A On the [Start] menu, point to [Settings], and then click [Printers].
The [Printers] window appears.
2
B Click the icon of the printer you want to use.
C On the [File] menu, click [Properties].
The printer properties dialog box appears.
D Make the necessary settings, and then click [OK].
Note
❒ Settings you make here are used as the default settings for all applications.
❒ Do not make a setting for [Form to Tray Assignment].
Reference
For details about settings, see the printer driver Help.
25
Page 34

2
Setting Up the Printer Driver
Making the printer default settings - Printing Preferences
Important
❒ You cannot change the printer default settings for each user. Settings made in
the printer properties dialog box are applied to all users.
A On the [Start] menu, point to [Settings], and then click [Printers].
The [Printers] window appears.
B Click the icon of the printer you want to use.
C On the [File] menu, click [Printing Preferences...].
The [Printing Preferences] dialog box appears.
D Make the necessary settings, and then click [OK].
Note
❒ Settings you make here are used as the default settings for all applications.
Reference
For details about settings, see the printer driver Help.
Making printer settings from an application
You can make printer settings for a specific application.
To make printer settings for a specific application, open the [Printing Preferences]
dialog box from that application. The following explains how to make settings
for the WordPad application provided with Windows 2000.
A On the [File] menu, click [Print...].
The [Print] dialog box appears.
B Select the printer you want to use in the [Select Printer] list.
C Make the necessary settings, and then click [Print] to start printing.
Note
❒ The procedure to open the [Printing Preferences] dialog box may vary de-
pending on the application. For details, see the manuals provided with the
application you use.
❒ Any settings you make in the procedure above are valid for the current ap-
plication only.
❒ General users can change the properties displayed in the [Print] dialog box
of an application. Settings made here are used as defaults when printing
from this application.
26
Reference
For details about settings, see the printer driver Help.
Page 35

PostScript 3 - Setting Up for Printing
Windows XP and Windows Server 2003/2003 R2 - Making Printer Settings
Making the printer default settings - [Printers and Faxes] window
Important
❒ To change the printer default settings including option configuration settings,
log on using an account that has Manage Printers permission. Members of the
Administrators and Power Users groups have Manage Printers permission
by default.
❒ You cannot change the printer default settings for each user. Settings made in
the printer properties dialog box are applied to all users.
A On the [Start] menu, click [Printers and Faxes].
The [Printers and Faxes] window appears.
B Click the icon of the printer you want to use.
C On the [File] menu, click [Properties].
The printer properties dialog box appears.
2
D Make the necessary settings, and then click [OK].
Note
❒ Settings you make here are used as the default settings for all applications.
❒ Do not make a setting for [Form to Tray Assignment].
Reference
For details about settings, see the printer driver Help.
27
Page 36

2
Setting Up the Printer Driver
Making the printer default settings - Printing Preferences
Important
❒ You cannot change the printer default settings for each user. Settings made in
the printer properties dialog box are applied to all users.
A On the [Start] menu, click [Printers and Faxes].
The [Printers and Faxes] window appears.
B Click the icon of the printer you want to use.
C On the [File] menu, click [Printing Preferences...].
The [Printing Preferences] dialog box appears.
D Make the necessary settings, and then click [OK].
Note
❒ Settings you make here are used as the default settings for all applications.
Reference
For details about settings, see the printer driver Help.
Making printer settings from an application
You can make printer settings for a specific application.
To make printer settings for a specific application, open the [Printing Preferences]
dialog box from that application. The following explains how to make settings
for the WordPad application provided with Windows XP.
A On the [File] menu, click [Print...].
The [Print] dialog box appears.
B Select the printer you want to use in the [Select Printer] list.
C Make the necessary settings, and then click [Print] to start printing.
Note
❒ The procedure to open the [Printing Preferences] dialog box may vary de-
pending on the application. For details, see the manuals provided with the
application you use.
❒ Any settings you make in the procedure above are valid for the current ap-
plication only.
❒ General users can change the properties displayed in the [Print] dialog box
of an application. Settings made here are used as defaults when printing
from this application.
28
Reference
For details about settings, see the printer driver Help.
Page 37

PostScript 3 - Setting Up for Printing
Windows Vista - Making Printer Settings
Making the printer default settings - the [Printer] window
Important
❒ To change the printer default settings including option configuration settings,
log on using an account that has Manage Printers permission. Members of the
Administrators and Power Users groups have Manage Printers permission
by default.
❒ You cannot change the printer default settings for each user. Settings made in
the printer properties dialog box are applied to all users.
A On the [Start] menu, click [Control Panel].
The [Control Panel] window appears.
B Click [Printer] in “Hardware and Sound”.
C Right-click the icon of the printer you want to use, and then click the [Prop-
erties].
The printer properties dialog box appears.
2
D Make the necessary settings, and then click [OK].
Note
❒ Settings you make here are used as the default settings for all applications.
❒ Do not make a setting for [Form to Tray Assignment].
Reference
For details about settings, see the printer driver Help.
29
Page 38

2
Setting Up the Printer Driver
Making the printer default settings - Printing Preferences
Important
❒ You cannot change the printer default settings for each user. Settings made in
the printer properties dialog box are applied to all users.
A On the [Start] menu, click [Control Panel].
The [Control Panel] window appears.
B Click [Printer] in “Hardware and Sound”.
C Right-click the icon of the printer you want to use, and then click [Printing
Preferences...].
The [Printing Preferences] dialog box appears.
D Make the necessary settings, and then click [OK].
Note
❒ Settings you make here are used as the default settings for all applications.
Reference
For details about settings, see the printer driver Help.
Making printer settings from an application
You can make printer settings for a specific application.
To make printer settings for a specific application, open the [Printing Preferences]
dialog box from that application. The following explains how to make settings
for the WordPad application provided with Windows Vista.
A On the [File] menu, click [Print...].
The [Print] dialog box appears.
B Select the printer you want to use in the [Select Printer] list.
C Make the necessary settings, and then click [Apply] to start printing.
Note
❒ The procedure to open the [Printing Preferences] dialog box may vary de-
pending on the application. For details, see the manuals provided with the
application you use.
❒ Any settings you make in the procedure above are valid for the current ap-
plication only.
❒ General users can change the properties displayed in the [Print] dialog box
of an application. Settings made here are used as defaults when printing
from this application.
30
Reference
For details about settings, see the printer driver Help.
Page 39

3. Other Print Operations
Form Feed
Use the form feed function to continue printing when a problem such as a paper
size error occurred.
This function can be performed using the control panel.
Important
❒ The tray cannot be changed if the following function is set:
• Duplex Print to a tray that does not support duplex printing
•Cover Sheet
❒ If the paper that is loaded is larger than the paper size specified in the printer
driver, using the form feed function could result in a paper jam. Use form feed
only if the paper is the same as or smaller than the paper size specified in the
printer driver.
Note
❒ If form feed is selected for a tray with the following settings, you can change
the tray by canceling the settings:
• Duplex Print
Performing Form Feed
Follow the procedure below to perform form feed.
A If the Smart Organizing Monitor dialog box with a caution message ap-
pears, press the {Stop/Start} button.
The printer prints using the selected tray.
Note
❒ If you want to print after adding paper to the tray, load the correct paper,
and then click the {Stop/Start} button.
❒ If a tray with a smaller paper size is selected, the print job may be cut short,
or other problems may occur.
Canceling a Print Job
Follow the procedure below to cancel a print job that is related to the printer error occurred.
A If the Smart Organizing Monitor dialog box appears with a caution mes-
sage.
31
Page 40

Other Print Operations
Canceling a Print Job
This section gives instruction to stop printing from the control panel or computer.
Canceling a Print Job Using the Control Panel
You can cancel a print job using the control panel, if transferring print jobs is not
completed.
3
A Press the {Job Reset} key.
Windows - Canceling a Print Job from the Computer
You can cancel a print job from the computer if the transferring print job is not
completed.
A Double-click the printer icon on the Windows task tray.
A window appears, showing all print jobs currently queued for printing.
Check the current status of the job you want to cancel.
B Select the name of the job you want to cancel.
C On the [Document] menu, click [Cancel Printing].
Note
❒ In Windows XP and Windows Server 2003/2003 R2, click [Cancel] on the
[Document] menu.
❒ In Windows 2000/Vista, you can also open the print job queue window by
double-clicking the printer icon in the [Printers] window (the [Printers and
Faxes] window under Windows XP and Windows Server 2003/2003 R2).
❒ You cannot stop printing data that has already been processed. For this
reason, printing may continue for a few pages after you cancel printing.
❒ A print job containing a large volume of data may take considerable time
to stop.
32
Page 41

Collate
Use the Collate function to print documents into page-ordered sets.
❖ Collate
Output can be assembled as sets in sequential order.
Note
❒ If Auto Continue occurs on the first set, the Collate will be canceled.
❒ If a form feed occurs on the first set, the Collate will be canceled.
Reference
For details about printing method, see the printer driver Help.
Collate
3
33
Page 42

3
Other Print Operations
Cover
Use the Cover function to insert cover sheets using paper in a specified tray.
Note
❒ The cover sheet's size and orientation must be the same as those of the body
paper.
Reference
For details about printing methods, see the printer driver Help.
34
Page 43

Watermark
Watermark
Use the Watermark function to print watermark text.
Note
❒ If the watermark size is larger than the paper size, watermarks cannot be
printed properly.
Reference
For details about the setting method, see the printer driver Help.
3
35
Page 44

3
Other Print Operations
Manual Duplex
Use the manual duplex printing function to print on both sides of sheets.
Important
❒ This function is only available for the SP C221N model printer.
❒ This function is only available for PCL5c and PCL6.
❒ When printing on the other side of sheets, reload the paper into Tray 1.
Note
❒ If you select [Auto Tray Select] when performing duplex printing, the printer
searches for an appropriate tray for the first page only. All subsequent pages
will be printed using that tray.
❒ When you print a document whose page count is an odd number, a blank
page is printed first. This blank page is the last page of the document. When
you start printing on the other side of sheets, include the sheet containing this
blank page in the bundle of paper.
When a print job that contains an even number of pages is completed, a dialog
box prompting you to reload the paper appears on Smart Organizing Monitor.
Follow the instructions on the screen to start printing on the other side of sheets.
Place the original face down into Tray 1, and then press the {Start/Stop} key to
start printing the other side.
36
Page 45

Memory Capacity and Paper Size
Memory Capacity and Paper Size
Additional memory apart from standard memory may also be required depending on the paper size and data type.
❖ Memory Capacity
128 MB(Standard)
❖ Resolution
600 dpi Speed (1bit)
600 dpi Standard (2bits)
600 dpi Fine (4bits)
❖ Paper Size
Letter (8.5" × 11"), A4 (210 × 297 mm), B5 JIS (182 × 257 mm), B6 JIS(128 × 182
mm), A5 (148 × 210 mm), A6 (105 × 148 mm), Legal (8.5" × 14"), Executive
(7.25" × 10.5"), 5.5" × 8.5", Com10 Env. (4.125" × 9.5"), Monarch Env. (3.875" ×
7.5"), DL Env. (110 × 220 mm), C6 Env. (114 × 162 mm), C5 Env. (162 × 229
mm), 8" × 13", 8.5" × 13", 8.25" × 13", 16K (195 × 267 mm), Custom Paper Size
3
Note
❒ When printing from bypass tray, duplex printing will not be supported re-
gardless of the memory capacity, and only one-side will be printed.
❒ To print an A3, 11 " × 17 ", B4, or 8K size document, you must first select the
[Enable Large Papers] check box on the [Advanced Options] tab in the printer
driver's properties dialog box. The document is reduced to fit the specified
paper size, and then printed.
❒ If you select [Custom Paper Size], you can specify a paper size that is within the
following ranges:
• Horizontal: 10.00 to 30.50
• Vertical: 13.97 to 60.00
Reference
For details about the paper size, see Hardware Guide.
37
Page 46

3
Other Print Operations
38
Page 47

4. Direct Printing from a Digital
Camera (PictBridge)
What Is PictBridge?
Important
❒ This function is only available for the SP C222DN model printer.
You can connect a PictBridge-compatible digital camera to this printer using a
USB cable. This allows you to print photographs taken using the digital camera
directly by operating the digital camera.
ASH109S
Note
❒ Check your digital camera is PictBridge-compatible.
❒ Up to 999 images can be sent from the digital camera to the printer during one
print transaction. If an attempt is made to send more images, an error message is sent to the camera and printing fails.
❒ Since printing conditions are specified on the digital camera, specifiable pa-
rameters depend on the digital camera. For details, see the manuals provided
with the digital camera.
❒ This function is compatible with USB 1.1.
39
Page 48

4
Direct Printing from a Digital Camera (PictBridge)
PictBridge Printing
Follow the procedure below to start PictBridge printing on this printer.
Important
❒ Memory overflow errors can occur when printing a large-pixel image using
4-up printing. To prevent memory overflow errors, add the optional memory.
❒ Do not disconnect the USB cable while data is being sent. If you do, printing
will fail.
A Check the printer and the digital camera are both turned on.
B Connect a USB cable between the USB host interface board installed on the
printer and digital camera.
The Ready indicator on the printer flashes for several seconds and then stays lit.
This indicates the printer recognizes the digital camera as a PictBridge device.
ASH108S
C On your digital camera, select the images you want to print, and then spec-
ify the printing conditions.
D The printer receives settings from the digital camera and starts printing.
Note
❒ Since printing conditions are specified on the digital camera, specifiable
parameters depend on the digital camera. For details, see the manuals provided with the digital camera.
❒ Some digital cameras require settings for manual PictBridge operation. For
details, see the manual provided with the digital camera.
❒ Some digital cameras require to turn the power switch off for a manual
PictBridge operation. For details, see the manual provided with the digital
camera.
❒ Some digital cameras need to be switched off when connecting to the print-
er. For details, see the manual provided with the digital camera.
Reference
For details about how to stop printing data, see p.31 “Canceling a Print Job”.
40
Page 49

What Can Be Done on This Printer
What Can Be Done on This Printer
This printer can perform the following functions using its PictBridge feature.
The settings available for these functions are as follows:
• Single image printing
• Selected image printing
• All image printing
• Index printing
•Copies
• Paper size
•N-up layout
Note
❒ The setting parameters and their names may vary depending on the digital
camera. For details, see the manuals provided with the digital camera.
4
Paper Size
Use this function to print on paper with the size specified on the digital camera.
Paper size name Actual size
A4 210 × 297 mm (8.3 × 11.7 in)
Note
1
/2” × 11”) 215.9 × 279.4 mm (8 1/2 × 11 in)
Letter (8
❒ For details about specifying undefined sizes, see Hardware Guide.
Image Print Size
Use this function to print images with the size specified on the digital camera.
Note
❒ This functions default setting is fit to paper.
❒ Scale factor depends on image size and paper size.
• Scale Factor: 25% - 400%.
41
Page 50

4
Direct Printing from a Digital Camera (PictBridge)
Exiting PictBridge
Follow the procedure below to quit the PictBridge mode.
Important
❒ Do not disconnect the USB cable while data is being sent to the printer. If you
do, printing will fail.
A Check the printer's Ready indicator is lit.
B Disconnect the USB cable from the printer.
42
Page 51

When PictBridge Printing Does Not Work
When PictBridge Printing Does Not Work
This section explains likely causes and possible solutions for problems that can
occur when PictBridge printing.
Problem Cause Solution
PictBridge is not available. There is a problem with the
USB connection or the PictBridge settings.
When two or more digital
cameras are connected, the
second and subsequent cameras are not recognized.
Printing is disabled. The number of originals ex-
Printing is disabled. There is no paper of the speci-
You have connected multiple
digital cameras.
ceeds the maximum number
of pages that can be printed at
a time.
fied size remaining.
Use the following procedure
to check the connection and
settings:
A Disconnect and then recon-
nect the USB cable.
B Check the PictBridge set-
tings are enabled.
C Disconnect the USB cable,
and then turn off the printer. Turn the printer back
on. When the printer has
fully booted up, reconnect
the USB cable.
Connect one digital camera
only.
Do not connect multiple cameras.
The maximum specifiable
print quantity at a time is 999.
Respecify the quantity to 999
or less, and then retry printing.
There is no paper of the specified size remaining.
If you have to use paper that is
not of the specified size, perform Form Feed. To cancel
printing, perform Job Cancel.
4
Printing is disabled. The paper size setting for this
tray cannot be printed on the
printer.
Select the paper size setting
that can be printed on the
printer.
43
Page 52

4
Direct Printing from a Digital Camera (PictBridge)
44
Page 53

5. Monitoring and Configuring
the Printer
Using Web Image Monitor
Using Web Image Monitor, you can check the printer status and change settings.
❖ Available operations
The following operations can be remotely performed using Web Image Monitor from a client computer:
• Display printer status and supply information
• Displaying the counter information
• Making settings for paper loaded into each input tray
• Making input tray settings
• Printing a list of printer configuration
• Making network protocol settings
❖ Configuring the printer
To perform the operations from Web Image Monitor, TCP/IP is required. After the printer is configured to use TCP/IP, operations from Web Image Monitor become available.
❖ Recommended Web browser
•Windows:
Internet Explorer 5.5 SP2 or higher
Firefox 1.0 or higher
•Mac OS X:
Firefox 1.0 or higher
Safari 1.0, 1.2, 2.0 or higher
Note
❒ If the previous versions of the Web browser above are used or JavaScript and
cookies are not enabled with the Web browser used, display and operation
problems may occur.
❒ If you are using a proxy server, change the Web browser settings. Contact
your network administrator for information about the settings.
❒ The previous page may not appear even after the back button of the Web
browser is clicked. If this happens, click the refresh button of the Web browser.
❒ Updating the printer information is not automatically performed. Click [Re-
fresh] in the main area to update the printer information.
❒ We recommend using Web Image Monitor in the same network.
❒ You cannot access the printer from outside the firewall.
❒ When using the printer under DHCP, the IPv4 address may be automatically
changed by the DHCP server settings.
❒ If the HTTP port is disabled, connection to the printer using the printer's URL
cannot be established.
45
Page 54

5
Monitoring and Configuring the Printer
Displaying Top Page
This section explains how to display Web Image Monitor and its Top Page.
Displaying Top Page of Web Image Monitor
A Start your Web browser.
B Enter “http://(printer's address)/” in the address bar of the Web browser.
Top Page of Web Image Monitor appears.
If the printer's host name has been registered on the DNS server, you can enter it.
Top Page
Every Web Image Monitor page is divided into the following areas:
ASH102S
1. Menu area
When you select [Configuration], content
of the [Configuration] page appears on the
main area.
2. Tab area
Contains menus for the Status and Counter modes and tabs for switching between them.
3. Help
Use Help to view help file contents.
Note
❒ Contents of the [Configuration] page differ according to the mode you are
logged into.
4. Login
Click to log on in administrator mode.
5. Main area
Displays the contents of the item selected
in the menu area.
Machine information in the main area is
not automatically updated. Click [Re-
fresh] at the upper right in the main area
to update the machine information. Click
the Web browser's [Refresh] button to refresh the entire browser screen.
46
Page 55

Using Web Image Monitor
Displaying the Printer Status
Top page of Web Image Monitor contains two tabs: the [Status] tab and [Counter] tab.
❖ [Status] tab
You can check the status of monitored printers.
• Displays the general information of the printer, such as the model name,
location and the status.
•Toner
Displays the levels of remaining toner.
• Supplies
Displays the status of the consumables.
•Input Tray
Displays the input tray status and paper settings.
❖ [Counter] tab
You can check the total number of pages printed to date.
The following counter information is displayed.
5
•Total
• Black & White
• Full Color
• 2 Sided (Two Sided Print)
About Menu and Mode
There are two modes available with Web Image Monitor: user mode and administrator mode.
The available menus on the [Configuration] page differ depending on the mode
you are logging on.
47
Page 56

Monitoring and Configuring the Printer
❖ User Mode
In this mode, users can view settings but cannot change them.
5
ASH103S
1. Paper
Click to display the [Paper] page.
2. Network
Click to display the [Network] page.
❖ Administrator Mode
In this mode, users can make input tray and network settings.
ASH104S
1. Paper
Click to display the [Paper] page.
2. Network
Click to display the [Network] page.
48
3. Change Login Password
Click to change the login password.
4. Help Source File Setting
Click to specify the Help source file.
Page 57

Using Web Image Monitor
Access in the Administrator Mode
Follow the procedure below to access Web Image Monitor in the administrator
mode.
Note
❒ When you access Web Image Monitor in the administrator mode, "Adminis-
trator" appears under [Login].
Log on
A On Top Page, click [Login].
The dialog box for entering the user name and password appears.
B Enter the user name and password, and then click [OK].
Note
❒ For details about the login user name and password, consult your network
administrator.
Log off
Click [Logout] to log off.
Note
❒ When log on and made the settings, always click [Logout].
Configuring the Printer Settings
From the [Configuration] page, two menus are available to configure the settings.
Important
❒ To make printer settings, you must access Web Image Monitor in administra-
tor mode. If you access Web Image Monitor in user mode, you can view the
printer settings, but you cannot change them.
❖ Paper
Displays the [Paper] page.
On the [Paper] page, following operations are possible:
• Setting the paper size and type on each tray
5
• Changing the tray priority
• Printing lists of configuration of the printer
49
Page 58

5
Monitoring and Configuring the Printer
❖ Network
Displays the [Network] page.
On the [Network] page, following operations are possible:
• Checking the information of the printer
•Interface settings
•Protocol settings
• Resetting to factory-set defaults
Changing the paper settings
On the [Paper] page, you can change paper size and other paper settings.
• Tray 1: Size
You can specify the paper size for Tray 1.
The following sizes are available:
A4, B5 JIS, A5, B6 JIS, A6, 8 1/2 x 14, 8 1/2 x 11, 5 1/2 x 8 1/2, 7 1/4 x 10 1/2,
8 x 13, 8 1/2 x 13, 8 1/4 x 13, 4 1/8 x 9 1/2, 3 7/8 x 7 1/2, C5 Env, C6 Env, DL
Env, 16K, Custom Paper Size, 100 x 148 mm, 148 x 200 mm, Any Size
•Tray 1: Type
You can specify the paper type for Tray 1.
The following paper types are available:
Thin Paper, Plain Paper 1, Plain Paper 2, Recycled Paper, Color Paper, Letterhead, Preprinted Paper, Prepunched Paper, Labels, Bond Paper, Cardstock,
Thick Paper 1, Envelope, Any Type
• Tray 2: Size
You can specify the paper size for tray 2.
The following sizes are available:
A4, 8 1/2 x 11
•Tray 2: Type
You can specify the paper type for tray 2.
The following paper types are available:
Thin Paper, Plain Paper 1, Plain Paper 2, Recycled Paper, Color Paper, Letterhead, Preprinted Paper, Prepunched Paper
•Tray Priority
Select the tray used for the priority paper source.
Note
❒ Tray 2 is available only when the optional paper feed unit is attached to the
printer
50
Page 59

Using Web Image Monitor
Printing the printer configurations
On the [Paper] page, you can print lists of printer information.
Important
❒ To use this function, the printer must be monitored from Web Image Monitor.
In the [List/Test Print] list, select the item you want to print. You can print the following:
❖ Configuration Page
The current configurations and general information of this printer is printed.
❖ Test Page
Network information such as Subnet address and Gateway address is printed.
❖ PCL Configuration/Font Page
The installed PCL font list is printed.
❖ PS Configuration/Font Page
The installed PS font list is printed.
Making the network related settings
You can set configurations about network connection and communication.
Important
❒ To make the settings about TCP/IP protocol, set TCP/IP “Active” in Inter-
face.
The following operations are possible on the [Network] menu:
• Checking the information about the printer such as Device Name and Active
Protocol.
• Interface settings such as setting the timeout and making protocol to active.
•TCP/IP port settings
• SMTP Settings
• SNMP Settings
• IPX Settings
• AppleTalk Settings
5
51
Page 60

5
Monitoring and Configuring the Printer
Changing the Login Information
On the [Change Login Password] page, you can change the administrator's login
password.
A On the [Configuration] page, click [Change Login Password].
The [Change Login Password] page appears.
B Enter the new password in the [New Login Password] box, and then enter the
same password in the [Confirm Login Password] box.
C Click [OK].
Displaying Web Image Monitor Help
To use Help for the first time, you need to install its source file from the CDROM provided with this printer.
Note
❒ By clicking [Help] in the header area, the contents of Help appear.
❒ By clicking “?”, the Help icon in the main area, Help for the setting items in
the main area appears.
Installing Help
A Copy the [WIMHELP] folder on the CD-ROM to your computer's hard drive.
The example procedures explain how to copy the [WIMHELP] folder to the
C:\tmp\WIMHELP directory.
B Log on as an administrator, access Web Image Monitor, and then click [Help
Source File Setting] on the [Configuration] page.
C In the text box, enter “C:\tmp\WIMHELP\JA” .
D Click [OK].
52
Page 61

Using Smart Organizing Monitor
Using Smart Organizing Monitor
Smart Organizing Monitor allows you to make printer settings, such as input
tray and network-related settings, from your client computer.
You can also use Smart Organizing Monitor to check printer status.
The following operations are possible with Smart Organizing Monitor:
• Displaying printer status or settings
• Checking locations where errors have occurred and error recovery methods
• Displaying the printer status and supply information
• Printing a list of printer configurations
• Specifying the printer's IP address
• Making settings for paper loaded into each input tray
• Making input tray settings
• Changing the factory-set default settings
• Making system, access code and language settings
• Making network protocol settings
• Making printer settings
5
Reference
The Smart Organizing Monitor functions you can use under Windows operating systems are also available under Mac OS. For details, see p.85 “Using
Smart Organizing Monitor”.
For details about specifying the printer's IP address, see p.4 “Specifying the
printer's IP address”.
Installing Smart Organizing Monitor
Important
❒ To install Smart Organizing Monitor, log on as an Administrators or Power
Users group member.
Smart Organizing Monitor is automatically installed with the printer driver
when installing it, or by clicking [Smart Organizing Monitor] in the [Printer Drivers
and Utilities] dialog box, which appears when inserting the CD-ROM provided
with this printer.
53
Page 62

5
Monitoring and Configuring the Printer
Displaying the Smart Organizing Monitor Dialog Box
Methods of displaying the Smart Organizing Monitor dialog box differ depending on how it was installed.
❖ If you installed Smart Organizing Monitor by clicking [Smart Organizing Monitor] in
the [Printer Drivers and Utilities] dialog box:
On the [Start] menu, point to [Programs] or [All Programs], and then point to
[Smart Organizing Monitor for PCL] > [Smart Organizing Monitor for PCL Status].
❖ If you installed Smart Organizing Monitor with the printer driver:
In the printing preferences dialog box, click [Printer Status Monitor...]. Or, [Ac-
cessories], [Advanced Options] or [Paper Size Settings] tab in the printer's proper-
ties dialog box, click [Printer Status Monitor...].
Note
❒ To automatically display the Smart Organizing Monitor dialog box when er-
rors occur, in the printer driver's properties dialog box, on the [Advanced Op-
tions] tab, select the [Display Smart Organizing Monitor automatically] check box.
Displaying the Printer Status
In the Smart Organizing Monitor dialog box, you can check the status of monitored printers.
The printer status is displayed using graphics and comments.
Note
❒ If Smart Organizing Monitor is monitoring multiple printers, the [Printer Driver
Selection] dialog box appears. Select the printer driver used by the target
printer, and then click [OK]. To check the status of a network printer, click
[Search Network Printer].
54
Page 63

ASH107S
Using Smart Organizing Monitor
1. Printer graphic
If an input tray error occurs, appears.
This identifies the tray where the error
occurred. The problem tray is outlined in
red.
2. Comments
Displays current printer status and instructions for resolving problems.
5. [User Guide] button
Click to display error related Help.
6. [Search Network Printer] button
Click to select a network printer.
7. [User Tools] tab
Prints the test page or configuration
page. The [Printer Configuration] dialog box
can be opened from this tab.
3. [Continue] button
Click to display the [Form Feed] dialog
box which you can use to change input
tray settings.
4. [Cancel] button
Click to cancel a print job.
Note
❒ [Continue] and [Cancel] button are always disabled for this printer model.
8. [Job Log] tab
Displays the information related to print
jobs.
9. [Status] tab
Display the status of the items such as
toner levels and paper level.
5
55
Page 64

Monitoring and Configuring the Printer
Displaying the Printer Information
The lower half of the Smart Organizing Monitor dialog box contains the following three tabs: [Status], [Job Log], and [User Tools]. You can use these tabs to display information about a monitored printer, such as its status, job history, and
configuration.
Displaying the printer status
The left side of the [Status] tab shows the printer name and tree. Click an item in
the tree to display information relating to it.
❖ Toner
Displays the following messages to indicate remaining toner levels for each
color of toner: Remaining Level 1 to 5, “Almost Empty” and “Empty”.
Graphics also indicate remaining toner levels.
5
❖ Input Tray
You can check the following information about the input trays.
•Input Tray
Displays the installed input trays.
• Status
Displays the input tray status, "Out of Paper" or "Status OK".
• Paper Size
Displays the size of the paper loaded into each input tray.
•Paper Type
Displays the type of the paper loaded into each input tray.
❖ Supplies
Displays the name of consumables and uses graphics to indicate their statuses.
❖ System
Displays the system information about the printer, such as the model name,
system version, and memory size.
❖ Counter
Displays information about the counters.
❖ Network
Displays network details such as the printer's IP address and network-related
comments.
56
Reference
For details about each item in the Smart Organizing Monitor dialog box, see
Smart Organizing Monitor Help.
You can print information that appears on the [Status] tab. For details see p.57
“Printing the printer configurations”.
Page 65

Using Smart Organizing Monitor
Displaying the job history
On the [Job Log] tab, print jobs are displayed in the list.
You can check the following information:
•User name
•Document name
• The date and time when the print job was requested
• Number of printed pages
•Job status
Note
❒ Normally, the names used to log on to Windows are displayed in the [User
Name] column.
Printing the printer configurations
On the [User Tools] tab, you can print lists of printer information.
Important
❒ You can print the configuration page only when the printer is not busy process-
ing jobs.
❒ To print information about the printer, the printer must be monitored from
Smart Organizing Monitor via a supported printer driver.
In the [List/Test Print] list, select the item you want to print. You can print the following:
5
❖ Configuration Page
The current configurations and general information of the printer are printed.
❖ Test Page
Print the test page to check the printer's status.
❖ PCL Config./Font Page
The installed PCL font list is printed.
❖ PS Config./Font Page
The installed PS font list is printed.
The procedure for printing the configuration page is described as an example.
A On the [User Tools] tab, in the [List/Test Print] list, select [Configuration Page].
B Click [Print].
C Click [Yes].
The configuration page is printed.
Reference
For details about the items displayed on the configuration page, see p.64
“Reading the Configuration Page”.
57
Page 66

5
Monitoring and Configuring the Printer
Printer Configuration
You can use the [Printer Configuration] dialog box to change the current printer settings. To display the [Printer Configuration] dialog box and change printer settings,
on the [User Tools] tab, click [Printer Configuration].
Important
❒ The [Printer Configuration] is disabled when the printer is not in the ready state
or power save mode.
You can use the [Printer Configuration] dialog box to change the settings of:
•printers,
•input trays,
• paper loaded in input trays,
• network protocol, and
• factory-set defaults.
Reference
For details about each item you can specify on the [Printer Configuration] dialog
box, see Smart Organizing Monitor Help.
About menu and mode
There are two modes you can use to access the [Printer Configuration] dialog box:
administrator mode and general users mode.
Available tabs in the [Printer Configuration] dialog box differ depending on the
mode you are in.
❖ Administrator
In the [Access Code] dialog box, enter an access code.
All tabs in the [Printer Configuration] dialog box are available.
❖ General users
Only the [Paper Input] tab is available.
58
Page 67

Using Smart Organizing Monitor
Changing the paper settings
On the [Paper Input] tab, you can change paper size and other paper settings.
• Tray 1: Size
The following sizes are available:
A4 (210 x 297 mm), B5 JIS (182 x 257 mm), A5 (148 x 210 mm), B6 JIS (128 x 182
mm), A6 (105 x 148 mm), 8 1/2 x 14, 8 1/2 x 11, 5 1/2 x 8 1/2, 7 1/4 x 10 1/2,
8 x 13, 8 1/2 x 13, 8 1/4 x 13, 4 1/8 x 9 1/2, 3 7/8 x 7 1/2, C5 Env, C6 Env, DL
Env, 16K, Custom Paper Size, Any Size
•Tray 1: Type
The following paper types are available:
Thin Paper, Plain Paper 1, Plain Paper 2, Recycled Paper, Color Paper, Letterhead, Preprinted Paper, Prepunched Paper, Thick Paper 1, Bond Paper, Cardstock, Labels, Envelope, Any Type
• Custom Paper Size
You can make the custom paper size settings, when [Custom Paper Size] is selected.
•Unit:
Specify the unit of measurement in "mm" or "inch".
• Horizontal:
Specify the horizontal width between 90 and 216 mm (3.54 and 8.50 inch).
•Vertical:
Specify the vertical length between 148 and 356 mm (5.83 and 14.02 inch).
• Tray 2: Size
You can specify the paper size for tray 2.
The following sizes are available:
A4 (210 x 297 mm), 8 1/2 x 11
5
•Tray 2: Type
You can specify the paper type for tray 2.
The following paper types are available:
Thin Paper, Plain Paper 1, Plain Paper 2, Recycled Paper, Color Paper, Letterhead, Preprinted Paper, Prepunched Paper
•Tray Priority
Select the priority tray from the [Default Tray:] list, when the optional paper
feed unit is attached to the printer.
Note
❒ The paper settings are not available for the bypass tray.
❒ Tray 2 is available only when the optional paper feed unit is attached to the
printer.
59
Page 68

5
Monitoring and Configuring the Printer
Adjusting registrations
On the [Maintenance] tab, you can adjust color registration and print starting positions.
Normally, you do not have to adjust registrations. However, adjustments could
be useful in some cases, especially when you want to print in a specific position.
Under [Registration: Tray 2 Paper] and [Registration: Bypass Tray], you can adjust the
print image position printed on the sheet fed from each tray. To check the adjustment result, use [Print Test Sheet].
Also, you can updated the firmware by clicking [Printer Firmware Update].
The latest version of the firmware can be downloaded form the supplier's website.
Setting basic functions
On the [System] tab, you can set basic functions required to use the printer. The
printer can be used on factory-set defaults, but the configuration can be changed
depending on the condition of the user. The changed condition holds even if the
printer is turned off.
The access code can be changed on this tab.
Making network-related settings
On the [Network 1], [Network 2] and [Network 3] tabs, you can set configurations
about network connection and communication.
The following operations are possible on these tabs:
• Checking the machine name, active protocol, and other printer information
• Making interface settings, including the timeout setting and protocol settings
• Checking or making TCP/IP settings
• Checking or making IPX and SMTP settings
• Checking or making SNMP and AppleTalk settings
Settings conditions for printing
On the [Printer] tab, you can set conditions for printing.
In the [PCL] area, you can specify the conditions such as Orientation and font settings.
In the [PS] area, you can specify Resolution and Color Profile.
60
Page 69

Printer Status Notification by E-Mail
Printer Status Notification by E-Mail
Whenever a toner cartridge becomes empty or paper is jammed, an e-mail alert
is issued to the registered addresses to notify the printer status.
Important
❒ This function is available only if you are using this printer in a network envi-
ronment.
❒ Depending on your e-mail application, a phishing warning might appear af-
ter you receive an e-mail message. To prevent phishing warnings appearing
after you receive e-mail from a specified sender, you must add the sender to
your e-mail application's exclusion list. For details about how to do this, refer
to your e-mail application's Help.
For this notification, you can make the e-mail notification settings.
You can be notified of the following events:
• Service call
• Toner cartridge is empty
• Toner cartridge is nearly empty
• Waste toner bottle is full
5
• Waste toner bottle is nearly full
• Paper has jammed
• Open door is detected
• Paper tray is empty
Also you can see the information of the printer, such as Machine name, serial
number and total counter.
A Open a Web browser, and then enter “http://(printer's address)/” in the ad-
dress bar.
Top Page of Web Image Monitor appears.
B Click [Login].
The window for entering the login user name and password appears.
C Enter the user name and password, and then click [OK].
For details about the login user name and password, consult your network
administrator.
D In the menu area, click [Configuration].
E Click [Network].
The [Network] page appears.
F Set [Auto E-mail Notification] to [On].
61
Page 70

Monitoring and Configuring the Printer
G Make the necessary settings:
• Items in the SNMP Setting column: Configure the SMTP server. Check
your mailing environment, and then specify the necessary items. You can
also perform mail authentication for the SMTP server.
H Click [OK].
Note
❒ You can set [Auto E-mail Notification] to [On] using Smart Organizing Monitor.
Mail Authentication
You can configure mail authentication to prevent illegal use of the mail server.
When mail is sent to the SMTP server, authentication is performed using the
SMTP AUTH protocol by prompting the mail originator to enter the user name
and password.
5
Follow the procedure below to specify SMTP authentication.
A In the menu area, click [Configuration].
B Click [Network] in the [Configuration] page.
C Make the following settings:
• SMTP Authentication: Enable or disable SMTP authentication.
• E-mail Address: Enter the e-mail address.
• SMTP User Name: Enter the user name for SMTP Authentication.
• SMTP Password: Enter the password set for the SMTP User Name.
D Click [OK].
E Click [Logout].
F Quit Web Image Monitor.
62
Page 71

SNMP
SNMP
You can use the SNMP manager to obtain information about the printer.
The SNMP agent operating on UDP and IPX is built into the Ethernet board that
is installed in this printer.
Important
❒ If you change the printer's community name, use Web Image Monitor or
Smart Organizing Monitor to change the computer's settings accordingly.
Note
❒ Only PCL printer supports the Host IPX Address.
The default community names is [private]. You can use these community names
to obtain MIB information.
5
63
Page 72

5
Monitoring and Configuring the Printer
Reading the Configuration Page
Settings made on the [Printer Configuration] dialog box are printed.
❖ Product Name
Displays the product name.
❖ Reference
Displays the following information about the printer.
•Product ID
• Model Number
• Firmware Version
•Engine Version
❖ Print Language
Displays the version number of the printer language.
❖ Memory
Displays the total memory of SDRAM installed on the printer.
❖ Options
Displays the installed options.
❖ Paper Input
Displays the paper size and type settings.
•Tray Priority
• Tray Paper Size
•Bypass Paper Size
• Tray Paper Type
❖ Duplex
Displays the Duplex settings
❖ Print Quality
Displays the settings related to the print quality.
•Resolution
•Toner Saving
64
Page 73

Reading the Configuration Page
❖ System
Displays the settings made under [System] menu.
• Print PS Errors
•USB Timeout
• Network Timeout
• I/O Buffer
•Auto Continue
•Sub Paper Size
❖ PCL Menu
Displays settings made under [Printer] tab in [Printer Configuration] dialog box.
• Paper Size
• Orientation
•Form Lines
• Font Source
•Font Number
•Point Size
5
•Font Pitch
•Symbol Set
•Courier Font
• Ext. A4 Width
• Append CR To LF
❖ PS Menu
Displays settings made under [Printer] tab in [Printer Configuration] dialog box.
• Color Setting
• Color Profile
❖ Network Setup
Displays the network related settings.
• IP Address
•Subnet Mask
• Gateway Address
• MAC Address
❖ Error Log
Displays the error logs.
•Fatal Error
•Normal Error
65
Page 74

5
Monitoring and Configuring the Printer
❖ Counter List
Displays the counter information.
•Page Counter
•Jam Counter
Note
❒ Configuration page can be printed using the keys on the control panel. For
details see "Hardware Guide".
❒ The printed items and the contents might be different depending how it was
printed.
Reference
For details about printing printer configuration using Web Image Monitor,
see p.51 “Printing the printer configurations”.
For details about printing printer configuration using Smart Organizing
Monitor, see p.88 “Printer Configuration”.
66
Page 75

6. Using a Print Server
Preparing Print Server
This section explains how to configure this printer as a Windows network printer. The printer is configured to enabling network clients to use it.
Important
❒ To change the printer properties in the [Printer] folder, you need Printer Man-
agement access authentication. Log on to the file server as an Administrators
or member of the PowerUsers group.
A Open the [Printers] window from the [Start] menu.
The [Printers] window appears.
Under Windows XP or Windows Server 2003/2003 R2, the [Printers and Faxes]
window appears.
B Click the icon of this printer. On the [File] menu, click [Properties].
The printer properties appears.
C On the [Sharing] tab, click [Shared as:].
D To share this printer with users using a different version of Windows, click
[Additional Drivers...].
If you have installed an alternative driver by selecting [Shared as:] during the
printer driver installation, this step can be ignored.
E Click [OK], and then close the printer properties.
67
Page 76

Using a Print Server
6
68
Page 77

7. Special Operations under Windows
Printing Files Directly from Windows
You can print files directly using Windows commands; "lpr" or "ftp".
Setup
Follow the procedure below to make network environment settings.
A Enable TCP/IP using Smart Organizing Monitor, and then set up the print-
er’s network environment about TCP/IP including IP addresses.
TCP/IP of the printer is set as default.
B Install a TCP/IP in Windows to set up the network environment.
Consult the network administrator for the local setting information.
C To print, install “Printing service for UNIX” as the network application.
Reference
For details about setting up IPv4 address, see Hardware Guide.
For details about setting the IPv4 address of the printer using DHCP, see
p.93 “Using DHCP”.
This completes the setup for specifying a printer using an IPv4 address
when printing. When using a host name to specify a printer, proceed to p.70
“Using a Host Name Instead of an IPv4 Address”and continue the setup.
69
Page 78

Special Operations under Windows
Using a Host Name Instead of an IPv4 Address
When a host name is defined, you can specify a printer by host name instead of
IPv4 address. The host names vary depending on the network environment.
When using DNS
Use the host name set to the data file on the DNS server.
When setting the IPv4 address of a printer using DHCP
Use the printer name on the configuration page as the host name.
Reference
For details about printing a configuration page, see p.57 “Printing the printer
configurations”.
In other cases
7
Add the IPv4 address and host name of the network printer to the hosts file on
the computer used for printing.
A Open the hosts file using memo pad files, for instance.
The hosts file is in the following folder:
\WINNT\SYSTEM32\DRIVERS\ETC\HOSTS
“\WINNT” is the directory of the installation destination for Windows
2000/XP/Vista, and Windows Server 2003/2003 R2
B Add an IPv4 address and host name to the hosts file using the following
format:
192.168.15.16 host # NP
“192.168.15.16” is the IPv4 address, “host” is this printer's host name, and
“#NP” is replaced by comments. Insert a space or tab between “192.168.15.16”
and “host”, between “host” and “#NP” respectively, using one line for this
format.
C Save the file.
70
Page 79

Printing Files Directly from Windows
Printing Commands
The following explains printing operations using the lpr commands.
Enter commands using the command prompt window. The location of the command prompt varies depending on operating systems:
• Windows 2000
[Start] - [Programs] - [Accessories] - [Command Prompt]
• Windows XP/Vista, Windows Server 2003/2003 R2
[Start] - [All Programs] - [Accessories] - [Command Prompt]
Note
❒ Match the data format of the file to be printed with the emulation mode of this
printer.
❒ If the message “print requests full” appears, no print jobs can be accepted. Try
again when sessions end. For each command, the amount of possible sessions
is indicated as follows:
•lpr: 10
❒ Enter the file name in a format including the path from the directory execut-
ing commands.
Reference
The “option” specified in a command is an intrinsic printer option and its syntax is similar to printing from UNIX.
lpr
❖ When specifying a printer by IP address
c:> lpr -Sprinter's IP address -Pprinter name [-ol] \pass
name\file name
❖ When specifying a printer by host name instead of IP address
c:> lpr -Sprinter's host name -Pprinter name [-ol] \pass
name\file name
To print a binary file, include the “-ol” switch (a dash followed by a lowercase
O and L) after the printer name.
7
71
Page 80

Special Operations under Windows
ftp
Use the “put” or “mput” command according to the number of files to be printed.
❖ When one file is printed
ftp> put \pass name\file name [option]
❖ When multiple files are printed
ftp> mput \pass name\file name [\pass name\file name...]
[option]
A Formulate the printer's IP address or the host name of the hosts file printer
as an argument and use the “ftp” command.
% ftp printer's IP address
B Enter the user name and password, and then press the {OK} key.
For details about the user name and password, consult your network administrator.
User:
Password:
7
C When printing a binary file, set the file mode to binary.
ftp> bin
When printing a binary file in ASCII mode, print may not come out correctly.
D Specify files to be printed.
The following shows the examples of printing a PostScript file named “file 1”
in the “C:\PRINT” directory and printing file 1 and file 2.
ftp> put C:\PRINT\file1 filetype=RPS
ftp> mput C:\PRINT\file1 C:\PRINT\file2
E Quit ftp.
ftp> bye
Note
❒ “=”, “,”, “_”, and “;”cannot be used for file names. File names will be read
as option strings.
❒ For “mput” command, option can not be defined.
❒ For “mput” command, “*” and “?” can be used as wild cards in file names.
❒ When printing a binary file in ASCII mode, print may not come out cor-
rectly.
72
Page 81

8. Mac OS Configuration
This chapter explains how to use this printer under Mac OS X.
The example procedures in this chapter explain configuration under Mac OS X
10.4.
Installing the PostScript 3 Printer Driver
Important
❒ If you want to use this printer in a Mac OS environment, update to Mac OS
10.2.8 or higher.
A Insert the CD-ROM into the CD-ROM drive.
B Double-click the CD-ROM icon.
C Double-click the [Mac OS X] folder.
D Double-click the [PPD Installer] folder.
E Double-click the package file icon.
F Follow the instructions on the screen.
Note
❒ When installing the printer driver under Mac OS X, Smart Organizing
Monitor is also installed together with it. For details about Smart Organizing Monitor for Mac OS X, see p.85 “Using Smart Organizing Monitor”.
73
Page 82

Mac OS Configuration
Specifying the Printer
This section explains how to configure this printer using Printer Setup Utility.
Using USB
Use this procedure to connect the computer to the printer via USB.
The printer is automatically added, if the connection is successfully detected.
A Connect the printer and computer using the USB cable, and then turn the
printer's power switch to on.
B Start [Printer Setup Utility].
C Click [Add].
The [Printer Browser] dialog box appears.
D Click [Default Browser].
8
E Check if the name of this printer appears on Printer Name.
F Exit [Printer Setup Utility].
Using TCP/IP
To connect the printer via TCP/IP, you must complete the following four steps.
A Install Smart Organizing Monitor.
B Connect the printer and computer using the USB cable, and then start Smart
Organizing Monitor from the [Applications] folder.
C Specify the printer's IP address using Smart Organizing Monitor.
D Add the printer using Printer Setup Utilities.
Reference
For details about installing Smart Organizing Monitor, see p.85 “Installing
Smart Organizing Monitor”.
For details about Smart Organizing Monitor, see p.85 “Using Smart Organizing Monitor”.
74
Page 83

Specifying the Printer
Specifying the printer's IP address
Important
❒ To perform the following procedure, you must first return the printer's set-
tings to its factory-set defaults. To do this: first turn the printer's power switch
to off, wait a few seconds and then, while pressing down the {Job Reset} and
{Stop/Start} keys, turn the printer's power switch back to on and keep both
keys pressed down until the Alert and Ready indicators light up.
A Connect the printer and computer using the USB cable, and then turn the
printer's power switch to on.
B Start Smart Organizing Monitor from the [Applications] folder.
The [Printer Driver Selection] dialog box appears.
C In the [Printer Driver Selection] dialog box, select this printer, and then click
[OK].
Smart Organizing Monitor appears.
D On the [User Tools] tab, click [IP Address].
E In [IP Address], enter the IP address you want to set for the printer.
The MAC address is displayed automatically.
Reference
p.85 “Using Smart Organizing Monitor”
Using TCP/IP
A Connect the printer and the computer using the Ethernet cable.
B Start [Printer Setup Utility].
C Click [Add].
The [Printer Browser] dialog box appears.
D Click [Default Browser].
E In the list that appears, select this printer, and then click [Add].
Exit [Printer Setup Utility].
8
75
Page 84

Mac OS Configuration
Setting Up the PPD File
A Start [Printer Setup Utility].
B Click [Add].
• Mac OS X 10.4 or higher
Click [More Printers...]. Then select the zone from the second pop-up menu.
•Other Mac OS X
Click [AppleTalk] on the first pop-up menu.
If the zone is set, select the zone from the second pop-up menu.
C Select the printer, and then select its manufacturer from the [Printer Model:]
pop-up menu.
Under Mac OS X 10.4 or higher, manufacturer from the [Print Using] pop-up
menu.
A list of printer types appears.
D Select the PPD file for the model you are using, and then click [Add].
8
E Quit Printer Setup Utility.
76
Page 85

Setting Up Options
Setting Up Options
Use this procedure to configure the printer's options.
A Start [Printer Setup Utility].
The printer list appears.
B Select this printer, and then click [Show Info].
C Select [Installable Options], and then configure the required settings.
D Click [Apply Changes].
E Exit [Printer Setup Utility].
Note
❒ If the option you want to select is not displayed, PPD files may not be set
up correctly. To complete the setup, check the name of the PPD file displayed in the dialog box.
77
8
Page 86

Mac OS Configuration
Set Up for Printing
Use the following procedures to configure the printer.
Making paper settings from an application
A Open the file you want to print.
B On the [File] menu, click [Page Setup...].
C Check that the printer you want to use is displayed in [Format for], and then
select the paper size you want to use in [Paper Size].
If this printer is not displayed in [Format for], select the printer you want to
use.
D Configure the settings, and then click [OK].
Reference
The [Page Setup...] dialog box varies depending on the application you use.
For details, see the manuals provided with the Mac OS X.
8
Setting up for printing from an application
A Open the file you want to print.
B On the [File] menu, click [Print].
C In the [Printer] list, select the printer.
D Configure the print settings, and then click [Print].
78
Page 87

Canceling a Print Job from the Computer
Canceling a Print Job from the Computer
A Start [Printer Setup Utility].
B Double-click the name of this printer.
C Select the name of the job you want to cancel, and then click the Delete
icon.
Note
❒ If the printer is shared by multiple computers, be careful not to cancel a
print job of other user.
❒ You cannot stop printing data that has already been processed. For this
reason, printing may continue for a few pages after you cancel printing.
❒ To stop a large data size print job may takes a while.
79
8
Page 88

Mac OS Configuration
Changing to EtherTalk
Follow the procedure below to configure a Mac OS X to use EtherTalk.
Important
❒ You need an administrator name and a password (phrase). For details, con-
sult your network administrator
A Open [System Preference], and then click the Network icon.
B Click [Built-in Ethernet] in the [Show:] list box.
C Click the [AppleTalk] tab.
D Select the [Make AppleTalk Active] check box.
E To change AppleTalk zones, select a name from the [AppleTalk Zone:] pop-up
menu.
F When the settings are made, click [Apply Now].
8
G Quit [System Preference].
Reference
For information about installing applications required for EtherTalk, see
the Mac OS X manuals.
80
Page 89

Configuring the Printer
Configuring the Printer
Use Web Image Monitor to enable AppleTalk. (The default is active.)
Note
❒ AppleTalk is set to "active" by default.
81
8
Page 90

Mac OS Configuration
Using PostScript 3
Use the PostScript 3 driver to print files.
You can use the following functions if [Printer Features] is selected in the [Print]
dialog:
❖ Paper Type
Use this function to select the paper type.
In the [Feature Sets] list, select [Paper Type], and then, in the [Media Type] list, select the paper type you want to use for printing.
❖ Print Quality
Use this function to select the print quality.
In the [Feature Sets] list, select [Imaging], and then, in the [Print Quality] list, select the print quality.
You can select Standard, High Quality, or Best Quality.
❖ Color Profile
Use this function to select the color profile pattern.
In the [Feature Sets] list, select [Imaging], and then, in the [Color Profile] list, select the color profile pattern.
You can select Off, Solid Color, Presentation, or Photographic.
8
❖ CMYK Simulation Profile
Use this function to simulate the color tone of the printing ink.
In the [Feature Sets] list, select [Imaging], and then, in the [CMYK Simulation Pro-
file] list, select the printing ink standard.
You can select the printing ink standard from Off, US OffsetPrint, Euroscale,
or PaletteColor.
❖ Black Text Over Print
Use this function to specify whether or not to print black over other colors.
To enable black text over print, in the [Feature Sets] list, select [Imaging]. Then,
set [Black Over Print] to [On].
❖ Dithering
Use this function to specify the rendering mode.
In the [Feature Sets] list, select [Dithering], and then, in the [Dithering] list, select
the rendering mode.
You can select Automatic, Photographic, or Text.
❖ Color / Black and White
Use this function to specify whether the document is printed in color or black
and white.
In the [Feature Sets] list, select [Toner], and then, in the [Color/ Black and White]
list, select the toner color.
You can select Automatic, Color, or Black and White.
82
Page 91

Using PostScript 3
❖ Gray Reproduction
Use this function to select the black color mode for text and line art.
In the [Feature Sets] list, select [Toner], and then, in the [Gray Reproduction] list,
select the black color mode.
You can select Black by K or CMY+K.
❖ Toner Saving
Use this function to reduce the amount of toner used when printing.
To reduce toner consumption, in the [Feature Sets] list, select [Toner]. Then set
[Toner Saving] to [On].
❖ Print Blank Pages
Use this function to print blank pages.
To print blank pages, in the [Feature Sets] list, select [Toner]. Then set [Print
Blank Pages] to [On].
❖ Front Cover
Use this function to print a front cover.
In the [Feature Sets] list, select [Cover], and then, in the [Front Cover] list, select
the front cover setting.
You can select Off, Leave Blank, One Side, or Both Sides.
❖ Front Cover Input
Use this function to select the input tray for printing the front cover.
In the [Feature Sets] list, select [Cover], and then, in the [Front Cover Input] list,
select the input tray.
❖ Watermark Type
Use this function to select the watermark style.
In the [Feature Sets] list, select [Watermark Text], and then select the watermark
type in the list.
You can select Outlined, Solid, or Transparent Text.
❖ Watermark Text
Use this function to select the watermark text.
In the [Feature Sets] list, select [Watermark Text], and then select the watermark
text in the list.
You can select the following text:
•CONFIDENTIAL
•TOP SECRET
•COPY
•DRAFT
•FINAL
8
• FILE COPY
•PROOF
83
Page 92

Mac OS Configuration
❖ Watermark Font Size (Points)
Use this function to select the watermark font size.
In the [Feature Sets] list, select [Watermark Text], and then, select the watermark
font size in the list.
❖ Watermark Font Typeface
Use this function to select the watermark font typeface.
In the [Feature Sets] list, select [Watermark Text], and then, select the watermark
typeface.
❖ Watermark Font Shading
Use this function to select the watermark font shading.
In the [Feature Sets] list, select [Watermark Text], and then, select the watermark
font shading in the list.
❖ Watermark Position
Use this function to select the watermark position.
In the [Feature Sets] list, select [Watermark Location]. Then, in the [Watermark Po-
sition (Horizontal)] and [Watermark Position (Vertical)] lists, select the horizontal
and vertical positions, respectively.
8
❖ Watermark Angle
Use this function to select the watermark angle.
In the [Feature Sets] list, select [Watermark Location], and then , select the watermark angle in the list.
❖ Watermark
Use this function to select which page(s) to print the watermark on.
In the [Feature Sets] list, select [Watermark Location], and then, in the [Watermark]
list, select which page(s) you want to print the watermark on.
You can select Off, First Page Only, or All Pages.
84
Page 93

Using Smart Organizing Monitor
Using Smart Organizing Monitor
This section explains about using Smart Organizing Monitor under Mac OS X.
Using Smart Organizing Monitor, you can check the printer status and change
printer settings from your client computer.
The following operations are possible with Smart Organizing Monitor:
• Displaying printer status or settings
• Printing a list of printer configurations
• Making settings for paper loaded into each input tray
• Making input tray settings
• Changing factory-set default settings
• Making network protocol settings
• Making printer settings
• Displaying the printer status and supply information
• IPX Settings
• SMTP Settings
• SNMP Settings
• AppleTalk Settings
Installing Smart Organizing Monitor
Follow the procedure below to install Smart Organizing Monitor under Mac OS X.
A Insert the CD-ROM into the CD-ROM drive.
B Double-click the CD-ROM icon.
C Double-click the [Mac OS X] folder.
D Double-click the [Utility] folder.
E Double-click the package file icon.
F Follow the instructions on the screen.
8
85
Page 94

Mac OS Configuration
Displaying the Smart Organizing Monitor Dialog Box
To display the Smart Organizing Monitor dialog box, double-click [Smart Organizing Monitor] in the [Applications] folder.
Displaying the Printer Status
In the Smart Organizing Monitor dialog box, you can check the status of monitored printers. The printer status is displayed using graphics and comments.
Note
❒ If Smart Organizing Monitor is monitoring multiple printers, the [Printer Driver
Selection] dialog box appears. Select the printer driver used by the target
printer, and then click [OK]. To check the status of a network printer, click
[Search Network Printer].
Displaying the Printer Information
8
Smart Organizing Monitor features two tabs, [Status:] and [User Tools]. On these
tabs, you can view information about a monitored printer, such as its configuration details and current status.
Displaying the printer status
When you click the [Status:] tab, the printer name and tree appear. Click an item
in the tree to display information relating to it.
❖ Toner
Displays the remaining amount of each toner. The following are used to indicate the remaining amount: Level 1 to 5, “Almost Empty” and “Empty”.
A graphic also indicates each toner’s status.
❖ Input Tray
You can check the following information about the input trays.
•Input Tray
Displays the installed input trays.
• Status
Displays the input tray status using a graphic.
• Paper Size
Displays the size of the paper loaded into each input tray.
•Paper Type
Displays the type of the paper loaded into each input tray.
86
❖ Supplies
Displays the consumable names and status. The graphics also indicate the
consumables status.
Page 95

Using Smart Organizing Monitor
❖ System
Displays the system information about the printer, such as the model name,
system version, and memory size.
❖ Counter
Displays information about the counters.
❖ Network
Displays network details such as the printer's IP address and network-related
comments.
Reference
For details about what you can perform on each tab in the Smart Organizing
Monitor dialog box, see Smart Organizing Monitor Help.
Printing the printer configurations
On the [User Tools] tab, you can print lists of printer information.
Important
❒ You can print the configuration page only when the printer is not busy process-
ing jobs.
❒ To use this function, the printer must be monitored from Smart Organizing
Monitor via a supported printer driver.
In the [List/Test Print:] list, select the item you want to print. You can print the following:
❖ Configuration Page
The current configurations and general information of the printer are printed.
❖ Menu List
The machine's function menus are printed.
❖ Test Page
Test page can be printed when you want to confirm the printer status.
❖ PS Config./Font Page
The installed PS font list is printed.
Use the printed configuration page to check the information, such as general information and printer configuration.
The procedure for printing the configuration page is described as an example.
A On the [User Tools] tab, in the [List/Test Print:] list, select [Configuration Page].
B Click [Print].
8
The configuration page is printed.
87
Page 96

Mac OS Configuration
Printer Configuration
Clicking [Printer Configuration] on the [User Tools] tab enables you to change the
printer settings in the [Printer Configuration] dialog box.
You can use the [Printer Configuration] dialog box to change the settings of:
•printers,
•input trays,
• paper loaded in input trays,
• network protocols, and
• factory-set defaults.
Reference
For details about each item you can specify on the [Printer Configuration] dialog
box, see Smart Organizing Monitor Help.
About menu and mode
There are two modes you can use to access the [Printer Configuration] dialog box:
for administrator mode and general users mode.
Available tabs in the [Printer Configuration] dialog box differ depending on the
mode you are in.
8
❖ Administrator
In the [Access Code] dialog box, enter an access code.
All tabs in the [Printer Configuration] dialog box are available.
❖ General users
Only the [Paper Input] tab is available.
Changing the paper settings
On the [Paper Input] tab, you can change paper size and other paper settings.
Note
❒ The paper settings are not available for the bypass tray.
• Tray 1: Size
The following sizes are available:
A4 (210 x 297 mm), B5 JIS (182 x 257 mm), A5 (148 x 210 mm), B6 JIS (128 x 182
mm), A6 (105 x 148 mm), 8 1/2 x 14, 8 1/2 x 11, 5 1/2 x 8 1/2, 7 1/4 x 10 1/2,
8 x 13, 8 1/2 x 13, 8 1/4 x 13, 4 1/8 x 9 1/2, 3 7/8 x 7 1/2, C5 Env, C6 Env, DL
Env, 16K, Custom Paper Size, Any Size
88
Page 97

Using Smart Organizing Monitor
•Tray 1: Type
The following paper types are available:
Thin Paper, Plain Paper 1, Plain Paper 2, Recycled Paper, Color Paper, Letterhead, Preprinted Paper, Prepunched Paper, Labels, Bond Paper, Cardstock,
Thick Paper 1, Envelope, Any Type
• Custom Paper Size
You can make the custom paper size settings, when [Custom Paper Size] is selected.
•Unit:
Specify the unit of measurement in "mm" or "inch".
• Horizontal:
Specify the horizontal width between 90 and 216 mm.
•Vertical:
Specify the vertical length between 148 and 356 mm.
• Tray 2: Size
The following sizes are available:
A4 (210 x 297 mm), 8 1/2 x 11
•Tray 2: Type
The following paper types are available:
Thin Paper, Plain Paper 1, Plain Paper 2, Recycled Paper, Color Paper, Letterhead, Preprinted Paper, Prepunched Paper
Note
❒ Tray 2 is available only when the optional paper feed unit is attached to the
printer
Adjusting registration
On the [Maintenance] tab, you can adjust color registration and print starting positions.
Normally, you do not have to adjust registration. However, adjustment can be
useful in some cases, especially if you want to print in a specific position. Under
[Registration: Tray 2 Paper] and [Registration: Bypass Tray], you can adjust the print
image position printed on the sheet fed from each tray. To check the adjustment
result, use [Print Test Sheet].
Also, you can updated the firmware by clicking [Printer Firmware Update].
The latest version of the firmware can be downloaded form the supplier's website.
8
89
Page 98

Mac OS Configuration
Setting basic functions
On the [System] tab, you can set basic functions required to use the printer. The
printer can be used on factory-set defaults, but the configuration can be changed
depending on the condition of the user. The changed condition holds even if the
printer is turned off.
The access code can be changed on this tab.
Making network-related settings
On the [Network 1], [Network 2] and [Network 3] tabs, you can set configurations
about network connection and communication.
The following operations are possible on these tabs:
• Checking the device name, active protocol, and other printer information
• Making interface settings, including the timeout setting and protocol settings
• Checking or making TCP/IP settings
• Checking or making IPX and SMTP settings
• Checking or making SNMP and AppleTalk settings
8
Settings conditions for printing
On the [Printer:] tab, you can set conditions for printing.
In the [PCL] area, you can specify the conditions such as Orientation and font settings.
In the [PS] area, you can specify Resolution and Color Profile.
90
Page 99

9. Appendix
Software and Utilities Included on the CDROM
The following software and utility are included in the CD-ROMs that come with
this printer.
❖ Smart Organizing Monitor
Allows users and system administrators to check and configure the printer
from a client computer.
Viewing the contents of the CD-ROM
Follow the procedure below to view the contents of the CD-ROM.
A Insert the CD-ROM into the CD-ROM drive.
The installer starts.
B Click [Browse This CD-ROM].
Explorer starts and displays the contents of the CD-ROM.
Printer Drivers for this Printer
Printing requires installing a printer driver appropriate to your operating system.
The following driver is included on the CD-ROM provided with this printer.
❖ PCL 5c/ 6 printer driver
This printer driver allows the computer to communicate with the printer via
a printer language.
The following operating system is supported.
• Windows 2000/XP/Vista and Windows Server 2003/2003 R2
❖ PostScript 3 Printer Drivers and PPD files
PostScript 3 printer driver and the PPD files are included on the CD-ROM
provided with this printer. PostScript 3 printer driver allow the computer to
communicate with the printer using a printer language. PPD files allow the
printer driver to enable specific printer functions.
The following operating system is supported.
• Windows 2000/XP/Vista, Windows Server 2003/2003 R2, and Mac OS X
10.2.8 (or later)
Note
❒ The PostScript 3 printer driver and PPD files are included on the CD-ROM
labeled “Printer Drivers and Utilities”.
❖ PPD files
PPD files are included on the CD-ROM provided with this printer. PPD files
allow the printer driver to enable specific printer functions.
91
Page 100

Appendix
Smart Organizing Monitor
You can use Smart Organizing Monitor, to check and configure the printer from
a client computer.
❖ File path
UTILITY
❖ Available functions
Smart Organizing Monitor enables you to check the printer settings as well as
configuring them from your client computer.
Reference
For information about using Smart Organizing Monitor, see p.53 “Using
Smart Organizing Monitor”.
9
92
 Loading...