

Page 1
Operating Instructions
Troubleshooting
When the Machine Does Not Operate As Wanted
1
Troubleshooting When Using the Copy/Document Server Function
2
Troubleshooting When Using the Facsimile Function
3
Troubleshooting When Using the Printer Function
4
Troubleshooting When Using the Scanner Function
5
Clearing Misfeeds
6
Appendix
7
Read this manual carefully before you use this machine and keep it handy for future reference. For safe and correct use, be sure to read the Safety
Information in "Manuals and Safety Information for This Machine" before using the machine.
Page 2

Page 3

TABLE OF CONTENTS
Manuals for This Machine.................................................................................................................................4
Notice..................................................................................................................................................................7
Important.........................................................................................................................................................7
How to Read This Manual.................................................................................................................................8
Symbols...........................................................................................................................................................8
Machine Types...............................................................................................................................................8
Notes...............................................................................................................................................................9
Names of Major Items...................................................................................................................................9
List of Options.................................................................................................................................................9
Model-Specific Information.............................................................................................................................10
1. When the Machine Does Not Operate As Wanted
Indicators..........................................................................................................................................................11
Panel Tone........................................................................................................................................................12
Checking Machine Status and Settings..........................................................................................................13
When an Indicator to the Right of a Function Key Is Lit.................................................................................16
When You Have Problems Operating the Machine.....................................................................................18
Messages Displayed When Changing the On-screen Language...........................................................23
Adjusting the Image Density............................................................................................................................26
Adjusting Printing Position................................................................................................................................28
2. Troubleshooting When Using the Copy/Document Server Function
Messages Displayed When Using the Copy/Document Server Function..................................................31
When You Cannot Make Clear Copies.........................................................................................................34
When You Cannot Make Copies As Wanted...............................................................................................38
When Memory Is Full..................................................................................................................................45
3. Troubleshooting When Using the Facsimile Function
Adjusting the Volume.......................................................................................................................................47
Messages Displayed When Using the Facsimile Function............................................................................49
When You Cannot Send or Receive Fax Messages As Wanted.................................................................60
When Memory Is Full..................................................................................................................................66
If an Error Report Is Printed..............................................................................................................................67
Turning Off the Main Power / In the Event of Power Failure.......................................................................68
When an Error Occurs Using Internet Fax.....................................................................................................69
Error Mail Notification.................................................................................................................................69
1
Page 4

Error Report (E-mail)....................................................................................................................................69
Server-Generated Error E-mail...................................................................................................................69
4. Troubleshooting When Using the Printer Function
Messages Displayed When Installing the Printer Driver...............................................................................71
Windows XP Professional or Windows Server 2003/2003 R2.............................................................71
Windows XP Home Edition.........................................................................................................................72
Windows Vista.............................................................................................................................................72
Windows 7...................................................................................................................................................73
Windows Server 2008...............................................................................................................................74
Windows Server 2008 R2..........................................................................................................................75
If USB Connection Fails...................................................................................................................................76
Messages Displayed When Using the Printer Function.................................................................................77
Status Messages..........................................................................................................................................77
Messages Displayed on the Control Panel When Using the Printer Function.........................................78
Other Messages...........................................................................................................................................81
When You Cannot Print...................................................................................................................................91
When the Data In Indicator Does Not Light Up or Flash..........................................................................93
Other Printing Problems...................................................................................................................................96
5. Troubleshooting When Using the Scanner Function
Messages Displayed When Using the Scanner Function...........................................................................105
Messages Displayed on the Control Panel When Using the Scanner Function...................................105
Messages Displayed on the Client Computer.........................................................................................115
When You Cannot Send Scanned Files.......................................................................................................120
When Stored Files Cannot Be Accessed.................................................................................................120
When Stored Files Cannot Be Edited......................................................................................................120
When You Cannot Browse the Network to Send a Scan File...............................................................120
When the TWAIN Driver Cannot Be Started..........................................................................................121
When the Network Delivery Function Cannot Be Used.........................................................................121
When S/MIME Cannot Be Used............................................................................................................121
When You Cannot Send Scan Files Using WSD....................................................................................122
When Scanning Is Not Done As Expected..................................................................................................123
6. Clearing Misfeeds
Removing Jammed Paper..............................................................................................................................125
2
Page 5

Locating Jammed Paper............................................................................................................................125
When A1 is displayed..............................................................................................................................127
When A2 is displayed..............................................................................................................................128
When B is displayed.................................................................................................................................128
When C is displayed.................................................................................................................................131
When P is displayed..................................................................................................................................133
When R is displayed (Type 3 Only)........................................................................................................135
When Y1 - Y3 is displayed.......................................................................................................................136
When Z1 - Z2 is displayed......................................................................................................................137
Removing Jammed Staples...........................................................................................................................141
7. Appendix
Trademarks.....................................................................................................................................................143
INDEX...........................................................................................................................................................145
3
Page 6

Manuals for This Machine
Read this manual carefully before you use this machine.
Refer to the manuals that are relevant to what you want to do with the machine.
• Media differ according to manual.
• The printed and electronic versions of a manual have the same contents.
• Adobe® Acrobat® Reader®/Adobe Reader must be installed in order to view the manuals as PDF
files.
• A Web browser must be installed in order to view the html manuals.
Manuals and Safety Information for This Machine (mainly Europe and Asia)
Contains introductions of the manuals and information about safe usage of this machine.
Before using the machine, be sure to read the section of this manual entitled Safety Information to
avoid injury and prevent damage to the machine.
Manuals and Safety Information for This Machine (mainly North America)
Contains introductions of the manuals and information about safe usage of this machine.
Before using the machine, be sure to read the section of this manual entitled Safety Information to
avoid injury and prevent damage to the machine.
This manual is provided in English only.
Quick Installation Guide
Contains procedures for unpacking and installing the machine.
Initial Guide for Scanner and Fax
Explains how to set up the Scanner and Facsimile functions and use their basic features. Details
about these functions that are not included in this manual are provided in Scanner Reference,
Facsimile Reference, and Network and System Settings Reference.
About This Machine
This manual introduces the machine's various functions. It also explains preparation procedures for
using the machine, the control panel, how to install options, how to enter text, how to install the
CD-ROMs provided, and how to replace paper, print cartridge, staples, and other consumables.
Troubleshooting
Provides a guide for resolving common usage-related problems.
Copy and Document Server Reference
Explains Copier and Document Server functions and operations. Also refer to this manual for
explanations on how to place originals.
4
Page 7

Facsimile Reference
Explains Facsimile functions and operations.
Printer Reference
Explains Printer functions and operations.
Scanner Reference
Explains Scanner functions and operations.
Network and System Settings Reference
Explains how to connect the machine to a network and how to configure and operate the machine
in a network environment. It also explains how to change System Settings and how to register
information in the Address Book.
Security Reference
This manual is for administrators of the machine. It explains security functions that you can use to
prevent unauthorized use of the machine, data tampering, or information leakage. For enhanced
security, we recommend that you first make the following settings:
• Install the Device Certificate.
• Enable SSL (Secure Sockets Layer) Encryption.
• Change the user name and password of the administrator using Web Image Monitor.
For details, see “Setting up the Machine”, Security Reference.
Be sure to read this manual when setting the enhanced security functions, or user and administrator
authentication.
VM Card Extended Feature Settings Device Reference
Explains how to set up the extended features settings with the machine.
VM Card Extended Feature Settings Web Reference
Explains how to set up the extended features settings using Web Image Monitor.
UNIX Supplement
Explains how to set up and use a network printer using UNIX.
To obtain the “UNIX Supplement”, visit our Web site or consult an authorized dealer.
This manual includes explanations of functions and settings that might not be available on this
machine.
This manual is provided in English only.
Other manuals
• Quick Reference Copy Guide
• Quick Reference Printer Guide
• Quick Reference Fax Guide
• Quick Reference Scanner Guide
5
Page 8

• App2Me Start Guide
• The following software products are referred to using general names:
Product name General name
DeskTopBinder Lite and DeskTopBinder Professional *
1
DeskTopBinder
SmartDeviceMonitor for Client 2 SmartDeviceMonitor for Client
Optional
*1
6
Page 9

Notice
Important
In no event will the company be liable for direct, indirect, special, incidental, or consequential damages
as a result of handling or operating the machine.
For good copy quality, the manufacturer recommends that you use genuine toner from the manufacturer.
The manufacturer shall not be responsible for any damage or expense that might result from the use of
parts other than genuine parts from the manufacturer with your office products.
7
Page 10
How to Read This Manual
Symbols
This manual uses the following symbols:
Indicates points to pay attention to when using the machine, and explanations of likely causes of paper
misfeeds, damage to originals, or loss of data. Be sure to read these explanations.
Indicates supplementary explanations of the machine's functions, and instructions on resolving user
errors.
This symbol is located at the end of sections. It indicates where you can find further relevant information.
[ ]
Indicates the names of keys on the machine's display or control panels.
(mainly Europe and Asia)
(mainly North America)
Differences in the functions of Region A and Region B models are indicated by two symbols. Read the
information indicated by the symbol that corresponds to the region of the model you are using. For
details about which symbol corresponds to the model you are using, see “Model-Specific Information”.
Machine Types
This machine comes in three models with different copy and print speeds, and different units installed.
Machine type
Type 1 45 sheets/minute (A4 )
47 sheets/minute (81/2 × 11 )
Type 2 50 sheets/minute (A4 )
52 sheets/minute (81/2 × 11 )
Type 3 50 sheets/minute (A4 )
52 sheets/minute (81/2 × 11 )
8
Copy/print speed Finisher Internal tray 2
Cannot be installed Cannot be installed
Cannot be installed Standard
Standard Cannot be installed
Page 11

Notes
Contents of this manual are subject to change without prior notice.
Some illustrations in this manual might be slightly different from the machine.
Certain options might not be available in some countries. For details, please contact your local dealer.
Depending on which country you are in, certain units may be optional. For details, please contact your
local dealer.
Names of Major Items
Major items of this machine are referred to as follows in this manual:
• Auto Document Feeder ADF
List of Options
This section provides a list of options for this machine, and how they are referred to as in this manual.
Option list Referred to as
IEEE 802.11a/g Interface Unit Type J
IEEE 802.11g Interface Unit Type K
IEEE 802.11a/g Interface Unit Type J
Wireless LAN board
9
Page 12
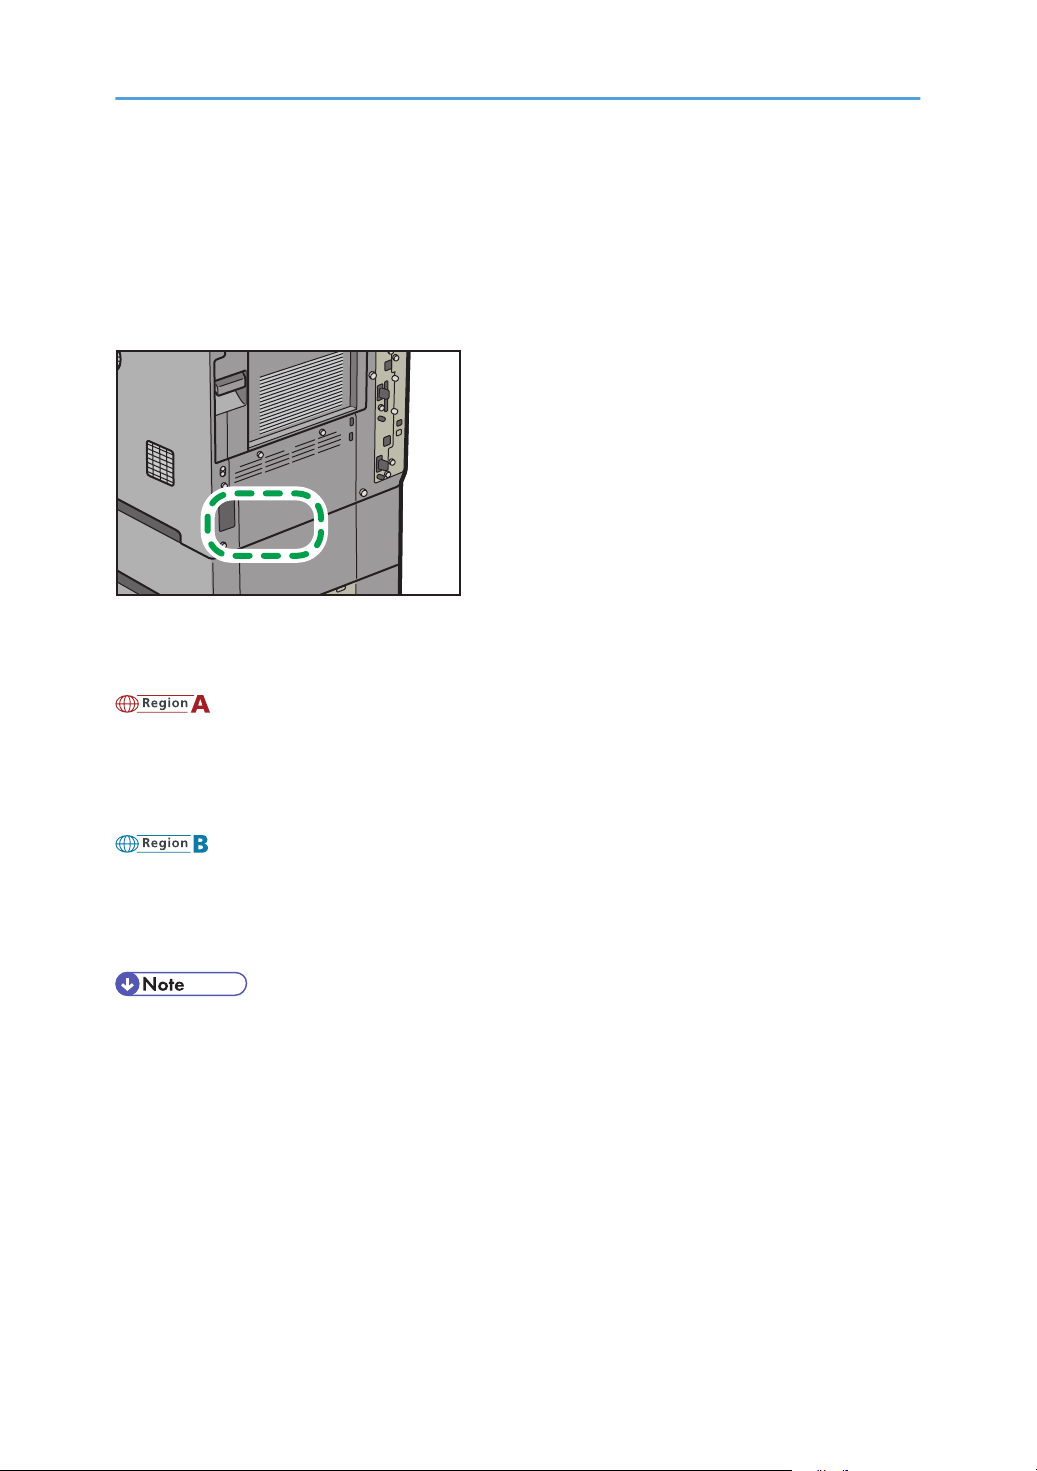
Model-Specific Information
CFE052
This section explains how you can identify the region your machine belongs to.
There is a label on the rear of the machine, located in the position shown below. The label contains
details that identify the region your machine belongs to. Read the label.
The following information is region-specific. Read the information under the symbol that corresponds to
the region of your machine.
(mainly Europe and Asia)
If the label contains the following, your machine is a region A model:
• CODE XXXX -67, -69
• 220-240V
(mainly North America)
If the label contains the following, your machine is a region B model:
• CODE XXXX -57
• 120-127V
• Dimensions in this manual are given in two units of measure: metric and inch. If your machine is a
Region A model, refer to the metric units. If your machine is a Region B model, refer to the inch
units.
10
Page 13
1. When the Machine Does Not
1
Operate As Wanted
This chapter describes basic troubleshooting procedures that are applicable to all functions of this
machine.
Indicators
This section describes the indicators displayed when the machine requires the user to remove misfed
paper, to add paper, or to perform other procedures.
Indicator Status
: Paper Misfeed indicator Appears when a paper misfeed occurs.
See p.125 "Removing Jammed Paper".
: Original Misfeed indicator Appears when an original misfeed occurs.
See p.125 "Removing Jammed Paper".
: Load Paper indicator Appears when paper runs out.
See "Loading Paper", About This Machine.
: Replace Print Cartridge indicator Appears when the print cartridge needs to be replaced
soon.
Follow the on-screen instructions.
See "Handling the Print Cartridge", About This Machine.
: Add Staple indicator Appears when staples run out.
See "Adding Staples", About This Machine.
: Service Call indicator Appears when the machine is malfunctioning or requires
maintenance.
: Open Cover indicator Appears when one or more covers of the machine are
open.
11
Page 14
1. When the Machine Does Not Operate As Wanted
1
Panel Tone
The following table describes the meaning of the various beep patterns that the machine produces to
alert users about left originals and other machine conditions.
Beep pattern Meaning Causes
Single short beep Panel/screen input
accepted.
Short, then long beep Panel/screen input rejected. An invalid key was pressed on the
Single long beep Job completed successfully. A Copier/Document Server Features
Two long beeps Machine has warmed up. After cooling or being switched on, the
Five long beeps Soft alert The initial screen returns when the
Five long beeps repeated
four times.
Five short beeps repeated
five times.
Soft alert An original has been left on the
Strong alert The machine requires user attention
A control panel or screen key was
pressed.
control panel or screen, or the entered
password was incorrect.
job has finished.
machine has fully warmed up and is
ready for use.
machine goes into energy saving mode
and when simplified display is
canceled.
exposure glass or paper is empty.
because paper has jammed, the toner
needs replenishing, or other problems
have occurred.
• Users cannot mute the machine's beep alerts. When the machine beeps to alert users of a paper
jam or toner request, if the machine's covers are opened and closed repeatedly within a short
space of time, the beep alert might continue, even after normal status has resumed.
• You can select to enable or disable beep alerts. For details about Panel Key Sound, see "General
Features", Network and System Settings Reference.
12
Page 15

Checking Machine Status and Settings
1
Checking Machine Status and Settings
You can check the machine's system status.
Maintenance Info
You can check the following items under [Maintenance Info]:
• [Remaining Print Cart.]
Displays the amount of remaining toner.
• [No Staples]
Displays whether there are staples remaining or not.
• [Paper Tray]
Displays the paper type and size loaded into the paper tray.
• [Output Tray Full]
Displays whether the output tray is overloaded.
• [Original Misfeed]
Displays the state of and solutions for original misfeeds.
• [Paper Misfeed]
Displays the state of and solutions for paper misfeeds.
• [Cover Open]
Indicates whether one or more covers of the machine are open.
Data Storage
You can check the following items under [Data Storage]:
• [HDD Remaining Memory]
Displays the amount of available hard disk memory.
• [HDD File(s)]
Displays the total number of jobs stored on the hard disk.
• [Print Job(s)]
Displays the number of jobs for "Hold Print Job(s):", "Stored Print Job(s):", "Locked Print
Job(s):", and "Sample Print Job(s):".
• [Fax TX / RX File(s)]
Displays the number of "Transmission Standby File(s):", "Memory Lock File(s):", "RX Print
Standby File(s):", and other files stored on the hard disk.
• [Memory Erase Status]
Displays the state of the memory data.
13
Page 16

1. When the Machine Does Not Operate As Wanted
1
Machine Address Info
You can check the following items under [Machine Address Info]:
• [Fax No.]
Displays the machine's fax number.
• [H.323 Own Fax No.]
Displays the machine's alias telephone number.
• [SIP User Name]
Displays the machine's SIP user name.
• [Fax E-mail Account]
Displays the machine's fax e-mail account.
• [Machine IPv4 Address]
Displays the machine's IPv4 address.
• [Machine IPv6 Address]
Displays the machine's IPv6 address.
Enquiry
You can check the following items under [Enquiry]:
• [Machine Repairs]
Displays the machine number and contact number which are required for service.
• [Sales Representative]
Displays the sales representative's telephone number.
• [Supply Order]
Displays the contact number for placing supply orders.
• [Supply Details]
Displays the name of toner, staples, etc., used on the machine.
1. On the control panel, press [System Status].
14
Page 17

2. Press each tab, and then check the contents.
1
3. After checking the information, press [Exit].
Checking Machine Status and Settings
The previous screen returns.
• [No Staples], [Output Tray Full], [Original Misfeed], [Paper Misfeed], and [Cover Open] appear
on the [Maintenance Info] tab only when these errors occur.
• Depending on the security settings, the [Machine Address Info] tab might not be displayed.
• The contact numbers appear in [Machine Repairs], [Sales Representative], and [Supply Order] on
the [Enquiry] tab only when your sales or service representative enters them.
• [Supply Details] appears on the [Enquiry] tab only when your sales or service representative enters
them.
• For details about how to locate and remove misfeeds, see "Removing Jammed Paper".
• p.125 "Removing Jammed Paper"
15
Page 18

CCT002
1. When the Machine Does Not Operate As Wanted
1
When an Indicator to the Right of a Function Key Is Lit
When an indicator to the right of a function key lights up, press the corresponding function key. Then,
follow the instructions displayed on the control panel.
If an error occurs in the function you are using, check the message that appears on the control panel,
and see "Messages Displayed" for the relevant function.
The following table explains problems that cause the indicator to light.
Problem
Documents and reports do
not print out.
Documents and reports do
not print out.
An error has occurred. The function whose indicator
The paper output tray is full. Remove the prints from the tray.
There is no paper left. Load paper. See "Loading Paper",
is lit is defective.
Causes Solutions
About This Machine.
Check the displayed message, and
then take an appropriate action. See
"Messages Displayed" of each
chapter.
You can use other functions normally.
16
Page 19

When an Indicator to the Right of a Function Key Is Lit
1
Problem Causes Solutions
The machine is unable to
connect to the network.
• p.31 "Messages Displayed When Using the Copy/Document Server Function"
A network error has
occurred.
• Check the displayed message,
and then take an appropriate
action. See "Messages
Displayed" of each chapter.
• Check that the machine is
correctly connected to the
network, and that the machine is
correctly set. For details about
how to connect the network, see
"Interface Settings", Network and
System Settings Reference.
• Contact the network
administrator.
• If the indicator is still lit even after
trying to solve the problem as
described here, contact your
service representative.
• p.49 "Messages Displayed When Using the Facsimile Function"
• p.71 "Messages Displayed When Installing the Printer Driver"
• p.77 "Messages Displayed When Using the Printer Function"
• p.105 "Messages Displayed When Using the Scanner Function"
17
Page 20
1. When the Machine Does Not Operate As Wanted
1
When You Have Problems Operating the Machine
This section describes common problems and messages. If other messages appear, follow the
instructions displayed.
• When disconnecting the power cord from the wall outlet, always pull the plug, not the cord.
Pulling the cord can damage the power cord. Use of damaged power cords could result in fire
or electric shock.
Problem Causes Solutions
Although the copier screen
appears when the machine
is turned on using the main
power switch, it cannot be
switched to another screen
by pressing the [Facsimile],
[Printer], or [Scanner] key.
The machine has just been
turned on and the User Tools
screen is displayed, but the
User Tools menu has items
missing.
The operation switch
indicator continues blinking
and does not turn off when
pressed.
Functions other than the
copier function are not yet
ready.
Functions other than the
copier function are not yet
ready. Time required varies
by function. Functions
appear in the User Tools
menu when they become
ready for use.
This occurs in the following
cases:
• The ADF is open.
• The machine is
communicating with
external equipment.
Wait a little longer.
Wait a little longer.
• Lower the ADF.
• Check if the machine is
communicating with external
equipment.
• Wait a little longer.
18
• The hard disk is active.
Strange noise is heard. The supplies or options are
not properly installed.
The display is off. The machine is in Energy
Saver mode.
Confirm that the supplies or options are
properly installed.
Press the [Energy Saver] key to cancel
Energy Saver mode.
Page 21

When You Have Problems Operating the Machine
1
Problem Causes Solutions
The display is off. The operation switch is
turned off.
Nothing happens when the
operation switch is turned
on.
"Please wait." appears. This message appears when
"Please wait." appears. This message appears when
"Please wait." appears. This message appears when
The main power switch is
turned off.
you turn on the operation
switch.
the machine is warming up.
you change the print
cartridge.
Turn on the operation switch.
Check the cable is securely plugged
into the power outlet and the machine.
Turn on the main power switch.
Wait for a while. If the machine does
not get ready in two minutes, contact
your service representative.
• Wait for a while. If the machine
does not get ready in two
minutes, contact your service
representative.
• Wait until the message
disappears. Do not turn off the
main power switch while the
message is showing.
Wait for a while. If the message does
not disappear in 30 seconds, contact
your service representative.
"Toner has been depleted."
appears, even though there
is toner remaining.
"Memory is full. Do you
want to store scanned file?"
appears.
The user code entry screen is
displayed.
The machine is failing to
detect the amount of toner
remaining correctly. The
environment in which the
printer is used can affect the
accuracy of toner detection.
The scanned originals
exceed the number of
sheets/pages that can be
stored on the hard disk.
Users are restricted by User
Code Authentication.
If there is toner remaining, remove and
then reinsert the print cartridge. The
machine will automatically attempt to
reload the toner and printing will be
possible if there is enough toner
remaining.
• Press [Yes] to store pages that
have been scanned. Delete
unnecessary files by pressing
[Delete File].
• Press [No] if you are not storing
pages that have been scanned.
Delete unnecessary files by
pressing [Delete File].
Enter the user code (up to eight digits),
and then press [OK].
19
Page 22
CFF041
1. When the Machine Does Not Operate As Wanted
1
Problem Causes Solutions
The Authentication screen
appears.
"Authentication has failed."
appears.
"Authentication has failed."
appears.
"You do not have the
privileges to use this
function." continues to be
displayed even though you
have entered a valid user
name.
An error message remains,
even if misfed paper is
removed.
Basic Authentication,
Windows Authentication,
LDAP Authentication or
Integration Server
Authentication is set.
The entered login user name
or login password is not
correct.
The machine cannot perform
authentication.
The logged in user name
does not have permission for
the selected function.
• When a misfeed
message appears, it
remains until you open
and close the cover as
required.
Enter your login user name and user
password. See "When the
Authentication Screen is Displayed",
About This Machine.
Ask the user administrator for the
correct login user name and login
password.
Contact your administrator.
Contact your administrator about the
permission for the required function.
Remove misfed paper, and then open
and close the cover. See p.125
"Removing Jammed Paper".
20
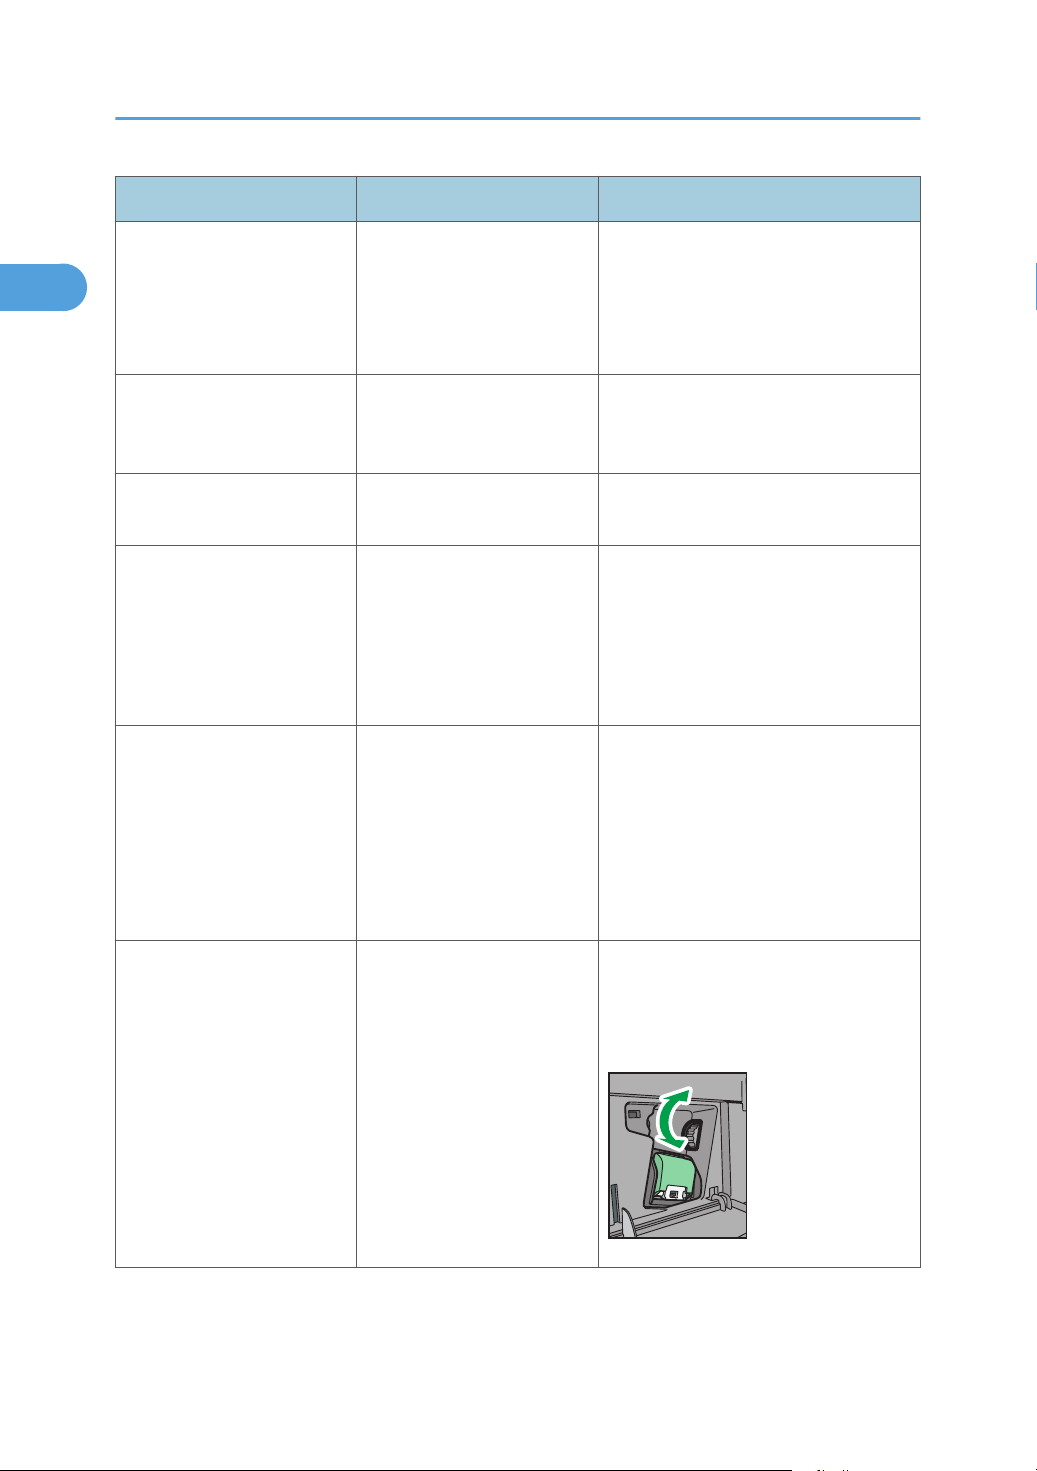
An error message remains,
even if misfed paper is
removed.
• Paper is still jammed in
the tray.
Misfed paper in the finisher
has not been removed.
Open the front cover of the finisher,
turn the knob clockwise or
counterclockwise, and then remove the
misfed paper (type 3 only).
Page 23

When You Have Problems Operating the Machine
1
Problem Causes Solutions
Original images are printed
on the reverse side of the
paper.
Misfeeds occur frequently. The tray's side or end fences
Misfeeds occur frequently. Paper of undetectable size
Misfeeds occur frequently. There is a foreign object on
You may have loaded the
paper incorrectly.
may not be set properly.
has been loaded.
the finisher tray.
Load paper correctly. Load paper into
the paper tray with the print side down.
Load paper into the bypass tray with
the print side up.
• Remove misfed paper. See p.
125 "Removing Jammed Paper".
• Check that the side or end fences
are set properly. See "Changing
the Paper Size", About This
Machine.
• Remove misfed paper. See p.
125 "Removing Jammed Paper".
• If you load a paper size that is not
selected automatically, you need
to specify the paper size with the
control panel. See "Changing to a
Size That Is Not Automatically
Detected", About This Machine.
• Remove misfed paper. See p.
125 "Removing Jammed Paper".
Misfeeds occur frequently. The friction pad, paper feed
roller, or registration roller
may be dirty.
Cannot print in duplex
mode.
"Apply Duplex" is set to [No]
for "Paper Type".
• Do not place anything on the
finisher tray. It may cause a paper
jam.
Clean the pertinent section as
necessary. See "Cleaning the Friction
Pad and Paper Feed Roller" and
"Cleaning the Registration Roller",
About This Machine.
Under "Paper Type" in [Tray Paper
Settings], set "Apply Duplex" to [Yes].
For details, see "Tray Paper Settings",
Network and System Settings
Reference.
21
Page 24

1. When the Machine Does Not Operate As Wanted
1
Problem Causes Solutions
Cannot print in duplex
mode.
"Following output tray is full.
Remove paper." appears.
"Turn main Power Switch off"
appears.
"Shutting down... Please
wait. Main power will be
turned off automatically."
appears.
You have selected a paper
type that cannot be used for
duplex print.
The output tray is full. Remove paper from the output tray to
The machine does not shut
down normally when the
main power switch is turned
off, and then immediately
turned on.
The shut down procedure
has begun because the main
power switch was turned off
while the machine was in
standby mode or performing
an operation.
In [Tray Paper Settings], select a paper
type that can be used for duplex print.
For details about the paper types that
can be used, see "Specifications for the
Main Unit", About This Machine.
resume printing. If paper is destined for
the finisher shift tray, to prevent paper
from falling off the tray press the
[Clear/Stop] key to suspend printing,
and then remove the paper. Press
[Continue] on the display panel to
resume printing.
Turn off the machine. Wait for three
seconds or more after shutting it down,
and then turn it on again.
Follow the message that appears and
wait until the machine has shut down.
Do not turn on the main power switch
while this message is displayed. If the
main power switch has been turned on,
follow the message that appears. For
details about turning the main power
switch on and off, see "Turning On/Off
the Power", About This Machine.
22
Two minutes elapses after
you turn off the main power
switch, but the machine does
not power off.
An error has occurred when
the Address Book is
changed from the display
panel or Web Image
Monitor.
The machine cannot
complete the shutdown
procedure.
The Address Book cannot be
changed while deleting the
multiple stored documents.
Repeat the shutdown procedure, and
then force power off by disconnecting
the machine's power cord from the
wall outlet.
Wait a while, and then retry the
operation.
Page 25
When You Have Problems Operating the Machine
1
Problem Causes Solutions
Cannot use Web Image
Monitor to print documents
stored in Document Server.
• If you cannot make copies as you want because of paper type, paper size, or paper capacity
problems, use the recommended paper. See "Recommended Paper Sizes and Types", About This
Machine.
• Using curled paper often causes misfeeds, soiled paper edges, or slipped positions while
performing staple or stack printing. When using curled paper, take the stiffness out of the paper
with your hands to straighten out the curl, or load the paper up side down. Also, lay paper on a flat
surface to prevent paper from curling, and do not lean it against the wall.
• p.125 "Removing Jammed Paper"
When print volume limits are
specified, users cannot print
beyond their print volume
limit. Print jobs selected by
users who have reached
their print volume limits will
be canceled.
• For details about specifying print
volume limits, contact your
administrator.
• To view the status of a print job,
see [Print Job History]. In Web
Image Monitor, [Print Job History]
is under [Document Server] in
[Job].
Messages Displayed When Changing the On-screen Language
This section describes possible solutions for the messages that appear on the control panel when
changing the on-screen language.
• Before turning the main power switch off, see "Turning On/Off the Power", About This Machine.
Message
"Reboot after card insert
E01"
"Download Error E02"
"Power off on"
"Download Error E03"
"Power off on"
Turn off the main power switch, and then back on again. If the error
occurs again, contact your sales or service representative.
Turn off the main power switch, and then back on again. If the error
occurs again, contact your sales or service representative.
Turn off the main power switch, and then back on again. If the error
occurs again, contact your sales or service representative.
Solutions
23
Page 26

1. When the Machine Does Not Operate As Wanted
1
Message Solutions
"Download Error E04"
"Power off on"
"Download Error E05"
"Power off on"
"Download Error E06"
"Power off on"
"Download Error"
"Power off on E10"
"Download Error"
"Power off on E11"
"Download Error"
"Power off on E12"
"Download Error"
"Power off on E13"
"Download Error"
"Power off on E14"
Turn off the main power switch, and then back on again. If the error
occurs again, contact your sales or service representative.
Turn off the main power switch, and then back on again. If the error
occurs again, contact your sales or service representative.
Contact your sales or service representative.
Contact your sales or service representative.
Turn off the main power switch, and then back on again. If the error
occurs again, contact your sales or service representative.
Contact your sales or service representative.
Contact your sales or service representative.
Turn off the main power switch, and then back on again. If the error
occurs again, contact your sales or service representative.
24
"Download Error"
"Power off on E15"
"Download Error E19"
"Power off on"
"Download Error E20"
"Power off on"
"Download Error E21"
"Power off on"
"Download Error E22" Turn off the main power switch, and then back on again. If the error
"Download Error E24"
"Power Off On"
Turn off the main power switch, and then back on again. If the error
occurs again, contact your sales or service representative.
Turn off the main power switch, and then back on again. If the error
occurs again, contact your sales or service representative.
Turn off the main power switch, and then back on again. If the error
occurs again, contact your sales or service representative.
Turn off the main power switch, and then back on again. If the error
occurs again, contact your sales or service representative.
occurs again, contact your sales or service representative.
Turn off the main power switch, and then back on again. If the error
occurs again, contact your sales or service representative.
Page 27

When You Have Problems Operating the Machine
1
Message Solutions
"Reboot After Card Insert
E32"
"No Valid Data E33" The data in the SD card may be invalid. Contact your sales or service
"No Valid Data E34" The data in the SD card may be invalid. Contact your sales or service
"No Valid Data E35" The data in the SD card may be invalid. Contact your sales or service
"No Valid Version E38" The data in the SD card may be invalid. Contact your sales or service
"Download Error E42" Turn off the main power switch, and then back on again. If the error
"Download Error E49"
"Power Off On"
"No Valid Data E50" The data in the SD card may be invalid. Contact your sales or service
Turn off the main power switch, and then back on again. If the error
occurs again, contact your sales or service representative.
representative.
representative.
representative.
representative.
occurs again, contact your sales or service representative.
Firmware update is prohibited. Contact your administrator.
representative.
25
Page 28

CCS003
1. When the Machine Does Not Operate As Wanted
1
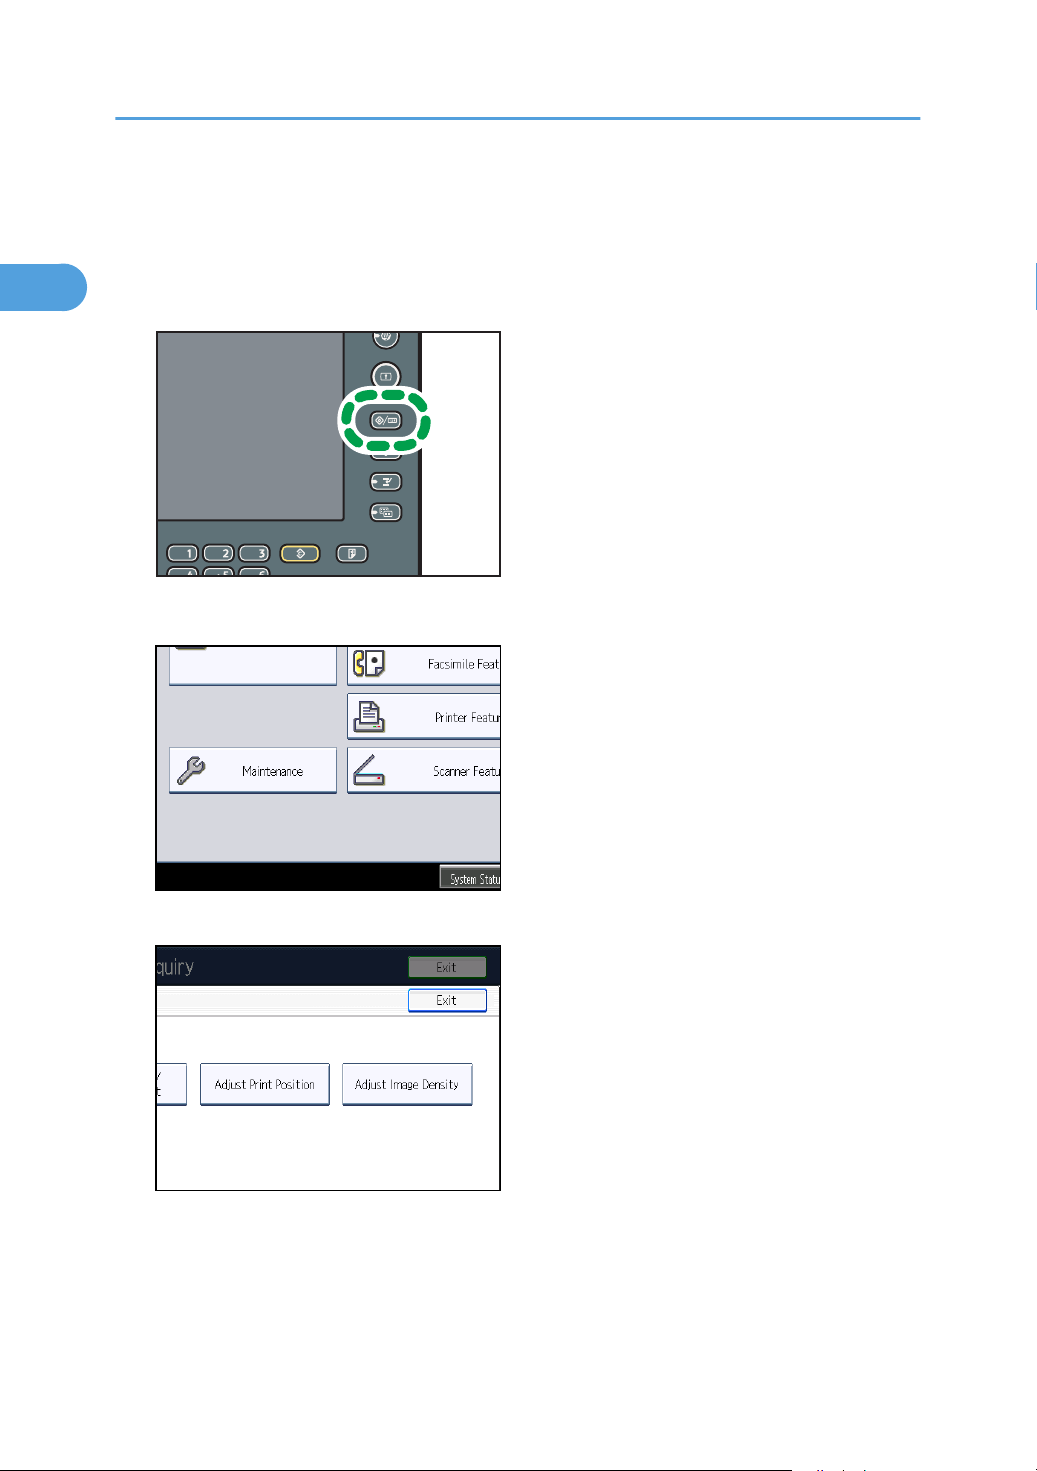
Adjusting the Image Density
• Maximized settings may produce smudged printouts.
1. Press the [User Tools/Counter] key.
Press [Maintenance].
2.
3. Press [Adjust Image Density].
26
Page 29

Adjusting the Image Density
1
4. Adjust the image density by pressing [Lighter] or [Darker].
You can specify the image density in the range from -3 to +3.
Increasing the value makes the printouts darker and decreasing the value makes the printouts
lighter.
5. Press [OK].
6. Press [Exit] twice.
27
Page 30
CCS003
1. When the Machine Does Not Operate As Wanted
1
Adjusting Printing Position
You can adjust the printing position for trays 2-4.
1. Press the [User Tools/Counter] key.
2. Press [Maintenance].
3. Press [Adjust Print Position].
28
Page 31

4. Press [Print Test Sheet].
1
5. Press [Start Printing].
Adjusting Printing Position
6. Confirm the position of the image on the test sheet, and then adjust the registration value.
Use this sheet to confirm the current print position.
29
Page 32

1. When the Machine Does Not Operate As Wanted
1
7. Select the tray you want to adjust.
8. Press [ ] or [ ] to specify the vertical position.
You can specify the printing position between -5.0 mm to 5.0 mm in increments of 0.1 mm.
9. Press [ ] or [ ] to specify the horizontal position.
10. Press [OK].
11. Print the test sheet to confirm the adjustment result.
12. Press [Exit] three times.
30
Page 33

2. Troubleshooting When Using the
2
Copy/Document Server Function
This chapter describes likely causes of and possible solutions for Copier and Document Server function
problems.
Messages Displayed When Using the Copy/ Document Server Function
This section describes the machine's main messages. If other messages appear, follow their instructions.
• If you cannot make copies as you want because of the paper type, paper size or paper capacity
problems, use recommended paper. See "Recommended Paper Sizes and Types", About This
Machine.
• For messages that are not listed here, see "When You Have Problems Operating the Machine".
Message
"Authentication has failed." The entered login user name
or login password is not
correct.
"Authentication has failed." The machine cannot perform
authentication.
"Cannot staple paper of this
size."
"Check paper size." An irregular paper size is
"Duplex is not available with
this paper size."
"Exceeded max. number of
pages per file. Do you want
to store the scanned pages
as 1 file?"
The Staple function cannot
be used with paper size
selected.
set.
A paper size not available in
Duplex mode has been
selected.
The number of scanned
pages exceeds the capacity
per file of the Document
Server.
Causes Solutions
Contact the user administrator.
Contact your administrator.
Select a proper paper size. See
"Finisher (Type 3 Only)", About This
Machine.
If you press the [Start] key, the copy
will start using the selected paper.
Select a proper paper size. See
"Specifications for the Main Unit",
About This Machine.
Press [Store File] to store scanned
pages as a file. Scanned data is stored
as a file in the Document Server. If you
do not want to store scanned pages,
press [No]. Scanned data is deleted.
31
Page 34

2. Troubleshooting When Using the Copy/Document Server Function
2
Message Causes Solutions
"Exceeded the maximum
number of sheets that can be
used. Copying will be
stopped."
"File being stored exceeded
max. number of pages per
file. Copying will be
stopped."
"Magazine or Booklet mode
is not available due to mixed
image mode."
"Maximum number of sets is
n."
(A figure is placed at n.)
The number of pages the
user is permitted to copy has
been exceeded.
The scanned originals have
too many pages to store as
one document.
You selected the
"Magazine" or "Booklet"
function for originals
scanned using different
functions, such as copy and
printer.
The number of copies
exceeds the maximum copy
quantity.
Contact your administrator.
Press [Exit], and then store again with
an appropriate number of pages.
Make sure originals for the
"Magazine" or "Booklet" function are
scanned using the same function.
You can change the maximum copy
quantity from [Max. Copy Quantity] in
[General Features] under [Copier /
Document Server Features]. For details
about Max. Copy Quantity, see
"General Features", Copy and
Document Server Reference.
32
"Original is being scanned
by another function. Switch
to the following function,
then press the Stop key to
cancel scanning or press the
Start key to continue."
"Please wait." The destination list is being
A function of the machine
other than the Copier
function is being used such
as the Document Server
function.
updated from the network
using Web Image Monitor.
Cancel the job in progress. For
example, press [Exit], and then press
the [Document Server] key. Next, press
the [Clear/Stop] key. When the
message "The Clear / Stop key was
pressed. Are you sure you want to stop
scanning?" appears, press [Stop].
Wait until the message disappears. Do
not switch off the power while this
message is displayed. Depending on
the number of destinations to be
updated, there may be some delay
before you can resume operation.
Operations are not possible while this
message is displayed.
Page 35

Messages Displayed When Using the Copy/Document Server Function
2
Message Causes Solutions
"Stapling capacity
exceeded."
"The selected file(s)
contained file(s) without
access privileges. Only
file(s) with access privileges
will be deleted."
"You do not have the
privileges to use this
function."
• p.18 "When You Have Problems Operating the Machine"
The number of sheets per set
is over the staple capacity.
You have tried to delete files
without the authority to do
so.
The logged in user name
does not have permission for
the selected function.
Check the stapler capacity. See
"Finisher (Type 3 Only)", About This
Machine.
Files can be deleted by the person who
created the file. To delete a file which
you are not authorized to delete,
contact the person who created the
file.
Contact your administrator about
permission for the required function.
33
Page 36

2. Troubleshooting When Using the Copy/Document Server Function
2
When You Cannot Make Clear Copies
This section describes likely causes of and possible solutions for unclear copies.
Problem Causes Solutions
Copies appear dirty. Image density is too high. Adjust the image density settings. See
"Adjusting Copy Image Density", Copy
and Document Server Reference.
Copies appear dirty. Auto Image Density is not
selected.
Images are smudged. Smudging can occur if a
printed side rubs against
things such as the corner of
the machine.
The reverse side of an
original image is copied.
The reverse side of an
original image is copied.
The reverse side of an
original image is copied.
A shadow appears on
copies if you use pasted
originals.
Image density is too high. Adjust the image density settings. See
Auto Image Density is not
selected.
The original is thin. On the control panel, select [Auto
Image density is too high. • Adjust the image density settings.
On the control panel, select [Auto
Density].
When removing copies from the output
tray, do so carefully to avoid scuffing
the printed side. If you are making
many copies, remove them in small
batches.
"Adjusting Copy Image Density", Copy
and Document Server Reference.
On the control panel, select [Auto
Density].
Density], or adjust the image density
settings.
See "Adjusting Copy Image Density",
Copy and Document Server Reference.
See "Adjusting Copy Image
Density", Copy and Document
Server Reference.
34
The same copy area is dirty
whenever making copies.
The exposure glass,
scanning glass, or ADF is
dirty.
• Change the orientation of the
original.
• Put mending tape on the pasted
part.
Clean them. See "Cleaning the
Machine", About This Machine.
Page 37

When You Cannot Make Clear Copies
2
Problem Causes Solutions
The same copy area is dirty
whenever making copies.
Copies are too light. Image density is too light. Adjust the image density settings. See
Copies are too light. A light copy may result when
• The original that has
already been printed is
scanned.
• Original Type is set to
[Text / Photo], and an
original with text and
photographs that can
hardly be distinguished
from each other is
loaded.
you use damp or rough
grain paper.
On the control panel, press
[Generation Copy], and then begin
copying.
"Adjusting Copy Image Density", Copy
and Document Server Reference.
• Use recommended paper. For
details about recommended
paper, see "Recommended Paper
Sizes and Types", About This
Machine.
• Use paper that has been stored in
the recommended temperature
and humidity conditions. For
details about the proper way to
store paper, see "Paper Storage",
About This Machine.
Parts of images are not
copied.
Parts of images are not
copied.
Parts of images are not
copied.
The original is not set
correctly.
The correct paper size is not
selected.
Even if you place originals
on the exposure glass, or
ADF correctly, margin of a
few millimeters on all four
sides of the original might
not be copied.
Set originals correctly. See "Placing
Originals", Copy and Document
Server Reference.
Select the proper paper size.
Use "Create Margin" function to
reduce the image of its original size.
For details about missing image area,
see "Create Margin", Copy and
Document Server Reference.
35
Page 38

2. Troubleshooting When Using the Copy/Document Server Function
2
Problem Causes Solutions
Images appear only
partially.
Black lines appear. The exposure glass,
White lines appear. The exposure glass,
Copies are blank. The original is not set
A moire pattern is produced
on copies.
The paper is damp. Use paper that has been stored in the
scanning glass, or ADF is
dirty.
scanning glass, or ADF is
dirty.
correctly.
The original has a dot
pattern image or many lines.
recommended temperature and
humidity conditions. For details about
the proper way to store it, see "Paper
Storage", About This Machine.
Clean them. See "Cleaning the
Machine", About This Machine.
Clean them. See "Cleaning the
Machine", About This Machine.
When using the exposure glass, face
the originals down. When using the
ADF, face them up.
Place the original on the exposure
glass at a slight angle.
36
Black spots appear on the
copy of a photographic
print.
White stripes appear on the
OHP.
Because of high humidity,
the photographic print has
stuck to the exposure glass.
Fragments of paper are
stuck to the OHP.
Place the print on the exposure glass in
either of the following ways:
• Place an OHP transparency on
the exposure glass, and then
place the print on the OHP
transparency.
• Place the print on the exposure
glass, and then place two or three
sheets of white paper on it. Leave
the ADF open when copying.
Use a dry cloth to wipe any paper
fragments off the back of the OHP.
Page 39

When You Cannot Make Clear Copies
2
Problem Causes Solutions
The image on the back side
of duplex copies has mottled
blank patches or is
smudged.
Missing patches and
smudges are caused by
moisture leaking from the
paper.
• Do not install the machine in
areas that are susceptible to low
temperatures.
• Use paper that has been stored
where temperature and humidity
conditions meet the limitations we
recommend. For details about the
paper storage conditions we
recommend, see "Paper Storage",
About This Machine.
37
Page 40

2. Troubleshooting When Using the Copy/Document Server Function
2
When You Cannot Make Copies As Wanted
This section describes likely causes of and possible solutions for unsatisfactory copy results.
Basic
Problem Causes Solutions
Misfeeds occur frequently. The number of sheets loaded
exceeds the capacity of the
machine.
Misfeeds occur frequently. The paper tray's side fences
are set too tightly.
Misfeeds occur frequently. The paper is damp. Use paper that has been stored in the
Misfeeds occur frequently. The paper is too thick or too
thin.
Fan the sheets thoroughly before
loading them.
• When loading paper into the
paper tray, load paper only as
high as the upper limit markings
on the side fences of the paper.
• When loading paper on the
bypass tray, load only as much
paper as can be held between
the guides on the bypass tray.
Push the side fences lightly, and then
reset it.
recommended temperature and
humidity conditions. See "Paper
Storage", About This Machine.
Use recommended paper. See
"Recommended Paper Sizes and
Types", About This Machine.
38
Misfeeds occur frequently. The copy paper is wrinkled
or has been folded/
creased.
• Use recommended paper. For
details about recommended
paper, see "Recommended Paper
Sizes and Types", About This
Machine.
• Use paper that has been stored in
the recommended temperature
and humidity conditions. For
details about the proper way to
store paper, see "Paper Storage",
About This Machine.
Page 41

When You Cannot Make Copies As Wanted
2
Problem Causes Solutions
Misfeeds occur frequently. Printed paper is being used. Do not load sheets that have already
been copied or printed onto by
another machine.
Misfeeds occur frequently. Sheets are sticking together. Fan the sheets thoroughly before
loading them. Alternatively, feed the
sheets into the machine one at a time.
Misfeeds occur frequently. The friction pad, paper feed
roller, or registration roller
may be dirty.
Copy paper becomes
creased.
Copy paper becomes
creased.
Copies are not stapled. There are jammed staples in
Copies are not stapled. Copy paper is curled. Turn the copy paper over in the tray.
Copies are stapled as
separate batches.
The paper is damp. Use paper that has been stored in the
The paper is too thin. Use recommended paper. See
the stapler.
The number of copies is too
great for the stapler to staple
as a single batch.
Clean the pertinent section as
necessary. See "Cleaning the Friction
Pad and Paper Feed Roller" and
"Cleaning the Registration Roller",
About This Machine.
recommended temperature and
humidity conditions. See "Paper
Storage", About This Machine.
"Recommended Paper Sizes and
Types", About This Machine.
Remove jammed staples. See p.141
"Removing Jammed Staples".
Check the stapler capacity. See
"Finisher (Type 3 Only)", About This
Machine.
Staples are wrongly
positioned.
Paper does not output
during printing with stapling.
Originals are not set
correctly.
When you stop printing
while using the staple
function, paper not stapled
during printing may be left in
the staple unit.
Check the correct position to place the
originals. For details about how to
place the originals with stapling, see
"Staple (Type 3 Only)", Copy and
Document Server Reference.
Press the [Clear Modes] key, and then
cancel copy settings, including
stapling.
39
Page 42

2. Troubleshooting When Using the Copy/Document Server Function
2
Problem Causes Solutions
You cannot combine several
functions.
When sorting, the pages are
divided into two blocks.
The copy is grayed out or a
text pattern appears in the
background of the copy.
Images are skewed. The side fences in the paper
Images are skewed. The paper is feeding in at a
Selected functions cannot be
used together.
The memory became full in
the middle of sorting and the
pages were delivered in two
blocks.
You have copied a copyguarded document
protected from unauthorized
copying.
feed tray are not set
properly.
slant.
Check the combination of functions,
and then make the settings again. See
"Function Compatibility", Copy and
Document Server Reference.
In [Copier / Document Server
Features], under [Input / Output], set
[Memory Full Auto Scan Restart] to
[Off].
Check the document. For details about
how to prevent unauthorized copying
of the document, see "Preventing an
Unauthorized Copy", About This
Machine.
Make sure the side fences are set
properly. For details about how to set
the side fences, see "Changing the
Paper Size", About This Machine.
Load the paper correctly. See "Loading
Paper", About This Machine.
40
Edges of sheets are creased. The paper is damp. Use paper that has been stored in the
recommended temperature and
humidity conditions. See "Paper
Storage", About This Machine.
Edges of sheets are creased. You are using non-
recommended paper.
Sheets are feeding in
together, resulting in jams.
"Add Staples" message
appears and the Staple
function cannot be used.
Sheets are sticking together. Fan the pages to loosen the paper
The staple cartridge is not set
properly.
Use recommended paper. See
"Recommended Paper Sizes and
Types", About This Machine.
before loading it. Alternatively, feed
the paper one sheet at a time.
Make sure the staple cartridge is set
properly. See "Adding Staples", About
This Machine.
Page 43

Edit
2
When You Cannot Make Copies As Wanted
Problem Causes Solutions
In "Erase Border", "Erase
Centre", or "Erase Centre /
Border" mode, parts of the
original image are not
copied.
In "Erase Border", "Erase
Centre", or "Erase Centre /
Border" mode, parts of the
original image are not
copied.
In "Margin Adjustment"
mode, parts of the original
image are not copied.
In "Image Repeat" mode, the
original image is not copied
repeatedly.
You have entered a wide
erased margin.
Originals are not scanned
correctly.
• You set a wide erased
margin.
• There is a lack of
margin space on the
opposite side of the
binding position.
You selected copy paper the
same size as the originals, or
you did not select the proper
reproduction ratio.
Make the margin width narrower. You
can adjust it between 2 99 mm (0.1
3.9 inches).
Place the originals correctly.
Set a narrower margin with User Tools.
You can set the width between 0 30
mm (0 1.2 inches).
Select copy paper larger than the
originals or select the proper
reproduction ratio.
Stamp
Problem Causes Solutions
The stamp position is wrong. The paper orientation is
wrong.
The stamp is not printed on
the back side of sheets when
duplex copying.
The back side stamp position
is incorrect for the paper
size.
Check the paper orientation and stamp
position.
Reset the back side stamp position. For
details about Duplex Back Page
Stamping Position, see "Copier and
Document Server Features", Copy and
Document Server Reference.
41
Page 44

2. Troubleshooting When Using the Copy/Document Server Function
2
Combine
Problem Causes Solutions
Copies made with the
"Booklet" or "Magazine"
function cannot be folded
into a book correctly.
When using "Combine",
parts of the image are not
copied.
Copies are not in correct
order.
You have selected a setting
("Open to Left" or "Open to
Right") that does not match
the orientation of originals.
You specified a
reproduction ratio that does
not match the sizes of the
originals and copy paper.
You placed the originals in
the incorrect order.
In [Copier / Document Server
Features], under [Edit], set
[Orientation: Booklet, Magazine]
properly.
When you specify a reproduction ratio
using Manual Paper Select mode,
make sure the ratio matches the
originals and the copy paper. Select
the correct reproduction ratio before
using Combine mode. See "One-Sided
Combine", "Two-Sided Combine", or
"Auto Reduce / Enlarge", Copy and
Document Server Reference.
When inserting a stack of originals into
the ADF, the last page should be on
the bottom.
If you place an original on the
exposure glass, start with the first page
to be copied.
42
Duplex
Problem Causes Solutions
Cannot print in duplex
mode.
Cannot print in duplex
mode.
You have loaded thin paper
lighter than 60 g/m2 (16 lb.
Bond), or thick paper
heavier than 163 g/m2 (90
lb. Index).
"Apply Duplex" is set to [No]
for "Paper Type".
Change the paper.
In [Tray Paper Settings], under "Paper
Type", set "Apply Duplex" to [Yes]. For
details, see "Tray Paper Settings",
Network and System Settings
Reference.
Page 45

When You Cannot Make Copies As Wanted
2
Problem Causes Solutions
Cannot print in duplex
mode.
Copies are not in correct
order.
When using "Duplex", copy
is made top to bottom even
though [Top to Top] is
selected.
Document Server
Problem Causes Solutions
Cannot access file. The file is password
You have selected a paper
type that cannot be used for
duplex copying.
You placed the originals in
the incorrect order.
You placed the originals in
the wrong orientation.
protected.
In [Tray Paper Settings], select a paper
type that can be used for duplex print.
For details about the paper types that
can be used, see "Specifications for the
Main Unit", About This Machine.
When inserting a stack of originals into
the ADF, the last page should be on
the bottom.
If you place an original on the
exposure glass, start with the first page
to be copied.
Place the original in the correct
orientation. See "Duplex Copying",
Copy and Document Server Reference.
Contact your administrator.
To delete the files stored in the
Document Server, select [Delete All
Files in Document Server] under
[Administrator Tools] in [System
Settings]. As this will permanently
delete every single file, make sure the
Document Server does not contain any
files you want to keep. For details
about Delete All Files in Document
Server, see "Administrator Tools",
Network and System Settings
Reference.
43
Page 46

2. Troubleshooting When Using the Copy/Document Server Function
2
Problem Causes Solutions
You cannot find out what is
stored in a file.
Memory frequently becomes
full.
You may not be able to
ascertain the contents of a
file simply from the file
name.
The Document Server
memory is full.
You can switch the Select File screen
between [List] and [Thumbnails]
display to check the contents of the file.
Check information other than the file
name.
• List display
The file name, date of storage,
and user name are shown.
• Thumbnails display
An image of the stored file
appears.
You can enlarge the image by pressing
[Preview]. See "Checking the Details of
a Stored Document", Copy and
Document Server Reference.
Delete unnecessary files. On the file
selection display, select unnecessary
files, and then press [Delete File]. If this
does not increase available memory,
do the following.
44
"Cannot display preview of
this page." appears, and
you cannot check the
thumbnail image.
The image data may have
been corrupted.
• Switch to the scanner screen, and
then delete unnecessary files
stored under the scanner function.
• Switch to the printer screen, and
then delete unnecessary files
stored under Sample Print, Locked
Print, Hold Print, or Stored Print.
Press [Exit] to display the preview
screen without a thumbnail.
If the selected document contains
several pages, press [Switch] on the
"Display Page" area to change the
page, and then a preview of the next
page will appear.
Page 47

When You Cannot Make Copies As Wanted
2
When Memory Is Full
This section describes likely causes of and possible solutions for problems related to full memory.
Message Causes Solutions
"Memory is full. nn originals
have been scanned. Press
[Print] to copy scanned
originals. Do not remove
remaining originals."
"n" in the message
represents a changeable
number.
"Press [Continue] to scan
and copy remaining
originals."
• If you set [Memory Full Auto Scan Restart] in [Input / Output] of User Tools to [On], even if the
memory becomes full, the memory overflow message will not be displayed. The machine will make
copies of the scanned originals first, and then automatically proceed to scan and to copy the
remaining originals. In this case, the resulting sorted pages will not be sequential. For details about
Memory Full Auto Scan Restart, see "Input / Output ", Copy and Document Server Reference.
The scanned originals
exceed the number of pages
that can be stored in
memory.
The machine checked if the
remaining originals should
be copied, after the scanned
originals were printed.
Press [Print] to copy scanned originals
and cancel the scanning data. Press
[Stop] to cancel the scanning data and
not copy.
Remove all copies, and then press
[Continue] to continue copying. Press
[Stop] to stop copying.
45
Page 48

2. Troubleshooting When Using the Copy/Document Server Function
2
46
Page 49

3. Troubleshooting When Using the
CCS003
3
Facsimile Function
This chapter describes likely causes of and possible solutions for facsimile function problems.
Adjusting the Volume
This section describes how to adjust the volume.
You can change the volume of the following sounds that the machine makes.
On Hook Mode
Heard when [On Hook] is pressed.
At Transmission
Heard when "Immediate Transmission" is performed.
At Reception
Heard when the machine receives a document.
At Dialing
Heard after pressing the [Start] key, until the line connects to the destination.
At Printing
Heard when a received document is printed.
1. Press the [User Tools/Counter] key.
2. Press [Facsimile Features].
3. Check that [General Settings] screen appears.
47
Page 50

3. Troubleshooting When Using the Facsimile Function
3
4. Press [Adjust Sound Volume].
5. Press [Lower] or [Louder] to adjust the volume, and then press [OK].
You can hear the actual volume by pressing [Check].
If you press [Cancel], the volume setting is canceled. The screen returns to that of step 4.
You can set the volume level to between 0 and 7.
6. Press the [User Tools/Counter] key.
The standby screen appears.
• You can adjust the On Hook volume when you press [On Hook]. See "On Hook Dial", Facsimile
Reference.
48
Page 51

Messages Displayed When Using the Facsimile Function
3
Messages Displayed When Using the Facsimile
Function
This section describes the machine's main messages. If other messages appear, follow their instructions.
Message Causes Solutions
"Authentication has failed." The entered login user name
or login password is not
correct.
"Authentication has failed." The machine cannot perform
authentication.
"Cannot find the specified
path. Please check the
settings."
"Check whether there are
any network problems."
[13-10]
"Check whether there are
any network problems."
[13-11]
The name of the computer or
folder entered as the
destination is wrong.
The alias telephone number
you entered is already
registered on the gatekeeper
by another device.
Cannot access gatekeeper. • In [Facsimile Features], under
Contact the user administrator.
Contact your administrator.
Check whether the computer name and
the folder name for the destination are
correct.
• In [Facsimile Features], under
[Initial Settings], select [H.323
Settings], and then check that the
alias telephone number is
correctly programmed. You can
also use the Web Image Monitor
for confirmation. See Web Image
Monitor Help.
• Contact the network
administrator.
[Initial Settings], select [H.323
Settings], and then check that
Gatekeeper Address is correctly
programmed. You can also use
the Web Image Monitor for
confirmation. See Web Image
Monitor Help.
• Contact the network
administrator.
49
Page 52

3. Troubleshooting When Using the Facsimile Function
3
Message Causes Solutions
"Check whether there are
any network problems."
[13-17]
"Check whether there are
any network problems."
[13-18]
Registering of user name is
rejected by SIP server.
Cannot access SIP server. • In [Facsimile Features], under
• In [Facsimile Features], under
[Initial Settings], select [SIP
Settings], and then check that "SIP
Server IP Address" and "SIP User
Name" are correctly
programmed. You can also use
the Web Image Monitor for
confirmation. See Web Image
Monitor Help.
• Contact the network
administrator.
[Initial Settings], select [SIP
Settings], and then check that "SIP
Server IP Address" is correctly
programmed. You can also use
the Web Image Monitor for
confirmation. See Web Image
Monitor Help.
• Contact the network
administrator.
50
"Check whether there are
any network problems."
[13-24]
The password registered for
the SIP server is not the same
as the password registered
for this machine.
Contact your administrator.
Page 53

Messages Displayed When Using the Facsimile Function
3
Message Causes Solutions
"Check whether there are
any network problems."
[13-25]
"Check whether there are
any network problems."
[13-26]
In [Effective Protocol], the IP
address is not enabled, or an
incorrect IP address has been
registered.
The "Effective Protocol" and
"SIP Server IP Address"
settings are different, or an
incorrect IP address has been
registered.
• In [System Settings], under
[Interface Settings], select
[Effective Protocol], and then
check that "IPv4" is programmed
to "Active". You can also use the
Web Image Monitor for
confirmation. See Web Image
Monitor Help.
• In [System Settings], under
[Interface Settings], select
[Machine IPv4 Address], and
then check that the IP address is
correctly programmed. You can
also use the Web Image Monitor
for confirmation. See Web Image
Monitor Help.
• Contact your administrator.
• In [System Settings], under
[Interface Settings], check that the
IP address is correctly
programmed. You can also use
the Web Image Monitor for
confirmation. See Web Image
Monitor Help.
• Contact your administrator.
51
Page 54

3. Troubleshooting When Using the Facsimile Function
3
Message Causes Solutions
"Check whether there are
any network problems."
[14-01]
The DNS server, SMTP
server, or folder specified for
transfer to was not found, or
the destination for Internet
Fax around (not through) the
SMTP server could not be
found.
• In [System Settings], under
[Interface Settings], check that the
DNS server is correctly
programmed. You can also use
the Web Image Monitor for
confirmation. See Web Image
Monitor Help.
• In [System Settings], under [File
Transfer], select [SMTP Server],
and then check that "Server
Name" or "Port No." is correctly
programmed. You can also use
the Web Image Monitor for
confirmation. See Web Image
Monitor Help.
• Check that the folder for transfer is
correctly specified.
• Check that the computer in which
the folder for transfer is specified
is correctly operated.
• Check that the LAN cable is
correctly connected to the
machine.
• Contact the network administrator
of the destinations.
• Contact the network
administrator.
52
Page 55

Messages Displayed When Using the Facsimile Function
3
Message Causes Solutions
"Check whether there are
any network problems."
[14-09]
E-mail transmission was
refused by SMTP
authentication, POP before
SMTP authentication, or login
authentication of the
computer in which the folder
for transfer is specified.
• In [System Settings], under [File
Transfer], select [SMTP
Authentication], [POP before
SMTP], or [Fax E-mail Account],
and then check that "User Name"
and "Password" are correctly
programmed. You can also use
the Web Image Monitor for
confirmation. See Web Image
Monitor Help.
• Check that the user ID and
password for the computer in
which the folder for forwarding is
specified are correctly
programmed.
• Check that the folder for
forwarding is correctly specified.
• Check that the computer in which
the folder for forwarding is
specified is correctly operated.
• Contact the network
administrator.
"Check whether there are
any network problems."
[14-33]
Neither the machine's nor the
administrator's e-mail
address is registered.
• In [System Settings], under [File
Transfer], select [Fax E-mail
Account], and then check that "Email Address" is correctly
programmed. You can also use
the Web Image Monitor for
confirmation. See Web Image
Monitor Help.
• Contact the network
administrator.
53
Page 56

3. Troubleshooting When Using the Facsimile Function
3
Message Causes Solutions
"Check whether there are
any network problems."
[15-01]
"Check whether there are
any network problems."
[15-02]
No POP3/IMAP4 server
address is programmed.
Cannot log in to the POP3/
IMAP4 server.
• In [System Settings], under [File
Transfer], select [POP3 / IMAP4
Settings], and then check that
"Server Name" is correctly
programmed. You can also use
the Web Image Monitor for
confirmation. See Web Image
Monitor Help.
• Contact the network
administrator.
• In [System Settings], under [File
Transfer], select [Fax E-mail
Account], and then check that
"User Name" and "Password" are
correctly programmed. You can
also use the Web Image Monitor
for confirmation. See Web Image
Monitor Help.
• Contact the network
administrator.
54
"Check whether there are
any network problems."
[15-03]
No machine e-mail address
is programmed.
• In [System Settings], under [File
Transfer], check that the machine
e-mail address is correctly
programmed. You can also use
the Web Image Monitor for
confirmation. See Web Image
Monitor Help.
• Contact the network
administrator.
Page 57

Messages Displayed When Using the Facsimile Function
3
Message Causes Solutions
"Check whether there are
any network problems."
[15-11]
Cannot find the DNS server
or POP3/IMAP4 server.
• In [System Settings], under
[Interface Settings], check that the
IP address of the DNS Server is
correctly programmed. You can
also use the Web Image Monitor
for confirmation. See Web Image
Monitor Help.
• In [System Settings], under [File
Transfer], select [POP3 / IMAP4
Settings], and then check that
"Server Name" is correctly
programmed. You can also use
the Web Image Monitor for
confirmation. See Web Image
Monitor Help.
• In [System Settings], under [File
Transfer], select [E-mail
Communication Port], and then
check that the port number of the
POP3/IMAP4 server is correctly
programmed. You can also use
the Web Image Monitor for
confirmation. See Web Image
Monitor Help.
• Check that the LAN cable is
correctly connected to the
machine.
• In [System Settings], under [File
Transfer], select [Reception
Protocol], and then check that the
reception protocol is correctly
programmed. You can also use
the Web Image Monitor. See
Web Image Monitor Help.
• Contact the network
administrator.
55
Page 58

3. Troubleshooting When Using the Facsimile Function
3
Message Causes Solutions
"Check whether there are
any network problems."
[15-12]
"Connection with LDAP
server has failed. Check the
server status."
Cannot log in to the POP3/
IMAP4 server.
A network error has occurred
and connection has failed.
• In [System Settings], under [File
Transfer], select [Fax E-mail
Account], and then check that
"User Name" and "Password" are
correctly programmed. You can
also use the Web Image Monitor
for confirmation. See Web Image
Monitor Help.
• In [System Settings], under [File
Transfer], check that the user
name and password for POP
before SMTP authentication are
correctly programmed. You can
also use the Web Image Monitor
for confirmation. See Web Image
Monitor Help.
• Contact the network
administrator.
• Try the operation once more. If
the message is still shown, the
network may be crowded.
56
"Error occurred, and
transmission was
cancelled."
"Exceeded max. No. of
display search results.
Max.: n"
(A figure is placed at n.)
• Original jammed during
Immediate Transmission.
• A problem occurred in
the machine, or noise
occurred on the
telephone line.
The number of search results
has exceeded the maximum
number of items that can be
displayed.
• In [System Settings], under
[Administrator Tools], check the
settings of LDAP server. For
details, see "Programming the
LDAP server", Network and
System Settings Reference.
Press [Exit], and then send the
documents again.
Search again after changing the
search conditions.
Page 59

Messages Displayed When Using the Facsimile Function
3
Message Causes Solutions
"Exceeded time limit for
LDAP server search. Check
the server status."
"Functional problem
occurred. Stopped
processing."
"Functional problems with
facsimile. Data will be
initialized."
A network error has occurred
and connection has failed.
The main power switch was
turned off while the machine
was receiving a document by
Internet Fax.
There is a problem with the
fax.
• Try the operation once more. If
the message is still shown, the
network may be crowded.
• In [System Settings], under
[Administrator Tools], check the
settings of LDAP server. For
details, see "Programming the
LDAP server", Network and
System Settings Reference.
Even if you turn the main power switch
back on immediately, depending on
the mail server, the machine might not
be able to resume reception of the
Internet Fax if the timeout period has
not expired. Wait until the mail server's
timeout period has expired, and then
resume reception of the Internet Fax.
For details, contact your network
administrator.
Record the code number shown on the
screen, and then contact your service
representative. Other functions can be
used.
"LDAP server authentication
has failed. Check the
settings."
"Original is being scanned
by another function. Switch
to the following function,
then press the Stop key to
cancel scanning or press
the Start key to continue."
"Put original back, check it
and press the Start key."
A network error has occurred
and connection has failed.
A function of the machine
other than the Facsimile
function is being used such as
the Document Server
function.
Original jammed during
Memory Transmission.
Make settings correctly for the user
name and the password for LDAP
server authentication.
Before sending a file by fax, cancel the
job in progress. For example, press
[Exit], and then press the [Document
Server] key. Next, press the [Clear/
Stop] key. When the message "The
Clear / Stop key was pressed. Are you
sure you want to stop scanning?"
appears, press [Stop].
Press [Exit], and then send the
documents again.
57
Page 60

3. Troubleshooting When Using the Facsimile Function
3
Message Causes Solutions
"Remove the paper from
Internal Tray 1."
"Some invalid destination(s)
contained. Do you want to
select only valid
destination(s)?"
"Some page(s) are near
blank."
"The selected file(s)
contained file(s) without
access privileges. Only
file(s) with access privileges
will be deleted."
Internal Tray 1 is full. Remove the paper. If the other tray is
also full, the tray name shown on the
screen changes. Remove paper from
the tray indicated on the display.
The specified group contains
fax destinations, e-mail
destinations, and/or folder
destinations, either of which
are incompatible with the
specified transmission
method.
The first page of the
document is almost blank.
You tried to delete a
document for which you do
not have permission to
delete.
In the message that appears at each
transmission, press [Select].
The original's blank side might have
been scanned. Be sure to place your
originals correctly. For details, see
"Detecting Blank Sheet", Facsimile
Reference.
Only the administrator can delete this
document. Contact your administrator
if you want to delete a document for
which you do not have permission to
delete.
58
"Updating the destination
list... Please wait. Specified
destination(s) or sender's
name has been cleared."
"You do not have the
privileges to use this
function."
• If "Check whether there are any network problems." appears, the machine is not correctly
connected to the network or the settings of the machine are not correct. If you do not need to
connect to a network, you can specify the setting so this message is not displayed, and then the
The destination list is being
updated from the network
using Web Image Monitor.
The logged in user name
does not have permission for
the selected function.
Wait until the message disappears. Do
not switch off the power while this
message is displayed. Depending on
the number of destinations to be
updated, there may be some delay
before you can resume operation.
Operation is not possible while this
message is displayed.
Contact your administrator about the
permission for the required function.
Page 61

Messages Displayed When Using the Facsimile Function
3
[Facsimile] key no longer lights. For details about how to do this, see "Parameter Settings",
Facsimile Reference. If you reconnect the machine to the network, be sure to set "Display" by
configuring the appropriate User Parameter.
• If the paper tray runs out of paper, "There is no paper. Load paper." appears on the screen, asking
you to add paper. If there is paper left in the other trays, you can receive documents as usual, even
if the message appears on the screen. You can turn this function on or off with "Parameter Settings".
For details about how to do this, see "Parameter Settings", Facsimile Reference.
59
Page 62

3. Troubleshooting When Using the Facsimile Function
3
When You Cannot Send or Receive Fax Messages As Wanted
This section describes likely causes of and possible solutions for transmission and reception-related
problems.
Transmission/Reception
Problem Causes Solutions
Both transmission and
reception are impossible.
Transmission
Problem Causes Solutions
Document appears blank at
the other end.
Printed or sent images are
spotty.
Reception is possible, but
transmission is impossible.
The modular cord may be
disconnected.
The original was placed
upside down.
The exposure glass,
scanning glass, or ADF is
dirty.
There are regions and
telephone exchanges where
a dial tone can not be
detected.
Make sure the modular cord is
correctly connected. See "Connecting
the Machine to a Telephone Line and
Telephone", Network and System
Settings Reference.
When the original is placed directly on
the exposure glass, the side to be
scanned must face down. When the
original is inserted into the ADF, the
side to be scanned must face up.
Clean them. See "Cleaning the
Machine", About This Machine. Make
sure ink or correction fluid is dry before
placing originals.
Turn the dial tone detection off in User
Parameters. For details about how to
do this, see "Parameter Settings",
Facsimile Reference.
60
Transmission failed due to
"maximum e-mail size" error.
If the e-mail size specified
on the machine is too large,
the Internet Fax document
cannot be sent.
In [Facsimile Features], under [Send
Settings], set [Max. E-mail Size] to
[Off], or set the maximum e-mail size to
a larger value. Then, resend the
document.
Page 63

When You Cannot Send or Receive Fax Messages As Wanted
3
Problem Causes Solutions
LAN-Fax Driver does not
work.
LAN-Fax Driver does not
work.
Although a group
specification was set for the
following, reception was not
possible.
Receiving Station of Transfer
Box, Forwarding,
Forwarding of Special
Sender, Reception Report email, E-mail TX Results,
routing e-mail received via
SMTP.
Reception
The entered login user
name, login password, or
driver encryption key is
incorrect.
A high security level is set by
the extended security
function.
The number of specified
destinations exceeds the
maximum number that can
be specified as a group.
Check your login user name, login
password, or driver encryption key,
and then enter them correctly. Contact
your administrator.
Contact your administrator.
A maximum of 500 parties can be
specified for a group. Check if there
are more than the specified numbers
registered in the Address Book. If a
group was registered in another group
or specified as Receiving Stations 1 to
5 for the Transfer Box, transmission is
canceled but an error message does
not appear.
Problem Causes Solutions
The machine failed to print
received fax documents.
The machine failed to print
received fax documents.
The machine failed to print
received fax documents.
If this happened when the
Receiving File indicator was
lit, low paper or low toner
may have caused printing to
stop.
In [Facsimile Features],
under [Reception Settings],
[Store] has been selected for
[Reception File Setting].
The paper has run out. Load paper into the tray. See
• Load paper into the tray.
• Add toner.
For details about Substitute Reception,
see "Substitute Reception", Facsimile
Reference.
Print the fax documents using a Web
browser or the Print Stored RX File
function. See "Printing Received and
Stored Documents" and "Viewing,
Printing, and Deleting Received Fax
Documents Using Web Image
Monitor", Facsimile Reference.
"Changing the Paper Size", About This
Machine.
61
Page 64

3. Troubleshooting When Using the Facsimile Function
3
Problem Causes Solutions
While pressing [Manual Email RX], "Cannot receive Emails currently." appears
and e-mail cannot be
received.
Printing
Problem Causes Solutions
Print is slanted. The paper is fed at a slant. Load the paper correctly. See "Loading
Misfeeds occur frequently. The number of feeding into
Misfeeds occur frequently. The paper tray's side fences
The machine is receiving an
on-demand e-mail message
(e-mail inquiry from the
administrator).
the paper tray exceeds the
capacity of the machine.
are set too tightly.
After the e-mail is received, press
[Manual E-mail RX], and then try
again.
Paper", About This Machine.
• When loading paper into the
paper tray, load paper only as
high as the upper limit markings
on the side fences of the paper.
• When loading paper on the
bypass tray, load only as much
paper as can be held between
the guides on the bypass tray.
Push the side fences lightly, and then
reset it.
62
Misfeeds occur frequently. The paper is damp. • Use recommended paper. For
details about recommended
paper, see "Recommended Paper
Sizes and Types", About This
Machine.
• Use paper that has been stored in
the recommended temperature
and humidity conditions. For
details about the proper way to
store paper, see "Paper Storage",
About This Machine.
Misfeeds occur frequently. The paper is too thick or too
thin.
Use recommended paper. See
"Recommended Paper Sizes and
Types", About This Machine.
Page 65

When You Cannot Send or Receive Fax Messages As Wanted
3
Problem Causes Solutions
Misfeeds occur frequently. The paper is wrinkled or has
been folded/creased.
Misfeeds occur frequently. Printed paper is being used. Do not load sheets that have already
Misfeeds occur frequently. Sheets are sticking together. Fan the sheets thoroughly before
Misfeeds occur frequently. The friction pad, paper feed
roller, or registration roller
may be dirty.
Use recommended paper only and be
sure its storage environment meets the
recommended temperature and
humidity conditions. For details about
recommended paper and the proper
way to store it, see "Recommended
Paper Sizes and Types" and "Paper
Storage", About This Machine.
been copied or printed onto by
another machine.
loading them. Alternatively, feed the
sheets into the machine one at a time.
Clean the pertinent section as
necessary. See "Cleaning the Friction
Pad and Paper Feed Roller" and
"Cleaning the Registration Roller",
About This Machine.
Sheets are feeding in
together, resulting in jams.
Copy paper becomes
creased.
Copy paper becomes
creased.
Copy paper becomes
creased.
The pages are sticking
together.
Printed paper is being used. Do not load sheets that have already
The paper is damp. Use paper that has been stored in the
The paper is too thin. Use recommended paper. See
Fan the sheets thoroughly before
loading them. Alternatively, feed the
sheets into the machine one at a time.
been copied or printed onto by
another machine.
recommended temperature and
humidity conditions. See "Paper
Storage", About This Machine.
"Recommended Paper Sizes and
Types", About This Machine.
63
Page 66

3. Troubleshooting When Using the Facsimile Function
3
Problem Causes Solutions
Edges of sheets are creased. The paper is damp. Use paper that has been stored in the
recommended temperature and
humidity conditions. See "Paper
Storage", About This Machine.
Edges of sheets are creased. You are using non-
recommended paper.
Images are only partially
printed.
Black lines appear on the
print produced at the
destination.
Images are smudged. Smudging can occur if a
Background of received
images appears dirty.
Images from the back of the
page appear.
The paper is damp. Use paper that has been stored in the
The exposure glass,
scanning glass, or ADF is
dirty.
printed side rubs against
things such as the corner of
the machine.
Image density is too high. Ask the sender to adjust the scan
Use recommended paper. See
"Recommended Paper Sizes and
Types", About This Machine.
recommended temperature and
humidity conditions. See "Paper
Storage", About This Machine.
Clean them. See "Cleaning the
Machine", About This Machine.
When removing copies from the output
tray, do so carefully to avoid scuffing
the printed side. If you are making
many copies, remove them in small
batches.
density settings. For details about how
to change the density, see "Density
(Contrast)", Facsimile Reference.
64
Received image is too light. When using moist, rough, or
processed paper, areas of
print may not be fully
reproduced.
Received image is too light. The image density has been
set too low.
Received image is too light. The original of the
transmitted fax was printed
on paper that is too thin.
Use recommended paper. See
"Recommended Paper Sizes and
Types", About This Machine.
Ask the sender to increase the scanning
density. For details about how to
change the density, see "Density
(Contrast)", Facsimile Reference.
Ask the sender to reprint the original on
thicker paper, and then fax it again.
Page 67

When You Cannot Send or Receive Fax Messages As Wanted
3
Problem Causes Solutions
The image on the back side
of duplex copies has mottled
blank patches or is
smudged.
Others
Problem Causes Solutions
All fax documents stored in
memory have been lost.
Those documents include
ones stored through
Memory Transmission/
Reception, Memory Lock, or
Substitute Reception.
Missing patches and
smudges are caused by
moisture leaking from the
paper.
When about one hour
passes after power to the
machine is turned off, all fax
documents stored in memory
are lost.
• Do not install the machine in
areas that are susceptible to low
temperature.
• Use paper that has been stored
where temperature and humidity
conditions meet the limitations we
recommend. For details about the
paper storage conditions we
recommend, see "Paper Storage",
About This Machine.
If any documents have been lost for this
reason, a Power Failure Report is
automatically printed when the
machine is turned on. If fax documents
stored for Memory Transmission have
been lost, check the destinations and
resend the documents. If fax documents
received through Memory, Memory
Lock or Substitute Reception have been
lost, ask the senders to resend the
documents. See p.68 "Turning Off
the Main Power / In the Event of
Power Failure".
When a correct password is
entered, you cannot print
documents that appear in
the Personal box or
Information box, or
transmit / print out stored
documents.
[Prg. Dest.] or [Manual
Entry] does not appear.
Documents are locked by a
security function if incorrect
passwords are entered a
certain number of times.
This function is made
unavailable by the
enhanced security function.
Contact your administrator.
Contact your administrator.
65
Page 68

3. Troubleshooting When Using the Facsimile Function
3
Problem Causes Solutions
The following functions are
not available: Forwarding,
Store File in the Information
Box, routing e-mail received
via SMTP.
Cannot print JPEG format
files with the Mail to Print
function.
This function is made
unavailable by the
enhanced security function.
Only JFIF files are printable.
(JFIF is a JPEG subformat.)
Contact your administrator.
Make sure the files you are trying to
print are in JFIF subformat.
When Memory Is Full
This section describes likely causes of and possible solutions for problems related to full memory.
Message Causes Solutions
"Memory is full. Cannot scan
more. Transmission will be
stopped."
The memory is full. If you press [Exit], the machine returns
to standby mode and starts transmitting
the stored pages.
Check the pages that have not been
sent using the Communication Result
Report, and then resend those pages.
66
Page 69

If an Error Report Is Printed
3
If an Error Report Is Printed
An Error Report is printed if a document cannot be successfully sent or received.
Possible causes include a problem with the machine or noise on the telephone line. If an error occurs
during transmission, resend the original. If an error occurs during reception, ask the sender to resend the
document.
• If an error happens frequently, contact your service representative.
• The "Page" column gives the total number of pages. The "Page not sent" or "Page not received"
column gives the number of pages not sent or received successfully.
• You can display destinations by configuring the appropriate User Parameter. For details about how
to do this, see "Parameter Settings", Facsimile Reference.
• You can display sender names by configuring the appropriate User Parameter. For details about
how to do this, see "Parameter Settings", Facsimile Reference.
67
Page 70

3. Troubleshooting When Using the Facsimile Function
3
Turning Off the Main Power / In the Event of Power Failure
The following notes concern power failure and turning off the machine.
• When disconnecting the power cord from the wall outlet, always pull the plug, not the cord.
Pulling the cord can damage the power cord. Use of damaged power cords could result in fire
or electric shock.
• Do not turn off the main power switch while the power indicator is lit or blinking. If you do, the hard
disk and memory may be damaged and failure could result.
• Turn off the main power switch before pulling out the plug. If you pull out the plug with the switch
on, the hard disk and memory may be damaged and failure could result.
• Make sure 100% is shown on the display before you unplug the machine. If a lower value is
shown, some data is currently present in memory.
• Right after a power failure, the internal battery needs to be sufficiently recharged to guard against
future data loss. Keep the machine plugged in and the main power switch on for about 24 hours
after the power loss.
Even if the main power switch is turned off, the contents of the machine memory (for example,
programmed numbers) will not be lost. However, if power is lost for about one hour because the main
power switch is turned off, there is a power cut, or the power cable is removed, contents of the Fax
memory are lost. Lost items will include any fax documents stored in memory using Memory
Transmission/Reception, or Memory Lock.
If a file was deleted from memory, a Power Failure Report is automatically printed as soon as the power
is restored.
This report can be used to identify lost files. If a memory stored for Memory Transmission was lost,
resend it. If a document received by Memory Reception or Substitute Reception was lost, ask the sender
to resend it.
68
Page 71

When an Error Occurs Using Internet Fax
3
When an Error Occurs Using Internet Fax
This section describes reports that the machine sends if an Internet Fax error occurs.
Error Mail Notification
The machine sends the Error Mail Notification to the sender when it is unable to successfully receive a
particular e-mail message. A "cc" of this notification is also sent to the administrator's e-mail address
when one is specified.
• If an incoming Internet Fax from another party bypasses the SMTP server, even if reception is not
successful, an Error Mail Notification is not sent to the sender.
• You can select to send Error Mail Notification by configuring the appropriate User Parameter. For
details about how to do this, see "Parameter Settings", Facsimile Reference.
• If Error Mail Notification cannot be sent, the Error Report (E-mail) is printed by the machine.
• If an error occurs when an e-mail is received via SMTP, the SMTP server sends an error e-mail to
the originator of the document.
Error Report (E-mail)
The Error Report (E-mail) is printed by the machine when it is unable to send an Error Mail Notification.
Server-Generated Error E-mail
The transmitting server sends this error e-mail to the originator of e-mail that cannot be transmitted
successfully (due to reasons such as specifying an incorrect e-mail address).
• If an Internet Fax transmission bypasses the SMTP server, even if transmission is not successful, an
error e-mail is not sent from the server.
• After a server-generated error e-mail is printed, the first page of the sent document is printed.
69
Page 72

3. Troubleshooting When Using the Facsimile Function
3
70
Page 73

4. Troubleshooting When Using the
4
Printer Function
This chapter describes likely causes of and possible solutions for printer function problems.
Messages Displayed When Installing the Printer Driver
This section describes what to do if a message appears when installing the printer driver.
Message number 58 or 34 indicates that the printer driver cannot be installed using Auto Run. Install the
printer driver using [Add Printer] or [Install Printer].
Message number 58 appears if there is a newer version of the printer driver already installed.
Windows XP Professional or Windows Server 2003/2003 R2
This section describes the procedure under Windows XP Professional or Windows Server 2003/2003
R2.
1. On the [start] menu, click [Printers and Faxes].
2. Click [Add a printer].
3. Follow the instructions in Add Printer Wizard.
If the printer driver is on a CD-ROM, the location of the driver is as follows:
• PCL 5e
32bit-driver: "\x86\DRIVERS\PCL5e\XP_VISTA\(language)\DISK1"
64bit-driver: "\X64\DRIVERS\PCL5e\X64\(language)\DISK1"
• PCL 6
32bit-driver: "\x86\DRIVERS\PCL6\XP_VISTA\MUI\DISK1"
64bit-driver: "\X64\DRIVERS\PCL6\X64\MUI\DISK1"
• PostScript® 3
32bit-driver: "\x86\DRIVERS\PS\XP_VISTA\MUI\DISK1"
64bit-driver: "\X64\DRIVERS\PS\X64\MUI\DISK1"
If the installer starts, click [Cancel] to quit.
4. Specify a port.
TM
71
Page 74

4. Troubleshooting When Using the Printer Function
4
• Available ports vary according to your Windows operating system or the type of interface. For
details, see "Confirming the Connection Method", Printer Reference.
• The PCL6 printer driver is installed in the language of your operating system.
Windows XP Home Edition
This section describes the procedure under Windows XP Home Edition.
1. On the [start] menu, click [Control Panel].
2. Click [Printers and Other Hardware].
3. Click [Printers and Faxes].
4. Click [Add a printer].
5. Follow the instructions in Add Printer Wizard.
If the printer driver is on a CD-ROM, the location of the driver is as follows:
• PCL 5e
32bit-driver: "\x86\DRIVERS\PCL5e\XP_VISTA\(language)\DISK1"
64bit-driver: "\X64\DRIVERS\PCL5e\X64\(language)\DISK1"
• PCL 6
32bit-driver: "\x86\DRIVERS\PCL6\XP_VISTA\MUI\DISK1"
64bit-driver: "\X64\DRIVERS\PCL6\X64\MUI\DISK1"
• PostScript 3
32bit-driver: "\x86\DRIVERS\PS\XP_VISTA\MUI\DISK1"
64bit-driver: "\X64\DRIVERS\PS\X64\MUI\DISK1"
If the installer starts, click [Cancel] to quit.
6. Specify a port.
• Available ports vary according to your Windows operating system or the type of interface. For
details, see "Confirming the Connection Method", Printer Reference.
• The PCL6 printer driver is installed in the language of your operating system.
Windows Vista
This section describes the procedure under Windows Vista.
1. On the Start menu, click [Control Panel].
72
Page 75

Messages Displayed When Installing the Printer Driver
4
2. Click [Hardware and Sound].
3. Click [Printers].
4. Click [Add a printer].
5. Follow the instructions in Add Printer Wizard.
If the printer driver is on a CD-ROM, the location of the driver is as follows:
• PCL 5e
32bit-driver: "\x86\DRIVERS\PCL5e\XP_VISTA\(language)\DISK1"
64bit-driver: "\X64\DRIVERS\PCL5e\X64\(language)\DISK1"
• PCL 6
32bit-driver: "\x86\DRIVERS\PCL6\XP_VISTA\MUI\DISK1"
64bit-driver: "\X64\DRIVERS\PCL6\X64\MUI\DISK1"
• PostScript 3
32bit-driver: "\x86\DRIVERS\PS\XP_VISTA\MUI\DISK1"
64bit-driver: "\X64\DRIVERS\PS\X64\MUI\DISK1"
If the installer starts, click [Cancel] to quit.
6. Specify a port.
• Available ports vary according to your Windows operating system or the type of interface. For
details, see "Confirming the Connection Method", Printer Reference.
• The PCL6 printer driver is installed in the language of your operating system.
Windows 7
This section describes the procedure under Windows 7.
1. On the Start menu, click [Control Panel].
2. Click [Hardware and Sound].
3. Click [Devices and Printers].
4. Click [Add a printer].
5. Follow the instructions in Add Printer Wizard.
If the printer driver is on a CD-ROM, the location of the driver is as follows:
• PCL 5e
32bit-driver: "\x86\DRIVERS\PCL5e\XP_VISTA\(language)\DISK1"
64bit-driver: "\X64\DRIVERS\PCL5e\X64\(language)\DISK1"
73
Page 76

4. Troubleshooting When Using the Printer Function
4
• PCL 6
32bit-driver: "\x86\DRIVERS\PCL6\XP_VISTA\MUI\DISK1"
64bit-driver: "\X64\DRIVERS\PCL6\X64\MUI\DISK1"
• PostScript 3
32bit-driver: "\x86\DRIVERS\PS\XP_VISTA\MUI\DISK1"
64bit-driver: "\X64\DRIVERS\PS\X64\MUI\DISK1"
If the installer starts, click [Cancel] to quit.
6. Specify a port.
• Available ports vary according to your Windows operating system or the type of interface. For
details, see "Confirming the Connection Method", Printer Reference.
• The PCL6 printer driver is installed in the language of your operating system.
Windows Server 2008
This section describes the procedure under Windows Server 2008.
1. On the [Start] menu, click [Control Panel].
2. Click [Hardware and Sound].
3. Click [Printers].
4. Click [Add a printer].
5. Follow the instructions in Add Printer Wizard.
If the printer driver is on a CD-ROM, the location of the driver is as follows:
• PCL 5e
32bit-driver: "\x86\DRIVERS\PCL5e\XP_VISTA\(language)\DISK1"
64bit-driver: "\X64\DRIVERS\PCL5e\X64\(language)\DISK1"
• PCL 6
32bit-driver: "\x86\DRIVERS\PCL6\XP_VISTA\MUI\DISK1"
64bit-driver: "\X64\DRIVERS\PCL6\X64\MUI\DISK1"
• PostScript 3
32bit-driver: "\x86\DRIVERS\PS\XP_VISTA\MUI\DISK1"
64bit-driver: "\X64\DRIVERS\PS\X64\MUI\DISK1"
If the installer starts, click [Cancel] to quit.
6. Specify a port.
74
Page 77

Messages Displayed When Installing the Printer Driver
4
• Available ports vary according to your Windows operating system or the type of interface. For
details, see "Confirming the Connection Method", Printer Reference.
• The PCL6 printer driver is installed in the language of your operating system.
Windows Server 2008 R2
This section describes the procedure under Windows Server 2008 R2.
1. On the [Start] menu, click [Control Panel].
2. Click [Hardware].
3. Click [Devices and Printers].
4. Click [Add a printer].
5. Follow the instructions in Add Printer Wizard.
If the printer driver is on a CD-ROM, the location of the driver is as follows:
• PCL 5e
32bit-driver: "\x86\DRIVERS\PCL5e\XP_VISTA\(language)\DISK1"
64bit-driver: "\X64\DRIVERS\PCL5e\X64\(language)\DISK1"
• PCL 6
32bit-driver: "\x86\DRIVERS\PCL6\XP_VISTA\MUI\DISK1"
64bit-driver: "\X64\DRIVERS\PCL6\X64\MUI\DISK1"
• PostScript 3
32bit-driver: "\x86\DRIVERS\PS\XP_VISTA\MUI\DISK1"
64bit-driver: "\X64\DRIVERS\PS\X64\MUI\DISK1"
If the installer starts, click [Cancel] to quit.
6. Specify a port.
• Available ports vary according to your Windows operating system or the type of interface. For
details, see "Confirming the Connection Method", Printer Reference.
• The PCL6 printer driver is installed in the language of your operating system.
75
Page 78

4. Troubleshooting When Using the Printer Function
4
If USB Connection Fails
This section describes how to troubleshoot a problem related to USB connections.
Problem Causes Solutions
The machine is not
automatically recognized.
Windows has already
configured the USB settings.
The machine does not
recognize the USB
connection even when a
USB cable is inserted.
The USB cable is not
connected properly.
Check whether the computer
has identified the machine as
an unsupported device.
If the USB cable is
connected while the
machine is off, the machine
might not recognize the USB
connection.
Disconnect the USB cable, and then
turn off the main power switch. Turn on
the main power switch again. When
the machine has fully booted up,
reconnect the USB cable.
Open Windows' Device Manager,
and then, under [Universal Serial Bus
controllers], remove any conflicting
devices. Conflicting devices have a [!]
or [?] icon by them. Take care not to
accidentally remove required devices.
For details, see Windows Help.
Press the operation switch, and then
disconnect the USB cable. When the
machine has returned to the ready
condition, reconnect the USB cable.
76
Page 79

Messages Displayed When Using the Printer Function
4
Messages Displayed When Using the Printer
Function
This section describes the principal messages that appear on the display panel, error logs or reports. If
other messages appear, follow their instructions.
Status Messages
This section describes the machine status messages.
Message Status
"Hex Dump Mode" In Hex Dump mode, the machine receives data in hexadecimal format.
Turn off the main power switch after printing, and then turn it back on.
"Job Suspended..." Printing was temporarily stopped by SmartDeviceMonitor for Client.
You can resume printing via [My Job List] in SmartDeviceMonitor for
Client, or via the Web Image Monitor. To resume printing via Web
Image Monitor, check with your system administrator first.
"Offline" The machine is offline. To start printing, switch the machine online by
pressing [ Online].
"Please wait." This message might appear for a second or two while the machine is
preparing, performing initial adjustments, or adding toner. Wait a
while.
"Printing..." The machine is printing. Wait a while.
"Ready" This is the default ready message. The machine is ready for use. No
action is required.
"Resetting job..." The machine is resetting the print job. Wait until "Ready" appears on
the display panel.
"Setting change..." The machine is changing settings. You cannot use the control panel
while this message is displayed. Wait a while.
"Waiting for print data..." The machine is waiting for the next data to print. Wait a while.
77
Page 80

4. Troubleshooting When Using the Printer Function
4
Messages Displayed on the Control Panel When Using the Printer Function
This section describes likely causes of and possible solutions for the error messages that appear on the
control panel.
• Before turning the main power switch off, see "Turning On/Off the Power", About This Machine.
Message Causes Solutions
"Authentication has failed." The entered login user name
or login password is not
correct.
"Authentication has failed." The machine cannot perform
authentication.
"Cannot connect with the
wireless card. Turn the main
power switch off, then check
the card."
"Cannot display files from
the selected memory
device."
• The wireless LAN
board was not inserted
when the machine was
turned on.
• The wireless LAN
board was pulled out
after the machine was
turned on.
• The settings are not
updated although the
unit is detected.
The memory device used
cannot be recognized.
Ask the user administrator for the
correct login user name and login
password.
Contact your administrator.
Turn off the main power switch, and
then check the wireless LAN board is
inserted correctly. And then, turn on the
main power switch again. If the
message appears again, call your
service representative.
For details about the recommended
memory devices for the Direct printing
function from removable memory
devices, contact your sales or service
representative. The USB flash memory
that features password protection or
other security features may not work
normally.
78
"Hardware Problem:
Ethernet"
An error has occurred in the
Ethernet interface.
Turn off the main power switch, and
then back on again. If the message
appears again, contact your service
representative.
Page 81

Messages Displayed When Using the Printer Function
4
Message Causes Solutions
"Hardware Problem: HDD" An error has occurred in the
hard disk.
"Hardware Problem: USB" An error has occurred in the
USB interface.
"Hardware Problem:
Wireless Board"
"Hardware Problem:
Wireless Card"
Access to the wireless board
in which the wireless LAN
board is inserted is possible,
but an error was detected.
• The installed wireless
LAN card is not
compatible with this
machine.
• An error has occurred
in the wireless LAN
card.
Turn off the main power switch, and
then back on again. If the message
appears again, contact your service
representative.
Turn off the main power switch, and
then back on again. If the message
appears again, contact your service
representative.
Turn off the main power switch, and
then check the wireless board is
inserted correctly. And then, turn on the
main power switch again. If the
message appears again, contact your
service representative.
Turn off the main power switch, and
then check the wireless card. And then,
turn on the main power switch again. If
the message appears again, contact
your service representative.
"Load following paper in n.
To cancel job, press [Job
Reset]."
(A figure is placed at n.)
"More than one file cannot
be selected with this file
type."
The printer driver settings are
incorrect or the tray does not
contain paper of the size
selected in the printer driver.
A non-JPEG file has been
selected.
Check that the printer driver settings
are correct, and then load paper of the
size selected in the printer driver into
the input tray. For details about how to
change the paper size, see "Changing
the Paper Size", About This Machine.
Multiple non-JPEG files cannot be
selected at one time in the Direct
printing function from removable
memory devices. Select files
separately.
79
Page 82

4. Troubleshooting When Using the Printer Function
4
Message Causes Solutions
"Paper size and type are
mismatched. Select another
tray from the following and
press [Continue]. To cancel
job, press [Job Reset]. Paper
size and type can also be
changed in User Tool."
"Paper size of n is
mismatched. Select another
tray from the following and
press [Continue].Paper type
can also be changed in User
Tools."
(A tray name is placed at n.)
"Problem: Printer Font Error" An error has occurred in the
"The selected file(s)
contained file(s) without
access privileges. Only
file(s) with access privileges
will be deleted."
The printer driver settings are
incorrect or the tray does not
contain paper of the size or
type selected in the printer
driver.
The size of the paper in the
tray does not match the
paper size specified in the
printer driver.
font settings.
You have tried to delete files
without the authority to do
so.
Check that the printer driver settings
are correct, and then load paper of the
size selected in the printer driver into
the input tray. For details about how to
change the paper size, see "Changing
the Paper Size", About This Machine.
Select a tray containing paper that is
the same size as the specified paper
size.
Contact your service representative.
Files can be deleted by the person who
created the file. To delete a file which
you are not authorized to delete,
contact the person who created the
file.
80
"The same paper tray
cannot be set for the main
sheets and slip sheets
([Designate]). Check the
setting."
"The size of the selected
file(s) is too large."
The tray selected for other
pages is the same as the one
for slip sheets.
The total size of the selected
file(s) exceeds 1 GB.
Reset the job. Be sure the tray you
select for slip sheets is not providing
paper for other pages.
File(s) with a total size that exceeds 1
GB cannot be printed.
• When the total size of the multiple
files that are selected exceeds 1
GB, select files separately.
• Print by using a function other
than the Direct printing function
from removable memory devices.
Page 83

Messages Displayed When Using the Printer Function
4
Message Causes Solutions
"Updating the destination
list... Please wait. Specified
destination(s) or sender's
name has been cleared."
"You do not have the
privileges to use this
function."
The destination list is being
updated from the network
using Web Image Monitor.
The logged in user name
does not have permission for
the selected function.
Wait until the message disappears. Do
not switch off the power while this
message is displayed. Depending on
the number of destinations to be
updated, there may be some delay
before you can resume operation.
Operations are not possible while this
message is displayed.
Contact your administrator about the
permission for the required function.
Other Messages
This section describes likely causes of and possible solutions for the error messages that are printed on
the error logs or reports.
Message Causes Solutions
"86: Error" Parameters of the control
code are invalid.
Check the print settings.
"91: Error" Printing was canceled by the
auto job cancel function due
to a command error.
"92: Error" Printing was canceled
because [Job Reset] or the
[Clear/Stop] key was
selected on the machine's
control panel.
"98: Error" The machine could not
access Hard disk correctly.
Check that the data is valid.
Perform the print operation again if
necessary.
Turn off the main power switch, and
then back on again. If the message
appears frequently, contact your
service representative.
81
Page 84

4. Troubleshooting When Using the Printer Function
4
Message Causes Solutions
"99: Error" This data cannot be printed.
The specified data is either
corrupt or not supported by
the Direct printing function
from removable memory
devices.
"Address Book is currently in
use by another function.
Authentication has failed."
"Auto-registration of user
information has failed."
"Cannot store data of this
size."
The machine currently
cannot perform
authentication because the
Address Book is being used
by another function.
Automatic registration of
information for LDAP
Authentication or Windows
Authentication failed
because the Address Book is
full.
The paper size exceeded
the capacity of the
Document Server.
Check that the data is valid. For details
about the kinds of data supported by
the Direct printing function from
removable memory devices, see
"Direct Printing from a Removable
Memory Device", Printer Reference.
Wait a while, and then retry the
operation.
Contact your administrator.
Reduce the paper size of the file that
you want to send to a size that the
Document Server can store. Custom
size files can be sent but not stored
afterward.
82
"Classification Code is
incorrect."
"Classification Code is
incorrect."
"Collate has been
cancelled."
The classification code has
not been entered, or the
classification code has been
entered incorrectly.
The classification code is not
supported with the printer
driver.
Collate was canceled. Turn off the main power switch, and
Enter the correct classification code.
Select Optional for classification code.
For details about how to specify
classification code settings, see
"Configuring Classification Codes",
Printer Reference.
then back on again. If the message
appears again, contact your sales or
service representative.
Page 85

Messages Displayed When Using the Printer Function
4
Message Causes Solutions
"Compressed Data Error." The printer detected corrupt
compressed data.
"Data storage error." You tried to print a Sample
Print, Locked Print, Hold
Print, or Stored Print file, or
to store a file in the
Document Server when the
hard disk was
malfunctioning.
"Document Server is not
available to use. Cannot
store."
"Duplex has been
cancelled."
You cannot use the
Document Server function.
Duplex printing was
canceled.
• Check the connection between
the computer and the printer.
• Check that the program you used
to compress the data is
functioning correctly.
Contact your service representative.
Contact your administrator.
• Select the proper paper size for
the duplex function. See
"Specifications for the Main Unit",
About This Machine.
"Error has occurred." A syntax error, etc.,
occurred.
"Exceeded max. capacity of
Document Server. Cannot
store."
"Exceeded max. number of
files of Document Server.
Cannot store."
The hard disk became full
after a file was stored.
The maximum file capacity
of the Document Server was
exceeded.
• In [Tray Paper Settings], under
"Paper Type", set "Apply Duplex"
to [Yes] for the paper tray that
can be used for duplex print. For
details, see "Tray Paper Settings",
Network and System Settings
Reference.
Check that the PDF file is valid.
Delete some of the files stored in the
Document Server or reduce the size
that you want to send.
Delete some of the files stored in the
Document Server.
83
Page 86

4. Troubleshooting When Using the Printer Function
4
Message Causes Solutions
"Exceeded max. number of
files to print for temporary /
stored jobs."
"Exceeded max. number of
pages of Document Server.
Cannot store."
"Exceeded max. number of
pages to print for
temporary / stored jobs."
"Exceeded max. pages.
Collate is incomplete."
"Exceeded the maximum unit
count for Print Volume Use.
The job has been
cancelled."
While printing a Sample
Print, Locked Print, Hold
Print, or Stored Print file, the
maximum file capacity was
exceeded.
The maximum page
capacity of the Document
Server was exceeded.
While printing a Sample
Print, Locked Print, Hold
Print, or Stored Print file, the
maximum page capacity
was exceeded.
The number of pages
exceeds the maximum
number of sheets that you
can use Collate with.
The number of pages the
user is permitted to print has
been exceeded.
Delete unneeded files stored in the
machine.
Delete some of the files stored in the
Document Server or reduce the number
of pages that you want to send.
Delete unneeded files stored in the
machine.
Reduce the number of pages to print.
Reduce the number of pages to print.
Contact your administrator.
84
"Failed to obtain file system." PDF direct printing could not
be performed because the
file system could not be
obtained.
"File system is full." PDF file does not print out
because the capacity of the
file system is full.
"HDD is full." The hard disk became full
while printing a Sample
Print, Locked Print, Hold
Print, or Stored Print file.
Turn off the main power switch, and
then back on again. If the message
appears again, contact your service
representative.
Delete all unnecessary files from the
hard disk, or decrease the file size sent
to the machine.
Delete unneeded files stored in the
machine.
Alternatively, reduce the data size of
the Sample Print, Locked Print, Hold
Print, or Stored Print file.
Page 87

Messages Displayed When Using the Printer Function
4
Message Causes Solutions
"HDD is full." When printing with the
PostScript 3 printer driver,
the hard disk capacity for
fonts and forms has been
exceeded.
"I/O buffer overflow." An input buffer overflow
occurred.
"Information for user
authentication is already
registered for another user."
The user name for LDAP or
Integration Server
authentication was already
registered in a different
server with a different ID,
and a duplication of the user
name occurred due to a
switching of domains
(servers), etc..
Delete unneeded forms or fonts
registered in the machine.
• In [Printer Features], under
[System], set [Memory Usage] to
[Font Priority].
• In [Printer Features], under [Host
Interface], select [I/O Buffer],
and then set the maximum buffer
size to a larger value.
• Reduce the number of files being
sent to the machine.
Contact your administrator.
85
Page 88

4. Troubleshooting When Using the Printer Function
4
Message Causes Solutions
"Insufficient Memory" A memory allocation error
occurred.
PCL 5e
• On the printer driver's [Print
Quality] tab, select a lower
resolution in the "Resolution"
area.
• In [Printer Features], under
[System], set [Memory
Usage] to [Font Priority].
PCL 6
• On the printer driver's
[Detailed Settings] tab, click
[Print Quality] in the
"Menu:", and then select a
lower resolution in the
"Resolution:" list.
• On the printer driver's
[Detailed Settings] tab, click
[Print Quality] in the
"Menu:", and then select
"Raster" in the "Vector/
Raster:" list. In some cases, it
will take a long time to
complete a print job.
• In [Printer Features], under
[System], set [Memory
Usage] to [Font Priority].
PostScript 3
• On the printer driver's
[Detailed Settings] tab, click
[Print Quality] in the
"Menu:", and then select a
lower resolution in the
"Resolution:" list.
• In [Printer Features], under
[System], set [Memory
Usage] to [Font Priority].
86
Page 89

Messages Displayed When Using the Printer Function
4
Message Causes Solutions
"Memory Retrieval Error" A memory allocation error
occurred.
"No response from the
server. Authentication has
failed."
"Print overrun." Images were discarded
A timeout occurred while
connecting to the server for
LDAP authentication or
Windows Authentication.
while printing.
Turn off the main power switch, and
then back on again. If the message
appears again, replace the RAM.
Check the status of the server.
PCL 5e
On the printer driver's [Print
Quality] tab, select a lower
resolution in the "Resolution" area.
PCL 6
On the printer driver's [Detailed
Settings] tab, click [Print Quality]
in the "Menu:", and then select a
lower resolution in the
"Resolution:" list.
PostScript 3
On the printer driver's [Detailed
Settings] tab, click [Print Quality]
in the "Menu:", and then select a
lower resolution in the
"Resolution:" list.
"Printing privileges have not
been set for this document."
"Receiving data failed." Data reception was aborted. Resend the data.
"Selected ppr. size is not
supported. Job was
cancelled."
"Sending data failed." The machine received a
The PDF document you have
tried to print has no
privileges to print.
Job reset is automatically
performed if the specified
paper size is incorrect.
command to stop
transmission from the printer
driver.
Contact the owner of the document.
Specify the correct paper size, and
then print the file again.
Check if the computer is working
correctly.
87
Page 90

4. Troubleshooting When Using the Printer Function
4
Message Causes Solutions
"Staple has been cancelled." Stapling printing was
canceled.
"The entered password is
incorrect."
"The print job has been
cancelled because capture
file(s) could not be stored:
Exceeded max. memory."
"The print job has been
cancelled because capture
file(s) could not be stored:
Exceeded max. number of
files."
"The print job has been
cancelled because capture
file(s) could not be stored:
Exceeded max. number of
pages per file."
The password of the
encrypted PDF file has been
entered incorrectly.
The hard disk became full
after a file was stored.
The maximum file capacity
of the Document Server was
exceeded.
The maximum page
capacity of the Document
Server was exceeded.
Check the paper orientation, paper
quantity, print orientation, and staple
position. Certain settings can produce
print results that might not be as
expected.
Enter the correct password.
Delete the files stored in the Document
Server or reduce the file size to be sent.
Delete the files stored in the Document
Server.
Delete some of the files stored in the
Document Server or reduce the number
of pages that you want to send.
"You do not have a privilege
to use this function. This job
has been cancelled."
"You do not have a privilege
to use this function. This job
has been cancelled."
"You do not have a privilege
to use this function. This
operation has been
cancelled."
If printing does not start, contact your service representative.
88
The entered login user name
or login password is not
correct.
The logged in user is not
allowed to use the selected
function.
The logged in user does not
have the privileges to
register programs or change
the paper tray settings.
Check that the user name and
password are correct.
Contact your administrator.
Contact your administrator.
Page 91

CCT001
Messages Displayed When Using the Printer Function
4
• The contents of errors may be printed on the Configuration Page. Check the Configuration Page in
conjunction with the error log. For details about how to print the Configuration Page, see "List / Test
Print", Printer Reference.
Checking the Error Log
If files could not be stored due to printing errors, identify the cause of the errors by checking the error log
on the control panel.
• The most recent 30 errors are stored in the error log. If a new error is added when there are 30
errors already stored, the oldest error is deleted. However, if the earliest error is a Sample Print,
Locked Print, Hold Print, or Stored Print error, it is not deleted. The error is stored separately until the
number of errors reaches 30.
• If the main power switch is turned off, the log is deleted.
• You cannot view [Error Log] on the simplified display.
1. Press the [Printer] key to display the printer screen.
2. Press [Error Log].
An error log list appears.
89
Page 92

4. Troubleshooting When Using the Printer Function
4
3. Press the desired job list, and then press [Details].
A detailed error log appears.
90
Page 93

When You Cannot Print
4
When You Cannot Print
This section describes what to do if printing does not start even after performing a printing operation.
Problem Causes Solutions
Printing does not start. The power is off. Check the cable is securely plugged
into the power outlet and the machine.
Turn on the main power switch.
Printing does not start. The machine is set to
"Offline".
Printing does not start. The cause is displayed on
the screen of the control
panel.
Printing does not start. The interface cable is not
connected correctly.
Printing does not start. The correct interface cable is
not being used.
Printing does not start. The interface cable was
connected after the machine
was switched on.
Press [ Online].
Check the error message or warning
status on the display panel, and then
take the required action.
Connect the interface cable securely. If
it has a fastener, fasten that securely as
well. See "Connecting to the Interface",
Network and System Settings
Reference.
The type of interface cable you should
use depends on the computer. Be sure
to use the correct one. If the cable is
damaged or worn, replace it. See
"Connecting to the Interface", Network
and System Settings Reference.
Connect the interface cable before
turning on the main power switch.
91
Page 94

4. Troubleshooting When Using the Printer Function
4
Problem Causes Solutions
Printing does not start. If the machine is using
wireless LAN, failure to print
might result from a weak
wireless signal.
Printing does not start. If the machine is using
wireless LAN, SSID settings
are incorrect.
Printing does not start. If the machine is using
wireless LAN, the receiver's
MAC address may be
preventing communication
with the access point.
In [System Settings], under [Interface
Settings], select [Wireless LAN], and
then press [Wireless LAN Signal] to
check signal status. If signal quality is
poor, move the machine to a location
where radio waves can pass or
remove objects that might cause
interference.
(You can check signal status only when
using wireless LAN in the infrastructure
mode.)
Check using the machine's display
panel that the SSID is correctly set. See
"Wireless LAN", Network and System
Settings Reference.
Check access point settings when in the
infrastructure mode. Depending on the
access point, client access may be
limited by MAC address. Also, check
there are no problems in transmission
between access point and wired
clients, and between access point and
wireless clients.
92
Printing does not start. The login user name, login
password, or driver
encryption key is invalid.
Printing does not start. Advanced encryption has
been set using the Extended
Security function.
Check the login user name, login
password, or driver encryption key.
Check the settings of the Extended
Security function with the administrator.
Page 95

When You Cannot Print
4
Problem Causes Solutions
Data In indicator does not
light up or flash.
[List / Test Print] is disabled. A mechanical error might
Printing does not start when
using the extended wireless
LAN in Ad-hoc mode.
If the Data In indicator does
not light up or flash even
after the print job starts, the
machine has not received
the data.
have occurred.
The correct Communication
mode is not set.
• When the machine is connected
to a computer via a cable, check
the computer print port settings
are correct. For details, see p.
93 "When the Data In Indicator
Does Not Light Up or Flash".
• When it is networked with a
computer, contact your
administrator.
Contact your service representative.
• Turn off the main power switch,
and then back on again. See
"Turning On/Off the Power",
About This Machine.
• In [System Settings], under
[Interface Settings], select
[Wireless LAN], and then set
[Communication Mode] to
[802.11 Ad-hoc Mode] and
[Security Method] to [Off]. Then
at the other side, set [SSID
Setting] and [Ad-hoc Channel] to
the same values.
If printing does not start, contact your service representative.
When the Data In Indicator Does Not Light Up or Flash
When the Data In indicator does not light up or flash after starting a print job, data is not being sent to
the machine.
When the machine is connected to the computer using the interface cable
This section describes how to check the print port when the Data In indicator does not light up or blink.
Check if the print port setting is correct.
93
Page 96

4. Troubleshooting When Using the Printer Function
4
For Windows XP Professional or Windows Server 2003/2003 R2
1. Click the [start] button, and then click [Printers and Faxes].
2. Click the icon of the machine. On the [File] menu, click [Properties].
3. Click the [Ports] tab.
4. In the [Print to the following port(s)] list, confirm the correct port is selected.
For Windows XP Home Edition
1. Click the [start] button, and then click [Control Panel].
2. Click [Printers and Other Hardware].
3. Click [Printers and Faxes].
4. Click the icon of the machine. On the [File] menu, click [Properties].
5. Click the [Ports] tab.
6. In the [Print to the following port(s)] list, confirm the correct port is selected.
For Windows Vista
1. Click the Start button, and then click [Control Panel].
2. Click [Hardware and Sound].
3. Click [Printers].
4. Click the icon of the machine. On the [Organize] menu, click [Properties].
5. Click the [Ports] tab.
6. In the [Print to the following port(s)] list, confirm the correct port is selected.
For Windows 7
1. Click the Start button, and then click [Control Panel].
2. Click [Hardware and Sound].
3. Click [Devices and Printers].
4. Right click the icon of the machine. On the context menu, click [Printer properties].
5. Click the [Ports] tab.
6. In the [Print to the following port(s)] list, confirm the correct port is selected.
For Windows Server 2008
1. Click the [Start] button, and then click [Control Panel].
2. Click [Hardware and Sound].
3. Click [Printers].
4. Click the icon of the machine. On the [Organize] menu, click [Properties].
5. Click the [Ports] tab.
6. In the [Print to the following port(s)] list, confirm the correct port is selected.
94
Page 97

For Windows Server 2008 R2
4
1. Click the [Start] button, and then click [Control Panel].
2. Click [Hardware].
3. Click [Devices and Printers].
4. Right click the icon of the machine. On the context menu, click [Printer properties].
5. Click the [Ports] tab.
6. In the [Print to the following port(s)] list, confirm the correct port is selected.
Network connection
Contact the network administrator.
When You Cannot Print
95
Page 98

4. Troubleshooting When Using the Printer Function
4
Other Printing Problems
This section describes likely causes of and possible solutions for problems that can occur when printing
from a computer.
When you cannot print clearly
Problem Causes Solutions
The printed image is
smudged.
Settings for thick paper have
not been made when
printing on thick paper in the
bypass tray.
PCL 5e
On the printer driver's [Paper]
tab, select [Bypass Tray] in the
"Input Tray:" list. Then in the
"Type:" list, select [Thick 1 (106 to
130 g/m2)] [Thick 3 (164 to
220 g/m2)].
PCL 6
On the printer driver's [Detailed
Settings] tab, click [Paper] in the
"Menu:", and then select [Bypass
Tray] in the "Input Tray:" list. Then
in the "Paper Type:" list, select
[Thick 1 (106 to 130 g/m2)]
[Thick 3 (164 to 220 g/m2)].
PostScript 3
On the printer driver's [Detailed
Settings] tab, click [Paper] in the
"Menu:", and then select [Bypass
Tray] in the "Input Tray:" list. Then
in the "Paper Type:" list, select
[Thick 1 (106 to 130 g/m2)]
[Thick 3 (164 to 220 g/m2)].
96
The printed image is faded
over the entire page.
The printed image is faded
over the entire page.
The paper is damp. Use paper that has been stored in the
recommended temperature and
humidity conditions. See "Paper
Storage", About This Machine.
The paper is unsuitable. Use recommended paper. Printing on
coarse or treated paper might result in
faint print image. See "Recommended
Paper Sizes and Types", About This
Machine.
Page 99

Other Printing Problems
4
Problem Causes Solutions
Images smudge when
rubbed. (Toner is not fixed.)
Images smudge when
rubbed. (Toner is not fixed.)
The printed image is different
from the image on the
computer's display.
The specified paper type
and the paper that is
actually loaded might be
different. For example, thick
paper might be loaded but
not specified as the paper
type.
The fusing unit is
deteriorated or damaged.
Printing will be performed by
the machine's graphic
processing function.
PCL 5e
On the printer driver's [Paper]
tab, select a proper paper type in
the [Type:] box.
PCL 6
On the printer driver's [Detailed
Settings] tab, click [Paper] in the
"Menu:", and then select a proper
paper type in the "Paper Type:"
list.
PostScript 3
On the printer driver's [Detailed
Settings] tab, click [Paper] in the
"Menu:", and then select a proper
paper type in the "Paper Type:"
list.
Replace the unit. See "Replacing
Machine Parts", About This Machine.
Only when using PCL 6
On the printer driver's [Detailed
Settings] tab, click [Print Quality]
in the "Menu:", and then select
[Raster] in the "Vector/Raster:"
list.
When printing graphics, the
output and the screen are
different.
Images are smudged. Smudging can occur if a
If the printer driver is
configured to use the
graphics command, the
graphics command from the
machine is used to print.
printed side rubs against
things such as the corner of
the machine.
If you want to print accurately, set the
printer driver to print without using the
graphics command. See the printer
driver Help.
When removing copies from the output
tray, do so carefully to avoid scuffing
the printed side. If you are making
many copies, remove them in small
batches.
97
Page 100

4. Troubleshooting When Using the Printer Function
4
Problem Causes Solutions
Lines of garbled or
unwanted alphanumeric
characters appear.
Images are cut off, or excess
is printed.
Photo images are coarse. Some applications print at
A solid line is printed as a
dashed line or appears
blurred.
Fine lines are fuzzy, of
inconsistent thickness, or do
not appear.
An incorrect printer
language might have been
selected.
You may be using paper
smaller than the size
selected in the application.
lower resolution.
Dither patterns do not match. Only when using PostScript 3
Super fine lines have been
specified in the application.
Select the correct printer driver, and
then print the file again.
Use the same size paper as that
selected in the application. If you
cannot load paper of the correct size,
use the reduction function to reduce the
image, and then print. See the printer
driver Help.
Use the application's settings to specify
a higher resolution.
On the printer driver's [Detailed
Settings] tab, click [Print Quality]
in the "Menu:", and then change
the "Dithering" setting.
Only when using PostScript 3
On the printer driver's [Detailed
Settings] tab, click [Print Quality]
in the "Menu:", and then change
the "Dithering" setting.
If the problem continues after you
change the dithering settings, use the
settings of the application in which the
image was created to change thickness
of the lines.
98
 Loading...