


Rexel ProStyle, Style+, Style CC and Style RC
G Instruction Manual F Manuel d’utilisation D Bedienungsanleitung I Manuale d’istruzioni O Gebruiksaanwijzing
E Manual de instrucciones
P Manual de Instruções
T Kullanım Kılavuzu K Οδηγίες
c Brugsvejledning oFI Käyttöopas
oNO Bruksanvisning
S Bruksanvisning
Q Instrukcja obsługi oCZ Návod k obsluze H Használati útmutató
oRUS Руководствo по
зкcплyатации
|
English |
4 |
|
Français |
6 |
|
Deutsch |
8 |
|
Italiano |
10 |
|
Nederlands |
12 |
|
Español |
14 |
|
Português |
16 |
|
Türkçe |
18 |
|
Ελληνικά |
20 |
|
Dansk |
22 |
|
Suomi |
24 |
|
Norsk |
26 |
|
Svenska |
28 |
|
Polski |
30 |
|
Česky |
32 |
|
Magyar |
34 |
ACCO Australia |
Pyccкий |
36 |
Warranty (in Australia)
ACCO Australia warrants its products and their parts against defects in materials and workmanship under normal use for a period of 24 months from the original date of purchase (please retain proof of purchase). This warranty applies in place of any other warranty in this manual. During this period we will repair or replace a defective product or part subject to the following warranty conditions:
The warranty applies only to defects in materials and workmanship under normal use and does not extend to damage to the Product or parts which result from:-
• Alteration, repair, modiication or service carried out by anyone other than an authorised ACCO service centre.
• Accident, neglect, abuse or misuse owing to failure to comply with the normal operating procedures for a product of this type.
Nothing in this Warranty shall have the effect of excluding the liability of ACCO in respect of death and personal injury caused by the negligence of
ACCO. This Warranty is offered (subject to these terms and conditions) in addition to, and does not affect your rights and remedies under,the Australian
Consumer Law and other laws.
Our goods come with guarantees that cannot be excluded under the Australian Consumer Law. You are entitled to a replacement or refund for a major failure and for compensation for any other reasonably foreseeable loss or damage. You are also entitled to have the goods repaired or replaced if the goods fail to be of acceptable quality and the failure does not amount to a major failure.
For any questions relating to your warranty, please contact your local service agent.
Additional Guarantee
ACCO Australia guarantees the cutting blades of the shredder to be free from defects in material and workmanship for an extended warranty period from the date of purchase by the original consumer. Please refer to the table below for the cutter warranty period applicable to your shredder model.
Shredder Models |
Extended Cutter Warranty Period |
Style, Style+, V35WS, V30WS, Alpha |
3 |
|
|
Auto+60 |
5 |
|
|
Promax V65WS, Promax V60WS, Prostyle, Prostyle+, RES1223, REX1023, REM723, SC170, CC175, Auto+80 |
7 |
|
|
V120, V125, P180CD, P185, RSS2030, RSX1630, RSS2232, RSX1632, RSM1130, Auto+100 |
10 |
|
|
Auto+250 |
15 |
|
|
RDS2250, RDX1850, RDSM750, RDM1150, RDS2270, RDX2070, RDSM770, RDM1170, Auto+500, RLS32, |
20 |
RLX20, RLM11, RLSM9, RLWX19, RLWX30, RLWSFM9, RLWM26, RLWX39, RLWS47, RLWX25, RLWS35 |
|
*Please note that the cutter blades will be progressively worn down by shredding fastened sheets (staples and paperclips)- this is not covered by this warranty. Excessive credit card and CD shredding will also invalidate the extended cutter warranty. Some shredder models are NOT designed to shred CDs. Any attempt to do so will invalidate the warranty.
How to Make a Claim
To make a claim under this warranty, contact the ACCO Australia Customer Service Team with your proof of original purchase handy:
ACCO Australia
Level 2, 8 Lord St
Botany NSW 2019
Ph: 1300 366 376
E:sales.au@acco.com
F:1300 360 944
The customer service team member will advise whether your product should be repaired, replaced or returned and advise the next step for you to take. If the product is validated as still under warranty and deemed faulty, ACCO will bear costs involved with the warranty process. To claim expenses incurred in making a claim under this warranty, contact our Customer Service Team on the details above.

1 |
2 |
3 |
4 |

Specifications
|
Rexel ProStyle Shredder |
Rexel Style+ Shredder |
Rexel Style CC Shredder |
Rexel Style RC Shredder |
|
Cutting Type |
Confetti Cut |
Confetti Cut |
Confetti Cut |
Ribbon Cut |
|
|
|
|
|
|
|
Shred Size |
4 x 35mm |
4 x 23mm |
4 x 30mm |
5.8 mm |
|
Security Class |
DIN S3 |
DIN S3 |
DIN S3 |
DIN S2 |
|
Sheet Capacity (one pass) |
11 sheets (80 gsm) |
7 sheets (80 gsm) |
5 sheets (80 gsm) |
7 sheets (80 gsm) |
|
Entry Width |
230mm |
230mm |
230mm |
230mm |
|
Product Dimensions |
430 x 232 x 410mm |
378 x 203 x 360mm |
340 x 185 x 320mm |
340 x 185 x 320 mm |
|
Rated Voltage/Frequency |
220-240V~50Hz |
220-240V~50Hz |
220-240V~50Hz |
220-240V- 50 Hz |
|
Rated Current |
2A |
1.6A |
0.8A |
0.8A |
|
Introduction
Thank you for choosing this Shredder from Rexel. We are sure it will serve you well, but please take a little time to read these instructions to
ensure you get the best out of your machine.
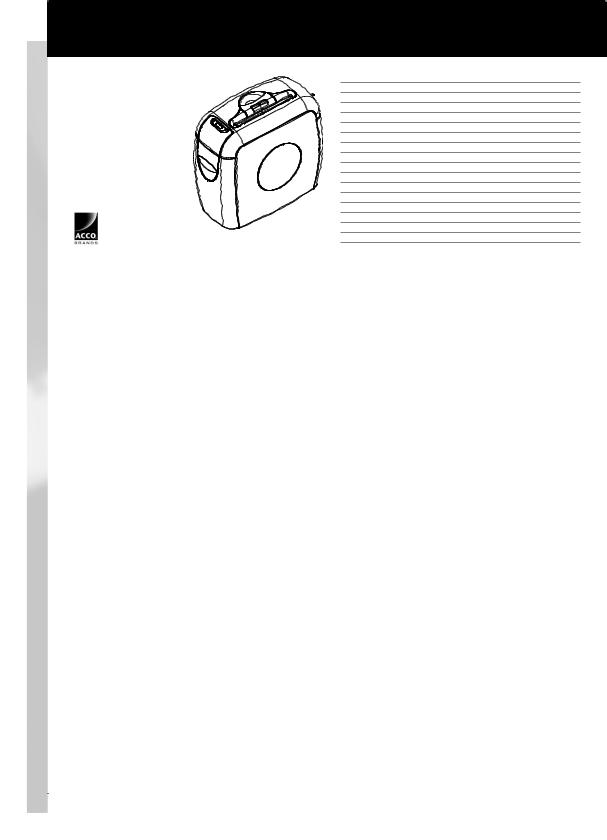
Description of product parts (fig 1)
1 Power Cable (Euro plug shown)
2 Viewing window
3 Paper entry slot
Safety First |
m |
|
|
• Please store this instruction manual in a safe place for future reference.
• Please pay close attention to the safety symbols on the top of the shredder and operate the machine accordingly.
• If the shredder needs cleaning, unplug the unit from the power socket and use a damp cloth. NB. Do not use any cleaning products to clean the unit.
• Do not position the unit near to an object that radiates heat.
• Do not place the unit in a damp environment.
• Take care not to splash any liquid onto the machine.
• Return the product and proof of purchase with receipt to the store at which it was purchased if…
-The power cable or plug is broken.
-The machine malfunctions because liquid was accidentally spilt onto the machine.
-The shredder doesn’t operate despite following the guidelines in the manual.
• Make sure the power cable isn’t a trip hazard.
• Please ensure the power supply is compatible with the requirements of the machine (220-240V 50Hz).
• To avoid risk of injury, do not open the machine’s casing to attempt DIY repair. Any attempted repair by an unqualiied person will invalidate
the warranty.
DO NOT attempt to repair shredder yourself. m KEEP OUT OF REACH OF CHILDREN.
Preparation before use
How to use the shredder correctly:
1 Take care not to insert ingers, ties or other objects into the entry slot of the shredder.
2 Try to avoid laminating materials, plastic bags etc. from being passed through the shredder. This will prevent damage to the cutters.
3 Do not shred wet paper as it can tangle in the cutters.
4 Do not shred more than the stated sheet capacity in one pass.
5Do not shred continuously for more than 3 minutes at a time (2 minutes Style RC). Running the unit for too long may make the motor overheat. If the motor over heats, allow it to cool down for at least
30 minutes before resuming use.
6 Do not use the “REV” ( ) (reverse) function if it’s not necessary. Over use of the “REV” (
 ) function can result in shredded paper becoming jammed in the entry slot, which will adversely affect the
performance of the shredder.
Correct operating procedure (fig 2)
1 Insert plug into the AC power socket.
2 Check the shredder bin is fully closed.
3 Push the switch to the ON/AUTO position (standby mode)
4 When not in use, push the switch to the O (off position)
4

Auto shred and stop
• Place the paper or credit card into the centre of the entry slot - shredding will start automatically (ig 3).
• Paper smaller than A4 in width should be placed in the middle of the entry slot to ensure the shredder works automatically.
• The cutters will stop rotating automatically after inishing shredding
• Do not shred more than the stated sheet capacity at a time.
• If too many sheets are inserted at a time, the shredder can become jammed. If the shredder becomes jammed, switch the button to REV
(  ) position to clear the jam by reversing the paper. If the paper has become so entangled in the cutter that it can’t be reversed, turn off the power and pull out the paper by hand. Restart with fewer sheets and feed the non-shredded end of the paper in irst.
Cautions |
m |
|
|
• Do not shred continuously for more than 3 minutes (2 minutes Style RC). When the motor has overheated, the thermal safety switch will start working automatically. If the thermal switch trips, do not use
the machine for about 30 minutes while the thermal sensitive safety switch cools down so the shredder can be safely used again.
• This machine is not a toy. Keep away from children and pets.
• For indoor use only.
• Never insert ingers into the entry slot of the shredder.
• Turn the power off immediately if your hair, tie or sleeve becomes entangled in the shredder.
• The shredder bin must be fully pushed closed for the machine to operate.
• Empty the shredder bin when it is full otherwise the shredder’s
performance will be adversely affected. Operating the shredder with a full shredder bin can result in paper jamming in the cutters, which will
increase the machine’s noise level.
• Do not force down shredder paper in the bin using your feet.
G
Emptying the pull-out waste bin (fig 4)
Empty the shredder bin when the shredder paper is visible through the viewing window on the side of the pullout bin.
1 Pull out the shredder bin (fully).
2 Empty the shredder bin into a waste sack.
3 Push the shredder bin back in ensuring it is fully closed.
Troubleshooting
If the paper shredder will not start, please check the following:
1 Is the machine plugged in correctly?
2 Is the switch pushed to the ‘ON/AUTO’ position?
3 Is the machine jammed with paper?
4 Has the motor overheated?
5 Is the shredder bin fully pushed in?
In case of jammed paper, please follow the procedure below:
1Check if the bin is too full with paper - the bin should be emptied regularly to avoid paper becoming jammed in the cutters.
2 Slide the switch to the ‘REV’ ( ) position to reverse the jammed paper.
3 If the paper is so jammed that it will not come out in reverse function, slowly push the switch between ‘REV’ ( ) and ON/AUTO.
Do not do this too quickly as this can damage the shredder.
4WARNING – Do not under any circumstances use any metal objects
(scissors, letter openers etc.) in an attempt to clear the entry – this model has mains voltage inside the casing, which could cause serious injury.
This machine does not require lubricant. Acco Brands Europe accepts no liability for product performance or safety should any lubricant be used on any part(s) of this machine.
Warranty
ACCO Brands Europe warrants its product/products and their parts against defects in materials and workmanship under normal use for a period of 2 years from the original date of purchase. During this period we will repair or replace a defective product or part subject to the following warranty conditions:
The warranty applies only to defects in materials and workmanship under normal use and does not extend to damage to the Product or parts which result from:-
(a) Alteration, repair, modiication or service carried out by anyone other than an authorised ACCO service centre.
(b) Accident, neglect, abuse or misuse owing to failure to comply with the normal operating procedures for a product of this type.
Register this product online at www.accoeurope.com
Nothing in this Warranty shall have the effect of excluding the liability of ACCO in respect of death and personal injury caused by the negligence
of ACCO. This Warranty is offered (subject to these terms and conditions) in addition to, and does not affect your statutory rights.
These conditions shall in all respects be governed and construed in accordance with English Law and subject to the exclusive jurisdiction of the English Courts.
5

Spécifications techniques
|
Rexel ProStyle Shredder |
Rexel Style+ Shredder |
Rexel Style CC Shredder |
Rexel Style RC Shredder |
|
Type de coupe |
Coupe croisée |
Coupe croisée |
Coupe croisée |
Coupe ibres |
|
|
|
|
|
|
|
Taille des particules |
4 x 35 mm |
4 x 23 mm |
4 x 30 mm |
5,8 mm |
|
Niveau de sécurité |
DIN 3 |
DIN 3 |
DIN 3 |
DIN 2 |
|
Capacité de destruction |
11 feuilles (80 gsm) |
7 feuilles (80 gsm) |
5 feuilles (80 gsm) |
7 feuilles (80 gsm) |
|
(en une fois) |
|
|
|
|
|
Ouverture de coupe |
230 mm |
230 mm |
230 mm |
230 mm |
|
|
|
|
|
|
|
Dimensions de l’appareil |
430 x 232 x 410 mm |
378 x 203 x 360 mm |
340 x 185 x 320 mm |
340 x 185 x 320 mm |
|
|
|
|
|
|
|
Tension/Fréquence |
220-240 V~50 Hz |
220-240 V~50 Hz |
220-240 V~50 Hz |
220-240 V~50 Hz |
|
nominale |
|
|
|
|
|
|
|
|
|
|
|
Intensité nominale |
2 A |
1,6 A |
0,8 A |
0,8 A |
|
Introduction
Merci d’avoir choisi ce destructeur Rexel qui devrait vous donner entière satisfaction. Veuillez prendre quelques minutes pour lire le mode d’emploi qui vous indiquera comment proiter au maximum de votre
nouvel appareil.
Description des pièces du produit (fig 1)
1 Cordon d’alimentation (fiche européenne illustrée)
2 Fenêtre de contrôle de remplissage de la corbeille
3 Ouverture de coupe
Consignes de sécurité |
m |
|
|
• Veuillez conserver ces instructions dans un lieu sûr pour toute référence ultérieure.
• Prêtez une attention toute particulière aux symboles de sécurité illustrés sur la face supérieure du destructeur et observezles lors du
fonctionnement de l’appareil.
• Si le destructeur a besoin d’être nettoyé, débranchez-le de la prise de courant et utilisez un chiffon humide. N.B. : N’utilisez jamais de produit
de nettoyage à cet effet.
• Ne placez pas l’appareil près d’une source de chaleur.
• Ne placez pas l’appareil dans un endroit humide.
• Veillez à ne pas renverser de liquide sur l’appareil.
• Renvoyez le produit et une preuve d’achat (ticket de caisse) au magasin où vous l’avez acheté dans les cas suivants :
-le cordon d’alimentation ou la prise est endommagée ;
-l’appareil fonctionne mal depuis qu’un liquide a été accidentellement
déversé sur la machine ;
- le destructeur ne fonctionne pas, bien que vous ayez suivi les
instructions de cette notice.
• Veillez à ce que personne ne puisse trébucher sur le cordon d’alimentation.
• Veuillez vous assurer que l’alimentation est compatible avec les exigences de l’appareil (220-240 V 50 Hz).
• Pour éviter tout risque de blessure, n’ouvrez pas le boîtier de l’appareil pour essayer d’effectuer vous-même une réparation. La garantie
sera annulée en cas de tentative de réparation par du personnel non qualiié.
N’essayez PAS de réparer vous-même le destructeur. m GARDEZ HORS DE PORTÉE DES ENFANTS.
Préparation avant l’emploi
Comment utiliser le destructeur correctement :
1 Veillez à ne pas insérer de doigts, cravates ou autres objets dans l’ouverture de coupe du destructeur.
2 Pour éviter d’endommager les couteaux, essayez de ne pas faire passer de matériels plastiiés ou de sacs en plastique, entre autres,
dans le destructeur.
3 N’alimentez pas de feuilles de papier humides car elles risquent de s’enchevêtrer dans les couteaux.
4 Lors de l’alimentation des feuilles, ne dépassez pas la capacité de couple indiquée.
5 N’utilisez pas l’appareil de façon continue pendant plus de 3 minutes (2 minutes pour le destructeur Style RC). S’il fonctionne pendant trop longtemps, le moteur risque de surchauffer.
6 N’utilisez la fonction « REV » ( ) (marche arrière) qu’en cas de besoin. L’emploi excessif de cette fonction peut, en effet, entraîner le blocage des documents dans l’ouverture de coupe, ce qui aura un
effet néfaste sur le bon fonctionnement du destructeur.
Procédure de fonctionnement (fig 2)
1 Branchez l’appareil sur une prise de courant alternatif.
2 Vériiez que la corbeille du destructeur est bien positionnée à
l’intérieur du destructeur.
3Faites glisser le commutateur dans la position ON/AUTO (mode veille).
4 En cas de non utilisation, faites glisser le commutateur dans la
position O (hors tension).
6

Alimentation et arrêt automatiques
• Placez le document ou la carte de crédit au centre de l’ouverture de coupe et la destruction se lancera automatiquement (ig 3).
• Les feuilles d’une largeur inférieure à celle du format A4 doivent être placées au milieu de l’ouverture de coupe pour garantir le
fonctionnement automatique du destructeur.
• Les couteaux s’arrêteront de tourner automatiquement dès la in de l’alimentation de feuilles.
• N’alimentez pas ensemble un nombre de feuilles supérieur à la capacité de coupe indiquée.
• En cas d’alimentation d’un trop grand nombre de feuilles à la fois, le destructeur peut bourrer. En cas de bourrage, faites glisser le commutateur dans la position « REV » ( ) (marche arrière) ain de
débloquer les feuilles en les faisant ressortir par l’ouverture de coupe.
Si les feuilles restent toujours bloquées après la marche arrière, mettez l’appareil hors tension et arrachez les feuilles à la main. Recommencez
ensuite l’alimentation en mettant un moins grand nombre de feuilles à la fois et en introduisant d’abord l’extrémité non découpée.
Avertissement |
m |
|
|
• Ne faites pas fonctionner l’appareil sans arrêt pendant plus de 3 minutes (2 minutes pour le destructeur Style RC). En cas de surchauffe du moteur, le dispositif de sécurité thermique se met automatiquement en marche. Dans ce cas-là, n’utilisez pas l’appareil
pendant 30 minutes. Après le refroidissement du dispositif de sécurité thermique, vous pouvez réutiliser le destructeur en toute sécurité.
• Cet appareil n’est pas un jouet. Gardez-le hors de portée des enfants et des animaux domestiques.
• Réservé à un usage intérieur.
• N’introduisez jamais les doigts dans l’ouverture de coupe du destructeur.
• Éteignez immédiatement l’appareil si vos cheveux, votre cravate ou votre manche se prend accidentellement dans l’appareil.
• L’appareil ne fonctionne que lorsque la corbeille est bien enfoncée dans le destructeur.
• Videz la corbeille quand elle est pleine pour assurer le bon
fonctionnement du destructeur. Le fonctionnement du destructeur avec une corbeille pleine peut entraîner un blocage de papier dans les
couteaux et une hausse du niveau sonore de l’appareil.
• Ne tassez pas les déchets dans la corbeille (par exemple avec les pieds).
Garantie
ACCO Brands Europe garantit son/ses produit(s) et leurs composants contre tout défaut de matériel et de fabrication en cas d’utilisation
normale pendant 2 ans à compter de la date d’achat initiale. Pendant cette période, nous nous engageons à réparer ou remplacer un produit ou
une pièce défectueuse sous réserve des conditions de garantie suivantes :
La garantie s’applique uniquement aux défauts de matériel et de fabrication dans le cadre d’une utilisation normale et ne couvre pas les dommages causés au produit ou à ses pièces résultant de :
(a)la transformation, la réparation, la modiication ou le dépannage exécuté par quiconque autre que le centre de dépannage agréé ACCO ;
(b) les accidents, les actes de négligence, les abus d’usage ou les mauvais usages en raison du non-respect du mode d’emploi normal pour un produit de ce type.
Enregistrez ce produit en ligne à www.accoeurope.com
F
Vidage de la corbeille amovible (fig 4)
Videz la corbeille dès que les déchets sont visibles par la fenêtre de contrôle de remplissage, située sur le côté de la corbeille.
1 Retirez la corbeille (complètement).
2 Videz la corbeille dans un sac à poubelle.
3 Remettez la corbeille dans le destructeur en veillant à bien l’enfoncer.
Dépannage
Si le destructeur ne démarre pas, effectuez les vériications suivantes :
1 L’appareil est-il bien branché ?
2 Le commutateur est-il en mode « ON/AUTO » ?
3 Y a-t-il bourrage ?
4 Le moteur a-t-il surchauffé ?
5 La corbeille est-elle bien enfoncée dans le destructeur ?
En cas de bourrage de papier, veuillez suivre les instructions suivantes :
1 Vériiez si la corbeille est trop pleine. Elle doit être vidée
régulièrement pour éviter le blocage de papier dans les couteaux.
2 Faites glisser le commutateur dans la position « REV » ( )
(marche arrière) pour faire ressortir le papier.
3Si le papier ne ressort pas lorsque le destructeur est en mode marche arrière, faites basculer lentement le commutateur entre les positions « REV » ( ) et « ON/AUTO ». Veillez à ne pas le faire trop rapidement pour ne pas risquer d’endommager le destructeur.
4ATTENTION – N’essayez jamais de débloquer l’ouverture de coupe en utilisant un objet métallique quel qu’il soit (ciseaux, coupe-papier, etc.) – ce modèle étant alimenté sur secteur, vous risquez alors de vous infliger des blessures graves.
Cet appareil n’exige aucun lubriiant. Acco Brands Europe décline toute
responsabilité concernant le bon fonctionnement ou la sécurité de l’appareil en cas d’utilisation de lubriiant sur l’une ou plusieurs des
pièces de cet appareil.
Aucune des dispositions de la présente garantie n’aura pour effet d’exclure la responsabilité d’ACCO en cas de décès et de blessures corporelles causées par la négligence d’ACCO. Cette garantie est offerte (sous réserve des présentes conditions) en sus de vos droits légaux qui ne sont pas remis en cause.
Ces conditions seront à tous égards régies et interprétées par le droit anglais et soumises à la juridiction exclusive des tribunaux anglais.
7

Technische Daten
|
Rexel ProStyle Shredder |
Rexel Style+ Shredder |
Rexel Style CC Shredder |
Rexel Style RC Shredder |
|
|
Schnitttyp |
Partikelschnitt |
Partikelschnitt |
Partikelschnitt |
Streifenschnitt |
|
|
|
|
|
|
|
|
|
Partikelgröße |
4 x 35 mm |
4 x 23 mm |
4 x 30 mm |
5,8 mm |
|
|
Sicherheitsstufe |
DIN 3 |
DIN 3 |
DIN 3 |
DIN 2 |
|
|
Blattkapazität |
11 Blatt (80 gsm) |
7 Blatt (80 gsm) |
5 Blatt (80 gsm) |
7 Blatt (80 gsm) |
|
|
(pro Durchgang) |
|
|
|
|
|
|
Einzugsbreite |
230 mm |
230 mm |
230 mm |
230 mm |
|
|
|
|
|
|
|
|
|
Geräteabmessungen |
430 x 232 x 410 mm |
378 x 203 x 360 mm |
340 x 185 x 320 mm |
340 x 185 x 320 mm |
|
|
|
|
|
|
|
|
|
Nennspannung/-frequenz |
220-240 V/~50 Hz |
220-240 V/~50 Hz |
220-240 V/~50 Hz |
220-240 V/~50 Hz |
|
|
|
|
|
|
|
|
|
Nennstrom |
2 A |
1,6 A |
0,8 A |
0,8A |
|
|
|
||||||
|
|
|
|
|
|
|
Einführung
Vielen Dank für Ihre Wahl dieses Aktenvernichters von Rexel. Wir sind uns sicher, dass er Ihnen gute Dienste leisten wird, aber nehmen Sie sich zuerst bitte etwas Zeit zum Durchlesen dieser Anweisungen, damit Sie das Gerät optimal nutzen können.
Beschreibung der Produktteile (Abb. 1)
1 Netzkabel (abgebildet mit Eurostecker)
2 Sichtfenster
3 Papiereinzugsschlitz
Sicherheit |
m |
|
|
• Bewahren Sie diese Anleitung bitte an einem sicheren Ort auf, damit Sie bei Bedarf später nachschlagen können.
• Beachten Sie die Sicherheitssymbole oben auf dem Aktenvernichter bitte genau und bedienen Sie das Gerät entsprechend.
• Falls der Aktenvernichter gereinigt werden muss, ziehen Sie den Stecker des Geräts aus der Netzsteckdose und verwenden Sie ein feuchtes Tuch. Hinweis: Verwenden Sie zum Reinigen des Geräts keine Reinigungsprodukte.
• Stellen Sie das Gerät nicht in der Nähe von Gegenständen auf, die Wärme ausstrahlen.
• Stellen Sie das Gerät nicht in einer feuchten Umgebung auf.
• Achten Sie darauf, dass das Gerät nicht mit Flüssigkeiten bespritzt wird.
• Bringen Sie das Gerät sowie einen Kaufbeleg (Quittung) wieder zu dem Händler, bei dem Sie es gekauft haben, falls: - Netzkabel oder Stecker defekt sind. - das Gerät nicht mehr richtig funktioniert, weil versehentlich eine Flüssigkeit darauf verschüttet wurde. - der Aktenvernichter trotz Befolgung der Leitlinien in der Anleitung
nicht funktioniert.
• Stellen Sie sicher, dass das Netzkabel keine Stolperoder Sturzgefahr darstellt.
• Stellen Sie bitte sicher, dass die Netzstromversorgung den Anforderungen des Geräts entspricht (220-240 V/50 Hz).
• Um eine Verletzungsgefahr zu vermeiden, sollten Sie das Gehäuse des Geräts nie öffnen, um selbst eine Reparatur durchzuführen. Bei einem Instandsetzungsversuch durch eine nicht qualiizierte Person wird die Garantie ungültig.
m Gerät nicht selbst reparieren. GERÄT VON KINDERN FERNHALTEN.
Vorbereitung vor der Verwendung
Korrekte Verwendung des Aktenvernichters:
1 Achten Sie unbedingt darauf, dass keine Finger, Krawatten oder andere Gegenstände in den Papiereinzugsschlitz des Aktenvernichters eingeführt werden.
2 Um eine Beschädigung des Schneidwerks zu vermeiden, vermeiden Sie möglichst, dass Laminiermaterial, Plastiktüten usw. in den
Aktenvernichter gelangen.
3 Vernichten Sie kein nasses Papier, da es sich im Schneidwerk verheddern kann.
4 Vernichten Sie nicht mehr als die angegebene Höchstblattzahl in einem Durchgang.
5 Betreiben Sie das Gerät nicht länger als 3 Minuten (2 Minuten beim Modell Style RC) im Dauerbetrieb. Wenn das Gerät zu lange läuft, kann es zur Überhitzung des Motors kommen. Bei überhitztem Motor müssen Sie das Gerät mindestens 30 Minuten lang abkühlen lassen,
bevor Sie den Betrieb wieder aufnehmen.
6 Verwenden Sie die Funktion REV ( ) (Rückwärtsbetrieb) nur bei Bedarf. Eine übermäßige Verwendung der Funktion REV ( ) kann dazu führen, dass das Papier im Einzugsschlitz stecken bleibt, und dies kann die Leistung des Aktenvernichters beeinträchtigen.
Korrektes Betriebsverfahren (Abb. 2)
1 Stecken Sie den Stecker in die Wechselstrom-Netzsteckdose.
2 Prüfen Sie, ob der Auffangbehälter des Aktenvernichters ganz
eingeschoben ist.
3Schieben Sie den Schalter auf die Position ON/AUTO (Bereitschaftsmodus).
4 Wenn das Gerät nicht in Verwendung ist, schieben Sie den Schalter
auf die Position O (Aus).
8

Automatische Aktenvernichtung und Stoppen des Betriebs
• Führen Sie das Papier oder die Kreditkarte in der Mitte des Einzugsschlitzes ein – die Aktenvernichtung beginnt automatisch (Abb. 3).
• Papier, das schmaler ist als die Breite eines A4-Blatts, sollten Sie in der Mitte des Einzugsschlitzes einführen, um sicherzustellen, dass der
Betrieb automatisch beginnt.
• Nachdem das Papier oder die Kreditkarte vernichtet ist, stellt das
Schneidwerk den Betrieb automatisch ein.
• Vernichten Sie nicht mehr als die angegebene Höchstblattzahl pro
Durchgang.
• Falls zu viele Blätter auf einmal eingeführt werden, kann der
Aktenvernichter blockieren. Bei einer Blockierung schieben Sie den Schalter auf die Position REV ( ) (Rückwärtsbetrieb), um die Blockierung aufzuheben, indem das Papier rückwärts läuft. Falls das Papier sich so im Schneidwerk verheddert hat, dass ein Rückwärtsbetrieb nicht mehr möglich ist, schalten Sie das Gerät aus und ziehen Sie das Papier von Hand heraus. Beginnen Sie dann die Aktenvernichtung mit weniger Blättern und schieben Sie die noch nicht vernichtete Kante des Papiers zuerst in den Schlitz.
Achtung |
m |
|
|
• Lassen Sie das Gerät nicht länger als 3 Minuten (2 Minuten beim Modell Style RC) im Dauerbetrieb laufen. Wenn der Motor überhitzt ist, spricht der Sicherheitsthermoschalter automatisch an. Bei ausgelöstem Thermoschalter dürfen Sie das Gerät ungefähr 30 Minuten lang nicht verwenden, während der wärmeempindliche Sicherheitsschalter abkühlt, so dass der sichere Betrieb wieder aufgenommen werden kann.
• Das Gerät ist kein Spielzeug; von Kindern und Haustieren fern halten!
• Nicht für den Gebrauch im Freien geeignet!
• Stecken Sie niemals Ihre Finger in den Einzugsschlitz des
Aktenvernichters.
• Schalten Sie das Gerät sofort am Netzschalter aus, falls sich Haare, eine Krawatte oder ein Ärmel im Aktenvernichter verfangen haben.
• Der Auffangbehälter muss ganz in den Aktenvernichter hineingeschoben werden, bevor das Gerät den Betrieb aufnehmen kann.
• Leeren Sie den Auffangbehälter, wenn er voll ist, da ansonsten die Aktenvernichterleistung beeinträchtigt wird. Wenn Sie den Aktenvernichter bei vollem Auffangbehälter laufen lassen, kann dies dazu führen, dass Papier im Schneidwerk blockiert, und dies wird den Geräuschpegel des Geräts steigern.
• Drücken Sie das vernichtete Papier im Auffangbehälter nicht mit dem Fuß zusammen.
D
Leeren des ausziehbaren Abfallauffangbehälters (Abb. 4)
Leeren Sie den Auffangbehälter des Aktenvernichters, sobald durch das
Sichtfenster an der Seite des ausziehbaren
Auffangbehälters vernichtetes Papier sichtbar ist.
1 Ziehen Sie den Auffangbehälter (ganz) heraus.
2 Entleeren Sie den Inhalt des Behälters in einen Abfallsack.
3 Schieben Sie den Auffangbehälter wieder in das Gerät hinein und
achten Sie darauf, dass er ganz hineingeschoben wird.
Störungsbeseitigung
Falls der Aktenvernichter nicht startet, prüfen Sie bitte Folgendes:
1 Haben Sie das Gerät richtig mit der Steckdose verbunden?
2 Haben Sie den Schalter auf den Modus ‘ON/AUTO’ eingestellt?
3 Besteht eine Papierblockierung im Gerät?
4 Ist der Motor überhitzt?
5 Ist der Auffangbehälter des Geräts ganz eingeschoben?
Falls eine Papierblockierung besteht, befolgen Sie bitte folgende
Anweisungen:
1 Prüfen Sie, ob der Auffangbehälter zu voll ist – er sollte regelmäßig geleert werden, um eine Blockierung von Papier im Schneidwerk zu
vermeiden.
2 Schieben Sie den Schalter auf die Position REV ( ) (Rückwärtsbetrieb), um das blockierte Papier rückwärts laufen zu
lassen.
3 Falls das Papier so blockiert ist, dass es beim Rückwärtsbetrieb nicht mehr herauskommt, schieben Sie den Schalter langsam zwischen REV ( ) und ON/AUTO hin und her. Tun Sie dies allerdings nicht zu schnell, denn dies kann den Aktenvernichter beschädigen.
4WARNHINWEIS – Versuchen Sie auf keinen Fall, zum Beheben einer Blockierung des Schlitzes irgendeinen Metallgegenstand zu verwenden (Schere, Brieföffner usw.) – im Gehäuse dieses Modells herrscht Netzstrom, der schwere Verletzungen verursachen könnte.
Für dieses Gerät ist kein Schmieröl erforderlich. Acco Brands Europe übernimmt keine Haftung für die Produktleistung oder-sicherheit bei Verwendung von Schmieröl auf irgendeinem Teil dieses Geräts.
Gewährleistung
Alle ACCO Brands Europe-Produkte und deren Bauteile unterliegen bei normaler Verwendung und Wartung einer zweijährigen Garantie ab Kaufdatum auf Material und Verarbeitungsqualität. Während des Gewährleistungszeitraums wird ein defektes Gerät oder Bauteil unter den nachfolgend aufgeführten Bedingungen entweder repariert oder ersetzt.
Diese Garantie deckt ausschließlich Mängel bei Material und Verarbeitungsqualität ab, wenn das Gerät normal verwendet wird. Durch eine der folgenden Ursachen hervorgerufene Schäden an Produkten
oder deren Bauteilen werden nicht abgedeckt:
a.) Modiizierung, Reparatur oder Wartung, die von Anderen als dem autorisierten ACCO-Servicepersonal durchgeführt wurde
Registrieren Sie dieses Produkt online bei www.accoeurope.com
b.) Unfälle, Nachlässigkeit, Missbrauch oder falsche Anwendung aufgrund einer Missachtung der für ein Gerät des jeweiligen Typs normalen Einsatzmethoden
Diese Garantie hat keinerlei ausschließende Wirkung auf die Haftbarkeit von ACCO bei Tod oder Personenschaden aufgrund einer Verletzung der Sorgfaltsplicht seitens ACCOs. Diese Garantie gilt (gemäß den vorliegenden Bedingungen) zusätzlich zu jeglichen gesetzlich vorgeschriebenen Rechten und hat auf diese keinerlei Auswirkungen.
Sämtliche Aspekte dieser Bedingungen unterliegen der englischen Gesetzgebung, ausschließlicher Gerichtsstand ist England.
9

Scheda tecnica
|
Rexel ProStyle Shredder |
Rexel Style+ Shredder |
Rexel Style CC Shredder |
Rexel Style RC Shredder |
|
Tipo di taglio |
Taglio a particelle |
Taglio a particelle |
Taglio a particelle |
Taglio a strisce |
|
|
|
|
|
|
|
Dimensione del frammento |
4 x 35 mm |
4 x 23 mm |
4 x 30 mm |
5,8 mm |
|
Livello di sicurezza |
DIN 3 |
DIN 3 |
DIN 3 |
DIN 2 |
|
Capacità di taglio (per volta) |
11 fogli (80 gsm) |
7 fogli (80 gsm) |
5 fogli (80 gsm) |
7 fogli (80 gsm) |
|
Luce di taglio |
230 mm |
230 mm |
230 mm |
230 mm |
|
Dimensioni |
430 x 232 x 410 mm |
378 x 203 x 360 mm |
340 x 185 x 320 mm |
340 x 185 x 320 mm |
|
Alimentazione |
220-240V~50Hz |
220-240V~50Hz |
220-240V~50Hz |
220-240V~50Hz |
|
Corrente nominale |
2 Amp |
1,6 Amp |
0,8 Amp |
0,8 Amp |
|
Introduzione
Grazie per avere scelto questo distruggidocumenti Rexel, una
macchina che si rivelerà indubbiamente molto utile. Si prega di leggere attentamente queste istruzioni prima dell’uso per garantirne la massima prestazione.
Descrizione delle parti del distruggidocumenti (fig 1)
1 Cavo di alimentazione (presa europea indicata)
2 Finestra per controllo riempimento
3 Imboccatura
Sicurezza |
m |
|
|
• Conservare questo manuale di istruzioni in un luogo sicuro per futura consultazione.
• Fare particolare attenzione ai simboli di sicurezza riportati sulla parte
superiore del distruggidocumenti ed usare la macchina in conformità a tali indicazioni.
• Prima di procedere alla pulizia del distruggidocumenti, scollegare la macchina dalla presa di alimentazione e pulire usando un panno umido. N.B. – Non utilizzare detergenti per la pulizia di questo
dispositivo.
• Non collocare il distruggidocumenti vicino a fonti di calore.
• Non mettere il distruggidocumenti in un ambiente umido.
• Fare attenzione a non spruzzare liquidi sulla macchina.
• Restituire il distruggidocumenti insieme ad una prova di acquisto (ricevuta) presso il negozio nel quale è stato acquistato in caso di: - rottura del cavo di alimentazione o della spina; - malfunzionamento della macchina a causa di inavvertito versamento
di liquidi sul dispositivo;
- mancato funzionamento del distruggidocumenti nonostante siano state osservate le istruzioni riportate nel presente manuale.
• Controllare che il cavo di alimentazione non si trovi in posizione tale da far inciampare persone che si trovano nei paraggi.
• Assicurarsi che l’alimentazione usata corrisponda a quella richiesta per la macchina (220-240V 50Hz).
• Per evitare eventuali infortuni, non aprire la macchina per effettuare riparazioni. Qualsiasi intervento di riparazione effettuato da personale non qualiicato annullerà la garanzia.
m NON tentare di riparare personalmente il distruggidocumenti.
TENERE LONTANO DALLA PORTATA DEI BAMBINI.
Preparazione prima dell’uso
Istruzioni per l’uso corretto del distruggidocumenti
1 Fare attenzione a non inserire dita, cravatte ed altri oggetti
nell’imboccatura del distruggidocumenti.
2 Per evitare danni al gruppo di taglio, controllate che non entrino nel
distruggidocumenti materiali di plastiicazione, sacchetti di plastica,
ed oggetti simili.
3Non distruggere carta bagnata in quanto può incepparsi nel gruppo di taglio.
4Non distruggere una quantità di fogli per volta maggiore di quella indicata.
5Non distruggere ininterrottamente per più di 3 minuti (2 minuti con il distruggidocumenti Style RC) per volta. L’uso eccessivo della
macchina potrebbe causare il surriscaldamento del motore. In tale evenienza, attendere almeno 30 minuti per consentire alla macchina di raffreddarsi prima di continuare l’operazione di distruzione.
6 Non usare la funzione “REV” ( ) (reverse) a meno che non sia assolutamente necessario. L’uso eccessivo della funzione “REV”
(  ) (reverse) potrebbe comportare l’inceppamento della carta
nell’imboccatura del distruggidocumenti pregiudicando il buon funzionamento della macchina.
Uso corretto del distruggidocumenti (fig 2)
1 Inserire la spina nella presa di alimentazione c.a.
2Controllare che il cestino del distruggidocumenti sia stato completamente inserito.
3 Mettere l’interruttore in posizione ON/AUTO (modalità standby).
4 Spostare l’interruttore nella posizione O (off) quando il
distruggidocumenti non è in funzione.
10
Avvio/arresto automatico
• Collocare la carta, o la carta di credito, al centro dell’imboccatura e l’operazione di distruzione verrà avviata automaticamente (ig 3).
• Per formati minori di A4 in larghezza, posizionare il foglio al centro dell’imboccatura per far funzionare automaticamente il
distruggidocumenti.
• La rotazione del gruppo di taglio verrà arrestata automaticamente a completamento dell’operazione di distruzione della carta.
• Non distruggere una quantità di fogli per volta maggiore di quella indicata.
• L’inserimento di una quantità eccessiva di fogli per volta può causare l’inceppamento della macchina. In tale evenienza, mettere l’interruttore nella posizione REV ( ) per eliminare l’inceppamento facendo funzionare la macchina in reverse. In caso l’inceppamento sia così grave da non consentire il funzionamento in reverse del gruppo di taglio, togliere l’alimentazione alla macchina ed estrarre la carta manualmente. Iniziare di nuovo l’operazione di distruzione solo con pochi fogli ed
inserendo per prima l’estremità del foglio non ancora tagliata.
Attenzione |
m |
|
|
• Non distruggere documenti ininterrottamente per più di 3 minuti (2 minuti con il distruggidocumenti Style RC). In caso di surriscaldamento del motore, verrà attivato automaticamente il dispositivo di protezione
da sovraccarico termico. Se dovesse scattare tale dispositivo di protezione, non usare il distruggidocumenti per circa 30 minuti per consentire che il dispositivo di protezione da sovraccarico termico si raffreddi, dopodiché è possibile utilizzare di nuovo la macchina.
• Questa macchina non è un giocattolo. Tenere fuori della portata di bambini e animali domestici.
• Solo per uso all’interno.
• Non mettere mai le dita nell’imboccatura del distruggidocumenti.
• Togliere immediatamente l’alimentazione in caso capelli, cravatte o maniche rimangano impigliati nel distruggidocumenti.
• Il distruggidocumenti non funziona se il cestino non è completamente inserito.
• Svuotare il cestino quando è pieno in quanto l’inosservanza di questa precauzione potrebbe pregiudicare il buon funzionamento
del distruggidocumenti. L’uso della macchina con il cestino pieno potrebbe causare inceppamenti nel gruppo di taglio e comportare un aumento del livello di rumore del dispositivo.
• Non compattare la carta nel cestino usando i piedi.
I
Svuotamento del cestino estraibile (fig 4)
Svuotare il cestino quando si iniziano a vedere i ritagli attraverso la inestra per il controllo el riempimento posta sul lato del cestino
estraibile.
1 Estrarre il cestino (completamente).
2 Svuotare il cestino mettendo i ritagli in un sacchetto dei riiuti. 3 Rimettere il cestino controllando che sia entrato completamente.
Localizzazione dei guasti
In caso di mancato avviamento del distruggidocumenti, controllare che:
1la macchina sia stata collegata correttamente alla fonte di alimentazione;
2 l’interruttore sia stato posto su ‘ON/AUTO’;
3 non vi siano inceppamenti della carta nel distruggidocumenti;
4 il motore non sia surriscaldato;
5 il cestino sia stato completamente inserito.
In caso di inceppamento della carta, seguire la procedura descritta di seguito.
1Controllare che il cestino non sia troppo pieno. Il cestino va svuotato periodicamente per evitare inceppamenti della carta nel gruppo di taglio.
2 Mettere l’interruttore nella posizione ‘REV’ () (reverse) per far
funzionare la macchina in reverse ed eliminare l’inceppamento.
3Se l’inceppamento è tale da non riuscire ad eliminarlo facendo funzionare il distruggidocumenti in reverse, portare lentamente l’interruttore da ‘REV’ ( ) a ‘ON/AUTO’. Non spostare l’interruttore troppo velocemente in quanto si potrebbe danneggiare la macchina.
4ATTENZIONE – Non usare mai oggetti metallici (forbici, aprilettere, ecc.) per tentare di liberare l’imboccatura poiché è presente tensione di rete all’interno della macchina che potrebbe causare gravi lesioni.
Questo distruggidocumenti non richiede lubriicante. Acco Brands Europe declina qualsiasi responsabilità per la prestazione o la sicurezza del prodotto in caso si sia usato lubriicante su qualsiasi parte della
macchina.
Garanzia
ACCO Brands Europe garantisce che il proprio prodotto/i propri prodotti e le relative parti sono privi di difetti di materiale e lavorazione in normali condizioni d’uso per un periodo di 2 anni dalla data originale di acquisto. Durante detto periodo, ACCO Brands Europe provvederà a riparare o sostituire prodotti o parti difettosi in base alle seguenti condizioni di garanzia.
La garanzia è valida solo per difetti di materiale e lavorazione in normali condizioni d’uso e non copre eventuali danni arrecati al prodotto o alle
relative parti risultanti da:
a) alterazioni, riparazioni, modiiche o interventi di assistenza tecnica non effettuati da personale di centri di assistenza tecnica ACCO autorizzati;
Registrare il prodotto online su www.accoeurope.com
b) incidenti, negligenza, abuso o uso improprio dovuto alla mancata osservanza delle normali procedure operative per un prodotto di
questo tipo.
Nessuna dichiarazione in questa garanzia implica l’esclusione di
responsabilità di ACCO relativamente alla morte o a danni personali causati da negligenza da parte di ACCO. Questa garanzia viene offerta (subordinatamente a questi termini e condizioni) in aggiunta e senza pregiudizio alcun ai diritti riconosciuti dalla legge vigente.
Queste condizioni sono regolamentate ed interpretate a tutti gli effetti in conformità alla legislazione inglese e subordinate all’esclusiva giurisdizione dei tribunali inglesi.
11
Technische gegevens
|
Rexel ProStyle Shredder |
Rexel Style+ Shredder |
Rexel Style CC Shredder |
Rexel Style RC Shredder |
|
Wijze van snijden |
Snippers |
Snippers |
Snippers |
Stroken |
|
|
|
|
|
|
|
Grootte van de snippers |
4 x 35 mm |
4 x 23 mm |
4 x 30 mm |
5,8 mm |
|
Veiligheidsklasse |
DIN 3 |
DIN 3 |
DIN 3 |
DIN 2 |
|
Maximum aantal vellen |
11 vellen (80 gsm) |
7 vellen (80 gsm) |
5 vellen (80 gsm) |
7 vellen (80 gsm) |
|
(in een keer) |
|
|
|
|
|
Breedte invoeropening |
230 mm |
230 mm |
230 mm |
230mm |
|
|
|
|
|
|
|
Afmetingen apparaat |
430 x 232 x 410 mm |
378 x 203 x 360 mm |
340 x 185 x 320 mm |
340 x 185 x 320 mm |
|
|
|
|
|
|
|
Nominale spanning/ |
220-240 V ~50 Hz |
220-240 V ~50 Hz |
220-240 V ~50 Hz |
220-240 V ~50 Hz |
|
frequentie |
|
|
|
|
|
|
|
|
|
|
|
Nominale stroomsterkte |
2 A |
1,6 A |
0,8 A |
0,8A |
|
Inleiding
Gefeliciteerd met de aankoop van deze papiervernietiger van Rexel. We zijn er van overtuigd dat u veel plezier van dit apparaat zult hebben; om het apparaat optimaal te kunnen benutten, is het echter raadzaam deze gebruiksaanwijzing goed door te lezen.
Beschrijving van de onderdelen (fig 1)
1 Stroomkabel (met Europese stekker)
2 Kijkvenster
3 Invoeropening papier
Veiligheid |
m |
|
|
• Bewaar deze handleiding op een veilige plaats (om deze in de toekomst opnieuw te kunnen raadplegen).
• Neem bij gebruik van de papiervernietiger de veiligheidssymbolen bovenop het apparaat in acht.
• Haal voor het reinigen van de papiervernietiger eerst de stekker uit het stopcontact en gebruik vervolgens een vochtige doek. NB. Gebruik
geen reinigingsmiddelen voor het reinigen van het apparaat.
• Plaats het apparaat niet in de buurt van een voorwerp dat warmte afgeeft.
• Plaats het apparaat niet in een vochtige ruimte.
• Zorg dat het apparaat niet nat wordt.
• Breng het apparaat, met het bewijs van aankoop (de kassabon), terug naar de winkel waar het gekocht is, indien:
-de stroomkabel of stekker kapot is;
-het apparaat niet goed functioneert omdat het per ongeluk nat is
geworden;
- het apparaat het niet doet, ondanks dat de gebruikshandleiding
gevolgd is.
• Zorg dat er niet over de stroomkabel gestruikeld kan worden.
• Zorg dat de stroomtoevoer geschikt is voor dit apparaat (220-240 V 50 Hz).
• Maak de behuizing niet open om zelf het apparaat te repareren indien het defect is; zo voorkomt u lichamelijk letsel. Bij eventuele pogingen door een onbevoegd persoon om dit apparaat te repareren, vervalt
de garantie.
m Probeer NOOIT de papiervernietiger zelf te repareren UIT DE BUURT VAN KINDEREN HOUDEN.
Voorbereiding voor gebruik
Correcte bediening van de papiervernietiger:
1 Zorg dat er geen vingers, stropdassen of andere voorwerpen in de invoeropening van de papiervernietiger terechtkomen.
2 Zorg dat er geen lamineerproducten, plastic zakjes/tassen e.d. door de papiervernietiger worden gevoerd; zo voorkomt u schade aan het
snijmechanisme.
3 Voer geen nat papier in; dit kan vastlopen in het snijmechanisme. 4 Houd u telkens aan de maximumcapaciteit voor ingevoerde vellen.
5 Gebruik het apparaat nooit langer dan 3 minuten zonder onderbreking (2 minuten voor de Style RC-papiervernietiger). Als het apparaat te lang gebruikt wordt, kan de oververhittingsbeveiliging
in werking treden. Laat het apparaat in dat geval ten minste 30 minuten afkoelen voordat het weer gebruikt wordt.
6 Gebruik de stand ‘REV’ ( ) (achteruit) alleen als dat nodig is. Als de stand ‘REV’ ( ) (achteruit) te veel gebruikt wordt, kan er papier vastlopen in de invoeropening, waardoor de papiervernietiger niet
meer goed functioneert.
Correcte bediening (fig 2)
1 Steek de stekker in het stopcontact.
2 Controleer of de opvangbak volledig is ingeschoven.
3 Zet de schakelaar op ‘ON/AUTO’ (op standby).
4 Zet de schakelaar op O (uit) als de papiervernietiger niet gebruikt wordt.
12
 Loading...