

REVELL 1969 Camaro Yenko-SC User Manual [en, fr, nl, it, gr, da, no, fi, sv, es, pt, de, en, hr, et, fi, hu, lv, lt, nl, pl, ro, ru, sr, sk, sl, cs, tr, gr, bg, uk, ch, he, ar, ja, ch, ch, ko, hi, id, kk, ms, fa, pt, es, th, vi, sq, mk]
KIT2826 85282600200
‘69 Camaro® Yenko/SC
427 Coupe
Catching both the automotive industry and the American motoring public by surprise, Ford released the new Mustang in April, 1964
to unprecedented success. Its smaller, two door profile along with
its long hood/short rear deck design made a lasting impression on
everyone who saw it.
Stunned by the sales numbers the Mustang was racking up, it
took until 1967 for General Motors to bring its competitors to market.
Chevrolet® unveiled the new ’67 Camaro® in the fall of 1966. Among
the available options was the "SS"™ package that included the new
350 cubic inch engine. In a classic example of corporate competition, Ford offered its 390 engine in the Mustang for ’67 which of
course spurred Chevy® to release its 396 big block V8 as a mid-year
Camaro option.
The 396 Camaros burned up the drag strips across the country, but fans also knew that Chevy had an even larger 427 cubic
inch V8 in its arsenal. When initial requests for the factory to install
Chevy dealership in Pennsylvania, Yenko used his connections
within the GM management to convince Chevy in 1969 to write what
was known as a "COPO" order, which stood for Corporate Office
Production Order. These were used for special combinations of
options that were not generally available.
Don Yenko grabbed up 201 of the special 427 powered ’69
Camaros for his dealership. All of the Yenko cars came equipped
with the 450 horsepower version of the iron block 427, high-rise
intake with Holley 4 barrel carb, power disc brakes, the ZL2 cowl
induction hood, positraction rear end with 4.10 gear and the customer’s choice of a 4 speed manual transmission or GM’s M40 TurboHydramatic automatic transmission which in this case came with
Hurst’s dual-gate linkage. Yenko’s staff added the horizontal body
stripes and headrest graphics after the cars arrived at his dealership.
Today, original Yenkos are among the most sought after Camaros
ever built
the 427 into the Camaro were turned down, enterprising Chevrolet
dealers started ordering the engines by themselves and swapped
the big motors in. Don Yenko was one such dealer. Owning a large
* REPEAT SEVERAL TIMES
* A REPETER PLUSIEURS FOIS
READ THIS BEFORE YOU BEGIN LIRE CE QUI SUIT AVANT DE COMMENCER
* Study the assembly drawings.
* Each plastic part is identified by a number.
* In the assembly drawings, some parts will be
marked by a star (★) to indicate chrome
plated plastic.
* For better paint and decal adhesion, wash
the plastic parts in a mild detergent solution.
Rinse and let air dry.
* Check the fit of each piece before
cementing in place.
* Use only cement for polystyrene plastic.
* Scrape plating and paint from areas
to be cemented.
* Allow paint to dry thoroughly before
handling parts.
* Any unused parts may be discarded.
DECAL APPLICATION INSTRUCTIONS
1. Cut desired decal from sheet.
2. Dip decal in water for a few seconds.
3. Place wet decal on paper towel.
4. Wait until decal is movable on paper backing.
5. Place decal in position on model, face up and
slide backing away.
6. Press out air bubbles with a soft damp cloth.
7. Milkiness that may appear is for better decal
adhesion and will dry clear. Wipe away any
excess adhesive.
8. Do not touch decal until fully dry.
9. Allow the decals 48 hours to dry before
applying clear coat.
NOTE: Decals are compatible with
setting solutions or solvents.
* OPTIONAL PARTS
* PIECES EN OPTION
* DECAL
* DECAL COMANIE
* Etudier les schémas de montage.
* Chaque pièce en plastique est identifiée par un numéro.
* Sur les schémas de montage, certaines pièces sont
marquées d'une étoile (★) pour indiquer qu'elles sont en
plastique chromé.
* Pour une meilleure prise de la peinture et des autocollants,
laver les pièces en plastique avec une solution détergente
peu concentrée. Les rincer et les laisser sécher à l'air.
* Vérifier que chaque pièce s'ajuste bien avant
de la coller en place.
* N'utiliser que de la colle pour polystyrène.
* Gratter les parties à coller pour enlever le chrome et la peinture.
* Laisser la peinture bien sécher avant de manipuler les pièces.
* Toute pièce inutilisée peut être jetée.
DIRECTIVES D'APPLICATION DES AUTOCOLLANTS
1. Découper l'autocollant désiré de la feuille.
2. Tremper l'autocollant dans de l'eau pendant quelques secondes.
3. Placer l'autocollant mouillé sur une serviette en papier.
4. Attendez que l'autocollant puisse être déplacé sur son support
en papier.
5. Mettre l'autocollant en position sur le modèle face sur
le dessus et faire glisser le support pour l'enlever.
6. Appuyer avec un chiffon doux humide pour éliminer les bulles d'air.
7. La substance laiteuse qui peut apparaître est destinée à
améliorer l'adhésion de l'autocollant et devient incolore au
séchage. Essuyer pour enlever tout excédent d'adhésif.
8. Ne pas toucher l'autocollant tant qu'il n'est pas bien sec.
9. Laisser l'autocollant sécher pendant 48 heures avant
d'appliquer une couche transparente.
REMARQUE: Les autocollants sont compatibles avec
* ALTERNATIVE ASSEMBLY
* ENSEMBLAGE ALTERNATIVE
les solutions de fixage ou les solvants.
* CEMENT TOGETHER
* A COLLER
* REMOVE AND THROW AWAY
* A RETIRER ET JETER
* DO NOT CEMENT
* NE PAS COLLER
This optional paint guide is provided if
you choose to detail paint your model.
Ce guide de peinture vous sera fourni si vous choisissez
de peindre votre modèle en détail.
Aluminium
Gloss Black
Gloss Red
Gloss Yellow
Semigloss Black
Silver
Steel
Turn Signal Amber
White
Aluminum
Noir brilliant
Rouge brilliant
Jaune brilliant
Noir satiné
Argent
Acier
Clignotant ambre
Blanc
If you have any questions or comments, call our hotline at: (800) 833-3570
or, please write to:
Revell-Monogram Consumer Service Department, 725 Landwehr Road, Northbrook, Illinois 60062
Be sure to include the plan number (85282600200), part number, description, your return address and phone number.
Visit our website: www.revell-monogram.com
REVELL-MONOGRAM, LLC Northbrook, IL. Copyright © 2003. All rights reserved.
1
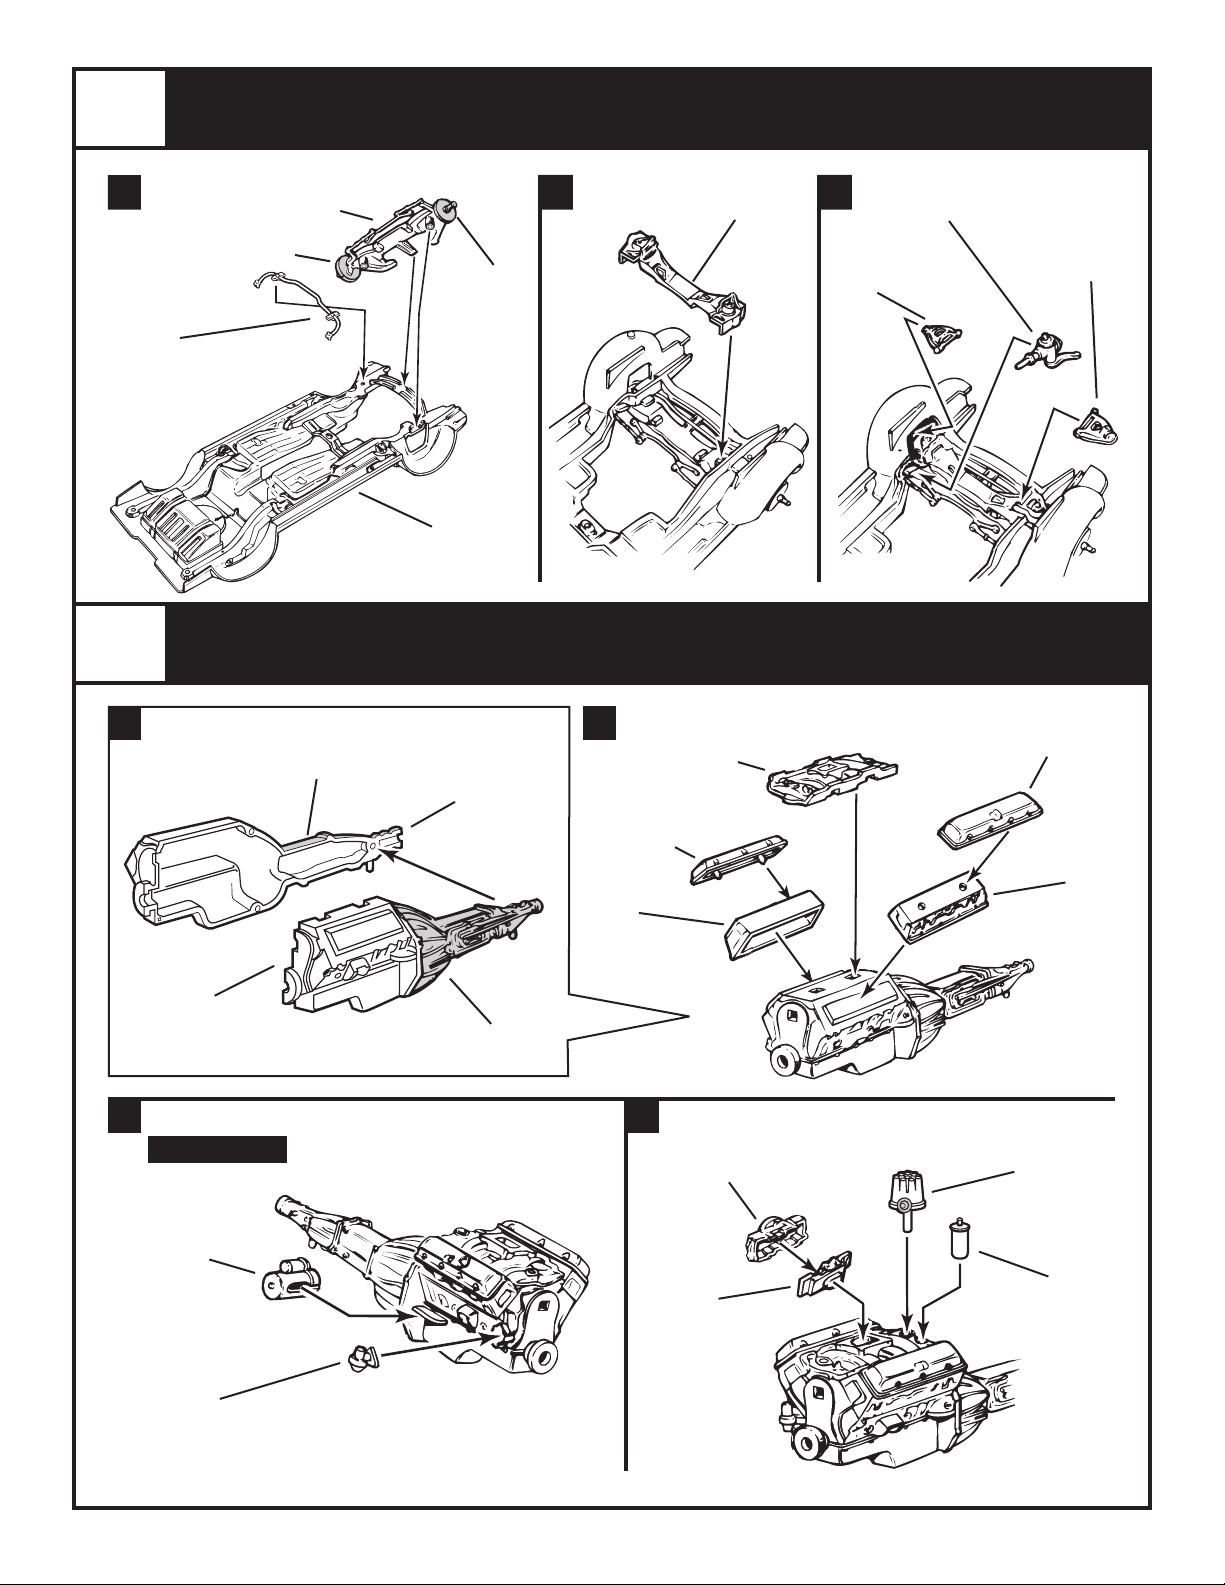
FRONT SUSPENSION ASSEMBLY
A
SWAY BAR
GLOSS BLACK
2
A
19
FRONT
SUSPENSION
GLOSS BLACK
ALUMINUM
38
ALUMINUM
16
CHASSIS
SEMIGLOSS
BLACK
B
20
CROSS MEMBER
GLOSS BLACK
C
17
UPPER
A-ARM
GLOSS BLACK
41
STEERING BOX
GLOSS BLACK
18
UPPER
A-ARM
GLOSS BLACK
ENGINE ASSEMBLY
ALUMINUM
61
ENGINE HALF
GLOSS RED
B
MANIFOLD
ALUMINUM
★
80
VALVE COVER
CHROME
63
INTAKE
★
79
VALVE COVER
CHROME
ENGINE HALF
GLOSS RED
C
RIGHT SIDE
34
STARTER
GLOSS BLACK
FUEL PUMP
CHROME
60
★54
ALUMINUM
76
CYLINDER
HEAD
GLOSS RED
D
★56
CARBURETOR
TOP
CHROME
★57
CARBURETOR
BASE
CHROME
62
CYLINDER
HEAD
GLOSS RED
35
DISTRIBUTOR
GLOSS BLACK
53
COIL
GLOSS BLACK
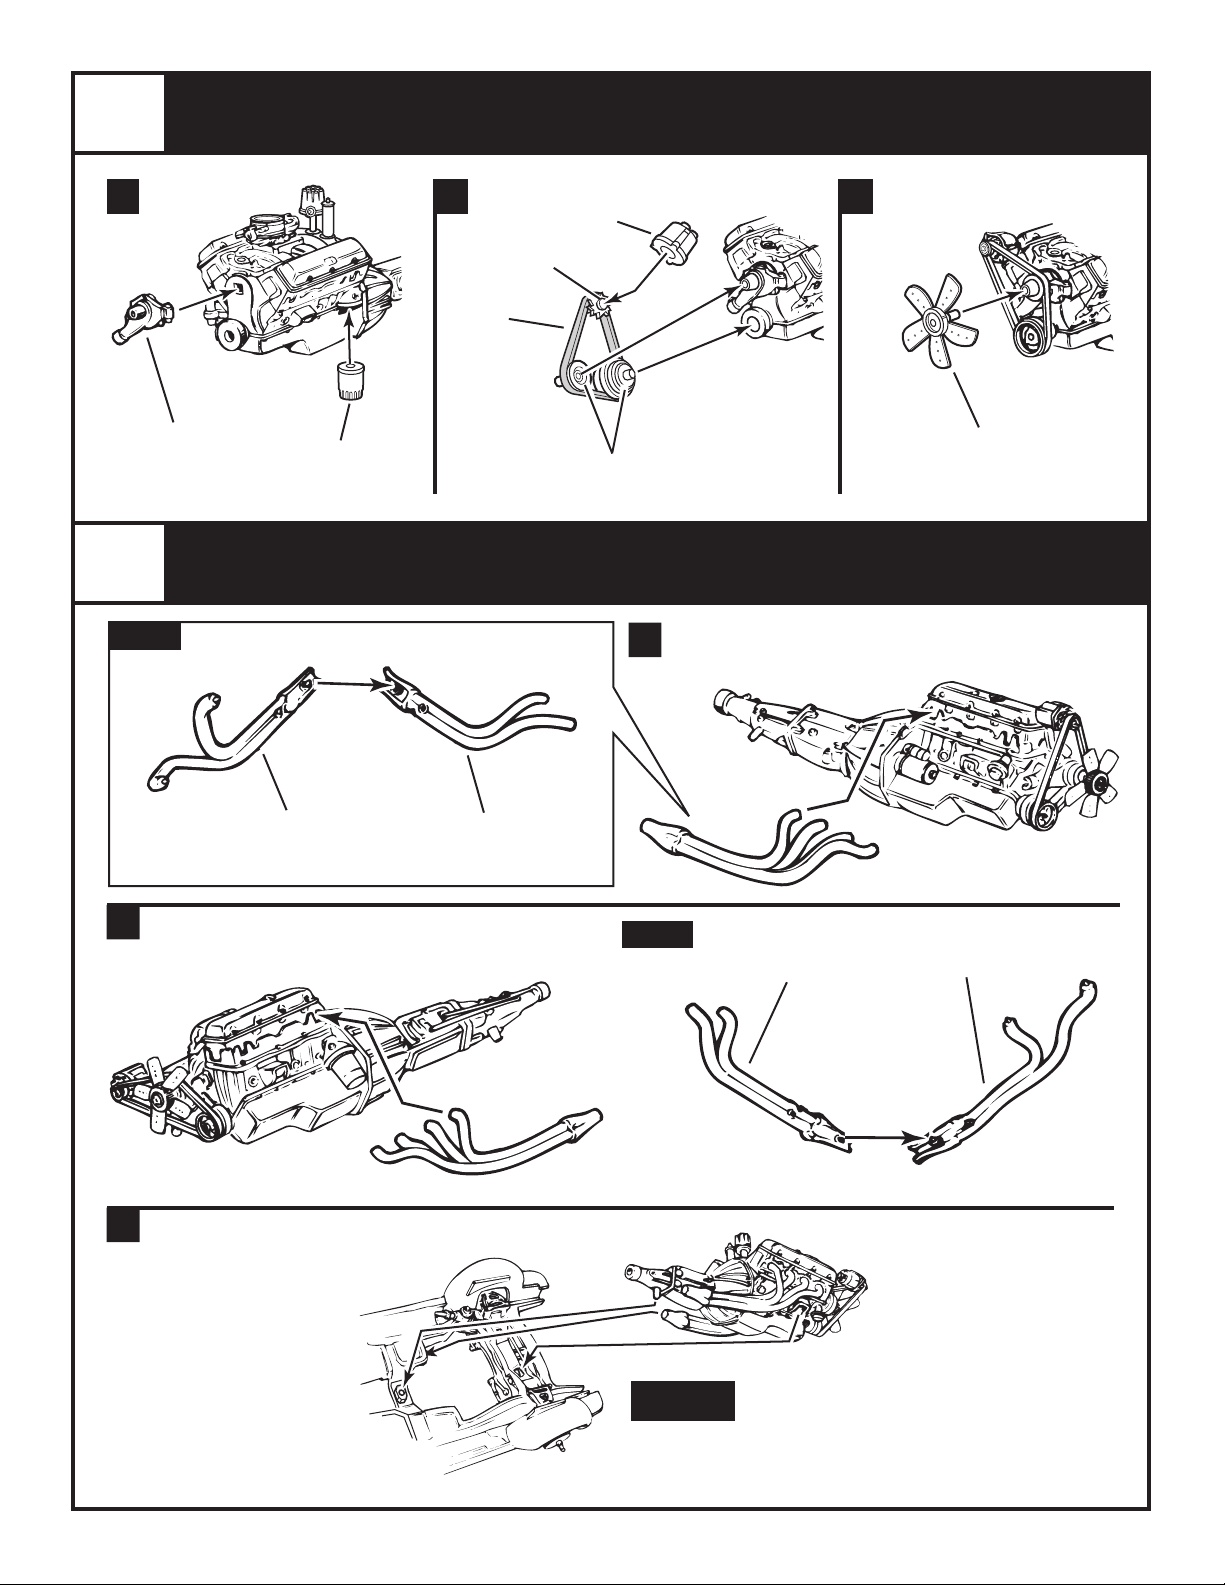
2
ENGINE ASSEMBLY
CONTINUED
E F G
ALUMINUM
68
BELTS
SEMIGLOSS
BLACK
66
WATER PUMP
GLOSS RED
3
RIGHT
51
OIL FILTER
GLOSS RED
EXHAUST ASSEMBLY
★55
ALTERNATOR
CHROME
GLOSS BLACK
A
67
FAN
ALUMINUM
B
C
78
OUTER HEADER
ALUMINUM
65
EXHAUST HEADER
ALUMINUM
LEFT
ENGINE TO
CHASSIS
64
EXHAUST HEADER
ALUMINUM
77
OUTER HEADER
ALUMINUM
 Loading...