

Page 1

GRAND SCENIC
(
www.e-guide.renault.com
)
QUICK GUIDE
Page 2
1
WELCOME TO YOUR GRAND SCÉNIC
Note
Congratulations on your choice: designed for all the family, you will be immediately at home in your New Grand Scénic, which offers exceptional modularity and space,
comfort perfectly tailored to suit you, and high-tech equipment to make your life easier.
In order to make your experience as pleasant as possible, we suggest you discover the main features of your New Grand Scénic by reading this document.
Detailed information regarding your vehicle’s use, maintenance and warranty, as well as videos and simulators,
are all only a click away in the New Grand Scénic e-Guide, available at www.e-guide.renault.com.
Translated from French. Copying or translation, in part or in full, is forbidden unless prior written permission has been obtained from RENAULT, 92100 Billancourt
2009.
This document does not replace the driver’s handbook.
Please read your complete driver’s handbook for more detailed information on the equipment mentioned in the reference guide for your Grand Scénic.
Page 3
Front and engine compar tment
3
Passenger side
4
Rear seats
5
Rear of vehicle
7
Accessing the vehicle
9
Adjusting the front seats
10
Driver’s position settings
11
Star ting/Stopping the engine
12
Dashboar d
13
Instrument panel
14
Lighting/Wipers
15
Driving position
16
Multimedia systems
17
Heating and air conditioning
system
21
Gadgets
22
Page 4
3
F R O N T A N D E N G I N E C O M P A R T M E N T
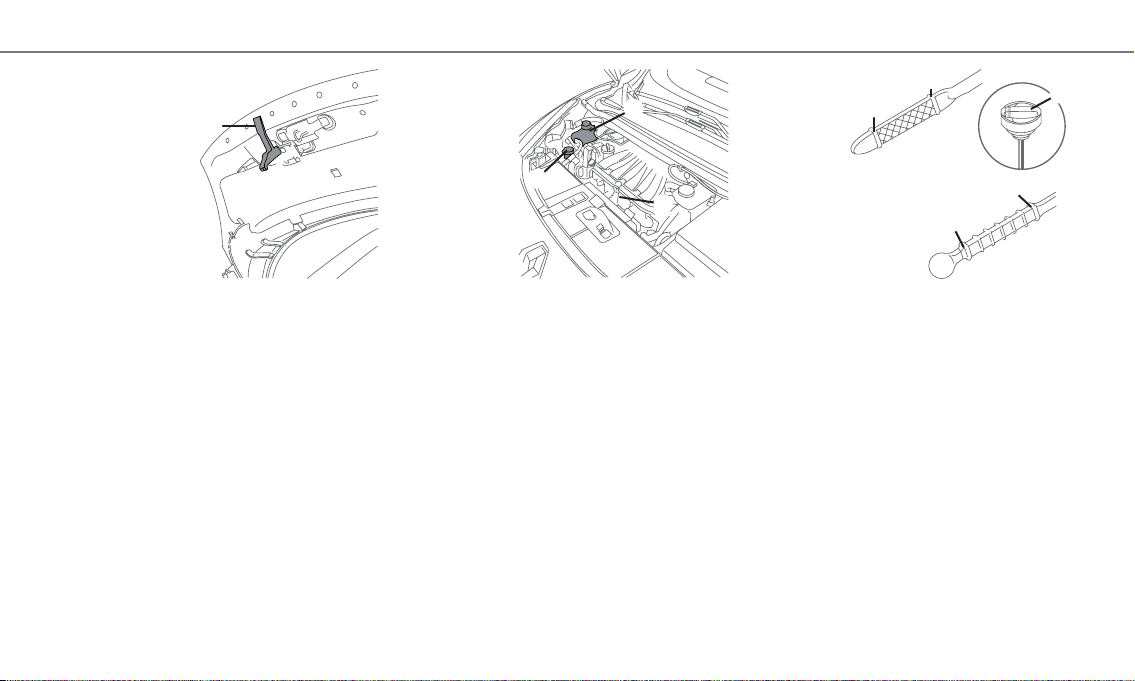
Engine oil level
To check the oil level, use dipstick 3.
The level shown on dipstick 3 should be between
MIN A and MAX B. If the oil level is at minimum,
the message “Adjust oil level” is displayed on the
instrument panel.
You must observe the service intervals and the
standards governing the oils tested for your engine.
Refer to the Maintenance Service and Warranty
document for your vehicle, and to Section 4 of the
vehicle handbook for the precautions to take when
filling with oil.
Coolant level
The level indicated on reservoir 2 should be between the MIN and MAX markings.
If it is necessary to top up this level, it is essential
to do so when the engine is cold.
Screen washer fluid level
Add some fluid to reservoir 4 if necessary.
Note: depending on the vehicle, to find out the fluid
level, open the cap and pull out the dipstick.
Opening the bonnet
To open, pull the unlocking control (refer to the
“Dashboard” section), lift handle 1 and raise the
bonnet. Guide it when opening; it is supported by
struts.
Closing the bonnet
Check that nothing has been left in the engine
compartment. To close the bonnet again, hold it
in the middle and guide it down, allowing a 30 cm
gap before it is closed, then release it. It will latch
automatically under its own weight. Check that it
is locked.
2
4
3
A
B
A
B
1
3
Page 5
4
P A S S E N G E R S I D E
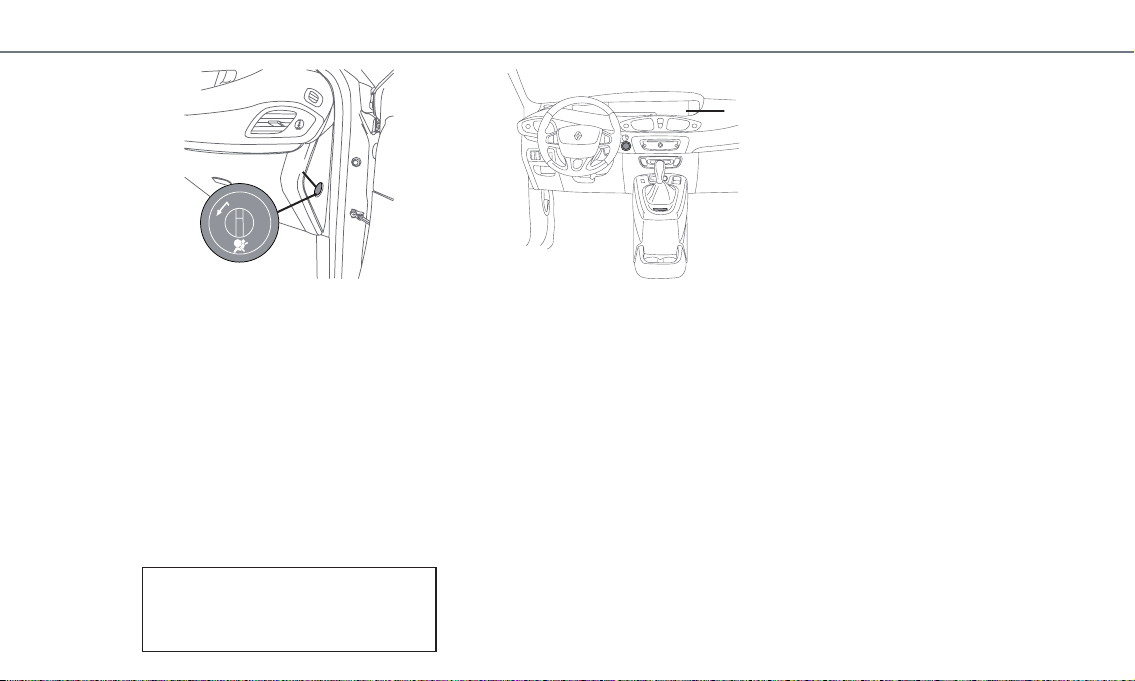
Deactivating the front
passenger air bag
If you wish to fit a rear-facing child seat on the
front passenger seat, you must deactivate the air
bag: with the vehicle stationary, turn switch 1 to
OFF.
With the ignition on, the
¹
warning light
lights up orange on instrument panel 2.
Reposition the switch immediately to ON as soon
as you are no longer using the child seat.
Activation of the front
passenger air bag
You should reactivate the air bag as soon as you
remove the child seat from the front passenger seat
to ensure the protection of the front passenger in
the event of an impact.
To reactivate the air bag: when the vehicle is stationary, push and turn lock 1 to the ON position.
With the ignition on, you must check that the
›
warning light lights up green on instrument panel 2, then goes off after about one
minute.
ON
OFF
1
2
Page 6
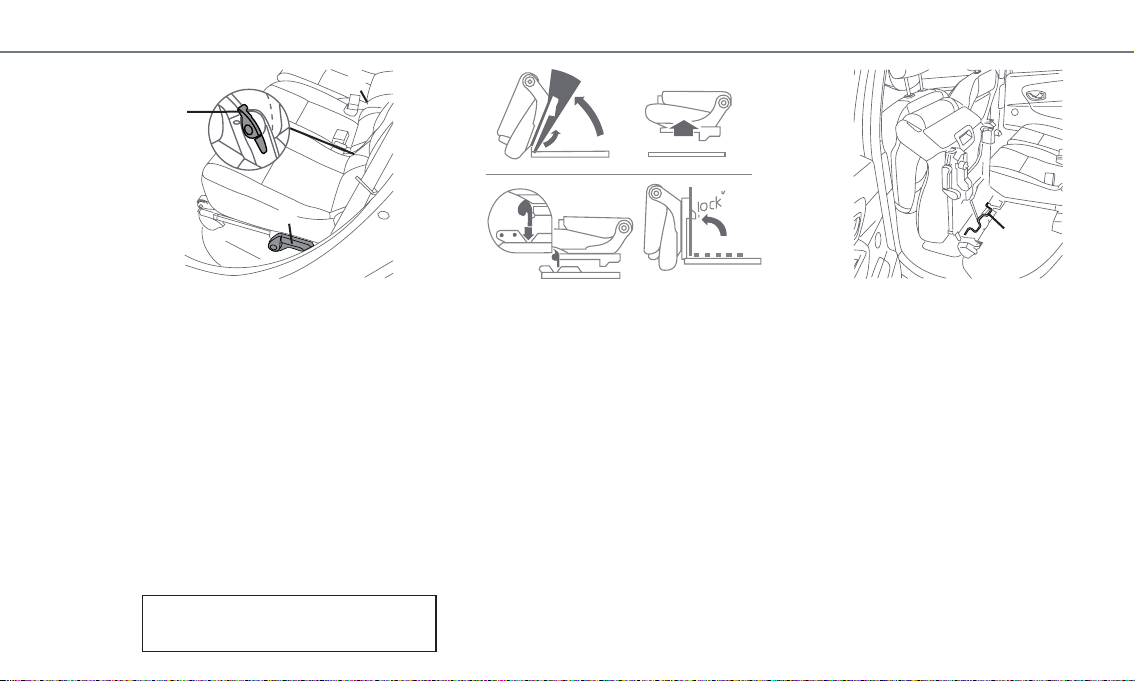
5
R E A R S E A T S
Folding down the seat
7-SEATER VERSION
Move control 3, then fold down the seatback, then
the seat.
5-SEATER VERSION
Move control 1 or strap 2 (centre seat) to fold
down the seatback.
Lift the control located under the rear of the seat to
fold down the seat.
A
Removing the seat
With the seat folded down (1), gently lower it and
lift handle 4 to unlock the front mountings of seat
(2). Then guide the seat to the floor (3). Refer to
the label located on the back of the seat.
B
Fitting the seat
Fit the seat flat on the floor, positioning the hooks
opposite the arrows (1) located on the seat’s front
plastic trim.
Lift it as far forward as possible (2) until control
4
locks (move the front seat forward if necessary),
lower it until it is 10 centimetres from the floor and
release it. Check that it is correctly locked. Refer to
the label located on the back of the seat.
Accessing the third row
rear seats
From one of the rear doors, fold down the seat
using handle 3 and sit in the third row seat.
Reposition the second row seat. Check that it is
correctly locked.
1
3
2
2
1 3
1
2
4
A
B
Check that the seats are correctly locked when
put back in position.
Page 7
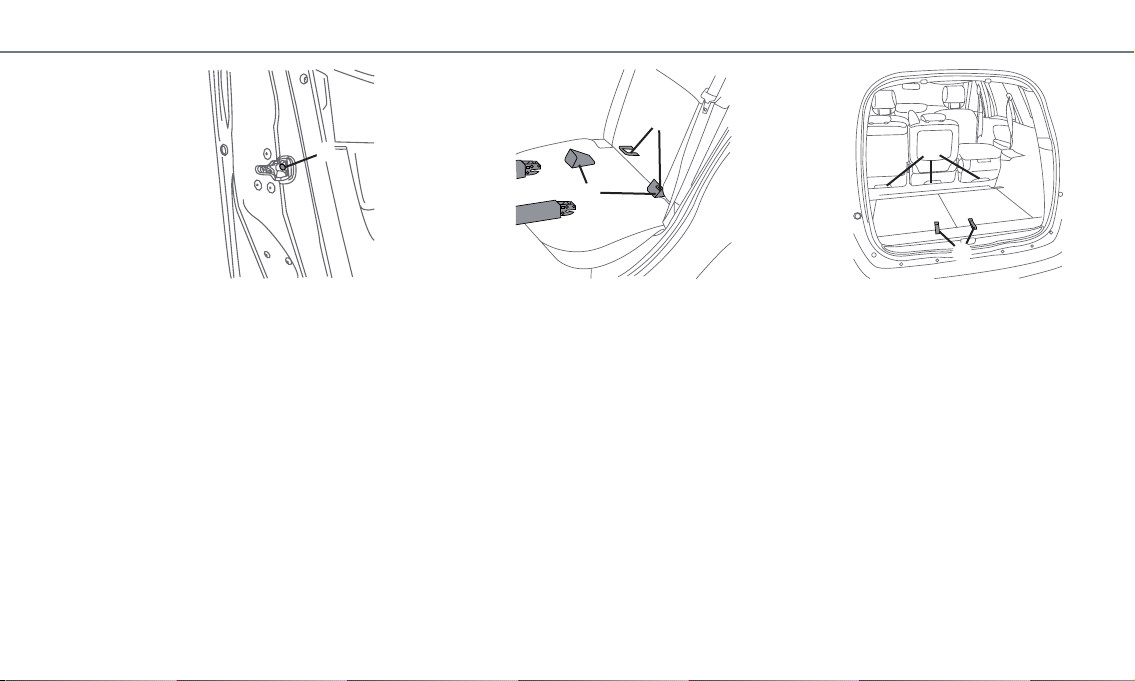
6
R E A R S E A T S
ISOFIX system
Each second row seat is fitted with the ISOFIX
child seat mounting system.
Depending on the type of child seat used, installation requires specific precautions. Refer to Section
1 of the driver’s handbook.
The two rings 6 are located between the seatback
and the seat base, and a third anchoring point is located behind each seat. The rings are indicated by
a marking. To ensure your child seat can be easily
fitted and locked on the rings 6, use the access
guides 7 on the child seat.
Third row rear seats
To pull out a seat: from the luggage compartment,
take out the luggage compartment cover, store it
in its housing (refer to the “Gadgets” section) and
pull strap 9. Make sure the seat is correctly locked
in position.
To fold down a seat: from the luggage compartment, pull strap 9 and press on the top of the seatback. Make sure the seat is correctly locked in position.
To get out of the vehicle from the third row
seats: pull red tab 8, fold down the seat, and get
out of the vehicle.
9
6
7
8
Child locks
Electric locking: this is located on the driver’s door
controls and makes it impossible to open the electric windows and rear doors from the inside.
Manual locking: to make it impossible to open the
rear doors from the inside, move lever 5, visible on
the edge of the door and check that the doors are
definitely locked from the inside.
Refer to Section 1 of the driver’s handbook.
5
Page 8
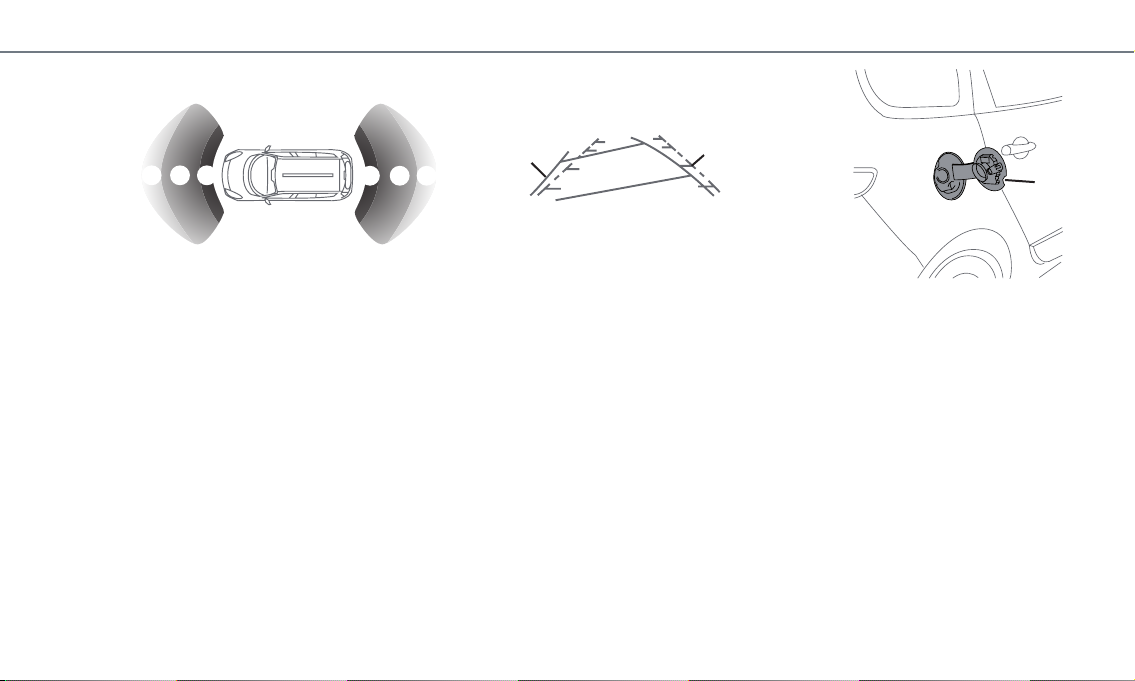
7
R E A R
Parking distance control
On equipped vehicles, the parking distance control
measures the distance between the rear (and, depending on the vehicle, the front) of the vehicle and
any obstacles that are nearby.
When approaching an obstacle during manoeuvres,
the beeps become faster and then sound continuously when 30 cm from the obstacle. In addition
to the beeps, there is display 1 on the instrument
panel. It is made up of three zones in different
colours: A, B and C.
Depending on the vehicle, you may have a reversing camera which allows the area to the rear of the
vehicle to be displayed on the navigation screen.
Fuel tank
Your vehicle is fitted with an integrated fuel filler
flap.
– Place your finger in recess 4 in the fuel filler flap
to open it, then insert the filler nozzle;
– when driving, if the low fuel level warning light
L
comes on or f lashes (depending on the
vehicle), fill up immediately.
The fuel tank capacity is approximately 60 litres.
When switching to reverse gear, the camera is activated and two lines appear on the screen.
Moving blue line 2: this shows the vehicle’s trajectory according to the position of the steering
wheel.
Fixed line 3: this is made up of three fixed points
which shown you the distance behind the vehicle.
Refer to Section 2 of your driver’s handbook.
You can deactivate the parking distance control
permanently and adjust the volume from the vehicle settings customisation menu. Refer to Section
1 of your driver’s handbook.
4
1
A B C
C B A
2
3
Page 9
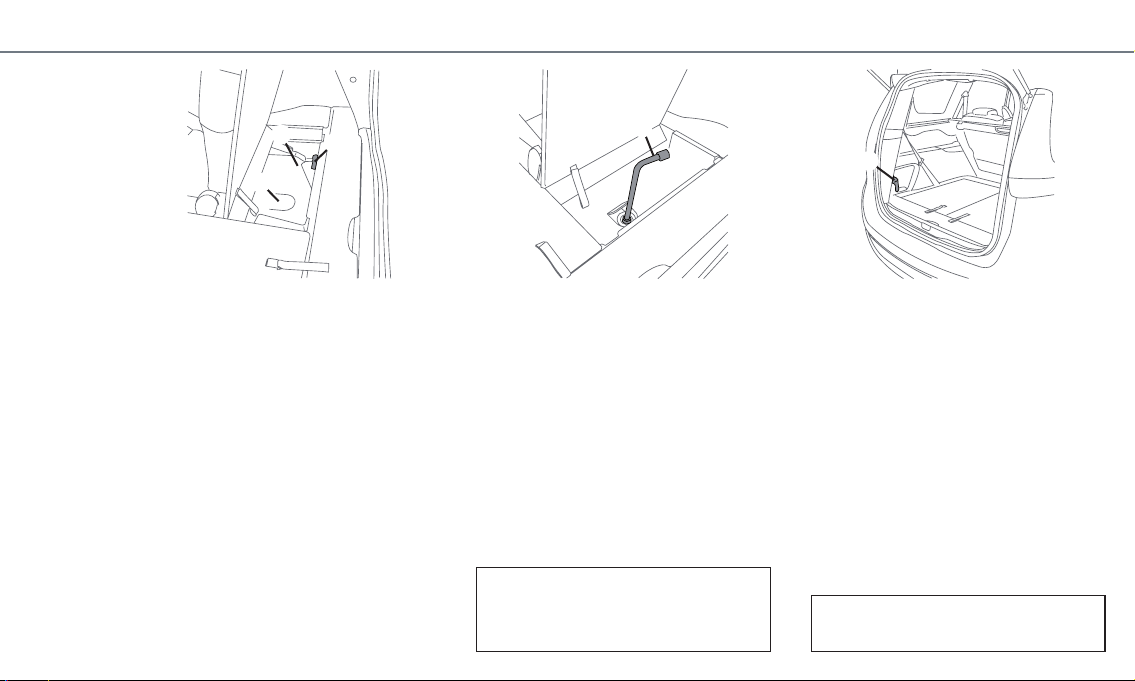
8
R E A R
Tyre inflation kit
If the vehicle is equipped with this, it will be located under the luggage compartment carpet or in
left side storage compartment 9, depending on the
vehicle.
Emergency spare wheel
If the vehicle is equipped with this, it will be located
under the luggage compartment carpet or underneath the vehicle.
To access the emergency spare wheel located underneath the vehicle:
– lift cover
7;
– unscrew the retaining cable using wheelbrace
8.
9
7
8
Tools
Depending on the vehicle, these are located under
the luggage compartment carpet or in a compartment behind the third row right-hand seat.
To access tools located behind the third row righthand seat:
– lift the third row right-hand seat;
– pull tab 6.
Note: marking 5 indicates the position of the compartment.
Refer to Section 5 of your driver’s handbook.
6
5
For precautions relating to a punctured tyre, refer
to section 5 of your driver’s handbook.
Page 10
9
A C C E S S I N G T H E V E H I C L E
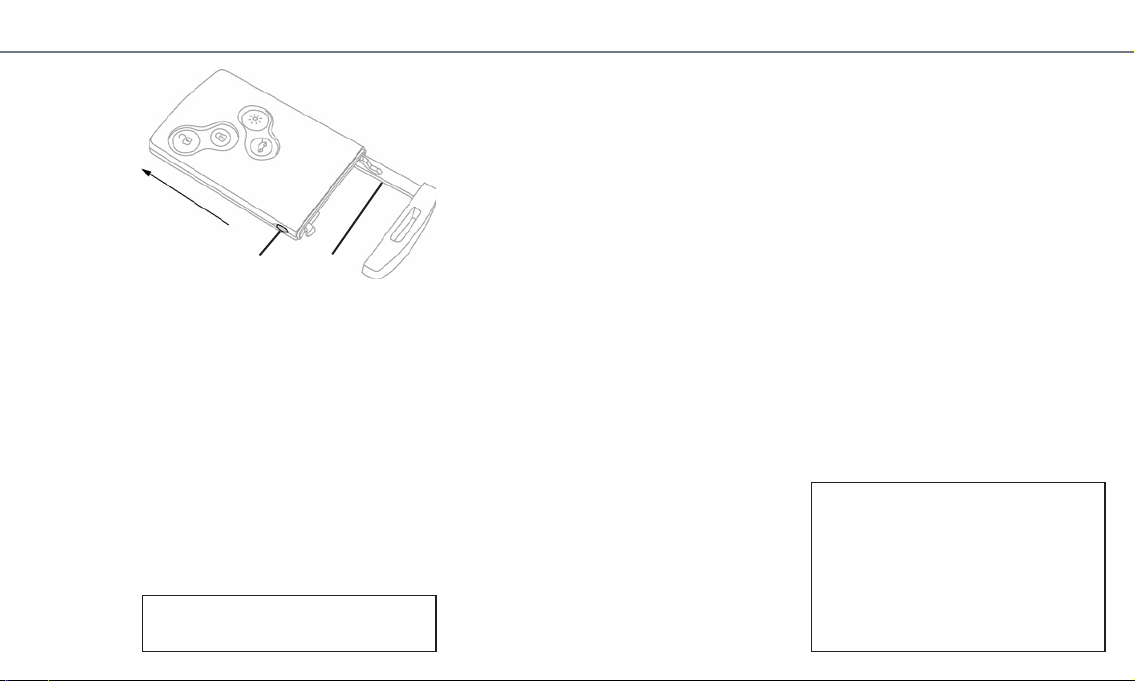
REMOTE CONTROL RENAULT CARD VERSION
Press:
‡
to unlock;
…
to lock;
ˆ
to switch the exterior lights on/off remotely
(in order to find your vehicle in a car park for example);
†
to lock/unlock the luggage compartment
only.
HANDS-FREE RENAULT CARD VERSION
With the card on your person (you can leave it in
your pocket, bag etc.), in addition to the remote
control RENAULT card functions, the following are
possible:
– automatic unlocking by pulling a door handle;
– automatic locking when leaving the vehicle (a
beep sounds) or intentional locking by pressing
the button on the driver’s door handle.
Note: if required, you can use the manual mode or
the key 2. To release the key, press button 1.
1
2
Locking/unlocking the
vehicle
The RENAULT card system replaces the traditional key. Locking/unlocking the vehicle is simple:
whether from a distance or nearby, a single press
is required.
For special notes relating to this system, refer to
Section 1 of your driver’s handbook.
SPECIAL FEATURES
– The detection zone of the card, necessary for
locking and unlocking the vehicle, depends on
the surrounding environment or the location of
the card;
– … for vehicles equipped with deadlocking,
two successive presses on this button stop the
vehicle from being opened, even from the inside
and, depending on the vehicle, the windows are
closed.
NOTE
In all situations:
– two flashes of the direction indicator lights con-
firm locking;
– one flash of the direction indicator lights con-
firms unlocking.
After locking/unlocking the vehicle or the tailgate
only using the buttons on the RENAULT card,
remote locking and unlocking in hands-free
mode are deactivated.
To reactivate the hands-free mode: restart the
vehicle.
Never leave the RENAULT card in the vehicle
Page 11
10
D R I V E R ’ S P O S I T I O N : S E A T S
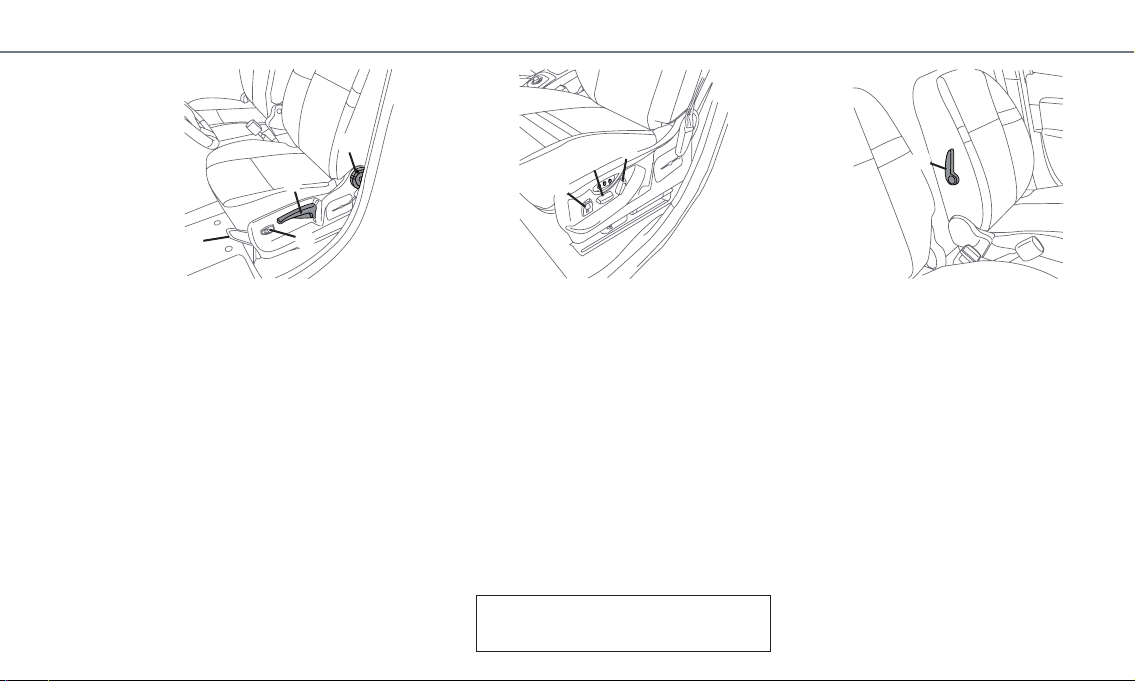
Electric seat adjustment
TO MOVE THE SEAT FORWARDS OR BACKWARDS
Move switch 5 forwards or backwards.
TO RAISE OR LOWER THE SEAT
Move the switch 5 upwards or downwards.
TO TILT THE SEATBACK
Move the rear of switch
6 forwards or backwards.
Adjusting the lumbar
support on the seat
Lower handle 7 to increase the support and lift it
to decrease it.
Heated seats
With the engine running, turn control 4 to one of
the positions I, II or III.
ñ
this indicator light illuminates on the instrument panel once the front seat heating system is
operating. The system, which has a thermostat, decides whether or not the heating is needed, according to the position selected.
Manual seat adjustment
TO MOVE THE SEAT FORWARDS OR BACKWARDS
Lift handle 1 to release. Release the handle at the
desired position and make sure that it is locked.
TO RAISE OR LOWER THE SEAT
Move lever 2 as many times as necessary upwards
or downwards.
TO TILT THE SEATBACK
Turn control knob
3 to the required position.
Carry out these adjustments when the vehicle
is stationary.
2
1
3
4
4
5
6
7
Page 12
11
D R I V E R ’ S P O S I T I O N : A D J U S T M E N T
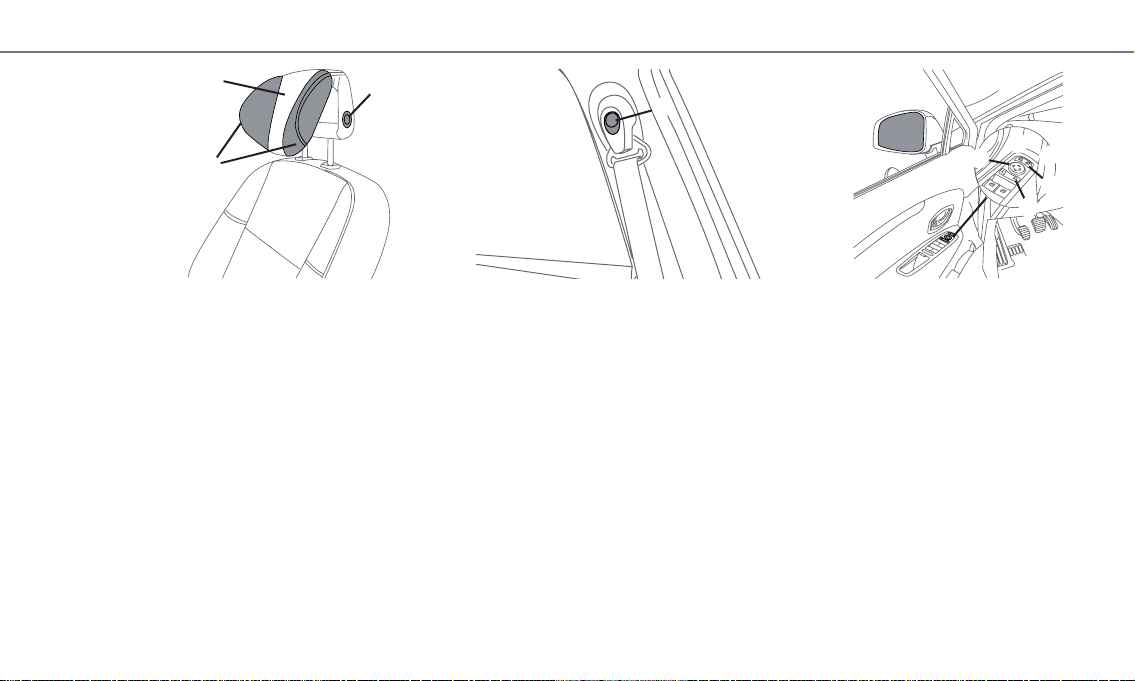
FOLDING DOOR MIRRORS
Switch
4 in central position: the rear view mirrors
will fold back automatically when the vehicle is
locked. They will fold out when the ignition is next
switched on.
Depending on the vehicle, to force the door mirrors
to fold back or out, position switch 4 to C or D.
Automatic mode is then deactivated.
To reactivate it, set switch 4 to the central position.
Headrest
RAISING THE HEADREST
Pull the headrest upwards to the desired height.
LOWERING THE HEADREST
Press button 1 and guide the headrest down to the
desired height.
TO ADJUST THE ANGLE OF THE HEADREST
Depending on the vehicle, move section
A towards
or away from you to the required position.
TO ADJUST SIDE SUPPORTS
Depending on the vehicle, the sections
B can be
adjusted independently.
Front seat belts
ADJUSTING THE HEIGHT
Press button 2 and hold it, then adjust the seat belt
to the desired height.
Rear seat belts
Refer to Section 1 of your driver’s handbook.
Door mirrors
ADJUSTMENT
Select the door mirror using switch 5, then use
button 3 to adjust it to the desired position.
1
A
B
3
4
5
C
D
2
Page 13
12
S T A R T I N G / S T O P P I N G T H E E N G I N E
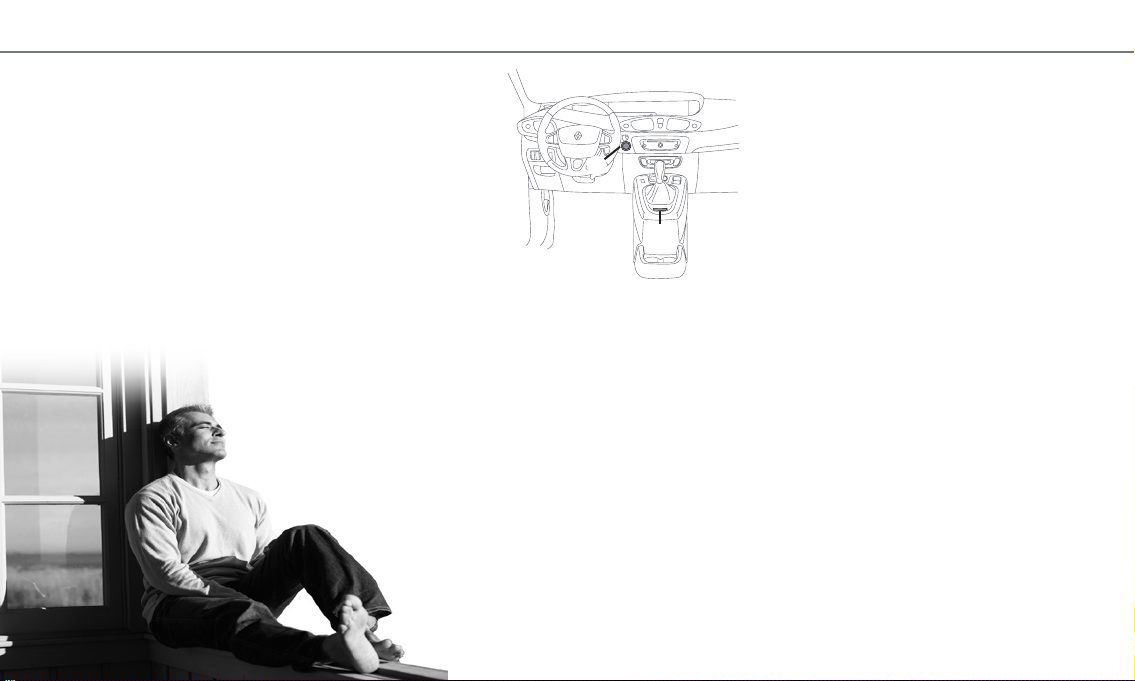
Starting the engine
With the remote control RENAULT Card in reader 2
or hands-free RENAULT card in the interior detection zone (excluding certain high locations such
as the sun visor etc.) apply the following starting
conditions:
MANUAL GEARBOX
With the gear lever in neutral, press START/STOP
button 1.
AUTOMATIC TRANSMISSION
With the lever in position P, press START/STOP
button 1.
Note: for vehicles fitted with the hands-free
RENAULT card, depress the brake pedal to start
the engine.
Stopping the engine
When the vehicle is stationary, press START/STOP
button 1.
Depending on the case, certain functions (radio,
navigation, wipers etc.) may be switched off at the
latest when the vehicle is locked.
1
2
Page 14
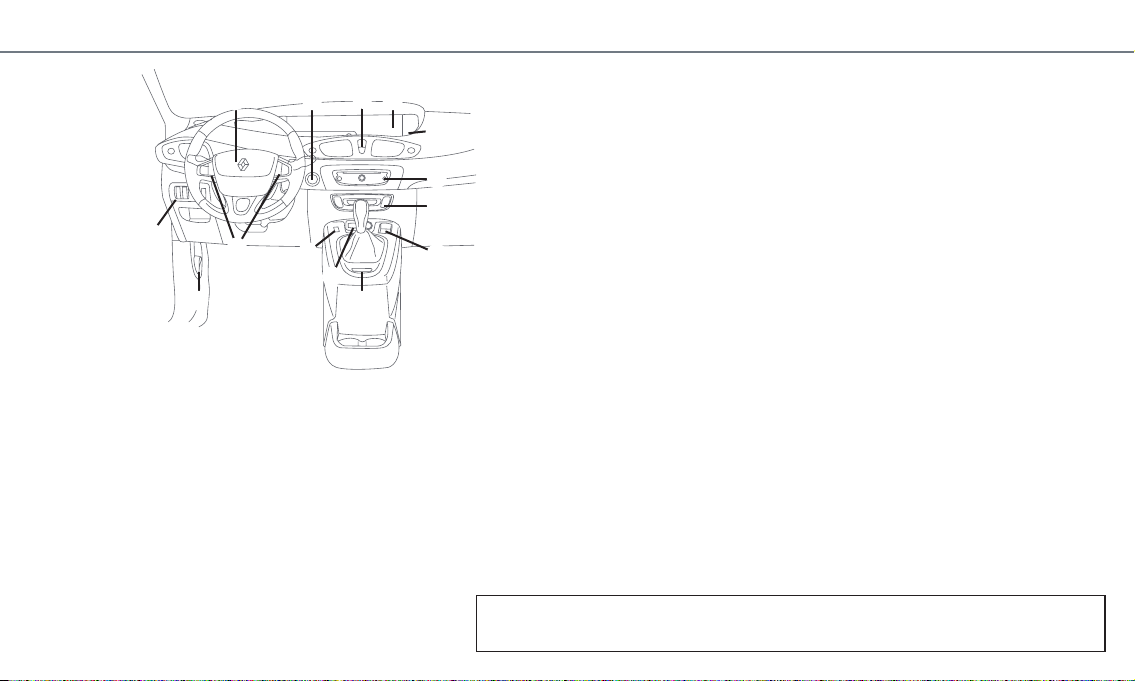
13
D A S H B O A R D
5 Front seat belt reminder warning lights and pas-
senger air bag activation/deactivation status indicator lights:
ç
driver’s and front passenger seat belt.
For the rear seat belts, a message on the instrument panel indicates the number of seat belts
that are buckled.
¹
: passenger air bag in OFF position;
›
: passenger air bag in ON position.
6 Location for radio or storage.
7 Heating and ventilation controls.
8 Electronic parking brake control.
9 RENAULT card reader.
10 Sockets for audio connection. These give you
the option to connect a portable audio player,
an MP3 player, a USB key, etc. to your audio
system.
11 Cruise control/speed limiter main on/off con-
trol.
12 Cruise control/speed limiter controls.
13 Bonnet release.
14 Controls for:
– headlight beam height remote adjustment;
– lighting dimmer for control instruments;
– activation/deactivation of the traction control.
WARNING LIGHTS:
©
This requires you to drive carefully
to a RENAULT Dealer as soon as possible. You
risk damaging your vehicle if you keep driving
after this warning light has come on.
®
: this warning light requires you to stop
immediately, for your own safety, as soon as
traffic conditions allow. Stop your engine and
do not restart it. Contact a RENAULT Dealer.
1 4
3
11
8
6
9
7
12
13
14
2
5
The equipment fitted, described below, depends on the version and country.
10
1 Horn and location for driver’s air bag.
2 Engine start/stop button.
3 Hazard warning lights.
4 Instrument panel.
Page 15
14
I N S T R U M E N T P A N E L
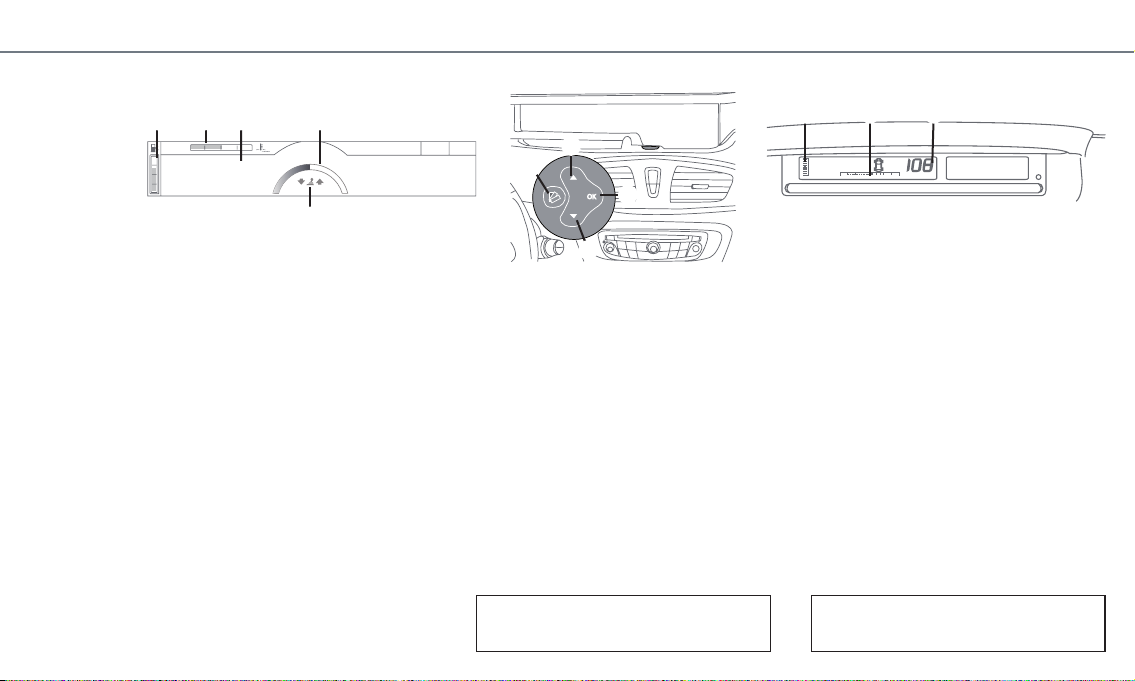
Instrument panel “TFT
Display”
A
This can be customised: press button 6 until the
desired display appears.
1 Fuel level gauge. If the minimum level is reached,
the
M
warning light flashes and a beep
sounds.
2 Coolant temperature indicator.
3 Speedometer (km or miles per hour).
4 Rev counter (rpm × 1, 000)
This is displayed according to how the instrument
panel is customised.
5 Fuel economy aid.
Instrument panel
B
10 Fuel level gauge.
If the minimum level is reached, the M warning
light comes on and a beep sounds.
11 Rev counter (rpm × 1,000).
12 Speedometer (km or miles per hour).
Vehicle settings
personalisation menu
For vehicles fitted with instrument panel A, some
functions can be adjusted.
To access this menu, press 7, 8 or 9. Select the
function to be changed by pressing 7 or 9, then activate, deactivate or access the settings with 8.
To change a setting, press 7 or 9 and confirm
with 8.
To exit the menu, select the “Exit” line, then confirm by pressing 7 or 9, then 8.
13:20
20°C
90
4
km/h
3
0
1
2
4
5
6
21490 km
49.6 km
x1000 0
1
2 345
6
km/h
OK
1 32
5
4
6
7
8
9
10 11 12
A
B
Refer to Section 1 of your driver’s handbook.
Carry out these adjustments when the vehicle
is stationary.
Page 16
15
L I G H T I N G / W I P E R S
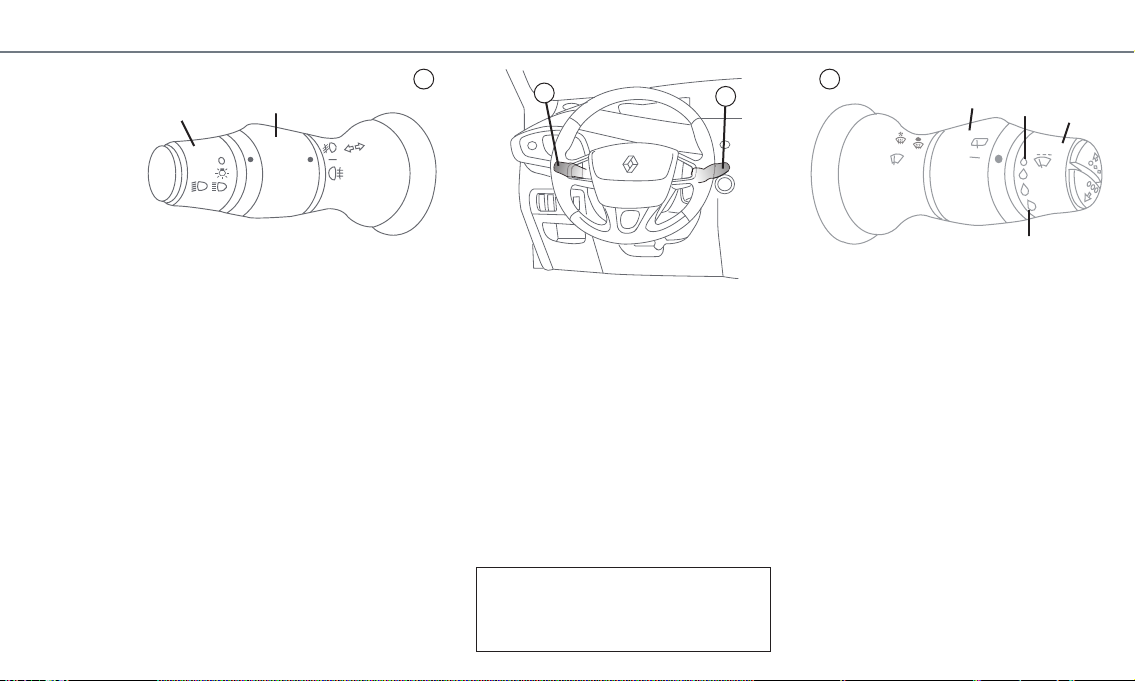
Lighting
On stalk 1, turn ring A to:
u
switch on the side lights;
k
switch on the dipped beam headlights.
Hazard lights: pull the stalk towards you.
Main beam headlights: with ring A in position
k
, pull the stalk.
AUTO: activate the automatic headlights (depending on the vehicle).
Turn ring
B, then release it to:
g
switch on the front fog lights;
f
switch on the rear fog light.
To switch them off, repeat the operation.
Wiping
Stalk 2 in position:
– 0: park;
– AUTO: intermittent wiping or, depending on the
vehicle, automatic wiping;
Note: ring E can be used to adjust the sensitivity
of automatic wiping, from minimum sensitivity (D)
to maximum sensitivity (F).
– 1: normal wiping speed;
– 2: fast wiping speed or, with the engine switched
off, maintenance position.
Rear screen wiper: to start/stop wiping, turn
ring C towards you, then release it.
Windscreen washer: pull stalk 2.
Rear screen washer: push stalk 2.
If you move the wiper blades: place them in the
maintenance position.
AUTO
AUTO
1
2
0
1 2
A
B
C
E
1
2
D
F
Page 17
16
D R I V I N G P O S I T I O N
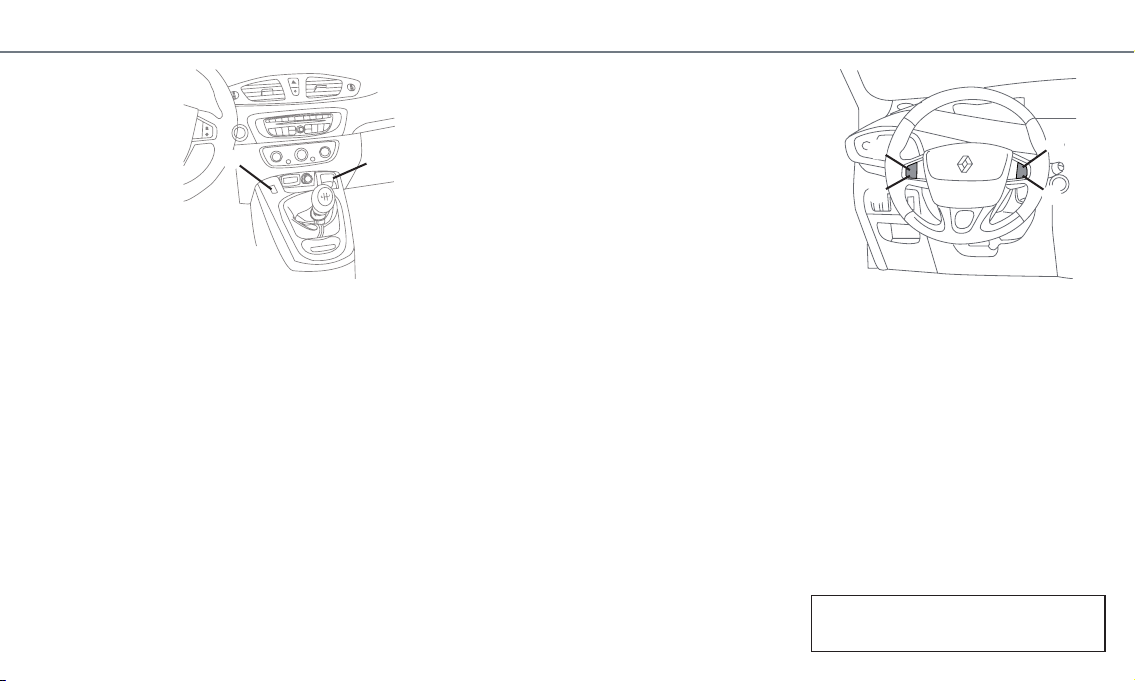
Electronic parking brake
The parking brake is automatically activated
when the engine is switched off by pressing the
engine start/stop button (except if the engine has
stalled).
It is released automatically: with the engine running, a gear engaged, when accelerating and, for
manual gearboxes, as soon as the clutch is released.
The assisted parking brake, like the manual parking
brake, also enables:
– manual engagement: lift the switch 2;
– manual release: with the brake pedal depressed,
press switch 2.
Cruise control/speed
limiter
The cruise control helps you to keep your driving
speed at a constant value.
The speed limiter helps you stay within the speed
limit.
If fitted to the vehicle, select the cruise control or
speed limiter by moving switch 1:
Ï
cruise control;
Note: you can interrupt the cruise control operation
by depressing either the brake pedal or the clutch.
You can exceed the cruising speed by depressing
the accelerator; the speed flashes on the instrument panel and its display zone lights up, depending on the vehicle.
Ð
speed limiter.
Note: You can exceed the limit speed by depressing the accelerator fully; the speed flashes on the
instrument panel and its display zone lights up, depending on the vehicle.
Cruise control/speed
limiter controls
– Activation, storage and increase switch for the
programmed speed: button 3 (+);
– Decrease switch for the programmed speed:
button 6 (-);
– Function standby with programmed speed stor-
age: button 5 (0);
– Activation with programmed speed recall:
button 4 (R);
– Function off: switch 1.
Refer to Section 2 of your driver’s handbook.
1 2
3
6
4
5
Page 18
17
A U D I O S Y S T E M
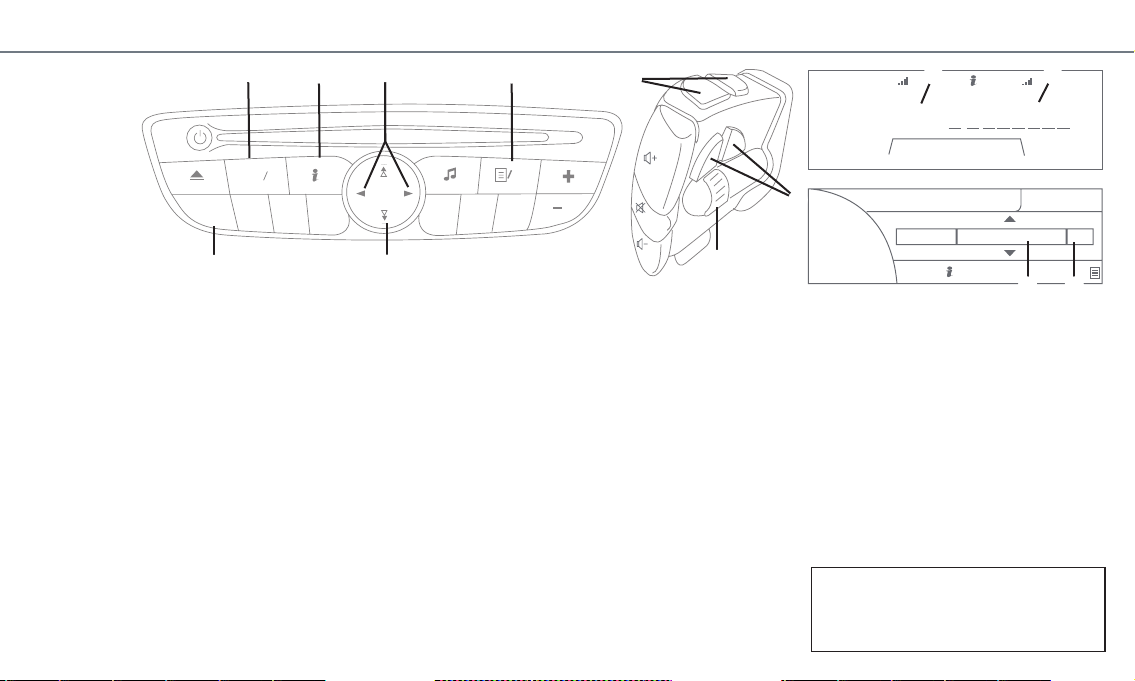
LISTENING TO THE RADIO, A CD (AUDIO AND
MP3) OR A PLAYER
Select the desired source by pressing one of the
buttons A once or more.
If you wish to listen to an AUXILIARY source,
connect your portable audio player to the desired
socket (refer to the “Dashboard” section).
FM RADIO SOURCE
– To select a radio station from a list in alphabetical
order:
Press C to move to the station name field 1 then
turn G or press E several times to scroll through
the list of radio stations.
– To update the list:
Press
B, then E or turn G to select the “Update FM
List” field and confirm by pressing D or G.
– To store a station to one of the buttons num
-
bered 1 to 6:
Select a radio station and press one of the buttons
1 to 6 until a beep sounds.
To recall a stored station, press the corresponding button.
– To store up to 12 FM stations:
Select a radio station, press
F, then use E or turn G
to select a location from 1 to 12 then confirm by
pressing D or G.
To recall a stored station, move across to the station number 2, then scroll through the radio stations using E or G.
To move across the displays 1, press buttons C.
20:34
RADIO 1
TRAFFIC
RDS-AF
MEM. 5
RADIO 1
5
100.00
RADIO FM
News
RDS-AF
17
PM
°c
MEM.
4
5
6
1
2
3
RADIO
CD
OK
A
E
C
B D
F
C
G
A
2 1
1 2
Page 19
18
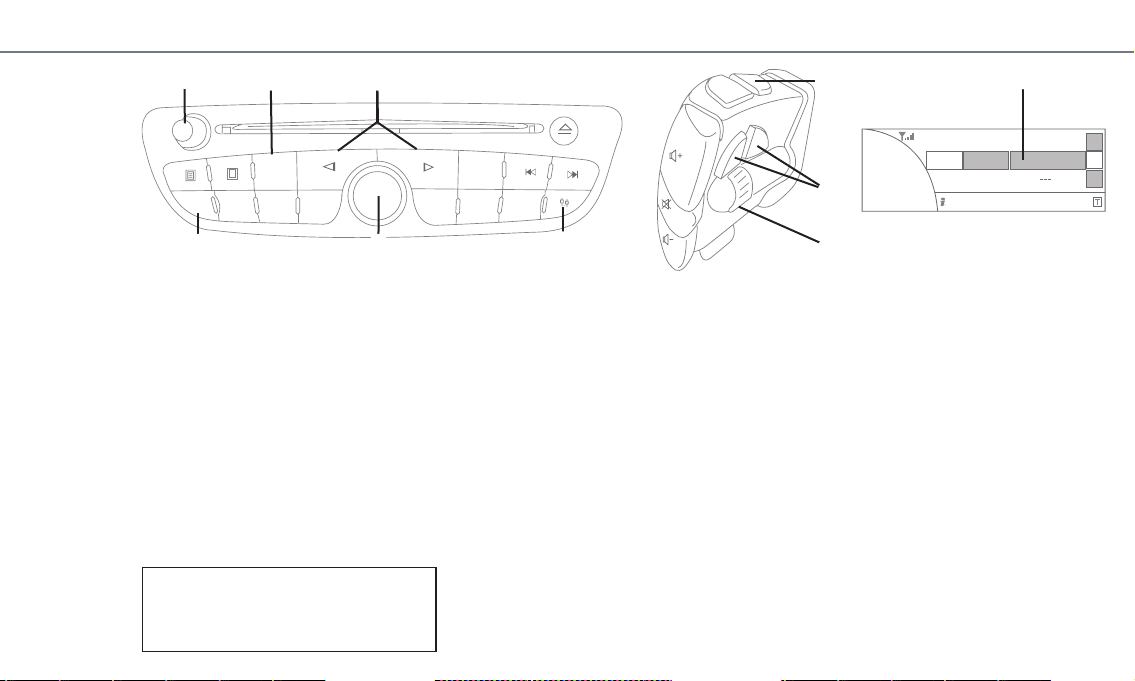
FM RADIO SOURCE
– To select a radio station from a list in alphabetical
order:
Press C to move to the station name field 1 then
turn E or G to scroll through the list of radio stations.
– To update the list:
Press B, then turn E or G to select the “Audio settings” field then “Radio functions” and “Update FM
list”; confirm by pressing E or G.
– To store a station from 1 to 6:
Select a radio station then press one of the buttons
1 to 6 until a beep sounds.
TEL
4
5
6
1
2
3
MEM
RADIO
CD
T
B L U E T O O T H ® A U D I O S Y S T E M
To switch the system on/off, press P. Adjust the
volume by turning button P.
LISTENING TO THE RADIO, A CD OR AN AUDIO
PLAYER
Select the desired source by pressing one of the
buttons A once or more.
If you wish to listen to an AUXILIARY source,
connect your portable audio player to the desired
socket (refer to the “Dashboard” section).
– To recall a stored station, press the correspond
-
ing button.
– Button F is used to store up to 12 stations (refer
to the previous page).
Pairing your Bluetooth®
device
In order to use your hands-free device (telephone,
portable audio player), you must pair it when using
it for the first time. After this, once the vehicle is
started, your device will be recognised and automatically connected to the hands-free system.
Refer to the “Bluetooth® connection” section.
A C
E
A
C
G
B
RADIO 1
107.7
FM
TRAFFIC
RDS-AF
90.45
90.5
(90.45)
11
12
1
1
To move across the displays 1, press buttons C.
F
P
Page 20
19
P H O N E / N A V I G A T I O N S Y S T E M
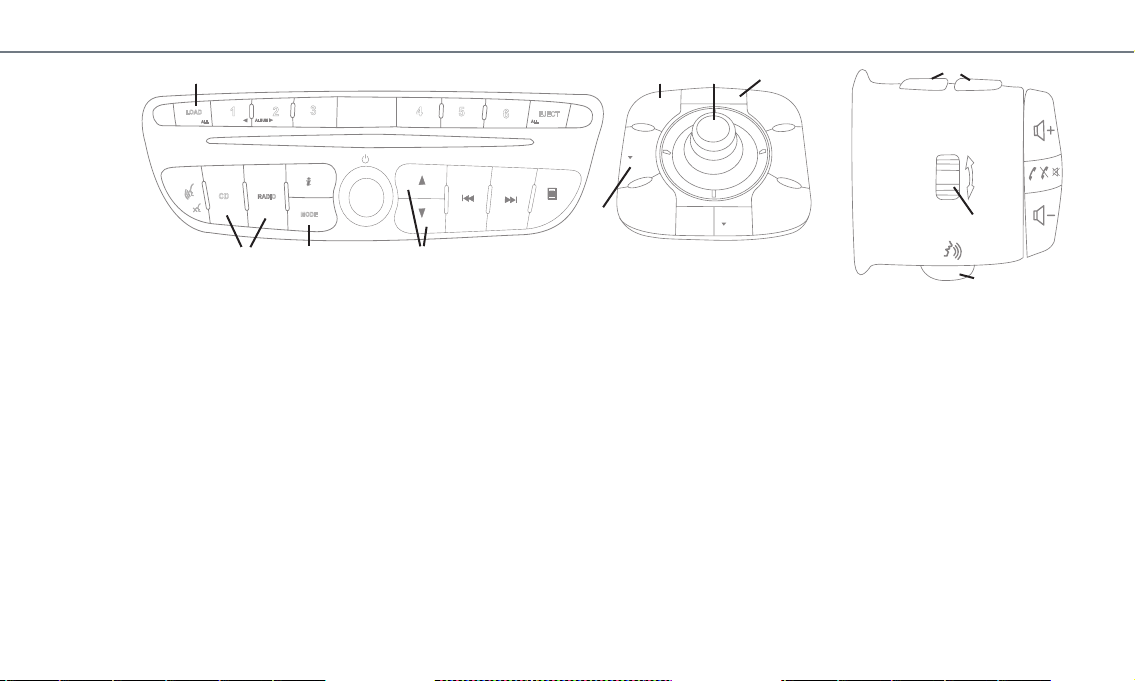
LISTENING TO THE RADIO OR A CD
Select the source (FM radio or CD) by pressing one
of the buttons A.
FM RADIO SOURCE
To select a radio station from an alphabetical list,
press K, choose the “List” mode, then select the
name of the radio either using the arrows L or by
turning control knob G.
To store a radio station to one of the buttons numbered 1 to 6:
– select the radio station;
– press on one of the buttons from 1 to 6, until a
beep sounds.
To recall a stored radio station, press the corresponding button.
CD SOURCE
Before inserting a CD, press button
J. You can
insert up to 6 CDs.
VOICE RECOGNITION
Button
I: to operate certain functions using voice
control.
STARTING THE NAVIGATION SYSTEM
– press M;
– turn the button D to select “new address” then
confirm by pressing D;
– enter the address fields (town and street) using
the keypad on the screen. To select and confirm
a character, rotate then press button D;
– when entry is complete, select “Start” and follow
the voice guidance and on-screen directions to
your destination.
CANCELLING AN ACTION
Press
N if you wish to return to the previous menu
or erase an entered character.
DISPLAYING THE MAP
Press button
O to return to the map at any time.
ALL
CD
RADIO
MODE
LOAD
1
2
3
5
6
ALBUM
ALL
EJECT
4
MAP
MAIN
DEST
BACK
TEL
INFO
SET
LIGHT
DARK
ZOOM
ROUTE
RADIO
CD
OK
J M D N
A
G
I
O
LK
A
Page 21

20
B L U E T O O T H ® C O N N E C T I O N
In order to use a Bluetooth® device, either a telephone or portable audio player (depending on the
vehicle), from your multimedia system, please
follow the instructions below.
Pairing a Bluetooth®
device
PRINCIPLE
Pairing will enable the multimedia system to recognise and store your Bluetooth® device. This is
the first step to carry out in order to use your telephone or portable audio player.
Note: you can pair several devices to your multimedia system, but only one device can be used
at a time (a single telephone or a single portable
audio player).
PAIRING STEPS
Pairing is carried out directly on your device (refer
to its user instructions):
– check that your multimedia system and your
Bluetooth® device are on;
– activate the Bluetooth® connection on your
device;
– In the multimedia system settings menu, select
the field which allows you to store or pair a
Bluetooth® device;
– launch a search for Bluetooth® equipment from
your device;
– select “My-Radiosat” or “MY-CAR” from the list
of devices found;
– enter the pairing code using your device’s keypad
(it will appear on the multimedia system screen,
otherwise refer to the user instructions for the
system).
The device is paired.
Connecting a Bluetooth®
device
Your Bluetooth® device must be connected to the
multimedia system for all its functions to be accessible.
To connect your device, select it from the list of
devices stored in the multimedia system.
The multimedia system may also automatically recognise your device once it is switched on.
Using a Bluetooth®
device
With your Bluetooth® device connected, you can
use some functions directly via the controls on
your audio system.
You can also:
– for a portable audio system: select a music track
or an album…;
– for a telephone: display the telephone address
book, call a contact from the telephone address
book, update the telephone address book…
Page 22
21
SOFT AUTO FAST
OFF
AC
OFF
MAX
AC OFF
20° 20°
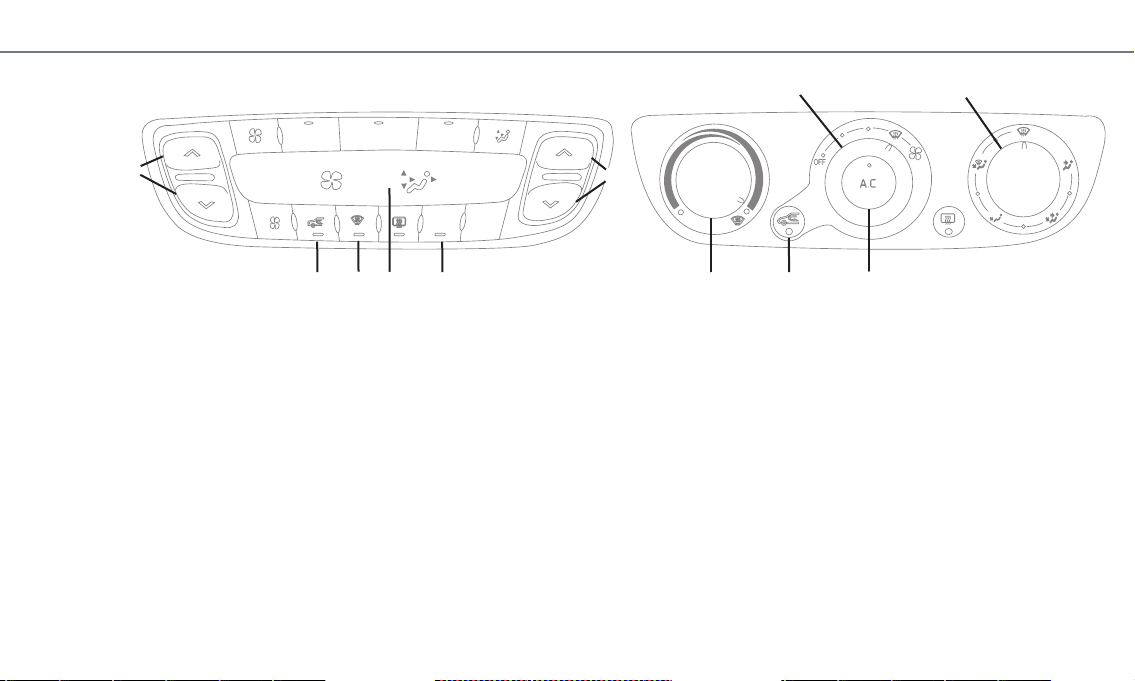
Automatic climate
control
A
With the engine running, to benefit from the automatic climate control, select one of the three automatic programmes:
– AUTO: regular temperature regulation mode;
– SOFT: quietest temperature regulation mode;
– FAST: ventilation mode (recommended for the
rear seats).
Then, choose the temperatures using levers 1
and 2.
Note: you can exit automatic mode by pressing any
of the other buttons.
“CLEAR VIEW” FUNCTION (DEMISTING)
Press button
5. To exit the function, press button 5
again.
AIR CONDITIONING
Button
3 is used to deactivate the air conditioning (integrated indicator lights up and “AC OFF” is
shown on the display 4).
AIR RECIRCULATION
This is switched on when certain automatic controls are used. It can also be activated manually
by pressing 6.
H E A T I N G A N D A I R C O N D I T I O N I N G S Y S T E M
Manual air conditioning
B
– To adjust the ventilation speed: turn 7;
– to change the distribution of air : turn 8 ;
– to activate/deactivate the air conditioning :
press 9 ;
– to activate/deactivate air recirculation: press 10 ;
– to choose the temperature: turn 11.
DEMISTING
Turn
7, 8 and 11 to position d.
Note: in certain positions, control 8 deactivates the
air recirculation and activates the air conditioning.
1
2
3
4
7
8
9
10
11
6
A
B
5
Page 23
22
G A D G E T S
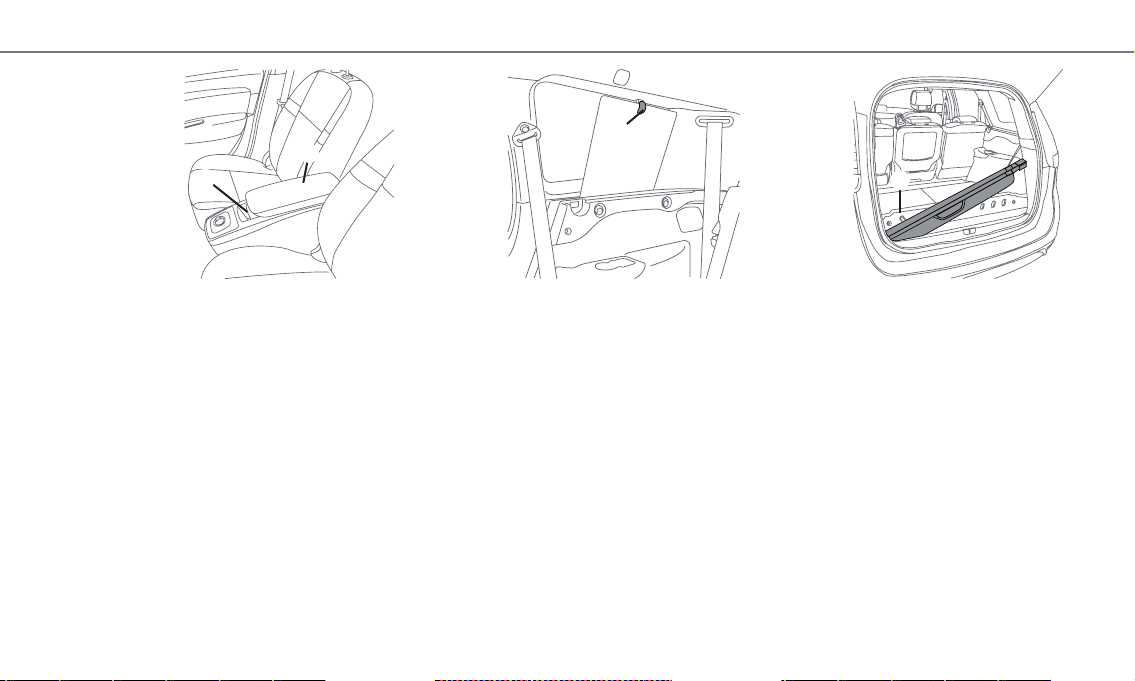
Sun blinds
To provide shelter from the sun, you can pull the
sun blinds over all the side windows, and over the
rear screen.
Pull the blind upwards using hook 3 and secure the
hook in its housing.
Luggage compartment
cover storage
There is a storage compartment specially designed
for your luggage compartment cover.
To store your luggage compartment cover:
– lift cover
4 (7-seater version only);
– insert the left side of the roller, then the right
side;
– position the luggage compartment cover so that
it does not extend beyond the storage compart-
ment.
Sliding centre console
The centre console slides to allow the length to
be adjusted. Lift handle 1 and slide the entire console.
It contains two storage compartments.
To access the first, lift the armrest.
To access the second: with the armrest closed,
press the button located in front of the armrest.
Sliding armrest
To open armrest 2, slide back the cover.
1
3
2
4
Page 24

www.e-guide.renault.com
(
)
RENAULT S.A.S. SOCIÉTÉ PAR ACTIONS SIMPLIFIÉE AU CAPITAL DE 533 941 113 € / 13-15, QUAI LE GALLO
92100 BOULOGNE-BILLANCOURT R.C.S. NANTERRE 780 129 987 — SIRET 780 129 987 03591 / TÉL. : 0810 40 50 60
RP 890-1 – 99 91 074 22R – 11/2008 – Edition anglaise
à999107422Ríîòä
MM
 Loading...