

Page 1

Renault EASY CONNECT - Multimedia Systems
EASY LINK Introduction
Page 2

Page 3
PRECAUTIONS DURING USE (1/2)
It is essential to follow the precautions below when using the system, both in the interest of safety and to prevent material damage.
You must always comply with the laws of the country in which you are travelling.
Precautions when operating the system
– Operate the controls and read the information on the screen only when road conditions allow.
– Set the volume to a reasonable level so that outside noise can be heard.
– Use of the navigation system does not in any way replace the responsibility or vigilance of the driver when driving the vehi-
– Depending on the geographical area, the map may not have the latest information on new roads. Be alert. In all cases, Road
Precautions concerning the equipment
– Do not attempt to dismantle or modify the system, as there is a risk of damage to equipment and fire.
– Contact a representative of the manufacturer in the event of malfunction and for all operations involving disassembly.
– Do not insert foreign objects or a damaged or dirty external storage device (USB flash drive, SD card, etc.) into the reader.
– Use only an external storage device (USB flash drive, Jack socket, etc.) that is compatible with your system.
– Always clean your screen with a microfibre cloth.
– Do not use products containing alcohol and/or spray fluids on the area.
The prior acceptance of the General Conditions of Sale is mandatory before using the system.
The description of the models given in this manual is based on the specifications at the time of writing. This manual covers
all existing functions for the models described. Whether or not they are fitted depends on the equipment model, options selected and the country where they are sold. This manual may also contain information about functions to be
introduced later in the model year. Screens shown in the user manual
are for illustration only. Depending on the make and model of your telephone, some functions may be partially or completely
incompatible with your vehicle’s multimedia system.
For further information, please contact an Authorised Dealer of brand.
Precautions regarding navigation
cle.
Traffic Regulations and road signs always take precedence over the directions of the navigation system.
0.1
Page 4
PRECAUTIONS DURING USE (2/2)
Protection of your personal data
Data about you are collected via your vehicle. They are processed by the manufacturer, acting as a processor, in ac-
cordance with the regulations in force.
Your personal data can be used to:
– improve and optimise your use of your vehicle and the associated services;
– improve the driving and onboard experience;
– improve the road safety and predictive maintenance systems;
– improve the assisted driving systems;
– offer you added-value services relating to the vehicle.
The manufacturer takes all the necessary precautions to ensure that your personal data is processed in total security. Your
multimedia system enables you to delete your personal data.
To find out more about the use of your data and your rights, go to https://easyconnect.renault.com.
0.2
Page 5

C O N T E N T S
Sections
General information .............................................
Navigation .............................................................
Multimedia ............................................................
Phone ....................................................................
Apps - Easy Connect ............................................
Vehicle ...................................................................
System ..................................................................
Index ..................................................................
1
2
3
4
5
6
7
8
0.3
Page 6

0.4
Page 7

General information
General description . . . . . . . . . . . . . . . . . . . . . . . . . . . . . . . . . . . . . . . . . . . . . . . . . . . . . . . . . . . . . . 1.2
Introduction to the controls . . . . . . . . . . . . . . . . . . . . . . . . . . . . . . . . . . . . . . . . . . . . . . . . . . . . . . . . 1.3
Operating principles. . . . . . . . . . . . . . . . . . . . . . . . . . . . . . . . . . . . . . . . . . . . . . . . . . . . . . . . . . . . . . 1.7
Switch on/off . . . . . . . . . . . . . . . . . . . . . . . . . . . . . . . . . . . . . . . . . . . . . . . . . . . . . . . . . . . . . . . . . . . 1.11
Add, manage widgets . . . . . . . . . . . . . . . . . . . . . . . . . . . . . . . . . . . . . . . . . . . . . . . . . . . . . . . . . . . . 1.12
Using voice recognition . . . . . . . . . . . . . . . . . . . . . . . . . . . . . . . . . . . . . . . . . . . . . . . . . . . . . . . . . . . 1.15
1.1
Page 8
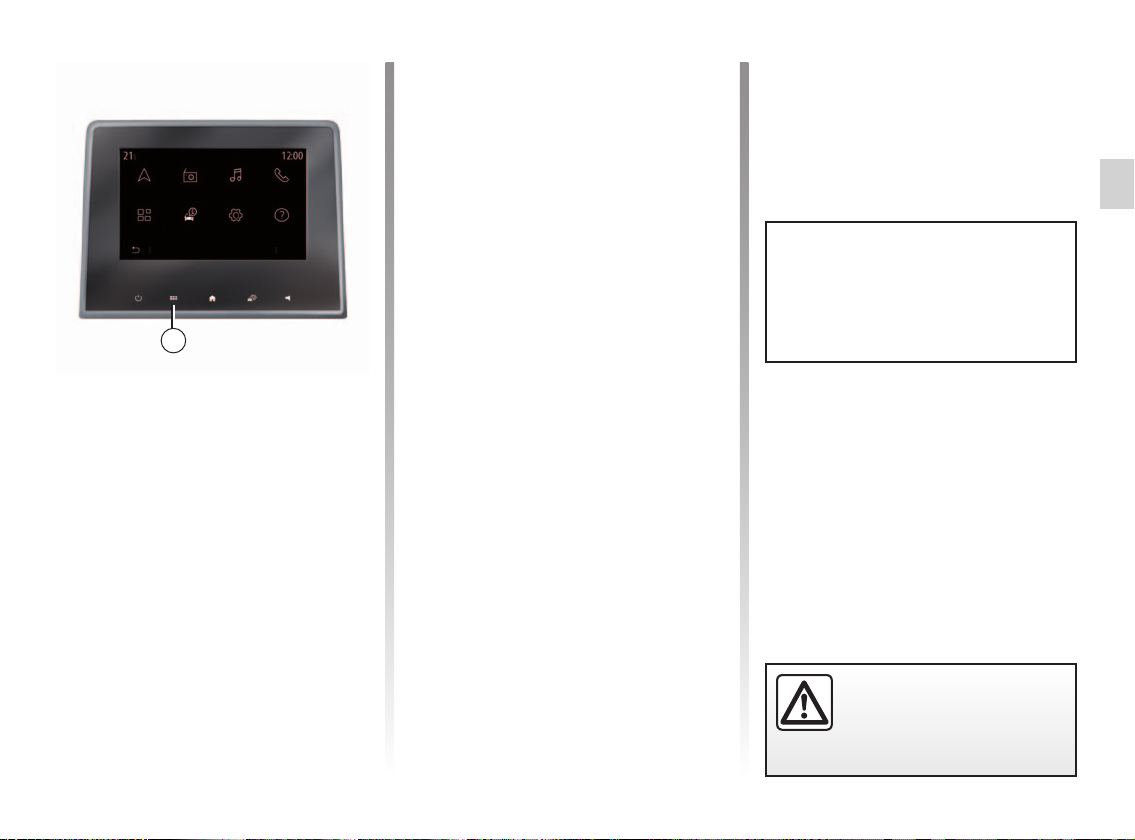
GENERAL DESCRIPTION
A
B
F
ElodieMenu
E D C
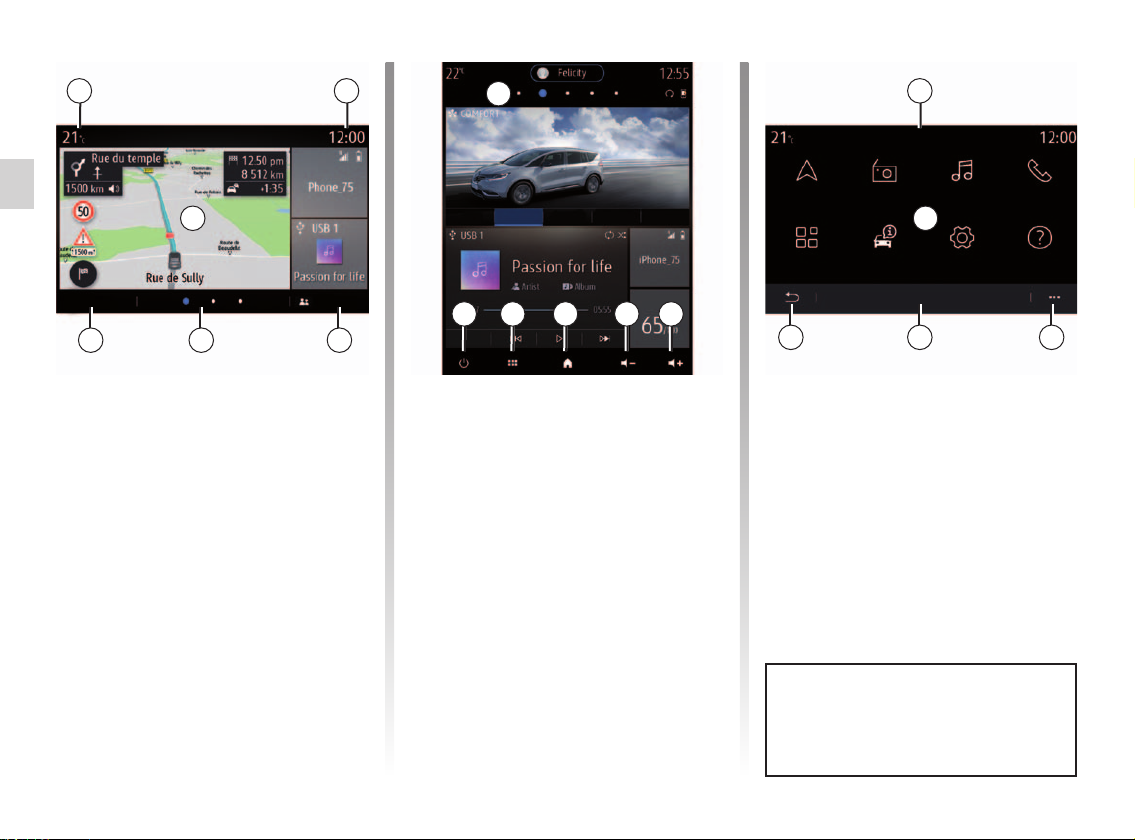
Home screens
A Exterior temperature.
B Time.
C Selected user profile. To configure
the user profile, refer to the section
headed “Settings”.
D Page indicator: quickly swipe the
content area to change page.
E Access to main menu.
F Home page/Accessing functions.
G Increase the volume of the source
currently in use.
D
ComfortEco Regular Sport My Sense
Driving Eco
E
K
Sources
H Decrease the volume of the source
currently in use.
J Display the home screen:
– Short press: access the first home
page;
– Long press: display all home
pages.
K Accessing the functions:
– Press and hold: restart the
system;
– Short press: switch off the radio/
music, switch off the screen, put
in standby.
Note: You can change the configura-
tion of the home page. Please refer to
the “Add and manage widgets” section
for further information.
J H G
L
Menu
Navigation
Radio
Music
Phone
Q
Applications
Car info
Settings
Help
MP N
Menu screen
L Depending on the menu, this area
displays the shortcuts to the functions in progress.
M Pop-up menu.
N Depending on the menu, this area
displays from two to five buttons.
P Back to previous page.
Q Main menu.
For more information, open the user
manual from the pop-up menu.
1.2
Page 9
INTRODUCTION TO THE CONTROLS (1/4)
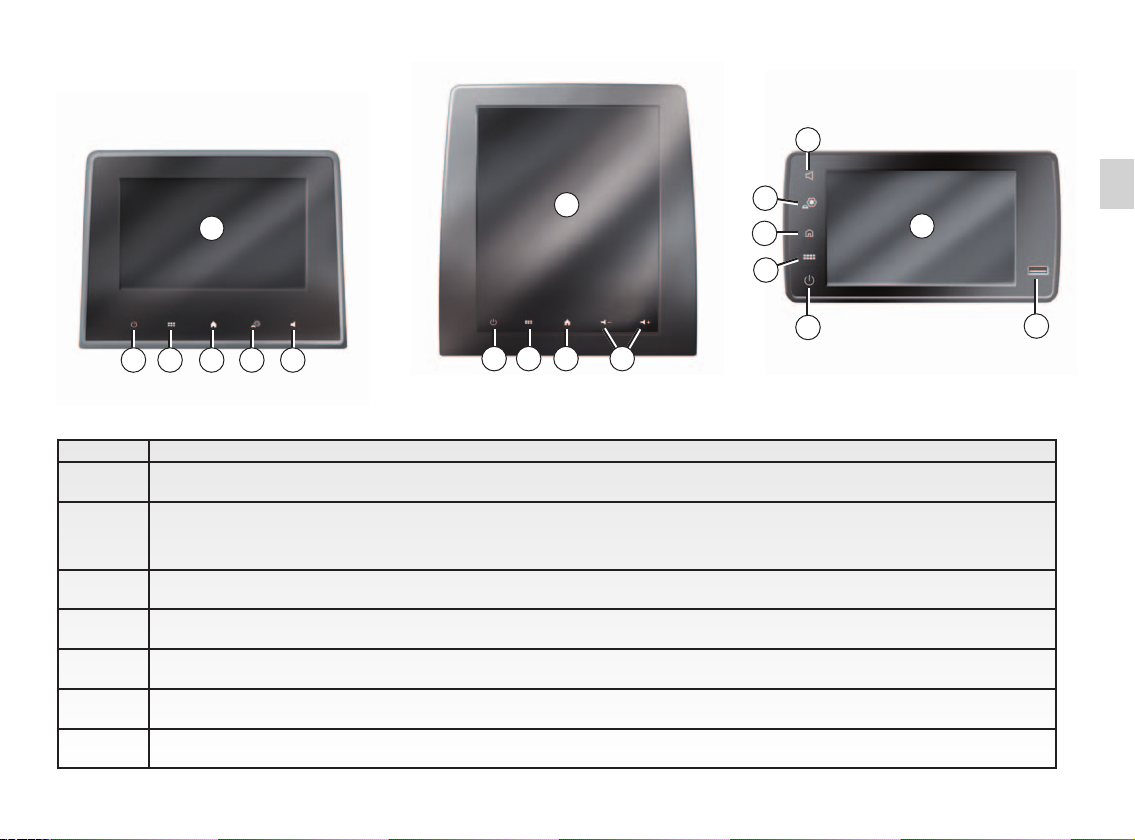
Screen controls
6
1
1
432
65432
1 Multimedia screen.
Press and hold (around 5 seconds): restart the system.
2
Short press: radio/music OFF, turn off the screen, put on standby, stop/start.
3 Access to main menu.
4 Access the home page.
5 Access the settings menu.
6 Volume adjustment (1 or 2 buttons, depending on the screen).
7 Socket USB.
6
Function
5
4
1
3
2
7
1.3
Page 10
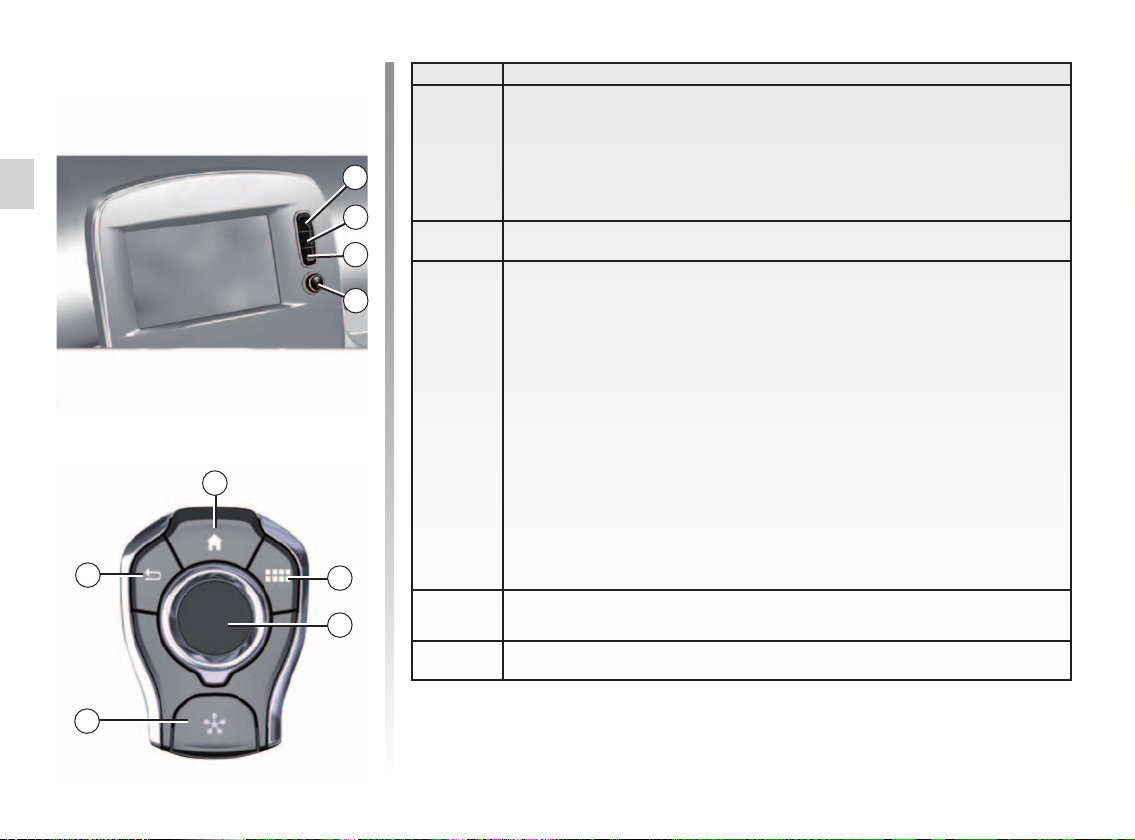
INTRODUCTION TO THE CONTROLS (2/4)
Central controls
Remote control
4
12
9
10
Function
Press:
– On/Off.
8
5
Rotate:
– volume of the audio source currently playing.
4
3
8
9 Access to main menu.
Switching:
– navigation within the selected area;
– up/down: move around the various areas of a menu (upper bar, cen-
tral zone, lower bar);
– left/right: move around the various tabs of a menu.
10
11 Direct access to the MULTI-SENSE menu.
Rotate:
– move around the various elements of a zone;
– move around a list;
– change the scale of the navigation map (ZOOM mode).
Press:
– confirm.
1.4
12 Return to the previous screen.
11
Page 11

INTRODUCTION TO THE CONTROLS (3/4)
Steering column controls
13 13
16
13
18
17
14
14
15
Function
13 Audio source selection.
14 Increase the volume of the source currently in use.
14 + 15
15 Decrease the volume of the source currently in use.
16
17
Mute/unmute the radio sound.
Pause or play the audio track.
Interrupt the voice recognition voice synthesizer.
Short press:
– confirm an action.
Press and hold:
– return to previous screen/previous level when browsing through
menus;
– cancel current action.
Browse the radio stations or the audio tracks/directories.
Browse through the list of numbers if telephone is connected to the
multimedia system.
17
15
16
1.5
Page 12
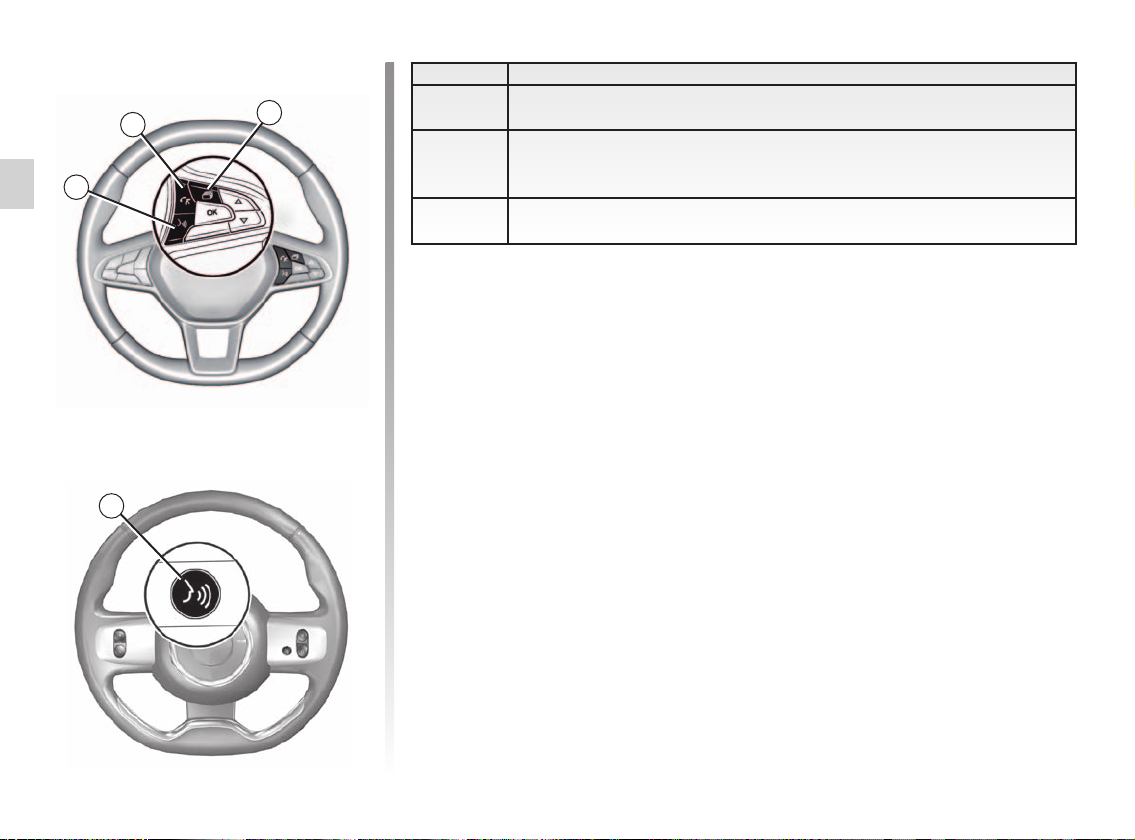
INTRODUCTION TO THE CONTROLS (4/4)
Steering column controls
18
19
20
20
Function
18 Answer/end a call.
19
20 Activate/deactivate the multimedia system voice recognition.
Scroll through information according to the display style (audio, compass, engine power, etc.).
1.6
Page 13
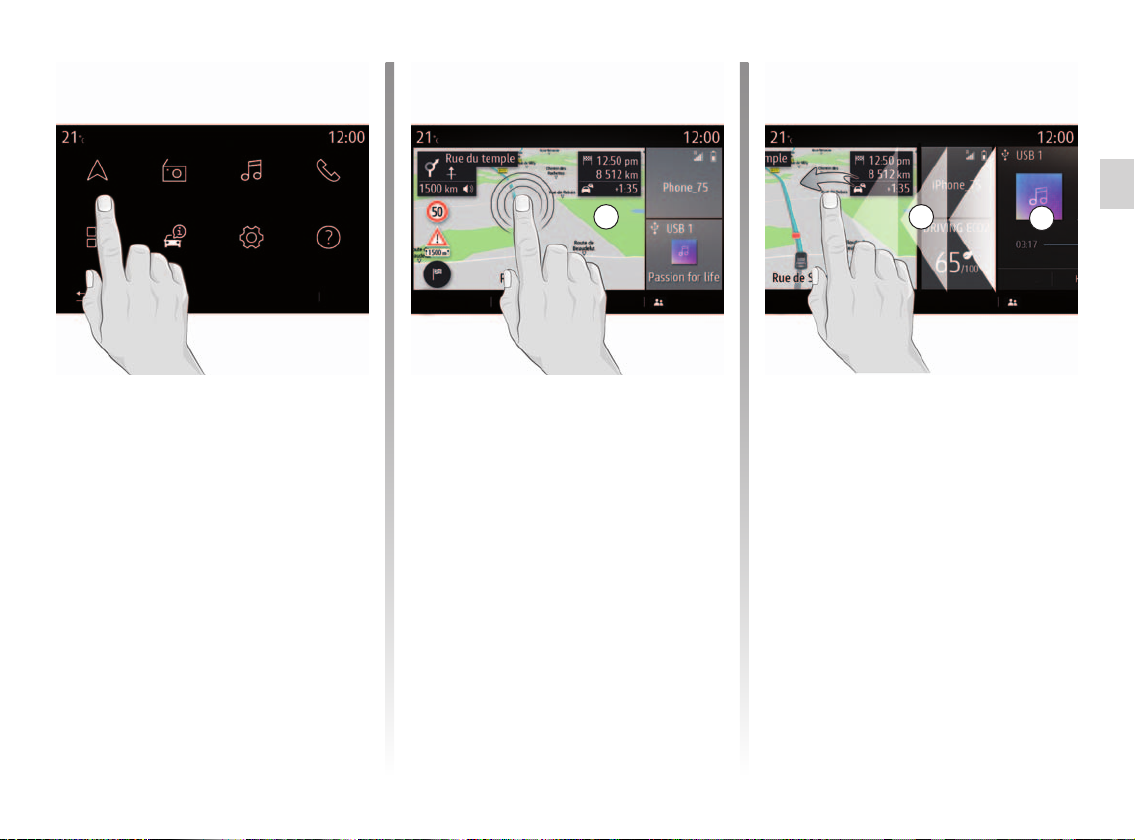
OPERATING PRINCIPLES (1/4)
Menu
Navigation Radio Music
Settings
Phone
Help
Multimedia screen
Navigating a menu
The multimedia screen can be used to
access the system functions. Touch the
multimedia screen to select one of the
menus.
A
Menu Nicolas
Gesture interaction
– Short press: touch a part of the
screen with your finger and then take
the finger off the screen.
– Long press: touch a part of the
screen for 1 second or longer.
A
Menu
B
Sources
Nicolas
– Pan (panoramic movement): press
and hold the screen with one finger
and swipe across the screen.
– Fast swipe: swipe your finger quickly
left to right to switch from home
page A to home page B.
– Drag and drop: touch a part of the
screen for one second or longer
while moving an object.
– Zoom-in/Zoom-out: bring together
two fingers or slide them apart on the
screen.
1.7
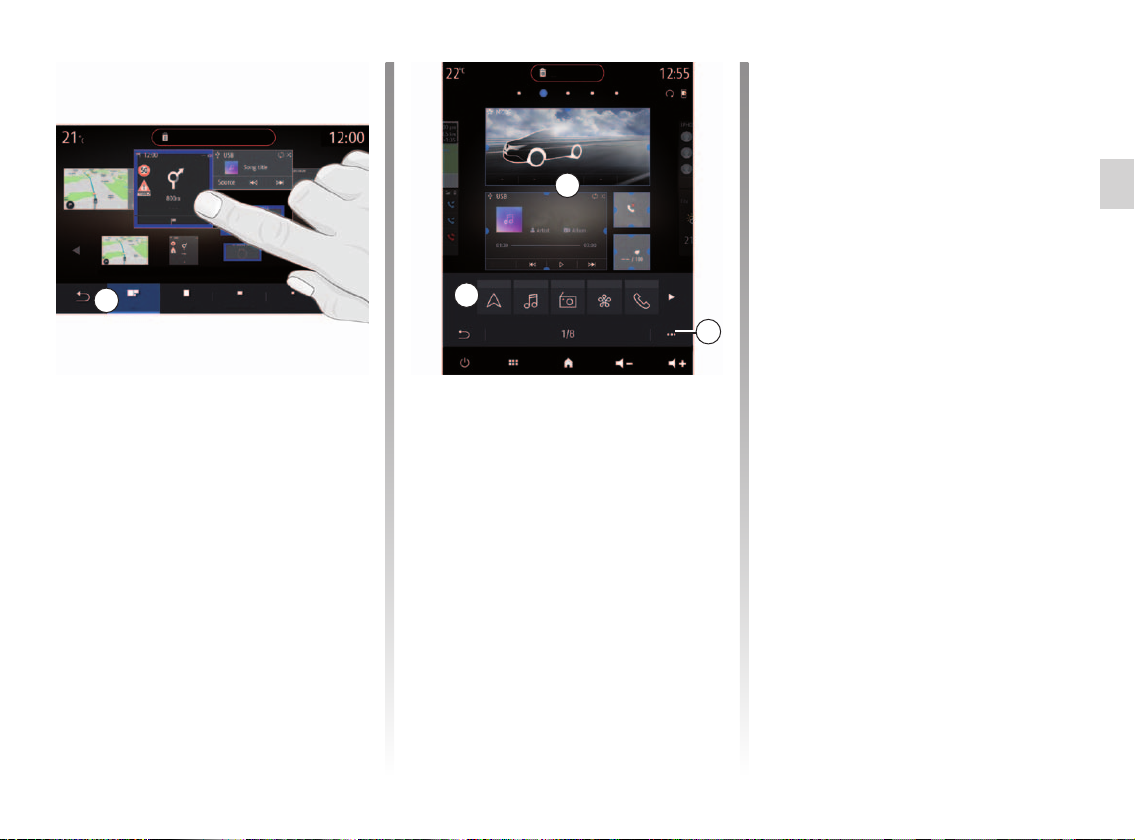
Page 14
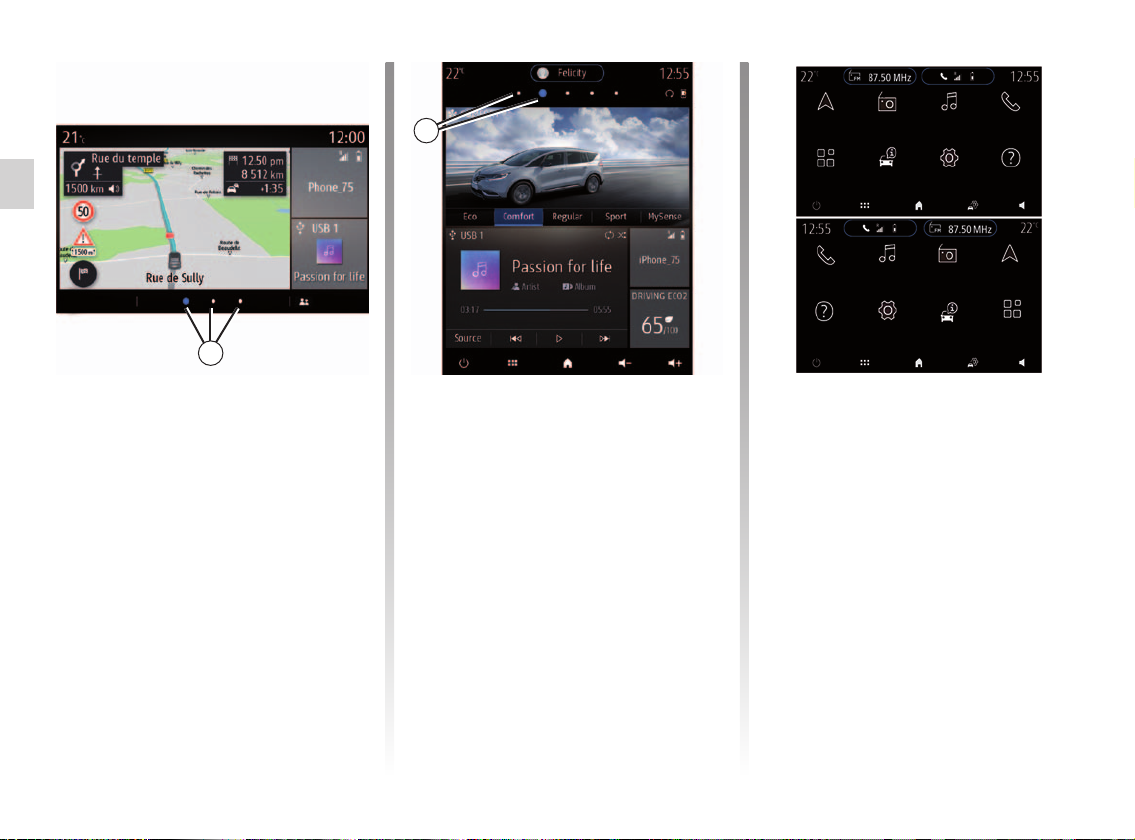
OPERATING PRINCIPLES (2/4)
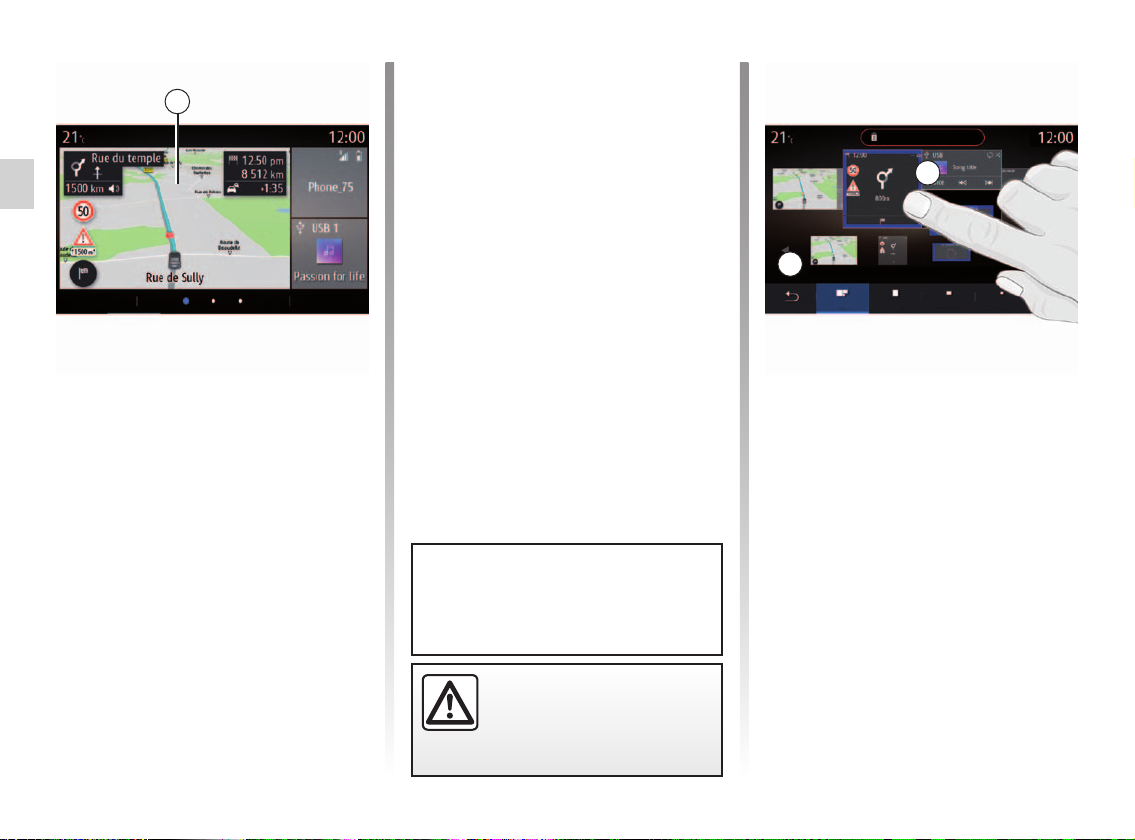
1
Introduction to the home
pages
The home pages are the default
screens for your multimedia system.
Your system has several customisable
home pages 1. Move from one page to
another by quickly swiping your finger
horizontally.
These home pages are made up of a
certain number of widgets to functions
such as the navigation, the radio, etc.
1
These widgets grant you direct access
to the main screen for the function or,
in certain cases, enable you to directly
control them from one of the main
screens (change the radio station, for
example).
For a description of the home page,
please refer to the “General description” section.
Note: you can change the configuration
of the home pages. Please refer to the
“Add and manage widgets” section for
further information.
Navigation
Applications
Phone
Help
Radio
Car info
Music
Settings
Music
Settings
Radio
Car info
Phone
Help
Navigation
Applications
Display of home pages, functions and
information may be reversed depending on country and read direction.
1.8
Page 15
OPERATING PRINCIPLES (3/4)
Menu
Navigation Radio Music
Phone
SettingsCar infoApplications
Help
2
Introduction to the main
menu
To access the main menu, press 2 on
the screen or on the central control.
The system has several menus, all of
which can be accessed from the main
menu:
– “Navigation”: includes all of the satel-
lite guidance functions, road maps
and traffic information
– “Radio”: used to manage the radio and
audio playback
– “Music”: manage the playing of audio
files;
– “Phone”: used to pair the system with
one or more mobile phones and to
use hands-free mode
– “Applications”: used to manage your
photos, videos and apps;
– “Car info”: covers information related
to the multimedia system
– “Settings”: manage some vehicle
equipment, such as MULTI-SENSE,
the driving assistance systems, the
reversing camera, Driving Eco and
adjust various settings on the multimedia system, e.g. display, language, etc. ;
– Use “Help”: to contact call centres
as required (breakdown, healthcare,
services);
– “Notifications”: informs you of
events by category; “Navigation”,
Multimedia, “Phone”, etc.
Note: depending on the equipment,
some menus may not be available.
Some settings have to be set with
the engine running to be stored
by the multimedia system.
For safety reasons, carry
out these operations when
the vehicle is stationary.
1.9
Page 16
OPERATING PRINCIPLES (4/4)
4
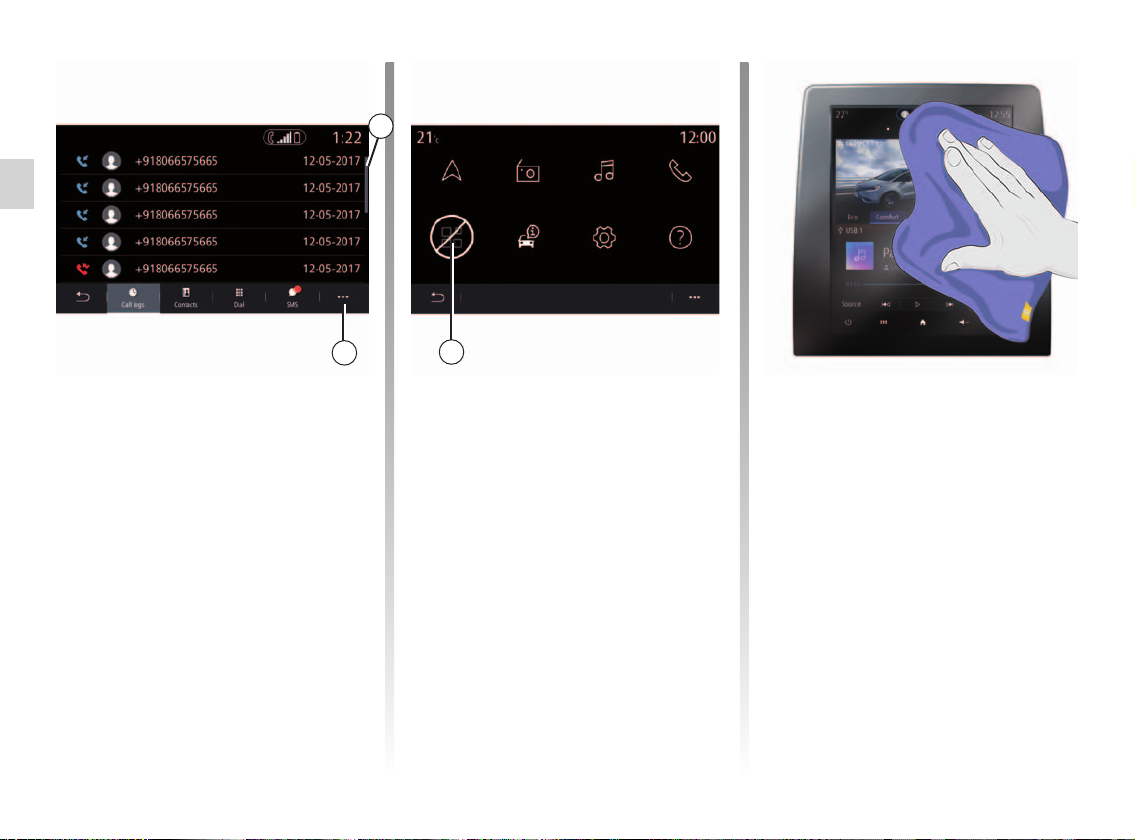
Scroll bar
The bar 3 shows the position of the
current screen in the page. Swipe the
multimedia screen up or down to scroll
through the list and move around the
page.
Pop-up menu
There is a pop-up menu 4 available
from most system menus that gives
access to sub-menus (delete favourites, change current route, settings etc.)
and to the user manual for your multimedia system.
3
Navigation
Menu
Radio Music
Car infoApplications
Settings
5
Functions unavailable
While driving, functions such as “Video”,
“Photo”, access to the tutorial and some
settings may be unavailable, according
to country-specific regulation.
Unavailable functions can be identified
by the icon 5.
To access unavailable functions, stop
your vehicle.
Note: in some countries, regulation requires that the hand brake be applied
in order to access the applications. For
further information, please contact an
Authorised Dealer of brand.
Phone
Help
Cleaning
Your multimedia system is fitted with an
anti-glare screen.
Clean properly but do not apply too
much pressure. Use only a micro-fibre
cloth.
Do not use any alcohol-based products
or any other liquid.
1.10
Page 17
SWITCHING ON, OFF
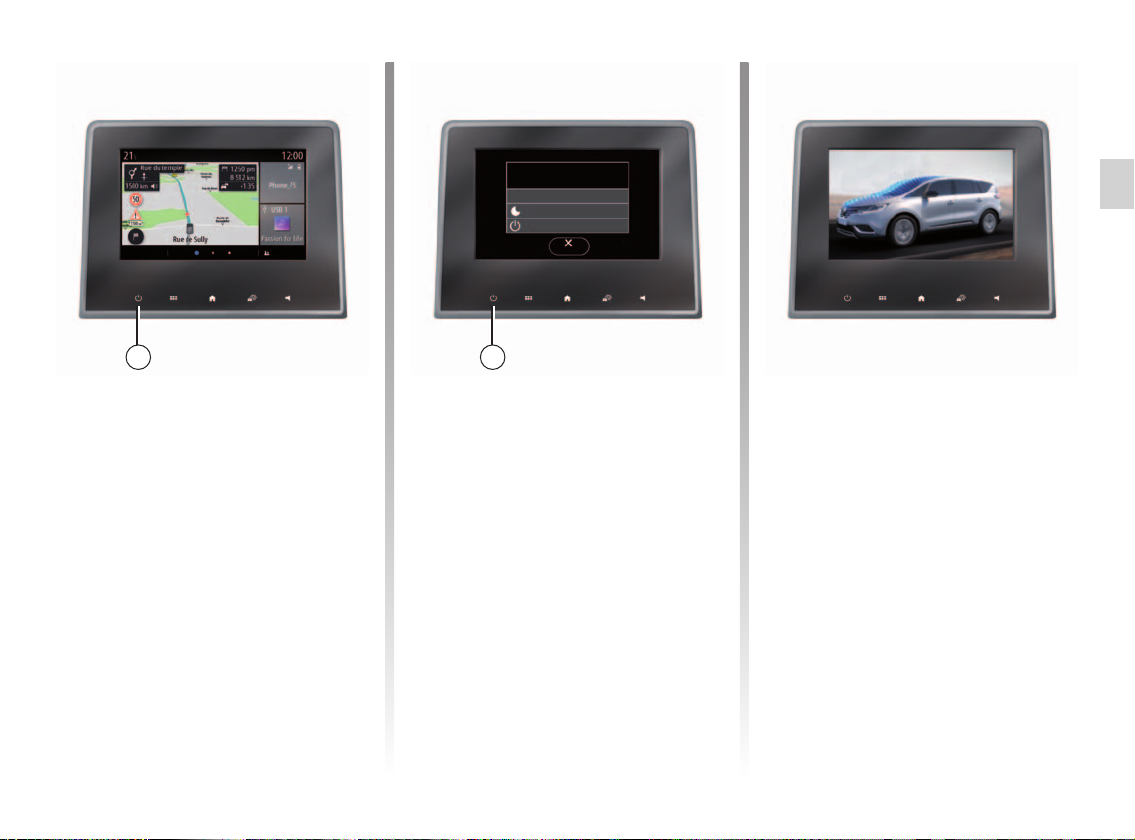
Switching on
The multimedia system starts:
– when the vehicle is started;
– by tapping the 1 control on the multi-
media screen or the central control.
System ON/OFF
Radio / music OFF
Dark screen
Standby
Close
11
Switching off
The multimedia system switches off:
– by pressing and holding the 1 control
on the multimedia screen or the central control;
– by tapping the 1 control on the mul-
timedia screen or the central control,
you can:
– Switch off the radio/Music;
– Switch off the screen;
– “Standby”.
– when the opening elements of your
vehicle are locked.
23°
26-06-2018
13:35
Clock/temperature/date
screen
This screen is displayed when you
select the “Standby” function.
1.11
Page 18
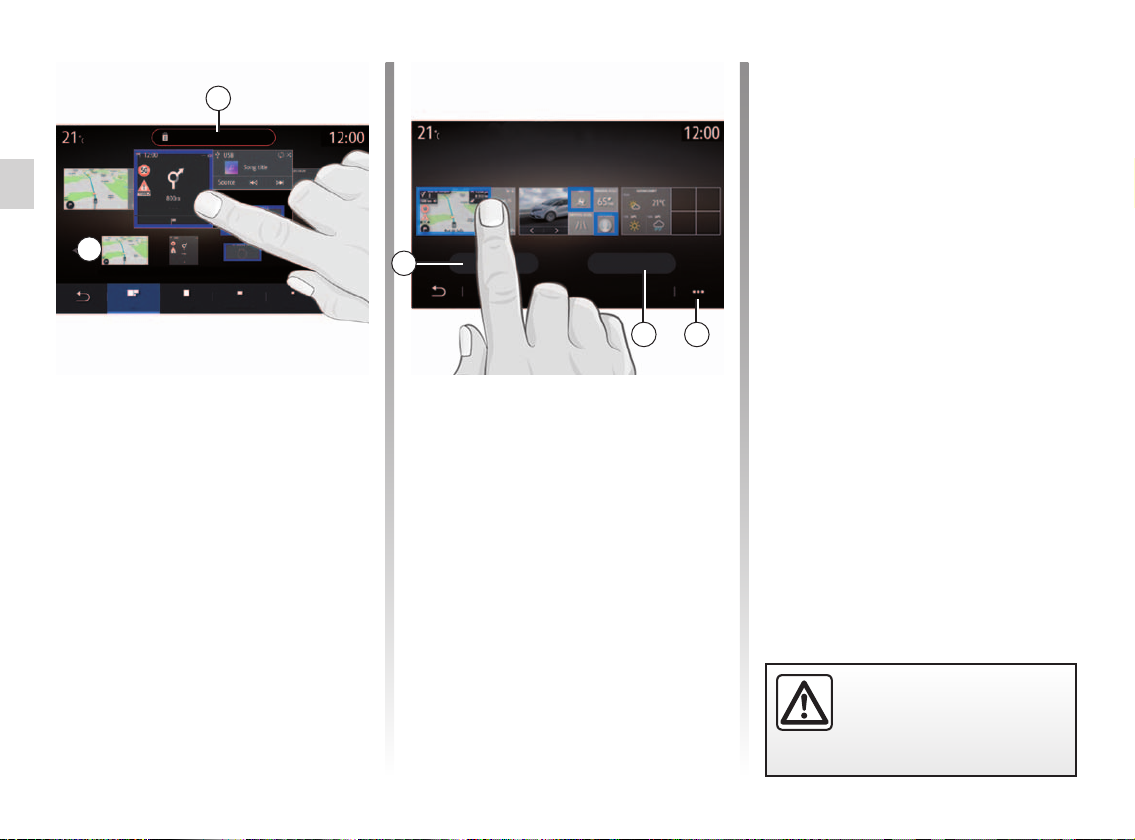
ADD AND MANAGE WIDGETS (1/3)
Customising the home pages
1
You can change the configuration of the
home page by adding widgets.
From the home page, press and hold
the multimedia screen 1 to access the
home page customisation settings.
Delete
A
Menu
Your system contains three customisable home pages which include a
number of widgets allowing access to
functions such as Navigation, Radio,
Settings, etc.
Press on one of the home page widgets to access the function or, in certain
cases, directly control the function from
the main screen (e.g. to change the
radio station or access your telephone).
1.12
Widget configuration is linked to the
profile. If the profile changes, the
widgets display changes too.
For safety reasons, carry
out these operations when
the vehicle is stationary.
B
Navigation Navigation
Navigation
All Large Method Small
Add a widget
Select the home page A that you wish
to customise.
In area B, select the function of the
widget that you wish to be displayed.
The selected widget is framed in blue
to confirm the action.
Drag the widget from area B and move
it to the desired location on the home
page A.
Page 19
ADD AND MANAGE WIDGETS (2/3)
Delete
Navigation Navigation
Navigation
All Large Method Small
C
You can also move the widgets by
simply touching the screen (select/position).
Note: some widgets can be used only
once depending on their size. A widget
for a given function can be used only
once on a page.
Widget size
You can select the widget size from the
bar C. Some apps only have one size.
The number of widgets displayed on
the home screen may vary depending
on the format of the multimedia screen.
Delete
A
Title:
Navigation
Music Radio MULTI-SENSE Phone
Phone
Driving eco
B
3
Customising the widgets
On some multimedia system front
panels, area C to select the size of the
widget is not required.
Select the widget in area B then pinch
or spread on any edge of the widget to
adjust it as required.
A red frame is displayed when the size
limit is reached.
“Address” and “Contact” widgets
Activation of services is necessary to
configure these two widgets. Please
see the section entitled “Activating
services”.
“Address”
The multimedia system directs you to
the “Navigation” menu.
Select the address that you wish to
designate as One Touch from your favourites, call log or by manual entry.
“Contact”
The multimedia system directs you to
your telephone's contacts list (only if
your telephone is connected to the multimedia system).
Select the contact that you wish to designate as One Touch from the contacts
list on your telephone.
Note: the data related to these two
widgets is stored in the multimedia
system even if your telephone is not
connected to the multimedia system.
The data is considered non-confidential.
1.13
Page 20
ADD AND MANAGE WIDGETS (3/3)
2
Delete
B
Navigation Navigation
Navigation
All Large Method Small
5
Edit home pages
Delete
Delete a home page
To delete a home page, you must delete
all of the widgets on the page.
Pop-up menu
Use the pop-up menu 3 to:
– delete one or more widgets on the
home pages;
– restore the home page default con-
figuration.
4
3
Delete widgets
Select the widget that you wish to delete
and drag it to the “Delete” button 2 or
slide the widget to area B.
Note: you can also delete widgets
by touching the screen, selecting the
widget(s) then pressing the “Delete”
button 2.
Note: the selected widget changes
colour in order to confirm the action.
1.14
To see a complete view of all home
screens in order to delete several widgets, press “Delete” from the pop-up
menu 3.
Select, depending on your choice:
– the widget(s), then press the “Delete”
button 4;
– all widgets from all pages, then press
“Select all” 5 followed by “Delete” 4.
For safety reasons, carry
out these operations when
the vehicle is stationary.
Page 21
USING VOICE RECOGNITION (1/9)
Introduction
Your multimedia system has a voice
recognition system
voice control of some of the functions
on the multimedia system and on your
phone. This enables you to use your
multimedia system or your phone while
keeping your hands on the steering
wheel.
Note: the position of the voice recognition button may vary. Please refer to
the vehicle user manual for further information.
The voice recognition system does not
store the voice or requests and does
not include the system voice assistance which can interact with the user
and answer questions.
Examples:
– What is the weather in Paris?
– Are there disruptions on my journey
this morning?
Precautions regarding navigation
Use of the navigation system does not in any way replace the responsibility or vigilance of the driver when driving the vehicle.
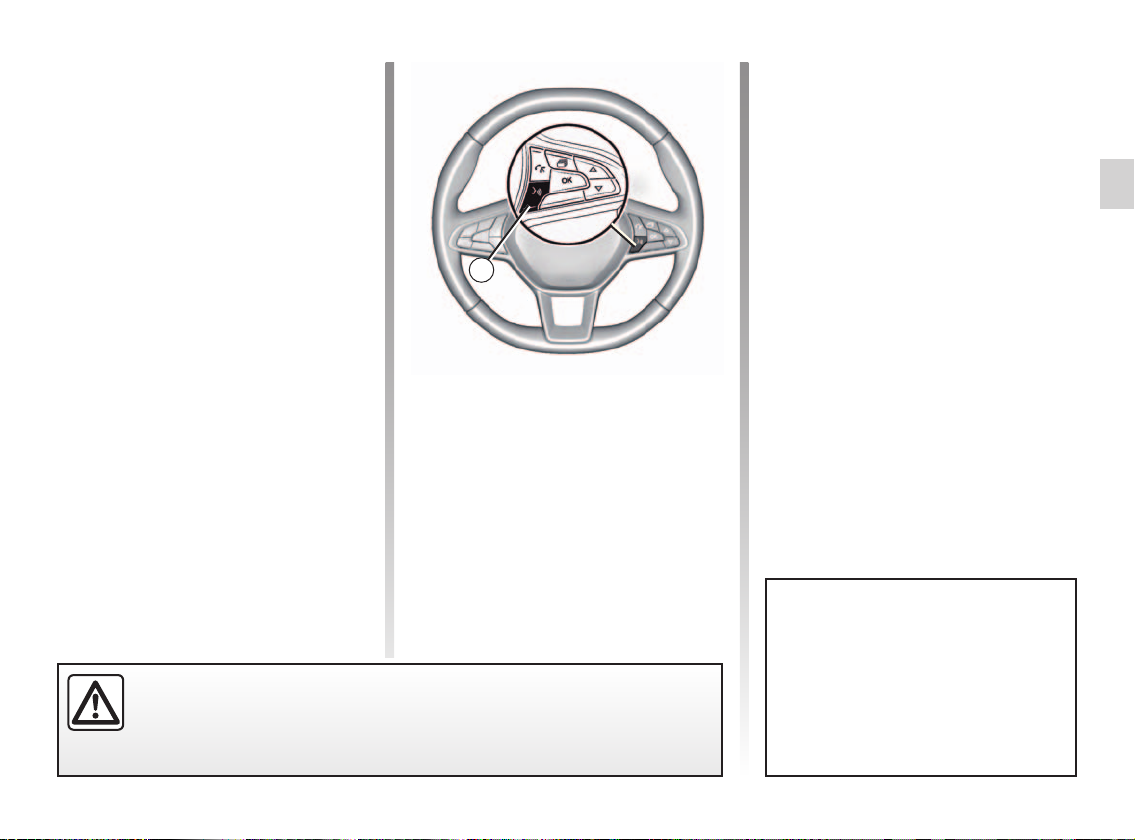
which allows
1
Voice controls
You can use voice control to call a contact in your phonebook, enter a destination and change the radio station
without touching the screen. Press 1
and follow the audio and visual instructions provided by the system and on the
screen.
Activation
To activate the voice recognition
system, press the voice recognition
button
in your vehicle.
Deactivation
To deactivate the voice recognition
system, press and hold the voice rec-
ognition button
signal, say “Quit”.
You can interrupt the voice synthesizer when using voice recognition
by pressing the 1 button or by dictating your command. A beep indicates
that you may speak.
or, after the sound
1.15
Page 22

USING VOICE RECOGNITION (2/9)
Using the multimedia
system’s voice recognition
Main voice commands for your
multimedia system
Say “Main screen” or “Back” to return to
the voice recognition main screen.
Say “Quit” to exit the voice recognition
menu.
Say “Help” to hear the details for each
system screen as well as the features
available.
Say: “Next page”, “Previous page”,
“First page”, “Last page” to navigate
within the voice recognition lists.
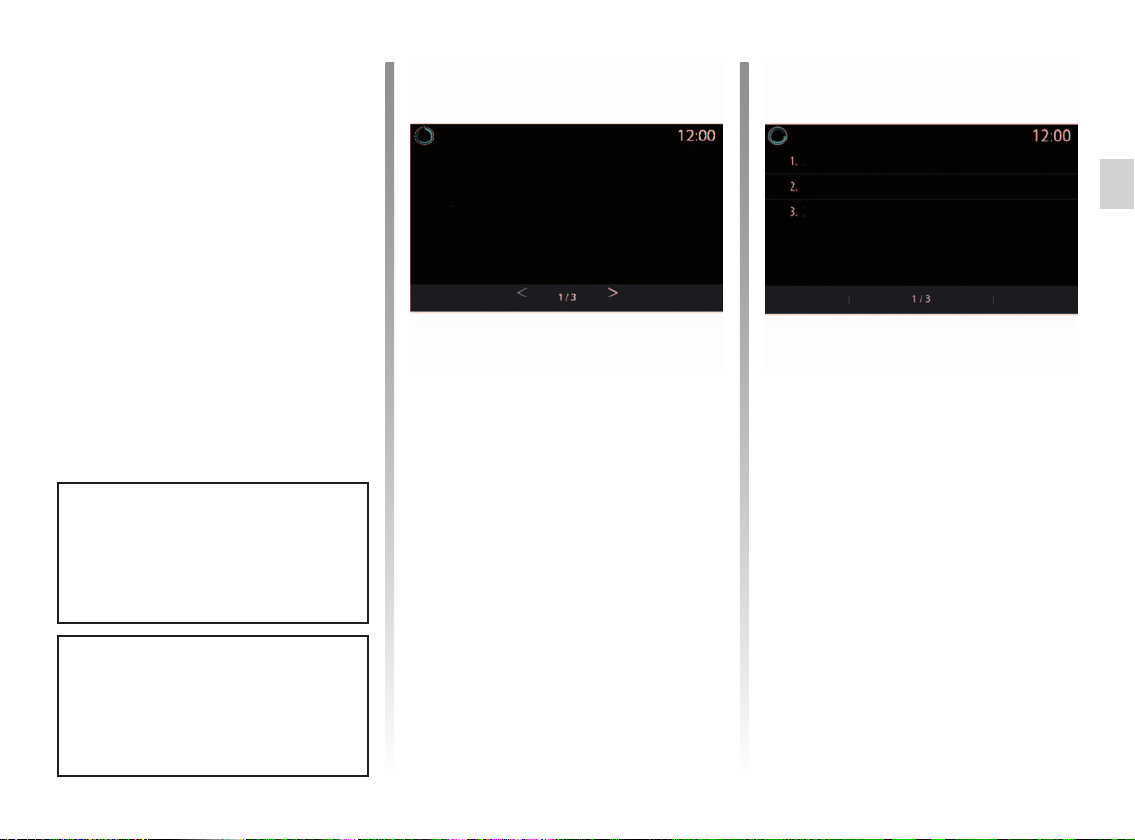
A
Navigation
Voice Recognition menu
From the main voice control menu, you
can use the voice command to control
the following functions:
– “Phone”;
– “Navigation”;
– “Audio”.
Welcome, what can I do for you?
Phone
Audio
Quit
Call Nicolas
Dial Nicolas home
Go to work
Find service station
Play album
France Info station
Help
A
2
3
4
Voice recognition indicator A
The voice recognition indicator A consists of coloured markers and icons.
– The 2 icon informs you that the multi-
media system is listening: the colour
of indicator A optimises voice recognition.
– low blue marker: average voice
recognition
1.16
The functions shown in blue on the
screen are valid commands understood by the multimedia system.
Page 23
USING VOICE RECOGNITION (3/9)
– half blue marker: good voice rec-
ognition
– full blue marker: optimum voice
recognition
– red marker: the user’s voice is too
loud and the system has difficulty
interpreting the command.
– The 3 icon informs you that the multi-
media system is analysing your command;
– The 4 icon indicates that the multi-
media system is responding.
Go to
Go home
Find
Find
Back
Navigation Favourite addresses
Avenue des Champs Elysée
Restaurant
A service station
Help
Technocentre Renault
Vélizy 2
Tour Eiffel
Back
Help
If functions are greyed-out this indicates that they not available or not
connected. The multimedia system
will suggest to connect, e.g. the
telephone.
Speak loudly and so that you can be
understood. Use the voice recognition indicator to optimise voice recognition.
Controlling navigation with
voice recognition
There are several ways to enter a destination using the voice control
cluded with your multimedia system.
in-
Destination
Enter a complete address using the
voice command.
Press the voice control button
to
display the main voice control menu.
After the sound signal, say “Go to”, then
state the complete destination address
(number, street name, destination town/
city, neighbourhood).
The system will show the address it has
understood, then you can confirm your
destination to begin the guided navigation.
1.17
Page 24

USING VOICE RECOGNITION (4/9)
Destination log
Retrieve an address already entered
using the voice command.
Press the voice control button
display the main voice control menu.
After the second sound signal, say
“Destination history”, then select your
destination.
The system will show the address it has
understood, then you can confirm your
destination to begin the guided navigation.
Note: when using voice recognition,
always wait for a beep before speaking.
Note: when you enter an address, you
can change country as long as the
country is supported by the system language. The country must be changed
before you say the address. After the
second sound signal, say “Change
country”.
to
“Home”
Retrieve your home address using the
voice command.
Press the voice control button
display the main voice control menu.
After the sound signal, say “Go home”.
The system will indicate your pre-re-
corded home address. Confirm your
destination to begin guidance.
“Work”
Retrieve your work address using the
voice command.
Press the voice control button
display the main voice control menu.
After the sound signal, say “Go to work”.
The system will indicate your pre-re-
corded work address. Confirm your
destination to begin guidance.
to
to
Note: to use the “Go home” or “Go
to work” voice function, you must first
save an address.
If no address is registered, the multimedia system suggests that you enter an
address.
For more information on saving a home
address or work address, see section:
“Navigation settings”.
“Favourites”
Use the voice command to retrieve an
address saved in favourites.
Press the voice control button
display the main voice control menu.
After the sound signal say “Favourites”,
then select your destination.
The system will show the address it has
understood, then you can confirm your
destination to begin the guided navigation.
to
1.18
Page 25

USING VOICE RECOGNITION (5/9)
“Points of interest”
Search for a point of interest using the
voice command.
After the sound signal, say “Find service station” or “Find hotel”.
Abroad
The navigation system offers you several POI (points of interest) in different
categories.
During your journeys abroad, some
of the vocal commands for categories
may not be recognised.
If you want to search for a point of interest, say: “POI by category”. The multimedia system displays the points of interest categories list. Select one of the
categories.
For further information about using
points of interest, please refer to the
section on “Entering a destination”.
Multimodality
The system multimodality makes it possible to complete the voice command
using the multimedia screen.
Using favourites with voice
recognition
The saved addresses can be called directly using voice recognition.
Press the voice control button
display the main voice control menu.
After the sound signal, say “Display my
favourites”.
The system displays the saved
favourite(s).
to
“Radio” control with voice
recognition
You can activate music, radio or change
waveband using the voice command included with your multimedia system.
Press the voice control button
display the main voice control menu.
After the sound signal, say:
– “Radio station FM”, “Radio station
AM”, “Radio station DR”;
or
– “Radio station X”, X being the name
of the radio station;
or
– “Radio station” followed by the de-
sired frequency. e.g. For “Radio
station 91.8”, say “Radio station 91
point 8”.
to
1.19
Page 26
USING VOICE RECOGNITION (6/9)
Voice menu
Phone
Navigation
Audio
Quit
Call Nicolas
Dial Nicolas home
Go to work
Find service station
Play album
France Info station
Help
“Music” control with voice
recognition
You can play music (an audio track,
playlists, etc.) using the voice command
included with your multimedia system.
Possible auxiliary audio sources:
– “USB” (USB port);
– “AUX” (Jack socket).
Press the voice control button
to
display the main voice control menu.
After the sound signal, say one of the
following:
– “Play artist” followed by the name of
the artist;
or
– “Play track” followed by the name of
the track;
or
– “Play album” followed by the name of
the album;
or
– “Play genre” followed by the genre;
or
– “Playlist” followed by the name of the
playlist.
Depending on the source selected, you
can:
– play the next/previous track;
or
– play all titles/display the music list.
“Change audio source”
From the main menu you can change
the audio source.
Press the voice control button
to
display the main voice control menu.
After the sound signal, say “Play” fol-
lowed by the source name:
– “Play USB”;
or
– “Play FM”;
or
– “Play Bluetooth”.
1.20
Page 27
USING VOICE RECOGNITION (7/9)
Using a telephone with voice
recognition
It is possible to call a number or a contact using the voice control included
with your multimedia system.
Press the voice control button
display the main voice control menu.
After the sound signal, say one of the
following:
– “Call” followed by the name of the
contact you wish to call;
or
– “Dial” followed by the telephone
number you wish to call.
Note: you are recommended to dictate
the numerals either one at a time or two
at a time.
The system displays the number,
say “Dial” to call the number or
“Correct”/“Return” to say another
number.
to
Phone number
Dial
Correct
Back
Quit
Help
Voice control can also be used to view
your call log and read an SMS.
Press the voice control button
to
display the main voice control menu.
After the sound signal, say one of the
following:
– “Call history” or “Recent calls”;
or
– “Read SMS” or “Display SMS”.
Note: only the “SMS” received while
driving can be read.
“Help”
To find out more about using voice
functions:
– press the voice control button, then
say “Help”. The system displays a
number of help categories on the
screen;
– select the required function.
The “Help” function is available at all
times. For example, if you wish to find
the “Phone” on the screen and you say
“Help”, the help voice will assist you in
using the function.
1.21
Page 28
USING VOICE RECOGNITION (8/9)
Using the phone’s voice
recognition with the
multimedia system
To use your phone’s voice recognition
system with your multimedia system
you should:
– connect your telephone to the multi-
media system (refer to the section on
“Connecting, disconnecting a telephone”);
– ensure that your phone has a voice
recognition function compatible with
your multimedia system.
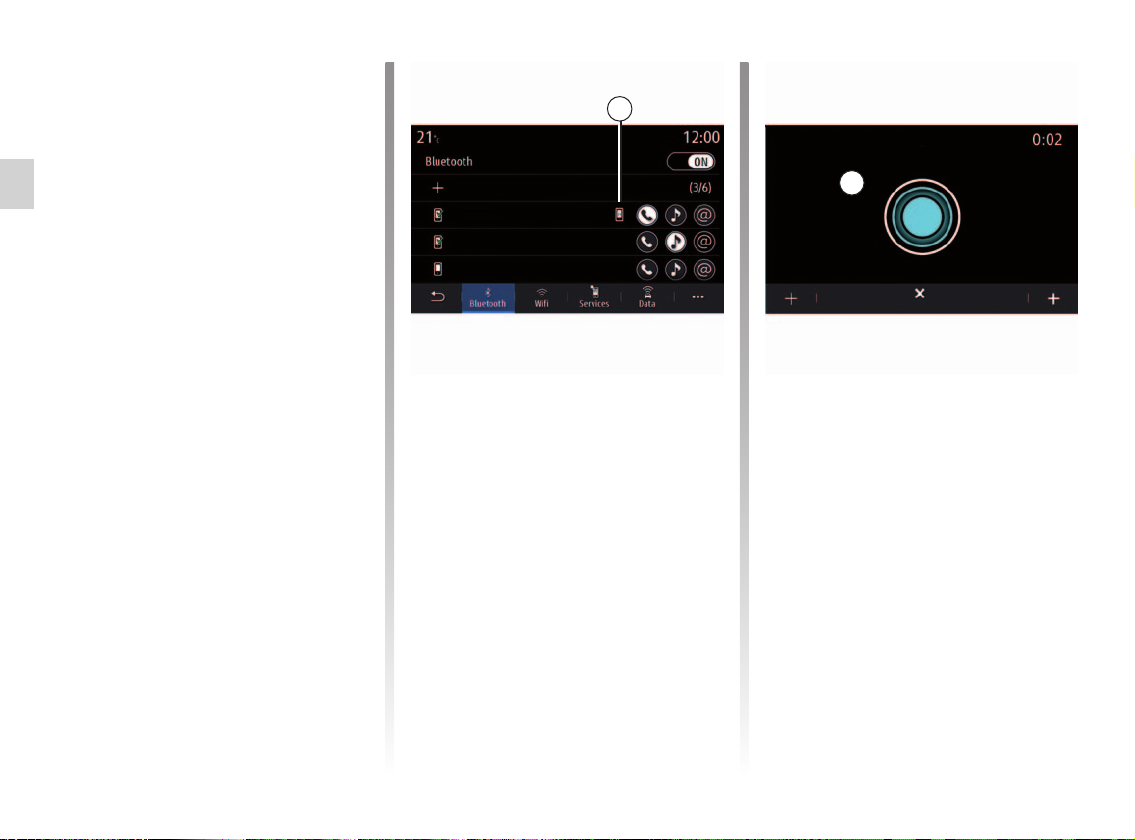
Note: If the voice recognition from your
phone is compatible with the multimedia system, the 5 pictogram appears
from the “Paired devices list” menu.
For more information, please refer
to “Connecting/disconnecting a telephone”.
Note: if you wish to use your phone’s
voice recognition with the multimedia
system, make sure that you are located
in a network coverage area.
To activate your phone’s voice recognition system with the multimedia system,
press and hold your vehicle’s voice rec-
ognition button
The multimedia screen displays your
telephone’s main voice control menu
on the B screen.
Add new device
Nicolas’s phone
Elodie’s phone
Phone 874
Devices
.
5
Phone
B
Cancel
To reactivate your phone’s voice recognition system with the multimedia system, briefly press your vehi-
cle’s voice recognition button
screen B.
To deactivate your phone’s voice recognition system with the multimedia
system, press and hold your vehicle’s
voice recognition button
.
or
1.22
Page 29

USING VOICE RECOGNITION (9/9)
From the main voice control menu, you
can use voice control for some of your
phone’s functions.
Voice recognition is disabled:
– when reversing your vehicle;
– during a call.
Note: the voice recognition session is
automatically deactivated after several
seconds of inactivity.
When using your phone’s voice recognition with the multimedia system,
the transfer of cellular data required
for its operation can generate additional costs not included in your
phone service contract.
Using the One Shot feature
The One Shot feature allows you carry
out a more accurate and direct voice
command in order to avoid going
through the “Phone”, “Phonebook”,
“Navigation”, “Destination” menus.
To use the telephone function you can
command directly:
– “Call Alice”;
– “Call office”;
– ...
To use the navigation function you can
command directly:
– “Go to Champs Elysée”;
– “Go home”;
– ...
For the multimedia functions, you can
command directly:
– “Station Classique”;
– “Play Bluetooth”;
– ...
To use this function, press the voice
recognition button
sound signal then state your command.
, wait for the
1.23
Page 30

1.24
Page 31

Navigation
Map . . . . . . . . . . . . . . . . . . . . . . . . . . . . . . . . . . . . . . . . . . . . . . . . . . . . . . . . . . . . . . . . . . . . . . . . . . 2.2
Enter a destination. . . . . . . . . . . . . . . . . . . . . . . . . . . . . . . . . . . . . . . . . . . . . . . . . . . . . . . . . . . . . . . 2.9
Traffic . . . . . . . . . . . . . . . . . . . . . . . . . . . . . . . . . . . . . . . . . . . . . . . . . . . . . . . . . . . . . . . . . . . . . . . . . 2.25
Navigation settings . . . . . . . . . . . . . . . . . . . . . . . . . . . . . . . . . . . . . . . . . . . . . . . . . . . . . . . . . . . . . . 2.27
2.1
Page 32

MAP (1/7)
Map
From the home screen, press Menu,
then Navigation to access the map.
You can also access the map from the
Navigation widget.
The map shows your current position
and the information that you configured
(show POIs, weather, traffic, etc.)
For safety reasons, carry
out these operations when
the vehicle is stationary.
K
J
H
Route des rédacteurs
F
G
“Map” screen with a route in
progress
A Journey information such as your ar-
rival time, additional time due to traffic and the total distance remaining.
Note: by pressing area A, the multime-
dia system displays either the arrival
time or remaining journey time.
E
D
K
A
A
B
J
H
C
G
F
B Information on traffic conditions over
the next few miles. Press this area to
view the list of incidents on the route
in progress.
C Pop-up menu.
D Views/Zoom:
– press the “±” button to display the
front and rear zoom buttons;
– press the “Views” button to dis-
play a 2D/2D view facing North,
3D/3D Inception, “Traffic”.
LM
E
B
C
2.2
Page 33

MAP (2/7)
Note: depending on the multimedia
screen, these functions may be separated:
– L Zoom “±”;
– M “Views”.
E Location and the name of the street
which you are on. Access additional
features by pressing.
F Navigation menu.
G Back to previous screen or back to
navigation menu.
H Speed Check or Speed Camera area
warning
J Speed limit indicator panel.
K While a route is in progress, infor-
mation on upcoming road turns and
the name of the next street on your
route. Touch the unit to display the
voice guidance volume adjustment
menu and repeat the previous guiding instruction.
N Journey information such as your ar-
rival time, additional time due to traffic and distance.
P Information on the road types used
(motorways, toll roads, motorail).
Q Q
S
Fast route
Go
U
P
Avenue des Champs-Elysées
Visual
feedback
T
N
Route calculation screen
Q When a route is in progress, this
function can be used to return to
the route in progress after moving
around the map.
R Zoom: zoom in and out buttons.
S Pop-up menu
T Depending on the equipment, use
“Visual feedback” to display a photo
of the destination location if available.
U Press the Go button to start the se-
lected route.
K
R
Route des rédacteurs
“Map” screen without a route in
progress
Information area K is replaced by a
compass.
Use Q to return to your current position.
For safety reasons, carry
out these operations when
the vehicle is stationary.
2.3
Page 34

MAP (3/7)
V
Detour all
W
Traffic screen
V View of traffic events on the map or
by a list of events.
W Press the Detour all button to avoid
all areas with traffic disruption.
Pop-up menu with no route in
progress
Press the pop-up menu to access the
“Settings” menu.
Use the “Route” tab to access the following settings:
– Route type
– Use traffic detour
– Allow toll roads
– Allow motorways
– Allow ferries
– Allow car train
– Automatic guidance proposal
– Destinations shared with other de-
vices
– Allow time-restricted roads
– Allow roads with time-based toll (“vi-
gnette”)
– Avoidance area
– Allow unpaved road.
Use the “Map” tab to access the following settings:
– Map colour
– Time display
– “2D/2D views facing North, 3D/3D
Inception, “Traffic”;
– Traffic display
– Traffic signs
– Auto zoom
– My car
– Junction view
– POI display
– Weather display.
Pop-up menu with a route in
progress
Press the pop-up menu to access the
following menus:
– “Cancel route”;
– Guidance voice;
– Route details;
– “Settings”.
“Cancel route”
Stops the navigation in progress.
2.4
Page 35

MAP (4/7)
You can also adjust the “Guidance
voice” volume when it is activated:
– by rotating the central control;
– using the steering column control.
Note: if this function is deactivated,
no voice guidance instructions will be
issued by the multimedia system.
Route details
Av. Daumesnil
Rue Picpus
5
Rue L. Braille
Rue de Toul
Porte Dorée
300m
125m
200m
75m
350m
00:00
00:02
00:09
00:01
00:04
00:05
00:07
00:18
00:19
00:23
1
3 4
2
Guidance voice
From the pop-up menu you can adjust
the “Guidance voice” volume:
– press 2 and 3 to reduce or increase
the guidance voice volume;
– press the 1 button to activate/deacti-
vate the guidance voice.
Note: the level indicator 4 is shown for
information purposes. You can’t use it
to adjust the volume level.
For safety reasons, carry
out these operations when
the vehicle is stationary.
Summary
Road list Steps
Route details
This function is used to view the details
of the current route.
From the “Summary” tab you can view
the departure address and destination
address as well as the routes taken.
From the “Road list” tab you can view
the route in detail.
From the “Steps” tab you can view the
various directions, distances and durations for each stage of the journey.
2.5
Page 36

MAP (5/7)
D
Display mode
You can select between several display modes by pressing the View/Zoom
button D.
Route view
The map displays your complete route.
2D view
The map displays your current location
and faces the direction you are travelling in.
2D/North view
The map displays your current position
facing North.
2.6
3D view
The map displays your current position
on a 3D map surface. It automatically
faces the direction of travel.
3D Inception view
The map is angled slightly upwards to
provide a longer distance of visibility.
It automatically faces the direction of
travel.
Page 37

MAP (6/7)
Guidance
Guidance is activated once the route
has been calculated. The multimedia
system guides you all the way along
your route, informing you at each intersection of the direction to follow over
several stages.
Step 1: Preparation
The multimedia system will inform you,
using the navigation voice, that you will
soon have to carry out a manoeuvre.
Step 2: Alert
The multimedia system announces the
manoeuvre that you need to carry out.
e.g. “In 400 metres, take the next exit”.
The screen displays a detailed repre-
sentation or 3D image of the manoeuvre.
Step 3: Manoeuvre
The multimedia system announces the
manoeuvre that you need to carry out.
e.g. “Take the next right”.
Once the manoeuvre has been com-
pleted, the map will appear in full
screen.
Note: if you do not follow the driving
recommendations or if you quit the
calculated route, a new route is automatically calculated by the multimedia
system.
5 6
Lane
The display automatically switches to
a more detailed view in order to guide
you to the correct lane for the next manoeuvre:
– Grey lane(s) 5: the lane can be taken
but is not part of the calculated route.
– White lane(s) 6: the lane should be
followed to continue on your calcu-
lated route.
Note: other lanes may appear during
the manoeuvre.
2.7
Page 38

MAP (7/7)
Fast route
7
Avenue des Champs-Elysées
Weather
Guyancourt (France)
Go
Visual
feedback
Weather
From the pop-up menu, you can activate or deactivate the weather display
on the map.
The multimedia system lets you know
the weather forecast around your position and at the destination if a route is
in progress.
Note: services must be activated in
order to display the weather. Please
see the section entitled “Activating
services”.
2.8
Press the weather icon 7 to view a
weather forecast over the next few
hours.
This information can also be accessed
from the “Weather” widget.
Page 39

ENTERING A DESTINATION (1/16)
“Navigation”
menu
From the home screen, press the card
or press “Menu”, then “Navigation”.
Using voice recognition to enter an
address
On the menu, press the voice recognition button: following the audible signal,
you will be able to dictate a destination
town, number and/or street name and/
or area. For more information, see the
section on “Using voice recognition”.
Precautions r egarding
navigation
Use of the navigation
system does not in any way
replace the responsibility or vigilance of the driver when driving the
vehicle.
Find an ad-
dress
Coordinates
History
Route
Favourites
Traffic
Points of in-
terest
Navigation set-
tings
1
Use the navigation menu 1 to access
the following functions:
– “Find an address”;
– “History
– “Favourites
– “Points of interest”;
– “Coordinates”;
– “Route”;
– “Traffic”;
– “Navigation settings”.
2.9
Page 40

ENTERING A DESTINATION (2/16)
Find an ad-
dress
Coordinates
2
Call logs
Route
From fa-
vourites
Traffic
3
Points of in-
terest
Navigation set-
tings
One Line Search
Use the One Line Search function for a
quick and precise search.
As soon as you enter the first letters
in the 2 search field, the multimedia
system suggests a street name, town
or POI (point of interest).
Press the 3 button to view the full list of
suggestions.
For example: “Rouen”.
Note: additional information provided
by your multimedia system may vary,
depending on your connection type.
5
4
Current pos. In a city
You can display the suggestions in a
list 5 or on the map 4.
The map display 4 shows the geographical position for each suggestion.
2.10
Page 41

ENTERING A DESTINATION (3/16)
Address
Country
City
Street
House Number
Enter junction
France
Paris
Go Map
Find an address
From this menu you can enter a complete or partial address: country, town,
post code, street, number, etc. On first
use, the system asks you to choose the
destination country. Enter the town/city
name or a postcode using the keypad.
Ern_
Rue Ernest Lacoste
Rue Ernest Lavisse
Rue Ernest Léfébure
From the search area 6 enter a street
name.
When you start entering letters, the
system suggests similar town names.
You can:
– press the town/city name displayed
on-screen to confirm your selection;
– access the full list 7 returned by your
search.
Note: the system stores previously entered cities in its memory.
Note: only addresses known to the
system through the digital map are authorised.
Use the pop-up menu 8 to:
6
7
– save the selected address to your fa-
vourites;
– enter the destination location details
(latitude and longitude values).
8
2.11
Page 42

ENTERING A DESTINATION (4/16)
9
History
Fuel station Paris Saint-Quentin
Centre commercial Vélisy
Technocentre Guyancourt
Champs Elysée Paris
RouteAddress
11
12
“History”
Use this menu to select a destination
from the list of recently used addresses.
These are automatically stored.
From the “Address” tab 12 you can
access the stored destination history.
Select a destination to start guidance.
11-09-2018
07-09-2018
25-08-2018
24-08-2018
10
Use the “Route” tab 11 to access the
route history. Select a route to start
guidance.
Use the magnifying glass icon 9 to
search for an address, a route stored in
the route history, or to enter a new address using the keypad.
From the pop- up menu you
can 10access the “Address” 12 and
“Route” tabs 11 to:
– “Delete” one or more of the ad-
dresses selected;
– “Delete all”;
– “Sort by date”;
– “Sort by name”;
– “Save as favourite”.
During guidance, when you launch the
search for a new destination you have
the choice between setting it as either:
– a waypoint;
– a new destination.
2.12
For safety reasons, carry
out these operations when
the vehicle is stationary.
Page 43

ENTERING A DESTINATION (5/16)
13 14
Favourites
Add new address
Home
19
Work (empty)
18
RouteAddress
17 16
“Favourites”
From the “Address” tab 17, you can:
– “Add new address”;
– run navigation guidance to your
Home 19 or place of Work 18.
– run navigation guidance to an ad-
dress saved in your favourites.
15
From the “Route” tab 16, you can:
– “Add new route”;
– run a route saved in your favourites.
Use the magnifying glass icon 13 to
search for an address, a route stored in
the route history, or to enter a new address using the keypad.
When you select “Home” 19 or
“Work” 18 for the first time, the system
asks you to register an address.
Note: Only one “Home” address and
“Work” address can be recorded by the
multimedia system.
20 21
Modify address
HomeName
Address
From the “Address” menu 17, press on
Add new address” 14:
– “Name” 20 to name your new favour-
ite destination;
– Address 21 to access the following
search functions:
– “Find an address”;
– “Call logs”;
– “Points of interest”;
– “Coordinates”;
– “On map”.
2.13
Page 44

ENTERING A DESTINATION (6/16)
From the “Route” tab 16, press “Add
new route”:
– “Name” to name your new favourite
route;
– Route to access the following search
functions:
– “Add as waypoint”;
– “Add as destination”.
You can search using the following
functions:
– “Find an address”;
– “Call logs”;
– Points of interest POI.
Use the pop-up menu 15 to:
– “Edit”:
– “Name” 20 of the favourite;
– “Address” 21 or “Route “ of the fa-
vourites according to the tab selected;
– Delete (select one or more ad-
dresses);
– “Delete all”;
– “Sort by name”.
Fuel station
Renault
garage
A point of interest (POI) is a service, establishment or even a tourist area close
to a location (start point, destination
city, en route etc.).
The points of interest are grouped
by category: Fuel station, Parking,
Accommodation etc.
Select the “Navigation” menu, then
“Points of interest” to select a destination from points of interest.
22
Restaurant
Parking
Journey
Travel
Shopping
“Points of interest”
Accommodation
Hospital
Clinic
23
Total
Total Relais Guyancourt
10 avenue de l’Europe, 78280 Guyancourt
Total Saint Cyr
21 avenue Pompidou, 78210 Yveline
24
“Search by name”
In the search area 22, enter a POI category (name of a restaurant, shop etc.).
Select a desired POI from the list of results 23.
Use the pop-up menu 24 to:
– display “Online results”:
– “Reset” the search.
For safety reasons, carry
out these operations when
the vehicle is stationary.
2.14
Page 45

ENTERING A DESTINATION (7/16)
“Search by category”
The navigation system suggests several POIs in the category selected, according to the tab selected:
– no route in progress:
– “Current position”;
– “In a city” (enter town name).
– when a route is in progress:
– “On route”;
– “Destination”;
– “Current position”;
– “In a city” (enter town name).
Use the pop-up menu 24 to:
– display “Online results”:
– “Sort by price” (depending on POI);
– “Sort by distance”.
Select a POI from the results list 23.
Depending on the equipment, the multi-
media system can be used to:
– you can contact some POIs directly
(to reserve a place or for information)
by pressing on “Call”;
– start navigation towards the selected
POI, by pressing “Go”;
– preview the destination location
using the display 25.
From the pop-up menu, you can add
the address in your favourites.
25
Go Call
Fuel prices
The Fuel station POI shows the petrol
stations around your position, as well
as the price of fuel for your vehicle.
The price of fuel is associated to a
colour indicator:
– Green: petrol stations offering the
lowest prices;
– Orange: petrol stations offering aver-
age prices;
– Red: petrol stations offering the high-
est prices.
2.15
Page 46

ENTERING A DESTINATION (8/16)
You can select the areas then enter the
“latitude” and “longitude” values using
the keypad.
Enter coordinates
MapGo
26
“Coordinates”
From the “Navigation” menu, press
“Coordinates”.
Use this menu to search for a destination by entering its coordinates.
Once the coordinates have been entered, press Go to go directly to this
destination or press Map to view the
details on the map.
From the pop-up menu 26, press:
– “UTM” to enter coordinates in UTM
format;
– “Units and formats”: decimal de-
grees; decimal degrees and minutes; decimal degrees, minutes and
seconds;
– “Save as favourite”.
2.16
For safety reasons, carry
out these operations when
the vehicle is stationary.
Page 47

ENTERING A DESTINATION (9/16)
Route
Cancel
route
Route
details
Create
route
Route simu-
lation
Avoidance
area
Overview
“Route”
Use this function to manage a destination with associated stops. From
the main menu, press “Navigation”,
select the navigation menu, then press
“Route” to access the Route menus:
When a route is in progress:
– “Cancel route”;
– “Modify route”;
– “Avoidance area”;
– “Overview”;
– “Route details”;
– “Route simulation”.
No route in progress:
– “Create route”;
– “Avoidance area”.
“Cancel route”
Use this function to cancel the current
route.
“Modify route”
Use this function to modify your current
route:
– “Add as waypoint”;
– “Add as destination”.
Then select the required function:
– “Find an address”;
– “History”;
– “Favourites”;
– “Points of interest”;
– “Coordinates”;
– “On map”.
2.17
Page 48

ENTERING A DESTINATION (10/16)
27
Name
Motorways
Avoidance
area
Draw
30
Unknown
28
29
“Avoidance area”
Use this function to avoid a set or defined geographical area.
From the “Avoidance area” menu, press
“Add new avoidance area” or select previously stored areas. Press “Name” 27
to change it using the keypad.
Choose to avoid a certain sections of
motorway using the 28 button.
From the 29 pop-up menu, press
“Select city” to manually enter the country and town.
Avoidance
area
31
Save
32
Press the “Draw” button 30 to create a
“Avoidance area”.
Briefly press the map again to display
the Avoidance area 31.
Pinch/spread to enlarge or reduce the
area selected.
Press the “Save” button 32 to add the
selected area to the list of areas to
avoid.
To modify a “Avoidance area”, select it
from the list of areas to be avoided and
press the “Edit” button on the map.
33
Avoidance area
Add new avoidance area
Bordeaux, France
Paris, France
34
From the pop-up menu 34 of the
Avoidance area menu, press:
– “Delete “ (select one or more areas
to be avoided);
– “Delete all”.
By pressing the magnifying glass 33
you can search for stored areas to
avoid.
For safety reasons, carry
out these operations when
the vehicle is stationary.
2.18
Page 49

ENTERING A DESTINATION (11/16)
Use the 37 pop-up menu to access the
following functions:
Fast route
Cancel
35
Visual
feedback
36
37
“Overview”
Use this function to view all of your
route on a map.
To use this function, launch navigation
then press on “Route” in the navigation
menu, then “Overview”.
Depending on your equipment level,
use the 36 button for a Visual feedback
of the destination location.
Press the 35 button to cancel the current route.
– “Cancel route”;
– “ Guidance voice”;
– “Alternative routes”;
– “Route details”;
– “Settings”.
“Route details”
With this function you can view the
route stages in detail, using several
tabs:
– “Summary”;
– “Road list”;
– “Steps”.
38
Cancel
When a route is in progress, use the 38
control to return to the cursor position
after moving around the navigation
map.
When there is no current route, use
the 38 control to view the complete
journey after moving around the navigation map.
2.19
Page 50

ENTERING A DESTINATION (12/16)
39
Route details
Start position
Point of arrival
Roads taken
Summary Road list Steps
42
41
40
Summary
From the Summary tab 40 you can view
your:
– “Start position” 39;
– “Point of arrival” 42;
– “Roads taken” 41 (toll road, ferry, rail-
way ferry, etc.).
For safety reasons, carry
out these operations when
the vehicle is stationary.
43
43
Route details
300m
00:00
00:02
00:09
00:01
00:04
00:05
00:07
00:18
00:19
00:23
Av. Daumesnil
Rue de Toul
Rue L. Braille
Rue Picpus
Porte Dorée
Summary
125m
200m
75m
350m
Road list Steps
44
Road list
From the Road list tab 44 you can view
the route in detail.
From the list of stages 43, you can view
different directions, names of streets
and avenues taken, distance remaining
and time for each stage.
press on one of the journey stages 43
to view the stage selected on the map
with the possibility of moving back to
previous stages or forward to following
stages using the arrows 47.
45
Route details
Rue de Toul
75m 00:10 00:05
39
46
Diversion
47
The 45 bar will display information on
each stage (distance, stage time and
arrival time).
The navigation system may suggest
that you avoid an event on one of your
stages.
If you press the Detour button 46,
the navigation system will calculate a
detour route.
2.20
Page 51

ENTERING A DESTINATION (13/16)
Route details
Current position
Av. Daumesnil
300m
Rue Picpus
125m
Summary Road list Steps
48
00:00
00:00
49
00:05
00:05
54
Technocentre
53
52
50
The speed of the simulation may be
modified by pressing the 51 button.
During the simulation, you can view
the speed limit 54 as well as details in
the 50 area (distance remaining, arrival
time and journey time).
By pressing the 50 area, the simulation
is carried out while the journey over-
51
view remains visible.
“Steps”
From the Steps 49 tab, you can see the
different stages of your trip (distance,
journey time and arrival time).
By pressing on one of the stages in
the 48 list, you can access the photo,
name, full address and geographical
coordinates of the location.
“Route simulation”
Use this function to simulate the route
you will be taking to reach the destination.
Press the 52 button to stop or launch
the simulation.
Press the 53 button to return to the start
of the route simulation.
2.21
Page 52

ENTERING A DESTINATION (14/16)
Find an ad-
dress
Range
Call logs
Route
From fa-
vourites
Traffic
Points of in-
terest
Navigation set-
tings
The Navigation menu for
electric vehicle and hybrid
vehicle
From the home screen, press the card
or press “Menu”, then “Navigation”. The
configuration of the multimedia system
depends on your vehicle’s engine.
Additional menus and different settings
are displayed.
For safety reasons, carry
out these operations when
the vehicle is stationary.
map of the area within range
Eco
Standard
57
56
55
Range menu
This menu shows the geographical
area within range, given your vehicle’s
remaining charge:
– the Standard blue area represents
the area in range given the current
driving mode;
– the green Eco area represents the
area in range if Eco mode is used.
Route
Traffic
Navigation set-
La Coudray sur Chartres
tings
Use the Range button 56 to view the
geographical area still within range
once you have arrived at your next
stage or final destination.
This map shows available charging
points for your vehicle. Refer to the
“Navigation settings” section to set the
charging parameters.
2.22
Page 53

ENTERING A DESTINATION (15/16)
Depending on the equipment, the
Charge 57 button displays the list of the
available charging points within range.
The dropdown menu 55 allows you to
display or hide the points of interest
(POI).
Guardian angel
The multimedia system informs you
when the number of charging sockets
located around your position is lower
than 3. You can deactivate the function
from the Navigation menu, Settings, EV
tab.
58
Tour Montparnasse
Go
60
59
61
Total Vaucresson
13:15
+ 00:30
Total Vaucresson
14:30 + 00:30
Go
Tour Montparnasse
Go
“Route”
From the Route menu, select Overview
to view the whole of your route.
Press the Go button 60. The multimedia system informs you if your destination 59 is in range (black) or not (red),
depending on the vehicle’s charge.
The information field 58 displays the re-
maining charge once you arrive at the
destination.
Destination out of range
The SRP assistant (Smart Route
Planner) comes into operation if your
destination is out of range, given the remaining charge.
In the information area 61, the SRP assistant displays:
– the name of the charging station;
– the time of arrival at the charging
point;
– the charging time.
Refer to the Navigation settings section
to activate the SRP assistant.
2.23
Page 54

ENTERING A DESTINATION (16/16)
63
Fuel station
64
Charging
station
Fuel station
63
Charging
station
64
“Points of interest”
The configuration of the multimedia system depends on your vehicle’s
engine:
– Fuel station 63 for internal combus-
tion engine vehicles and hybrid vehicles (without charging socket);
– Charging station 64 for electric vehi-
cles;
– Fuel station 63 and Charging
Station 64 for hybrid vehicles (with
charging socket).
PICASSO - LES
ARCHIVES station
CHATELET St Jacques
garage
de l’ARSENAL garage
Charging station
400 m
600 m
750 m
Destination
Route
Current pos.
In a city
Charging station
The Charging Station POI 64 shows the
charging stations around your position,
along your route, around the destination or in a town or city.
Each station indicates the number of
compatible sockets available for your
vehicle.
Colour coding indicates the availability
of the charging sockets:
– Green: socket available;
– Red: socket unavailable.
Go Call
Select one of the charging stations for
more information:
– distance to and address of the sta-
tion;
– charging type (free, on subscription
etc.) ;
– the number of charging sockets
(available and total).
From this menu you can:
– run navigation to the station;
– call the station;
– reserve a charging socket.
2.24
Page 55

TRAFFIC (1/2)
1
3
“Traffic”
The “Traffic” function uses real-time
online information.
2
From the home screen, press “Menu”,
“Navigation”, then navigation menu 3,
then “Traffic” to access the latest traffic
information.
The traffic information bar on your
route 1 informs you of traffic incidents in
the form of dots on the map and covers
the main routes.
From the pop-up menu 2, you can
access the “Navigation settings”.
Note: the availability of the “Traffic”
services may vary.
Precautions r egarding
navigation
Use of the navigation
system does not in any way
replace the responsibility or vigilance of the driver when driving the
vehicle.
2.25
Page 56

TRAFFIC (2/2)
5
4
Detour all
9
6
8
“Traffic” screen
Traffic incident map 4 or traffic incident
list 5.
When a route is in progress, use the 6
icon to centre the route as a whole.
When a route is not in progress, use
the 6 icon to return to the cursor position after moving around the map.
Press the zoom in/out buttons 7 to
adjust the map.
5
Traffic Map
Traffic jams 300m
Caution 750m
7
Road works 1200m
Accidents 2500m
10
Detour all
9
From the 8 pop-up menu, you can
access the various navigation settings,
see section: “Navigation settings”.
Use “Detour all” 9 to avoid congested
areas.
Traffic incident list.
From the incident list 5, you can access
the details of incidents on your route.
Select one of the incidents on the list 10
to display it in detail on the map.
Rue de Rivolis - 300m
M° Saint Antoine - M° Tuilerie
Traffic jams
A
11
Detour
8
Traffic incident details
Tap one of the items in the incident list
to view details and to display the relevant section of the route on the map A.
You can scroll through the traffic incidents using the 12 arrows and command the system to avoid a selected
incident by pressing the “Detour”
button 11.
12
2.26
Page 57

NAVIGATION SETTINGS (1/6)
Navigation settings
Route type
Enable alternative route
Use traffic detour
Fast Short
Always
Route
Eco
Ask
Map
1
Never
2
“Navigation
settings” menu
From the home screen, press the
map or, from the main menu, press
Navigation.
Press the Navigation Menu, then
Navigation settings.
“Route”
From the “ Route” tab 1, you can
access the settings below:
– Route type
– “Enable alternative route”;
– “Use traffic detour”;
– “Allow toll roads”;
– “Allow motorways”;
– “Allow ferries”;
– “Allow car train”;
– Automatic guidance proposal
– “Downloadable destinations”;
– “Allow time-restricted roads”;
– “Allow roads with time-based toll (“vi-
gnette”)”;
– “Avoidance area”;
– “Allow unpaved road”.
Route type
This setting gives you the option of a
Fast, Eco or a Short route.
“Enable alternative route”
You can allow/block an alternative route
by pressing ON or OFF.
“Use traffic detour”
You can set detours and configure to
“Always”, “Ask” or “Never”.
“Allow toll roads”
This setting governs the use of toll
roads and you can set it to Always, Ask
or Never.
For safety reasons, carry
out these operations when
the vehicle is stationary.
2.27
Page 58

NAVIGATION SETTINGS (2/6)
“Allow motorways”
Allow/block the use of motorways on
the route by pressing ON or OFF.
“Allow ferries”
Allow/block the use of ferries on the
route by pressing ON or OFF.
“Allow car train”
Allow/block the use of motorail on the
route by pressing ON or OFF.
Automatic guidance proposal
Use this navigation programming function to manage the confidentiality parameters related to your navigation
data programming.
The multimedia system analyses your
daily journeys and trip times in order to
suggest a destination without the need
to configure it when the multimedia
system starts. E.g. home, work etc.
You can access the settings below:
– Authorise navigation programming by
pressing ON or OFF
– Automatic guidance proposal by
pressing ON or OFF
– Delete journeys log.
“Downloadable destinations”
From your telephone, you can plan a
journey and share it with the multimedia
system. For further information about
the dedicated app, refer to the section
on MY Renault.
When starting your vehicle, the multimedia systems informs you of “You
have planned a route on your smartphone”.
You will have the choice between:
– “Go”;
– “Save to favourites”;
– “Ignore”.
Allow/block destination sharing by
pressing ON or OFF.
Allow time-restricted roads
This option governs the use of time-
restricted roads and you can set it to
Always, When open or Never.
“Allow roads with time-based toll (“vignette”)”
Activate/deactivate the use of toll roads
on the route by pressing “ON” or “OFF”.
“Avoidance area”
Activate/Deactivate the area to be
avoided on the route by pressing “ON”
or “OFF”.
Allow unpaved road
Allow/block the use of roads unsuitable
for vehicles on the route by pressing
ON or OFF.
Pop-up menu
From the pop-up menu 2, you can reinitialise the Navigation settings.
2.28
Page 59

NAVIGATION SETTINGS (3/6)
Navigation settings
Time display
Traffic display
Junction view
Map colour
Weather display
Route
Auto
Day Night
Map
3
4
“Map”
Use the “Map” tab 3 to access the following settings:
– “Map colour”;
– “Time display”;
– “Traffic display”;
– “Traffic signs”;
– “Auto zoom”;
– “My car”;
– “Junction view”;
– “POI display”;
– “Weather display”.
“Map colour”
Use this option to set the map colour to
Auto, Day or Night.
“Time display”
Use this option to display the Arrival
time at destination or the Time to destination.
“Traffic display”
Allow/block Display traffic by pressing
ON or OFF.
“Traffic signs”
This menu provides the following func-
tions:
– “Traffic sign recognition”;
– “Overspeed sound alert”;
– “Risk area display”;
– “Risk area sound alert”.
Allow/block them by pressing ON or
OFF.
Press the Reset button on the pop-up
menu to switch all settings to ON.
“Auto zoom”
Allow/block Auto zoom by pressing ON
or OFF.
For safety reasons, carry
out these operations when
the vehicle is stationary.
2.29
Page 60

NAVIGATION SETTINGS (4/6)
Vehicle
5
“My car”
To change the type of cursor, press the
left / right arrows 6 and select the desired model.
To confirm your selection, remain on
the desired model and press the return
arrow 5.
“Junction view”
Allow/block Junction view by pressing
ON or OFF.
6
“POI display”
Activate/deactivate the display of Points
of Interest (POI) on the map:
– “Fuel station”;
– “Charging station” (for electric and
hybrid vehicles);
– “Parking”;
– “Restaurant”;
– “Residence”;
– “Travel and Travel”;
– “Shopping”;
– “Hospital”;
– ...
From the map, you can select the POI
directly. The multimedia system will
suggest several options:
– “Go”;
– “Call”.
For more information, please see
“Points of interest” in the section entitled “Enter a destination”.
“Weather display”
Allow/block the weather view by press-
ing ON or OFF.
Pop-up menu
From the pop-up menu 4, you can reinitialise the Navigation settings.
2.30
Page 61

NAVIGATION SETTINGS (5/6)
Navigation settings
Low battery warning
Charging station assistance
Guardian angel
Charge type
Connector type
Auto
RouteEV
Map
ON
Manual
ON
7
Electric vehicle
From the “EV” 7 tab, you can configure
the charging settings and alerts.
“Low battery warning”
Warns you when the battery charge
level falls below 20%.
“Charging station assistance”
Allows you to search for charging stations if your destination is out of range,
given the remaining charge.
Charge type
Normal charging
Quick charging
Accelerated charging
Quick battery change
Unknown
“Guardian angel”
The multimedia system informs you
when the number of charging sockets
around your location is less than 3.
“Charge type”
Allows you to select the charging stations which offer, depending on your
selection, a charging mode appropriate
to your needs and to display them on
the map.
Connector type
Connector type 01
Connector type 02
Connector type 03
Connector type 04
Connector type
05
“Connector type”
Allows you to select the charging stations which offer a charging socket
adapted to your vehicle and to display
them on the map.
For safety reasons, carry
out these operations when
the vehicle is stationary.
2.31
Page 62

NAVIGATION SETTINGS (6/6)
Navigation settings
Eco-Nav
Charge type
Connector type
Price
Means of payment
RouteHybrid
8
Hybrid vehicle
From the “Hybrid” tab 8, you can config-
ure the settings and warnings related to
hybrid vehicles:
“Eco-Nav”
This function uses information related
to your route to optimise the electrical
energy consumption and minimise fuel
consumption.
Map
“Charge type”
Allows you to select the charging stations which offer, depending on your
selection, a charging mode appropriate
to your needs and to display them on
the map.
“Connector type”
Allows you to select the charging stations which offer a charging socket
adapted to your vehicle and to display
them on the map.
“Price”
Select the display of charging sockets
according to whether access is paid or
free;
“Means of payment”
Selecting your method of payment.
2.32
For safety reasons, carry
out these operations when
the vehicle is stationary.
Page 63

Multimedia
Music . . . . . . . . . . . . . . . . . . . . . . . . . . . . . . . . . . . . . . . . . . . . . . . . . . . . . . . . . . . . . . . . . . . . . . . . . 3.2
Photo . . . . . . . . . . . . . . . . . . . . . . . . . . . . . . . . . . . . . . . . . . . . . . . . . . . . . . . . . . . . . . . . . . . . . . . . . 3.4
Video . . . . . . . . . . . . . . . . . . . . . . . . . . . . . . . . . . . . . . . . . . . . . . . . . . . . . . . . . . . . . . . . . . . . . . . . . 3.6
Listen to the radio . . . . . . . . . . . . . . . . . . . . . . . . . . . . . . . . . . . . . . . . . . . . . . . . . . . . . . . . . . . . . . . 3.8
3.1
Page 64

MUSIC (1/2)
“Music” menu
From the main menu, press “Music”,
from other menus press the shortcut in
area A.
Use this menu to listen to music from
an external source (USB, AUX etc.).
Select an input source connected to the
system from the following list:
– “USB-1” (USB port);
– “USB-2” (USB port);
– “Bluetooth”;
– “AUX” (Jack socket).
The music sources described above
may vary according to the equipment
level. Only the sources that are available are displayed and can be selected
on the multimedia screen.
Note: some formats may not be recognised by the system.
Note: the USB flash drive must be
FAT32 or NTFS formatted and have a
minimum capacity of 8GB and a maximum capacity of 64GB.
1
2 3
A
B
15
14
13
812
9
1011 7
Play mode
B Information on the audio track
currently playing (song title, artist
name, album title and visual of
the cover, if transferred from the
source).
1 Shortcut to the “Navigation”
menu.
2 Shortcut to the “Phone” menu.
3 Name of the source currently
playing.
4 Shortcut to the audio playlist clas-
sified by category.
5 Length of the audio track playing.
6 Access to the pop-up menu.
7 Activate/deactivate repeat of the
track or playlist.
8 Access the current playlist;
9 Short press: Play the next audio
4
5
6
track.
Press and hold: Fast forward.
10 Currently playing audio track
progress bar.
11 Pause/resume the audio track.
12 Short press: return to the start of
the current audio track.
Second short press (less than 3
seconds after the first short press):
play the preceding audio track.
Press and hold: Rewind.
13 Activate/deactivate random play-
back of the audio tracks.
14 Current audio track playback
time.
15 Access the audio sources.
3.2
Page 65

MUSIC (2/2)
From the Search menu, you access
the playlists classified by category
(Playlists, Artists, Albums, Podcasts).
Note: only available sources can be selected. Unavailable sources won’t be
shown on the screen.
You can sort the playback by category (“Playlists”, “Artists”, “Albums”,
“Podcasts”, etc.) When playing a track,
you can:
– access the current playback list 8;
– access the next track by pressing 9
or press and hold to fast forward
through the current track;
– pause by pressing 11;
– access the previous track by press-
ing 12 or press and hold to rewind
the current track;
– view the scroll bar 10 and use it to
select the music.
Note: depending on the input source
connected, the display on the multimedia screen will vary.
“List” mode
Press the “List” button to access the
current playlist.
Note: The system reads all tracks by
default.
Note: the playlists described above
vary depending on the input source
connected and its content.
Pop-up menu 6
From the pop-up menu 6, press Audio
settings to access the sound settings
(bass, balance, volume/speed etc.).
You can change the music using the
button on the steering column control.
3.3
Page 66

PHOTO (1/2)
“Photo” menu
From the main menu , press
“Applications”, then press the “Photo”
tab.
Select a connected input source.
If several sources are connected, select
one of the input sources from the following list to access the photos:
– “USB-1" (USB port);
– “USB-2” (USB port).
Note: Some formats may not be readable by the system.
Note: the USB flash drive must be
FAT32 or NTFS formatted and have a
minimum capacity of 8GB and a maximum capacity of 64GB.
1
5
6
4
3
2
Playback
You can choose to see all the photos in
a slideshow or view a single photo.
When viewing a photo, you can:
– access the previous or the next
photo by quickly swiping the image
preview area 1;
– switch from normal mode (adjusted)
to full screen mode by pressing the 3
key or by clicking the image preview
area 1 twice;
1
3
– rotate a photo by pressing 5;
– play a slideshow by pressing 4;
– save your changes and return to the
previous screen by pressing 6.
Photo playback is only possible
when the vehicle is stationary.
3.4
Page 67

PHOTO (2/2)
Information
From this menu, you can access photo
information (title, type, access path,
size, resolution).
Note: For more information on compatible photo formats, please consult an
Authorised Dealer.
Select profile
From this menu, you can change the
profile image. Confirm by pressing “OK”
to save your changes.
26
Pop-up menu
From the photo display screen, press 2
to:
– get detailed information of photos
(title, file type, date, path etc.);
– set the photo as a user profile;
– accessing settings
“Settings”
From this menu, you can access the
slideshow settings:
– change the display time for each
photo in the slideshow;
– active/deactivate animation effect
between each photo in the slideshow.
Note: the slideshow animation effect is
activated by default.
3.5
Page 68

VIDEO (1/2)
“Video” menu
From the main menu , press
“Applications”, then press the “Video”
menu.
Select a connected input source.
If several sources are connected, select
one of the input sources from the following list to access the videos:
– “USB-1" (USB port);
– “USB-2” (USB port).
Note: some formats and resolutions
may be incompatible with the multimedia system.
Note: the USB flash drive must be
FAT32 or NTFS formatted and have a
minimum capacity of 8GB and a maximum capacity of 64GB.
Video playback is only possible when the vehicle is stationary.
When driving, only the soundtrack
of the current video remains active.
1
2
7
8
9
5
6
“Video”
When playing a video, you can:
– adjust the brilliance by pressing the 2
key;
– adjust the playback rate by pressing
the 3 button;
– access the pop-up menu 4;
– access the previous video by press-
ing 7 if the playtime does not exceed
3 seconds. After 3 seconds, the
video resumes from the beginning;
– use the scroll bar 8;
1
3
2
4
9
8
– pause by pressing 6;
– access the next video by pressing 5;
– click twice on the image preview
area 1 to switch the video to full
screen mode;
– press 9 to return to the previous
screen.
Note: some functions are only available in full screen mode.
Note: the play controls disappear automatically after 10 seconds when playing a video in full screen mode.
6
7
5
3
4
3.6
Page 69

VIDEO (2/2)
4
Pop-up menu
Using the pop-up menu 4, you can:
– get detailed information about the
video (title, file type, date, path, etc.);
– Accessing settings.
Information
From this menu, you can access information about the video (title, type, time,
resolution).
Note: For further information about
compatible video formats, please consult an authorised dealer.
“Settings”
From the “Settings” menu, you can
choose the type of display:
– normal (adjusted);
– full screen.
3.7
Page 70

LISTENING TO THE RADIO (1/5)
“Radio” menu
From the main menu, press “Radio”. If
a radio station is already playing, press
the shortcut to area A from some of
the pages on the “Navigation” or “Phone”
menus.
11
A
1
2
A
11
1
3
5
3
2
4
4
5
8
9 610
87 7
You can select a saved station,
scroll through the radio stations by
frequency or by list depending on
the mode selected using the button
on the steering column control.
3.8
“Radio” screen
1 Logo of the radio station now
playing.
2 The name of the current station
and the frequency. Text information (artist, song etc.)
3 Indication of the activation of the
traffic information and station
tracking functions.
4 Access to manual entry of the de-
sired frequency.
5 Store the station now playing in
“Presets”.
6 Access the pop-up menu.
7 Access the next or previous sta-
tion.
8 Access the next or previous fre-
quency.
9 Frequency selector bar.
10 Return to previous screen
11 Access the audio sources menu
Note: the information available de-
pends on the station or radio band selected.
Page 71

LISTENING TO THE RADIO (2/5)
11
9
8 87 7
12
“Frequency” mode
Use this mode to select radio stations
or frequencies in the current radio
band. To scan the frequency range, you
have two options:
– search by frequency: scan the fre-
quencies (in 0.5 Hz steps) by repeatedly pressing the 8 buttons or move
the cursor on the selector bar 9 directly;
– search by station: move forwards
or backwards to the next station by
pressing the 7 buttons.
Select a radio band
Select FM, AM or DR (digital radio) by
pressing “Sources” 11 on the multimedia
screen.
You can also choose the radio band by
using the button on the steering column
control.
Store a radio station as a
preset
Use this function to store the station
now playing.
In “Frequency” mode, press the 5 button
or press and hold the logo 1 of the current station and select a location (from
one of the three pages 12) by pressing
on the location until a beep sounds.
You can store up to 27 radio stations.
3.9
Page 72

LISTENING TO THE RADIO (3/5)
If radio stations do not use RDS or if
13
the vehicle is in an area with poor radio
reception, the name and logo will not
appear on the screen. Only their frequencies are shown, at the top of the
list.
Note: the information available depends on the station or radio band selected.
14
Source
“List” mode
This mode allows you to find a station
by name from an alphabetical list.
Flick the list to scroll through all the stations. The radio station 13 you stopped
on is played. You can also press a radio
station on the list to play.
3.10
“Presets” mode
This mode allows you to access the
previously stored radio stations. For
more information, refer to the “Save
preset” in this section.
Press one of the buttons 14 to select
the radio station you wish to listen to.
For safety reasons, carry
out these operations when
the vehicle is stationary.
Page 73

LISTENING TO THE RADIO (4/5)
Radio settings
Radio text
Regions
I-Traffic
Pop-up menu 6
Use the pop-up menu 6 in any mode to
go to the settings and configure the following radio functions:
– “Radio settings”;
– Sound environment settings;
– “Sound settings”;
– Open the instructions for your multi-
media system.
For further information, please refer to
the section on “Settings”.
“Radio settings”
From the settings, you can activate or
deactivate the following elements:
– “Radio text”;
– “Region”;
– TA/I-Traffic.
“Radio text”
(text information)
Some FM radio stations broadcast
text information relating to their programmes (e.g. song titles). Activate this
function if you would like to see these
details.
Note: This information is only available
for certain radio stations.
“Region”
The frequency of an “FM” radio station
may change depending on the geographical area.
Activate this function to continue listening to the same radio station while driving. The audio system will automatically
track frequency changes without interruption.
When Region mode is off, if the signal
quality drops, the radio will switch to a
new frequency which might be operating as a relay for the station you were
listening to previously.
Note: stations in the same area sometimes broadcast different programmes
or use different programme service
names.
TA/I-Traffic
(traffic information)
When this function is activated, your
audio system makes it possible to automatically receive traffic bulletins when
they are broadcast on certain FM radio
stations (depending on the country).
You must then select the frequency of
the station that is transmitting traffic information. If another source is playing
(USB, Bluetooth), it will be automatically interrupted whenever traffic information is received.
3.11
Page 74

LISTENING TO THE RADIO (5/5)
Sound environment settings
From the settings, you can activate or
deactivate the following elements:
– “Natural”;
– “Live”;
– “Club”;
– “Lounge”;
– ...
Note: the environment list may vary according to the equipment.
“Sound settings”
From this menu, you can set the following:
– “Bass boost”: use this function to
boost/reduce the bass sound;
– “Bass / Medium / Treble”: use this
function to boost/reduce the bass,
medium or treble sounds;
– Speed-dependent volume control:
when this function is activated, the
volume of the audio system varies in
accordance with the vehicle speed.
You can adjust its sensitivity or disable it.
For further information, please refer to
the section on “Settings”.
3.12
For safety reasons, carry
out these operations when
the vehicle is stationary.
Page 75

Phone
Pairing, unpairing a telephone . . . . . . . . . . . . . . . . . . . . . . . . . . . . . . . . . . . . . . . . . . . . . . . . . . . . . . 4.2
Connecting, disconnecting a telephone . . . . . . . . . . . . . . . . . . . . . . . . . . . . . . . . . . . . . . . . . . . . . . 4.5
Phone call . . . . . . . . . . . . . . . . . . . . . . . . . . . . . . . . . . . . . . . . . . . . . . . . . . . . . . . . . . . . . . . . . . . . . 4.8
Phonebook . . . . . . . . . . . . . . . . . . . . . . . . . . . . . . . . . . . . . . . . . . . . . . . . . . . . . . . . . . . . . . . . . . . . 4.11
Call log. . . . . . . . . . . . . . . . . . . . . . . . . . . . . . . . . . . . . . . . . . . . . . . . . . . . . . . . . . . . . . . . . . . . . . . . 4.13
Dial number . . . . . . . . . . . . . . . . . . . . . . . . . . . . . . . . . . . . . . . . . . . . . . . . . . . . . . . . . . . . . . . . . . . . 4.14
SMS . . . . . . . . . . . . . . . . . . . . . . . . . . . . . . . . . . . . . . . . . . . . . . . . . . . . . . . . . . . . . . . . . . . . . . . . . . 4.15
Phone Settings . . . . . . . . . . . . . . . . . . . . . . . . . . . . . . . . . . . . . . . . . . . . . . . . . . . . . . . . . . . . . . . . . 4.17
Wireless charger . . . . . . . . . . . . . . . . . . . . . . . . . . . . . . . . . . . . . . . . . . . . . . . . . . . . . . . . . . . . . . . . 4.19
4.1
Page 76

PAIRING AND UNPAIRING A TELEPHONE (1/3)
Telephone
menu
From the home screen, press “Phone”
or (if a telephone is already connected)
press the shortcut A if the “Phone”
menu appears. This function enables
your phone to be paired with the multimedia system.
Note: if no telephone is connected to
the multimedia system, some menus
will be disabled.
Pairing your telephone will enable the
multimedia system to access your telephone functions. No copies of your contacts or personal data will be saved in
the multimedia system.
The multimedia system does not
manage telephones equipped with
“dual SIM”. Adjust the settings on your
telephone to enable the multimedia
system to pair correctly.
Pair, connect screen
1 Connected device list.
2 Phone voice recognition.
3 Activate/deactivate the Bluetooth
4 Add a new device.
5 Activate/deactivate the phone in-
6 Activate/deactivate the “Music”
7 Activate/deactivate the “Phone”
1 32
connection.
ternet connection.
function.
function.
8 Pop-up menu.
9 Access the “Data” menu
A
10 Access the “Services” menu.
11 Access the WIFI menu.
12 Access the Bluetooth® menu.
4
13 Return to previous screen.
5
Note: the availability of the phone inter-
6
net connection 5 depends on the equip-
7
ment in the vehicle and it can be turned
on only for compatible models.
8910111213
For a list of compatible telephones,
consult the https://easyconnect.
renault.com site.
For safety reasons, carry
out these operations when
the vehicle is stationary.
4.2
Page 77

PAIRING AND UNPAIRING A TELEPHONE (2/3)
Pairing a phone
To use your hands-free system, pair
your Bluetooth® mobile phone with
the multimedia system. Check that the
Bluetooth® of your phone is activated
and set its status to “visible”.
For more information about activating
the visible status of your phone, please
refer to your telephone user manual.
Depending on the model, and if the
system requests it, enter the Bluetooth®
code on your telephone to pair it to the
multimedia system, or confirm the pairing request.
Your telephone may ask for authorisation to share your contacts, call logs
and music. Accept sharing to find this
information on the multimedia system.
Connecting the telephone...
Please select the services that you will use
Services used previously will be automatically disconnected
Cancel OK
From the main menu of your multimedia system:
– press “Phone”. A message is dis-
played on the screen asking you to
pair a telephone;
– press “Yes”. The multimedia system
searches for nearby telephones with
Bluetooth® activated that are visible;
– Select your telephone from the list;
– select the functions on the telephone
to be paired;
– “Phone” function: access the
phonebook, make and receive a
call, access the call log etc. ;
– “Music” function: access your
music;
– Hotspot function: Internet access
via the phone.
– press “OK” to confirm.
Note: the icon for the function shows
you if it is activated.
Your phone is now paired to the multi-
media system.
Note: the multimedia system can store
up to six telephones.
For a list of compatible telephones,
consult the https://easyconnect.
renault.com site.
4.3
Page 78

PAIRING, UNPAIRING A TELEPHONE (3/3)
Pairing another telephone
To pair a new telephone to the multimedia system:
– Activate the Bluetooth® connection
on your telephone and set its status
to “visible”.
– from the main menu, select “Phone”,
the pop-up menu, “Paired devices
list”, “Add new device”;
– select the functions on the telephone
to be connected;
– press “OK” to confirm.
Note: the icon for the function shows
you if it is activated.
Your phone is now paired to the multi-
media system.
You can pair six telephones simulta-
neously.
Unpairing a phone
To unpair a telephone from the multimedia system:
– from the main menu, select “Phone”,
pop-up menu then “Paired devices
list ”and select the phone to be unpaired;
– from the main menu, select “Settings”,
“System settings”, “Devices” and
select the phone to be unpaired.
Pop-up menu 8
Use the pop-up menu 8 to:
– delete a paired device;
– delete all paired devices;
– access approved devices (enables
you to use Renault connected services).
4.4
For safety reasons, carry
out these operations when
the vehicle is stationary.
Page 79

CONNECTING, DISCONNECTING A TELEPHONE (1/3)
Connecting a telephone
No phone can be connected to the
hands-free phone system if it has not
first been paired. For more information,
please refer to the “Pairing, unpairing
a telephone” section. Your phone must
be connected to the hands-free phone
system in order to use all its functions.
Note: if no telephone is connected to
the multimedia system, some menus
will be disabled.
Connecting your telephone will enable
the multimedia system to access your
telephone functions. No copies of your
contacts or personal data will be saved
in the multimedia system.
The multimedia system does not
manage telephones equipped with
“dual SIM”. Adjust the settings on your
telephone to enable the multimedia
system to connect correctly.
Manual connection
From the “Phone” menu, then pop-up
menu “Paired devices list”, a list of
paired phones is displayed.
Select the telephone that you wish
to connect and make sure it has
Bluetooth® activated and that it is set
to “Visible”.
Note: if a call is ongoing while the telephone is being connected, it will automatically be transferred to the vehicle
loudspeakers.
Automatic connection
Once the multimedia system is started,
the hands-free phone system searches
for any paired phones with Bluetooth®
activated nearby. The system automatically downloads the data for the last
telephone connected (directory, music,
etc).
Note: on the automatic connection
of your telephone to the multimedia
system, data downloads (phonebook,
music, contacts etc.) will only be enabled if you previously allowed data
sharing when pairing your telephone to
the multimedia system. For more information, please refer to the “Pairing, unpairing a telephone” section.
For a list of compatible telephones,
consult the https://easyconnect.
renault.com site.
For safety reasons, carry
out these operations when
the vehicle is stationary.
4.5
Page 80

CONNECTING, DISCONNECTING A TELEPHONE (2/3)
4
Connecting a telephone
To access your phone’s music, phonebook and internet connection directly
via the multimedia system, you will
need to authorise data sharing from
the “Phone” menu, then pop-up menu
“Paired devices list” Bluetooth®.
The list of connected phones is displayed.
Select your telephone from the list
shown then select the functions of the
phone to be connected:
– “Phone” 1
– “Music” 2;
– Telephone internet connection 3.
Note: the availability of the phone inter-
1
net connection 3 depends on the equip-
2
ment in the vehicle and it can be turned
on only for compatible models.
3
Note: the icon for the function shows
you if it is activated.
Note: some phones may allow auto-
matic data transfer.
Note: some telephones do not activate
the “Music” function unless they contain
at least one music file.
Changing a connected telephone
From the “Phone” menu, pop up menu 4
then “Paired devices list”:
– de-select the functions to be discon-
nected from the telephone currently
in use;
– select the functions to be connected
to another telephone that is already
paired and present in the list of devices.
From the “Settings” menu, select
“System settings”, “Devices” and select
the telephone to be connected.
Note: to change the connected telephone, you will first have to pair more
than one telephone.
4.6
Page 81

CONNECTING, DISCONNECTING A TELEPHONE (3/3)
Disconnect a phone
From the “Phone” menu, pop up menu
A
Connecting two telephones
You can simultaneously connect the
“Phone” function 1 on two phones by
selecting telephone A.
When the second “Phone” function is
activated 1, the multimedia system will
ask if you wish to add a second telephone.
By adding a second phone, you will
have the option of accessing all of the
functions of the phone identified as A
and the option of receiving incoming
calls on both connected phones at the
same time.
then “Paired devices list”:
– de-select the functions to be discon-
nected from the telephone currently
in use;
– select the functions to be connected
to another telephone that is already
paired and present in the list of devices.
Your phone functions are disconnected
from the multimedia system as soon as
the icons are off.
From the “Settings” menu, select
“System settings”, “Devices”, and select
the telephone to be disconnected.
Note: if a call is in progress when the
phone is disconnected, the call will be
automatically transferred to your phone.
For safety reasons, carry
out these operations when
the vehicle is stationary.
4.7
Page 82

PHONE CALL (1/3)
“Phone” menu
From the main menu, press “Phone”.
Note: press area A to access the
“Phone” menu directly from most
menus.
Note: In order to make a call, your telephone must be connected to your multimedia system. For more information,
please refer to “Connecting/disconnecting a telephone”.
1 2
A
4567
“Call in progress” screen
1 Contact name and telephone
number.
2 Put current call on hold.
3 Access the keypad to dial a
number.
4 Pop-up menu.
5 Current call duration.
6 Transfer the call to the telephone.
7 Return to the previous menu.
8 End the call.
38
91011
Making a call
You can make a call by selecting:
– a number in the call log from the
“History” menu11;
– a contact in the phonebook from the
“Phonebook” menu 10;
– the keys on the keypad from the
“Dial” menu 9.
4.8
Page 83

PHONE CALL (2/3)
Receiving a call
When receiving a call, the “Calls received” screen is displayed, giving the
following information:
– the name of the contact (if the
number is present in your handset
memory or the phonebook list);
– the caller’s number (if the number is
not present in your handset memory);
– “Private number” (if the number
cannot be viewed).
“Answer”
To pick up a call, press the “Answer”
key 16. Press the “End call” key 12 to
end the call.
“Reject” a call
To reject an incoming call, press the
“Reject” key 12. The person calling you
will be redirected to your voicemail.
Put the call “on hold”
Press the “Hold” key 14. The multimedia system will hold the call and automatically put incoming calls on hold. A
voice synthesizer informs your callers
that their call is on standby.
Transfer to phone
Press the Transfer key 13 to transfer the call from the vehicle to the telephone.
Note: some telephones may disconnect from the multimedia system during
a call transfer.
Keypad
Press the “Keypad” key 15 to access
the keypad.
1712 13 14 15 16
You can answer/end a call by pressing
directly on control 17 on the steering
wheel.
For safety reasons, carry
out these operations when
the vehicle is stationary.
4.9
Page 84

PHONE CALL (3/3)
1819
During a call
During a call you can:
– adjust the volume using the control
buttons beneath the vehicle's steering wheel or using the volume buttons on the multimedia screen;
– end a call by pressing “End call” 8
or by pressing the 17 button on your
steering wheel;
– place a call on hold by pressing
the 14 key. To resume a call that is
on hold, press the 14 key again;
– transfer the call to the connected
phone by pressing “Transfer to
Phone” 13;
– answer a second call and switch be-
tween two calls by pressing 18;
Note: as soon as you answer the
second incoming call, the first call will
be put on hold automatically.
– press the 15 key to display the
keypad;
– return to the previous menu and the
other functions by pressing 19.
Once your call ends, the multimedia
system allows you to call your caller
back.
Note: during a call, you can receive
a second call but you cannot make a
second call.
4
Conference call
During a call you have the option of inviting the caller who you put on standby
to join the call.
From the pop-up menu 4, press the
“Merge calls” button to activate the conference call.
4.10
Page 85

PHONEBOOK (1/2)
“Phonebook”
menu
On the main menu, press “Phone” or
press the A shortcut on most menus,
then “Contact” to access the phonebook on your telephone from your multimedia system.
The multimedia system does not
manage telephones equipped with
“dual SIM”. Configure your telephone
to enable the multimedia system to
access the correct directory on your
telephone.
1 2 3
A
7
6
“Phonebook” mode
1 Search for a contact by name or
number.
2 Search for a contact in alphabeti-
cal order.
3 Telephone connected.
4 Pop-up menu.
5 Return to the previous menu.
6 List of contacts in the connected
phone.
7 Contacts stored in favourites on
the phone.
Downloading the phone
memory
By default, when connecting a telephone, the contacts are synchronised
automatically if hands-free connection is activated. For more information,
please refer to “Connecting/disconnecting a telephone”.
Note: to access the phonebook via the
multimedia system, you will need to authorise data sharing on your telephone.
Please refer to the “Pairing, unpairing a
45
telephone” section, and your telephone
user manual.
Updating the phonebook
You can manually update your phone
contacts in the multimedia system
phonebook via Bluetooth®. Tap the
pop-up menu 4, then press “Update
list”.
4.11
Page 86

PHONEBOOK (2/2)
1 2 3
Searching contacts
You can search for a contact by entering their name or phone number.
Press the magnifying glass 1. Enter
some of the numbers or letters of the
desired contact.
Press on ABC 2. Select just one letter.
The phonebook displays the list of contacts starting with the selected letter.
Select the phonebook
If two telephones are connected to the
multimedia system at the same time,
you can select which contact list is displayed.
Select the phone from the 3 bar.
Confidentiality
The list of contacts for each telephone
is not stored in the memory by the
hands-free telephone system.
For reasons of confidentiality, each
downloaded contacts list can only be
viewed when the corresponding telephone is connected.
4.12
For safety reasons, carry
out these operations when
the vehicle is stationary.
Page 87

CALL LOG
“Call log”
menu
Accessing the call log
From the main menu, press “Phone” or
press the shortcut A from most menus,
then “History” to access the log of all
your calls.
The call log is displayed from the most
recent to the oldest.
8
7
6
5
“Call in progress” mode
1 Contact names.
2 Contact numbers.
3 Call time/date.
4 Pop-up menu.
5 Back to previous menu.
6 Incoming call.
7 Missed call.
8 Outgoing call.
Browsing the call log
2 31
A
Swipe up and down to scroll through
the list of calls.
Updating the call log
Press 4 and select “Update list”. A message will notify you that the data has
been updated.
Making a call from the call
log
4
Press one of the contacts or numbers
to dial. The call will be started automatically.
4.13
Page 88

DIAL NUMBER
“Dial number”
menu
Making a call by dialling a
number
From the main menu, press “Phone” or
press the shortcut A found on most
menus, then “Dial” to open the keypad
used to enter a number.
Dial number
Enter the desired number using the
keypad 1, then press “Call” to make the
call.
From the moment the first entry is
made, the multimedia system suggests
a list of your contacts with the same
series of numbers.
Select the contact that you wish to call,
then press the “Phone 5” button to
make the call.
1 2
A
“Dial” mode
1 Digital keypad.
2 Number dialled.
3 Suggested contacts.
4 Pop-up menu.
5 Call.
6 Return to the previous menu.
Enter a number using voice
control
It is possible to dial a number using the
voice control incorporated in your multimedia system. To do this, press the
voice control button to display the main
3
voice control menu. After the beep, say:
– “Call” then dictate the telephone
number that you wish to call.
– or “Call” followed by the name of the
contact you wish to call.
The multimedia system displays and
456
begins to call the number you provided.
Note: if your contact has several phone
numbers (work, home, mobile, etc.)
you can specify which you require. e.g.
“Call” - Stéphane - home.
4.14
For safety reasons, carry
out these operations when
the vehicle is stationary.
Page 89

SMS (1/2)
“SMS” menu
From the main menu, press “Telephone”
or press shortcut A from any menu,
then “SMS” to access your telephone
SMS via the multimedia system.
Your telephone must be connected to
the hands-free phone system. You must
also authorise the transfer of messages
(using your phone settings, depending
on the model) in order to use all of its
functions.
Note: only SMS can be read via the
multimedia system. Other types of
message may not be read.
1 2 3 4
A
56
“SMS” screen
1 Message status. Read/Unread.
2 Name/number of the sender of
the message.
3 Start of the message.
4 Time/date received.
5 Pop-up menu.
6 Back to previous page.
7
8
9
B
10
Receiving SMS
The multimedia system informs you
that a new SMS has been received, via
a warning message in B that is shown
in any menu that is open.
By default, after pairing and the telephone connection, when a new message is received, it will be available on
the multimedia system.
Note: only the messages received after
pairing and during connection of the
telephone to the multimedia system will
be available.
Depending on the make and model
of your phone, certain functions
may not work.
4.15
Page 90

SMS (2/2)
11
14
13
Reading SMS
During driving, it can be read by the
voice synthesizer in the multimedia
system SMS by pressing the “Listen to”
button 7 or you can return the contact’s
call by pressing the “Call” button10.
With the vehicle stationary only, the
multimedia system enables you to open
the SMS by pressing the “Message”
button 8 or to reply to the SMS by
pressing the “Reply” button 9 and reading the SMS details.
15
12
SMS details
You can call the contact directly by
pressing the “Call” button 11 if the
number is saved in the telephone directory.
Press the message that you would like
the multimedia system voice synthesizer to read out by pressing the “Listen”
button 12, display the SMS using 14 or
reply by pressing the 13 button.
Note: while driving, the multimedia
system suggests sending a preset
message 15.
For safety reasons, carry
out these operations when
the vehicle is stationary.
4.16
Page 91

TELEPHONE SETTINGS (1/2)
“Settings”
menu
With the telephone connected to the
system, from the main menu press
“Phone” or press on shortcut A from
any menu.
From the pop-up menu, select
“Settings” to access the following settings:
– “Voice mail settings”;
– “Automatic phonebook download”
(“ON”/“OFF”);
– “Sort by name / First name”;
– “Automatic hold”
(“ON”/“OFF”);
– “Phone ringtone”
(“ON”/“OFF”);
– “SMS” (“ON”/“OFF”);
– “Private mode” (“ON”/“OFF”);
– “Smartphone help”.
Voice mail settings
B
Please enter the number in
order to call your voice mail.
Save
A
“Voice mail settings”
Use this option to configure the settings
of your telephone answering system.
If voice messaging is not set up, use the
set-up screen to select your voice messaging number using the keypad B,
then “Save”.
Sound
Phone ringtone
Hands-free phone
Audio
PhoneVoice Other
“Phone ringtone”
From the main menu, press “Music”,
then the “Sound settings” pop-up menu.
From the “Phone” tab you can adjust
the volume of the:
– “Phone ringtone”;
– “Hands-free phone”.
For further information, please refer to
the section on “System settings”.
For safety reasons, carry
out these operations when
the vehicle is stationary.
4.17
Page 92

TELEPHONE SETTINGS (2/2)
“SMS”
You can activate or deactivate SMS.
“Private mode”
Use this option to enable a discreet
sound signal informing you of an incoming call or message without displaying
anything on the multimedia screen.
“Smartphone help”
Use this option to access a tutorial
on how to use your telephone's voice
recognition system via the multimedia
system.
4.18
Depending on the make and model
of your phone, certain functions
may not work.
Page 93

WIRELESS CHARGER (1/2)
1
Introduction
Use the induction charging zone 1 to
charge a telephone without connecting
it to a charging cable.
Note: for more information on compatible telephones, contact an authorised
dealer or visit the https://easyconnect.
renault.com website.
Note: it is preferable to remove the
protective bodyshell or case from your
telephone before charging, for optimal
charging efficiency.
2
1
Charging procedure
Position your telephone in the 2 induction area 1.
Phone charging 2 is interrupted in the
following cases:
– an object is detected in the induction
area 1;
– the induction area 1 is overheating.
Once the temperature has dropped,
your telephone’s charging procedure 2 will soon restart.
3
4
5
6
Charging progress
The multimedia system informs you
of the charging status 3 for your telephone2:
– charging complete 4;
– charging in progress 5;
– object detected in the charging area/
object overheating/charging procedure interrupted 6.
Note: the multimedia system will signal
if your telephone 2 charging procedure
is interrupted.
4.19
Page 94

WIRELESS CHARGER (2/2)
The inductive charger uses open
source software under licence BSD-
3-Clause, which contains restrictions
and limitations which you should
learn about at Open Source Initiative.
It is essential not to leave any objects (USB flash drive, SDcard,
credit card, jewels, keys CD, coins,
etc.) in the charging induction
zone 1 while charging your phone.
Remove all magnetic cards or credit
cards from the case before positioning your telephone in the induction
charging area 1.
Objects left in the induction charging
area 1 may overheat. It is advisable
to place them in the other storage
areas provided. (storage compartment, sun visor storage compartment, etc.)
4.20
Page 95

Apps - Easy Connect
Android Auto™, Carplay™, Yandex.Auto™ . . . . . . . . . . . . . . . . . . . . . . . . . . . . . . . . . . . . . . . . . . . 5.2
App management . . . . . . . . . . . . . . . . . . . . . . . . . . . . . . . . . . . . . . . . . . . . . . . . . . . . . . . . . . . . . . . 5.6
Activating services . . . . . . . . . . . . . . . . . . . . . . . . . . . . . . . . . . . . . . . . . . . . . . . . . . . . . . . . . . . . . . . 5.8
Updating the system and maps . . . . . . . . . . . . . . . . . . . . . . . . . . . . . . . . . . . . . . . . . . . . . . . . . . . . . 5.10
My Renault . . . . . . . . . . . . . . . . . . . . . . . . . . . . . . . . . . . . . . . . . . . . . . . . . . . . . . . . . . . . . . . . . . . . 5.14
Online services . . . . . . . . . . . . . . . . . . . . . . . . . . . . . . . . . . . . . . . . . . . . . . . . . . . . . . . . . . . . . . . . . 5.16
Vehicle lending and resale. . . . . . . . . . . . . . . . . . . . . . . . . . . . . . . . . . . . . . . . . . . . . . . . . . . . . . . . . 5.17
5.1
Page 96

ANDROID AUTO™, CARPLAY™, YANDEX.AUTO™ (1/4)
Introduction Android Auto™,
Yandex.Auto™
Android Auto™ and “Yandex.Auto™”
are apps that can be downloaded from
your smartphone to enable you to use
some apps on your phone from your
multimedia system screen.
Note: the “Android Auto™” and
“Yandex.Auto™” apps will only work if
your smartphone is connected to your
vehicle's USB port and the SIRI service
is activated.
First use
Download and install the “Android
Auto™” or “Yandex.Auto™” app from
your smartphone's app download platform.
Connect your phone to your multimedia
system’s USB port.
Accept the requests on your smartphone in order to use the app.
Service type
Android Auto
Yandex.Auto
Cancel
OK
The multimedia system offers either
“Android Auto™” or “Yandex.Auto™”,
depending on country;
– the connection as an audio source;
– a tutorial on how the function works.
The app runs on the multimedia system
and should be visible in area 1.
If the procedure described above fails,
repeat the operation.
1
Android Auto
Menu Elodie
Special feature of “Yandex.Auto™”
The “Yandex.Auto™” app will only work
if all of the following conditions are met:
– the telephone is connected to the
USB socket in your vehicle;
– the telephone is connected to your
multimedia system via Bluetooth®;
– the telephone is unlocked;
– the “Yandex.Auto™” app is on your
telephone screen.
5.2
Page 97

ANDROID AUTO™, CARPLAY™, YANDEX.AUTO™ (2/4)
Introduction CarPlay™
“CarPlay™" is a native service available on your smartphone which enables
you to use some applications on your
phone from your multimedia system
screen.
Note: the “CarPlay™” service will only
work if your smartphone is connected
to your vehicle's USB port and if the
SIRI service is activated.
Service type
CarPlay
Yandex.Auto
Cancel
OK
First use
Connect your telephone to your multimedia system’s USB port;
The multimedia system offers either
“CarPlay™” or “Yandex.Auto™”, depending on country;
– the connection as an audio source;
– a tutorial on how the service works.
1
CarPlay
Menu Elodie
The service runs on the multimedia
system and should be visible in area 1.
If the procedure described above fails,
repeat the operation.
5.3
Page 98

ANDROID AUTO™, CARPLAY™, YANDEX.AUTO™ (3/4)
Note: when you use Android Auto™,
“Yandex.Auto™” or CarPlay™, you can
access your smartphone's navigation
and music apps.
These applications will replace similar
applications integrated into your multimedia system which are already running.
2
Voice recognition
Once the “Android Auto™” and “Yandex.
Auto™” apps or the “CarPlay™” service are working with your multimedia
system, you can use the voice recognition button in your vehicle to control
certain smartphone functions with your
voice.
To do this, press and hold the 2 button
on the steering wheel. For more information, refer to the section on “Using
voice recognition”.
One navigation only, that of:
– “Android Auto™”;
– “Yandex.Auto™”;
– “CarPlay™”;
– or the one included in your multime-
dia system can be used.
Note: when you are using the Android
Auto™ or “Yandex.Auto™” apps or the
CarPlay™ service, certain functions in
your multimedia system will continue
to run in the background. For example
if you start Android Auto™, “Yandex.
Auto™” or CarPlay™ and use the navigation on your smartphone while the
radio in the multimedia system is playing, the radio will continue to be broadcast.
Phone
Listening
Music
A-IVI
Maps
Podcasts
Messages
Books
3
Return to the multimedia
interface
Return to your multimedia system interface:
– press the Home page button 4 on
the front panel of your multimedia
system or on the central control;
or
– press button 3 on the multimedia
system screen.
5.4
Page 99

ANDROID AUTO™, CARPLAY™, YANDEX.AUTO™ (4/4)
3
3
4
Phone
Listening
Music
A-IVI
Maps
Podcasts
Messages
Books
4
3
Yandex.Auto
4
3
CarPlay™ Android Auto™ “Yandex.Auto™”
The functions available in the Android Auto™ and “Yandex.Auto™” apps and the Carplay™ service depend on the make and
model of your telephone. For further information, please refer to the manufacturer's website if there is one.
When you use the Android Auto™ and “Yandex.Auto™” apps or the CarPlay™ service, the transfer of mobile data required for
their operation may lead to additional costs not included in your phone plan.
5.5
Page 100

APP MANAGEMENT (1/2)
“Applications”
menu
From the main menu , press
“Applications” or “Apps” to access the
following:
– the apps installed on your navigation
system;
– “Photo”;
– “Video”.
Note: some services will be available
free of charge for a trial period. You can
extend your subscription from your vehicle or online via the www.myrenault.
com website.
Applications
Photo
Apps 3
Video
Apps 1
Apps 2
1
Pop-up menu
Use the 1 pop-up menu to:
– organise your applications by drag-
and-drop;
– delete the application by pressing on
the “X” delete button. If the application cannot be deleted, the delete
button is not displayed;
– activate notifications;
– access “App manager”.
App manager
130 MB
Photo
Video
Apps 1
Apps 2
Apps 3
used
space
2
free space
450 MB
In progress...
In progress...
In progress...
“App manager”
Use the “App manager” menu to view
the applications 2 that are currently run-
ning on your multimedia system.
Note: the “Photo” and “Video” applications are not included in the “App manager”.
Note: applications that are running will
stop as soon as the multimedia system
is switched off.
Note: the number of applications is limited according to system storage space.
5.6
 Loading...