

Page 1
Page 2
ELF is developing a complete range of
lubricants for RENAULT: engine oils, manual
and automatic transmission oils.
These are very high-technology
lubricants stimulated by applied
research in Formula One.
This range is updated with RENAULT’s
engineering teams to perfectly meet the
specific needs of RENAULT vehicles.
Ź ELF lubricants are a major factor in your
vehicle’s performance.
recommends ELF
Important: to optimize engine operation the use of a lubricant
may be restricted to certain vehicles. See your owner’s
manual.
RENAULT recommends the approved ELF lubricants for your oil changes and top-ups.
Contact your RENAULT representative or visit the site: www.lubricants.elf.com
The oil born in Formula One
Page 3
Quick overview
– Tyre pressures . . . . . . . . . . . . . . . . . . . . . . . . . . . . . . . . . . . . . . . . . . . . . . 0.4 – 0.5
– Adjusting the seats and driver’s position . . . . . . . . . . . . . . . . . . . . . . . . 1.9 → 1.13
– Child restraints/seats . . . . . . . . . . . . . . . . . . . . . . . . . . . . . . . . . . . . . . 1.25 → 1.33
– Warning lights . . . . . . . . . . . . . . . . . . . . . . . . . . . . . . . . . . . . . . . . . . . . 1.38 → 1.43
– Audible and visible signals . . . . . . . . . . . . . . . . . . . . . . . . . . . . . . . . . . 1.50 → 1.53
– De-icing . . . . . . . . . . . . . . . . . . . . . . . . . . . . . . . . . . . . . . . . . . . . . . . . . . . . . . 1.56
– Running in, driving . . . . . . . . . . . . . . . . . . . . . . . . . . . . . . . . . . . . . . . . . 2.2 → 2.28
– Heating and air conditioning system . . . . . . . . . . . . . . . . . . . . . . . . . . . 3.4 → 3.19
– Opening the bonnet . . . . . . . . . . . . . . . . . . . . . . . . . . . . . . . . . . . . . . . . . . . . . . 4.2
– Levels (engine oil, windscreen washer etc.) . . . . . . . . . . . . . . . . . . . . . . 4.3 → 4.11
– Emergency spare wheel . . . . . . . . . . . . . . . . . . . . . . . . . . . . . . . . . . . . . . 5.2 → 5.5
– Practical advice (changing bulbs, fuses, breakdown, operating faults) . 5.2 → 5.35
0.2
Page 4
C O N T E N T S
Sections
Getting to know your vehicle ...............................
Driving ...................................................................
Your comfort .........................................................
Maintenance .........................................................
Practical advice ....................................................
Technical specifications ......................................
Alphabetical index ...............................................
1
2
3
4
5
6
7
0.3
Page 5

TYRE PRESSURE WHEN COLD (in bar or kg/cm² when cold)
Versions
Tyre dimensions
Normal use (1)
– Front
– Rear
Motorway use (1)
– Front
– Rear
Wheel sizes
Tyre safety and use of chains
Refer to the information on “Tyres” in Section 5 for the servicing conditions and, depending on the version, the use of chains.
(1) Special note concerning vehicles used under full load (maximum permissible all-up weight) and towing a trailer:
Maximum speed must be limited to 60 mph (100 km/h) and the tyre pressure increased by 0.2 bar (or 3 PSI).
Refer to the information on “Weights” in section 6 for more details.
1.2
1.2 16V
175/65 R14 T
185/55 R15 H
1.9 2.2 2.3
1.8 2 2
2.1 2.3 2.4
1.9 2.1 2.2
5.5 J 14
6.0 J 15
1.4 16V
1.5 dCi
175/65 R14 T
185/55 R15 H
1.6 16V
185/55 R15 H
6.0 J 15
0.4
Page 6

TYRE PRESSURE WHEN COLD (in psi when cold)
Versions
Tyre dimensions
Normal use (1)
– Front
– Rear
Motorway use (1)
– Front
– Rear
Wheel sizes
Tyre safety and use of chains
Refer to the information on “Tyres” in Section 5 for the servicing conditions and, depending on the version, the use of chains.
(1) Special note concerning vehicles used under full load (maximum permissible all-up weight) and towing a trailer:
Maximum speed must be limited to 60 mph (100 km/h) and the tyre pressure increased by 0.2 bar (or 3 PSI).
Refer to the information on “Weights” in section 6 for more details.
1.2
1.2 16V
175/65 R14 T
185/55 R15 H
28 32 33
26 29 30
30 33 34
28 30 32
5.5 J 14
6.0 J 15
1.4 16V
1.5 dCi
175/65 R14 T
185/55 R15 H
1.6 16V
185/55 R15 H
6.0 J 15
0.5
Page 7

0.6
Page 8
Section 1: Getting to know your vehicle
Keys - Remote control locking units . . . . . . . . . . . . . . . . . . . . . . . . . . . . . . . . . . . . . . . . . . . . . . . . . 1.2
Doors . . . . . . . . . . . . . . . . . . . . . . . . . . . . . . . . . . . . . . . . . . . . . . . . . . . . . . . . . . . . . . . . . . . . . . . . . 1.4
RAID (Renault Anti-Intruder Device) . . . . . . . . . . . . . . . . . . . . . . . . . . . . . . . . . . . . . . . . . . . . . . . . . 1.6
Engine immobiliser . . . . . . . . . . . . . . . . . . . . . . . . . . . . . . . . . . . . . . . . . . . . . . . . . . . . . . . . . . . . . . 1.7
Headrests – Seats . . . . . . . . . . . . . . . . . . . . . . . . . . . . . . . . . . . . . . . . . . . . . . . . . . . . . . . . . . . . . . . 1.9
Seat belts/Additional restraint devices . . . . . . . . . . . . . . . . . . . . . . . . . . . . . . . . . . . . . . . . . . . . . . . 1.14
Child safety . . . . . . . . . . . . . . . . . . . . . . . . . . . . . . . . . . . . . . . . . . . . . . . . . . . . . . . . . . . . . . . . . . . . 1.25
Driving position . . . . . . . . . . . . . . . . . . . . . . . . . . . . . . . . . . . . . . . . . . . . . . . . . . . . . . . . . . . . . . . . . 1.34
Instrument panel . . . . . . . . . . . . . . . . . . . . . . . . . . . . . . . . . . . . . . . . . . . . . . . . . . . . . . . . . . . . . . . . 1.38
Trip computer and warning system . . . . . . . . . . . . . . . . . . . . . . . . . . . . . . . . . . . . . . . . . . . . . . . . . . 1.44
Time and external temperature . . . . . . . . . . . . . . . . . . . . . . . . . . . . . . . . . . . . . . . . . . . . . . . . . . . . . 1.47
Rear view mirrors . . . . . . . . . . . . . . . . . . . . . . . . . . . . . . . . . . . . . . . . . . . . . . . . . . . . . . . . . . . . . . . 1.48
Steering wheel . . . . . . . . . . . . . . . . . . . . . . . . . . . . . . . . . . . . . . . . . . . . . . . . . . . . . . . . . . . . . . . . . . 1.49
Exterior lighting and signals . . . . . . . . . . . . . . . . . . . . . . . . . . . . . . . . . . . . . . . . . . . . . . . . . . . . . . . 1.50
Headlight beam adjustment . . . . . . . . . . . . . . . . . . . . . . . . . . . . . . . . . . . . . . . . . . . . . . . . . . . . . . . . 1.52
Audible and visual signals . . . . . . . . . . . . . . . . . . . . . . . . . . . . . . . . . . . . . . . . . . . . . . . . . . . . . . . . . 1.53
Wipers . . . . . . . . . . . . . . . . . . . . . . . . . . . . . . . . . . . . . . . . . . . . . . . . . . . . . . . . . . . . . . . . . . . . . . . . 1.54
De-icing . . . . . . . . . . . . . . . . . . . . . . . . . . . . . . . . . . . . . . . . . . . . . . . . . . . . . . . . . . . . . . . . . . . . . . . 1.56
Fuel tank (filling with fuel) . . . . . . . . . . . . . . . . . . . . . . . . . . . . . . . . . . . . . . . . . . . . . . . . . . . . . . . . . 1.57
1.1
Page 9
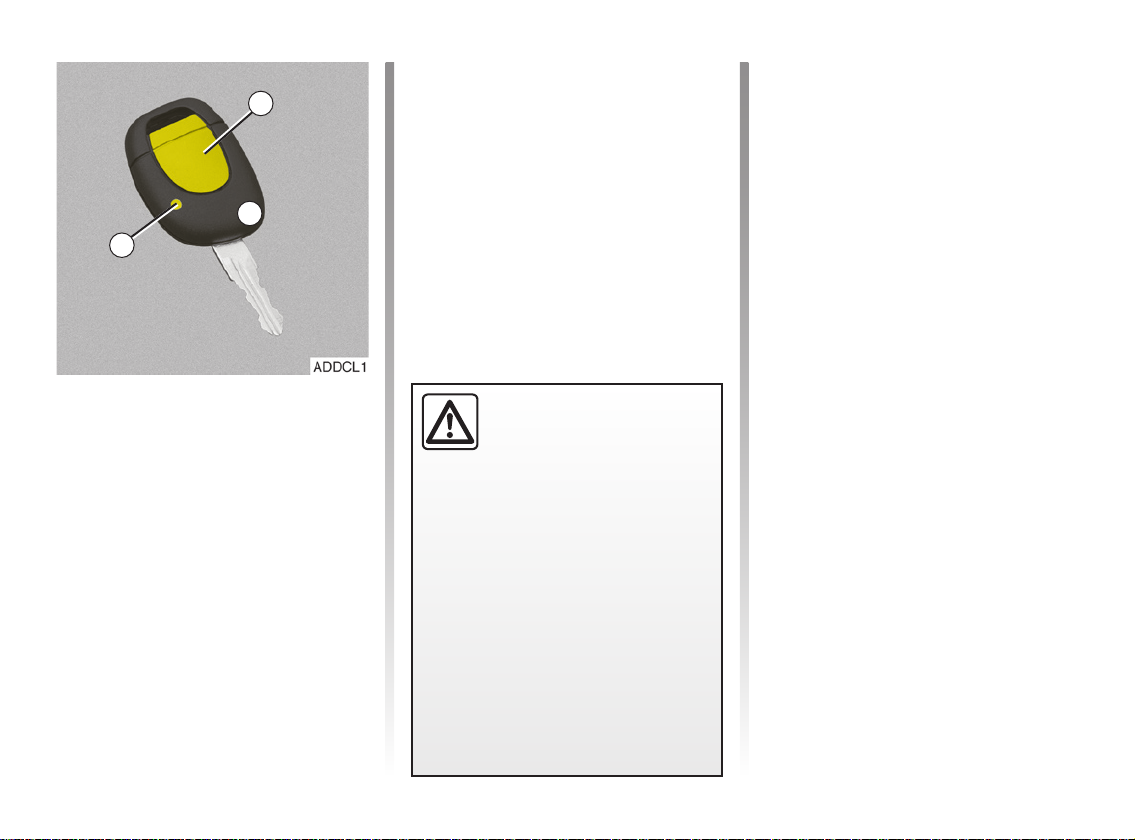
KEYS / RADIO FREQUENCY REMOTE CONTROLS
1
A
2
Radio frequency remote control
unit A
It can be identified by the presence of
button 1.
1 Remote control door locking unit,
coded ignition key, key for doors and
fuel filler cap.
Doors are locked and unlocked using
remote control unit A.
It is supplied with power by a battery
which must be replaced when the bat
tery warning light
(Refer to the information on “Remote
control locking: batteries”).
Driver’s responsibility
(or animal) in the vehicle. With the
key in the ignition, he or she could
start the engine or operate electri
cal equipment such as the electric
windows and there is a risk that part
of their body may become trapped
(neck, arm, hand, etc.). Risk of seri
ous injury.
Never leave the vehicle un
attended with the key in the
ignition if there is a child
2 no longer lights up.
Door locking/unlocking
Press remote control for approximately
one second (indicator light
-
to lock or unlock the doors.
– The hazard warning lights flash
-
-
-
twice to indicate that the doors have
been locked.
Note: If a door or the tailgate is not
properly shut or is still open, or if a
rear light is in the continuously lit po
sition (refer to the relevant informa
tion in Section 3), the hazard warn
ing lights do not flash.
– The hazard warning lights flash
to indicate that the doors have been
unlocked.
2 comes on)
-
-
-
once
1.2
Page 10

KEYS/RADIO FREQUENCY REMOTE CONTROLS: general information
Radio frequency remote
control range
This varies according to the environment. It is therefore important when
handling the remote control to ensure
that you do not lock or unlock the ve
hicle by inadvertently pressing the but
tons.
Note: on certain vehicles, if a door is
not opened within approximately
30 seconds of the door being unlocked
by remote control, the doors will lock
again automatically.
Interference
The presence of certain objects (metal
objects, mobile telephones, or an area
with strong electromagnetic radiation,
etc.) close to the key may create inter
ference and affect the operation of the
system.
-
-
-
If you lose your keys or need another set of keys (or a remote con
trol unit), contact your RENAULT
Dealer.
– If you need to replace a key it will
be necessary to take the vehicle
and all its keys to your RENAULT
Dealer in order to initialise the
whole system.
– No more than four remote control
units may be used for one vehi
cle.
If the remote control will not
operate:
Make sure that the correct battery
type is being used, and that the
battery is in good condition and in
serted correctly. These batteries
should have a service life of approx
imately two years.
In this case, refer to the informa
tion on the “Radio frequency remote
control: batteries”, in Section 5.
-
-
-
-
-
1.3
Page 11
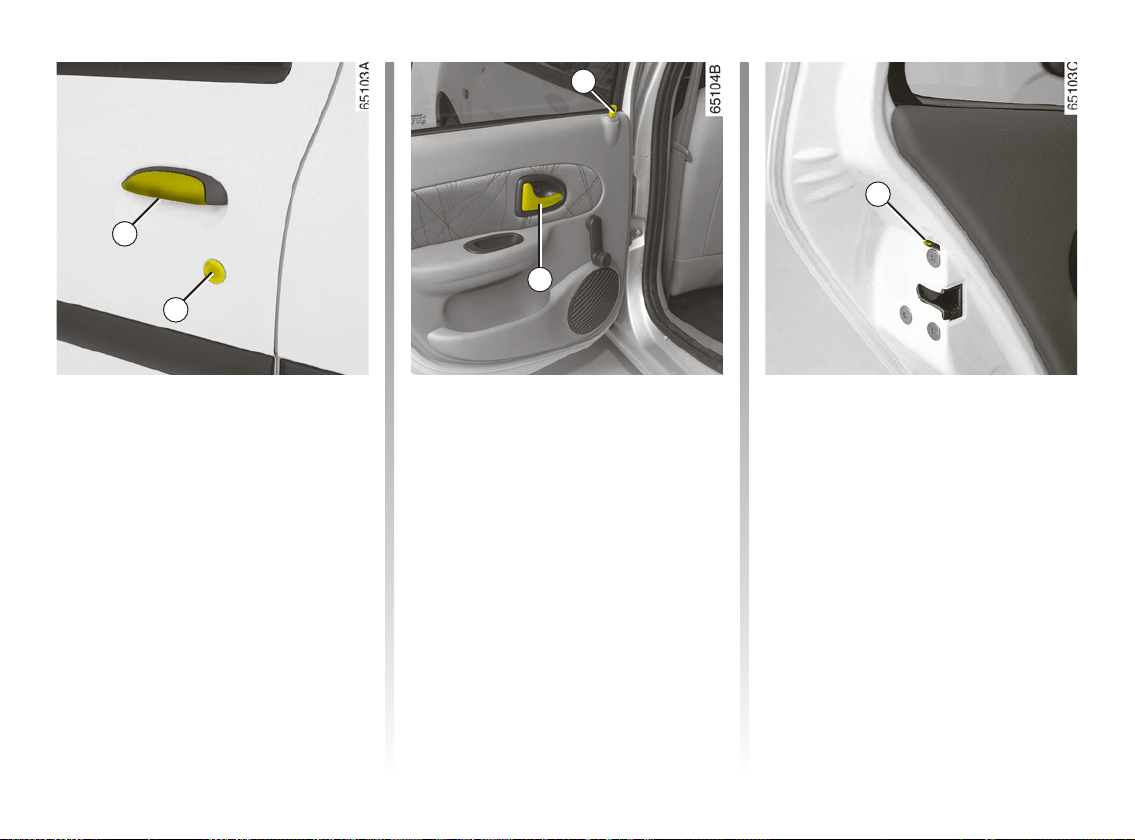
OPENING THE DOORS
1
2
3
5
4
Opening manually from the
outside
Front: use the key to unlock front door
lock
2. Place your hand behind han-
dle 1 and pull it towards you.
Rear: if fitted to the vehicle, when the
front door is open, lift unlocking knob
from inside and pull the door handle.
1.4
Opening manually from the
inside
Pull handle 4.
Lights-on warning buzzer
If you have left the lights on after switch-
3
ing off the ignition, a reminder buzzer
will sound when a door is opened (to
prevent discharge of the battery, etc.).
Childproof locks
To make it impossible for the rear doors
to be opened from the inside, move
lever
5 on each door and check from
the inside that the doors are securely
locked.
Page 12

LOCKING THE DOORS
1
Manual locking
Front: use the key from the outside.
Rear: if fitted to the vehicle, press down
knob 1 on each door.
2
S
This enables the doors and the luggage
compartment to be locked or unlocked
simultaneously.
To lock, press the switch on the side
with the padlock symbol 2.
The front door mechanism cannot be
locked if the door is open.
Electric central locking
Doors and tailgate status
indicator light
The indicator light on switch 2 informs
you of the closure status of the doors
and tailgate:
– the indicator light is on when the
doors/tailgate are locked;
– the indicator light goes out when a
door or the tailgate is open (or incor
rectly closed).
When you lock the doors using the
remote control, the indicator light re
mains lit for approximately one minute
then goes out.
those assisting you to gain access
to the passenger compartment in
the event of an emergency.
If you decide to keep the
doors locked when you
are driving, remember that
it may be more difficult for
-
-
1.5
Page 13
RENAULT ANTI-INTRUDER DEVICE (RAID)
You must first decide if you want to
activate this function.
To activate
With the ignition on, press central door
locking button
until a beep is heard.
To deactivate
With the ignition on, press central door
locking button
until a beep is heard.
those assisting you to gain access
to the passenger compartment in
the event of an emergency.
1 for about five seconds,
1 for about five seconds,
If you decide to keep the
doors locked when you
are driving, remember that
it may be more difficult for
1
Operating principle
When the vehicle moves off, the system
locks the doors automatically as soon
as you reach a speed of approximately
4 mph (6 km/h). The indicator light on
button 1 will light up.
The door is unlocked
– by opening a front door.
Note: if a rear door is opened, it will
automatically be locked again when
the vehicle reaches a speed of ap
proximately 4 mph (6 km/h);
– by pressing door unlocking button
Operating faults
If you find an operating fault (no automatic locking, the indicator light for but
ton
1 does not light up when trying to
lock the doors and tailgate, etc.), firstly
check that the doors and tailgate are
properly closed. If they are properly
closed, contact your RENAULT Dealer.
Also make sure that locking has not
been deactivated inadvertently. If this
occurs, switch the ignition off and on
again and reactivate it as described
above.
-
1.
-
1.6
Page 14
ENGINE IMMOBILISER
This prevents the vehicle being
driven by anyone not in possession
of the vehicle’s coded ignition key.
Any repair or modification
to the engine immobiliser
(computer, wiring, etc.) may
be dangerous. It must be
carried out by a qualified RENAULT
technician.
1
Operating principle
The vehicle is automatically protected for a few seconds after the
key is removed from the ignition.
When the ignition is switched on, indi
cator light
onds and then goes off.
The vehicle has recognised the code
and the engine can be started.
If the vehicle does not recognise the ig
nition key code, tell-tale light
continuously and the engine cannot be
started.
1 comes on for a few sec-
1 will flash
Indicator light
System operating tell-tale light
When the ignition is switched on, telltale 1 lights up continuously for approximately three seconds and then goes
out. You can then start the engine.
Vehicle protection tell-tale light
A few seconds after the ignition has
been switched off, tell-tale light
flash constantly.
The vehicle will not be protected until
the key has been taken out of the igni
tion.
-
-
1 will
-
1.7
Page 15
ENGINE IMMOBILISER (continued)
1
Operating fault warning light
After the ignition has been switched
on, if warning light 1 continues to flash
or remains continuously lit, this indi
cates a system operating fault.
In all cases, it is
RENAULT Dealer as only he is qualified
to repair the engine immobiliser.
If the coded ignition key is faulty,
the second key (supplied with the ve
hicle).
-
essential to consult a
use
-
1.8
Page 16
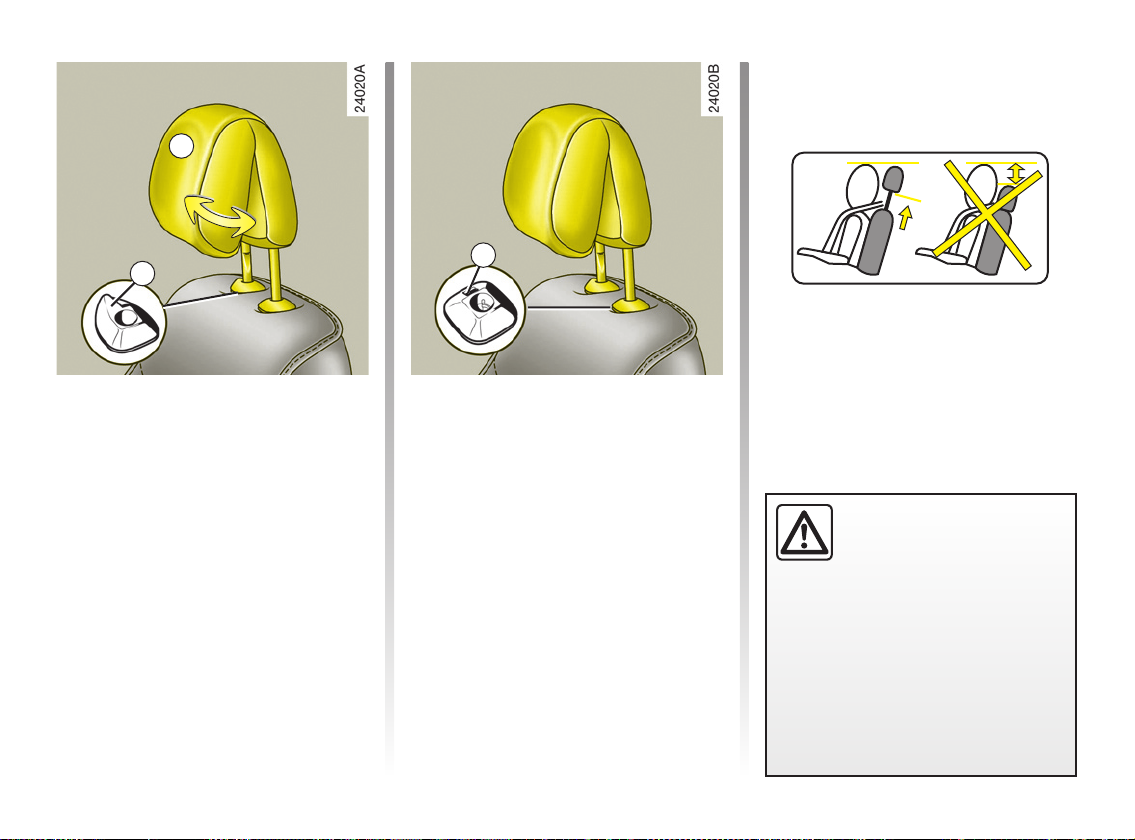
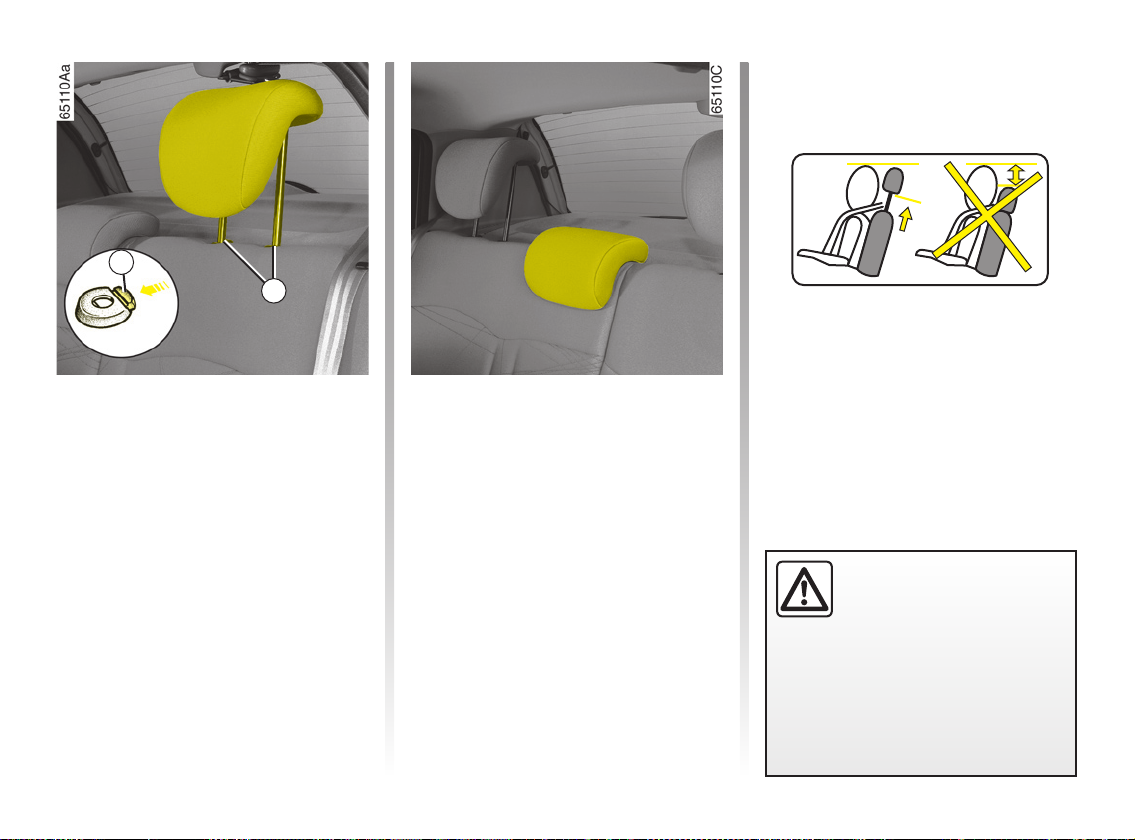
FRONT HEADRESTS
A
1
Headrest with tab 1
To raise the headrest
Slide it upwards to the required height.
To lower the headrest
Move tab
headrest down to the required height.
To adjust the angle of the headrest
Depending on the vehicle, tilt section
towards or away from you to the re
quired position.
1 forwards and lower the
2
To remove the headrest
Press button
release it.
To refit the headrest
Insert the headrest rods into the holes,
with the notches facing forwards.
Move tab
headrest down to the required height.
A
-
2 and lift the headrest to
1 forwards and lower the
tween your head and the headrest
should be as small as possible. The
top of your head should be in line
with the top of the headrest.
The headrest is important
for safety. Ensure that it is
in place and in the correct
position. The distance be
-
1.9
Page 17
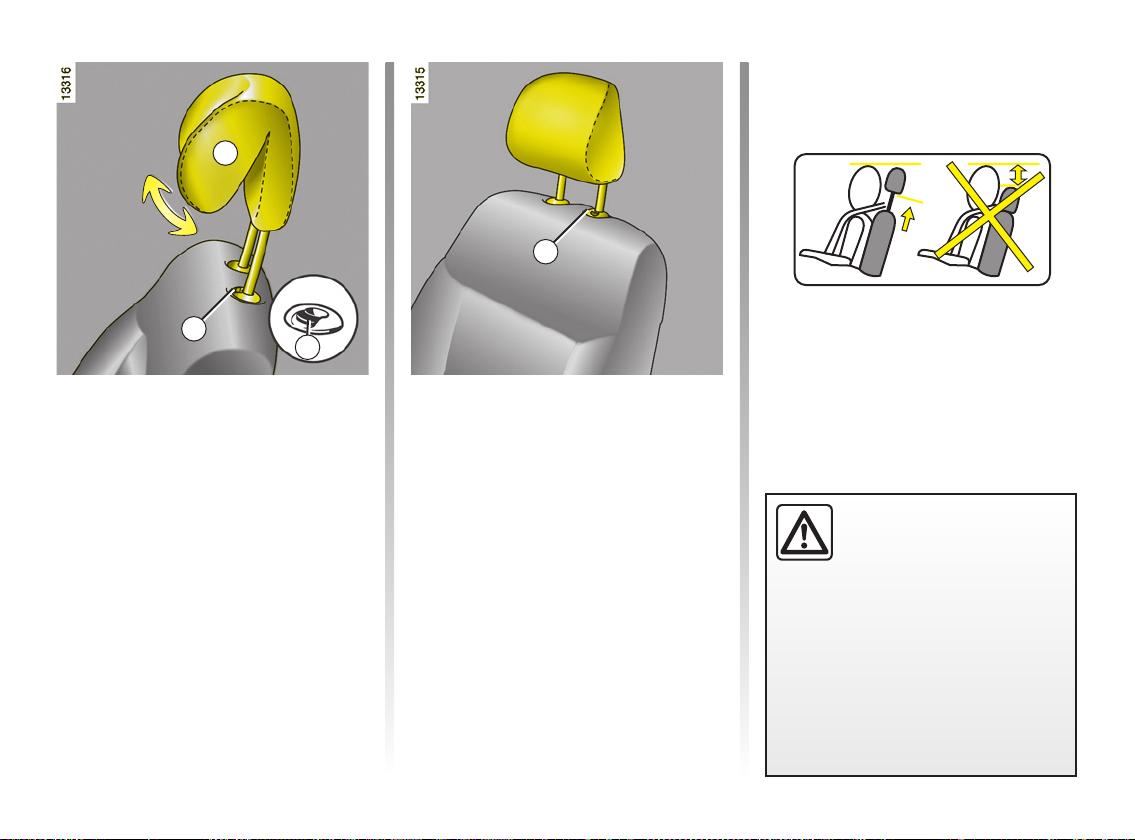
FRONT HEADRESTS (continued)
A
3
3
3
Headrest with tab 3
To raise or lower the headrest
Pull the headrest towards you (i.e. to
wards the front of the vehicle) and slide
it up or down at the same time.
To adjust the angle of the headrest
On some vehicles the angle of the
headrest can be adjusted. To do this,
move the front section
rest forwards or backwards until it feels
comfortable.
1.10
A of the head-
To remove the headrest
First incline the seatback towards the
rear.
Raise the headrest until it is at the high
est possible setting. Lift up tab
then pull the headrest upwards until it
is released.
To refit the headrest
Insert the rods into the holes with the
notches facing forwards.
Lower the headrest until it locks in po
sition.
3 and
-
tween your head and the headrest
should be as small as possible. The
-
top of your head should be in line
with the top of the headrest.
The headrest is important
for safety. Ensure that it is
in place and in the correct
position. The distance be
-
Page 18
REAR HEADRESTS
1
1
To adjust the height
Simply slide it up.
To remove the headrest
Press tab 1.
To refit the headrest
Insert the rods into the sleeves, with the
notches facing forwards, and lower the
headrest to the desired height.
Storage position
When the headrest is fully lowered, it
is in the storage position: do not use
this position when someone is sitting in
the rear seats.
The headrest is important
for safety. Ensure that it is
in place and in the correct
position. The distance be
tween your head and the headrest
should be as small as possible. The
top of your head should be in line
with the top of the headrest.
-
1.11
Page 19
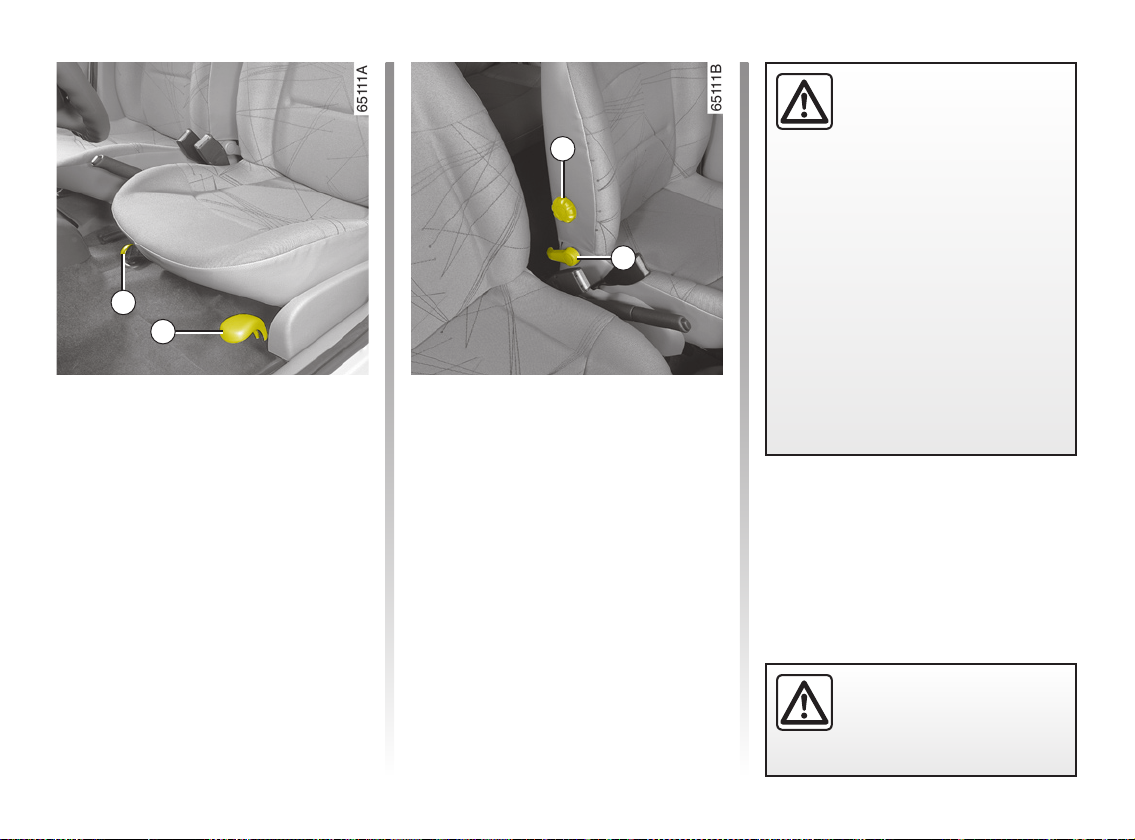
FRONT SEATS
1
2
We would advise you not
to recline the seatbacks too
far to ensure that the effec
3
4
not reduced.
Make sure that the seatbacks are
locked in place correctly.
Nothing should be placed on the
floor (area in front of driver) as such
objects may slide under the pedal
during braking manoeuvres, thus
obstructing its use.
tiveness of the seat belts is
-
To move forwards or backwards
Lift lever
seat is in the required position, release
the lever and ensure that the seat is
locked in place.
To raise or lower the driver’s seat
Move lever 1.
1.12
2 to unlock the seat. When the
To tilt the seatback
Move handle
the desired position.
To adjust the lumbar support on the
driver’s seat
Turn control knob
4 and tilt the seatback to
3.
For safety reasons, make
these adjustments only
when the vehicle is station
ary.
-
Page 20
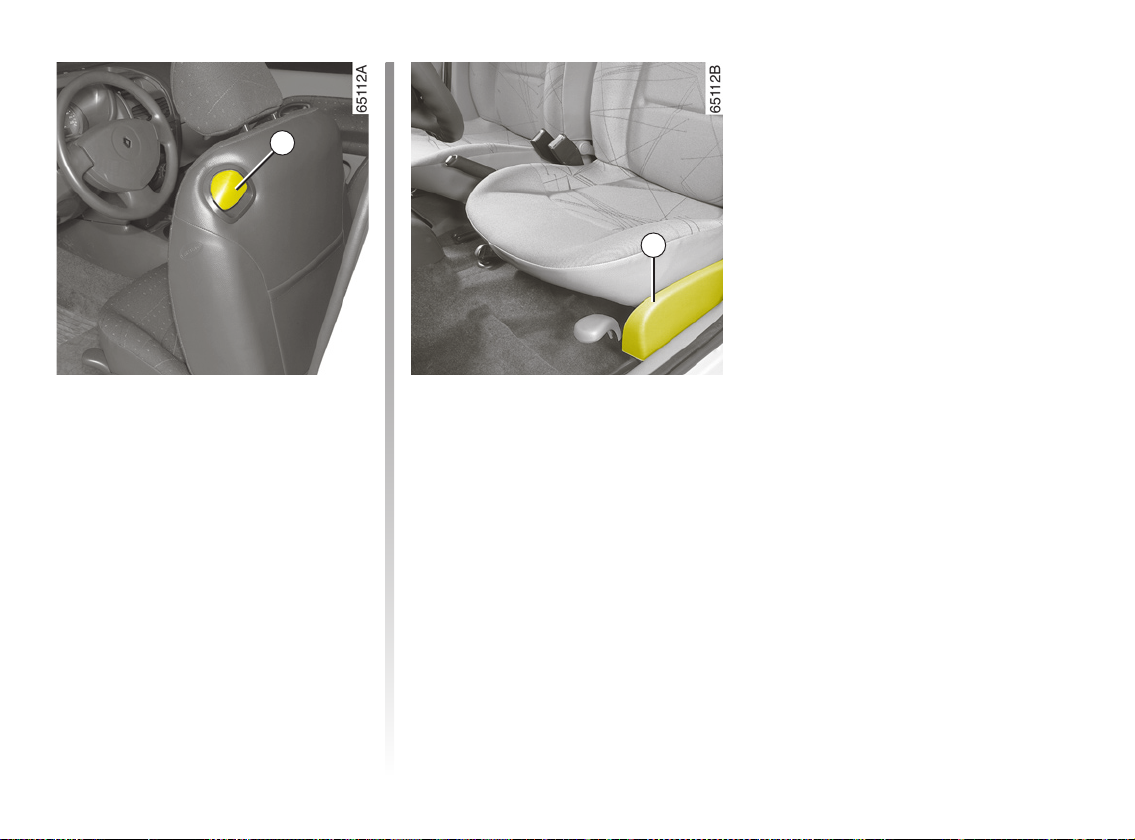
FRONT SEATS (continued)
5
6
Access to the rear seats
(three-door versions)
Lift lever 5 and slide the seat forwards.
To return the seat to its original (stored)
position on the driver’s side, slide the
seat backwards until it locks.
ð
press the switch located on the rail cov
er
the instrument panel.
The system, which has a thermostat,
decides whether or not the heating is
needed.
Heated seats
With the ignition switched on,
6. An indicator light will light up on
-
1.13
Page 21
SEAT BELTS
Always wear your seat belt when travelling in your vehicle. You must also
comply with the legislation of the par
ticular country you are in.
Before starting:
– first ensure that your driving posi
tion is correctly adjusted,
– then adjust your seat belt to pro
vide maximum protection.
Incorrectly adjusted seat
belts may cause injuries in
the event of an accident.
Even pregnant women
should wear a seat belt. In this case,
ensure that the lap belt is not exert
ing too much pressure on the abdo
men without allowing any slack.
-
-
Adjusting your driving
position
– Sit well back in your seat (having
first removed your coat or jacket).
This is essential to ensure your back
-
-
is positioned correctly.
– Adjust the distance between the
seat and the pedals.
Your seat should be as far back as
possible while still allowing you to
depress the clutch pedal fully. The
seatback should be adjusted so that
your arms are slightly bent when you
hold the steering wheel.
– Adjust the position of your head
rest.
For safety reasons, the top of the
headrest must be level with the top
of the head.
– Adjust the height of the seat.
This adjustment allows you to select
the seat position which offers you the
best possible view.
– Adjust the position of the steering
wheel.
-
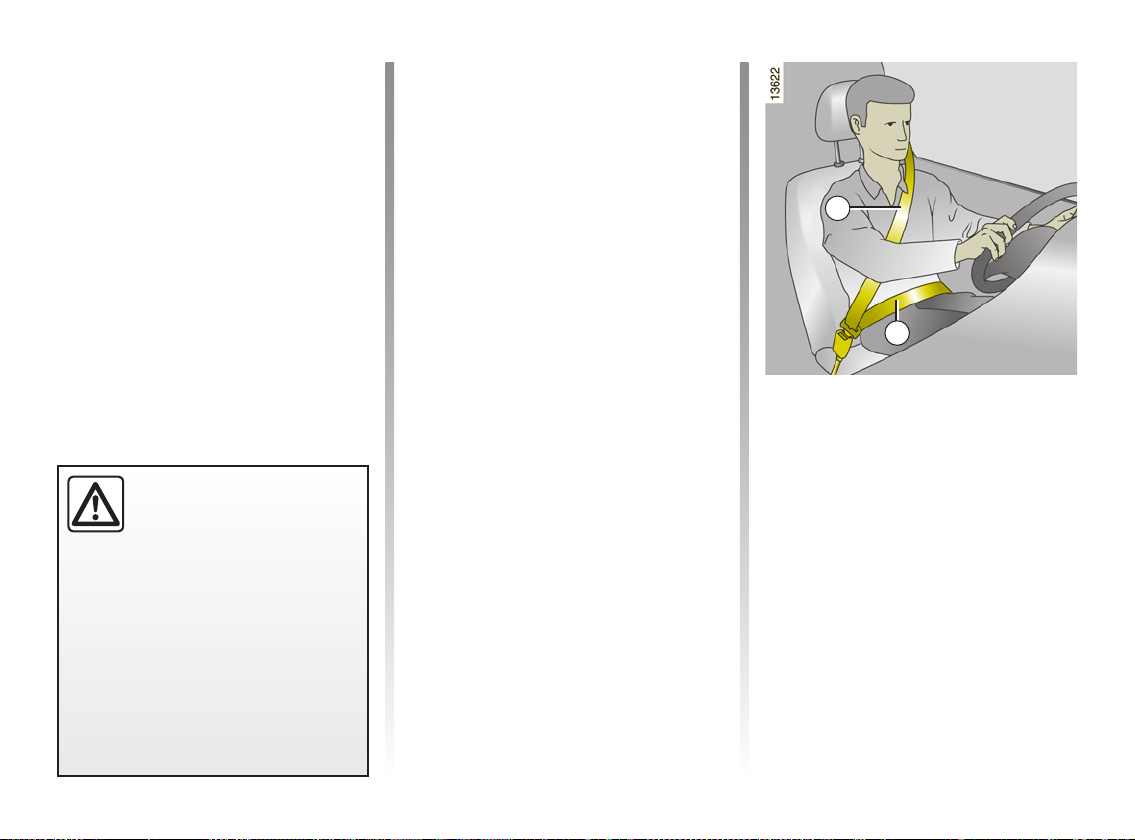
Adjusting the seat belts
Sit with your back firmly against the
seatback.
Shoulder strap
possible to the base of the neck but not
on it.
Lap belt
thighs and against the pelvis.
The belt should be worn so that it is
as close as possible to your body,
i.e.: avoid wearing heavy clothing or
allowing bulky objects under the belts.
1
2
1 should be as close as
2 should be worn flat over the
1.14
Page 22
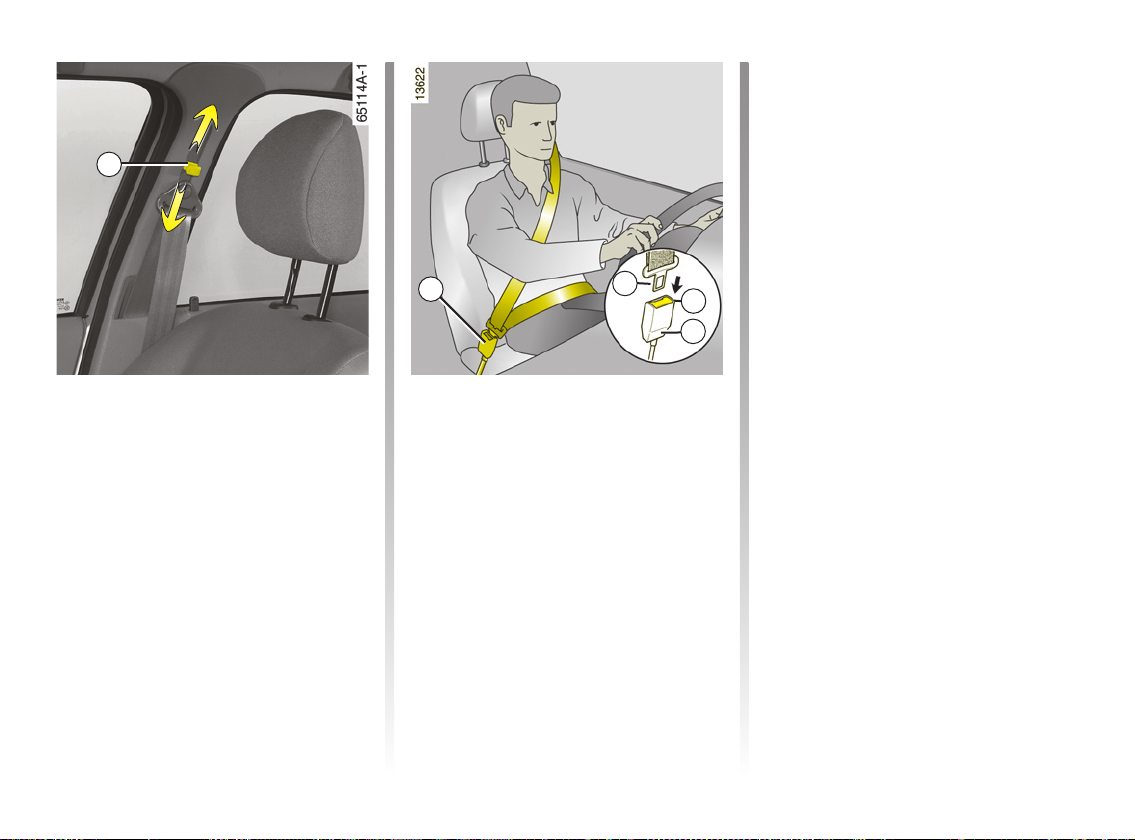
SEAT BELTS (continued)
3
Adjusting the front seat belt
shoulder strap height
Move button 3 to select the position you
require so that shoulder strap
as described above.
Make sure that the seat belt is locked
in position correctly after you have ad
justed it.
1 is worn
6
Fastening
Unwind the belt slowly and smoothly
and ensure that buckle
catch 6 (check that it is locked by pulling on buckle
it to return slightly before attempting to
unwind it again.
-
4). If the belt jams, allow
4
5
6
4 locks into
Fastening (continued)
If your seat belt becomes completely
jammed:
– pull the belt slowly but firmly so that
just over 3 cm unwinds;
– then allow the seat belt to rewind au
tomatically;
– unwind it again;
– if there is still a problem, contact your
RENAULT Dealer.
ç
This lights up continuously if the driver’s seat belt is not fastened and, when
the vehicle reaches a speed of approxi
mately 6 mph (10 km/h), it flashes and
a bleep sounds for approximately
90 seconds before the light returns to
continuously lit status.
Seat belt reminder
warning light
Unfastening
Press button 5 on catch 6 and the seat
belt will be rewound by the inertia reel.
Guide the buckle to help the operation.
-
-
1.15
Page 23
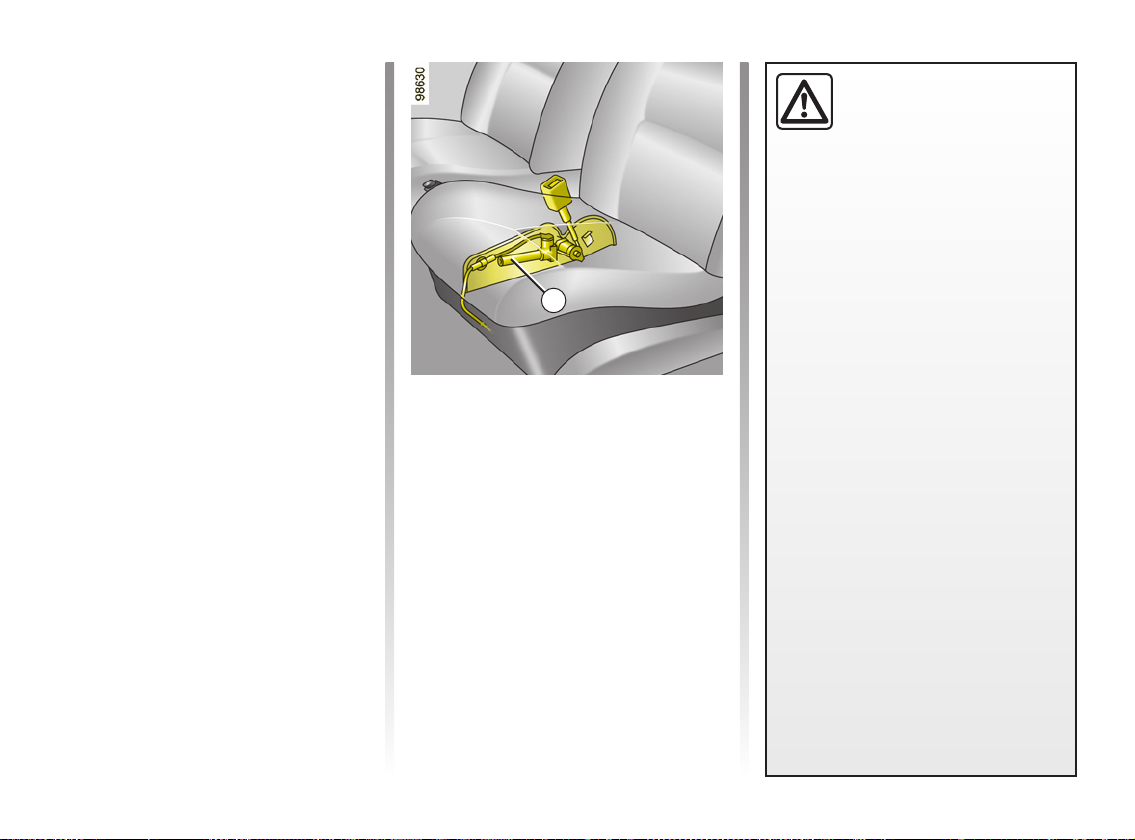
METHODS OF RESTRAINT IN ADDITION TO THE FRONT SEAT BELTS
These are:
– Front seat belt pretensioners.
– Force limiter.
– Air bags for driver and front pas
senger.
These systems are designed to act
independently or together when
the vehicle is subjected to a frontal
impact.
There are three possibilities, de
pending on the level of impact force:
– protection is provided by the seat
belt only;
– the pretensioner is triggered to
rectify belt position and take up
seat belt slack;
– the air bag and the force limiter
are also triggered when there are
severe impacts.
– Side air bags are provided to deploy
in the event of severe side impacts.
-
-
Front seat belt pretensioners
With the ignition switched on, if the vehicle is subject to a significant frontal
impact the system may, depending on
the severity of the impact, trigger pis
ton 1 which instantly retracts the belt.
The pretensioners hold the seat belt
against the body, holding the occupant
more securely against the seat, thus in
creasing the seat belt’s efficiency.
1
– Have the entire restraint
system checked following
an accident.
– No operation whatso
ever is permitted on any part of
the system (pretensioners, air
bags, computers, wiring) and the
system components must not
be reused on any other vehicle,
even if identical.
– To avoid incorrect triggering of the
system which may cause injury,
only qualified RENAULT Network
personnel may work on the pre
tensioner and air bag system.
– The ignition module electrical
-
-
specifications may only be tested
by a specially trained technician
using special equipment.
– When the vehicle is scrapped,
contact your RENAULT Dealer
for disposal of the pretensioner
and air bag gas generators.
-
-
1.16
Page 24
METHODS OF RESTRAINT IN ADDITION TO THE FRONT SEAT BELTS (continued)
Force limiter
Above a certain level of impact force,
this mechanism is used to limit the force
of the belt against the body so that it is
at an acceptable level.
Air bags for driver and front
passenger
An “Air bag” marking on the steering
wheel and dashboard and a label on
the lower section of the windscreen
inform you of the presence of additional
means of restraint (air bags, preten
sioners, etc.) in the passenger com
partment.
The air bag system consists of:
– for the driver: an adaptable air bag
and its two gas generators (for the
small or large volume bag depending
on the severity of the frontal impact)
mounted on the steering wheel;
– for the passenger: an air bag and its
gas generator mounted in the dash
board.
Note: this passenger air bag is
adaptable for right-hand drive ver
sions.
– a computer for both systems, which
includes the impact detector and a
monitor controlling the electrical trig
ger system for the gas generators;
– a single å tell-tale light on the
instrument panel.
-
-
-
-
The air bag system uses pyrotechnic principles. This explains why,
-
when the air bag inflates, it will gen
erate heat, produce smoke (this
does not mean that a fire is about
to start) and make a noise upon
detonation. In a situation where an
air bag is required, it will inflate im
mediately and this may cause some
minor, superficial grazing to the skin
or other problems.
-
-
1.17
Page 25
METHODS OF RESTRAINT IN ADDITION TO THE FRONT SEAT BELTS (continued)
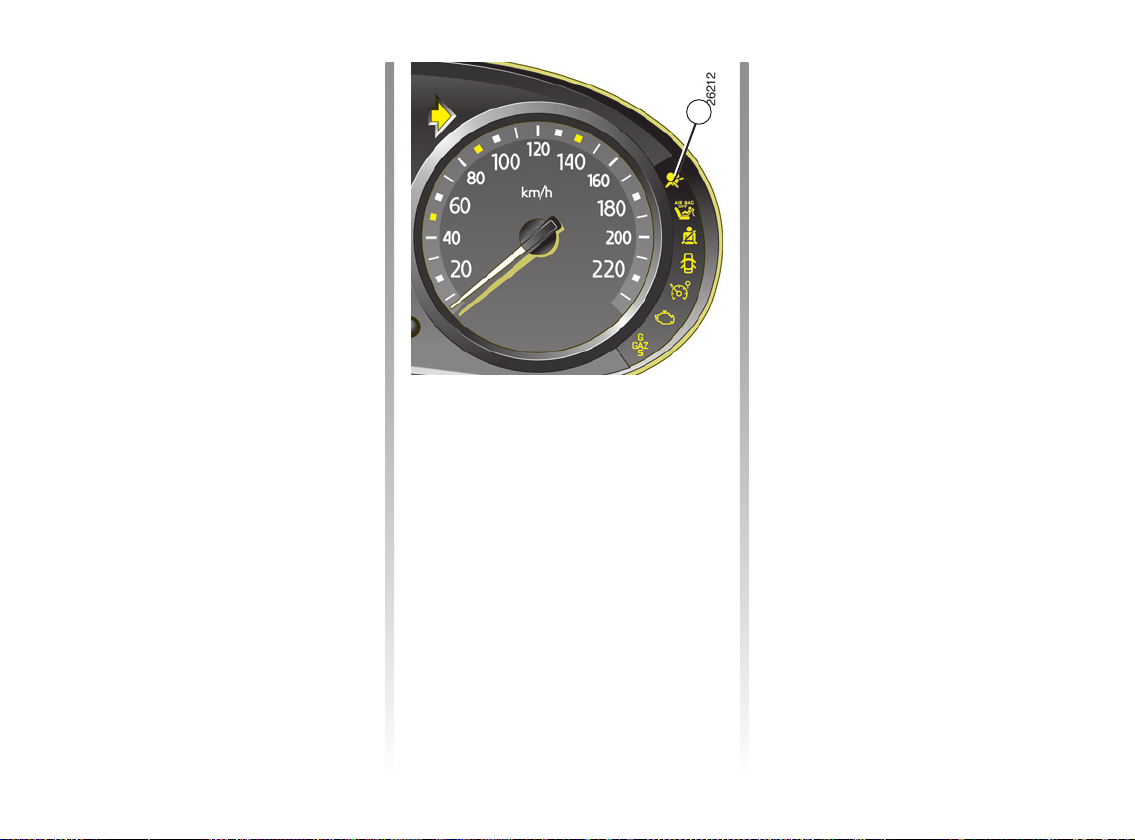
Operation
The system is not operational until a
few seconds after the ignition has been
switched on.
If a severe
bag(s) inflate(s) rapidly, cushioning the
impact of the driver’s head and chest
against the steering wheel and the front
passenger’s head against the dash
board. The air bag(s) then deflate(s)
immediately so that the passengers are
not impeded in any way as they exit the
vehicle.
frontal impact occurs, the air
-
Operating faults
Warning light 1 will light up on the instrument panel when the ignition is
switched on and then go out after a few
seconds.
If it does not light up when the igni
tion is turned on, there is a fault in the
system.
If it lights up while you are driving, stop
at once and switch off the ignition.
If it remains lit after the ignition has
been switched on again, there is a fault
1
in the system.
It is not recommended to let a passen
ger use this seat.
Contact your RENAULT Dealer as soon
as possible.
-
-
1.18
Page 26
METHODS OF RESTRAINT IN ADDITION TO THE FRONT SEAT BELTS (continued)
All of the warnings below are given so that the air bag is not obstructed in any way when it is inflated and also to prevent
the risk of serious injuries caused by items which may be dislodged when the air bag inflates.
The air bag is designed to complement the action of the seat belt. Both the air bags and seat belts are integral parts
of the same protection system. It is therefore essential to wear the seat belt at all times. If seat belts are not worn, the
occupants of the vehicle are at risk of serious injury in the event of an accident. The risk of minor superficial injuries
occurring when the air bag is deployed may also increase, although such minor injuries are always possible with air
bags.
If the vehicle should overturn or suffer a rear impact, however severe, the pretensioners and air bags are not always triggered.
Impacts to the underside of the vehicle from pavements, holes, stones etc. can all trigger these systems.
Air bags for driver and front passenger
– No work or modification
tensioner, computer, wiring harness, etc.), except by qualified RENAULT Network personnel;
– To ensure that the system is in good working order and to avoid accidental triggering of the system which may cause injury,
only qualified RENAULT Network personnel may work on the air bag system;
– As a safety precaution, have the air bag system checked if your vehicle has been involved in an accident, or is stolen or
broken into;
– When selling or lending the vehicle, inform the user of these points and hand over this driver’s handbook with the vehicle;
– When scrapping your vehicle, contact your RENAULT Dealer for disposal of the gas generator(s).
whatsoever may be carried out on any part of the driver or passenger air bag system (air bag, pre-
1.19
Page 27
METHODS OF RESTRAINT IN ADDITION TO THE FRONT SEAT BELTS (continued)
Warnings concerning the driver’s air bag
– Do not modify the steering wheel or the steering wheel boss.
A
– Do not attach any objects (badge, logo, clock, telephone holder, etc.) to the
– The steering wheel must not be removed (except by qualified personnel from
– When driving, do not sit too close to the steering wheel. Sit with your arms
– Do not cover the steering wheel boss under any circumstances.
steering wheel boss.
the RENAULT Network).
slightly bent (see the information on “Adjusting your driving position” in
Section 1). This will allow sufficient space for the air bag to deploy correctly
and be fully effective.
All the warnings below are given
so that air bag activation is not ob
structed in any way and also to
prevent the risk of serious injuries
caused by items which may be dis
lodged when the air bag inflates.
1.20
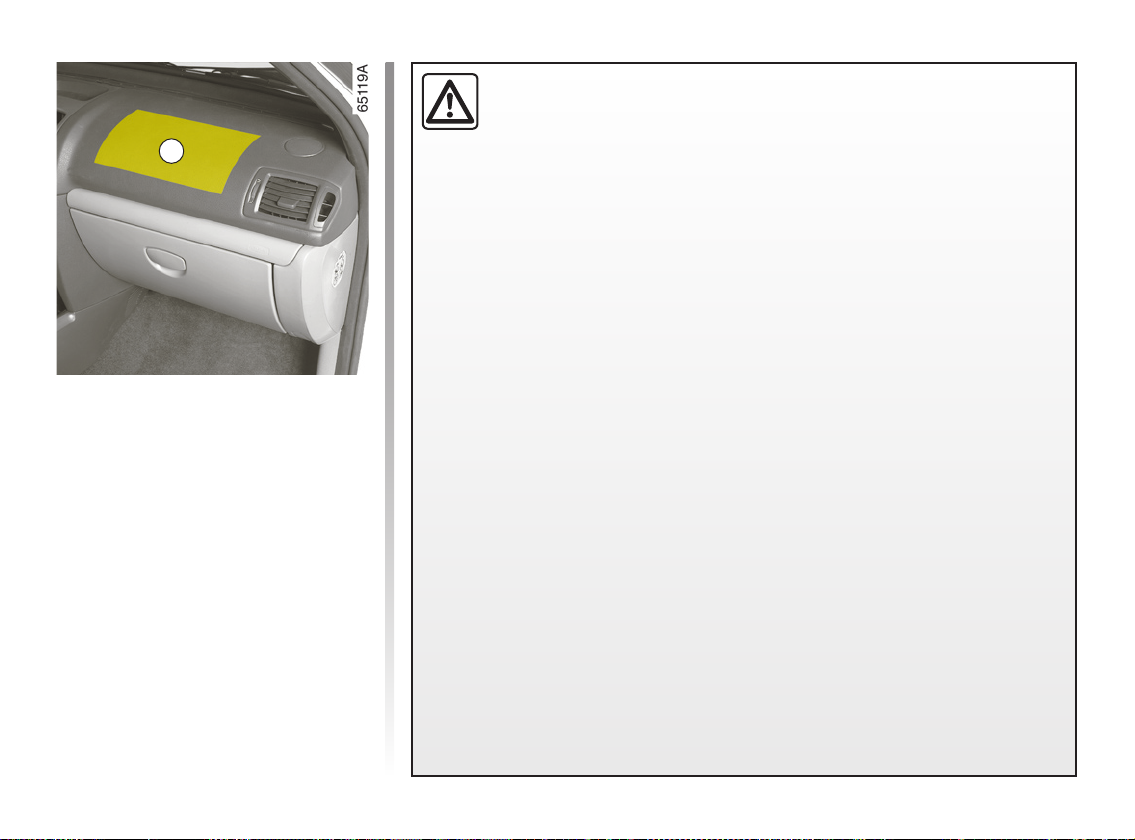
Warnings concerning passenger air bag: location
-
-
– Do not attach or glue any objects (badges, logo, clock, telephone holder, etc.)
onto the front passenger side of the dashboard.
– Do not place anything between the dashboard and the passenger (pet, um
brella, walking stick, parcels, etc.).
– The passenger must not put his or her feet on the dashboard or seat as there
is a risk that serious injuries may occur. In general, parts of the body should be
kept away from the dashboard (knees, hands, head, etc.).
A REAR-FACING CHILD SEAT MUST NOT BE FITTED
TO THE FRONT PASSENGER SEAT IF THE VEHICLE
IS EQUIPPED WITH A PASSENGER AIR BAG.
A
-
Page 28
SIDE PROTECTION DEVICES
Side air bags
These air bags may be fitted to the front
seats and are deployed at the sides of
the seats (door side) to protect the oc
cupants in the event of a severe side
impact.
These air bags operate
through slits in the front
seatbacks (door side):
never insert any objects in
these slits.
Warnings concerning the
-
– Do not place any accessories,
– Only qualified RENAULT network
side air bag
– Fitting seat covers:
seats equipped with an
air bag require covers specifi
cally designed for your vehicle.
Contact your RENAULT Dealer
to find out if these covers may be
purchased from RENAULT ac
cessory outlets. The use of any
other covers (including those de
signed for another vehicle) may
affect the operation of these air
bags and reduce your protection.
objects or even animals between
the seat back and the door. Do
not cover the seatback with any
items such as clothes or acces
sories. This may prevent the air
bag from operating correctly or
cause injury when the air bag is
deployed.
personnel may remove or modify
a seat.
-
-
-
-
1.21
Page 29
REAR SEAT BELTS
1
2
6
3
5
4
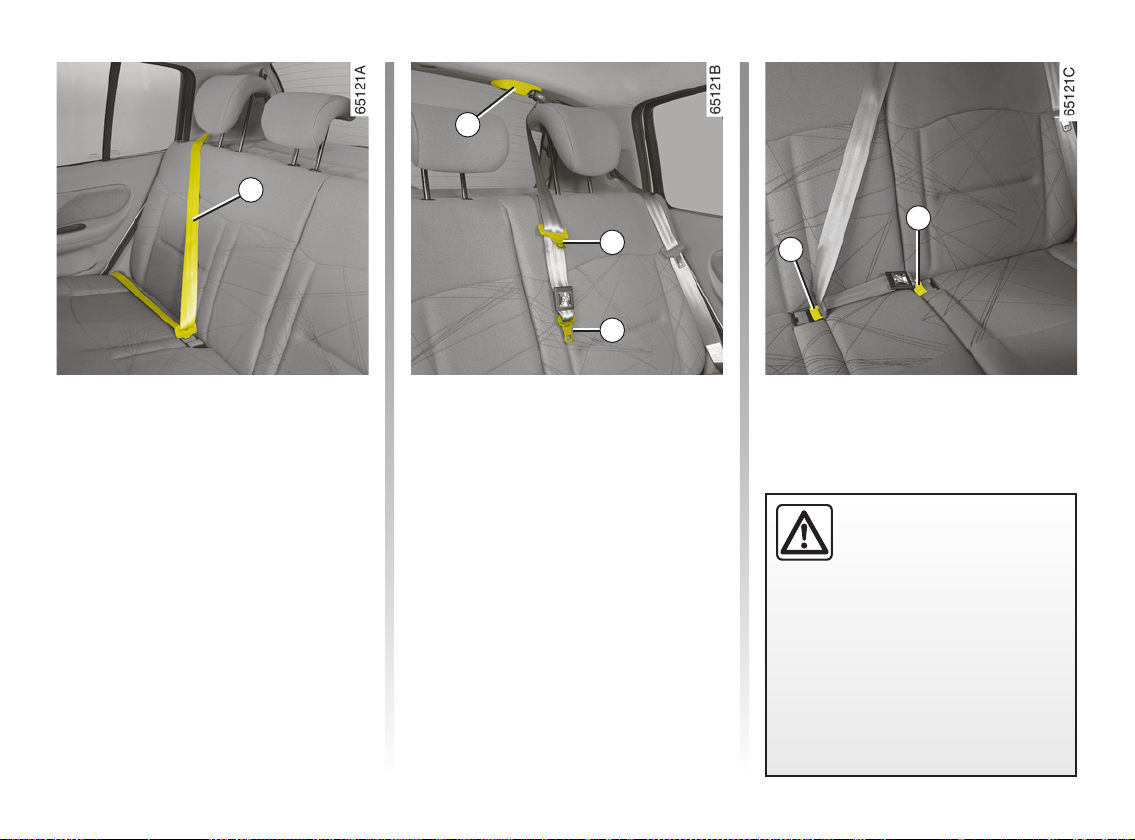
Rear side seat belts 1
The belts are locked, unlocked and
adjusted in the same way as the front
belts.
1.22
Rear centre belt
Unwind belt 2 slowly from its housing.
Click buckle 4 into the black catch 6.
Snap the last sliding buckle
red catch 5.
3 into the
Make sure that the rear
bench seat is locked in po
sition correctly so that the
seat belts will operate effi
ciently.
Refer to the information on the “Rear
bench seat” in Section 3.
-
-
Page 30
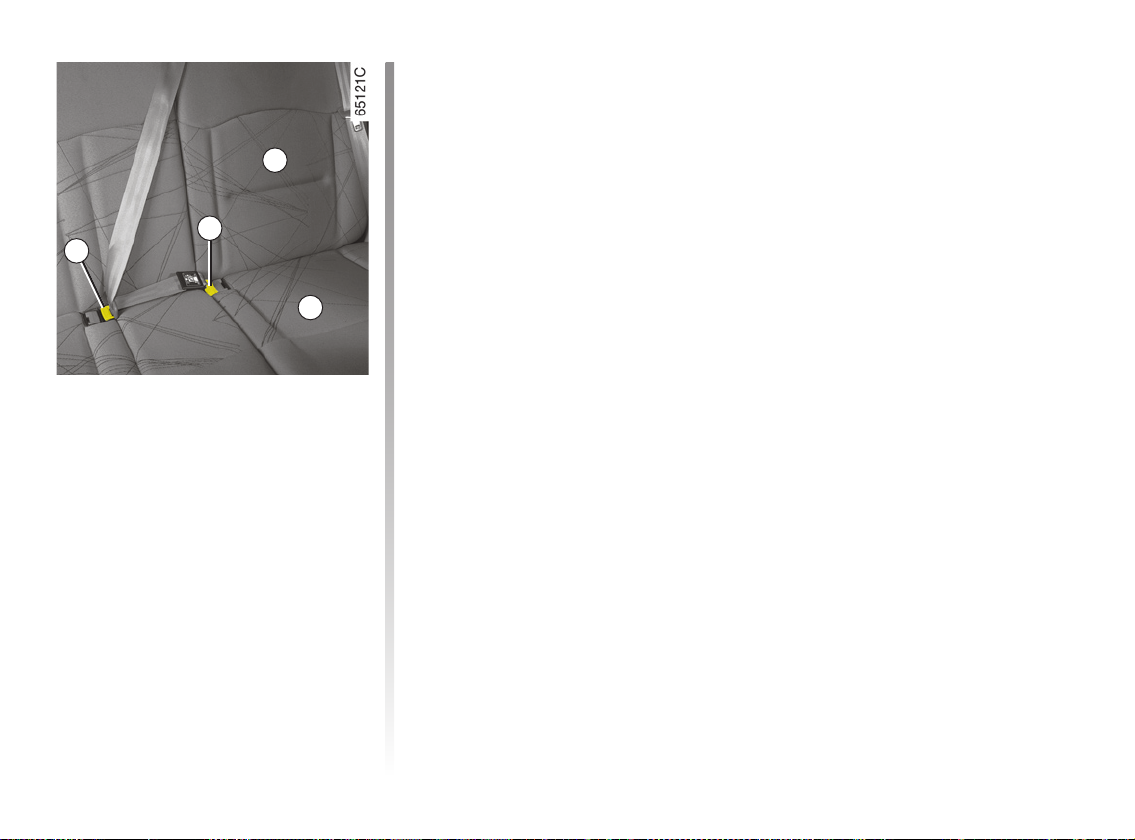
REAR SEAT BELTS (continued)
A
6
5
B
Special note concerning vehicles
with a two-part rear bench seat
If you have to fold down the part of the
rear bench seat behind the front lefthand seat:
– lift the seat base
seat;
– click buckle
– lower the seatback
the headrest).
Then snap the last sliding buckle
the red catch 5.
B against the front
4 into the black catch 6;
A (after removing
3 into
Systems in addition to the
rear seat belts:
Force limiter
Above a certain level of impact force to
the front, this mechanism is used to limit
the force of the belt against the body so
that it is at an acceptable level.
1.23
Page 31

SEAT BELTS
The following information applies to the vehicle’s front and rear seat belts.
– No modification may be made to the component parts of the restraint system (belts and seats and their mountings)
fitted originally.
Contact your RENAULT Dealer for special operations (e.g. fitting child seats).
– Do not use any devices which give any play in the belts (clothes pegs, clips, for example).
– Never wear the shoulder strap under your arm or behind your back.
– Never use the same belt for more than one person and never hold a baby or child on your lap with your seat belt around
them.
– The belt should never be twisted.
– Following a serious accident, the seat belts in use at the time must be replaced. Always replace your seat belts as soon as
they show any signs of wear.
– When putting back the rear bench seat, take care that the seat belts are correctly positioned so that they can be used prop
erly.
– If necessary, readjust the position and tension of the belt.
-
1.24
Page 32

CHILD SAFETY
In all countries there are regulations
governing the use of restraints for chil
dren and babies.
In Europe children under 10 years of
(1)
age
must be seated in an approved
safety device which is suitable for the
weight and size of the child.
The driver is responsible for ensuring
that this equipment is used correctly.
Child restraints for which type approval
was obtained after January 1992 offer
a level of safety much greater than re
straints with type approval before that
date.
It is therefore advisable to select a child
restraint that complies with European
regulation ECE 44.
Restraints that comply with this legis
lation must be marked with an orange
label bearing the letter
E followed by
a number (which represents the coun
try where it is type approved) and the
year in which the type approval was
granted.
Refer to the “Child safety equipment
booklet” available from the RENAULT
Network to choose the seat suited to
your child and recommended for your
vehicle.
(1) Always comply with the laws of the country
in which you are travelling. They may be dif
ferent to the guidelines in this handbook.
There are some passenger seats in
Remember that a collision at 30 mph
(50 km/h) is the same as falling a
distance of 10 metres. Expressed in
other terms, transporting a child
without a restraint is the equivalent
of allowing him or her to play on a
fourth-floor balcony without railings.
which the fitting of child seats is forbid
den.
To find the authorised seats and types
of child seats that can be fitted in each
of the authorised seats, refer to the
table in the following pages.
-
-
-
senger in the vehicle.
If a frontal impact occurs at 30 mph
(50 km/h) a child weighing 30 kg will
be transformed into a missile equi
valent to one ton: you will find it im
possible to hold the child, even if
you are wearing a belt yourself.
It is particularly dangerous to put
the belt round a child who is sitting
on your lap. Never use the belt for
more than one person at the same
Under no circumstances
should babies or children
be allowed to travel sitting
on the lap of another pas
-
-
-
time.
-
1.25
Page 33

CHILD SAFETY (continued)
Type of child seat
Weight of
the child
Seat size (2)
Seats suitable for fitting a child seat
Front passenger
seat (1)
Rear side
seats
Rear centre
seat
Carrycot fitted across the vehicle
Approved for group 0
Rear-facing shell seat
Approved for group 0 or 0+
Rear-facing seat
Approved for group 0+
Rear-facing seat
Approved for group 1
Forward-facing seat
Approved for group 1
Forward-facing seat
Approved for group 1
Booster cushion
Approved for group 2
Booster cushion
Approved for group 3 (7)
(1) IT IS NOT PERMITTED TO FIT A CHILD SEAT IN THIS SEAT: RISK OF DEATH OR SERIOUS INJURY.
< 10 kg F - G X
< 13 kg E X
< 13 kg C - D X
9 kg to
18 kg
9 kg to
18 kg
9 kg to
18 kg
15 kg to
25 kg
22 kg to
36 kg
C - D X
B - B1 X
A X
– X
– X
U - IL
(3) (4)
U - IL
(4)
U
(4)
U
(4)
U - IUF - IL
(5) (6)
U
(5) (6)
U
(5) (6)
U
(5) (6)
X
X
X
X
X
X
X
X
1.26
Page 34

CHILD SAFETY (continued)
X : Seat not suitable for fitting child seats.
U : Seat allowing a child seat with “Universal” approval to be attached by seat belt; check that it can be fitted correctly.
IUF :
Seat allowing a forward-facing child seat with “Universal” approval to be fitted with ISOFIX fixings; check that it can be fitted
correctly.
IL : Seat allowing a forward facing child seat with “Semi-universal” or “Specific to RENAULT vehicles” approval to be fitted with
ISOFIX fixings; check that it can be fitted correctly.
Refer to the “Child safety equipment booklet” available from the RENAULT Network to choose the seat suited to your
child and recommended for your vehicle.
(2) The size of the child seat with ISOFIX fixings is indicated by the ü logo followed by a letter (A, B, B1, C, D, E, F, G).
(3) A carrycot should be fitted sideways across the vehicle. Position the child with his or her feet nearest the door.
(4) Move the front seat forward as far as possible to fit the child seat, then move it back so that it is as near as possible but not
touching. Adjust the headrest, or remove it if necessary.
(5) Position the seatback of the child seat against the vehicle’s seatback. Adjust the headrest, or remove it if necessary.
(6) For the child’s safety, do not push the front seat more than halfway back on its runners and do not recline the seatback more
than 25°.
(7) A child over 10 years of age, weighing more than 36 kg or taller than 1.36 m can be strapped directly into the seat like an
adult.
1.27
Page 35

CHILD SAFETY (continued)
The right choice
The safety of your children is also your
responsibility.
Your vehicle is fitted with the Isofix
system, approved according to the new
regulations ECE 14 and ECE 16.
To ensure that your child has the maxi
mum possible protection, we recom
mend that you use Isofix seats ap
proved by the RENAULT Network.
Refer to the information on the “ISOFIX
child seat mounting system” in
Section 1.
Restraint systems for all categories are
available. These systems have been
developed in consultation with the
manufacturers and have been tested in
RENAULT vehicles.
Contact your RENAULT Dealer and ask
them to help you install it.
-
-
-
Categories 0 and 0+
(from 0 to 13 kg)
A child’s neck is very susceptible to
injury up to the age of two.
It is preferable to put your child into a
rear-facing enclosing shell seat. This
position enhances safety.
Category 1
(from 9 kg to 18 kg)
Between the ages of 2 and 4, a child’s
pelvis is not fully developed. Restraints
using the vehicle’s seat belts are not
adequate and there is also a risk that
the child will sustain abdominal injuries
in the event of a frontal impact. Use a
seat which restrains the child by means
of a harness.
1.28
To avoid any risk to your safety, we recommend that you use RENAULT
approved accessories because they are designed for your vehicle and
are the only accessories for which RENAULT will provide a warranty.
Page 36

CHILD SAFETY (continued)
Category 2 (15 kg to 25 kg)
and category 3 (22 kg to 36 kg)
For correctly supporting the pelvis of
a child under 10 years, a height under
1.36 m and a weight of less than 36 kg,
it is preferable to use a booster seat
with belt guides that ensure that the
three-point belt lies flat over the child’s
thighs.
A booster seat with a height-adjustable
seatback and a belt guide are recom
mended as this will allow the belt to be
worn as close to the base of the neck
as possible but not on it.
Place the back of the child seat firmly
against the vehicle seatback. Adjust the
height of the headrest or remove it if
necessary.
If a booster seat without a seatback is
used, the vehicle’s headrest will have
to be adjusted to suit the child’s height;
the upper edge of the headrest must
be at the same height as the top of the
child’s head and should never be lower
than the child’s eye level.
-
The standard classifies the child restraints in 5 categories:
Category 0 : 0 to 10 kg
Category 0+: 0 to 13 kg
Category 1 : 9 to 18 kg
Category 2 : 15 kg to 25 kg
Category 3 : 22 kg to 36 kg
We recommend that you remove
the headrest and put it in the lug
gage compartment, to facilitate fit
ting certain types of child seat to the
rear seats.
1.29
-
-
Page 37

CHILD SAFETY (continued)
Isofix child seat mounting
system
This is a system for fitting the child seat
to the vehicle.
The Isofix system has been approved
in accordance with regulations
ECE 14 and ECE 16 and allows all child
seats approved as “Semi-universal” or
“Universal” in accordance with regulation ECE 44 to be fitted.
The child seats are fitted with two
latches which are attached to the two
rings.
The Universal Isofix seats are also pro
vided with a belt to secure the back of
the child seat.
To find out which seats are fitted with
this system, refer to the table of “Seats
suitable for fitting a child seat” at the
beginning of the information on “Child
safety”.
Your vehicle’s Isofix system comprises:
– two anchoring rings for securing the
base of the child seat;
– a ring for securing the backs of for
-
ward facing seats.
Your vehicle is also provided with an
additional ring specific to RENAULT for
securing the belt of those rear-facing
seats available from the RENAULT net
work. This belt improves the support
your child receives in the event of a rear
impact.
– Make sure that there is
nothing obstructing the seat
mounting mechanism at the
anchorage points (gravel,
rags, toys, etc.).
– Always remember to fasten the
seat belts on child seats for all
journeys.
Fitting
Forward-facing child seat
When a forward-facing child seat is
installed, the front seat must not be
moved back beyond the halfway point
on the seat runners and the seatback
must be in an upright position.
Rear-facing child seat or shell seat
When installing a rear facing child seat,
push the front passenger seat back as
far as possible.
1.30
Page 38

CHILD SAFETY (continued)
1
2
3
Fitting a child seat
– before fitting and using the seat,
carefully read the instructions pro
vided;
– attach mounting guides
rings
1 located between the seat
base and the seatback and marked
by labels on the ISOFIX system
which is fitted to the vehicle’s rear
seats;
2 on the
Fitting a child seat
(continued)
– slide the seat catches 3 in the
guides 2 and push the seat firmly to
lock it on the rings;
– check that the seat is locked cor
rectly by moving it from left to right
and then forwards and backwards.
-
-
1.31
Page 39

CHILD SAFETY (continued)
A forward-facing Isofix seat
fitted on the rear side seat
When a forward-facing child seat is
installed, the front seat must not be
moved back beyond the halfway point
on the seat runners and the seatback
must not be reclined too far.
Each of the rear seats is fitted with two
rings for mounting the base of the seat.
4
5
6
Mounting ring for a forwardfacing seat
Use belt 4 supplied with the seat:
– pass belt
headrest rods;
– attach hook
luggage compartment;
– tighten the belt.
4 between the two rear
5 to ring 6 located in the
4
5
7
A rear-facing Isofix seat fitted
on the rear side seat
When a rear-facing child seat is installed, the front seat must not be
moved forward beyond the halfway
point on the seat runners.
The front seatback must be close to or
touching the shell of the child seat.
Use belt 4 supplied with the seat:
– fix hook
front passenger seat;
– tighten the belt.
5 on ring 7 located under the
1.32
Page 40

CHILD SAFETY (continued)
CHILD SAFETY
– No modifications may be made to the component parts of the restraint system (belts, seats and their mountings)
originally fitted.
– Carefully follow the instructions for fitting provided by the manufacturer of the restraint system.
– Always avoid dressing the child in bulky garments and do not place any objects between the child and the restraint
system.
– The seat belt in the vehicle must be tight enough that the child seat is held in position securely. Check the tension regu
larly.
– Never pass the shoulder strap under the arm or behind the back.
– The harness or belt should be taut and fitted to suit the child’s size.
– Never allow your child to stand up or kneel on the seats while the vehicle is moving.
– Check that the child is in the correct position for the entire journey, especially if asleep.
– Use the seat belts to hold the seat in position, even if it is not occupied. Otherwise, if an accident were to occur, it may
become dislodged and pose a risk to other vehicle occupants.
– Following a serious accident, have the seat belts and restraint systems in use at the time checked.
– You should never leave a child unattended in a vehicle, even in the restraint device.
– Activate the rear door locks (if your vehicle is equipped with these).
– Make sure that the child does not get out of the vehicle at the side of the traffic.
– Set your children a good example; always wear your seat belt.
-
1.33
Page 41

DRIVER’S POSITION, LEFT-HAND DRIVE
1 2 3 4 5 6 7 8 9 10 11 12 13
1.34
232728
1425 24262930 151617
1819202122
Page 42

DRIVER’S POSITION, LEFT-HAND DRIVE (continued)
The presence of equipment DEPENDS ON THE VERSION AND VEHICLE OPTIONS AS WELL AS THE COUNTRY.
1 Side window demister outlet.
2 Side air vent.
3 Stalk for:
– direction indicator lights,
– exterior lights,
– front fog lights,
– rear fog lights.
4 Instrument panel.
5 – Location for driver’s air bag.
– Horn.
6 Radio remote control.
7 – Steering column stalk for wind-
screen and rear screen wash/
wipe.
– Trip computer information read
out control.
8 Centre air vents.
9 Display:
– clock and temperature,
– radio, clock and temperature,
– radio, clock, temperature and
navigation system.
10 Storage compartments.
11 Passenger air bag location.
12 Side air vent.
13 Side window demister outlet.
14 Glove box.
15 Heated rear screen switch.
16 Hazard warning lights switch.
17 Location for radio or storage com-
partment.
18 Heating and ventilation controls.
19 Ashtray and cigar lighter.
20 Handbrake.
21 Gear lever.
22 Cup holder.
23 Central door locking switch.
24 Ignition switch.
25 Cruise control/speed limiter con-
trols.
26 Steering wheel height adjustment
control.
27 Controls for:
– electric beam height adjust
ment,
– control instruments lighting rhe
ostat,
– cruise control and speed limiter.
28 Storage compartments.
29 Bonnet release.
30 Fuse box.
-
-
1.35
Page 43

DRIVER’S POSITION, RIGHT-HAND DRIVE
2 3 4 5 6 8 9 10 1271 11 13
1.36
30 29 28 27
26 25 24
21 20 19 18 17 16 15 14
23 22
Page 44

DRIVER’S POSITION, RIGHT-HAND DRIVE (continued)
The presence of equipment DEPENDS ON THE VERSION AND VEHICLE OPTIONS AS WELL AS THE COUNTRY.
1 Side window demister outlet.
2 Side air vent.
3 Location for passenger air bag.
4 Storage compartment.
5 Display:
– clock and temperature,
– radio, clock and temperature,
– radio, clock, temperature and
navigation system.
6 Centre air vents.
7 Stalk for:
– direction indicator lights,
– exterior lights,
– front fog lights,
– rear fog lights.
8 Instrument panel.
9 – Location for driver’s air bag.
– Horn.
10 Radio remote control.
11 – Steering column stalk for wind-
screen and rear screen wash/
wipe.
– Trip computer information read
out control.
12 Side air vent.
13 Side window demister outlet.
14 Controls for:
– electric beam height adjust
ment,
– control instruments lighting rhe
ostat,
– cruise control and speed limiter.
15 Storage compartments.
16 Ignition switch.
17 Cruise control/speed limiter con-
trols.
18 Steering wheel height adjustment
control.
19 Heated rear screen switch.
20 Hazard warning lights switch.
21 Cup holder.
22 Handbrake.
23 Gear lever.
24 Ashtray and cigar lighter.
25 Heating and ventilation controls.
26 Location for radio or storage com-
-
partment.
27 Central door locking switch.
28 Glove box.
29 Bonnet release.
30 Fuse box.
1.37
Page 45

INSTRUMENT PANEL: warning lights
The presence and operation of the warning lights DEPEND ON THE EQUIPMENT AND COUNTRY.
A
If the ú indicator light comes
on, you should visit a RENAULT
Dealer immediately.
If the û indicator light comes
on, you must stop as soon as traf
fic conditions allow. Contact a
RENAULT Dealer.
In some cases, the appearance of
a warning light is accompanied by
a message on the instrument pan
el A.
c
b
á
k
g
f
V
-
-
Left-hand direction indicator
tell-tale light
Right-hand direction indicator tell-tale light
Main beam headlight tell-tale
light
Dipped beam headlight telltale light
Front fog light tell-tale light
Rear f og l i g ht t e l ltale light
Heated rear screen tell-tale
light
å
This lights up when the ignition is
switched on and goes out after a few
seconds.
If it does not light up when the ignition
is switched on or if it flashes, there is a
fault in the system.
Contact your RENAULT Dealer as soon
as possible.
ã
Î
To understand how this operates,
refer to the information on the “Cruise
Control” and “Speed Limiter” in
Section 2.
Air bag warning light
Not used
Speed limiter and cruise
control warning light
1.38
Page 46

INSTRUMENT PANEL: warning lights (continued)
The presence and operation of the warning lights DEPEND ON THE EQUIPMENT AND COUNTRY.
A
ç
It remains lit when the engine is started,
then when the seat belt is not fastened
and the vehicle reaches a speed of ap
proximately 6 mph (10 km/h), it flashes
and a bleep sounds for approximately
90 seconds.
Seat belt reminder warning
light
ê
Refer to the information on the “Engine
immobiliser” in Section 1.
ú
This lights up when the engine is started
and goes out after a few seconds.
It can light up with other indicator lights
or messages on the instrument panel.
If it comes on when the vehicle is
being driven, it is advisable to visit your
RENAULT Dealer as soon as possible.
û
This goes out as soon as the
engine starts.
It comes on with other warning lights
and/or messages, and is accompanied
by a beep. It indicates that it is essen
tial to stop as soon as traffic conditions
allow.
Engine immobiliser system
warning light
Warning light
STOP light
Ä
On equipped vehicles, the light comes
on when the ignition is switched on then
goes out.
– If it lights up continuously, consult
– If it flashes, reduce the engine speed
Refer to the information on “Antipollution,
fuel economy and driving” in Section 2.
L
This goes out as soon as the
engine starts. If it lights up or remains
lit, fill up with fuel as soon as possible.
-
2
Warning light for monitoring
exhaust gas
your RENAULT Dealer as soon as
possible.
until the light stops flashing.
Contact your RENAULT Dealer as
soon as possible.
Low fuel level warning light
Door status warning light
1.39
Page 47

INSTRUMENT PANEL: warning lights (continued)
The presence and operation of the warning lights DEPEND ON THE EQUIPMENT AND COUNTRY.
A
x
This light comes on when the ignition is
switched on and goes out within 3 sec
onds.
If it lights up when you are driving, it in
dicates a fault in the anti-lock braking
system.
Braking will then be without the ABS
system. Contact your RENAULT Dealer
as soon as possible.
Anti-lock braking warning
light
Preheating warning light/
6
– Preheating warning light
– Electronic fault or water in the
-
ù
-
Electronic fault or water in
the diesel filter warning light
With the ignition switched on, this
light should come on; it indicates that
the heater plugs are switched on. It
goes out when preheating is com
plete and the engine can be started.
diesel filter warning light
If it remains lit or comes on while
driving, it indicates an electrical or
electronic fault, or the presence of
water in the diesel filter.
Contact your RENAULT Dealer as
soon as possible.
Not used
À
This goes out as soon as the engine
starts.
If it lights up while driving, accompanied
by the
-
stop as soon as possible and switch off
the ignition.
Check the oil level. If the level is normal,
the indicator light is being lit by some
thing else.
Contact a RENAULT Dealer.
Ú
It should go out as soon as the
engine starts.
If it lights up while driving, accompa
nied by the
dicates that the electrical circuit is over
charged or undercharged.
Stop as soon as traffic conditions allow
and contact a RENAULT Dealer.
Oil pressure warning light
û warning light, you must
Battery charge warning light
û warning light, this in-
-
-
-
1.40
Page 48

INSTRUMENT PANEL: warning lights (continued)
The presence and operation of the warning lights DEPEND ON THE EQUIPMENT AND COUNTRY.
A
Â
Indicates that you need to change gear
or
X
This light comes on when the ignition is
switched on and goes out within 3 sec
onds.
Refer to the special document on “LPG
Vehicles” or CNG Vehicles”.
Over-revving warning light
LPG or CNG mode operating
tell-tale
D
This lights up when the handbrake is
applied and goes out immediately.
If it lights up while driving, accompa
nied by the
dicates a low level in one of the circuits
or a fault in the braking system.
Stop as soon as traffic conditions allow
and contact a RENAULT Dealer.
U
This goes out as soon as the engine
starts. If this warning light lights up
when you are driving it indicates a fault
in the system.
Contact a RENAULT Dealer as soon as
possible.
-
Handbrake on and brake circuit incident warning light
û warning light, this in-
Variable p ower-as siste d
steering warning light
Æ
If it lights up while driving, accompa
nied by the
-
and allow the engine to idle for one or
two minutes. The temperature should
lower and the warning light should go
out. If not, stop the engine. Let the
engine cool down, then check the cool
ant level.
Contact a RENAULT Dealer if neces
sary.
â
H
ï
Coolant temperature warning light
û warning light, stop
Automatic transmission operational warning lights
Refer to information on
“Proactive automatic transmis
sion” and “Quickshift gearbox”
in section 2.
-
-
-
-
1.41
Page 49

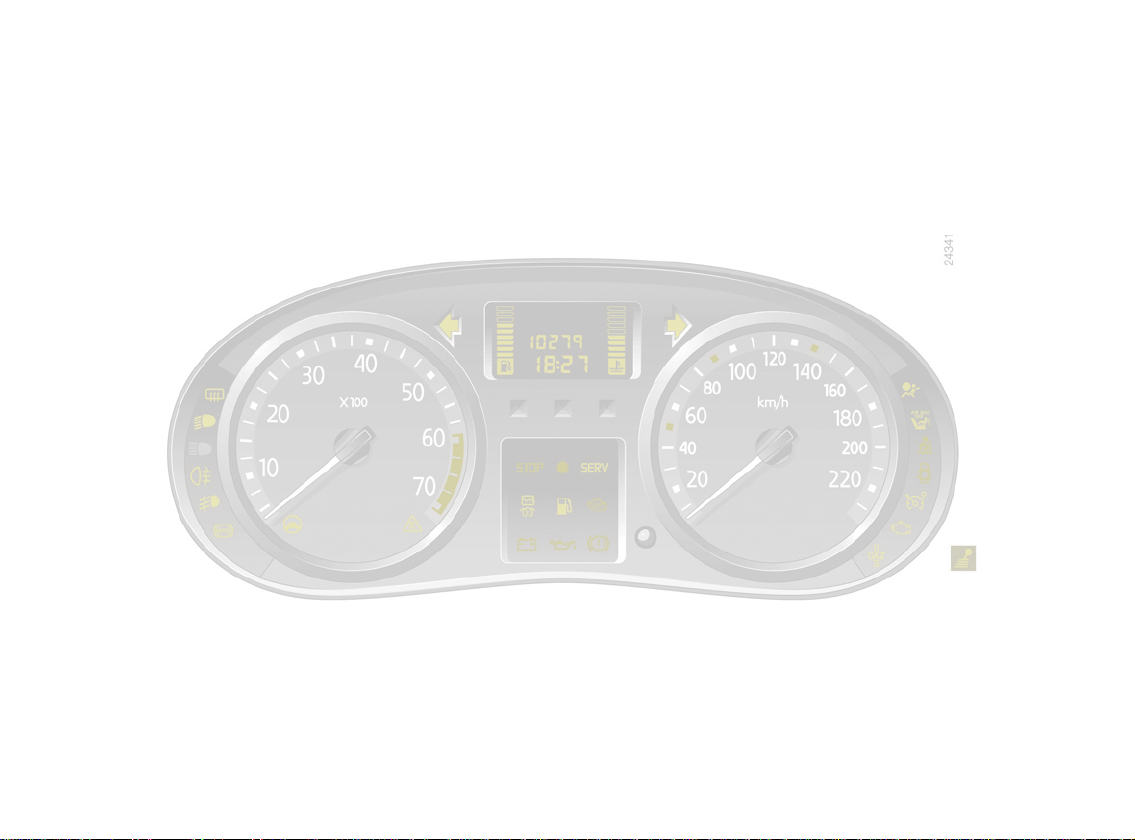
INSTRUMENT PANEL: displays and indicators
1
Rev counter 1 (graduations × 100) Fuel gauge 2
Coolant temperature indicator 3
This is not serious unless the Æ
warning light comes on.
32
Speedometer 4 (mph or km/h)
Overspeed buzzer
Depending on the vehicle, a buzzer
sounds for approximately 10 seconds
every 40 seconds, as long as the ve
hicle is travelling in excess of 72 mph
(120 km/h).
4
-
1.42
Page 50

INSTRUMENT PANEL: displays and indicators (continued)
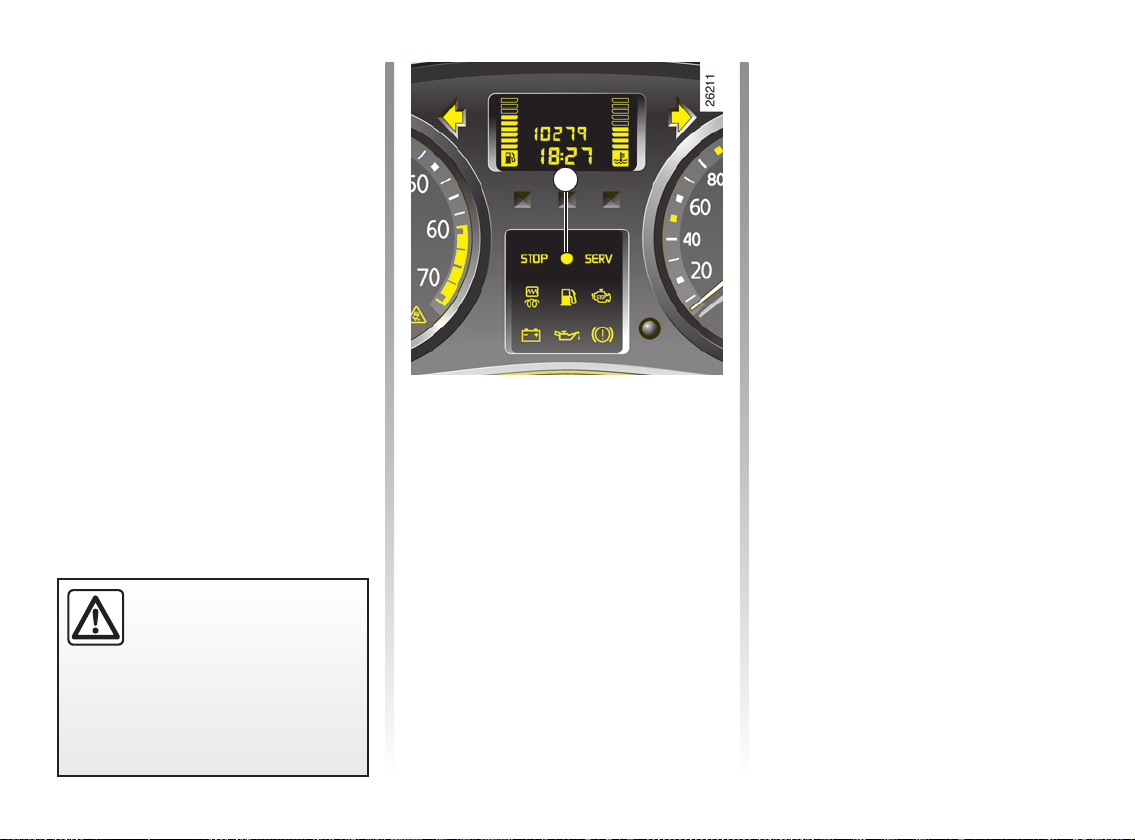
5
6
Automatic gearbox display 5
This indicates the gear engaged (depending on the vehicle).
Refer to information on “Proactive au
tomatic transmission” and “Quickshift
gearbox” in section 2.
Engine oil level low warning 6
The display informs the driver that the
engine oil level is low when the engine
is started. This warning lasts for 30 sec
onds. Refer to the information on the
“Engine oil level” in Section 4.
Trip computer and warning
system 6
After 30 seconds, the display will
switch to the trip computer and warning
system: refer to the information on the
“Trip computer and warning system” in
the following pages.
-
-
1.43
Page 51

TRIP COMPUTER AND WARNING SYSTEM
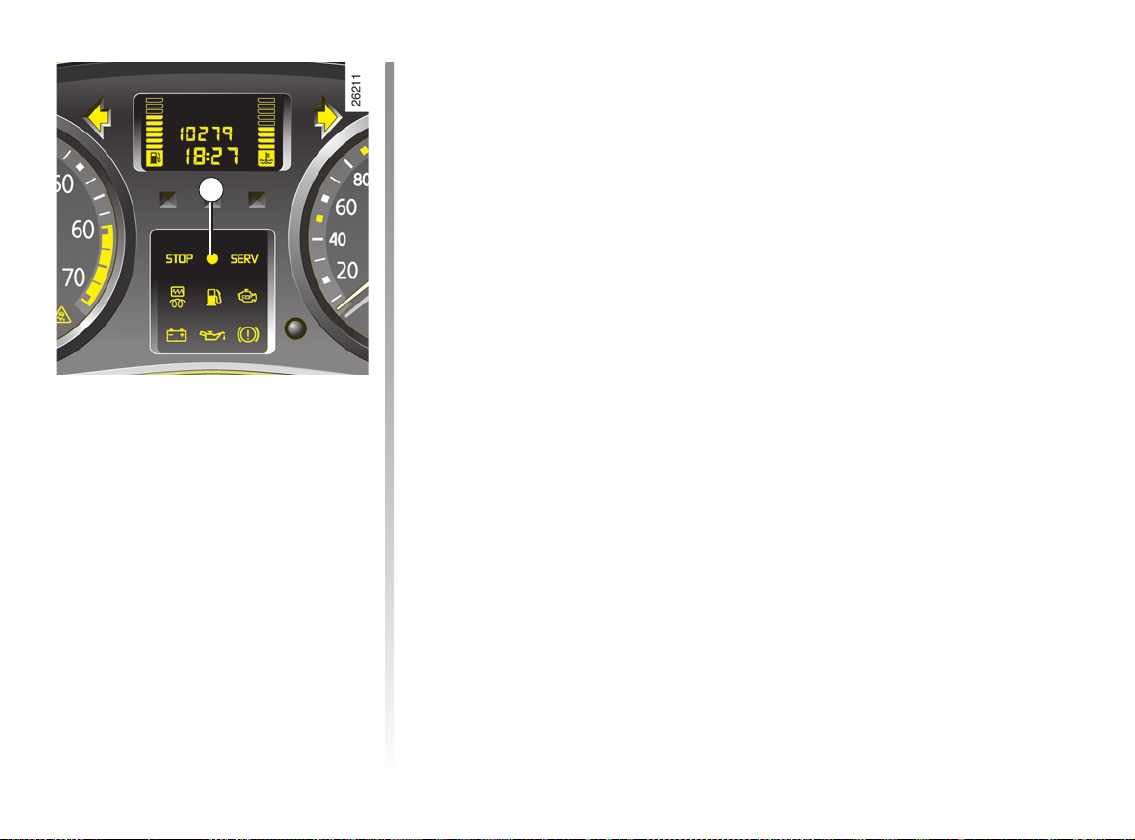
1
2
3
Display 1
General reset and trip
mileage recorder reset key 2
To reset the trip mileage recorder, the
display must show the Trip mileage re
corder.
Display selection key 3
Press button 3 repeatedly to scroll
through the following information:
a) total mileage recorder,
b) trip mileage recorder,
c) fuel used,
d) average fuel consumption,
e) current fuel consumption,
f) estimated range,
g) distance travelled,
h) average speed,
i) programmed speed (speed limiter/
cruise control).
Refer to the table on the following page
for display examples.
Interpreting certain values
displayed after a reset:
The values showing average fuel consumption, range and average speed
-
will become more stable and reliable
the further you have travelled since the
last time the reset button was pressed.
For the first few miles after pressing the
reset key you will notice:
– that the range increases as you
travel. This is normal, as average fuel
consumption may decrease when:
– the vehicle stops accelerating,
– the engine reaches its operating
temperature (engine cold when
reset button pressed),
– driving from a built-up area onto
the open road.
Therefore, if the average fuel con
sumption decreases, the range
will increase.
– You may also notice that the average
fuel consumption increases when the
vehicle is stationary and the engine
idling.
This is normal, since the computer
takes account of fuel used during
idling.
Note: when the maximum capacity of
any of the memories is exceeded, the
system automatically resets.
-
1.44
Page 52

TRIP COMPUTER AND WARNING SYSTEM (continued)
26047
26048
26049
26051
The display on the instrument panel of the information described below depends on the vehicle equipment and country.
Examples of display
selections by repeatedly
pressing 3
Interpreting the display
a) Total mileage recorder.
b) Trip mileage recorder.
c) Fuel used (in litres) since the last reset.
d) Average consumption (in mpg or litres/100 km) since the last reset.
This value is displayed after driving 400 metres and takes into account the
distance travelled and the fuel used since the last time the reset button was
pressed.
1.45
Page 53

TRIP COMPUTER AND WARNING SYSTEM (continued)
26042
26043
26044
26045
26046
Examples of display
selections by repeatedly
pressing 3
Interpreting the display
e) Current fuel consumption (in mpg or litres/100 km)
This value is displayed after reaching a speed of 15 mph (25 km/h).
f) Estimated range with remaining fuel (in miles or km)
This range takes into account the average fuel consumption since the last time
the reset button was pressed.
The value is displayed after driving 400 metres.
g) Distance travelled (in miles or km) since the last reset.
h) Average speed (in mph or km/h) since the last reset.
The value is displayed after driving 400 metres.
1.46
i) Cruise control or speed limiter setpoint speed (depending on vehicle).
Refer to the information on the “Speed Limiter” and “Cruise Control” in
Section 2.
Page 54

CLOCK - EXTERNAL TEMPERATURE
1
H M
Clock 1, setting the time
With the ignition on, press button:
H for the hours,
M for the minutes.
2
3
Clock 2, setting the time
With the engine switched on, and dis-
play 2 set to total mileage recorder and
clock function, press and hold button
to access time setting mode, then re
lease the button.
There are two ways to set the time:
– Pressing and holding button
you to scroll through the hours and
minutes quickly;
– short presses on button
to set the time minute by minute.
3 allows
3 allow you
If the electrical supply is cut (battery
disconnected, broken supply wire,
etc.), the clock will lose its time set
ting.
The clock must be reset.
For your safety, we recommend
that you do not adjust the clock
while driving.
3
-
midity and temperature, the external
temperature alone is not sufficient to
detect ice.
External temperature
indicator 1
As ice formation is related
to exposure, local air hu
-
-
1.47
Page 55

REAR VIEW MIRRORS
1
A
B
Door mirrors with manual
adjustment
To adjust the mirror, move lever 1.
C
D
2
E
Door mirrors with electrical
adjustment:
With the ignition on, move button 2:
– position
door mirror;
– position
door mirror;
D is the inactive position.
C to adjust the left-hand
E to adjust the right-hand
Heated door mirrors
With the engine running, mirror de-
icing is activated at the same time as
rear screen de-icing/demisting.
The door mirror on the driver’s side has two clearly de
fined zones. Zone
what can normally be seen
in an ordinary rear view mirror. For
your safety, zone
rear side visibility.
Objects in zone
ther away than they really are.
A increases the
A look much fur-
-
B shows
1.48
Page 56

REAR VIEW MIRRORS (continued)
1
STEERING WHEEL
2
Interior rear-view mirror
Its position can be adjusted. When driving at night, to avoid being dazzled by
the headlights of the vehicle behind,
depress the little lever
the rear view mirror.
1 located behind
Adjusting the steering wheel
On certain vehicles, the position of the
steering wheel is adjustable.
Raise lever
wheel in the required position; lower
the lever to lock the steering wheel in
place.
Make sure that the steering wheel is
correctly locked.
2 and place the steering
For safety reasons, only
adjust the steering wheel
when the vehicle is station
ary.
-
1.49
Page 57

EXTERIOR LIGHTING AND SIGNALS
1
2
u
Turn the end of stalk 1 until the symbol
is opposite mark 3.
The instrument panel will light up. The
brightness may be adjusted by turning
control knob
with this facility.
Side lights
2, if the vehicle is equipped
3
k
Turn the end of stalk 1 until the symbol
is opposite mark 3.
An indicator light lights up on the instru
ment panel in all cases.
Dipped beam
headlights
1
á
When the dipped beam headlights are
lit, move stalk
tor light on the instrument panel lights
up).
To return to the dipped beam headlight
position, pull the stalk towards you.
e
Return stalk 1 to its original position.
-
Main beam headlights
1 towards you (an indica-
Switching off the lights
1.50
Before driving at night, check that the electrical equipment is in good condition and adjust the headlight beams (if your
vehicle is not carrying its normal load). Check that the lights are not obscured (by dirt, mud, snow or objects which
could cover them).
Page 58

EXTERIOR LIGHTING AND SIGNALS (continued)
4 5
4
g
the stalk until the symbol is opposite
mark 5.
Operation of the fog lights depends on
the exterior lighting position selected,
and an indicator light will light up on the
instrument panel.
Front fog lights
Turn the centre ring 4 of
h
the stalk until the symbol is opposite
mark 5.
Operation of the fog lights depends on
the exterior lighting position selected,
and an indicator light will light up on the
instrument panel.
To avoid inconveniencing other road
users, remember to switch off the rear
fog light when it is no longer needed.
Rear fog lights
Turn the centre ring 4 of
The front and rear fog lights switch off
when the exterior lights are switched
off.
Special case
The front and rear fog lights do not operate in automatic mode.
They only come on when the end of the
stalk is in position u or k.
Lights-on warning buzzer
A warning buzzer will sound when a
front door is opened and the lights
are left on after the ignition has been
switched off (to prevent discharge of
the battery etc.).
1.51
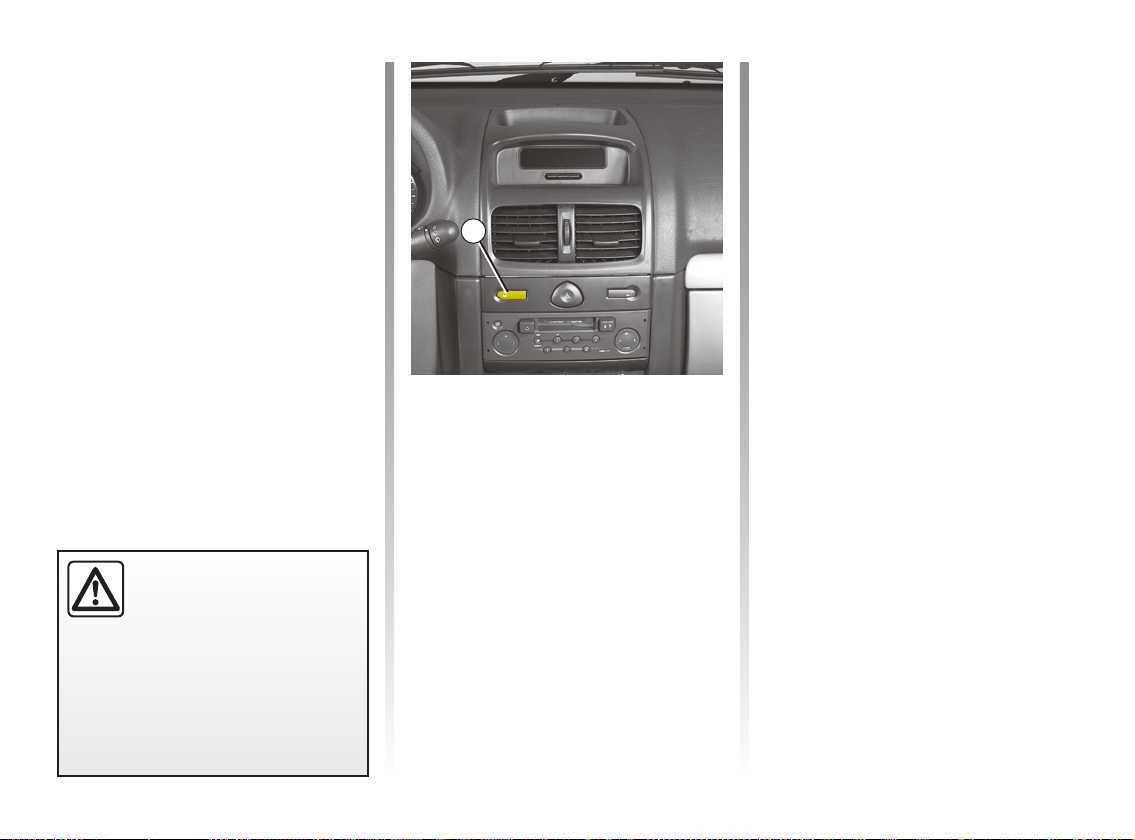
Page 59

ELECTRIC BEAM HEIGHT ADJUSTMENT
Versions Setting positions of control A
All versions except utility vehicles
A
On equipped vehicles, control A allows
you to adjust the height of the beams
according to the load.
Turn control
headlights and upwards to raise them.
A downwards to lower the
Utility version
Position 0 or 1: Basic setting, luggage
compartment empty with driver only or with
one front passenger.
Position 2 or 3: Vehicle with 5 persons on
board, luggage compartment empty.
Position 3: Driver only and luggage compartment full.
Position 4: Intermediate position.
Position 0: Basic setting, vehicle not
loaded.
1.52
Position 3: Vehicle loaded to maximum.
Positions 1, 2, 4: Intermediate positions.
Page 60

AUDIBLE AND VISUAL SIGNALS
1
0
2
Horn
Press on the central cushion of steering wheel 2.
Headlight flasher
To flash the headlights, even if the
lights are not switched on: Pull stalk
towards you.
Special case
If automatic operation for dipped headlights is activated, first pull stalk
wards you to light the main beam head
light then again to turn them off.
1 to-
é
Press switch 3.
This switch lights up all four indicators
simultaneously.
Only use this function to warn other
1
road users if:
– you have to stop in an area where
– you are obliged to drive under spe
-
Hazard warning lights
stopping is prohibited or unex
pected,
cial conditions.
3
1
Direction indicators
Move stalk 1 parallel to the steering
wheel and in the direction you are going
to turn it.
When driving on the motorway, the
steering wheel is not often turned
enough to return the stalk automatically
to
0. There is an intermediate position
in which the stalk may be held when
changing lanes.
When the stalk is released, it automati
cally returns to 0.
-
-
1.53
Page 61

WINDSCREEN WASH/WIPE
1
A
B
C
D
With the ignition on, move stalk 1
– A park.
– B intermittent wiping.
The wipers may stop for a few sec
onds between wipes depending on
the version. You can vary the time
between sweeps by turning the
centre ring on stalk 1.
– C normal wiping speed.
– D fast wiping speed.
Automatic selection of wiping
speed
When driving, with a wiping speed se-
lected, the wiping speed changes to a
lower speed if the vehicle stops:
– from fast wiping speed, the speed
will change to normal wiping speed;
– from normal wiping speed, the speed
will change to intermittent wiping.
As soon as the vehicle moves off,
wiping will return to the speed originally
selected.
When the vehicle is stationary,
moving stalk
automatic operation.
Note
if for any reason the wipers cannot
-
move (e.g. stuck to windscreen by ice),
the system will automatically cut off the
power supply to the wipers.
Risk of injury.
1 overrides and cancels
When working in the engine
compartment, ensure that
the windscreen wiper stalk
is in position A (park).
1.54
Page 62

WINDSCREEN WASH/WIPE (continued)
– Headlights on
Press for longer than one second to
1
Windscreen washer,
headlight washers
With the ignition on, pull stalk 1 towards
you.
A brief press triggers one sweep cycle
of the wiper, while a longer press trig
gers three cycles.
– Headlights off
You activate the windscreen washer
and wiper.
This will make another sweep after a
few seconds.
-
activate the windscreen washer and
headlight washer simultaneously.
In frosty weather, make sure that
the wiper blades are not stuck by ice
(risk of motor overheating).
Keep an eye on the condition of the
blades. Replace the wiper blades as
soon as they begin to lose efficiency
(approximately once a year).
If you switch off the ignition before
switching off the windscreen wiper
(position
random on the windscreen.
A) the blades will stop at
1
A
B
C
D
wiping is activated.
Before washing the vehicle,
move the stalk to position
(park) to avoid the risk of
damage to the blades when
A
1.55
Page 63

REAR SCREEN WASH/WIPE
DE-ICING
1
2
Y
With the ignition on, turn the end of
stalk 1 to align mark 3 with the symbol.
Rear screen wiper with
timer
3
1
p
With the ignition on, turn the end of
stalk 1 to align mark 3 with the symbol.
When the stalk is released, it returns to
the rear screen wiper position.
Rear screen washer/
wiper
Special note
For certain vehicles, the rear screen is
wiped once if reverse gear is selected
when the windscreen wipers are in op
eration.
V
press button
instrument panel lights up).
This function demists the rear screen
and the electric door mirrors (if these
are fitted to the vehicle).
The demist function is stopped in two
ways:
– automatically after 15 minutes oper
– by pressing button
-
Heated rear screen
With the engine running,
2 (the indicator light on the
ation,
2 again (the indi-
cator light goes out).
Before using the rear wiper, check
that no object obstructs the travel of
the blade.
In frosty weather, make sure that
the wiper blades are not stuck by ice
(risk of motor overheating).
Keep an eye on the condition of the
blades. Replace the wiper blades as
soon as they begin to lose efficiency
(approximately once a year).
-
1.56
Page 64

FUEL TANK
A
1
Capacity of the fuel tank: 50 litres ap-
proximately.
There is a cap holder
flap for holding the cap when the tank is
being filled.
1 on the fuel filler
Fuel filler cap: this is specific to the vehicle type. If
you have to replace it, make
sure the new cap is of the
same type. Contact your RENAULT
Dealer.
Never place the cap near a source
of heat or flame.
Fuel grade
Use a high grade fuel with the appro-
priate octane rating as defined by the
particular standards in force in your
country.
Petrol versions
It is essential to use unleaded petrol.
The octane rating (RON) must con
form with the specifications given on
the label inside fuel filler flap
to the information on “Engine specifica
tions” in Section 6.
Diesel version
It is essential to use diesel fuel that
conforms to the specifications given on
the label inside fuel filler flap A.
Make sure that no water accidentally
enters the fuel tank during filling. The
fuel filler cap and neck must be clean
and dust-free.
Do not mix even small
amounts of petrol with
diesel.
-
A. Refer
-
1.57
Page 65

FUEL TANK (continued)
Filling with fuel
Petrol versions
Using leaded petrol will damage the
antipollution system and may lead to a
loss of warranty.
To ensure the fuel tank is not filled
with leaded petrol, the fuel tank filler
neck contains a restrictor fitted with a
valve which only allows the nozzle
for unleaded petrol to be used (at the
pump).
– Insert the nozzle as far as it will go
so that the valve is opened.
– Keep the nozzle in this position
throughout the entire filling opera
tion.
Filling up with fuel
(continued)
Petrol and diesel versions
When the pump cuts out automatically
at the end of the filling procedure, a
maximum of two further filling attempts
may be made, as there must be suffi
cient space in the fuel tank to allow for
expansion.
-
No modifications what-
soever are permitted on
any part of the fuel supply
system (computers, wiring,
fuel circuit, injector, protection
covers, etc.) as this may be danger
ous (such work must be undertaken
by qualified RENAULT Network per
sonnel).
Persistent smell of fuel
If you notice a persistent smell of fuel
you should:
– stop the vehicle if traffic conditions
-
-
-
allow and switch off the ignition;
– switch on the hazard warning lights
and ask your passengers to leave
the vehicle and to keep away from
the traffic;
– refrain from working on or restart
ing the vehicle before it has been
inspected by qualified staff from the
RENAULT Network.
-
1.58
Page 66

Section 2: Driving
(Advice on use relating to fuel economy and the environment)
Running in - Ignition switch . . . . . . . . . . . . . . . . . . . . . . . . . . . . . . . . . . . . . . . . . . . . . . . . . . . . . . . . 2.2
Starting/stopping the engine . . . . . . . . . . . . . . . . . . . . . . . . . . . . . . . . . . . . . . . . . . . . . . . . . . . . . . . 2.3
Special features of petrol versions . . . . . . . . . . . . . . . . . . . . . . . . . . . . . . . . . . . . . . . . . . . . . . . . . . 2.4
Special features of diesel versions . . . . . . . . . . . . . . . . . . . . . . . . . . . . . . . . . . . . . . . . . . . . . . . . . . 2.5
Gear lever - Power-assisted steering . . . . . . . . . . . . . . . . . . . . . . . . . . . . . . . . . . . . . . . . . . . . . . . . 2.6
Handbrake . . . . . . . . . . . . . . . . . . . . . . . . . . . . . . . . . . . . . . . . . . . . . . . . . . . . . . . . . . . . . . . . . . . . . 2.7
Advice on antipollution, fuel economy and driving . . . . . . . . . . . . . . . . . . . . . . . . . . . . . . . . . . . . . . 2.8
Environment . . . . . . . . . . . . . . . . . . . . . . . . . . . . . . . . . . . . . . . . . . . . . . . . . . . . . . . . . . . . . . . . . . . 2.11
Anti-lock braking system . . . . . . . . . . . . . . . . . . . . . . . . . . . . . . . . . . . . . . . . . . . . . . . . . . . . . . . . . . 2.12
Cruise control-Speed limiter . . . . . . . . . . . . . . . . . . . . . . . . . . . . . . . . . . . . . . . . . . . . . . . . . . . . . . . 2.13
Proactive automatic transmission . . . . . . . . . . . . . . . . . . . . . . . . . . . . . . . . . . . . . . . . . . . . . . . . . . . 2.20
Quickshift 5 gearbox . . . . . . . . . . . . . . . . . . . . . . . . . . . . . . . . . . . . . . . . . . . . . . . . . . . . . . . . . . . . . 2.23
2.1
Page 67

RUNNING IN
IGNITION SWITCH
Petrol version
For the first 600 miles (1, 000 km), do
not exceed 78 mph (130 km/h) in the
highest gear or 3,000 to 3,500 rpm.
After 600 miles (1,000 km), you may
use your vehicle normally, although you
may only expect top performance after
approximately 1,800 miles (3,000 km).
Service intervals: Refer to your
Maintenance Service Booklet for de
tails of subsequent service intervals.
Diesel version
For the first 900 miles (1,500 km), do
not exceed 2,500 rpm. After complet
ing this mileage you may drive faster,
although you may only expect
top performance after approximately
3,600 miles (6,000 km).
During the running in period, do not ac
celerate hard while the engine is still
cold and do not let the engine over-rev.
Service intervals: Refer to your
Maintenance Service Booklet for de
tails of subsequent service intervals.
-
“Stop and steering lock” position St
To lock: remove the key and turn the
steering wheel until the steering column
locks.
To unlock: turn the key and the steering
wheel slightly.
-
“Accessories” position A
When the ignition is switched off, any
accessories (radio, etc.) will continue to
function.
“Ignition on” position M
The ignition is switched on:
– petrol version: the engine may be
started.
– diesel version: the engine is pre
heating.
“Start” position D
If the engine fails to start at the first
attempt, the key must be turned back
before the starter can be activated
again. Release the key as soon as the
engine starts.
-
2.2
Page 68

STARTING/STOPPING THE ENGINE
Starting the engine
Petrol injection
Engine warm or cold
– Run the starter without depress
ing the accelerator pedal,
– Release the key as soon as the
engine starts.
É
Cold or warm engine
Turn the ignition key to ignition on
position
until the preheating warning light
goes out.
Turn the key to starter position
without depressing the accelera
tor pedal. Release the key as soon
as the engine starts.
Diesel injection
M, and hold this position
D
Stopping the engine
With the engine idling, turn the key back
to the “Stop” position.
-
-
Never leave the vehicle unattended with the key in the
ignition if there is a child
(or animal) in the vehicle.
With the key in the ignition, he or
she could start the engine or oper
ate electrical equipment such as the
electric windows and there is a risk
that the child may be injured by trap
ping his or her neck, arm, hand, etc.
Risk of serious injury.
Never switch off the ignition
before the vehicle has stopped
completely. Once the engine has
stopped, the brake servo, power as
sisted steering, etc., and the pas
sive safety devices such as air bags
and pretensioners will no longer op
erate.
The steering is locked when the key
is removed.
-
-
-
-
-
2.3
Page 69

SPECIAL FEATURES OF PETROL VERSIONS
The following operating conditions:
– driving for long periods when the low
fuel level warning light is lit up,
– using leaded petrol,
– using fuel or lubrication addi
tives which are not approved by
RENAULT.
Or operating faults such as:
– faulty ignition, running out of fuel or
spark plug disconnected resulting in
engine misfiring and hesitation when
driving,
– loss of power,
as they may cause the catalytic con
verter to overheat and thus reduce its
efficiency, or damage it irreparably
and cause heat damage to the vehi
cle.
If you notice any of the above operat
ing faults, have the necessary repairs
carried out as soon as possible by your
RENAULT Dealer.
These faults may be avoided by regularly
-
taking your vehicle to your RENAULT
Dealer at the intervals specified in your
Maintenance Service Booklet.
Starting problems
To avoid damaging the catalytic converter, do not keep trying to start the
engine (using the start button, or by
pushing or towing the vehicle)
having identified and corrected the
starting fault.
If the fault cannot be identified, do not
continue to try and start the engine, but
-
contact a RENAULT Dealer.
without
-
Do not park the vehicle or
run the engine in locations
where combustible sub
stances or materials such as
grass or leaves can come into con
tact with the hot exhaust system.
-
-
2.4
Page 70

SPECIAL FEATURES OF DIESEL VERSIONS
Diesel engine speed
Diesel engines are fitted with injection
equipment which prevents the engine
speed being exceeded irrespective of
the gear selected.
Running out of fuel
You may start the engine normally after
refilling the fuel tank even if you have
completely run out of fuel, provided
that the battery is fully charged.
However, if after a few seconds and
several attempts the engine fails to
start, contact a RENAULT Dealer.
Precautions to be taken in winter
To avoid faults in icy weather:
– ensure that the battery is always fully
charged,
– always keep the diesel tank rela
tively full to avoid water vapour con
densing in it and accumulating at the
bottom of the tank.
-
-
Do not park the vehicle or
run the engine in locations
where combustible sub
stances or materials such as
grass or leaves can come into con
tact with the hot exhaust system.
-
-
2.5
Page 71

GEAR LEVER POWER-ASSISTED STEERING
1
2
To select reverse gear
(vehicle stationary)
Move the lever to neutral, then follow
the grid shown on the gear lever knob
or, depending on the vehicle, lift ring
against the gear lever knob to select re
verse gear.
The reversing lights will come on as
soon as reverse gear is selected with
the ignition on.
If you have power-assisted steering
fitted, do not leave the steering wheel
at full lock while stationary as this may
damage the pump.
1
2
-
furniture) may result in damage to
the vehicle (e.g.: deformation of the
rear axle).
To avoid any risk of accident, have
your vehicle checked by a RENAULT
Dealer.
An impact to the underside
of the vehicle while revers
ing (e.g.: striking a post,
raised kerb or other street
-
is not provided).
Never switch off the igni-
tion when travelling down
hill, and avoid doing so in
normal driving (assistance
-
2.6
Page 72

HANDBRAKE
1
To release
Pull the lever up slightly, press button 1
and then lower the lever to the floor.
The red warning light on the instrument
panel will light up if you are driving with
an incorrectly released handbrake.
Make sure that the handbrake is properly released
when driving, otherwise
overheating may occur.
To apply
Pull upwards, check that the vehicle is
properly immobilised.
Depending on the slope
and/or vehicle load, it may
be necessary to apply the
brake by an additional two
notches and to engage a gear
(1st or reverse) for manual vehicles,
or position P for automatic vehicles.
2.7
Page 73

ADVICE: Antipollution, fuel economy and driving
RENAULT is actively striving to reduce
pollutant exhaust gas emissions and
to save energy. By virtue of its design,
moderate fuel consumption and ini
tial settings, your RENAULT conforms
to current antipollution standards.
Technical design, however, cannot
achieve all. The fuel consumption of
your vehicle and the level of pollutant
exhaust gas emissions are also your
responsibility. Make sure that your ve
hicle is maintained and used correctly.
Maintenance
It should be noted that failure to respect
antipollution regulations may lead to
legal action being taken against the
vehicle owner. In addition, replacing
engine, fuel supply system and exhaust
components with parts other than those
originally recommended by the manu
facturer may alter your vehicle so that
it no longer complies with antipollution
standards.
Have your vehicle checked and ad
justed by your RENAULT Dealer in ac
cordance with the instructions in the ve
hicle’s Maintenance Service booklet.
Your approved Dealer has all the
equipment necessary for ensuring that
your vehicle is maintained to its original
standard.
Engine adjustments
– ignition: this does not require any
-
-
-
-
adjustment.
– spark plugs: for optimum condi-
tions of use, output and performance
the specifications laid down by our
Design Department must be strictly
applied.
If the spark plugs have to be changed,
use the make, type and gap specified
for your vehicle’s engine. Contact
your RENAULT Dealer for this infor
mation.
– idling speed: this does not require
any adjustment.
– air filter, diesel filter: a choked ele-
ment hinders performance and must
be replaced.
-
2.8
Page 74

ADVICE: Antipollution, fuel economy and driving (continued)
Exhaust gas monitoring
system
The exhaust gas monitoring system will
detect any operating faults in the vehi
cle’s antipollution system.
If this system malfunctions, toxic sub
stances may be released into the at
mosphere or damage may occur.
Ä
system:
This comes on when the ignition is
switched on and goes out after three
seconds.
– if it comes on continuously, consult
– if it flashes, reduce the engine speed
This warning light on the instrument panel will indicate if
there are any faults in the
your RENAULT Dealer as soon as
possible;
until the light stops flashing. Consult
your RENAULT Dealer as soon as
possible.
-
-
-
Driving
– Drive carefully for the first few miles
until the engine reaches its normal
operating temperature, rather than
let it warm up while the vehicle is sta
tionary.
– Speed is expensive.
– Sporty driving uses a lot of fuel: drive
with a light right foot.
– Brake as little as possible by suitably
anticipating an obstacle or bend and
then simply releasing the accelerator
pedal.
– Avoid sudden acceleration.
– Do not overrev the engine in the in
termediate gears.
Always use the highest gear possi
ble without labouring the engine.
On versions with automatic trans
missions, it is preferable to keep the
gear lever in position D.
– Do not try to maintain the same
speed up a hill, accelerate no more
than you would on level roads. Keep
your foot in the same position on the
-
accelerator pedal.
– Double declutching and accelerating
before switching off the engine are
unnecessary in modern vehicles.
– Bad weather, flooded roads.
Do not drive through floods
if the depth of water is above
the lower edge of the wheel
rims.
-
-
-
2.9
Page 75

ADVICE: Antipollution, fuel economy and driving (continued)
– In vehicles with air conditioning, it
Advice on use
– Electricity is fuel; switch off all the
electrical components which are
not really needed. However (safety
first), keep your lights on when the
visibility is bad (“see and be seen”).
– Use the air vents. Driving with the
windows open at 60 mph (100 km/h)
will increase fuel consumption
by 4%.
– When towing a caravan, fit a wind
deflector and adjust it carefully.
is normal to observe an increase in
fuel consumption (especially in urban
conditions) when it is used. For vehi
cles fitted with manual air condition
ing, switch off the system when it is
not required.
Advice for reducing consumption
and therefore helping to preserve
the environment:
Drive with the air vents open and the
windows closed.
If the vehicle has been parked in the
sun, open the doors for a few mo
ments to let the hot air escape before
starting the engine.
– Never fill the fuel tank to the brim to
avoid overflow.
– Do not leave an empty roof rack
fitted to the vehicle.
– It is better to fit a trailer for bulky ob
jects.
-
-
-
-
– Avoid using the vehicle for door-
to-door calls (short journeys with
long waits in between) because the
engine never reaches its normal op
erating temperature.
Tyres
– An underinflated tyre increases fuel
consumption.
– The use of non-recommended tyres
can increase fuel consumption.
-
2.10
Page 76

ENVIRONMENT
Your vehicle has been designed with
respect for the environment in mind.
– Most versions are equipped with a
particle filter system including a
alytic converter, an oxygen sensor
and an active carbon filter (the
latter prevents vapour from the fuel
tank being released into the open
air).
– These vehicles operate with un-
leaded fuel only.
– 87% of the parts in your vehicle
be recycled and it already contains
recycled materials.
– 95% of the plastic components
in your vehicle are marked with a
symbol which allows the principal
component material to be identified.
These markings mean that parts re
moved can be sorted more easily,
making it easier to recycle them.
cat-
can
In addition to this, your vehicle meets
the requirements laid down in European
legislation relating to environmental
protection.
Make your contribution towards pro
tecting the environment too.
Do not dispose of parts replaced in the
course of routine vehicle maintenance
(battery, oil filter, air filter, etc.) and oil
containers (empty or full of used oil)
with household waste.
Dispose of them through specialist or
ganisations. In all cases, comply with
local legislation.
-
-
-
2.11
Page 77

ANTI-LOCK BRAKING SYSTEM (ABS)
Under heavy braking, the essential requirements are to limit the stopping
distance and keep your vehicle under
control. However, there is a risk that
roadholding and directional control
may be lost and the wheels may lock
under braking, depending on the nature
of the ground, weather conditions and
your reactions. The Anti-lock Braking
System (ABS) has been designed to
combat this danger.
The safety enhancement is that the
brake control system prevents the
wheels from locking, even if the brakes
are applied too sharply, and allows the
vehicle to be steered and thus its direc
tion to be controlled. Under these cir
cumstances it is quite possible for the
driver to steer the vehicle and to avoid
an obstacle whilst at the same time
applying the brake. This system also
allows you to optimise stopping dis
tances, especially when roadholding
becomes difficult (wet or slippery roads,
varying road surfaces).
Although this system allows you to benefit from optimum stopping distances,
even with the ABS you must still take
account of the actual condition of the
road surface.
It is still essential to follow the rules
of good driving practice (such as driv
ing at a safe distance from the vehicle
in front). The fact that the vehicle’s
safety has been increased should
not encourage you to take risks.
You will feel pulsing through the brake
pedal each time the system is activated.
These tangible signs will warn you that
the adhesion between the tyres and the
ground has reached its limit and enable
you to adapt your driving style to suit
the road conditions.
-
The braking modulation provided by
the ABS is independent of the effort
applied to the brake pedal. In an
emergency, apply firm and contin
uous pressure to the brake pedal
There is no need to pump it repeat
edly.
Operating faults
Two possible situations may occur:
1 - Warning light x is lit on the
-
-
-
instrument panel.
Braking is still performed, but with
out the ABS system. Contact a
RENAULT Dealer as soon as pos
sible.
2 - Warning lights x
D are lit on the
instrument panel.
This indicates that both the brak
ing system and the ABS system
are faulty. Your braking systems are
only partially operational. However,
it is dangerous to brake suddenly
and it is essential to stop immedi
ately, as soon as traffic conditions
allow. Contact a RENAULT Dealer.
and
-
-
-
-
2.12
Page 78

CRUISE CONTROL - SPEED LIMITER: limiter function
1
The speed limiter function helps you
stay within the driving speed limit that
you choose.
This may be useful, for example, driving
in urban areas or areas with a speed re
striction (roadworks), etc.
The system operates from a driving
speed of about 18 mph (30 km/h).
2
5
Controls
1 Main “On/Off” switch
2 Limit speed storage and increase
-
switch
3 Recall of stored limit speed
4 Switching the function off (with limit
speed storage)
5 Limit speed storage and decrease
switch
3
6
4
Î
This orange warning light on the instrument panel comes on to indicate that
the limiter function is in operation.
Stored speed information appears on
instrument panel display
or for approximately 30 seconds, de
pending on vehicle type.
Indicator light
6 permanently
-
2.13
Page 79

CRUISE CONTROL - SPEED LIMITER: limiter function (continued)
Driving
When a limit speed has been memorised, if this speed is not reached the
vehicle behaves in a similar way to a
vehicle without the speed limiter func
tion.
Once this speed is reached, no effort on
the accelerator pedal will allow you to
exceed the programmed speed except
in an emergency (refer to information
on “Exceeding the limit speed”).
1
1
-
2
5
Switching on
Press switch 1 on the side showing
Ð.
The indicator light lights up in the in
strument panel and the trip computer
enters Speed limiter mode.
Limiting the speed
At a steady speed (above approximately
18 mph (30 km/h)) press switch
speed is stored.
2.14
2: the
Varying the limit speed
The limit speed may be changed by
pressing repeatedly or holding down:
-
The system is designed in such a
way that it is possible to detect a
difference between the memorised
speed and the speed shown on the
instrument panel.
– button
– button
If the vehicle has the temporary display
function, the limited speed is displayed
for approximately 30 seconds.
2 to increase the speed,
5 to decrease the speed.
Page 80

CRUISE CONTROL - SPEED LIMITER: limiter function (continued)
Exceeding the limit speed
In the event of an emergency
It is possible to exceed the limit speed
at any moment. To do this: depress
the accelerator pedal firmly and fully
(beyond the kickdown point).
The speed flashes on the instrument
panel (trip computer) to inform you that
the limit speed is being exceeded.
When the emergency has passed, re
lease the accelerator pedal: the speed
limiter function will return as soon as
you reach a speed lower than the limit
speed before the emergency.
Limit speed cannot be maintained
In some driving conditions (for example
when driving up or down a steep gradi
ent), the system is unable to maintain
the limit speed: the memorised speed
on the instrument panel information dis
play will flash to inform you of this situ
ation.
-
1
Switching off the function
The speed limiter function is interrupted
when you press:
– button
-
– button
-
The instrument panel indicator light
goes out, confirming that the function is
stopped.
4, in this case, the limit speed
remains memorised
1, in this case, there is no
longer a memorised limit speed.
Recalling the limit speed
It is possible to recall a memorised
speed by pressing button 3 once.
If the vehicle has the temporary display
function, the limited speed is displayed
for approximately 30 seconds.
3
4
2.15
Page 81

CRUISE CONTROL - SPEED LIMITER: cruise control function
6
2
5
3
4
1
The cruise control function helps you to
maintain your driving speed at a speed
that you choose, called the cruising
speed.
This cruising speed can be adjusted
continuously from 18 mph (30 km/h).
This function is an additional driving aid. However,
the function does not take
the place of the driver.
Therefore, it can under no circum
stances replace the driver’s respon
sibility to respect speed limits and to
be vigilant (the driver must always
be ready to brake).
The cruise control must not be used
in heavy traffic, on winding or slip
pery roads (black ice, aquaplaning,
gravel) and during times of inclem
ent weather (fog, rain, side wind
etc.). There is a risk of accidents.
Controls
1 Main “On/Off” switch
2 Cruising speed storage and activa-
tion. Increasing the cruising speed
3 Stored cruising speed recall
4 Switching the function off (with cruis-
ing speed storage)
5 Cruising speed storage and activa-
tion. Decreasing the cruising speed
Î
-
-
-
-
This green indicator light on the instrument panel comes on to indicate that
the cruise control function is in opera
tion.
Stored speed information appears on
instrument panel display
or for approximately 30 seconds, de
pending on vehicle type.
Indicator light
-
6 permanently
-
2.16
The cruise control function
is in no way linked to the
braking system.
Page 82

CRUISE CONTROL - SPEED LIMITER: cruise control function (continued)
Driving
Once a cruising speed is memorised
and the cruise control function is active,
you may lift your foot off the accelera
tor pedal.
2
-
5
1
Switching on
Press switch 1 on the side showing
Ï.
The indicator light on the instrument
panel lights up and the trip computer
enters cruise control mode.
Activating cruise control
At a steady speed (from 18 mph
(30 km/h)) press switch
speed is memorised.
2 or 5: the
Important: you are nevertheless advised to keep
your feet close to the pedals
in order to react if neces
sary.
The system is designed in such a
way that it is possible to detect a
difference between the memorised
speed and the speed shown on the
instrument panel.
-
2.17
Page 83

CRUISE CONTROL - SPEED LIMITER: cruise control function (continued)
Exceeding the cruising speed
In the event of an emergency
The cruising speed may be exceeded
at any time by depressing the accelera
tor pedal.
The cruising speed flashes on the in
2
strument panel (trip computer) to inform
you that it is being exceeded.
-
-
5
Changing the cruising speed
The cruising speed may be changed
by pressing repeatedly or continuously
on:
– button
– button
Depending on the vehicle, the cruising
speed is displayed for approximately
30 seconds.
2.18
2 to increase the speed,
5 to decrease the speed.
The cruise control function is in no way linked to the braking system.
Cruising speed cannot be
maintained
In some driving conditions (for example
when driving up or down a steep gradi
ent), the system is unable to maintain
the set speed: the speed on the instru
ment panel information display will flash
to inform you of this situation.
-
-
Page 84

CRUISE CONTROL - SPEED LIMITER: cruise control function (continued)
2
5
3
4
1
Putting the function on
standby
The function is interrupted when you:
– depress the brake pedal,
– depress the clutch pedal or shift into
neutral if the vehicle has an auto
matic gearbox,
– button
In all three cases, the cruising speed is
memorised.
4,
Recalling the cruising speed
If a speed has been memorised, it is
possible to recall it by pressing button
on condition that you are driving ap
proximately 18 mph (30 km/h) and that
you are sure that the driving conditions
are suitable (traffic, road surface condi
tion, weather conditions, etc.).
If the vehicle has the temporary display
function, the limited speed is displayed
for approximately 30 seconds.
-
Pressing button 2 or 5 reactivates
the cruise control function without
taking into account the memorised
speed: it is the speed at which the
vehicle is moving that is taken into
account.
Switching off the function
Press the main “On/Off” switch
do this, the speed is not memorised.
3
-
The instrument panel indicator light
goes out, confirming that the function is
stopped.
-
Putting the cruise control
on standby or switching it
off does not cause a rapid
must brake by depressing the brake
pedal.
reduction in speed: you
1. If you
2.19
Page 85

PROACTIVE AUTOMATIC GEARBOX
1
A
B
C
Selector lever 1
P: Park
R: Reverse
N: Neutral
D: drive in automatic (gears authorised:
1st, 2nd, 3rd and 4th)
nd
2 : 2
held
(gears authorised: 1st, 2nd)
1
: 1st held.
Warning bar
G, H, and I on the instrument panel,
inform you of the selector lever position 1 and/or the operating mode of the
automatic gearbox.
E, and warning lights F,
G H E
I
F
Position D3 or 3rd held
(gears authorised: 1st, 2nd, 3rd).
With the selector lever in position
press button
up on the instrument panel. Press but
ton
B again to deselect this position.
(the warning light will go out).
Note: While the warning light is on, the
system inhibits selection of 4th gear.
B. Warning light G lights
D,
For safety reasons, certain positions
may not be selected until the mecha
nism is unlocked: press button A.
Only engage D or R when the vehi
cle is stopped, with your foot on the
brake and the accelerator pedal re
leased.
Operation
With the gear lever in position P or N,
switch on the ignition.
With your foot on the brake pedal,
move the lever out of position P or N.
For safety reasons, to move out of
position P, it is essential to depress
the brake pedal before pressing un
locking button A.
-
-
-
-
-
2.20
Page 86

PROACTIVE AUTOMATIC GEARBOX (continued)
Moving off forwards
Select position D. In the majority of
traffic conditions, you will not have to
touch the gear selector lever again: the
gear will be changed automatically at
the right time and at the most suitable
engine speed because the automatic
system takes into account the vehicle
load and road contour and adjusts itself
to the particular driving style you have
chosen.
Accelerating and overtaking
Depress the accelerator pedal fully and
firmly (or even take your foot off the ac
celerator and depress it again firmly as
far as it will go).
The speed with which you depress
the pedal will allow you to downshift
according to the vehicle’s capabili
ties.
-
Special circumstances
– Snow position: if you are driving on
-
ground where you are likely to skid
(snow, mud, etc.), press switch
and operating tell-tale
on.
Once these driving conditions no
longer apply, exit this position by
pressing switch
ating tell-tale goes out.
C again; the oper-
C
C,
F will come
– In hilly or mountainous areas: if
you cannot remain in 4
cause of the road surface and the
number of bends, we would advise
you to select D3 (by pressing but
ton
B, with the gear lever in posi-
tion
D), or 2 (2nd gear held), which
will prevent shifting to gears higher
than the one selected. Likewise, position 1, which holds 1st gear, retains a
high level of engine braking.
If you are travelling downhill for a
long way, we would advise you to
place the lever in
to obtain the most efficient engine
braking and to relieve the brakes.
– In cold weather, to avoid stalling the
engine, wait a few seconds before
moving the lever from position
and selecting D or R.
D3 or 2 (or even 1)
th
gear be-
P or N
-
2.21
Page 87

PROACTIVE AUTOMATIC GEARBOX (continued)
Parking the vehicle
When the vehicle is stopped, move the
A
J
Economical driving
Leave the selector in position D on the
open road, depress the accelerator
pedal slightly to ensure that automatic
gear changes are made at low engine
speeds.
Do not use positions D3, 2, 1 or the
snow position for normal driving
conditions.
lever to position
foot on the brake pedal: the gearbox is
in neutral and the drive wheels are me
chanically locked by the driveshaft.
Apply the handbrake.
Operating faults
– If the lever is jammed in the P po-
sition even though you are depress-
ing the brake pedal, the lever can be
released manually.
To do this, unclip cover
multaneously press lug (located un
derneath cover
button A to move the lever out of position P.
Contact your RENAULT Dealer.
– H: if this warning light I comes
on while driving, it indicates a fault.
Contact a RENAULT Dealer as soon
as possible.
P while keeping your
J) and unlocking
J and si-
– H and Ò: if these warning
lights come on simultaneously
-
-
driving, avoid leaving the lever in
position D (or R) when stopping the
vehicle: always return to
the vehicle is stationary. Contact a
RENAULT Dealer as soon as possi
ble.
– If a vehicle with an automatic gear-
box breaks down, refer to the infor
mation on “Towing” in Section 5.
An impact to the underside
of the vehicle while revers
ing (e.g.: striking a post,
raised kerb or other street
furniture) may result in damage to
the vehicle (e.g.: deformation of the
rear axle).
To avoid any risk of accident, have
your vehicle checked by a RENAULT
Dealer.
while
N while
-
-
-
2.22
Page 88

QUICKSHIFT 5 GEARBOX
Selector lever
– allows you to shift directly from first
gear to reverse gear, to select re
verse gear and neutral and to change
gear in manual mode (see shift pat
tern);
– allows you to switch between manual
and automatic modes at any time,
with the engine switched on and re
verse gear engaged, by moving the
lever to the left.
Note: the selector lever automatically
returns to the centre position after use.
5
1 2
4
3
Display
1 gear display
-
2 automatic mode
3 not used
-
4 brake pedal depressed indicator light
5 gearbox fault warning light.
The gear selected (
played on the instrument panel. In auto
matic mode, A is also displayed.
1, 2, 5, N, R,) is dis-
Operation
Switch on the ignition.
The display on the instrument panel
switches on.
If neutral
engine but do not depress the acceler
ator pedal.
If a gear other than neutral
played, the display will flash; it will be
possible to start the engine if you
depress the brake pedal (warning
light
while holding the key in the starting
position.
The vehicle will automatically change to
neutral N and the engine will start.
You may also select neutral after switch
ing on the ignition by pushing the lever
to the right whilst depressing the brake
pedal.
When the engine is running, automatic
mode will be selected by default.
Note: do not attempt to start the engine
by pushing the vehicle if the battery is
flat (the display remains off when the ig
nition is switched on).
N is displayed, start the
4 will light up if your forget)
-
N is dis-
-
-
2.23
Page 89

QUICKSHIFT 5 GEARBOX (continued)
24606
Starting
Moving off forwards (in neutral). The
display indicates gears N and A.
– With the brake pedal depressed,
push the selector lever forwards then
release it.
– Release the brake pedal and accel
erate gently to move forwards.
Moving the lever (changing up or down
or shifting the lever to the left) will
switch to semi-automatic mode (refer to
the “Semi-automatic operating mode”
section).
Reverse
Vehicle stationary
– Brake pedal depressed. Push the
-
selector lever towards the right and
to the rear as shown on the knob and
then release it. Reverse gear is en
gaged and the letter
the display.
– Release the brake pedal:
– the engine’s idle speed is suffi
cient for parking manoeuvres.
– accelerate gently to reverse.
With the engine switched off, you can
engage a forward gear from reverse
gear by pushing the lever forwards.
Note: when the vehicle is stationary,
you must depress the brake pedal to
engage or disengage a gear. Otherwise,
warning light 4 will light up.
R appears on
-
-
Gear shift pattern
+ To move up through the gears
– To shift down through the gears
N Neutral
R Reverse
A/M Switching between automatic and
manual modes
● Only stable position of the lever
2.24
Page 90

QUICKSHIFT 5 GEARBOX (continued)
Operation in automatic mode
Automatic mode is selected by default
every time the ignition is switched on.
The letter A appears on the display.
The vehicle is controlled using the accel
erator and the brake. Gears will change
automatically at the correct moment
to a speed suitable for the engine be
cause the automatic function takes into
consideration the weight of the car, the
road surface and the chosen driving
style.
Automatic mode can be deactivated
and reactivated at any time with the
engine running by pushing the lever to
the left.
Note:
Automatic mode takes account of:
– the position and speed of depression
of the accelerator pedal to assess
-
-
driving style and select the optimum
gear,
– action on the brake pedal, to com
mence engine braking in preparation
for a downshift.
You can stop the vehicle at red lights,
with the gear engaged, by pressing the
brake pedal; there is no need to change
to neutral.
The vehicle will move off again:
– either slowly, if you release the brake
without accelerating (e.g. when in a
traffic jam),
– or quickly, if you release the brake
and accelerate.
-
The oil level in the automatic
gearbox system reservoir is
variable depending on use.
Adding oil is strictly forbid
den (except by qualified RENAULT
Network personnel).
-
2.25
Page 91

QUICKSHIFT 5 GEARBOX (continued)
Operation in semiautomatic
mode (manual)
When in automatic mode, moving the
selector lever (up or down through the
gears) or moving the lever to the left will
switch the system to semi-automatic
mode. In the latter case, the system will
switch without a gear change.
You can initiate gear changes using the
selector lever.
To move up through the gears simply
push the selector lever forwards with
out necessarily releasing the accelera
tor.
To move down through the gears simply
push the selector lever backwards with
out necessarily releasing the accelera
tor.
The system does not accept downshifts
which would generate a high engine
speed or upshifts which would cause
low engine speed.
By pushing the lever forwards twice
you can move up two gears at a time
(unless this causes low engine speeds).
By pushing the lever backwards twice
you can move down two gears at a
time (unless this causes high engine
speeds).
When decelerating with the foot off the
-
pedal, the gears will automatically drop
-
to the low engine speed limit to avoid
stalling. First gear automatically shifts
below a certain speed limit. It is possi
ble to keep the vehicle stationary (stop,
red light, etc.) by depressing the brake
pedal and not shifting to neutral N.
The vehicle will move off again:
– either slowly, if you release the brake
-
without accelerating (e.g. when in a
traffic jam)
– or quickly, if you release the brake
and accelerate.
Note: neutral may only be selected
when the vehicle is being driven or is
stationary when the brake pedal is
depressed (if you forget, warning
light 4 will light up).
Push the gear selector lever to the right
to engage neutral.
Semi-automatic mode can be deacti
vated and reactivated at any time when
the engine is running by pushing the
lever to the left.
-
2.26
Page 92

QUICKSHIFT 5 GEARBOX (continued)
Accelerating and overtaking
You have two options:
– slowly depress the accelerator pedal
in order to accelerate gradually,
– to obtain maximum vehicle perform
ance irrespective of the mode se
lected (automatic or manual), quickly
depress the accelerator pedal fully
beyond the kickdown point.
The speed with which you de
press the pedal will allow you to
downshift according to the vehi
cle’s capabilities.
Parking
It is possible to park in gear (for example, on a slope). To do this:
– with the ignition on, select a gear
-
-
-
-
with your foot on the brake.
– check that a gear other than
played on the instrument panel, then
remove the ignition key.
To disengage the gear, repeat this op
eration by switching on the ignition
without starting the engine and shift the
selector lever to neutral with your foot
on the brake.
Check that
ment panel.
N is displayed on the instru-
N is dis-
Driving on slippery surfaces
(mud, snow etc.)
When the vehicle is being driven on
slippery surfaces (mud, snow, etc.), you
may start off in second gear.
To do this, move the gear selector lever
twice with your foot on the brake pedal.
The figure
display. The system then switches to
semi-automatic mode (refer to the sec
tion entitled “Semi-automatic”).
To return to automatic mode, press the
mode change button.
2 appears on the dashboard
-
2.27
Page 93

QUICKSHIFT 5 GEARBOX (continued)
Audible warning
– If you hold the vehicle on a slope
for too long without applying the
brakes or handbrake, you will strain
the system (risk of overheating the
clutch).
In this case, an intermittent beep
ing sound will remind you that you
should put your foot on the brake
pedal or apply the handbrake.
– Never leave the vehicle with the
engine running and a gear engaged,
even if the handbrake is applied.
For safety reasons you will hear an
intermittent beeping sound when you
open the door if you have not shifted
into neutral or you have not switched
off the ignition or depressed the
brake pedal.
– Your vehicle will not start: you can
push the vehicle to start the engine,
-
provided the battery is not flat (dis
play lit).
Proceed as follows:
– switch on the ignition;
– select neutral;
– push or tow the car or run it down
a slope until you reach the speed
at which the warning buzzer is
activated. This will indicate that
moving the selector lever for
wards will engage the gear most
suited to starting the engine.
Note: never attempt this operation in
reverse.
Operating faults
-
I
fault in the system. In most cases, you
may still drive the vehicle, although it
will not function perfectly. However, you
should consult a RENAULT Dealer as
soon as possible.
Towing a vehicle with a
sequential gearbox
-
If the gearbox is stuck in a gear:
– switch on the ignition;
– select neutral with the brake pedal
– check that the gearbox is in neutral
If you cannot find neutral you must
tow the vehicle with the front wheels
raised.
The vehicle should always be towed
with the ignition switched off.
When driving, if this warning
light comes on, it indicates a
depressed;
(by pushing the vehicle, for exam
ple).
-
2.28
Page 94

Section 3: Your comfort
Air vents . . . . . . . . . . . . . . . . . . . . . . . . . . . . . . . . . . . . . . . . . . . . . . . . . . . . . . . . . . . . . . . . . . . . . . 3.2
Heating and air conditioning system . . . . . . . . . . . . . . . . . . . . . . . . . . . . . . . . . . . . . . . . . . . . . . . . . 3.4
Interior lighting . . . . . . . . . . . . . . . . . . . . . . . . . . . . . . . . . . . . . . . . . . . . . . . . . . . . . . . . . . . . . . . . . . 3.20
Electric windows . . . . . . . . . . . . . . . . . . . . . . . . . . . . . . . . . . . . . . . . . . . . . . . . . . . . . . . . . . . . . . . . 3.22
Sun visor/Vanity mirrors . . . . . . . . . . . . . . . . . . . . . . . . . . . . . . . . . . . . . . . . . . . . . . . . . . . . . . . . . . . 3.24
Grab handle/Windscreen . . . . . . . . . . . . . . . . . . . . . . . . . . . . . . . . . . . . . . . . . . . . . . . . . . . . . . . . . . 3.25
Sunroof . . . . . . . . . . . . . . . . . . . . . . . . . . . . . . . . . . . . . . . . . . . . . . . . . . . . . . . . . . . . . . . . . . . . . . . 3.26
Passenger compartment storage/fittings . . . . . . . . . . . . . . . . . . . . . . . . . . . . . . . . . . . . . . . . . . . . . . 3.29
Ashtray - cigar lighter . . . . . . . . . . . . . . . . . . . . . . . . . . . . . . . . . . . . . . . . . . . . . . . . . . . . . . . . . . . . 3.33
Rear bench seat . . . . . . . . . . . . . . . . . . . . . . . . . . . . . . . . . . . . . . . . . . . . . . . . . . . . . . . . . . . . . . . . 3.34
Luggage compartment . . . . . . . . . . . . . . . . . . . . . . . . . . . . . . . . . . . . . . . . . . . . . . . . . . . . . . . . . . . 3.35
Rear parcel shelf . . . . . . . . . . . . . . . . . . . . . . . . . . . . . . . . . . . . . . . . . . . . . . . . . . . . . . . . . . 3.36
Transporting objects in the luggage compartment . . . . . . . . . . . . . . . . . . . . . . . . . . . . . . . . . 3.38
3.1
Page 95

AIR VENTS (air outlets)
2 31
1 left-hand side window demister
outlet
2 left-hand side air vent
3 windscreen demister outlets
4
8
5 6 7
8
5 control panel
6 right-hand side air vent
7 right-hand side window demister
outlet
4 centre air vents
3.2
8 footwell heater outlets for front and
rear passengers (depending on
the vehicle)
Page 96

AIR VENTS (continued)
1
2
Side air vents
Air flow
Move control knob
of resistance).
■ : maximum air flow.
– : minimum air flow.
Direction
Right/left: move tab 1.
Up/down: guide the air vent up or
down.
2 (beyond the point
3
4
Centre air vents
Air flow
Move the control knob
point of resistance).
■ : maximum air flow.
– : minimum air flow.
Direction
Right/left: move tabs 3.
Up/down: guide the air vent up or
down.
4 (beyond the
3
3.3
Page 97

HEATING/VENTILATION
A B C
Controls
A Air temperature adjustment.
B Air distribution.
C Adjusting the amount of air blown
into the passenger compartment.
Adjusting the air temperature
Move button A.
Turning the control to the right increases
the temperature.
Distribution of air in the
passenger compartment
Move control B.
J
All the air flow is directed to the dash
board vents.
This selection is not appropriate if all
the air vents are closed.
G
The air flow is directed towards the
dashboard vents and the footwells.
F
The air flow is directed only towards the
footwells.
i
The air flow is distributed between all
the air vents, the front side window de
misting vents, the windscreen demist
ing vents and the footwells.
Position
Position
Position
Position
-
-
-
3.4
Page 98

HEATING/VENTILATION (continued)
W
Close the dashboard vents for more
effective demisting.
All the air is then directed to the wind
screen and front side window demister
outlets.
Position
B C
A
This function closes the air vent and
stops ventilation (irrespective of the
position of control
passenger compartment to be isolated
from the outside (driving in polluted
areas, etc.).
Prolonged used of the STOP function
may cause some condensation.
It is advisable to exit the STOP position
as soon as you have left the polluted
area.
Position (STOP position)
C). This allows the
Adjusting the amount of air
blown into the passenger
compartment
Move control C from 0 to 4.
The passenger compartment is ven
tilated by blown air. The blower deter
mines how much air enters but vehicle
speed has a slight effect on this.
The further the control is positioned
to the right, the greater the amount of
air blown into the passenger compart
ment.
-
-
-
3.5
Page 99

AIR CONDITIONING
A B C D E F G
Controls
A Air temperature adjustment.
B Activating the air conditioning.
C Air conditioning operating tell-tale.
D Air distribution.
E Isolation of the passenger com-
partment (air recirculation).
F Air recirculation operating tell-tale.
G Adjusting the amount of air blown
into the passenger compartment.
Information and advice for use:
refer to the end of the “Automatic cli
mate control” paragraph.
Adjusting the air temperature
Move control A.
To the right: maximum possible tem
perature.
To the left: minimum possible tempera
ture.
Adjusting the amount of air
blown into the passenger
compartment
Move control G from 0 to 4.
The passenger compartment is ven
tilated by blown air. The blower deter
mines how much air enters but vehicle
speed has a slight effect on this.
The further the control is positioned
to the right, the greater the amount of
air blown into the passenger compart
ment.
-
-
-
-
-
-
3.6
Page 100

AIR CONDITIONING (continued)
Distribution of air in the
passenger compartment
Move control D.
J
dashboard vents.
This selection is not appropriate if all
the air vents are closed.
Position
All the air flow is directed to the
D
G
the dashboard vents and the footwells.
F
wards the footwells.
Position
The air flow is directed towards
Position
The air flow is directed only to
i
tween all the air vents, the front side
window demisting vents, the wind
screen demisting vents and the foot
wells.
W
for more effective demisting.
All the air is then directed to the wind
screen and front side window demister
outlets.
In this position, demisting may be
more effective if the air conditioning
is switched on at the same time.
-
Position
The air flow is distributed be
Position
Close the dashboard vents
-
-
-
-
3.7
 Loading...