

Page 1

NX806-2 | ENG | Dos = 4 mm | 78 pages | 1 de Couv
Cyan Magenta Jaune Noir Noir texte
DRIVER’S HANDBOOK
CARMINAT NAVIGATION ET COMMUNICATION
CARMINAT BLUETOOTH ® DVD NAV-COM SYSTEM
Page 2

NX806-2 | ENG | Dos = 4 mm | 78 pages | Rabat
Cyan Magenta Jaune Noir Noir texte
Page 3
NX806-2 | ENG | Dos = 4 mm | 78 pages | Rabat
Cyan Magenta Jaune Noir Noir texte
2 21
10 8 9 8 7 6 5 4 3
24 25 26 27
33
32 31
28
2930
8
1
7
9
11
12
17
16
2
4
15
8
14
13
A
16
21
17
19
18
20
19 22
16
17
18
23
20
B
23
Page 4

1
Precautions during use . . . . . . . . . . . . . . . . . . . . . . . . . . . . . . . . . . . . . . . . . . . . . . . . . . . . . . . . . . . 3
Quick start guide . . . . . . . . . . . . . . . . . . . . . . . . . . . . . . . . . . . . . . . . . . . . . . . . . . . . . . . . . . . . . . . . 5
General information . . . . . . . . . . . . . . . . . . . . . . . . . . . . . . . . . . . . . . . . . . . . . . . . . . . . . . . . . . . . . . 18
General description . . . . . . . . . . . . . . . . . . . . . . . . . . . . . . . . . . . . . . . . . . . . . . . . . . . . . . . . 18
Introduction to the controls . . . . . . . . . . . . . . . . . . . . . . . . . . . . . . . . . . . . . . . . . . . . . . . . . . . 20
Switching on/off . . . . . . . . . . . . . . . . . . . . . . . . . . . . . . . . . . . . . . . . . . . . . . . . . . . . . . . . . . . 24
Operating principles . . . . . . . . . . . . . . . . . . . . . . . . . . . . . . . . . . . . . . . . . . . . . . . . . . . . . . . . 25
Volume . . . . . . . . . . . . . . . . . . . . . . . . . . . . . . . . . . . . . . . . . . . . . . . . . . . . . . . . . . . . . . . . . . 26
Radio/CD . . . . . . . . . . . . . . . . . . . . . . . . . . . . . . . . . . . . . . . . . . . . . . . . . . . . . . . . . . . . . . . . . . . . . . 27
Listening to the radio . . . . . . . . . . . . . . . . . . . . . . . . . . . . . . . . . . . . . . . . . . . . . . . . . . . . . . . 27
Listening to a CD . . . . . . . . . . . . . . . . . . . . . . . . . . . . . . . . . . . . . . . . . . . . . . . . . . . . . . . . . . 29
Audio settings . . . . . . . . . . . . . . . . . . . . . . . . . . . . . . . . . . . . . . . . . . . . . . . . . . . . . . . . . . . . . 32
Navigation . . . . . . . . . . . . . . . . . . . . . . . . . . . . . . . . . . . . . . . . . . . . . . . . . . . . . . . . . . . . . . . . . . . . . 33
Navigation system . . . . . . . . . . . . . . . . . . . . . . . . . . . . . . . . . . . . . . . . . . . . . . . . . . . . . . . . . 33
Reading a map . . . . . . . . . . . . . . . . . . . . . . . . . . . . . . . . . . . . . . . . . . . . . . . . . . . . . . . . . . . . 34
Entering a destination . . . . . . . . . . . . . . . . . . . . . . . . . . . . . . . . . . . . . . . . . . . . . . . . . . . . . . 38
Guidance . . . . . . . . . . . . . . . . . . . . . . . . . . . . . . . . . . . . . . . . . . . . . . . . . . . . . . . . . . . . . . . . 46
Map settings . . . . . . . . . . . . . . . . . . . . . . . . . . . . . . . . . . . . . . . . . . . . . . . . . . . . . . . . . . . . . . 51
TMC Traffic Information . . . . . . . . . . . . . . . . . . . . . . . . . . . . . . . . . . . . . . . . . . . . . . . . . . . . . 53
Managing the address book . . . . . . . . . . . . . . . . . . . . . . . . . . . . . . . . . . . . . . . . . . . . . . . . . . 56
Navigation settings . . . . . . . . . . . . . . . . . . . . . . . . . . . . . . . . . . . . . . . . . . . . . . . . . . . . . . . . . 58
Contents
Page 5

2
Phone system . . . . . . . . . . . . . . . . . . . . . . . . . . . . . . . . . . . . . . . . . . . . . . . . . . . . . . . . . . . . . . . . . . 61
Pairing/unpairing a phone . . . . . . . . . . . . . . . . . . . . . . . . . . . . . . . . . . . . . . . . . . . . . . . . . . . 61
Connecting/disconnecting a Bluetooth® phone . . . . . . . . . . . . . . . . . . . . . . . . . . . . . . . . . . . 62
Phonebook . . . . . . . . . . . . . . . . . . . . . . . . . . . . . . . . . . . . . . . . . . . . . . . . . . . . . . . . . . . . . . . 63
Making a call . . . . . . . . . . . . . . . . . . . . . . . . . . . . . . . . . . . . . . . . . . . . . . . . . . . . . . . . . . . . . 64
Receiving a call . . . . . . . . . . . . . . . . . . . . . . . . . . . . . . . . . . . . . . . . . . . . . . . . . . . . . . . . . . . 66
During a call . . . . . . . . . . . . . . . . . . . . . . . . . . . . . . . . . . . . . . . . . . . . . . . . . . . . . . . . . . . . . . 67
Phone settings . . . . . . . . . . . . . . . . . . . . . . . . . . . . . . . . . . . . . . . . . . . . . . . . . . . . . . . . . . . . 68
Voice commands . . . . . . . . . . . . . . . . . . . . . . . . . . . . . . . . . . . . . . . . . . . . . . . . . . . . . . . . . . . . . . . . 69
Use voice commands . . . . . . . . . . . . . . . . . . . . . . . . . . . . . . . . . . . . . . . . . . . . . . . . . . . . . . . 69
System settings . . . . . . . . . . . . . . . . . . . . . . . . . . . . . . . . . . . . . . . . . . . . . . . . . . . . . . . . . . . . . . . . . 72
Operating faults . . . . . . . . . . . . . . . . . . . . . . . . . . . . . . . . . . . . . . . . . . . . . . . . . . . . . . . . . . . . . . . . . 74
Alphabetical index . . . . . . . . . . . . . . . . . . . . . . . . . . . . . . . . . . . . . . . . . . . . . . . . . . . . . . . . . . . . . . . 76
Page 6
3
PRECAUTIONS DURING USE
The description of the models given in this manual is based on the specifications at the time of writing. This manual covers all
existing functions for the models described. Whether or not they are fitted depends on the equipment model, options selected
and the country where it is sold. This manual may also contain information about functions to be introduced later in the year.
Precautions when operating the system
– Operate the controls (on the dash or near the steering wheel) and read the information on the screen only when road
conditions allow.
– Set the volume to a reasonable level so that outside noise can be heard.
Precautions regarding navigation
– Use of the navigation system does not in any way replace the responsibility or vigilance of the driver when driving the vehi
-
cle.
– Depending on the geographical zones, the map DVD may not have the latest information on new roads. Be alert. In all
cases, Road Traffic Regulations and road signs always take precedence over the directions of the navigation system.
Precautions concerning the equipment
– Do not attempt to dismantle or modify the system, as there is a risk of damage to equipment and fire.
– Contact a representative of the manufacturer in the event of malfunction and for all operations involving disassembly.
– Do not insert foreign bodies, or damaged or dirty CDs or DVDs, into the player.
– Use only circular CDs and DVDs that are 12 cm in diameter.
Precautions when using the phone
– There are laws which govern the use of phones in vehicles. They do not necessarily authorise the use of hands-free phone
systems under all driving conditions: drivers must be in control of their vehicles at all times;
– Using a phone whilst driving is a significant distraction and risk factor during all stages of use (dialling, communicating,
searching for a number in the handset memory, etc.).
It is essential to follow the precautions below when using the system, both in the interest of safety and to prevent material damage.
You must always comply with the laws of the country in which you are travelling.
Page 7

4
Page 8
5
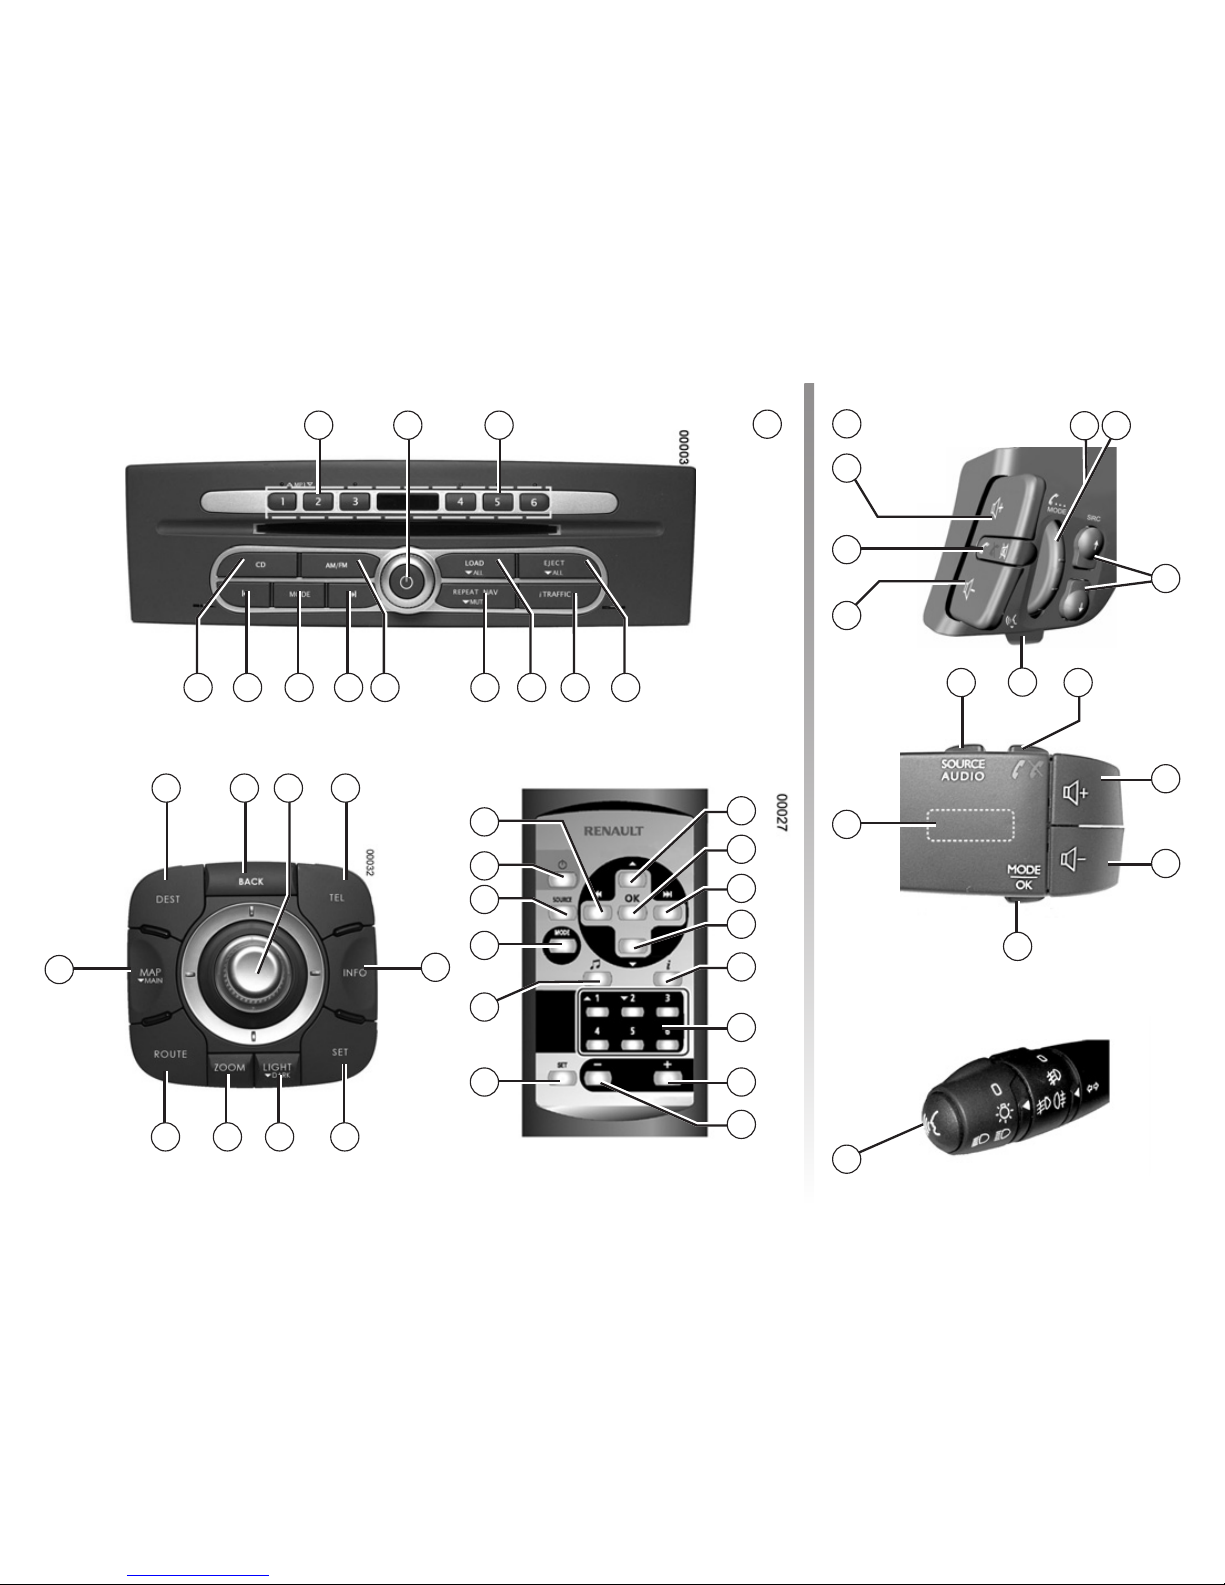
> Activate the radio
source and display the
radio on the full screen
AM/FM to
ÉÊ
:
From 1 to 3 (radio source) to
> Store (long press)
> Recall radio station selections (short press)
> Change band
From 1 to 3 (CD source) to
Select a CD from the changer
ON/OFF:
audio system
> Adjust the volume
From 4 to 6 (radio source) to
> Store (long press)
> Recall radio station selections (short press)
From 4 to 6 (CD source) to
Select a CD from the changer
LOAD to
> Load a CD (short
press)
> Load several CDs
(long press)
EJECT to
> Eject a CD (short press)
> Eject all of the CDs (press
and hold)
CD to
> Activate the CD source
> Display the CD source on
the full screen
> Scroll through the radio lists
> Search for a CD/MP3 CD track
> Search for a station/radio frequency
> Fast forward/Rewind a CD/MP3 CD track (press and hold)
MODE to
> Change the CD source reading
mode (Repeat, Random)
> Change station selection mode
(PRESET, LIST, MANUAL) for radio
source
REPEAT NAV to
> Repeat/interrupt the last
guidance or TMC traffic
information voice message
(short press)
MUTE to
> Activate voice guidance (long press)
> Deactivate voice guidance
i TRAFFIC to
> Activate/Deactivate Traffic information
(short press)
> Activate/Deactivate the i PTY function
(long press)
ROTATE to
QUICK START GUIDE
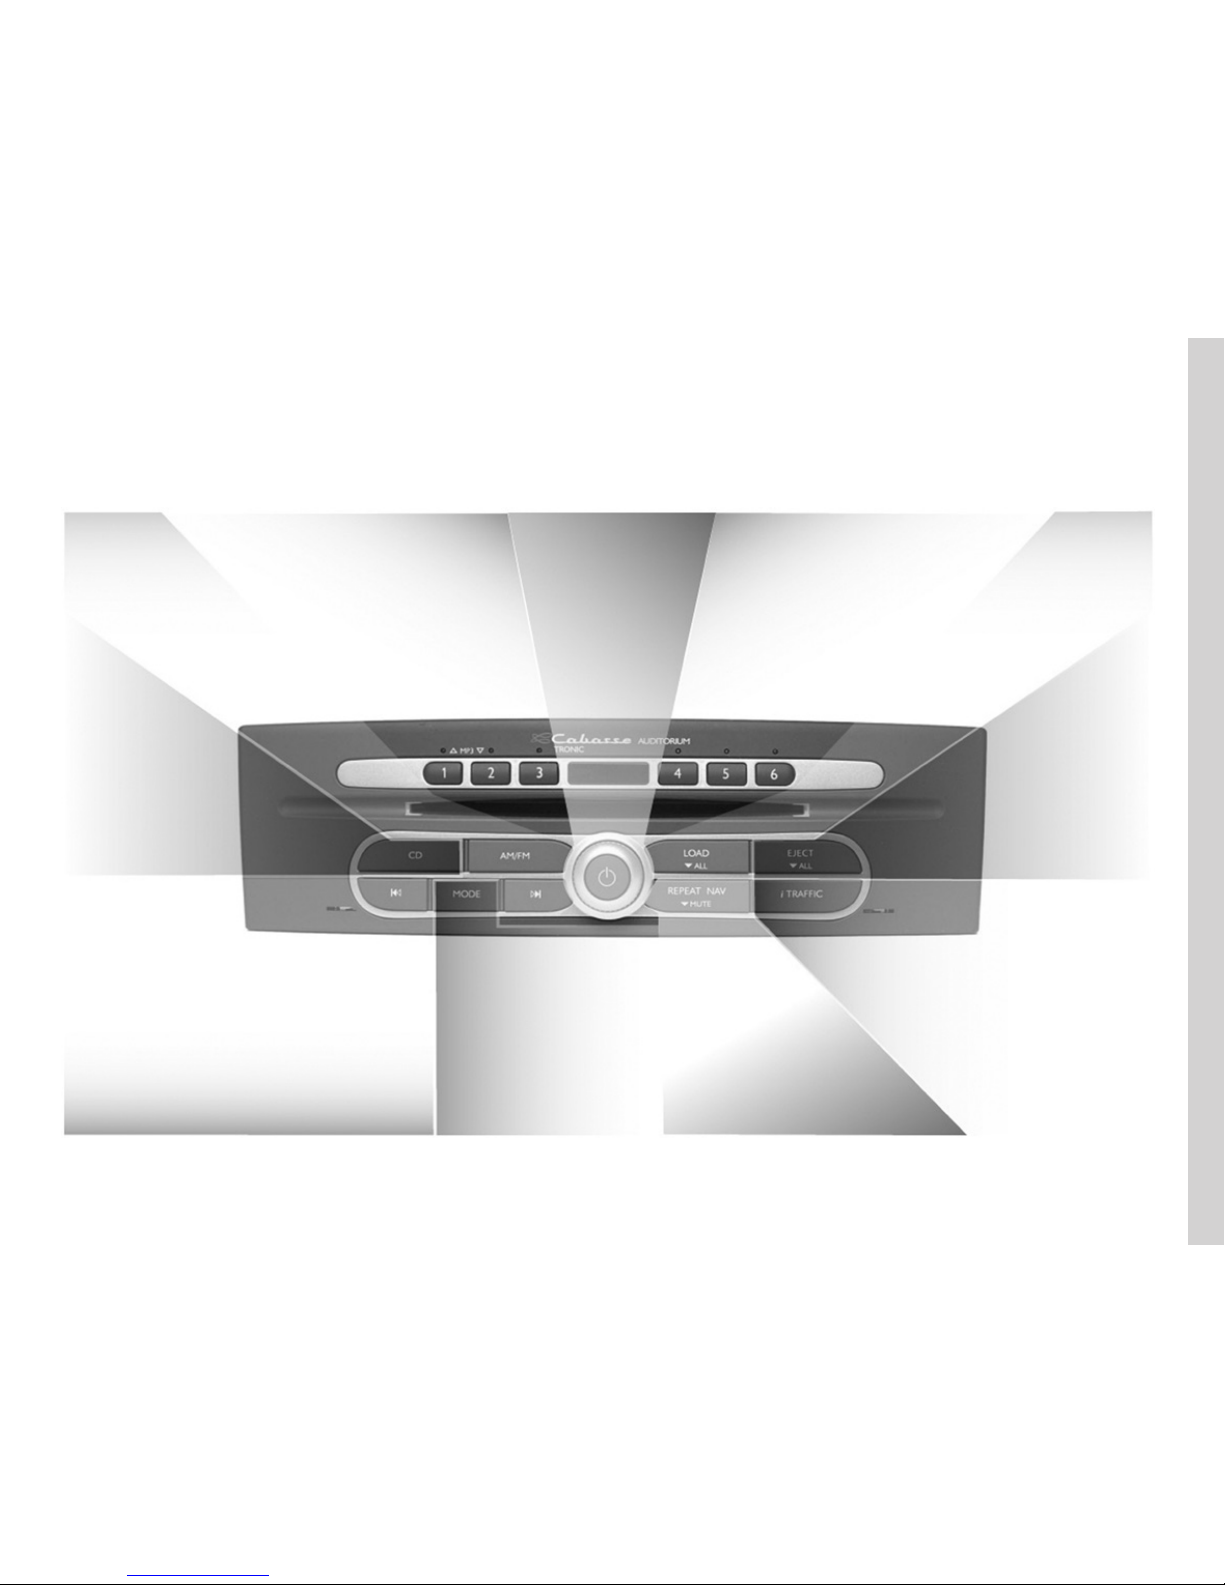
INTRODUCTION TO CONTROLS: Front panel
Page 9
6
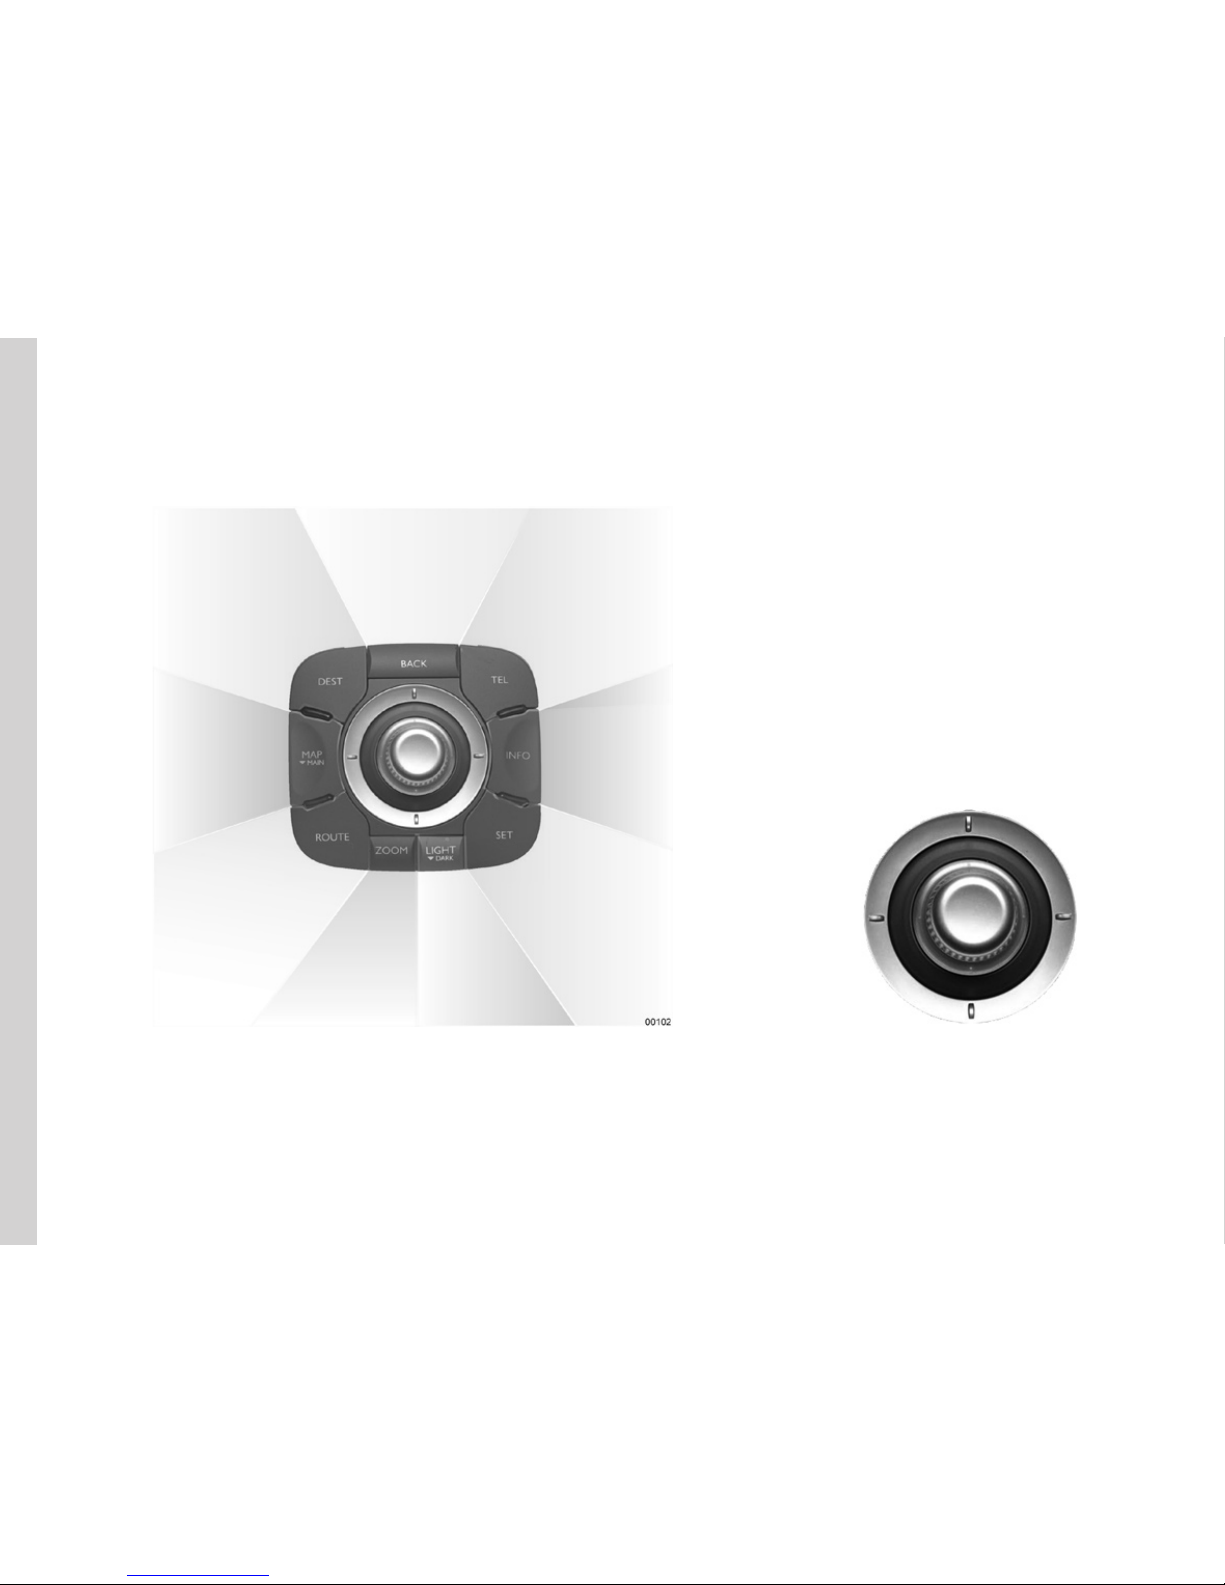
INTRODUCTION TO CONTROLS: Central control
DEST to
> Access the destination
entry menu
BACK to
> Return to the previous
screen
> Correct an entered
character (short press)
TEL to
> Access telephone
functions
ROUTE to
> Access the itinerary management
menu
SET to
> Access the
system setting
menu
> Manage the
address book
> Manage fav-
ourite numbers
MAP to
> Display the map
(short press)
> Display the Main
screen (long press)
INFO to
> Access trafc
information
> Access GPS
coordinates
ZOOM to
> Change the
scale of the
map
LIGHT to
> Adjust the
screen brightness
DARK to
> Switch to standby
(long press)
ROTATE
> Move vertically in the menus and alphanumerical keyboards
SHIFT
(Front, Back, Right, Left)
> Move vertically or horizontally through
the menus
> Move around the map
PRESS
> Confirm a selection
> Display the map menu
Page 10
7
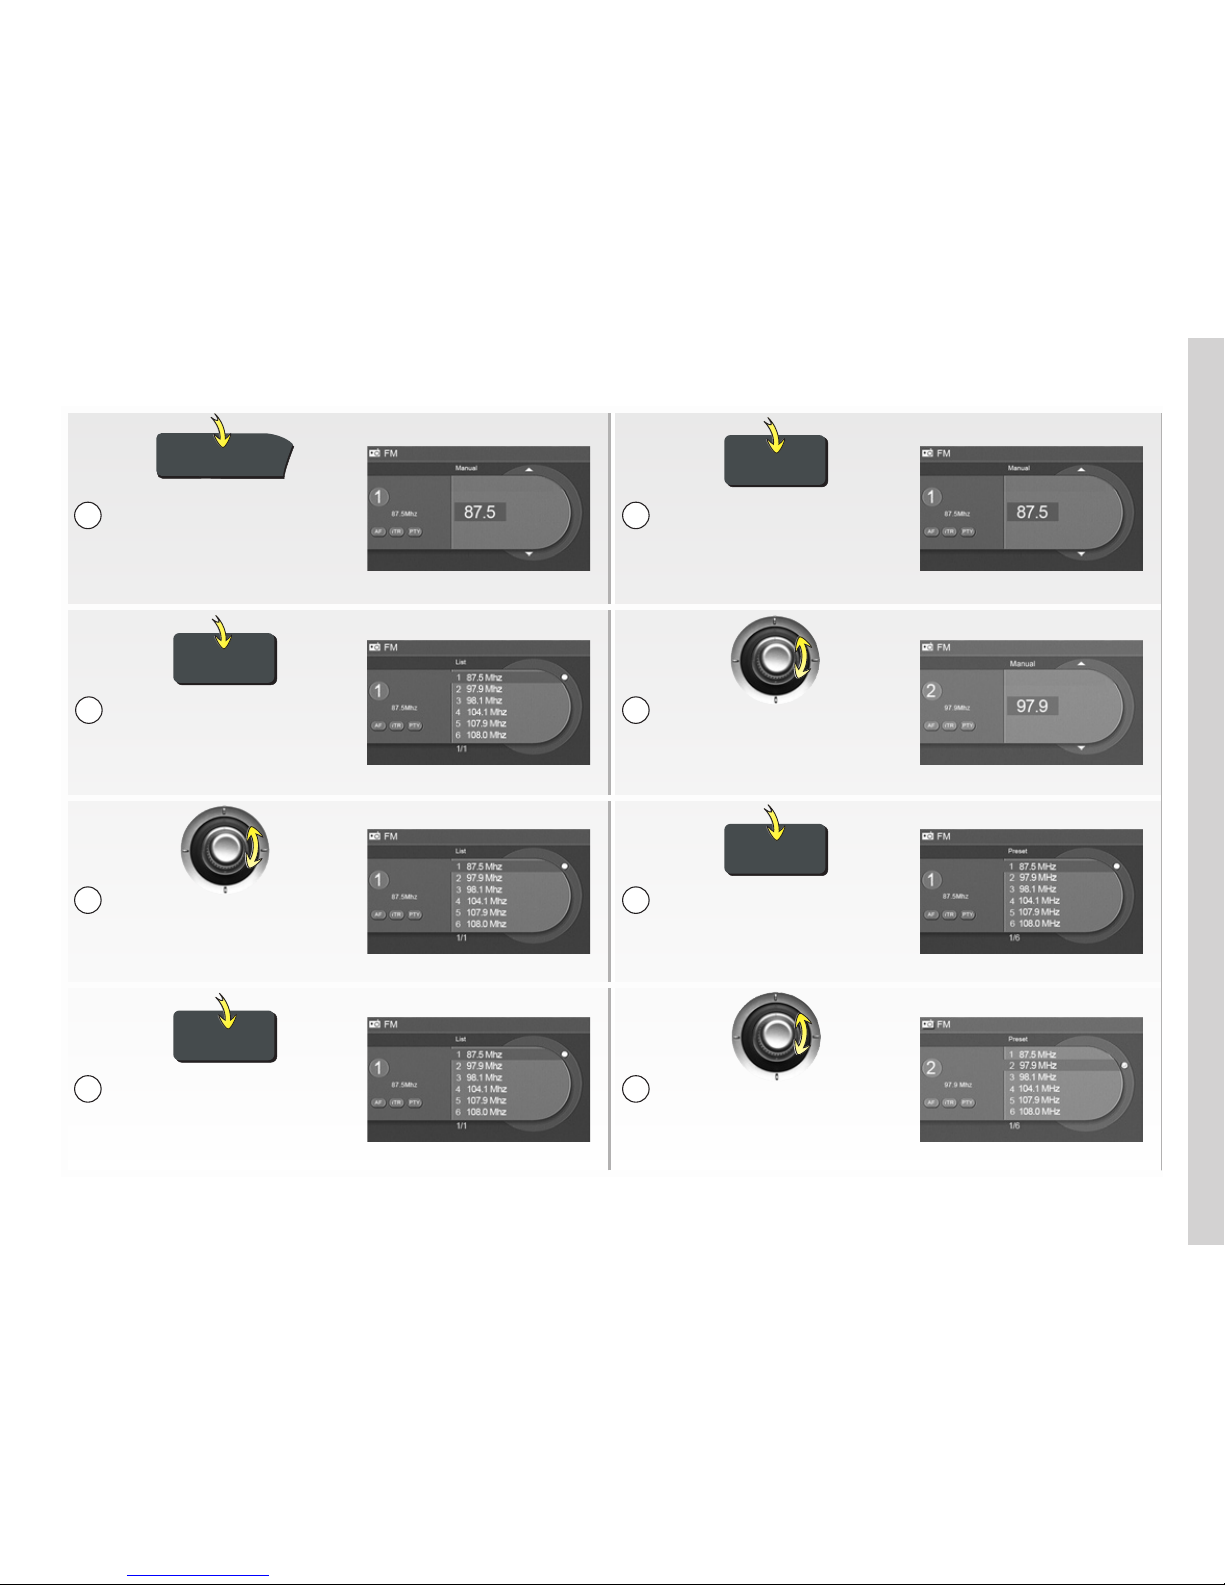
AM / FM
MODE
Press AM/FM to select
a wavelength
MANUAL mode:
Press MODE several times
to select “MANUAL” mode
MODE
LIST mode:
Press MODE several times
to select “LIST” mode
Select your station by
rotating the central control
MODE
Select your station by
rotating the central control
PRESET mode:
Press MODE several times
to select “PRESET” mode
MODE
If necessary, update the
radio list by pressing
and holding MODE
Select your station by
rotating the central control
1
AUDIO: Selecting a radio station
2
1
4
3
2
2
1
Page 11
8
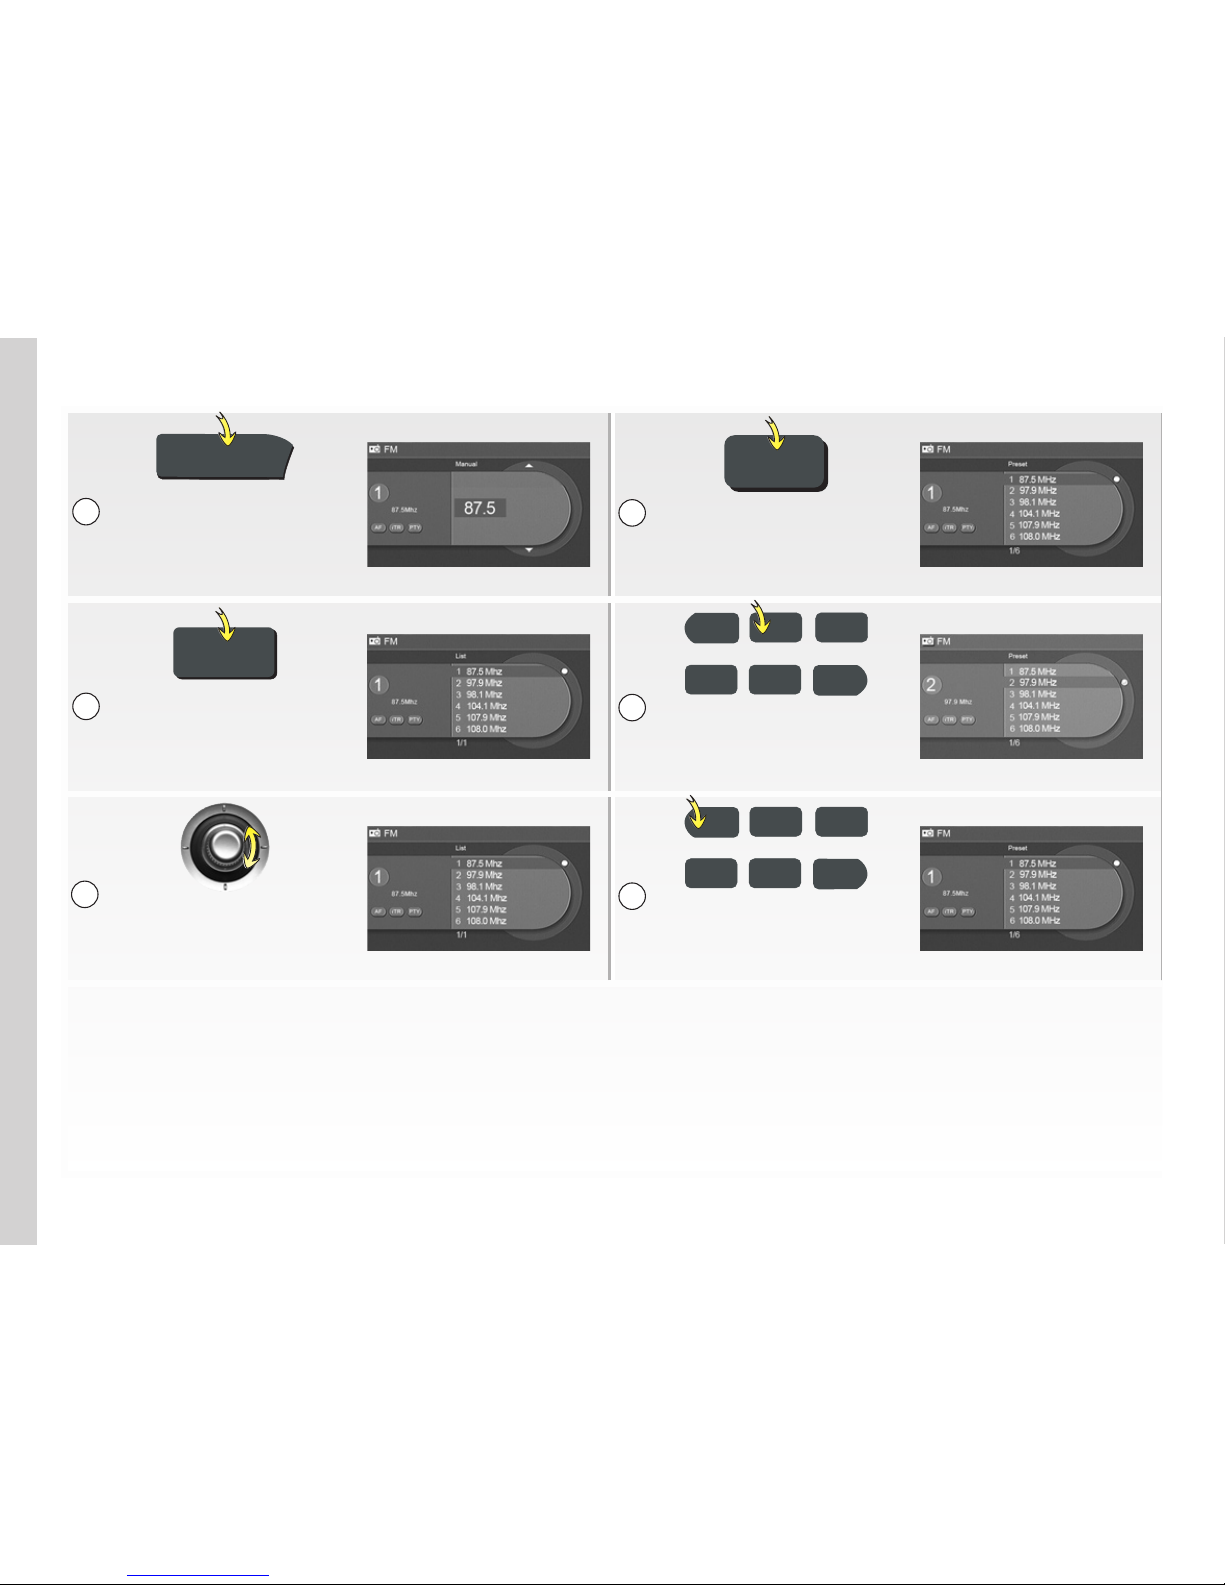
AUDIO: Storing a favourite radio station
AM / FM
1
Press AM/FM to select
a wavelength
Press and hold one of
the 6 buttons to store
the radio station
MODE
1
2 3
4
6
5
Press MODE several times
to select the search mode
Repeat the operation for
the other radio stations
1
2 3
4
6
5
Select your station by
rotating the central
control (LIST mode)
Briefly press one of the
6 buttons to recall the
stored radio station
1
3
2
5
6
4
Page 12
9
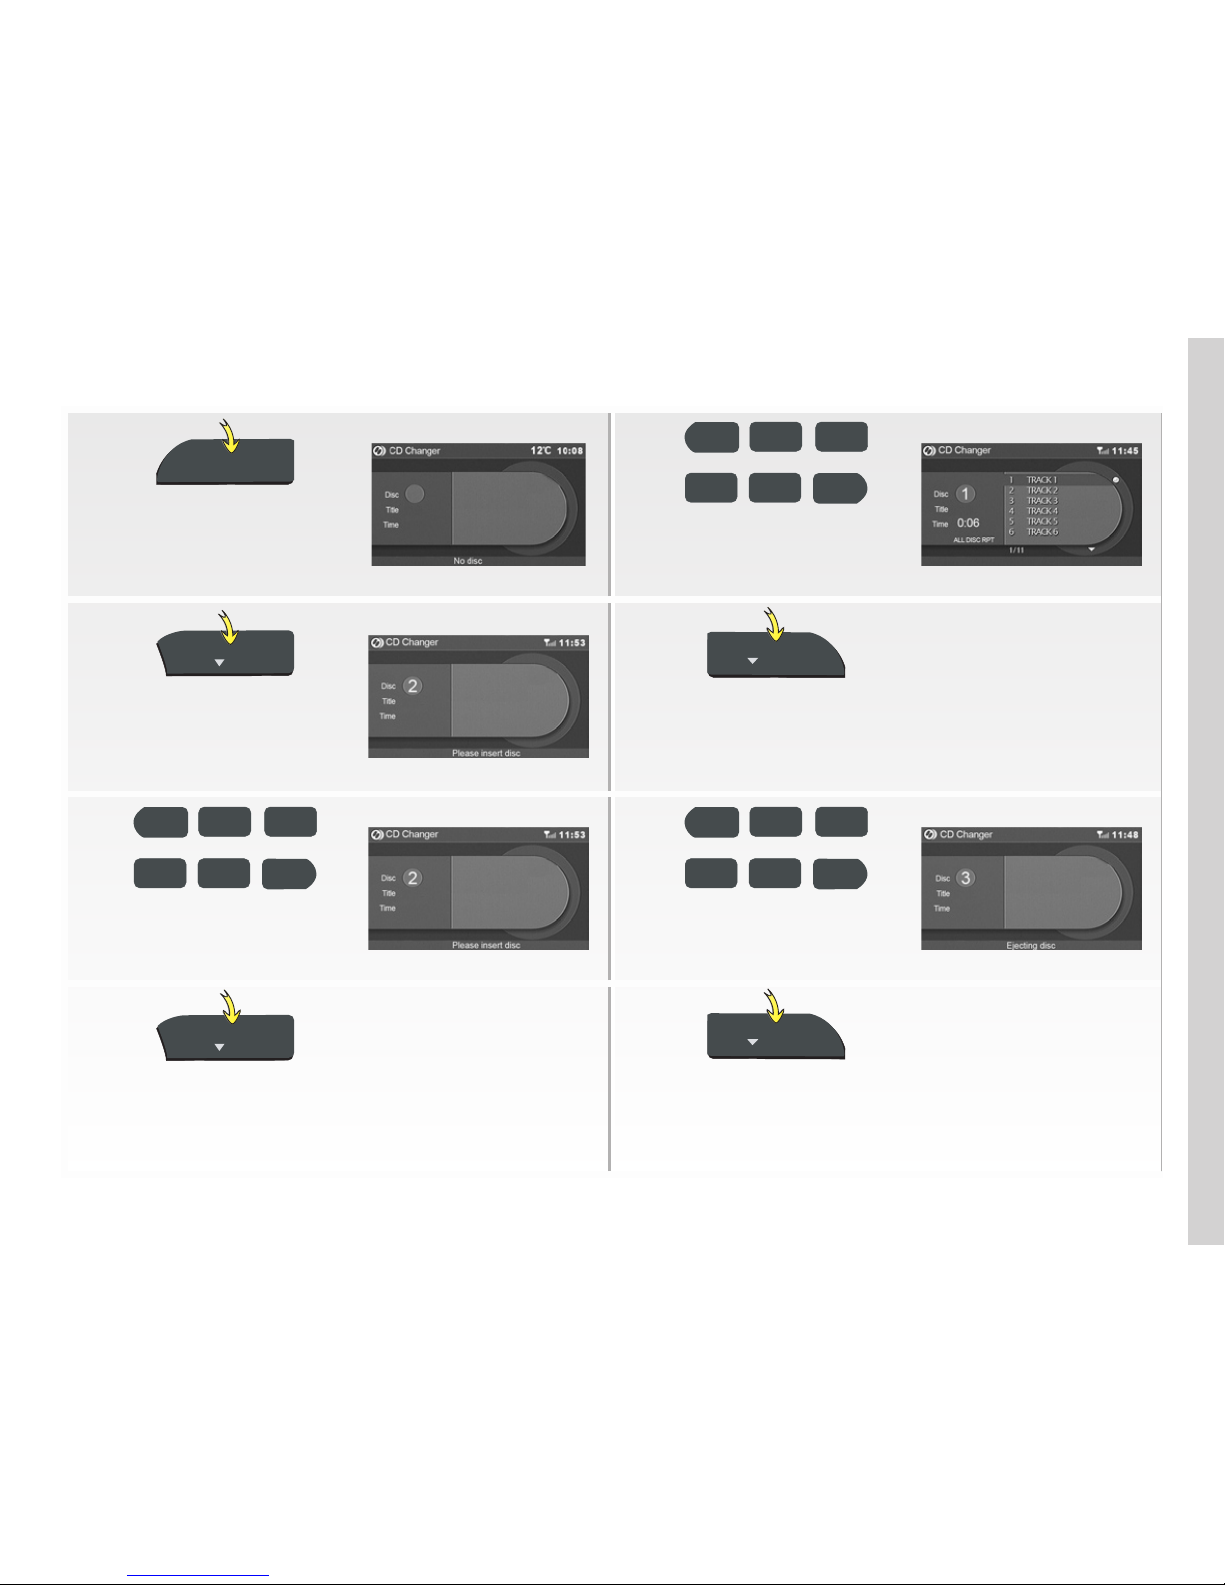
CD
1
2 3
4
6
5
Press CD once or
twice to display the full
screen CD source
Listening to a CD:
Press one of the buttons
to select a CD
LOAD
ALL
EJECT
ALL
Inserting a CD:
Press LOAD
Ejecting a CD:
Press EJECT
1
2 3
1
2 3
4
6
5
4
6
5
If required, select the
location number of the CD
Press one of the
buttons to select the
CD you wish to eject
LOAD
ALL
EJECT
ALL
Inserting several CDs: Press and hold LOAD then
follow the instructions displayed on the screen
Ejecting all CDs:
Press
and hold EJECT
AUDIO: Using the CD changer
Page 13
10
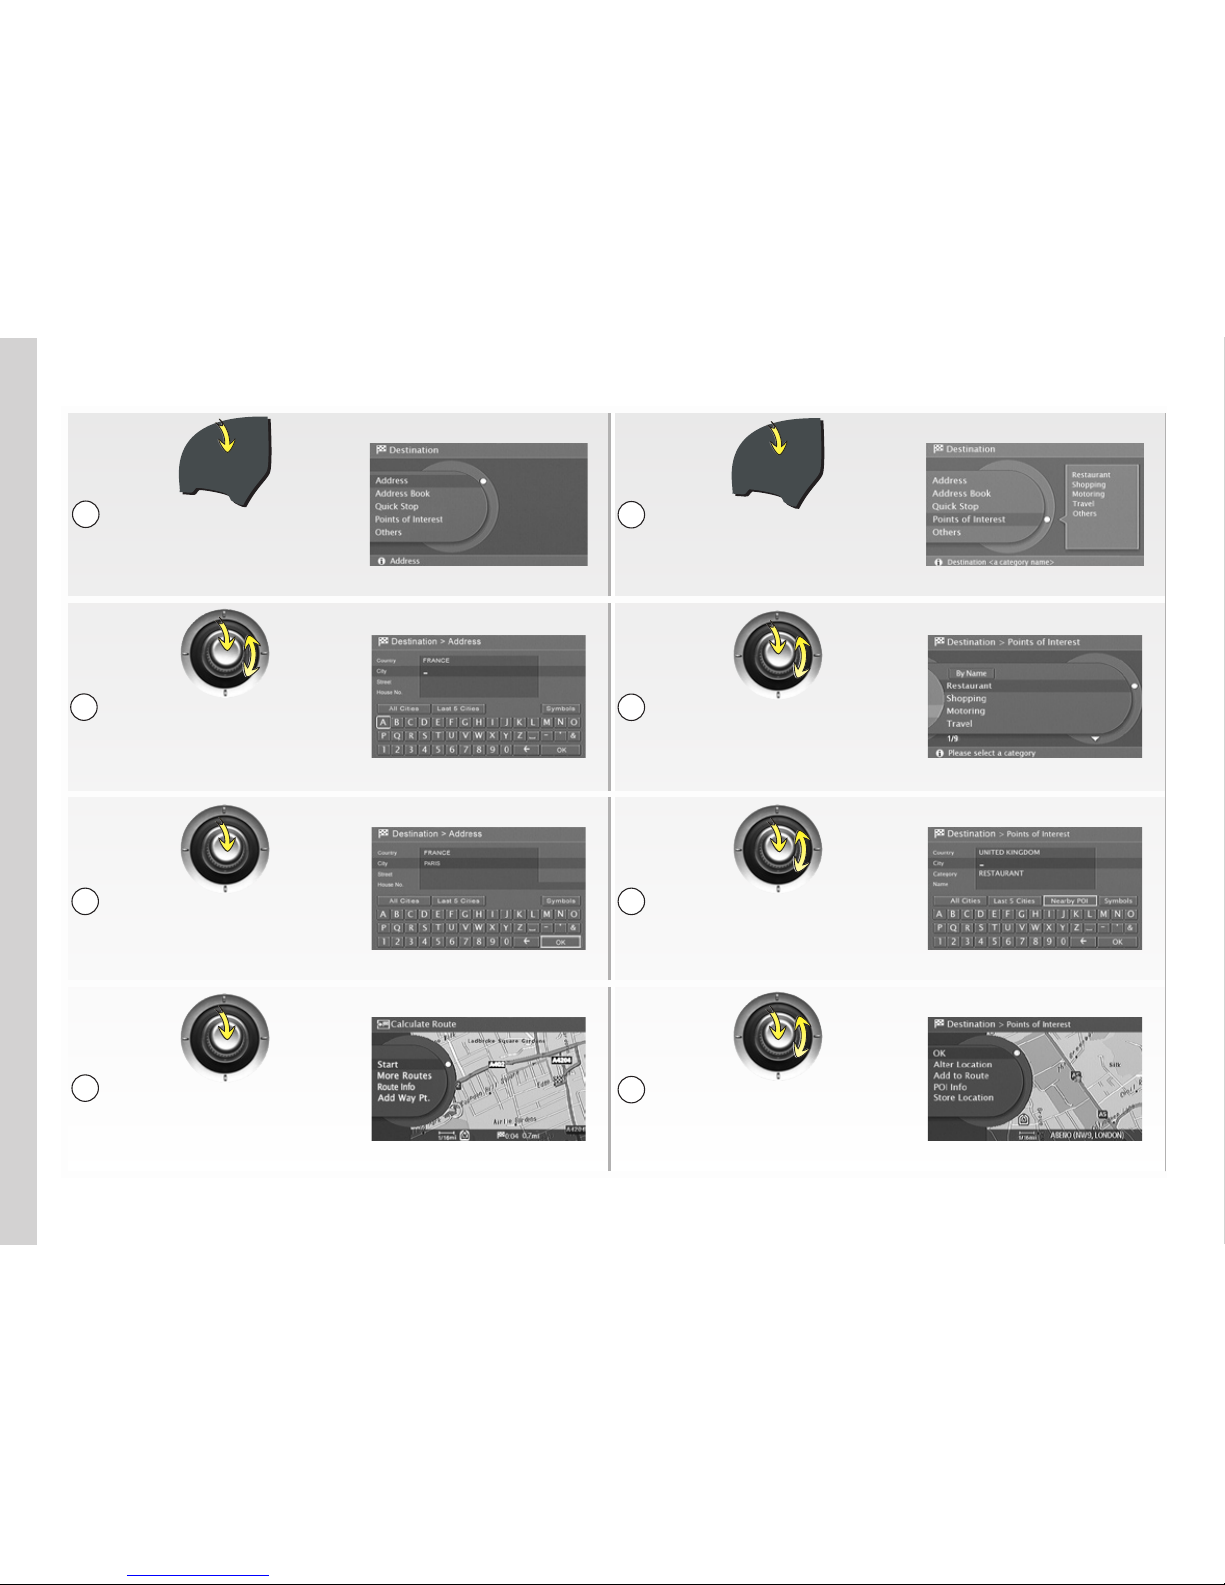
DEST
DEST
DEST
DEST
Entering an address:
Press DEST then
select “Address”
Destination to a POI:
Press DEST then select
“Points of Interest”
Rotate the central control
and select and confirm your
destination letter by letter
Rotate the central
control and select your
Point of interest
Select “OK” to confirm
the destination
Select the search area
and enter the name of
the POI if possible
View the route and select
“Start” to activate guidance
Activate guidance by
selecting “OK” or view
the details of the POI by
selecting “POI Info”
1
2
3
4
1
2
3
4
NAVIGATION: Entering a destination
Page 14
11
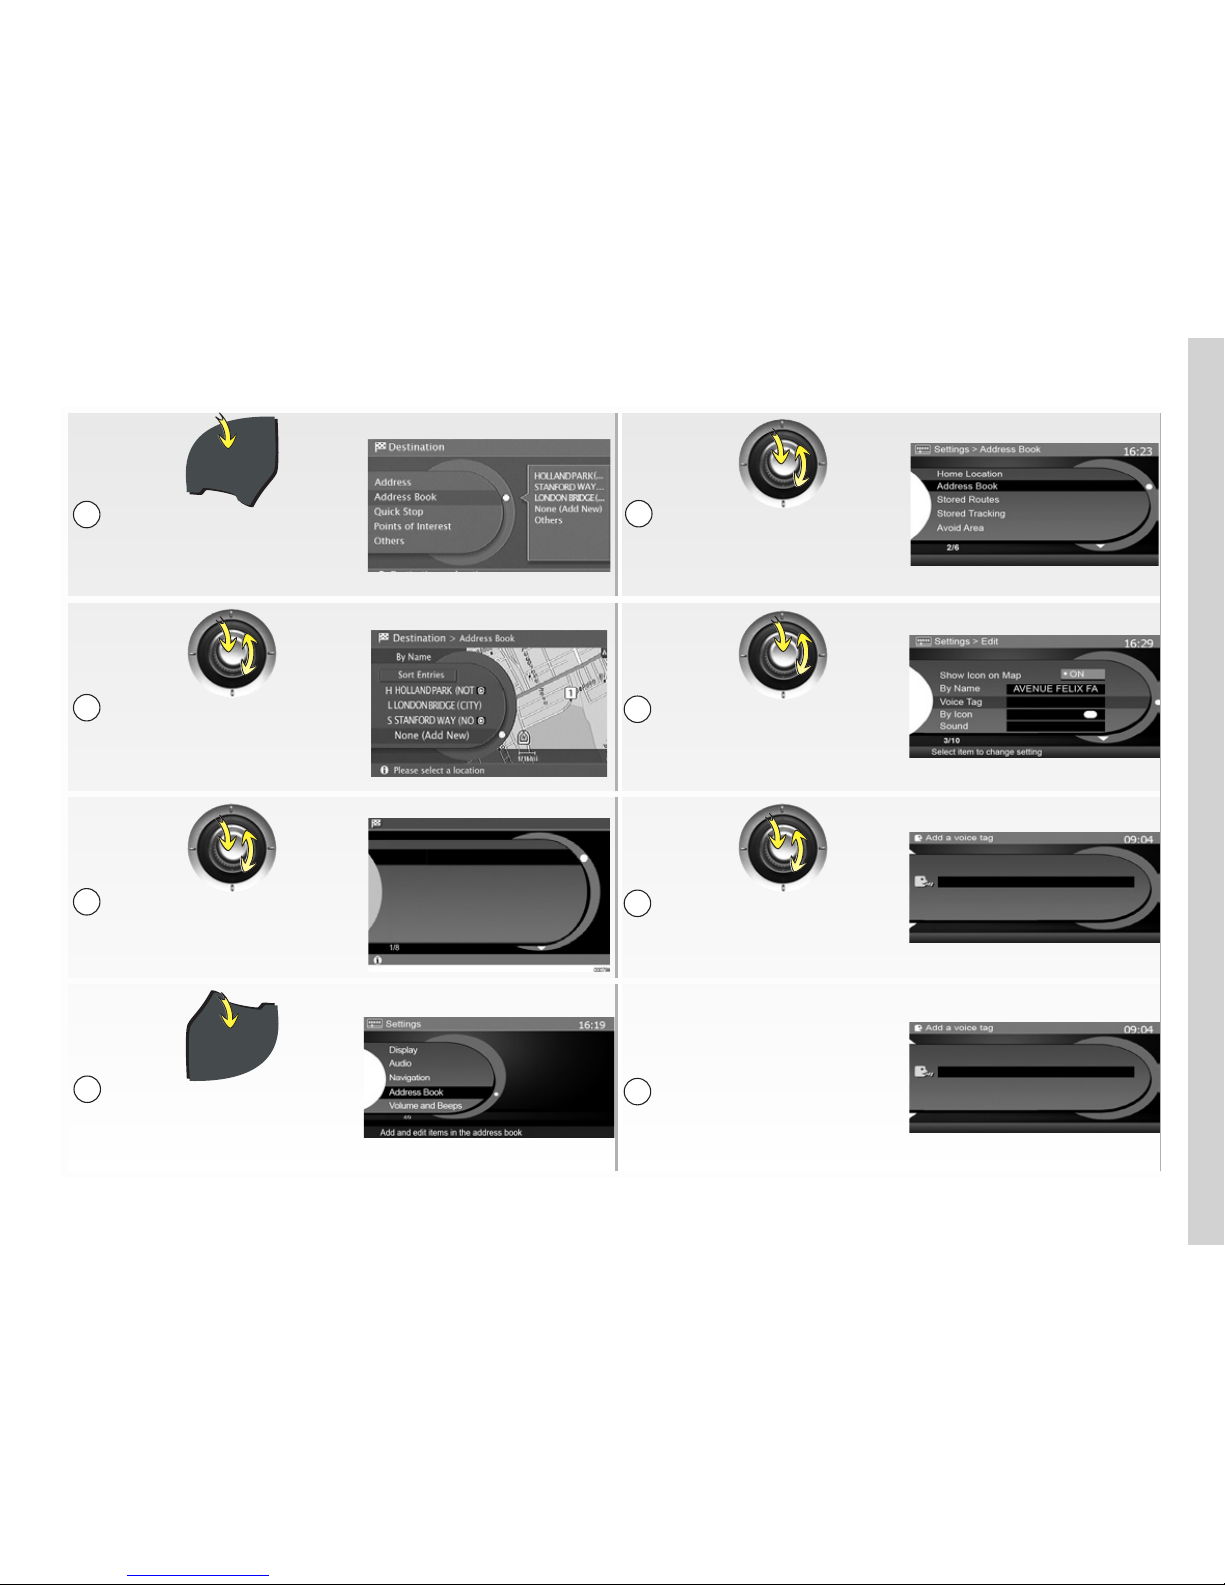
DEST
DEST
Press DEST and select
“Address Book”
Select “Address Book”
Select “None (Add New)”
Select your contact, and
“Edit” and then “Voice Tag”
Destination > Address
Map
Points of Interest
Address
Previous Destinations
Previous Starting Point
Add from map
Select one of the items
to create an entry
Select “Store” and say
your voice command
DEST
SET
To start guidance, activate
the voice command
by pressing Þ on the
steering column control,
then say “Destination” and
the associated voice tag
Allocating a voice tag:
Press SET and select
“Address Book”
1
2
3
2
3
4
5
NAVIGATION: Store a destination in the address book
1
Page 15
12
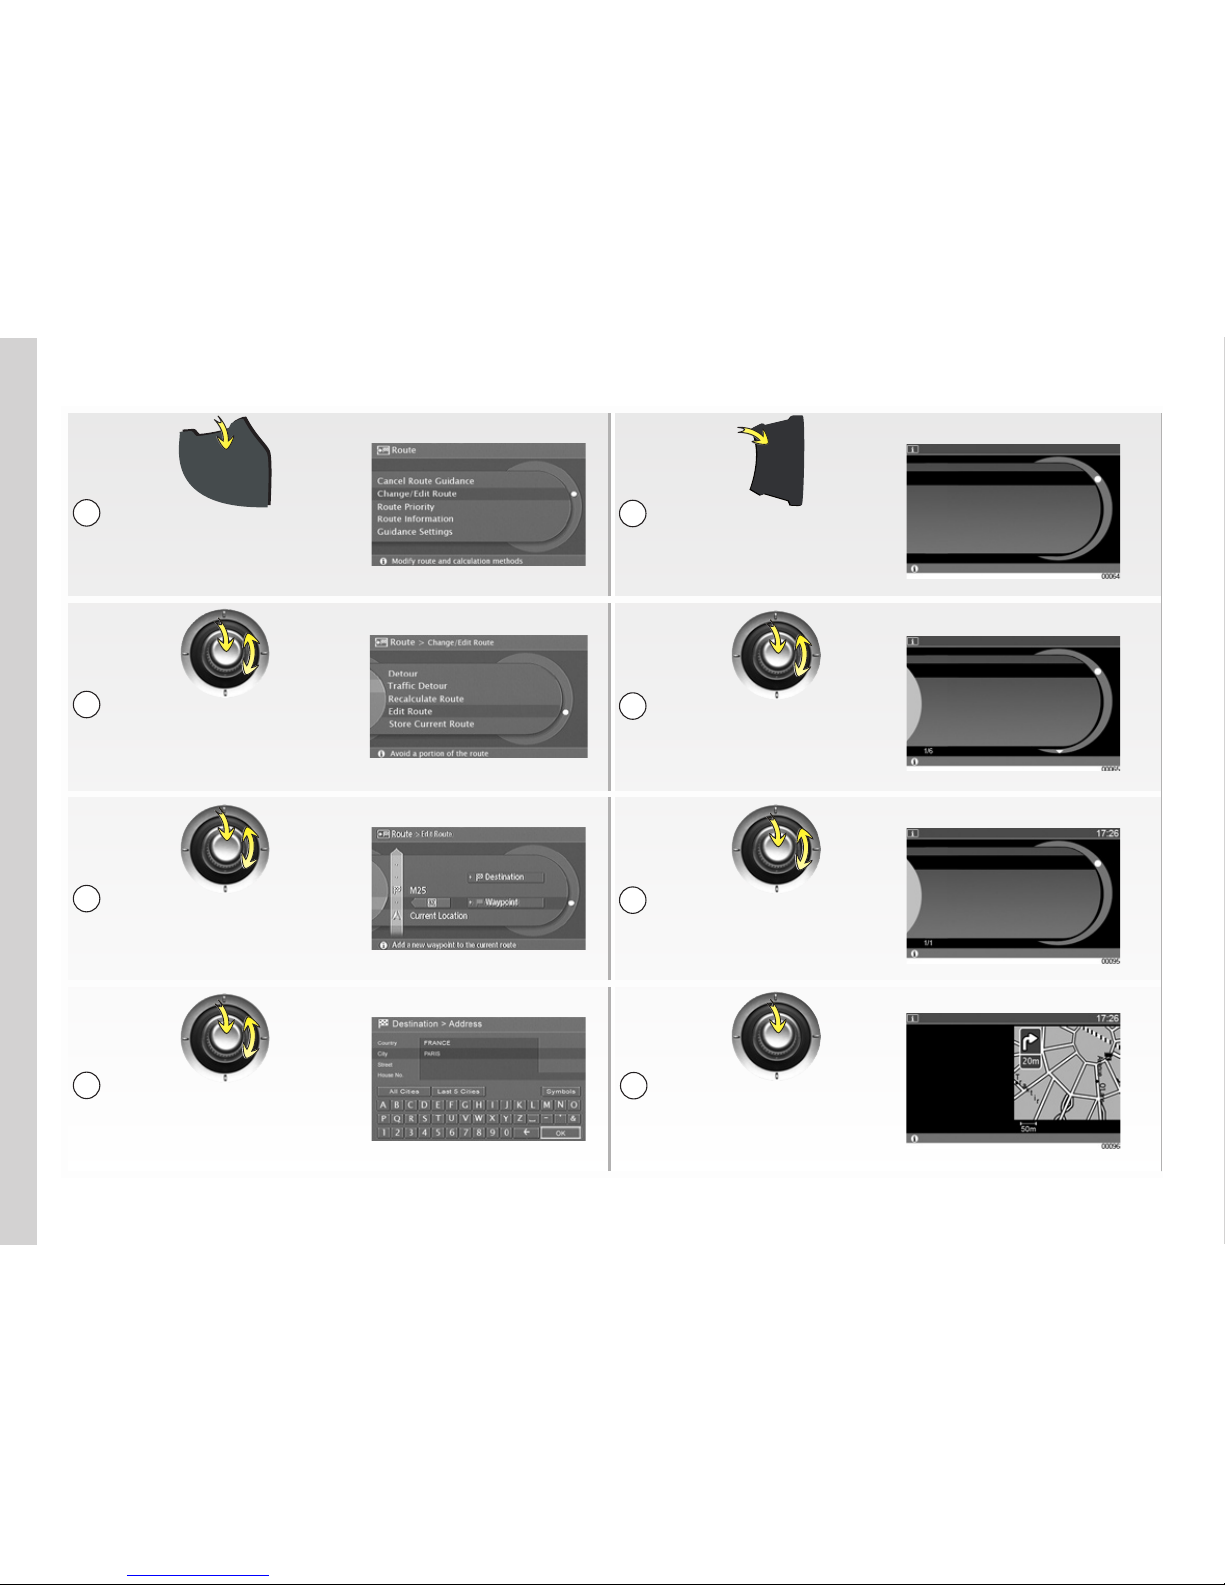
DEST
ROUTE
Press ROUTE then select
“Change/Edit Route”
Press the INFO
button, then select
“TMC Traffic Info Settings”
Select “Edit Route” Select “Traffic Info on Route”
Select “Waypoint”
then “Address”
Select information
from the list
Enter the stop
point address and
confirm with “OK”
View the details
1
2
3
4
1
2
3
4
NAVIGATION: Changing the route Route information
MAP
INFO
Information
TMC Traffic Info Settings
Where am I ?
GPS Current Location
Navigation Versions
View traffic information and settings
Information > TMC Traffic Info
Traffic Info on Route
Nearby Traffic Info
Traffic Info on Map
Weather
Traffic Forecast
Show traffic info on route
Information > Traffic Info on Route
Select an item for more detail
·In 2.4 miles (4 km), On A12, Accident.
ºIn 6 miles (10 km), On N286, Slow traffic.
¼In 15 miles (25 km), Porte de Vanves,
Roadworks.
Information > Traffic Info on Route
Push BACK to return to the list
In 2.4 miles (4 km), On
A12, Direction A12 / N286
towards Rocquencourt
Triangle (A13) Accident.
Detour in 20m, Delay:
13 min
·
Page 16
13
PHONE SYSTEM: Pairing a phone
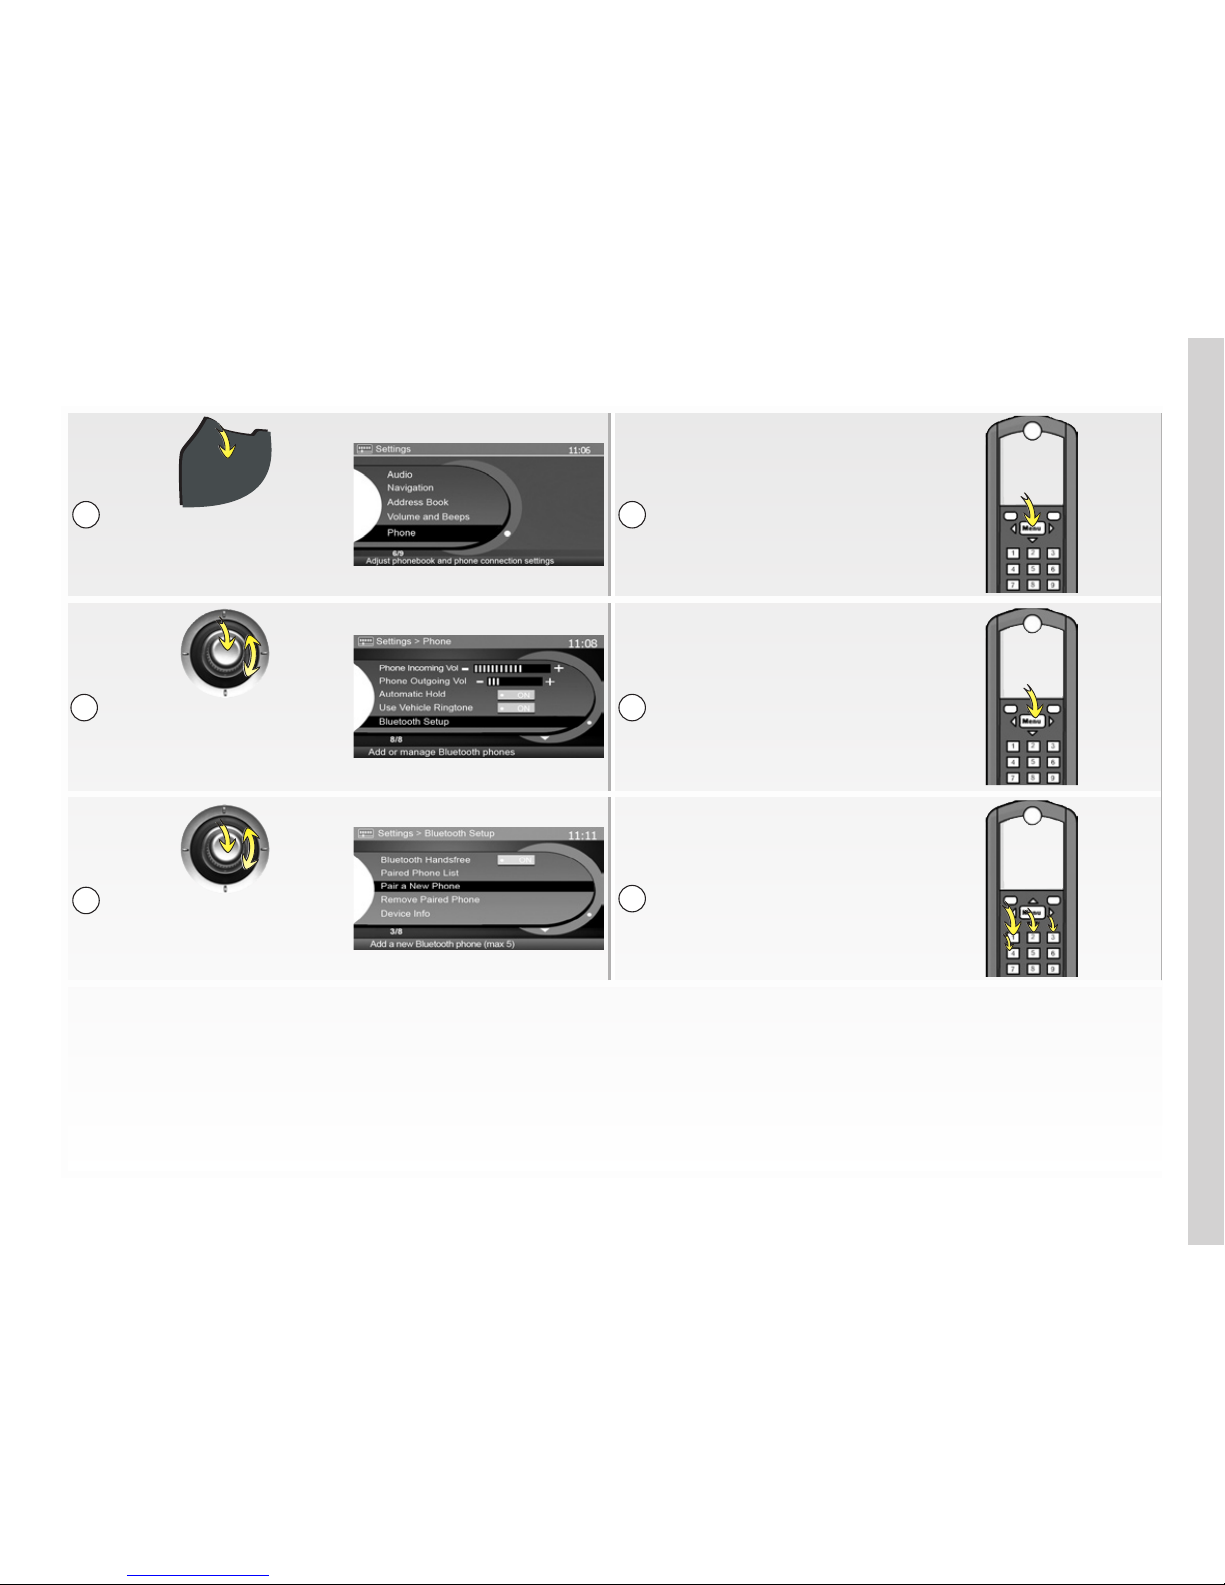
DEST
SET
Activate the Bluetooth®
connection on your
mobile phone
Press SET then
select “Phone”
Begin a search for
Bluetooth® equipment
and select “My Car”
Select “Bluetooth Setup”
Enter the number 1234
and confirm
Select “Pair a New Phone”
1
2
3
6
4
5
Page 17
14
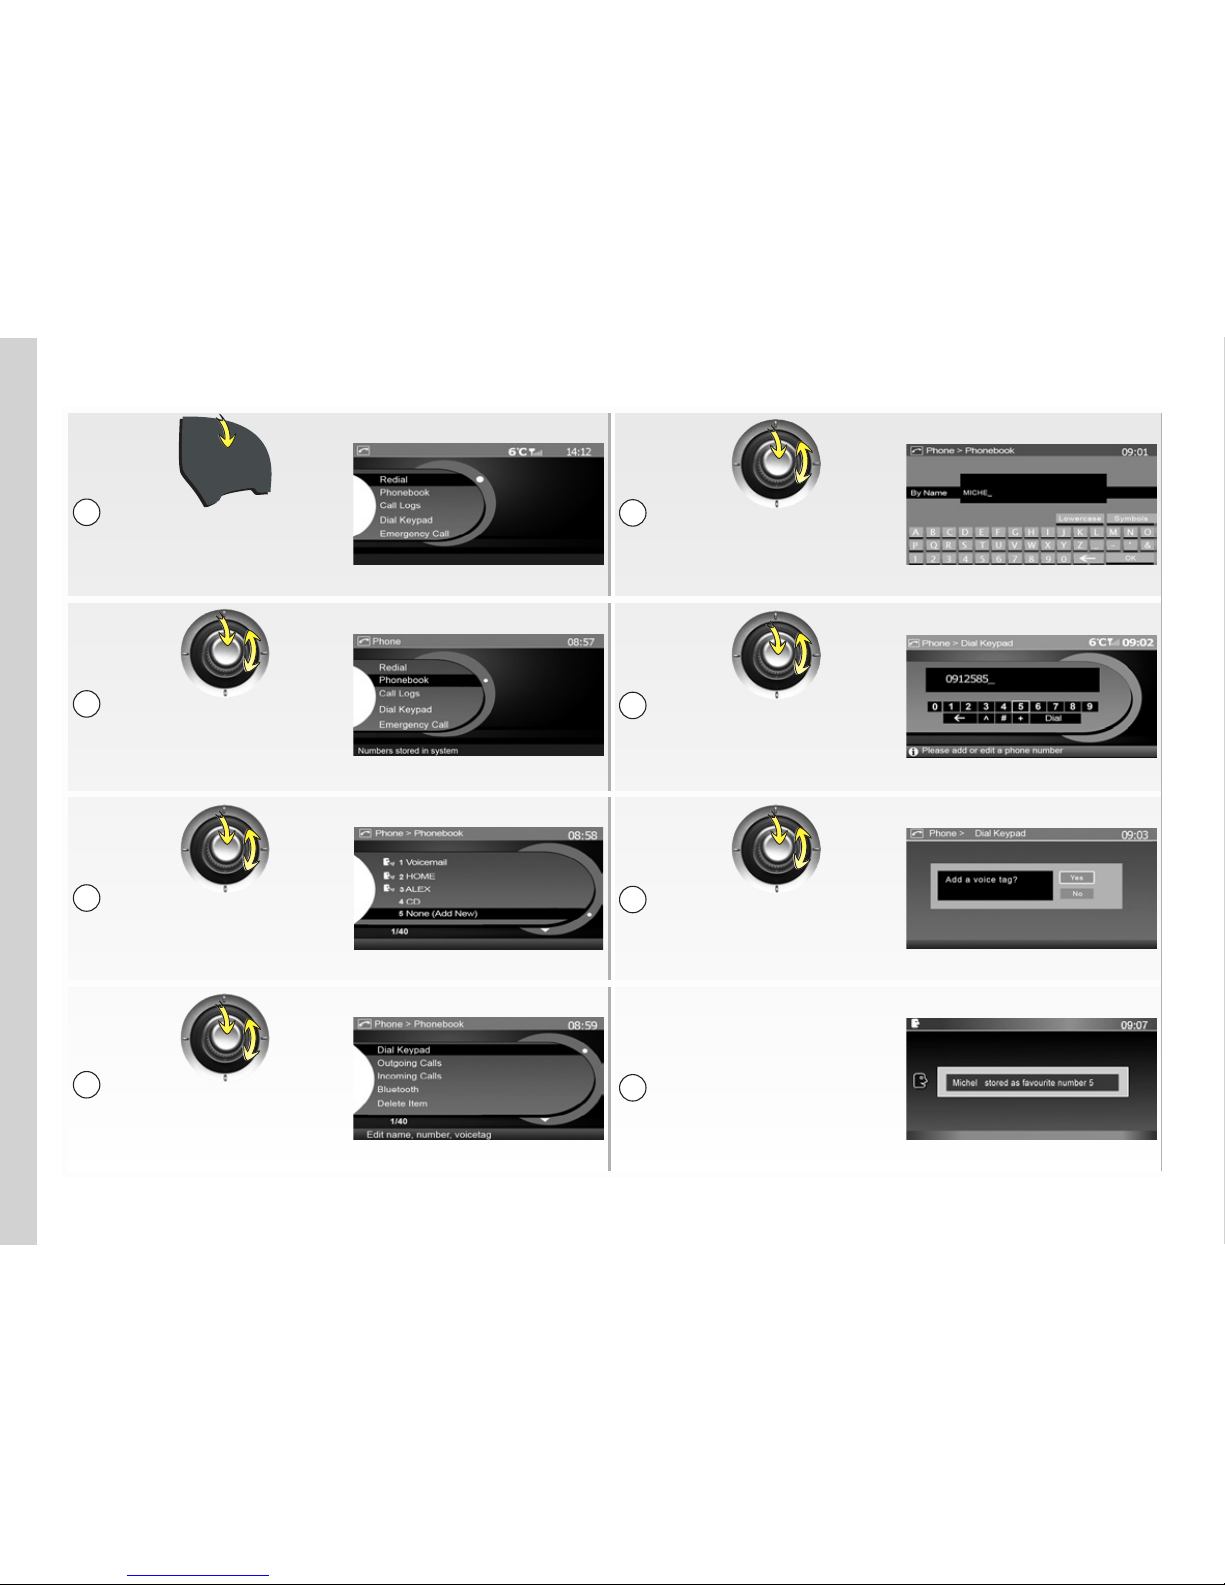
DEST
TEL
Press TEL
Enter the name of the
contact letter by letter
and confirm with “OK”
Select “Phonebook”
Enter the contact’s phone
number digit by digit
and confirm with “OK”
Select “None (Add New)”
The system will ask if
you wish to add a voice
tag, select “Yes” and
say the command
The system will confirm
the new contact is stored
Select “Dial Keypad”
1
2
3
4
5
6
7
8
PHONE SYSTEM: Storing a phonebook entry
Page 18
15
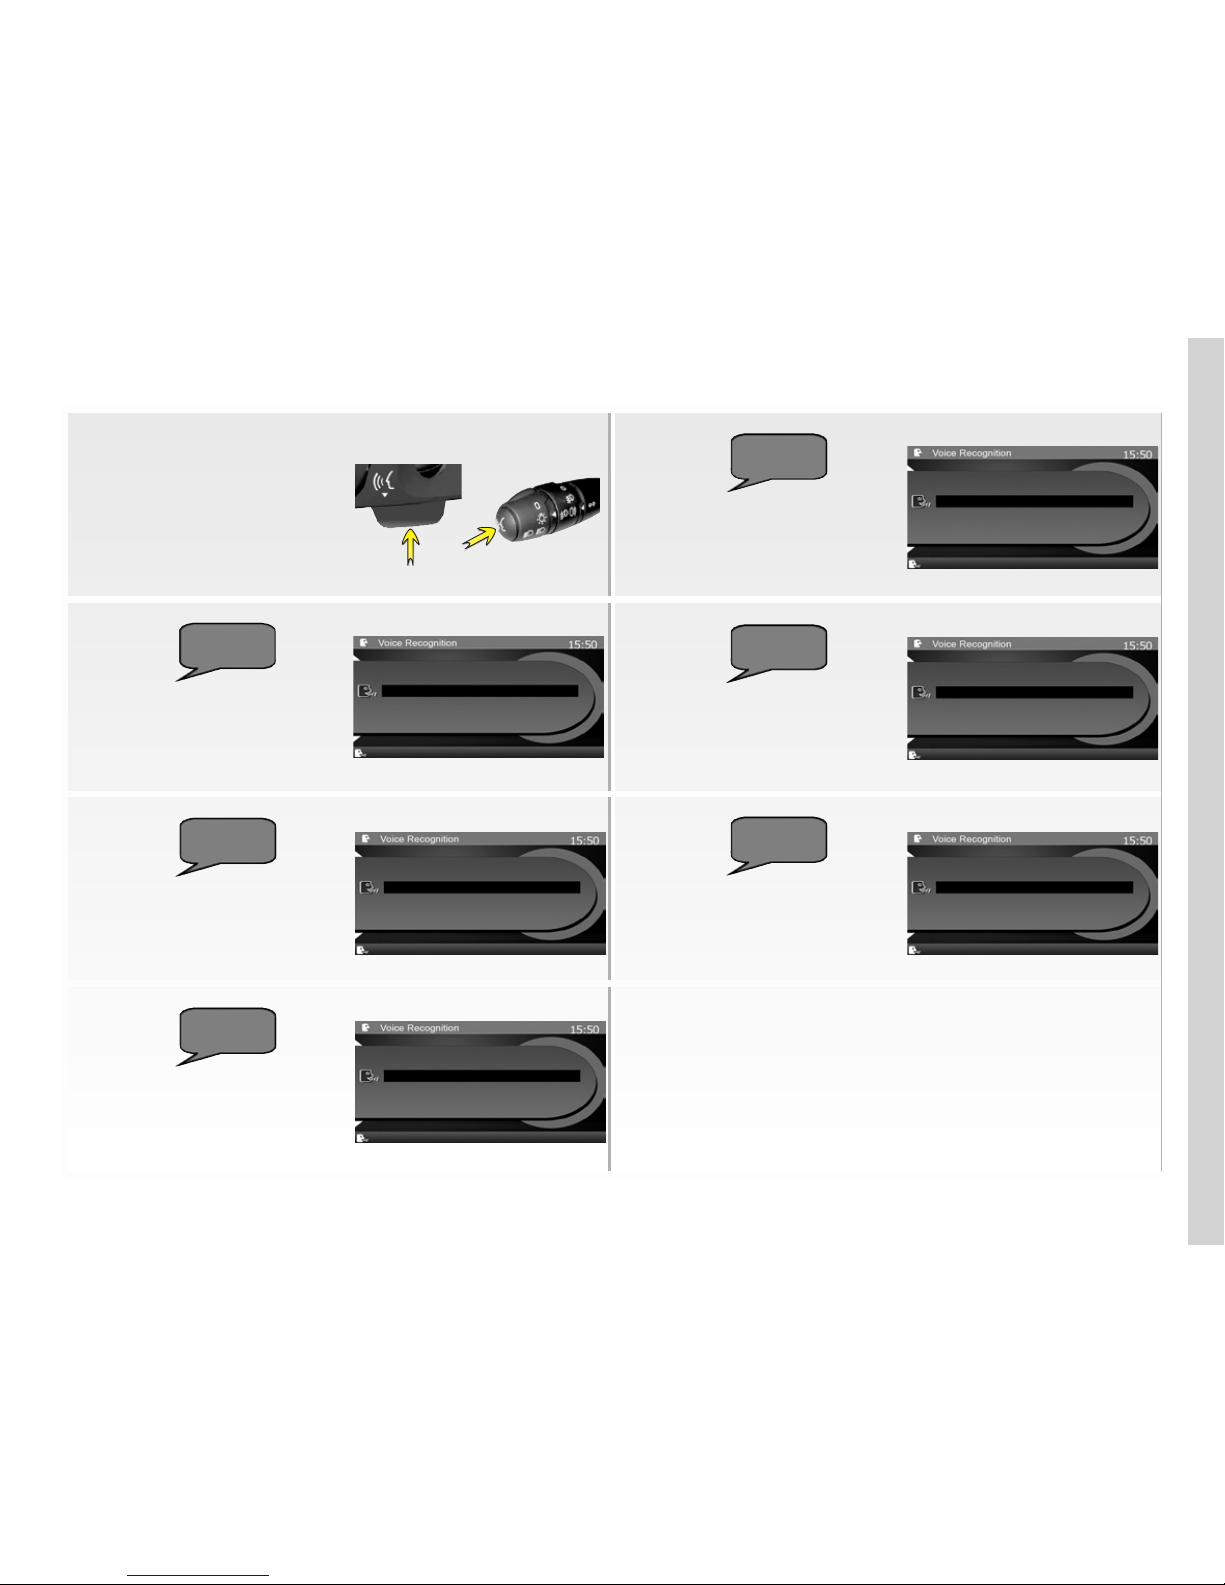
PHONE SYSTEM: Making a call
Press Þ on the steering
column control to activate
voice recognition
Dialling a number in
the log: Say “Outgoing
calls” or “Incoming calls”
or “Missed Calls”
Dialling a phonebook
entry: Say “Call”
If necessary, say
“Next page” or
“Previous page”
Say the voice tag of
the number that you
recorded beforehand
Say the number of the
contact in the list
Dialling a number:
Say “Dial”, then say
your number
Page 19
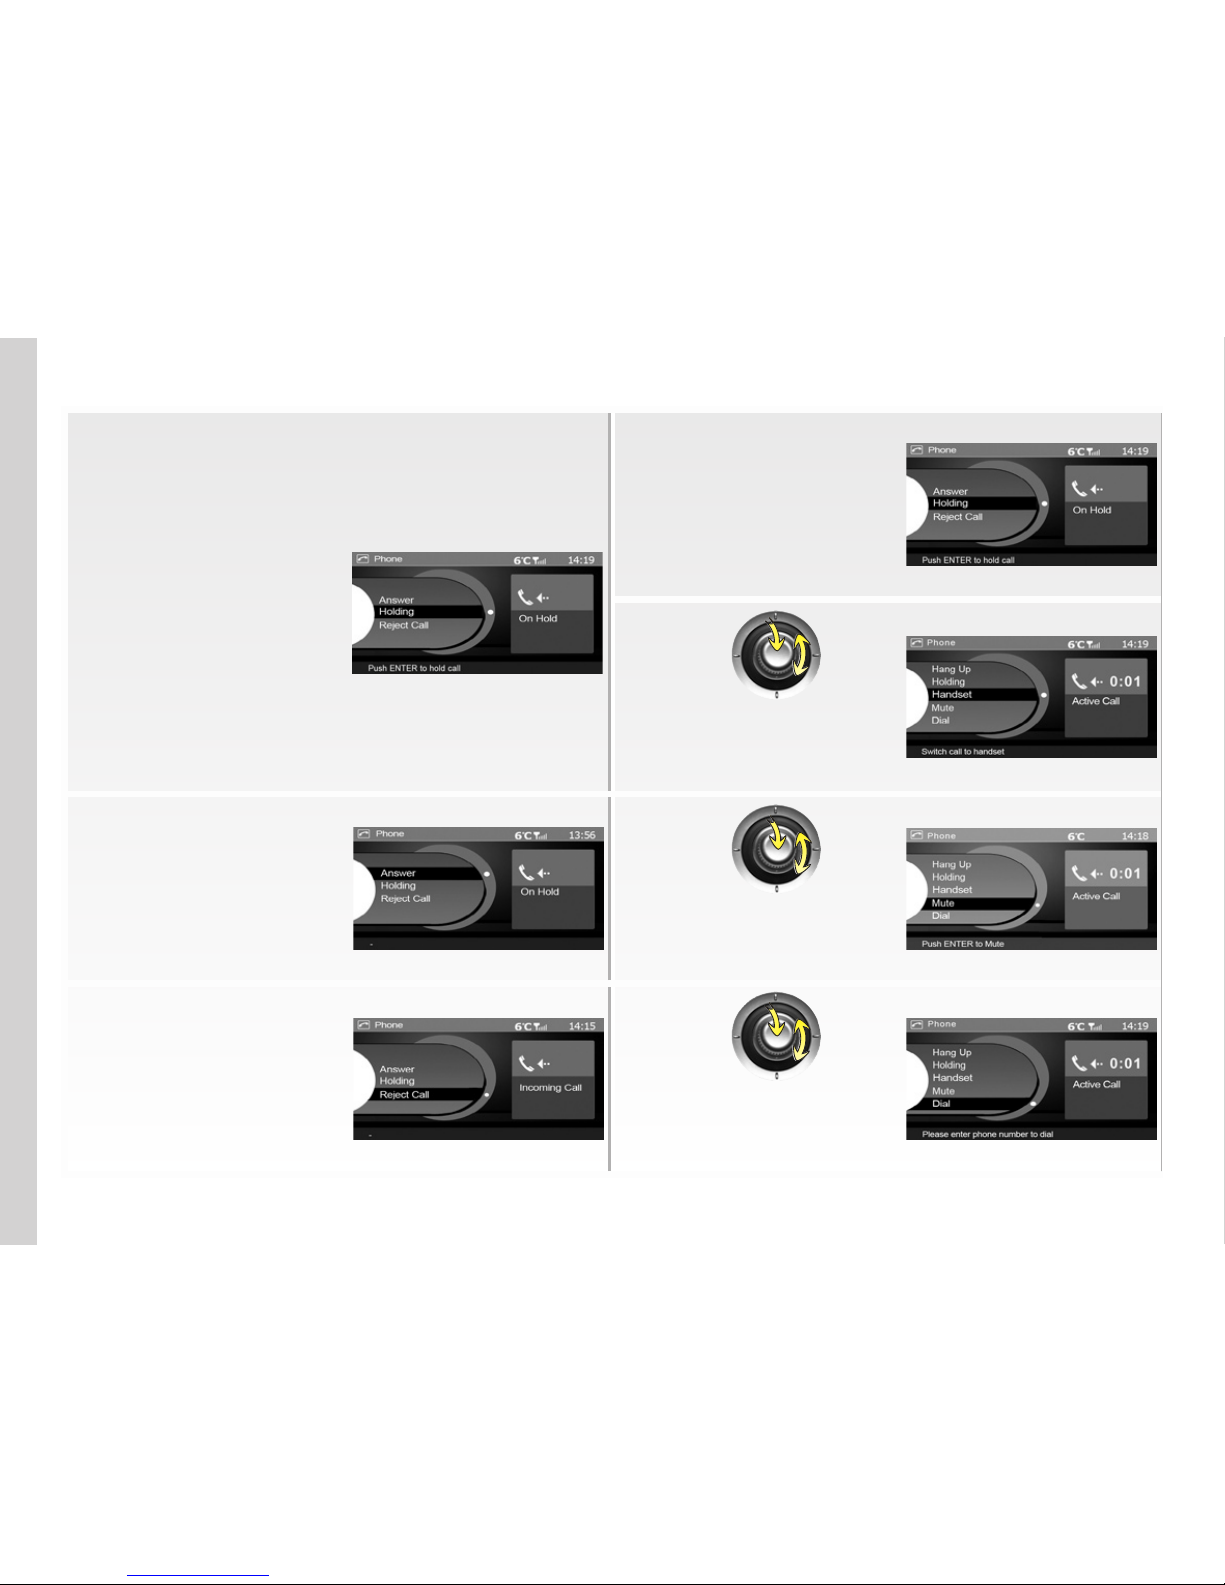
16
Placing a call on hold:
Press the þ† button on
the steering column control
Automatic call waiting:
A message will inform
your caller that you
are driving
Transferring a call to the
phone: Select “Handset”
To resume a call:
Press
the þ† button on your
steering column control
Speaking without
being heard by the
caller: Select “Mute”
Rejecting a call:
Press and
hold the þ† button on the
steering column control
Controlling a voice server
such as your answering
machine: Select “Dial”
PHONE SYSTEM: Managing a call
Page 20
17
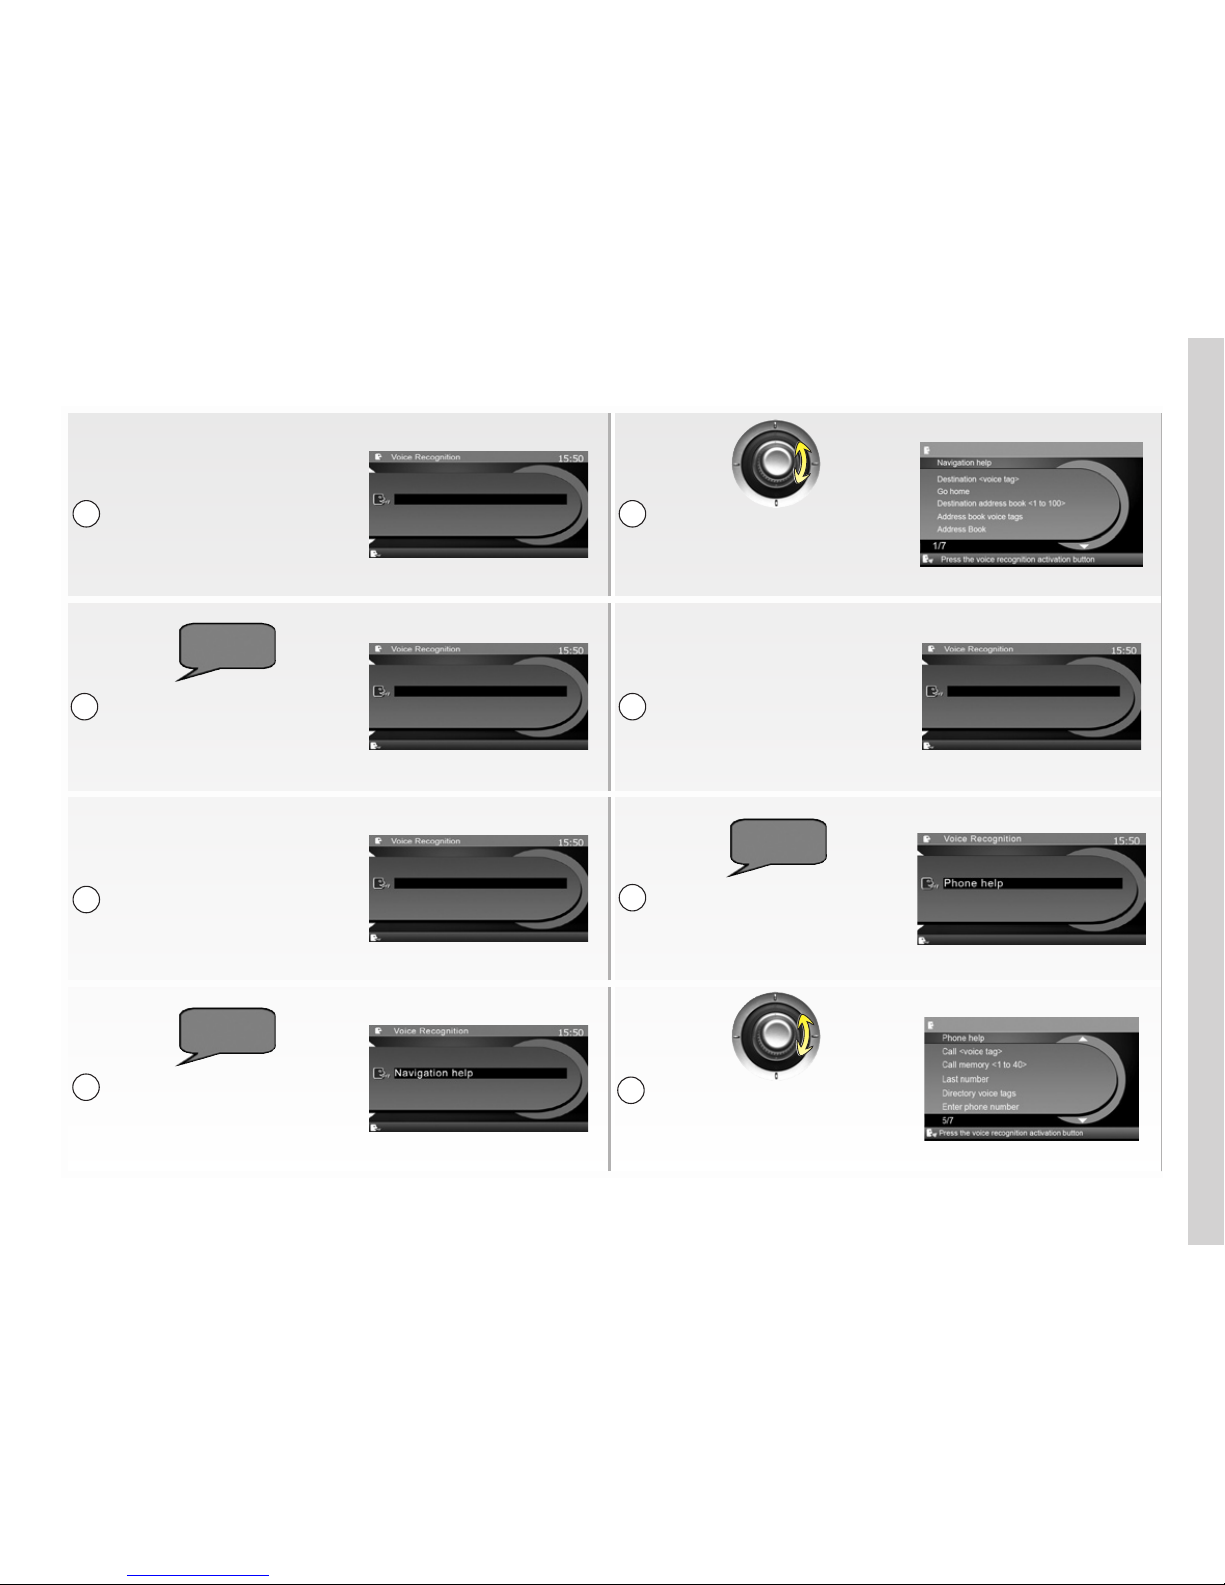
VOICE RECOGNITION: Using voice commands
Using voice commands:
Press the Þ button
on your steering
column control
Rotate the central control
to scroll through all of
the voice commands
Using the phone
system help: Press
the Þ button on your
steering column control
Say your command
Using the navigation
help: Press the Þ
button on your steering
column control
Say “Phone help” to display
all the phone commands
Say “Navigation help”
to display all the
navigation commands
Rotate the central control
to scroll through all of
the voice commands
1
2
1
2
3
1
2
3
Page 21

18
Jaune Noir Noir texte
GENERAL DESCRIPTION
Introduction
Your vehicle’s multimedia system performs the following functions:
– RDS radio,
– 6 audio MP3/WMA changer
– navigation assistance,
– hands-free phone.
The multimedia system can store up
to 4 user profiles for vehicles equipped
with the hands-free Renault card
(storage of radio stations, audio settings, etc.).
Radio and CD functions
The multimedia system can be used
to listen to FM (frequency modulation), LW (long wave) and MW (medium
wave) radio stations, as well as audio
and MP3/WMA CDs.
The RDS system makes it possible to
display the name of some stations and
also for information messages sent by
FM stations to be heard automatically:
– traffic bulletins,
– news bulletins,
– emergency messages.
Voice command function
The voice command function makes it
possible to control certain functions by
voice (navigation/phone).
Hands-free phone function
The hands-free phone system makes
the following functions possible without
having to handle your phone:
– send/receive/suspend a call,
– dial voicemail,
– dial emergency numbers.
Navigation assistance
function
The navigation system automatically
calculates the geographical position of
the vehicle by receiving GPS signals.
It suggests a route to your chosen destination using:
– its road map (on the “map” DVD),
– information from the TMC traf
fic information service (depending on
country).
Finally, it indicates the route to take,
step by step, using the display screen
and voice messages
Your hands-free phone system is only intended to facilitate communication by reducing the risk factors, without removing them completely. You must always comply with the laws of the country in which you are travelling.
Page 22
19
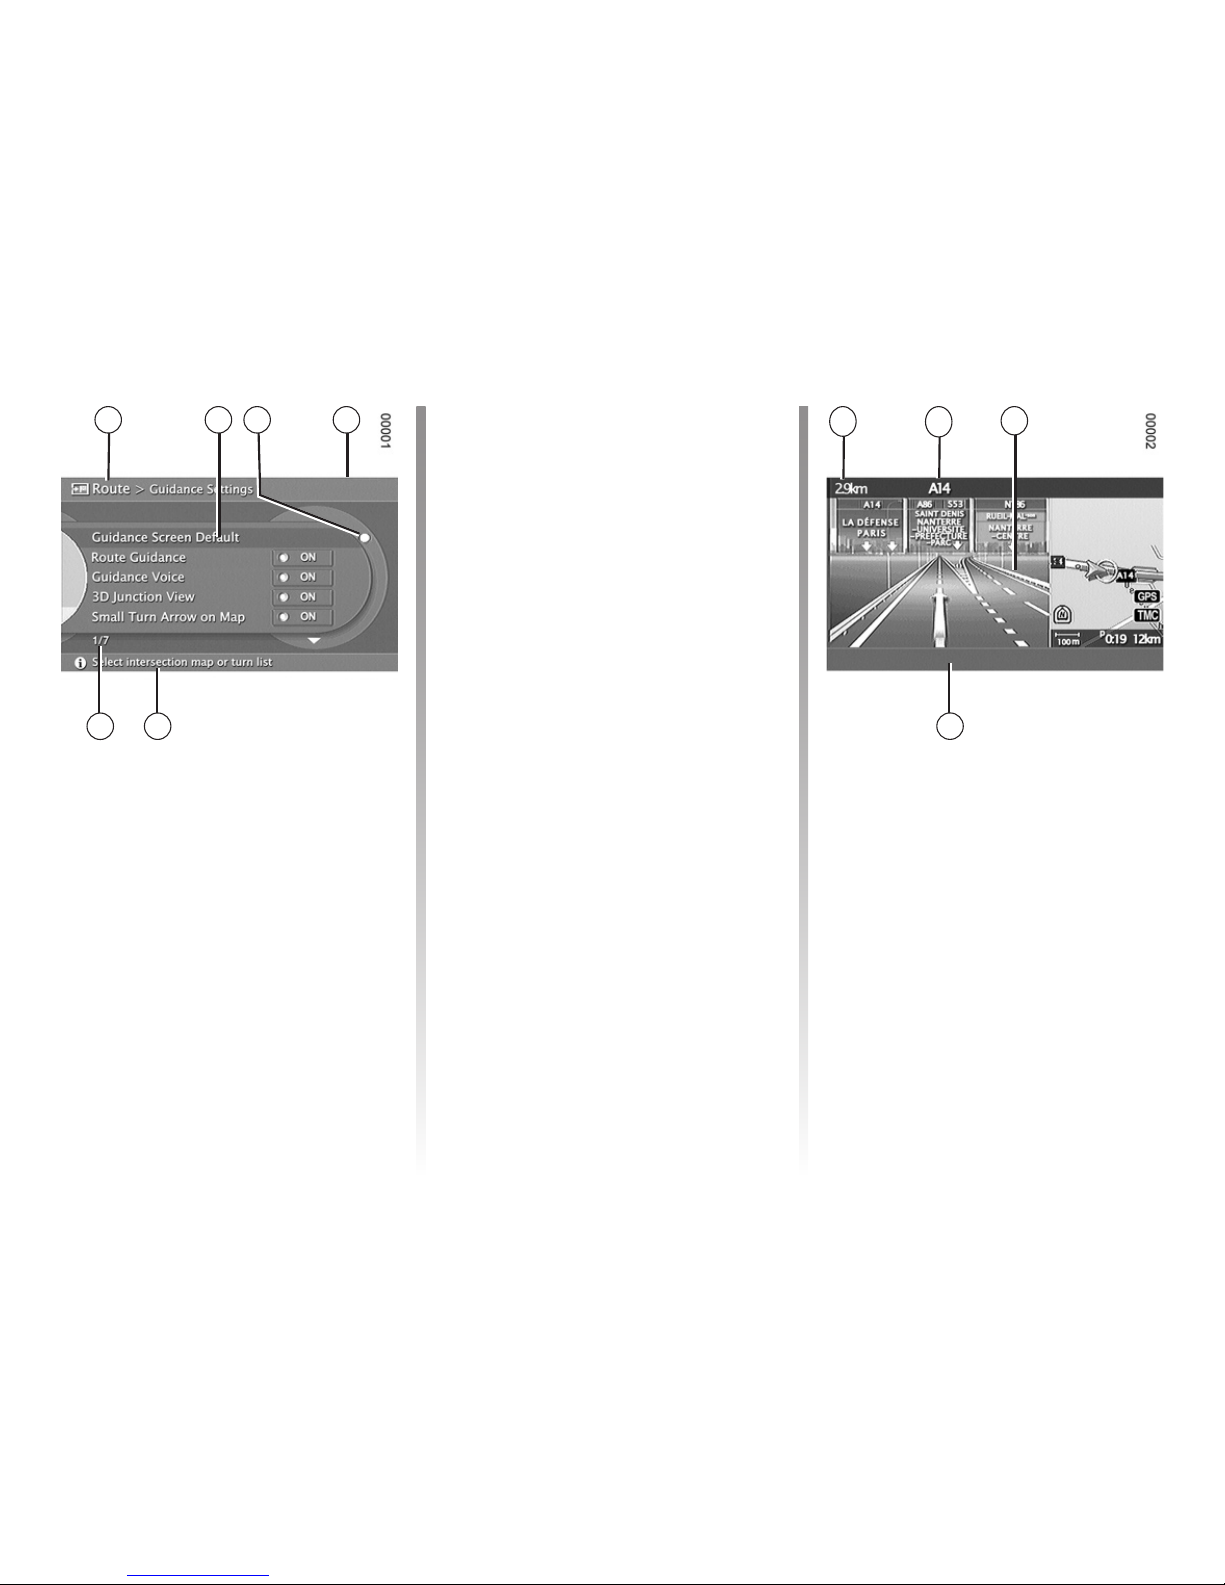
Displays
Menu screen
The upper band indicates: the name of
the selected menu (zone
A), the time,
the phone network and the exterior
temperature (zone
D).
The central zone (zone
B) displays the
tree diagrams for the audio, phone and
navigation menus.
The yellow dot (zone
C) indicates the
item you are currently on.
The middle band (zone
F) indicates the
number of the item currently being selected and the total number of items in
the menu.
The lower band (zone
E) indicates the
contents of the selected item.
Navigation screen
The upper band indicates the distance
left to cover before the next crossing
(zone
G), and the designation of the
road you are travelling on (zone
H).
The central zone (zone
I) is reserved
for displaying the navigation maps.
The lower band (zone
J) indicates
audio information.
A B C
E
G
H
I
J
GENERAL DESCRIPTION (continued)
F
D
Page 23
20
Jaune Noir Noir texte
2 21
10 8 9 8 7 6 5 4 3
24 25 26 27
33
32 31
28
2930
8
1
7
9
11
12
17
16
2
4
15
8
14
13
A
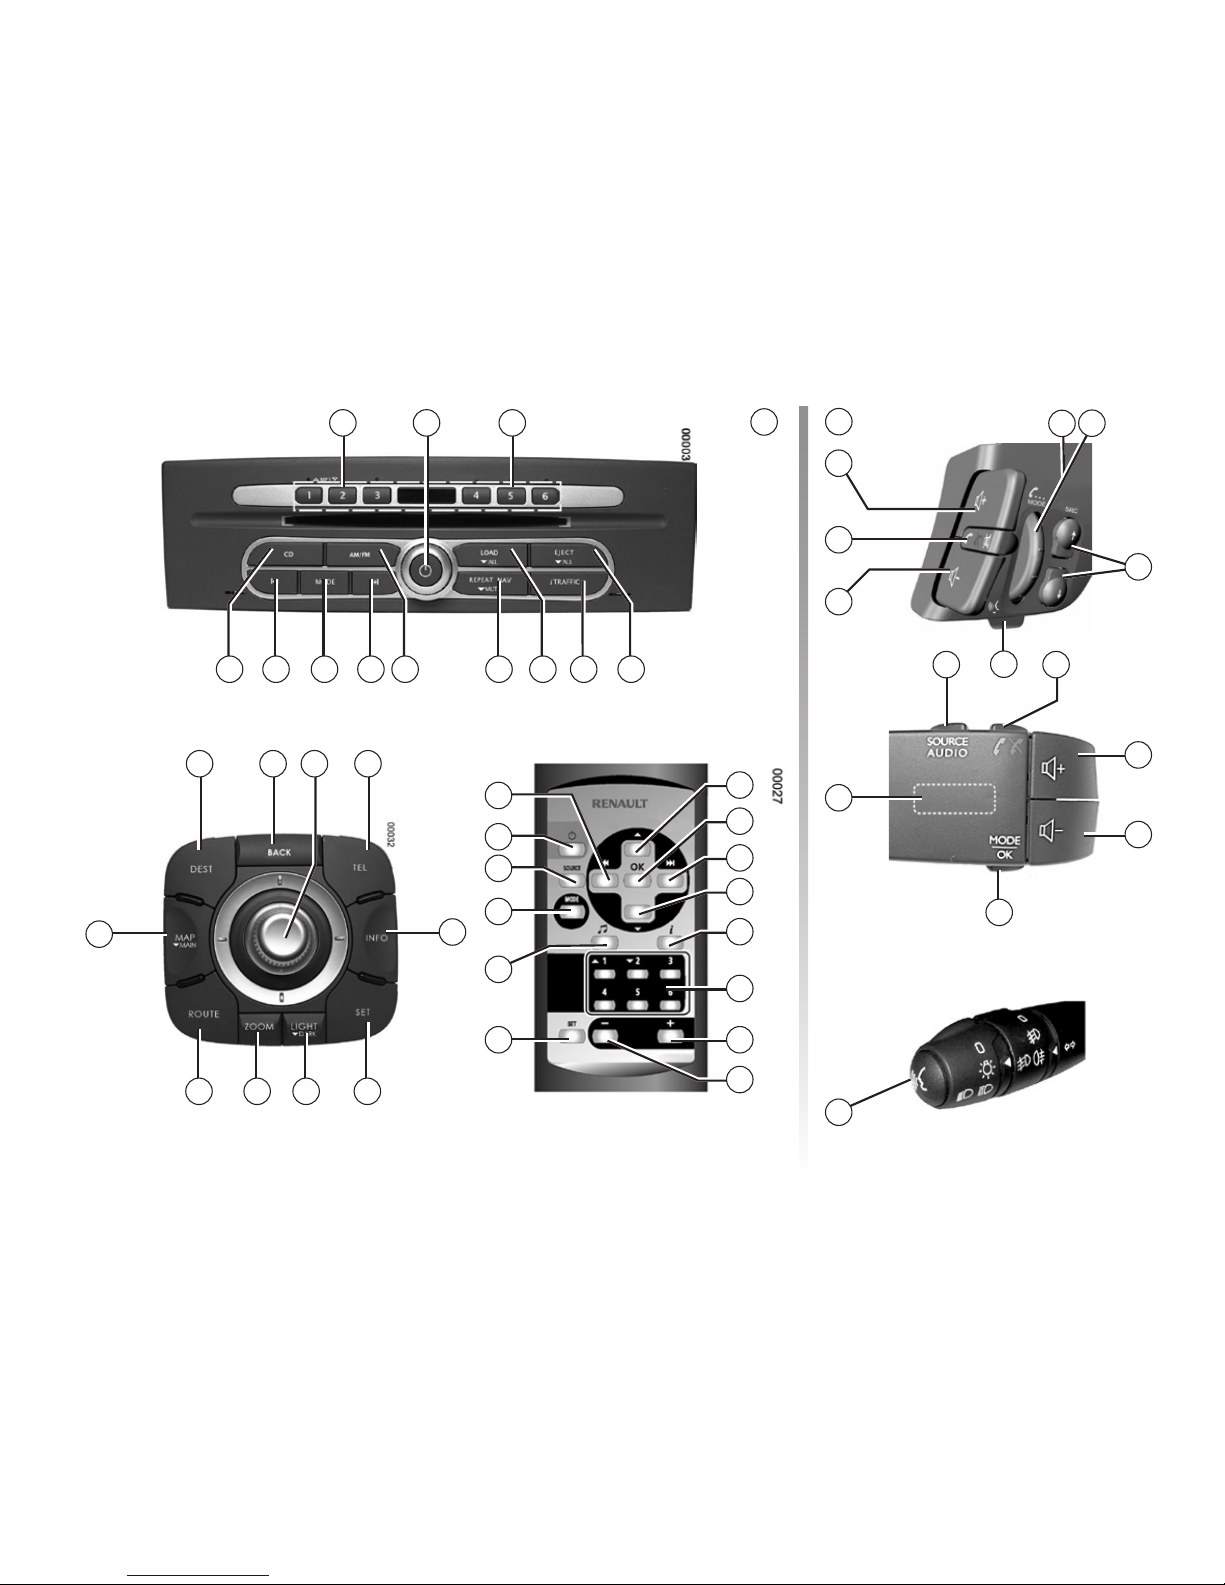
INTRODUCTION TO THE CONTROLS
16
21
17
19
18
20
19
22
16
17
18
23
20
B
23
Page 24

21
A B Function
1
Press: audio system On/Off
Rotate: Adjust the volume
2
Store (long press)/Recall a stored radio station (short press)
Select a CD from a CD changer
3 Eject a CD (short press)/Eject all CDs (long press)
4
Activate/deactivate “i TRAFFIC” road traffic information (short press)
Activate/deactivate the i PTY function (press and hold)
5 Load a CD (short press)/Load all CDs (long press)
6
Repeat or interrupt the last guidance or traffic information (TMC) voice message (short press)
Activate/deactivate voice guidance (long press)
7
Activate the radio source/display the radio on the full screen
Change the AM/FM band
8
Search for a CD/MP3 CD track
Search for a station or radio frequency
Fast forward/rewind CD/MP3 CD tracks (press and hold)
9
18 Change station selection mode (“PRESET”, “LIST”, “MANUAL”)
Change play mode (Repeat, Random) for CD source
10 Activate the CD source/display the CD source on the full screen
11 Activate/deactivate the loudness function
12 Access the audio settings menu
13/15 23
Search for a CD/MP3 CD track
Search for a station or radio frequency
14
Confirm the audio settings
Change music folder on an MP3/WMA CD
16/17 16/17 Adjust the volume
16+17
21
16+17
Mute the sound, pause
INTRODUCTION TO THE CONTROLS (continued)
Page 25
22
Jaune Noir Noir texte
2 21
10 8 9 8 7 6 5 4 3
24 25 26 27
33
32 31
28
2930
8
1
7
9
11
12
17
16
2
4
15
8
14
13
A B
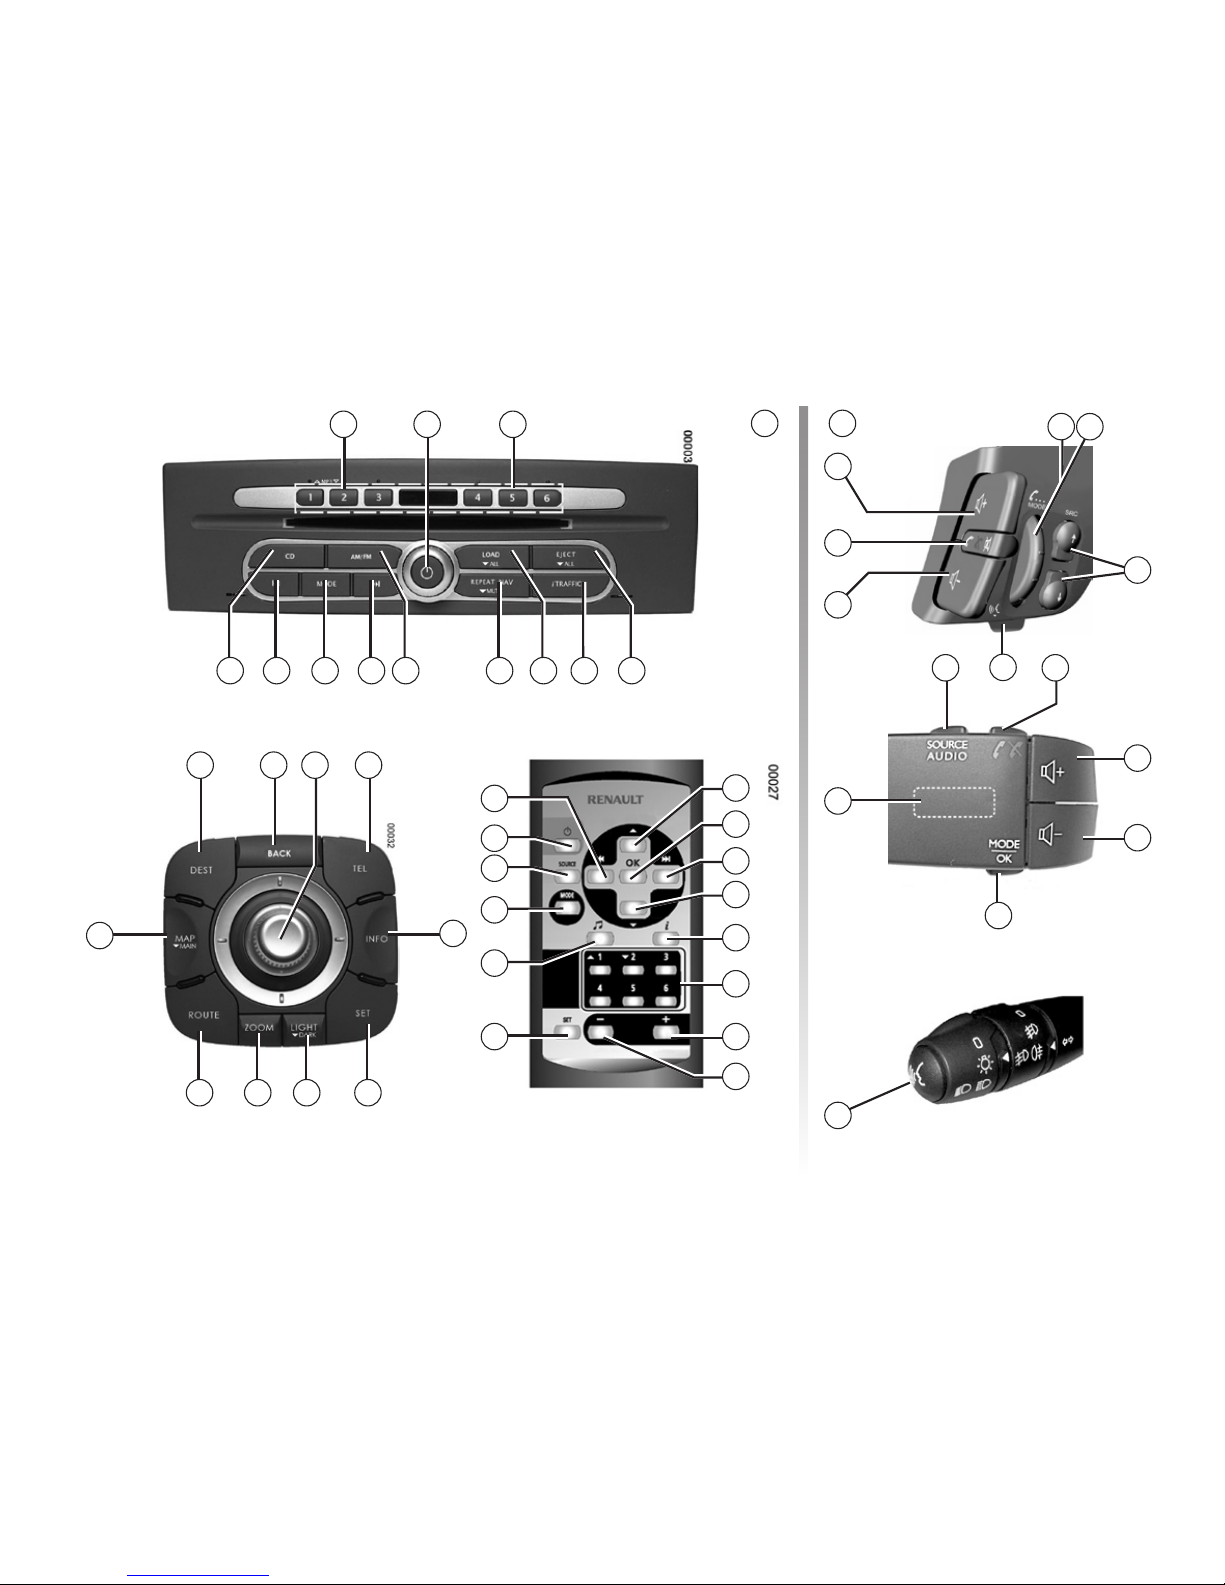
INTRODUCTION TO THE CONTROLS (continued)
16
21
17
19
18
20
19 22
16
17
18
23
20
23
Page 26

23
INTRODUCTION TO THE CONTROLS (continued)
A B Function
18
Place an incoming call or a current call on hold (short press)
Resume a call on hold (short press)
Update the radio station list (long press with radio source)
Select a CD (on CD source) (short press)
19 Change source, CD, AM, FM
20 Activate/deactivate voice recognition
21/22
Answer/end a phone call (short press)
Reject a call (long press)
Resume a call on hold (short press)
24 Access the destination entry menu
25
Return to the previous screen or correct an entered character (short press) or delete the entire entry (long
press)
26
Rotate:
– move up or down through the menus ;
– modify the scale (in ZOOM mode) ;
– adjust the brightness of the screen (in LIGHT mode).
Shift (front, back, right, left):
– move vertically or horizontally through the menu;
– move around the map;
– modify the scale (in ZOOM mode)/adjust the screen brightness (in LIGHT mode).
Press:
– confirm;
– to display the map menu.
27 Access telephone functions
28 Access information on traffic, on GPS co-ordinates, on the version number of the map
29 Access the system setting menu, the address book manager and phonebook
30
Adjust the screen brightness
Select Day/Night mode (double press)
Activate (long press)/deactivate (short press) standby screen
31 Access the menu for changing the scale
32 Access the route management menu
33
Display the map (short press)
Display the MAIN screen (press and hold)
Page 27

24
SWITCHING ON/OFF
Switching on
The multimedia system switches on automatically when the ignition is switched
on.
In other cases, press button
1 to switch
on the multimedia system.
With the ignition off, you can use the
system for 20 minutes. A bleep and
message will then indicate that it is
switching off.
Press
1 to make the multimedia system
operate for a further 20 minutes.
Switching off
The system switches off automatically
when the vehicle’s ignition is switched
off. With the ignition on, press
1 to
switch off the radio or CD function (the
navigation function remains active).
Standby screen
The standby screen mode allows the
display screen to be switched off.
When in standby screen mode, the
system is still operating. The radio, CD
or guidance system will continue to operate.
Press and hold
30 to activate and
briefly press
30 to deactivate the screen
standby.
Any action will temporarily reactivate
the screen.
Page 28

25
Navigating a menu
You can navigate a menu:
– by turning the rotary switch
26 for
vertical movement (movement
A);
– by shifting
26 for horizontal or verti-
cal movement (movement
B).
OPERATING PRINCIPLES
Using the steering column
controls
Press button 18 or control knob 18
(press from behind) to change the radio
station search mode.
Rotate wheel
23 to change station
(movement
D).
Press
19 to change source (CD, AM,
FM).
181923
1823
Confirming/cancelling a
selection
Central control
Always confirm the selection by pressing
26.
To return to the previous menu or to
clear an entered character, press
25.
To delete several entered characters,
press and hold
25.
B
A
26 25
C
D
D
19
Page 29

26
Audio volume
When the system is activated, the
volume levels of the radio/CD sources
and messages will be the same as
when the system was switched off. The
volume will decrease automatically if it
is too high.
Adjust the sound level when listening to
the different sources and messages:
– by turning the wheel
1,
– or by pressing
16/17.
The radio/CD source being listened
to is interrupted when “i TRAFFIC” information, news bulletins or a warning
message is received.
Muting the sound
Press 21 or simultaneously on 16/17 to
mute the sound.
This function is deactivated automatically when the volume control is used
or when a news or road traffic bulletin
is broadcast.
You can also interrupt a news bulletin
by pressing
7 or 10.
Phone volume
The ringtone, received call and outgoing call volumes can be set in the
“System settings” menu.
To adjust these volumes, refer to the
information on “Volumes and beeps” in
the section on “System settings”.
Other volumes
Press 16/17 or rotate wheel 1 to change
the different volumes of the navigation,
voice recognition and phone.
Volume adjustment according
to speed
When this function is activated, the
audio and navigation volume will vary
according to the vehicle speed.
This function is inactive by default.
To activate and adjust this function,
refer to the information on “Volume
adjustment according to speed” of the
section on “System settings”.
VOLUME
Set the volume to a reasonable level so that outside
noise can be heard.
Page 30

27
LISTENING TO THE RADIO
Selecting a wavelength
Select the wavelength (AM or FM) required by pressing
7 or 19.
Pressing
7 a second time switches the
radio to full screen.
Choosing a station
There are different modes for choosing
a radio station.
After having selected the wavelength,
select the mode by pressing
9 or 18.
Three search modes are available in
the following order:
– “LIST” mode,
– “PRESET” mode,
– “MANUAL” mode.
“LIST” mode
This operating mode allows you to find
a station easily by name from an alphabetical list (with FM only).
It is possible to scan up to 50 available
radio stations.
Press
23, 8, 13/15 or 26 to scroll
through all the stations.
Update the list by pressing and holding
9 or 18.
The names of the radio stations that do
not use the RDS system will not appear
on the screen. Only their frequency is
displayed and sorted at the end of the
list.
“PRESET” mode
This operation mode allows you to
recall on demand those stations which
you have already stored (refer to information on “Storing a station” in this section).
Press the buttons on the keypad
2
(numbered 1 to 6) to select your stored
stations.
“MANUAL” mode
This mode allows stations to be
searched manually by scanning the selected wavelength.
Scan the wavelength (advancing in increments of 0.1) by repeatedly press
-
ing
8.
Press and hold
8 then release when
scanning starts to launch the automatic
radio station search.
Repeat the operation each time the
search stops if necessary.
Move wheel
23 to launch an automatic
station search.
Storing a station
Select a radio station by using one of
the modes described above.
Press one of the buttons on the keypad
2 until a bleep sounds.
You can store up to 6 stations per wavelength.
Page 31

28
LISTENING TO THE RADIO (continued)
Radio services and
messages
Retuning to an FM station (RDS-AF)
The frequency of an FM radio station
may change depending on the geographical area.
In order to keep listening to the same
radio station when driving, activate the
RDS-AF function so that your audio
system can automatically retune the
frequency.
Note:
not all radio stations offer this
possibility.
Poor reception can sometimes cause
erratic and annoying changes in frequency. In this case you should deacti
-
vate the automatic frequency retuning.
To activate/deactivate this function,
refer to the section on “Audio settings”.
Traffic news (i TRAFFIC)
When this function is activated, your
audio system makes it possible to automatically receive traffic bulletins when
they are broadcast on certain FM radio
stations (depending on the country).
On the radio source, display the radio
station in full screen by pressing
7.
Briefly press
4 (the i Tr icon is dis-
played).
If you then select the CD source, traf-
fic information broadcasts will interrupt
the CD.
To deactivate this function, press
4.
Programme type search (PTY)
When this function is activated, it is
possible to automatically listen to specific types of programmes (news, sport,
etc.) when they are broadcast by cer
tain FM radio stations (depending on
country).
On the radio source, display the radio
station in full screen by pressing
7 then
press and hold
4 until the PTY icon and
list of programme types appears.
Select the type of programme desired
from the following possibilities:
– “NEWS”
– “SPORTS”
– “VARIED”
– “POP M”
– “CLASSICS”
If you then select the CD source, when
a broadcast of the selected programme
type is made, it will interrupt the CD.
To deactivate this function, press and
hold
4.
Page 32

29
LISTENING TO A CD
CD source
This source allows audio CDs and MP3/
WMA CDs to be played. Up to 6 CDs
can be kept in the CD changer.
Press
10 to select the CD source.
Specifications of readable
formats
The CD changer will only play Audio
CDs, CD-Rs and CD/RWs with audio
tracks in standard format and in MP3/
WMA format. Do not try to play other
formats.
Note:
some protected files (copyright)
cannot be read.
MP3 files (songs) can be saved in fold-
ers (albums) which makes it easy to
access different CD song tracks.
A maximum number of 7 subfolder
levels are permitted in the root folder.
The rate is between 32 kbits/s and
320 kbits/s.
Inserting a CD
Insert the CD(s) with the printed side
facing upwards. If a CD is inserted the
wrong way up, the error message “Disc
read error” is displayed.
Press
5.
The indicator lights located above the
keys on the keypad 2 (numbered from 1
to 6) indicate the presence of a CD.
Press one of the buttons on the keypad
2 to select the location of the CD
to be inserted.
Note:
to enable the file and folder
names to be easily read, names of
32 characters or less should be used,
avoiding special characters such as accents (these will be replaced by asterisks).
Note:
the following recommendations
should be followed for optimum readability of discs recorded on CD-R and
CD-RW devices:
– use devices with a storage capac
ity of less than 80 mins or 700 Mb (it
is prohibited to use CDs which are
dyed black or another colour with inferior reflectivity resulting in reduced
readability);
– use the minimum available burn
speed (8x) even if your disc supports
a higher speed;
– use the “Disc At Once”
(1)
writing
method as the preferred method;
– avoid burning audio files with other
non-audio files;
– the disc must be finalised.
1 This mode, however, prevents multisession
discs from being created, although not from
being copied. To create a multisession disc,
use the “Track At Once” mode and always
ensure that the disc is finalised after the last
session.
Page 33

30
Jaune Noir Noir texte
LISTENING TO A CD (continued)
Note: you can also change file by
pressing and holding
2.
Press
25 to return to previous folders
on the CD.
Fast winding
Press and hold 8 to fast forward or
rewind.
Playback resumes when the button is
released.
Pause
Press 21 or simultaneously on 16/17 to
interrupt play of the current CD.
Press buttons
16,17 or 21 to deactivate
pause.
Inserting several CDs
Do not attempt to force a CD into the
player when the display indicates “loading disc”.
Avoid forcing a CD in, or preventing it
from inserting, to avoid damaging the
CD changer.
Press and hold
5 until the message
“Please wait” appears.
The message “Please insert disc” is
displayed after a delay. Insert the CD
you wish to listen to.
The CD changer will fill the empty
spaces. The indicators located above
the keypad
2 indicate the presence of
the CDs that have been inserted.
Selecting the CD to play
On CD source, press 18 or keypad button
2 to select the CD to be played.
Ejecting a CD
Press 3.
Press the numbered button that corre-
sponds to the CD to be ejected.
Remove the disc.
Ejecting all the CDs
Press and hold 3.
All the CDs will be ejected one after the
other.
Remove each CD
Note:
If an ejected disc is not removed
within 20 seconds, it will automatically
be reinserted into the CD changer.
Selecting a file or a track
(MP3 or WMA CD)
Once the CD is selected, press 8 or 23
to scroll through the CD tracks.
In full screen display, select a track by
pressing
8 or 23.
Press
6 or rotate 26 to scroll through
the files. Confirm the desired file
with
26. Rotate 26 to select the track to
listen to.
Page 34

31
LISTENING TO A CD (continued)
Displaying CD information
You can display the information contained in each folder or track (folder
name, filename, song title or artist’s
name) being played.
In the CD full screen display, select an
audio track and select the item “Audio
text” by shifting
26 to the left to display
the track information. Confirm by press
-
ing
26.
Press
25 to return to the CD tree dia-
gram.
CD playing mode
Press 9 to change the play mode.
The play modes are as follows:
– repeat CD,
– repeat file (MP3),
– repeat track,
– random play all CDs,
– CD random play,
– random play folder (MP3),
– repeat all CDs.
CD maintenance
To protect CD readability, never expose
a CD to heat or direct sunlight.
To clean a CD, rub the CD from the
centre outwards using a soft cloth.
As a general rule, refer to the CD manufacturer’s advice concerning maintenance and storage.
Note:
the system may not be able to
read scratched or dirty CDs.
Page 35

32
Setting the pitch (bass/treble)
Press 29, select the “Audio” item. Select
the tone to adjust “Bass” or “Treble” and
confirm by pressing
26.
Rotate
26 to adjust the bass or treble
and confirm by pressing
26.
Balance/Fader settings
Press 29, select the “Audio” item.
Select the sound distribution to adjust
“Balance” or “Fader” and confirm by
pressing
26.
“Balance”: Left/Right distribution.
“Fader”: Front/Rear distribution
Rotate
26 to adjust the distribution and
confirm by pressing
26.
Activating the loudness
function
(Increased bass amplification)
Press
29, select the “Audio” item and
then “Loudness”. Press
26 to activate/
deactivate this function.
SPeed Sensitive Volume
Press 29, select the “Audio” item and
then “Speed Sensitive Vol” and confirm
by pressing
26. Rotate 26 to adjust the
volume correction according to vehicle
speed, and confirm by pressing
26.
PTY Category
Press 29, select the “Audio” item and
then “PTY Category”. Press
26 to select
the type of programme required.
– News
– Sport
– Variety
– Pop_M
– Classical
Confirm your selection by pressing
26.
Traffic information
Press 29, select the “Audio” item and
then “Traffic information”. Press
26 to
activate/deactivate this function.
AF (automatic frequency
retuning)
Press 29, select the “Audio” item and
then “AF”. Press
26 to activate/deacti-
vate this function.
REG (Local station reception)
Press 29, select the “Audio” item and
then “REG”. Press
26 to activate/deac-
tivate this function.
PTY/iTR Volume
Press 29, select the “Audio” item and
then “PTY/iTR Volume” and confirm by
pressing
26. Change the volume of the
transmission by rotating
26 and confirm
by pressing
26.
AUDIO SETTINGS
Page 36

33
THE NAVIGATION SYSTEM
The navigation system
The navigation system calculates your
position and guides you using data:
– on vehicle speed and from the gyro
-
scope (measuring corners) ;
– from the GPS receiver;
– from the digital map.
The GPS receiver
The navigation system uses GPS
(Global Positioning System) satellites
orbiting the Earth.
The GPS receiver receives signals
transmitted from several satellites. The
system can then locate the position of
the vehicle.
The digital map
The digital map contains the road maps
and town maps that the system requires. It is located on the “map” DVD.
Inserting the “map” DVD
Move button A “LOAD/EJECT” to the
right to insert the “map” DVD.
Move button
A “PLAY” to the left to
begin navigation.
“Map” DVD
A “map” DVD of Europe is supplied with
the navigation system. Updated “map”
DVDs are regularly released.
If possible, always use the most recent
version.
Only use “map” DVDs that are compatible with your vehicle’s navigation system.
A
Page 37

34
Jaune Noir Noir texte
READING A MAP
Displaying the map
To display the map around the location
of the vehicle, press
33.
Shift
26 in the four directions to move
around the navigation map.
Press
31 to access the menu to change
the scale.
Change the map scale by rotating
26.
Map key
A Indicates the next direction change
B
Indicates the direction change
C
Route calculated by the navigation
system
D
Distance remaining to the destination
E
Estimated time of arrival
F
Indicates the quality of the reception
for TMC traffic information
grey: poor reception
green: good reception
G
Indicates the quality of the reception
of the GPS signal
grey: poor reception
green: good reception
H
Location of the vehicle on the navigation map
I
Compass
J
Navigation map scale
GPS Current Location Info
This function makes it possible to find
out the geographical location of the vehicle (Latitude/longitude/altitude).
Press
28. Select “GPS Current Location
Info” to find out the exact location of the
vehicle.
A CB
DEFGHIJ
Page 38

35
Colour codes of roads
The roads are displayed differently depending on the type of carriageway.
Key
Motorway: yellow with red border
Major road: red
Minor road: yellow
Street: white
Compass
The compass L is displayed permanently at the bottom of the map.
It indicates North whatever the position
of the map.
It is indicated by a black circle with a
red arrow pointing North.
READING A MAP (continued)
L
Page 39

36
Jaune Noir Noir texte
READING A MAP (continued)
Map icons
The navigation system uses icons O to
display points of interest (POI).
The icons displayed on the map (scale
100 m) are the following:
Icon
Meaning
Universities or colleges
Shopping centres
Town halls
Courts
Banks
Police stations
Military bases
Hotels
Restaurants
Petrol stations
Icon
Meaning
Supermarkets
Subway stations/regional
train stations
National train stations
Park and Ride
Car parks
Underground car parks
Rest areas
Monuments and historic
buildings
Tourist information
Leisure centres
O
Page 40

37
READING A MAP (continued)
Map icons
3D icons
Viewing the map in “birds-eye-view”
mode makes it possible to view icons
N
in three dimensions.
Icon
Meaning
Buildings
Airports
Town halls
Parks
National train stations
Castles
N
N
Page 41

38
Jaune Noir Noir texte
ENTERING A DESTINATION
Destination menu
Press 24 to access the “Destination”
menu.
The “Destination” menu offers several
methods to enter a destination:
– enter an address (complete or par
-
tial);
– select an address from the Address
Book;
– selecting a nearby service (Quick
Stops);
– selecting an address from Points of
Interest (POI);
– selecting from Others: home loca
tion address, a previous destination,
a previous starting point, a stored
route, etc.
To select a destination from the map,
refer to the section on “Entering a
destination” and the information on
“Selecting a destination on the map”.
The “Destination” map also makes it
possible to add stops to the route.
Refer to the information on “Adapting
your route” subheading “Adding a
stop”.
Entering an address
Select the “Address” item.
The “Address” item allows you to enter
all or part of the address: country, city,
street and number.
Only addresses known to the system
will be recognised.
Select the “Country” item and confirm
by pressing
26.
Rotate the central control
26 to select
the name of the required country from
the countries listed.
Confirm your country by pressing
26.
Select the “City” item.
Use central control
26 to enter the
name of the city required.
When the number of corresponding
cities is below 5, the system will display
a list. Select the required city and con
-
firm by pressing
26.
Page 42

39
ENTERING A DESTINATION (continued)
Select “OK” to display the list at any
time.
Confirm by pressing
26.
Proceed in the same way for “Street”
and “House No”.
Press
A to insert spaces in a city or
street name.
Press
B or 25 to correct the entry.
The system will store in its memory the
last 5 cities entered.
By selecting “Last 5 Cities” you can
select one of these cities directly.
When entering the address the system
will remove the brightness of certain letters to prevent any errors when entering a destination.
In the destination list, you can scroll the
full name of the destination by shifting
the central control
26 to the right.
Note:
When entering the street, it is not
necessary to specify the type of road
(street, avenue, boulevard, etc.).
B
A
Address Book
Press 24 to display the “Destination”
menu.
Select “Address Book” and confirm by
pressing
26.
Select the required destination address
in the list of stored addresses.
Confirm by pressing
26.
To store an address in the address
book, select “None (Add New)”. For fur
ther information, refer to the section on
“Managing the address book”.
Page 43

40
Jaune Noir Noir texte
ENTERING A DESTINATION (continued)
Classification by “Icon”
The system displays a list starting from
the destinations associated with the required icon.
Classification by “Group”
The system will display a list starting
with the destinations associated with
the required group (family, friends, leisure etc.).
To associate a group name or icon
to an address, refer to the section on
“Managing the address book” and the
information on “Creating a new entry”.
To make it easier to search in the address book, you can sort the destinations into several groups.
Select the item “Sort Entries” and confirm with
26.
Classification by “Number”
Sorting by number makes it possible to
display the destinations in ascending
numerical order.
Classification by “Name”
Sorting by name makes it possible to
display the destinations in alphabetical
order.
Selecting a nearby service
(“Quick Stop”)
The system makes it possible to select
a service located near your vehicle.
There a five categories of service available:
– “petrol station”;
– “restaurant”;
– “parking garage”;
– “hotel or motel”;
– “hospital”.
Note:
the five Quick Stop categories
can be changed. Refer to the infor
mation on “Guidance settings”, “Quick
Stop” item of the section on “Navigation
settings”.
Page 44

41
ENTERING A DESTINATION (continued)
Press 24 to display the “Destination”
menu. Select the item “Quick Stops”
and confirm by pressing
26.
Select the required category and confirm your selection by pressing
26.
The system will suggest a list of addresses around your vehicle, classified
according to distance or length of route
if guidance is in progress.
The map will appear at the right of the
screen and displays the different addresses near to the vehicle.
Select the required address and confirm by pressing
26.
Select a point of interest
(POI)
This item allows you to find a point of
interest in different categories.
There are several options to find a point
of interest:
– by category;
– by the name of the required point of
interest.
Press
24 to display the “Destination”
menu. Select the “Points of Interest
(POI)” item and confirm by pressing
26.
Search by point of interest name
Select “By Name” by pressing
26.
Enter the name of the point of interest you are looking for and begin the
search by selecting “OK”.
If the suggested list is too long, return to
the previous screen to refine the search
by entering a city name or a point of interest category.
Search by category
Select the required category by pressing
26.
Enter a city name and start the search
with “OK”.
You can refine the search by entering
the name of the point of interest if it is
known.
Page 45

42
Jaune Noir Noir texte
“Home Location”
This item allows you to define a destination near your previously stored
home location.
Refer to the section “Navigation settings” to store the address of your home
location.
“Previous Destinations”
This item allows you to select an address that was previously entered.
These are automatically stored.
“Previous Starting Point”
This item will guide you to the starting
point of the previous route (route out
and back).
“Stored Routes”
This item allows you to select a route
stored in advance (stops, destination
and calculation criteria).
“M-way Entrance/Exit”
This item allows you to enter a destination near a motorway entrance or exit.
Select the country and the name of the
motorway and confirm by pressing
26.
The system will display a list of the entrances and exits for the motorway selected.
Select and confirm your selection
with
26.
“Intersection”
This item allows you to enter an intersection between 2 streets as a destination.
Proceed in the same way as with the
other items by entering and confirming
the following categories:
– “country” (compulsory);
– “city” (compulsory);
– “1st street” (compulsory);
– “2nd street” (list of streets crossing
1st street).
“City Centre”
This item allows you to enter a destination near the town centre of the required city. Proceed in the same way
as with the other items by entering the
country and the city.
Note:
this item is also available in the
address entry screen.
ENTERING A DESTINATION (continued)
Selecting other destinations
Press 24 to display the “Destination”
menu.
Select the “Others” item and confirm by
pressing
26.
This item allows you to access the following destinations:
– “home location”;
– “previous destinations” ;
– “previous starting point”;
– “stored routes”;
“M-way entrance/exit”;
– “intersection”;
– “city centre”.
Page 46

43
ENTERING A DESTINATION (continued)
Selecting a destination on the
map
This function allows you to define a
destination from the map.
Shift
26 in one of the four directions to
make the pointer appear on the map.
Move around the map by operating the
central control
26 to the required des-
tination.
To move the pointer more quickly or with
greater precision on the map, adjust the
scale.
Confirming the destination
There are several possible options
before confirming a destination:
– “OK”;
– “Alter Location”;
– “Add to Route”;
– “POI info” (only activated after se
-
lecting a POI);
– “Store Location”.
“OK”
Confirm the destination. If guidance is
operating, it will be cancelled.
“Alter Location”
This function allows you, with any entry
mode for the destination, to correct the
position of the destination on the map.
“Add to Route”
If guidance is in progress, this item
allows you to enter stops (maximum 5)
and to modify the guidance mode for
each step.
“POI info”
This item allows you to consult the address, phone number and to call the selected point of interest (only active after
selecting a point of interest).
“Store Location”
This item allows you to store the destination in the address book.
Page 47

44
Jaune Noir Noir texte
ENTERING A DESTINATION (continued)
Adapting your route
After having confirmed your destination, the system will calculate the route
and suggest several options:
– “Start”;
– “More Routes”;
– “Route Info”;
– “Add Way Pt.”.
Confirm the location on the map by
pressing
26.
There are several possible choices:
– New destination;
– Alter route;
– Nearby point of interest;
– Store location;
– Delete
New destination
This function allows you to confirm your
destination. If guidance is operating, it
will be cancelled.
Alter route
If guidance is in progress, this item
allows you to enter stops (maximum 5)
and to modify the mode for each step.
Nearby point of interest
This item allows you to find a point of interest near to the location on the map.
Store location
This item allows you to store the destination in the address book.
Delete
This item allows you to delete the stored
position where the pointer is located.
Page 48

45
“Add Way Pt.”
Select “Add Way Pt.” to insert one or
several stops in the route. A route can
include up to 5 stops.
Proceed in the same way as when entering a destination.
“Start”
This item allows you to start guidance.
“More Routes”
This item allows you to select the type
of route you wish to take:
– “Short. Time”;
– “Min. M-way”;
– “Short. Dist.”.
“Route Info”
This menu allows you to view or simulate the route entered in the system.
Refer to the information on “Route information” of the section on “Guidance”
to view or simulate a route.
ENTERING A DESTINATION (continued)
Page 49

46
Jaune Noir Noir texte
GUIDANCE
Activating guidance
Select “Start” after having entered a
destination. Guidance will begin.
Guidance screens
The system will offer several different
navigation maps.
Press
26, select “Map View” to change
the map display.
The different possible full screen dis-
plays are:
– 2D map (“Plan View”);
– 3D map (“Birdview”).
The different possible split screen displays are:
– “2D/2D” map;
– “2D/3D” map.
Full screen mode
This mode allows you to view the navigation map on the entire screen.
The information on the arrival time and
the distance remaining to the destination are indicated at the bottom of the
map.
The indication for the next change of direction is located in the top left corner
of the map.
Page 50

47
GUIDANCE (continued)
Split screen mode
This mode allows you to display two
map views to different scales.
Adjust the map on the left by pressing
26 and select “Map View” and “Left
Screen Settings”.
Refer to the information on “Map set-
tings” to adjust the map on the right.
Intersection map
During guidance, before each change
of direction, the system will automatically display a close-up of the intersection. You can activate the zoom sooner
by pressing
33.
The system will automatically switch
back to “map” mode after you have
passed through the intersection. To
return to “map” mode before the end of
the intersection, press
33.
Motorway junction view
During guidance, before each motorway junction, this system will display
a 3-dimensional view of the junction.
You can activate this display sooner by
pressing
33.
Note:
for some junctions, only a guid-
ance arrow will appear on the map.
The system will switch back to “map”
mode after you have passed the junction. To return to “map” mode before
the end of the junction, press
33. To activate/deactivate this function, refer to
the information on “Guidance Settings”
of the section on “Navigation settings”.
Page 51

48
Jaune Noir Noir texte
Voice guidance
Activate/Deactivate voice guidance
Press and hold
6 until you hear the
voice message to activate/deactivate
the function.
Repeating the guidance message
Press
6 to repeat the voice message.
Interrupting the guidance message
Briefly press
6 on the front panel to interrupt the guidance message or TMC
traffic information message that is in
progress.
GUIDANCE (continued)
Route information
This function allows you to view your
route before guidance begins.
This view includes your stops.
Press
32 to display the “Route” menu
and select the item “Route information”.
Three choices will be given:
– “Route info”;
– “Preview”;
– “Simulation”.
“Route info”
This function makes it possible to view
the route plan.
Several details of the route will appear:
– direction change arrows;
– road types;
– road names;
– miles/kilometres before a fork.
“Preview”
This function makes it possible to view
the route on the map.
Page 52

49
GUIDANCE (continued)
“Simulation”
This function allows you to quickly view
the required route.
Start the simulation by selecting
A by
pressing
26.
You can stop the route simulation at
any given moment by selecting
B by
pressing
26.
Change/Edit route
“Detour”
This item allows you to make a detour
from the suggested route over a distance you select.
Press
32 and select the “Change/Edit
Route” menu and then “Detour”. Select
the length of the route to be changed:
0.6 miles (1 km), 1.2 miles (2 km),
3 miles (5 km) or 6 miles (10 km) and
confirm the selection by pressing
26.
“Traffic Detour”
If a detour has been suggested and
refused following a TMC incident, you
may display the last detour suggested
by the system as long as it is still a
viable option.
Press
32 and select the “Change/Edit
Route” menu and then “Traffic Detour”
and confirm by pressing
26.
Once the item is selected, the system
will suggest an alternative route.
Confirm the new route by pressing
26
or reject it by pressing
25.
“Recalculate Route”
This item allows you to recalculate your
route.
Refer to the information on “Adapting
your route” in the section on “Entering
a destination”.
A
B
Page 53

50
GUIDANCE (continued)
Deactivating guidance
At any given moment, you can stop the
guidance.
Press
32 and select “Cancel Route
Guidance”, confirming by pressing
26.
Select the item “Resume Route
Guidance” and confirm by pressing
26
to resume guidance.
“Edit Route”
By selecting this item, you can:
– add stops to the route (maximum 5);
– add a new destination;
– modify the guidance mode.
“Store Current Route”
By selecting this item, the route is
stored in the “Stored Routes” item. It in
cludes the destination and the various
stops.
Page 54

51
MAP SETTINGS
Moving around the map
This function makes it possible to move
around the map.
Press
33 to display the map on the
screen.
Shift the central control
26 to display
the pointer.
Move vertically or horizontally on the
map by shifting the central control
26 in
one of the four directions.
To have a better overview or for more
detail, change the scale of the map
(refer to the following paragraph).
Adjusting the scale
This function allows you to change the
scale of the navigation map.
Press
31 to display the adjustment
scale.
Change the scale by shifting or rotating
the central control
26.
Turning the map
This function allows you to change the
way the map is facing.
To access this function, press
33 to dis-
play the map, then press
26 and select
“Heading”.
Otherwise, press
29 , select the
“Navigation” menu, and “Heading”.
There are several possible choices:
– “North Up”;
– “Heading Up”;
– “Long Range Map View”;
– “Birdview Angle”.
“North Up”
In all circumstances, the map will
always face north.
“Heading Up”
The direction of your vehicle will always
face the top of the map.
This function is only available with the
2D map.
“Long Range Map View”
The position of the vehicle is located at
the bottom of the map.
This makes it easier to view the route
that must be followed.
This function is only available with the
2D map.
“Birdview Angle”
This function allows you to change the
view angle to 3D or 2D/3D mode.
Rotate the central control
26 to + or -
and confirm by pressing
26.
Page 55

52
MAP SETTINGS (continued)
Display points of interest
You can select certain points of interest
(visible at 100 m scale) to be displayed
on the map.
To access this function directly, press
26
and select “Landmark Icons”. Otherwise
press
29 to access the settings menu.
Select the item “Navigation” and
“Landmark Icons”.
Select, by pressing
26 the following
points of interest to be displayed on the
map:
– Service station;
– Restaurant;
– Rest area;
– Hotel;
– Hospital.
Adjusting image quality
The image quality can be adjusted
(contrast, brightness and background
colour).
Press
29 and select the item “Display”
and confirm with
26.
According to the exterior light, the display will automatically switch from the
day settings to the night settings.
For each of the settings, select one of
the following items:
– “brightness”,
– “contrast”,
– “background” colour,
and adjust the setting by rotating
26.
To access the brightness settings directly, press
30. Pressing 30 again
changes the background colour and
enables you to adjust the brightness.
Page 56

53
TMC TRAFFIC INFORMATION
TMC Traffic Information
service
This service operates using the RDS
system. The navigation system re
ceives Traffic Information messages directly from the TMC (Traffic Message
Channel) RDS radio channel. This de
tailed information informs you of traffic
incidents.
TMC Traffic Information functions
The navigation system indicates traffic
incidents:
– by displaying TMC icons on the map
(list of icons at the end of the informa-
tion on “TMC Traffic Information”);
– with a detailed description;
– with voice messages.
When a traffic incident occurs on your
route, the system will automatically
calculate a route to avoid the incident.
Accept the proposed detour by pressing
26 or refuse it by pressing 25.
Traffic information can include:
– accidents and incidents;
– traffic volumes;
– roadworks;
– meteorological conditions;
– general information;
– traffic volume forecast;
– weather forecast;
– lane closures.
Note:
The name of the TMC service
operator is displayed in green when
reception of the service is good, otherwise it is in grey.
Refer to the information on “TMC
Traffic Information” in the section on
“Navigation settings” to select the TMC
Traffic Information function.
TMC Traffic Detour
When a traffic incident occurs on your
route, the system will automatically
calculate a route to avoid the incident.
Accept the proposed detour by pressing
26 or refuse it by pressing 25.
Page 57

54
Jaune Noir Noir texte
TMC TRAFFIC INFORMATION (continued)
Information display
This item allows you to display traffic information on the map.
Press
28 and select “Traffic information
(TMC)” to display the detailed information.
There are several possible choices:
– “Traffic Info on Route”;
– “Nearby Traffic Info”;
– “Traffic Info on Map”;
– “Weather”;
– “Traffic Forecast”;
– “User Locations”;
– “Traffic information settings”.
“Traffic Info on Route”
This item allows you to display the list
of traffic information located on the
guidance route.
“Nearby Traffic Info”
This item allows you to display the list
of traffic information within a radius of
30 miles (50 km) around your vehicle’s
position, even if this relates to areas not
on your route.
“Traffic Info on Map”
This item allows you to access traffic
information by pointing at the symbols
displayed on the map.
The following is then displayed on a
split screen:
– detailed view of the information;
– location of the information on the
navigation map.
You can access event information directly by positioning the pointer on
one of the icons displayed on the map
using
26. A window is displayed with
the event details.
“Weather”
This item allows you to display weather
information on the map.
“Traffic Forecast”
This item allows you to display traffic
forecasts on the map.
“User Locations”
This item allows you to access traffic
information located in a zone that you
have stored in advance.
Once the item is selected, a double
screen is displayed:
– the left half contains the list of stored
zones;
– the right half contains the map show
ing the traffic information on the selected zone.
To store the zone, select “None (Add
New)” and enter the details.
The system allows you to name or enter
a zone, to alter its position on the map
or to delete it.
“Traffic information settings”
Refer to the section “Navigation settings” to select the type of information
to be displayed.
Page 58

55
TMC TRAFFIC INFORMATION (continued)
Symbol Meaning
Accident
Broken down vehicle
Danger: Vehicle
travelling in the
wrong direction
Traffic disrupted
Slippery conditions
Lane closed, restrictions
Two-way traffic
Symbol Meaning
Road closed
Danger
Road works
Road in poor condition
Major event,
demonstrations
Fog, reduced visibility
Heavy rain
Symbol Meaning
Snow
Bad weather
Strong wind, storm
Information
Delays
Page 59

56
Jaune Noir Noir texte
MANAGING THE ADDRESS BOOK
Creating an entry
Press 24 to access the “Destination”
menu. Select the item “Address Book”
and confirm. Select “None (Add New)”
and select one of the following items to
create an entry, confirming with
26:
– Map: refer to the information on
“Selecting a destination on the map”
in the section on “Entering a destination”.
– “Points of Interest (POI)”: refer to
the information on “Selecting a point
of interest (POI)” in the section on
“Entering a destination”.
– “Address”: refer to the information on
“Entering an address” in the section
on “Entering a destination”.
– “Previous destinations”: refer to the
information on “Selecting other destinations” in the section on “Entering
a destination”.
– “Previous starting point”: refer to the
information on “Selecting other destinations” in the section on “Entering
a destination”.
– “M-way Entrance/Exit”: refer to the
information on “Selecting other destinations” in the section on “Entering a
destination”.
– “Intersection”: refer to the information
on “Selecting other destinations” in
the section on “Entering a destination”.
– “City Centre”: refer to the informa-
tion on “Selecting other destinations”
in the section on “Entering a destination”.
In all cases, once the address is confirmed, the system will locate it on the
map. Press
26 to confirm, otherwise
press
25 to modify your entry.
After confirmation, you have the
choice between the items “Edit”, “Alter
Location” and “OK”.
Page 60

57
MANAGING THE ADDRESS BOOK (continued)
Modifying or deleting an
entry
Press 29, select “Address Book” and
“Address Book”. Select the line to be
modified and confirm by pressing
26.
To modify the entry, select “Edit” or
“Alter Location”.
To delete the entry, select “Delete”.
Deleting the address book
Press 29, select “Address Book”
and “Delete Stored Items”. Select the
item “Delete stored locations” and confirm by pressing
26.
Allocating a voice tag to an
address
Press 29 and select the item “Address
Book”, and “Address Book”. Select
the line to be modified by confirming
with
26. Select “Edit” to modify the se-
lected entry and “Voice tag”.
Note:
a voice tag can only be recorded
when the vehicle is stationary.
– “Edit”: to link the following to the ad
-
dress:
– an icon,
– a name,
– a voice tag,
– a sound (emitted when approach
-
ing the address),
– directions (defined for when the
sound is emitted when approaching the address),
– a phone number (this number
cannot be used by the hands-free
phone system),
– a group (family, friends, etc.),
– an index number in the address
book.
– “Position”: to alter the position on the
map.
– “OK”: to confirm.
You can also create an entry in the ad-
dress book by pressing
29 and selecting “Address Book” and “Address
Book”.
Page 61

58
Jaune Noir Noir texte
NAVIGATION SETTINGS
The “Navigation Settings” menu allows
you to change the display of the map or
navigation parameters.
Display points of interest
This item allows you to display points of
interest on the map.
Refer to the information on “Displaying
points of interest” in the section on “Map
settings”.
Map View
Refer to the information on the
“Guidance Screens” in the section on
“Guidance”.
Heading
Refer to the information on “Turning the
map” in the section on “Map settings”.
Guidance Settings
Press 29 and “Navigation”. Select the
“Guidance Settings” menu, confirming
your selection by pressing
26.
You can also access the guidance settings directly by pressing
32.
Activate/deactivate the required functions by pressing
26.
Guidance Screens
This function allows you to activate/deactivate:
– permanent display of the intersection
map,
– permanent display of route details.
Route Guidance
This function allows you to activate/deactivate guidance for a route.
Page 62

59
Guidance Voice
This function allows you to activate/deactivate voice guidance for a route.
3D Junction View
This function allows you to activate/deactivate the display of motorway junctions.
Small Turn Arrow on Map
This function allows you to activate/deactivate the display guidance arrows.
Voice Announcements
This function allows you to select the
number of voice announcements.
Set Average Speeds
This function allows you to set the average speed at which you estimate you
will be travelling depending on the type
of road.
This data allows the system to calculate
an estimated time of arrival.
Deactivate the automatic function. Next
change the values you wish to alter and
confirm with
26.
NAVIGATION SETTINGS (continued)
Avoid area settings
This function allows you to define the
areas to avoid.
Press
29, select “Navigation” and
“Avoid Area Settings”.
When a route is calculated, the system
takes into consideration the avoid area
settings.
Traffic information (TMC)
This function allows you to display the
information on the navigation map.
Press
29, select “Navigation” and
“Traffic information (TMC)”.
There are several possible settings:
– Traffic info on map,
– Type of information to display,
– Select TMC provider,
– Add TMC provider.
Traffic info on map,
Activate/deactivate TMC traffic information display on the map.
Type of information to display
Activate/deactivate the display each
TMC icon on the map.
Select TMC Provider
Select the TMC service mode:
– Commercial service,
– Public service,
– Automatic,
– Other.
Add TMC provider
This item is unavailable.
Refer to the information on “Possible
traffic information” in the section on
“TMC traffic information”.
Page 63

60
Select the route calculation
criteria
This item allows you to select the type
of route to use during the navigation.
Press
32 and select the “Default route
calculation criteria” menu, confirming
your selection by pressing
26.
The system will offer 4 main route calculation criteria.
– short time;
– avoid motorways;
– short distance;
– detailed route priorities.
Select the type of route required by
pressing
26.
NAVIGATION SETTINGS (continued)
The item “Detailed route priorities”
allows you to add certain additional criteria for the type of route:
– avoid tolls;
– use roads subject to restricted
hours;
– use traffic information (TMC Traffic
Information);
– use avoid area settings;
– use ferry transport;
– automatically change route.
Tracking Display Settings
This function displays the parts of the
route that have been covered.
Press
29, select “Navigation” and
“Tracking Display Settings”.
Quick stops
This function makes it possible to
modify the Quick stops (on the system
by default) with other points of interest
better suited to your needs.
Vehicle location
This function allows you to modify the
actual location of the vehicle on the
map.
Returning to default settings
Press 29, select the item “Navigation”
and “Reset ALL settings to Default”.
Select “Return ALL settings to default”
and press
26 to confirm.
Page 64

61
PAIRING/UNPAIRING A PHONE
Bluetooth® connection
Check that the Bluetooth® connection is “ON”. To do this press
29, select
“Phone” and then “Bluetooth Setup”.
Pairing a phone
In order to use your hands-free phone
system, you must pair your Bluetooth®
mobile to your vehicle before using it for
the first time.
Pairing will enable the system to recognise and store a phone. You can pair
up to 5 phones, but only one can be
connected at a time to the hands-free
phone system.
Pairing is carried out directly on your
phone. Your multimedia system and
phone must both be switched on.
Note
: when pairing, ensure any other
phones already paired are not connected to the hands-free phone
system.
Press
29 and select the “Phone” menu.
Select the “Bluetooth® Setup” menu
and select “Pair a New Phone”.
From your mobile, carry out the procedure in the following order:
– activate the phone’s Bluetooth® con
-
nection;
– run a search for Bluetooth® devices
in close proximity;
– select “MY-CAR” (Name of hands-
free phone system) from the list;
– enter the Bluetooth® code ‘1234’ on
the phone keypad.
The phone is automatically stored and
connected to the vehicle.
If pairing fails, repeat these operations.
For more information, refer to your
phone’s user guide.
Unpairing a phone
Unpairing erases a phone from the
hands-free phone system memory.
Press
29 and select the “Phone” menu.
Select the “Bluetooth® Setup” item
and select “Remove Paired Phone”.
Select the phone to be deleted and
confirm with
26.
Confirm your choice by selecting “Yes”.
Your hands-free phone
system is only intended to
facilitate communication by
reducing the risk factors,
without removing them completely.
You must always comply with the
laws of the country in which you are
travelling.
Page 65

62
Connecting a paired phone
Your phone must be connected to the
hands-free phone system in order to
use all its functions.
It is not possible to connect a phone to
the hands-free phone system if it has
not first been paired. Refer to the infor
-
mation on “Pairing/unpairing a phone”.
Once the system is initiated, the hands-
free phone system will search for any
paired phones present in the vicinity
(the search may take a minute).
A message will indicate that the phone is
connected. If a call is in progress when
the connection is made, it is transferred
to the vehicle speakers.
Changing a connected phone
The multimedia system can store up to
5 mobile phones.
You can connect/disconnect one of the
five phones at any time.
Press
29, select “Phone”, “Bluetooth
Setup” and “Paired Phone List”.
Select the phone to be connected and
confirm with
26.
If a call is in progress when the phone is
disconnected, the call will automatically
switch to your phone.
CONNECTING/DISCONNECTING A BLUETOOTH® PHONE
Connection failure
If connection fails, check the following
information:
– your phone is configured to accept
the system’s connection request;
– your phone is switched on;
– your phone battery is not flat;
– your phone has been paired to the
hands-free phone system;
– your phone’s Bluetooth® function
has been activated.
Using your hands-free phone system for
prolonged periods of time will discharge
your phone’s battery more quickly.
Page 66

63
Creating the phonebook list
Press 27, and select “Phonebook” and
choose “None (Add New)” (the phone
must be connected).
Note:
the maximum number of phone-
book entries is 40.
There are several ways to add a number
to the list:
– Edit,
– Outgoing Calls,
– Incoming Calls,
– Bluetooth.
It is recommended that you
stop your vehicle before entering a number or searching for a contact.
PHONEBOOK
Edit
Enter the different information associated with the contact (name and telephone number) and confirm with “OK”.
The system will ask if you wish to add
a voice tag. If you do, select “YES” and
say the voice tag you wish to link to the
contact.
Outgoing calls
Select from the list of outgoing calls the
one you wish to add to the phonebook
list. The system will ask if you wish to
add a voice tag. If you do, select “YES”
and say the voice tag you wish to link to
the contact.
Incoming calls
Select from the list of incoming calls the
one you wish to add to the phonebook
list. The system will ask if you wish to
add a voice tag. If you do, select “YES”
and say the voice tag you wish to link to
the contact.
Bluetooth®
Select and send a contact from your
phone (for further information, refer to
your phone’s instructions). The system
will ask if you wish to add a voice tag. If
you do, select “YES” and say the voice
tag you wish to link to the contact.
Modifying or deleting a
contact
Press 29, select “Phone” and
“Phonebook” and select a contact from
the list. To modify a contact, select
“Edit”, then correct the name, phone
number, and voice tag (a voice tag can
only be recorded when the vehicle is
stationary).
To delete the contact select “Delete
Item”.
Page 67

64
Jaune Noir Noir texte
Dialling a number from the
phonebook
Press 27, select “Phonebook” and
select a contact from the list.
You can also say the voice tag of
the contact that you wish to call after
having activated the voice recognition
command.
Dial a number from the call
history
Press 27 and select “Call Logs”. From
the 3 contacts lists select:
– the list of “missed calls”;
– the list of “outgoing calls”;
– the list of “incoming calls”.
For each list, the contacts are listed
from the most recent to the oldest.
Select a contact to make the call.
Note:
the Call Logs only contain calls
made within the vehicle.
Redial a number
You can redial the last number called
with the hands-free phone system. To
do this press
27 and select “Redial”.
MAKING A CALL
Entering a number
Press 27 and select “Dial Keypad”.
Rotate button
26 to select a number,
then confirm the number by pressing
26. Move to the next number in the
same way and then select “Dial”.
To correct a number select
A or
press
25. Press and hold 25 to delete
all the numbers at once.
A
It is recommended that you
stop your vehicle before entering a number or searching for a contact.
Page 68

65
Dialling emergency services
Press 27 and select “Emergency Call”
to call the number 112.
Note: only dial 112 in the event of an
emergency (e.g.: road accident with in
-
jured persons).
MAKING A CALL (continued)
It is recommended that you
stop your vehicle before entering a number or searching for a contact.
Page 69

66
RECEIVING A CALL
When receiving a call, the reception
screen is displayed with any information available on the caller:
– the name of the contact (if the
number is present in your handset
memory or the phonebook list);
– the caller’s number (if the number
is not present in your handset
memory);
– “Private number” (if the number
cannot be viewed).
Automatic call waiting
deactivated
When receiving a call, you can:
– reject the call by selecting “Reject
Call” or by pressing and holding
21
or
22. The caller is directed to your
Voicemail;
– put your caller on hold by selecting
“Holding” or by pressing
18,
– answer by selecting “Answer” or by
pressing
21, 22 or 26;
– adjust the volume of the ringtone by
using buttons
16 and 17 or 1 when
the ringtone is sounding;
Note
: The hands-free phone system
does not support three-way calling or
conference calling. If during a call you
receive a second call, the second call
is automatically rejected by the handsfree phone system.
Automatic call waiting
In order to make your hands-free phone
system as safe as possible, the call
waiting function is automatically activated.
When an incoming call arrives, a message alerts your caller to the fact that
you are driving.
To accept the call press
18, 21 or 22.
You can also select “Answer” by turning
and confirming with
26.
To deactivate automatic call waiting,
refer to the information on “Automatic
call waiting” in the section on “Phone
settings”.
The automatic call waiting function allows the user to answer a call
when it is safe to do so. We recom
mend that you activate this function.
Page 70

67
DURING A CALL
During a call
During a call you can:
– adjust the volume by pressing
16
and
17;
– hang up by pressing
21 or 22;
– put a call on hold by select-
ing “Holding” or by pressing
18.
To resume a call that is on hold,
press
18;
– move the call to the phone by se-
lecting “Handset” (in the case of a
Bluetooth® phone);
– select “Mute” to mute the sound to
your caller. To exit the mute mode,
select “Cancel Mute”;
– select “Dial” (function which sim
ulates a phone keypad to control a
voice server such as an answering
machine). Rotate button
26 to select
the code to enter, then confirm the
number by pressing
26.
During a call, you can return to other
system functions (navigation etc.).
Press
33 to return to the map.
Press
27 to return to the call screen.
Page 71

68
PHONE SETTINGS
Press 29, select “Phone” and then
“Phone Incoming Vol”. Adjust the
volume by rotating
26.
Phone Outgoing Vol
This item allows you to change the outgoing phone volume. Press
29, select
“Phone” and then “Phone Outgoing
Vol”. Adjust the volume by rotating
26.
Automatic call waiting
This item allows you to activate/deactivate automatic call waiting. Press
29,
select “Phone” and then “Automatic call
waiting”. Activate/deactivate “ON” by
pressing
26.
Use Vehicle Ringtone
This item allows you to activate/deactivate the vehicle ringtone. Press
29,
select “Phone” and then “Use Vehicle
Ringtone”. Activate/deactivate “ON” by
pressing
26.
Bluetooth Setup
Press 29, select “Bluetooth Setup” to
access the menu.
You can:
– Activate/deactivate the Bluetooth
connection by pressing
26.
– Consult the Paired Phone List, and
select the phone to be used.
– Pair a New Phone. Refer to the sec
tion on “Phone” and the information
on “Pairing/unpairing a phone”.
– Remove a Paired Phone.
– Consult the Bluetooth settings of the
system in “Device Info”.
The automatic call waiting function allows the user to answer a call
when it is safe to do so. We recom
mend that you activate this function.
Phonebook
This item allows you to add, change or
delete contacts. You can add a voice
tag to each phonebook number, allowing you to call it more quickly. Press
29,
select “Phone” and then “Phonebook”.
Delete Call Logs
This item allows you to delete outgoing
and incoming call logs. Press
29, select
“Phone” and then “Delete Call Logs”.
Phone Ringer Vol
This item allows you to change the vehicle ringtone volume. Press
29, select
“Phone” and then “Phone Ringer Vol”.
Adjust the volume by rotating
26.
Phone Incoming Vol
This item allows you to change the incoming phone volume in the vehicle.
Page 72

69
USING VOICE COMMANDS
Voice recognition allows you to control certain functions of the system by
voice.
Activation/interruption
Activation
Press
20 to activate voice recognition.
A few main commands are displayed
on the screen.
After the bleep, say the required voice
command (refer to the table of commands below). The command is con
-
firmed by an audible reply.
To return to the previous command, say
“correct”.
When no command is spoken, the
system sounds a second bleep. If this
is followed by silence again, the function will deactivate.
Interruption
To briefly interrupt voice recognition,
say “pause”. To reactivate it press
20.
To interrupt voice recognition, say
“cancel”.
Help
To display the list of commands, press 20
and say “navigation help”, “phone help”
or “voice recognition help”.
Rotate
26 to run help and select your
voice command. Press
20 and say your
command.
Voice tags
Voice tags make it possible to:
– make a call to a stored number more
quickly;
– to launch guidance to a stored des
tination in the address book more
quickly.
Recording a voice tag when creating an
entry or when editing:
– a phone number (refer to the section
on “Phonebook”);
– an address in the address book (for
this, refer to the section on “Managing
the address book”).
Note:
a voice tag can only be recorded
when the vehicle is stationary.
Page 73

70
Jaune Noir Noir texte
USING VOICE COMMANDS (continued)
Functions Navigation voice commands
Display the 2D map. 2D Map; plan.
Selecting an address book entry. Address book.
Display the map in 3D. Birds-eye-view map; 3D map.
Display the vehicle’s position. Vehicle position; car position.
Select the home location as destination.
House; home location.
Select a prerecorded destination. Go to “voice tag”; “voice tag” destination; guide to “voice tag”.
Select a POI as destination. Quick Stops “Quick Stops”; favourite points of interest “Quick Stops”.
Select a detour. Detour; deviation.
Display the map on the full screen. Full screen map.
Display navigation voice command
help.
Navigation help.
Display the map. Map.
Display the previous destinations. Last destinations; previous destinations.
Recalculate route. Recalculate itinerary; recalculate route.
Listen to the voice tags allocated to
addresses.
Read/listen to address book voice tags.
Go to an address in the address
book.
Go to/destination address “1 to 100”.
Select a scale. Scale “1 to 10”.
Deactivate voice guidance. Deactivate/stop voice guidance; Deactivate/stop voice.
Activate voice guidance. Activate/launch voice guidance; Activate/launch voice.
Repeat the voice message. Repeat the directions; repeat the guidance instructions.
Display the POI. Display the Quick Stops “Quick Stops”; favourite points of interest “Quick Stops”.
Select a destination from the
Favourite POI.
Quick Stops “Quick Stops”; favourite points of interest “Quick Stops”.
Page 74

71
Functions Phone voice commands
Dial a stored number. Dial “voice tag” (contact).
Dial a number from the phone-
book.
Dial phonebook entries “1 to 40”.
Listen to the voice tags allocated to
the phonebook entries.
Listen to/read phonebook entries; listen to/read phonebook voice tags.
Enter a number. Number; dial; enter; enter phone number.
Display phone voice command
help.
Phone help.
Redial the last number. Dial/redial last number; dial/redial previous number; last number.
Display received call list. Received calls; incoming calls.
Display the list of calls made. Calls made; outgoing calls.
Display phonebook. Favourites; phonebook.
Display the handset memory. Handset memory; phone memory.
Display phone voice command
help.
Help; what can I say?
Other commands System voice commands
Move forwards in a menu. Next page.
Go back in a menu. Previous page.
Cancel a command. Cancel.
Correct. Correct.
USING VOICE COMMANDS (continued)
Page 75

72
Jaune Noir Noir texte
SYSTEM SETTINGS
To access the system parameters:
– press
29;
– select an item.
Adjusting the display
Standby screen
To switch to standby screen, select
“Display” and activate “ON” by pressing
26.
To exit the standby screen, press
30.
Display settings and parameters
To adjust brightness, contrast and the
display background, refer to the information on “Adjusting image quality” in
the section on “Map settings”.
Stored information
Press 29, select “Address Book” to
access all stored information.
You can display, modify or delete one or
all of the stored entries.
Press
26 to access the following infor-
mation:
– home location;
– address book;
– routes;
– route tracking;
– avoid area settings;
– delete details.
Volume and Beeps
Voice guidance volume
You can adjust the volume of voice
messages. Rotate button
26 to move
the cursor in the “+” or “-” direction and
confirm by pressing
26.
Voice guidance
To activate/deactivate voice guidance,
press
26.
Phone volume
To vary the volume of the ringtone,of
the incoming call and of the outgoing
call, select the corresponding item, turn
and confirm with
26.
Beeps
To activate/deactivate beeps when
pressing buttons, press
26.
Page 76

73
Clock
The system, via the GPS receiver, automatically adjusts the clock.
Press
29 and select “Clock” to access
the clock parameters.
Select “Time display” to display or hide
the clock.
Select “Offset Adjust” to adjust the time
(-59 min to +59 min).
Select “Daylight Saving Time” to acti-
vate/deactivate switching to daylight
saving time.
Select “Time Zone” to display the local
time of the country you are in.
Voice recognition
Press 2 9 and select “Voice
Recognition”.
Press
26 to activate/deactivate the
“Minimise Voice Feedback” function.
Volume adjustment according
to speed
The audio and navigation volume is
able to vary automatically according to
the vehicle speed. This item allows you
to adjust the sensitivity of this variation
(from 0 to 5).
press
29, select “Audio” and then
“Speed Sensitive Vol”.
SYSTEM SETTINGS (continued)
Languages
To select a language, press 29 and
select “Language”.
Select the required language from the
following list:
– English (mile),
– English (Km),
– Français,
– Italiano,
– Deutsch,
– Español,
– Nederlands,
– Português.
Page 77

74
Jaune Noir Noir texte
OPERATING FAULTS
System
Description Causes Solutions
No image is displayed. The screen is on standby.
Ensure that the screen is not on
standby.
No sound can be heard. The volume is set to minimum or pause.
Increase the volume or deactivate
pause.
No sound comes from the left, right, front
or rear speakers.
The balance or fader settings are incorrect.
Adjust the sound balance or fader correctly.
No map is displayed.
The map DVD-ROM is missing or
scratched.
The DVD-ROM reader control is in the
“load/eject” position.
Check the presence of the map DVD.
Move the control to “play”.
Navigation
Description Causes Solutions
The location of the vehicle on the screen
does not correspond to its actual location.
The GPS indicator on the screen stays
grey or yellow.
Incorrect positioning of the vehicle
caused by GPS reception.
Move the vehicle until reception of the
GPS signal is improved.
The directions on the screen do not correspond to the actual road.
The DVD-ROM is out of date. Obtain the latest version of the “map”
DVD-ROM.
Traffic flow information is not displayed
on the screen.
Guidance has not been activated. Ensure guidance is activated.
Select a destination and begin the guidance.
Certain items on the menu are not available.
Depending on the current command,
some items will be unavailable.
Voice guidance is unavailable.
The navigation system does not include
the intersection.
Voice guidance or guidance is deactivated.
Increase the volume.
Ensure voice guidance is activated.
Ensure guidance is activated.
Page 78

75
Navigation
Description Causes Solutions
The directions of the voice guidance do
not correspond to your exact location.
The voice guidance may vary according
to the environment.
Drive according to the actual conditions.
The suggested route does not start or
end at the required destination.
The destination is not yet recognised by
the system.
Enter a road near to the required destination.
The system calculates a detour automatically.
Prioritising avoid area settings or traffic
restrictions will affect the calculation of
the route.
Deactivate the “avoid area settings” function.
Phone
Description Causes Solutions
No sounds or ringtone can be heard.
The mobile phone is not connected to the
system.
The volume is set to minimum or pause.
Ensure that the mobile phone is connected to the system.
Increase the volume or deactivate
pause.
Impossible to make a call.
The mobile phone is not connected to the
system.
The phone keypad has been locked.
Ensure that the mobile phone is connected to the system.
Unlock the phone keypad.
Voice recognition
Description Causes Solutions
The system does not recognise the voice
command.
The voice command has not been recognised.
The voice recognition time delay has expired.
The voice recognition cannot operate
properly due to a noisy environment.
Check that the voice command exists
(Refer to the section “Using voice commands”).
Speak within the voice recognition time
delay.
Speak in a quiet environment.
OPERATING FAULTS (continued)
Page 79

76
Jaune Noir Noir texte
compass ............................................................................... 35
confirm a destination ............................................................43
connect a telephone ............................................................. 62
contacts ................................................................................ 56
contacts list ...........................................................................63
D
destination .....................................................38→45,56–57
detailed route ...............................................................46→50
detour ..........................................................................46→50
dialling ..................................................................................64
dialling a number ............................................................ 63, 65
E
emergency call .....................................................................65
entering an address ......................................................38 – 39
F
FADER..................................................................................32
favourite number..................................................... 63 – 65, 68
favourite POI................................................................... 40, 60
file ................................................................................29→31
FM/LW/MW bandwidths ................................................ 27 – 28
G
GPS
receiver ..................................................................33→75
reception ......................................................................... 33
guidance
activation ....................................................44→46,58,72
cancellation ..................................................................... 50
map ........................................................46→75,51→75
split screen .............................................................46→75
voice ......................................................................46→75
A
address book .................................................. 39 – 40, 56 – 57
AF-RDS ................................................................................ 32
answering a call ....................................................................66
B
BALANCE .............................................................................32
balance ................................................................................. 32
BASS .................................................................................... 32
bass ...................................................................................... 32
Bluetooth connection ............................................................ 62
Bluetooth® .............................................................61→63,68
C
call ........................................................................................ 64
call history............................................................................. 68
call volume................................................................ 26, 68, 72
CD/MP3 CD
changing a WMA CD album ............................................ 30
changing an MP3 album ................................................. 30
eject .......................................................................29→75
fast winding ............................................................29→75
file repeat (MP3) ............................................................. 30
file repeat (WMA) ............................................................ 30
listen ......................................................................29→75
maintenance ..........................................................29→75
random playback ...................................................29→75
repeat .............................................................................. 30
searching for a track ..............................................29→75
track repeat (MP3) ..........................................................30
track repeat (WMA) ......................................................... 30
CD changer .................................................................29→31
clock .....................................................................................73
display ............................................................................. 73
setting ............................................................................. 73
communication .....................................................................67
ALPHABETICAL INDEX
Page 80

77
R
range of wavelengths ...................................................27 – 28
RDS ................................................................................ 18, 28
REG ......................................................................................32
ringtone................................................................................. 68
ringtone volume .............................................................. 68, 72
S
screen
monitor ...................................................................24→75
navigation display ................................................46→75
navigation screen ................................... 46→75,51→75
settings ............................................................51→75,58
second route ................................................................46→50
setting ................................................................................... 32
settings ....................................................58→60,68,72–73
audio ............................................................................... 32
balance ........................................................................... 32
brightness ....................................................................... 72
configuration menu ................................................72→75
contrast ............................................................51→75,72
customising ............................................................72→75
fader ................................................................................ 32
navigation ..............................................................58→75
special destination ................................................................ 42
stage ............................................................................45→50
storing a radio station ................................................... 27 – 28
switching off ..........................................................................24
T
3D/2D mode .........................................................................46
TMC
guidance with pictograms ......................................53→75
TMC icons ..............................................................53→75
traffic description ....................................................53→75
Traffic Information service ................................53→75,59
I
i PTY .....................................................................................32
iTR ........................................................................................ 32
i TRAFFIC ....................................................................... 28, 32
inserting a CD .......................................................................29
L
LIST mode ............................................................................ 27
M
MANU mode ......................................................................... 27
map
digitised map ................................................................... 33
display ..............................................................34,51→75
map symbols ................................................................... 34
scale ................................................................34,51→75
settings ............................................................51→75,58
map DVD .............................................................................. 33
map navigation ............................................................. 51 – 52
map symbols ................................................................36 – 37
MP3 ...................................................................................... 18
mute...................................................................................... 26
O
operating faults ............................................................. 74 – 75
operation............................................................................... 24
P
pairing a telephone ............................................................... 61
pause ....................................................................................30
POI ...............................................40 – 41, 44, 51 – 52, 58, 60
point of interest ................................................. 41, 51 – 52, 58
PRESET mode ............................................................. 27 – 28
PTY ................................................................................. 28, 32
ALPHABETICAL INDEX (continued)
Page 81

78
TMC (Traffic Message Channel) traffic detour ...................... 49
TMC icons ...................................................................53→55
TMC Traffic Information .........................................53→55,59
TMC Traffic Message Channel information .................53→55
treble..................................................................................... 32
2D/2D mode .........................................................................47
U
unpairing a telephone ........................................................... 61
V
vehicle position ............................................................. 51 – 52
voice control ................................................................69→71
voice marker ................................................................... 57, 69
voice recognition................................................................... 73
voice recognition assistance........................................69→71
volume ...................................................................... 26, 32, 72
volume: adapted to speed .............................................. 26, 73
VOLUME menu ....................................................................32
W
WMA .....................................................................................18
ALPHABETICAL INDEX (continued)
Page 82

NX806-2 | ENG | Dos = 4 mm | 78 pages | 3 de Couv
Cyan Magenta Jaune Noir Noir texte
CLASS I
LASER PRODUCT
Page 83

NX806-2 | ENG | Dos = 4 mm | 78 pages | 4 de Couv
Cyan Magenta Jaune Noir Noir texte
à8200766712ïìêä
RENAULT S.A.S. SOCIÉTÉ PAR ACTIONS SIMPLIFIÉE AU CAPITAL DE 533 941 113 € / 13-15, QUAI LE GALLO
92100 BOULOGNE-BILLANCOURT R.C.S. NANTERRE 780 129 987 — SIRET 780 129 987 03591 / TÉL. : 0810 40 50 60
NX 806-2 – 82 00 766 712 – 06/2007 – Edition anglaise
(
www.renault.co.uk
)(
www.renault.ie
)(
www.renault.is
)
 Loading...