

Regency Greenfire GFI55 Installation Manual
GF55 & GFI55
TECHNICAL MANUAL
Freestanding and Fireplace
Insert Pellet Stove
WARNING:
Improper installation, adjustment, alteration,
service or maintenance can cause
injury, property damage, or loss of life.
Refer to this manual. For assistance or
additional information consult an authorized
installer or service agency.
Tested by:
IMPORTANT: SAVE THESE INSTRUCTIONS
GF55-080
FPI FIREPLACE PRODUCTS INTERNATIONAL, LTD. 6988 Venture St., Delta, BC, Canada V4G 1H4
FOR YOUR SAFETY :
Do not store or use gasoline or other fl ammable
vapours and liquids in the vicinity of this or any other
appliance.
Installation and service must be performed by an
authorized installer or service agency.
10/26/09
WARNING
HOT GLASS
CAUSE BURNS
DO NOT TOUCH
UNTIL COOLED
NEVER
TO TOUCH GLASS
CHILDREN AND ADULTS SHOULD BE ALERTED TO
THE HAZARDS OF HIGH SURFACE TEMPERATURES,
ESPECIALLY THE FIREPLACE GLASS, AND SHOULD
ST AY AWA Y TO AVOID BURNS OR CLOTHING IGNITION.
ALLOW CHILDREN
WILL
GLASS
Safety Note: If this stove is not properly installed, a house fi re may result. For your safety,
follow the installation instructions, contact local building, fi re offi cials, or authority having jurisdiction
about restrictions and installation inspection requirements in your area.
The authority having jurisdiction should be consulted before installation to determine the need to
obtain a permit.
2
Greenfi re Pellet Stove and Insert Technical Manual

TABLE OF CONTENTS
* This manual is designed for the technician in conjunction with the owner’s manual. *
SAFETY LABEL
Copy of Serial No. Decal ...............................................4
UNIT DIMENSIONS
GF55 Freestanding Pellet Stove ...................................5
GFI55 Fireplace Pellet Insert .........................................6
INSTALLATION
Important Safety Information .........................................7
Safety Warnings & Recommendations ..........................7
Removing Pellet Stove From Pallet ...............................8
Opening the Door ..........................................................8
Locating the Pellet Appliance ........................................8
GF55 Freestanding Pellet Stove ...................................9
Clearances to Combustibles.....................................9
Alcove Clearances ....................................................9
Mobile Home Installation ..........................................9
Vent Termination Requirements .............................10
Exhaust & Fresh Air Intake Location ...................... 11
Outside Fresh Air Connection.................................11
Corner Through Wall Install ....................................11
Horizontal Exhaust Through Wall Install .................12
Vertical Rise with Horizontal Termination ...............13
Through Concrete Wall with Vertical Rise ..............13
Inside Vertical Installations .....................................13
Outside Vertical Installations ..................................14
Hearth Mount Installations ......................................14
GFI55 Pellet Insert.......................................................15
Clearances to Combustibles...................................15
Fireplace Specifi cations..........................................15
Pedestal & Leveling Legs .......................................15
Hopper Cover & Adjusting Hopper Height ..............15
Exhaust & Fresh Air Intake Location ......................16
Outside Fresh Air Connection.................................16
Masonry Fireplace Insert Install..............................16
Positive Flue Connection without
a Full Reline (USA only) .........................................17
Control Panel in Surround Panel ............................18
Surround Panel Installation ....................................18
Plated Door Installation ...............................................19
Thermostat Installation ................................................19
Slider / Damper Set-Up .............................................. 20
TROUBLESHOOTING
Troubleshooting FAQ's ................................................21
Wiring Diagram ............................................................23
PARTS LIST
Parts List & Components .............................................24
Pellet Stove Components ............................................25
GF55 Freestanding Pellet Stove .................................26
GFI55 Pellet Insert.......................................................27
WARRANTY
Warranty ......................................................................28
Exclusions and Limitations ..........................................29
Greenfi re Pellet Stove and Insert Technical Manual 3

SAFETY LABEL
To P ri me A
uger: Restart the u
nit five (
5) mi
nutes into its startup or b
y
putti
ng a sm
a
ll hand f
ull of pellets into the bur
n
pot.
To Operate
Stove: MANUAL MODE: When a fire has been established the stove settings ar
e adj
ustable. / HIGH/LOW MODE:
(Requi
r
es a thermostat) Whe
n
the ther
mostat calls for heat the stove sett
ings are adjustable. When th
e ther
mostat contacts op
en, the HEAT
LE
VEL and Fans
w
ill dr
op down
to the LOW
setting until the thermostat contacts close agai
n. / AUTO/OFF MODE:
(R
equires a ther
mostat) When th
e ther
mostat contacts cl
ose, the
unit wi
ll light
automatically. Once up to temperatur
e the stove set
t
i
ngs are adjustable. When the ther
mostat contacts op
en, the stove will drop down to the LO
W
settin
gs for
30 minutes.
If within
the
30 min the thermostat contacts close,
the HEAT
LE
VEL will r
e
turn to
p
r
evi
ous
MAN
UAL setting or if the ther
mostat con
tacts rem
ain
open the stove beg
in its
shutdown rou
tine.
To T ur
n Off Stove: M
A
NUAL and HI / LOW mode: Pr
ess the ON
/ OFF button
AUTO /
OFF mode
: Tur
n th
e ther
mostat down or of
f
The unit can be installed on a hard,
stable non-combustibl
e surface.
L'unité peut être
i
nstal
lée
sur un dur,
la surf
ace non-combustible stable.
Cert
ifie
d f
o
r
use
in Can
ada & USA
Certi
fié pour in
stall
a
t
ion
a
u
Canada et
aux
Etats-Unis
.
Listed Room
Hea
ter, Pelletized Fuel Type (Appareil de chauffage à granules certif
ié)
S
uitable For
Mobile Home Installation (A
ccepté
p
our
l'in
st
allation
dan
s une
maison
mobile, test)
Tes t ed
to (Testée selo
n)
:
UL 14 82- 19 98 / ULC S6 27-
00
/ AST M 1 50 9-95 / ULC
S
628-M93
US Environmental P
r
otection Age
ncy, certif
i
ed to comply July 1, 1
990, particulate
emission
st
and
ar
d
s. (
É
tats-Unis Environnem
en
tal
P
r
otection Ag
ence, a certifi
é
p
our
conforme
r
au Juillet
1
,
1990, les normes de particules
d
'émission.)
This pellet appliance ha
s been t
e
st
ed and liste
d
for use in manufactured homes
in
ac
cordance with O
r
egon
A
dminis
t
ration Rules 814-23-900
throug
h
814-23-909.
Install and use
only in accord
ance
with the
Manufac
t
ure’
s
i
ns
t
allation and opera
t
ing instructio
ns. Cont
act local building or
fir
e off
icials about restrictions and
installation inspection in
your
ar
ea.
Do not con
nect
this unit to a chimney flue serving another appli
a
nce. See
local building
codes
and
manufac
turers i
ns
tructions f
or
precautions requ
i
r
ed
for passing a
chimne
y
through a combus
t
ible
wall or ceiling. Elec
tri
cal
r
ating: 120 volts, 60 hz, 4.3 Amps
. R
oute cord away from the heater
.
Cet appa
reil
a été testé et c
erti
fié pour
uti
lisation dans les maisons mobiles en ac
cord avec l
es "Règles Administr
at
ives
de l'O
r
egon
8
14-23-900
à 814-23
-909".
Installez et utilis
ez cet appareil
seulement selon les instruc
t
ions d'installation et
d'opération du fabri
can
t.
Contactez les autorités locales de votre quar
t
ier concernant
le
s restri
c
tions et les inspections
d'ins
t
allation. Consultez les
codes
de bâtiment loc
aux et
les ins
t
r
uct
ions du fabricant pou
r
les préc
autions à
pr
endre
lorsqu
e
une cheminée doit êtr
e instal
lée au travers un mur ou un plaf
ond
combustible. CLASSEMENT ÉLECTRIQUE :
120 Volts, 60
Hz, 4.1 Amps. Pla
cez
le câble électrique loin de la chaleur.
F
o
r
Use With Only
Pelletized W
ood
fuels. Operate only with viewing
door
and ash removal door
closed. Only r
eplace
gl
as
s
wit
h ceramic glass. Components r
equired for
installation: a 3 inch (75 mm)
or
4inch (100 m
m) listed PL vent,
complete with components. Ins
ert and Hearth mount installations; a listed single wall chimne
y
line
r m
ay be u
sed.
Inspect
and clean Exhaus
t
Ve
nt
ing s
ystem frequent
ly.
Utilisation avec les combustibles s
ous
forme de boulets uniquement. Utiliser seulement lor
sque les portes avant
s
et la
porte du récept
acle de cend
re sont
ferm
é
es.
Si une ou des vitr
es devai
ent êtr
e rem
placées, utilisez seulement du
verre
céramique. Les com
p
osantes r
equi
se
s
pour
l'installation sont u
n
évent PL cer
t
ifié d
e 3in/75mm or
4in/1
00m
m av
ec
ses
composantes. Les ins
t
allations inser
t
ion e
t
de mont de foyer
; un
paquebot d
e
cheminée de mur de seul énumér
é peut
être utilisé.
I
nput
Rating (
Les données évaluant): 12,000 to 45,000
BTU/Hr (3.5 to 13.2 kWh)
334
DATE OF MANUFACTURE /
D
ATE DE FABRICATION:
J F M A M J J A S O N D 2009 2010 2011
CAUTION:
Hot while operating. Do not
touch, severe burns may
resu
l
t. Ke
ep children,
clo
t
h
ing,
furniture, gaso
line or ot
h
er
fla
m
mab
le vapor
s
away
.
ATTENTION:
T
r
ès
ch
aud quand allumé.
Ne touc
hez pas,
les brûlures sévères peuvent résulter.
Tenez loin des enf
a
nts, des vêtements, des
meubles,de l’essence ou d’autr
e
s fluides
p
r
o
duisant des vapeurs inf
lammables.
DO NOT REMOVE THIS LABEL /
NE
RETIREZ PAS CETTE ÉTIQUETTE
See installation and operating instructions accompanying appliance. /
Co
nsultez le m
a
nuel avec les instructions d’installation et d’opérat
i
on
.
A Sidewall t
o Uni
t (
Du mur de côté à l
'appareil)
8”
(203 mm
)
B Top of unit to an unshi
elded 8”
(
203
m
m)
mantle
(Le sommet de
l'unité à
un
m
anteau de chemi
née non blindé)
8”
(
203 mm
)
C
Unit to top facing (protruding ¾” [
19
m
m
])
(
De
l
'unit
é
au
sommet du parement)
8” (203 m
m
)
D U
nit t
o side
f
aci
ng
(prot
r
udi
ng ¾
”
[
19
m
m])
(
D
e l'unité au côté du parement)
8”
(203
m
m
)
E From door
opening of unit t
o
edge of floor protection
(De la porte ouvrant au devant de prot
ec
tion de pl
ancher
)
6”
(
152 mm)
F
Fr
om
si
de of unit to edge of floor
pr
ot
ection
(De
l'ouverture
de porte po
u
r
prendre parti de pr
otecti
on de plancher
)
6” (152
m
m
)
Combus
t
ible flo
ors must
be prot
ec
t
ed by a n
on-com
bu
st
ible material. - See Owner
s Manu
al
.
Le planche
r
combustible doit être protégé par
un mat
ériel incombustible. -
Con
sult
ez le manua
l
.
INSTALLED AS A
FIREPLACE
I
NSERT STOVE MODEL (GFI55) /
A
I
NSTALLE
COMME UN
MODÈLE SUR PIED
D
E POELE.
M
inimum c
l
ear
ances t
o combus
t
ible mater
i
als./
Les
dégagements minimums aux
m
at
ériels c
om
bustibles:
A
Sidewall t
o Uni
t (
Du m
ur de
côté à l
'appareil)
6” (152 m
m)
B Backwall to Unit (Du
m
ur de
der
rière à l'a
pp
a
reil
)
3” (76 mm
)
C C
o
rner t
o Unit
(
D
u coin à l'appareil)
2”
(51
mm)
D
Wal
l to vent (
Le m
ur pour
donner
ven
t
)
3” (76 m
m
)
E Fr
om
door opening of
uni
t to edge of floor protect
ion
(De la porte ouvrant au devant de protection de pla
ncher)
6”
(
152 mm
)
N
OTE: A combu
stibl
e floor must be protecte
d
by a
non-
combustible mater
i
al -
Width 27" (686mm
)
by depth 34"
(864mm)
. (Un plancher combust
ible doit etre protege par
un
mater
i
el incombustible. La largeur
27" (686 mm) par la
profondeur 34" (864mm)
.
)
Minimum
Alco
ve Width (La largeur m
inimum de l'alcove)
36”
(9
14 mm
)
Minimum
Alcove Height (
La hauteur mini
m
um de l
'alcove)
48”
(1219 mm)
M
axi
m
um Alcov
e Depth (La profondeur m
aximum de l
'alcove)
30
”
(762
mm)
I
N
STALLED AS A FREESTANDI
NG
STOVE
M
ODEL (GF55)
/
A
INSTALLE
COMME
U
N
M
O
DÈLE FS,
QU’IL SOIT ENCASTRÈ, SUR PIED
OU
DA
NS
U
NE M
AISON MOBI
LE.
Minimum clearan
ces t
o combustible materials./ L
es
dé
gagement
s minimums
aux matéri
e
l
s
combustib
l
es:
Ser
i
al
No.
/
No.
De Serié:
Greenfire
GF55 (Stove) GFI55 (Insert)
M
odel /
Modèle:
15956
B
A
D
C
Adjacent
w
all
F
E
Fl
o
or
Pr
ot
e
cti
o
n
A
B
C
E
Backwall
Sidewall
D
Pou
r
démarrer le
poêle: Appuyer sur le bouton "ON/OFF".
Si le Auger n
écessite d'être amorcé, appuyer sur le
b
outon m
a
nuel d'alimentation
du Auger jusqu'à ce que les
granules se d
éver
sent da
ns le
pot de combustion.
Pour faire fonctionner le poêle : MODE MANUEL : Lors
q
ue le feu es
t bien établi, les réglages peuvent
être ajust
é
s
. / MODE "HIGH/LOW" : (N
écessite
un thermostat) Lorsque le t
hermostat requière de la
chaleur, les r
églages p
euvent être ajustés. Lorsque les contacts du
thermostat ouvrent, le réglage du niveau
de chaleu
r
et les ventilateurs s'ajuster
ont au
réglage " bas " jusqu'à ce que les contacts du thermostat se referment. / MODE "AUT
O/OFF" : (
N
écessite un ther
mostat) Lorsque les contacts du th
er
mostat ferment, le
poêle s'allum
era
autom
atique
m
ent. Lorsque la température adéqu
ate est atteinte, les réglages peuvent être ajustés. Lor
sque les conta
c
ts du thermostat ouvre
nt,
l
e poêle s'ajustera aux r
é
glages "
LOW" pendant 30
minutes.
Si
les contact
s du thermostat sont fermés pendant ces 30
m
i
nut
es, le réglage de niveau de chaleur
retournera en rég
lages "
MAN
UEL" ou
si les contacts du thermostat restent ou
v
e
r
ts, le poêle entamera le processus d'arrêt.
P
our
éte
indre le poêle : M
ODE MANU
EL ET " HI
GH/LOW " :
Appuyer sur
le bouton "ON/
OFF".
MODE "AUTO / OFF"
: Régler le ther
mostat à l
a baisse ou
éteignez le.
Manuf
a
c
tur
e
d i
n
Ca
nada f
or /
F
abriqué da
ns
le
Canada pour
:
FPI
Fire
pl
ac
e
Pr
oduct
s I
nt
ernati
o
nal
Ltd.
Delta,
BC,
Canada
M
odel BIH Only Minimum Clearance to Com
bustibl
e Materials / Espace de
dégagem
ent requi
s
pour l
e modèle BIH:
G
B
H
BIH Model
E
FP
I o
r BIH
M
odels
G Fr
om
S
ides and rear
wal
ls to standoffs
(
Les murs côté et mur d'arrière à spacers
)
0” (0 mm)
H
Recess depth
(
Le dos de poêle à une profondeur
)
11”
(280
mm)
FS Model
GF55-081a
This is a copy of the label that accompanies each GF55 & GFI55. We have
printed a copy of the contents here for
your reference.
On the GF55 the safety label is located
on the underside of the hopper lid.
On the GFI55 the safety label is located
on the hopper cover behind the top
INSTALLATION
faceplate.
4
Greenfi re Pellet Stove and Insert Technical Manual
9
/16"
1
(40mm)
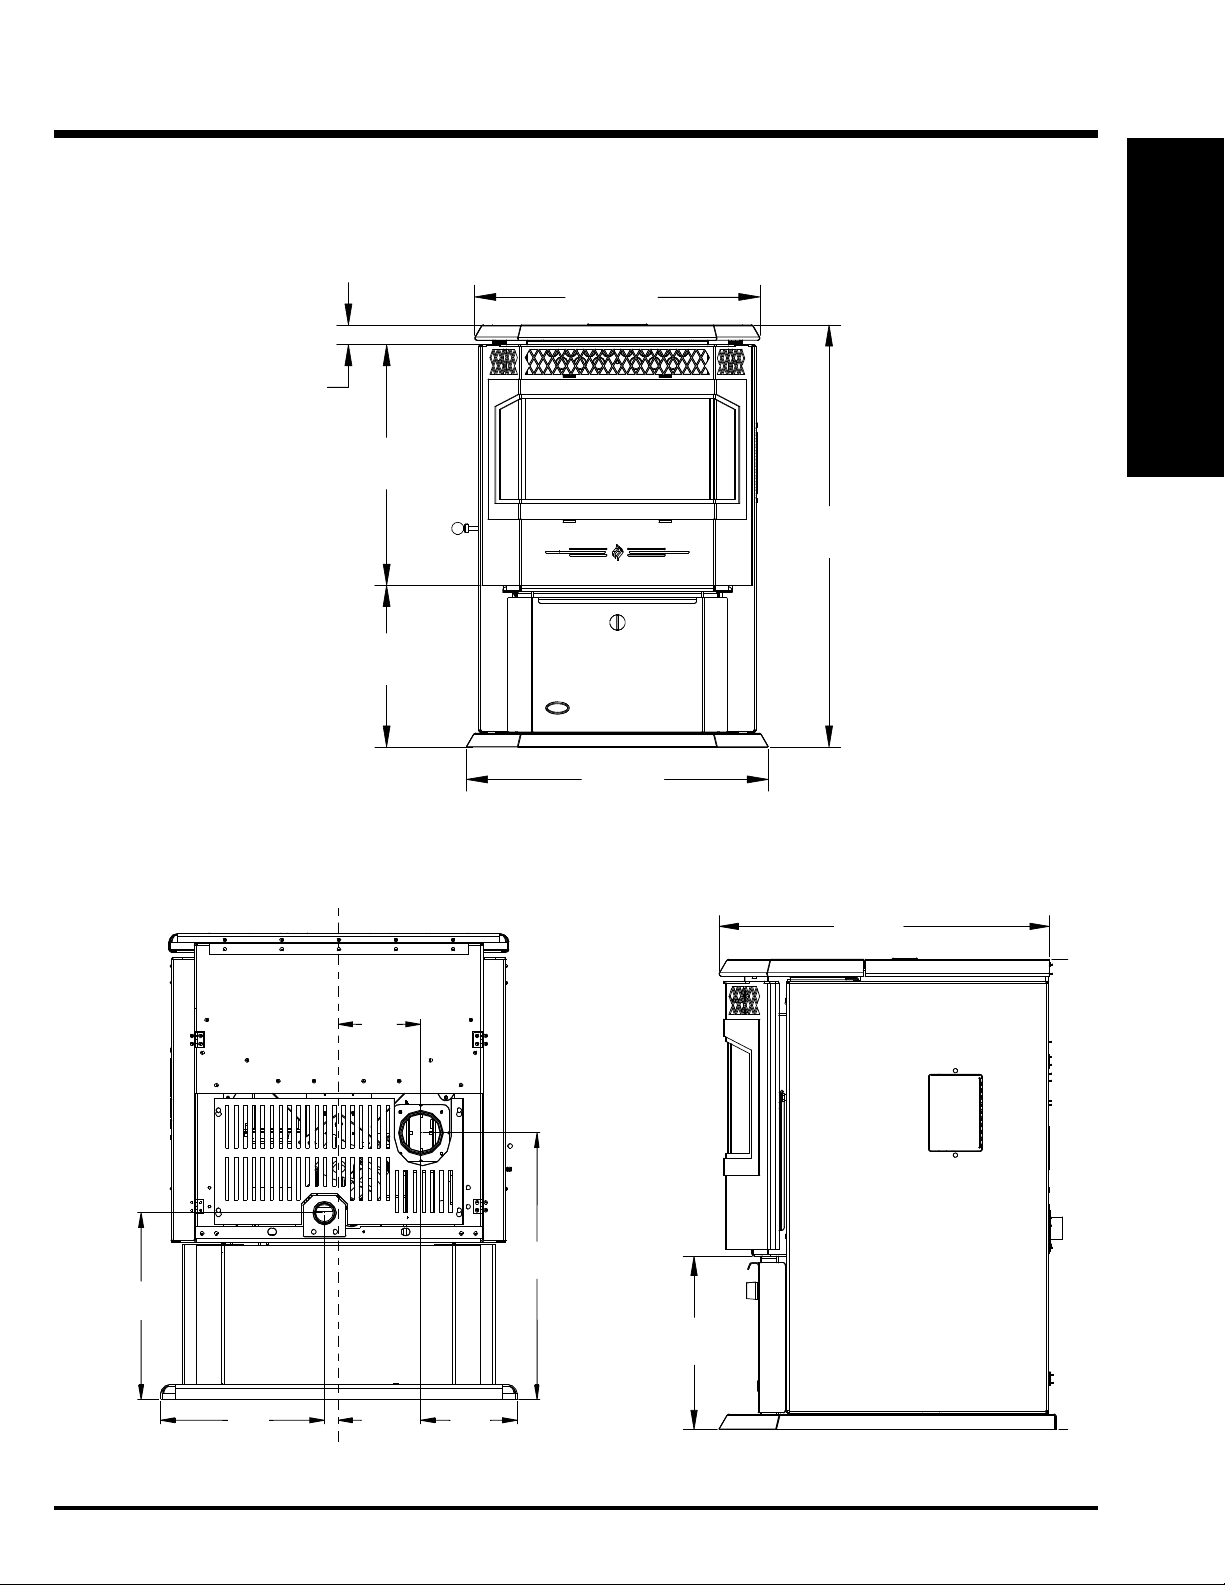
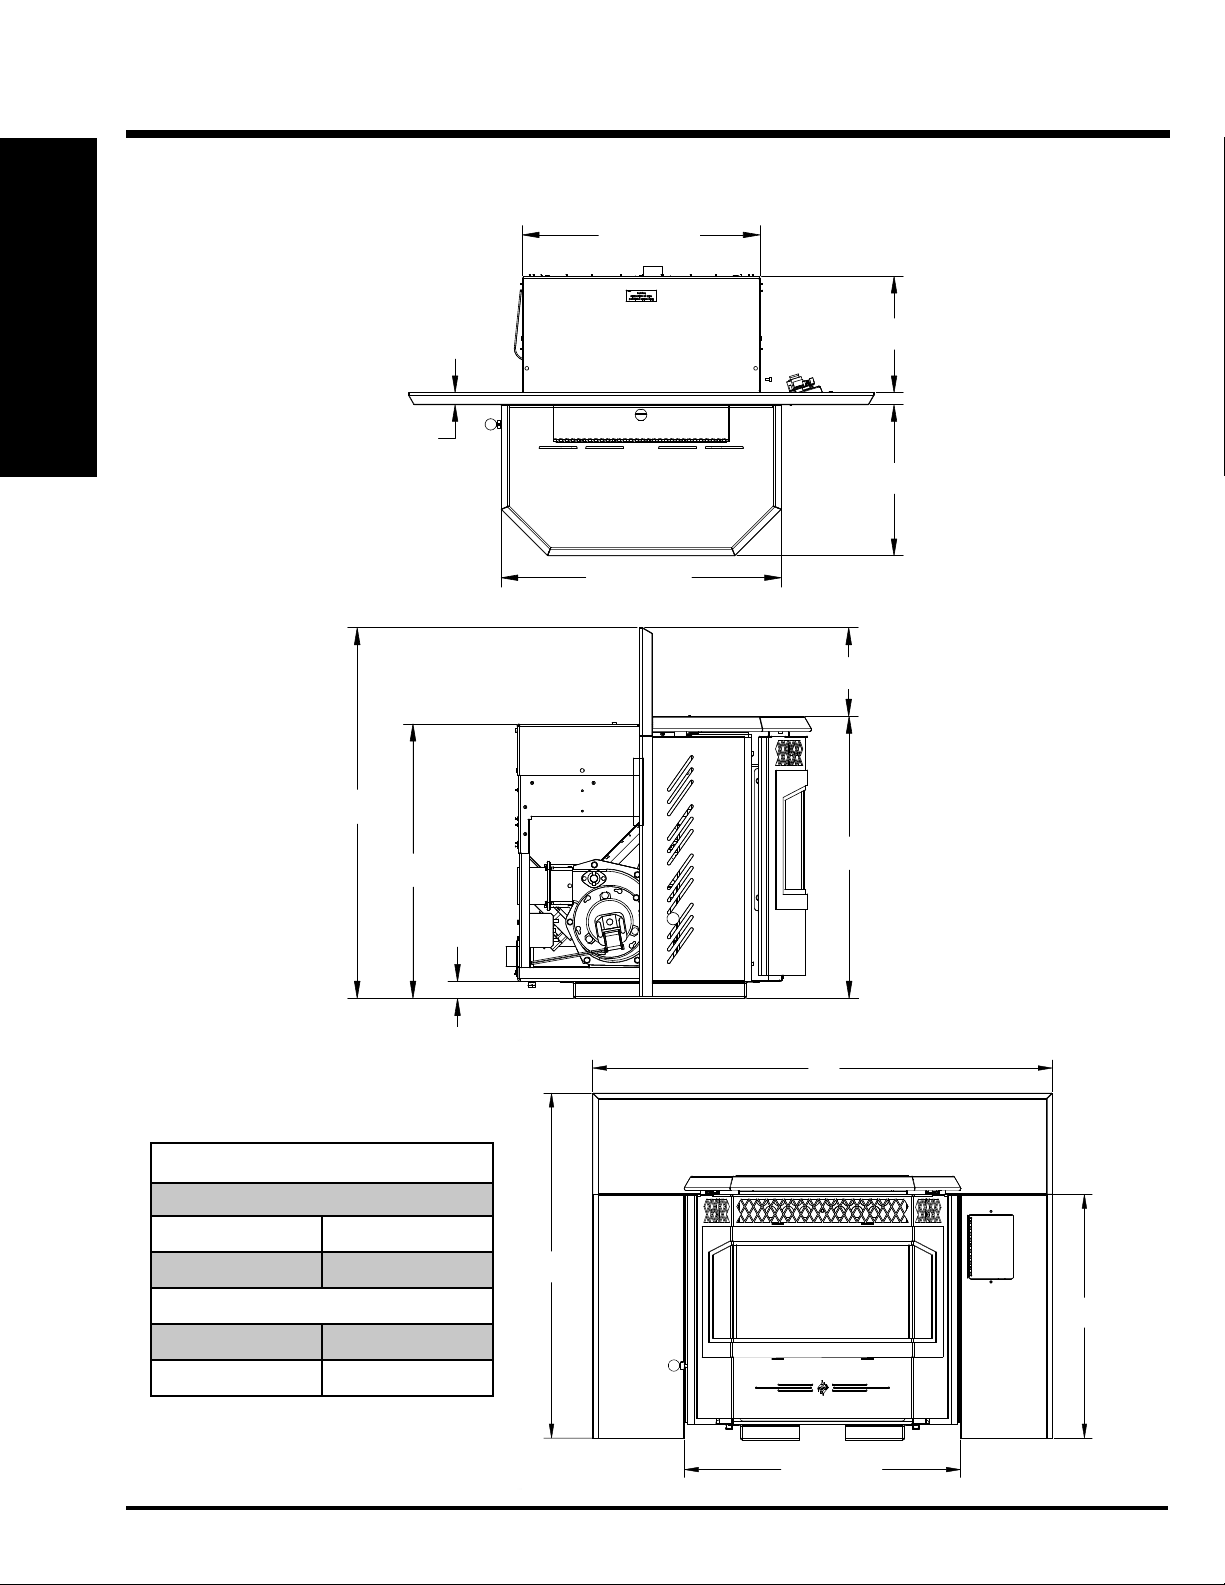
UNIT DIMENSIONS
GF55 FREESTANDING PELLET STOVE
1
23
/16"
(586mm)
7
19
/16"
(494mm)
341/8"
(866mm)
1
13
/16"
(332mm)
INSTALLATION
5
/8"
14
(356mm)
3
/4"
5
(146mm)
5
/16"
20
(508mm)
7
24
/16"
(620mm)
9
/16"
12
(319mm)
24"
(610mm)
11 7/16"
(291mm)
Greenfi re Pellet Stove and Insert Technical Manual 5
1"
(25mm)
11
/16"
6
(170mm)
UNIT DIMENSIONS
INSTALLATION
GFI55 FIREPLACE PELLET INSERT
203/8" (517mm)
1
/16"
1
(26mm)
1
/16" (610mm)
24
10"
(253mm)
13"
(329mm)
3
/16"
30
(766mm)
225/16"
(567mm)
1
FACEPLATE DIMENSIONS
Regular Faceplate
(A) Height 30" (761mm)
3
/8" (35mm)
1
/4"
7
(183mm)
15
22
/16"
(582mm)
B
(B) Width 39-15/16" (1014mm)
Oversize Faceplate
(A) Height 33" (838mm)
(B) Width 45-15/16" (1167mm)
6
A
3
21
/16"
(538mm)
2315/16" (609mm)
Greenfi re Pellet Stove and Insert Technical Manual

INSTALLATION
IMPORTANT SAFETY INFORMATION
Failure to follow these instructions may result
in property damage, bodily injury or even death.
Contact your local building or fi re offi cial to obtain a permit and any
information on installation restrictions and inspection requirements for
your area.
To prevent the possibility of a fi re, ensure that the appliance is properly
installed by adhering to the installation instructions. A Greenfi re dealer will
be happy to assist you in obtaining information with regards to your local
building codes and installation restrictions.
Be sure to maintain the structural integrity of the home when passing a
vent through walls, ceilings, or roofs.
The stove's exhaust system works with negative combustion chamber
pressure and a slightly positive chimney pressure. It is very important to
ensure that the exhaust system be sealed and airtight. The ash pan and
viewing door must be locked securely for proper and safe operation of
the pellet stove.
Do not burn with insuffi cient combustion air. A periodic check is recom-
mended to ensure proper combustion air is admitted to the combustion
chamber. Setting the proper combustion air is achieved by adjusting the
slider damper located on the left side of the stove. Refer to "Slider/Damper
Set-up" section.
When installing the stove in a mobile home, it must be electrically grounded
to the steel chassis of the home and bolted to the fl oor. Make sure that the
structural integrity of the home is maintained and all construction meets
local building codes.
Minor soot or creosote may accumulate when the stove is operated under
incorrect conditions such as an extremely rich burn (black tipped, lazy
orange fl ames).
If you have any questions with regard to your stove or the above-mentioned information, please feel free to contact your local dealer for further
clarifi cation and comments.
SAFETY WARNINGS &
RECOMMENDATIONS
ELECTRICAL: The use of a surge protected power bar is
recommended. The unit must be grounded. The grounded electrical
cord should be connected to a standard 115 volts (4.6 Amps), 60 hertz
electrical outlet. Be careful that the electrical cord is not trapped under
the appliance and that it is clear of any hot surfaces or sharp edges and
also must be accessible. If this power cord should become damaged,
a replacement power cord must be purchased from a Greenfi re dealer.
This unit's maximum power requirement is 520 watts.
GLASS: Do not abuse the glass by striking or slamming the door. Do not
attempt to operate the stove with broken glass. The stove uses ceramic
glass. Replacement glass must be purchased from a Greenfire dealer.
Do not attempt to open the door and clean the glass while the unit is in
operation or if glass is hot. To clean the glass, use a soft cotton cloth and
mild window cleaner, gas or wood stove glass cleaner, or take a damp
paper towel and dip into the fly ash. This is a very mild abrasive and will
not damage the glass.
FLAMMABLE LIQUIDS: Never use gasoline, gasoline-type lantern
fuel, kerosene, charcoal lighter fluid, or similar liquids to start or “freshen
up” a fire in the heater. Keep all such liquids well away from the heater
while it is in use.
SMOKE DETECTOR: Smoke detectors should be installed and
maintained in the structure when installing and operating a pellet burning
appliance.
OPERATION: The ash pan and door must be closed securely for proper
and safe operation of the pellet stove. Also ensure all gaskets on the door
are checked and replaced when necessary.
INSTALLATION: Be sure to maintain the structural integrity of your
home when passing a vent through walls, ceilings, or roofs. It is
recommended that the unit be secured into its position in order to avoid
any displacement.
DO NOT INSTALL A FLUE DAMPER IN THE EXHAUST VENTING
SYSTEM OF THIS UNIT.
DO NOT CONNECT THIS UNIT TO A CHIMNEY FLUE SERVING
ANOTHER APPLIANCE.
FRESH AIR: Outside Fresh Air connection is optional. Must be
connected to all units installed in Mobile and “Air Tight Homes” (R2000)
or where required by local codes. Consider all large air moving devices
when installing your unit and provide room air accordingly. Limited air
for combustion may result in poor performance, smoking and other side
effects of poor combustion.
INSTALLATION
CAUTION:
Do not connect to any air distribution duct or system.
Do not burn garbage or fl ammable fl uids such as gaso-
line, naptha or engine oil.
Unit hot while in operation. Keep children, clothing and
furniture away. Contact may cause skin burns.
SOOT: Operation of the stove with insuffi cient combustion air will result in
the formation of soot which will collect on the glass, the heat exchanger,
the exhaust vent system, and may stain the outside of the house. This is
a dangerous situation and is ineffi cient. Frequently check your stove and
adjust the slider/damper as needed to ensure proper combustion. See
"Slider/Damper Setting".
CLEANING: There will be some build up of fl y ash and small amounts of
creosote in the exhaust. This will vary due to the ash content of the fuel
used and the operation of the stove. It is advisable to inspect and clean
the exhaust vent semi-annually or every two tons of pellets.
Greenfi re Pellet Stove and Insert Technical Manual 7
If you have any questions with regards to your stove or the abovementioned information, please feel free to contact your Greenfire dealer
for further clarification and comments.
SINCE FPI HAS NO CONTROL OVER THE INSTALLATION OF YOUR
STOVE, FPI GRANTS NO WARRANTY IMPLIED OR STA TED FOR THE
INSTALLATION OR MAINTENANCE OF YOUR STOVE. THEREFORE,
FPI ASSUMES NO RESPONSIBILITY FOR ANY CONSEQUENTIAL
DAMAGE(S).
INSTALLATION
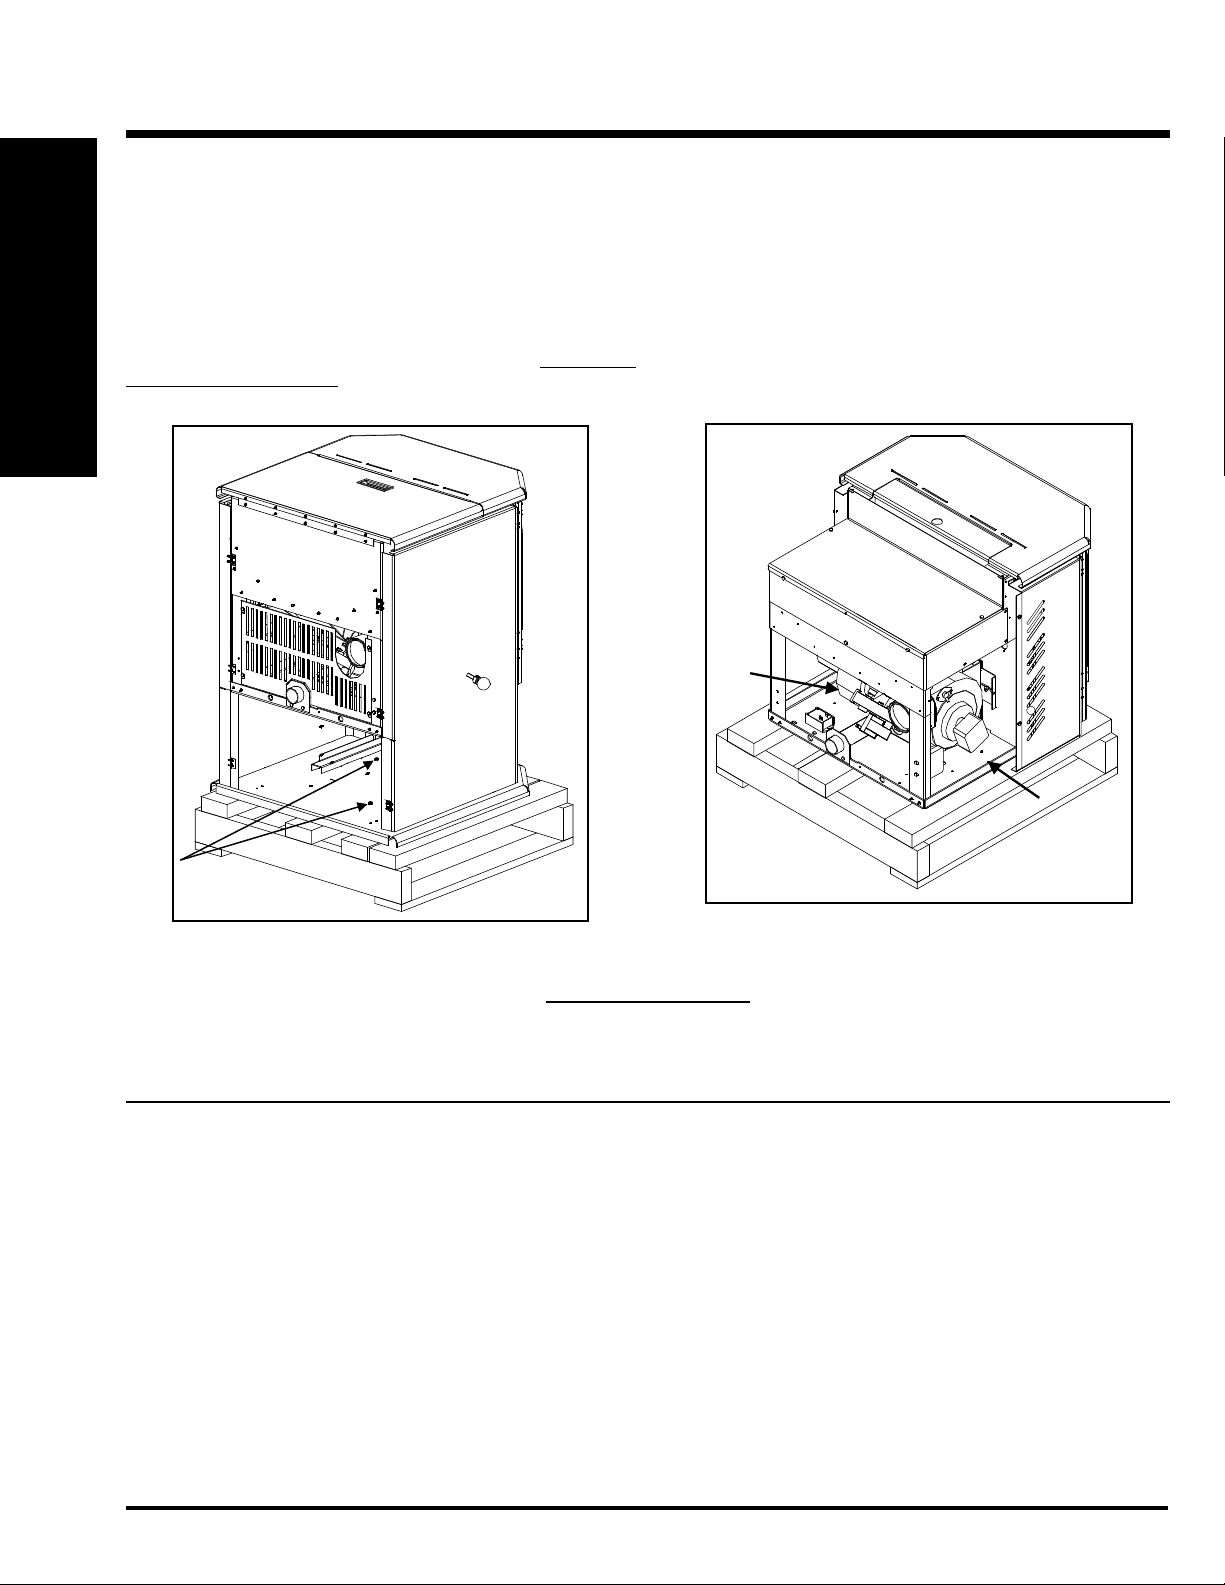
REMOVING PELLET STOVE
FROM PALLET
To remove your new stove from its pallet, remove the two (2) screws
securing the bottom to the pallet.
Freestanding:
One screw can be easily seen from behind but to access the second screw
INSTALLATION
the ashpan must be removed. See fi gure 1.
Fireplace Insert:
There is one screw on either side of the bottom. See fi gure 2.
Figure 1: Removing GF55 From Pallet.
Figure 2: Removing GFI55 From Pallet.
OPENING THE DOOR
The door lever can be found inbehind the right side of the door frame. To open the door, pivet the lever outwards and upwards until it unlocks.
LOCATING THE PELLET APPLIANCE
1. Check clearances to combustibles. See "Clearance to Combustibles"
section.
2. Do not obtain combustion air from an attic, garage or any unventilated
space if enough air is available. Combustion air may be obtained from
a ventilated crawlspace.
3. Do not install the stove in a bedroom.
4. You can vent the stove through an exterior wall behind the unit or
connect it to an existing masonry or metal chimney (must be lined if
the chimney is over 6” (15 cm) diameter, or over 28 inches² (180 cm²)
cross sectional area). An interior vent can be used with approved pipe
passing through the ceiling and roof.
5. Locate the stove in a large and open room that is centrally located in
the house. This will optimize heat circulation.
6. The power cord is 8 feet (2.43 m) long and may require a grounded
extension cord to reach the nearest electrical outlet.
8
Greenfi re Pellet Stove and Insert Technical Manual
GF55 FREESTANDING PELLET STOVE
INSTALLATION
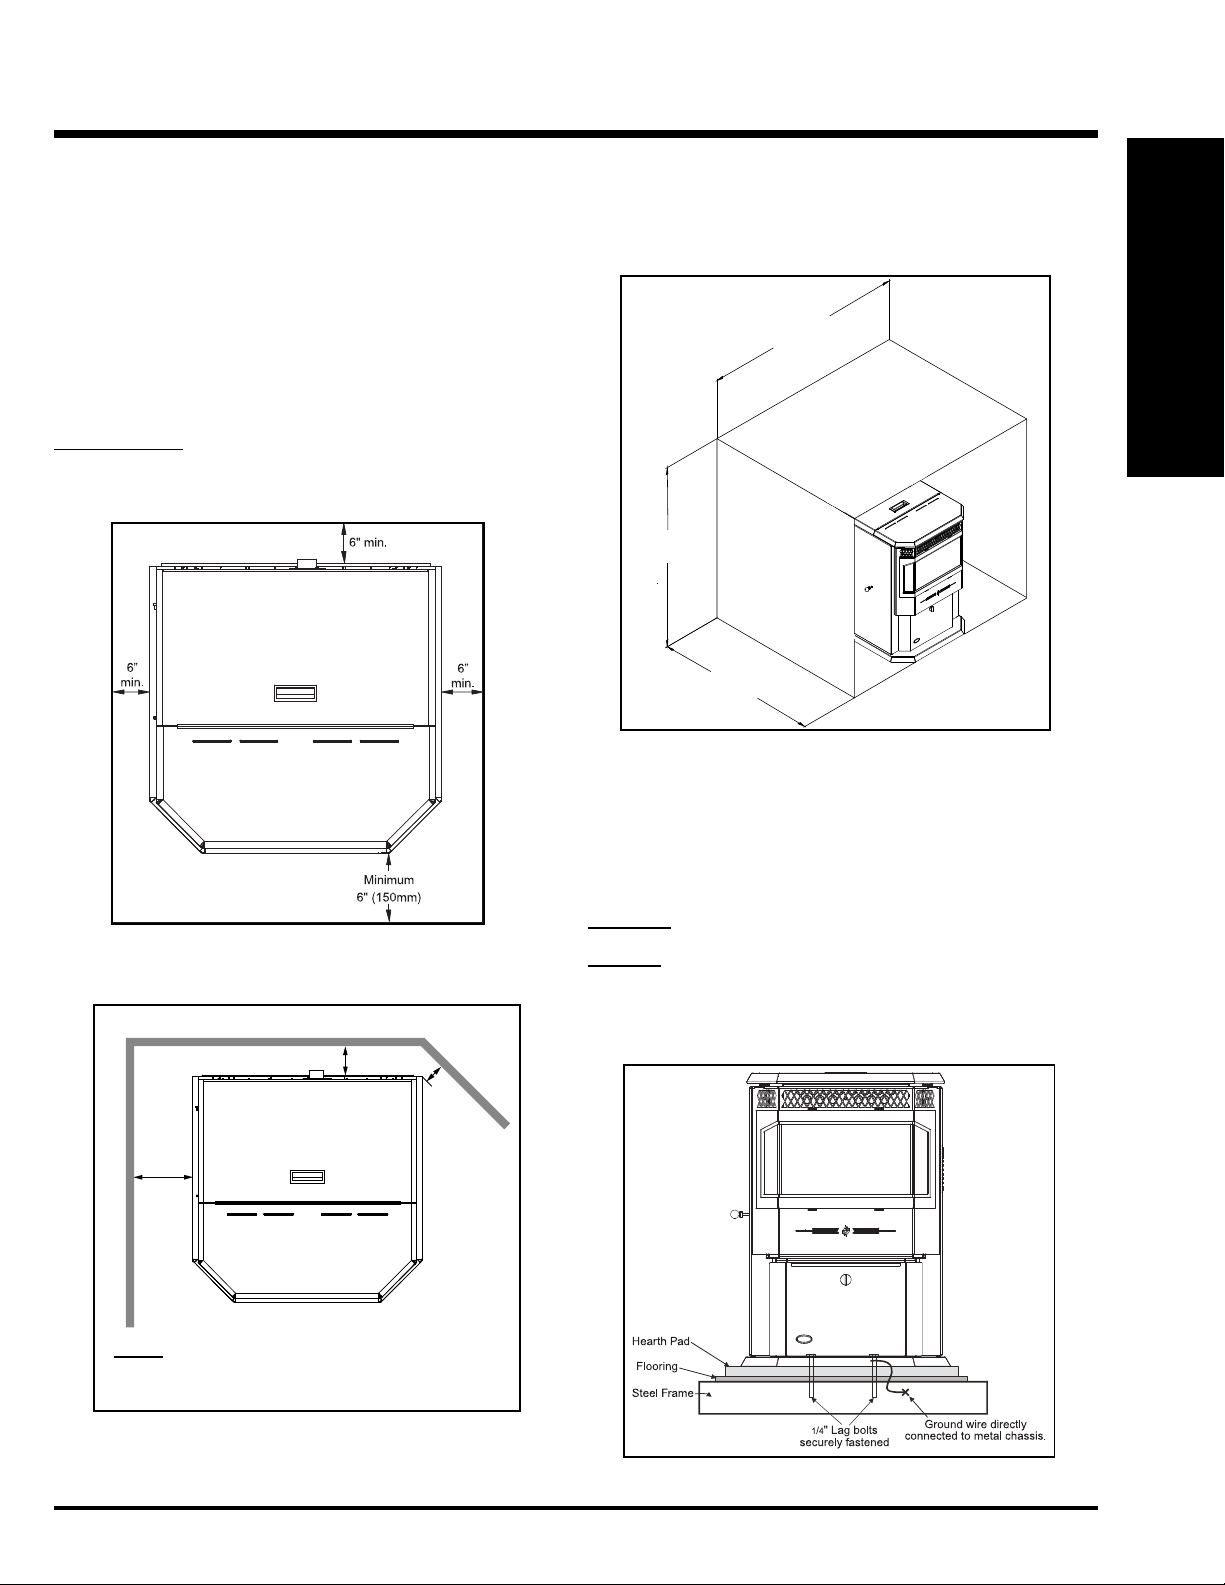
CLEARANCES TO COMBUSTIBLES
These dimensions are minimum clearances to combustibles, however it
is highly recommended that you leave suffi cient room on each side (20"
where possible) for servicing, routine cleaning and maintenance.
This pellet stove requires fl oor protection. The fl oor protection must be
non-combustible, extending 6" (150mm) beyond the full width and depth
of the unit including 6" (150 mm) in front for ember protection.
Floor Protection:
Width 36-7/16” (934mm)
Depth 36” (914mm)
ALCOVE CLEARANCES
Minimum Width
36" (914mm)
Minimum Height
48" (1219mm)
Maximum Depth
30" (762mm)
Figure 5: Alcove Clearances.
MOBILE HOME INSTALLATION
● Secure the heater to the fl oor using the holes in the pedestal of the
appliance.
● Ensure the unit is electrically grounded to the chassis of your home
(permanently).
INSTALLATION
Figure 3: Floor Protection.
6"
Side wall
(152mm)
Back wall
3" (76mm)
Adjacent
2"
(51mm)*
wall
*NOTE: If the unit is installed as a corner installation,
clearances change from 2" to 3", see "Corner thru Wall
Installation" section.
Figure 4: Minimum Clearances to Combustibles.
WARNING: Do not install in a room people sleep in.
CAUTION: The structural integrity of the manufactured home fl oor,
wall and ceiling/roof must be maintained
• Outside fresh air is mandatory. Secure outside air connections directly to
fresh air intake pipe and secure with three (3) screws evenly spaced.
Figure 6: Mobile Home Install Mounting.
Greenfi re Pellet Stove and Insert Technical Manual 9
 Loading...