

Page 1
vide o cassette recorde r
user,'s....guide
VR911I-IF
Page 2

RISKOF ELECTRIC
SHOCKDO NOTOPEN
YThi_sy_6ot irillicates'_t
"dangerous voltage" inside.
the product that presents a
risk of electric shock or
personal injury.
i
To reduce the risk of electric shock, do not remove
cover (or back). No user serviceable parts inside.
Refer servicing to qualified service personnel.
Thmssymbol indicates !'_
important instructions
accompanying the product.
"WARNING
To reduce the risk of fire or
shock hazard, do not expose
this product tO rain or moisture.
Caution: To reduce the risk of electric shock, match
wide blade of plug to wide slot, fully insert.
Attention- Pour _viter les chocs _lectriques, introduire
la lame la plus large de la fiche dans la borne
correspondante cl_l/_:_._jet pousser jusq_ au fond.
R_he_identific_tinn/rating Ibb_!..k_ed on the back panel of your
pr__cLqctfor it__sproper operating voll_ 0_)
FC-_-Regulations_state_that_una_hdl_i;_d,€;_anges or modifications to this
equipment ma_ void th_ _tauthority to_erate it.
(:able-ll:V-Install_rj_cLe_g_i_ed to call your attention to
ALl:icle820-40 of the National Ele_bCo_e (Section 54 of the Canadian
Electrical Code, Part 1) which provide_i_elines for proper grounding
and-_-_particul'ar, specit, es that thefl _c_fll_e6_lroundshall be connected to the
grounding system of the building as close to the point of cable entry as
practical. ' -
Product Registration
Please fill out the product registration card and return it immediately,
Returning this card allowsus to contact you if needed.*
Keep your sales receipt to obtain warranty parts and service and for
proof of purchase. Attach it here and record the serial and model
numbers in case you need them. The numbers are located on the back
of the product.
Model No. VR911HF
Serial No.
Purchase Date:
Dealer/Address/Phone:
Page 3
First Things First ..... .................. ,....... .... ,............. ...... ....... 3
Setting up the VCR ................ ,.. ........... ,. .... ,.,....,..,.... .... 7
Using the Menu to Set Up Features ................................................. 8
VCR Channels List......................................................................... 8
To Auto Channel Search ....................................................... 8
To Add or Remove Channels ............................................... 9
To Change the SignaIType ............ .................................. .....9
Set the Time and Date ................................................................ 10
Additional Set-up Features in_he_eferences Menu .......... II
RemoteVCR I/VCR2 Option ........._.:..;;,.._.:., ................... I I
Auto Play .............................................................. .:...;............. 12
Auto TV/VCR ......................................................................... 12
VCR Basics .............................. ,...................................... 13
Remote Buttons .................................................................................. 14
Component Buttons ................................................................... 14
VCR Function Buttons ................................................................ 14
Digital Satellite Receiver Buttons ............................................. 16
Universal TV Function Buttons ................................................. 16
RCA, GE, and Proscan TV Function Buttons ......................... 17
Playing aTape ....................................................................................... 17
Automatic Rewind .............................................................................. 18
Tape Eject ............................................................................................. 18
StandardVHS Recording ................................................................... 18
Check the SafetyTab .......................................................................... 18
Recording ...................................................................... 19
Recording Features ............................................................................ 20
D-VHS Recording ..................... ..;........................ ........................ 20
Conditions for D-VHS Recording ................... , ................ 21
Express Recording (XPR) ..........;............................................... 2 I
Timer Recording .......................................................................... 22
Stopping aTimer Recording ............................................... 23
Reviewing and Clearing Programs ..................................... 23
Timer Recording Using a Digital Satellite Receiver ............. 24
Conflicting Timers ................ ,................................................ 25
Editing or Cancelling aTimer Recording ......................... 25
Recording Broadcast Stereo TV or SAP ........................................ 26
Recording Audio Only ....................... ......_......................................... 26
Playing Back Audio Only ...................................... ............._.........27
UsingTwoVCRs for Copying and EditingTapes ,.,, ...........,........ 27
Editing with the AutoEdit Feature ............................ ................ 27
Editing Manually ............................................................................ 28
Dubbing D-VHS Recordings ...................................................... 28
1
Page 4
Programming theRemote ................................ ,..,....., 29
About Programming the Remote ................................................... 30
To Control a "IV .............................. .:..;;:......;.._...;;;.......................;... 30
To Control an Auxiliary Component...., ........................................ 32 °
To Control a Laser Disc Player or DVD Player ........................... 33
To Control a Digital Satellite Receiver or Cable Box .............,,. 34
Other Features ................................. ,.., .... .,...... ............. 35
Picture Search Options ................... Z.............. ,................................. 36
Forward and Reverse Search ....;.......;....i.:.._.;_.._.!,.........._....:.. 36
SearchingWith the Remote. ................ ...., ....... .........;........ 36"
SearchingWith theVCR ..................,................................... 36
Slow Motion ........................................... ....................................... 36
Commercial Scan (Search Bu_on) ........................................... 37
Frame Advance ........................................... .......;........................ ,.37
Index Search .................................................................................. 37 •
Go-To Search ................................................................ ;............... 38
Tracking ........................................................................................... ;..... 39
Time Counter ...................................... _......................... ;...................... 39
On-Screen Displays .............................. ;............................................. 40
Audio Set-Up Features ............................................................... _...... 4 I
Reception ..................................... ;.............................. ;..................4 I
Tape Playback ................................................................................ 42
Connections ............................. ............ ......................... 43
Connecting YourVCR ......._................................................................ 44
Choosing a VCR Connection .......................................................... 45
Advantages of Audio/Video Cable Connections ................... 45
Don't Forget About the Auto TV/VCR Feature .................... 45
Best Picture and Sound Quality ...................................................... 46
Very Good Picture and Sound Quality. ........;.;............................ J.47
Good Picture and Sound Quality .................................................... 48
Reference ...................................................................... 49
Front Panel ........................................................................................... S0
Display Panel ........................................................................................ S I
Back Panel ......................................... .......................... ......................... 52
TroubleshootingTips ............................... ,................... ......,. .............. $3
Specifications ...................................... ........................ .................. ."'". 56
Cleaning theVCR ...................... ..........i_......................... ............._ ...... 56
Accessories ............................................. ,;.................,......;............... ... 57
Limited Warranty _'_ - ..... "
................................ ..,....,.,...;..,...:;,.,...;.,..,;...,;.;;;. 59,4
Index ................................................... ii._.............,..,;,;.;.. ............. ,,...;...60
2
Page 5
HI, MY NAME IS ROGER...
and I wrote this User's Guide. It's my job to see
that you have a rewarding user manual experience.
You'll find that I've arranged this manual to clearly
explain all of yourVCR's features.
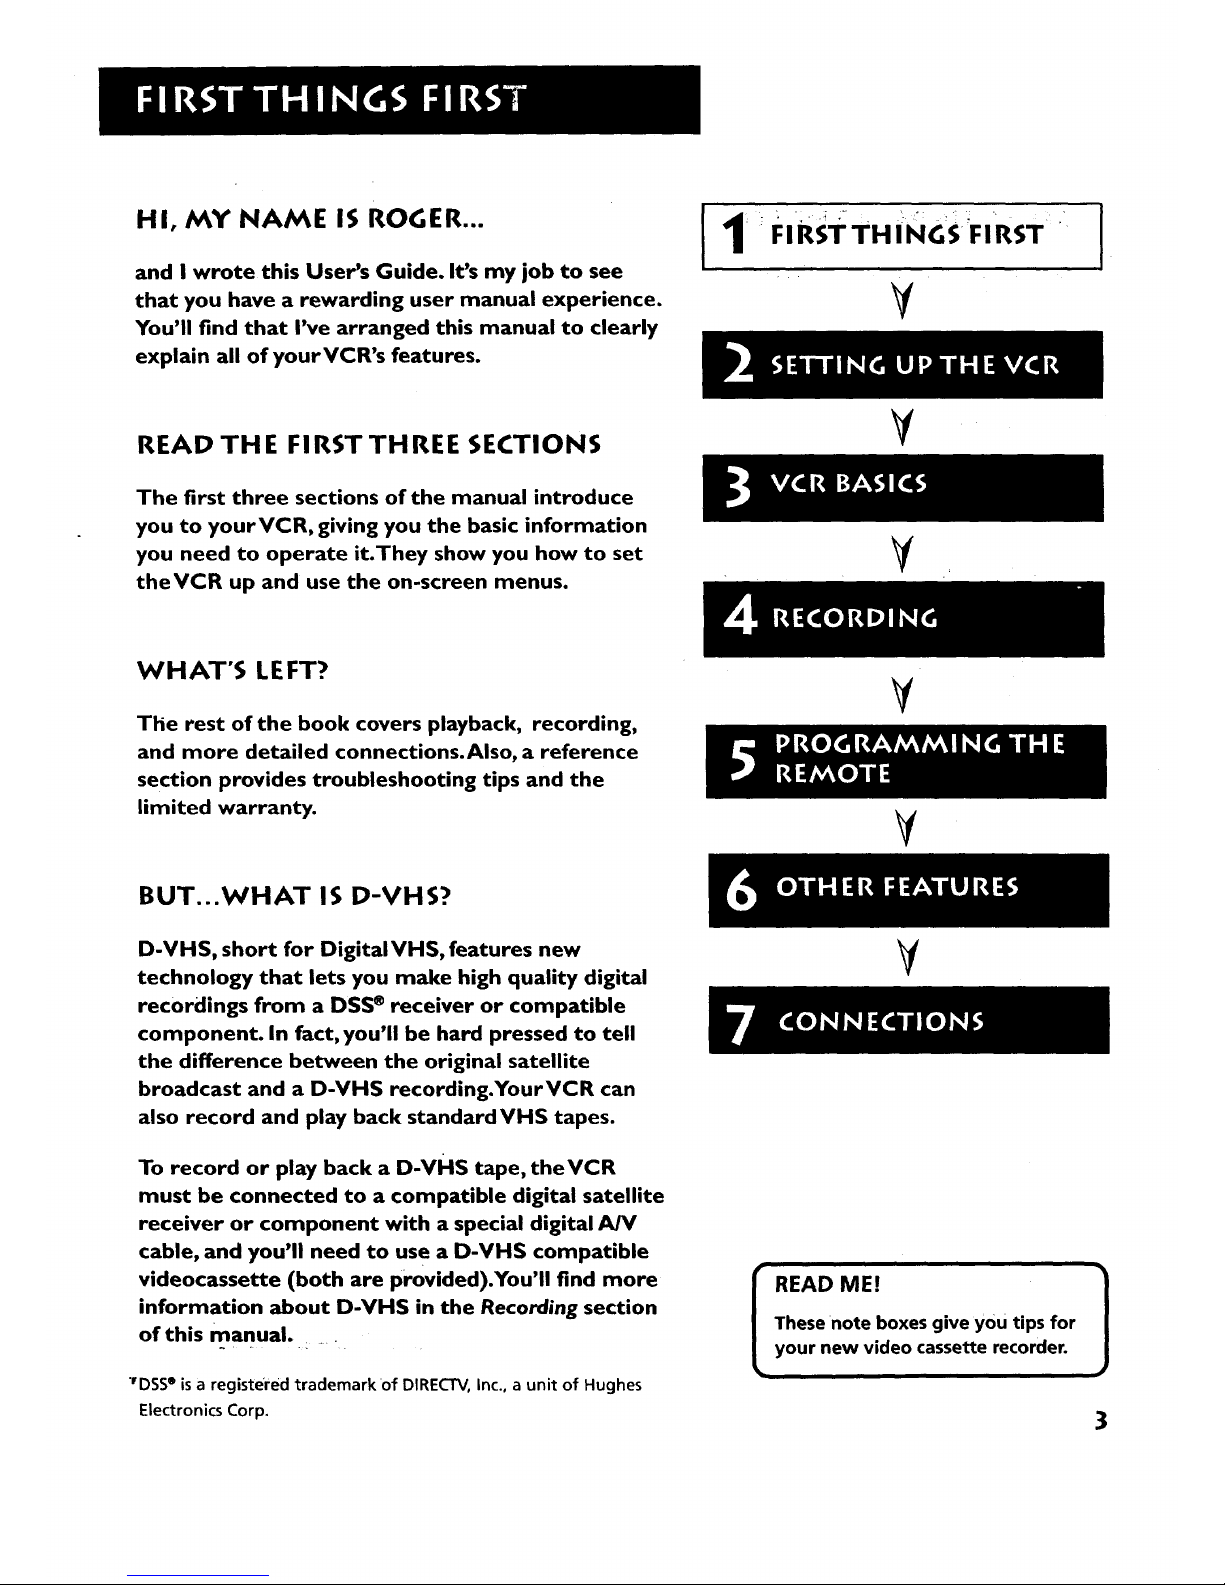
FIRST THINGS FIRST
_r
READ TH E FI RST TH REE SECTIONS
Y
The first three sections of the manual introduce
you to yourVCR, giving you the basic information
you need to operate it.They show you how to set
theVCR up and use the on-screen menus.
WHAT'S LEFT?
The rest of the book covers playback, recording,
and more detailed connections.Also, a reference
section provides troubleshooting tips and the
limited warranty.
V
V
BUT...WHAT IS D-VHS?
D-VHS, short for DigitalVHS, features new
technology that lets you make high quality digital
recordings from a DSS ® receiver or compatible
component. In fact, you'll be hard pressed to tell
the difference between the original satellite
broadcast and a D-VHS recording.YourVCR can
also record and play back standardVHS tapes.
To record or play back a D-vHs tape, theVCR
must be connected to a compatible digital satellite
receiver or component with a special digital A/V
cable, and you'll need to use a D-VHS compatible
videocassette (both are provided).You'll find more
information about D-VHS in the Recording section
of this manual.
"rDSS®is a registered trademark of DIRECTV, Inc., a unit of Hughes
Electronics Corp.
V
I READ ME! 1
These note boxes give you tips for
your new video cassette recorder.
3
Page 6
STEP I:UNPACKTHE BOX
Carefully unpack the items in the box:
• VCR
• Remote control and batteries
• •RFcoaxial cable
• AudioNideo cables
• Digital A/V cable
• D-VHS videocassette
STEP 2: INSTALL BA'I-FERIES IN THE
REMOTE CONTROL
Follow these steps whenever you need to install or change the
batteries in your VCR remote.
1. Remove the cover of the battery compartment.
2. Place batteries in the remote, matching the + and - ends of
each battery to the diagram inside the compartment.
3. Replace the cover.
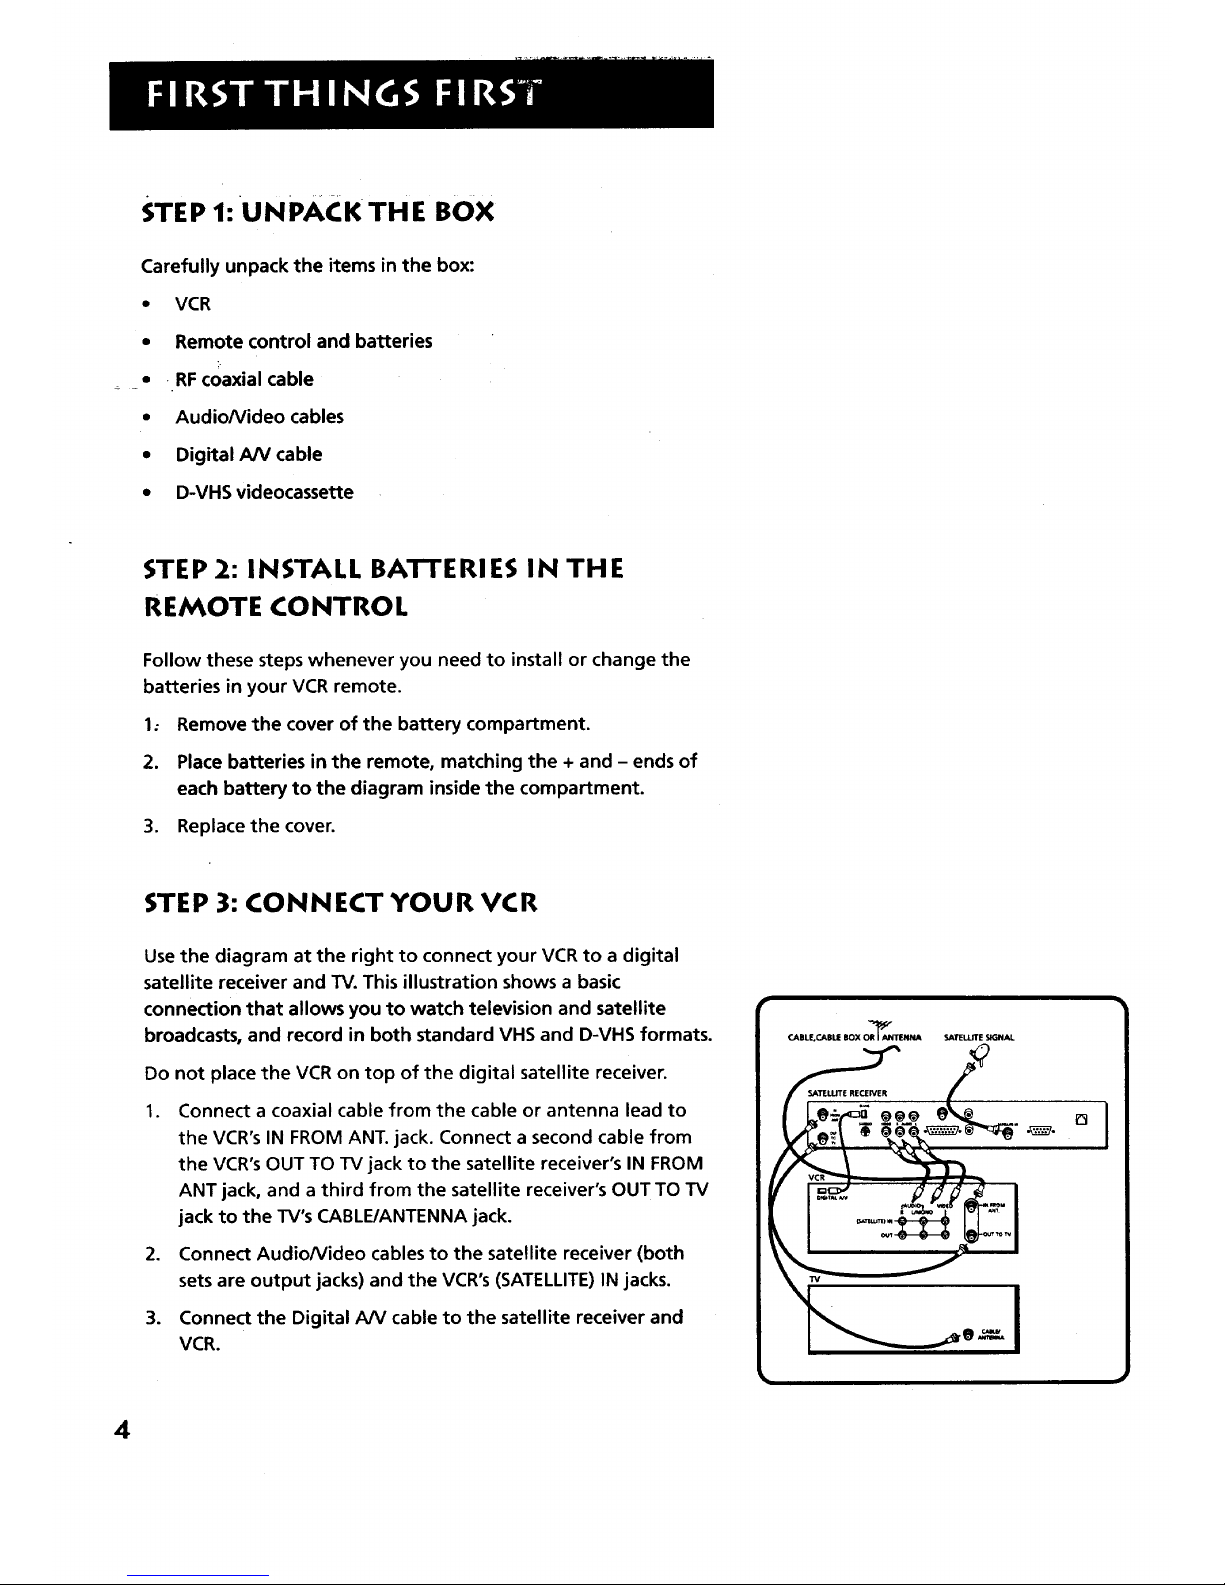
STEP 3: CONNECT YOUR VCR
Use the diagram at the right to connect your VCR to a digital
satellite receiver and TV. This illustration shows a basic
connection that allows you to watch television and satellite
broadcasts, and record in both standard VHS and D-VHS formats.
Do not place the VCR on top of the digital satellite receiver.
.
Connect a coaxial cable from the cable or antenna lead to
the VCR's IN FROM ANT. jack. Connect a second cable from
the VCR's OUT TO TV jack to the satellite receiver's IN FROM
ANT jack, and a third from the satellite receiver's OUT TO TV
jack to the TV's CABLE/ANTENNA jack.
2. Connect Audio/Video cables to the satellite receiver (both
sets are output jacks) and the VCR's (SATELLITE) IN jacks.
3. Connect the Digital A/V cable to the satellite receiver and
VCR.
CABLE,CABLI[ 80X OR_ANTENNA SATELLITESIGNAL
I
°1
4
Page 7
If you have a TV with AUDIO/VIDEO jacks, use the jacks for a
better connection. For additional information and connection
options, refer to the Connections section toward the back of the
manual.
STEP 4: PLUG IN THE VCR
Match the wide blade of the plug with the wide slot in the
outlet. Be sure to insert the plug completely.
STEP 5: TUNE THE TV
Tune the TV to the VCR viewing channel. The VCR viewing
channel is channel 3 or 4 or the TV's video input, depending on
the connection you've chosen,
• If you connect your VCR using the ANTENNA connectors with
RFcoaxial cable, set the CH3-4 switch to channel 3 or 4--the
• channel you want to use on your TV.
• If you connect your VCR using the AUDIO/VIDEO jacks with
audio/video cables, select the TV's video input to see the
signal. See your TV Owner's Manual.
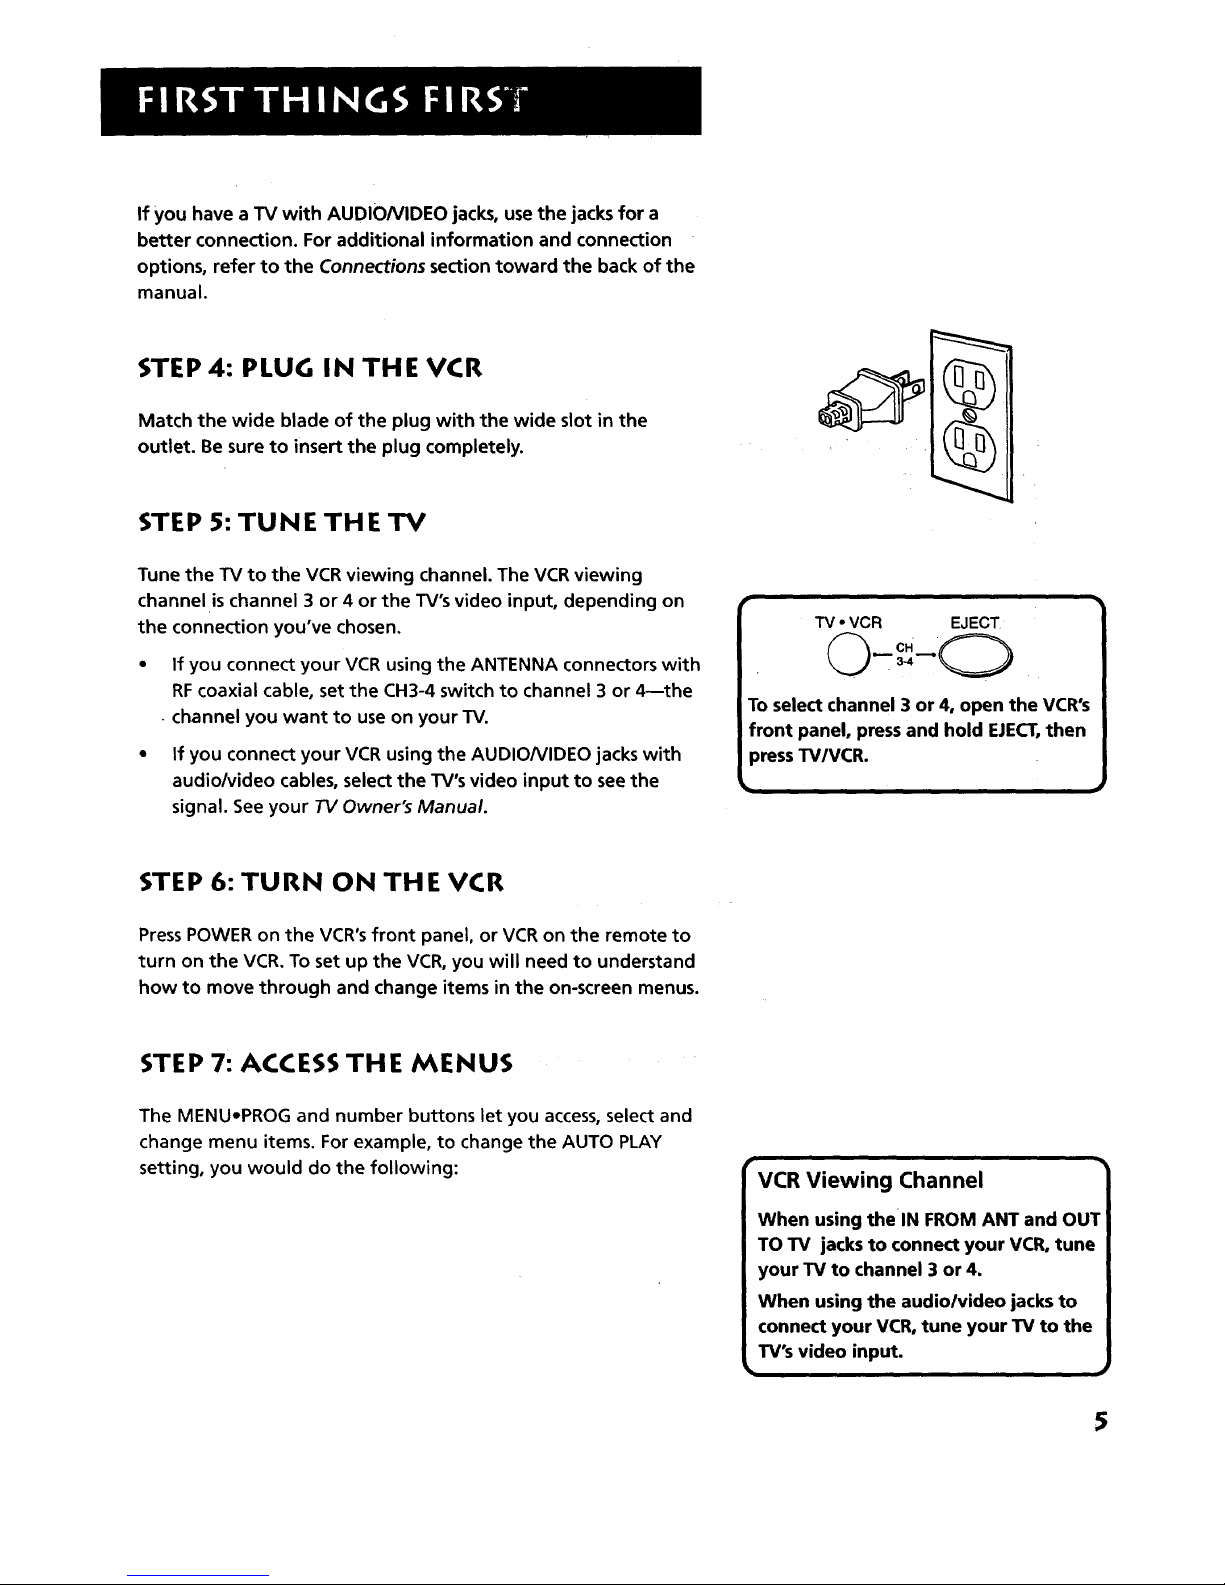
i ii
TV* VCR EJECT
To select channel 3 or 4, open the VCR's
front panel, press and hold EJECT,then
press TV/VCR.
STEP 6: TURN ON THE VCR
Press POWER on the VCR's front panel, or VCR on the remote to
turn on the VCR. To set up the VCR, you will need to understand
how to move through and change items in the on-screen menus.
STEP 7: ACCESS THE MENUS
The MENU-PROG and number buttons let you access, select and
change menu items. For example, to change the AUTO PLAY
setting, you would do the following:
VCR Viewing Channel
When using the IN FROM ANT and OUT
TO TV jacks to connect your VCR, tune
your TV to channel 3 or 4.
When using the audiolvideo jacks to
connect your VCR, tune your TV to the
TV's video input.
5
Page 8

1. PressMENU.PROG todisplay the VCR MAIN MENU,
VCR MAIN MENU
1 Timer Recordings
2 ChanneLs
3 Preferences
4 Audio
.
Press3 to display the PREFERENCESmenu.
.- PREFERENCES
1 Remote ControL: VCR1
2 Auto PLay: ON
3 Auto TV/VCR: ON
0 Exit
3. Press2 to switch Auto Play to ON or OFR
PREFERENCES
-1 Remote ControL: VCR1
2 Auto PLay: OFF
3 Auto TV/VCR: ON
0 Exit
See Additional Set-Up Features for detailed information
about the Auto Play feature.
STEP 8: SET UP THE VCR
Once you understand how to move around through the menus,
go to the next section to set up your VCR.
6
Page 9

SETUP FEATURES
Below is a list of features that you may, want to set.
up before you begin using yourVCR for the first
time.
I
• Set upVCR Channel List (Auto Channel I _i
Search)
• Set theTime and Date
SETTING UP THE VCR
_d
• Set the RemoteVCRI/VCR2 feature
• Set the Auto Play feature
• Set the Auto TV/VCR feature
V
V
V
V
7
Page 10
USING,THE:MENUTO SET UP FEATURES
. :.- : _ .
You can set up features by using the menu system. The features
you may want to set up before you begin using your VCR are
explained in this section.
_ VCRCHANNELS LIST
Your VCR may have had a channel list preset at the factory.
Even if your VCR has a list, it's possible that you may want to
add or deletesome channels depending on whether they are
active.
If you use a cable box and/or digital satellite receiver to tune
all channels exclusively, this step isn't necessary.
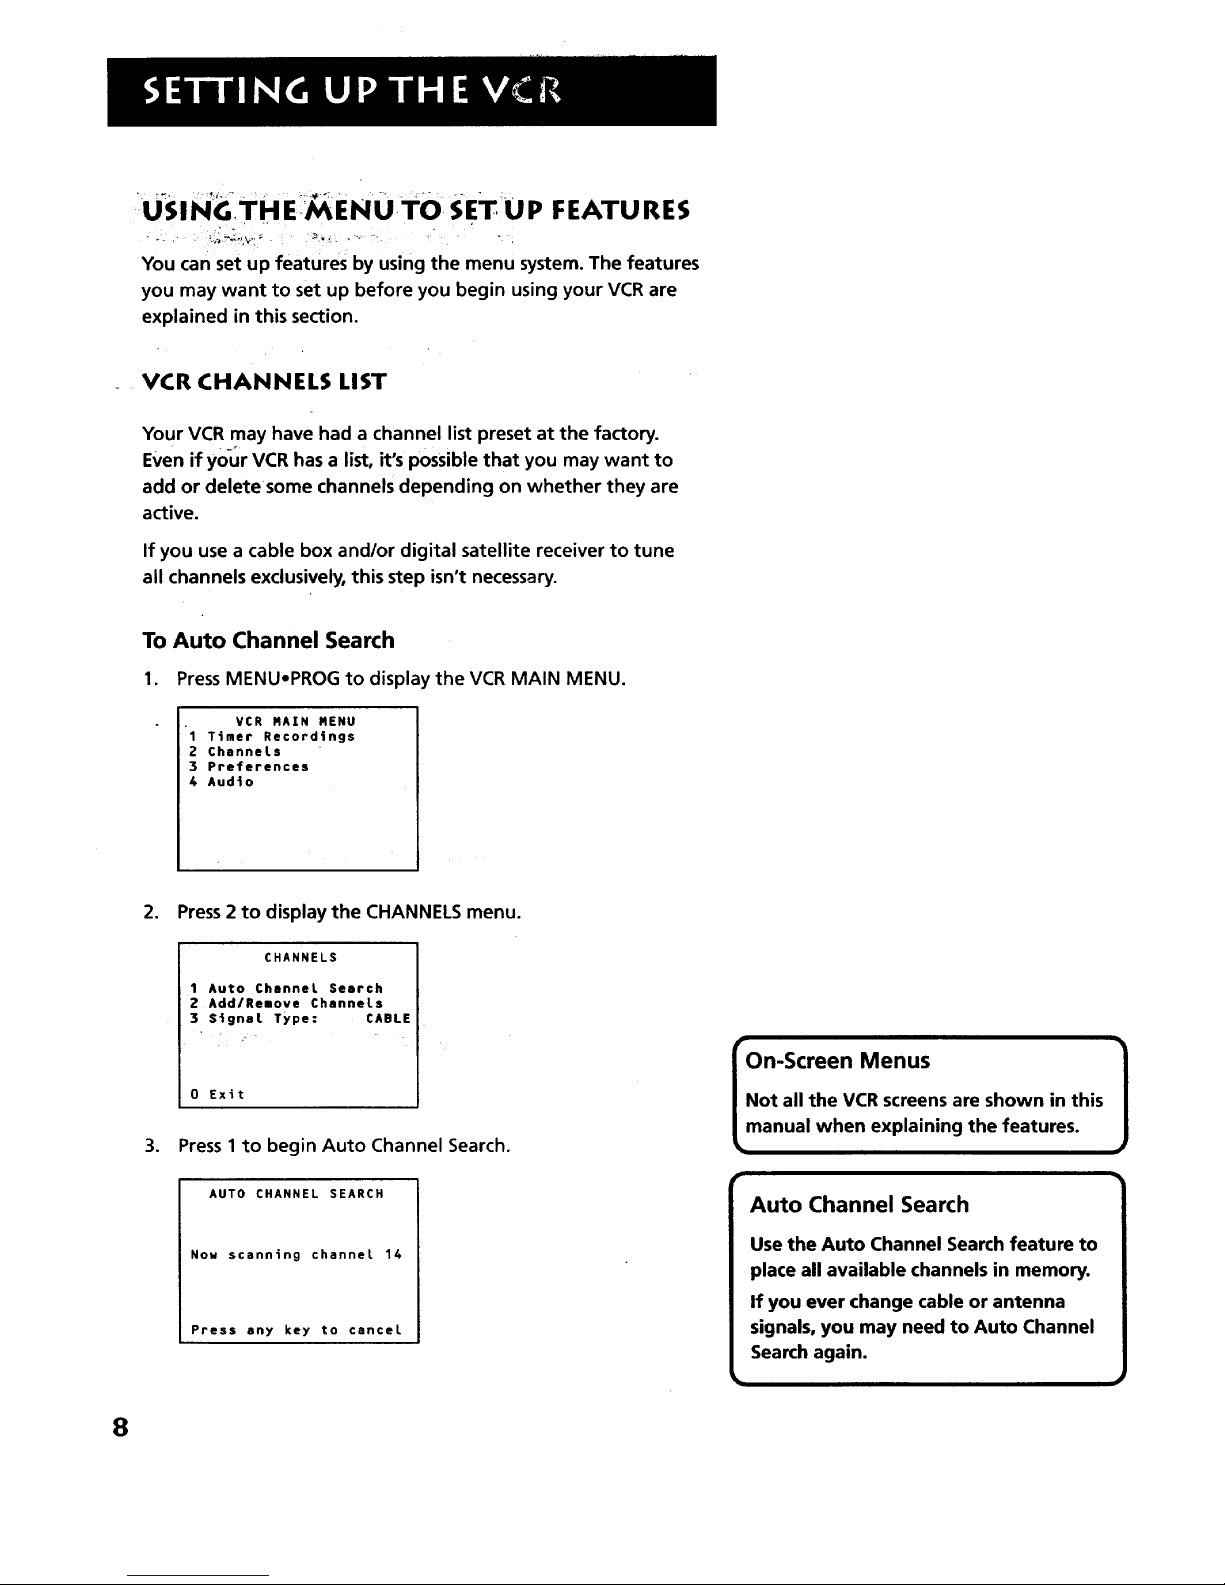
To Auto Channel Search
1. Press MENUoPROG to display the VCR MAIN MENU.
VCR RAIN RENU
1 Timer Record4ngs
2 Channels
3 Preferences
4 Audio
2. Press2 to display the CHANNELS menu.
CHANNELS
1 Auto Channel Seerch
2 AddlRelove Channels
3 S_gnat TYpe: CABLE
0 Exit
3. Press 1to begin Auto Channel Search.
r
On-Screen Menus
Not all the VCR screens are shown in this
manual when explaining the features.
AUTO CHANNEL SEARCH
Now scanning channel 14
Press any key to cancel
Auto Channel Search
Use the Auto Channel Search feature to
place all available channels in memory.
If you ever change cable or antenna
signals, you may need to Auto Channel
Search again.
8
Page 11

The VCR begins scanning for the available channels--this takes
about two to three minutes. The lowest channel is tuned once
the search is complete. Now pressing CHANNELup or down
should only select the active channels.
To Add or Remove Channels
You may want to add or remove channels after you Auto
Channel Search, especially if some of the channels have weak
signals or you don't want to watch them.
,
2.
3.
PressMENU.PROG to display the VCR MAIN MENU.
Press2 to display the CHANNELS menu.
Press 2 to display the ADD/REMOVE CHANNELS screen. Use
CHANNEL up or down or number buttons to go to the
channels you want to remove or add.
ADD/REROVE CHANNELS
Channel 115
is presently ADDED
Press CLEAR to remove
Press RENU to exit
ADD/REROVE CHANNELS
Channel 115
is presently REROVED
Press 1NFO to add
Press RENU to exit
To
1.
2.
3.
Change the Signal Type
PressMENUopROG to display the VCR MAIN MENU.
Press2 to display the CHANNELS menu.
Press 3 to change the Signal Type between CABLEand
ANTENNA.
Selecting Channels
n
The CHANNEL up and down buttons
accessthose channels active in your VCR
channel list.
You can still accesschannels not in the
channel list by using the number buttons
on the remote.
:9
Page 12
SETTHE TIME AND DATE
You will only need to set the time and date if you have not
connected the VCR to a digital satellite receiver with a Digital
AN cable. When connected, the VCR automatically receives date
and time information from the digital satellite receiver each time
it isturned on and off.
This option will not appear in the Main Menu if the VCR is
connected to a digital satellite receiver.
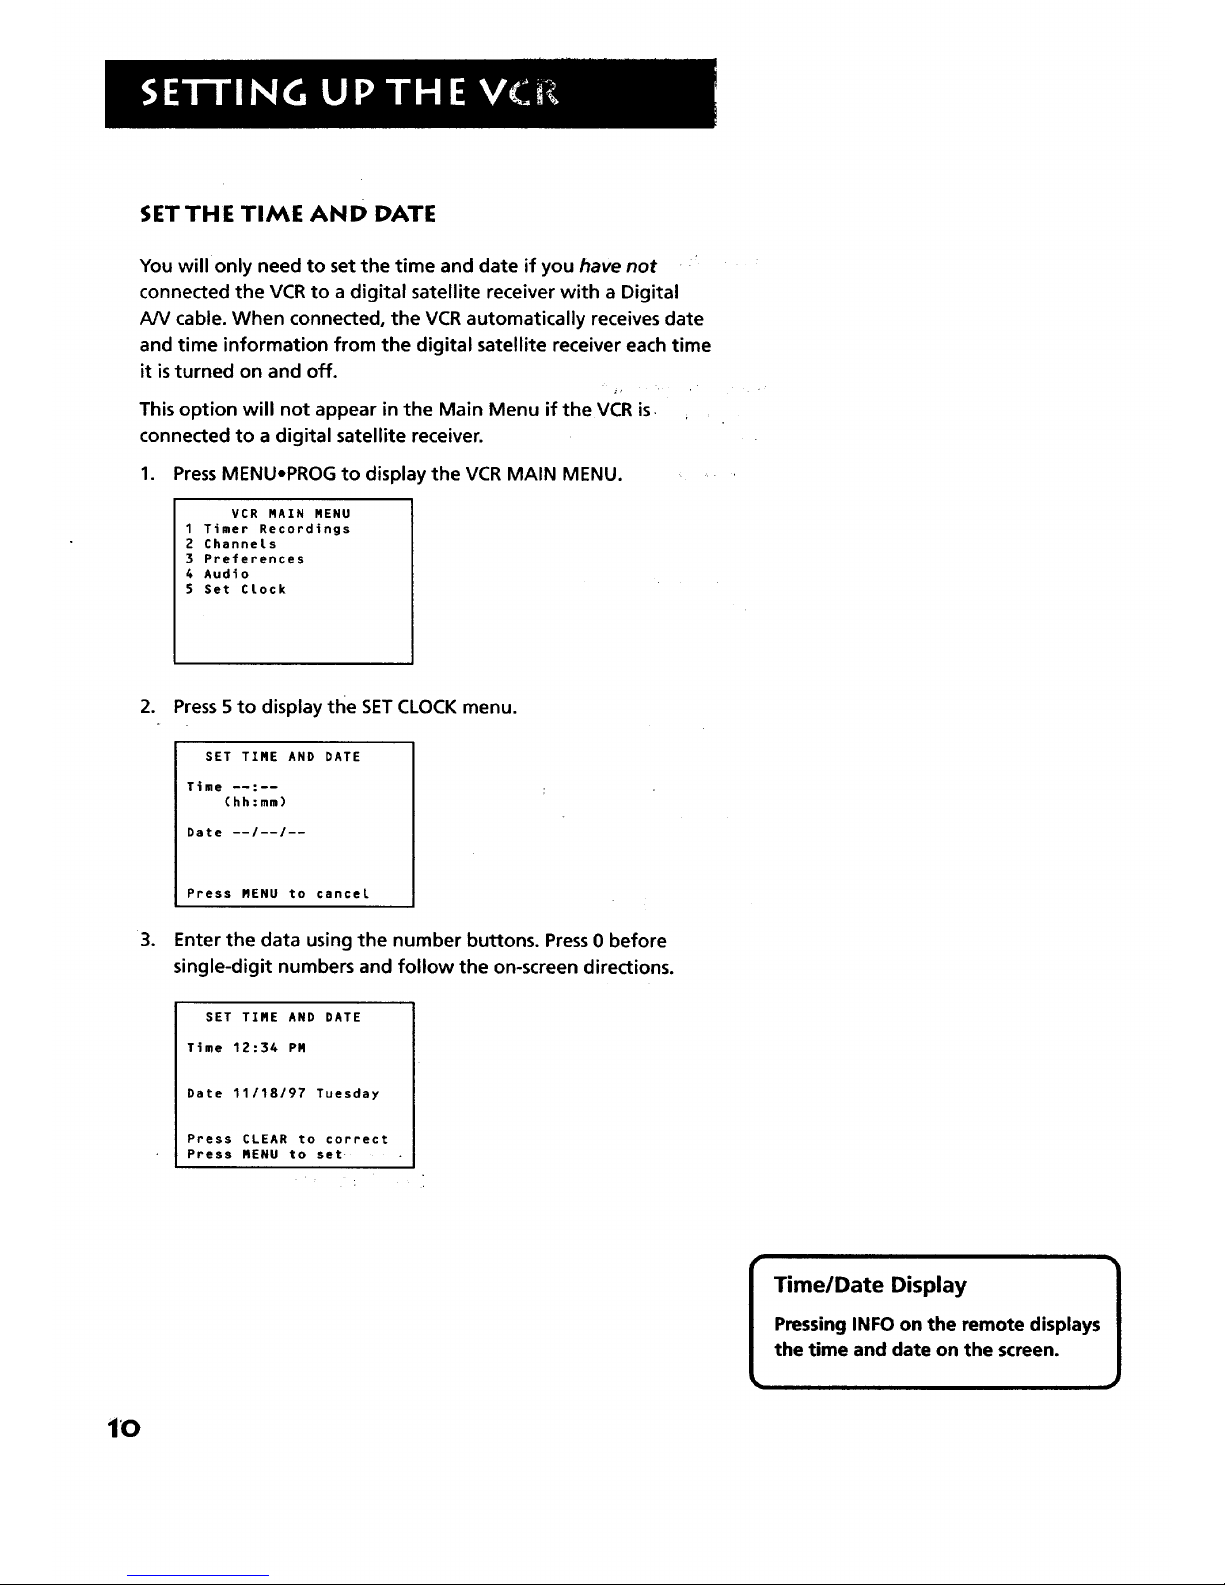
1. PressMENU-PROG to display the VCR MAIN MENU.
VCR RAIN MENU
1 Timer Recordings
2 ChanneLs
3 Preferences
4 Audio
5 Set CLock
2. Press5 to display the SETCLOCK menu.
.
SET TIRE AND DATE
Time --:--
(hh:mm)
Date --I--/--
Press MENU to cancel
Enter the data using the number buttons. Press 0 before
single-digit numbers and follow the on-screen directions.
SET TIRE AND DATE
Time 12:34 PR
Date 11/18/97 Tuesday
Press CLEAR to correct
Press MENU to set .....
[
Time/Date Display
Pressing INFO on the remote displays
the time and date on the screen.
1
iO
Page 13

ADDITIONAL SETUP FEATURES IN THE
PREFERENCES MENU
The features in this section are all accessedthrough the
PREFERENCESmenu.
1. PressMENU,PROG to display the VCR MAIN MENU.
VCR RAIN RENU
1 Timer Recordings
2 Channels
3 Preferences
4 Audio
2. Press 3 to display the PREFERENCESmenu.
PREFERENCES
1 Remote Control: VCR1
2 Auto PLay: ON
3 Auto TV/VCR: ON
0 Exi t
Now you are ready to select an item from the menu to set up.
REMOTE VCR1/VCR2 OPTION
The VCR2oDVD button on the remote control lets you to
control a second VCR. If you have a second compatible VCR
that you would like to operate as "VCRI," set this VCR to
respond to the VCR2.DVD button.
Press 1 to select the Remote Control item. Then press the
VCR2eDVD button to change.
PREFERENCES
(Press VCR2 to Change)
2 Auto PLay: OFF
3 Auto TV/VCR: OFF
• _ -i _= L
0 Exit 11,0 Exit
PREFERENCES
1 Remote Control: VCR2
i-2.Auto PLay: OFF
3 Auto TVIVCR: OFF
11
Page 14

This VCR will only respond to the remote's VCR2-DVD button.
To change the remote setting back to VCR1, display the
PREFERENCESmenu, press 1, and then pressVCR1 on the
remote.
AUTO PLAY
This feature allows the VCR to automatically start playing when
you insert a tape with the safety tab removed. Press2 to switch
between ON or OFF.
Select ON if you want a tape with its safety tab removed to
start playing automatically when the tape is inserted.
Select OFF if you do not want a tape with its safety tab
removed to start playing automatically.
AUTO TV/VC R
This feature controls whether the TVNCR switch changes
automatically to the VCR mode, when the VCR is turned on.
Press3 to switch between ON and OFF.
Select ON if you want the VCR to switch to the VCR mode
when the VCR isturned on or a cassette is inserted. This only
applies if you connect the IN FROM ANT and OUT TO TV
jacks of your VCR and TV and watch your VCR on channel 3
or 4 of your 7_.
Select OFF if you want the VCR to remain in the TV mode.
This isuseful if you watch your VCR on the TV's video input
and you don't want your antenna/cable signal interrupted
by the VCR.
Auto TV/VCR
Pressing TV,VCR will still switch
between the VCR and TV mode.
VCR mode: VCR indicator in the
display panel lights.
TV mode: VCR indicator turns off.
12
Page 15

LEARN THE BASICS TO GET
YOU STARTE D
TheseVCR basics should be enough for you to
begin enjoying yourVCR. Learning the remote
control functions, playing a recorded tape, and
recording a program should do just that.
However, there are other features that
enhance the enjoyment of yourVCR, but they
aren't necessary to get you started. If you want
to learn more about yourVCR, just keep
reading.
V
VCR BASICS
¥
¥
V
¥
i
to know in order to watch a movie
or tape your favorite show.' _
i
13
Page 16
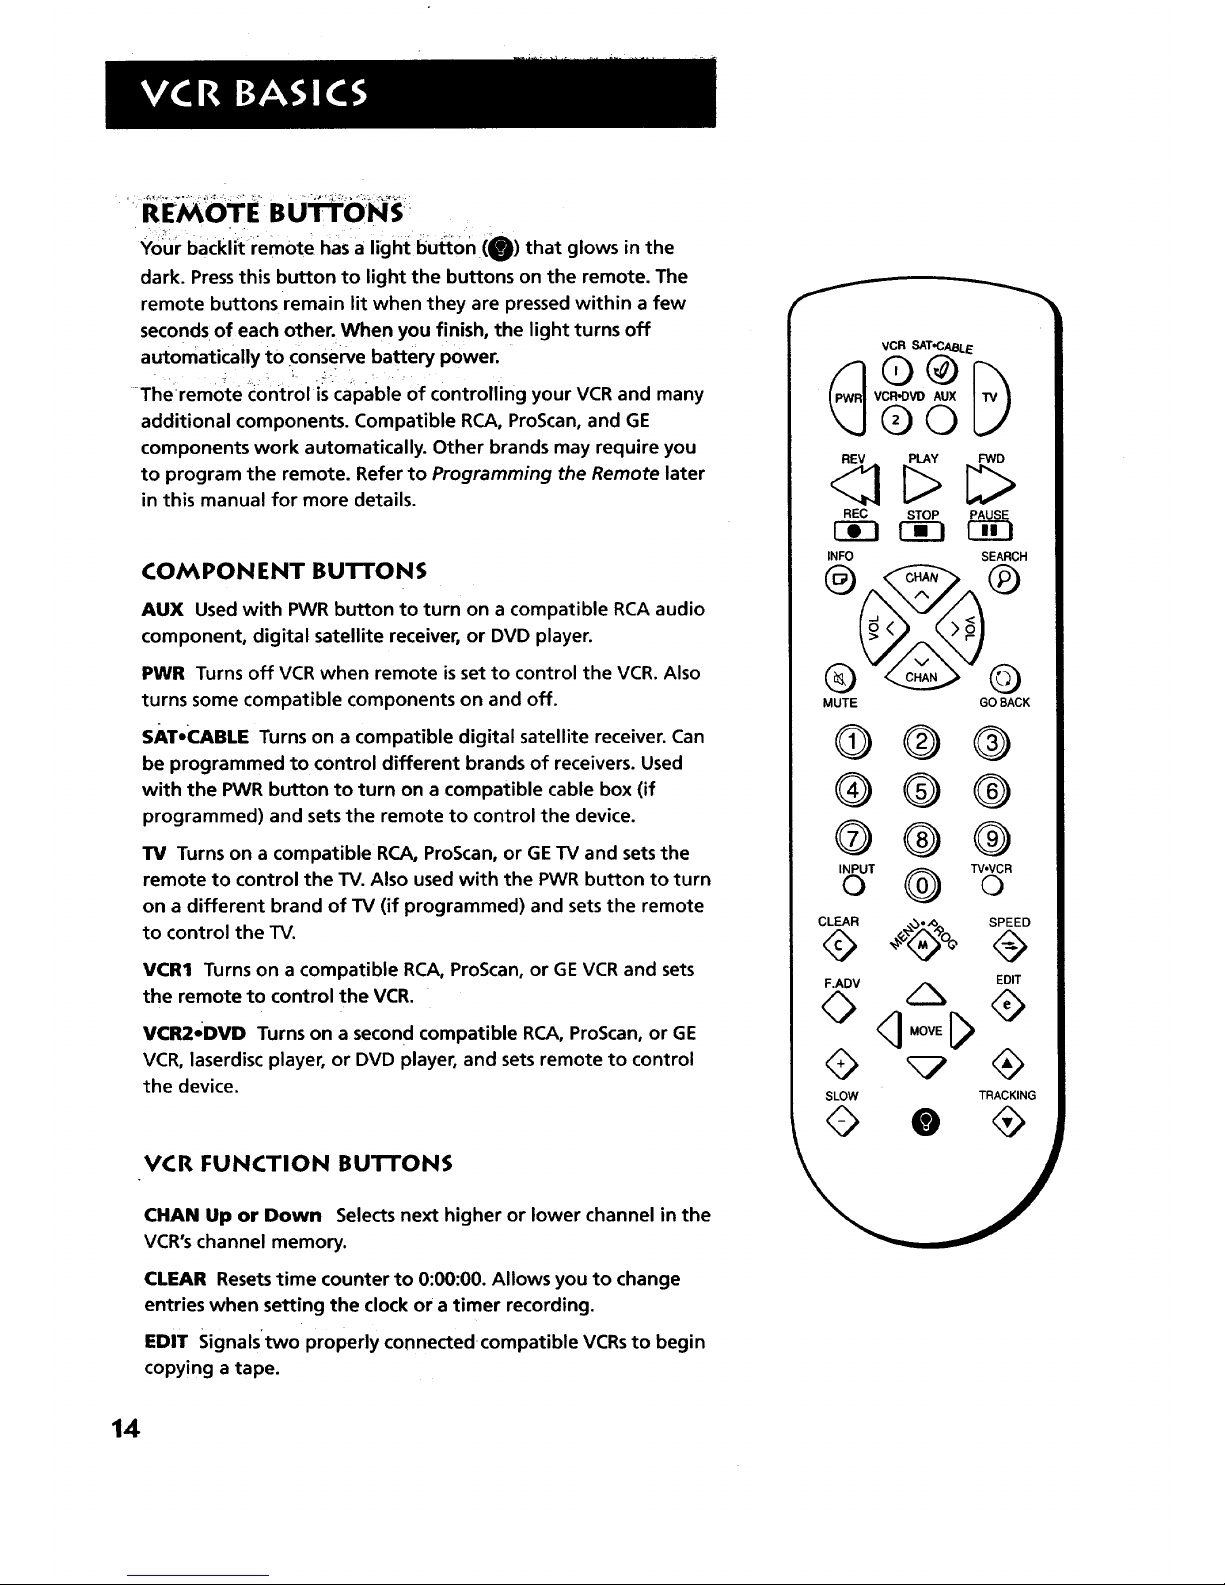
Your backii_ remote hasa light huron (_) that glows in the
dark. Pressthis button to light the buttons on the remote. The
remote buttons remain lit when they are pressed within a few
seconds of each other. When you finish, the light turns off
automatically to conserve battery power.
.; . _ ;. L -_ • . ' •
-Theremote control iscapable of controlling your VCR and many
additional components. Compatible RCA, ProScan, and GE
components work automatically. Other brands may require you
to program the remote. Refer to Programming the Remote later
in this manual for more details.
COMPON ENT BUTTONS
AUX Used with PWR button to turn on a compatible RCA audio
component, digital satellite receiver, or DVD player.
PWR Turns off VCR when remote is set to control the VCR. Also
turns some compatible components on and off.
SAT*_..J_BLE Turns on a compatible digital satellite receiver. Can
be programmed to control different brands of receivers. Used
with the PWR button to turn on a compatible cable box (if
programmed) and sets the remote to control the device.
TV Turns on a compatible RCA, ProScan, or GE TV and sets the
remote to control the TV. Also used with the PWR button to turn
on a different brand of TV (if programmed) and sets the remote
to control the TV.
VCR1 Turns on a compatible RCA, ProScan, or GE VCR and sets
the remote to control the VCR.
VCR2*DVD Turns on a second compatible RCA, ProScan, or GE
VCR, laserdisc player, or DVD player, and sets remote to control
the device.
VCR FUNCTION BUTTONS
CHAN Up or Down Selects next higher or lower channel in the
VCR's channel memory.
CLEAR Resetstime counter to 0:00:00. Allows you to change
entries when setting the clock or a timer recording.
EDIT Signals'two properly connected compatible VCRsto begin
copying a tape.
VCR SAT_CABLE
VCR'DVD AUX
©©
_ PLAY FW_
REC STOP PAUSE
r- -i Fg-i
INFO SEARCH
MUTE GO BACK
@®®
®@®
®®®
INPUTo @ TV,VCRQ
CLEAR ,_o_,, SPEED
EDIT
SLOW TRACKING
14
Page 17
F.ADV (Frame Advance) In standard VHS mode lets you view
one frame with each pressof the button when tape is in pause.
FWD (Forward) Fast forwards the tape when the VCR is
stopped. Searches forward through a tape during playback.
GO BACK Switches between two channels. Select one channel
and then select another using the number buttons. Press GO
BACK to switch between the two channels.
INFO Shows the status displays on the TV screen.
INPUT! Selects between the line inputs and the VCR's tuner. Line
input refers to the signal coming from the component connected
to the audio/video input jacks on the back (LINE 1) or front
(LINE 2) of the VCR.
MENUoPROG Displays VCR MAIN MENU on the TV screen. Used
to select a menu item or exit a menu.
Numbers (0 through 9) Select a channel up to 99 by pressing
two numbers. Select a cable channel over 99 by pressing and
holding 1 until 1 -- appears on the screen. Then press the other
two numbers.
PAUSE Pauses playback or recording. Press PAUSE again to
return to playback or recording.
PLAY Plays a tape.
PWR Turns off the VCR when the remote is set to control
the VCR.
REC Starts VCR recording. Also used for express recording.
REV Rewinds the tape when the VCR is stopped. Searches
backward through a tape during playback.
SEARCH Displays Index and Go-To Search menus on TV screen
when VCR is stopped. During playback, each press of the button
advances the tape 60 seconds of recorded material.
SLOW + AND - Used to activate slow-motion playback in
standard VHS mode.
SPEED In standard VHS mode selects a recording speed (SP
or SLp).
STOP Stops the current VCR function such as record, playback,
rewind, or fast forward.
Visual Search in D-VHS Mode
Visual search, slow motion, and
frame advance are available only in
standard VHS mode. In D-VHSmode,
a still picture is displaye d during
forward/reverse search, while the
tape time counter indicates tape
position. A still picture is also , _
displayed when the VCR is paused:
15
Page 18
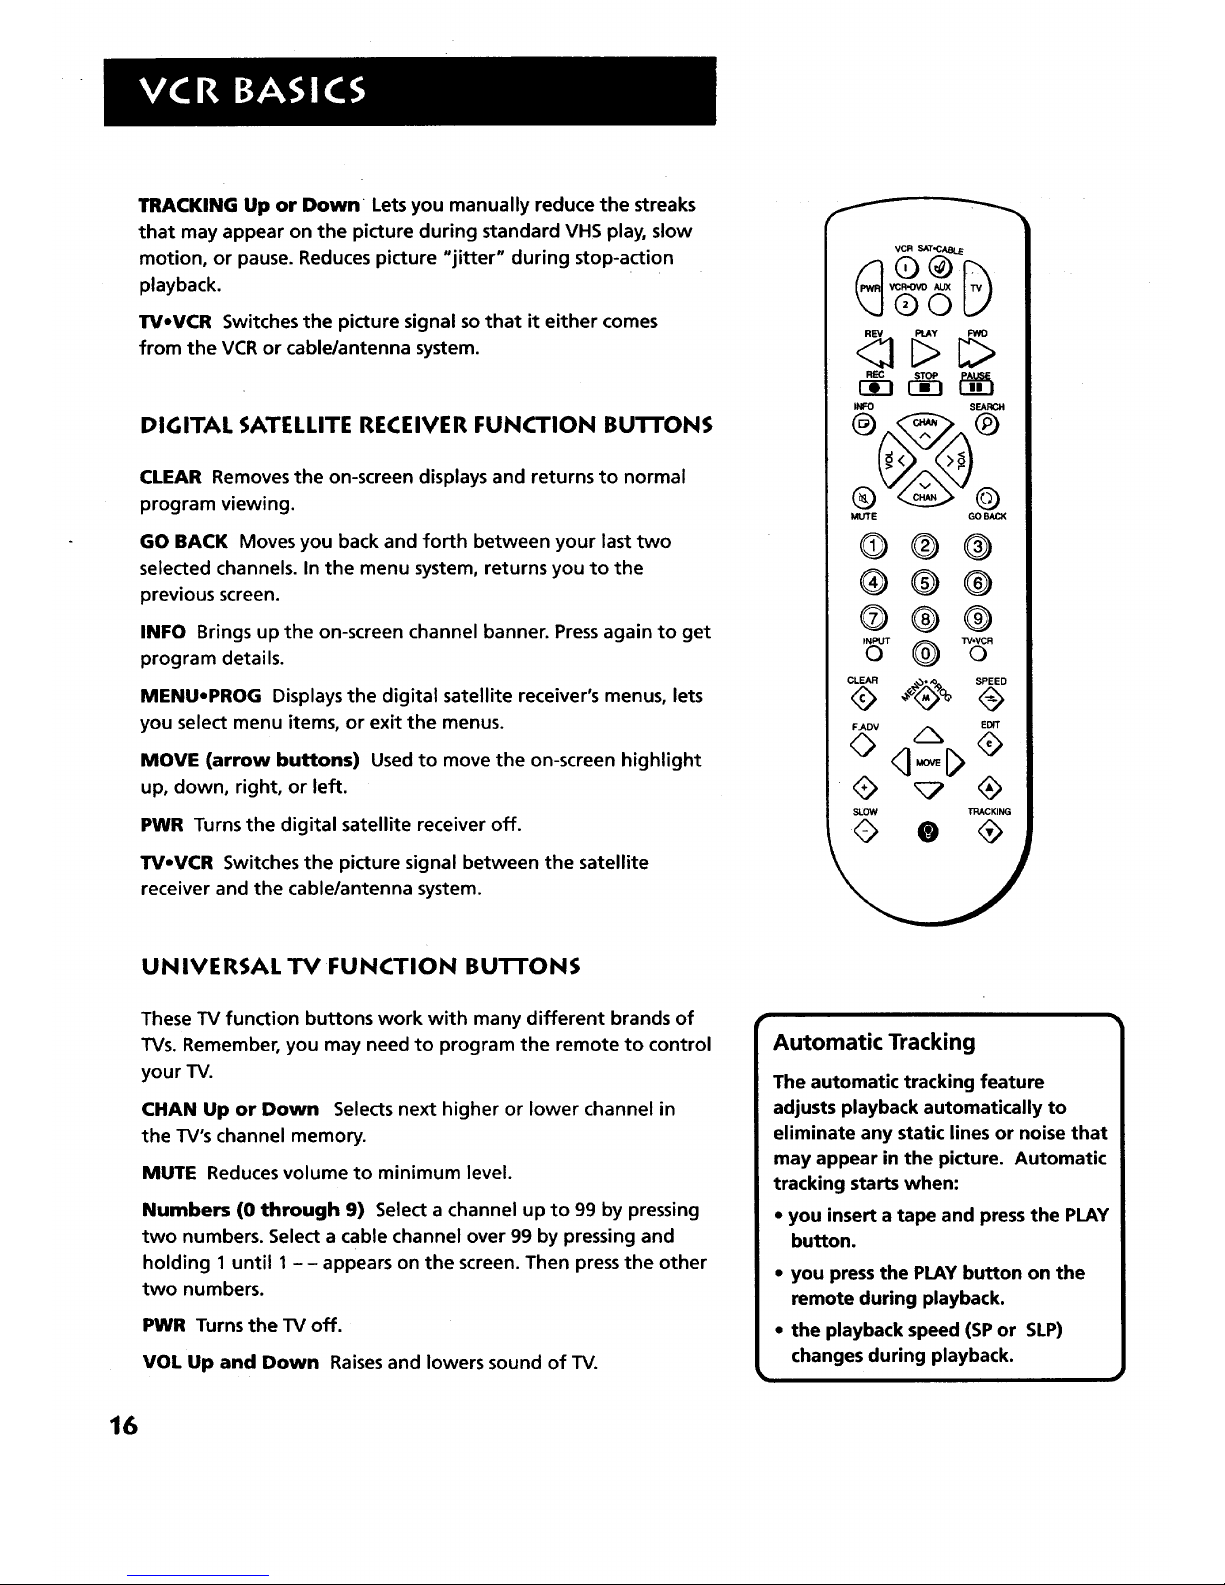
TRACKING Up or Dower Lets you manually reduce the streaks
that may appear on the picture during standard VHS play, slow
motion, or pause. Reduces picture "jitter" during stop-action
playback.
TVoVCR Switches the picture signal so that it either comes
from the VCR or cable/antenna system.
DIGITAL SATELLITE RECEIVER FUNCTION BU'FFONS
CLEAR Removes the on-screen displays and returns to normal
program viewing.
GO BACK Moves you back and forth between your last two
selected channels. In the menu system, returns you to the
previous screen.
INFO Brings up the on-screen channel banner. Press again to get
program details.
MENU,PROG Displays the digital satellite receiver's menus, lets
you select menu items, or exit the menus.
MOVE (arrow buttons) Used to move the on-screen highlight
up, down, right, or left.
PWR Turns the digital satellite receiver off.
TV.VC:R Switches the picture signal between the satellite
receiver and the cable/antenna system.
UNIVERSAL TV FUNCTION BU'BIONS
VCR sxr.c_.._
®o
I_ SEARCH
MUTE GO BACK
®® ®
®@ ®
®® ®
INI_JTo @ 33/,VCRo
CLEAR SPEED
EDrT
,.,ov A
SLOW TRACKING
These TV function buttons work with many different brands of
TVs. Remember, you may need to program the remote to control
your TV.
C:HAN Up or Down Selects next higher or lower channel in
the TV's channel memory.
MUTE Reduces volume to minimum level.
Numbers (0 through 9) Select a channel up to 99 by pressing
two numbers. Select a cable channel over 99 by pressing and
holding 1 until 1- - appears on the screen. Then press the other
two numbers.
PWR Turns the TV off.
VOL Up and Down Raises and lowers sound of TV.
16
Page 19

RCA, GE, AND PROSCAN TV FUNCTION BUTFONS
Along with the universal buttons listed above, these buttons
offer additional control over many RCA, GE, and ProScan TVs.
CLEAR Removes menus or status displays from the screen.
GO BACK Switches between two channels on TVs. Select one
channel and then select another using the number buttons. Press
GO BACK to switch between the two channels.
INFO Shows TV's status displays on the TV screen.
INPUT Selects between the TV's line input(s) and tuner.
MENU-PROG Displays the TV's MAIN MENU and is used to select
menu items or to exit a menu.
MOVE (arrow buttons) Lets you move through the TV's menus,
enter data, and change settings of selected features.
SEARCH Turns on the TV's Commercial Skip feature.
SLOW + and - Used with some RCA, GE, and ProScan TV menus
to.select and adjust features.
TV-VCR Switches between different antenna leads, if your TV
has more than one.
PLAYING A TAPE
1. Tune the TV to your VCR viewing channel
(3, 4, or TV's video input).
2. Insert a tape in the VCR.
• Press FWD or REVto position the tape.
• Press PLAY (if necessary) to begin tape play.
• , Press PAUSEfor stop action.
• Press TRACKING up or down to remove any streaks from the
" :picture, if necessary (stanclard VHS mode only).
• Press STOPto sto p PlaYback.
TV Buttons
The TV buttons may not control all
features of all models of RCAo
ProScanoand GE TVs.
r
Auto Play
If the Auto Play feature is set to ON
when you insert a tape in the VCR,
playback begins automatically (if
the safety tab on the cassette is
removed).. •
Pause
If you pause' the vcR automatically
switches from paiJse to' st_p a_er a
minute to reduce tape wear.
1
1
1•7
Page 20

AUTOMATIC REWIND
The VCR automatically rewinds the tape if it reaches the end
of the tape during playback. While rewinding, you can press
POWER on the VCR (PWR on the remote) and the VCRwill turn
off after rewinding.
TAPE EJECT
Press EJECT on the VCR to eject the tape.
STANDARD VHS RECORDING
If you want to record something that you're watching, you can
use basic recording.
1. Set the tape speed by pressing the SPEEDbutton on the
remote (see margin note for information about tape speed
settings).
.
3.
Press the RECORD button to begin recording.
Press STOP to stop recording.
If you just want to pause the recording for a short time
(during a commercial, for instance), press PAUSE instead of
STOR
CH ECK TH E SAFETY TAB
No matter which recording option you use, you need to make
sure there is a tape in the VCR, and that the tape's safety tab is in
place. You cannot record on a tape with the safety tab removed.
Safety Tab
If the safety tab is removed and you want to record over the
tape, simply cover the hole with vinyl tape.
TapeSpeeds
Standard VHS Mode
SP (Standard Play)
Gives the best quality recording, but
fewer programs can be recorded on
the tape. Special effects such as
pause, slow motion, picture search,
and frame advance work well when
you play back tapes recorded in
this speed.
LP (Long Play)
Your VCR is capable of playing back
tapes recorded in LP. You cannot
record in the LP speed.
SLP (Super Long Play)
Gives three times the recording time
of tapes recorded in SP. Special
effects such as pause, slow motion,
picture search, and frame advance
work well when you play back tapes
recorded in this speed.
Recording Time
Cassette SP SLP
T-120 2Hr 6Hr
T-160 2Hr 8Hr
40Min
D-VHS Mode
Only one speed is offered in D-VHS
mode. At this speed, a DF-300
cassette records for 5 hours; a DF-420
cassette for 7 hours.
18
Page 21

SEVERAL RECORDING OPTIONS
Now that you've gone through the necessary _,:
steps to operate yourVCR, rll explain the
different recording features that are available
to suit your needs.
Recording Features:
• Recording (explained in VCR
Basics section)
• Digital Recording (D-VHS mode)
• Express Recording
• Timer Recording
• Timer Recording using a Digital Satellite
Receiver
4
¥
RECORDING
V
• Broadcast Stereo or Second Audio
Program (SAP)
• Audio Only Recording
• Copying and EditingTapes
¥
19
Page 22

RECORD IN G FEATU RES
There are three ways to record programs. Both standard VHS and
D-VHS recordings may be made with each method.
•.... Recording lets you press one button to start recording a
;.. program (standard VHS)._
standard VHS mode records Conventional video and Hi-Fi
audio tracks, and is completely compatible with other VHS
_ recorders; (See VCR Basicsfor instructions.)
D-VHS mode records high-quality digital video and audio
data directly from a digital satellite system or other
compatible component. A special Digital AN cable isused to
carry the digital signal between the VCR and receiver. Your
VCR also relies on the receiver to decode the digital signal
during playback, so the components must remain connected
at all times.
Express Recording lets you start recording a program you
are watching, and then setthe VCR to automatically stop
recording after a designated period of time. This method
works identically in both standard VHS and D-VHS modes.
Timer Recording lets yoU automatically start and stop
recording at a predetermined time. You can program the VCR
directly, or use your digital satellite receiver's timers to record
Satellite programming.
D-VHS RECORDING
Whenmakinga recorrding of a satellite broadcast, you might find
it easier to use the digital satellite receiver's menus, guides, and
one-touch recording features Consult your receiver's instruction
manual for more details
However, you can also operate the VCR directly to make a
digital recording from a satellite broadcast. This is very similar
to making a standard VHS recording.
1. In STOP mode, press D-VHS on the VCR'sfront panel. D-VHS
mode is turned on when the button is lit up.
2. Press INPUT on the remote or VCR until "dL1" appears in the
VCR's front panel display.
Press RECORD to begin recording
Press STOP to stop recording.
.
4.
20
Caution:
The unauthorized recording of
satellite broadcasts, television
programs, or other copyrighted
materials may infringe the rights
of others.
Page 23

Conditions for D-VHS Recording
Regardless of whether or not you initiate a D-VHS recording
from the digital satellite receiver or VCR0several conditions must
be met in order for a digital recording to be made:
• A D-VHS compatible cassette is loaded (see note on using
S-VHSvideocassettes).
• The Digital AN connection is complete.
• D-VHS mode isselected.
• When a recording is initiated from the VCR, LINE 1 must be
selected as the input; dL1 (digital line 1) appears in the front
panel display.
• The digital satellite receiver is turned on and tuned to the
channel you want to record.
• The recording is authorized by the digital satellite system
(e.g., not copy-protected).
If these conditions are not met, the VCR will attempt to make a
standard VHS recording, as long as a videocassette is loaded in
the VCR.
EXPRESS RECORDING (XPR)
Use express recording when you want to quickly record the
remaining portion of the program you are watching.
1. Set the tape speed by pressing the SPEEDbutton on the
remote.
2. Press the RECORD button to begin recording.
3. Repeatedly pressthe RECORD button to set up the recording
duration.
REC Ch 13 0:01:23
SLP
Rec Ch 13
Record Length 0:00
Press REC tO setlength
Eachtime you press the RECORDbutton, you increase:the
recording time 30 minutes;(Ul_;t0 4 h'6urs). _'"_:',:_ ,_,
"t _,'k_::; L_.:', l._, _.:..,. _-'_ "_, _ :'_--,_J_f i) _. i . . . .........
The VCR continues to record for the amount of time y0u _ "" ':_
ihdicate, ,and,then, automatica!!y turns off.
t
Using S-VHS Cassettes for
D-VHS Recording
Professional or high-grad e S-VHS
videocassettes can be used for D-VHS
recordings, though the recording
quality may be affected bythe quality
of tape used.
If a D-VHS recording is made using a
low-quality S-VHS tape, the recording
may produce momentary picture
freezes during playback due to brief
losses of data.
Express Recording
Express recording is a great way to _
taPe the last quarter of the game, or
"the last part of a movie When you
have to leave. J:_'' ...... -,,..,_1_...,:,_
_Tostop_an express _cording. press
VCR1 and then STOP.
21
Page 24

TIMER RECORDING
You can set up as many as eight timer recording programs.
1. PressMENUmPROG to display the VCR MAIN MENU.
VCR HAIN MENU
1 Timer Recordings
2 Channels
3 Preferences
4 Audio
2. Press 1 to display the TIMER RECORDINGS menu.
TZBER RECORDINGS
1 Create a New Program
2 Review Existing Progs.
0 Extt
3. Press1 to Create a New Program.
How often shoutd this
program record?
1 OneTime
2 Daily (every day)
3 Weekdays (H-F)
4 Weekly (Once per week)
0 Cancel
4. Select how often you want the program to record.
Program 1 (One Time)
Channel --
Start Time --:--
End Time
Start Date --/--/--
Tape Speed SLP
Press RENU to cancel
5. Enter the data for the program with the number buttons.
The data includes the channel number (press INPUT to
select the line_input or dL1), start time including AM or
PM, and end time. The start date is automatically entered
based on the VCR clock._'Boththe date and speed can be
changed. "' __" _.... " "
Timer Recording Information
The clock must be set correctly--which
is automatic if your VCR is connected
to a digital satellite receiver.
Insert a tape with the safety tab in
place and enough tape to record
the program.
PROGRAMS OVERLAPappears if you
have entered two programs where the
times overlap.
The TIMER indicator appears in the
display when you turn off the VCR and
a timer recording has been set. It
flashes if there isno tape in the VCR.
For cable box application, turn it on
and tune it tothe channel yOu want to
record before the recording is tO begin.
22
Page 25

. Review the information to make sure it is correct, and then
press MENUePROG to save.
Program 1 (One Time)
Channel 03 Cable
Start Time 08:00 PR
End Time 09:30 PM
Start Date 10/24/97 FRI
Tape Speed SLP
I=SP 2=SLP
Press CLEAR to correct
Press MENU to save
Program 1 has been saved
Remember to insert a
recordable tape and
turn the VCR off before
the program start time.
Press MENU to continue
STOPPING A TIMER RECORDING
To stop or cancel atimer recording in progress (even an express
recording):
1. Press VCR1 on the remote or POWER on the front panel.
2. Press STOR
REVIEWING AND CLEARING PROGRAMS
To review programs that you have already set up:
1. Press2 when the VCR MAIN MENU isdisplayed to display the
TIMER RECORDINGS menu.
TIMER RECORDINGS
1 Create a New Program
2 Review Existing Progs.
0 Exit
2. Press 2 to display the Review Existing Progs. screen.
.
Program 1 (One Time)
Channel 104 CABLE
Start Time 12:00 AR
End Time 01:30 AM
Start Date 10/24/97 Fri
Tape Speed SLP
Press CLEAR to delete
Press MENU for next prog
PressCLEAR to erase or MENU.PROG to see the next
program.
r
Using the timer to make a
D-VHS recording
If you are setting the VCR's timer to
make a digital recording, be sure the
conditions for D-VHS recording are
met (see D-VHS Recording earlier in
this section).
23
Page 26

TIMER RECORDING USING A DSS® RECEIVER
When your VCR is connected to a compatible DSS®receiver, you
can program timer recordings with the receiver itself. In fact, this
is probably the easiest way to make a standard or D-VHS
recording of a satellite program.
These are basic instructions. Consult your satellite system's user's
guide for more details.
1. Select TIMERS from Main Menu.
2. Select a Timer (1-8) and then use the arrow keys to complete
the on-screen sentence.
.
.
Choose the type of recording you want to make, either
digital or analog.
Choosing analog allows you to set the recording speed:
standard play (SP) or super-long play (SLP).
If you choose digital, make sure that a D-VHS compatible
videocassette is loaded in the VCR before the program is set
to run. The on-screen preference you set in the timer (analog
or digital) will automatically override the front panel D-VHS
setting for the particular event.
5. When the sentence is complete, select RUN TIMER.
Your VCR must be turned off at the time the program is set
to start recording.
DSS®is a registered trademark of DIRECTV, Inc., a unit of Hughes
Electronics Corp.
On-screen icons are an easy way
to understand the timers.
(_ indicates the timer is set.
_ ndicates the timer is set for
a pay-per_view program.
indicates a timer conflict.
24
Page 27

Conflicting Timers
Occasionally you may accidentally set timer recording programs
that occur at the same time. Timer conflicts may occur between
two programs initiated with the digital satellite receiver, the
VCR, or a combination of the two.
When a conflict occurs, the components will warn you of the
problem, but will not take any action to avoid or eliminate it.
• When a conflict occurswhile you are setting timer programs
with the digital satellite receiver, this icon is displayed:
®
• When a conflict occurs while you are setting timer programs
with the VCR, this screen appears:
PROGRAMS OVERLAP
VCR - 1 2 3 4 5 6 7 8
SAT - 1 2 3 4 5 6 7 8
Review programs and
select one to delete.
Press MENU to exit.
If you don't change any of the programs, the VCR will record the
program with the earlier start time in its entirety, ignoring the
beginning of the second. After the first program is complete, the
VCR will record what remains of the second (unless it is a pay-
per-view program, or is copy protected).
Editing or Cancelling a TimerRecording
• From the TIMERS screen, select the Timer you want to edit or
cancel.
To edit the timer, usethe arrow keys, then select RUN TIMER.
To cancel the timer, select CLEARTIMER.
To record the program on a daily or weekly basis,edit that
program's timer.
2Y
Page 28

RECORDING BROADCAST STEREO TV OR SAP
(SECOND AUDIO PROGRAM)
Some TV programs are broadcast with stereo audio or SAP
(Second Audio Program).
1. Turn on the TV and tune it to the VCR viewing channel
(either 3, 4, or TV°s video input).
°
3.
Insert a tape with safety tab in place.
If your VCR viewing channel is 3 or 4, make sure the VCR
indicator appears in the VCR°sdisplay panel. If not, press
TV.VCR to turn it on.
4. Use the SPEED button on the remote to select a recording
speed. The tape speed indicator appears on the TV screen.
5. Select the channel or line input to be recorded.
6. Set the Reception: STEREO/MONO/SAP feature for the type of
audio you want to record. See Other Features section.
AUDIO
1 Reception: STEREO
2 Tape PLayback: HZ-FZ
0 Exit
7. PressRECORDto start recording.
8. PressSTOPwhen you are finished.
RECORDING AUDIO ONLY
You can record audio only from another audio source connected
to the AUDIO IN (R and L)jacks on the front or back of the VCR.
This example uses the LINE 2 jacks on the VCR's front panel.
1. Press the INPUT button on the remote to select the line
input (LINE 1 or LINE 2).
The VCR will record audio from the audio equipment
connected to the AUDIO IN jacks.
2. Use SPEEDon the remote to select the recording speed.
3. Start audio source playing and press RECORD to begin.
4. Press STOPwhen you are finished.
26
Audio Connection
FRONT OF VCR
BACK OF AMPLIFIER I RECEIVER
Page 29

Playing Back Audio Only
To get stereo sound, connect the AUDIO OUT jacks of the VCR to
the appropriate input on your amplifier or receiver. Do not use
the phono input. Refer to your amplifier or receiver user's guide.
USING TWO VCRS FOR COPYING AND EDITING TAPES
With two VCRs, you can copy and edit tapes. Three methods are
described in this section--two for standard VHS0and one for
D-VHS.
Editing With the AutoEdit Feature
AutoEdit allows you to control the playback and recording VCRs
in sync from one remote. To useAutoEdit, both VCRs must be
equipped with the feature.
1. Set the playback VCRto respond to VCR1, and the recording
VCR to respond to VCR2,DVD on the remote. Refer to
. Programming the Remote for details.
2. Connect the VCRs using the diagram below.
3. Tune the TV to the VCR viewing channel (either 3, 4, or TV's
video input).
.
If you are using coaxial cables for the connection, tune
recording VCRto channel 3 or 4_the one selected on the
playback VCR.
If you are using audio/video cables, select LINE on the
recording VCR.
5. Insert the tape you want to copy into playback VCR. Insert a
blank tape with its safety tab in place into recording VCR.
6. PressVCR2.DVD on the remote to control recording VCR.
PressREC, then PAUSEto set the VCR to record.
7. PressVCR1 on the remote to control playback VCR. Use FWD,
REV, and PLAY to locate the point where you want to begin
copying, then pressPAUSE.
8. Press EDIT on the remote. The VCRs will begin copying
9. PressEDIT again to stop the VCRs.
10. Repeat steps 7-9 for each additional segment you want to
copy." "
r
Two VCR Connection
CABLE BOX
Playback VCR (VCR1)
OlGffAt AN
R_UD/O10,O VIDE ANT.
,,,
RecordingVCR {VCR2oDVD)) ] "l_ /
OR
27
Page 30

Editing Manually
If both your VCRs are not equipped with AutoEdit, you will need
to edit the tapes manually.
1. Follow steps 2-5 in the AutoEdit section.
2. Locate the segment you want to copy on the playback VCR.
Pause the tape at this location.
3. Press RECORD on the recording VCR, then PAUSE.
4. Press PAUSEon both VCRs to begin copying.
5. Press PAUSEon both VCRs to stop copying.
6. Locate the next segment to copy on the playback VCR.
7. Press PAUSEon both VCRs to copy the next segment.
Dubbing D-VHS Recordings
You can make high quality copies of D-VHS tapes using the
digital AN cable. Since this is a digital signal, there will be
virtually no difference between the quality of the original and
the copy.
1. Set the playback VCRto be controlled as VCR1 by the remote.
The recording VCR should be set to be controlled asVCR2.
2. _ Connect the digital A/V cable to both VCRs.
3. Make sure both VCRs are loaded with D-VHS tapes.
.
For the playback VCR, press and hold VCR1 on the remote,
then press the D-VHS button on the VCR'sfront panel. The
D-VHS light will come on and "dub" will appear in the front
panel display.
,
For the recording VCR, press and hold VCR2 on the remote,
then press the D-VHS button on the VCR's front panel.
The D-VHS light will come on and "dub" will appear in
the front panel display.
6. Confirm that "dub" appears in the displays of both VCRs. If
not, repeat steps 4 and/or 5.
7. Press PLAY on the playback VCR and RECORD on the
recording VCRto begin dubbing.
No picture will be visible on the TV screen while dubbing
:takes place. ':
8. To stop dubbing, press STOPon the remote or either of the
.,. VCRs.......
Caution:
The unauthorized recording of
satellite broadcasts, television
programs, or other copyrighted
materials may infringe the rights
of others.
Satellite programming may be copy
protected. If you attempt to make a
D-VHS dub of a protected program,
the D-VHS button on the VCR's front
panel will flash and the message
"Dubbing Not Allowed" appears
on-screen.
28
Page 31

CONTROL YOUR OTH ER
COMPONENTS...
The remote can be programmed to control
several components, such as a television, digital
satellite receiver, cable box, laser disc player, DVD
player, or RCA audio component.
Initially, the remote is programmed to control
an RCA, GE, or ProScanTV or digital satellite
receiver.You will need to program other
manufacturer's brands.
¥
V
V
PROGRAMMING THE
REMOTE
V
I
V
29
Page 32

NG TH E REMOTE
;.'_.:_,_ .: '._- ,; 7,: "
• ,_,_;_:_-, _.-._:_..'_._:_ ._.: .::_ _. .... .
The:_remote is already programmed to operate most RCA,
ProScan, and GETVs. You may program the remote to control
other manufacturers' brands.
PROGRAMMINC, THE REMOTE TO CONTROL
ATV
If the TV does not turn on when you pressthe TV button, the
remote needs to be programmed.
Follow these steps to program the remote to control your
particular TV:
1. Turn on the TV.
2. Find your TV brand and code number(s) on the code list.
3. Pressand hold the TV button on the remote.
4.. Enter the code from the code list.
,
6_
Release TV, and then pressCHAN up or down. If the TV
responds to the remote commands, the remote is
programmed.
If the TV does not respond, repeat these steps using the
next code in the list.
OPERATE THE TV
After you set up the remote, see which buttons operate your TV.
1:1_;oint the remote at the TV,
and press the TV button.
If the TV does not turn on, press the TV button and then
press the PWR button.
2. You may want to experiment to see which buttons operate
your TV. Try pressing buttons, such as VOL and MUTE. See
"TV Function Buttons" in the VCRBasicssection for details.
This remote may not operate all
models of the brands that are
shown.
Note the difference between the TV
and VCR on-screen displays to see
which one the remote is operating.
30
Page 33

TVCodes
Brand Code Brand Code
A-Mark ............................................ 102
Admiral .................................... 005,114
Amtron ............................................ 064
Akai .......................................... 002,103
Anam ........................................ 104,105
Anam National ........................ 038,106
AOC ..................... 011,019,027,088,107
Bell & Howell ........................... 005,013
Candle ............................... 011,027,033
Citizen ........................ 011,027,033,064
Colortyme ......................... 011;027,084
Concerto .................................. 011,027
ContedCony ........ 036,037,040,042,064
Craig ................................................ 064
Curtis Mathes ......................... 000,011,
........................................... 015,027,037
CXC .................................................. 064
Daewoo ............... 011,019,027,112,116
Daytron .................................... 011,027
Dimensia ......................................... 000
Electrohome .............. 006,011,014,027
........................................... 038,061,068
Emerson 011,026,027,028,029,030,031,
............... 032,037,042,053,064,065,067,
............... 075,076,078,079,094,095,096
Envision ................................... 011,027
Fisher ......................... 017,021,039,041
Funai ............................................... 064
GE ....................... 000,008,009,011,012,
............... 027,038,068,086,089,091,116
Goldstar ............. 003,004,006,011,019,
........................................... 027,037,050
Hallmark .................................. 011,027
Hitachi ......... 009,011,027,036,037,040,
............... 047,048,063,080,094,097,098
Infinity ............................................ 013
JBL ................................................... 013
JC Penney .................. 000,008,011,019,
...................... 027,040,068,077,086,088
Jensen ...................................... 011,027
JVC ...................... 012,024,036,037,040,
........................................... 048,051,074
Kawasho .......................... 002, 011,027
Kenwood ................... 006,011,014,027
Kloss Novabeam ...................... 035,043
KTV .................................................. 078
Loewe .............................................. 013
Luxman .................................... 011,027
LXI ................ 000,013,018,021,023,054
Magnavox ... 006,007,010,011,013,016,
........ 027,033,035,043,049,066,087,089
Marantz ...................... 011,013,027,069
• Memorex ........................................ 005
. MGA ................... 006,011,014,019,022,
............................. 027,041,056,061,068
Mitsubishi .......... 006,011,014,019,022,
............... 027,041,055,056,061,068,108
MTC ................................... 011,019,027
Multivision ..................................... 081
NAD .......................................... 018,023
NEC ............... 011,014,019,027,038,084
Panasonic ............ 012,013,038,086,111
Philco ... 006,007,010,011,013,016,019,
........ 027,033,035,037,038,043,087,089
Philips ......... 002,006,007,010,011,013,
........ 016,033,035,037,038,043,066,073
Pioneer ......... 011,027,045,062,093,113
Portland ..................... 011,019,027,037
ProScan ........................................... 000
Proton ........................ 011,027,037,072
Quasar ........................ 012,038,092,111
Radio Shack ....... 000,021,025,036,037,
........................................... 059,064,078
RCA ..................... 000,006,011,019,027,
........ 034,038,044,046,088,100,101,109
Realistic .......................................... 021
Sampo ...................................... 011,027
Samsung ............ 006,011,014,015,019,
............................. 027,036,037,077,110
Sanyo ........... 017,021,039,056,057,058
Scott .................................. 028,037,064
Sears ..... 000,006,011,014,017,018,021,
.. 023,027,039,040,041,051,071,083,095
Sharp .................. 011,020,025,027,037,
............................. 052,053,059,060,108
Signature .......................... 005,094,108
Sony ................................................ 002
Soundesign ....................... 011,027,033
Sylvania ...... 006,007,010,011,013,016,
........ 027,033,035,043,049,066,087,089
Symphonic ........................ 064,076,115
Tatung ............................................. 038
Technics ........................................... 012
Techwood ................................. 011,027
Teknika ............... 011,019,027,033,036,
........................................... 037,040,066
Telecaption ..................................... 090
TMK .......................................... 011,027
Toshiba ............... 018,021,023,027,040,
.................................... 071,077,085,090
Universal .................................. 008,009
Victor .............................................. 051
Vidtech ..................................... 019,027
Wards .................. 000,005,006,007,008
....... 009,010,011,013,019,025,027,028,
............... 035,043,059,066,076,082,089
Yamaha ...................... 006,014,019,027
Zenith ................................ 001,099,114
31
Page 34

PROG RAMMI N__TH ER EMOTE TOCOI_IT RO Liiii.....
AN AUXI LIARY COMPONENT
Your remote can be programmed _tooperate RCAI ProScan,
and Dimensia brand auxiliary equipment, such as a radio, CD
player, tape player, turntable, amplifier, digital satellite
receiver, or DVD player.
1. Turn on the component to be programmed.
2. Look up your component's code number on the codelist.
3. Press and hold the AUX button _.
4. Enter the three-digit code from the code list.
5. Release the AUX button and press PWR or CHAN up or
down to see if the audio component responds to the
remote commands.
OPERATING THE AUXILIARY COMPONENT
After you have programmed your remote, see which buttons
will operate your component.
1. Point the remote at the component and press AUX. If it
does not turn on, press AUX and then PWR.
2. You may want to experiment to see which buttons will
operate your component. Try pressing buttons, such as
PLAY, REV, and FWD. For instance, the PLAY button
functions as MENUoSELECT for a DVD player.
Auxiliary Component
RCAJProScan/Dimensia
AM/FM ................................ 003
Auxiliary Component ........ 004
CD ........................................ 007
DVD ..................................... 010
• Phono .................................. 005
Digital Satellite Receiver .. 008
Tape 1 ............................ ..... .006
Tape 2 .................................. 009
m
. rThis:r_mote may not operate all ......._'
l models of the brands that are shown.
32
Page 35

PROGRAMMINGTHEI, REMOTE TO ,_.......
CONTROL A LASER DISC PLAYER OR
DVD PLAYER .........................
The VCR2oDVD button on the remote is programmed to
control a VCR set to respond to the VCR2 button or an
RCA, ProScan, or GE laser disc player.
If you have an RCA, ProScan, or GE DVD player, you can
program the VCR2.DVD button to operate it.
1. Turn on the component.
2. Look up your component and its code number in the
code list on the right.
3. Pressand hold the VCR2oDVD button on the remote.
4. Enter the three-digit code from the code list.
5. Release the VCR2oDVD button, and press PWR. If the
component turns off, setup iscomplete.
NOte: For DVD control, the PLAY button functions as
SELECT.The MENU button brings up the DVD disc menu.
OPERATE TH E COMPONENT
After you have set up your remote, see which button will
operate it.
1. Point the remote at the component, and press
VCR2oDVD. If it does not turn on, press VCR2oDVD
and then PWR.
.
You may want to experiment to see which buttons will
operate your component. Try pressing buttons, such as
CHAN up or down.
I RCA, ProScan, and GE Codes 1
VCR ....................................... 037
Laser Disc Player ................. 037
DVD Player .......................... 078
This remote may not operate all 1
models of the brands that are shown.
33
Page 36

PROG RAMMI NG TH E REMOTE TO
CONTROL A DIGITAL SATELLITE
RECEIVER OR CABLE BOX
The remote is programmed to control an RCA, GE, or ProScan
digital satellite receiver.
If you have another brand of digital satellite receiver or cable
box with its own remote, you may be able to use the VCR's
remote to operate it.
1. Turn on the cable box or digital satellite receiver.
2. Look up the brand and its code number(s) in the code list
on the right.
3. Press and hold the SAToCABLE button on the remote.
4. Enter the three digit code form the code list.
5. Release the SAToCABLE button and press PWR or CHAN up
or down to see if the cable box or receiver responds to the
remote commands.
OPERATE A CABLE BOX OR DIGITAL SATELLITE
RECEIVER
After you have set up your remote, see which buttons will
operate your cable box or digital satellite receiver.
1. Point the remote atthe box or digital receiver, and press
SAToCABLE and then PWR.
.
You may want to experiment to see which buttons will
operate your cable box or digital satellite receiver. Try pressing
buttons, such as CHAN up or down.
_ "]" FI ...... "T "} ]-I I
Digital Satellite Receiver Codes
RCA/ProScan/GE ......................... 000
_: Sony ....................... ,,..., ..... ,.....,..095
Toshiba ......................... .............. 096
Panasonic ................................... 097
Cable Box Codes
ABC ........................... 022,046,053,054
Anvision ................................. 007,008
Cablestar ................................ 007,008
Diamond ....................................... 056
Eagle ....................................... 007,008
Eastern International ................... 002
General Instrument ............. 004,00S,
............. 015,023,024,025,030,036,046
Hamlin ............... 003,012,013,034,048
Hitachi ............................. 037,043,046
Jerrold ..................... 004,005,015,023,
024,025,030,036,045,046,047,062,065
Macom .................................... 037,043
Magnavox ............... 007,008,019,021,
............. 026,028,029,032,033,040,041
NSC ................................................ 009
Oak .................................. 001,016,038
Oak Sigma ..................................... 016
Panasonic ................. 003,027,039,061
Philips ........ 007,008,019,021,026,028,
........................... 029,032,033,040,041
Pioneer ............................ 018,020,044
Randtek .................................. 007,008
RCA .................................. 000,027,060
Regal ............................... 003,012,013
Regency .................................. 002,033
Samsung ....................................... 044
Scientific Atlanta003,022,0350063,064
Signature ...................................... 046
Sprucer .......................................... 027
Starcom ......................................... 046
Stargate 2000 ............................... 058
Sylvania .................................. 011,059
Teknika .......................................... 006
Texscan ............................ 010,011,059
Tocom ................ 017,021,049,050,055
Unika ............................... 031,032,041
Viewstar ........... 007,008,019,021,026,
.................... 028,029,032,033,040,041
Warner Amex ................................ 044
Zenith ....................... 014,042,057,061
This remote may not operate all 1
models of the brands that are shown.
34
Page 37

FEATURES TO ENHANCE VCR
OPERATION
• Picture Search Options
• Tracking
• Time Counter
• On-Screen Displays
• Audio Reception
• AudioTape Playback
¥
V
V
V
16
V
OTH ER FEATURES
¥
I
35
Page 38

PICTURE SEARCH OPTIONS
The most basic way to search during playback is using the
FORWARD (FWD) and REVERSE(REV) buttons. This section
contains several other options available for searching a tape.
FORWARD AND REVERSE SEARCH
In standard VHS mode, you can search a tape during playback.
Sound is turned off during picture search. Search works best for
tapes recorded at the SPor SLPspeed.
Searching with the Remote
1. Press FWD to search forward or REV to search in reverse.
2. PressFWD or REV again, or press PLAY to return to normal
playback.
Searching with the VCR
Use the shuttle ring on the VCR's front panel to search either
direction. Visual search occurs when the VCR isin play mode.
1. Turn and hold the shuttle ring clockwise toward FWD to
search forward.
2. Turn and hold the shuttle ring counterclockwise toward REV
to search in reverse.
3. Release the shuttle ring to return to playback
SLOW MOTION
In standard VHS mode, you can view a tape in slow motion from
the play-pause mode. Slow motion works best for tapes recorded
at the SP or SLP speed.
1. Press PAUSEto "freeze" the action. Then press SLOW+ (FWD)
or SLOW- (REV) to begin slow-motion playback.
2. UseTRACKING up or down to remove any streaks from
the picture.
3. Press PLAY to return to normal playback.
The VCR switches automatically from slow-motion playback
to stop after a few minutes.
displayed when the VCR is paused.
Insert Tape
Don't forget to insert a recorded
tape when attempting to use the
search features.
1
36
Page 39

COMMERCIAL SCAN (SEARCH BUTTON)
This is useful for skipping commercials or short program
segments. This feature isavailable both in standard VHS and
D-VHS modes.
• PressSEARCH once during playback to advance the tape
approximately 60 seconds of recorded material.
• Press PLAY to cancel commercial scan and return to normal
playback.
FRAME ADVANCE
In standard VHS mode, frame advance lets you view one-stop
action frame after another during playback. Frame advance
works best for tapes recorded at the SPor SLP speed.
1. Press PAUSE to "freeze" the action.
2. Press F.ADV each time you want to view a frame of the scene.
3. Press PAUSE or PLAY to return to normal playback.
INDEX SEARCH
In both standard VHS and DoVHS modes, the VCR has a "VHS
Index Search System" that automatically records an index mark
on the tape every time you start a recording. During playback
you can locate the program you want to play by the number of
index marks or by scanning. The VCR will search forward or
reverse from the location you are on the tape.
To Search:
1. Press STOP.
2. Press SEARCH on the remote until the INDEX SEARCH menu
appears on the TV screen.
INDEX SEARCH
Press REV OR FMD
to begin scanning
OR
enter a specific
index numben
Ppess SEARCH to exit
37
Page 40

.
.
If you want to search through a certain number of index
marks, press two number buttons to enter the number of
marks you want to search. Press CLEAR on the remote to
correct an entry.
Press FORWARD (FWD) to search forward or REVERSE(REV)
to search in reverse. The VCR will locate your index mark
and begin playback. If you did not enter a specific index
number, the VCR will locate the next index mark and
begin playback.
5. Press STOP to stop index searching.
Some index marks may be missed by the VCR:
• A mark too close to your location on the tape.
• The mark at the beginning of a recorded segment of five
minutes or less.
• The first index mark on the tape when you start at the
beginning of the tape.
INDEX SEARCH
Searching for
index number
12
Press STOP to cancel
GO-TO SEARCH
In both standard VHS and D-VHS modes, the Go-To search
feature enables the VCR to quickly locate a counter reading
anywhere on the tape.
1. Press STOR
2. Press SEARCHon the remote until the GO-TO SEARCH menu
appears on the screen.
3. Press number buttons to enter the hour(s) and/or minutes of
the counter reading you want the VCR to "go to". Press
CLEAR on the remote to correct an entry.
4. Press FORWARD (FWD) or REVERSE(REV) to begin searching.
5. Press STOPto stop Go-To searching.
GO-TO SEARCH
Current tape counter is
2:17:25
Press REV or FWD to go to
-:--:00
Press SEARCH to exit
38
Page 41

TRACKI NG
Your VCR has automatic tracking.which removes the streaks or
snow from the picture. Automatic tracking isactivated when you
insert a tape, turn on the VCR, or the speed changes during
playback. Occasionally you may need to manually adjust tracking,
especially if the tape was recorded on a different VCR. Just use
the TRACKING buttons to remove the streaks or snow. During
playback, the tracking level meter (with a number) will appear in
the VCR's display. You can also use tracking when you pause a
tape to reduce jittering of the picture.
When you manually adjust the picture, automatic tracking is
turned off. To turn automatic tracking back on, press the
PLAY button on the remote during playback, or eject the tape
and reinsert it.
TIME COUNTER
The time counter shows the actual time it takes to record a
program or play back a segment of a recorded tape. It helps
locate the beginning or end of programs you taped. The time
counter resets to 0:00:00 whenever the tape is ejected from
the VCR.
For example, if you record a 30-minute program at the beginning
of the tape and you want to go to the end of that program to
begin another recording, you would:
1. Press INFO twice on the remote to display the time counter.
2. Press CLEAR to reset the time counter to 0:00:00.
3. Press FORWARD (FWD) to forward the tape until the time
counter reads 0:30:00.
.
.
Press STOR This is the approximate end of the program.
(You may want to press PLAY to verify.) Now, you can begin
recording at this spot.
Press INFO to remove the time counter from the screen and
return to the normal display mode.
0:30:00
Hours 1
Rinutes
Seconds
39
Page 42

ON-SCREEN DISPLAYS
The INFO button shows the status of the VCR (STOP,PLAY,
RECORD, etc.), channel number, time counter, date, time, and
tape speed on the TV screen. The date and time must be set
before they can be displayed.
1. PressINFO to see all of the on-screen displays. These will
automatically time out after a few seconds
2. Press INFO again to have only the time counter remain on
the screen. This display does not time out automatically.
3. Pressing INFO a third time disables the on-screen displays.
This feature prevents you from accidently recording on-
screen displays while copying tapes.
4. Press INFO to see all of the on-screen displays again.
These on-screen displays do not appear when the VCR is
recording or playing back in D-VHS mode. Instead, on-
screen displays are generated by the digital satellite receiver.
ON-SCREEN DISPLAYS IN D-VHS MODE
.
2
3
Stop Ch OS 0:30:00
11118/97 Tue 01:30PM SLP
On-screendisplay
_imes dUO
0:30:00
Time counter only
(does not time out)
D-VHS recordings from a digital satellite receiver contain the
program's original on-screen data, so the display is nearly
identical to that of a live satellite broadcast. Note that the VCR's
playback mode and time counter are included in the display.
On-screen display off
40
Page 43

AUDIO SET-UP FEATURES
The audio setup features enhance your tape playback and
recordings. The features in this section are accessedthrough the
AUDIO menu and are shown in the displays below.
1. PressMENUePROG to display the VCR MAIN MENU.
VCR MAIN MENU
1 Timer Record+ngs
2 ChanneLs
3 Preferences
6 Audio
2. Press 4 to display the AUDIO menu.
AUDIO
i Reception: STEREO
2 Tape PLayback: HI-FI
O Exit
Now you are ready to select an item from the menu to set up.
RECEPTION
Some TV programs are broadcast with stereo audio or a second
audio program (SAP) which offers a second language. The
Reception feature lets you select the type of audio you want to
record. Press 1 to switch between Reception: STEREO,MONO,
and SAP.
Select STEREOfor normal or stereo broadcast TV recording.
When you press INFO, the STEREO indicator appears on-
screen of channels broadcasting in stereo.
Select MONO if the stereo signal is weak and the sound istoo
noisy.
Select SAP to record a second audio program instead of the
normal audio on both the Hi-Fi and linear tracks. When you
press INFO, the SAPindicator appears on-screen of channels
broadcasting a second audio program.
41
Page 44

TAPE PLAYBACK
In standard VHS mode, the VCR records the same audio on both
the Hi-Fi and linear tracks on the tape. Hi-Fi sound is recorded on:
separate left and right stereo channels. Monaural sound is
recorded on the linear track. Press 2 to switch between Tape
Playback: HI-FI, LINEAR, and MIX.
To enjoy Hi-Fi sound, connect your VCR to a stereo television or
amplifier/receiver using the audio/video jacks. The Tape Playback
feature lets you select which audio you play back.
• Select HI-FI to play back sound recorded on the Hi-Fi track
and for normal use.
• Select LINEAR to play back the sound recorded on the linear
monaural track, such as a second audio program, (SAP) or a
dubbed voice-over.
• Select MIX to play back the sound recorded on both the
linear track and the Hi-Fi track, sound-on-sound.
42
Page 45

THINGS TO KNOW BEFORE
CO N N ECTI N G COM PO N ENTS
Protect Your Components from Power Surges
• Connect all components before plugging any power
cords into the wall outlet.
Always turn off the TV and other components before
you connect or disconnect any cables.
Position Cables Correctly to Avoid Audio Hum or
Interference
• Insert all cable plugs firmly into their jacks.
• Place the audio/video cables to the sides of the TV's back
panel instead of straight down the middle after you
connect your components.
• Try not to coil any twin-lead cables and keep them away
•from the audio/video cables as much as possible.
Make sure all antennas and cables are properly
grounded. Refer to the Safety Tips sheet packed with
your unit.
¥
V
V
V
Protect Your Components from Overheating
• Do not block ventilation holes in any of the components.
Arrange the components so that air can circulate freely.
• Do not stack components.
• Allow adequate ventilation when placing your
components in a stand.
• Place an amplifier or satellite receiver on the top shelf of
the stand so heated air rising from it will not flow
around other components.
CON N ECTIO N S
I
43
Page 46

CONNECTING YOUR VCR '
Refer to these pages to help you connect your VCR.
JACKS AND CABLES
RF Jacks and Coaxial Cables (F-type)
The RFjacks provide good picture and mono sound quality, and
must be used if audio/video connections are not available for
your TV.
These jacks are required for antenna or cable-TV connections.
The RFjacks on the VCR are labeled IN FROM ANT and OUT TO
TV. The coaxial cable supplied with your VCR is used to connect
the VCR's OUT TO TV jack and your TV's antenna input.
O
RFJack
Audio/Video Jacks and Cables (RCA-type)
The audio/video jacks provide very good picture and sound
quality, and can be used if your TV has audio/video input jacks.
These jacks must be used for stereo sound. The VCR audio/video
jacks are color coded (yellow for video, red for right audio, and
white for left audio). If your TV has only one input for audio
(mono), you may need a Y-adapter to hear sound from both
channels.
0
Audio/Video Jack
Digital Audio/Video Connector and Cable
The Digital AudioNideo cable connects the VCR to a digital
satellite receiver or other compatible components. This
connection lets you record and play back digital programming
with virtually no loss in picture and sound quality. When
connecting this cable, make sure the connector is correctly
oriented in the jack.
D-VHS Jack
44
Page 47

CHOOSING A VCR CONNECTION
Three different connection scenarios are described in this section.
Each isdependent on the number and type of jacks your TV has, and
assumes you will be connecting a digital satellite receiver to the VCR
in order to take full advantage of D-VHS recording and playback.
Choose the scenario that best matches your TV's input jacks. If you
need to connect additional components not shown in the diagrams,
refer to the instruction manual that came with that particular
component.
ADVANTAGES OF AUDIO/VIDEO CABLE
CONNECTIONS
Using a simple coaxial cable connection gives you good picture
quality. If your television has audio/video jacks, I highly recommend
using them to get even better picture quality and stereo sound when
recording and playing back videotapes. These connections give you
more Convenient operation by not having to share the TV's antenna
signal.
DON'T FORGET ABOUT THE AUTO TV/VCR
FEATURE
The TV/VCR switch controls whether the picture signal iscoming
from the VCR or the TV.
You can change the setting manually by using the TV-VCR button on
the remote or you can set the Auto TV/VCR feature to ON when
using only IN FROM ANT and OUT TO TV jacks and OFF when using
the AUDIONIDEO output jacks--so your TV signal is not interrupted
when the VCR is turned on.
45
Page 48

BEST PICTURE AND SOUND QUALITY
To use this connection you must have:
• A TV that has two sets of A/V inputs and an S-Video jack.
• Coaxial cables, A/V cables, Digital A/V cable, and S-Video
cable.
This connection provides:
• Highest quality picture from your VCR and satellite
receiver.
• Stereo sound from the VCR and satellite receiver.
To connect:
• Connect coaxial cables as shown.
• Connect Audio/Video cables as shown.
• Connect Digital A/V cable as shown
• Connect S-Video cable as shown.
Using This Connection
• In the VCR's Preferences menu, set the Auto TV/VCR
feature to OFF
To watch VCR programming:
1. Tune TVto LINE IN 2.
2. Play a tape, or change channels on the VCR's tuner.
To watch digital satellite system programming:
1. Tune TV to S-VIDEO INPUT.
2. Tune digital satellite system to desired channel.
To watch antenna or cable programming:
1. Tune TV to desired channel. (if you use a cable box, tune
TV to cable box output channel--usually channel 3 or 4.)
2. Or, use the VCR's tuner while the TV is tuned to LINE IN 2.
To record one program and watch another:
1. Begin recording a program using one of the recording
features.
2. Press TV and select a different channel on the TV.
CABLE,CABLE BOX OR_ANTENNA SATELLITE SIGNAL
@
46
Page 49

VERY GOOD PICTURE AND SOUND QUALITY
To use the connection you must have:
• A TV that has a set of A/V inputs.
• Coaxial cables, A/V cables, and a Digital AN cable.
This connection provides:
• Very good picture quality from your VCR and satellite
receiver.
• Stereo sound from the VCR and satellite receiver.
To connect:
• Connect coaxial cables as shown.
• Connect A/V cables as shown.
• Connect Digital A/V cable as shown.
Using This Connection
• In the VCR's Preferences menu, set the Auto TV/VCR
feature to OFF
To watch VCR programming:
1. Tune TVto LINE IN.
2. Press VCR1 on the remote.
3. Play a tape, or change channels on the VCR's tuner.
To watch digital satellite system programming:
1. Tune TV to LINE IN.
2. Press SAToCABLE on the remote.
3. Tune digital satellite system to desired channel.
To watch antenna or cable programming:
1. Tune TV to desired channel. (If you use a cable box, tune
TV to cable box output channel--usually channel 3 or 4.)
2. Or, use the VCR's tuner while the TV is tuned to LINE IN.
To record one program and watch another:
1. Begin recording a program using one of the
recording features.
2. Press TV select a different channel on the TV.
This connection takes advantage of a
built-in A/V output switch in the VCR that
allows both the VCR and digital satellite
receiver to share the same A/V connection
to the TV.
CABLE,CABLE BOX OR_ANTENNA
SATELLITE SIGNAL
VCR
47
Page 50

GOOD PICTURE AND souND QUALITY
To use the connection you must have:
• Coaxial cables, AN cables, and a Digital A/V cable.
This connection provides:
• Good picture quality from your VCR and satellite receiver.
To connect:
• Connect coaxial cables as shown.
• Connect AN cables as shown.
• Connect Digital A/V cable as shown.
Using This Connection
• In the VCR's Preferences menu, set the Auto TV/VCR
feature to ON.
To watch VCR programming:
1. Either turn off digital satellite receiver or set the TV/DSS
switch to TV position.
2. Tune TV to VCR output channel (3 or 4).
3. Press VCR1, then play a tape, or change channels on the
VCR°stuner.
To watch digital satellite system programming:
1. Turn digital satellite receiver on and tune TV to DSS
output channel. Check your receiver's user's guide for
default output channels.
2. Press SAT•CABLE, then tune digital satellite system to
desired channel.
To watch antenna or cable programming:
Turn off VCR and digital satellite receiver.
.
2.
.
3.
t
48
Press TV, then tune the TV to desired channel. (If you
use a cable box, tune TV to cable box output channel w
usually channel 3 or 4.)
To record one program and watch another:
1. Begin recording a program using one of the
recording features.
PressVCR1, then setTV/VCR to TV.
Press TV, then select a different channel on the TV.
f
CABLE, CABLE BOX OR_ANTENNA ._TELLITE SIGNAL
I
[]
eo i I
Page 51

This section gives you some additional information
about theVCR, including a description of the unit's
controls and display.
You also will find aTroubleshootingTips section in this
Appendix, which might help to resolve some of those
simple problems.
Finally, this section contains your warranty
information.
49
Page 52

FRONT PANEL
01 _.Pin
Line 2 Inputs Remote Sensor
CH 3-4 Selects the VCR's output channel. Press and hold EJECT,then press
TVNCR.
CHANNEL-TRACKING Up or Down Selects next higher or lower channel in
the VCR's channel memory. Adjusts tracking when a tape isplaying.
D-VHS Selects recording preference. Will make a digital recording if a digital
satellite signal is present and a D-VHS tape is inserted in the recorder.
EJECT Ejects the tape when the VCR isstopped.
INPUT Selects between the line inputs and VCR's tuner. When connected to a
digital satellite receiver, line input refers to the signal coming from the
component connected to the audio/video input jacks on the back of the VCR.
The rear input jacks are LINE 1; the front LINE2.
PAUSE Pausesaction for viewing during playback. Pauses recording to prevent
recording of unwanted scenes.
PLAY Plays a tape.
POWER Turns the VCR on or off.
RECORD Starts VCR recording. Also used for express recording.
Remote Sensor Receives signals from the remote control. Aim the remote at
this sensor.
ShutL4:le Ring When a cassette is playing, allows visual search in either
direction. When cassette is stopped, operates as fast-forward and reverse.
STOP Stopsthe normal functions such as record, playback, rewind, fast-
forward, or pause.
TVeVCR Switches the picture signal so that it either comes from the VCR or the
antenna/cable system.
50
Page 53

DI SPLAY PAN EL
TV/VCR Indicator
! T±
,'--,' !3|"W
Time/Time Counter Timer Indicator Cassette Indicator
Cassette Indicator Shows when a cassette is inserted.
Hi-Fi Stereo Indicator (L, R) Shows which audio channel(s) you are currently
listening to.
Time, Time Counter, Channel Number, Line Input Indicator (L1, L2), Digital
Satellite Receiver (dL1), or Status Displays
Time or Time Counter Press INFO to switch between the current time and time
counter.
Channel Number or Line Input Indicator The channel number appears when the
VCR is tuned to a channel. The line indicator (dL1, L1, or L2) appears when a line input
is selected.
Status Indicators
Show what the VCR is doing.
FF Fast forward
PLAY Playback
REC Record
REW Rewind
SLOW Slow motion
SP or SLP Standard VHS tape speed (times out after 3 seconds)
SRCH or -SRCH Forward or reverse search
• STILL Play pause and frame advance
TIMER Indicator Lights when VCR is turned off and set for timer
recording (standard VHS and D-VHS).
VCR Indicator (Applies only if the VCR Viewing Channel is3
or 4). Press the TV-VCR button to turn on or off.
• VCR indicator on: Picture from VCR.
• VCR indicator off: Picture from TV (antenna/cable) channel.
51
Page 54

BACK PANEL
VCR
1:3
DIGITAL AN
rAUDIO 1 _/IDEO _IFI FROM
R L/MONO. | l_,l ANT.
($ATIELLITE) ,N--_ _ '_ [_0 i r"
UT,O
AUDIO (R and L) and VIDEO IN Jacks Receives signals from
another component, like a VCR or camcorder, when it is
connected to these jacks. Use INPUT on the remote to select
LINE to record from these jacks. Connect a digital satellite
receiver to these jacks to enable standard VHS recording from
digital satellite source and to view digital recording or
playback through the VCR's display connections.
AUDIO (R and L) and VIDEO OUT Jacks Sends signals from
VCR to another component, like a "IV or VCR0when it is
connected to these jacks.
DIGITAL A/V Jack Sends and receives a digital satellite
system signal or other compatible device. Required
connection for D-VHS recording and playback
IN FROM ANT Jack Receives a signal from an antenna or
cable system when attached.
OUT TO TV Jack Passessignal to TV using the cable supplied.
52
Page 55

TROUBLESHOOTING TI PS
No power
• Check to make sure it is plugged into an operating outlet.
• Check to make sure your connections are correct.
VCR does not respond to remote
• PressVCR to set remote to control the VCR.
• Check to make sure there are no objects between the VCR and remote.
• The batteries may need changing.
• Make sure the Remote VCR1/VCR2 setting is set to VCR1 so the remote that came packed with your VCR
can operate it.
• Remove batteries and hold number button 1for at least 60 seconds to drain the microprocessor inside
the remote. Release number 1 and replace the batteries.
• Remove all batteries for approximately 12 hours. Then replace batteries.
Remote no longer controls an RCA, ProScan, or GE TV
• PressTV to set remote to control a compatible TV.
• check to make sure the remote isprogrammed to control an RCA, ProScan, or GE TV.
Remote no longer controls a compatible TV
• PressTV to set remote to control the compatible TV.
• Check to make sure there are no objects between the component and remote.
• The batteries may need changing.
• Reprogram remote after batteries have been changed.
• Remove batteries and hold number button 1 for at least 60 seconds to drain the microprocessor inside
the remote. Release number 1, replace the batteries, and (if necessary) reprogram the remote.
• Remove all batteries for approximately 12 hours. Then replace batteries and (if necessary) reprogram the
remote.
Unable to make a D-VHS recording
• Digital A/V cable is not present, or connected incorrectly.
• D-VHS or high-grade S-VHS cassette is not loaded in recorder.
• The program content is copy protected.
• The digital satellite receiver isnot turned on.
• Digital satellite receiver timer program did not specify "digital."
Poor or no picture for normal TV viewing
• Check to make sure the VCR indicator isoff.
• Check to make sure the TV isswitched to an active channel.
• J
• Check to make sure the antenna connections are secure and correct.
53
Page 56

Snowy or no picture during playback
• If using a basic connection, pressTV-VCR to turn VCR indicator on.
• If using a basic connection, check TV channel selected (3 or 4) to make sure it matches the channel
selected with CH3.4 switch on the front panel of VCR.
• Check to make sure the TV's fine tuning iscorrect for the channel you have selected.
• Check video cable connections between VCR and TV monitor.
• Check to make sure the TV monitor is set to the proper viewing channel (3, 4, or line input).
• Try another tape.
• Some snow/streaks are normal during search, stop action, frame advance, and slow-motion playback.
• Rain fade in digital satellite signal.
Streaks in picture during normal playback (standard VHS mode)
• Press one of the TRACKING buttons to move streaks up or down for the best picture.
• Check to make sure the tape is of good quality and not worn out.
Time counter not working or time counter not working in search modes
• The time counter does not advance during unrecorded portions of tape. When an unrecorded
segment of tape is encountered, the time counter will hold its count until recorded material is
detected again.
• " A minus (-) will appear in front of the time if you rewind the tape farther back than a counter
reading of 0:00:00.
Will not record or play
• Check to make sure there is a tape in the VCR.
• Try ejecting and reinserting the cassette.
• Check to make sure the tape isnot broken.
• Check to make sure the VCR isnot in pause mode. Press PAUSE or PLAY to return to normal playback.
Will not record
• Check to make sure the safety tab is intact.
• Check to make sure the VCR isnot in the line mode. PressINPUT.
Rewind does not operate
• Checkto make sure the tape isnot already rewound.
Clock shows incorrect time or date
• Power interruption.
• Check to make sure the clock is set accurately (check AM/PM and date). Applies only when not
connected to a digital satellite receiver.
VCR makes noise when stopped
• VCR is removing tape from heads. This is normal. The head cylinder inside the VCR will Continue tO
rotate for a few minutes after you put the VCR in the stop mode.
54
Page 57

Will not Auto Channel Search active channels correctly
• Check to make sure the antenna connections are secure and correct.
• Check to make sure the Signal Type: CABLE!ANTENNA feature isset correctly.
Tape plays back in slow motion (standard VHS mode)
• Press PLAY to return to normal playback.
Cannot select channels over 69
• Cable channels over 69 can only be selected if Signal Type: CABLE/ANTENNA,feature isset to CABLE.
Cassette with safety tab removed does not start to play automatically
• Check to make sure the Auto Play ON/OFF feature is set to ON.
CASSETTE Indicator flashes in display
• Check to make sure there is a cassette in the VCR when a timer recording is set.
Time counter disappears during searching
• This isnormal.
No stereo sound during playback (standard VHS mode)
• Check to make sure the Playback: HI-FI/LINEAPJMIX feature isset to HI-FI to hear stereo sound during playback.
• Must use the AUDiO/VIDEO output jacks on the back of the VCR to hear stereo sound.
Stereo audio too noisy when tuning a broadcast or cable TV channel
• Stereo signal is weak. Set Reception: STEREO/MONO/SAP feature to MONO.
• Pressone of the TRACKING up or down buttons to minimize the noise.
55
Page 58

SPECI FICATIONS
Format:
Record/Playback
System:
Digital Record/Plaback
Data Rate:
Video Signal System:
Antenna:
Tuner:
Type:
Power Requirement:
Power Consumption:
Dimensions:
Weight:
Storage Temperature
Range:
Operating
Temperature Range:
D-VHSNHS
D-VHS: Digital 2-head record/playback system
VHS Video: 4-head-Double Azimuth
Audio: 2 Hi-Fi record/playback system
14.1 Mbs
D-VHS: D-VHS system standard CTP STD MODE 2
VHS: EIA standard: NTSC color
75-ohm external VHF/UHF combined
antenna terminal
USA:
Canada:
181 channels capability*
(125 cable channels)
178 channels capability*
(122 cable channels)
AutoProgramming frequency synthesis
120V AC, 60 Hz
22 watts
3.6 inches high (93 mm)
15 inches wide (380 ram)
12.4 inches deep (280 mm)
8.4 pounds (3.8 kg)
-22°F to +149°F
(130°Cto +65°C)
+41°Fto +104°F
(+5°C to +40"C)
*Check your cable company°s compatibility requirements.
CLEANING THE VCR
Use a soft cloth or dusting attachment of your vacuum cleaner to
dust your VCR. Remove dust from the ventilation holes on the
top, back, sides, and bottom of the cabinet.
Plastic surfaces are easily scratched and can be marred by alcohol
and various solvents. Avoid excessive use of oil-based furniture
polishes since the materials used in the cabinet will accumulate
more dust. We recommend using a nonabrasive, antistatic
cleaner and polisher. I Specifications are subject to change. I
56
Page 59

CRK70VBL2
239259
VH81 (3-ft)
VH82 (6-ft)
VH89 (6-ft)
VH83 (6-ft)
P1394 (5-ft)
240984
Dr-300 (5 hours)
240985
Remote Control This is
the remote control that
came packed with your
VCR. Replacements or
spares can be ordered as
needed.
Screw-on RF Cable
attaches to the round
antenna connectors on
the back of the VCR.
Push-on RF Cable
attaches to the round
antenna connectors on
the back of the VCR. Use
for a quick connection.
Stereo AN Cable isa
triple cable that lets you
connect the VIDEO and
AUDIO jacks of stereo-
compatible components.
Digital AN Cable
Connects VCR to a corn-
patible digital satellite
receiver or component.
Required to record, play _
back, or dub digital
recordings.
D-VHS Cassette Special
tape formulation required
for digital recordings. -r
u
_3
Accessory Order Form
Description
Remote Control (CRKT0VBL2)
5crew-on antenna cable (3-ft) VH81
Screw-on antenna cable (6-ft) VH82
Push-on antenna cable (6-ft) VH89
Stereo AN Cable (6-ft) VH84
Digital AN Cable 240984
D-VHS Cassette 240985
$4.95
$6.95
$5.95
$9.95
$14.95
$19.95
Qty
Prices are subject to change without notice.
Total Merchandise .............................................
Sales Tax .............................................................. S__
We are required by law to collect the
appropriate sales tax for each individual
state, country, and locality to which the
merchandise is being sent.
Shipping and Handling ..................................... $5.0_0
Total Amount Enclosed ..................................... $-_
Use VISA, MasterCard, or Discover Card
preferably.
Money order or check must be in U.S.
currency only.
No COD or CASH.
All accessories are subject to availability.
Where applicable, we will ship a superseding model.
57
Page 60

Charge your order on your VISA,
MasterCard, or Discover Card by
filling in below
USE YOUR CREDIT CARD
IMPORTANT: Copy complete account number
from your VISA card
I-T-]-NI-I-NIII IIIII
My exp, s:I---I--'1I--1--1
IMPORTANT: Copy complete account number
from your MasterCard
I-V-I--NF-T-TTqlIIII[--V-J--N
Copy Number
above your
name on
MasterCard
My card 1--']'-'] ['--_
expires:
IMPORTANT: Copy complete account number
from your Discover Card
7-VV-Iq I I I I I
My card expire._: _ _]
AUTHORIZED SIGNATURE
(Credit card order will not be processed without signature)
Prices are subject to change without notice.
Print or type your name and A complete and correct
address clearly. This will be _i order will save you days
your mailing label, of waiting.
Name:
Street:
City:
State:
Apt:
Zip:
Please make sure that both sides of this form
have been filled out completely.
• Allow 4 weeks for delivery.
• All accessories are subject to availability.
• Prices are subject to change
58
United States and Canada Orders
To place your order by phone, have your Visa,
MasterCard or Discover Card ready and call the toll-
free number listed below between 8AM and 8PM
(EST)Monday through Friday or between 9AM and
5PM (EST) Saturday.
Use this number only to place on order for accessory
items listed on this order form.
1-800-338-0376
To place your order by mail, detach and mail the
completed order form with credit card information,
money order or check in US currency (made payable
to Thomson Consumer Electronics, Inc.) to the
following address:
Video Accessories
PO Box 8419
Ronks, PA 17573
Page 61

LIMITED WARRANTY
What your warranty covers:
• Any defect in materialsor workmanship.
For how long after your purchase:
• Ninety days for labor charges.-
• One year for parts.'
The warranty period for rental units begins with the first rental or 45 days from date of shipment to the ,
rental firm, whichever comes first.
What we will do:
• Pay any Authorized RCA VCR Service Center the labor charges to repair your VCR.
• Pay any Authorized RCA VCR Service Center for the new or, at our option, refurbished replacement
parts required to repair your VCR.
How you get service:
• Take your VCR to any Authorized RCA VCR ServicelCenter. To identify your nearest Authorized RCA VCR
Service Center, ask your dealer, look in the Yellow Pages, or call 1-800-336-1900.
• Show the Authorized Service Center Representative your evidence or purchase date or first rental.
• Pick up your VCR when repairs ar e completed.
What your warranty does not cover:
• Customer instruction. (Your Owner's Manual Clearly describes how to install, adjust, and operate your
VCR. Any additional information should be obtained from your Dealer.)
• Installation and related adjustments.
• Signal reception problems not caused by your VCR.
• Damage from misuse or neglect.
• Cleaning of video/audio heads.
• Batteries.
• A VCR that has been modified or incorporated into other products or is used for institutional or other
commercial purposes.
• A VCR purchased or serviced outside the USA.
• Acts of God, such as but not limited to lightning damage.
Product Registration:
• Please complete and mail the Product Registration Card packed with your VCR. It will make it easier to
contact you should it ever be necessary. The return of the card isnot required for warranty coverage.
How state law relates to this warranty:
• This warranty gives you specific legal rights and you also may have other rights that vary from state
to state.
If you purchased your VCR outside the United states:
• This warranty does not apply. Contact your dealer for warranty information.
"59
Page 62

A
Accessing menus 6
Add or remove channels 9
Audio 41
playing back 27
recording 26
Audio/video jacks 26, 27, 45, 52
Auto channel search 8
Auto play feature 12, 17
Auto TVNCR feature i2, 45
AutoEdit 27
B
Back panel 52
Batteries, installing in the remote 4
Broadcast stereo TV recording 26
¢
Cable box codes 34
Cables 43, 44
CHANNEL buttons 14, 30, 50
Channels, add orremove 9
Channels list, VCR 8
CHANNELS menu 8, 9
Choosing a VCR connection 45
Cleaning the VCR 56
CLEAR button 14, 23, 38, 39
Conflicting timers 25
Connections 43-48
Controls
back panel 52
front panel 50
Copying and editing tapes 27
D
D-VHS Recording 20, 21, 28
Date and time setting 10
Displays
on-screen 40, 51
E
Editing 27, 28
60
EJECTbutton 18,.50
Eject, tape 17
Express Recording 21
F
F.ADV button 15, 37
FORWARD button 17, 36, 38, 39
Frame advance 37
G
GO BACK button 15, 17
Go-to search feature 38
GO-TO SEARCHmenu 38
IN FROM ANT jack 12, 45, 52
Index search feature 37
INDEX SEARCH menu 37
INFO button 15, 17, 39, 40, 51
INPUT button 15, 22, 26, 50
J
Jacks, types of 44
L
LINE indicator 26, 51
M
MENU button 6, 8-11, 15, 22, 23, 41
Menus, accessing 6
MUTE button 16
N
Number buttons 10,. ! 5, 16.
Page 63

O
On-screen displays 40
OUT TO TV jack 12, 45, 52
Overheating 43
P
PAUSE button 15, 17, 18, 36, 37, 50
Picture search options 36
PLAY button 15, 17, 36, 37, 39, 50
Playing a tape 17
POWER button 18, 50
Power surges 43
PREFERENCESmenu 6, 11
Problem solving 53
Programming the remote
to operate TVs 30
R
Reception: STEREO/MONO/SAP 26, 41
RECORD button 15, 18, 21, 26, 50
Recording 18, 20-28
Remote Buttons 14-17
Remote Control, Programming 30-34
Remote VCR1/VCR2 option 11
Remove or add channels 9
REVERSEbutton 15, 17, 36, 38
Review programs screen 23
Rewind, automatic 18
S
Safety tab 18
SAP,recording 26
Satellite receiver codes 34
Search 36-38
SEARCH button 15, 37, 38
Sensor, remote 50
Set up
audio features 41
using the menus 8
Signal type 9
Slow motion playback 36
Solving problems 53
Specifications 56
Speed 18
SPEEDbutton 15, 18, 21, 26
Status indicators 51
STOPbutton 15, 17, 18, 26, 38, 39, 50
T
Tab, safety 18
Tape eject 17
Tape playback 42
Tape playback: HIFI, LINEAR and MIX 42
Tape, playing a 17
Tape speeds 18
Time and date setting 10
Time counter 39
Time counter display 51
Time display 51
TIME menu 10
TIMER indicator 22, 51
Timer recording 22
conflicting timers 25
with DSS®receiver 22
Timer recording, stopping 23
TIMER RECORDINGS menu 22, 23
Timers
icons 24
Tips, troubleshooting 53
TRACKING buttons 16, 17, 36, 39, 50
Tracking feature 39
Troubleshooting tips 53
TV button 14, 30
TV, programming the remote to control 30
TVoVCR button 12, 16, 17, 26, 45, 50
V
VCR button 14
VCR channels list 8
VCR, cleaning 56
VCR indicator 26, 51
VCR MAIN MENU 6, 8, 9, 11, 15, 22, 23, 41
Viewing channel 5
VOL buttons 18
V¢
Warranty, limited 59
61
Page 64

If your VCR needs service, please contact your dealer or the
nearest Service Center from the yellow pages. Please do not
send any products to the Indianapolis address listed in this
manual or on the carton. This will only add delays in service
for your product.
THOMSON CONSUMER ELECTRONICS
10330 North Meridian Street
Indianapolis, IN 46290
©1997 Thomson Consumer Electronics,
Trademark(s)® Registered
Marca(s) Registrada(s)
Printed in Japan
TOCOM 15244160
. QR14051
 Loading...