

Page 1
USER’S
GUIDE
VR681HF
VIDEO CASSETTE RECORDER
Page 2

i
Introduction
WARNING
To reduce the risk of
fire or shock hazard,
do not expose this VCR
to rain or moisture.
CAUTION: To reduce the risk of electric shock, match wide blade of plug to wide slot, fully insert.
ATTENTION: Pour éviter les chocs électriques, introduire la lame la plus large de la fiche dans la
borne correspondante de la prise et pousser jusqú au fond.
Do not defeat the safety feature of the plug. The wide blade fits into the wall socket only one way.
If you need an extension cord, make sure it matches the plug of the VCR.
For U.S.A. — Operate VCR only on 120 volts, 60Hz AC power (normal house power).
FCC Regulations state that unauthorized changes or modifications to this equipment may void the
user’s authority to operate it.
Please fill out the product registration card and return it immediately. Returning this card
allows us to contact you if needed.
Keep your sales receipt to obtain warranty parts and service and for proof of purchase.
Attach it here and record the serial and model numbers in case you need them. The numbers
are located on the back of the VCR.
Model No.______________________________________________________________________
Serial No. _____________________________________________________________________
Purchase Date: ________________________________________________________________
Dealer/Address/Phone: ________________________________________________________
_______________________________________________________________________________
_______________________________________________________________________________
Important Information
VR681HF
Cautions
Note To Cable TV Installer
Product Registration
This reminder is provided to call your attention to Article 820-40 of the National
Electrical Code (Section 54 of the Canadian Electrical Code, Part 1) which provides
guidelines for proper grounding and, in particular, specifies that the cable ground
shall be connected to the grounding system of the building as close to the point of
cable entry as practical.
WARNING
RISK OF ELECTRIC SHOCK
DO NOT OPEN
TO REDUCE THE RISK OF ELECTRIC SHOCK, DO NOT REMOVE
COVER (OR BACK). NO USER SERVICEABLE PARTS INSIDE.
REFER SERVICING TO QUALIFIED SERVICE PERSONNEL.
This symbol indicates “dangerous
voltage” inside the product that
presents a risk of electric shock or
personal injury.
This symbol indicates important
instructions accompanying the
product.
Page 3

1
Introduction
Table of Contents
Important Information
Warnings______________________________ i
Cautions ______________________________ i
Note to Cable TV Installer _______________ i
Product Registration ____________________ i
Hooking Up the VCR
Choosing a Hookup ____________________ 2
Antenna or Cable System Without a
Cable Box _________________________ 3
Cable System With Cable Box to
Unscramble All Channels ___________ 4
Cable System With Cable Box to
Unscramble Pay Channels___________ 5
Connecting Two VCRs for Copying Tapes_ 6
Setting Up the VCR
Startup
Check Accessories With VCR ________ 7
Insert Batteries in Remote ___________ 7
Turn on TV and VCR _______________ 7
Use On-Screen Menu System ________ 8
Select Signal Type__________________ 8
Set the Time and Date ______________ 9
Place Channels in VCR's Memory ____ 9
Add or Remove Channels from
VCR's Memory_________________ 10
Use
TV•VCR Button _______________ 10
Set Up Cable Box__________________ 11
Using the Remote Control
Component, VCR, TV, and
StarSight Function Buttons ______ 12-14
Controlling a TV ______________________ 15
Playing a Tape
Operating Instructions_________________ 16
Using the Playback Features
Auto Play Feature_________________ 17
Tracking _________________________ 17
Pause for Stop-Action______________ 17
Slow Motion______________________ 17
Picture Search ____________________ 18
Variable Speed Picture Search and
Frame Advance ________________ 18
Go-To 0:00:00 and STOP ___________ 18
Index Search _____________________ 19
Scan and Play ________________ 19
Skip Search_______________________ 19
Tape Length______________________ 20
Repeat Function __________________ 20
Audio Playback___________________ 20
Closed Captioning ________________ 21
On-Screen Status Displays__________ 21
Recording Features
Recording Speeds _____________________ 22
Pause________________________________ 22
Recording Options______________ 22
Basic Recording_______________________ 23
Watching a TV Channel While VCR
is Recording a Different Channel ____ 23
Timer Recording ___________________ 24-25
Recording Broadcast Stereo TV or SAP___ 26
Recording Audio Only_________________ 27
Using Two VCRs for Copying
and Editing Tapes__________________ 28
StarSight System
Introduction__________________________ 29
Subscribing to StarSight Information_____ 29
Activating StarSight ________________ 31-32
Using the StarSight Features
INFO Button_______________________ 33
Grazing___________________________ 33
Browsing _________________________ 34
Grid Guide________________________ 35
Tuning by Channel_________________ 35
Channel Guide ____________________ 36
Theme Guide______________________ 37
Recording ______________________ 38-40
Selecting and De-selecting Channels__ 41
Changing the Channel Order ________ 41
Scheduling Data Reception __________ 42
What you should do when you move _ 42
Changing Your Cable Box___________ 43
References
PBS Stations _______________________44-46
Cable Box Codes ______________________46
Specifications_________________________ 47
Cleaning the VCR _____________________ 47
Location of Controls
Front Panel_______________________ 48
Display Panel_____________________ 49
Back Panel _______________________ 50
Limited Warranty _____________________ 51
Trouble Checks ____________________ 52-55
Index _____________________________ 56-57
Page 4

2
Hooking Up the VCR
Choosing a Hookup
The hookups on pages 3 through 5 are divided into two hookup types: Basic (A)
and Advanced (B).
The basic hookup shows the backs of TVs that have only an antenna/cable
connection. It is the easier of the two hookups and additional accessories may not
be needed.
The advanced hookup shows the VCR hooked up to a TV with audio and video
jacks using a signal splitter. This connection may improve the picture quality as
well as convenience of operation, and it may require additional accessories.
Answer the questions to choose the hookup for your VCR.
1. How do you receive your TV signals?
Choose one answer from below.
A. Outside antenna – Turn to page 3.
B. Rabbit ears (set-top) and/or bow tie antenna – Turn to page 3.
C. Cable System – Go to question 2.
2. What type of Cable-TV system* do you have?
Choose one answer from below.
A. Cable without a cable box – Turn to page 3.
B. Cable box to unscramble all the channels – Turn to page 4.
C. Cable box to unscramble only pay channels, such as HBO, Showtime,
Cinemax, etc. – Turn to page 5.
*You may need to contact your local cable company for assistance.
Optional Hookup
How to hook up two VCRs for copying tapes?
A. Select a hookup by answering questions 1 and 2 above.
B. Then modify the connections as shown on page 6.
Page 5
3
Hooking Up the VCR
Back of VCR
Back of TV
300/75 Ohm
Adapter
OR
From Antenna
or Cable
Cable/
Antenna
OR
VHF
UHF
RF Coaxial Cable
(supplied)
75 to 75/300 Ohm
Separator
OUT TO TV
IN FROM ANT.
CH
3 564
AUDIO
VIDEO
IN 1
OUT 1
R
L
CABLE BOX
OUT TO
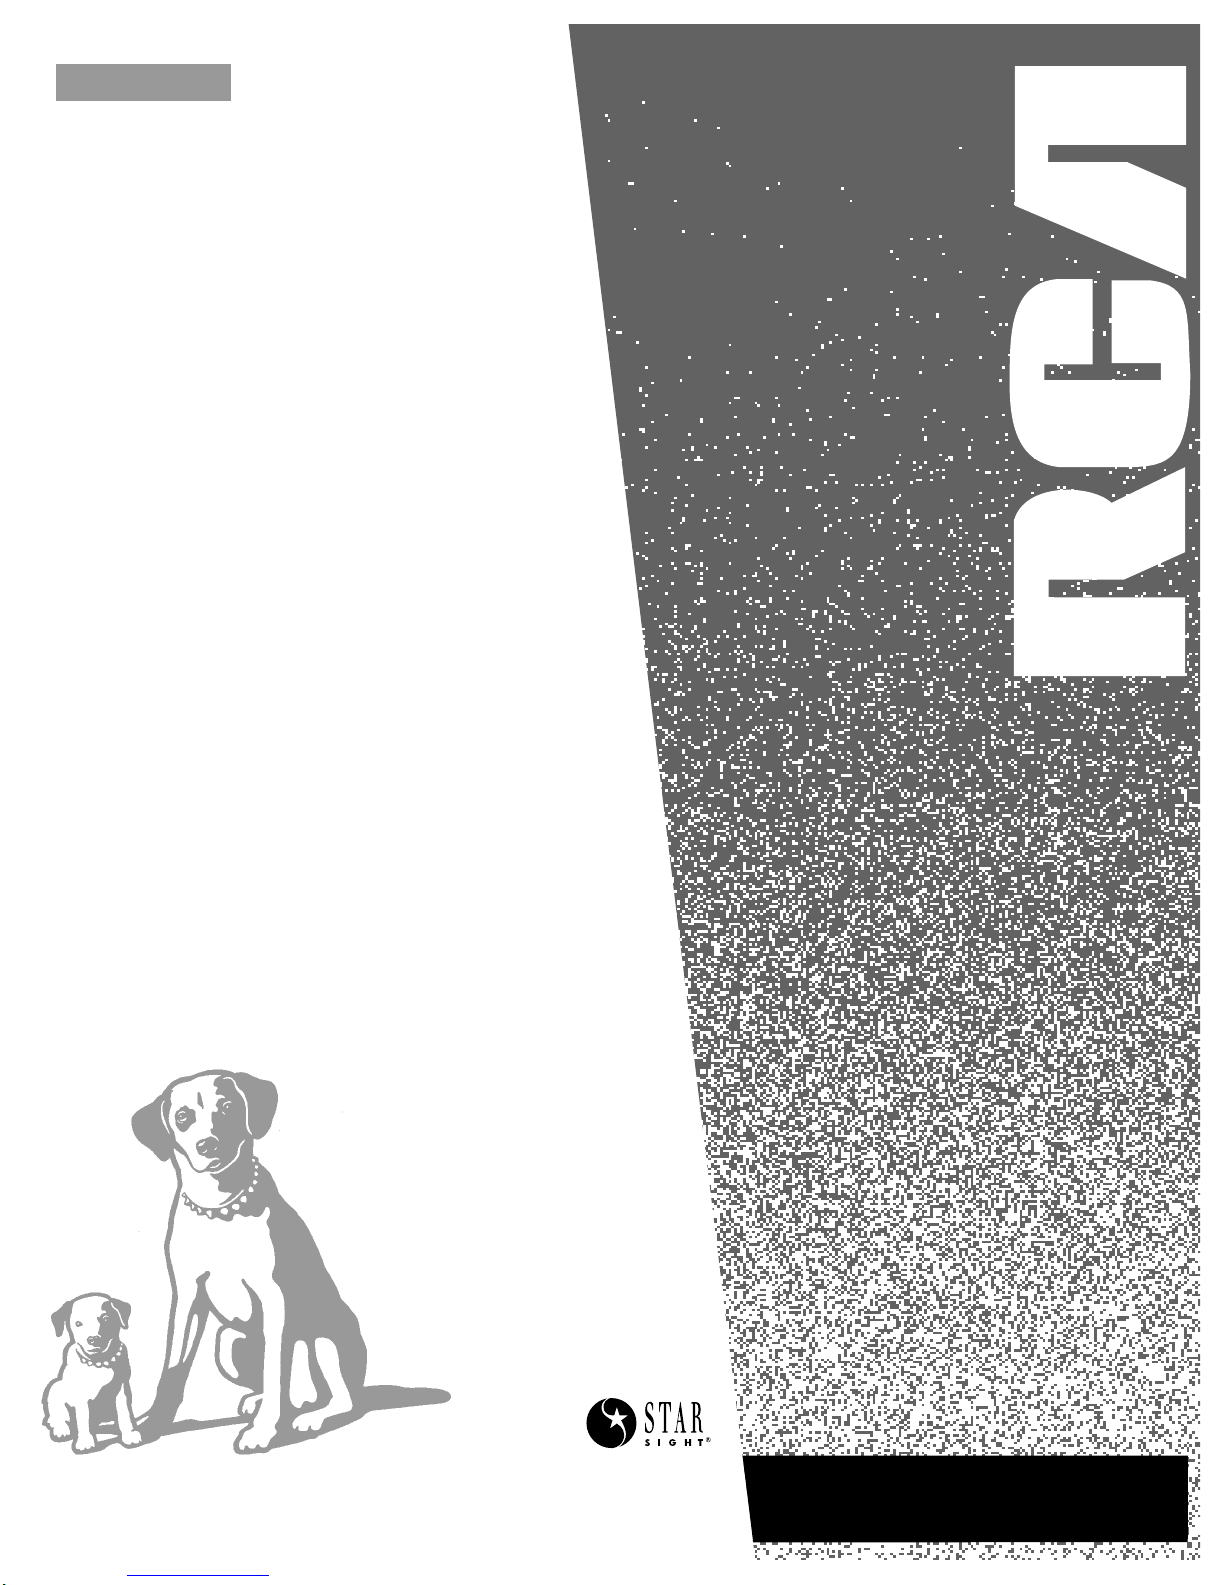
Antenna or Cable System Without a Cable Box
A. Basic hookup.
Use this hookup for a simple connection
which requires fewer accessories.
1. Set the CH 3
55 66
4 switch on back of VCR
to either channel 3 or 4.
You will tune the TV to this channel and use the
TV•VCR button to watch the VCR.
2. Connect as shown.
This connection may require additional
accessories not provided.
3. Plug in power cords of VCR and TV.
4.
B. Advanced hookup.
Use this hookup for slightly improved
picture quality, Hi-Fi, stereo playback and
more convenient operation — use of
TV•VCR button not required.
1. Connect as shown.
This connection requires additional accessories
not provided.
If your TV is not stereo, you may need a
Y-adapter to hear sound from both channels.
2. Plug in power cords of VCR and TV.
3.
You will tune the TV to its video input to
watch the VCR.
Continue to page 7.
Continue to page 7.
OUT TO TV
IN FROM ANT.
CH
3 564
AUDIO
VIDEO
IN 1
OUT 1
R
L
CABLE BOX
OUT TO
Back of VCR
S-VIDEO
AUDIO
CABLE /
ANTENNA
L /
MONO
RIGHT
VIDEO
INPUT
INOUT
From Antenna
or Cable
OR
Back of TV
300/75 Ohm
Adapter
RF Coaxial Cable
(supplied)
Audio/Video Cables
Signal
Splitter
A
B
Page 6
4
Hooking Up the VCR
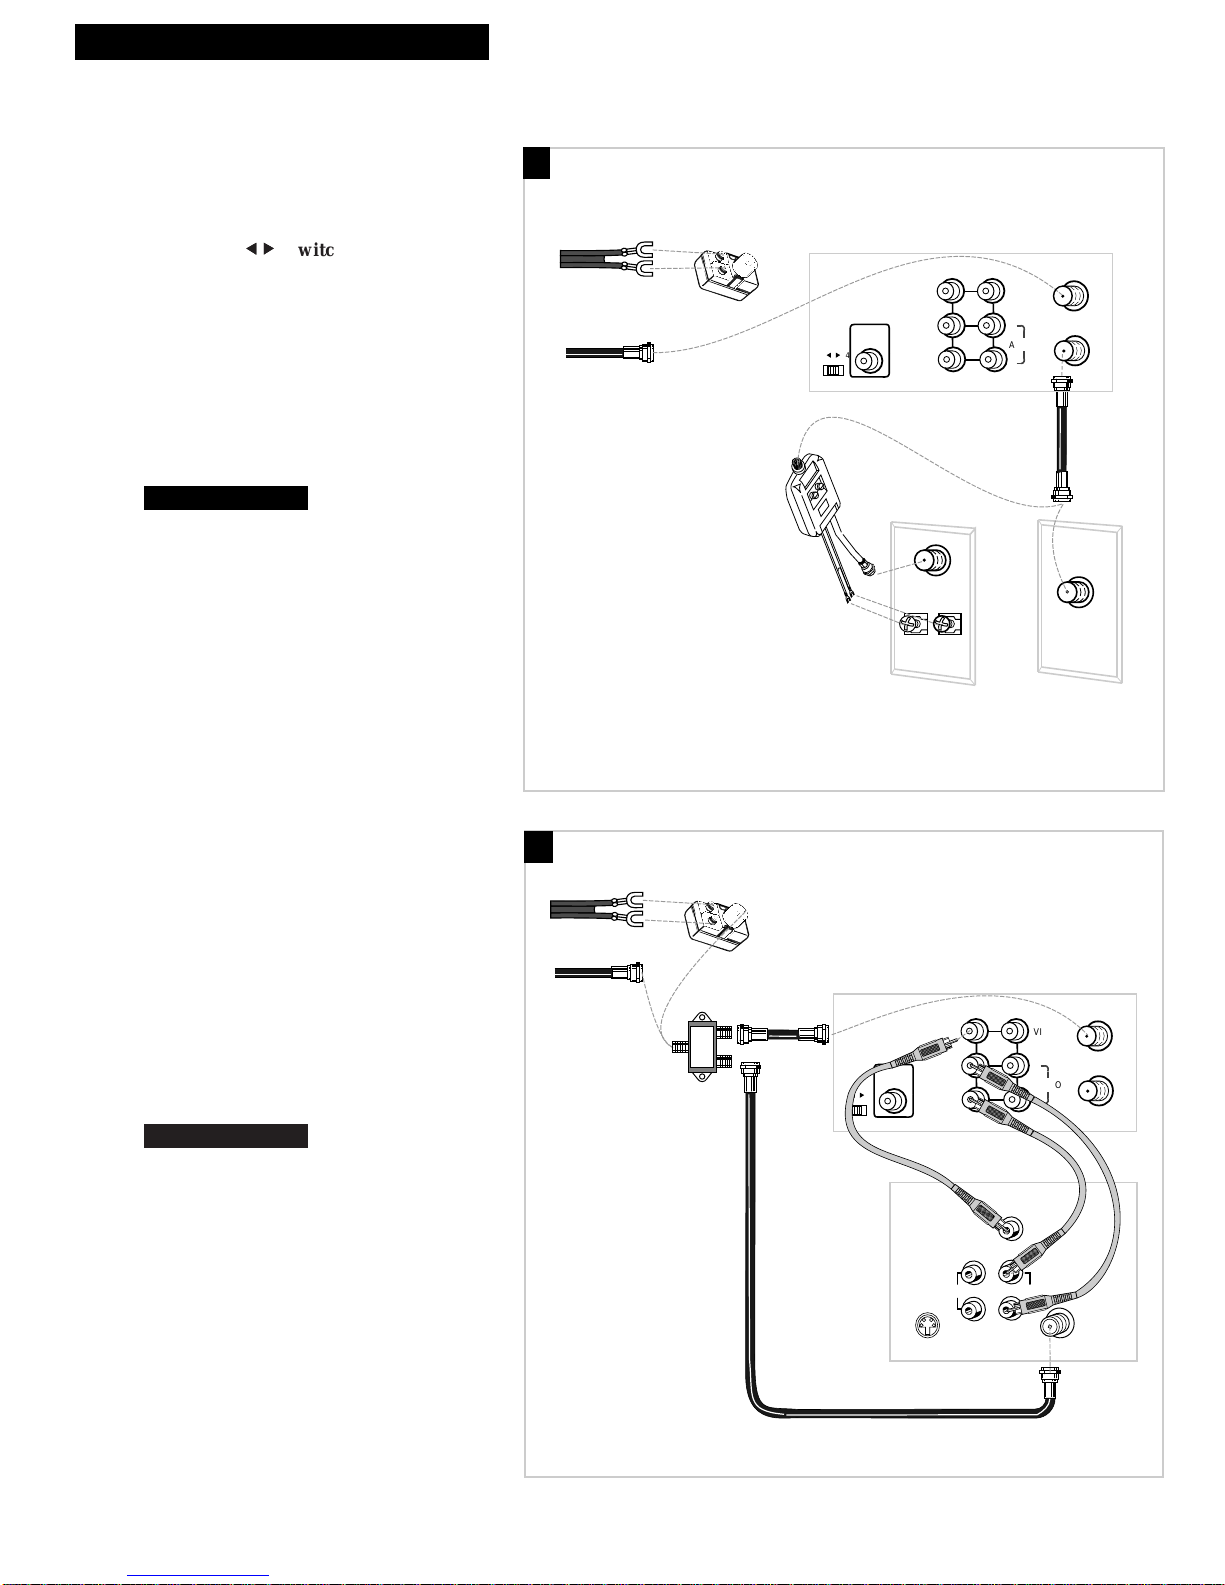
Cable System With Cable Box to Unscramble All Channels
OUT TO TV
IN FROM ANT.
CH
3 564
AUDIO
VIDEO
IN 1
OUT 1
R
L
CABLE BOX
OUT TO
Back of VCR
OUTIN
Cable Box
From Cable
RF Coaxial
Cable
Back of TV
Cable/
Antenna
OR
VHF
UHF
RF Coaxial Cable
(supplied)
75 to 75/300 Ohm
Separator
A. Basic hookup.
Use this hookup for a simple connection
which requires fewer accessories.
1. Set the CH 3
55
66
4 switch on back of VCR
to either channel 3 or 4.
You will tune the TV to this channel and use the
TV•VCR button to watch the VCR.
2. Connect as shown.
This connection may require additional
accessories not provided.
3. Plug in power cords of VCR, TV, and
cable box.
4.
B. Advanced hookup.
Use this hookup for slightly improved
picture quality, Hi-Fi, stereo playback and
more convenient operation — use of TV•VCR
button not required.
1. Connect as shown.
This connection requires additional accessories
not provided.
If your TV is not stereo, you may need a
Y-adapter to hear sound from both channels.
2. Plug in power cords of VCR, TV, and
cable box.
3.
You will tune the TV to its video input to
watch the VCR.
Cable Box Adapter Hookup
Use this adapter if you have a wireless
remote controlled cable box. You can tune
the cable box to the channel you want to
record or watch with the remote. Refer to
step 11, page 11 for setup.
1. Connect the cable box adapter to the OUT
TO CABLE BOX jack on the back of the
VCR.
2. Position adapter on top of the cable box.
Make sure it is properly positioned so the sensor
on the bottom can send signals to the sensor
area of the cable box. You may want to test the
adapter before removing the adhesive for
permanent placement.
Continue to page 7.
Continue to page 7.
A
B
CH 9
Infra-red receiving area
Decoder Box
Infra-red
emitting point
The bottom
of the adapter
OUT TO TV
IN FROM ANT.
CH
3 564
AUDIO
VIDEO
IN 1
OUT 1
R
L
CABLE BOX
OUT TO
Back of VCR
From Cable
RF Coaxial
Cable
Signal
Splitter
RF Coaxial Cable
(supplied)
Cable Box
OUTIN
RF Coaxial
Cable
CH
3 564
OUT TO
CABLE BOX
S-VIDEO
Back of VCR
IN 1
OUT 1
Audio/Video Cables
VIDEO
INPUT
RIGHT
AUDIO
L /
MONO
Back of TV
VIDEO
L
AUDIO
R
INOUT
IN FROM ANT.
OUT TO TV
CABLE /
ANTENNA
Page 7
5
Hooking Up the VCR
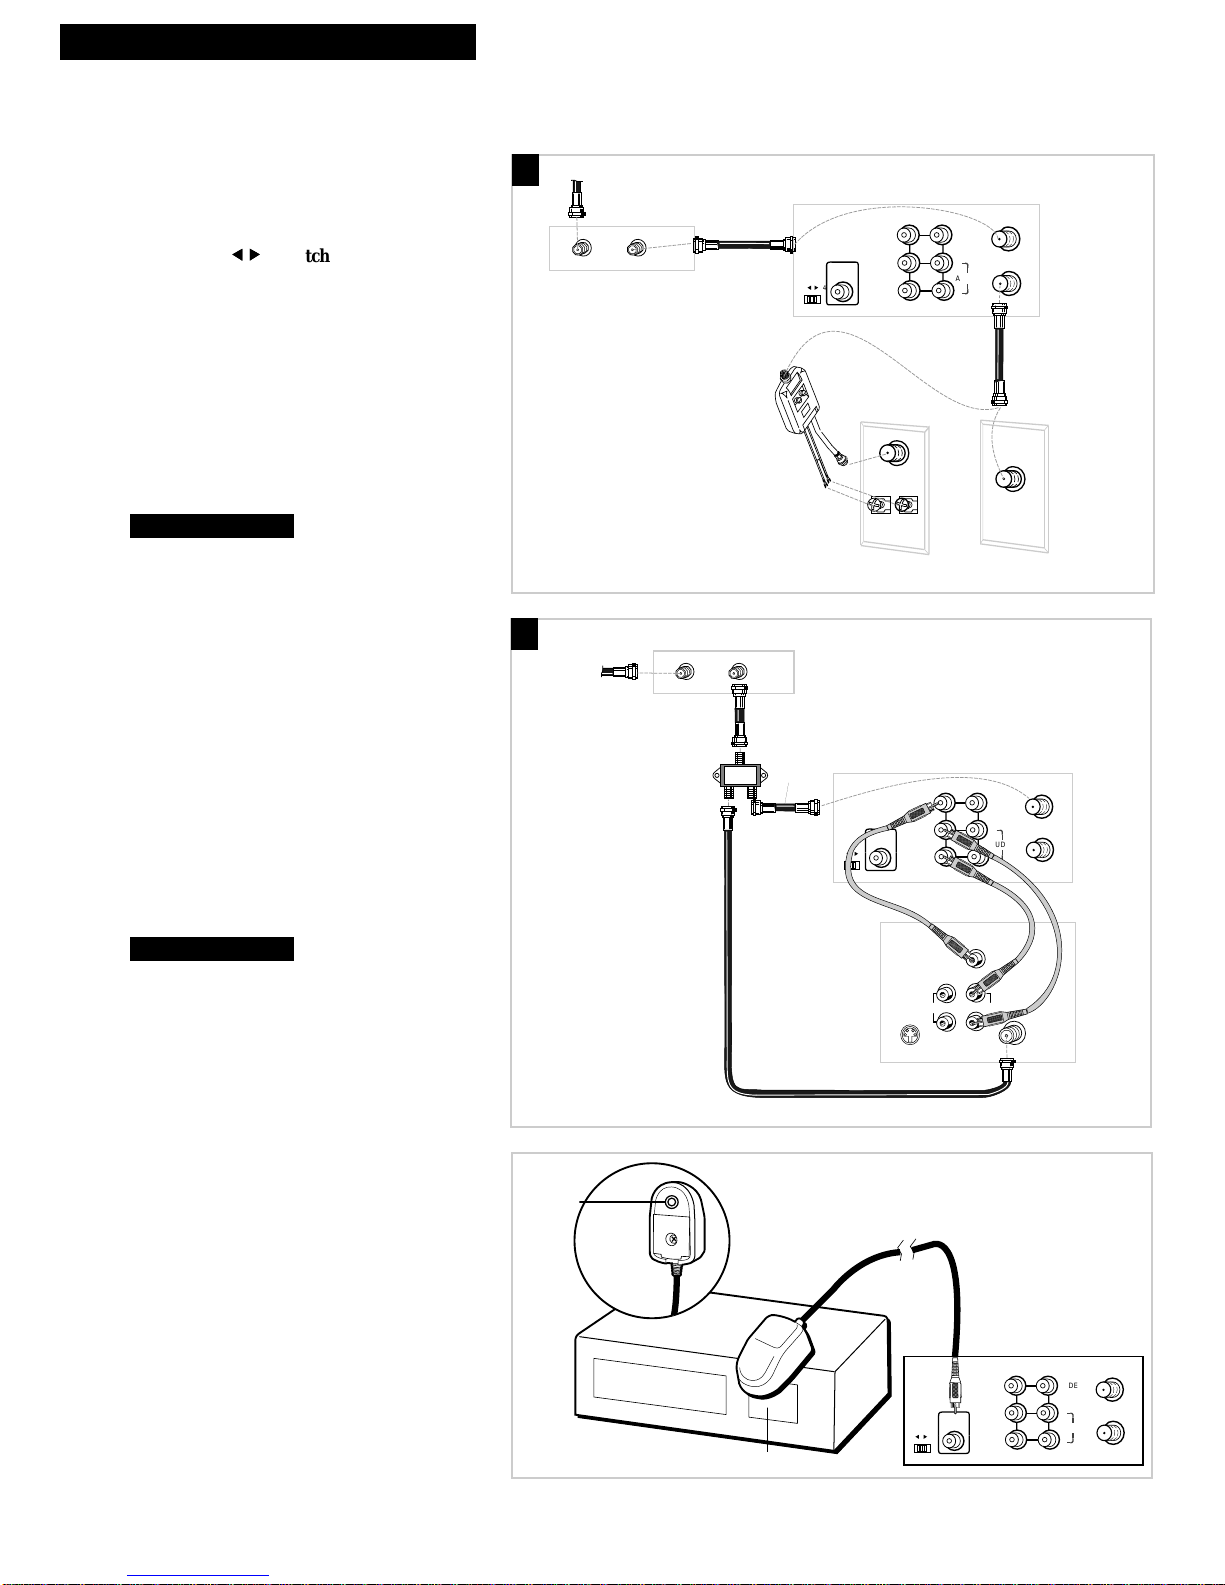
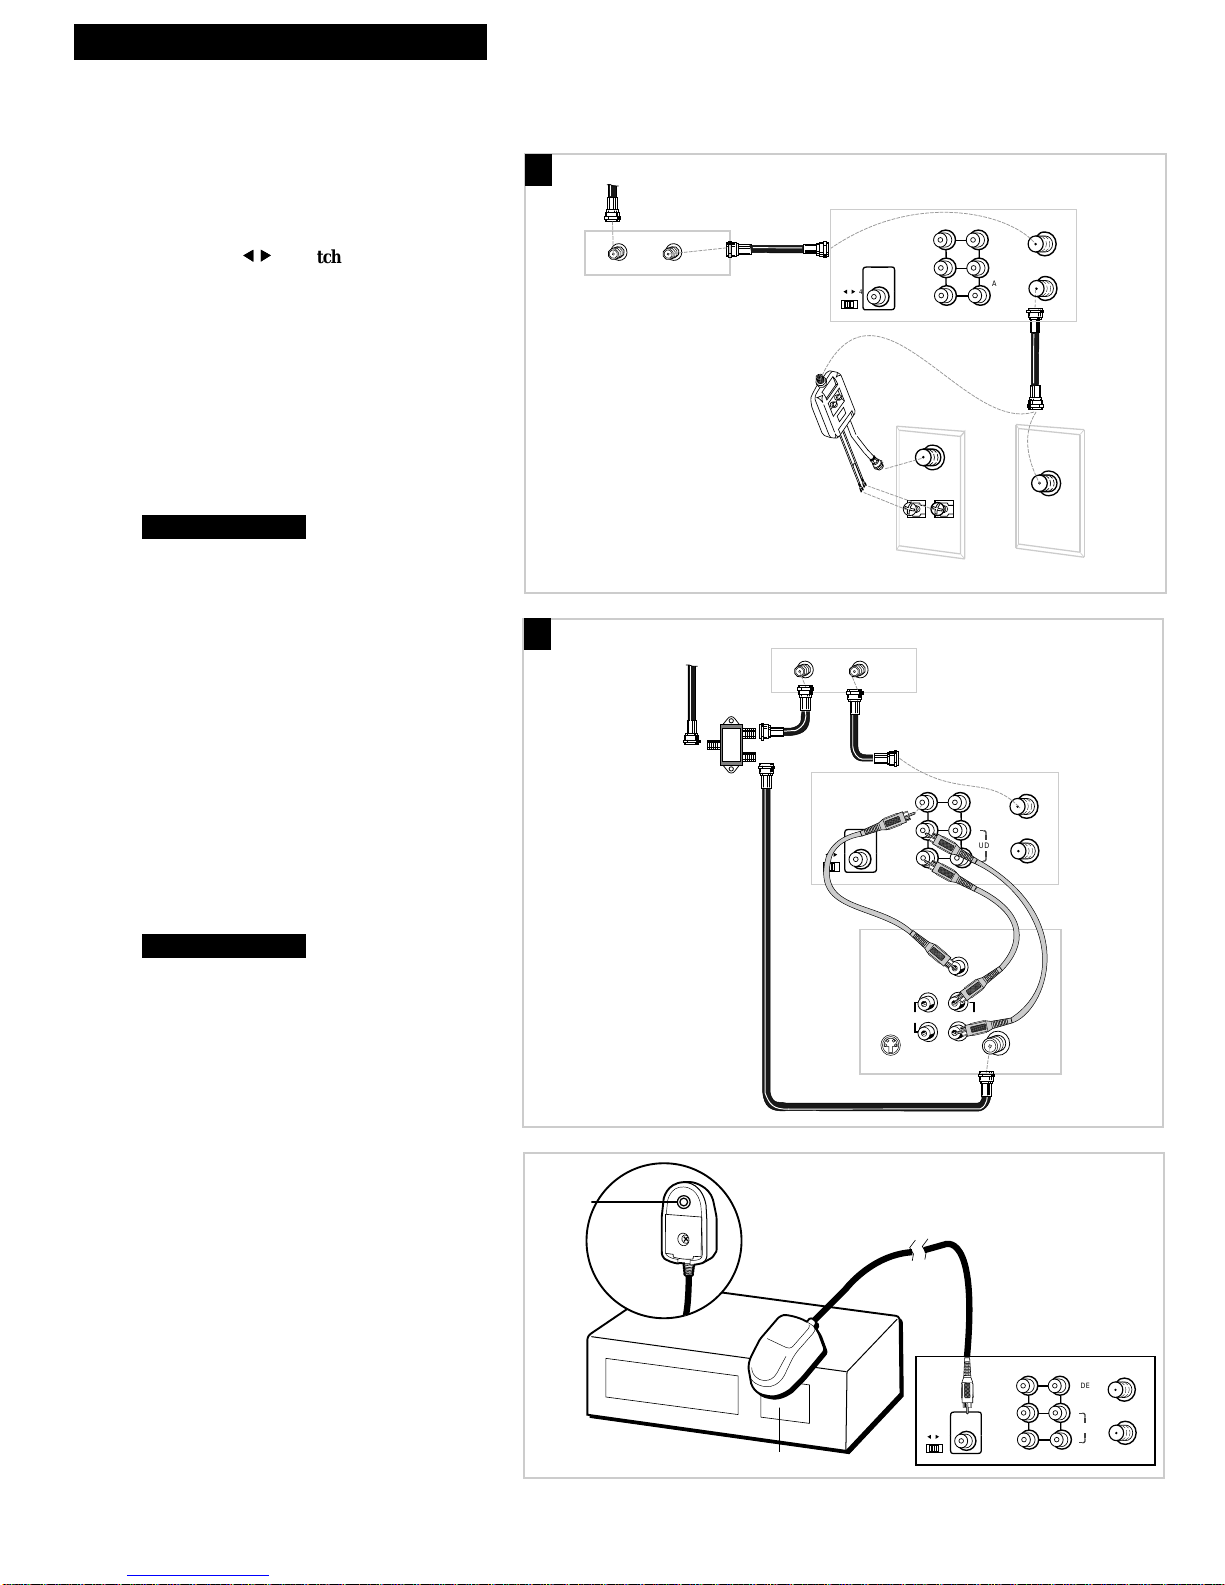
Cable System With Cable Box to Unscramble Pay Channels
(such as HBO, Showtime, Pay-Per-View, etc.)
Back of VCR
OUTIN
Cable Box
From Cable
RF Coaxial
Cable
Back of TV
Cable/
Antenna
OR
VHF
UHF
RF Coaxial Cable
(supplied)
75 to 75/300 Ohm
Separator
OUT TO TV
IN FROM ANT.
CH
3 564
AUDIO
VIDEO
IN 1
OUT 1
R
L
CABLE BOX
OUT TO
A. Basic hookup.
Use this hookup for a simple connection
which requires fewer accessories.
1. Set the CH 3
55
66
4 switch on back of VCR
to either channel 3 or 4.
You will tune the TV to this channel and use the
TV•VCR button to watch the VCR.
2. Connect as shown.
This connection may require additional
accessories not provided.
3. Plug in power cords of VCR, TV, and
cable box.
4.
B. Advanced hookup.
Use this hookup for slightly improved
picture quality, Hi-Fi, stereo playback and
more convenient operation — use of
TV•VCR button not required.
1. Connect as shown.
This connection requires additional accessories
not provided.
If your TV is not stereo, you may need a
Y-adapter to hear sound from both channels.
2. Plug in power cords of VCR, TV, and
cable box.
3.
You will tune the TV to its video input to
watch the VCR. All pay channels are
viewed through the VCR.
Cable Box Adapter Hookup
Use this adapter if you have a wireless
remote controlled cable box. You can tune
the cable box to the channel you want to
record or watch with the remote. Refer to
step 11, page 11 for setup.
1. Connect the cable box adapter to the OUT
TO CABLE BOX jack on the back of the
VCR.
2. Position adapter on top of the cable box.
Make sure it is properly positioned so the
sensor on the bottom can send signals to the
sensor area of the cable box. You may want to
test the adapter before removing the adhesive
for permanent placement.
Continue to page 7.
Continue to page 7.
A
B
CH 9
Infra-red receiving area
Decoder Box
Infra-red
emitting point
The bottom
of the adapter
OUT TO TV
IN FROM ANT.
CH
3 564
AUDIO
VIDEO
IN 1
OUT 1
R
L
CABLE BOX
OUT TO
Back of VCR
From Cable
Signal
Splitter
Cable Box
OUT TO
CABLE BOX
CH
3 564
OUTIN
Back of VCR
IN 1
OUT 1
VIDEO
L
AUDIO
R
IN FROM ANT.
OUT TO TV
RF Coaxial
Cable
(supplied)
Audio/Video Cables
S-VIDEO
Back of TV
VIDEO
INPUT
RIGHT
AUDIO
L /
MONO
INOUT
CABLE /
ANTENNA
Page 8

6
Hooking Up the VCR
Connecting T wo VCRs for Copying Tapes
OUT TO TV
IN FROM ANT.
CH
3 564
AUDIO
VIDEO
IN 1
OUT 1
R
L
CABLE BOX
OUT TO
OUT TO TV
IN FROM ANT.
CH
3 564
AUDIO
VIDEO
IN 1
OUT 1
R
L
CABLE BOX
OUT TO
Playback VCR
RF Coaxial Cable
(supplied)
Recording
VCR
Audio/Video
Cables
RF Coaxial
Cable
or
Use the hookup to the TV
as previously selected on
pages 3, 4, or 5.
From Antenna, Cable
or Cable Box
Option A Hookup.
Use this hookup for a simple connection
which requires fewer accessories.
1. Select a hookup from pages 2 through 5
and then modify with this connection.
2. Set the CH 3
55
66
4 switch on the playback
VCR to either channel 3 or 4.
You will tune the recording VCR to this channel
to receive the signal from the playback VCR.
3. Connect as shown.
This connection may require additional
accessories not provided.
4. Plug in power cords of VCRs and TV.
5.
Option B Hookup.
Use this hookup for slightly improved copy
quality.
1. Select a hookup from pages 2 through 5
and then modify with this connection.
2. Connect as shown.
This connection requires additional accessories
not provided.
If your other VCR is not stereo, you may need a
Y-adapter to copy sound from both channels.
3. Plug in power cords of VCRs and TV.
4.
You will select the LINE (audio/video)
input on the recording VCR to receive the
signal from the playback VCR.
Continue to page 7.
Continue to page 7.
B
A
Caution: The unauthorized recording of
television programs and other materials
may infringe the rights of others.
From Antenna, Cable
or Cable Box
Audio/Video
Cables
Playback VCR
OUT TO
CABLE BOX
CH
3 564
Recording
VCR
OUT TO
CABLE BOX
CH
3 564
Use the hookup to the TV
as previously selected on
IN 1
OUT 1
OUT 1
IN 1
VIDEO
L
AUDIO
R
VIDEO
L
AUDIO
R
RF Coaxial
Cable
IN FROM ANT.
OUT TO TV
IN FROM ANT.
OUT TO TV
or
pages 3, 4, or 5.
RF Coaxial Cable
(supplied)
Page 9
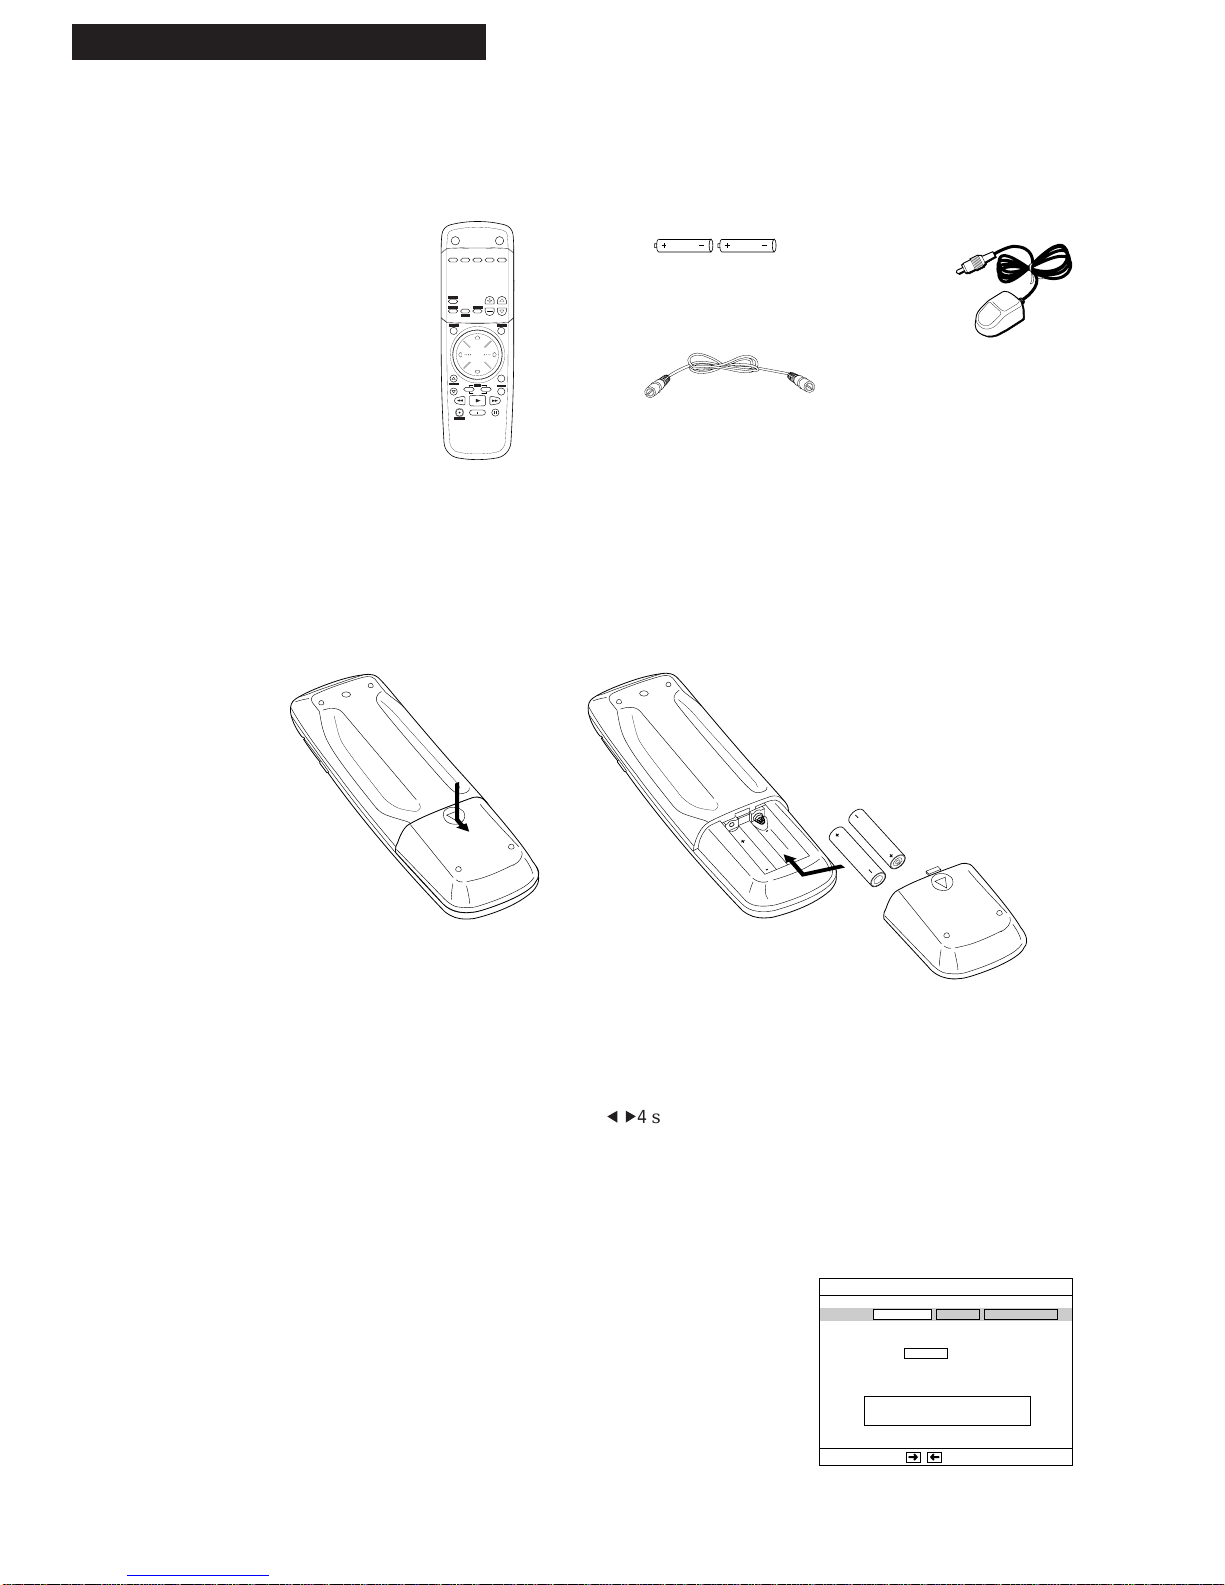
7
Setting Up the VCR
1. Check accessories with VCR.
Contact your dealer if any items are missing.
2. Insert batteries in remote.
3. Turn on the TV.
A. Turn on the TV.
B. If you used one of the basic hookups, tune the TV to
the channel selected with the CH 3
56
4switch on
back of VCR.
If you used one of the advanced hookups, tune the
TV to the TV’s video input. (See TV owner’s manual
for details.)
4. Turn on the VCR.
A. Press VCR POWER on the remote.
The ANTENNA/CABLE SET menu appears
prompting you to set the type of connection you are
using for the VCR.
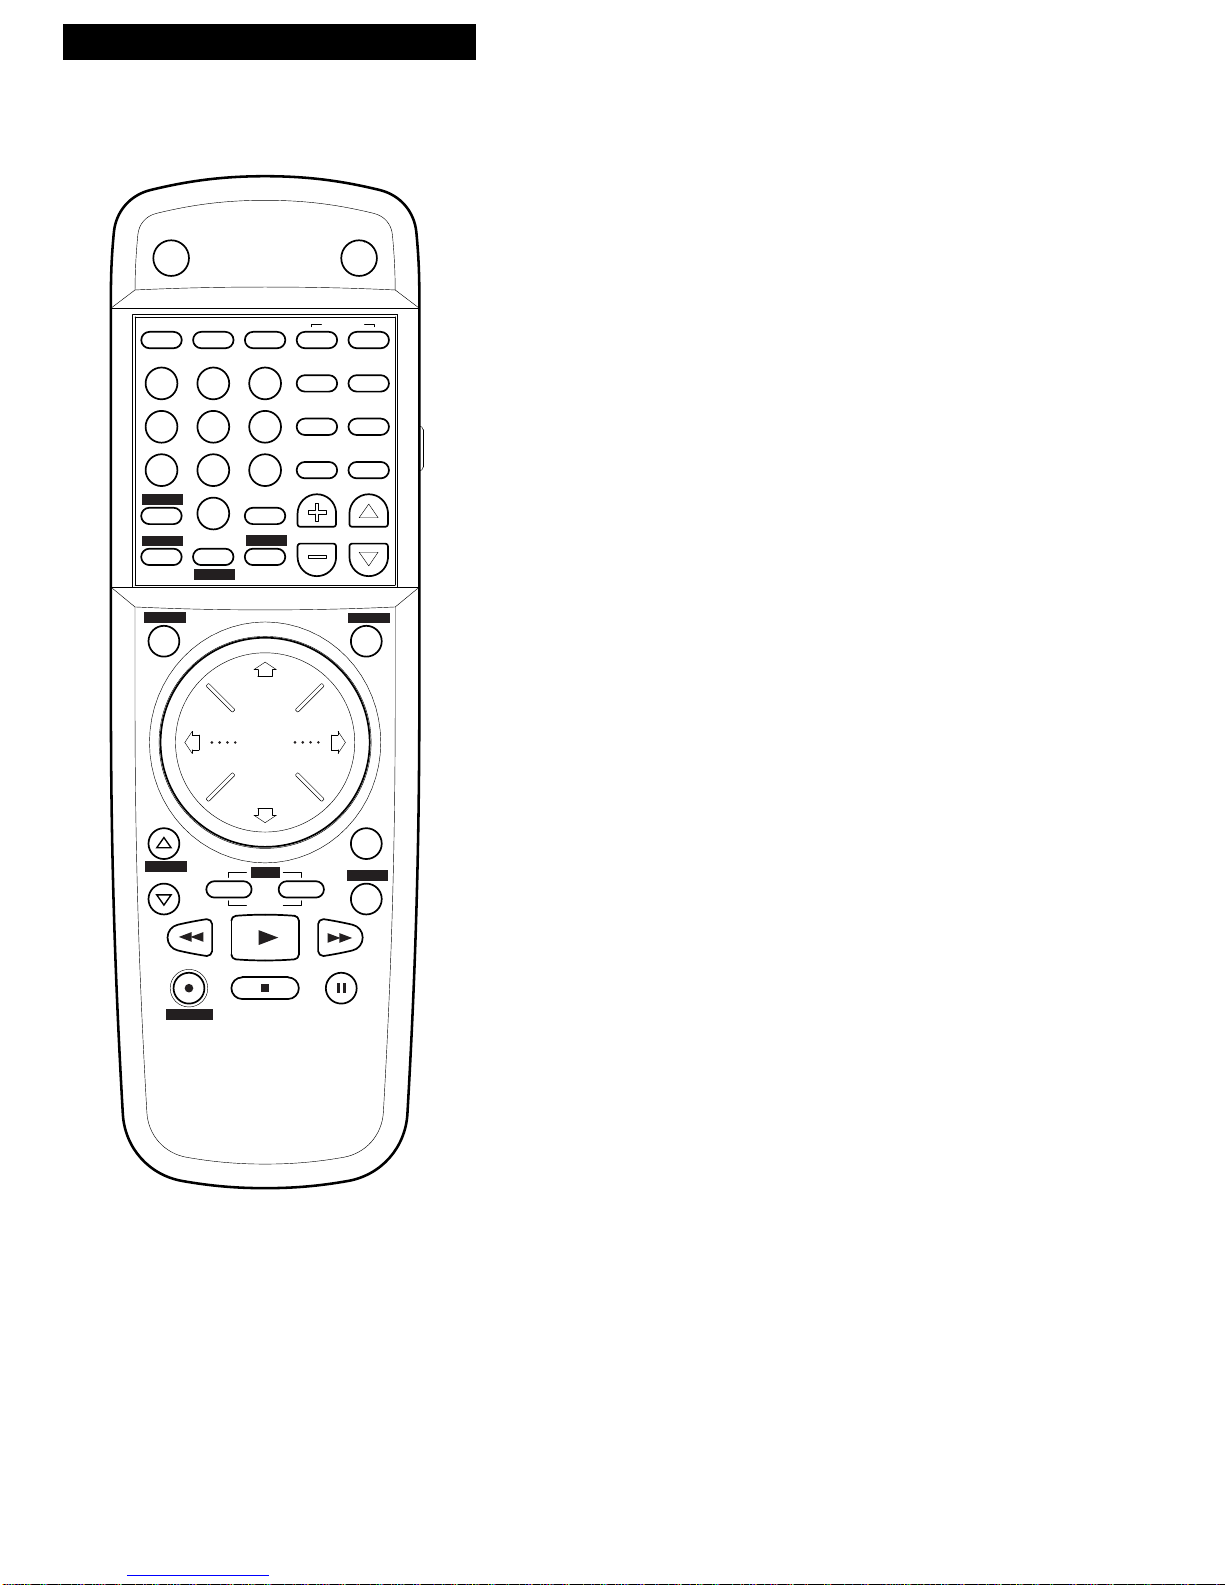
Remote
(Stock No. 221403)
RECORD
EXIT
VCR
POWER
TV
POWER
VCR
EJECT
MENU
MUTE
SELECT
TV
CHAN
VOL
PROG
GUIDE
INFO
LIST
THEME
ENTER
PLAY
STOP
SLOW
DISP
REW
PAUSE
FWD
+
-
DAY
CLEAR
SHUTTLE
JOG
REPEAT
SKIP
JOG
PAGE
TRACKING
RF Coaxial Cable
(Stock No. 207417)
2 “AAA” Batteries
Startup
continued on next page
Cable Box Adapter
(Stock No. 221404)
Type ANTENNA CABLE CABLE BOX
Press ENTER to CONFIRM
Type of connection
the VCR is using
Use to SELECT
ANTENNA/CABLE SET
Page 10

Setting Up the VCR
Startup
8
5. Use the on-screen menu system.
Point and Select is the method you use to move
through the menu system. There are two ways to select
(or change) a menu or feature.
• Using the ARROWButtons: Press the MENU button
to display the VCR MAIN MENU. Then use the UP or
DOWN ARROW button to point to a menu or item.
Use the LEFT ARROW to move left and the RIGHT
ARROW button to move right on a line. Press
ENTER to select (or change) the item.
• Using the Number Buttons: Press the MENU button
to display the VCR MAIN MENU. Then press the
number button on the remote that corresponds to the
number on the menu to select (or change) an items.
Using the number button allows you to point and
select a menu item at the same time.
Although there are two ways to access the menu
system, only the ARROW buttons are referenced when
explaining the VCR features and operations. The
ARROW buttons are easier to access because the
number buttons are located behind the remote door.
6. Select the signal type.
Before channels can be added into the VCR’s channel
memory, the signal type (ANTENNA, CABLE or CABLE
BOX) must be selected. If the ANTENNA/ CABLE SET
menu did not appear when you first turned on your
VCR, follow these directions.
A. Press MENUto display the MAIN MENU. If this
menu does not appear:
• Make sure TV is tuned to same channel as
CH 3564switch on the back of the VCR or the
TV’s video input (refer to TV’s manual).
• Press SELECT VCR, then press MENU again.
• If you use a basic hookup, check VCR indicator in
display panel – it should be on. Press TV•VCR to
turn it on.
• Check the connections.
B. Press the DOWN ARROW to highlight
“Antenna/Cable set,” then press ENTER.
C. Use the RIGHT ARROW to select the signal type.
For Cable Box selection, channel memory is not
available. See step 11 on page 11.
D. Follow the on-screen instructions.
1
2
3
4
5
6
7
9
8
0
SHUTTLE
JOG
REPEAT
SKIP
JOG
MAIN MENU
Press ENTER to SELECT
1 Timer recording list
2 Clock set/adjust
3 Antenna/Cable set
4 Channel memory set
5 VCR function setup
6 StarSight setup
Type ANTENNA CABLE CABLE BOX
Press ENTER to CONFIRM
Type of connection
the VCR is using
Use to SELECT
ANTENNA/CABLE SET
Buttons on Remote
MAIN MENU
Press ENTER to SELECT
1 Timer recording list
2 Clock set/adjust
3 Antenna/Cable set
4 Channel memory set
5 VCR function setup
6 StarSight setup
Page 11
9
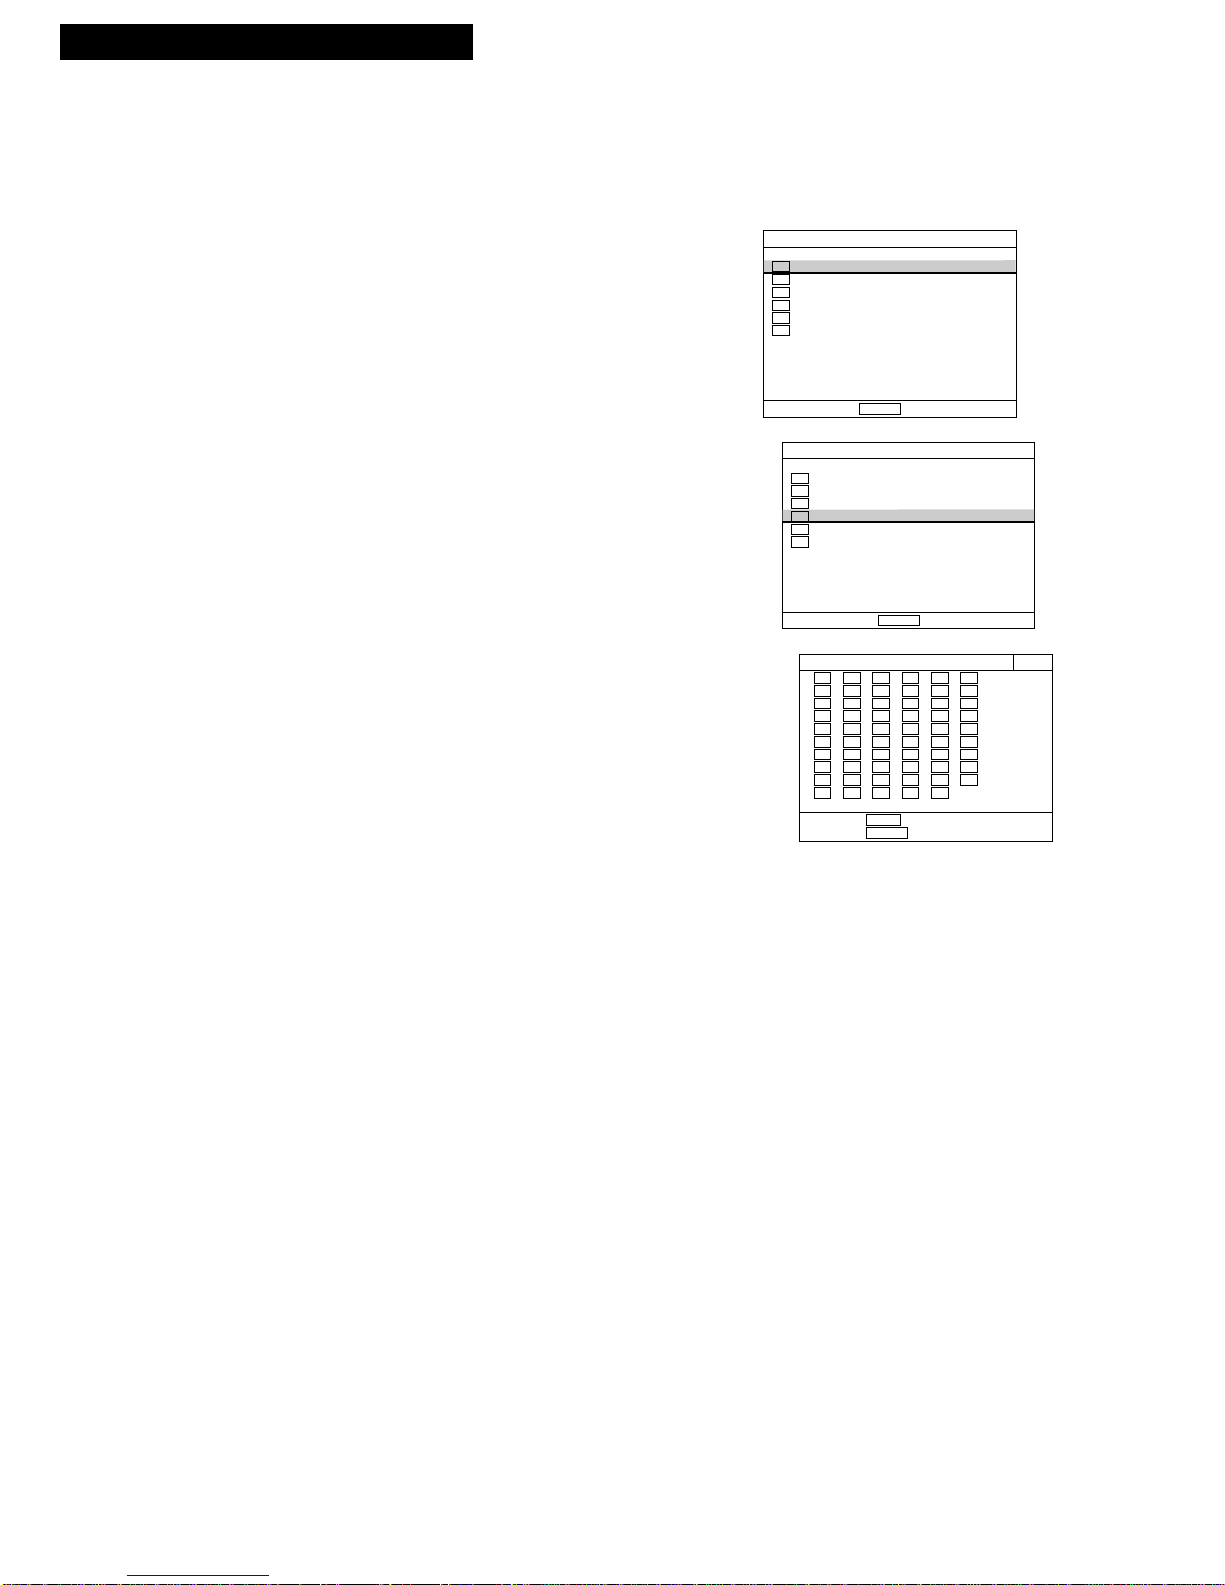
Setting Up the VCR
7. Set the time and date.
The VCR automatically sets the clock, updates to the
current time, and adjusts to daylight savings time every
time the VCR is turned off. Or, you may manually set
the clock.
A. Press MENU to bring up the MAIN MENU.
B. Press the DOWN ARROW to highlight “Clock
set/adjust,” then press ENTER.
C. Select AUTO or MANUAL by using the ARROW
buttons.
• AUTO CLOCK SET: Tune the VCR to the PBS
station before turning off the VCR. If you don’t, it
takes longer for the VCR to set the clock. If you
use a cable box, turn on the cable box and tune it
to the PBS station before turning the VCR off. See
“PBS Stations” on pages 44-46.
• MANUAL CLOCK SET: Use the number buttons
to enter the time and date. Enter a “0” before
single digits, such as 0, then 5, then 0, then 7 for a
time of 5:07.
D. Follow the on-screen instructions to manually set
the clock.
8. Place channels in the VCR’s memory.
The VCR automatically scans through all channels in
your area and adds them to the VCR’s memory.
A. Press MENU to bring up the MAIN MENU.
B. Press the DOWN ARROW to highlight “Channel
memory set,” then press ENTER.
C. Press PROG to begin adding channels to memory.
Your VCR begins scanning through the channels
and displays only those channels programmed into
the VCR’s memory with a green background.
Startup
MAIN MENU
Press ENTER to SELECT
1 Timer recording list
2 Clock set/adjust
3 Antenna/Cable set
4 Channel memory set
5 VCR function setup
6 StarSight setup
OR
MAIN MENU
Press ENTER to SELECT
1 Timer recording list
2 Clock set/adjust
3 Antenna/Cable set
4 Channel memory set
5 VCR function setup
6 StarSight setup
Please wait...
Press EXIT to STOP memorizing
14
2
3
4
5
7
8
9
10
11
11
13
CHANNEL MEMORY
CLOCK SET/ADJUST
Enter present TIME
- - : - -
To correct use
MAIN MENU
Press ENTER to SELECT
1 Timer recording list
2 Clock set/adjust
3 Antenna/Cable set
4 Channel memory set
5 VCR function setup
6 StarSight setup
CLOCK SET/ADJUST
Clock mode AUTO MANUAL
Use to SELECT
Press ENTER to CONTINUE
AUTO CLOCK SET
The clock is set and
adjusted automatically when
the VCR power is turned OFF
(See User's Guide for listing)
NOTE For best results,
tune VCR to your
nearest PBS station
before turning it OFF
MAIN MENU
Press ENTER to SELECT
1 Timer recording list
2 Clock set/adjust
3 Antenna/Cable set
4 Channel memory set
5 VCR function setup
6 StarSight setup
Press PROG for AUTO SETTING
2
CHANNEL MEMORY
Press Enter to ADD/DELETE
Page 12
10
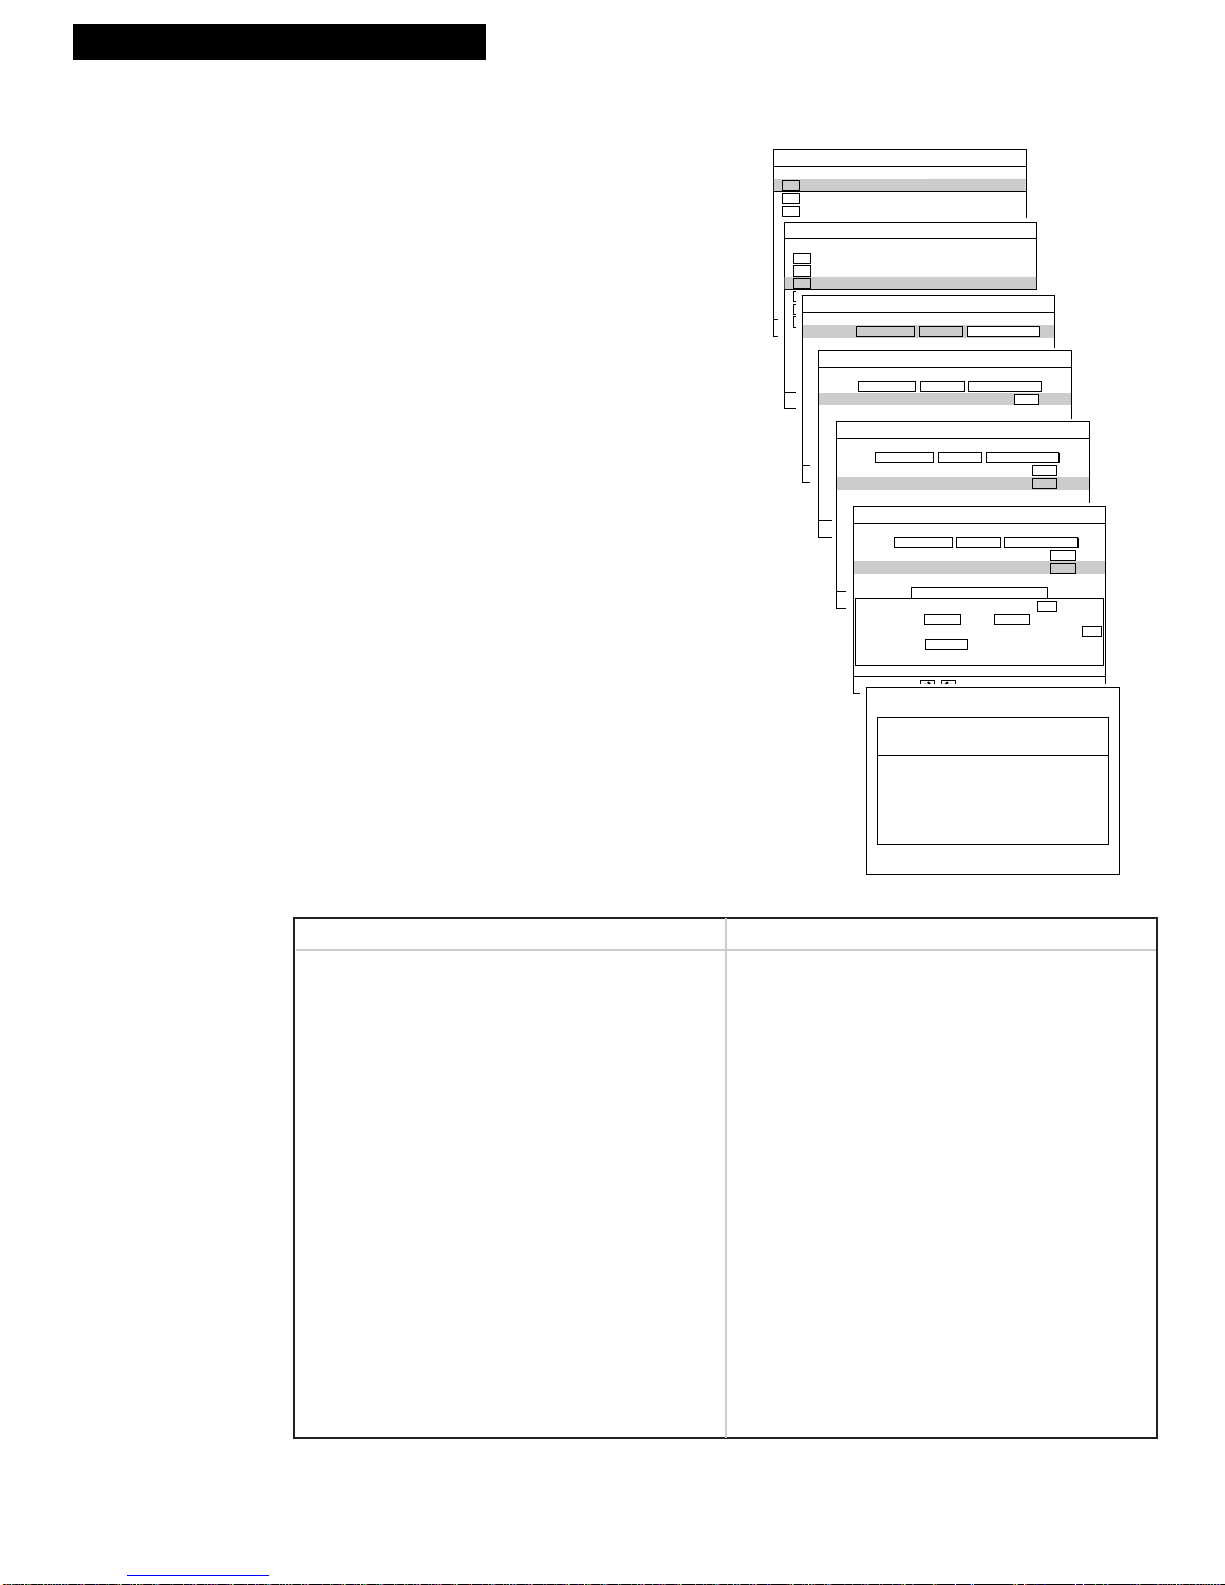
Setting Up the VCR
Startup
9. Add or remove channels from the VCR’s
memory.
After programming the channels into memory, you can
remove channels if some of the channels have weak
signals, or you do not want to watch them. You can also
add channels that were missed or removed.
A. Press MENU on the remote to see the MAIN MENU.
B. Press the DOWN ARROW to highlight “Channel
memory set,” then press ENTER.
All channels in memory are displayed with a green
background
C. Highlight a channel with the UP or DOWN ARROW.
When a channel is highlighted, the background
changes color depending on its status:
Green: Channel is in memory.
Yellow: Channel in memory is highlighted.
Pink: Channel to be deleted from memory
is highlighted.
Gray: Channel is deleted from memory.
If you want to add a channel that does not appear
on the Channel Memory screen, then highlight the
channel number in the upper right corner and press
two number buttons. For cable channels over 100,
press 100 and then two number buttons.
D. Press ENTER to add or delete the channel.
10. Use TV•VCR button.
Skip this step if you used one of the advanced
hookups.
When using a basic hookup, the TV•VCR button lets
you switch between the picture coming from the VCR
or the picture from the TV channel. This button lets you
record a program on the VCR while watching another
channel on the TV. Details are on page 23.
A. Press SELECT VCR to set the remote to control the
VCR.
B. Press TV•VCR to see the picture from the VCR.
The VCR indicator lights in the display panel.
C. Press CHANNEL up or down on the VCR or CHAN
on VCR’s remote to change channels on the VCR.
The channel number changes in the display panel.
D. Press TV•VCR to see the TV channels.
The VCR indicator does not light in the display.
Press the SELECT TV button to set remote to
control the TV and change channels using the TV’s
remote.
E. Return the TV to the VCR viewing channel—CH3
or CH4.
F. Press SELECT VCR, then TV•VCR to switch back to
the picture from the VCR.
MAIN MENU
Press ENTER to SELECT
1 Timer recording list
2 Clock set/adjust
3 Antenna/Cable set
4 Channel memory set
5 VCR function setup
6 StarSight setup
MAIN MENU
Press ENTER to SELECT
1 Timer recording list
2 Clock set/adjust
3 Antenna/Cable set
4 Channel memory set
5 VCR function setup
6 StarSight setup
CHANNEL MEMORY
Press PROG for AUTO SETTING
Press Enter to ADD/DELETE
2
3
4
5
6
7
8
9
11
12
13
14
15
16
17
18
19
20
21
22
23
25
26
27
28
29
30
31
32
33
34
35
36
37
38
39
40
41
42
43
44
45
46
47
48
49
51
52
53
54
55
56
57
58
59
60
61
98
99
Page 13
11
Setting Up the VCR
11. Set up Cable Box, if necessary.
The included cable box adapter is used with a wireless
remote controlled cable box. It allows the remote to
tune to a channel you want to watch or record.
A. Make sure the cable box adapter is hooked up if
you have a wireless remote controlled cable box.
Refer to page 4.
B. Press MENU to bring up MAIN MENU.
C. Press the DOWN ARROW to highlight
“Antenna/cable set,” then press ENTER.
D. Press the RIGHT ARROW to highlight CABLE BOX.
E. Press two numbers on the remote to enter the
output channel of your cable box (valid numbers
are 01-13). Press 0 before a single-digit number.
F. Enter the code for your cable box brand from the
list below.
If the cable box channel changes to channel 09, then
programming is complete.
G. Follow the on-screen directions to complete setup.
Startup
Brand* Code
Anvision.......................................2, 3, 4, 5, 6, 7, 8, 9, 10 ,11
Archer..........................................48, 49, 50
Cablestar......................................2, 3, 4, 5, 6, 7, 8, 9, 10, 11
Cable View..................................49, 50
Citizen..........................................49, 50
Curtis ...........................................30, 31, 32, 33
Diamond ......................................90, 91
Eagle............................................2, 3, 4, 5, 6, 7, 8, 9, 10, 11
Eastern.........................................75
GC Brand.....................................49, 50
Gemini.........................................93,94
General Instrument......................17, 18, 19, 20, 21, 22, 23
Hamlin.........................................84, 85
Hitachi .........................................13, 14, 15
Jerrold..........................................17, 18, 19, 20, 21, 22, 23
Macom.........................................13, 14, 15
Magnavox....................................2, 3, 4, 5, 6, 7, 8, 9, 10, 11
Movietime....................................52, 53, 54
NSC .............................................53, 54
Oak...............................................62, 63, 64, 65, 66
Oak Sigma ...................................66
Panasonic.....................................35, 36, 37, 38
Philips..........................................1, 2, 3, 4, 5, 6, 7, 8, 9, 10, 11
Pioneer.........................................81, 82
Brand* Code
Pulser...........................................49, 50
Randtek........................................2, 3, 4, 5, 6, 7, 8, 9, 10, 11
RCA.............................................35, 36, 37, 38
Regal............................................77, 78, 79
Rembrandt ...................................52
Samsung.......................................40, 41, 42, 43, 45
Scientific Atlanta.........................30, 31, 32, 33
Sheritech......................................73, 74, 75
SL Mark.......................................40, 41, 42, 43
Sprucer.........................................35, 36, 37, 38
Stargate........................................40, 41, 42, 43, 44
Sylvania.......................................88
Teknika........................................97
Telecaption ..................................98
Teleview ......................................40, 41, 42, 43
Texcan .........................................87,88
TOCOM.......................................56, 57, 58, 59, 60
Toshiba ........................................96
Unika ...........................................46, 47, 48, 49, 50
Universal......................................68, 69, 70, 71
Videoway.....................................25, 26, 27, 28
Viewstar.......................................2, 3, 4, 5, 6, 7, 8, 9, 10, 11
Warner Amex ..............................35
Zenith...........................................25, 26, 27,28
Cable Box Codes for VCR
*The remote may not be able to control every cable box model of the brands listed.
MAIN MENU
Press ENTER to SELECT
1 Timer recording list
2 Clock set/adjust
3 Antenna/Cable set
4 Channel memory set
5 VCR function setup
6 StarSight setup
MAIN MENU
Press ENTER to SELECT
1 Timer recording list
2 Clock set/adjust
3 Antenna/Cable set
4 Channel memory set
5 VCR function setup
6 StarSight setup
Type ANTENNA CABLE CABLE BOX
Press ENTER to CONFIRM
Type of connection
the VCR is using
Use to SELECT
ANTENNA/CABLE SET
ANTENNA/CABLE SET
The VCR channel when
recording from the cable box
Use numeric keypad
- -
Cable box OUTPUT CHANNEL
Type ANTENNA CABLE CABLE BOX
ANTENNA/CABLE SET
Check VCR Operating Manual
Use numeric keypad
- -
Type ANTENNA CABLE CABLE BOX
Cable box OUTPUT CHANNEL
3
Cable box BRAND CODE
ANTENNA/CABLE SET
TESTING PROCEDURE
Use to ADJUST CODE
Type ANTENNA CABLE CABLE BOX
Cable box OUTPUT CHANNEL
Cable box BRAND CODE
3
9
4
16
4. If not, try with OTHER codes
Press ENTER to COMPLETE
3. If cable box changed to CH
2. Press PROG and WAIT
1. Tune cable box to CH
CABLE BOX SETUP IS COMPLETE
Use the VCR remote control
to change cable box channels
Always leave cable box power
ON for timer recordings
Page 14

12
Using the Remote Control
Buttons
RECORD
EXIT
VCR
POWER
TV
POWER
VCR
EJECT
MENU
MUTE
SELECT
TV
CHAN
VOL
PROG
GUIDE
INFO
LIST
THEME
ENTER
PLAY
STOP
SLOW
DISP
REW
PAUSE
FWD
+
-
DAY
CLEAR
SHUTTLE
JOG
REPEAT
SKIP
JOG
PAGE
TRACKING
SELECT TV
Turns on a compatible RCA,
ProScan or GE TV, and sets the
remote to control the TV.
Can also be programmed to
control other TV brands.
See page 15.
SELECT VCR
Turns on a compatible RCA,
ProScan, or GE VCR, and sets
remote to control the VCR.
100
Select a cable channel over 99 by
pressing and holding 100 until 1-appears on the screen, then press
the other two numbers.
ARROWS
Move through the menus.
Adjust clock setting and timer
recordings.
AUDIO
Selects an audio mode when
playing back Hi-Fi tapes or
recording SAP or stereo programs.
CAPTION
Turns closed captioning on or off.
CHAN
s/t
(Channel Up or Down)
Selects next higher or lower
channel in the VCR’s channel
memory.
CLEAR
Resets time counter to 0:00:00.
DISP (Display)
Shows VCR operating displays on
the TV screen.
Displays the time counter, time
remaining, speed and tape
histogram. See page 49.
EJECT
Ejects the tape.
ENTER
Saves the on-screen entries and
moves to the next menu screen.
EXIT
Exits the menu system.
FWD (Fast Forward)
Fast forwards the tape when the
VCR is stopped.
Searches the picture in forward
motion during playback.
INDEX
Displays INDEX SEARCH, SCAN
and PLAY, and Go to 0:00:00 and
STOP search menus.
INPUT
Changes the line input on or off.
L1 or L2 appears in the display
panel and LINE1 or LINE2
appears on the TV screen.
Line input refers to the signal
coming from the component
connected to the audio/video
jacks on the back or front of
the VCR.
Component Buttons
Press one of the buttons to set the remote to operate that component.
VCR Function Buttons
Press SELECT VCR to set remote to control the VCR to use the function
buttons.
The remote control that came packed with your VCR controls your VCR and basic functions of a compatible
RCA, ProScan or GE TV. Also, it can be programmed to control other brands of TV, specifically those listed
on page 15. The remote comes with two mode buttons (SELECT TV and SELECT VCR)that let you switch
between the VCR and TV, and you must always press the specific mode button for the component you
want to control.
The remote is designed with some buttons hidden behind a door to make the remote less complicated. You
will note that some of the buttons appear on the door as well as behind the door, especially those that are
used frequently. The first remote illustration shows the door closed and the second shows the door open.
(View with Door Closed)
Page 15

13
Using the Remote Control
VCR Function Buttons
(continued)
TV Function Buttons
Press the SELECT TV button to set remote to control a compatible TV. Some buttons
may not work with the TV.
Buttons
JOG + / – (Frame Advance)
Lets you view one frame with
each press of the button in the
pause mode.
MENU
Displays the MAIN MENU on the
TV screen.
Removes a menu from the screen.
Numbers (0 through 9)
Select a channel up to 99 by
pressing two numbers.
PAUSE
Pauses action for viewing during
playback.
Pauses recording to prevent
recording of unwanted scenes.
PLAY
Plays a tape.
PROG LIST
Lets you program timer
recordings.
RECORD
Starts VCR recording.
REPEAT
Lets you review the last five
seconds during playback or press
0:00:00 to repeat.
REW (Rewind)
Rewinds the tape when the VCR is
stopped.
Searches the picture in reverse
motion during playback.
SHUTTLE
Used with variable speed picture
search during playback.
SKIP
Lets you advance tape 60 or 120
seconds during playback.
SLOW – / +
Used for slow-motion playback.
SP SLP (Tape Speed)
Selects the recording speed
(SP or SLP).
STOP
Stops the normal functions such as
record, playback, rewind, fast
forward, and pause of the VCR.
TRACKING Up and Down
(Use PAGE s/t)
Lets you manually reduce the
streaks that may appear on the
picture during play or pause.
Reduces picture “jitter” during
stop-action playback.
TV•VCR
Switches the picture signal so
that it either comes from the VCR
or the TV channel. See page 10.
VCR POWER
Turns VCR on or off.
100
Select a cable channel over 99 by
pressing and holding 100 until 1--
appears on the screen. Then press
the other two numbers.
ARROWS
Move through the menus.
Adjust clock setting and timer
recordings.
CHAN s/t
(Channel Up or Down)
Selects next higher or lower
channel in the TV’s channel
memory when remote is set to
control the TV.
CLEAR
Removes menus or status displays
from the screen.
DISP (Display)
Shows the status displays on the
screen.
Removes menus or displays from
the screen.
INPUT
Selects the TV line input.
MUTE
Turns the TV sound on or off.
Numbers (0 through 9 )
Select a channel up to 99 by
pressing two numbers.
SLOW – / +
Used with the TV’s menus to
select and adjust features.
TV POWER
Turns a compatible TV on or off
when remote is set to control TV.
Used with SELECT TV button to
turn on a compatible TV, other
than RCA, when the remote is set
to control that TV.
VOL +/–
( Volume Up and Down)
Raises and lowers sound.
Page 16
14
Using the Remote Control
StarSight Function Buttons
This section describes the buttons you will use for the StarSight System. See
the “Subscribing to StarSight Information” on pages 29-30.
CHAN s/t
(Channel Up or Down)
Go to the next or previous
channel.
CLEAR
Cancels the current screen or
Pop-up.
Cancels a timer recording.
DAY–/+
Moves back or ahead 24 hours
from the screen time currently
displayed in StarSight Program
Guides. Hold to repeat.
ENTER
Turns to the highlighted channel;
enters selections in StarSight
Setup.
EXIT
Cancels the current screen or Popup or returns you to currently
tuned channel.
GUIDE
Displays the Grid Guide or
Channel Guide.
INFO
Displays StarSight Information in
Pop-up.
LIST
Displays list of single recordings
and series recordings.
MENU
Accesses RCA on-screen menu
and StarSight Setup menu.
Numbers (0 through 9 )
Select channels and enter number
selections in StarSight Setup.
PAGE s/t (Up or Down)
Displays the previous or next
page. Hold to repeat.
RECORD
Starts recording or schedules a
program for recording.
SELECT VCR
Sets the remote to control your
VCR.
SP•SLP (Tape Speed)
Selects the recording speed for a
StarSight recording.
(SP or SLP).
THEME
Displays the Theme Guide’s
program categories.
TV•VCR
Switches the picture signal so
that it either comes from the VCR
or the TV channel. See page 10.
VCR POWER
Turns VCR on or off.
Buttons
VCR
POWER
TV
POWER
VCR
EJECT
MENU
MUTE
SELECT
TV
INDEX
CAPTION
SP•SLP
TV•VCR
AUDIO
INPUT
1
2
3
4
5
6
7
9
8
0
EXIT
CHAN
VOL
PROG
LIST
THEME
ENTER
100
RECORD
GUIDE
INFO
PLAY
STOP
SLOW
DISP
REW
PAUSE
FWD
+
-
DAY
CLEAR
SHUTTLE
JOG
REPEAT
SKIP
JOG
PAGE
TRACKING
(View with Door Open)
Page 17
15
Using the Remote Control
Controlling a TV
This remote can be programmed to control a compatible TV—other manufacturer‘s brands. To program the
remote, use the TV code that corresponds to your TV brand by following the directions.
Program the remote for a TV
Operate the TV
After you have set up your remote to control your TV, test the buttons to see
which ones operate your TV.
1. Point the remote at the TV and press TV POWER.
2. Use the “TV Function Buttons” as described on page 13.
1. Turn on the TV.
2. Point the VCR remote at the TV.
3. Press and hold the SELECT TV button, then enter the two number buttons
for your TV code. If the TV changes channels when the CHAN up or down
button is pressed, setup is complete.
4. Release the buttons.
5. Repeat steps 2 – 4 with two other buttons if the first ones do not work.
*The remote may not be able to control every TV model of the brands listed.
Helpful Hint: Notice the difference
between the TV and VCR on-screen
displays. This is one way to tell if the
remote is set to control the VCR or the TV.
Brand * Code
Daewoo . . . . . . . . . . . . .19
Emerson . . . . . . . . . . . . .21
GE . . . . . . . . . . . . . . . . . . .01
Goldstar . . . . . . . . . . . . . .06, 08, 18
Hitachi . . . . . . . . . . . . . . .10
JVC . . . . . . . . . . . . . . . . . .11
Magnavox . . . . . . . . . . . .04
Mitsubishi . . . . . . . . . . . .13
Brand * Code
Panasonic . . . . . . . . . . . .12
RCA . . . . . . . . . . . . . . . . .01
Samsung . . . . . . . . . . . . .02, 14, 15
Sanyo . . . . . . . . . . . . . . . .05, 20
Sharp . . . . . . . . . . . . . . . .07, 16, 22
Sony . . . . . . . . . . . . . . . . .03
Toshiba . . . . . . . . . . . . . .09
Zenith . . . . . . . . . . . . . . .17
TV Codes
Page 18
16
Playing a Tape
Operating Instructions
To play a tape
1. Turn on the TV and tune it to channel 3, 4, or TV’s video input to see the
picture from the VCR.
2. Insert a tape in the VCR.
VCR automatically turns on. The cassette-in indicator lights, the VCR
indicator lights, and the clock changes to counter. The tape automatically
begins playback if the safety tab on the cassette has been removed and the
Auto Play feature is turned on.
3. Press PLAY, if necessary.
The VCR automatically tracks (TRACKING display appears) the tape for a
few seconds, then the sound begins. If you need to adjust tracking
manually, use the TRACKING buttons on the remote.
4. Press STOP.
5. Press REW.
The VCR will automatically rewind the tape if it reaches the end of the tape
during playback. While rewinding, you can press VCR POWER and the
VCR will turn off after rewinding.
6. Press EJECT to eject the tape once it is completely rewound.
PLAY
FWD
REW
STOP
PAUSE
POWER
EJECT
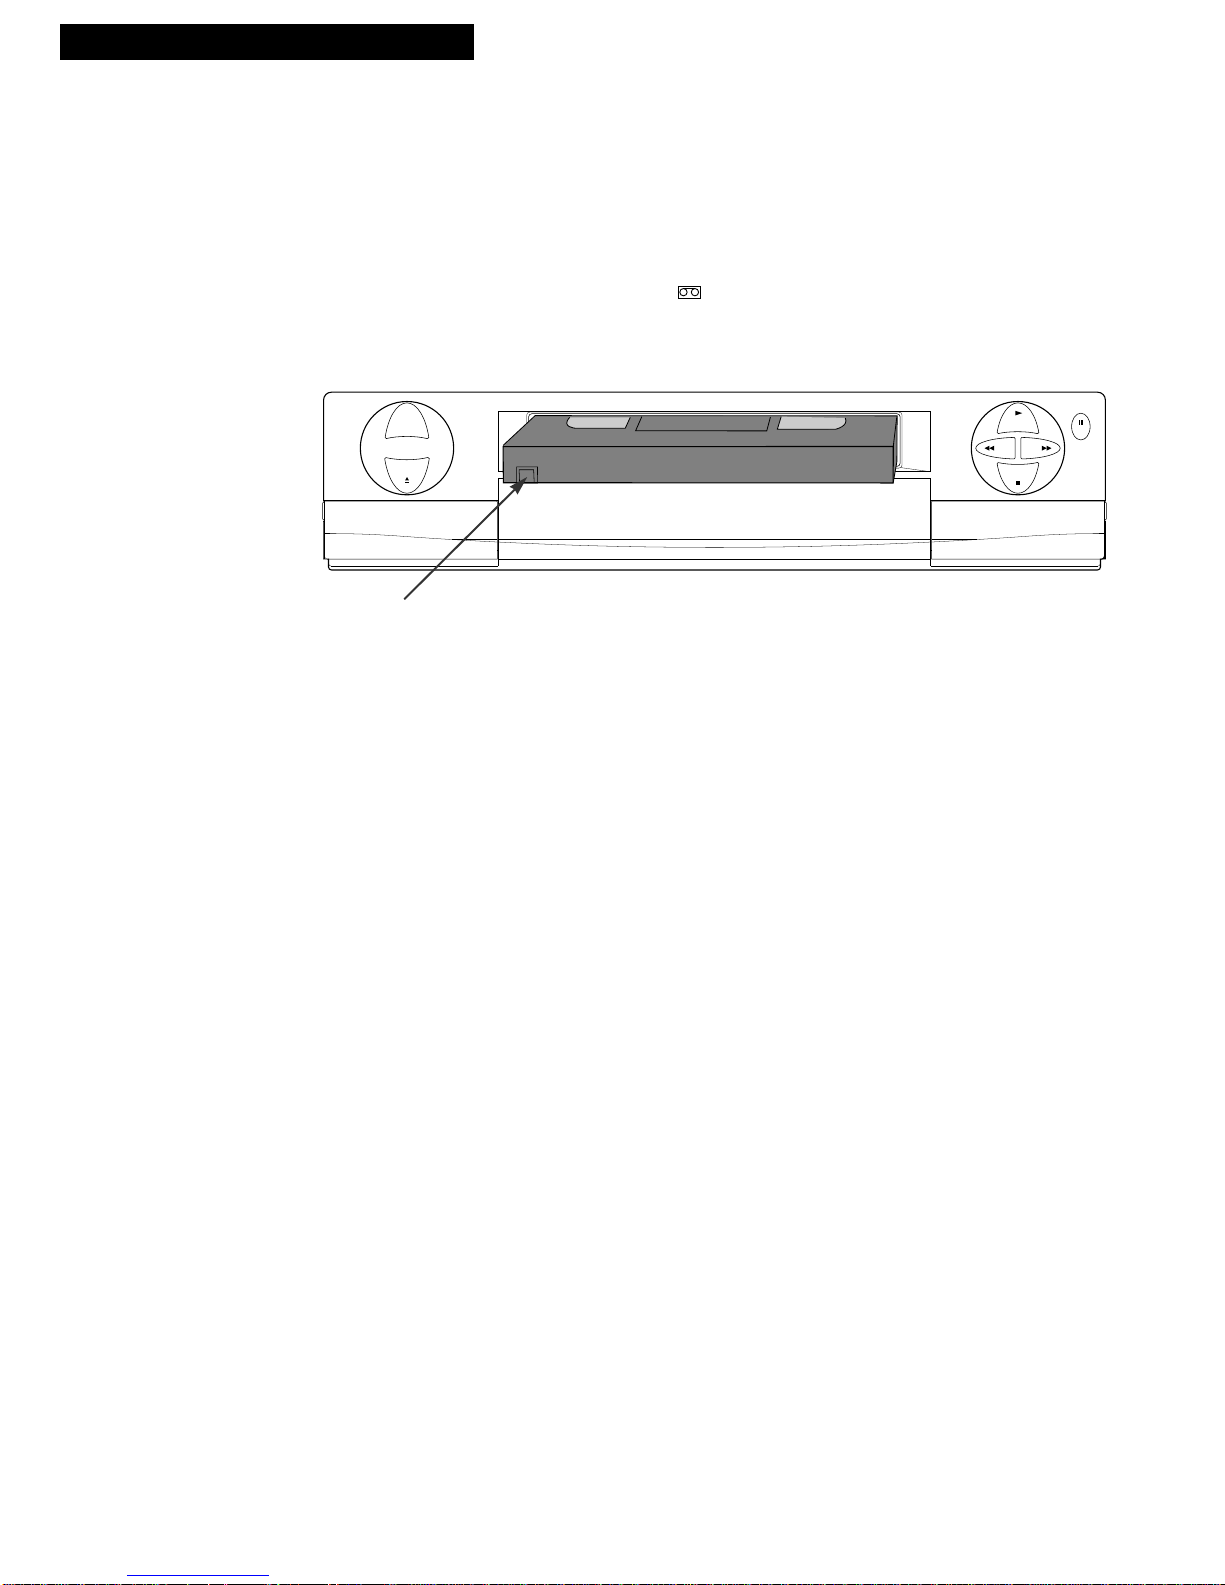
Safety Tab
Page 19

17
Using the Playback Features
Auto Play Feature
This feature allows the VCR to automatically begin playing a tape that is inserted
with the safety tab removed.
1. Press MENU to see the MAIN MENU on the TV
screen.
2. Press the DOWN ARROW to highlight the “VCR
function setup,” then press ENTER.
3. Press the DOWN ARROW to highlight the “Auto
play.”
4. Press the RIGHT or LEFT ARROW to toggle Auto
Play: ON or OFF.
• Select ON to have a tape with the safety tab
removed play automatically.
• Select OFF if you do not want the tape to play
automatically.
Tracking
The VCR automatically adjusts the picture every time a tape is inserted and begins
play. During tracking the sound is delayed for a few seconds. Occasionally, you
may need to manually adjust tracking on a tape recorded on a different VCR or
camcorder. Use the TRACKING buttons on the remote when playing a tape.
Tracking has no effect during recording.
When streaks or snow appear, press TRACKING UP or DOWN for the best possible
picture. Press TRACKING UP or DOWN during stop-action pause to reduce
picture jitter.
Pause for Stop Action
This feature stops the tape in playback or slow motion to allow you to examine the
details of the scene. Stop action works best for tapes recorded in the SP and SLP
speed.
1. Press PAUSE during playback to stop the action.
2. Press TRACKING UP or DOWN to reduce any
jittering of the picture.
3. Press PAUSE or PLAY to return to playback.
The VCR will automatically switch from stop-action
playback to stop after a few minutes.
Slow Motion
You can view the picture in slow motion during play. SLOW – and + allow you to
change the speed. Sound is turned off during slow-motion playback. Slow motion
works best in the SP or SLP speed.
1. Press SLOW + or – to increase or decrease the
speed.
2. Use TRACKING UP or DOWN to remove any
streaks from the picture.
3. Press PLAY to return to playback.
The VCR will automatically switch from slow-
motion playback to stop after a few minutes.
Playing a Tape
MAIN MENU
Press ENTER to SELECT
1 Timer recording list
2 Clock set/adjust
3 Antenna/Cable set
4 Channel memory set
5 VCR function setup
6 StarSight setup
TRACKING
MAIN MENU
Press ENTER to SELECT
1 Timer recording list
2 Clock set/adjust
3 Antenna/Cable set
4 Channel memory set
5 VCR function setup
6 StarSight setup
VCR FUNCTION
Press ENTER to CHANGE
1
2
3
4
Tape length
T120
Tape dubbing mode
Auto play
Segment repeat
- Last 5 seconds
- From counter zero
OFFON
OFF
5s
ON
T160
T180
0
Page 20

18
Picture Search
You can search a picture during playback by fast forwarding or rewinding the tape.
Sound is turned off during picture search. Picture Search works for tapes recorded
in the SP or SLP speed.
Fast Forward Search
1. Press FWD to search forward at a faster-thannormal speed. Press FWD again or PLAY to return
to normal playback
2. Press FWD and hold to advance at a higher rate of
speed. Release the button to return to normal
playback
Rewind Search
1. Use REW instead of FF for the same steps described
in “Fast Forward Search.”
Variable Speed Picture Search and Frame
Advance—Using JOG+/– and SHUTTLE Dial
Not only are the FWD and REW buttons used for picture search during playback,
but you can use the SHUTTLE dial for varying speeds, from a pause/still picture to
forward or reverse picture search. The JOG + and – buttons are used for frame
advance—a single frame at a time during pause/still.
Sound is turned off during picture search and frame advance. Tapes recorded in SP
or SLP speed give the best picture.
Variable Speed Picture Search
Press the SHUTTLE RIGHT ARROW to advance
forward or SHUTTLE LEFT ARROW to reverse
playback from a pause/still picture. Each press
changes the speed. Press PLAY to return to normal
playback.
Frame Advance
Press JOG+/– to advance or reverse the picture frameby-frame for viewing. Each press advances a frame.
Go to 0:00:00 and STOP
The Go-to feature allows you to return to the 0:00:00 spot on the tape. Sometimes
you may want to watch a specific segment of a tape over and over.
1. Begin playing the tape.
2. Press CLEAR to reset the timer counter to 0:00:00
when you find the spot on the tape you want to
return to.
3. Press INDEX when the tape is playing or stopped.
The “Go to 0:00:00 and STOP” display appears.
4. Press RIGHT or LEFT ARROW to search for 0:00:00.
The VCR automatically rewinds or fast forwards to
the 0:00:00 position and stops.
Using the Playback Features
Playing a Tape
INDEX SEARCH --
Select number
SCAN and PLAY
press FF or REW
Go to 0:00:00 and STOP
press or
Go to 0:00:00 and STOP
Page 21

19
Index Search
The VCR has a “VHS Index Search System” that automatically records an index
mark on the tape every time you stop and start a recording. Pause has no effect on
index marks.
During playback, the VCR automatically locates the index number you select. The
VCR searches forward or reverse from the location where you are on the tape.
1. Insert the prerecorded tape and press PLAY.
2. Press INDEX. A display appears.
3. Press two number buttons to enter the number of
index marks you want the VCR to skip.
Press CLEAR to correct an entry.
4. Press FWD to search forward or REW to search in
reverse.
Each time an index mark is skipped, the on-screen
counter is reduced by one. When the number of
marks entered have been skipped, the VCR
begins playing.
5. Press STOP to stop index searching.
Some index marks may be missed by the VCR.
• A mark too close to your location on the tape.
• The mark at the beginning of a recorded segment of five
minutes or less.
• The first index mark on the tape when you start at the
beginning of the tape.
Scan and Play
This Index feature is used when you do not know
exactly where a program is located on the tape.
1. Press INDEX while playing a tape. A display
appears.
2. Press FWD to search forward or REW to search in
reverse.
When an index mark is found, the VCR plays for
about five seconds. You can press PLAY to view
that program. If you do not press PLAY, the VCR
continues to the next index mark and then plays for
five seconds. The VCR repeats this process until it
reaches the end of the tape.
Skip Search
This is useful for scanning commercials or short program segments.
1. Press SKIP once during playback to advance
the tape approximately 30 seconds.
2. Press SKIP twice during playback to advance
the tape approximately 60 seconds.
3. Press PLAY to cancel skipping.
Using the Playback Features
Playing a Tape
INDEX SEARCH --
Select number
SCAN and PLAY
press FF or REW
Go to 0:00:00 and STOP
press or
INDEX SEARCH 03
press FF or REW
INDEX SEARCH --
Select number
SCAN and PLAY
press FF or REW
Go to 0:00:00 and STOP
press or
SCAN and PLAY FF
Page 22

20
Playing a Tape
Using the Playback Features
Tape Length
You must select the correct tape length of the tape you are using for playback (or
record). This is important for the “remaining time” display to be accurate.
1. Press MENU to see the MAIN MENU.
2. Press DOWN ARROW to highlight “VCR function
setup,” then press ENTER.
3. Press RIGHT or LEFT ARROW to select the
tape length.
The tape length is printed on the tape box.
Repeat Function
The VCR allows you to select two types of tape repeat functions during playback:
Last 5 seconds and From Counter zero. When “Last 5 Seconds” is selected, the
VCR reverse searches the last 5 seconds of the tape and then plays it back (also
works in slow motion). When“From Counter zero” is selected, the VCR reverse
searches to time counter 0:00:00 and begins playback again.
1. Press MENU to see the MAIN MENU.
2. Press DOWN ARROW to highlight “VCR function
setup,” then press ENTER.
3. Press DOWN ARROW to highlight
“Segment repeat”.
4. Press the DOWN ARROW to select the
segment type.
5. Press the REPEAT DOWN ARROW to select the
segment type.
Audio Playback (Tapes must be in stereo)
The VCR records the same audio on both the Hi-Fi and linear tracks on the tape.
The Hi-Fi sound is recorded on separate left and right stereo channels, and mono
sound is recorded on the linear track. To enjoy Hi-Fi sound, connect your VCR to
a stereo television or amplifier/receiver using the audio/video jacks. The AUDIO
has no effect for those tapes that are not stereo.
To Select Playback Sound
Press AUDIO to switch among HI-FI, LEFT, RIGHT, or
MONO.
• Select HI-FI to play back stereo sound recorded
on the Hi-Fi track. Hi-Fi indicator lights in the
VCR’s display.
• Select LEFT to play back sound on the linear
track for the left channel only.
• Select RIGHT to play back the sound recorded
on both the linear track and the Hi-Fi track for
the right channel only.
• Select MONO to play back sound recorded on
the linear track, such as a second audio
program (SAP). Hi-Fi indicator turns off in the
VCR’s display.
(((( HI-FI ))))
(((( LEFT ))))
(((( RIGHT ))))
MAIN MENU
Press ENTER to SELECT
1 Timer recording list
2 Clock set/adjust
3 Antenna/Cable set
4 Channel memory set
5 VCR function setup
6 StarSight setup
MAIN MENU
Press ENTER to SELECT
1 Timer recording list
2 Clock set/adjust
3 Antenna/Cable set
4 Channel memory set
5 VCR function setup
6 StarSight setup
VCR FUNCTION
Press ENTER to CHANGE
1
2
3
4
Tape length
T120
Tape dubbing mode
Auto play
Segment repeat
- Last 5 seconds
- From counter zero
OFFON
OFF
5s
ON
T160
T180
0
MAIN MENU
Press ENTER to SELECT
1 Timer recording list
2 Clock set/adjust
3 Antenna/Cable set
4 Channel memory set
5 VCR function setup
6 StarSight setup
MAIN MENU
Press ENTER to SELECT
1 Timer recording list
2 Clock set/adjust
3 Antenna/Cable set
4 Channel memory set
5 VCR function setup
6 StarSight setup
VCR FUNCTION
Press ENTER to CHANGE
1
2
3
4
Tape length
T120
Tape dubbing mode
Auto play
Segment repeat
- Last 5 seconds
- From counter zero
OFFON
OFF
5s
ON
T160
T180
0
(((( MONO ))))
Page 23

21
Playing a Tape
Using the Playback Features
Closed Captioning
In order for Closed Captioning to work, the tape must be caption coded, or the
program being watched must be broadcast in caption.
1. Press CAPTION to switch between CAPTION ON or
OFF.
• The captions may disappear momentarily from
the screen to display other information (such as
tape mode change).
• During several function operations, no captions
will appear.
• Wrong text may appear during adjustment of
the tape.
• Although the recorded condition of the tape or
broadcast signal is good, wrong text may appear
if the caption signal is distorted.
On-Screen Status Displays
Using the DISP (Display) button allows you to see the status of the VCR in playback
or recording mode. The function, such as STOP, RECORD, PLAY, PAUSE, appears
in the upper left corner. The tape histogram graphically represents the amount of
tape that has elapsed from the beginning of the tape. The counter appears in the
lower left corner with the tape speed, and your VCR calculates the amount of play
(or record) time that has elapsed since the counter was last reset.
1. Press DISP during tape playback (or recording).
The display at the right appears
After three seconds, the top portion of the display is
cleared.
2. Press DISP again. The time counter is displayed if
the first display did not time out, or the time
remaining is displayed if the first display timed out.
3. Press DISP again to display the time remaining or
remove the display from the screen.
After three seconds, the top portion of the display is
cleared.
Caption ON
PLAY 6
0:34:25 SP
Function
Channel
Counter
Tape HistogramTape Speed
REM 1:30 SP
0:34:25 SP
Page 24

22
Recording a Program
Recording Features
Recording Speeds
SP and SLP speeds are used when recording a program. The speed you select
appears on the TV screen and in the VCR’s display panel. The VCR automatically
selects the speed for playback. Although this VCR does not record in LP, it can play
LP programs recorded on other VCRs. Special effects such as pause, frame advance,
slow motion, and picture search work well in either speed.
SP (Standard Play) gives the best quality recording.
That is why most prerecorded, rental tapes are
recorded in SP. Fewer programs can be recorded on
the tape.
SLP (Super Long Play) gives three times the recording
time of tapes recorded in SP.
Pause
This feature allows you to prevent recording short passages of unwanted material.
Press PAUSE during recording to stop and start
recording. PAUSE and Dappear in the VCR’s
display panel.
The VCR will automatically switch from pause to stop
after a few minutes.
Recording Options
This section explains the recording features and options, including the following:
Basic Recording
Watching One TV Channel While Recording
Another Channel
Timer Recording
Recording Broadcast Stereo TV or SAP (Second
Audio Program)
Recording Audio Only
Using Two VCRs for Copying Tapes
Recording Time
Cassette SP SLP
T-120 2Hrs 6Hrs
T-160 2Hrs 40Min 8Hrs
T-180 3 Hrs 9Hrs
Page 25

23
Recording a Program
Basic Recording
To Make a Recording
Turn on the TV and tune it to the VCR viewing channel, either 3, 4, or TV’s video
input channel.
1. Insert a tape with safety tab in place.
The cassette-in indicator lights in the VCR’s
display panel.
2. Press SELECT VCR to set remote to control VCR.
3. If using one of the basic hookups, make sure the
VCR indicator appears in the VCR’s display panel.
If not, press TV•VCR to turn it on.
4. Make sure tape speed is correct.
5. Select the channel to be recorded.
The channel number appears in the VCR’s display
panel and on the TV screen.
6. Press RECORD to begin recording.
The
D
appears in the VCR’s display panel while
the VCR is recording.
Watching a TV Channel While VCR is Recording a
Another Channel
While your VCR is recording one channel, you can watch another program.
However, your VCR must be connected to your antenna/cable system. When using
a cable box, use an A/B switch that allows you to watch one channel while
recording another.
1. Follow steps 1 through 6 above.
2. If using one of the basic hookups, press TV•VCR to
switch to the TV channel. The VCR indicator turns
off in the display panel.
3. Press SELECT TV to set the remote to control TV
functions for a compatible TV.
4. Select the channel you want to watch with the TV’s
channel buttons.
Page 26

24
Recording a Program
Recording While You’re Away (Timer Recording)
The timer program features let you program the VCR to record up to eight different
programs within a one-year period. The VCR can be programmed to record a
single, daily (Monday through Friday), or weekly program. Daily and weekly
programs remain in the timer until erased, but a single program is erased after the
program records. Before setting the timer, make sure that:
• The clock is set correctly.
• A tape with safety tab in place has been inserted with enough tape to record
the programs.
• The remote is set to control the VCR — using SELECT VCR.
• If you receive all channels through a cable box select a cable box viewing
channel
on page 11.
Setting a Timer Recording
1. Press PROG LIST on remote to display the TIMER
PROG screen.
2. Press number buttons on the remote to enter the
channel number (or INPUT to select line input),
start time including AM or PM, and end time of the
recording. Just follow the on-screen prompts.
3. Change the record date by by using the arrow
buttons and pressing ENTER.
A default date is automatically selected after the
recording information is entered, but you may
change by following step 3.
Always enter a 0 before a single digit.
Noon is 12:00 PM and midnight is 12:00 AM.
4. Select recording speed using SP•SLP on the
remote.
The tape speed may be changed at any time during
the process of setting the timer recording. When
AUTO is selected, the VCR will use the best tape
speed for the length of the timer recording.
5. Press ENTER to enter the program.
Check the tape for enough time remaining to record
the program. Press the DISP button three times for
time remaining.
6.
Turn off the VCR before recording begins.
TIMER appears briefly and appears in the
VCR’s display panel when the timer has been
programmed.
If using a cable box, leave it turned on and tuned to
the channel you want to record.
TIMER
TIMER PROG 5:02P SAT Nov 7
Enter CHANNEL to record
- -
To correct use
Record tape speed AUTO SP SLP
TIMER PROG 5:02P SAT Nov 7
Enter Enter START TIME
- -
To correct use
06
Record tape speed AUTO SP SLP
TIMER PROG 5:02P SAT Nov 7
Enter END TIME
- -
To correct use
06 8:00P
Record tape speed AUTO SP SLP
7 8:45A 10:00A SAT Jul 2
MON-FRI
Select DATE and press ENTER
SUN MON TUE WED THU FRI SAT
TIMER PROG 5:02P SAT Nov 7
12
19
26
3
10
13
20
27
4
14
21
28
5
15
22
29
6
16
23
30
7
17
24
1
8
11
18
25
2
9
TIMER PROG 5:02P FSAT Nov 7
Press ENTER to COMPLETE
Use to ADJUST
Use to SELECT
4 8:00P 9:30P EVERY THU
Record tape speed AUTO SP SLP
TIMER PROG 5:02P SAT Nov 7
Press ENTER to COMPLETE
Use to ADJUST
Use to SELECT
4 8:00P 9:30P EVERY THU
Record tape speed AUTO SP SLP
Page 27

25
Recording a Program
Recording While You’re Away
Stopping a Timer Recording in Progress
With the VCR: Press POWER.
With the Remote: Press VCR POWER.
Reviewing, Correcting, or Cancelling a Timer Recording
1. Press MENU to display MAIN MENU on TV screen.
2. Press ENTER to display the RECORDINGS list.
3. Select the program you want to review, correct, or
clear with the UP or DOWN ARROW button.
4. Press ENTER to display the program you want to
correct or review. Or, press CLEAR to cancel.
5. Follow the on-screen directions to adjust.
Press the LEFT or RIGHT ARROW button to select
the item to be adjusted and then the UP or DOWN
ARROW to
adjust.
Timer Recording From the VCR’s Line Input
The line input refers to the signal coming from the AUDIO and VIDEO IN jacks of the
VCR. Recording from the line input is convenient if you have a satellite receiver or
similar component attached to these jacks. To timer record from the component
connected to the VCR’s line input:
Press INPUT to enter LINE1 (back jacks) or LINE 2 (front jacks) instead of the
channel number on the TV screen during timer programming.
RECORDINGS
13 MON˜FRI 10:00A˜11:00 AUTO
7 FRI Aug 24 10:00A˜11:00 SLP
107 FRI Aug 24 11:30A˜12:30 AUTO
Press ENTER to REVIEW
Press CLEAR to CANCEL
RECORDINGS
13 MON˜FRI 10:00A˜11:00 AUTO
7 FRI Aug 24 10:00A˜11:00 SLP
107 FRI Aug 24 11:30A˜12:30 AUTO
Press ENTER to REVIEW
Press CLEAR to CANCEL
TIMER PROG 5:02P SAT Nov 7
Press ENTER to COMPLETE
Use to ADJUST
Use to SELECT
107 11:30A 12:30P FRI Nov 24
Record tape speed AUTO SP SLP
RECORDINGS
13 MON˜FRI 10:00A˜11:00 AUTO
7 FRI Nov 24 10:00A˜11:00 SLP
107 FRI Nov 24 11:30A˜12:30 AUTO
Cancel timer recording?
Yes: press CLEAR
NO: press EXIT
Press ENTER to REVIEW
Press CLEAR to CANCEL
Page 28

26
Recording a Program
(((( MAIN ))))
(((( SAP ))))
Recording Broadcast Stereo TV or SAP
(Second Audio Program)
(((( MONO ))))
(((( STEREO ))))
(((( LEFT ))))
(((( RIGHT ))))
(((( MONO ))))
Some TV programs are broadcast with stereo audio and/or a second audio
language (SAP) and your VCR can record stereo or SAP. For SAP programs, the
VCR records the same audio on both the Hi-Fi and linear tracks on the tape. The
STEREO (ST) and/or SAP indicators appear in the VCR display panel
To Record Stereo Broadcast TV or SAP
Turn on the TV and tune it to the VCR viewing channel, either 3, 4, or TV’s video
input.
1. Insert a tape with safety tab in place.
2. If using one of the basic hookups, make sure the
VCR indicator appears in the VCR’s display panel.
If not, press TV•VCR to turn it on.
3. Use SPEED on the remote to select a recording
speed.
4. Select the channel or line input to be recorded.
5. Press the AUDIO button when the SAP indicator
lights on the front panel to set audio to MAIN, SAP
or MONO. When MAIN is selected, stereo is
automatically selected.
• MAIN: Records primary audio on the Hi-Fi
and linear tracks.
• SAP: Records the second audio on the HI-Fi
and linear tracks.
• MONO: Records mono sound on the Hi-Fi
and linear tracks.
OR
Press the AUDIO button when the ST indicator
lights on the front panel (no SAP) to set audio to
STEREO, LEFT, RIGHT, or MONO.
• STEREO: Records primary audio on the Hi-Fi
and linear tracks.
• LEFT: Records only the left channel of the
stereo signal.
• RIGHT: Records only the right channel of the
stereo signal.
• MONO: Records mono on the Hi-Fi and
linear tracks.
Type of Sound Indicators SAP Feature Normal Hi-Fi
Broadcast SAP STEREO Setting Sound L R
MONO OFF OFF ON or OFF MONO MONO MONO
STEREO OFF ON ON or OFF MONO (mixed) STEREO
STEREO & SAP ON ON ON MONO MONO SAP
OFF STEREO
Page 29

27
Recording a Program
Recording Audio Only
You can record audio only from another audio source connected to the AUDIO IN
(L and R) jacks on the back of the VCR.
To Record Audio Only
1. Press INPUT on remote until LINE1 (or LINE2)
appears in the VCR’s display panel, and VIDEO1 (or
VIDEO2) appears on the TV screen.
The VCR will record audio from the audio
equipment connected to the AUDIO IN jacks.
2. Use SP•SLP on the remote to select the recording
speed.
3. Start audio source playing and press RECORD to
begin recording.
The VCR automatically adjusts sound levels as it
records.
4. Press STOP when you are finished.
Page 30

Recording a Program
When editing or copying home videos, use this RCA VCR for the recording VCR
and the other VCR for playback. (Refer to hookup on page 6.)
To copy or edit tapes
1. Turn on the TV and both VCRs.
2. Tune TV to the VCR viewing channel, either 3, 4, or
TV’s line input.
3. If you have connected your VCR using Option A
(page 6), tune recording VCR to channel 3 or 4 —
the one selected on the back of the playback VCR.
If you have connected your VCR using Option B
(page 6), press INPUT on recording VCR to select
the line input. LINE1 appears in VCR’s display
panel.
4. Insert the tape you want to copy into playback
VCR. Insert a blank tape with safety tab in place
into the RCA recording VCR.
5. Press MENU for the Main Menu.
6. Press DOWN ARROW to select “VCR function
Setup” and press ENTER.
7. Press LEFT or RIGHT ARROW until
Tape dubbing
mode is ON, then press ENTER.
8 Press PLAY, then PAUSE on playback VCR when
you reach the point on the tape where you want to
begin copying.
9. Press RECORD, then PAUSE, on recording VCR.
10. Press PAUSE buttons on both VCRs at the same
time to begin copying the tape.
11. Edit out material by pressing PAUSE on the
recording VCR for a smooth edit. Press PAUSE
again to resume copying.
12. Press STOP on both VCRs when you are finished.
To play back the edited tape
1. Press LINE button to return to normal mode.
2. Press MENU for the Main Menu.
3. Press DOWN ARROW to select “VCR function
Setup” and press ENTER.
4. Press LEFT or RIGHT ARROW until Tape dubbing
mode is OFF, then press ENTER.
The picture quality may be poor when playing a
tape after editing if the tape dubbing mode is set
to ON.
Caution: The unauthorized
recording of television
programs and other
materials may infringe the
rights of others.
Using Two VCRs for Copying and Editing Tapes
MAIN MENU
Press ENTER to SELECT
1 Timer recording list
2 Clock set/adjust
3 Antenna/Cable set
4 Channel memory set
5 VCR function setup
6 StarSight setup
MAIN MENU
Press ENTER to SELECT
1 Timer recording list
2 Clock set/adjust
3 Antenna/Cable set
4 Channel memory set
5 VCR function setup
6 StarSight setup
ON
VCR FUNCTION
Press ENTER to CHANGE
1
2
3
4
Tape length
T120
Tape dubbing mode
Auto play
Segment repeat
- Last 5 seconds
- From counter zero
OFF
OFF
5s
ON
T160
T180
0
MAIN MENU
Press ENTER to SELECT
1 Timer recording list
2 Clock set/adjust
3 Antenna/Cable set
4 Channel memory set
5 VCR function setup
6 StarSight setup
MAIN MENU
Press ENTER to SELECT
1 Timer recording list
2 Clock set/adjust
3 Antenna/Cable set
4 Channel memory set
5 VCR function setup
6 StarSight setup
VCR FUNCTION
Press ENTER to CHANGE
1
2
3
4
Tape length
T120
Tape dubbing mode
Auto play
Segment repeat
- Last 5 seconds
- From counter zero
OFFON
OFF
5s
ON
T160
T180
0
28
Page 31

29
StarSight System
StarSight
®
®
is a new way to receive and display TV program information and manage the many channels
you receive. With StarSight, you can now:
• Program your VCR with the touch of a button.
• See an instant description of what’s on any channel.
• Select a program from a list that displays your favorite types of shows by
theme (movies, sports, comedies, etc.).
• Get information about plots, actors, movie ratings, running times.
• Tune from an on-screen guide right to the program you selected.
• Rearrange the order of channels to put your favorite ones first.
Subscribing to StarSight Information
To bring StarSight information into your home you must:
• Make sure your equipment is hooked up according to the instructions in the
“Hooking Up the VCR” section of the manual.
• Fill out the StarSight Checklist on the next page before proceeding further.
• Use your RCA VCR remote control to set up the StarSight system.
• Set up StarSight following the instructions in the StarSight Setup menu.
• Use the StarSight 800 number (1-800-643-STAR) to subscribe.
• Tune the cable box to the PBS channel if using a cable box or if there is no
cable box, tune your VCR to the PBS channel. Refer to the “Reference”
section for the PBS station in your area on pages 43-45.
Your RCA VCR that is equipped with the StarSight system is not designed to
operate with, or control, a satellite dish. For information on StarSight products
specifically designed for satellite systems, see your local satellite dealer.
© 1995 StarSight Telecast, Inc. StarSight®is a registered trademark of StarSight
Telecast. StarSight is a subscription service. VCR required for recording.
STARSIGHT FEATURES LICENSED UNDER U.S. PATENT NUMBERS
4,706,121 AND 5,151,789; USE RIGHTS RESERVED. FOR LICENSING AND
SUBSCRIPTION INFORMATION, CALL 1-800-643-STAR.
STARSIGHT TELECAST IS NOT IN ANY WAY LIABLE FOR THE
ACCURACY OF THE PROGRAM SCHEDULE INFORMATION PROVIDED
BY THE STARSIGHT SYSTEM. IN NO EVENT SHALL STARSIGHT
TELECAST BE LIABLE FOR ANY AMOUNTS REPRESENTING LOSS OF
PROFITS, LOSS OF BUSINESS, OR INDIRECT, SPECIAL, OR
CONSEQUENTIAL DAMAGES IN CONNECTION WITH THE PROVISION
OR USE OF ANY INFORMATION, EQUIPMENT, OR SERVICES RELATING
TO THE STARSIGHT SYSTEM.
Introduction
Please follow the directions
on the following pages, then
call: 1-800-643-STAR.
Page 32

30
StarSight System
Subscribing to StarSight Information
StarSight Checklist
Please fill in the blanks below and keep this checklist close at hand. You will find the information you need
to complete this list in later sections of this manual.
PBS Station
From the PBS Stations listed in the “Reference” section on pages 44-46, find the
PBS station that is closest to your city. If you have a choice of two or more PBS
stations, select the one with the clearest picture. Write the PBS station letters and
channel number below.
PBS Station Letters: _____________________
PBS Station Channel Number: _____________
For Cable Users Only:
Check your cable company’s channel lineup or your local newspaper’s TV
listing to see if the PBS station in your area has a different channel number from
the one you wrote down above. If so, enter your PBS station’s cable channel
number here: ________
(You will tune to this channel number during the setup process.)
Cable Box Code Numbers
From the “Cable Box Code” section on page 46, find the code numbers that apply
to your brand of cable box and enter them below:
Code 1: _____ Code 2: _____ Code 3: _____ Code 4: _____ Code 5: _____
Code 6: _____ Code 7: _____ Code 8: _____ Code 9: _____ Code 10: _____
StarSight Activation Numbers
StarSight displays your personal STAR number and ID number on the TV
screen. When these numbers appear, record them here:
STAR Number: _____________________________
ID Number: _____________________________
Turn to the next page to activate StarSight.
Page 33

31
StarSight System
Activating StarSight
To activate StarSight, go to “StarSight setup” in the MAIN MENU of the VCR and
follow the directions below. Only selected screens from the setup are shown.
1. Press MENU to display the MAIN MENU.
2. Use the
DOWN ARROW button to highlight
“StarSight setup.”
3. Press ENTER.
4. Follow the on-screen instructions.
If you have a cable box, follow the on-screen
instructions to supply information to StarSight
Telecast and test your equipment.
If you listed more than one code for your brand of
cable box, don’t worry; the StarSight system lets
you test each code until the correct one has been
entered.
The VCR searches for schedule information on your
PBS station and displays your STAR number and
ID number. (Please enter these numbers on the
blank lines in the StarSight Checklist on the
previous page.)
Call StarSight Telecast at 1-800-643-STAR.
You will see a congratulations message when
StarSight has been activated.
You should also know...
• The StarSight system works with virtually all current
cable boxes that can be operated by wireless remote
control.
• If no schedule data is found, you may be tuned to the
wrong PBS station. Check the PBS station written on
your StarSight Checklist and try again. Or, try tuning
to a different PBS station that is listed for your area in
the PBS Station’s section later in this guide. (If no
station is listed for your area, call
1-800-628-STAR for further information.)
• Make sure the Cable Box Adapter is positioned
according to the instructions on pages 4 or 5.
• To maintain StarSight program information, always
leave your VCR power cord plugged in and your
cable box turned on, if you have one.
• It normally takes three to five seconds for cable box
channels to change. This is the time it takes for the
Cable Box Adapter’s infrared signal to communicate
with your cable box.
MAIN MENU
Press ENTER to SELECT
1 Timer recording list
2 Clock set/adjust
3 Antenna/Cable set
4 Channel memory set
5 VCR function setup
6 StarSight setup
MAIN MENU
Press ENTER to SELECT
1 Timer recording list
2 Clock set/adjust
3 Antenna/Cable set
4 Channel memory set
5 VCR function setup
6 StarSight setup
To continue, press ENTER.
To return to TV, press EXIT. 03
Which of the following do you
have?
1. Cable with a box
2. Cable without a box
3. No cable
Enter your selection here:
To continue, press ENTER.
To return to TV, press EXIT. 01
Welcome to StarSight Setup.
Just follow our lead through
this step-by-step process...
...and soon you'll be enjoying
the convenience of your own
on-screen program guide.
To continue, press ENTER.
To return to TV, press EXIT. 10
Congratulations! You are now
an authorized subscriber.
Now we need some information
about the equipment you will
use with StarSight.
Then we'll test the equipment
to make sure it responds
properly.
We found schedule information.
Please leave your TV on.
To complete your activation,
jot down these numbers...
STAR# : 1000-0000-0078
ID# : 00000-00000
...and call 1-800-643-STAR.
08
Page 34

32
StarSight System
Activating StarSight
Receiving Program Information
With StarSight activation and equipment setup complete, you will begin to collect StarSight program
information at the scheduled data reception time (preset 2:00 AM to 8:00 AM). Your system will be
automatically updated with the latest program information at your scheduled data reception time or
anytime your VCR is tuned to your PBS station. Initially, it will take between 4 and 12 hours to collect
program information. If you want your VCR to collect program information during a different time period,
please see the “Scheduling Data Reception” on page 42.
S T A R S I G H T
37
MON TUE WED THU FRI SAT SUN
8:00P 8:30P
News1 U.S.Senate
Primenews
Mathnet: Despair in Monter
City Slickers
Bingo
All in a Day's Work
Major League Baseball (L)
Batman
Fresh Prince Blossom
Avonlea
SEP
7
SHOWTIME
CBL
7:30P
26
SHOW
HBO
DISC
ESPN
4
DISN
FAM
CNN
CSP2
SHOW
Page 35

33
StarSight System
Using the StarSight Features
By now, you should have completed the setup process and have activated StarSight.
(If not, please review “Activating StarSight”
on page 31.)
Turn on your TV (don’t forget to tune TV to channel 3 or 4 or line input) and VCR
and press
INFO button to see if the information was collected. You should get a
“Pop-up” of information. Now try some other StarSight buttons, like THEME
or GUIDE.
INFO Button
The INFO button allows you to find out more about what you’re watching on
a Pop-up.
1. Press INFO button.
You will see the program title and time remaining
on the Pop-up for five seconds.
2. Press INFO again.
The Pop-up changes to provide a description about
your program. It remains on the screen for
approximately 30 seconds. Or...
3. Press INFO again to remove the Pop-up.
Grazing
This feature is another method of finding out what’s on when you change channels.
1. Press CHANNEL UP or DOWN to change channels.
The Pop-up for the new program automatically
displays and then disappears in five seconds.
2. Press INFO while the Pop-up is displayed to get
more information on the program
3. Press INFO again to remove the Pop-up.
You should also know...
If you press INFO twice and then change channels, you’ll get
full program descriptions while you’re channel surfing.
Page 36

34
StarSight System
Using the StarSight Features
Browsing
This feature is another method of finding out what’s on without changing the
channels.
1. Press INFO to find out about the program for the
channel you are now watching.
2. Press UP or DOWN ARROW to see what’s on the
other channels.
You will continue to see the presently tuned
channel but will get a Pop-up for a program on a
different channel.
3. Press INFO while the Pop-up is displayed to get
even more information about the program.
4. Press INFO again to remove the Pop-up.
You should also know...
• Pressing ENTER takes you directly to the program for
which you see the Pop-up.
• In order to see information while browsing, you must first
have a Pop-up for the currently tuned program.
Page 37

35
StarSight System
Using the StarSight Features
Grid Guide
Using the Grid Guide, you can see what’s on right now, what’s on for the next seven
days, or what the programs are about.
1. Press GUIDE to see a full listing of all programs.
2. Press UP, DOWN, LEFT or RIGHT ARROW to
move the highlight bar around the Grid Guide.
3. Press INFO any time to get information about the
highlighted show.
4. Press INFO or CLEAR to remove the Pop-up or
press EXIT to resume watching TV.
You should also know...
• Press ENTER to tune to any currently highlighted show.
• Press RECORD at any time to record any highlighted show.
• Press PAGE UP/DOWN to see additional channel listings.
• Press DAY–/+ to see programs on different days for the
same time.
Tuning by Title
1. Press GUIDE to see the Grid Guide.
2. Press UP or DOWN ARROW to highlight a current
program.
3. Press ENTER to switch to that channel.
You should also know...
You can tune by title on the Grid Guide, Channel
Guide or Theme Guide.
Page 38

StarSight System
36
Using the StarSight Features
Channel Guide
Using the Channel Guide, you can see what’s on a single channel.
1. Press GUIDE to see the Grid Guide.
2. Press UP or DOWN ARROW to move the highlight
bar to the channel you want to know about.
3. Press GUIDE to see the Channel Guide for the
channel you highlighted. Then press PAGE DOWN
to see more programs on the same channel.
You should also know...
• Press INFO to learn more about a program.
• Press ENTER to tune to a current program.
• Press RECORD to start or schedule a recording.
• Press CHANNEL UP/DOWN to see the Channel Guide for
other channels.
• Press DAY–/+ to see program listings for other days.
• Press GUIDE to go back and forth between the Channel
Guide and Grid Guide.
• Press EXIT to resume watching TV.
Page 39

37
StarSight System
Using the StarSight Features
Theme Guide
Using the Theme Guide, you can choose programs by a category, such as, sports,
movies, comedies, etc.
1. Press THEME to see the STARSIGHT THEMES
menu.
2. Press UP or DOWN ARROW to highlight a Theme.
3. Press ENTER to see the categories for that Theme.
4. Press UP or DOWN ARROW to highlight a
category.
5. Press ENTER to see the shows for that category.
Press PAGE DOWN to see additional shows for that
category.
You should also know...
• Press INFO to learn more about a program.
• Press ENTER to tune to a current program.
• Press RECORD to start or schedule a recording.
• Press DAY–/+ to see program listings for other days.
• Press GUIDE to go directly to the Grid Guide from any
Theme Guide.
• Press EXIT to resume watching TV.
Page 40

38
StarSight System
Recording
With StarSight, you can record a current program you are watching or schedule a
future recording. After you have scheduled your recordings, you can review them.
Make sure you insert a tape with safety tab in place.
Current Recording
1. Press GUIDE to see the Grid Guide. Note that the
show you’re watching is highlighted.
2. Press RECORD to see a Recording Pop-up. The
yellow highlight bar is on ONCE.
• To change your tape speed, press SP•SLP.
• To extend your recording end time, press RIGHT
ARROW.
3. Press RECORD again to confirm your recording.
StarSight will begin recording in a few seconds.
4. To cancel a recording in progress, press GUIDE to
see the Grid Guide. Position the highlight bar on
the program that is red. Press CLEAR and then
press ENTER to confirm.
You should also know...
• If you simply press RECORD without a StarSight screen
displayed, your VCR will begin recording. Since StarSight
has no way of knowing that a recording is taking place, a
recording conflict may result.
• Your VCR may be turned either on or off to record
with StarSight.
• You can schedule a StarSight recording whenever a
StarSight guide is displayed on the TV.
• You can extend the scheduled stop time of your recording
(for example, a baseball game) by pressing the RIGHT
ARROW button. Each press adds five minutes to the end of
the recording.
• Don’t press any buttons while a StarSight
recording begins.
• For more information on recording, see “Future Recording”
section on the next page.
Using the StarSight Features
Page 41

39
StarSight System
Using the StarSight Features
Future Recording
Make sure you insert a tape with safety tab in place.
1. Press GUIDE to see the Grid Guide.
2. Press UP, DOWN, RIGHT, or LEFT ARROW to
highlight a current or future program.
3. Press RECORD to see a Recording Pop-up for the
selected program.
4. Press UP or DOWN ARROW to select ONCE,
DAILY, or WEEKLY. See “You should also know...”
below.
5. Press RECORD again to confirm your recording.
6. To cancel a selected recording, highlight the
program in the Grid Guide (it is shown in red),
press CLEAR and then press ENTER to confirm.
You should also know...
• Selecting ONCE records only the selected program.
• Selecting DAILY records a program every day (M-F).
• Selecting WEEKLY records a program once every week.
• You can adjust the tape speed by pressing the SP•SLP
button. If you select the AUTO option, the highest quality
tape speed possible will be automatically set, based on the
amount of tape remaining.
• If a StarSight recording and an RCA VCR recording are
scheduled for the same time, only the StarSight recording
will occur.
• For more information on recording, see the “Current
Recording” section on the previous page.
Recordings List
StarSight keeps track of up to 25 scheduled recordings.
1. Press LIST to review your scheduled recordings.
Page 42

RECORDINGS
37
MON 6:30A Getting Fi :30
MON 8:30A Sesame Str 1:00
MON 8:00P Scott and 2:00
SHOWTIME
CBL
6:00P
ESPN
SHOW
SHOW
26
Scott and Molly
MON 8:00P 2 hours
A middle-aged couple discovers
new sides to their relationship
over a long, holiday weekend.
Todd Blake, Kim Jones.
*** (1995,PG) Movies: Comedy.
StarSight System
Using the StarSight Features
2. Press UP or DOWN ARROW to highlight a
recording.
3. Press INFO to see information about the program.
4. Press EXIT to resume watching TV.
You should also know...
• Press CLEAR, then ENTER to cancel a recording.
• To delete an entire series, go to “Series Recordings List.”
(See “You should also know...” in the next section.)
• If you see a question mark symbol on a scheduled
recording, it indicates you are asking StarSight to record
a program that is not available. To locate the conflict,
place the highlight bar on that program and press
GUIDE.
• The right hand column on the display screen normally
shows the duration of each program. Press the SP•SLP
button to change the right hand column to display the
tape speed that has been set for that program.
Series Recordings List
StarSight keeps track of five daily or weekly series
recordings.
1. Press LIST to review your scheduled recordings.
2. Press LIST again to see your “Series Recordings.”
3. Press EXIT to resume watching TV.
You should also know...
• To cancel a Series Recording, simply highlight the series
and press CLEAR, then ENTER. This also automatically
cancels all individual recordings within that series.
40
Page 43

41
StarSight System
Using the StarSight Features
Selecting and De-selecting Channels
StarSight allows you to remove channels that you rarely or never watch. When a
channel is removed, it will no longer appear in StarSight Guides, nor will it appear
when you flip through channels. To increase the amount of information for
individual programs, you should delete channels that you seldom or never watch.
1. Press MENU. Use UP or DOWN ARROW to
highlight “StarSight setup” and press ENTER.
“Select Guide Channels” will be highlighted.
2. Press ENTER to display your channel lineup.
3. Press UP, DOWN, LEFT, or RIGHT ARROW to
highlight the channel you want to remove and
press ENTER.
The background color changes to gray, indicating
that the channel is de-selected. If you want to add
the channel back at a later time, you must wait for
the scheduled data reception time to collect
program information for that channel.
If you change your mind, just highlight the channel
again and press ENTER. The background returns
to its original color, and the channel is selected.
4. Press EXIT to resume watching TV.
Changing the Channel Order
You can list your channels on the Grid Guide in any order you want. Your channels
will also be in this order as you change channels.
1. Press MENU. Use UP or DOWN ARROW to
highlight “StarSight setup” and press ENTER.
2. Press DOWN ARROW to highlight “Change
Channel Order,” and press ENTER to display your
list of channels.
3. Press UP, DOWN, LEFT, or RIGHT ARROW to
highlight the channel you want to move and press
ENTER (channel moves slightly to the left.)
4. Press UP, DOWN, LEFT, or RIGHT ARROW to
move the highlighted channel to the new location
and press ENTER to insert the channel into its new
position.
5. Press EXIT to resume watching TV.
You should also know...
• To reset your channels to the original order, use the UP
ARROW to highlight the RESET box at the top of the
Change Channel Order screen and press ENTER.
• To maximize show descriptions, place your most frequently
watched channels at the beginning of your list.
Page 44

42
Using the StarSight Features
Scheduling Data Reception
You can select the time period when StarSight will turn to your PBS station to collect
data. (It is a good idea to select a time period when you are seldom watching TV.
Please be sure that your local PBS station is broadcasting during that time.)
1. Press MENU. Use UP or DOWN ARROW to
highlight “StarSight setup” and press ENTER.
2. Press DOWN ARROW to highlight “Schedule Data
Reception,” and press ENTER to display your list of
choices.
3. Press UP or DOWN ARROW to move the highlight
bar on the time period you have chosen and press
ENTER to select.
4. Press EXIT to resume watching TV.
What You Should Do when You Move
1. Press MENU. Use UP or DOWN ARROW to
highlight “StarSight setup” and press ENTER.
2. Press DOWN ARROW to highlight “Re-Activate
/Change Address” and press ENTER.
3. Follow the on-screen instructions.
StarSight System
Page 45

43
StarSight System
Using the StarSight Features
Changing Your Cable Box
If you have changed your cable box, make sure your Cable Box Adapter is
positioned properly in front of the new cable box. Look on page for the Cable Box
Codes for your new cable box. Write the codes here.
_____ _____ _____ _____ _____
_____ _____ _____ _____ _____
1. Press MENU. Use UP or DOWN ARROW to
highlight “StarSight setup” and press ENTER.
2. Press DOWN ARROW to highlight “Change Cable
Box/Service,” and press ENTER.
3. Follow the on-screen instructions.
For the StarSight Help Desk, call 1-800-628-STAR.
Page 46

44
Choose the station closest to you. It may be in a bordering state.
References
PBS Stations
City Station Channel
ALABAMA
Anniston WCIQ 7
Birmingham WBIQ 10
Decatur WHIQ 25
Dothan WGIQ 43
Huntsville WHIQ 25
Mobile WEIQ 42
WRSE 23
Montgomery WAIQ 26
ALASKA
Anchorage KAKM` 7
Fairbanks KUAC 9
ARIZONA
Phoenix KAET 8
Tucson KUAT 6
ARKANSAS
Little Rock KETS 2
Pine Bluff KETS 2
CALIFORNIA
Eureka KEET 13
Fresno KVPT 18
Los Angeles KCET 28
Monterey KTEH 54
Redding KIXE 9
Sacramento KVIE 6
Salinas KTEH 54
San Diego KPBS 15
San Francisco KQED 9
San Jose KQED 9
Santa Barbara KCET 28
Stockton KVIE 6
Visalia KVPT 18
COLORADO
Colorado Springs KTSC 8
Denver KRMA 6
Pueblo KTSC 8
CONNECTICUT
Bridgeport WEDW 49
Hartford WEDH 24
New Haven WEDY 65
WEDH 24
Norwich WEDN 53
DELAWARE
Seaford WDPB 64
Wilmington WHYY 12
DIST OF COLUMBIA
Washington, D.C. WETA 26
FLORIDA
Daytona Beach WMFE 24
Ft. Lauderdale WPBT 2
Ft. Myers WSFP 30
Gainesville WUFT 5
Jacksonville WJCT 7
Miami WPBT 2
Naples WSFP 30
Orlando WMFE 24
City Station Channel
Panama City WFSG 56
Pensacola WSRE 23
St. Petersburg WEDU 3
Tallahassee WFSU 11
Tampa WEDU 3
Thomasville WFSU 11
West Palm Beach WXEL 42
GEORGIA
Albany WABW 14
Atlanta WGTV 8
Augusta WCES 20
Chatsworth WCLP 18
Columbus WJSP 28
Dawson WACS 25
Macon WDCO 15
Savannah WVAN 9
Waycross WXGA 8
HAWAII
Honolulu KHET 11
Waikiki KMEB 10
IDAHO
Boise KAID 4
Idaho Falls KISU 10
Twin Falls KITT 13
ILLINOIS
Carbondale WSIU 8
Champaign WILL 12
Chicago WTTW 11
Moline WQPT 24
Peoria WTVP 47
Quincy WQEC 27
Rock Island WQPT 24
Springfield WILL 12
INDIANA
Elkhart WNIT 34
Evansville WNIN 9
Fort Wayne WFWA 39
Indianapolis WFYI 20
Lafayette WFYI 20
South Bend WNIT 34
Vincennes WVUT 22
IOWA
Ames KDIN 11
Cedar Rapids KIIN 12
Council Bluffs KBIN 32
Davenport KQCT 36
Des Moines KDIN 11
Fort Dodge KTIN 21
Iowa City KIIN 12
Mason City KYIN 24
Red Oak KHIN 36
Sioux City KSIN 27
Waterloo KRIN 32
KIIN 12
KANSAS
Lakin KSWK 3
City Station Channel
Pittsburg KOZJ 26
Topeka KTWU 11
KENTUCKY
Bowling Green WKYU 24
Cape Girardeau WSIU 8
Lexington WKLE 46
Louisville WKPC 15
Paducah WSIU 8
Tri-Cities WSBN 47
LOUISIANA
Alexandria KLPA 25
Baton Rouge WLPB 27
EL Dorado KLTM 13
Lafayette KLPB 24
Lake Charles KLTL 18
Monroe KLTM 13
New Orleans WYES 12
Shreveport KLTS 24
MAINE
Bangor WMEB 12
Calais WMED 13
Lewiston WCBB 10
Presque Isle WMEM 10
MARYLAND
Annapolis WMPT 22
Baltimore WMPB 67
Frederick WFPT 62
Hagerstown WWPB 31
Oakland WGPT 36
Salisbury WCPB 28
MASSACHUSETTS
Boston WGBH 2
Holyoke WGBY 57
Springfield WGBY 57
MICHIGAN
Alpena WCML 6
Bad Axe WUCX 35
Bay City WUCM 19
Detroit WTVS 56
Flint WFUM 28
Grand Rapids WGVU 35
Kalamazoo WGVK 52
WGVU 35
Lansing WKAR 23
Marquette WNMU 13
Mount Pleasant WCMU 14
Saginaw WFUM 28
Traverse City WCMW 21
MINNESOTA
Austin KYIN 24
Duluth WDSE 8
La Crescent WHLA 31
Mason City KYIN 24
Minneapolis-St. Paul KTCI 17
Superior WDSE 8
Page 47

45
References
PBS Stations
City Station Channel
MISSISSIPPI
Biloxi WMAH 19
Bude WMAU 17
Columbus WMAB 2
Greenville WMAO 23
Greenwood WMAO 23
Gulfport WMAH 19
Jackson WMPN 29
Meridian WMAW 14
Oxford WMAV 18
MISSOURI
Hannibal WQEC 27
Joplin KOZJ 26
Kansas City KCPT 19
Pittsburg KOZJ 26
Springfield KOZK 21
St. Louis KETC 9
MONTANA
Bozeman KUSM 9
Butte KUSM 9
NEBRASKA
Bassett KMNE 7
Hastings KHNE 29
KUON 12
Lexington KLNE 3
Lincoln KUON 12
Merriman KRNE 12
Norfolk KXNE 19
North Platte KPNE 9
Omaha KYNE 26
Scottsbluff KTNE 13
NEVADA
Las Vegas KLVX 10
Reno KNPB 5
NEW HAMPSHIRE
Durham WENH 11
Keene WEKW 52
Littleton WLED 49
NEW JERSEY
N. New Jersey WNET 13
S. New Jersey WHYY 12
NEW MEXICO
Albuquerque KNME 5
Santa Fe KNME 5
NEW YORK
Albany WMHT 17
Binghamton WSKG 46
Buffalo WNED 17
New York WNET 13
Norwood WNPI 18
Plattsburgh WCFE 57
Rochester WXXI 21
Schenectady WMHT 17
Syracuse WCNY 24
Watertown WNPE 16
NORTH CAROLINA
Asheville WUNF 33
City Station Channel
Charlotte WUNG 58
Columbia WUND 2
Greensboro WUNL 26
Greenville WUNK 25
Jacksonville WUNM 19
Linville WUNE 17
Raleigh-Durham WUNC 4
Roanoke Rapids WUNP 36
Wilmington WUNJ 39
NORTH DAKOTA
Bismarck KBME 3
Drakinson KDSE 9
Ellendale KJRE 19
Fargo KFME 13
Grand Forks KGFE 2
Minot KSRE 6
Williston KWSE 4
OHIO
Akron WEAO 49
WVIZ 25
Athens WOUB 20
Cleveland WVIZ 25
Cincinnati WCET 48
Columbus WOSU 34
Dayton WPTD 16
Lima WBGU 27
Portsmouth WPBO 42
Steubenville WOUC 44
Toledo WGTE 30
Youngstown WNEO 45
OKLAHOMA
Cheyenne KWET 12
Eufaula KOET 3
Oklahoma City KETA 13
Tulsa KOED 11
OREGON
Bend KOAB 3
Corvallis KOAC 7
Eugene KEPB 28
Klamath Falls KFTS 22
Medford KSYS 8
Portland KOPB 10
PENNSYLVANIA
Altoona WPSX 3
Erie WQLN 54
Harrisburg WITF 33
Johnstown WPSX 3
Lancaster WITF 33
Philadelphia WHYY 12
Pittsburgh WQED 13
Scranton WVIA 44
Wilkes-Barre WVIA 44
RHODE ISLAND
New Bedford WSBE 36
Providence WSBE 36
SOUTH CAROLINA
Allendale WEBA 14
City Station Channel
Beaufort WJWJ 16
Charleston WITV 7
Columbia WRLK 35
Conway WHMC 23
Florence WJPM 33
Greenville WNTV 29
Greenwood WNEH 38
Huntington WPBY 33
Rock Hill WNSC 30
Spartanburg WRET 49
Sumter WRJA 27
SOUTH DAKOTA
Aberdeen KDSD 16
Brookings KESD 8
Eagle Butte KPSD 13
Lowry KQSD 11
Martin KZSD 8
Pierre KTSD 10
Rapid City KBHE 9
Vermillion KUSD 2
TENNESSEE
Chattanooga WTCI 45
Jackson WLJT 11
Johnson City WSJK 2
Knoxville WKOP 15
Memphis WKNO 10
Nashville WDCN 8
Sneedville WSJK 2
TEXAS
Amarillo KACV 2
Austin KLRU 18
Corpus Christi KEDT 16
Dallas KERA 13
El Paso KCOS 13
Ft. Worth KERA 13
Harlingen KMBH 60
Houston KUHT 8
Lubbock KTXT 5
Odsessa Midland MOCV 36
San Antonio KLRN 9
Temple KNCT 46
Waco KNCT 46
UTAH
Salt Lake City KUED 7
VERMONT
Burlington WCFE 57
VIRGINIA
Arlington WETA 26
Charlottesville WHTJ 41
Harrisonburg WVPT 51
Lynchburg WBRA 15
Norfolk WHRO 15
Norton WSBN 47
Petersburg WCVE 23
Portsmouth WHRO 15
Richmond WCVE 23
Roanoke WBRA 15
Page 48

46
References
PBS Stations
CABLE BOX CODES
ABC . . . . . . . . . . . . . . . . . . . . . . . . .001, 011, 003, 017, 007, 013
014, 047, 206
Antronix . . . . . . . . . . . . . . . . . . . . .207
Archer . . . . . . . . . . . . . . . . . . . . . . .022, 039, 153, 207
BBT . . . . . . . . . . . . . . . . . . . . . . . . . .267
Cable Star . . . . . . . . . . . . . . . . . . . .056
Cabletenna . . . . . . . . . . . . . . . . . . .022
Century . . . . . . . . . . . . . . . . . . . . . .153
Citizen . . . . . . . . . . . . . . . . . . . . . . .153
Colour Voice . . . . . . . . . . . . . . . . . .025, 031
Comband . . . . . . . . . . . . . . . . . . . . .232, 233
Comtronics . . . . . . . . . . . . . . . . . . .060, 040
Diamond . . . . . . . . . . . . . . . . . . . . .035
Eastern . . . . . . . . . . . . . . . . . . . . . . .002, 274
Electricord . . . . . . . . . . . . . . . . . . . .078
Garrard . . . . . . . . . . . . . . . . . . . . . .153
GC Electronics . . . . . . . . . . . . . . . .016, 056
Gemini . . . . . . . . . . . . . . . . . . . . . . .057, 070, 015, 242
General Electric . . . . . . . . . . . . . . .232, 233
General Instrument . . . . . . . . . . . .011
Hamlin . . . . . . . . . . . . . . . . . . . . . . .259, 273, 020, 009, 034
Hitachi . . . . . . . . . . . . . . . . . . . . . . .011, 154
Jasco . . . . . . . . . . . . . . . . . . . . . . . . .153
Jerrold . . . . . . . . . . . . . . . . . . . . . . .014, 011, 012, 003, 015, 024
026, 047, 098
Macom . . . . . . . . . . . . . . . . . . . . . . .033
Magnavox . . . . . . . . . . . . . . . . . . . .027, 032, 069
Memorex . . . . . . . . . . . . . . . . . . . . .000
Movie Time . . . . . . . . . . . . . . . . . . .078, 156, 203
Northcoast . . . . . . . . . . . . . . . . . . .314
NSC . . . . . . . . . . . . . . . . . . . . . . . . .063, 203, 070, 156
Oak . . . . . . . . . . . . . . . . . . . . . . . . . .007, 019, 248
Panasonic . . . . . . . . . . . . . . . . . . . .021, 107
Paragon . . . . . . . . . . . . . . . . . . . . . .000
Philips . . . . . . . . . . . . . . . . . . . . . . .060, 030, 025, 027, 028, 029
031, 290
Philips ECG . . . . . . . . . . . . . . . . . .242
Pioneer . . . . . . . . . . . . . . . . . . . . . . .144, 023, 260
Popular Mechanics . . . . . . . . . . . .400
CABLE BOX CODES
Pulsar . . . . . . . . . . . . . . . . . . . . . . . .000
PVP Stereo Visual Matrix . . . . . . .003
RCA . . . . . . . . . . . . . . . . . . . . . . . . .021
Realistic . . . . . . . . . . . . . . . . . . . . . .207
Regal . . . . . . . . . . . . . . . . . . . . . . . .279, 259, 020, 273
Regency . . . . . . . . . . . . . . . . . . . . . .002, 003
Rembrandt . . . . . . . . . . . . . . . . . . .070
RK . . . . . . . . . . . . . . . . . . . . . . . . . . .304, 306
Runco . . . . . . . . . . . . . . . . . . . . . . . .000
Samsung . . . . . . . . . . . . . . . . . . . . .040, 144
Scientific Atlanta . . . . . . . . . . . . . .008, 017, 006, 277
Signal . . . . . . . . . . . . . . . . . . . . . . . .015, 040
Signature . . . . . . . . . . . . . . . . . . . . .011
SL Marx . . . . . . . . . . . . . . . . . . . . . .040
Spectrovision . . . . . . . . . . . . . . . . .058
Sprucer . . . . . . . . . . . . . . . . . . . . . .021, 307
Standard Components . . . . . . . . .096, 155
Starcom . . . . . . . . . . . . . . . . . . . . . .015, 003, 047, 098
Stargate . . . . . . . . . . . . . . . . . . . . . .040, 015
STS . . . . . . . . . . . . . . . . . . . . . . . . . .156
Sylvania . . . . . . . . . . . . . . . . . . . . . .001
Tandy . . . . . . . . . . . . . . . . . . . . . . . .258
Tatung . . . . . . . . . . . . . . . . . . . . . . .097
Teknika . . . . . . . . . . . . . . . . . . . . . .146
Telecaption . . . . . . . . . . . . . . . . . . .221
Texscan . . . . . . . . . . . . . . . . . . . . . .001, 096
TFC . . . . . . . . . . . . . . . . . . . . . . . . . .310
Tocom . . . . . . . . . . . . . . . . . . . . . . .013, 012, 059
Toshiba . . . . . . . . . . . . . . . . . . . . . .000
TV86 . . . . . . . . . . . . . . . . . . . . . . . . .063
Uniden . . . . . . . . . . . . . . . . . . . . . . .225
Unika . . . . . . . . . . . . . . . . . . . . . . . .207, 153, 022
United Artists . . . . . . . . . . . . . . . . .007
United Cable . . . . . . . . . . . . . . . . . .003
Universal . . . . . . . . . . . . . . . . . . . . .077, 078, 191, 022, 039, 056
153, 207
Video Way . . . . . . . . . . . . . . . . . . .250
Viewstar . . . . . . . . . . . . . . . . . . . . .027, 060, 063, 111, 211, 258, 289
Zenith . . . . . . . . . . . . . . . . . . . . . . .000, 054
Cable Box Codes for StarSight System
City Station Channel
WASHINGTON
Seattle KCTS 9
Spokane KSPS 7
Tacoma KCTS 9
Yakima KYVE 47
WEST VIRGINIA
Beckley WSWP 9
Bluefield WSWP 9
Charleston WPBY 33
Clarksburg WNPB 24
City Station Channel
Huntington WPBY 33
Parkersburg WOUB 20
Weston WNPB 24
Wheeling WOUC 44
WISCONSON
Appleton WPNE 38
Eau Claire WHLA 31
Green Bay WPNE 38
La Crosse WHLA 31
City Station Channel
Madison WHA 21
Menomonie WHWC 28
Milwaukee WMVS 10
Park Falls WLEF 36
Rhinelander WHRM 20
Wausau WHRM 20
WYOMING
Cheyenne KTNE 13
Evanston KUED 7
Page 49

47
References
Format: VHS
Record/Playback Video: 4-Head
System: Audio: 2 Hi-Fi record/playback system
Video Signal System: EIA standard: NTSC color
Antenna: 75-ohm external VHF/UHF combined
antenna terminal
Tuner: USA: 181 channels capability*
(125 cable channels)
Canada: 178 channels capability*
(122 cable channels)
Type: Autoprogramming frequency synthesis
Power Requirement: 120V AC, 60 Hz
Power Consumption: 19 watts
Dimensions: 3.6 inches high
(91.5 mm)
15.4 inches wide
(390 mm)
12.5 inches deep
(318.5 mm)
Weight: 8.8 pounds
(4 kg)
Storage Temperature
Range: - 22˚F to +149˚F
Operating
Temperature Range: +41˚F to +104˚F
*Check your cable company‘s compatibility requirements.
Cleaning the VCR
Use a soft cloth or dusting attachment of your vacuum cleaner to dust your
VCR. Remove dust from the ventilation holes on the top, back, sides, and
bottom of the cabinet.
Plastic surfaces are easily scratched and can be marred by alcohol and various
solvents. Avoid excessive use of oil-based furniture polishes since the materials
used in the cabinet will accumulate more dust. We recommend using a nonabrasive, anti-static cleaner and polisher.
Specifications
Page 50

48
References
Location of Controls
Front Panel
PLAY
FWD
REW
STOP
PAUSE
POWER
EJECT
VIDEO IN
L • AUDIO IN • R
CHANNEL
TV•VCR
INPUT
RECORD
demo
Remote Sensor
Tape Compartment
Reset
AUDIO L (Left) and
R (Right) IN Jacks
Receive audio signals from another component,
like a VCR or camcorder, when it is connected to
these jacks.
Use the
L•AUDIO IN jack when a component is not
stereo to hear sound on both channels.
CHANNEL
s/t Up or Down
Selects next higher or lower channel in the VCR’s
channel memory.
demo
Used to demonstrate StarSight displays if you are
an authorized subscriber.
EJECT
Ejects a tape.
FWD (Fast Forward)
Fast forwards the tape when the VCR is stopped.
Searches the picture forward during playback.
INPUT
Turns the line input (LINE1- Back Jacks, LINE2 -
Front Jacks) on or off.
Line input refers to the signal coming from the
component connected to the audio/video in jacks
on the back (LINE1) or front of the VCR (LINE2).
PAUSE
Pauses action for viewing during playback.
Pauses recording to prevent recording of
unwanted scenes.
PLAY
Plays a tape.
POWER
Turns the VCR on or off and stops tape during
playback or recording
RECORD
Starts VCR recording.
Remote Sensor
Receives signals from the remote control. Aim the
remote at this sensor with no objects between it
and the VCR.
RESET
Erases all memory functions (timer recording,
channels setting, clock set) if you are a StarSight
authorized user.
REW (Rewind)
Rewinds the tape when the VCR is stopped.
Searches the picture in reverse during playback.
STOP
Stops the normal functions such as record,
playback, rewind, fast-forward, or pause.
TV•VCR
Switches the picture signal so that it either comes
from the VCR or the TV channel.
See page 10.
VIDEO IN Jack
Receives video signals from another component,
like a VCR or camcorder when it is connected to
this jack.
Page 51

49
References
Location of Controls
Display Panel
AM/PM Indicator
Shows clock time as AM or PM.
Audio Level Indicator
Shows audio levels.
Cassette-in Indicator
( )
Lights when a tape is in the VCR.
Channel Number or LINE
Displays channel number or line input.
Press INPUT to display L1 or L2 to record from the
VIDEO and AUDIO IN jacks.
HI-FI Indicator
Lights when HI-FI is selected.
SAP Indicator
Lights when the station you are tuned to is
broadcasting SAP.
Status Indicators
Show what the VCR is doing.
FF Rotates clockwise at
fast speed
PAUSE
Blinks
PLAY Rotates clockwise
RECORD
Rotates clockwise/
D
RECORD Pause
/
D
Blinks
REW
Rotates counter
clockwise at fast speed
SLOW
Blinks and rotates
clockwise at slow speed
STOP
ST (STEREO) Indicator
Lights when the station you are tuned to is
broadcasting stereo.
Tape Histogram Indicator
Shows the amount of tape used during recording or
playback.
Tape Speed Indicators (SP or SLP)
Show the tape speed.
Time or Time Counter
Press DISP to switch between the current time and
elapsed-time counter.
VCR Indicator (Applies Only to Basic Hookups)
Press TV•VCR to turn on or off.
VCR indicator on: Picture from VCR.
VCR indicator off: Picture from TV channel.
Cassette
Indicator
Tape Histogram Channel Number / Line Indicator
Time / Counter Indicator
Audio Level
Indicators
Page 52

50
References
Location of Controls
Back Panel
OUT TO TV
IN FROM ANT.
CH
3 564
AUDIO
VIDEO
IN 1
OUT 1
R
L
CABLE BOX
OUT TO
CH 3
55 66
4 Switch
Selects the channel to which you will tune the TV
to see the VCR picture if you connect the VCR
using one of the basic hookups.
IN FROM ANT. (Antenna) Connector
Receives the signal from an antenna or cable
system that is attached to this connector.
OUT TO TV Connector
Passes signal to TV using the cable supplied.
OUT TO CABLE BOX Connector
Sends infrared remote signal to the cable box
through the cable box adapter (supplied) for those
cable boxes that are remote controlled.
VIDEO and AUDIO R (Right) and L (Left) IN Jacks
Receive signals from another component, like a
VCR or camcorder, when it is connected to these
jacks. Use INPUT to select.
VIDEO and AUDIO R (Right) and L (Left) OUT
Jacks
Send signals from this VCR to another component,
like a TV monitor or VCR, when it is connected to
these jacks.
Page 53

51
References
Limited Warranty
What your warranty covers:
• Any defect in material or workmanship.
For how long after your purchase:
• Ninety days for labor charges.
• One year for parts.
The warranty period for rental units begins with the first rental.
What we will do:
• Pay any Authorized RCA VCR Servicenter the labor charges to repair your
VCR.
• Pay any Authorized RCA VCR Servicenter for the new or, at our option,
refurbished replacement parts required to repair your VCR.
How you get service:
• Take your VCR to any Authorized RCA VCR Servicenter. To identify your
nearest Authorized RCA VCR Servicenter, ask your dealer, look in the Yellow
Pages, or call 1-800-336-1900.
• Show the service technician your evidence of purchase date.
• Pick up your VCR when repairs are completed.
What your warranty does not cover:
• Customer instruction. (Your Owner’s Manual clearly describes how to install,
adjust, and operate your VCR. Any additional information should be obtained
from your Dealer.)
• Installation and related adjustments.
• Signal reception problems not caused by your VCR.
• Damage from misuse or neglect.
• Cleaning of video/audio heads.
• Remote control batteries.
• A VCR that has been modified or incorporated into other products or is used
for institutional or other commercial purposes.
• A VCR purchased or serviced outside the USA.
• Acts of God, such as, but not limited to lightning damage.
• Accuracy of the program schedule information provided by the
StarSight System.
Product Registration:
• Please complete and mail the Product Registration Card packed with your
VCR. It will make it easier to contact you should it ever be necessary. The
return of the card is not required for warranty coverage.
How state law relates to this warranty:
• This warranty gives you specific legal rights, and you also may have other
rights that vary from state to state.
If you purchased your VCR outside the United States:
• This warranty does not apply. Contact your dealer for warranty information.
Page 54

52
References
Trouble Checks
Sometimes problems can be easily solved by checking a few basic things. Check below
before you call for help or take your VCR to an Authorized RCA VCR Servicenter.
No power
VCR does not respond to remote
Remote no longer controls a compatible TV
Poor or no picture for normal TV viewing
Snowy or no picture during playback
Time counter not working
Will not record or play
Streaks in picture during normal playback
Will not record
• Plug VCR into an operating outlet.
• Check connections.
• Check batteries in remote.
• Press SELECT VCR to set remote to control the VCR..
• Aim remote at VCR with no objects between them.
• Change batteries.
• Press SELECT TV to set remote to control a compatible TV.
• Reprogram remote for your TV brand. See page 15.
• Aim remote at TV with no objects between them.
• Change batteries.
• Press TV•VCR to turn VCR indicator off.
• Switch TV to an active channel.
• Check antenna connections.
• Press TV•VCR to turn VCR indicator on.
• Check TV channel selected (3 or 4) to make sure it matches the channel
selected with CH3564 switch on back of VCR.
• Check TV’s fine tuning.
• Check video cable connections between VCR and TV monitor.
• Set TV monitor to video input channel.
• Try another tape.
• Some snow/streaks are normal during search, frame advance, slow-motion,
or stop-action playback.
• Make sure there is a recording on the tape.
• The time counter does not advance during unrecorded portions of tape.
When an unrecorded segment of tape is encountered, the time counter will
hold its count until recorded material is detected again.
• A minus (–) will appear in front of the time if you rewind the tape farther
back than a counter reading of 0:00:00.
• No cassette in VCR.
• Eject and re-insert cassette.
• Broken tape — try another cassette.
• Some snow/streaks are normal during search, frame advance, slow-motion,
or stop-action playback.
• Press PAGE UP or DOWN to adjust the picture.
• Check all connections.
• VCR is in pause mode. Press PAUSE.
• Safety tab removed from cassette.
• Make sure the line indicator (LINE) is turned off in VCR’s display panel for
normal recording from the VCR’s tuner. Press INPUT to turn off the line
indicator.
Trouble Here's what to try:
Video Cassette Recorder
Page 55

53
References
Trouble Checks
Trouble Here's what to try:
Rewind does not operate
Clock shows incorrect time or date
VCR makes noise when stopped
Will not auto-search channels active
channels correctly
Cannot add or remove channels
Cannot select channels over 69
Cassette with safety tab removed does not start to
play automatically
Segment of tape plays over and over
Stereo or SAP sound not recorded
No stereo sound during playback
Stereo audio too noisy
Timer recording not made
• Tape already rewound.
• Power interruption. Clock on the front panel will show --:--.
• Clock was not set accurately (check AM/PM and date).
• Time counter display appears in VCR’s display panel. Press DISP on
remote.
• VCR is removing tape from heads. This is normal. The head cylinder inside
the VCR will continue to rotate for a few minutes after you put the VCR in
the stop mode.
• Check antenna connections.
• Check Signal Type: ANTENNA/CABLE/CABLE BOX feature. See page 8.
• Channels must be placed in memory using Auto-Search Channels feature
before channels can be added or removed from channel memory. See page 10.
• Cable channels over 69 can only be selected if Signal Type:
ANTENNA/CABLE/CABLE BOX feature is set to CABLE. See page 8.
• Set Auto Play ON/OFF feature to ON. See page 17.
• Auto Repeat feature turned on.
• AUDIO button must be set to STEREO to record broadcast stereo.
See page 26.
• AUDIO button must be set to SAP to record SAP. See page 26.
• STEREO or SAP indicator not on. Station not broadcasting stereo or SAP.
• AUDIO button must be set to HI-FI to hear stereo sound during playback.
See page 20.
• Stereo signal is weak. Set AUDIO button to MONO.
• Press one of the TRACKING up or down buttons to minimize the noise.
• Check the clock to make sure the time is correct.
• Make sure safety tab is in place.
• If an RCA VCR recording and StarSight recording are scheduled at the same
time, only the StarSight recording will occur.
Page 56

54
References
Trouble Checks
Trouble Here's what to try:
StarSight
StarSight information does not appear on
my TV
Cable Box is not controlled by StarSight
TV or VCR turned off during the
Cable Box testing
No Picture “snow”
No StarSight Screens or Pop-ups are displayed
Don’t have any program data even though
StarSight is activated
Background color for the time is red
Blank spots in the guide
StarSight’s list of channels does not match those
that appear on my TV
• Make sure VCR or cable box is tuned to the PBS channel in your area for
schedule reception.
• Leave your cable box on at all times.
• Make sure your VCR and/or cable box is plugged into an outlet that is not
controlled by a light switch.
• Do not plug your VCR into the back of your cable box.
• Check to see if you have followed all of the User Guide’s instructions for your
particular video equipment
• Make sure you have followed all steps for StarSight setup and activation.
• Make sure the cable box adapter is plugged into the OUT TO CABLE BOX
jack on the back of your VCR.
• Check the placement of your cable box adapter. Position the cable box
adapter on top of your cable box as close to the sensor as possible. The cable
box adapter should extend as far out as possible over the front edge of the
cable box.
• Make sure you have tried all codes for your brand of cable box. See page 46.
• Make sure your TV or VCR is not plugged into the back of the cable box or
into a power outlet that is controlled by a light switch.
• Leave your cable box on at all times.
• Check the connections between your TV, VCR and/or cable box.
• Make sure your TV is set to the channel that allows you to watch cable
(usually channel “3, “ “4,” or LINE input).
• Make sure the VCR is in the VCR mode. Press the SELECT VCR button on
the remote. Also, make sure the VCR indicator lights in the display; if not,
press the TV/VCR button.
• Wait until program information is collected during the scheduled data
reception time period. To modify the schedule data reception period, see
page 42.
• Your VCR lost power momentarily. The time and date is corrected
automatically (VCR clock resets) when power is restored and your VCR
collects the program information. The background color returns to white
when the correct time is displayed.
• StarSight may not have received all the program information. Information is
collected during scheduled reception period.
• If your VCR has lost power or been unplugged for more than 30 minutes,
StarSight program information will disappear. To collect information, simply
plug your VCR power cord back into the electrical outlet and restore power.
• Call the StarSight Help Desk at 1-800-628-STAR or fax corrections directly to
1-800-229-9640.
Page 57

55
References
Trouble Checks
Trouble Here's what to try:
StarSight
Entire show did not record
Recordings of all episodes of a series are
cancelled, but new episodes for that same series
are still being recorded
A red question mark appears on a program title
in the Recordings List
Can’t see videotape picture when playing back on
the VCR
Program wasn’t recorded
• Make sure you have enough tape to record the whole program.
• StarSight records programs based upon the scheduled start and stop times. If
you think a program is going to run overtime, you should extend the ending
time of the recording. See page 38.
• You must cancel the whole series from the Series Recordings list. See page 40.
• The program information in the Recordings List does not match the program
information in the Grid Guide. Position the highlight bar on the question
mark and press GUIDE to see the program that will be recorded. If you don’t
want to record this program, return to the Recordings List and cancel the
recording. See page 39.
• Check the connections between your TV and VCR.
• Make sure your TV is tuned to either channel 3 or 4 (whichever number
matches the switch on the back of your VCR).
• If you have connected your VCR to your TV using audio/video cables, use
your TV remote control to select the VIDEO input source.
• Make sure that your VCR’s channel 3/4 switch matches your Cable box’s
output channel if you have one.
• Make sure you have a videotape with tape remaining and the safety tab is
intact.
• Check the placement of the cable box adapter. Position the cable box adapter
on top of your cable box as close to the sensor as possible (with the logo
facing upward). The cable box adapter should extend as far out as possible
over the front edge of the cable box.
• Make sure you are confirming the recordings when you schedule a program
for recording.
• If you do not schedule a recording from a StarSight screen, you may be
creating a VCR recording that conflicts with a StarSight recording.
Suggestion: Use either the VCR system or StarSight system to schedule
recordings, but not both.
• If you have scheduled a VCR recording to occur at the same time as a
StarSight recording, the StarSight recording will take precedence.
• When you extend recording into a subsequent time period, the remainder of
that time period can no longer be scheduled for a recording. StarSight
indicates this by shading the entire period in red.
Page 58

56
References
Index
1-800 Numbers
RCA . . . . . . . . . . .51, Back Cover
StarSight . . . . . . . 29, Back Cover
5-Second Repeat . . . . . . . . . . . . . . . 20
A
Accessories, Included . . . . . . . . . . . 7
Adapter, Cable Box . . . . . . . . . . . . . 5
Add Channels to Memory . . . . . . 10
Add or Remove Channels
from Memory . . . . . . . . . . . . . . 10
Antenna Connections . . . . . . . . . 2, 3
ANTENNA/CABLE SET . . . . . . . . . 8
ARROW Buttons . . . . . . . . . . 8, 12-14
Audio
Broadcast Stereo . . . . . . . . . . . 26
Playback . . . . . . . . . . . . . . . . . . 20
Mono . . . . . . . . . . . . . . . . . . 20, 26
Recording . . . . . . . . . . . . . . . . . 27
SAP . . . . . . . . . . . . . . . . . . . . . . 26
Stereo . . . . . . . . . . . . . . . . . . 20, 26
AUDIO and VIDEO
Jacks . . . . . . . . . . . . . . . . . .3-6, 50
AUDIO Button . . . . . . . . . . . . . . . . . 12
Audio Playback . . . . . . . . . . . . . . . .20
Audio Only, Recording . . . . . . . . .27
Broadcast Stereo . . . . . . . . . . . 26
Playback . . . . . . . . . . . . . . . . . . 20
Mono . . . . . . . . . . . . . . . . . . 20, 26
Recording . . . . . . . . . . . . . . . . . 27
SAP . . . . . . . . . . . . . . . . . . . . . . 26
Stereo . . . . . . . . . . . . . . . . . . 20, 26
AUTO CLOCK SET . . . . . . . . . . . . . 9
Auto Play . . . . . . . . . . . . . . . . . . . . . 17
Automatic Tracking . . . . . . . . . . . . 17
B
Back Panel . . . . . . . . . . . . . . . . . . . . 50
Basic Recording . . . . . . . . . . . . . . . 23
Broadcast Stereo . . . . . . . . . . . . . . . 26
Browsing . . . . . . . . . . . . . . . . . . . . . 34
Buttons
Front Panel . . . . . . . . . . . . . . . . 48
Remote Control . . . . . . . . . 12-14
StarSight . . . . . . . . . . . . . . . . . . 14
C
Cable Box Adapter . . . . . . . 4, 5, 7, 50
Cable Box Codes for VCR . . . . . . . 11
Cable Box Codes
StarSight . . . . . . . . . . . . . . . . . . 46
VCR . . . . . . . . . . . . . . . . . . . . . . 11
Cable Box Setup . . . . . . . . . . . . . . . 11
Cable System With Cable
Box Connections . . . . . . . . .2, 4, 5
Cable System Without Cable
Box Connections . . . . . . . . . . .2, 3
CAPTION Button . . . . . . . . . . . . . . .12
Card, Registration . . . . . . . . . . . . . . .i
Caution . . . . . . . . . . . . . . . . . . . . . . . .i
CH 3/4 Switch . . . . . . . . . . . . . . . 8, 50
Changing Channel Order . . . . . . . 41
Channel Guide . . . . . . . . . . . . . . . . 36
Channel Memory . . . . . . . . . . . . 9, 10
Checklist . . . . . . . . . . . . . . . . . . . . . 30
Checks, Trouble . . . . . . . . . . . . 52-55
Cleaning the VCR . . . . . . . . . . . . . 47
CLEAR Button . . . . . . . . . . . . . . 12-14
Clock Set
Auto . . . . . . . . . . . . . . . . . . . . . . . 9
Manual . . . . . . . . . . . . . . . . . . . . 9
Closed Captioning . . . . . . . . . . . . . 21
Codes
StarSight Cable Box . . . . . . . . . 46
VCR Cable Box . . . . . . . . . . . . . 11
TV . . . . . . . . . . . . . . . . . . . . . . . 15
Component Buttons
SELECT TV . . . . . . . . . . . . . . . 12
SELECT VCR . . . . . . . . . . . . . . 12
Connections
Antenna . . . . . . . . . . . . . . . . . .2, 3
Audio/Video Jacks . . . . . . 2, 3-6
Cable-TV . . . . . . . . . . . . . . . 2, 3-5
Choosing . . . . . . . . . . . . . . . . . . . 2
Two VCRs . . . . . . . . . . . . . . . . . . 6
Contents . . . . . . . . . . . . . . . . . . . . . . 1
Controls
Back Panel . . . . . . . . . . . . . . . . . . .
Display Panel . . . . . . . . . . . . . . . .
Front Panel . . . . . . . . . . . . . . . . . .
Remote Control Buttons . . .12-14
Copying Tapes . . . . . . . . . . . . . . . . 28
Copying Tapes, Connections . . . 2, 6
Counter, Time . . . . . . . . . . . . . . . . . 21
Counter Zero Repeat . . . . . . . . . . . 20
D
Date and Time . . . . . . . . . . . . . . . . . 9
Date, Set . . . . . . . . . . . . . . . . . . . . . . .9
DAY –/+ Button . . . . . . . . . . . . . . . .14
demo Button . . . . . . . . . . . . . . . . . . 48
Delete Channels from Memory . . 10
Display Panel . . . . . . . . . . . . . . . . . 49
Displays . . . . . . . . . . . . . . . . . . . . . . 23
Dubbing Tapes . . . . . . . . . . . . . . . .28
Dubbing Tapes, Connections . . . 2, 6
E
Editing Tapes . . . . . . . . . . . . . . . . . 28
EJECT Button . . . . . . . . . . . . . . 12, 48
EXIT Button . . . . . . . . . . . . . . . . 12, 14
ENTER Button . . . . . . . . . . . . . 12, 14
Eject a Tape . . . . . . . . . . . . . . . . . . . 16
Erase Channels from Memory . . . 10
F
Fast Forward Search . . . . . . . . . . . 18
Features
StarSight . . . . . . . . . . . . . . . 33-42
Changing Channel Order . . . . 41
Channel Guide . . . . . . . . . . . . . 36
Frame Advance . . . . . . . . . . . . 13, 18
Front AUDIO/VIDEO IN Jacks . . . 48
Front Panel . . . . . . . . . . . . . . . . . . . 48
G
Go to 0:00:00 and STOP . . . . . . . . . 18
Grazing . . . . . . . . . . . . . . . . . . . . . . 33
Grid Guide . . . . . . . . . . . . . . . . . . . 35
GUIDE Button . . . . . . . . . . . . . . . . 14
Guides
Channel . . . . . . . . . . . . . . . . . . . 36
Grid . . . . . . . . . . . . . . . . . . . . . . 35
Recording . . . . . . . . . . . . . . . . . 27
H
HI-FI . . . . . . . . . . . . . . . . . . . . . . . . . 20
I
Important Information . . . . . . . . . . . i
IN FROM ANT. Connector. . . . . . . 50
INDEX Button . . . . . . . . . . . . . . . . . 12
Index Search . . . . . . . . . . . . . . . . . . 18
Indicators . . . . . . . . . . . . . . . . . . . . . 49
INFO Button . . . . . . . . . . . . . . . 14, 33
INPUT Button . . . . . . . . . . . 12, 13, 48
Insert a Tape . . . . . . . . . . . . . . . . . . 16
J
Jacks
Back AUDIO/VIDEO IN . . . . . . 50
Back AUDIO/VIDEO OUT . . . . 50
Front AUDIO/VIDEO IN . . . . . 48
JOG +/– Buttons . . . . . . . . . . . . . . . 13
L
LEFT Channel . . . . . . . . . . . . . . . . . 20
Length, Tape . . . . . . . . . . . . . . . . . .20
Limited Warranty . . . . . . . . . . . . . 51
LINE input . . . . . . . . . . . . . . . . . . . . 49
LIST Button . . . . . . . . . . . . . . . . . . . 14
M
MANUAL CLOCK SET . . . . . . . . . . 9
Manual Tracking . . . . . . . . . . . . . . 17
MENU Button . . . . . . . . . . . . 8, 13, 14
Modes
TV . . . . . . . . . . . . . . . . . . . . . . . 12
VCR . . . . . . . . . . . . . . . . . . . . . . 12
MONO . . . . . . . . . . . . . . . . . . . . . . . 20
MUTE Button . . . . . . . . . . . . . . . . . 13
N
Number Buttons . . . . . . . . . . . .12-14
O
On-Screen Displays . . . . . . . . . . . . 21
On-Screen Menu System . . . . . . . . . 8
OUT TO CABLE BOX Connector 50
OUT TO TV Connector . . . . . . . . . 50
P
PBS Stations . . . . . . . . . . . . . . . .44-46
PAGE UP/DOWN . . . . . . . . . . . . . . 14
Pause Playback . . . . . . . . . . . . . . . . 17
Recording . . . . . . . . . . . . . . . . . 22
Pause for Stop Action . . . . . . . . . . 17
Playback Features . . . . . . . . . . . 17-21
Audio Playback . . . . . . . . . . . . 20
Auto Play . . . . . . . . . . . . . . . . . 17
Closed Captioning . . . . . . . . . . 21
Displays . . . . . . . . . . . . . . . . . . 23
Fast Forward Search . . . . . . . . 18
Frame Advance . . . . . . . . . . . . 18
Go to 0:00:00 and STOP . . . . . 18
HI-FI . . . . . . . . . . . . . . . . . . . . . 20
Index Search . . . . . . . . . . . . . . . 18
Insert a Tape . . . . . . . . . . . . . . . 16
LEFT Channel . . . . . . . . . . . . . 20
MONO . . . . . . . . . . . . . . . . . . . 20
On-Screen Displays . . . . . . . . . 21
Pause for Stop Action . . . . . . . 17
Picture Search . . . . . . . . . . . . . 18
Playing a Tape . . . . . . . . . . . . . 16
Repeat Function . . . . . . . . . . . . 20
Rewind Search . . . . . . . . . . . . . 18
RIGHT Channel . . . . . . . . . . . . 20
Page 59

57
References
Index
Scan and Play . . . . . . . . . . . . . . 18
Segment Repeat . . . . . . . . . . . . 20
Selection Playback Sound . . . 20
Skip Search . . . . . . . . . . . . . . . . 19
Slow Motion . . . . . . . . . . . . . . . 17
Tape Dubbing Mode . . . . . . . . 28
Tape Histogram . . . . . . . . . . . . 21
Tape Length . . . . . . . . . . . . . . . 21
Tape Speed . . . . . . . . . . . . . . . . 21
Time Remaining . . . . . . . . . . . 21
Tracking . . . . . . . . . . . . . . . 16, 17
Variable Speed Search . . . . . . 18
Playing a Tape . . . . . . . . . . . . . . . . 16
Picture Search . . . . . . . . . . . . . . . . . 18
POWER Button . . . . . . . . . . . . . . . 48
Point and Select Method . . . . . . . . .8
Problems
StarSight . . . . . . . . . . . . . . . 52, 53
VCR . . . . . . . . . . . . . . . . . . . 50, 51
Product Registration . . . . . . . . . . . . . i
PROG LIST Button . . . . . . . . . . . . 13
Programming the Remote . . . . . . . 15
R
Receiving Program Information . 32
Recording . . . . . . . . . . . . . . . . . .22-28
Recording Audio . . . . . . . . . . . . . . 27
Recording Features . . . . . . . . . . . . 22
Recording Options . . . . . . . . . . . . . 22
Audio Only . . . . . . . . . . . . . . . . 27
Basic Recording . . . . . . . . . . . . 23
Broadcast Stereo TV . . . . . . . . 26
Copying Tapes . . . . . . . . . . . . . 18
Editing Tapes . . . . . . . . . . . . . . 28
Frame Advance . . . . . . . . . . . . 18
SAP . . . . . . . . . . . . . . . . . . . . . . 26
Second Audio Program . . . . . .26
Stereo Broadcast . . . . . . . . . . . 26
Timer Recording . . . . . . . . 24, 25
Watch One Channel While
Recording Another . . . . . . . . 23
Recording Speeds . . . . . . . . 17, 18, 22
Recording StarSight . . . . . . 38, 39, 40
Remote Control . . . . . . . . . . . . . 12-16
Remote Sensor . . . . . . . . . . . . . . . . 48
REPEAT Button . . . . . . . . . . . . . . . 13
Repeat Function . . . . . . . . . . . . . . . 20
RESET Button . . . . . . . . . . . . . . . . 48
Rewind Search . . . . . . . . . . . . . . . . 18
RIGHT Channel . . . . . . . . . . . . . . . 20
S
Safety Precautions . . . . . . . . . . . . . . . i
SAP . . . . . . . . . . . . . . . . . . . . . . . . . . 26
Scan and Play . . . . . . . . . . . . . . . . . 18
Scheduling Data Reception . . . . . 42
Search
Fast Forward . . . . . . . . . . . . . . 18
Frame Advance . . . . . . . . . . . . 18
Go to 0:00:00 . . . . . . . . . . . . . . . 18
Index . . . . . . . . . . . . . . . . . . . . . 19
Picture . . . . . . . . . . . . . . . . . . . . 18
Rewind . . . . . . . . . . . . . . . . . . . 18
Skip . . . . . . . . . . . . . . . . . . . . . . 19
Second Audio Program . . . . . . . . . 26
Segment Repeat . . . . . . . . . . . . . . . 20
SELECT TV . . . . . . . . . . . . . . . . . . . 12
SELECT VCR . . . . . . . . . . . . . . . . . 12
Selecting/De-selecting Channels . 41
Selection Playback Sound . . . . . . . 20
Set Date . . . . . . . . . . . . . . . . . . . . . . . .9
Set Time . . . . . . . . . . . . . . . . . . . . . . .9
Set the time and date . . . . . . . . . . . . 9
Setting Up StarSight . . . . . . . . . . . 31
SHUTTLE Button . . . . . . . . . . . . . . 13
Signal Type . . . . . . . . . . . . . . . . . . . . 8
SKIP Button . . . . . . . . . . . . . . . . . . 13
Skip Search . . . . . . . . . . . . . . . . . . . 19
SLP Speed` . . . . . . . . . . . . . . . . 17, 18
SLOW –/+ Button . . . . . . . . . . . . . . 13
Slow Motion . . . . . . . . . . . . . . . . . . 17
SP Speed . . . . . . . . . . . . . . . . . . 17, 18
SP•SLP Button . . . . . . . . . . . . . . . . 13
Specifications . . . . . . . . . . . . . . . . . 47
StarSight Buttons . . . . . . . . . . . . . . 14
StarSight Features . . . . . . . . . . . 33-42
Buttons . . . . . . . . . . . . . . . . . . . 14
Browsing . . . . . . . . . . . . . . . . . . 34
Changing Channel Order . . . . 41
Channel Guide . . . . . . . . . . . . . 36
Grazing . . . . . . . . . . . . . . . . . . . 33
Grid Guide . . . . . . . . . . . . . . . . 35
INFO Button . . . . . . . . . . . . . . . 33
Recording . . . . . . . . . . . . . . 38-40
Scheduling Data Reception . . 42
Selecting/De-selecting
Channels . . . . . . . . . . . . . . . . 41
Theme Guide . . . . . . . . . . . . . . 37
Tuning by Title . . . . . . . . . . . . .35
When you move . . . . . . . . . . . 42
StarSight System . . . . . . . . . . . . 33-42
Checklist . . . . . . . . . . . . . . . . . . 30
Receiving Program
Information . . . . . . . . . . . . . . 32
Setting Up . . . . . . . . . . . . . . . . . 31
Subscription . . . . . . . . . . . . 29, 30
Stations, PBS . . . . . . . . . . . . . . . 44-46
Stereo . . . . . . . . . . . . . . . . . . . . .20, 26
Stereo Broadcast . . . . . . . . . . . . . . . 26
Stop Action . . . . . . . . . . . . . . . . . . . 17
Subscription . . . . . . . . . . . . . . . 29, 30
T
Table of Contents . . . . . . . . . . . . . . .1
Tape Compartment . . . . . . . . . 16, 48
Tape Dubbing Mode . . . . . . . . . . . 28
Tape Histogram . . . . . . . . . . . . 21, 49
Tape Length . . . . . . . . . . . . . . . . . . 20
Tape Speed . . . . . . . . . . . . . . . . . . . 21
Tapes
Copying . . . . . . . . . . . . . . . . . . 28
Editing . . . . . . . . . . . . . . . . . . . . 28
Ejecting . . . . . . . . . . . . . . . . . . . 16
Inserting . . . . . . . . . . . . . . . . . . 16
THEME Button . . . . . . . . . . . . . . . . 14
Theme Guide . . . . . . . . . . . . . . . . . 37
Time and Date . . . . . . . . . . . . . . . . . 9
Time Counter . . . . . . . . . . . . . . . . . 21
Time, Set . . . . . . . . . . . . . . . . . . . . . . 9
Time Remaining . . . . . . . . . . . . . . . 21
Timer Recording . . . . . . . . . . . . 24-25
Cancelling . . . . . . . . . . . . . . . . . 25
Correcting . . . . . . . . . . . . . . . . . 25
Reviewing . . . . . . . . . . . . . . . . . 25
Setting a . . . . . . . . . . . . . . . . . . 24
Stopping . . . . . . . . . . . . . . . . . . 25
Tracking . . . . . . . . . . . . . . . . . . . 16, 17
TRACKING Buttons . . . . . . . . . . . . 13
Page 60

10330 N Meridian Street
Indianapolis, IN 46290
©
1995 Thomson Consumer Electronics, Inc.
Trademark(s)®Registered
Marca(s) Registrada(s)
Printed in Korea
Part Number 95-VR681HF-1
Please do not send any products to the Indianapolis address
listed in this manual or on the carton. This will only add
delays in service for your product.
For your nearest RCA Dealer or Authorized Servicenter,
call 1-800-336-1900
Canadian Consumers –
Your toll free numbers are:
English: 1-800-522-0338
French: 1-800-522-0445
To activate StarSight,
call 1-800-643-STAR.
For the StarSight Help Desk,
call 1-800-628-STAR.
 Loading...