

Page 1

Home Theater
Music Jukebox
User’s Guide
Changing Entertainment. Again.
RTD750
Page 2
Important Information
CAUTION
RISK OF ELECTRIC SHOCK DO
NOT OPEN
WARNING
To reduce the risk of fire or electric
shock, do not expose this product to
rain or moisture. No objects filled with
liquids, such as vases, should be placed
on the apparatus.
CAUTION – To reduce the risk of fire, use only No. 26 AWG or larger telecommunication line cord.
ATTENTION – Pour réduire les risques d’incendie, utiliser uniquement des conducteurs de télécommunications 26 AWG au de section supérleure.
Product Registration
This symbol indicates important
instructions accompanying the
product.
This symbol indicates "dangerous voltage"
inside the product that presents a risk of
electric shock or personal injury.
CAUTION
FCC Regulations state that
unauthorized changes or
modifications to this equipment
may void the user’s authority to
operate it.
Please fill out the product registration card (packed separately) and return it immediately. For U.S. customers: Your RCA Consumer Electronics product may also be
registered at www.rca.com/productregistration. Registering allows us to contact you if needed.
Product Information
Keep your sales receipt to obtain warranty parts and service and for proof of purchase. Attach it here and record the serial and model numbers in case you need them.
The numbers are located on the back of the product.
Model No.: _______________________________________________________________________
Serial No. ________________________________________________________________________
Purchase Date: ___________________________________________________________________
Dealer/Address/Phone: _____________________________________________________________
CAUTION
THIS PRODUCT UTILIZES A LASER. USE
OF CONTROLS OR ADJUSTMENTS OR
PERFORMANCE OF PROCEDURES
OTHER THAN THOSE SPECIFIED HEREIN
MAY RESULT IN HAZARDOUS
RADIATION EXPOSURE. DO NOT OPEN
COVERS AND DO NOT REPAIR
YOURSELF. REFER SERVICING TO
QUALIFIED PERSONNEL.
Note:
This DVD player is designed and manufactured to
respond to the Region Management Information. If
the Region number of a DVD disc does not correspond
to the Region number of this DVD player, this player
cannot play the disc. The Region number for this DVD
player is Region No 1.
CLASS 1
LASER
PRODUCT
Page 3

Table of Contents
Chapter 1: Connections and Setup
Things to Consider Before Connecting
Components ........................................................ 3
Cables to Connect Components to Your Home
Theater Music Jukebox...................................... 3
Front of the Home Theater Music Jukebox ........... 4
Back of the Home Theater Music Jukebox ............ 5
Description of Jacks ......................................................... 5
Connecting your Home Theater Music Jukebox.... 6
Positioning your Speakers ....................................... 7
Connecting the Speakers ......................................... 8
Connecting the Antennas ........................................ 8
Connecting the Subwoofer...................................... 8
Put Batteries in the Remote Control...................... 9
Turn on the TV and Home Theater
Music Jukebox .................................................... 9
Using the Remote Control to Choose On-screen
Menu Items ......................................................... 9
How to Find Your TV’s Video Input Channel ....... 10
Introduction to Your Home Theater
Music Jukebox .................................................. 11
Demo Modes .......................................................11
What Is The Setup Process? .................................. 11
Running Quick Start .............................................. 11
Introduction Screens ........................................... 11
Completing Quick Start ......................................... 12
Entering Text with the Number Buttons
or Optional Keyboards ................................. 12
Internet Access through an ISP .......................... 12
Connection Method............................................12
Ethernet IP Addressing ....................................... 13
Ethernet Settings ................................................13
Broadband Access Provider ................................13
Broadband Login Info ........................................13
Zip Code .............................................................. 14
Dial-up ISP ...........................................................15
Internet Login Info ............................................. 15
Dialing Preferences ............................................. 16
Zip Code .............................................................. 16
The Buttons on the Remote Control ....................17
Frequently Used Buttons ....................................17
Other Buttons on the Remote Control .............. 18
Chapter 2: Music Features
Playing Music ......................................................... 19
Some Terms and Definitions You’ll See in the
Following Chapters .......................................19
Navigating the Music Player Screen .................. 19
Selecting and Listening to a Music Title ............ 19
Sorting Music by Artist, Title, Song,
Alphabetically ............................................... 19
Recording Music ..................................................... 20
Music Compression and MP3 Audio Quality .....20
Recording Music from a CD................................20
Recording Music from an External Audio
Device ............................................................ 21
Managing Music ..................................................... 21
Changing the View Mode ..................................22
Creating a New Playlist.......................................22
Editing a Playlist..................................................22
Deleting a Playlist ...............................................23
Creating a New Music Group .............................23
Editing a Music Group ........................................23
Deleting a Music Group......................................23
Changing the Play Mode .................................... 24
Deleting Music ....................................................24
Editing the Names of Tracks ............................... 25
Editing Disc Information .................................... 25
Transferring Music to a Portable Player ..............26
Chapter 3: Movie Features
Regional Coding ..................................................... 27
Using Different Menus .......................................... 27
To Load and Play a DVD Disc ................................ 27
Search Options .......................................................28
Using the On-Screen Info Display ........................ 28
Selecting a Title...................................................29
Selecting a Chapter.............................................29
Changing the Audio Language.............................. 29
Selecting Subtitles ................................................. 30
Changing the Camera Angle .................................30
Playing DVD Discs................................................... 31
Managing Movies ................................................... 31
Creating a New Movie Group ............................31
Editing a Movie Group .......................................32
(continued on the next page)
1
Page 4

Table of Contents
Deleting a Movie Group ..................................... 32
Getting Movie Info .............................................33
Editing Movie Disc Info ...................................... 33
Deleting Movies ..................................................33
Chapter 4: Radio Features
AM/FM Radio ......................................................... 34
Playing the Radio ................................................ 34
Autotuning AM/FM Stations ..............................34
Adding a New AM/FM Station ...........................34
Editing an AM/FM Station .................................. 35
Deleting a Radio Station ....................................35
Internet Radio......................................................... 36
Playing Music ...................................................... 36
Updating Internet Radio Stations ...................... 36
Adding a New Internet Station..........................36
Editing an Internet Station ................................ 37
Deleting an Internet Station ..............................37
Creating a New Radio Group .............................37
Editing a Radio Group ........................................37
Deleting a Radio Group......................................38
Chapter 5: Advanced Features
Advanced Settings..................................................39
User Information.................................................39
Network Configuration ......................................40
Preferences .......................................................... 42
Audio and Video Settings .................................. 44
Security and Parental Controls...........................47
Utilities ................................................................48
Chapter 6: Additional Information
Troubleshooting ...................................................... 50
Care and Cleaning .................................................. 53
Handling Cautions ..................................................53
Maintenance of Cabinet.....................................53
Formation of Condensation ...............................53
Handling Discs ..................................................... 53
Cleaning Discs ......................................................... 53
Programming the Remote to Operate
Other Components ........................................... 54
Find Out If You Need to Program the Remote . 54
Programming the Remote..................................54
How to Use the Remote After You’ve
Programmed It.................................................. 55
Code List ................................................................. 56
More from OpenGlobe Services ............................ 58
Compatible Optional USB Keyboards ................... 58
Adding a New Internet Station ............................ 59
Locating Stations ................................................ 59
FCC and Industry Canada Information ................. 60
Additional FCC Information .................................. 61
Limited Warranty ................................................... 62
2
Page 5
Chapter 1: Connections and Setup
Things to Consider Before Connecting Components
Protect Components From Power Surges
• Connect all components before plugging any power cords into the wall outlet.
• Always turn off the TV and other components before you connect or disconnect any cables.
Position Cables to Avoid Audio Hum or Interference
• Insert all cable plugs firmly into their jacks.
• Place any Audio/Video (A/V) cables to the side(s) of the TV’s back panel instead of straight down the back after connecting components.
•Try not to coil any twin-lead antenna cables and keep them away from all cables as much as possible.
• Make sure all antennas and cables are properly grounded. Refer to the Safety Tips sheet packed with your unit for detailed information.
Protect Components From Overheating
• Never block ventilation slots in any component. Arrange the components so that air can circulate freely.
• Do not stack components.
• Allow adequate ventilation when placing components in a stand.
• Place an amplifier or other hot component on the top shelf of a stand so heated air rising from it will not flow around other components.
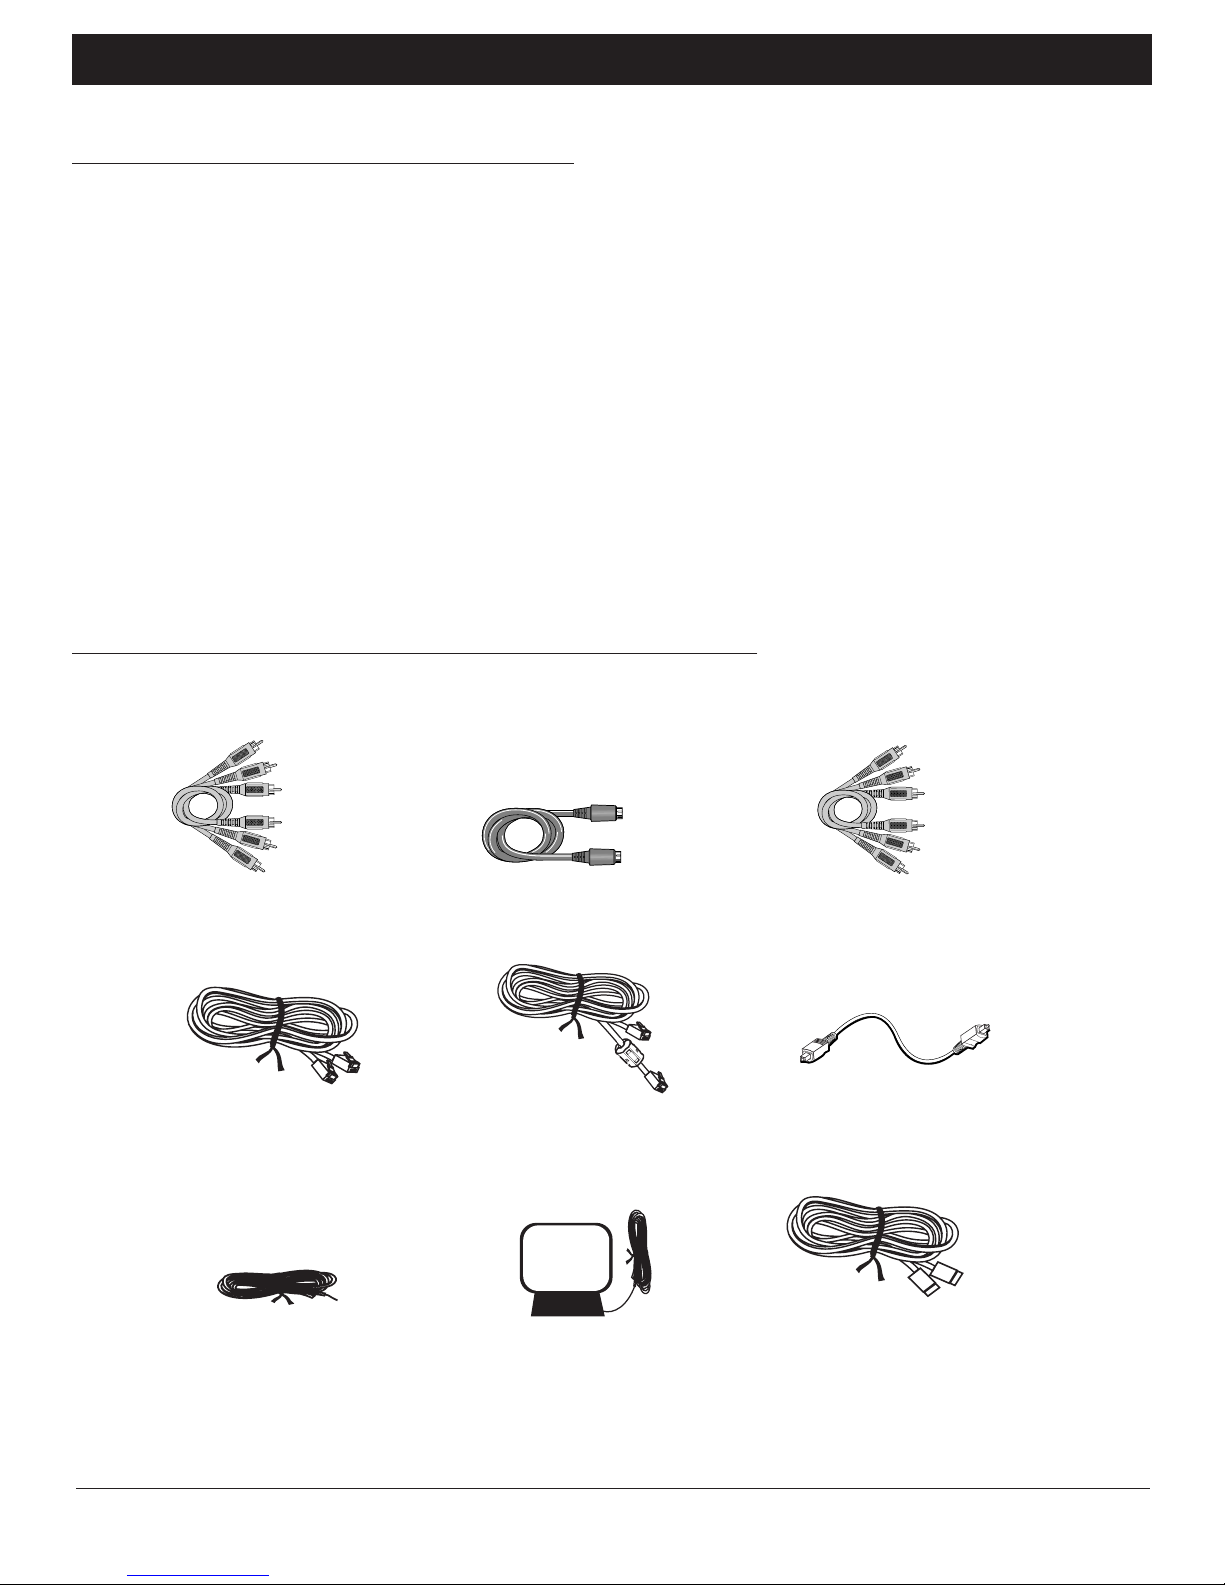
Cables to Connect Components to Your Home Theater Music Jukebox
The pictures below show the cables that can be used for the connections represented in this book.
Audio/Video cables (included)
26 AWG modem telephone line cord (included)
Ethernet cable with attached
ferrite core filter (included)
Component Video (Y•Pb•Pr) cablesS-Video cable (included)
Digital Optical cable
FM antenna (included) Am loop antenna (included)
Chapter 1 3
Illustrations contained in this document are for representation only.
USB cable
Page 6
Chapter 1: Connections and Setup
2
1
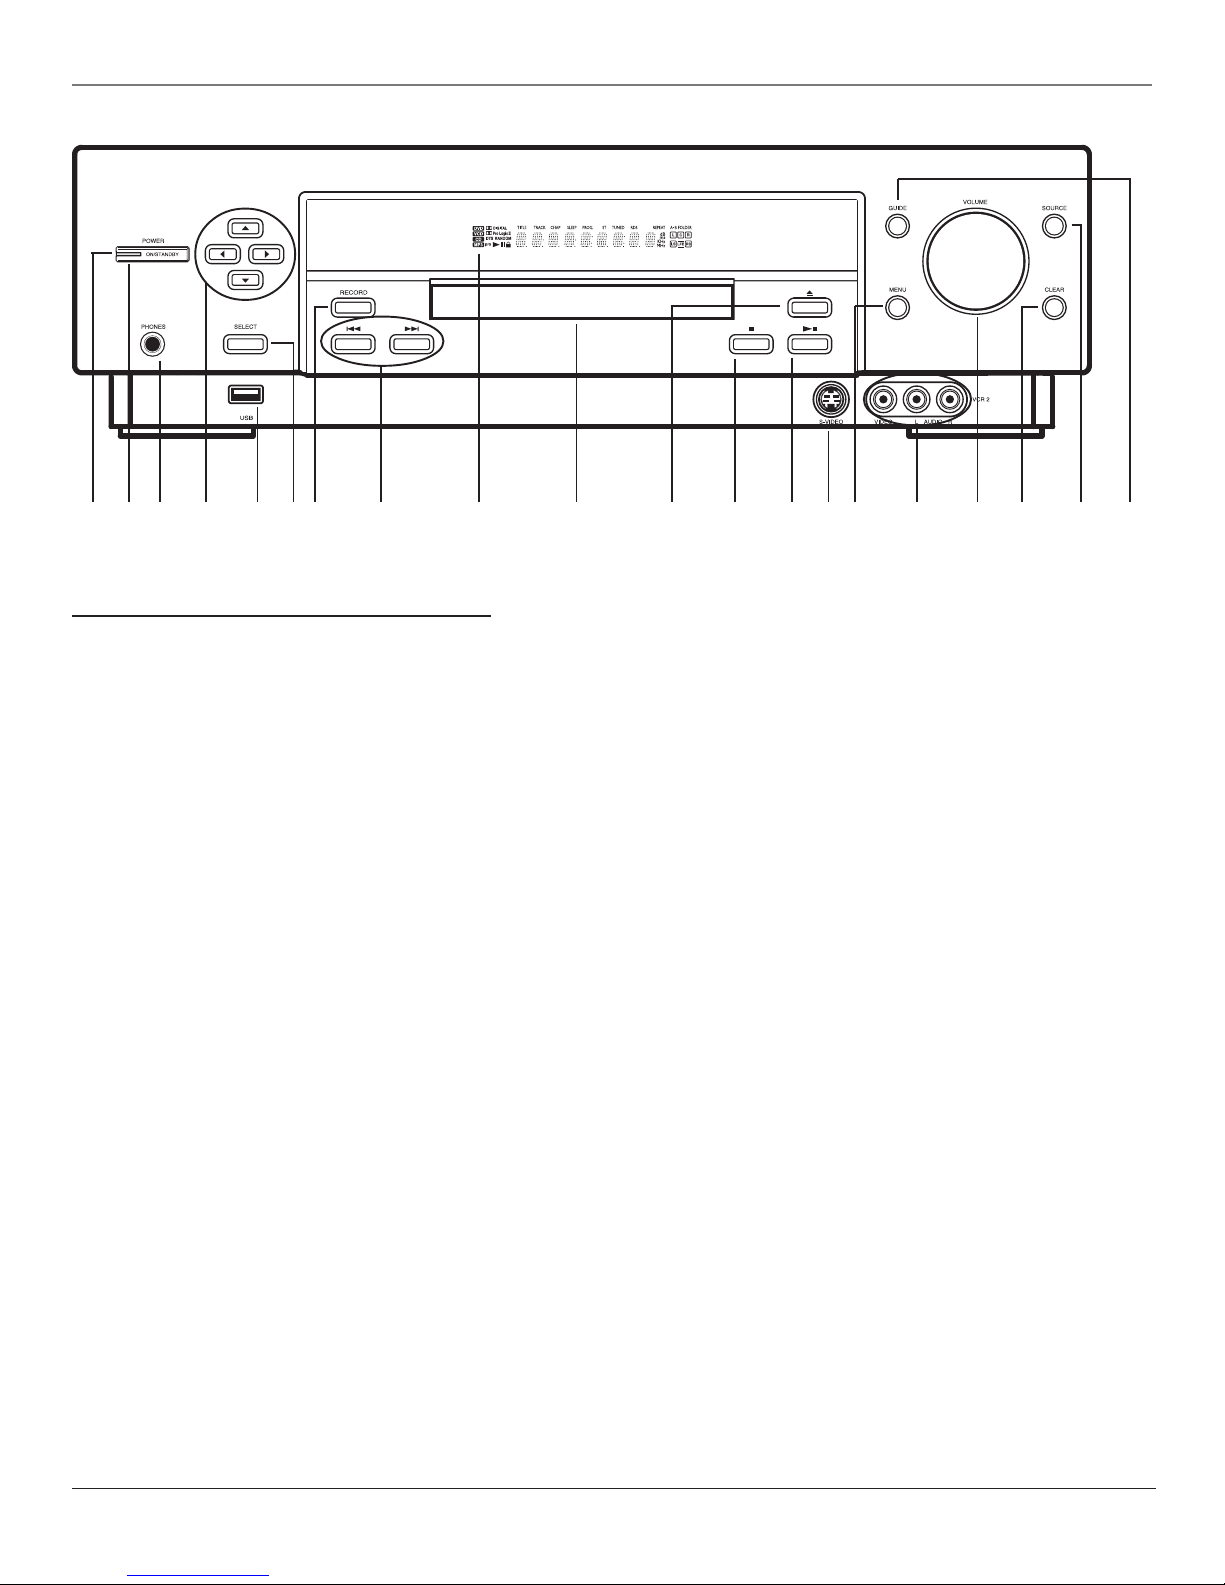
Front of the Home Theater Music Jukebox
1. POWER indicator — Indicates when the unit is on or in standby.
2. POWER — Toggles the unit between on and standby.
3. PHONES jack — Allows you to connect headphones for private listening.
4. Arrow buttons — Move the on-screen highlight.
5. USB jack — Allows you to connect a keyboard or Lyra portable mp3 player or some USB keyboards.
6. SELECT — Selects menu choices when they are highlighted.
7. RECORD — Starts recording MP3s.
8. Reverse and Forward buttons — Search forward or backward during playback. Press and hold to skip audio tracks and movie chapters.
9. Display
10. Disc tray
11 . Open/Close — Opens and closes the disc tray.
12. Stop — Stops the current function (record, play, etc.).
13. Play / Pause — Plays or pauses playback.
14. VCR2 S-Video input jack — Allows you to connect an S-video component.
15. MENU — Displays the on-screen menu system.
16. VCR2 audio/video input jacks — Allows you to connect an external audio or video component, such as a camcorder or video game system.
17. VOLUME — Raises and lowers the volume of the speakers.
18. CLEAR — Removes any menu or display from the screen and returns you to normal viewing. Also clears on-screen menu item entries.
19. SOURCE — Toggles between the available input sources (VCR, satellite, aux, etc.).
20. GUIDE — Toggles between the guide and player screens in Music, Movie, or Radio Modes.
34
567 8
11 12
13
14
15 17
16 20910
18
19
4 Chapter 1
Page 7
Chapter 1: Connections and Setup
1
MONITOR OUT
23
45 6
VIDEO
OUT
AUDIO
789
OUT
MAIN
AUX
10
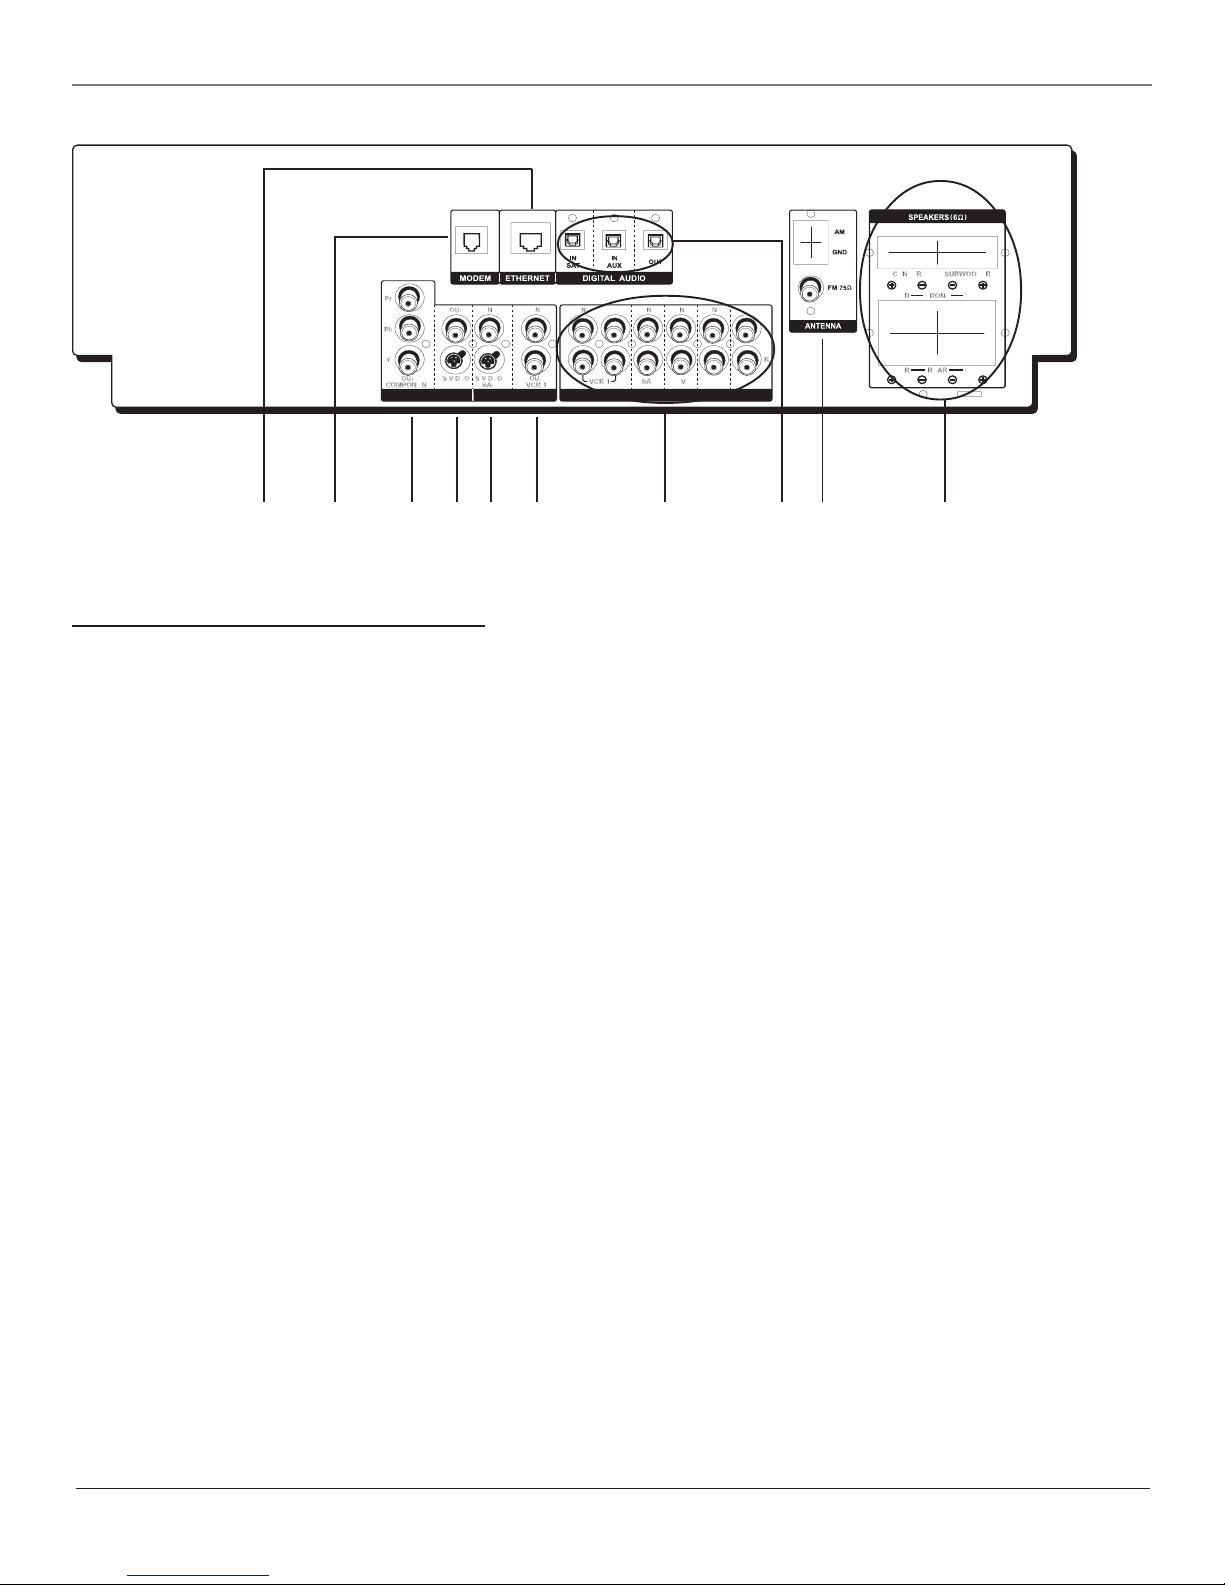
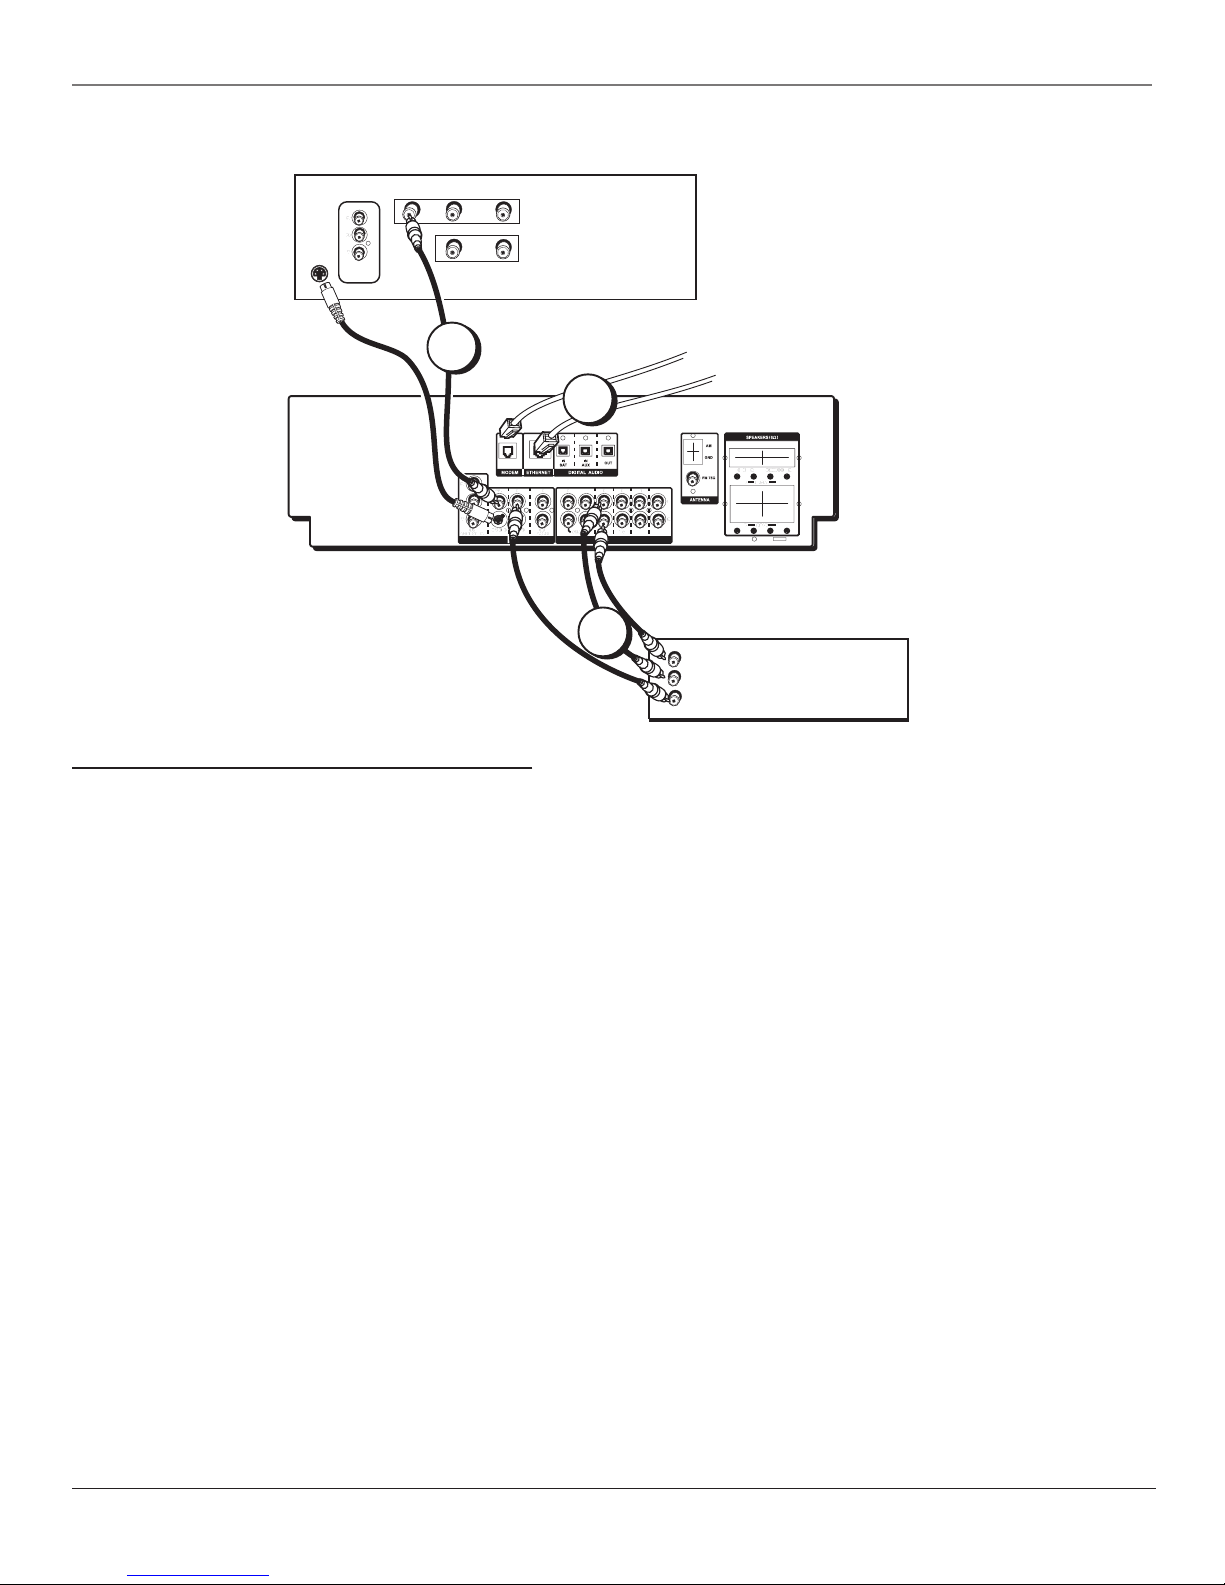
Back of the Home Theater Music Jukebox
When connecting, make sure you connect Output jacks to Input jacks, Video to Video, Right Audio to Right Audio, etc. A description of each jack
follows.
Description of Jacks
1. ETHERNET — Connects to your home network or router using an Ethernet cable.
2. MODEM — Connects to your home telephone wiring for dial-up Internet access.
3. Component Video Out jacks— If your TV has component video input jacks, connect to your TV for optimum quality.*
4. S-VIDEO OUT jacks — If your TV has an S-Video input jack, connect to your TV for better picture quality than using the VIDEO jack.
5. S-VIDEO IN jacks — If your video source component (e.g. cable box or satellite receiver) has an S-Video output jack, connect it to this S-Video
input for better quality than composite video.
6. VIDEO IN and OUT jacks — Allows you to connect a VCR and send the signal to your TV.
7. Audio Input jacks (VCR, SAT, TV, AUX) — Connects to your audio input sources.
8. DIGITAL AUDIO IN/OUT jacks — Connects to your digital audio input sources and connects your jukebox to a receiver or decoder with Dolby
Digital capability using a digital connection.
9. ANTENNA jacks — Allow you to connect AM/FM antennas for better radio reception (see page xx for installation instructions).
10. Speaker jacks
* Note: The Component Video Out jacks can’t convert composite video or S-video to component video.
Chapter 1 5
Page 8
Chapter 1: Connections and Setup
TV
AUDIO
L / MONO
R
IN
L
OUT
1
2
COMPONENT
VIDEO INPUT
S-VIDEO
HOME THEATER
MUSIC JUKEBOX
VIDEO
-OR-
The back of your TV might
not look exactly like the one
shown here.
From Phone Line or Ethernet
-OR-
Important: For Ethernet connections,
make sure you use the supplied
Ethernet cable with attached ferrite
core filter. Using other Ethernet
OUT
OUT
cables may cause interference.
MONITOR OUT
VIDEO
AUX MAIN
AUDIO
CABLE BOX or SATELLITE RECEIVER
3
Connecting your Home Theater Music Jukebox
1. Connect the Music Jukebox to the TV
Connect the VIDEO OUT jack from the Music Jukebox to the video input on the back of your TV. If your TV has line-level audio out jacks (red and
white connectors) and you want to listen to your TV programming in full surround sound, connect them to the desired audio input jacks on the
back of your Music Jukebox.
Note: If your TV has an S-Video input or component video input, we recommend you make the video connection by using these jacks instead.
2. Connect the telephone line or Ethernet cable to the Music Jukebox.
Connect the telephone line cord or Ethernet cable from the wall jack to the MODEM or ETHERNET jack on your Music Jukebox. For Ethernet
connections, make sure you use the supplied Ethernet cable with attached ferrite core filter. Using other Ethernet cables may cause interference.
Very Important: You must connect a telephone line or Ethernet cable to use many of the features of this unit. If the Music Jukebox can’t connect to the OpenGlobe server, you
won’t be able to access artist information, CD cover art, buy CDs from OpenGlobe services, radio information, etc.
If you’re not connected through Ethernet, make sure you select the modem in the setup menus (see page 12).
3. Connect your Cable Box or Satellite Receiver to the Music Jukebox.
If you have a cable box or satellite receiver, you may want to connect it to your Music Jukebox. Connect the audio output jacks from your cable
box or receiver to the AUDIO SAT IN jacks on the Music Jukebox. Then connect the video out on the cable box or receiver to the VIDEO SAT IN jack
on the Music Jukebox.
Note: If your cable box or satellite receiver has an S-Video output, we recommend you make the video connection by using this jack instead.
4. Plug the power cord into the power jack on the back of the Music Jukebox and the other end into an AC outlet.
6 Chapter 1
Page 9
Chapter 1: Connections and Setup
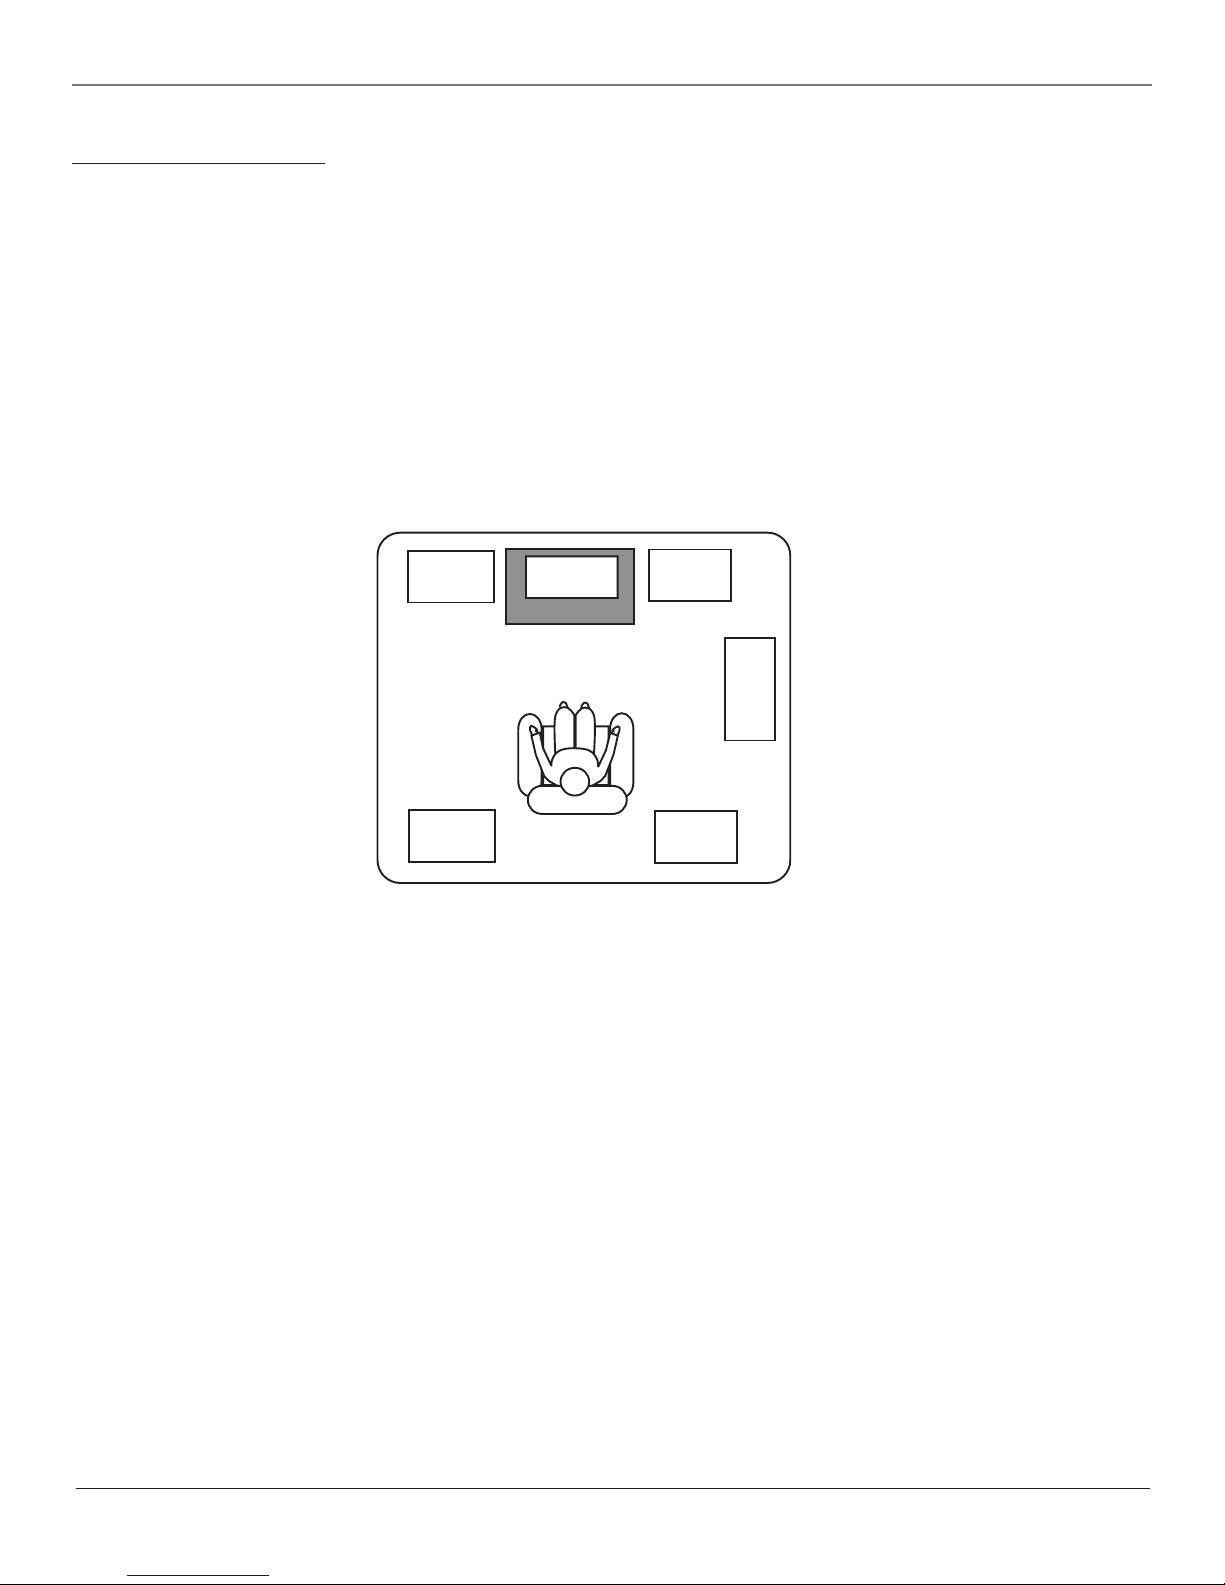
Positioning your Speakers
Your system is equipped with Dolby Digital and DTS (Digital Theater System) decoding, which enables the unit to reproduce sound effects as they were
intended. However, the speakers must be properly positioned and balanced. In order to enjoy Dolby Digital and DTS-enhanced sound quality, six
speakers are recommended: One center speaker, left and right main speakers, rear left and right speakers, and a subwoofer. A subwoofer is
recommended to enjoy improved bass effects. Below are a few suggestions for the set up:
1. The two main speakers should be set between six and ten feet apart. Putting them any closer or farther apart may result in reduced separation of
the surround sound effects.
2. Try to align the center speaker and two main speakers, or set the center speaker slightly behind the left and right main speakers, otherwise the
sound separation may be affected.
3. Aim the rear speakers directly at the two main speakers, matching height to height. If the room is sparsely decorated, slightly tilt the speakers
down to increase sound quality. If the room is densely decorated, face the speakers towards the rear wall at the ceiling. For more information on
speaker setup, please refer to Connecting the Speakers on the next page.
4. You can increase or decrease the bass effects by moving the subwoofer closer or farther away from a wall or corner of the room. (You may want
to experiment with this until you get the sound you want.)
Main
Left
Rear
Left
Here is an example of how you could position your speakers.
There are many possible options, and you may want to
experiment to find the right balance for you.
Center
TV
Main
Right
Subwoofer
Rear
Right
Chapter 1 7
Page 10
Chapter 1: Connections and Setup
j
Connecting the Speakers
For better sound quality, Center speaker, rear speakers and subwoofer are preferred. Adding center and rear speakers will enhance surround effects.
Adding a Subwoofer will increase bass response. If you want to enjoy a full frequency range of sound effects, it is recommended to use the subwoofer
with the speakers to maintain adequate bass signal for the surround sound effect.
Speaker cords, 1 for each speaker, are needed for connection. Twist the stripped ends of speaker cord about 2/3 inch (15 mm). Press down on the tab
to open the terminal and insert the wire. Snap the tab closed. To ease speaker connections, the speaker cords and the terminals are color-coded into:
Red/Black (Main Speakers), Blue/Black (Center Speaker) and Grey/ Black (Rear Speakers). Use the black wires for the negative terminal connections.
When connecting the speakers, make sure the colors of speaker wires and terminals are matched. If the cords are reversed, the sound will be distorted
and lack bass.
Connecting the Antennas
The AM and FM antennas connect to the AM and FM terminals on the system’s back panel. They must be hooked up in order to receive clear reception.
Uncoil the antenna wires and locate the bare ends. Press down on the tab to open the terminal and insert the wire. Snap the tab closed. After
connecting the antennas, extend them to their full length and adjust their positioning for better reception.
Remember to place your antenna wires away from speakers wires and any cables for best reception.
Connecting the Subwoofer
Connect the subwoofer with the audio cord (brown/ black) provided. If you want to connect your own powered subwoofer, refer to the owner’s
manual for the subwoofer.
Blue/Black-colored
acks and wires
CENTER
SPEAKER
CENTER
+
-
SUB WOOFER
-
+
SUB WOOFER
Brown-colored
jacks and wires
MAIN SPEAKERS
RIGHT
-
+
RIGHT
-
+
SURROUND SOUND SPEAKERS
LEFT
-
+
LEFT
-
+
Red/Black-colored
jacks and wires
Gray/Black-colored
jacks and wires
8 Chapter 1
Page 11
Chapter 1: Connections and Setup
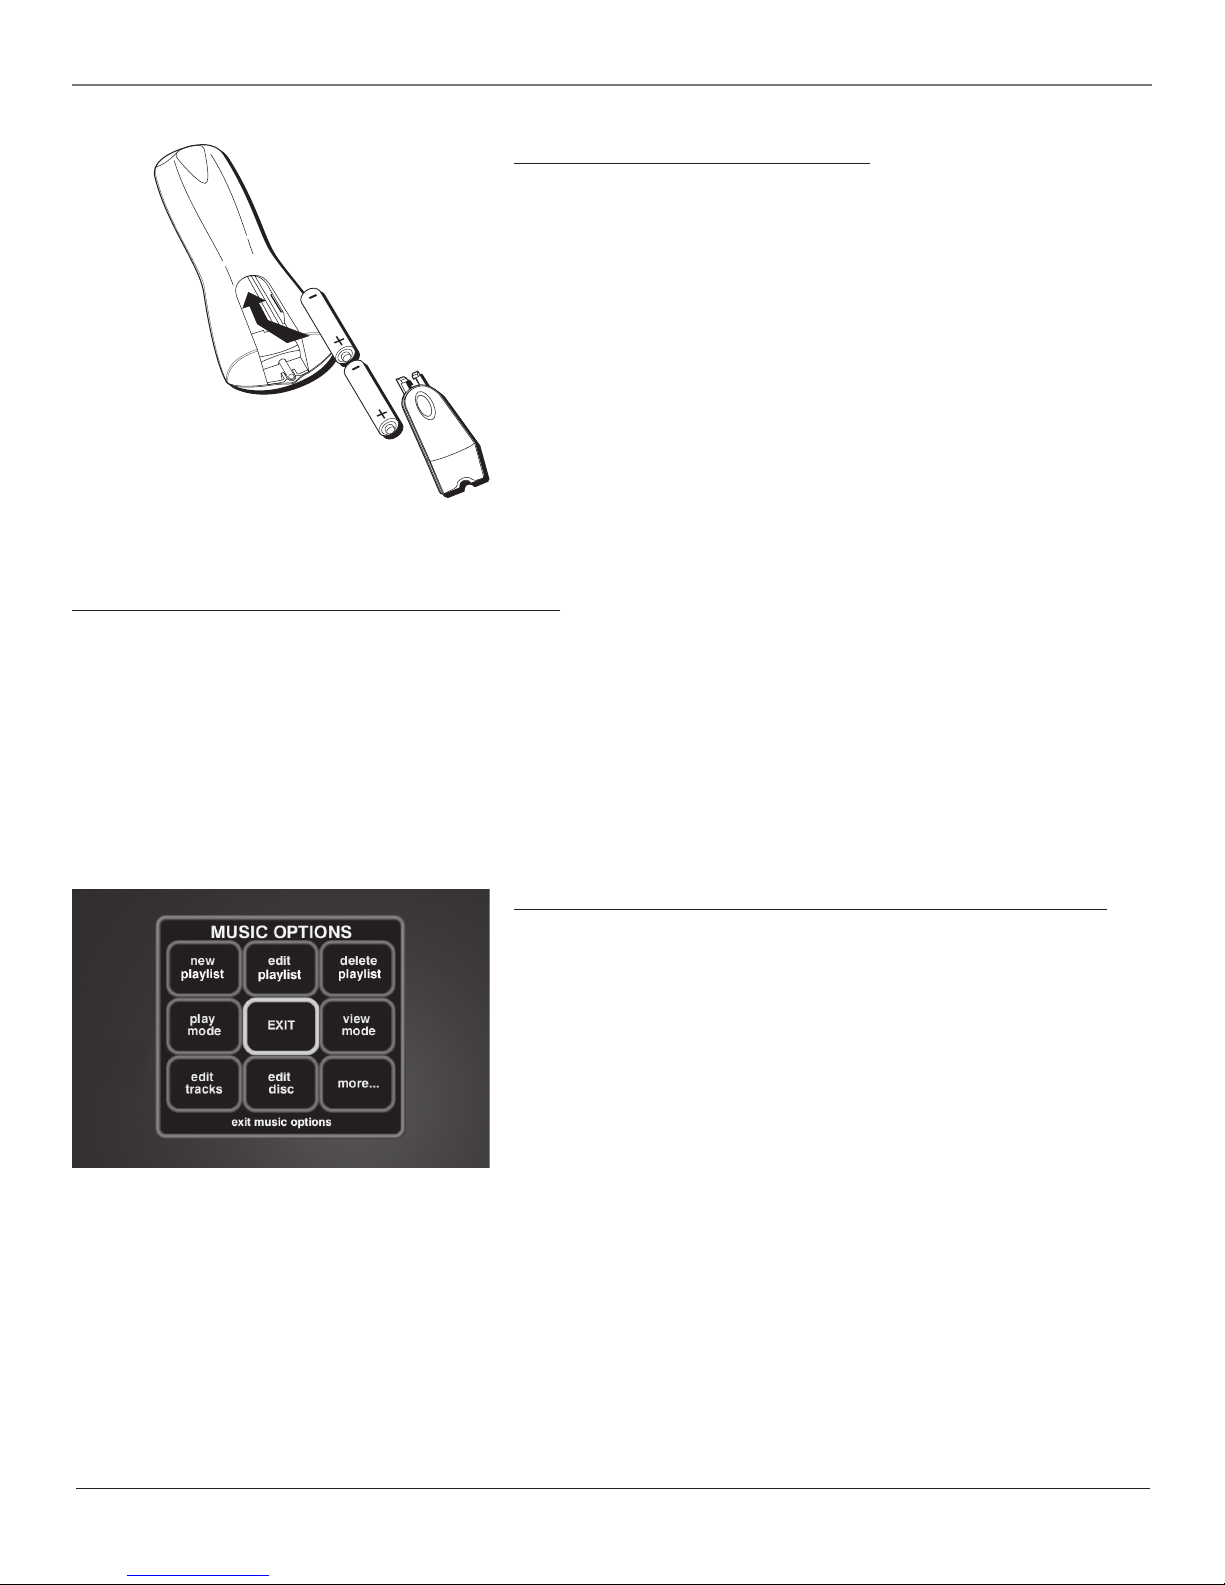
Put Batteries in the Remote Control
Insert the batteries matching the polarities (+ and –) on the batteries with the diagram
in the battery compartment.
Important Battery Information
• If you’re not going to use the remote for a month or more, be sure to remove the
batteries because they can leak and cause damage.
• Dispose of batteries in the proper manner, according to federal, state, and local
regulations.
• Any battery may leak electrolyte if mixed with a different battery type, if inserted
incorrectly, if all batteries are not replaced at the same time, if disposed of in fire, or
if an attempt is made to charge a battery not intended to be recharged.
• Discard leaky batteries immediately. Leaking batteries can cause skin burns or other
personal injury
Turn on the TV and Home Theater Music Jukebox
1. Turn on the TV (if the TV you’ve connected to the Jukebox is an RCA, GE, or Proscan TV, press the TV button on the remote packed with your unit).
2. Turn on the Music Jukebox by pressing the MUSIC, RADIO, or MOVIES button on the remote or press the POWER button on the front of the unit.
Note: The front of the unit displays STARTING when the system is first plugged in and initializing. The POWER indicator comes on when the Music Jukebox is ready for use.
3. Tune the TV to the correct Video Input Channel (see the next page for more information). You will not see any of the Music Jukebox’s menus if
you tune your TV to channel 3 or 4.
Note: If you can set you TV to auto tune to the correct Video Input Channel, you may want to do this. Refer to your TV’s owner’s manual for more information.
Using the Remote Control to Choose On-screen Menu Items
The technical term is “Navigation” – how you move through the on-screen menus. The
theory is the same throughout the menu screens: highlight your choice and select it.
To highlight a menu item, press the arrow buttons on the remote or the front of the
unit. Use the up or down arrow button to move up or down. Use the right or left arrow
button to move left or right.
To select the item that you’ve highlighted, press OK•SELECT.
Note: Highlighted means that the menu item stands out from the other menu items on the list
(usually represented by a colored box or circle around the choice).
Chapter 1 9
Page 12

Chapter 1: Connections and Setup
How to Find Your TV’s Video Input Channel
You must tune your TV to the Video Input Channel since you are using the Music Jukebox’s audio/video output jacks (composite video, S-video, or
component video [Y, Pb, Pr]). You will not see any of the Music Jukebox’s menus if you tune your TV to channel 3 or 4.
The Video Input Channel for TVs varies by brand and model. Below are some steps to try
to find your TV’s video input channel:
VCR1 ON • OFF TV
MOVIES VCR2 AUX SAT•CABLE
RADIOMUSIC
CH•PAGE+
VOL
CH•PAGE-
GUIDE
OK
SELECT
VOL
GO BACKMUTE
INFO
TV button
• If your TV brand is RCA, GE, or Proscan, press the TV button on the Music Jukebox’s
remote control, then press the INPUT button.
• If you have another brand of TV, see page 54 to see if the Music Jukebox’s remote
can be programmed to control your TV. If so, once completed, follow the step above.
If those options do not work, try the following ideas. You might access the Video Input
Channel by:
•Pressing a button on the TV’s remote control (see the table below).
• Selecting a specific channel from the TV’s on-screen menu system (see the table
below).
•Tuning directly to the Video Input Channel by selecting a specific channel number
(see the table below)
• Going through all available channels by pressing the channel up or down buttons on
the TV or its remote control.
@-*#
ANGLE SURR
CLEARMENU
SETUP
FWD•SPACE
_/.?' ABC DEF
123
GHI JKL MNO
456
PQRS TUV WXYZ
789
INPUT
0
REV•DEL PLAY
RECORD PAUSESTOP
MENU SUBTITLE
DVD
If you programmed your remote
control to operate your TV
(instructions on page 54), press
the INPUT button to find the
Video Input Channel.
Video Input Channel Variations
Button/Switch Button on the Channel
on the TV TV Remote Number
VIDEO VID 1 00
SIGNAL LINE 90
VID 1 VID 91
VID 2 VIDEO 92
S-VID S-VID 93
S-VIDEO INPUT VID 1
S-VIDEO VID 2
SOURCE
AUX
INPUT
button
10 Chapter 1
Page 13
Chapter 1: Connections and Setup
Introduction to Your Home Theater Music Jukebox
The first screen you will see when you turn on your Music Jukebox is the Introduction screen. The following screens help to familiarize you with the
features and the Internet requirements to get the most from your Music Jukebox experience.
Demo Modes
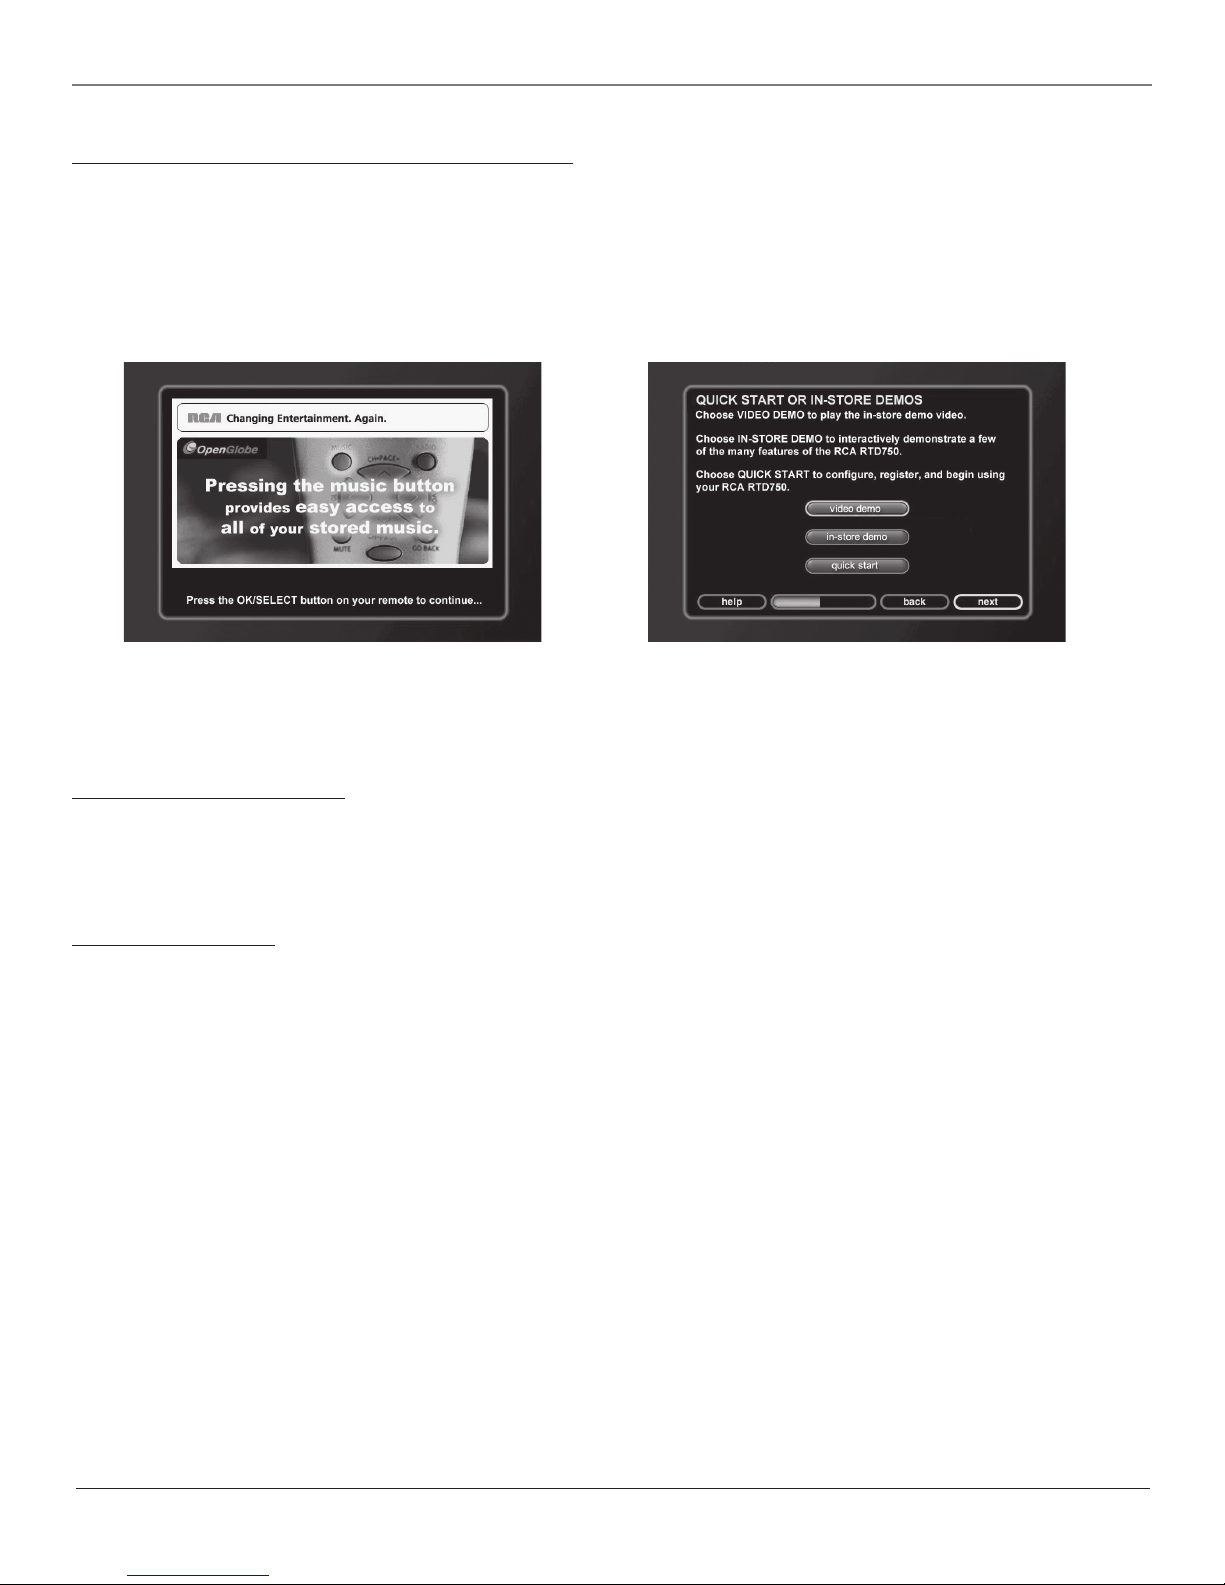
Following the Introduction screen, you’ll be able to choose a video demo of the unit, an in-store demo, or go right to the Quick Start to get started
using your Music Jukebox right away.
The Home Theater Music Jukebox’s Introduction screen.
The Demo or Quick Start options screen.
What Is The Setup Process?
To optimize your Home Theater Music Jukebox so that you can enjoy all of its capabilities, you will need to go through a setup procedure.
You will encounter two types of setup procedures. The first type of setup is Quick Start, and occurs automatically the first time you turn on the unit.
The second type of setup is one you can initiate at any time by pressing the SETUP button on your remote. This particular setup allows you to
customize user preferences, audio and video settings, communication port settings, security and parental controls, and more.
Running Quick Start
Introduction Screens
The Quick Start process begins with a welcome screen and a description of how to navigate through the menus. Remember to press the OK/SELECT
button on the remote to advance to the next screen. The next button is already highlighted by default.
If you have a dialup Internet Service Provider (ISP), gather the following information:
• Dialing Number
• Login Name
• Login Password
• Name of ISP
The Music Jukebox has a simple interface menu so that you can select and configure your connection on an existing account. Most other ISPs are
supported if they use standard PPP type connections. If you do not know if your ISP supports this standard (Point to Point Protocol), simply call the
provider and ask. If you don’t have an Internet Service Provider (ISP), please sign up for one before proceeding on to the next step.
To set up an account with AOL so that you can explore all the exciting features your RCA Home Theater Music Jukebox has to offer,
call 1-888-397-3966.
Note:
Free ISPs don’t use standard, consistent methods of Internet connectivity and don’t open their networks to outside users. Therefore, these can’t be used with the Music
Jukebox unless you have a Broadband connection.
Chapter 1 11
Page 14

Chapter 1: Connections and Setup
Completing Quick Start
Quick Start is a setup procedure that occurs automatically the first time you turn on the
unit. You must be connected to the Internet to complete Quick Start. It is a required
procedure which presents a series of screens and menus that enable the Music Jukebox
to perform the following:
• get additional information (CD cover art, music information)
• configure Internet Radio stations for your location
Each screen has a button bar at the bottom for accessing the previous or next page.
The arrow buttons on the remote or front of the unit are used to highlight the items,
while the OK/SELECT button is used to accept them. The default button on the Quick
Start screens is the next button, which allows you to go directly to the next screen if the
desired setting is already selected.
Next button
The first Quick Start screen, with the button bar at the bottom.
The next steps guide you through the Quick Start process.
Entering Text with the Number Buttons or Optional Keyboards
Before you begin the Quick Start process, you may find areas of the setup where you
need to enter more than just numbers. You’ll notice the number buttons on the remote
control also have letters next to them, and they work similarly to a cell phone or cordless
phone for entering letters.
For a list of compatible USB keyboards, see page 58.
•Press the desired number button repeatedly and scroll through the letters assigned to
that button until you see the desired letter.
•To delete a character, press REV•DEL.
•To move the cursor, use the arrow buttons.
•To add a space, press FWD•SPACE.
Internet Access through an ISP
This screen asks if you currently have an Internet Service Provider (ISP) or if you are an
AOL member. If you do, yes is selected and next is highlighted, so just press OK/SELECT. If
you don’t have an ISP, highlight no, and press OK/SELECT. The next screen has
information about how to obtain an ISP.
To set up an account with AOL so that you can explore all the exciting features
your RCA Home Theater Music Jukebox has to offer, call 1-888-397-3966.
Connection Method
Which type of Internet connection do you have? Highlight AOL dial-up, CompuServe,
other dialup or ethernet and press OK/SELECT.
Highlight next and press OK/SELECT to continue to the next screen.
If you have a dialup connection, go to page 15.
Important: If you’re not connected through Ethernet, make sure you select one of the
dialup connection methods.
12 Chapter 1
Page 15
Chapter 1: Connections and Setup
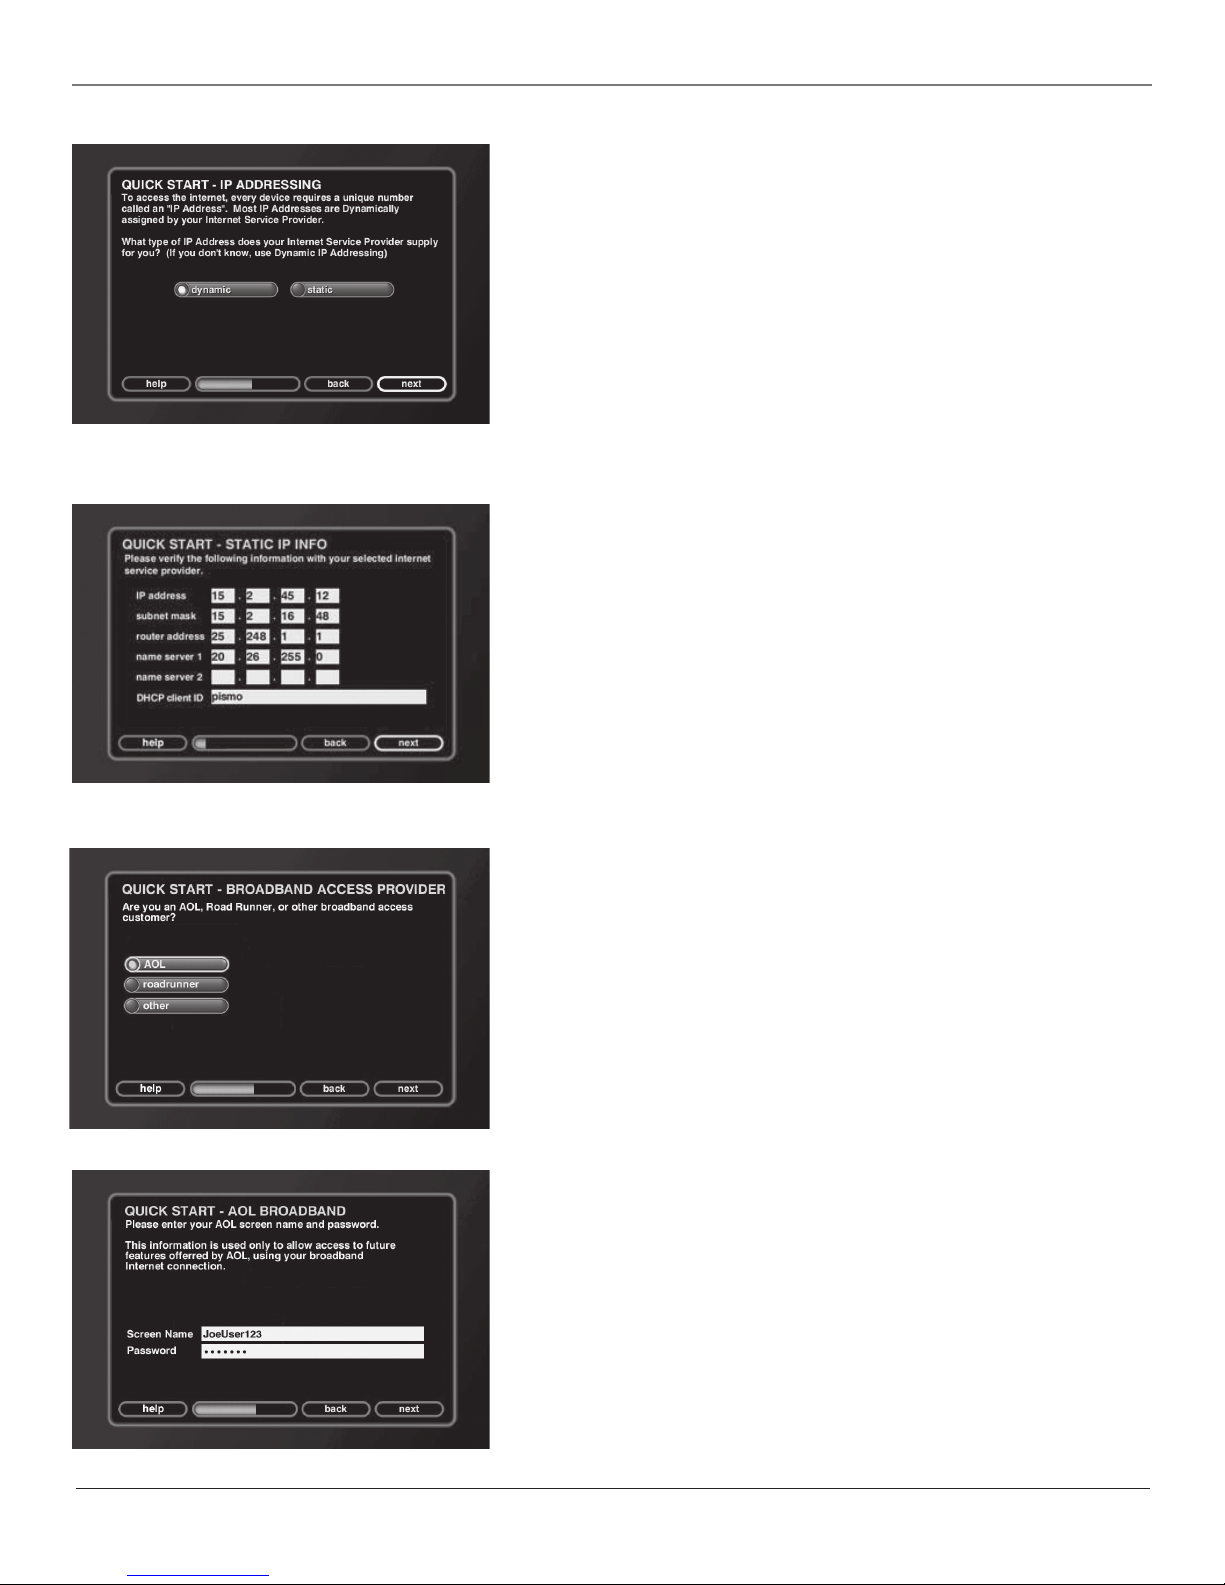
Ethernet IP Addressing
If you are using an Ethernet connection, choose what kind of Internet Protocol Address
your ISP supplies, and press OK/SELECT. If you don’t know, choose dynamic.
Highlight next and press OK/SELECT to continue to the next screen.
Tip: If you’re not familiar with IP addressing, we recommend you choose dynamic for
this setting. All your IP addressing information will be gathered from your ISP
automatically.
Ethernet Settings
If you chose static in the previous screen, enter all of the IP information provided by
your ISP. When finished, highlight save and press OK/SELECT.
To enter text, press the desired number button repeatedly and scroll through the letters
assigned to that button until you see the desired letter. To delete a character, press
REV•DEL. To move the cursor, use the arrow buttons.
When finished, highlight next and press OK/SELECT to continue to the next screen.
Broadband Access Provider
Once you set up your ethernet settings, you’ll be asked which broadband access provider
you use (AOL, Roadrunner, or other). Choose the correct one, highlight next, and press
OK/SELECT.
Highlight next and press OK/SELECT to continue to the next screen.
Broadband Login Info
Enter your screen name (for AOL) or email address for Roadrunner and others, as well as
your password.
When finished, highlight next and press OK/SELECT to continue to the next screen.
Chapter 1 13
Page 16
Chapter 1: Connections and Setup
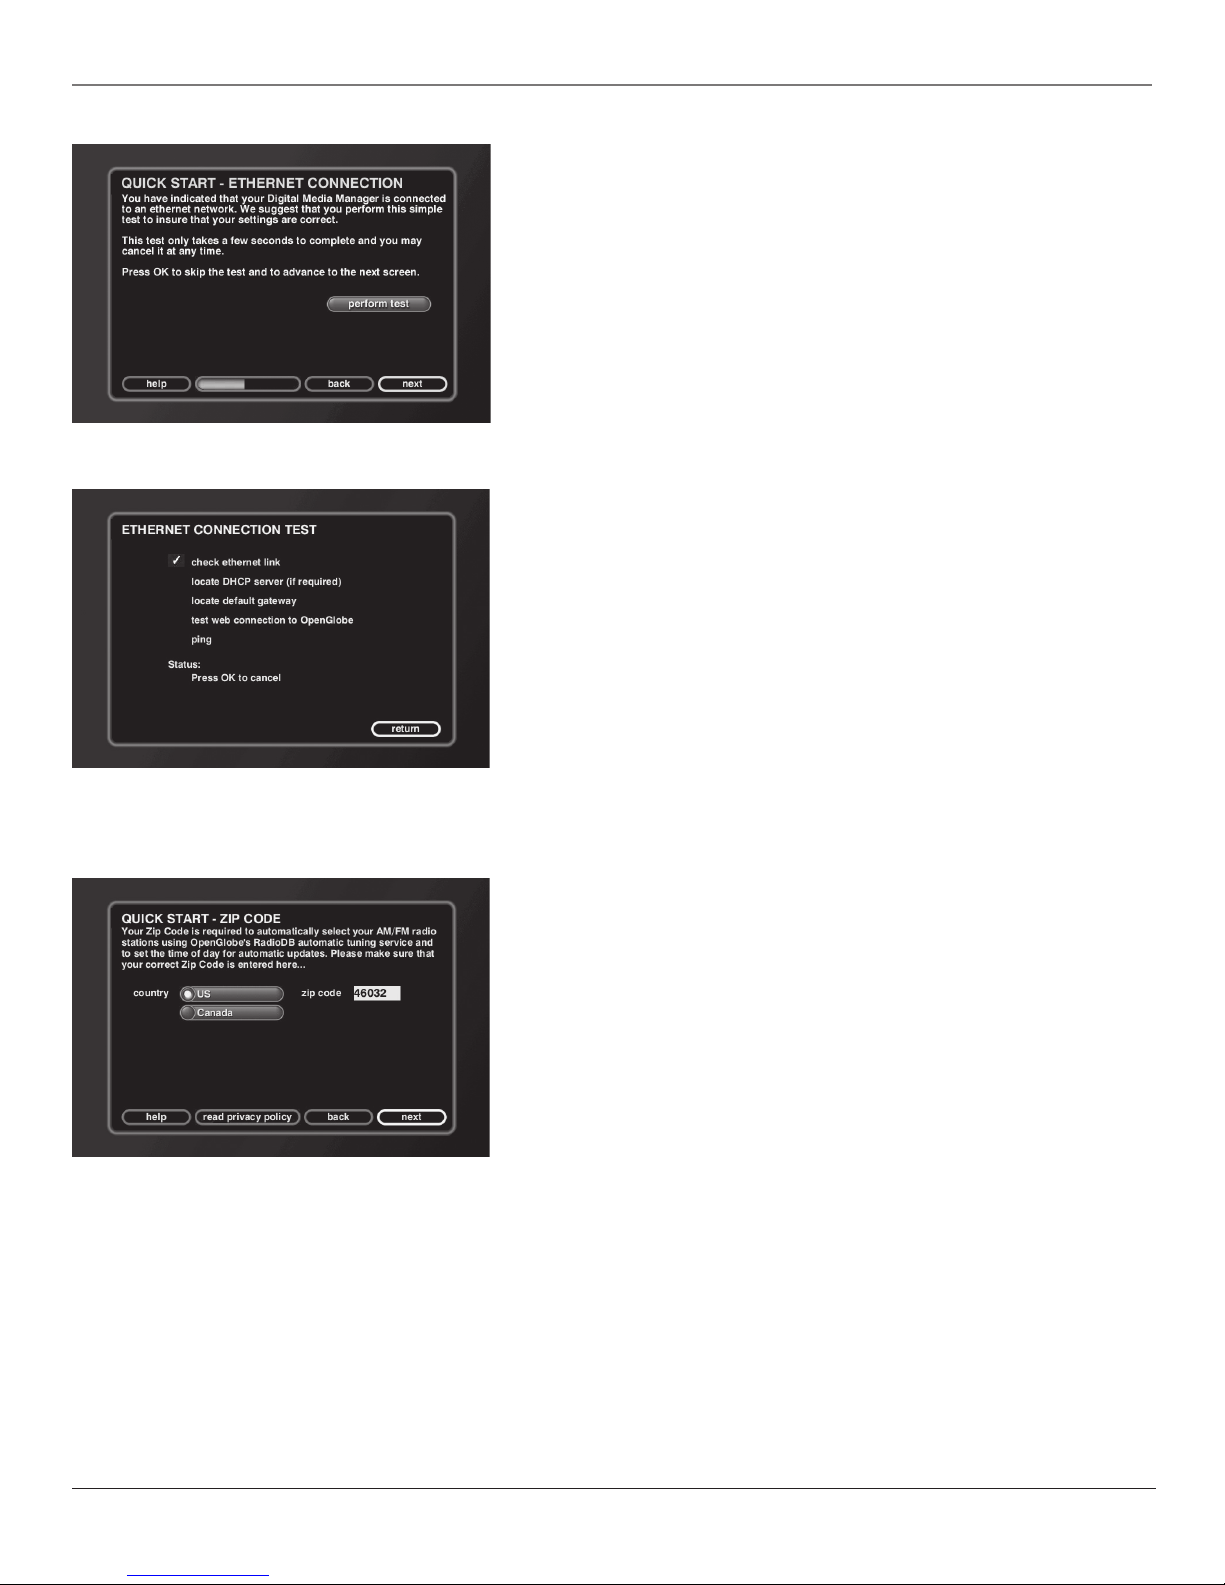
Testing the Ethernet Connection
After your enter your Ethernet settings and access information, a connection test screen
appears. Highlight test connection and press OK/SELECT. The test results are displayed. If
you experience any problems, see below for more information.
Highlight return, and press OK/SELECT to continue.
Note: You may need to run this test more than once to verify your connection.
Explanation of Connection Test
Check ethernet link — Verifies that there is a physical connection to an Ethernet
network. This test will fail if there is no Ethernet cable connected into the Music Jukebox
or if the other end is not connected to the network (hub, gateway, cable modem, etc.).
Locate DHCP server — Checks for a DHCP server is the IP address settings are set to
dynamic. This test will fail if no DHCP server is found.
Locate default gateway — Checks for the existence of the gateway whose IP address was
returned from the DHCP server. The test will fail if the gateway does not respond.
Test web connection to OpenGlobe — Checks connection to the OpenGlobe server.
Ping Time — Total time it took for the OpenGlobe server to respond to the above test.
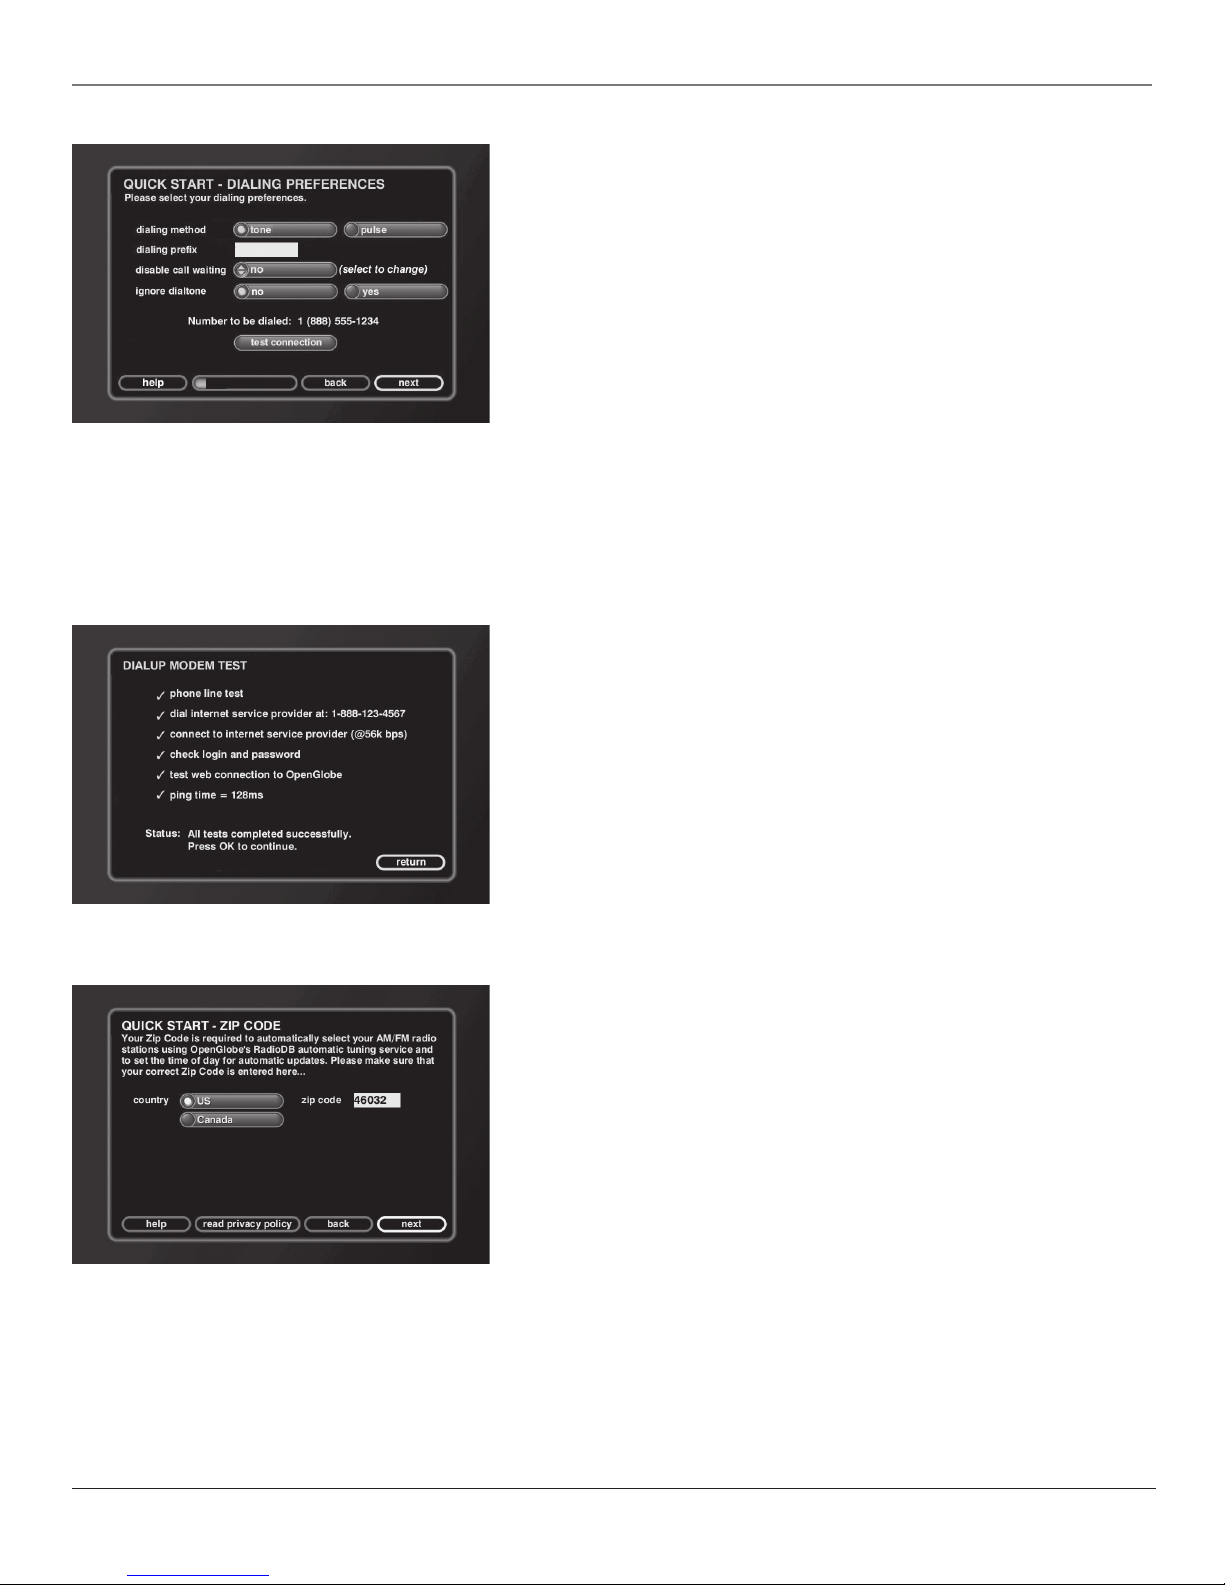
Zip Code
Important: You must enter a valid zip code for your location.
The Music Jukebox updates the time and gathers all your AM/FM and Internet radio
stations from your zip code. Choose the country where you live and enter your zip code.
Remember, many of the above features won’t be available if you don’t provide your zip
code or postal code.
Highlight next, and press OK/SELECT to continue.
This completes the Quick Start process, and you can now start enjoying your Home
Theater Music Jukebox!
Note: All advanced setup options are explained in Chapter 5.
14 Chapter 1
Page 17
Chapter 1: Connections and Setup
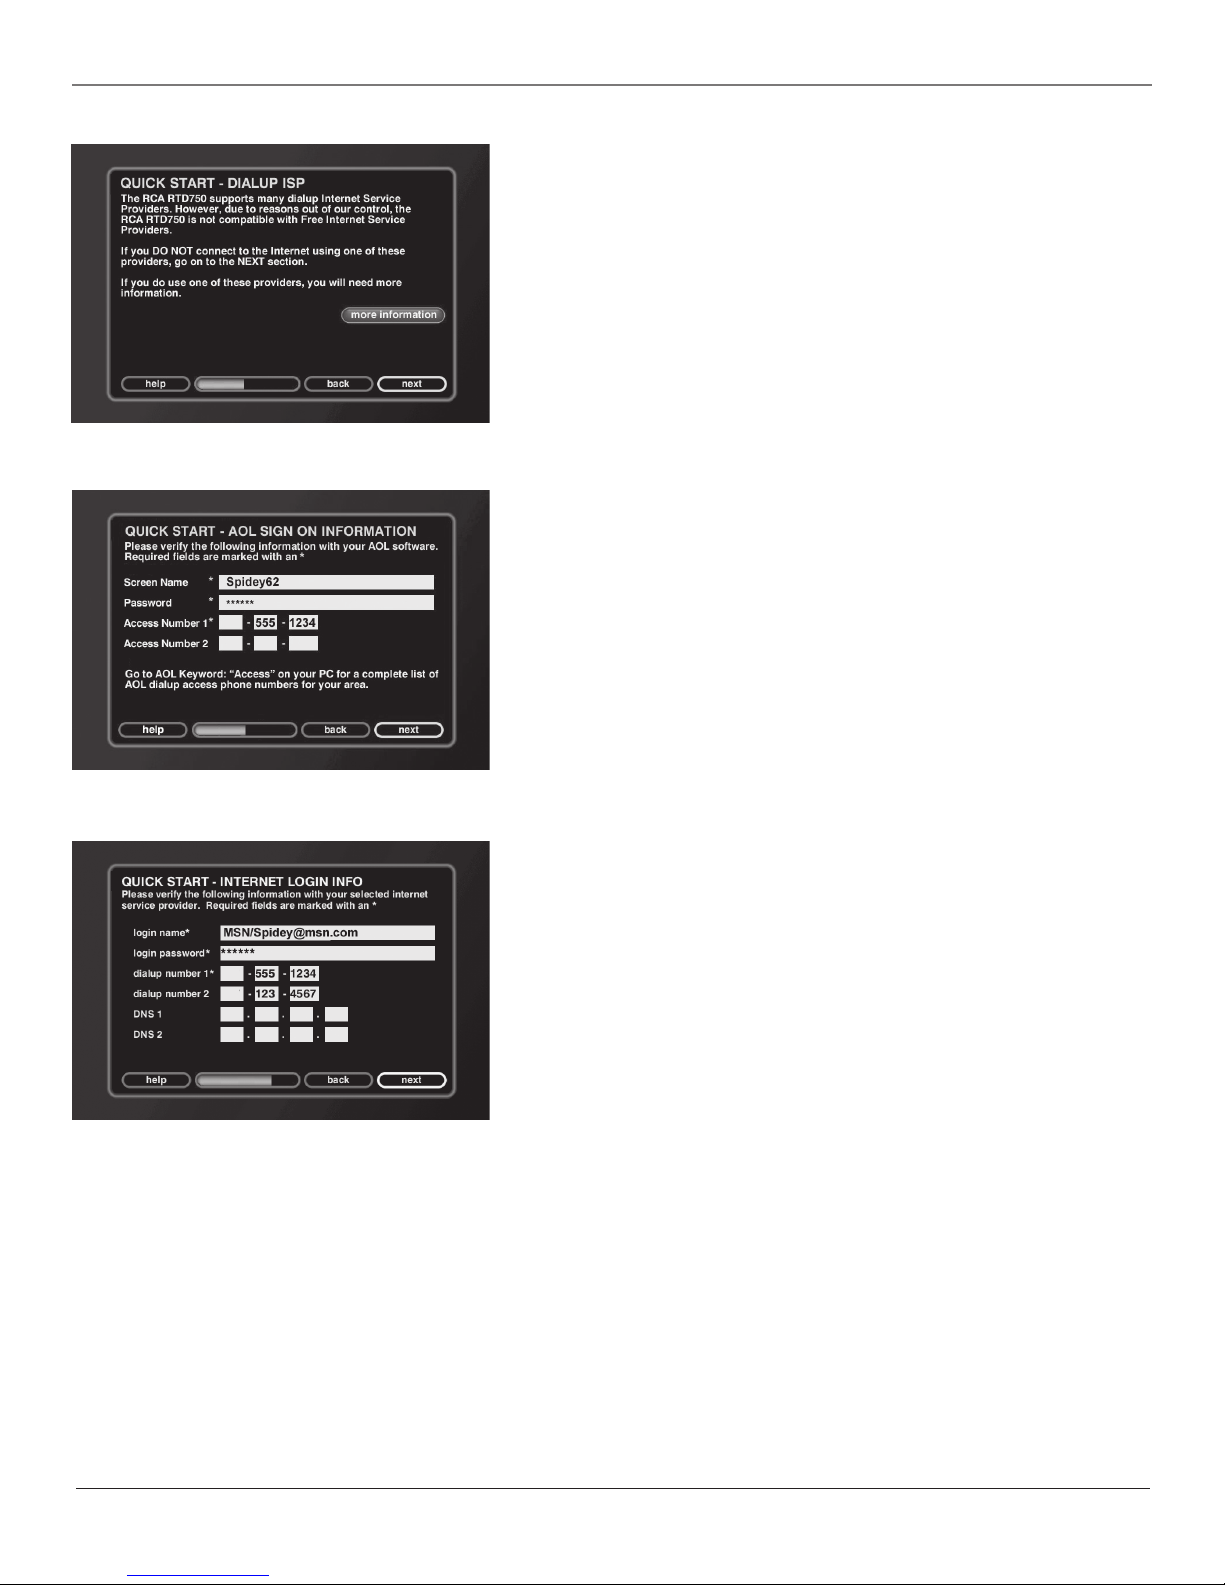
Dial-up ISP
If you chose other dial-up for your network connection access in the previous screen,
you will be asked if you use free ISPs to connect to the Internet. The Home Theater
Music Jukebox can’t use these ISPs. Highlight more info, and press OK/SELECT for more
on how to obtain an ISP.
Internet Login Info
If you are using a dial-up connection, enter the login name or username, password, and
dial-up number for your ISP account.
To enter text, press the desired number button repeatedly and scroll through the letters
assigned to that button until you see the desired letter. To delete a character, press
REV•DEL. To add a space, press FWD•SPACE. To move the cursor, use the arrow buttons.
The password will appear as visible text when the field is empty AND you are entering
the password. Once you move from the password field or whenever you return to this
screen, the password text is hidden.
The AOL sign on screen.
The standard dialup screen.
Some popular ISP access formats:
AOL Simply enter your username, password, and access number. (You don’t need to
enter AOL/username, etc.)
Earthlink There are two methods:
a) Login name — ELN/username
OR
b) Login name — username@earthlink.net
Then enter your password and access number information.
MSN Login name — MSN/username
Then enter your password and access number information.
When finished, highlight next and press OK/SELECT to continue to the next screen.
Chapter 1 15
Page 18
Chapter 1: Connections and Setup
Dialing Preferences
This screen allows you to select your dialing preferences, including dialing method,
diailing prefix, and call waiting disable, and ignore dial tone.
Dialing method – Tone or pulse. Check with your phone company if you are not sure
which one you have.
Dialing prefix – If you normally need to dial a prefix (1, 9, etc.) to make a call, enter it
here. You may also need to enter a 1 for 800 numbers.
Disable call waiting – If you have call waiting on your phone line, you may want to
disable it during your dialup session to prevent interruptions to your connection. Several
options are available, depending on which key combination your phone company uses
(*70, 70#, and 1170). It is automatically re-enabled after you disconnect from the
OpenGlobe server.
Ignore dial tone – If you have voice mail on your phone line, you are probably familiar
with the “stuttered” dial tone you hear when you have messages. Before the Music
Jukebox dials your ISP, it checks the line for a regular dial tone. If you have messages,
the Music Jukebox will disconnect and allow you to listen to your messages, or you can
set it to ignore the dial tone and dial automatically.
Highlight next and press OK/SELECT to continue to the next screen.
Testing the Dialup Connection
In the Dialing Preferences screen, highlight test connection and press OK/SELECT. The
test results are displayed.
Highlight return, and press OK/SELECT to continue.
16 Chapter 1
Zip Code
Important: You must enter a valid zip code for your location.
The Music Jukebox updates the time and gathers all your AM/FM and Internet radio
stations from your zip code. Choose the country where you live and enter your zip code.
Remember, many of the above features won’t be available if you don’t provide your zip
code or postal code.
Highlight next, and press OK/SELECT to continue.
This completes the Quick Start process, and you can now start enjoying your Home
Theater Music Jukebox!
Note: All advanced setup options are explained in Chapter 5.
Page 19
Chapter 1: Connections and Setup
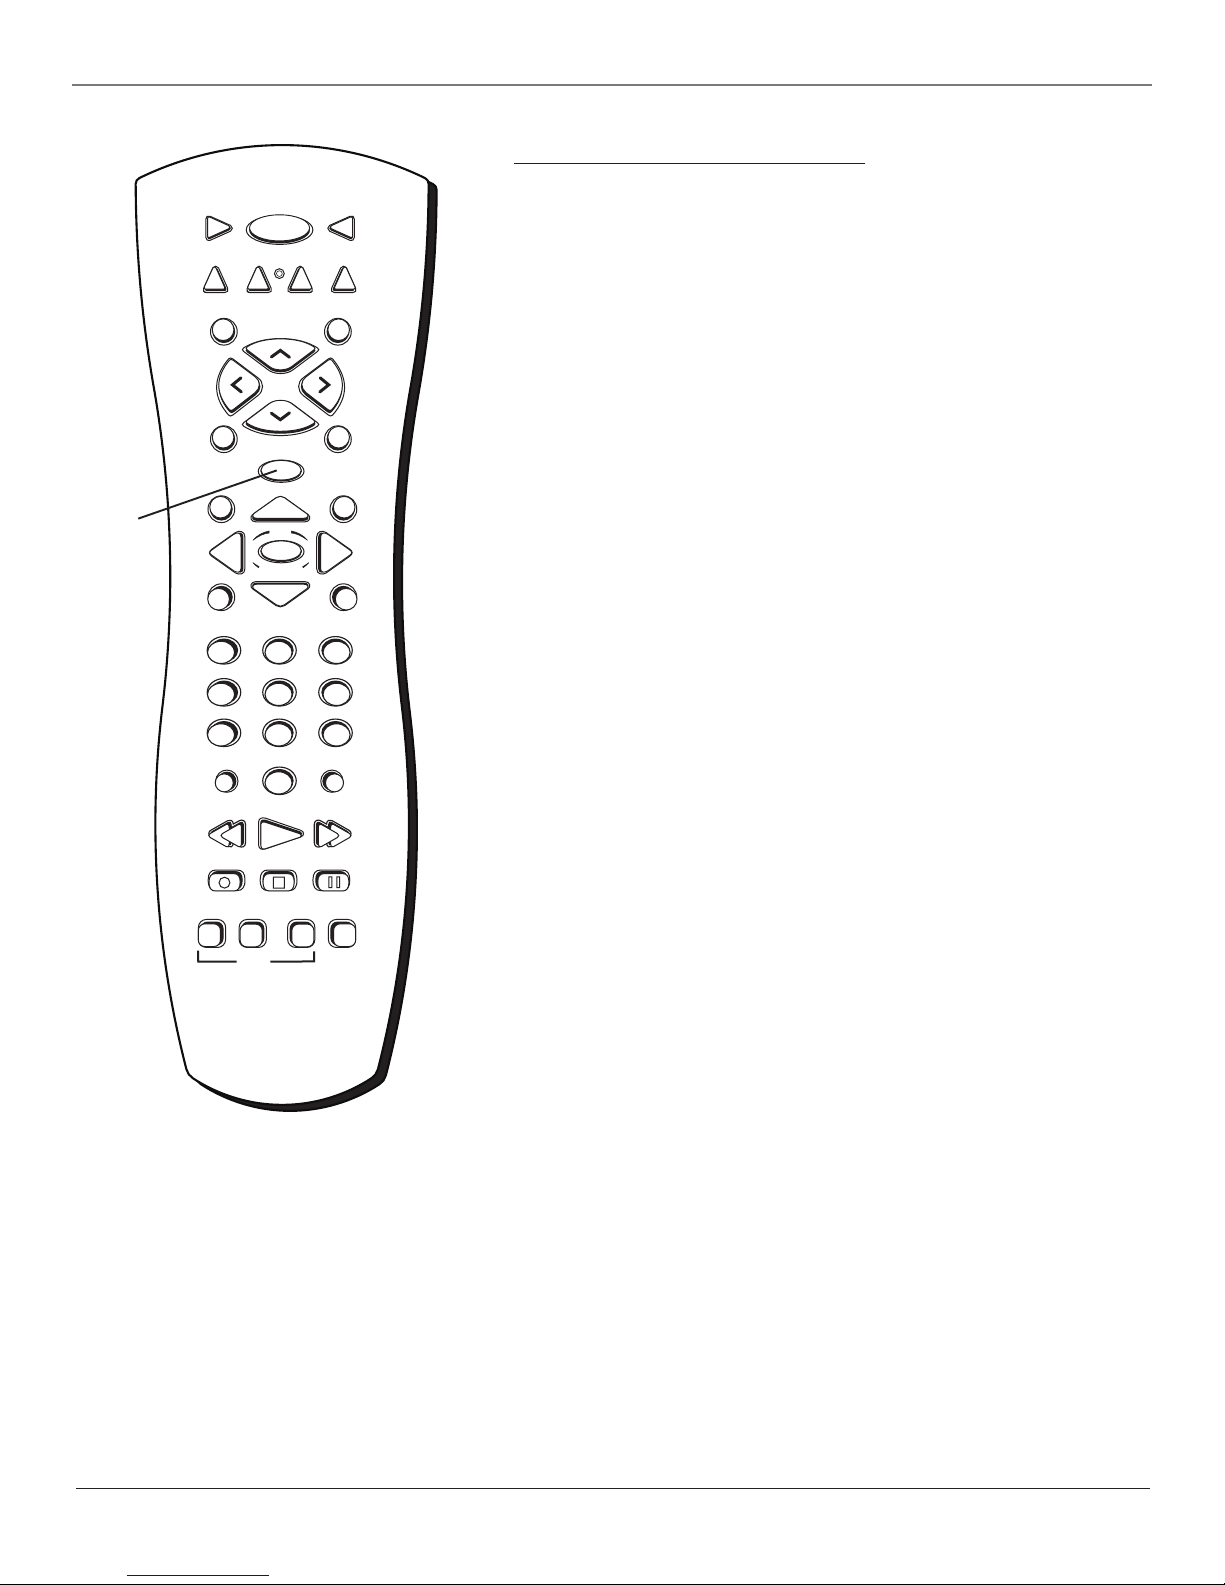
The Buttons on the Remote Control
OpenGlobe
button
VCR1 ON • OFF TV
MOVIES VCR2 AUX SAT•CABLE
OK
@-*#
SETUP
FWD•SPACE
ANGLE SURR
RADIOMUSIC
GO BACKMUTE
INFO
CLEARMENU
CH•PAGE+
VOL
CH•PAGE-
GUIDE
SELECT
_/.?' ABC DEF
123
GHI JKL MNO
456
PQRS TUV WXYZ
789
INPUT
0
REV•DEL PLAY
RECORD PAUSESTOP
MENU SUBTITLE
DVD
VOL
Frequently Used Buttons
The following are buttons on the remote control that you will use frequently, including
choosing what Guide you want the Home Theater Music Jukebox to display and
navigating the various menus.
(0-9) Number buttons Enters numbers when selecting track numbers, etc. Also used
to enter text when naming groups and playlists.
In VCR, TV, or satellite mode, selects channels up to 99 by pressing two number buttons.
Selects 3-digit channels by pressing and holding 1 until 1 – – appears on screen. Then
press the other two numbers.
Arrows Move the on-screen menu highlight.
GO BACK Selects/deselects all tracks of a CD or MP3 title or playlist, and toggles the
play modes. Also returns you to the previous menu for a compatible TV, VCR, or satellite
receiver.
GUIDE Toggles between the Guide and Player screens in Music, Movie, or Radio modes.
Also displays the channel guide on some RCA, GE, and Proscan TVs and satellite receivers.
MENU Displays the Music, Movies, or Radio Options menus.
MOVIES Puts the unit in DVD mode and displays the Movie Guide.
MUSIC Puts the unit in Music mode and displays the Music Guide.
OK•SELECT When a menu is on the screen, selects the highlighted item. Also selects
individual tracks of a CD or MP3 title or playlist.
OpenGlobe Takes you to a specialized information area to explore your favorite artists
and actors. You can also find similar artists or movies, and purchase new CDs and DVDs.
RADIO Puts the unit in Radio mode and displays the Radio Guide.
RECORD Used to record CDs in mp3 format to the hard drive. When making selections
in the menus or guides, confirms and saves your changes. Also starts record mode on a
compatible VCR.
STOP Cancels the current selection in the menus or guides without making any
changes. Also stops the current function (record, playback, rewind, etc).
Note: This remote operates most
RCA, GE, and Proscan products.
Chapter 1 17
Page 20

Chapter 1: Connections and Setup
Other Buttons on the Remote Control
These buttons are used for the DVD features of the unit, and for controlling other compatible components, including VCRs, TVs, and satellite receivers.
ANGLE Accesses various camera angles that might have been added to the disc when it was created.
Note: Currently, very few movies provide multiple camera angles.
AUX Puts the remote in AUX mode. Can also be programmed to operate some compatible products (TV, audio component, or satellite receiver/cable
box).
CH + and – Selects next higher or lower channel in the channel list. Also selects the next/previous chapter or track when you’re playing a disc, and
used to scroll a page at a time in the Music, Movies, and Radio Guides.
CLEAR Removes any menu or display from the screen and returns you to normal viewing. Also clears on-screen menu item entries.
FORWARD Searches forward if pressed during playback. During play-pause mode in DVD mode, starts slow-motion advance and each press of the
button during slow-motion advance increases the speed incrementally.
INFO Shows additional information for what is playing. Also, shows the status displays on screen of the VCR, TV, DVD player, etc. (whichever
compatible component is set as the remote control’s active device).
INPUT Toggles the Video Input Channels. Video Input Channel refers to the signal coming from the component connected to audio/video input jacks
on the Music Jukebox. In satellite/ cable mode, changes audio input from analog to digital.
MUTE Reduces the volume to a minimum level on some compatible products.
ON•OFF Turns the unit on or off. Also turns other compatible components on or off.
PAUSE Pauses playback or recording modes. Press PAUSE again to return to active playback or recording.
PLAY Plays a DVD disc.
REV•DEL Searches backward if pressed during playback. In DVD mode, searches backward on a DVD. Jumps back about 1/2 second each time it is
pressed when a movie is paused.
SAT•CABLE Turns on a compatible RCA, GE, or Proscan satellite receiver, puts the remote in satellite receiver or cable box mode, and can also be
programmed to operate some compatible receivers or cable boxes.
SUBTITLE In DVD mode, accesses the Subtitle part of the on-screen Info Display, and turns Subtitles on and off (if subtitles are available on the disc
you are playing).
SURR (Surround) Allows you to change the surround sound settings.
TV Turns on a compatible RCA, GE, or Proscan TV and puts the remote in TV mode. Also used with the ON•OFF button to turn on/off a compatible
TV.
VCR1/VCR2 buttons Turn on the unit and put the remote control in VCR mode. Likewise, you can change to DVD mode by pressing the MOVIES
button.
VOL < and > Raises and lowers the volume of some compatible products.
Using the INPUT Button
Use the INPUT button to scroll through the available Video Input Channels. The Video Input Channels allow you to view images from a device
connected to the unit (like a camcorder).
1. Make sure that the unit is turned ON.
2. Press the remote control’s INPUT button to tune to the Video Input Channel.
18 Chapter 1
Page 21

Chapter 2: Music Features
Playing Music
The Home Theater Music Jukebox puts your entire music collection at your fingertips. In this section you’ll learn how to navigate the Music Player screen
and sort, select, and listen to your favorite music. It’s as simple as cuing up something from your library, or putting in a CD to add something new to your
collection. You’ll learn more about how to record new music to your library in the next section, but for now let’s look at how the player works.
Some Terms and Definitions You’ll See in the Following Chapters
There may be a few terms used in the next few chapters you may not be familiar with. Take a minute to familiarize yourself with them.
Playlist — Your customized collection of songs that you can set in any order or include any song.
Track — An individual song.
Group — Think of this as a collection of musical genres (Country, Rock, Classical, etc.).
Title — Think of this as a complete CD album (including every track on the CD, for example).
MP3 track — A track you have recorded or “ripped” from a CD and is stored on the Music Jukebox’s hard drive.
Navigating the Music Player Screen
• The Music Player screen appears whenever you insert a CD or select a track from the
Music Guide.
• Arrow buttons - Use the up and down arrow buttons to move the highlight from one
track to another. The right and left buttons are not used on the Music Player screen.
• OK/SELECT - When a track is highlighted, stops playing the selected track and starts
playing the highlighted track. You can also play the track by pressing the PLAY button.
•PAGE +, PAGE- - Scroll the music player track list one page at a time. Each page
contains 12 different tracks. On a page that contains less than 12 tracks, the bottom
rows will be empty.
• Number buttons - Enter a track number using the number buttons, then press the
SELECT button.
• INFO - Displays detailed track information (transport status, play mode, elapsed track
time).
• RECORD - Starts recording an MP3. See the next chapter for details.
• PLAY, PAUSE, and STOP - Plays, pauses, or stops music. An on-screen status appears
each time the button is pressed.
• FAST FORWARD and REWIND - Fast forward and rewind a track. Both stop when the
beginning or end of a track is reached. An on-screen status appears each time the
button is pressed.
There are a number of ways to play music:
• Open the disc tray and insert an audio CD. The Music Jukebox plays the CD, connects to
the internet to identify the disc, loads the information into the music library, displays
the track list, title artist, and cover art in the Music Player View.
• Use the GUIDE button on the remote. The Music Jukebox displays the Music Guide View
so that you can navigate and select an item.
Selecting and Listening to a Music Title
1. Press the MUSIC button on your remote.
2. Press GUIDE. The Music Guide screen appears.
3. Use the left and right arrow buttons to highlight the group of your choice.
4. Use the up and down arrow buttons to highlight the desired music title.
5. Press SELECT to display a list of the tracks on the highlighted CD or PLAY to play the highlighted CD (the title tracks and cover art appear in the
Player screen and the music plays.)
Sorting Music by Artist, Title, Song, Alphabetically
1. Press the MUSIC button on your remote.
2. Press GUIDE. The Music Guide screen appears.
3. To sort by artist, title, or song, highlight and select the View Mode button on the screen and then highlight and select the desired view.
4. To sort alphabetically, press the number buttons on the remote for the desired letter.
Chapter 2 19
Illustrations contained in this document are for representation only.
Page 22

Chapter 2: Music Features
Recording Music
Music Compression and MP3 Audio Quality
When you create an MP3 file from a CD song, you compress the information so that it takes up less space on the hard drive. The compression
technology can use varying sample rates of the song, or bit rates, in which it chooses which bits of musical information to keep and which to ignore.
At high bit rates, you can match the quality of the song very closely, which should be the goal for the best representation of the music.
The Music Jukebox’s default bit rate is 128kbps, which is near CD quality. Again, the higher the bit rate, the better the performance, so you’ll want to
rip the song as close to 128kbps as possible. You can choose bit rates anywhere from 96kbps-320kbps. Keep in mind, however, that the higher the bit
rate, the larger the MP3 file becomes and the more space it will use on the hard drive.
The default record bitrate can be changed by pressing the SETUP button and using the Preferences menu settings.
Recording Music from a CD
Recording a CD to the Jukebox takes just 3 simple steps.
1. Press the Open/Close button on the front of the unit and insert a CD into the CD disc
tray. Press the button again to close the tray.
The Music Jukebox then connects to the OpenGlobe server for all available
information (including cover art and track listing).
2. Press RECORD (the Music Record screen appears).
All tracks appear with a check mark to the right to indicate they will be recorded.
• To remove or add all of the tracks, highlight the title of the CD and press GO BACK
(all tracks will be checked or unchecked).
• To remove or add a single track, use the up and down arrow buttons to highlight a
track, then press OK/SELECT to remove or add it (the track will be checked or
unchecked).
• To exit the Music Record screen, press STOP.
3. When finished selecting or deselecting tracks, press RECORD (all of the selected
tracks are recorded to the hard drive).
Note: You can also press RECORD while playing the CD.
The Music Record Progress screen appears and indicates how long the record process will
take, with a progress bar at the bottom of the screen and remaining time. Please be
patient. This may take several minutes.
After a few minutes, a screen saver appears. To return to the Music Record Progress
screen press any arrow button.
Important: Do not attempt any other functions during the record process.
Note: If a warning appears stating that there isn’t enough space on the hard drive, you will need to
remove some of the songs, or make room on the hard drive.
• To cancel recording at any time, press STOP. All tracks that have been completely
“ripped” will be saved. Tracks that have been partially recorded or have not yet
started will be deleted.
When recording is complete (or cancelled), the Music Guide screen will be displayed,
with the newly recorded title highlighted.
4. Go ahead and record a couple more tracks or titles of different musical styles. This
Playlist
icon
MP3
icon
will be useful for understanding how to manage your music and find it easily later.
Note: Keep in mind that you may see two icons in the Music Guide screen for the same song/title if a
CD you just recorded is in the disc tray, one for the CD and one for the MP3 stored on the hard drive.
Once you eject the CD, the CD icon will disappear.
20 Chapter 2
Page 23

Chapter 2: Music Features
Recording Music from an External Audio Device
This feature lets you record external audio sources (radio, tape, LPs) as MP3 files on the
hard drive.
1. Connect your external device to the Home Theater Music Jukebox.
2. Press MUSIC (the Music Guide appears).
3. In the Music Guide, navigate to the External Group, highlight the external input you
want to record, and press the RECORD button on the remote or front of the unit.
4. To start recording immediately, press RECORD again, or enter the artist and title
information, etc. You may also want to set the record time (up to 80 minutes). To
session is recorded as a single MP3 track on the hard drive.
When recording is complete (or cancelled), the Music Guide screen will be displayed,
with the newly recorded title highlighted.
Managing Music
You can easily manage your music through the Home Theater Music Jukebox’s Music Options feature. This set of screens allows you to create and
manage playlists (lists of songs), look up and edit music information, and transfer or record music to portable players.
There are two screens of Music Options. The first screen appears when you press the MENU button while in Music mode. The second screen appears
when you select more in the MUSIC OPTIONS MENU.
The MUSIC OPTIONS menu.
Chapter 2 21
The MORE MUSIC OPTIONS menu.
Page 24

Chapter 2: Music Features
The VIEW MODE menu.
The Cover Art view mode.
Changing the View Mode
You can change how your music library appears in the Music Guide. The choices include
cover, track, artist, and title.
1. Press the MUSIC button on your remote.
2. Press MENU (the MUSIC OPTIONS MENU appears).
3. Highlight and select view mode (the VIEW MODE menu appears).
4. Highlight and select the view mode you want:
cover — Sorts the list alphabetically by the cover art.
track — Sorts the list alphabetically by track name.
artist-title — Sorts the list alphabetically by artist.
title-artist — Sorts the list alphabetically by title.
Selecting a view will close the View Mode menu and display the Music Guide using the
new view.
• To cancel and exit this screen without changing the view mode, press STOP.
Creating a New Playlist
1. Press the MUSIC button on your remote.
2. Press MENU (the MUSIC OPTIONS MENU appears).
3. Highlight and select new playlist (a screen appears so you can enter the name for
the new playlist).
4. When you have finished, press OK/SELECT to continue (the Edit Playlist screen
appears).
5. Use the arrow buttons to highlight what songs you want to include in the playlist,
and press OK/SELECT to checkmark them.
6. When finished, press RECORD to save the playlist.
Note: Up to 200 songs can be added to a single playlist or “favorites” playlist. There is no limitation to
the number of playlists.
The EDIT PLAYLIST screen.
Editing a Playlist
1. Press the MUSIC button on your remote.
2. Press GUIDE (the Music Guide screen appears).
3. Use the arrow buttons to highlight the playlist you want to edit.
4. Press MENU (the MUSIC OPTIONS MENU appears).
5. Highlight and select edit playlist (a screen appears so you can change the name for
the playlist, if you want You don’t have to change the name of the playlist to edit its
contents).
6. Press OK/SELECT to continue (the EDIT PLAYLIST screen appears).
7. Use the arrow buttons to highlight what songs you want to remove from the playlist,
and press OK/SELECT to uncheck them.
8. When finished, press RECORD to save the updated playlist.
22 Chapter 2
Page 25

Chapter 2: Music Features
Deleting a Playlist
1. Press the MUSIC button on your remote.
2. Press MENU (the MUSIC OPTIONS MENU appears).
3. Highlight and select delete playlist (the DELETE PLAYLIST screen appears).
4. Use the arrow buttons to highlight the playlist(s) you want to delete and press OK/
SELECT to checkmark them.
5. Press RECORD to delete the selected playlists. Don’t worry, the tracks won’t be
deleted from the hard drive.
• To cancel and exit this screen without deleting any playlists, press STOP.
Creating a New Music Group
1. Press the MUSIC button on your remote.
2. Press MENU (the MUSIC OPTIONS MENU appears).
3. Highlight and select more (the MORE MUSIC OPTIONS MENU appears).
4. Highlight and select new group (a screen appears so you can enter the name for the
new group).
5. When you have finished, press OK/SELECT to continue (the Edit Music Group screen
appears).
6. Use the arrow buttons to highlight what CD titles you want to include in the group,
and press OK/SELECT to checkmark them.
7. When finished, press RECORD to save the group.
Editing a Music Group
1. Press the MUSIC button on your remote.
2. Use the left or right arrow buttons to highlight the group you want to edit.
3. Press MENU (the MUSIC OPTIONS MENU appears).
4. Highlight and select more (the MORE MUSIC OPTIONS MENU appears).
5. Highlight and select edit group (a screen appears so you can change the name for
the group, if you want. You don’t have to change the name of the group to edit its
contents).
6. Press OK/SELECT to continue (the EDIT MUSIC GROUP screen appears).
7. Use the arrow buttons to highlight what CD titles you want to remove from the
group, and press OK/SELECT to uncheck them.
8. When finished, press RECORD to save the updated group.
Deleting a Music Group
1. Press the MUSIC button on your remote.
2. Press MENU (the MUSIC OPTIONS MENU appears).
3. Highlight and select more (the MORE MUSIC OPTIONS MENU appears).
4. Highlight and select delete group (the DELETE GROUP screen appears).
5. Use the arrow buttons to highlight the group(s) you want to delete, and press OK/
SELECT to checkmark them.
6. Press RECORD to delete the selected groups. Don’t worry, the CD titles or tracks
won’t be deleted from the hard drive.
• To cancel and exit this screen without deleting any groups, press STOP.
Chapter 2 23
Page 26

Chapter 2: Music Features
Changing the Play Mode
This menu allows you to control the order of how the songs play using the normal,
repeat, and shuffle play modes.
1. Press the MUSIC button on your remote.
2. Press MENU (the MUSIC OPTIONS MENU appears).
3. Highlight and select play mode (the PLAY MODE menu appears).
4. Highlight and select the play mode you want:
normal — Plays the current title and then stops. Tracks are played in sequential order.
repeat track — Plays the current track repeatedly until stopped.
repeat title — Plays the current title repeatedly until stopped. Tracks are played in
sequential order.
repeat group — Plays all titles in the current group repeatedly until stopped. Titles
and tracks are played in sequential order.
shuffle title — Randomly plays all tracks within the current title until stopped. No
track will be repeated until all tracks have been played.
shuffle group — Randomly plays all tracks and all titles within the current group
until stopped. No track will be repeated until all tracks have been played.
Selecting a play mode will close the Play Mode menu and display the Music Guide with
the new play mode in effect.
• To cancel and exit this screen without changing the play mode, press STOP.
Note: In the player screen, press the GO BACK button to toggle the play modes.
Deleting Music
This feature allows you to see how much storage space is left on the hard drive and lets
you select songs you might want to delete.
1. Press the MUSIC button on your remote.
2. Press MENU (the MUSIC OPTIONS MENU appears).
3. Highlight and select more (the MORE MUSIC OPTIONS MENU appears).
4. Highlight and select delete music (the DELETE MUSIC-INFO screen appears).
5. Review the summary of the hard drive information, then press OK/SELECT on the
remote to continue (the DELETE MUSIC screen appears).
6. Use the arrow buttons to highlight the tracks you want to delete and press OK/
SELECT to checkmark them.
7. When finished, press RECORD to delete the tracks from the hard drive.
• To cancel and exit this screen without deleting any tracks, press STOP.
24 Chapter 2
Page 27

Chapter 2: Music Features
Editing the Names of Tracks
1. Press the MUSIC button on your remote.
2. Use the arrow buttons to highlight the CD title with the tracks you want to edit.
3. Press MENU (the MUSIC OPTIONS MENU appears).
4. Highlight and select edit tracks (the EDIT TRACKS screen appears).
5. Use the arrow buttons to highlight the track you want to edit and press OK/SELECT
(a cursor appears on the track name).
6. Enter the new track name.
7. Press RECORD to save the updated track name.
Editing Disc Information
This feature lets you edit the track information such as artist name, title, label name, and
year of release. Or, you can have the Home Theater Music Jukebox contact the
OpenGlobe server.
1. Press the MUSIC button on your remote.
2. Use the arrow buttons to highlight the CD title you want to edit.
3. Press MENU (the MUSIC OPTIONS MENU appears).
4. Highlight and select edit disc (the EDIT DISC INFO screen appears).
5. Use the arrow button to move to the desired field (artist, title, label, year), then enter
the information.
6. Move to genre and select the genre.
7. For more disc information, select lookup this disc, search for cover, or select cover.
Note: Choosing lookup this disc replaces any information you have already entered for this disc, but it
doesn’t get saved until you press RECORD.
Chapter 2 25
Page 28

Chapter 2: Music Features
Transferring Music to a Portable Player
The Home Theater Music Jukebox makes it easy to transfer mp3s and playlists to your
favorite USB RCA mp3 player.
1. Make sure the player is connected to the USB jack on the front of the Music Jukebox
and turned on (the Transfer to Portable screen appears).
If the Transfer to Portable screen does not appear:
a. Press the MUSIC button on your remote.
b. Press MENU (the MUSIC OPTIONS MENU appears).
c. Highlight and select more (the MORE MUSIC OPTIONS MENU appears).
d. Highlight and select transfer to portable (the TRANSFER MUSIC screen appears).
2. Use the arrow buttons to highlight the tracks you want to transfer and press OK/
SELECT to checkmark them.
3. When finished, press RECORD to transfer the tracks to the portable player.
Note: If a warning appears stating that there isn’t enough space on your portable player, you will
need to remove some of the songs from the transfer list, or make room on the player.
• To cancel and exit this screen without transferring any tracks, press STOP.
RCA Lyra Portable Mp3 Models compatible
with the Home Theater Music Jukebox
• RD1020
• RD1021
• RD1070
• RD1071
•RD1080
For more music and information, make sure to check out the services from
OpenGlobe (see page 58).
26 Chapter 2
Page 29

Regional Coding
Chapter 3: Movie Features
This DVD player is capable of playing the
following types of discs: DVDs, audio CDs,
DVD-Audio, and MP3 CDs. Before you put
a disc in the player, make sure it is
compatible.
You can’t play the following types of
discs: Laserdiscs, CD-I, CD-ROM
(computer-only discs), DVD-ROM, WMA
discs, or discs recorded using other
broadcast standards (i.e. PAL or SECAM).
Note: Some discs may not be compatible
due to laser pickup and disc design.
a
C
t
c
a
t
C
t
c
h
'
h
t
'
n
U
U
n
a
p
p
a
C
C
This is an example
of a one-sided disc.
e
d
s
i
c
r
W
e
(
e
n
p
U
V
e
h
r
c
s
t
i
a
o
n
C
)
t
'
n
a
C
This is an example of
a two-sided disc –
the title is usually in
the center of the
disc.
Both the Home Theater Music Jukebox’s DVD player and the discs are coded by region.
These regional codes must match in order for the disc to play. If the codes don’t match,
the disc won’t play. This player’s code is region 1.
Using Different Menus
Each disc is programmed with different features. There are two separate types of menus
that you can use to access features:
• The Disc menu – The Disc menu is part of each disc and is separate from the DVD
player’s menu. The contents of each Disc menu vary according to how the disc was
authored and what features are included.
The Disc menu is turned on and off (while the disc is playing) with the DVD MENU
button on the bottom of the remote.
• The Music Jukebox’s DVD player’s Info Display – The Info Display appears as icons
across the top of the screen when a disc is playing. It can only be accessed while you
are playing a disc. It’s turned on and off with the INFO button on the remote.
Remember: A feature will only work if the disc was programmed with that feature. For
example, if you choose subtitles on the Info Display, the subtitles will only appear if the
disc was created with subtitles. If Operation Not Permitted appears at the bottom of the
screen, that item (or feature) isn’t available.
To Load and Play a DVD Disc
Turn on the TV and your Home Theater Music Jukebox (press MOVIES on the remote or
press the Power button on front of the unit).
1. If necessary, tune the TV to its Video Input Channel (if you need more information,
go to page 10).
2. Press the OPEN/CLOSE button (the disc tray opens).
3. Place a disc gently into the tray with the disc’s label facing up (double-sided discs
have content on both sides, so you can place either side up).
4. Press the OPEN/CLOSE button. The disc tray closes. The Music Jukebox reads the disc’s
table of contents, and then one of two things happens depending on how the disc
was programmed:
• The disc starts playing.
• The disc menu appears on the screen. One of the options will start disc play.
Highlight that option and press OK.
When you stop playing a disc, the player remembers where you stopped. When you start
playing the disc again, the Music Jukebox’s DVD player picks up where you left off unless
the disc is removed or the unit is unplugged, or if you press the STOP button twice.
Chapter 3 27
Illustrations contained in this document are for representation only.
Page 30

Chapter 3: Movie Features
Search Options
To search a disc, you can use the FWD•SPACE button or the REV•DEL button. You can also utilize the following search features:
Picture Scan — When you’re playing a disc, each time you press FWD•SPACE or REV•DEL, your Music Jukebox scans the disc faster until you reach the
fastest scan speed. To resume normal playback, press PLAY.
Freeze Frame and Frame Advance – While a disc is playing, press PAUSE to freeze the picture. To advance one frame at a time, press PAUSE again (the
on-screen icon changes from PAUSE to FRAME). To resume normal playback, press PLAY.
Slow Motion (in Freeze Frame Mode) – While a disc is playing, press PAUSE. Press REV•DEL or FWD•SPACE (each time you press REV•DEL or
FWD•SPACE the slow motion will get faster). Press REV•DEL to jump back 1/2 second every time it is pressed. To resume normal playback, press PLAY.
Time display
Title
Chapter
Audio
Subtitles
Angle
Using the On-Screen Info Display
The on-screen Info Display contains many playback features. To see the Info Display, press the INFO button on the remote while a disc is playing (the
Info Display appears across the top of the screen). Each feature is illustrated with an icon. Use the left and right arrow buttons to move through the
different icons in the Info Display. When an icon is highlighted, use the up and down arrow buttons on the remote to scroll through the choices
displayed in the text box under the icons.
Remember, you can only access the Info Display when you’re playing a disc. Also, the Info Display features are only available if the disc was created
with that particular feature (i.e., if you select the Angle icon, you won’t be able to change the camera angle unless the disc was created with different
camera angles).
Operation Not Permitted appears on the screen when you press a button that doesn’t have any function. To make the Info Display disappear from the
screen, press INFO on the remote control. The Info Display will also automatically disappear after 5 seconds of inactivity.
28 Chapter 3
Page 31

Shortcut
While you’re playing a
disc, you can use the CH
+/- buttons to go to the
next chapter/ previous
chapter.
Chapter 3: Movie Features
Selecting a Title
Some discs contain more than one title. For example, there might be four movies on
one disc (each movie might be considered a title). Each title is divided into chapters.
To select a title:
1. While the disc is playing, press INFO on the remote (the Info Display appears).
2. If the Title icon on the Info Display isn’t highlighted, press the right and left arrow
buttons to highlight it.
3. Use the number button(s) on the remote to enter the title number or press the up
and down arrow buttons to go to the next or previous title.
Note: Some discs only have one title.
Selecting a Chapter
Because DVD discs use digital technology, a title can be divided into individual
chapters (similar to tracks on a CD). You can skip to a specific chapter by using the
Chapter feature in the Info Display.
1. While a disc is playing, press INFO on the remote (the Info Display appears).
2. Press the right arrow button until the chapter icon is highlighted.
3. Press the number button(s) on the remote to enter the chapter you want to play —
enter up to 3 digits and then press OK/SELECT. The movie starts playing at the
beginning of the chapter you entered.
You can also se the up and down arrow buttons to go to the next or previous
chapter.
Note: The Chapter feature won’t work if the disc isn’t formatted with separate chapters.
Changing the Audio Language
If the disc was created with different language tracks (recorded in different languages),
you can change the language while you’re playing the disc.
1. While a disc is playing, press INFO (the info display appears).
2. Press the right arrow button until the Audio icon is highlighted.
3. Press the down arrow button on the remote to scroll through the available audio
languages.
4. When the language you want to use is highlighted, press the OK button (the dialog
plays in the language you selected).
Notes:
The language feature only works if the disc was created with multiple language tracks. If the disc
doesn’t contain the language you selected, the disc will play in the default language.
When you choose an audio language during disc playback, you only override the audio language
setting in the Music Jukebox’s Preferences menu temporarily.
The audio language can also be changed through the DVD’s disc menu.
Chapter 3 29
Page 32

Chapter 3: Movie Features
Selecting Subtitles
By default, subtitles are off. To turn subtitles on:
1. While a disc is playing, press INFO (the Info Display appears).
2. Press the right arrow button until the Subtitle icon is highlighted.
3. Press SUBTITLE to turn on subtitles (the subtitles appear at the bottom of the screen)
4. To change the subtitle language, press the up or down arrow button repeatedly to
see what subtitle languages are available or to turn it off.
Notes:
Changing the subtitle language with the Info Display will only affect the disc you are currently
playing. When the disc is removed or the player is turned off, the subtitle language will revert to the
language setting specified through the Music Jukebox’s Preferences menu.
The subtitle language can also be changed through the DVD’s disc menu.
If the disc doesn’t contain the language you want to use, the disc’s default language is automatically
selected.
Some discs are programmed to only allow you to access the subtitle feature through the disc’s menu.
Changing the Camera Angle
Some discs contain multiple angles of a particular scene or sequence. If the disc only has
one angle, this feature won’t work. Currently, very few discs have this feature.
1. While a disc is playing, press ANGLE on the remote. If the disc wasn’t created with
multiple angles, Operation Not Permitted appears at the bottom of the screen.
2. Press the ANGLE button again to go to the second camera angle. Press ANGLE again
to go to the third angle, etc.
3. To resume normal playback, scroll through the camera angles until you get to
Angle 1.
30 Chapter 3
Page 33

Chapter 3: Movie Features
Playing DVD Discs
Not only can your Home Theater Music Jukebox store and manage thousands of your favorite music titles, but it can also play your favorite DVDs. It
connects to the OpenGlobe server for movie information much the same way it does your music information and catalogs the information each time
you put in a disc. In this chapter, you’ll learn how to use the features of the Music Jukebox to watch and manage your movie collection.
1. Open the disc tray and insert a DVD disc (the Music Jukebox plays the disc, connects
to the internet to identify it, loads the information into the movie library, and
displays the title, running time, and cover art in the Movie Guide).
2. Press the GUIDE button on your remote (the Movie Guide screen appears).
3. Use the left and right arrow buttons to highlight the group of your choice.
4. Use the up and down arrow buttons to highlight the desired movie title.
5. Press OK/SELECT or PLAY (the movie plays).
Managing Movies
The MOVIE OPTIONS MENU.
Creating a New Movie Group
1. Press the MOVIES button on your remote.
2. Press MENU (the MOVIE OPTIONS MENU appears).
3. Highlight and select new group (a screen appears so you can enter the name for the
new group).
4. When you have finished, press OK/SELECT to continue (the Edit Movie Group screen
appears).
5. Use the arrow buttons to highlight what DVD titles you want to include in the
group, and press OK/SELECT to checkmark them.
6. When finished, press RECORD to save the group.
The MOVIE GUIDE screen.
Chapter 3 31
Page 34

Chapter 3: Movie Features
Editing a Movie Group
1. Press the MOVIES button on your remote.
2. Use the right and left arrow buttons to highlight the group you want to edit.
3. Press MENU (the MOVIE OPTIONS MENU appears).
4. Highlight and select edit group (a screen appears so you can change the name for
the group, if you want. You don’t have to change the name of the group to edit its
contents).
5. Press OK/SELECT to continue (the EDIT MOVIE GROUP screen appears).
6. Use the arrow buttons to highlight what DVD titles you want to remove from the
group, and press OK/SELECT to uncheck them.
7. When finished, press RECORD to save the updated group.
Deleting a Movie Group
1. Press the MOVIES button on your remote.
2. Press MENU (the MOVIES OPTIONS MENU appears).
3. Highlight and select delete group (the DELETE GROUP screen appears).
4. Use the arrow buttons to highlight the group(s) you want to delete, and press OK/
SELECT to checkmark them.
5. Press RECORD to delete the selected groups. Don’t worry, the DVD titles won’t be
deleted from the hard drive.
• To cancel and exit this screen without deleting any groups, press STOP.
32 Chapter 3
Page 35

Chapter 3: Movie Features
Getting Movie Info
You can try to get movie info again for discs that couldn’t be identified during the initial
search when you inserted the disc.
1. Press the MOVIES button on your remote.
2. Press MENU (the MOVIES OPTIONS MENU appears).
3. Highlight and select get movie info (the GET MOVIE INFO screen appears and begins
searching the OpenGlobe server for the disc info. If the information is available, it
will appear).
• To cancel and exit this screen without getting the info, press STOP.
Editing Movie Disc Info
This feature lets you edit the movie information such as the title, actors, and year of
release. Or, you can have the Home Theater Music Jukebox contact the OpenGlobe
server.
1. Press the MOVIES button on your remote.
2. Use the arrow button to highlight the DVD title you want to edit.
3. Press MENU (the MOVIE OPTIONS MENU appears).
4. Highlight and select edit disc (the EDIT DISC INFO screen appears).
5. To connect to the OpenGlobe server for the disc info, highlight and select lookup
this disc ( if the info is available, it will automatically fill in info).
6. To enter the disc information manually, use the arrow button to move to the desired
field (title, actors, year), then enter the information.
7. Press RECORD to save any edits.
• To cancel and exit this screen without updating the info, press STOP.
Deleting Movies
1. Press the MOVIES button on your remote.
2. Press MENU (the MOVIE OPTIONS MENU appears).
3. Highlight and select delete movies (the DELETE MOVIES screen appears).
4. Use the arrow buttons to highlight the movies you want to delete and press OK/
SELECT to checkmark them.
5. When finished, press RECORD to delete the movies from the Movie Guide.
• To cancel and exit this screen without deleting any movies, press STOP.
For more movies and information, make sure to check out the services from
OpenGlobe (see page 58).
Chapter 3 33
Page 36

Chapter 4: Radio Features
AM/FM Radio
Playing the Radio
1. Press the RADIO button on your remote.
2. Press GUIDE. The Radio Guide screen appears. If you entered the correct zipcode in
the quick start process, you’ll see a list of radio station near you. If you don’t see any
station listed, check your antenna connections and your zipcode.
3. Highlight and select the radio station you want to hear or enter the radio station
frequency using the number buttons (e.g. 100.5), then press OK/SELECT.
Note: If you have several stations listed, you can sort them by entering the frequency using the
remote.
Autotuning AM/FM Stations
Important: Before you begin, make sure the antennas are connected properly (see
page 8).
Use this feature to automatically set the available AM/FM radio stations.
1. Press the RADIO button on your remote.
2. Press MENU (the RADIO OPTIONS MENU appears).
3. Highlight and select auto tune am/fm (a screen appears to ask what radio band you
want to tune).
4. Highlight and select am or fm (a confirmation screen appears).
5. To continue, highlight and select ok (the unit searches for all the available stations).
• To cancel and exit this screen without autotuning any stations, press STOP.
Adding a New AM/FM Station
This feature lets you add the station information such as name, location, call letters, and
frequency.
1. Press the RADIO button on your remote.
2. Press MENU (the RADIO OPTIONS MENU appears).
3. Highlight and select new station (a screen appears to ask what kind of station you
want to add).
4. Highlight and select am/fm (the NEW AM/FM STATION screen appears).
5. Use the arrow button to move to the desired field (name, location, call letters,
frequency), then enter the information.
6. Move to genre and press OK/SELECT to select the genre.
7. Move to band and select the radio band (am or fm).
8. When finished, press RECORD to save and add the new station.
• To cancel and exit this screen without adding a new station, press STOP.
34 Chapter 4
Illustrations contained in this document are for representation only.
Page 37

Chapter 4: Radio Features
Editing an AM/FM Station
1. Press the RADIO button on your remote.
2. Use the arrow buttons to highlight the station you want to edit.
3. Press MENU (the RADIO OPTIONS MENU appears).
4. Highlight and select edit station (a screen appears so you can change the name for
the station, if you want. You don’t have to change the name of the station to edit its
contents).
5. Highlight and select continue (the EDIT AM/FM STATION screen appears).
6. Enter the new information.
7. When finished, press RECORD to save these settings.
• To cancel and exit this screen without editing the station information, press STOP.
Deleting a Radio Station
1. Press the RADIO button on your remote.
2. Press MENU (the RADIO OPTIONS MENU appears).
3. Highlight and select delete stations (the DELETE STATION screen appears).
4. Use the arrow buttons to highlight the station(s) you want to delete, and press OK/
SELECT to checkmark them.
5. Press RECORD to delete the selected stations.
• To cancel and exit this screen without deleting any stations, press STOP.
Chapter 4 35
Page 38

Chapter 4: Radio Features
Internet Radio
Internet radio allows you to connect to unlimited radio stations on the internet, all over
the world. You can find everything from one station that caters only to 80s music, to
stations broadcasting only songs from one artist.
Playing Music
1. Press the RADIO button on your remote.
2. Press GUIDE to display the Radio Guide, if necessary (the Radio Guide screen
appears).
3. Highlight and select the internet radio station you want to hear.
Updating Internet Radio Stations
Use this feature to automatically set the available internet radio stations.
1. Press the RADIO button on your remote.
2. Press MENU (the RADIO OPTIONS MENU appears).
3. Highlight and select get radio info (a screen appears to ask which station list you
want to download from the OpenGlobe server).
4. Highlight and select internet (a confirmation screen appears).
5. To continue, highlight and select ok (the unit searches for all the available stations).
To cancel, highlight and select cancel.
• To cancel and exit this screen without autotuning any stations, press STOP.
Adding a New Internet Station
If you have a favorite Internet radio station, you can add it to your Internet Radio Guide.
For more information, see page 59.
36 Chapter 4
Page 39

Chapter 4: Radio Features
Editing an Internet Station
1. Press the RADIO button on your remote.
2. Use the arrow buttons to highlight the station you want edit.
3. Press MENU (the RADIO OPTIONS MENU appears).
4. Highlight and select edit station (a screen appears so you can change the name for
the station, if you want. You don’t have to change the name of the station to edit its
contents).
5. Highlight and select continue (the EDIT INTERNET STATION screen appears).
6. Enter the new information.
7. When finished, press RECORD to save the new settings.
• To cancel and exit this screen without editing the station information, press STOP.
Deleting an Internet Station
1. Press the RADIO button on your remote.
2. Press MENU (the RADIO OPTIONS MENU appears).
3. Highlight and select delete stations (the DELETE STATION screen appears).
4. Use the arrow buttons to highlight the station(s) you want to delete, and press OK/
SELECT to checkmark them.
5. Press RECORD to delete the selected stations.
• To cancel and exit this screen without deleting any stations, press STOP.
Creating a New Radio Group
1. Press the RADIO button on your remote.
2. Press MENU (the RADIO OPTIONS MENU appears).
3. Highlight and select new group (a screen appears so you can enter the name for the
new group).
4. When you have finished, press OK/SELECT to continue (the Edit RADIO Group screen
appears).
5. Use the arrow buttons to highlight what stations you want to include in the group,
and press OK/SELECT to checkmark them.
6. When finished, press RECORD to save the group.
Editing a Radio Group
1. Press the RADIO button on your remote.
2. Use the arrow buttons to highlight the group you want to edit.
3. Press MENU (the MUSIC OPTIONS MENU appears).
4. Highlight and select edit group (a screen appears so you can change the name for
the group, if you want. You don’t have to change the name of the group to edit its
contents).
5. Press OK/SELECT to continue (the EDIT RADIO GROUP screen appears).
6. Use the arrow buttons to highlight what stations you want to remove from the
group, and press OK/SELECT to uncheck them.
7. When finished, press RECORD to save the updated group.
Chapter 4 37
Page 40

Chapter 4: Radio Features
Deleting a Radio Group
1. Press the RADIO button on your remote.
2. Press MENU (the MUSIC OPTIONS MENU appears).
3. Highlight and select delete group (the DELETE GROUP screen appears).
4. Use the arrow buttons to highlight the group(s) you want to delete, and press OK/
SELECT to checkmark them.
5. Press RECORD to delete the selected groups.
• To cancel and exit this screen without deleting any groups, press STOP.
38 Chapter 4
Page 41

Chapter 5: Advanced Features
Advanced Settings
More advanced settings are available for your to customize in the Setup menu, including
network configuration, preferences, and parental controls. Press the SETUP button on
the remote control to bring up the menu.
Keep in mind, your unit is already set up for most normal situations. Under normal
circumstances, you won’t need to use these features. They are only for advanced
setup.
User Information
The User Information menu includes zip code, time zone, and privacy policy information.
Zip Code
Your zip code is necessary to update the time and radio autotune functions on the unit.
1. Press SETUP (the SETUP menu appears).
2. User information is already highlighted, so just press OK/SELECT (the SETUP — USER
INFORMATION menu appears).
3. Zip code is already highlighted, so just press OK/SELECT (the ZIP CODE screen
appears).
4. Press the up or down arrow button to highlight the country where you live, then
press OK/SELECT.
5. Enter your zip or postal code, then highlight save and press OK/SELECT.
Time Zone
You can manually set the time zone that you live in if it needs to be changed after
setup.
1. Press SETUP (the SETUP menu appears).
2. User information is already highlighted, so just press OK/SELECT (the SETUP — USER
INFORMATION menu appears).
3. Press the down arrow button to highlight time zone, and press OK/SELECT (the TIME
ZONE screen appears).
4. Press the up or down arrow button to highlight the time zone where you live, then
press OK/SELECT.
5. When finished, highlight save and press OK/SELECT.
Chapter 4 39
Illustrations contained in this document are for representation only.
Page 42

Chapter 5: Advanced Features
Privacy Policy
This screen provides all the legal disclaimers and warranty information for the product.
1. Press SETUP (the SETUP menu appears).
2. User information is already highlighted, so just press OK/SELECT (the SETUP — USER
3. Press the down arrow button until privacy policy is highlighted, then press
4. Read the policy and highlight more to continue, then press OK/SELECT.
5. When finished, highlight return and press OK/SELECT.
Network Configuration
The network settings allow you to change some of the more advanced dialup and
ethernet settings.
INFORMATION menu appears).
OK/SELECT (the PRIVACY POLICY screen appears).
Internet Connection
Choose how you connect to the internet.
1. Press SETUP (the SETUP menu appears).
2. Press the down arrow button until network configuration is highlighted, then press
OK/SELECT (the SETUP — NETWORK CONFIGURATION menu appears).
3. Internet connection is already highlighted, so just press OK/SELECT (the INTERNET
CONNECTION screen appears).
4. Press the up or down arrow button to highlight your Internet connection type, then
press OK/SELECT.
5. When finished, highlight save and press OK/SELECT.
40 Chapter 4
Page 43

Chapter 5: Advanced Features
Dialup Settings
This screen allows you to select or change your dialing preferences, including dialing
method, dialing prefix, and call waiting disable (you did this in the Quick Start
procedure).
1. Press SETUP (the SETUP menu appears).
2. Press the down arrow button until network configuration is highlighted, then press
OK/SELECT (the SETUP — NETWORK CONFIGURATION menu appears).
3. Press the down arrow button until dialup settings is highlighted, then press OK/
SELECT (the DIALUP SETTINGS screen appears).
4. Enter your login information and choose the desired settings.
To enter text, press the desired number button repeatedly and scroll through the
letters assigned to that button until you see the desired letter. To delete a character,
press REV•DEL. To move the cursor, use the arrow buttons.
The password will appear as visible text when the field is empty AND you are
entering the password. Once you move from the password field or whenever you
return to this screen, the password text is hidden.
5. Highlight test connection and press OK/SELECT. The test results are displayed.
6. When finished, highlight save and press OK/SELECT.
Ethernet Settings
Choose your Ethernet connection Internet Protocol method (dynamic or manual). If you
choose manual (static), enter all of the IP information provided by your ISP.
1. Press SETUP (the SETUP menu appears).
2. Press the down arrow button until network configuration is highlighted, then press
OK/SELECT (the SETUP — NETWORK CONFIGURATION menu appears).
3. Press the down arrow button until ethernet settings is highlighted, then press OK/
SELECT (the ETHERNET SETTINGS screen appears).
4. Enter your connection type and choose the desired settings.
To enter text, press the desired number button repeatedly and scroll through the
letters assigned to that button until you see the desired letter. To delete a character,
press REV•DEL. To move the cursor, use the arrow buttons.
5. Highlight test ethernet and press OK/SELECT. The test results are displayed.
6. When finished, highlight save and press OK/SELECT.
Chapter 4 41
Page 44

Chapter 5: Advanced Features
Preferences
The Preferences menu includes settings for music recording, the screen saver, software
updates, and DVD preferences.
Music Recording
You can choose the bitrate (quality) of your mp3s (96k, 128k, 160k, 192k, and 320k). The
higher the bitrate, the better the quality of the compressed song.
1. Press SETUP (the SETUP menu appears).
2. Press the down arrow button until preferences is highlighted, then press OK/SELECT
3. Music recording is already highlighted, so just press OK/SELECT (the MUSIC
4. Press the up or down arrow button to highlight the desired bitrate, then press OK/
5. When finished, highlight save and press OK/SELECT.
(the SETUP — PREFERENCES menu appears).
RECORDING PREFERENCES screen appears).
SELECT.
Screen Saver
You can set the amount of time of inactivity before the screen saver comes on the
screen (5 min., 10 min., 15 min., 30 min., 60 min., and never).
1. Press SETUP (the SETUP menu appears).
2. Press the down arrow button until preferences is highlighted, then press OK/SELECT
(the SETUP — PREFERENCES menu appears).
3. Press the down arrow button until screen saver is highlighted, then press OK/SELECT
(the SCREEN SAVER PREFERENCES screen appears).
4. Press the up or down arrow button to highlight the desired time, then press OK/
SELECT.
5. When finished, highlight save and press OK/SELECT.
42 Chapter 4
Page 45

Chapter 5: Advanced Features
Automatic Update
This feature sets the time range for when the Music Jukebox automatically connects to
the OpenGlobe server to check for software updates. You can choose daytime, evening,
or nighttime settings.
1. Press SETUP (the SETUP menu appears).
2. Press the down arrow button until preferences is highlighted, then press OK/SELECT
(the SETUP — PREFERENCES menu appears).
3. Press the down arrow button until automatic update is highlighted, then press OK/
SELECT (the AUTOMATIC UPDATE PREFERENCES screen appears).
4. Press the up or down arrow button to highlight the desired time, then press OK/
SELECT.
5. When finished, highlight save and press OK/SELECT.
DVD
These preferences allow you to set the DVD player default languages and screen type.
1. Press SETUP (the SETUP menu appears).
2. Press the down arrow button until preferences is highlighted, then press OK/SELECT
(the SETUP — PREFERENCES menu appears).
3. Press the down arrow button until dvd is highlighted, then press OK/SELECT (the DVD
PREFERENCES screen appears).
4. Press the up or down arrow button to highlight the default language for the DVD
menu, then press OK/SELECT to toggle through the options. Repeat for the other
language settings.
5. Press the right arrow button to highlight the screen type, then press OK/SELECT to
change it (4:3 letter box, 4:3 pan and scan, and 16:9).
6. When finished, highlight save and press OK/SELECT.
Chapter 4 43
Page 46

Chapter 5: Advanced Features
Audio and Video Settings
For your convenience, the audio/video settings of your Home Theater Music Jukebox can
be adjusted completely through the menu system.
Tone Controls
This setting allows you to set the bass and treble of the speakers connected to your
home theater system.
1. Press SETUP (the SETUP menu appears).
2. Press the down arrow button until audio and video settings is highlighted, then
3. Tone controls is already highlighted, so just press OK/SELECT (the TONE CONTROLS
4. Press the right or left arrow button to highlight the bass or treble, then press CH+ or
5. When finished, highlight save and press OK/SELECT.
press OK/SELECT (the SETUP — AUDIO AND VIDEO SETTINGS menu appears).
screen appears).
CH- to change the value (+/- 10 db).
Speaker Levels
You can set the individual level of each speaker( +/- 10 db).
1. Press SETUP (the SETUP menu appears).
2. Press the down arrow button until audio and video settings is highlighted, then
press OK/SELECT (the SETUP — AUDIO AND VIDEO SETTINGS menu appears).
3. Press the down arrow button until speaker levels is highlighted, then press OK/
SELECT (the SPEAKER LEVELS screen appears).
4. Press the right or left arrow button to highlight the speaker you want to adjust, then
press CH+ or CH- to change the value. Repeat for all the speakers.
5. To change the Dolby Digital Night Mode, press the right or left arrow button to
highlight normal, then press OK/SELECT to toggle through the options (Normal, Soft,
or Softer).
6. To turn the subwoofer on or off, use the arrow buttons to highlight subwoofer, then
press OK/SELECT to toggle it on or off.
7. To test the speakers, use the arrow buttons to highlight test tone, then press OK/
SELECT to toggle it on or off.
8. When finished, highlight save and press OK/SELECT.
44 Chapter 4
Page 47

Chapter 5: Advanced Features
Speaker Distance
This setting allows you to specify the distance of each speaker in relation to the center
listening position (from 0-40 ft.). The default settings are: left and right, 15ft.; center,
14ft., left and right rear, 5 ft.
1. Press SETUP (the SETUP menu appears).
2. Press the down arrow button until audio and video settings is highlighted, then press
OK/SELECT (the SETUP — AUDIO AND VIDEO SETTINGS menu appears).
3. Press the down arrow button until speaker distance is highlighted, then press OK/
SELECT (the SPEAKER DISTANCE screen appears).
4. Press the arrow buttons to highlight the speaker you want to adjust, then press CH+
or CH- to change the value. Repeat for all the speakers.
5. When finished, highlight save and press OK/SELECT.
Screen Centering
You can set the horizontal placement so that it is centered properly on your TV.
1. Press SETUP (the SETUP menu appears).
2. Press the down arrow button until audio and video settings is highlighted, then
press OK/SELECT (the SETUP — AUDIO AND VIDEO SETTINGS menu appears).
3. Press the down arrow button until screen centering is highlighted, then press OK/
SELECT (the SPEAKER CENTERING screen appears).
4. Press the right or left arrow button to center the screen, then press OK/SELECT.
5. When finished, press OK/SELECT to highlight return.
6. Press OK/SELECT to exit.
Brightness
This setting helps you to adjust the brightness of your TV to the optimum level.
1. Press SETUP (the SETUP menu appears).
2. Press the down arrow button until audio and video settings is highlighted, then
press OK/SELECT (the SETUP — AUDIO AND VIDEO SETTINGS menu appears).
3. Press the down arrow button until brightness is highlighted, then press OK/SELECT
(the BRIGHTNESS screen appears).
4. Follow the directions on screen to adjust the brightness to the desired level.
5. When finished, highlight return and press OK/SELECT.
Chapter 4 45
Page 48

Chapter 5: Advanced Features
Contrast
This setting helps you to adjust the contrast of your TV to the optimum level.
1. Press SETUP (the SETUP menu appears).
2. Press the down arrow button until audio and video settings is highlighted, then
3. Press the down arrow button until contrast is highlighted, then press OK/SELECT (the
4. Follow the directions on screen to adjust the contrast to the desired level.
5. When finished, highlight save and press OK/SELECT.
Sharpness
This setting helps you to adjust the sharpness of your TV to the optimum level.
1. Press SETUP (the SETUP menu appears).
2. Press the down arrow button until audio and video settings is highlighted, then
3. Press the down arrow button until sharpness is highlighted, then press OK/SELECT
4. Follow the directions on screen to adjust the sharpness to the desired level.
5. When finished, highlight save and press OK/SELECT.
press OK/SELECT (the SETUP — AUDIO AND VIDEO SETTINGS menu appears).
CONTRAST screen appears).
press OK/SELECT (the SETUP — AUDIO AND VIDEO SETTINGS menu appears).
(the SHARPNESS screen appears).
46 Chapter 4
Color and Tint
This setting helps you to adjust the color and tint settings of your TV to the optimum
level.
1. Press SETUP (the SETUP menu appears).
2. Press the down arrow button until audio and video settings is highlighted, then
press OK/SELECT (the SETUP — AUDIO AND VIDEO SETTINGS menu appears).
3. Press the down arrow button until color and tint is highlighted, then press OK/
SELECT (the COLOR AND TINT screen appears).
4. Turn your TV’s color and tint controls up and down until the color bars on screen are
at the point where they are not appearing to bleed together and the colors do not
appear to be too bright. This will get you color and tint controls as close to the
optimum settings as possible.
5. When finished, highlight save and press OK/SELECT.
Page 49

Chapter 5: Advanced Features
Security and Parental Controls
The Security and Parental Controls menu includes password protection and movie ratings
settings to protect you and your family by filtering undesirable content.
Password Protection
This feature allows you to set up a password to protect access to the Setup menus and will prompt you for the password when a DVD above your
parental control rating is inserted.
1. Press SETUP (the SETUP menu appears).
2. Press the down arrow button until security and parental controls is highlighted, then press OK/SELECT (the SECURITY AND PARENTAL CONTROLS
menu appears).
3. Password protection is already highlighted, so just press OK/SELECT (the PASSWORD PROTECTION screen appears).
4. Enter a numeric password in the password field, and then enter it again below in the verify field. (The password must be between 4 and 8 numbers
and cannot contain letters).
To delete a number, press REV•DEL. To move the cursor, use the arrow buttons.
5. When finished, highlight save and press OK/SELECT.
Notes: If you do not want to enable password protection, leave the password blank.
If you forget your password, enter 722. You will be able to clear the password or enter a new one.
Movie Ratings
You can choose which movies will be available, based on their ratings.
1. Press SETUP (the SETUP menu appears).
2. Press the down arrow button until security and parental controls is highlighted, then press OK/SELECT (the SECURITY AND PARENTAL CONTROLS
menu appears).
3. Press the down arrow button until movie ratings is highlighted, then press OK/SELECT (the MOVIE RATINGS screen appears).
4. Press the up or down arrow button to highlight the highest rating level you want to be available, and press OK/SELECT. All ratings above that will
be blocked.
5. When finished, highlight save and press OK/SELECT.
Important: Ratings will only be blocked if the password has been set and is active.
Chapter 4 47
Page 50

Chapter 5: Advanced Features
Utilities
The Utilities menu gives you access to more advanced features of the unit, such as
updating the software and resetting the system.
System Reset
This option lets you reset the system software.
1. Press SETUP (the SETUP menu appears).
2. Press the down arrow button until utilities is highlighted, then press OK/SELECT (the
3. System reset is already highlighted, so just press OK/SELECT.
4. Use the arrow button to highlight reset and press OK/SELECT (the unit will reboot).
UTILITIES menu appears).
A confirmation screen appears to make sure you want to reboot the system. No
information on the hard drive will be lost, but any recordings in progress are
interrupted.
System Information
The System Information screen gives you important information about the Jukebox
which may be helpful when contacting your service provider.
1. Press SETUP (the SETUP menu appears).
2. Press the down arrow button until utilities is highlighted, then press OK/SELECT (the
UTILITIES menu appears).
3. Press the down arrow button until system information is highlighted, then press OK/
SELECT (the SYSTEM INFORMATION screens appears).
4. When finished, press OK/SELECT.
48 Chapter 4
Page 51

Chapter 5: Advanced Features
Update Software
This feature allows your Music Jukebox to connect to the OpenGlobe server for any
software updates. Keep in mind this may take some time, and you won’t be able to use
the system during this process.
1. Press SETUP (the SETUP menu appears).
2. Press the down arrow button until utilities is highlighted, then press OK/SELECT (the
UTILITIES menu appears).
3. Press the down arrow button until update software is highlighted, then press OK/
SELECT.
A confirmation screen appears to make sure you want to update the software.
4. Use the arrow buttons to highlight ok and press OK/SELECT (the unit will begin
searching for updates—this may take several minutes).
Chapter 4 49
Page 52

Chapter 6: Additional Information
Troubleshooting
Most problems you encounter with your product can be corrected by consulting the following troubleshooting list.
Note: If you prefer, we can provide you with the name of an Authorized Service Representative who will visit your home for a fee to install your electronic entertainment
system and to instruct you in its operation. For details about this service, call 1-888-206-3359. For additional assistance while using your RCA product, please visit
www.rca.com/customersupport.
General Problems
Unit won’t turn on
•Press the MUSIC, MOVIES, or RADIO button, then press GUIDE.
• Make sure the unit is plugged in.
•Try unplugging the AC power cord and plugging it back in.
• Check the wall receptacle (or extension cord) to make sure it is “live” by plugging in something else.
• Something might be wrong with your remote control. Press the POWER button on the front of the unit and verify that the POWER indicator is on. If it
turns on, check the remote control solutions below.
•You may need to reset the system. Press and hold the POWER button on the front of the unit for several seconds. STARTING is displayed when it is
resetting.
No sound, picture okay
• Maybe the sound is muted. Try pressing the volume up button to restore sound on the TV.
• If using a standard video, S-video, or component video connection, remember to also connect audio cables to the Music Jukebox.
• If a center channel speaker is not connected, you may need to change the surround mode to stereo or press the SURR button on the remote until the
correct mode is selected.
No picture, no sound but unit is on
•Tune your TV to the appropriate Video Input Channel (see page 10).
• If you are using the component video connections (y, Pb, Pr), make sure you also have the composite video cable connected to your TV. (Component video
will not display the Music Jukebox’s menus).
•You may need to reset the system. Press and hold the POWER button on the front of the unit for several seconds. STARTING is displayed when it is
resetting.
Sound okay, picture poor
• Check connections. Make sure all of the cables are firmly connected to the jacks..
No connection after more than 5 minutes
• Make sure all connections are secure and try connecting to the OpenGlobe network again. If you still have problems connecting to the network, contact
your service provider.
Unit appears to be frozen or locked up
•You may need to reset the system. Press and hold the POWER button on the front of the unit for several seconds. STARTING is displayed when it is
resetting.
I lost my password. How do I reset it?
• Enter 722 as the password. You will be able to clear the password or enter a new one.
Unit keeps saying “Cannot Detect to Server.”
• If you’re not connected through Ethernet, make sure you select the modem in the setup menus (see page 12).
50 Chapter 5
Page 53

Chapter 6: Additional Information
Remote Control Problems
•You might be in the wrong mode. To operate your Music Jukebox, press MUSIC, MOVIE, or RADIO on the remote before you press any other
buttons. If you’re operating the TV, press the TV button first, etc. (this remote operates most RCA, GE, and Proscan products and can be
programmed for others).
• Check battery installation—the direction on the + and - on the batteries must match the information in the battery compartment cover.
• Insert new batteries in the remote and reprogram, if necessary.
• Operate the remote control at a distance of no more than 20 feet.
• Remove any obstacles between the remote and the Music Jukebox or other component. If your Music Jukebox is in an entertainment cabinet, the
glass doors might obstruct the remote control from operating the unit. Open the doors.
• Maybe the remote isn’t aimed directly at the component that you’re trying to operate.
•You might need to reset the remote: remove batteries and press the number 1 button for at least 60 seconds. Release the 1 button, replace the batteries,
and (if necessary) program the remote again.
General DVD Problems
Disc won’t play
• Insert a disc with the label side facing up.
• Check the type of disc you put into the player. This player only plays DVD video discs, DVD audio discs, CDs with mp3 files, and audio CDs.
• Both the player and the disc are coded by region. If the regional codes don’t match, the disc cannot be played. This player is Region No. 1.
Play starts, but then stops immediately
• The disc is dirty. Clean it.
• Condensation has formed. Allow player to dry out.
Can’t advance through a movie
•You can’t advance through the opening credits and warning information that appear at the beginning of movies because the disc is programmed
to prohibit that action.
Operation Not Permitted appears on screen
The feature or action cannot be completed at this time for one of the following reasons:
• The disc’s software restricts it.
• The disc’s software doesn’t support that feature (e.g., angles).
• The feature is not available at the moment.
• You’ve requested a title or chapter number that is out of range.
The picture is distorted
• The disc might be damaged. Try another disc.
Picture is distorted during forward and reverse scan
• It is normal for some distortion to appear while scanning.
A screen saver appears on the TV
•Your player is equipped with a screen saver that appears on the TV after your player has been idle for several minutes. To make it disappear, press
STOP or CLEAR on the remote.
Subtitle and/or audio language is not the one selected from the initial setting
• If the subtitle and/or audio language does not exist on the disc, the initial settings will not be seen/heard. The disc’s priority language is selected
instead. Set the subtitle and/or audio language manually through the Info Display.
Chapter 5 51
Page 54

Chapter 6: Additional Information
The menu is displayed in a foreign language
• The Language menu (Player Menus) is set to that language. Check the DVD preferences settings in the Setup menu.
Play doesn’t begin
• The rating of the title on the disc exceeds the rating limit set in the Movie Ratings menu.
No forward or reverse scan
• Some discs have sections that prohibit rapid scanning, or title and chapter skip.
• If you’re trying to skip through the warning information and credits at the beginning of a movie, you won’t be able to. This part of the movie is
often programmed to prohibit skipping through it.
Desired angle cannot be changed
• Most discs don’t have the multi-camera angle system, and some discs only have multiple angles during certain parts of the movie.
Picture is too tall and thin
• Change the aspect ratio of the DVD preferences settings in the Setup menu.
Picture is too short and wide
• Change the aspect ratio of the DVD preferences settings in the Setup menu.
Disc won’t eject
• When you put a disc into the player, the player may take up to 15 seconds to read the disc. You won’t be able to eject the disc during this time.
Wait 15 seconds and try again.
52 Chapter 5
Page 55

Chapter 6: Additional Information
Care and Cleaning
CAUTION: Unplug the unit before cleaning.
You can clean the unit as required, using a soft lint-free cloth. Be sure to occasionally dust the ventilation slots in the cabinet to help assure adequate
ventilation.
Never use strong cleaning agents, such as ammonia-based cleaners, or abrasive powder. These types of cleaners will damage the unit.
Avoid placing drinks or vases with water on top of the unit. This could increase the risk of fire or shock hazard or damage to the decoder.
Handling Cautions
• Before connecting other components to this player, be sure to turn all components off.
• Don’t move the player while a disc is being played. The disc may get scratched or broken, and the player’s internal parts may be damaged.
• Don’t put any container filled with liquid or any small metal objects on the player.
• Be careful not to put your hand into the disc tray.
• Don’t place anything other than the disc in the disc tray.
• Exterior influences such as lightning and static electricity can affect normal operation of this player. If this occurs, turn the player off and on
again with the ON•OFF button, or disconnect and then reconnect the AC power cord to the AC power outlet. The player will operate normally.
• Be sure to remove the disc and turn off the player after use.
Maintenance of Cabinet
For safety reasons, when cleaning the cabinet be sure to disconnect the AC power cord from the AC outlet.
• Do not use benzene, thinner, or other solvents for cleaning.
• Wipe the cabinet with a soft cloth.
Formation of Condensation
• Due to sharp changes in temperature and humidity, condensation may form if warm air comes in contact with any cold parts inside the player.
• When condensation forms inside the player, the player may not operate correctly. If this occurs, leave the player at room temperature until the
inside of the player becomes dry and operational.
• If condensation forms on a disc, wipe the disc with a soft, dry cloth by moving the cloth from the center hole toward the outer edge.
Handling Discs
• Don’t touch the disc’s signal surfaces. Hold by the edges or by one edge and the hole in the center.
• Don’t affix labels or adhesive tape to label surfaces. Don’t scratch or damage the label.
• Do not use damaged (cracked or warped) discs.
Cleaning Discs
• Dirty discs can cause reduced video and audio performance. Always keep discs clean by wiping them gently with a soft cloth from the inner edge
toward the outer perimeter.
• If a disc becomes very dirty, wet a soft cloth in water, wring it out well. Wipe the dirt away gently, and remove any water drops with a dry cloth.
• Do not use record-cleaning sprays or anti-static agents on discs. Also, never clean the discs with benzene, thinner, or other volatile solvents which
may cause damage to the disc surface.
Chapter 5 53
Page 56

Chapter 6: Additional Information
Programming the Remote to Operate Other Components
ON • OFF
VCR1
Indicator
REV•DEL
Use these buttons when
you program the remote.
Important: The remote may not be compatible with all models
of all brands of components. It may not operate all functions
of the remote that came with your component.
Important
You must continue pressing the component button while you enter
the code.
Let’s say you have a Zenith TV. To program the universal remote to
operate the TV, you would:
Press and hold the TV button while you enter the first code listed for
Zenith in the TV Codes column.
Release the TV button. Press ON•OFF to see if the TV responds. If it
doesn’t, follow the same steps, but enter the second code for Zenith
TVs instead of the first.
Note
Some of the remote’s buttons might operate differently for other
components, especially when you’re using another component’s
menu system.
PLAY
STOP
TV
The universal remote can be programmed to operate most brands of remote controllable
components. The remote is already programmed to operate most RCA, GE, and Proscan
components.
Find Out If You Need to Program the Remote
To determine whether the universal remote needs to be programmed for your
component, turn the component ON. For example, to program the remote for a TV, turn
on the TV. Point the remote at the TV, and press the TV button. Then press ON•OFF or
CH + (channel up) or CH – (channel down) to see if the TV responds to the remote
commands. If the component does not respond, the remote needs to be programmed.
Programming the Remote
There are two ways to program the remote control: direct entry and automatic code
search.
Using Direct Entry
1. Turn on the component to be programmed.
2. Look up the brand and code number(s) for the component on the code list in this
section.
3. Point the remote at the component. Press and hold the component button you want
to program on the remote (TV or AUX).
4. Enter the 4-digit code from the remote control code list on the following pages. If
the indicator flashes, you have either entered an invalid code or the button isn’t
programmable.
5. Release the component button, and then press ON•OFF to see if the component
responds to the command. If it doesn’t, try pressing the component button and then
ON•OFF again.
• If you get no response, repeat these steps using the next code listed for your brand,
until the component responds to the remote commands.
• If you try all the codes for your component brand and none work, try the automatic
code search method. If automatic code search doesn’t work, the remote is not
compatible with your component.
Using Automatic Code Search
You can program the remote to operate each of your components. To stop the automatic
code search without programming any of your components, press EXIT•CLEAR until the
indicator on the remote turns off.
Note: AUX can’t be programmed using the automatic code search method.
1. Turn on the component you want to operate (TV, VCR, etc.)
2. Press and hold the component button you want to program (TV, for example). While
holding the component button, press and hold ON•OFF until the indicator on the
remote turns on, then release both buttons.
3. Point the remote at the component. Press and release PLAY, then wait 5 seconds or
until the indicator on the remote stops flashing.
At this point the remote is searching for the correct code to program. If, after 5
seconds, the component you want to operate does not turn off, press PLAY again to
search the next set of codes.
Continue pressing PLAY until the component turns off or you have searched through
all of the codes. There are 20 total sets of codes. If the component does not turn off
after pressing PLAY 20 times, then the remote can’t be programmed to operate that
component.
If the component you want to control does turn off:
1. Press and release REVERSE, then wait 2 seconds. Repeat this step until the device
turns back ON.
2. Press and hold STOP until the indicator on the remote turns off.
54 Chapter 5
Page 57

Chapter 6: Additional Information
How to Use the Remote After You’ve Programmed It
Because this universal remote can control several different components (TV, VCR, Satellite, or Cable box) it uses operational modes triggered by the
component buttons. For example, if you want the remote to control the TV, press the TV button to put the remote into TV mode.
1. Press the appropriate component button (TV, VCR1, AUX, etc.) to set the remote to control the component.
2. Press ON•OFF to turn the component ON or OFF.
3. Use the remote buttons that apply to that component.
Notes:
• The remote may not be compatible with all brands and models of components. It also may not operate all functions of the remote that came with your component.
• If you keep pressing buttons and nothing happens, the remote is probably in the wrong mode. You must press the component button that matches the component
you want to operate (i.e., if you want to operate the TV, press TV on the remote control to put the remote in TV mode.)
Chapter 5 55
Page 58

Chapter 6: Additional Information
Code List
TV Codes
Abex ............................................................................... 1172
Admiral .................................................. 1001, 1173, 1211
Adventura ..................................................................... 1174
Aiko ............................................................................... 1016
Akai ............................................................................. 1002
Alleron .......................................................................... 1046
Amtron ......................................................................... 1038
Anam National ............. 1003, 1038, 1192, 1193, 1194
AOC ......... 1004, 1005, 1006, 1007, 1175, 1176, 1195
Audiovox ...................................................................... 1038
Belcor ............................................................................ 1004
Bell & Howell ...................................... 1001, 1083, 1162
Bradford ....................................................................... 1038
Brokwood ..................................................................... 1004
Candle ........................................ 1004, 1006, 1008, 1174
Celebrity ....................................................................... 1002
Centurion ..................................................................... 1009
Citizen ...................................... 1004, 1006, 1008, 1016,
Colortyme ............................................. 1004, 1006, 1010
Concerto .......................................................... 1004, 1006
Contec/Cony ............................ 1012, 1013, 1014, 1038
Craig .............................................................................. 1038
Crown ................................................................ 1038, 1171
Curtis-Mathes ................................... 1000, 1004, 1006,
CXC ................................................................................ 1038
Daewoo ............................................... 1004, 1005, 1006,
Daytron ................................................. 1004, 1006, 1171
Dimensia ...................................................................... 1000
Dumont ............................................................. 1004, 1151
Dynatech .......................................................................1178
Electronband ............................................................... 1002
Electrohome ..... 1003, 1004, 1006, 1019, 1020, 1022
Emerson1004, 1006, 1012, 1023, 1024, 1025, 1026,
1027, 1028, 1029,1030, 1031, 1032, 1033, 1034,
1035, 1036, 1037, 1038, 1039, 1041, 1042, 1043,
1044, 1046, 1047, 1123, 1124, 1162, 1171, 1177,
Envision ............................................................ 1004, 1006
Fisher .............................. 1048, 1049, 1051, 1162, 1180
Fujitso ........................................................................... 1046
Funai ................................................................. 1038, 1046
Futuretec ..................................................................... 1038
GE .................................. 1000, 1003, 1004, 1006, 1022,
1052, 1054,1055, 1087, 1164, 1165, 1166, 1167,
Gibralter ............................................................ 1004, 1151
Goldstar ..................................... 1004, 1005, 1006, 1012
Grundy ................................................... 1038, 1046, 1171
Hallmark .......................................................... 1004, 1006
Harvard ......................................................................... 1038
Hitachi .... 1004, 1006, 1012, 1013, 1014, 1059,1060,
1139, 1140, 1141, 1142, 1143, 1144, 1145,1146,
IMA ................................................................................ 1038
Infinity .......................................................................... 1062
Janeil ..............................................................................1174
JBL ................................................................................. 1062
JCB ................................................................................. 1002
JC Penney ......... 1000, 1004, 1005, 1006, 1008, 1022,
1052, 1054, 1058, 1063, 1064, 1072, 1087, 1105,
Jensen ............................................................... 1004, 1006
JVC ................................. 1012, 1013, 1014, 1054, 1060,
Kawasho ................................................1002, 1004, 1006
Kenwood ............................................... 1004, 1006, 1019
Kloss Novabeam ..................... 1068, 1069, 1174, 1183
KTV ............................................... 1038, 1070, 1171, 1177
Loewe ............................................................................ 1062
Logik .............................................................................. 1083
Luxman ............................................................. 1004, 1006
LXI ......................................................... 1000, 1006, 1049,
Magnavox ................................ 1004, 1006, 1008, 1019,
1062, 1068,1069,1075, 1076, 1077, 1088, 1130,
Majestic ....................................................................... 1083
Marants ........................................................................ 1062
Marantz ..................................... 1004, 1006, 1062, 1078
Megatron ......................................................... 1006, 1059
Memorex ....................... 1001, 1006, 1082, 1083, 1162
MGA ....... 1004, 1005, 1006, 1019, 1022, 1051, 1079,
1038, 1105, 1171, 1174, 1177
1015, 1105, 1162, 1171, 1212
1016, 1017, 1018, 1127, 1171, 1196
1179, 1191, 1208
1168, 1181, 1213
1019, 1056, 1057, 1058, 1155, 1156,
1061, 1135, 1136, 1137, 1138,
1148, 1150, 1179, 1198, 1199
1128, 1171, 1172, 1181, 1201
1065, 1066, 1067, 1157, 1158, 1159, 1182
1062, 1071, 1072, 1073, 1162, 1181, 1207
11 31, 1132, 1133, 1134, 1183, 1219,1235
1171, 1172
1080, 1082
Midland ........................... 1054, 1151, 1171, 1172, 1181
Minutz .......................................................................... 1052
Mitsubishi ................................ 1004, 1005, 1006, 1019,
1022, 1051, 1079, 1080, 1081, 1082, 1125
Montgomery Ward .................................................... 1083
Motorola ........................................................... 1003, 1173
MTC ............................................ 1004, 1005, 1006, 1105
Multitech ..................................................................... 1038
Multivision .................................................................. 1084
NAD ............................................. 1006, 1071, 1072, 1185
NEC ................................ 1003, 1004, 1005, 1006, 1200
Nikko ................................................................. 1006, 1016
NTC ................................................................................ 1016
Onwa ............................................................................. 1038
Optimus .........................................................................1185
Optonica ........................................................... 1095, 1173
Orion .................................................................. 1035, 1191
Panasonic ...................... 1003, 1054, 1062, 1170, 1214
Philco .... 1003, 1004, 1005, 1006, 1008, 1012, 1019,
Philips ... 1003, 1004, 1008, 1012, 1019, 1062, 1068,
Pilot .................................................................... 1004, 1171
Pioneer ... 1004, 1006, 1090, 1091, 1092, 1179, 1185
Portland ..........................1004, 1005, 1006, 1016, 1171
Price Club ..................................................................... 1105
Prism ............................................................................. 1054
ProScan ............................................................. 1000, 1181
Proton ........................................ 1004, 1006, 1012, 1093
Pulsar ................................................................. 1004, 1151
Quasar ....................................... 1003, 1054, 1070, 1094
Radio Shack/Realistic .................................. 1000, 1004,
RCA .................... 1000, 1003, 1004, 1005, 1006, 1007,
Runco ............................................................................. 1151
Sampo ......................................... 1004, 1006, 1171, 1172
Samsung 1004, 1005, 1006, 1012, 1015, 1019,1104,
Samsux .......................................................................... 1171
Sansui ............................................................................ 1191
Sanyo ................................................... 1004, 1048, 1049,
Scotch ........................................................................... 1006
Scott ....... 1004, 1006, 1012, 1024, 1035, 1038, 1046
Sears ..... 1000, 1004, 1006, 1013, 1014, 1019, 1046,
Sharp ....... 1004, 1006, 1012, 1029, 1095, 1111, 1112,
Shogun ......................................................................... 1004
Signature ............................................... 1001, 1083, 1115
Simpson ........................................................................ 1008
Sony .......................................... 1002, 1205, 1216, 1218
Soundesign ................... 1004, 1006, 1008, 1038, 1046
Squareview ...................................................................1189
SSS ..................................................................... 1004, 1038
Starlite .......................................................................... 1038
Supre-Macy ................................................................. 1174
Supreme ....................................................................... 1002
Sylvania 1004, 1006, 1008, 1019, 1062, 1068, 1069,
Symphonic ............................................ 1033, 1038, 1189
Tandy ..............................................................................1173
Tatung ........................................................................... 1003
Technics ........................................................................ 1054
Techwood ............................................. 1004, 1006, 1054
Teknika . 1004, 1005, 1006, 1008, 1012, 1013, 1014,
Telecaption ................................................................... 1117
TMK ................................................................... 1004, 1006
Toshiba ..... 1049, 1071, 1072, 1105, 1109, 1117, 1118,
Totevision ...................................................................... 1171
Universal .......................................................... 1052, 1087
Victor ................................................................. 1066, 1182
Vidtech ................................................. 1004, 1005, 1006
Viking ............................................................................. 1174
Wards .... 1000, 1001, 1004, 1005, 1006, 1019, 1024,
1033, 1046, 1052, 1062, 1068, 1069, 1075, 1076,
Yamaha ..................................... 1004, 1005, 1006, 1019
Zenith ...... 1004, 1083, 1151, 1152, 1153, 1154,1210,
1062, 1068, 1069, 1075, 1077, 1183
1069, 1075, 1076, 1086, 1087, 1088, 1089
1006, 1012, 1038, 1049, 1095, 1162, 1171, 1172
1019,1096, 1098, 1099, 1100, 1101,
1102, 1103, 1129, 1179, 1181, 1187,
1188,1190, 1202, 1203, 1215, 1233
1105, 1106, 1171, 1172, 1204
1080, 1107, 1108, 1162, 1169, 1180
1048, 1049, 1051, 1066, 1071, 1072, 1109, 1110,
1075, 1076, 1077, 1088, 1116, 1161, 1183
1016, 1038, 1046, 1076, 1082, 1083, 1105,1170,
1162, 1180, 1181, 1189
1113, 1122, 1171, 1173
11 71
1160, 1162
1083, 1087, 1088, 1095, 1119, 1120
1217
VCR Codes
Admiral ......................................................................... 2132
Adventura .................................................................... 2026
Aiko ............................................................................... 2027
Aiwa .............................................................................. 2026
Akai .............................. 2003, 2004, 2005, 2007, 2008,
................................................................... 2111, 2112, 2113
American High ........................................................... 2021
Asha .............................................................................. 2013
Audio Dynamics ............................................. 2009, 2010
Audiovox ...................................................................... 2014
Bell & Howell .............................................................. 2011
Beaumark ..................................................................... 2013
Broksonic ......................................................... 2012, 2025
Calix .............................................................................. 2014
Candle ...................................... 2013, 2014, 2015, 2016,
................................................................ 2017, 2018, 2019
Canon ..................................................... 2021, 2022, 2114
Capehart ........................................................... 2020, 2110
Carver ........................................................................... 2062
CCE .................................................................... 2027, 2061
Citizen ............................................................. 2013, 2014,
Colortyme .................................................................... 2009
Colt ................................................................................ 2061
Craig .......................................... 2013, 2014, 2023, 2061
Curtis-Mathes ................................... 2000, 2009, 2013,
Cybernex ...................................................................... 2013
Daewoo ....................... 2015, 2017, 2019, 2025, 2026,
Daytron ......................................................................... 2110
DBX .................................................................... 2009, 2010
Dimensia .......................................................... 2000, 2131
Dynatech ...................................................................... 2026
Electrohome .................................................... 2014, 2029
Electrophonic ............................................................. 2014
Emerson 2012, 2014, 2015, 2021, 2024, 2025, 2026,
2029, 2030, 2031, 2032, 2033, 2034, 2035, 2036,
2037, 2038, 2039, 2040, 2041, 2042, 2044, 2045,
Fisher .................................................... 2011, 2023, 2048,
Fuji ...................................................................... 2021, 2119
Funai ............................................................................. 2026
Garrard ......................................................................... 2026
GE ......................................................... 2000, 2001, 2013,
Goldstar ........................ 2009, 2014, 2018, 2054, 2131
Gradiente ..................................................................... 2026
Harley Davidson ......................................................... 2026
Harman Kardon .......................................................... 2009
Harwood ...................................................................... 2061
Headquarter ................................................................. 2011
Hitachi ............................................................. 2055, 2056,
Hi-Q .............................................................................. 2023
Instant Replay ............................................................ 2021
JCL ................................................................................. 2021
JC Penney ................................. 2009, 2010, 2011, 2013,
Jensen .................................................... 2055, 2056, 2111
JVC ....................... 2009, 2010, 2011, 2018, 2111, 2123
Kenwood .............................................. 2009, 2010, 2011,
KLH ................................................................................ 2061
Kodak ................................................................ 2014, 2021
Lloyd .............................................................................. 2026
Logik .............................................................................. 2061
LXI .................................................................................. 2014
Magnavox ........................................... 2021, 2022, 2062,
Magnin ......................................................................... 2013
Marantz ................................................ 2009, 2010, 2011,
Marta ............................................................................ 2014
Masushita .................................................................... 2021
Mei ................................................................................ 2021
Memorex .......................................................... 2011, 2013,
MGA ....................................................... 2029, 2065, 2113
MGN Technology ....................................................... 2013
Midland ........................................................................ 2053
Minolta ................................................. 2055, 2056, 2107
Mitsubishi ....... 2029, 2055, 2056, 2065, 2066, 2067,
Montgomery Ward ........................................ 2075, 2132
Motorola .......................................................... 2021, 2132
MTC ................................................................... 2013, 2126
2015, 2016, 2017, 2018, 2019, 2027
2016, 2018, 2021, 2022, 2024, 2115, 2131
2027, 2028, 2110
2046, 2047, 2065, 2113, 2116, 2117, 2130
2049, 2050, 2051, 2052, 2118
2021, 2022, 2053, 2115, 2120, 2131
2057, 2107, 2111, 2120, 2122
2014, 2021, 2022, 2055, 2056,
2058, 2059, 2060, 2107, 2118
2016, 2018, 2111, 2123
2063, 2104, 2105, 2108, 2124
2016, 2018, 2021, 2062, 2064
2014, 2021, 2023, 2026, 2104, 2132
2068, 2068, 2070, 2071, 2072, 2073, 2074, 2106,
2113, 2123
Multitech ....................... 2013, 2016, 2026, 2053, 2061
NEC ................................... 2009, 2010, 2011,2016, 2018,
Nikko ............................................................................... 2014
Noblex ............................................................................ 2013
Olympus ......................................................................... 2021
Optimus .............................................................. 2014, 2132
Optonica ........................................................................ 2096
Panasonic ............ 2021, 2022, 2109, 2125, 2126, 2127
Pentax ............................. 2016, 2055, 2056, 2107, 2120
Pentex Research .......................................................... 2018
Philco .......................................... 2021, 2022, 2062, 2063
Philips ......................................... 2021, 2062, 2096, 2124
Pilot ................................................................................. 2014
Pioneer ........................... 2010, 2055, 2080, 2081, 2123
Portland ....................................... 2016, 2017, 2019, 2110
PROSCAN ............................................... 2000, 2001, 2131
Protec .............................................................................. 2061
Pulsar .............................................................................. 2104
Quarter ........................................................................... 2011
Quartz ............................................................................. 2011
Quasar .................................................... 2021, 2022, 2125
RCA ......... 2000, 2001, 2003, 2013, 2021, 2055, 2056,
2082, 2083, 2084, 2085, 2086, 2087, 2088, 2089,
Radioshack/Realistic ... 2011, 2013, 2014, 2021, 2022,
Radix ............................................................................... 2014
Randex ............................................................................ 2014
Ricoh ............................................................................... 2128
Runco .............................................................................. 2104
Samsung ............ 2005, 2013, 2015, 2033, 2053, 2112
Sanky .................................................................. 2104, 2132
Sansui .......................................... 2010, 2092, 2111, 2123
Sanyo ....................................................... 2011, 2013, 2023
Scott ............................................ 2012, 2015, 2025, 2032
Sears ................................ 2011, 2014, 2021, 2023, 2048,
Sharp ....... 2017, 2029, 2094, 2095, 2096, 2097, 2131
Shintom ...................................... 2004, 2056, 2061, 2098
Shogun ........................................................................... 2013
Signature ....................................................................... 2131
Singer ...................................................... 2021, 2061, 2128
Sony ............................................ 2004, 2098, 2099, 2119
STS ........................................................................ 2021, 2107
Sylvania ............................................................. 2021, 2022,
Symphonic ..................................................................... 2026
Tandy ............................................................................... 2011
Tashiko ............................................................................ 2014
Tatung .............................................................................. 2111
TEAC ......................................................... 2026, 2085, 2111
Technics .............................................................. 2021, 2109
Teknika ........................... 2014, 2021, 2026, 2100, 2129
TMK ......................................................... 2013, 2024, 2047
Toshiba .................................................. 2015, 2049, 2051,
..................................................... 2055, 2065, 2093, 2116
Totevsion ............................................................ 2013, 2014
Unitech ........................................................................... 2013
Vector Research ....................... 2009, 2010, 2015, 2016
Victor .............................................................................. 2010
Video Concepts ............. 2009, 2010, 2015, 2016, 2113
Videosonic ..................................................................... 2013
Wards ......................................... 2013, 2014, 2015, 2021,
XR-1000 ................................................. 2021, 2026, 2061
Yamaha ............................ 2009, 2010, 2011, 2018, 2111
Zenith .............................. 2004, 2098, 2104, 2119, 2128
2064, 2076, 2078, 2079, 2111, 2123
2090, 2091, 2107, 2115, 2120, 2125, 2131, 2133
2023, 2026, 2029, 2049, 2050, 2096, 2132
2038, 2065, 2093, 2116
2049, 2050, 2051, 2055, 2056, 2107, 2118
2026, 2062, 2063, 2065, 2124
2023, 2026, 2029, 2055, 2056, 2061,
2096, 2101, 2102, 2103, 2107, 2116, 2132
continued on next page
56 Chapter 5
Page 59

Chapter 6: Additional Information
Cable Box Codes
ABC .................. 5002, 5003, 5004, 5005, 5006, 5007, 5053
Antronix ................................................................ 5008, 5009
Archer ............................................... 5008, 5009, 5010, 5011
Cabletenna ........................................................................ 5008
Cableview ......................................................................... 5008
Century .............................................................................. 5011
Citizen ................................................................................5011
Colour Voice.......................................................... 5012, 5013
Comtronics ............................................................ 5014, 5015
Contec ............................................................................... 5016
Eastern .............................................................................. 5017
Garrard ............................................................................... 5011
GC Electronics .................................................................. 5009
Gemini ......................................................... 5018, 5019, 5049
General Instrument ......................................................... 5003
Hamlin ................................... 5020, 5021, 5022, 5035, 5045
Hitachi .............................................................................. 5003
Hytex ................................................................................. 5002
Jasco ................................................................................... 5011
Jerrold .....5003, 5005, 5007,5018, 5023, 5024, 5046, 5053
Magnavox ........................................................................ 5025
Memorex ........................................................................... 5026
Movie Time ................................................ 5002, 5027, 5028
NSC .............................................................. 5002, 5027, 5028
Oak ................................................................ 5002,5016, 5029
Panasonic .............................................................. 5048, 5052
Paragon ............................................................................. 5026
Philips ..... 5011, 5012, 5013, 5019, 5025, 5030, 5031, 5032
Pioneer ................................................................... 5033, 5034
Pulsar ................................................................................ 5026
RCA ............................................................. 5047, 5049, 5052
Realistic ................................................................. 5009, 5049
Regal ...................................................................... 5022, 5035
Regency ............................................................................ 5017
Rembrandt ........................................................................ 5003
Runco ................................................................................ 5026
Samsung ................................................................ 5014, 5034
Scientific Atlanta ............................ 5006, 5036, 5037, 5038
Signal ..................................................................... 5014, 5018
Signature .......................................................................... 5003
SL Marx ............................................................................ 5014
Sprucer .......................................................... 5052
Starcom .................................... 5007, 5018, 5053
Stargate ............................................... 5014, 5018
Starquest ....................................................... 5018
Tandy ............................................................ 5040
Teleview ........................................................ 5014
Tocom ...................................... 5004, 5023, 5041
Toshiba .......................................................... 5026
Tusa ............................................................... 5018
TV86 .............................................................. 5027
Unika ........................................ 5008, 5009, 5011
United Artists ............................................... 5002
United Cable ................................................. 5053
Universal ........................ 5008, 5009, 5010, 5011
Videoway ...................................................... 5044
Viewstar ........................ 5015, 5025, 5027, 5040
Zenith ....................................... 5026, 5050, 5051
Satellite Receiver Codes
Alphastar ...................................................... 5079
Chapparal .......................................... 5056, 5057
Dishnet .......................................................... 5078
Drake .................................................. 5058, 5059
Echostar ........................................................ 5089
GE ........................................................ 5000, 5001
General Instruments ............... 5060, 5061, 5062
Hitachi ............................................... 5083, 5084
Hughes ................................................ 5077, 5090
JVC ................................................................ 5082
Panasonic ..................................................... 5075
Philips ........................................................... 5085
Primestar ...................................................... 5076
PROSCAN ........................................... 5000, 5001
RCA ..................... 5000, 5001, 5071, 5080, 5081
Realistic ........................................................ 5063
Sony .............................................................. 5072
STS1 .............................................................. 5064
STS2 .............................................................. 5065
STS3 .............................................................. 5066
STS4 .............................................................. 5067
Toshiba ................................................ 5068, 5073
Uniden .......................................................... 5086
Chapter 5 57
Page 60

Chapter 6: Additional Information
More from OpenGlobe Services
While enjoying Music, Radio, or Movies, push the OpenGlobe button to take you to a specialized information area for you to explore your favorite
artists and actors. You can also find similar artists or movies, top hits, artist bios, and purchase new CDs and DVDs to be shipped right to your home.
The available services are always evolving, so check back often.
With your RCA Home Theater Music Jukebox and all OpenGlobe has to offer, you have the key to enhanced entertainment information and services.
VCR1 ON • OFF TV
MOVIES VCR2 AUX SAT•CABLE
RADIOMUSIC
CH•PAGE+
OpenGlobe
Services
button
VOL
CH•PAGE-
GUIDE
OK
SELECT
_/.?' ABC DEF
123
GHI JKL MNO
456
PQRS TUV WXYZ
789
@-*#
0
DVD
SETUP
FWD•SPACE
ANGLE SURR
INPUT
REV•DEL PLAY
RECORD PAUSESTOP
MENU SUBTITLE
VOL
GO BACKMUTE
INFO
CLEARMENU
Compatible Optional USB Keyboards
The following models of USB keyboards are fully compatible with your Home Theater Music Jukebox. Check with your local retailer for availability.
• Logitech Cordless Keyboard, model #967090-0403
• Logitech Internet Navigator Keyboard, model # 967093-0403
• Belkin USB Classic Keyboard, model # F8E206-USB
• Compaq USB Internet Keyboard, model # 260725-001
58 Chapter 5
Page 61

Chapter 6: Additional Information
Adding a New Internet Station
Your Home Theater Music Jukebox is able to deliver a variety of Internet radio station programming through its connection to the Internet. Escient’s
OpenGlobe Internet radio service provides a large variety of stations including Sirius Satellite Radio (broadband users only), Radio Free Virgin, and
various other stations from across the country. These stations can be selected for playback in the Radio Guide.
In order to increase your listening enjoyment, the Music Jukebox also allows you to add new Internet Radio stations to the Radio Guide for playback.
The procedure below will give you some examples of how to find new stations and add them to the Radio Guide.
Locating Stations
Internet Radio is a fairly new form of radio broadcasting which all terrestrial radio stations have not yet adopted. Please keep in mind that the station
you are interested in may not broadcast over the Internet, or it may use a proprietary interface only accessible from a PC. You can locate Internet
radio stations using various Internet Radio web sites that can be accessed using your Internet Browser on a PC. One example is Radio-Locator.
Simply go to http://www.radio-locator.com and type in the station call letters, zip code, State code, Genre, or Country in the fields provided, and press
GO. The radio locator will return information about the station or the area that you requested. Click on the (i) icon in order to find the detailed
information about the specific station. From the Information page, the radio locator will list an Internet address for the Audio Stream location. If
this address ends with a .asx or .asf file extention, then the Music Jukebox may be able to playback this station.
Follow the steps below to enter the information you found and start enjoying your favorite Internet radio stations!
1. Press the RADIO button on your remote.
2. Press MENU (the RADIO OPTIONS MENU appears).
3. Highlight and select new station (a screen appears to ask what kind of station you
want to add).
4. Highlight and select internet (the NEW INTERNET STATION screen appears).
5. Use the arrow button to move to the desired field (name, location, url, speed), then
enter the information.
6. Move to genre and select the genre.
7. Move to channels and select the channel (stereo or mono).
8. When finished, press RECORD to save and add the new station.
Chapter 5 59
Page 62

Chapter 6: Additional Information
FCC and Industry Canada Information
This device complies with Part 15 of the FCC Rules. Operation is subject to the following two conditions: (1) this device may not cause harmful
interference, and (2) this device must accept any interference received, including interference that may cause undesired operation.
This equipment has been tested and found to comply with the limits for a Class B digital device, pursuant to Part 15 of the FCC Rules. These limits are
designed to provide reasonable protection against harmful interference in a residential installation. This equipment generates, uses, and can radiate
radio frequency energy and, if not installed and used in accordance with the instructions, may cause harmful interference to radio communications.
However there is no guarantee that interference will not occur in a particular installation. If this equipment does cause harmful interference to radio
or television reception, which can be determined by turning the equipment off and on, the user is encouraged to try and correct the interference by
one or more of the following measures:
• Reorient or relocate the receiving antenna.
• Increase the separation between the equipment and receiver.
• Connect this equipment into an outlet on a circuit different from that to which the receiver is connected.
• Consult your service provider or an experienced radio/TV technician for help.
FCC regulations state that unauthorized changes or modifications to this equipment may void the user’s authority to operate it.
This Class B digital apparatus meets all requirements of the Canadian Interference Causing Equipment Regulations.
60 Chapter 5
Page 63

Chapter 6: Additional Information
Additional FCC Information
This equipment complies with Part 68 of the FCC rules and the requirements adopted by the ACTA. On the back or bottom of this equipment is a label
that contains, among other information, a product identifier in the format US:AAAEQ##TXXXX or an FCC registration number. If requested, this
number must be provided to the telephone company.
The Ringer Equivalence Number (REN) is used to determine the number of devices that may be connected to a telephone line. Excessive RENs on a
telephone line may result in the devices not ringing in response to an incoming call. In most but not all areas, the sum of the RENs should not exceed
five (5.0). To be certain of the number of devices that may be connected to a line, as determined by the total RENs, contact the local telephone
company. For products approved after July 23, 2001, the REN for this product is part of the product identifier that has the format US:AAAEQ##TXXXX.
The digits represented by the ## are the REN without a decimal point (e.g., 03 is a REN of .3). For earlier products, the REN is separately shown on the
label.
A plug and jack used to connect this equipment to the premises wiring and telephone network must comply with the applicable FCC part 68 rules and
requirements adopted by the ACTA. A compliant telephone cord and modular RJ11 plug is provided with this product. It is designed to be connected
to a compatible modular jack that is also compliant. See installation instructions for details.
This equipment uses one or more of the following plugs and jacks:
USOC RJ11, USOC RJ14.
If this equipment causes harm to the telephone network, the telephone company will notify you in advance that temporary discontinuance of service
may be required. But if advance notice isn’t practical, the telephone company will notify the customer as soon as possible. Also, you will be advised
of your right to file a compliant with the FCC if you believe it is necessary.
The telephone company may make changes in its facilities, equipment, operations or procedures that could affect the operation of the equipment. If
this happens the telephone company will provide advance notice in order for you to make necessary modifications to maintain uninterrupted service.
Connection to party line service is subject to state tariffs. Contact the state public utility commission, public service commission or corporation
commission for information.
If your home has specially wired alarm equipment connected to the telephone line, ensure that the installation of this equipment does not disable
your alarm equipment. If you have questions about what will disable alarm equipment, consult your telephone company or qualified installer.
If trouble is experienced with this equipment, for repair or warranty information, please refer to the warranty section of this manual. If the equipment
is causing harm to the telephone network, the telephone company may request that you disconnect the equipment until the problem is resolved.
This product meets the applicable Industry Canada technical specifications. The term “IC” before the certification / registration number only signifies
that the Industry Canada technical specifications were met.
Chapter 5 61
Page 64

Chapter 6: Additional Information
Limited Warranty
What your warranty covers:
• Defects in materials or workmanship.
For how long after your purchase:
• One year from date of purchase - Unit exchange, which includes parts and labor.
• The warranty for rental units begins with the first rental or 45 days from date of shipment to the rental firm, whichever comes first.
What we will do:
• Exchange the defective unit for a new, or at our option, refurbished unit.
How you get service:
• Call 1-580-634-0366 and have your unit's date of purchase and model/serial number ready. The model/serial number information is on the back of your
unit.
• A representative will troubleshoot your problem over the phone.
• If the representative determines that you should receive a replacement unit you will be provided with a Service Request (SR) number. No returns will be
accepted without the SR number.
•Proof of purchase in the form of a bill of sale or receipted invoice which is evidence that the product is within the warranty period must be presented to
obtain warranty service. For rental firms, proof of first rental is also required.
Option I:
1. Provide your Discover, MasterCard or Visa account number and expiration date to your phone representative. This is for security purposes only and your
account will not be charged at this time.
2. We will send you a replacement unit.
3. If you return the defective unit to us within 14 days from the date you were provided a SR number, only items not covered by warranty will be charged to
your account. If your unit is not received within 14 days, the suggested retail value of the unit will be charged to your credit card. This amount will be
credited, less a handling fee, if the unit is subsequently received.
4. Ship your defective unit back to us, less accessories, using the replacement unit's carton. Shipping instructions will be included in the carton along with
your SR number which will allow you to easily ship the unit back to us. Make sure you insure your shipment in case of damage or loss. Include with the
shipment:
• Evidence of purchase date such as a bill of sale.
•A brief note describing your unit’s problem.
•Your name, address and phone number.
Option II:
1. For a fee, we will send a replacement unit to our exchange point.
2. The exchange location will notify you of its arrival.
3. Take your unit and evidence of purchase date, such as a bill of sale, to the exchange location and you will be provided the new or refurbished unit. Please
retain all accessories such as the remote control hand unit.
4. If the repairs are covered by your warranty, you will not be billed.
Thomson assumes no responsibility for warranty shipments from the customer to the factory if not shipped in the manner prescribed by
Thomson.
To receive a replacement unit after we have received your unit:
• Write the SR number on the outside of the carton used to return the unit. Make sure you insure your shipment in case of damage or loss.
• Carefully pack the unit using the original box and packing material if possible. Please retain all accessories that were included with your unit such as the
remote control hand unit.
62 Chapter 5
Page 65

Chapter 6: Additional Information
• Include with the shipment:
1. Evidence of purchase date such as a bill of sale.
2. A brief note describing your unit’s problem.
3. Your name, address and phone number.
• The representative will advise the address to mail a cashier’s check or money order for payment if there are any out of warranty labor or parts charges, and
you elect not to use your credit card.
• After we receive your product, a new or refurbished unit will be shipped to you.
What your warranty does not cover:
• Acts of nature, such as but not limited to lightning damage.
• Adjustment of customer controls.
• Damage from misuse or neglect.
•A unit that has been modified or incorporated into other products or is used for institutional or other commercial purposes.
• Batteries.
• Units purchased, serviced or operated outside the U.S.A.
• Loss of programming. It is recommended that you retain all original CD software that was loaded in the unit.
• Installation.
• Shipping damage if the unit was not packed and shipped in the manner prescribed by Thomson.
• Storage fees may be charged by the exchange point if you fail to pick up the replacement unit in a timely manner.
Product Registration:
• Please complete and the online Product Registration on RCA.com/productregistration or complete and mail the Product Registration Card packed with your
product. It will make it easier to contact you should it ever be necessary. The return of the card is not required for warranty coverage.
Limitation of Warranty:
• THE WARRANTY STATED ABOVE IS THE ONLY WARRANTY APPLICABLE TO THIS PRODUCT. ALL OTHER WARRANTIES, EXPRESS OR IMPLIED (INCLUDING
ALL IMPLIED WARRANTIES OF MERCHANTABILITY OR FITNESS FOR A PARTICULAR PURPOSE) ARE HEREBY DISCLAIMED. NO VERBAL OR WRITTEN
INFORMATION GIVEN BY THOMSON, ITS AGENTS OR EMPLOYEES SHALL CREATE A GUARANTY OR IN ANY WAY INCREASE THE SCOPE OF THIS
WARRANTY.
• REPAIR OR REPLACEMENT AS PROVIDED UNDER THIS WARRANTY IS THE EXCLUSIVE REMEDY OF THE CONSUMER. THOMSON SHALL NOT BE LIABLE
FOR INCIDENTAL OR CONSEQUENTIAL DAMAGES RESULTING FROM THE USE OF THIS PRODUCT OR ARISING OUT OF ANY BREACH OF ANY EXPRESS OR
IMPLIED WARRANTY ON THIS PRODUCT. THIS DISCLAIMER OF WARRANTIES AND LIMITED WARRANTY ARE GOVERNED BY THE LAWS OF THE STATE
OF INDIANA. EXCEPT TO THE EXTENT PROHIBITED BY APPLICABLE LAW, ANY IMPLIED WARRANTY OF MERCHANTABILITY OR FITNESS FOR A
PARTICULAR PURPOSE ON THIS PRODUCT IS LIMITED TO THE APPLICABLE WARRANTY PERIOD SET FORTH ABOVE.
How state law relates to warranty:
• Some states do not allow the exclusion nor limitation of incidental or consequential damages, or limitations on how long an implied warranty lasts, so the
above limitations or exclusions may not apply to you.
• This warranty gives you specific legal rights, and you also may have other rights that vary from state to state.
If you purchased your product outside the United States:
• This warranty does not apply. See your dealer for warranty information.
Chapter 5 63
Page 66

This page intentionally left blank.
Page 67

This page intentionally left blank.
Page 68

Visit the RCA website at www.rca.com
Please do not send any products to the Indianapolis address listed in this manual or on the carton. This will only add delays in
service for your product.
Thomson Inc.
10330 North Meridian Street
Indianapolis, IN 46290
©2003 Thomson Inc.
Trademark(s)® Registered
Marca(s) Registrada(s)
Printed in China
TOCOM 1606377A
 Loading...