

Page 1
Remote Control
1. Turn on/off the
player
2. Open the disc trov
3. Select DVD mode and
play DVD/CD
4. Start playback of a
DISC
5. Stop playback Press STOP
6. Adjust the volume Press VOL +/-
7. Skip to the next or
previous chapter
(DVD) or track (CD)
8. Start reverse
accelerated ploy
9. Start forward
accelerated ploy
10. Change the audio
language during
playback
11. Change the subtitle
13
12
language
12. Access the Disc menu
for DVD disc.
13. Access the Info menu Press INFO
14. Enter Setup menu. Press SETUP
15. Navigating through
menus
Note:
See page 12 - 13 of User Manual for more
details on remote control functions.
Press ON-OFF
Press and hold STOP
Press DVD
Press PLAY
Press CH +/-
Press REV
Press FWD
Press AUDIO
Press SUBTITLE
Press DISC MENU
Use the direction
buttons to navigate
through the menus.
Press OK to conflim your
selection.
Congratulations on purchasing your new RCA unit.
s read these Instructions for quick tips on using the unit.
Setting up
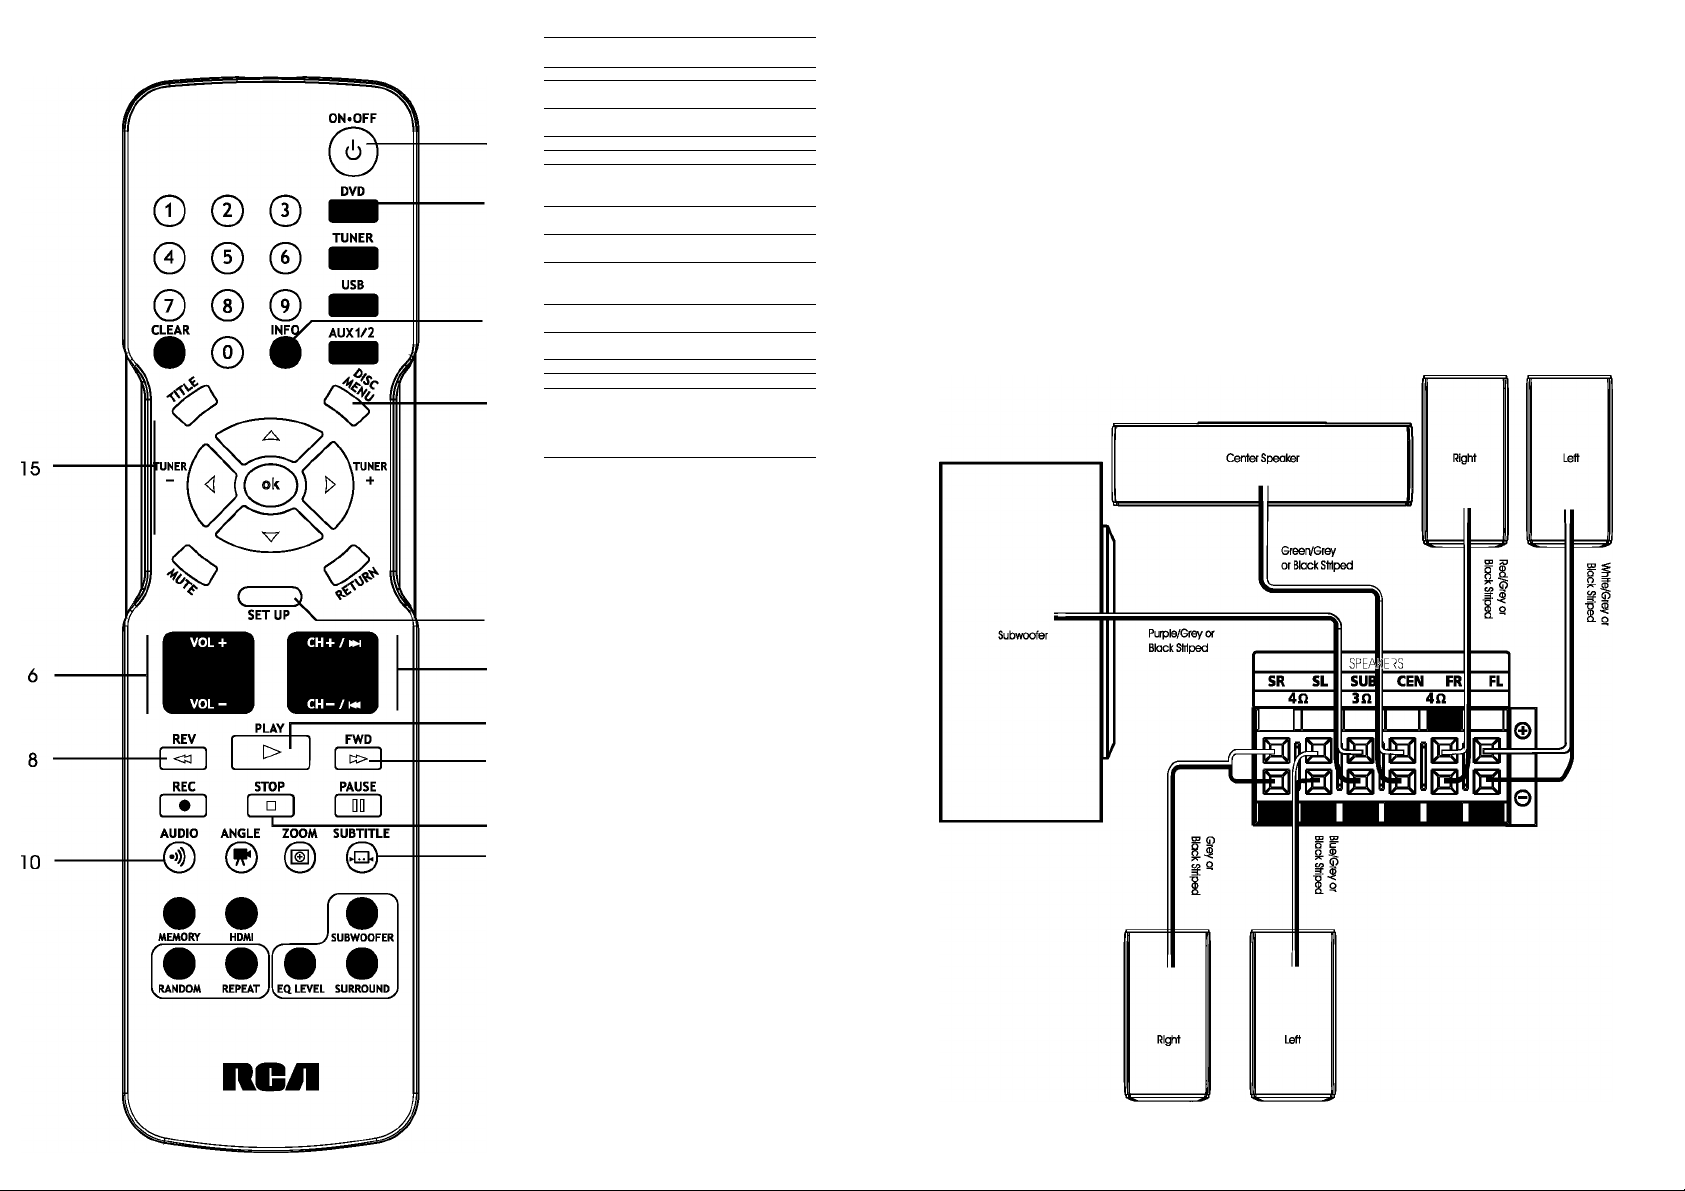
1 .Connecting ttie speakers
Six speakers are provided with the unit:
• 2 front speakers
• 1 center speaker
• 2 rear speakers
• 1 subwoofer
Speaker wires are color-coded to match the terminals.
Connect the speaker wire to the corresponding color terminal as shown below.
Press down the tab to open the terminal, Insert the wire and release the tab.
Quick Start Guide
RTD317
www.rcaaudiovldeo.com
Front Speakers
14
7
4
9
2,5
11
Rear Speakers
(Surround Sound]
RTD317QSG V1.0 (EN)
Page 2
2.Positioning the speakers
Left Rear Specter
(Surround]
S.Connecting to Other Components
Method 1: (Video)
Video OUT to Video
IN on the TV or monitor,
Use onlyone of the
video connections
(Pr,Pb,Y,or composite
video),not both.
Left Front
1. Center; In surround mode, the center speater carries most of the dialog as well
as music and effects. It should be set between the left and right specters.
2. Front Speakers: Front speakers carry primarily music and sound effects.
3. Rear Speakers; The rear specters' overall sound balance should be as close as
possible to the front speakers. Proper placement is vital to establish an evenly
distributed sound field.
4. Subwoofer: A subwoofer Is designed to reproduce powerful low bass effects
(explosions, the rumble of spaceships, etc.) which dramatically heighten the
action on the screen.
The jocks on the back of the unit shown on the left are used to connect to other components.
Connect the video OUT jacks to the IN jacks on your TV or monitor so the video content goes from the receiver to the screen.
Connect the audio IN jacks to the OLff jocks on the component you wish to connect, so the sound from the component comes Into the unit and out through the
To connect to other components, you need the following video and audio cables;
• Composite video cable (Included)
• Component video cable (not included)
• Audio cables (color-coded In red and white] (not Included]
See page 6 of User Manual for details.
Note;
This unit defaults to Progressive Scan (P^CAN) off.
See page 27 on the User Manual to learn how to turn P-SCAN on.
If your TV or monitor does not support P-SCAN, you may get a picture with incorrect color or no cotoi
General controls
Front panel controls
Method 2
HDMIOUTtoHDMIlN
on the TV monitor for
better audio video
connection instead
of method 1.
Method 1: (Audio)
AUDtOtNtoAUDtO
OUT on SAT, VCR
or other componet
and photos.
 Loading...