

Page 1

ST1000 Plus & ST2000 Plus Tiller Pilots
Owner’s Handbook
Document number: 81130-3
Date: June 2001
Page 2

ii ST1000 Plus & ST2000 Plus Tiller Pilots - Owner’s Handbook
Autohelm, HSB (High Speed Bus), SailPilot, SeaTalk and SportPilot
are registered trademarks of Raymarine Ltd.
Raymarine, AST (Advanced Steering T echnology), AutoAdapt,
AutoLearn, AutoRelease, AutoSeastate, AutoTack, AutoTrim,
FastTrim, GyroPl us, RayGyro, RayPilot and W indTrim are
trademarks of Raymarine Ltd.
Handbook contents © Raymarine Ltd 2001.
Page 3

Preface iii
Contents
Chapter 1: Introduction ............................................................1
1.1 Overview .................................................................................. 1
1.2 Specifications ............................................................................2
1.3 About this handbook .................................................................3
Important Information ..............................................................3
Chapter 2: Using the Tiller Pilot ...............................................7
2.1 Overview .................................................................................. 7
2.2 Using Auto mode ......................................................................8
Engaging the autopilot (Auto mode) .........................................8
Disengaging the autopilot (Stand by mode) ..............................8
Changing course ....................................................................... 9
Displaying navigation information pages ...............................12
Automatic deadband control (Auto Seastate) ......................... 12
Operating hints – trim changes ...............................................13
2.3 Switching display illumination on and off ..............................14
2.4 Using Track mode ...................................................................15
Selecting Track mode .............................................................15
Returning to Auto from T rack mode .......................................17
Cross track error (XTE) ..........................................................17
Tidal stream compensation .....................................................18
W aypoint arrival and advanc e .................................................19
Dodges in Track m ode ............................................................ 19
Safety in Track mode .............................................................. 20
W arning messages in T rack mode ...........................................21
2.5 Using WindT rim mode ...........................................................23
Selecting WindT rim mode ......................................................23
Exiting WindT rim mode ......................................................... 24
Returning to the previous apparent wind angle .......................24
Wind shift alarm ......................................................................24
Operating hints for WindT rim mode .......................................25
Chapter 3: Maintenance & Fault Finding ..............................27
3.1 General maintenance ..............................................................27
3.2 Product support .......................................................................28
3.3 Fault finding ............................................................................28
Chapter 4: Installing the Tiller Pilot ......................................33
4.1 Planning the installation ..........................................................33
4.2 Installing the tiller pin and mounting socket ...........................36
Measuring the critical dimensions ..........................................36
Page 4

iv ST1000 Plus & ST2000 Plus Tiller Pilots - Owner’s Handbook
Basic installation ..................................................................... 37
Installation accessories ........................................................... 38
4.3 Cabling and socket installation ............................................... 45
Mounting the socket ............................................................... 45
Power supply .......................................................................... 46
SeaTa lk cabling .......................................................................47
NMEA cabling ........................................................................49
Connecting NMEA and SeaTalk ............................................ 50
Chapter 5: Commissioning the Tiller Pilot ...........................51
5.1 Functional tests .......................................................................51
Switch on ................................................................................51
Operating sense .......................................................................51
Checking the navigation interface .......................................... 52
Checking the wind instrument interface ................................. 54
Checking the SeaT alk interface .............................................. 54
5.2 Initial sea trial .......................................................................... 55
Calibrating the compass .......................................................... 56
Autopilot operation ................................................................. 58
5.3 Adjusting autopilot performance ............................................ 58
Chapter 6: Adjusting Tiller Pilot Settings ............................61
6.1 Introduction ............................................................................ 61
Adjusting calibration values ................................................... 61
Calibration features .................................................................63
Default calibration values ....................................................... 63
6.2 Calibrating the tiller pilot ........................................................ 64
Calibration Level 1: Rudder gain ............................................64
Calibration Level 5: cruise speed ............................................64
Calibration Level 6: off course alarm a ngle ............................ 64
Calibration Level 9: magnetic variation ................................. 65
Calibration Level 10: heading error correction ....................... 65
Calibration Level 11: boat’s current latitude ........................... 66
Calibration Level 13: rudder damping ....................................66
Controlling access to calibration .............................................66
Index ..................................................................................... 69
Page 5
Chapter 1: Introduction 1
Chapter 1: Introduction
1.1 Overview
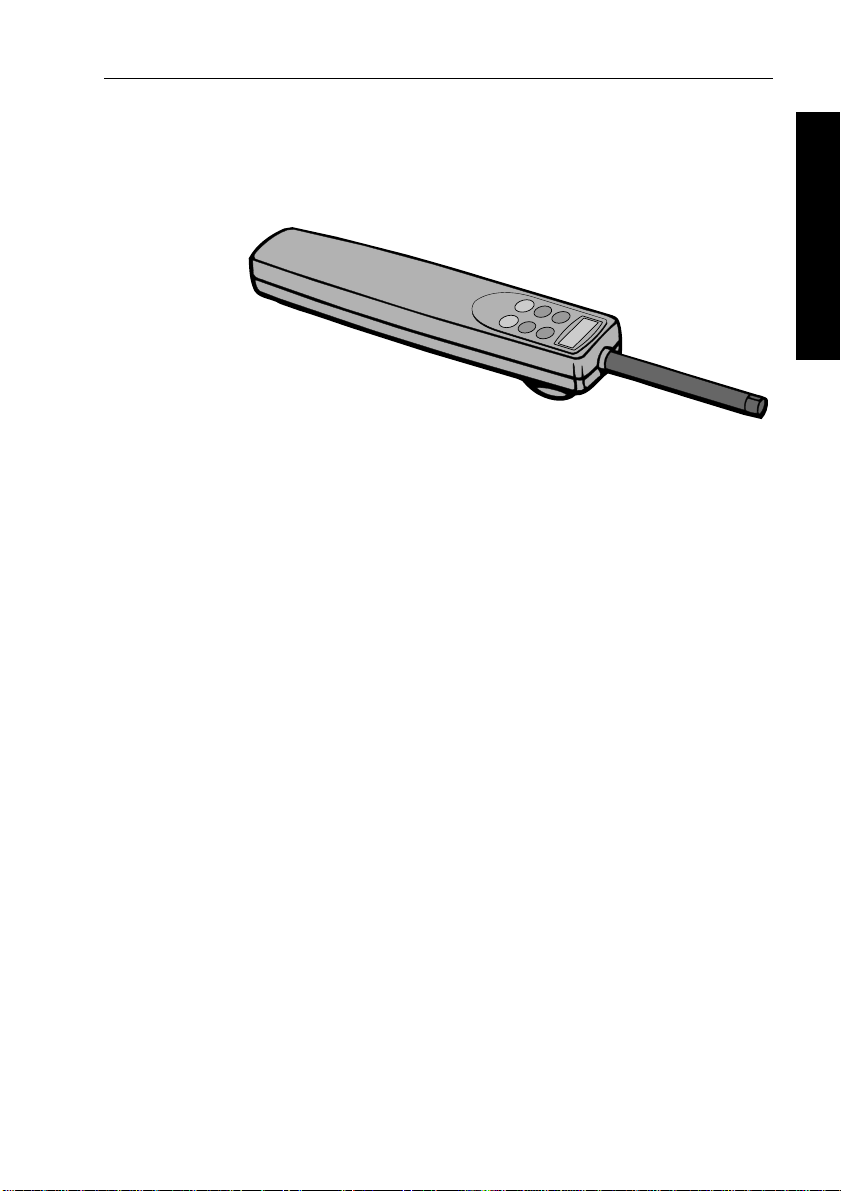
Y our Raymarine tiller pilot is a totally self-contained autopilot
designed for tiller steered sailboats. The autopilot is m ounted
between the tiller and a single attachment point on the boat’s
structure. It is designed for owner installation and is ready for use
after connection to the boat’s 12V electrical system.
Operating modes
The tiller pilot has four basic operating modes:
• Stan dby mode: autopilot off
• Auto mode: autopilot engaged and locked onto a heading
• T rack mode: autopi lot on and maintaining a track between two
• WindT rim mode: autopilot on and maintainin g a course re lative
1 Introduction
D5557-2
waypoints created on a navigation system
to an apparent wind angle
SeaTalk and NMEA compatibility
The tiller pilot is SeaTalk compatible, so it can share data transmitted
from other Raymarine SeaT alk instruments:
• wind information from a wind instrument can be used for
wind vane steering without the need to install a separate vane
• track information, from a navigator, enables the autopilot to
provide waypoint control
• boat speed from a speed instrument can provide optimum track
keeping performance
• SeaTalk compatibility also allows additional fixed and hand-held
autopilot control units to be easily connected at secondary
steering and control positions
Page 6

2 ST1000 Plus & ST2000 Plus Tiller Pilots - Owner’s Handbook
The ST1000 Plus and ST2000 Plus tiller pilot s can also be used with
any navigator transmitting NMEA 0183 or NMEA 0180 data.
The tiller pilot can be calibrated to suit each installation to provide
maximum performance with many types of boat.
1.2 Specifications
1 Introduction
General specifications
Power supply: 10 V to 15 V DC
Drive unit thrust torque: ST1000 Plus: 57 kg (125 lb)
ST2000 Plus: 77 kg (170 lb)
Maximum boat
displacement:
Drive mechanism: ST1000 Plus: lead-screw and nut drive
Helm speed (lock to lock): ST1000 Plus: 8 seconds
Current consumption: • Standby: 40 mA (90 mA with full lighting)
Operating temperature: 0°C to +70°C (32°F to 158°F)
Main features: • 6 button digital keypad
ST1000 Plus: 3 000 kg (6 600 lb)
ST2000 Plus: 4 500 kg (10 000 lb)
ST2000 Plus: re-circulating ball drive
ST2000 Plus: 4.5 seconds
• Auto: 0.5 A to 1.5 A depending on boat trim,
helm load and sailing conditions
• Backlit LCD display of heading, locked course
and navigational information
• User calibration for optimum performance
• WindTrim control in WindTrim mode
• SeaTalk compatible
• Automatic compass deviation correction
• Northerly/Southerly heading compensation
• Automatic heading dead band – seastate control
• Automatic tack
• Built-in navigator interface (NMEA and SeaTalk)
• Waypoint advance feature
EMC conformance
All Raymarine equipment and accessories are designed to the best
industry standards for use in the recreational marine environment.
The design and manufacture of Raymarine equipment and
accessories conform to the appropriate Electromagnetic
Compatibility (EMC) standards, but correct installation is required to
ensure that performance is not compromised.
Page 7
Chapter 1: Introduction 3
1.3 About this handbook
Part 1: Using the Tiller Pilot
This part of the handbook explains how to use yo ur tiller pilot:
Chapter 2: Using the Tiller Pilot
2
How to use the tiller pilot.
Chapter 3: Maintenance & Fault Finding
3
Provides maintenance and fault finding information.
page 7
page 27
Part 2: Installing the Tiller Pilot
This part of the handbook explains how to install your tiller pilot:
Chapter 4: Installing the Tiller Pilot
4
How to install your tiller pilot and its components.
Chapter 5: Commissioning the Tiller Pilot
5
How to check the tiller pilot and perform an initial sea trial.
Chapter 6: Adjusting Tiller Pilot Settings
6
How to change the tiller pilot calibration settings.
Note: T his handbook contains important information about
installing, using and maintainin g your new Raymarine product. To
get the best from the product, please read this h andbook thoroughly.
page 33
page 51
page 61
1 Introduction
Important Information
Warranty
T o register your new Raymarine product, please take a few min utes to
fill out the warranty card. It is important that you complete the owner
information and return the card to us to receive full warranty benefits.
Handbook information
T o the best of our knowledge, the information in this handbook was
correct when it went to press. However, Raymarine cannot accept
liability for any inaccuracies or omissions it may contain. In addition,
our policy of continuous product improv ement may change
specifications without notice. As a result, Raymarine cannot accept
liability for any differences between the product and th e handbook.
Page 8

4 ST1000 Plus & ST2000 Plus Tiller Pilots - Owner’s Handbook
Safety notices
WARNING: Product installation
This equipment must be installed and operated in accordance
with the instructions contained in this handbook. Failure to do so
could result in poor pr oduct performance, personal injury
1 Introduction
and/or damage to your boat.
WARNING: Electrical safety
Make sure the power supply is switched off befor e you make any
electrical connections.
WARNING: Navigation aid
Although we have designed this pr oduct to be accurate and
reliable, many factors can affect its performance. As a result, it
should only be used as an aid to n avigation and should never
replace common s ense and navigational judgement. A lways
maintain a permanent watch so you can respond t o situations as
they develop.
Y our Raymarine autopilot will add a new dim ension to your boating
enjoyment. However, it is the skipper’s responsibility to ensure the
safety of the boat at all times by following these basic rules:
• Ensure that someone is present at the helm A T ALL TIMES, to
take manual control in an emergency .
• Make sure that all crew members know how to disengage the
autopilot.
• Regularly check for other boats and any obstacles to navigation –
no matter how clear the sea may appear, a dangerous situation can
develop rapidly .
• Maintain an accurate record of the boat’s po sition by using either
a navigation aid or visual bearings.
• Maintain a continuous plot of your boat’s position on a current
chart. Ensure that the locked autopilot heading will steer the boat
clear of all obstacles. Make proper allowance for tidal set – the
autopilot cannot.
• Even when your autopilot is locked onto the desired track using a
navigation aid, always maintain a log and make regular positional
plots. Navigation signals can produce significant errors under
some circumstances and the autopilot will not be able to detect
these errors.
Page 9

Part 1: Using the Tiller Pilot
Part 1: Using the Tiller Pilot
Page 10

Part 1: Using the Tiller Pilot
Page 11
Chapter 2: Using the Tiller Pilot 7
Chapter 2: Using the Tiller Pilot
2.1 Overview
WARNING:
Passage making under autopi lot control is an enjoyable
experience that can, if you are not careful, lead to the relaxation
of the permanent watch. Always maintain a permanent watch no
matter how clear the sea may appear to be.
• The tiller pilot always powers up in Standby mode (indicated by a
flashing ‘
• The tiller pilot is controlled using simp le push-button operations,
all of which are confirmed with a short beep. In addition to the
main single key functions, there are several dual key operations.
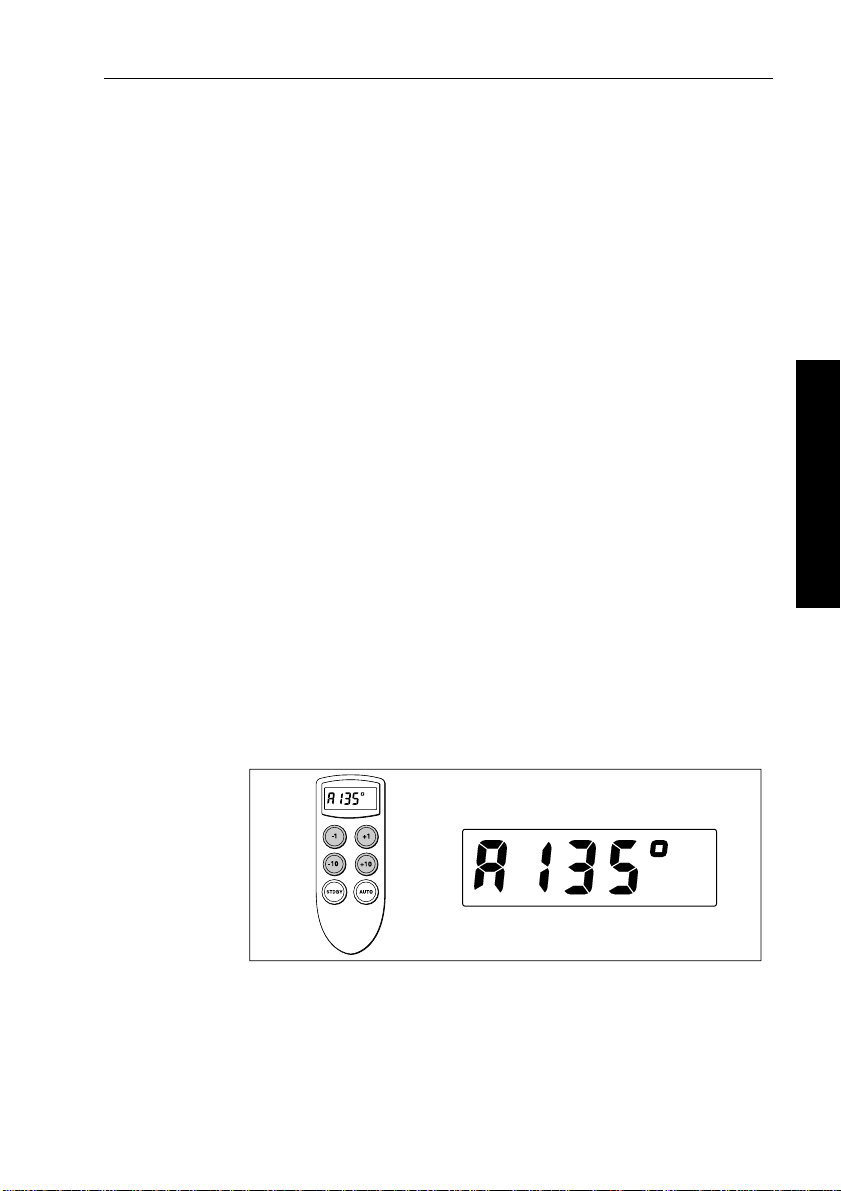
• T o select automatic steering:
• steady the boat on the required heading
• place the pushrod over the tiller pin (if necessary, extend or
• press
• T o return to manual steering at any time:
• press
• remove the pushrod from the tiller pin
• Y ou can use the
when the boat is under autopilot control.
C’ alongside the boat’s current compass heading).
retract the pushrod using the
-1, +1, -10, and +10 keys )
auto: t he display will then show an ‘A’ alongside the
current heading
standby
-1, +1, -10, and +10 keys to make course changes
2 Using the Tiller Pilot
D355-2
Page 12
8 ST1000 Plus & ST2000 Plus Tiller Pilots - Owner’s Handbook
2.2 Using Auto mode
Engaging the autopilot (Auto mode)
1. Steady the boat on the required heading.
2. Place the pushrod over the tiller pin. If necessary, extend or retract
the pushrod using the
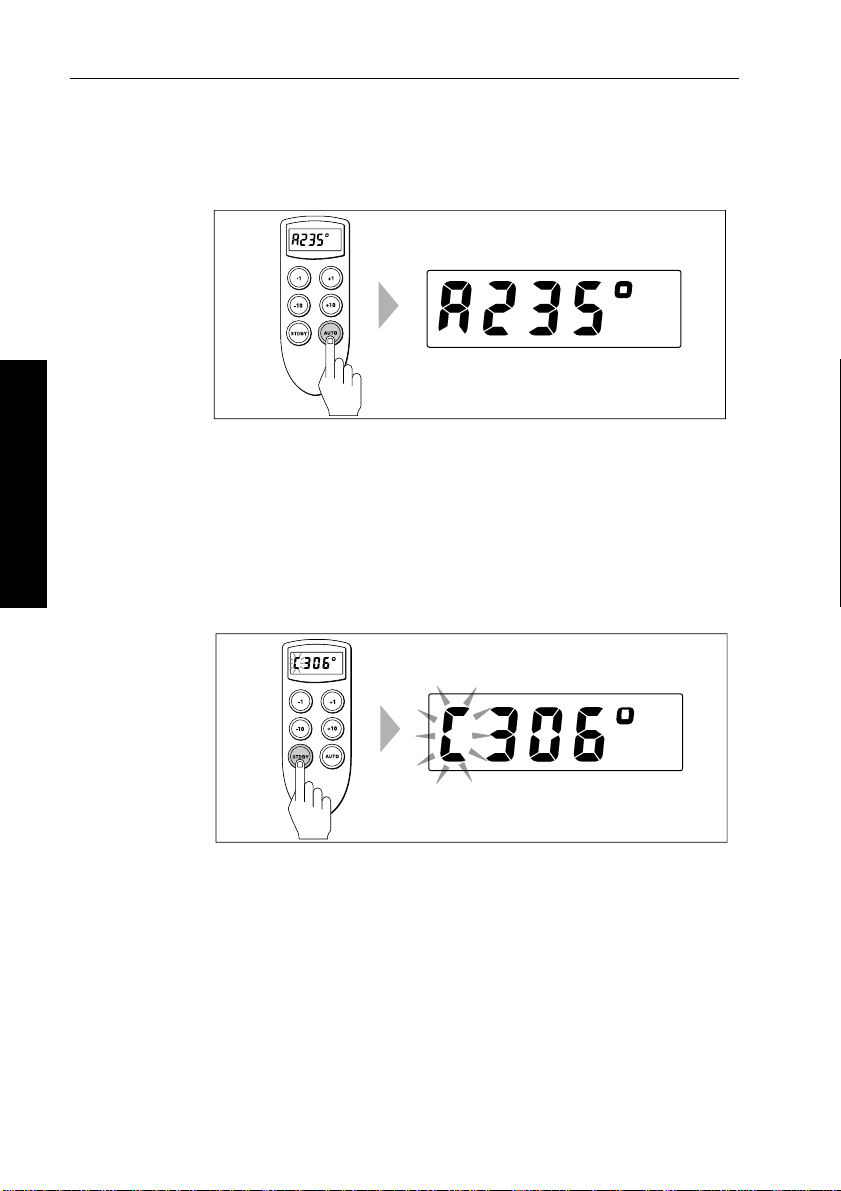
3. Press
2 Using the Tiller Pilot
auto: the tiller pilot will enter Auto mode and the display
will show an ‘
A’ (for auto) alongside the locked autopilot heading.
Disengaging the autopilot (Standby mode)
-1, +1, -10, and +10 keys.
D354-2
D353-2
T o return to hand steering:
1. Press
standby.
2. Remove the pushrod from the tiller pin to return to hand steering:
the display will show a flashing ‘
C’ and the boat’s current
compass heading.
3. The last heading is memorized and can be recalled (see page 1 1).
Page 13
Chapter 2: Using the Tiller Pilot 9
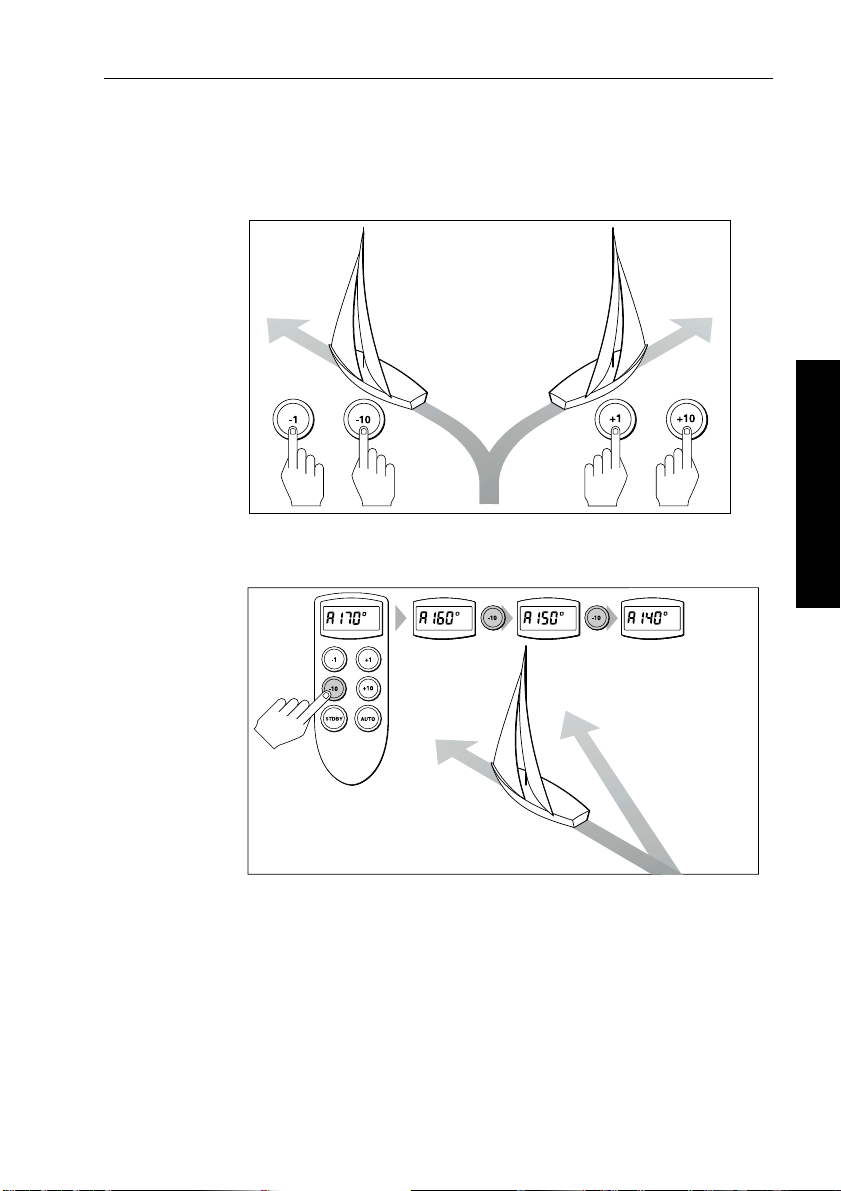
Changing course
In Auto mode, use the -1 and -10 (port) and +1 and +10 (starboard)
keys to change course in steps of 1° and 1 0°.
Port Starboard
oror
D3320-2
For example: press -10 three times for a 30° course change to port:
30˚ to port
Original
course
2 Using the Tiller Pilot
D3254-2
Page 14

10 ST1000 Plus & ST2000 Plus Tiller Pilots - Owner’s Handbook
Automatic tack feature (AutoTack)
The autopilot has a built-in automatic tack facility (in Auto, Track and
WindT rim modes) that turns the boat through 100°:
2 Using the Tiller Pilot
AutoTack - Port
• to AutoTack 100° to port, press
• to AutoTack 100° to starboard, press
AutoTack - Starboard
Wind
AutoTack
angle
-1 and -10 together
AutoTack
angle
+1 and +10 together
Wind
D5399-1
Dodging obstacles
1. T o avoid an obstacle when you boat is under autopilot con trol,
select a course change in the appropriate direction. For example,
press
-10 three times for a 30°dodge to port.
Obstacle
30˚ dodge
to port
Original
course
2. When safely clear of the obstacle, you can either:
• reverse the previous course change (for example, by pressing
+10 three times), or
• return to the previous heading (see below)
D3255-2
Page 15
Chapter 2: Using the Tiller Pilot 11
Returning to the previous heading
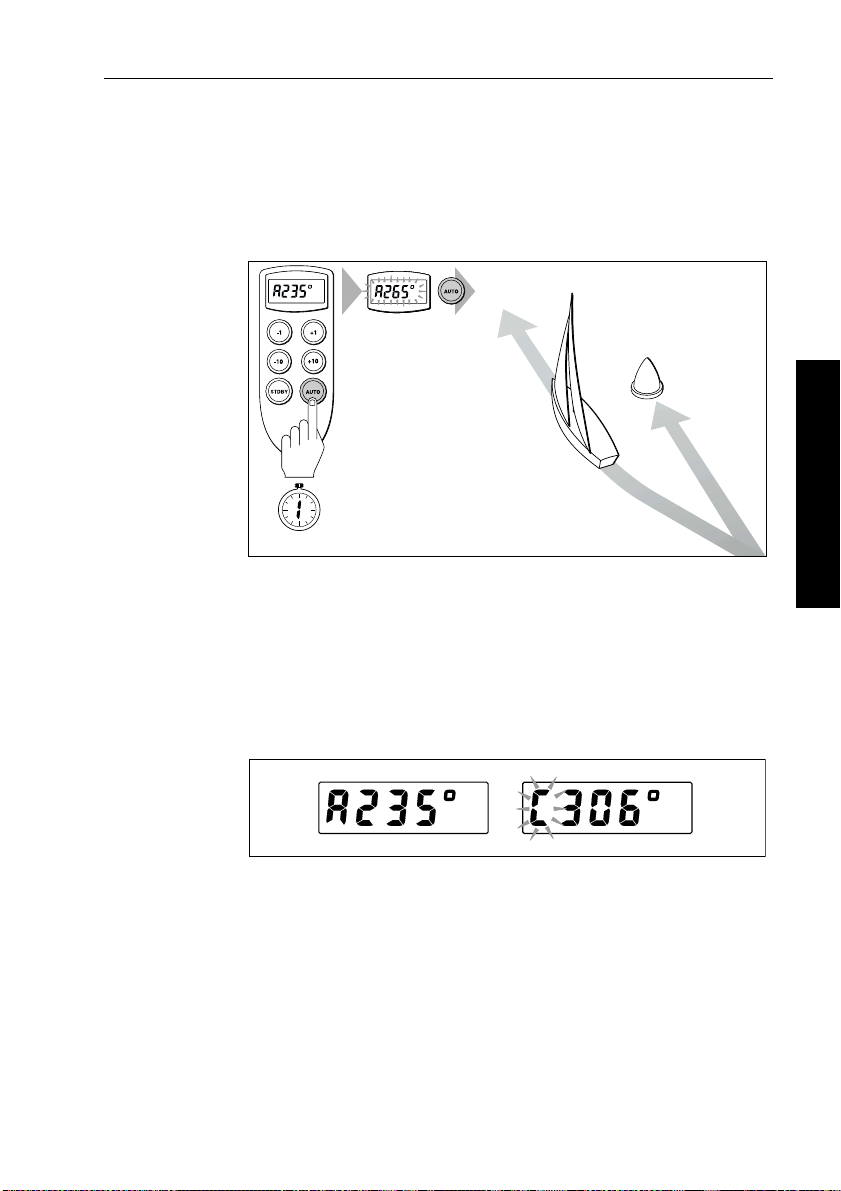
1. Press auto for 1 second: the previous heading will flash for
10 seconds.
2. T o accept the previous heading, press
previous heading is flashing.
Resumed
course
auto again while the
Obstacle
Original
course
2 Using the Tiller Pilot
SECOND
Dodge
Note: If you do not press auto while the display is flashing, the
autopilot will maintain the current heading.
Off course alarm
The off course alarm sounds if the locked autopilot heading and t he
boat’s current heading differ by more than the value set in
calibration level 6 (see page 64) for 20 seconds.
D191-2
Cancelling the off course alarm
T o cancel the off course alarm, press standby to return to manual
steering.
Note: If the off course alarm sounds, this is usually an indication t hat
the boat is carrying too much sail, or that the sails are badly
balanced. In these conditions, you can usually obtai n significant
improvements in course keeping by improving the sail balance.
D3256-2
Page 16
12 ST1000 Plus & ST2000 Plus Tiller Pilots - Owner’s Handbook
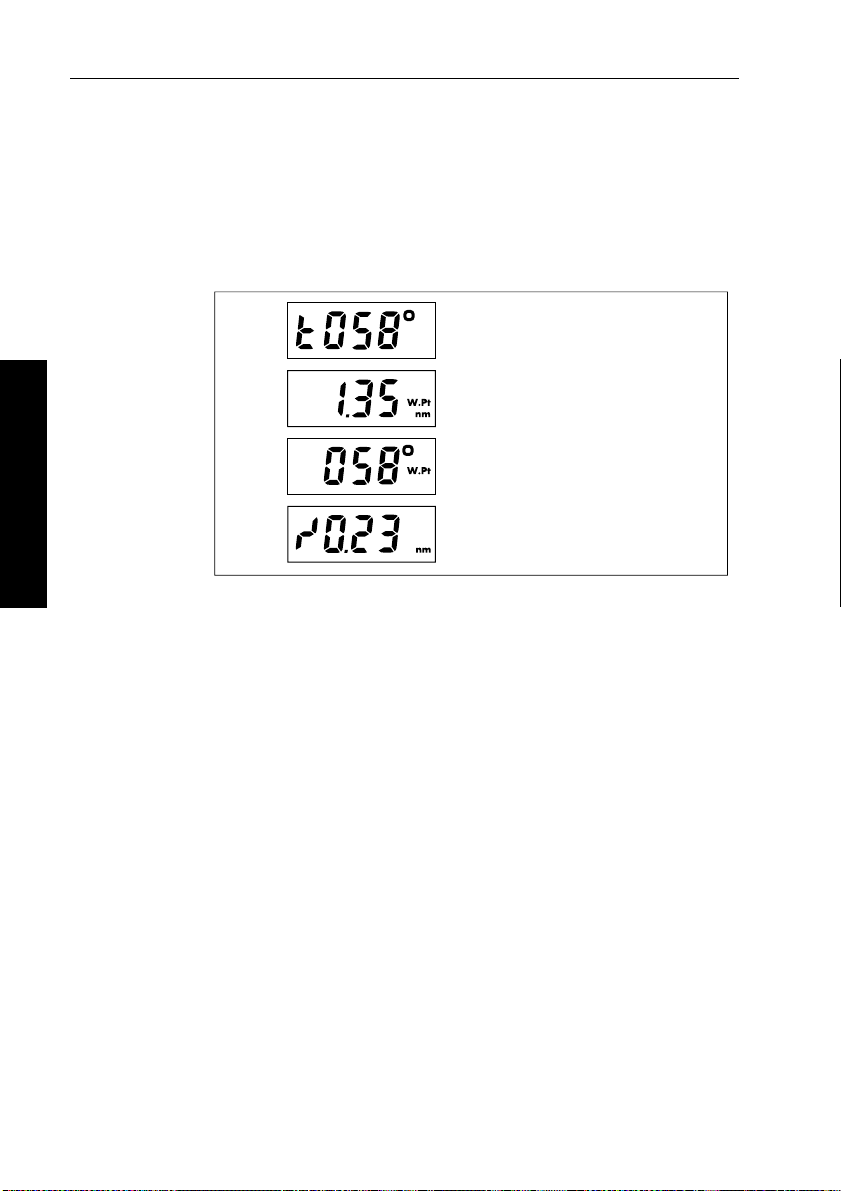
Displaying navigation information pages
If navigation information (e.g. distance to waypoint, cross track error
and bearing to waypoint) is available, you can display it in Auto mode
or Standby mode by pressing either
momentarily . The display will then cycle through the navigation
information pages:
2 Using the Tiller Pilot
Y ou can revert to no rmal operation by pressing either -1 and +10 or
+1 and -10 together again.
-1 and +10 or +1 and -10 together
Locked heading
Distance to waypoint
(if available)
Bearing to waypoint
(if available)
Cross track error
D178-2
Automatic deadband control (Auto Seastate)
In Auto, WindTrim or Track modes, the tiller pilot is set to
AutoSeastate (automatic deadband control) as a default. This causes
the pilot to gradually ignore repetitive movements of the boat and
respond only to true course variations.
By preventing unnecessary rudder movement, AutoSeastate
provides the best compromise between power consumption an d
course keeping accuracy .
If you want to switch off the AutoSeastate feature:
1. From Auto, WindT rim or Track mode, press
switch from AutoSeastate to Fixed Minimum Deadband.
2. The “
°” sign flashes when Fixed Minimum Deadband is selected.
Minimum deadband provides the tightest course keeping
possible, at the expense of increased power consumption and
drive unit activity.
-1 and +1 together to
Page 17

Chapter 2: Using the Tiller Pilot 13
D360-3a
T o switch back to AutoSeastate, press -1 and +1 again.
Note: The autopilot reverts to Automatic Deadband Contr ol each
time you select Standby mode.
Operating hints – trim changes
CAUTION:
Only make major course changes when steering MANUALL Y .
This ensures that the boat will safely clear any obstructions or
other boats, and you can take into account t he changed wind an d
sea conditions on the new heading b efore engaging the autopilot.
2 Using the Tiller Pilot
Large course changes which change the apparent wind direction can
produce large trim changes. When a sudden trim change occurs (for
example due to weather helm or sail imbalance) there will be a delay
of up to one minute before the aut omatic trim applies rudder to restore
the locked heading.
In these situations, the autopilot will not immediately assume the new
automatic heading, and will only settle onto cour se when the
automatic trim has been fully established. T o minimize this problem,
use the following procedure to make major course changes:
1. Note the required new heading.
2. Press
standby, remove the pushrod from the til ler pin, and steer
manually.
3. Bring boat onto the new heading and fit t he pushrod back onto the
tiller pin.
4. Press
5. Bring your boat onto the final course in 1° steps using
auto and let the boat settle on course.
-1 or +1.
Page 18
14 ST1000 Plus & ST2000 Plus Tiller Pilots - Owner’s Handbook
Gusting conditions
In gusting conditions, the course may tend to wander s lightly ,
particularly if the sails are badly balanced. By improving sail balance,
you can improve course keeping.
If you take the following precautions, the autopilot will be able to
maintain competent control even in gale force conditions:
• Do not allow the boat to heel over excessively .
• Ease the mainsheet traveller to leeward to reduce heeling and
weather helm.
• If necessary, r eef the mainsail a little early.
• It is also advisable (whenever possible) to avoid sailing w ith the
wind dead astern when there are very strong winds and large seas.
• Ideally, the wind should be at least 30° away from a dead run.
• In severe conditions, it may be advisable to remove the mainsail
altogether and sail under headsail only.
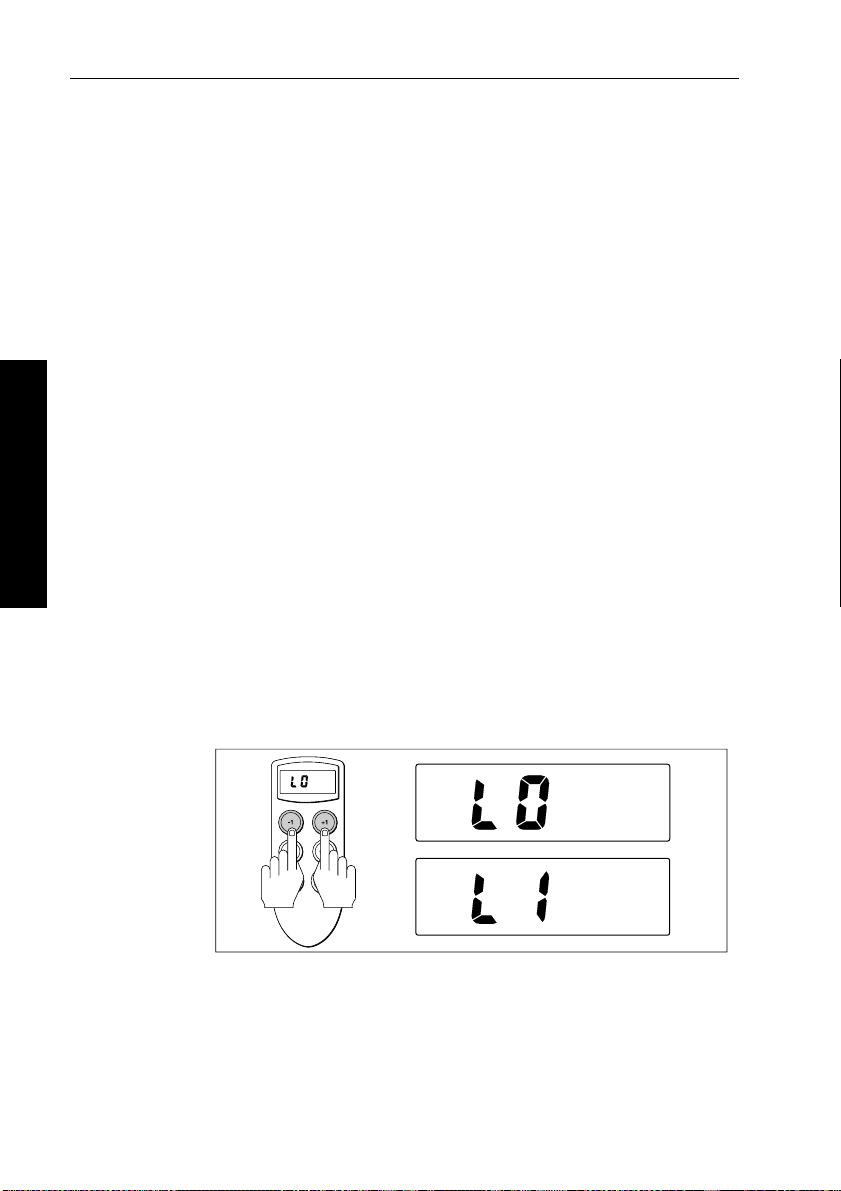
2.3 Switching display illumination on and off
2 Using the Tiller Pilot
Y ou can switch the displ ay illumination on and off when the till er
pilot is in Standby mode:
• from Standby mode, press
illumination between on (
• to return to the previous mode either wait 10 seconds or press the
appropriate mode key
-1 and +1 together to switch the
L1) and off (L0)
D364-2
Note: T he tiller pilot normally powers-up wi th the illumination
switched on (
L1).
If other SeaT alk instruments or autopilot control units are connected
via SeaT alk, you can also control the tiller pilot’s illumination from
these units.
Page 19

Chapter 2: Using the Tiller Pilot 15
2.4 Using Track mode
In Track mode, the tiller pilot maintains a t rack between waypoints
created on a navigation system. The tiller pilot computes any course
changes to keep your boat on track, automatically compensating fo r
tidal streams and leeway. To operate in Track mode, the tiller pilot
must receive cross track error information from either:
• a SeaT alk navigator, or
• a non-SeaT alk navigation system transmitting NM EA 0180 or
0183 data
Selecting Track mode
When you select Track mode, the tiller pilot can acquire the track in
one of two ways:
• automatic acquisition – when both cross track error and bearing to
waypoint data are available
• manual acquisition – when Cross T rack Error is the only available
information
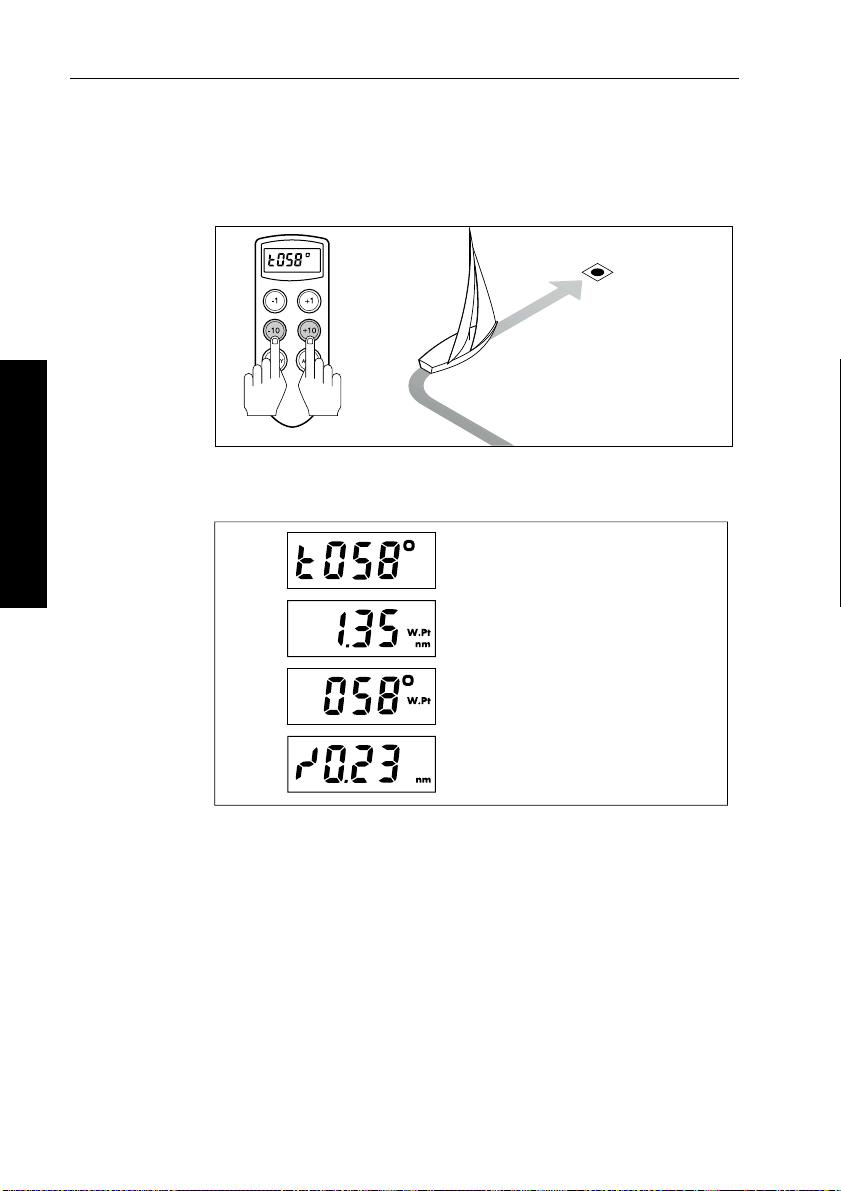
Automatic track acquisition
If cross track error and bearing to waypoint data are both available
(via SeaTalk or NMEA), the pilot can acquire a track automatically:
1. Bring the boat to within 0.1 nm of track.
2. Press
3. Press
4. An alarm will sound and the display will alternate between:
auto.
-10 and +10 together to enter T rack mo de.
• the bearing to waypoint, and
• the direction the boat will turn to take up the new track
Current
heading
Waypoint
at 058˚
2 Using the Tiller Pilot
D3277-2
Page 20
16 ST1000 Plus & ST2000 Plus Tiller Pilots - Owner’s Handbook
5. Check that it is safe to turn the boat onto the new course.
6. Press
-10 and +10 together:
• the boat will now turn on to the new course
• the alarm will cancel
Waypoint
at 058˚
D3257-2
7. The display will continuously cycle through the followi ng
navigation information pages:
2 Using the Tiller Pilot
Locked heading
Distance to waypoint
(if available)
Bearing to waypoint
(if available)
Cross track error
D178-2
Manual track acquisition
If your navigator only provides cross track error i nformation, you
must acquire the track manually:
1. Steer the boat to within 0.1 nm of track.
2. Bring the heading to within 5° of the bearing to the next waypoint.
3. Press
4. Press
auto.
-10 and +10 together to enter T rack mode:
• the autopilot will start tracking to the waypoint
• the display will alternate between cross track error and the
locked pilot heading
Page 21

Chapter 2: Using the Tiller Pilot 17
Manual track acquisition at low speeds
Using manual acquisition at low speeds requires additional care as
tidal streams have a far more significant effect at lower speeds than at
higher speeds.
In general terms, if the tidal flow is less than 35% of the boat’s speed,
you will not notice any difference in the tiller pilot’s performance in
Track mode. However , you should take extra care during manual
acquisition, as follows:
• before you select Track mode, make sure that the boat is as close
as possible to track, and that the direction made good over the
ground is as close as possibl e to the direction of the next waypoint
• positive checks of the boat’s position at regular intervals are vital,
especially if you are close to potential navigational hazards
Returning to Auto from Track mode
To return to Auto mode from Track mode:
2 Using the Tiller Pilot
• press
• press
auto, or
-10 and +10 together .
Cross track error (XTE)
Cross track error (XTE) is the distance between your current position
and the planned route. This is displayed in nautic al miles (nm) and is
taken directly from your navigator .
Waypoint 1
Cross track error
(XTE)
Waypoint 2
D3260-2
Page 22
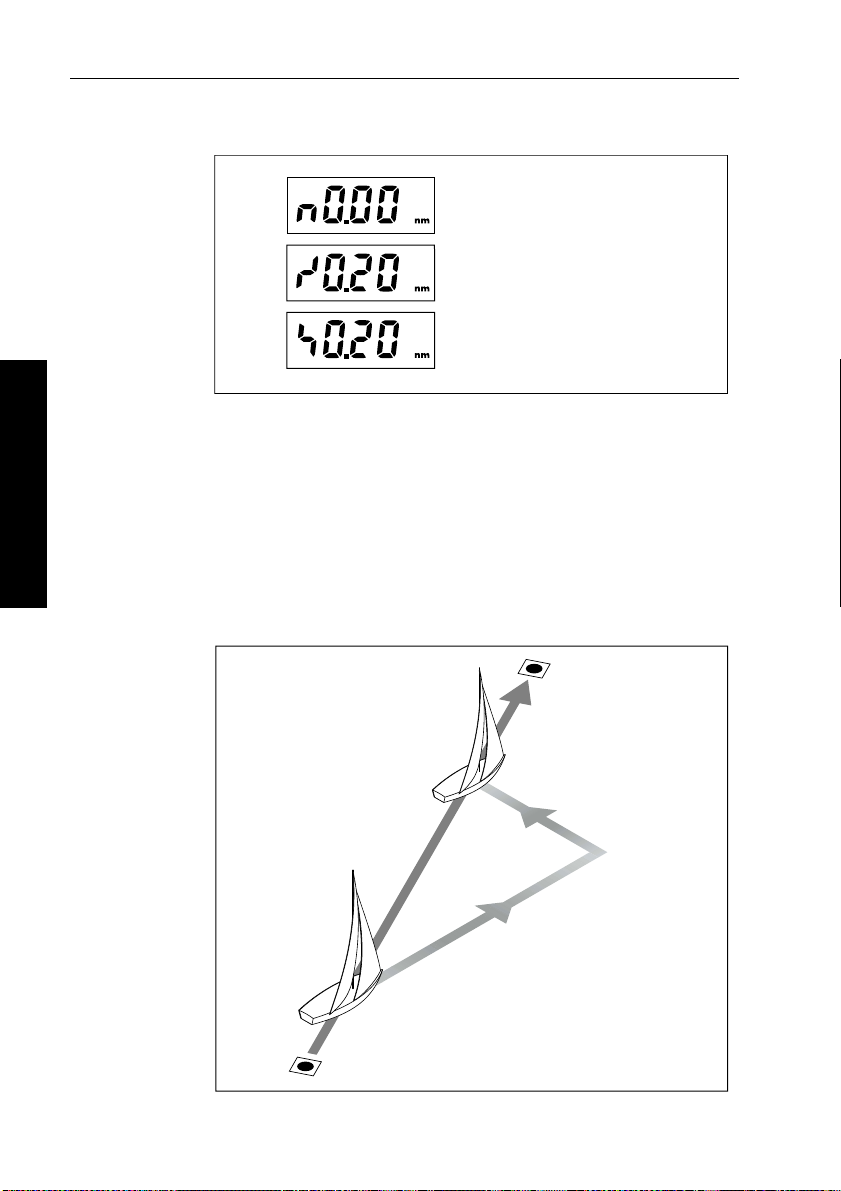
18 ST1000 Plus & ST2000 Plus Tiller Pilots - Owner’s Handbook
The tille r pilot dis plays the cross trac k error in the follow ing ways:
On track
Off track to port
(steer to starboard)
Off track to starboard
(steer to port)
Tidal stream compensation
Under most operating conditions, T rack mode will hold the selected
track to within ±0.05 nm (300 ft) or better .
The autopilot takes account of the boat’s speed when computing
2 Using the Tiller Pilot
course changes to ensure optimum performance over a wide ran ge of
boat speeds. If speed data is available, the autopilot will use the
measured boat speed. Otherwise it will use the default cruise speed
entered in Calibration Level 5 (see page 64).
D3294-2
Boat's speed over ground
Waypoint 1
Waypoint 2
Tidal component
Boat's speed through water
D3261-2
Page 23

Chapter 2: Using the Tiller Pilot 19
Waypoint arrival and advance
IMPORTANT NOTE:
Waypo int advance will only operate if the tiller pilot r eceives
valid bearing to waypoint an d waypoint name information.
The tiller pilot can only decode the first FOUR characters of a
waypoint name . It will not be ab le to decode nam es longer than
four characters, which will stop the waypoint advance featur e
from working.
If your navigator transmits valid w aypoint name and bearing to
waypoint data, you can advance from one waypoint to the next
by pressing
Arrival
As the boat passes the target waypoint, the navigator manually or
automatically selects the next target waypoint. The pilot will then:
• detect the new target waypoint name
• sound the waypoint advance alarm
• display the new bearing to waypoint and the direction the boat
will turn to acquire it
-10 and +10 together .
2 Using the Tiller Pilot
Advance
When the waypoint advance alarm is sounding, the tiller pilot will
suspend Track mode and maintain the current heading:
• check that it is safe to turn onto the new track
• press the
arrival alarm and turn the boat towards the next waypoint
Unless you accept the waypoint advance in this way, the alarm will
continue to sound and the tiller pilot will maintain the current course.
-10 and +10 keys together: this will cancel the waypoint
Dodges in Track mode
In Track mode, you still have ful l control from the keypad:
• to make a dodge maneuver: use the
• after you have avoided the hazard, reverse the course change
selected for the dodge maneuver by selecting an equal course
change in the opposite direction
• if the boat remains within 0.1 nm of track, there is no need to steer
back towards the track
-1, +1, -10 or +10 keys
Page 24

20 ST1000 Plus & ST2000 Plus Tiller Pilots - Owner’s Handbook
Safety in Track mode
WARNING:
T rack mode provides accurate track keeping even in complex
navigational situations. However, it is still the skipper’s
responsibility to ensur e the safety of their boat at all times
through careful navigation and frequent position checks.
Passage making in Track mod e assists precise navigation and
removes the tasks of compensating for wind and tidal drif t. However,
you MUST still maintain an accurate log with regular plots:
Confirming position at the start of a journey
• At the start of a journey you must always use an easily identifiable
fixed object to confirm the fix given by the navigation system.
• Check for fixed positional errors and compensat e for them.
Verifying computed positions
2 Using the Tiller Pilot
• Always verify the computed position with a dead reckoned
position, calculated from the average course steered and the
distance logged.
Plot frequency
• In open water, y ou should make plots at least every hour .
• In confined waters or when near to potential hazards, you should
make plots more frequently .
Setting waypoints
• Local variations in radio signal quality and changes in the tidal
stream can produce deviations from the desired track. When
setting waypoints, remember that deviations can occur.
• Thoroughly check along each track. Check up to 0.5 nm each side
of the track to ensure that there are no hazards within this zone.
• For the waypoint advance function to work, the last four
characters of adjacent waypoint names must be different.
Page 25

Chapter 2: Using the Tiller Pilot 21
Warning messages in Track mode
Track data not received
D167-4
The tiller pilot displays this message if you select T rack mode when
the autopilot is not receiving any navigation dat a.
Track data error
D167-5
The tiller pilot displays this message if you select T rack mode when
the navigator has lost its fix.This display will clear as soon as the
navigator regains its fix.
Large cross track error
2 Using the Tiller Pilot
This alarm sounds if cross track error exceeds 0.3 nm.
D234-2
Page 26

22 ST1000 Plus & ST2000 Plus Tiller Pilots - Owner’s Handbook
Waypoint advance
The waypoint advance alarm sounds whenever the target waypoint
number changes:
• the pilot continues on its current heading, and the displa y
alternates between the bearing to the next waypoint and the
direction the boat will turn to take up that bearing
• make sure that the turn will be safe and, when you are ready to
make the turn, momentarily press
• the pilot will turn onto the new bearing and track towards the next
waypoint
Note: Waypoint advance will only operate if your pilot receives valid
2 Using the Tiller Pilot
bearing to waypoint and waypoint number i nformation.
-10 and +10 together .
D208-2
Page 27

Chapter 2: Using the Tiller Pilot 23
2.5 Using WindTrim mode
Note: You can only use WindTrim mode if the tiller pilot is connected
to a suitable wind sensor/i nstrument providing wind direct ion data.
T o use WindTrim mode, the tiller pilot must receive wind information
from one of the following sources:
• SeaTalk wind instrument
• NMEA wind instrument
• Raymarine pushpit wind vane (part number Z159) co nnected via
supplied SeaT alk interface
In WindTrim mode the tiller pilot maintains a course relative to an
apparent wind angle. The pilot uses WindTrim to eliminate the effects
of turbulence and short term wind variations. This prov ides smooth
precise performance with minimum power consumption.
WindT rim mode uses the fluxgate compass as the primary heading
reference. When changes in the apparent wind angle occur, the tiller
pilot adjusts the locked compass heading to maintain the original
apparent wind angle.
In WindT rim mode, the tiller pilot ignores short-term changes in wind
direction, yet still tracks real wind shifts as su btle as 1°.
2 Using the Tiller Pilot
Selecting WindTrim mode
From Standby mode or Auto mode, press standby and auto
together to select WindTrim. The tiller pilot will then maintain the
current apparent wind angle.
Note: The tiller pilot beeps once every 30 seconds in WindTrim mode.
D5558-1
Page 28

24 ST1000 Plus & ST2000 Plus Tiller Pilots - Owner’s Handbook
Exiting WindTrim mode
T o exit WindT rim mode:
• press
• press
standby to return to Standby mode
auto to return to Auto mode
Returning to the previous apparent wind angle
If you have steered the boat away from the selected apparent wind
angle (for example, performing a dodge maneuver or selecting
Standby) you can return to the previous apparent wind angl e:
2 Using the Tiller Pilot
1. Press and hold standby and auto together for 1 second .
2. The display flashes the previous locked heading f or 10 seconds.
3. While the display is flashing, press
to select the previous heading:
• when you select the previous heading, the “
seconds to confirm the selection
standby and auto together
W” flashes for 10
D360-3
Wind shift alarm
If changes in apparent wind angle alter the original locked compass
heading by more than 15°, the wind shift alarm will sound.
The display alternates between the current WindTrim heading and the
direction of wind shift.
D209-2
Page 29

Chapter 2: Using the Tiller Pilot 25
T o cancel the wind shift alarm:
• check that the new course does not take the boat into danger
• press
standby and auto together momentarily to accept the
alarm and reset the wind shift alarm value to the current compass
heading
Operating hints for WindTrim mode
• WindT rim filters the wind vane output. Thi s provides optimum
response for offshore conditions where genuine shifts in wind
direction occur gradually .
• In gusting and unsteady inshore condi tions, it is best to sail a few
degrees further off the wind so that changes in apparent wind
directio n can be tole rated.
• It is important to minimize the amount of standi ng helm through
careful sail trimming and positioning of the mainsheet traveller .
• It is recommended that the headsail and mainsail are reefed a little
early rather than too late.
2 Using the Tiller Pilot
Page 30

26 ST1000 Plus & ST2000 Plus Tiller Pilots - Owner’s Handbook
2 Using the Tiller Pilot
Page 31

Chapter 3: Maintenance & Fault Finding 27
Chapter 3: Maintenance & Fault Finding
This chapter provides information about maintaining your tiller pilot
system, obtaining product support and sol ving common problems.
3.1 General maintenance
CAUTION:
The working parts of the tiller drive are sealed and lubricated for
life during manufacture.The tiller pilot does not contain any user
serviceable parts. It should be repaired only by authorized
Raymarine service representatives.
Display condensation
• In certain conditions, condensation may appear on the LCD
window . This will not harm the unit, and can be cleared by
switching on the illumination for a while.
Routine cabling checks
• Make sure all connections are firmly attached.
• Examine the cable for signs of wear or damage – replace any
damaged cables.
3 Maintenance & Fault Finding
Cleaning the tiller pilot
• If the tiller pilot is dirty, wipe it with a clean, damp cloth.
• Never use chemical or abrasive materials to clean the tiller pilot.
EMC advice
• When powered up, all electrical equipment produces
electromagnetic fields. These can cause adjacent pieces of
electrical equipment to interact with one another, with a
consequent adverse effect on operation.
• T o minimize these effects and enable you to get the best possible
performance from your Raymarine equipment, guidelines are
given in the installation instructions, to enable you to ensure
minimum interaction between different items of equipment, i.e.
ensure optimum Electromagnetic Compatibility (EMC).
Page 32

28 ST1000 Plus & ST2000 Plus Tiller Pilots - Owner’s Handbook
• Always report any EMC-related problems to your n earest
Raymarine dealer. We use such information to improve our
quality standards.
• In some installations, it may not be possible to preven t the
equipment from being affected by ext ernal influences. In general
this will not damage the equipment but it can lead to spurious
resetting action, or momentarily may result in faulty operation.
3.2 Product support
Raymarine products are supported by a worldwide network of
distributors and Authorized Service Representa tives.
Before you consider returning the autopilot, make sure that the power
supply cable is sound and that all connections are tight and free fr om
corrosion. If the connections are secure, refer to the following Fault
Finding sec tion.
If you cannot trace or rectify the fault, contact either your national
distributor , service representative, or the Raymarine T echnical
Services Call Center. Refer to the back cover or the W orldwide
Distributor List for contact details.
Always quote the product serial number (this number is printed on the
underside of the tiller pilot).
3.3 Fault finding
3 Maintenance & Fault Finding
All Raymarine products are designed to provide many years of
trouble-free operation. W e also put them through comprehensive
testing and quality assurance procedures befo re shipping.
In the unlikely event that a fault does occur with your autopilot, use
the following table to help identify the problem and provide a
solution. If you cannot resolve the problem yourself, contact either
your national distributor , service representative, or the Raymarine
T echnical Services Call Center.
Page 33

Chapter 3: Maintenance & Fault Finding 29
SYMPTOM SOLUTION
The autopilot display is blank. No power – check the fuse/circuit
breaker.
The displayed compass heading does
not agree with the boat’s compass.
Boat turns slowly and takes a long
time to come on to course.
Boat overshoots when turning on to
a new course.
The autopilot appears to be unstable
on Northerly headings in the
Northern hemisphere (or Southerly
headings in the Southern
hemisphere).
Display shows ‘CAL OFF’ when
entering calibration.
The autopilot will not ‘talk’ to other
SeaTalk instruments.
Position information not received. Navigator not transmitting the correct
The autopilot will not auto advance
to the next waypoint.
The screen shows a series of rotating
dashes.
The display shows a series of
stationary dashes.
The display shows ‘Err’. The navigator has lost its fix – refer to the
The compass has not been corrected for
deviation – carry out the deviation and
alignment procedures (see page 56).
Rudder gain too low (see page 58).
Rudder gain too high (see page 58).
Northerly/Southerly heading correction
not set up (see page 65).
Calibration access has been prevented
(see page 66).
Cabling problem – make sure all the
cables are connected properly.
position data.
No bearing to waypoint information
received from the navigator.
Compass deviation c orrection is running.
Data is not being received – check the
cabling.
navigator handbook for further action.
3 Maintenance & Fault Finding
Page 34

30 ST1000 Plus & ST2000 Plus Tiller Pilots - Owner’s Handbook
3 Maintenance & Fault Finding
Page 35

Part 2: Installing the Tiller Pilot
Part 2: Installing the Tiller Pilot
Page 36

Part 2: Installing the Tiller Pilot
Page 37

Chapter 4: Installing the Tiller Pilot 33
Chapter 4: Installing the Tiller Pilot
4.1 Planning the installation
Before you start installing your tiller pilot system, use the illust ration
to check the parts supplied. Then read through the following
informati on and the r elevant in stallatio n sections in this ch apter .
ST1000 Plus and ST2000 Plus Pack Contents
Tiller
pin
Tiller pilot socket Gasket Rubber cap
ST1000 Plus &
ST2000 Plus
Owner's
Handbook
Owner's handbook Quick reference guide Worldwide distributor list
Mounting
socket
ST1000+ and ST2000+ Quick Reference Guide
Self-tapping screw
No 6 x 3/4 in (x6)
Cable clip and
cable clamp
Worldwide
Distributors
4 Installing the Tiller Pilot
D3361-2
Page 38

34 ST1000 Plus & ST2000 Plus Tiller Pilots - Owner’s Handbook
Cabling guidelines
• consider how you will run cables to and from each component
• avoid running cables through bilges where possibl e
• avoid running cables close to fluorescent lights, engines, radi o
transmitting equipment etc.
EMC installation guidelines
All Raymarine equipment and accessories are designed to the best
industry standards for use in the recreational marine environment.
Their design and manufacture conforms to the appropriate
Electromagnetic Compatibility (EMC) standards, but correct
installation is required to ensure that performance is not compromised.
Although every effort has been taken to ensure that they will perform
under all conditions, it is important to understand w hat factors could
affect the operation of the product.
The guidelines given here describe the conditions for opti mum EMC
performance, but it is recognized that it may not be possible to meet
all of these conditions in all situations.
T o ensure the best possible conditions for EMC performance with in
the constraints imposed by any location, alwa ys ensure the maximum
separation possible between different items of electrical equipment.
For optimum EMC perform ance, we recommend that:
• Raymarine equipment and cables connected to it are:
• At least 3 ft (1 m) from any equipment transmitting or cabl es
carrying radio signals e.g. VHF radios, cables and antennas.
In the case of SSB radios, increase the distance to 7 ft (2 m).
• More than 7 ft (2 m) from the path of a radar beam. A radar
beam can normally be assumed to spread 20 degrees above
and below the radiating element.
• The equipment is supplied from a separate battery from that used
for engine start. Voltage drops below 10 V , and starter moto r
transients, can cause the equipment to reset. This will not damage
the equipment, but may cause the loss of some information and
may change the operating mode.
• Raymarine specified cables are used. Cutting and rejoining these
4 Installing the Tiller Pilot
cables can compromise EMC performance and must be avoided
unless doing so is detailed in the installation manu al.
Page 39

Chapter 4: Installing the Tiller Pilot 35
• If a suppression ferrite is attached to a cable, this ferrite should n ot
be removed. If the ferrite needs to be removed during installation
it must be reassembled in the same position.
EMC suppression ferrites
W e supply the fluxgate compass and power cab les with suppression
ferrites fitted. Always use these ferrites supplied by Raymarine.
D3548-2
Connections to other equipment
If your Raymarine equipment is to be connected to other equipment
using a cable not supplied by Raymarine, a suppression ferrite MUST
always be attached to the cable near to the Raymarine unit.
4 Installing the Tiller Pilot
Page 40

36 ST1000 Plus & ST2000 Plus Tiller Pilots - Owner’s Handbook
4.2 Installing the tiller pin and mounting socket
CAUTION:
As the tiller pilot has a built-in compass, make sure that the boat’s
steering compass is at least 7 50 mm (2 ft 6 in) away to avoid
deviation.
Measuring the critical dimensions
The tiller pilot is mounted between the tiller and a fixed point on the
structure of your boat.T wo dimensions are critical to ensure corr ect
installation:
• Dimension A = 589 mm (23.2 in): the distance from the
mounting socket to the tiller pin
Note: T his dimension increases if your inst allation requires a
pushrod extension (see page 38) or cantilever mount (see page 41).
• Dimension B = 460 mm (1 8 in): the distance from the rudder
stock’s center line to the tiller pin
47.5 mm
(1.9 in)
'A'
589 mm (23.2 in)
445 mm (17.5 in)
95 mm
(3.7 in)
610 mm (24.0 in)
'B'
460 mm
(18 in)
4 Installing the Tiller Pilot
'B' 460 mm (18 in)
90˚
Rudder axis
Sloping rudderstock
D3198-2
Page 41

Chapter 4: Installing the Tiller Pilot 37
T o measure the critical dimensions:
1. Clamp the tiller on the boat’s center line.
2. Mark dimensions A and B and use masking tape to locate the
fixing points.
Note: Fo r standard installations, d imension A is measured on the
starboard side of the cockpit. If you need to moun t the tiller pilot on
the port side of the cockpit, you can measure dimens ion A to port.
However you will need to reverse the tiller pilot’s operating sense
when you have completed installation (see page52).
3. Make sure that:
• dimensions A and B are at right angles to each other (as
shown on the diagram opposite)
• the tiller pilot is mounted horizontally
Basic installation
After establishing control dimensions A and B, you can usually
mount the tiller pilot directly onto the cockpit seat.
Mounting socket
12.5 mm
(0.5 in)
Tiller pin
4 Installing the Tiller Pilot
D3192-2
Page 42

38 ST1000 Plus & ST2000 Plus Tiller Pilots - Owner’s Handbook
Installing the tiller pin
1. Drill a 6 mm (1/4 in) diameter hole to a depth of 25 mm (1 in) at the
fixing point you have marked on the tiller .
2. Use a two part epoxy (e.g. Araldite) to fix the tiller pin in place.
3. Position the shoulder of the pin so it is 1 2.5 mm (
tiller surface.
1
/2 in) above the
Installing the mounting socket
1. Drill a 12.5 mm (1/2 in) hole to a depth of 25 mm (1 in) at the fixing
point you have marked on the cockpit seat.
2. If the structure at the mounting position is less t han 25 mm (1 in)
thick, reinforce the underside with plywoo d bonded into position.
3. Fix the mounting socket in place using a two part epoxy .
CAUTION:
As the tiller pilot is capable of generating high pushrod loads, you
MUST:
• drill all holes to the specified size and reinforce where necessary
• allow the epoxy to harden thor oughly before appl ying a load
Installation accessories
If you are not able to install the tiller pilot directly onto the cockpit
seat or tiller as described, one (or a combination) of the following
installation accessories:
• pushrod extensions
• tiller brackets
• cantilever sockets
• pedestal sockets
• alternative tiller pins
Pushrod Extensions
If you need to increase the pushrod length (because of the distance
from the mounting socket location to the center line), use a
Raymarine pushrod extension.
Identifying the correct pushrod extension
4 Installing the Tiller Pilot
1. Clamp the tiller on the boat’s center line.
2. Measure dimension C.
Page 43

Chapter 4: Installing the Tiller Pilot 39
3. Select the appropriate pushrod extension length (and part
number) using the following table.
Dimension C Pushrod extension length L Part no.
589 mm (23.2 in) Standard dimension -
615 mm (24.2 in) 25 mm (1 in) D003
640 mm (25.2 in) 51 mm (2 in) D004
665 mm (26.2 in) 76 mm (3 in) D005
691 mm (27.2 in) 102 mm (4 in) D006
716 mm (28.2 in) 107 mm (5 in) D007
742 mm (29.2 in) 152 mm (6 in) D008
C
L
Mounting the pushrod extension
T o mount the pushrod extension:
1. Unscrew the end of the tiller pilot’s pushrod.
2. Screw the extension into the pushrod.
3. Screw the pushrod end into the pushrod extension.
D3193-2
4 Installing the Tiller Pilot
Page 44

40 ST1000 Plus & ST2000 Plus Tiller Pilots - Owner’s Handbook
Tiller brackets
If the tiller is higher or lower than the mounting socket, you can use a
Raymarine tiller bracket to vary the tiller pin offset so the pilot is
horizontal.
Identifying the correct tiller bracket
1. Clamp the tiller on the boat’s center line.
2. Measure dimension D (if the pushrod is above the tiller) or
dimension E (if the pushrod is below the tiller).
3. Select the appropriate bracket from the following table:
Dimension D
(pushrod below tiller)
25 mm (1 in) 51 mm (2 in) D009
51 mm (2 in) 76 mm (3 in) D010
76 mm (3 in) 102 mm (4 in) D011
102 mm (4 in) 127 mm (5 in) D159
127 mm (5 in) 152 mm (6 in) D160
Dimension E
(pushrod above tiller)
Bracket
part no.
D
D3194-2
4 Installing the Tiller Pilot
Page 45

Chapter 4: Installing the Tiller Pilot 41
E
D3195-2
Mounting the tiller bracket
1. Position the tiller bracket on the center line of the tiller (above or
below) and establish the critical dimensions A and B
Note: To measure dimension B on a boat w ith a sloping rudderstock,
refer to the diagram on page36.
2. Mark the centers of the two bracket mounting holes.
3. Drill two 6 mm (
1
/4in) diameter holes through the center line of
the tiller at the positions you have marked.
1
4. Attach the tiller bracket using two 6 mm (
/4in) diameter bolts,
nuts and washers.
5. Bond the fixing bolts in place with two part epoxy adhesi ve
6. When the epoxy is completely hardened, fully tighten the nuts.
7. Attach the tiller pin to the bracket.
Cantilever mounting
If you need to attach the tiller pilot to a vertical face (such as the
cockpit sidewall), use a Raymarine cantilever socket assembly
(part number D031):
• the maximum possible extension of fset is 254 mm (10 in)
• you cut the cantilever to the exact length during mounting
Cutting the cantilever rod to length
1. Clamp the tiller on the boat’s center line.
2. Measure dimension F (actual).
4 Installing the Tiller Pilot
Page 46

42 ST1000 Plus & ST2000 Plus Tiller Pilots - Owner’s Handbook
3. Refer to the table to establish a cutting length for the cantilever
rod – double check measurements before cutting.
4. Measure the rod from threaded end, then cut the cantilever rod
to length L using a hacksaw. Remove any sharp edges with a file.
Dimension F Cut length L
654 mm (25.75 in) 51 mm (2 in)
705 mm (27.75 in) 102 mm (4 in)
743 mm (29.75 in) 152 mm (6 in)
806 mm (31.75 in) 203 mm (8 in)
832 mm (32.75 in) 229 mm (9 in)
F
L
D3196-2
Mounting the cantilever assembly
T o mount the cantilever assembly:
1. T emporarily assemble the cantilever by screwing the rod into the
mounting ring.
2. Ensure the tiller pilot is horizontal and then mar k the locat ion of
the mounting ring and its mounting holes.
3. Drill three 6 mm (
4 Installing the Tiller Pilot
marked.
1
/4in) diameter holes at the positions you have
4. Bed the mounting ring on a thin coat of silicon sealant.
Page 47

Chapter 4: Installing the Tiller Pilot 43
5. Use three 6 mm (1/4in) diameter bolts, nuts and washers to attach
the mounting ring to the backing plate (with the backing plate on
the other side of the mounting surface, as shown above).
6. Screw the rod firmly into place.
7. Roughen the end of the cantilever rod and the inside of the cap to
provide a key . Then apply two part epoxy adhesive t o the rod end
and the cap.
8. Place the cap over the rod end, making sure the hole for the tiller
pilot mountin g pin faces upwards . Allow the epoxy adhesive to
harden fully before applying a load.
Note: When the tiller pilot is not in use, you can unscrew the complete
rod assembly to leave the cockpit unobstructed.
Pedestal socket mounting
If you need to raise the height of the mounting so cket to keep the tiller
pilot horizontal, use a Raymarine pedestal socket assembly.
Identifying the correct pedestal socket
L
G
D3197-2
1. Clamp the tiller on the boat’s center line.
2. Establish the standard control dimensions A and B.
3. With the tiller pilot horizontal, measure dimension G.
4. Select the appropriate pedestal socket assembly from the table.
4 Installing the Tiller Pilot
Page 48

44 ST1000 Plus & ST2000 Plus Tiller Pilots - Owner’s Handbook
Dimension G Pedestal socket length L Part no.
64 mm (2.5 in) Standard dimension -
102 mm (4.0 in) 38 mm (1.5 in) D026
114 mm (4.5 in) 50 mm (2.0 in) D027
127 mm (5.0 in) 64 mm (2.5 in) D028
140 mm (5.5 in) 76 mm (3.0 in) D029
153 mm (6.0 in) 89 mm (3.5 in) D030
Mounting the pedestal socket
1. Mark the mounting ring’s position on the cockpit seat or counter .
2. Ensure that control dimensions A and B are correct.
3. Mark the bolt holes on the mounting ring and then drill three
6 mm (
1
/4in) diameter holes.
4. Bed the mounting ring on a thin coat of silicon sealant.
5. Use three 6 mm (
1
/4in) diameter bolts, nuts and washers to attach
the mounting ring to the backing plate (with the backing plate on
the other side of the mounting surface, as shown above).
6. Screw the mounting socket firmly into place.
Note: When the tiller pilot is not in use, you can unscrew the complete
rod assembly to leave the cockpit unobstructed.
Alternative tiller pins
Y our Raymarine dealer can also supply the following alte rnative
lengths of tiller pin for other non-st andard installations.
Description Size Part no.
Small threaded tiller pin 25 mm (1.0 in) D014
Extra length tiller pin 72 mm (2.8 in) D020
Extra length threaded tiller pin 72 mm (2.8 in) D021
4 Installing the Tiller Pilot
Page 49

Chapter 4: Installing the Tiller Pilot 45
4.3 Cabling and socket installation
Both power and data are supplied to the tiller pilot via a waterproof
plug and socket. The plug comes ready assembled and the socket can
be mounted in the cockpit area adjacent to the tiller pilot.
NMEA + (white, pin 6)
+12 V DC (brown, pin 1)
0 V (blue, pin 2)
Mounting the socket
Install the tiller pilot socket as follows:
Plug
Socket
Gasket
Cable
NMEA - (green, pin 5)
SeaTalk data (yellow, pin 4)
Floating nut
Retaining ring
Installed socket
D305-3
Screw
Rubber cap
D3296-2
1. Attach the template (provided at the back of this handbook) to the
selected bulkhead.
53
2. Carefully drill a 21 mm (
3. Drill 4 pilot holes (2.5 mm or
/64 in) clearance hole for the cable boss.
3
/32 in) for the self-tapping screws.
4 Installing the Tiller Pilot
Page 50

46 ST1000 Plus & ST2000 Plus Tiller Pilots - Owner’s Handbook
4. Remove the template.
5. Pass the power cable and any other cables (SeaTalk and NMEA)
through the bulkhead and the gasket.
6. Use a small flat-bladed screwdriver to connect the cable(s) to the
socket – refer to the illustrations on the following pages.
D3297-2
7. Assemble the rubber cap to one of the 4 self-tapping screws.
8. Secure the socket to the bulkhead using the 4 self-tapping screws.
9. Secure the cable(s) at regular intervals using suitable clips.
10. Assemble the plug to the socket by screwing the ‘floating’ nut
onto the threaded part of the socket by hand.
11. The retaining ring is designed as a stop for the plug nut to prevent
accidental disassembly. After you have tightened the floating nut,
slide the retaining ring back up the plug to retain the nut.
Power supply
Supply (0 V)
4 Installing the Tiller Pilot
Supply (+12 V DC)12 A fuse
Socket
D3265-2
Page 51

Chapter 4: Installing the Tiller Pilot 47
• The tiller pilot requires its own dedicated power supply – it cannot
source its power from SeaT alk.
• Power should be taken directly from the boat’s central
distribution panel and protected with a 12 A fuse or equivalent
circuit breaker.
The following table shows the minimum cable size acceptable for the
power supply:
Cable length Copper area AWG
Up to 2.5 m (8 ft) 1.5 mm
Up to 4 m (13 ft) 2.5 mm
2
2
16
14
IMPORTANT:
Correct power cable size is critical for correct autopilot
operation. If in doubt, use a heavier gauge cable than specified. A
lighter gauge cable might cause a voltage drop between the
supply and the autopilot. This will reduce the power at the tiller .
SeaTalk cabling
Supply (0 V)
Supply (+12 V DC)12 A fuse
SeaTalk
instruments
Socket
Yellow (SeaTalk data)
Screen (SeaTalk 0 V)
Red (SeaTalk 12 V)
with 5 A fuse
SeaTalk
interface cable
D366-2
CAUTION:
Protect the power supply for the SeaT alk 12 V (red) line with a
5 A fuse (or equivalent circuit breaker) fitted as close to the tiller
pilot as possible.
4 Installing the Tiller Pilot
Page 52

48 ST1000 Plus & ST2000 Plus Tiller Pilots - Owner’s Handbook
If required, the tiller pilot can be wired to the SeaT alk bus using a
suitable SeaTalk interface cable (part numbers: D229 flat moulded
plug, D179 male round plug, D181 female roun d plug).
Connect the SeaTalk cable to the tiller pilot socket as shown below.
As well as sharing SeaTalk data, the tiller pilot can also be used to
supply power to the SeaT alk instruments.
Raymarine produce a range of SeaTalk accessory cables you can use
to connect the tiller pilot to SeaTalk instruments and control units:
• flat plugs for recent SeaT alk equipment (e.g. ST30, ST40, ST60)
• round plugs for older SeaT alk equipment (e.g. ST50)
Extension cables - flat moulded plugs at each end
Part no. Type Length
D284 Flat moulded plugs at each end 1 m (3 ft 3 in)
D285 Flat moulded plugs at each end 3 m (9 ft 10 in)
D286 Flat moulded plugs at each end 5 m (16 ft 5 in)
D287 Flat moulded plugs at each end 9 m (29 ft 6 in)
D288 Flat moulded plugs at each end 20 m (65 ft 6 in)
Conversion cables - flat moulded plug to round plug
Part no. Type Length
D187 Flat moulded plug to male round plug 0.15 m (6 in)
D188 Flat moulded plug to female round plug 0.3 m (12 in)
Extension cables - round plugs at each end
Part no. Type Length
D124 Male round plug to female round plug 1 m (3 ft 3 in)
D125 Male round plug to female round plug 3 m (9 ft 10 in)
D126 Male round plug to female round plug 6 m (19 ft 8 in)
D154 Male round plug to female round plug 9 m (29 ft 6 in)
Interface cables - flat moulded/round plug to bare ends
Part no. Type Length
D229 Flat moulded plug to bare ends 1 m (3 ft 3 in)
D179 Male round plug to bare ends 3 m (9 ft 10 in)
4 Installing the Tiller Pilot
D181 Female round plug to bare ends 3 m (9 ft 10 in)
D5554-1
Page 53

Chapter 4: Installing the Tiller Pilot 49
Remote control cabling
If required, you can operate the tiller pilot using:
• a full-function ST600R remo te control unit (part no: A120 16), or
• a SeaT alk hand-held remote control (part no: Z101)
The following illustration shows how to connect a remote control.
SeaTalk
instruments
SeaTalk
cable*
*If you only need to connect a remote, wire
this SeaTalk cable into the tiller pilot socket
NMEA cabling
If required, you can connect a NMEA navigator or wind instrument to
the tiller pilot. It can then use this information for Track and
WindT rim modes.
Supply (0 V)
Supply (+12 V DC)12 A fuse
SeaTalk
socket
Socket
Yellow (SeaTalk data)
Screen (SeaTalk 0 V)
Red (SeaTalk 12 V)
with 5 A fuse
SeaTalk cable
ST600R remote
Z101 remote
or
D3279-2
4 Installing the Tiller Pilot
Recognized NMEA data
The following table lists the recognized NMEA sentences.
Page 54

50 ST1000 Plus & ST2000 Plus Tiller Pilots - Owner’s Handbook
Information NMEA 0183 data
Cross Track Error APB, APA,RMB, XTE, XTR
Bearing to Waypoint APB, BPI, BWR, BWC, BER, BEC, RMB
Distance to Waypoint WDR, WDC, BPI, BWR, BWC, BER,
BEC, RMB
Waypoint Number APA, APB,BPI, BWR, WDR, BWC,
Speed Through Water VHW
Apparent Wind Angle and Speed VWR
WDC, RMB, BOD, WCV, BER, BEC
Supply (0 V)
Supply (+12 V DC)12 A fuse
Socket
NMEA -
NMEA +
Navigator
or wind
instrument
with NMEA
output
D3662-2
Connecting NMEA and SeaTalk
Supply (0 V)
NMEA -
12 A fuse
Supply (+12 V DC)
Screen (0 V)
Red (12 V)
with 5 A fuse
SeaTalk
instruments
4 Installing the Tiller Pilot
Yellow
(SeaTalk
data)
NMEA +
Navigator
or wind
instrument
with NMEA
output
D3280-2
Page 55

Chapter 5: Commissioning the Tiller Pilot 51
Chapter 5: Commissioning the Tiller Pilot
This chapter explains how to commission your tiller pilot after
installation. This consists of a number of simple functional tests
followed by a short sea trial.
5.1 Functional tests
Switch on
1. Switch on the main power breaker.
2. The autopilot should beep and display the pi lot number (
or
ST2000).
3. Within 2 seco nds, the display should show a flashing
by the compass heading (for example,
autopilot is active.
Note: If the tiller pilot does not beep or display the compass heading,
please refer to the Fault Finding section (see page 28).
Operating sense
The operating sense defines the direction the tiller pilot will apply
helm when a course change key is pressed or the boat goes off course.
T o check the operating sense:
C 234). This shows the
‘C’ followed
5 Commissioning the Tiller Pilot
ST1000
1. Place the pushrod end over the tiller pin.
2. Press
3. The helm should move to produce a turn to starboard.
4. If the helm produces a turn to port, refer to the following
+10.
instructions on reversing the operating sense.
D168-3
Page 56

52 ST1000 Plus & ST2000 Plus Tiller Pilots - Owner’s Handbook
Reversing the operating sense
If necessary , reverse the operating sense can be reversed as follows:
1. Press
-1 and +1 together for 5 seconds.
2. The display shows the new operating sense (port or st arboard) for
5 seconds, and then the autopilot reverts to normal operation.
Checking the navigation interface
5 Commissioning the Tiller Pilot
If you have connected the tiller pilot to a navigator, check the
interface as follows:
1. Set up a track on the navigator to give a Cross T rack Error
between 0 nm and 0.3 nm.
2. Enter Auto mode by pressing
3. Enter Track mode by pressi ng
auto.
-10 and +10 together.
4. An alarm will sound and the display will alternate between the
bearing to waypoint and the direction the boat will turn to
acquire it.
D208-2
5. Make sure that it is safe to turn onto the new course, then press
-10 and +10 again.
6. If the navigator is connected correctly , the display will begin to
cycle through the available navigation data:
Locked heading
Distance to waypoint
(if available)
Bearing to waypoint
(if available)
Cross track error
D3267-2
Page 57

Chapter 5: Commissioning the Tiller Pilot 53
Navigation error screens
If the display shows either of the following error displays, the cause is
either:
• a wiring error, or
• the navigator is not configured to transmit the required data
format
Track data not received
D3268-2
This error message indicates that data has not been received. The
most likely reason is a cabling error – either open circuit, short circuit
or wires reversed.
Track data error
5 Commissioning the Tiller Pilot
D3269-2
This error message indicates that the navigator has lost its fix. Refer to
the navigator handbook for further action.
Page 58

54 ST1000 Plus & ST2000 Plus Tiller Pilots - Owner’s Handbook
Checking the wind instrument interface
If you have connected the tiller pilot to a wind instrument, check the
data link as follows:
1. Press
2. The tiller pilot should display a
standby and auto together .
‘W’ followed by the locked
heading.
5 Commissioning the Tiller Pilot
If the display continues to show a flashing ‘C’ and the current heading,
the tiller pilot is not receiving any wind data. The most likely reason is
a cabling error – either open circuit, short circuit or wires reversed.
Checking the SeaTalk interface
D3270-2
If you have linked the tiller pilot to other instrument s or control units
via SeaTalk, check the link as follows:
1. Press
standby.
D3271-2
Page 59

Chapter 5: Commissioning the Tiller Pilot 55
2. Select display illumination level 0 (LAMP 0) on any other SeaTalk
instrument or autopilot control unit.
3. The tiller pilot should immediately respond by switching off its
display illumination. If the illumination does not switch off, there
is a cabling fault between the tiller pilot and the instruments or
control un it.
5.2 Initial sea trial
CAUTION:
Failure to carry out the sea trial may r esult in impaired autopilot
performance on some compass headings.
When you have checked that the system is operating correctly , you
must complete a short sea trial to calibrate the compass.
The tiller pilot has a built-in calibration capability so you can
fine-tune it to suit your boat, its steerin g system and its dynamic
steering characteristics.
As supplied from the factory , the autopilot is calibrated to provide
safe, stable control for most boats.
5 Commissioning the Tiller Pilot
D170-2
• Do not at tempt to ma ke any perm anent cha nges to th e
recommended calibration values until you have completed the
sea trial.
• You must carry out the initial sea trial in conditions of light wind
and calm water – so you can assess the autopilot’s performance
without the influence of strong winds or lar ge waves.
Page 60

56 ST1000 Plus & ST2000 Plus Tiller Pilots - Owner’s Handbook
Before starting the sea trial
Before carrying out the sea trial, you should:
• check the calibration settings and, if necessary, reset them to the
default values (see page 63)
• check the installation to make sure that it is not affected by radio
transmissions, engine starting, etc.
Calibrating the compass
5 Commissioning the Tiller Pilot
Automatic compass deviation correction
By completing the following compass correction procedure, the tiller
pilot can correct its own internal fluxgate compass for most deviating
magnetic fields. Y ou should complete the Compass Deviation
Correction at the beginning of your sea t rial.
T o complete the compass correction:
1. Extend or retract the pushrod so you can place the pushrod end
onto the tiller pin.
2. Press and hold
cycle around the display .
3. Keeping boat speed below 2 knots, use the -10 and +10 keys to
turn the boat in slow circles. Y ou should take at least 3 minutes to
complete each 360°.
standby for 1 second – a series of dashes will
SECOND
D3272-2
Page 61

Chapter 5: Commissioning the Tiller Pilot 57
• boat's speed below 2 knots
• each complete circle should take 3 minutes
11/2 – 2 circles
4. Keep turning your boat until the display changes to show the
amount of deviation the autopilot has detected (this sh ould take
between 1
1
/2 t o2 complete circles). The deviation alternates with
the autopilot’s current heading ever y second.
Current heading
Deviation
5 Commissioning the Tiller Pilot
D3273-2
D3274-2
Heading alignment
1. Use the -1 and +1 keys to increase or decrease the displayed
heading until it agrees with the heading on the boat’s steering
compass, or a known transit bearing.
2. Exit compass linearization and heading alignment and store the
compass correction/alignment values as follows:
• press and hold
• or, to exit wi thout saving any new settings, press
momentarily
Note: Fo r installations where an ST 50 or ST30 Steering Compass
instrument is connected to the SeaTalk bus, and the Steering
Compass has a fluxgate transducer connected, it is only necessary to
carry out the auto deviation correction on the Steeri ng Compass
Instrument (refer to Steering Co mpass handbook instructions).
standby for 1 second until the pilot beeps
standby
Page 62

58 ST1000 Plus & ST2000 Plus Tiller Pilots - Owner’s Handbook
Further adjustments to heading alignment
If the heading alignment requires further adjustment, enter Compass
Deviation Correction again by pressing
standby f or 1 second.
1. Press
auto to skip Deviation Correction and proceed to Heading
Alignment.
2. Adjust the heading as described above.
Autopilot operation
5 Commissioning the Tiller Pilot
Having calibrated the compass, the following procedure is
recommended to familiarize yourself with autopilot operation:
1. Steer onto a compass heading and hold the course steady.
2. Place the pushrod end over the tiller pin.
3. Press
auto to lock onto the current heading. The tiller pilot should
achieve a constant heading in calm sea conditions.
4. Alter course to port or starboard in multiples of 1° and 10°.
Port Starboard
oror
5. Press standby and remove the pilot to return to hand steering.
5.3 Adjusting autopilot performance
The factory setting for rudder gain provides stable control for initial
sea trials. However, dif ferent boats can vary widely in their response
to the helm and further adjustment to the rudder gain may improve the
autopilot’s st eering ch aracte ristics .
D3320-2
Page 63

Chapter 5: Commissioning the Tiller Pilot 59
The following test will determine whether the rudder gain is set too
high or too low .
1. In clear water and with the autopilot in Auto mode, alter course to
starboard by 40° by pressing
+10 four times.
• At cruising speeds, a course change of 40° should result in a
crisp turn followed by an overshoot of no more than 5°.
If this occurs the rudder gain is set correctly .
• If rudder gain is too high, the 40° course change will result in a
distinct overshoot of more than 5° (
A).
Correct this overs teer by reducing the rudder ga in setting.
• If rudder gain is too low , the boat’s steering performance will
be sluggish – it will take a long time to make the 40° t urn and
there will be no overshoot (
B).
Correct thi s understeer by increasi ng the rudder gain setting.
New
heading
Rudder gain
too low
Rudder gain
too high
B
rudder gain
Correct
New
heading
A
New
heading
5 Commissioning the Tiller Pilot
D3262-2
Note: It is easier to recognize these actions in calm sea conditions
where wave action does not mask basic steering perf ormance.
2. Refer to the calibration menu diagram in Chapter 6: Adjusting
Tiller Pilot Settings, for instructions on how to adjust the rudder
gain setting.
3. Repeat the test until you achieve crisp course changes with no
more than 5° of overshoot.
Y ou should set th e rudder gain to the lowest setting consistent with
accurate course keeping. This will minimize drive movements and
reduce power consumption and wear and tear.
Page 64

60 ST1000 Plus & ST2000 Plus Tiller Pilots - Owner’s Handbook
5 Commissioning the Tiller Pilot
Page 65

Chapter 6: Adjusting Tiller Pilot Settings 61
Chapter 6: Adjusting Tiller Pilot Settings
6.1 Introduction
The tiller pilot is calibrated at the factory to provide stable
performance for most boats. However , you can fine tune many of the
calibration features to match your personal preferences, and the type
of boat and steering system.
Note: You should carry out an initial sea trial before adjusting any of
the calibration features.
Y ou mi ght need to adjust the tiller pi lot calibr ation sett ings if:
• the pilot does not maintain a selected heading
• the rudder activity is too high or the course keeping is not t ight
enough.
• the boat appears to be unstable on Northerly headings (or
Southerly headings in the southern hemisphere)
• you operate in Track Control mode without a speed instrument
• you wish to change the Off Course alarm angl e
The calibration menu allows you to adjust the following parameters
from their factory default settings:
6 Adjusting Tiller Pilot Settings
• rudder gain
• average cruise speed
• off course alarm limit
• variation
• Northerly/Southerly turning error compensati on
• boat’s current latitude
• rudder damping
Adjusting calibration values
The flow chart on the next page shows how to:
• enter the calibration menu
• scroll through the calibration menu
• adjust the calibration values
• quit calibration
Page 66

62 ST1000 Plus & ST2000 Plus Tiller Pilots - Owner’s Handbook
Calibration menu
1 = Rudder gain
5 = Average cruise speed
6 = Off course alarm angle
SECONDS
REPEAT THE ABOVE KEYPRESS
WITHIN 10 SECONDS TO ENTER CALIBRATION
9 = Local magnetic variation
10 = Northerly/Southerly
turning error correction
11 = Current boat latitude
13 = Rudder damping
SECONDS
ADJUSTING CALIBRATION
FEATURES
OR
6 Adjusting Tiller Pilot Settings
QUITTING CALIBRATION AND
SAVING ANY CHANGES
SECOND
QUITTING CALIBRATION
WITHOUT SAVING CHANGES
Does not appear if Level 10 is set to 0.
D3344-2
Page 67

Chapter 6: Adjusting Tiller Pilot Settings 63
Calibration features
Calibration feature Value
D167-07a
• The number on the left identifies the calibration feature and the
number on the right the currently selected value.
• Y ou can enter the calibration menu to view the existing values
without altering them. After viewing the value, a momentary
press of
without a ffectin g the prev ious sett ings.
• If the display shows
refer to page 66.
standby returns the pilot to its normal operating mode
CAL OFF when you try to enter calibration,
6 Adjusting Tiller Pilot Settings
Default calibration values
The following table shows the default calibration values. These will
provide safe performance for initial sea trial.
No. Feature Default setting Adjusted values
1 Rudder gain 5
5Average cruise speed 8
6 Off course alarm angle 20
9 Local magnetic variation Off (– –)
10 North/South turning error
correction
11 Boat’s current latitude 0
13 Rudder damping 3
Note: C alibration Levels 2,3,4,7,8 and 12 are not available. If
Calibration Level 10 is set to 0, level 11 will also be omitted.
D214-1
Off (0)
Page 68

64 ST1000 Plus & ST2000 Plus Tiller Pilots - Owner’s Handbook
6.2 Calibrating the tiller pilot
Calibration Level 1: Rudder gain
Use Calibration Level 1 to adjust the rudder gain. This must be set
when your boat is under way , as described on page 58.
Calibration Level 5: cruise speed
Use Calibration Level 5 to set the boat’s normal cruising speed for
operation in Track mode.
When interfacing with a navigation system, the tiller pilot uses the
boat’s average cruising speed to perform track calculations.
Note: If a SeaTalk speed instrument is connected, boat speed data
will be transmitted directly to the autopilot.
Calibration Level 6: off course alarm angle
Use Calibration Level 6 to set the off course alarm angle. This alarm
warns you if the autopilot is unable to maintain its set course.
6 Adjusting Tiller Pilot Settings
The off course alarm operates if the autopilot strays of f course, by
more than the set value, for more than 20 seconds.
Y ou can set the limit in 1° increments between 15° and 40°.
Locked heading
15˚ minimum
Boat heading
D3264-2
Page 69

Chapter 6: Adjusting Tiller Pilot Settings 65
Calibration Level 9: magnetic variation
Use Calibration Level 9 to input the level of magnetic variation
present at the boat’s current pos ition.
• -ve variation = west
• +ve variation = east
The tille r pilot tra nsmits thi s value o nto the Sea T alk bus, so it can be
picked up by other SeaT alk instruments.
Calibration Level 10: heading error correction
Use Calibration Level 10 to switch on Northerly or So utherly heading
error correction:
• 0 = Off
• 1 = Northern Hemisphere, 2 = Southern Hemisphere
Y ou might notice that the autopilot tends to be a little less stable on
Northerly headings in the higher latitudes of the Northern hemi sphere
(or Southerly headings in the Southern hemisphere).
This is caused by the increasing angle of dip of the earth’s magnet ic
field at higher latitudes, which has the effect of amplifying rudder
response on Northerly (Southerly) headings. This error af fects all
magnetic compasses and gets worse further away from the equator.
6 Adjusting Tiller Pilot Settings
With heading error correction switched on, the tiller pilot can
compensate for this error by automatically adjusting the autopilot
gain (depending on heading). This will provide precise cours e
keeping on all headings.
North
without
North
with
compensation
compensation
D3263-2
Page 70

66 ST1000 Plus & ST2000 Plus Tiller Pilots - Owner’s Handbook
Calibration Level 11: boat’s current latitude
When you have switched on heading error correction (Level 10), you
need to use Calibration Level 11 to i nput the boat’s current latitude
(to the nearest degree).
Set the latitude using the
-1, +1, -10 and +10 keys.
Note: If the cor rection is switched off in Calibration Level 10 (i.e. set
to ‘
0’),Level 11 will be omitted. When you press the auto key in
Calibration Level 10 you will advance to Level 13.
Calibration Level 13: rudder damping
Adjust the value in Calibration Level 13 if the tiller drive ‘hunts’
when trying to position the rudder .
• you can select 9 stages of rudder damping – initially , th is option
should be set to 3
• if the autopilot is over-active in calm conditions, increase the
damping
• if the course keeping is not tight enough, decrease the damping
6 Adjusting Tiller Pilot Settings
• adjust the damping one stage at a time
Controlling access to calibration
Y ou can prevent unauthorized access to calibration as follows:
1. Press and hold
display shows
-1 and standby together for 10 s econds unti l the
CAL OFF:
D214-1
2. T oggle the calibration access between On and OFF using the -1 and
+1 keys.
3. Store the setting by pressi ng
-1 and standby for 10 seconds until
the tiller drive returns to normal operation.
Page 71

ST1000+ and ST2000+
tiller drives: socket template
Drill 2.5 mm (3/32 inch)
diameter pilot hole (4 positions)
Drill 21 mm (53/64 inch)
diameter hole
D3362-2
Page 72

Page 73

Index 69
Index
A
Adjusting autopilot performance 58
Adjusting tiller pilot settings
Alarms and warnings
Large XTE
Off course alarm
Track data error
Track data not received
Waypoint advance
Wind shift
Auto mode
Automatic deadband
AutoTack
Changing course
Dodging obstacles
Entering Auto mode
Exiting Auto mode
Navigation infor m ation pages
Off course alarm
Return to previous heading
Auto Seastate
Automatic deviation correction
17, 21
24
8–14
10
12
61–66
11
21
21
19, 22
12
9
10
8
8
11
11
56
B
Boat’s current latitude 66
C
Cabling
49
NMEA
47
Power
Remote control (optional)
47
SeaTalk
Calibration
61–66
Access
66
Default values
Level 01 - Rudder gain
Level 05 - Cruise speed
Level 06 - Off course alarm angle
Level 09 - Magnetic variation
Level 10 - Heading error
Level 11 - Boat’s current latitude
Level 13 - Rudder damping
63
49
58, 64
64
65
66
12
65
64
66
Cantilever mounting
Changing course
Commissioning the tiller pilot
Adjusting rudder gain
Functional tests
Initial sea trial
Compass calibration
Deviation correction
Heading alignment
Cross track error
Cruise speed
Current latitude
41
9, 13
58
51–55
55–58
56–58
56
57
17
64
66
D
Display illumination 14
Dodging obstacles
10, 19
E
EMC
Installation guidelines
Servicing and safety guidelines
34
F
Fault finding 28
Functional test
Navigation interface
Operating sense
SeaTalk interface
Switch on
Wind instrument interface
51
52
51
54
H
Heading alignment 57
Heading error correction
65
I
Illumination 14
Initial sea trial
Checking autopilot operation 58
Compass deviation correction
Heading alignment
Installation
33–50
57
51–59
27
54
56
Page 74

70 ST1000 Plus & ST2000 Plus Tiller Pilots - Owner’s Handbook
Cabling
NMEA
49
47
Power
47
SeaTalk
EMC guidelines
Parts supplied
45
Socket
Tiller drive
34
33
36–44
L
Lighting 14
M
Magnetic variation 65
Maintenance
Mounting socket
27
38
N
Navigation inf ormation pages 12
NMEA
49
Cabling
Recognized data
Northerly heading error correction
49
O
Off course alarm 11
Off course alarm angle
Operating modes
Auto mode
Track mode
WindTrim mode
Operating sense, reversing
64
7–25
8–14
15–22
23–25
52
P
Parts supplied 33
Pedestal socket mounting
Power
Cabling 47
Socket installation
Product support
Pushrod extensio ns
28
43
45
38
R
Recognized NMEA data 49
Remote control cabling
49
65
Return to previous heading
Rudder damping
Rudder gain
66
58, 64
11
S
SeaTalk
Accessory cables
Cabling
47
Servicing
Socket installation
Southerly heading error correction
Specifications
27
48
45
2
T
Tiller drive installation 36–44
Cantilever mounting
Mounting socket
Pedestal socket mounting
Pushrod extensio n s
Tiller brackets
Tiller pin
Tiller pin (Non-standard)
Track mode
Cross track error
Dodging obstacles
Entering Track mode
Exiting Track mode
Safety
Tidal stream compensation
Warning messages
Waypoint arrival/advance
38
15–22
Automatic acquisition
Manual acquisition
20
41
38
43
38
40
44
17
19
15
15
16
17
18
21
19
W
WindTrim mode 23–25
Entering WindTrim mode
Exiting WindTrim mode
Return to previous wind
Wind shift alarm
24
23
24
24
X
XTE (Cross track error) 17
65
Page 75

Limited Warranty Certificate
Raymarine warrants each new Light Mar ine/Dealer Distributor Product to be of good materials and
workmanship, and will repair or exchange any parts proven to be defective in material and
workmanship under no rmal use for a period of 2 years/24 mon ths from date of sale to end user , except
as provided below.
Defects will be corrected by Raymarine or an authorized Raymarine dealer. Raymarine will, except
as provided below , accept labor cost for a period of 2 years /24 months from the date of sale to end user .
During this period, except for cer tain products, travel costs (auto milea ge and tolls) up to 100 round
trip highway miles (160 kilometres) and travel time of 2 hours, will be assumed by Raymarine only
on products where proof of installation or commission by authorized serv ice agents, can be shown.
Warranty Limitations
Raymarine W arranty policy does not apply to equ ipment which has been subjected to ac cident, abuse
or misuse, shipping damage, alteration s, corrosion, incorr ect and/or non-auth orized service, or
equipment on which the serial number has been altered, m utilated or removed.
Except where Raymarine or its authorized dealer has performed the installation, it assumes no
responsibility for damage incurred during installation.
This W arranty does not cover routin e system checkouts or alignment/calibration, unless required by
replacement of part(s) in the area being aligned.
A suitable proof of pu rchase, showing d ate, place, and serial number must be made available to
Raymarine or authorized service agent at the time of request for W arranty service.
Consumable items, (such as: Char t paper, lamps, fus es, batteries, styli, stylus/drive belts, radar mixer
crystals/diodes, snap-in impeller carriers, impellers, impeller bearings, and impeller shaft) are
specifically excluded from this Warranty .
Magnetrons, Cathode Ray Tubes (CR T), TFT Liquid Crystal Displays (LCD) and cold cathode
fluorescent lamps (CCFL), hailer horns and transducers are warranted for 1 year/12 months from date
of sale. These items must be returned to a Raymarine facility.
All costs associated with transducer replacement, other than the cost of the transducer itself, are
specifically excluded from this Warranty .
Overtime premium labor portion of services outside of normal working h ours is not covered by this
W arranty.
Travel cost allowance on certa in products with a suggested retail p rice below $2500 .00 is not
authorized. When/or if repairs are ne cessary , these products must be f orwarded to a Raymarine
facility or an authorized dealer at owner’s expense will be returned via surface carrier at no cost to the
owner.
Travel costs other than auto mileage, tolls and two (2) hours travel time, are specifically excluded on
all products. T ravel costs which are exc luded from the coverage of this W arranty in clude but are no t
limited to: taxi, launch fees, aircraft rental, subsistence, customs, shipp ing and communication
charges etc. T ravel cost s, mileage and time, in excess to that allo wed must have prior appr oval in
writing.
TO THE EXTENT CONSISTENT WITH ST ATE AND FEDERAL LA W:
(1) THIS W ARRANTY IS STRICTLY LIMITED TO THE TERMS INDICA TED HEREIN, AND
NO OTHER WARRA NTIES OR REM EDIES SHAL L BE BINDING ON RA YMAR INE
INCLUDING W ITHOUT LIMI T A TI ON ANY WARRANT IES OF MERCHA NT ABLE OR
FITNESS FOR A P ARTICULAR PURPOSE.
(2) Raymarine shall not be liable for any incidental, consequential or special (including punitive or
multiple) damages.
All Raymarine products sold or provided her eunder are merely aids to navigation. It is the
responsibility of the user to exercise discretion and proper navigational skill independent of any
Raymarine equipment.
Document number: 84064-8
April 2001
Page 76

Factory Service Centers
United States of America UK, Europe, Middle East, Far East
Raymarine Inc
22 Cotton Road, Unit D
Nashua, NH 03063-4 219, USA
Telephone: +1 603 881 5200
Fax: +1 603 864 4756
www.raymarine.com
Sales & Order Services
Telephone: +1 800 539 5539 Ext. 2333 or
Technical Support
Telephone: +1 800 539 5539 Ext. 2444 or
Email: techsupport@raymarine.com
Product Repair Center
Telephone: +1 800 539 5539 Ext. 2118
+1 603 881 5200 Ext. 2333
+1 603 881 5200 Ext. 2444
Raymarin e Ltd
Anchorage Park, Portsmouth
PO3 5TD, England
Telephone: +44 (0)23 9269 3611
Fax: +44 (0)23 9269 4642
www.raymarine.com
Customer Support
Telephone: +44 (0)23 9271 4713
Fax: +44 (0)23 9266 1228
Email: techsupport@ raymar ine.com
Stick barcode label here
Purchased f rom Purchase date
Dealer address
Installed by Installation date
Commissioned by
Commissioning date
Owner’s name
Mailing address
This portion should be comple ted and retained by the owner.
 Loading...