

Page 1

Raymarine SR100
Sirius Weather
System
Installation Guide
Document Number: 87067_1
Date: March 2006
Page 2

Trademarks and registered trademarks
Autohelm, HSB, Raymarine, RayTech, RayTech RNS, Sail Pilot, SeaTalk and
Sportpilot are registered trademarks of Raymarine Limited. Apelco is a
registered trademark of Raymarine Holdings Limited (Registered in all
major marketing territories).
AST, Autoadapt, Auto GST, Autoseastate, Autotrim, Bidata, Marine Intelligence, Maxiview, On Board, Raychart, Raynav, Raypilot, Raystar, ST40,
ST60, Seaclutter, Smart Route, Tridata and Waypoint Navigation are trademarks of Raymarine Limited.
All other product names mentioned are trademarks or registered trademarks (if applicable) of their respective companies.
© Raymarine Inc. 2006
Page 3

Contents i
Contents
Important information ................................................................1
Introduction........................................................................................... 1
Safety notices........................................................................................ 1
WARNING: Electrical safety......................................................1
WARNING: Product installation ...............................................1
WARNING: Navigation aid ........................................................1
Disclaimer .............................................................................................2
EMC conformance ................................................................................. 2
Warranty ............................................................................................... 2
Handbook information .......................................................................... 2
Installation ....................................................................................3
EMC installation guidelines................................................................... 3
What’s in the box? ................................................................................ 4
What tools do I need? ........................................................................... 4
Planning the installation .......................................................................5
Cable runs ............................................................................................. 6
Installing the system .............................................................................7
System connections............................................................................. 10
System activation ............................................................................... 12
Maintenance and troubleshooting ..........................................15
Introduction......................................................................................... 15
Maintenance ....................................................................................... 15
Troubleshooting ..................................................................................15
Accessories.......................................................................................... 16
Technical support ................................................................................ 17
Raymarine World Wide Warranty ............................................ 21
Page 4

ii Raymarine Sirius SR100 Weather System -Installation Guide
Page 5
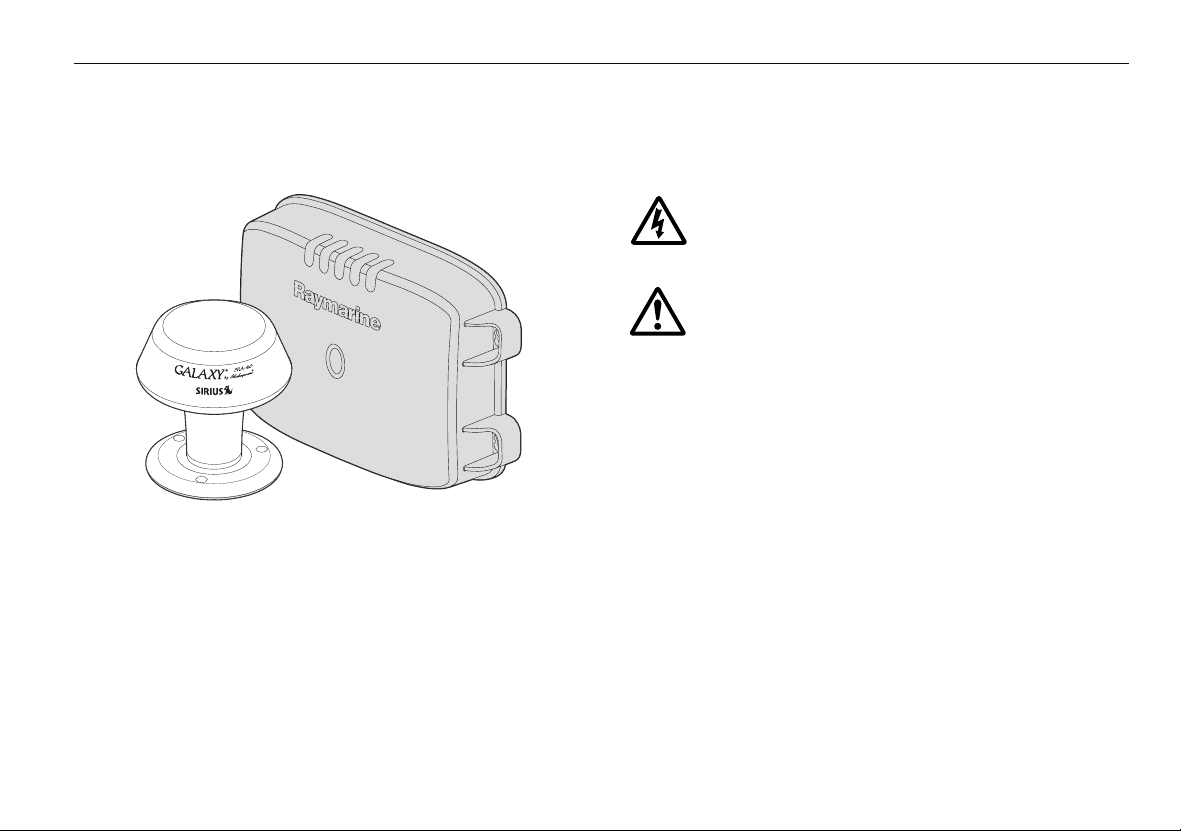
1
Important information
Introduction
D9060_1
This guide contains an explanation of how to install, commission and maintain your Raymarine SR100 Sirius Weather System for use with your ESeries display.
Intended use
This product is a weather information system consisting of a receiver and
antenna. The intended application is as one component of a navigation
system for leisure marine boats and workboats not covered by IMO/SOLAS
carriage requirements.
Safety notices
WARNING: Electrical safety
Make sure the power supply is switched off
before you make any electrical connections.
WARNING: Product installation
This equipment must be installed and operated in
accordance with the instructions contained in this
handbook. Failure to do so could result in poor
product performance, personal injury and/or
damage to your boat.
WARNING: Navigation aid
Although this product has been designed to be
accurate and reliable, many factors can affect its
performance. As a result, it should only be used
as an aid to navigation and should never replace
common sense and navigational judgement.
Always maintain a permanent watch so you can
respond to situations as they develop.
Page 6

2 Raymarine SR100 Sirius Weather System - Installation Guide
Disclaimer
All information presented by the Sirius weather service is advisory only.
You acknowledge the risk of incomplete and erroneous information and
assume complete responsibility and risks associated with this device, and
accordingly release Raymarine, Sirius Satellite Radio Inc., Navcast Inc, and
WSI Corporation from any and all claims arising from the use of this
service. By using this service, you acknowledge and agree that you have
read the terms of the subscription agreement for this service and agree to
all of the terms contained therein. If you do not have the subscription
agreement, you may view a copy at www.sirius.com/marineweath-
eragreement or call 1-800-869-5480 for a copy to be sent to you.
EMC conformance
All Raymarine equipment and accessories are designed to the best industry
standards for use in the recreational marine environment. The design and
manufacture of Raymarine equipment and accessories conforms to the
appropriate Electromagnetic Compatibility (EMC) standards, but correct
installation is required to ensure that performance is not compromised. For
full details and installation guidelines refer to www.raymarine.com
Warranty
To register your new Raymarine product, please take a few minutes to fill
out the warranty card. It is important that you complete the owner information and return the card to us to receive full warranty benefits. Your
product can also be registered via our website www.raymarine.com
Handbook information
To the best of our knowledge, the information contained in this handbook
was correct as it went to press. Raymarine cannot accept any liability for
any inaccuracies or omissions it may contain.
In addition, our policy of continuous product improvement may change
specifications without notice. As a result, Raymarine cannot accept liability
for any differences between the product and the handbook.
Handbook conventions
Throughout this handbook, the dedicated (labelled) keys are shown in bold
capitals, e.g. MENU. The soft key functions are shown in italics, e.g.
ALL.
SAVE
Page 7
3
Installation
EMC installation guidelines
All Raymarine equipment and accessories are designed to best industry
standards for use in the recreational marine environment.
Their design and manufacture conforms to the appropriate Electromagnetic
Compatibility (EMC) standards, but correct installation is required to ensure
that performance is not compromised. Although every effort has been
made to ensure that they will perform under all conditions, it is important
to understand what factors could affect the operation of the product.
The guidelines given here describe the conditions for optimum EMC performance, but it is recognized that it may not be possible to meet all of these
conditions in all situations. To ensure the best possible conditions for EMC
performance within the constraints imposed by any location, always ensure
the maximum separation possible between different items of electrical
equipment.
For optimum EMC performance, it is recommended that wherever possible:
• Raymarine equipment and cables connected to it are:
• At least 3 ft. (1m) from any equipment transmitting, or cables
carrying radio signals, e.g. VHF radios, cables and antennas. In the
case of Single Side Band (SSB) radios, the distance should be
increased to 7 ft. (2m).
• More than 7 ft. (2m) from the path of a radar beam. A radar beam
can normally be assumed to spread 20 degrees above and below
the radiating element.
• The equipment is supplied from a separate battery to that used for
engine start. Voltage drops below 10 V, and starter motor transients, can cause the equipment to reset. This will not damage the
equipment, but may cause the loss of some information and may
change the operating mode.
• Raymarine specified cables are used. Cutting and rejoining these
cables can compromise EMC performance and must be avoided unless
doing so is detailed in the installation manual.
• If a suppression ferrite is attached to a cable, this ferrite should not be
removed. If the ferrite needs to be removed during installation, it must
be reassembled in the same position.
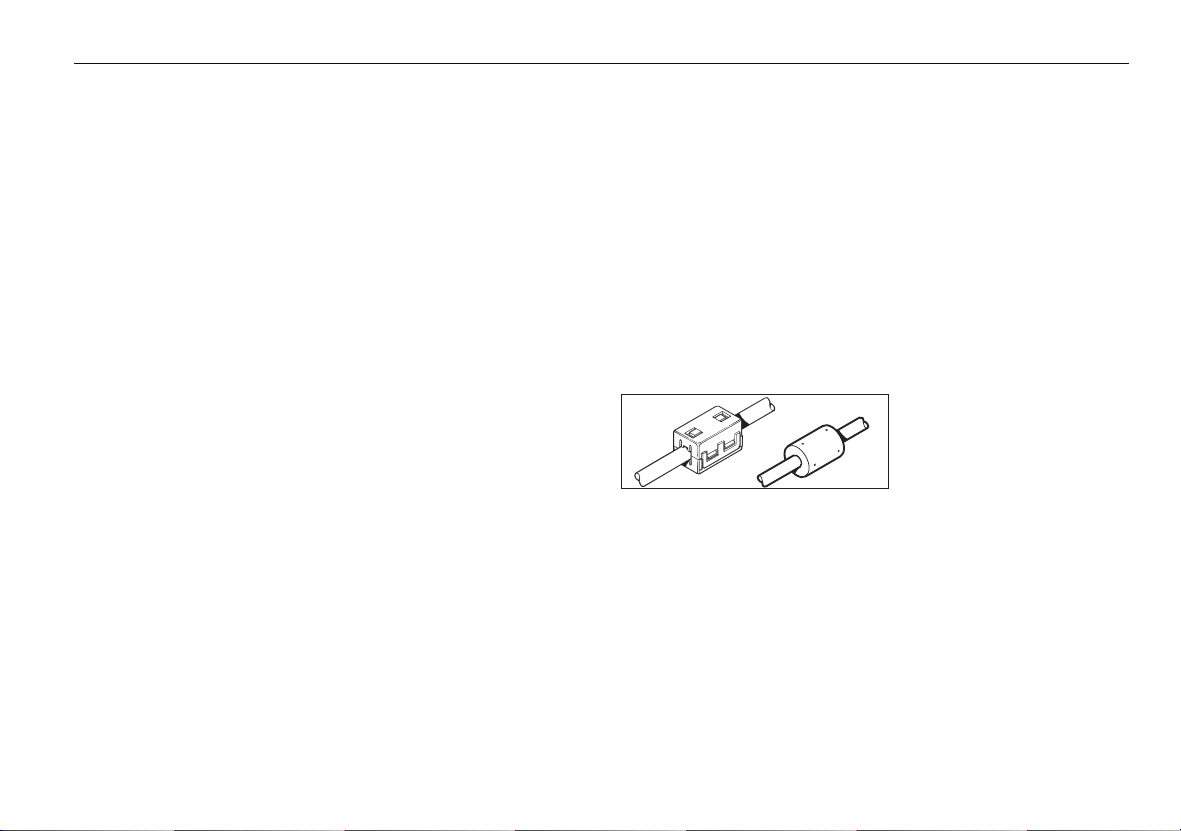
Suppression Ferrites
The illustration shows typical
cable suppression ferrites used
with Raymarine equipment.
Always use the ferrites supplied
D6626-1
by Raymarine
Connections to other equipment
If your Raymarine equipment is to be connected to other equipment using
a cable not supplied by Raymarine, a suppression ferrite MUST always be
attached to the cable near to the Raymarine unit
Page 8
4 Raymarine SR100 Sirius Weather System - Installation Guide
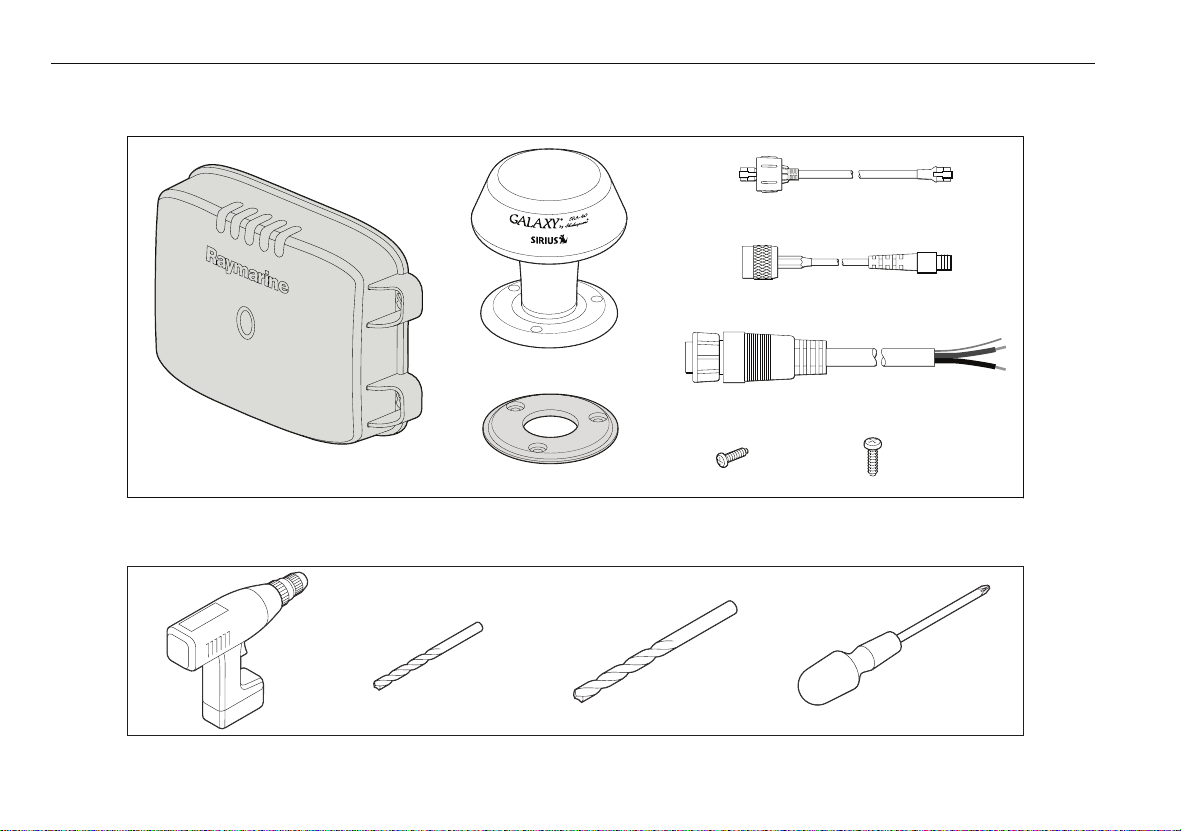
What’s in the box?
Weather receiver module
What tools do I need?
Drill
7/64"
Drill bit
SRA-40 Antenna
Mounting gasket
9/16"
Drill bit
4.9 ft. (1.5 m) SeaTalk
25 ft. (7.6 m) Antenna cable
10 ft. (3 m) Power cable
M3.5 screw (x3)
hs
ethernet cable
M8 screw (x4)
Phillips
screwdriver
D9061_1
D9062_1
Page 9

5
Planning the installation
When planning the installation and choosing locations for the antenna and
receiver, consider the following points:
Receiver
MAX
MIN
130
Protect from extremes of temperature.
-105514
DO NOT place near an engine, or where fuel vapor
could be present.
DO NOT get it wet or put it where it can be
splashed with water.
DO NOT put it where it can be kicked or trodden
on.
D9063_1
Antenna
Make sure the antenna
has a clear view of the
sky. Height is not
important. Make sure
nearby objects do not
block the antenna’s
view of the sky.
Make sure that the
antenna is installed on
a flat not curved
surface.
If your boat has radar,
make sure that the
antenna is mounted
above or below the
radar scanner, but not
in the radar beam.
DO NOT install the
antenna where it can
be kicked or trodden
D9064_1
on.
You should also choose the installation site so that the power cable can be
easily removed.
You should also make sure that the installation site has easy access from
below in an area which is clear of cables and other obstructions.
Page 10

6 Raymarine SR100 Sirius Weather System - Installation Guide
Cable runs
CAUTION: Cables
DO NOT cut cables or remove connectors as this will severely
reduce system performance.
If a longer cable is required you will need to purchase a
replacement cable from a suitable dealer.
If a shorter cable is required, coil excess cable neatly and
secure out of the way.
Consider the following points before installing the system cables:
• You will need to connect the antenna, ethernet and power cables to
the receiver.
• All cables should be adequately clamped and protected from physical
damage and exposure to heat.
• Avoid running cables through bilges or doorways, or close to moving
or hot objects.
• Acute bends must be avoided.
• Where a cable passes through an exposed bulkhead or deckhead, a
watertight gland or swan neck tube should be used.
• DO NOT cut the cables or remove the connectors.
• DO NOT pull cables through bulkheads using a cord attached to the
connector. This could damage the connector.
• Secure cables in place using tie-wraps or lacing twine. Coil any extra
cable and secure it out of the way.
You will need to run the following cables:
• Power cable.
•SeaTalk
• Antenna cable.
hs
network cable.
Power cable
A 10 ft. (3m) power cable is supplied. This cable has a connector plug for
connecting to the SR100 weather receiver at one end and three wires at
the other for connecting to your boats power supply. This cable may be
extended to a distance of 60 ft. (20m) using a suitable wire, gauge AWG
12 or greater. For full details of power connections refer to “Power cable”
on page 10.
SeaTalkhs Network cable
A 4.9 ft. (1.5m) network cable is supplied. This cable should be used to
connect your weather receiver to either a SeaTalkhs Network Switch or
cross over coupler to connect to your E-Series display. If a longer cable is
required it should be purchased from your local Raymarine dealer. For full
details of available cable lengths refer to “SeaTalkhs” on page 11.
Antenna cable
CAUTION: Antenna cable
Cutting or splicing the antenna cable will result in severely
reduced system performance.
An antenna cable of 25 ft. (7.5m) is supplied. This RF coax cable should be
used to connect the antenna to the weather receiver. If a longer cable is
required it should be purchased from your Shakespeare dealer. For full
details of available cable lengths refer to “Accessories” on page 16.
Page 11

7
Installing the system
The following section gives details of how to install your SR100 Sirius
Weather receiver and antenna.
Receiver
D9065_1
The receiver should be installed a minimum of 3 ft. (1m) away from an
engine, compass or any magnetic device.
Check
6"
A minimum 6" space must be left
below the unit to ensure adequate
space for cable bends/ connections.
D9069_1
Step 1
Check
x4
Vertical
D9066_1
Page 12

8 Raymarine SR100 Sirius Weather System - Installation Guide
Step 2
Antenna
CAUTION: Antenna
DO NOT cut the antenna cable or remove the connector.
The antenna consists of the following components:
1
SRA-40 Antenna
x4
Step 3
Use 7/64"
drill bit for
pilot holes
D9067_1
Mounting flange
2
Mounting gasket
3
Antenna cable and
4
connector
D9070_1
x4
No.8 x 3/4"screw (x4)
When selecting the antenna installation site, check that the area below the
site has easy access and is clear of cables and other obstructions.
D9068_1
Page 13

9
Step 1
D9071_1
Using the gasket as a template mark the center hole and 3 fixing holes.
Step 2
D9072_1
Step 3
D9073_1
Fix the mounting gasket and flange into position using the supplied screws.
Step 4
'O' ring
D9074_1
Use a 9/16” drill bit to drill the center hole and a 7/64” drill bit to make
pilot holes for the fixing screws.
Thread the cable and connector through the mounting flange and gasket.
Attach the antenna to the mounting flange, making sure the ‘O’ ring is in
position.
Page 14

10 Raymarine SR100 Sirius Weather System - Installation Guide
System connections
This section deals with connecting your Sirius weather system after
installation
SRA-40
Antenna
Power Supply
SR100
Weather Receiver
A typical Sirius weather system is shown in the illustration above.
E-Series Display
Network Switch
Other SeaTalk
SeaTalk
devices
PAGE
ACTIVE
WPTS
MOB
DATA
MENU
OUT
RANGE
IN
CANCELOK
hs
hs
D9075_1
Connector panel
SEATALK HS
AUDIO
POWER
ANTENNA
D9076_1
The connector panel of the receiver provides the following connection
sockets:
• Power - for connecting the system to your boat’s DC power supply.
• SeaTalk
hs
- for connecting the receiver to your boat’s ethernet
system.
• Antenna - for connecting the SRA-40 antenna to the system.
• Audio - not used at this time.
The connector panel also contains a light emitting diode (LED) to indicate
system status for diagnostic purposes. For full details of the status LED
refer to “Status LED” on page 15
Power cable
CAUTION: In-line fuse
If you do not have a breaker in the power circuit, an in-line
2A quick blow fuse should be fitted to the positive (red) lead
of the power cable.
Sirius SR100 weather systems are intended for use on boat’s DC power
systems operating in the range 9 V to 32 V. That is 12 V or 24 V systems.
There is no power switch on the SR100 receiver, it automatically turns on
when the system is powered.
Page 15

11
The power connection for your system should be made at either the output
of the battery isolator switch, or at a DC power distribution panel. The
power must be fed directly to the system through its own dedicated cable
system and MUST be protected by a thermal circuit breaker or fuse,
installed close to the power connection
A 10 ft. (3m) cable is supplied with your system for connecting to the
boat’s DC power supply as follows:
Red (12/24 V/+)
Black (0V-)
D9077_1
Shield (0V/ ground /-)
Extending the power cable
The power cable may be extended up to a maximum length of 60 ft. (20m)
using a suitable AWG 12 multi-stranded cable.
Note:
If the power connections are accidentally reversed the system will
not work. Raymarine recommends using a multi-meter to ensure
that the power lead is connected with the correct polarity.
Grounding the system
CAUTION: Grounding
This system is not intended for use on ‘positive’ ground
boats. The power cable earth screen must be connected to
the boat’s RF ground system.
Your boat’s power system should be either:
• Negative grounded, with the negative battery terminal connected to
the boat’s ground, or
• Floating with neither battery terminal connected to the boat’s ground.
It is important that an effective RF ground is connected to your SR100
weather system.
You must ground your weather system by connecting the drain wire
(screen) of the power cable to the nearest ground point on your boat’s RF
system.
If you need to extend the wire, the extension wire should be an 8 mm braid
or AWG 10 multi-strand cable.
If your boat does not have an RF system, connect the drain wire to the
negative battery terminal.
SeaTalk
hs
The supplied SeaTalkhs high speed network cable should be connected
from the receiver to a network hub or a cross-over coupler to enable
connection to your E-Series display.
SRA-40
Antenna
E Series Display
Crossover Coupler
hs
SeaTalk
Cable SeaTalk
E55060
hs
Cable
SR100
D9084-1
Page 16

12 Raymarine SR100 Sirius Weather System - Installation Guide
SRA-40
Antenna
D9083_1
E Series Display
SeaTalk
hs
SeaTalk
Network Switch
E55058
hs
Cable SeaTalk
hs
SR100
Cable
Antenna cable
CAUTION: Antenna cable
DO NOT cut or splice the antenna cable or remove the connectors as system performance will be severely reduced.
The antenna cable should be used to connect the SRA-40 to the receiver. If
a cable length greater than the 25 ft. (7.5m) supplied is required a substitute cable of suitable length should be purchased from your Shakespeare
dealer.
System activation
With your Sirius weather system correctly installed, this section details how
to activate Sirius weather.
Activation
To activate Sirius Weather:
With the weather system and your E-Series display powered ON:
1. Open a weather application page and make it active. For full details of
how to do this, refer to Raymarine Handbook No.
Networked Display - Reference Manual
.
2. Press the MENU key. The Setup dialog box appears.
Setup
Weather Setup Menu...
System Setup...
Alarm Setup...
3. Use the trackpad to highlight
4. Use the trackpad to enter
Sirius Weather ID XXXXXXXXX
Wind Symbol Arrow
Marine Watchbox Alerts ON
Weather Setup Menu
Weather Setup Menu
Weather Setup Menu
81244_2 E-Series
D9078_1
.
.
D9079_1
Page 17

13
Your Sirius Weather ID number is displayed on the first line of the
Weather Setup Menu.
5. Make a note of your Sirius Weather ID number.
6. Contact Sirius Weather at 1-800-869-5480 to activate your system.
Upgrading software
There may be occasions when it is necessary to upgrade your Sirius SR100
software. The following section gives details of how to carry out this
operation.
Before upgrading your SR100 software, there are 2 pieces of hardware that
are necessary to complete this process:
• A blank CompactFlash (CF) memory cartridge of 8 Megabytes capacity
or larger. Raymarine recommends using SanDisk brand CF cards with
E-Series.
• A CF reader/writer device for your PC or Mac. This device will be used
to copy the files downloaded from Raymarine.com to the CF card.
The CF reader/writer can be an external device (e.g. connected by USB
to your computer), or can be internal/built in.
Downloading the software upgrade
1. Point your web browser to http://www.raymarine.com
2. Navigate to
3. Click the relevant link to download the Sirius weather upgrade.
4. Follow the on-screen instructions.
Upgrading your SR100 software:
CAUTION: Software upgrade
While this software upgrade is not intended to erase data
stored in your E-Series displays internal memory, it is
strongly recommended that you perform a backup before
Software update
pages.
upgrading software should anything interrupt the upgrade
process.
You can use the same CF card used to perform the software upgrade for
backup, or you can use a different card if you wish.
To perform a backup:
1. Power your E-Series display ON. The navigation disclaimer appears.
2. Press OK.
3. Insert the backup CF card into the E-Series card slot.
4. If not already in chart plotter mode, press the PAGE key.
5. Select a page containing a chart plotter application.
6. Press the DATA key.
7. Press the
8. Press the
9. Press
stored data is copied to the CF card.
To save all stored data it is necessary to do a
Waypoints highlighted, a
SAVE ALL
The data has now been saved and you may proceed with the software
upgrade.
To upgrade SR100 software:
With your Sirius system and E-Series display powered OFF:
1. Insert a suitable CF card containing the software upgrade into the ESeries display.
2. Power your E-Series display ON. The Software Update Utility screen is
displayed.
The Sirius upgrade file is displayed in the left hand column. It should be
highlighted, if not use the trackpad and highlight it.
ARCHIVE AND TRANSFER
SAVE TO CARD
SAVE ALL
. All of your display’s highlighted (e.g. Waypoints)
with Tracks highlighted.
soft key.
SAVE ALL
soft key.
SAVE ALL
with Routes highlighted and a
with
Page 18

14 Raymarine SR100 Sirius Weather System - Installation Guide
3. Press the
4. Press the
progress meter appears.
5. Within 15 seconds of pressing the
soft key, power your Sirius Weather system ON.
The status bars will begin updating. If they do not begin updating
within 30 seconds, check:
i. that the correct software revision was selected.
ii. that the Sirius Weather receiver was powered ON within 15
iii. that the SeaTalk
6. When the update process is complete, remove the CF card from the
card reader slot.
7. Press the
automatically.
Your Sirius Weather System and E-Series display are now ready for normal operation.
For full details of how to operate your Sirius Weather Application refer to
Raymarine Handbook No.
Manual
at www.raymarine.com
Upgrade Remote Unit
Upgrade Remote Unit on Ethernet
soft key.
soft key.The Upgrade
Upgrade Remote Unit on Ethernet
seconds of pressing the
REBOOT
soft key. Your E-Series display will restart
Upgrade Remote Unit on Ethernet
hs
connection is intact.
soft key.
81244_2 E-Series Networked Display - Reference
. A copy of this manual is available from the relevant product pages
Page 19

15
Maintenance and troubleshooting
Introduction
This section provides information on routine maintenance and troubleshooting that can be carried out by the user.
Your Sirius SR100 Weather System is a sealed unit. DO NOT remove the
cover of the receiver. Adjustments require specialized service procedures
and tools only available to qualified service technicians. There are no user
serviceable parts or adjustments.
Maintenance
CAUTION: Power supply
Always turn your weather system OFF before carrying out
routine maintenance.
Routine checks
Your Sirius SR100 Weather System is a sealed unit. Routine checks are
therefore limited to the following periodical checks:
• Examine the cables for signs of damage, such as chafing, cuts, or nicks.
• Check that the cable connectors are firmly attached and dust caps are
fitted to any connection not in use.
Cleaning
Your Sirius SR100 Weather System is a sealed unit and does not require
regular cleaning. However, if you find it necessary to clean the unit, follow
these basic procedures:
• Wipe the module clean with a damp cloth.
• If necessary, use iso-propyl alcohol (IPA) or a mild detergent solution to
remove any grease marks.
Troubleshooting
Your Raymarine product, prior to packing and shipping, has been subjected
to comprehensive test and quality assurance programs. However, if the
unit should develop a fault, please refer to the following section to identify
the most likely cause and the corrective action required to restore normal
operation. If you still have a problem after referring to the following
section, contact your local dealer, national distributor or Raymarine Technical Services Department for further advice.
Status LED
The LED on the connector panel provides valuable information on the
status of your SR100 system.
The LED blinks green while the system is operating normally. If the unit
detects a problem, the LED blinks amber to indicate a warning or red to
indicate an error. The pattern of the LED blink is a code representing the
nature of the problem. For multiple warnings/errors the codes are given in
sequence with a 1.5 second pause between the indications.
The following table shows the LED status codes and their meanings:
LED color LED pattern Description
Green Blinking Normal operation
Amber 1sec ON, 1 sec. OFF Antenna disconnected
Page 20

16 Raymarine SR100 Sirius Weather System - Installation Guide
LED color LED pattern Description
Amber 1 sec. ON, 1 sec. OFF, 1 sec.
ON, 2 sec. OFF
hs
SeaTalk
cable
disconnected
Red Blinking Internal fault
It is normal during the first minute of initial power that the SR100 status
LED shows no activity and remains off. During the second minute the status
LED will start to flash the amber or red fault strings. Typically, during
normal operation, a flashing green LED will occur within 90 seconds of
initial power. If there is no LED indication of any sort displayed after 90
seconds you should check the in-line fuse or circuit breaker.
A blinking red LED indicates an internal fault condition. If this condition
persists contact Raymarine Technical Services.
Accessories
The following accessories are available from your local dealer, national
distributor or Raymarine Customer Service Department:
Part No. Description
E55049
E55050
E55051
E55052
1.5 m SeaTalk
5 m SeaTalk
10 m SeaTalk
20 m SeaTalk
The following accessories are available from your local Shakespeare dealer:
Part No Description
SRS-35 35 ft. antenna cable and connectors
SRS-50 50 ft. antenna cable and connectors
SRS-90 90 ft. antenna cable and connectors
hs
Network cable
hs
Network cable
hs
Network cable
hs
Network cable
Page 21

17
Technical support
www.raymarine.com
United States
Raymarine Technical Support
1-800-539-5539 extension 2444, or
(603) -881-5200
Product Repair and Service
Raymarine Product Repair Center
21 Manchester Street,
Merrimack, NH 03054 - 4801
1-800-539-5539
Opening hours:
Monday through Friday 0815 - 1700
Eastern Standard or Eastern Daylight
Savings Time.
Help us to help you
When requesting service, please quote the following product information:
Equipment type Model number Serial number
D9080-1
Page 22

18 Raymarine SR100 Sirius Weather System - Installation Guide
Appendix A: Technical specification
General
Antenna
Environmental
Waterproof
Operating range
Storage range
Humidity
IPX-2
o
-10
C to + 50oC
o
-20
C to + 70oC
up to 95% at 35oC non-condensing
Receiver
Size 10¾”x 7½” x 2½” (273.3 x 187.2 x 61.7 mm)
Weight 2.2 lbs (1 kg)
Mounting Four keyholed mounting tabs, screws
Power
Voltage
Current
Fuse
Connectors
Reverse polarity protected
9 V to 32 V DC
0.7 A at 9 V (2 A peak)
2A (recommended)
RJ-45 SeaTalk
hs
3 pin Power
4 pin Audio (not used)
SMB RF Antenna
Size Φ 3½” x 4¼”(including mounting flange and
gasket)
Weight 8 oz. (226 g)
Mounting Three countersunk holes, screws
Connector SMB RF
Page 23

19
Appendix B: List of Abbreviations
Abbreviation Description
AWG American Wire Gauge
CF CompactFlash
DC Direct current
EMC Electromagnetic Compatibility
FCC Federal Communications
Commission
ft. feet
IMO International Maritime
Organization
LED Light Emitting Diode
m meters
mm millimeters
USB Universal Serial Bus
VVolts
VHF Very High Frequency
WEEE Waste Electronic and Electrical
Equipment Directive
o
C
Degrees Centigrade
RF Radio Frequency
SMB Sub Miniature B
SOLAS Safety of Life at Sea
Page 24

20 Raymarine SR100 Sirius Weather System - Installation Guide
Page 25

21
Raymarine World Wide Warranty
Raymarine Inc.
APPLICABLE TO PRODUCTS SOLD THROUGH OFFICIAL RAYMARINE INC. DEALERS,
DISTRIBUTORS AND BOAT BUILDERS WITHIN THE AMERICAS AND CARIBBEAN.
Limited warranty
Subject to the terms, conditions and limitations set forth in this U.S. Limited Warranty
(hereinafter the ‘Warranty’), Raymarine warrants that its products, when properly
installed and used, wi ll be free from defects in material and workmanship for a perio d of
twenty-four (24) months (with respect to VHF radios, a period of thirty-six (36) months),
from the date of first purcha se (the ‘Warranty Period’).
For the purposes of this warranty, ‘date of first purchase’ means the date that the product
was purchased by the first retail cu stomer; or in the case of a product installed on a new
vessel by a certified Ra ymarine original equipment manufacturer (a ‘R aymarine OEM’),
the date that such vessel was purc hased by the first retail customer.
Raymarine will, at its sole option, repai r or replace any defective products or components
returned during the Warranty Period in accordan ce with the terms, conditions and
limitations set forth below. Such repairs or replacement will be the sole remedy
of the customer under this Warranty.
Obtaining Warranty Service
Standard Warranty Service
To qualify for standard warranty service the product must be returned to a Raymarinecertified service agent, or directly to Raymarine in person, or by mail (i) within the
Warranty Period, and (I) within thirty (30) da ys of the alleged product failure.Any
products returned by mail must be securely packaged and sent pre-paid and insured to
Raymarine or to a Raymarine-certified service agent. All products, whether returned in
person or by mail, must be accompanied by a copy of the original sales receipt, to be
eligible for standard warranty service.
A list of Raymarine-certified service agents is available from Raymarine Technical Support
or at www.raymarine.com
‘On Board’ Warranty Service
For any Raymarine product or system that (i) has been installed on your vessel by a
Raymarine-certified service agent or by a Raymarine OEM, and (ii) has a MSRP equal to or
greater than USD $2,500, you are eligible to receive warranty service by a Raymarine
certified service agent on-board your vessel (‘On Board Warranty Service’) for a period of
12 months from the da te of first purchase of such product or system, or the d ate of first
purchase of the vessel on which such p roduct or system has been installed (the ‘On Board
Warranty Period’). In order to obtain On Board Warranty Service eligible c ustomers
MUST:
• (i) within the On Board Warranty Period, and (ii) within thirty (30) days from the
date of the alleged f ailure giving rise to the warranty claim for which you are
requesting On Board Warranty Service, contact a local Raymarine-certified service agent and request On Board Warranty Service.
• Present to the Raymarine-certified service agent a copy of the original sales
receipt for the product, togeth er with proof of the date of installation of the
product by a Raymarine-certified service agent. The service agent may at its
sole option, accept or deny such proof of purchase and proof of installation as
sufficient to qualify you for On Board Warranty Service.
Costs associated with travel, mileage, taxi fares, launch or docking fees, aircraft or vehicle
rental, meals, customs, shipping, communication charges, and service agent travel costs
are specifically excluded from coverage under this Warranty and are your resp onsibility.
In addition, this Warranty does not co ver fees associated with haulin g, shipping or
towing your vessel to a Ray marine-certified agent.
Upon the expiration of the On Board Warranty Period, you are still eligible to receive
standard warranty service for the remaining term of the Warranty Period, but will not be
eligible for continued On Board Warranty Service.
Page 26

22
Limitations and Exclusions
In addition to any other limitations and exclusions set forth herein, Raymarine is not
responsible for, and this Warranty does not cover:
• fail ures due to abuse, misuse, accident, unauthorized alteration or repair,
improper installation (whether or not by a Raymarine-certified service agent),
shipping damage or corrosion;
• Co sts associated with routine system checkouts, alignment/calibration, seatrials or commissioning;
• rep air or replacement of consumable items, including, w ithout limitation,
fuses, batteries, drive belts, radar mixer diodes, snap-in impeller carriers, impellers, impeller bearings and imp eller shafts;
• cos ts associated with overtime or premium labor costs;
• d ifferences in material, coloring or size that may exist between actual products
and the pictures or descriptions of such products in our advertising, advertising
literature or on the Internet;
• products purchased by a customer from a United States dealer via the Internet
if such products were not delivered and installed within the United States; or
• the replacement of missing components from the package of any product purchased through an online auction site.
Other conditions
This Warranty is fully transferable provided that you furnish the orig inal proof of purchase
to Raymarine or, in the case of On Board Warranty Service, to a Raymarine-cert ified
service agent. This Warranty is void if the label bearing the serial number has been
removed or defaced.
TO THE EXTENT CONSISTENT WITH STATE AND FEDERAL LAW, THE
FOREGOING WARRANTY IS RAYMARINE’S SOLE WARRANTY AND IS
APPLICABLE ONLY TO NEW PRODUCTS PURCHASED IN THE UNITED STATES
OF AMERICA. THE PROVISIONS OF THIS WARRANTY ARE IN LIEU OF ANY OTHER
WRITTEN WARRANTY, WHETHER EXP RESSED OR IMPLIED, WRITTEN OR ORA L,
INCLUDING ANY WARRANTY OF MERCHANTABILITY OR FITNESS FOR A PARTICULAR
PURPOSE.
THE LIABILITY OF RAYMARINE TO A CUSTOMER UNDER THIS WARRANTY, WHETHER
FOR BREACH OF CONTRACT, TORT, BREACH OF STATUTORY DUTY OR OTHERWISE
SHALL IN NO EVENT EXCEED AN AMOUNT EQUAL TO TEN (10) TIMES THE
MANUFACTURER’S SUGGESTED RETAIL PRICE OF THE PRODUCT GIVING RISE TO SUCH
LIABILITY AND IN NO EVENT SHALL RAYMARINE BE LIABLE FOR SPECIAL, INCIDENTAL,
CONSEQUENT IAL OR INDIRECT DAMAGES.
SOME JURISDICTIONS DO NOT ALLOW EXCLUSION OR LIMITATION OF INCIDENTAL OR
CONSEQUENTIAL DAMAGES SO THE ABOVE LIMITATIONS OR EXCLUSIONS MAY NOT
APPLY TO YOU. THIS WARRANTY GIVES YOU SPECIFIC LEGAL RIGHTS AND YOU MAY
ALSO HAVE OTHER RIGHTS, WHICH VARY FROM JURISDICTION TO JURISDICTION.
This Warranty supersedes and replaces all previous Warranties.
January 2005
Page 27

23
Raymarine UK Ltd.
APPLICABLE TO PROD UCT SOLD THROUGH OFF ICIAL RAYM ARINE UK LTD. DEALERS,
DISTRIBUTORS AND BOAT BUILDERS WITHIN EUROPE, THE MIDDLE AND FAR EAST,
AFRICA AND AUSTRALASIA.
Limited Warranty
The Raymarine warranty terms and conditions as described below do not affect the
customers legal rights and complies with EU Directive 1999/44/EC.
In order to ensure that the p roduct continues to operate efficiently and reliably, we
recommend that, before using the product, the customer carefully reads the Owne r’s
Handbook and follows the advice on the safe and correct operation and use of the
product. We recommend that the Raym arine product is installed by a Raymarine certified
installer. Installation by persons other than a Raymarine certified installer may invalidate
the warranty.
1. Product warranty
1.1 Raymarine warrants each n ew product to be of good materials and workma nship.
Raymarine, or its approved agents, will repair or ex change under warranty any parts or
product proven to be defective in materia l or workmanship under normal use, for a period
of 2 years (24 months) from date of sale to end user, subject to the limits c ontained in this
warranty document.
1.2 The Raymarine warranty covers the parts and labour associated with any warranty
repair as described above, provided that the produ ct is returned to Raymarine or one of its
approved agents.
1.3 Raymarine reserve the right to replace under warranty, not repair, certain Raymarine
products subject to th e limitations below, provided that they are returned to the nearest
Raymarine National Distributor. For details of such products refer to the internet at
www.raymarine.com
2. Onboard warranty
2.1 In addition to the Product warranty cover as described above, Raymarine will,
authorize onboard warranty service by the nearest Raymarine approved service agent,
o r contact your nearest Raymarine National Distributor.
subject to the maximum milea ge and other limits referred to in paragraph 4.12 below, on
products, where proof of in stallation, or commission by Raymarine certified installers,
can be shown.
2.2 The warranty provides for onboard repa ir or exchange of the product, by Raymarine
or its approved service agents, for a period of 2 years (24 months), subject to the limits
contained in this warranty document. In the case of a product in stalled, by a Raymarine
certified OEM installer, on a new boat prior to the sale of the boat to a customer, th e 2year period will begin on the date of the sale of the boat to the customer. In the case of a
product installed, by a Raymarine certified installer, on a boat already in the possession of
the customer, the 2-year period will begin on the date of the commissioning of the
installed product.
2.3 Certain Raymarine products are not covered by onbo ard warranty unless the products
are pre-registered and on board warranty is purchased from the Raymarine certified
installer. For details of such products refer to the internet at
contact your nearest Rayma rine National Distributor.
2.4 The Purchaseable onboard warranty is subject to the limitations below.
www.raymarine.com
or
3.Obtaining warranty service
3.1 In the event of warranty service being required, the customer should contact
Raymarine Technical Support or the nearest Raymarine approved service agent - the
contact details of Raym arine Technical Support and a full list of the names and de tails of
worldwide service agents are available on the internet at
Owner’s Handbook.
3.2 In cases where the customer is requesting a warranty service and a Raymarine
certified installer has not installed the product; i.e. Product warranty, the affe cted product
must be returned to the customer’s local Raymarine approved service agent or dir ec t to
Raymarine with:
3.2.1 proof of purch ase showing the date of purchase and the na me of the
supplier of the product; and
3.2.2 the serial number of the affected product; or
3.2.3 a warranty card com pleted by the product supplier (which will contain
the information required b y paragraphs 3.2.1 and 3.2.2).
www.raymarine.com
and in the
Page 28

24
Subject to the limitations below, the product will be repaired or rep laced (at the discretion
of Raymarine or a Raymarin e Service Agent) at no further cost and promptly returned to
the customer.
3.3 In cases where the customer is making a warranty claim and the product has been
installed by a Raymarin e certified installer, (boat b uilder, installer, dealer etc.) i.e.
Onboard warranty, the nearest Raymarine approved service agent should be contacted
and onboard service requ ested (which will be subject to the limits referred to in
paragraph 4.12 below). Before the onboard warranty service is performed, the customer
must have available:
3.3.1 proof of purchase showing the date of purchase an d the name of the
supplier of the product; and
3.3.2 the serial number of the affected product; or
3.3.3 proof of installatio n of the product by a Raymarine certi fied installer; or
3.3.4 a warranty card completed by the product supplier (which will contain
the information required by p aragraphs 3.3.1 and 3.3.3).
3.4 In cases where onboard warranty has been purchased - as described in 2.3; the
nearest Raymarine approved service agent should be c ontacted and onboard service
requested, information d etailed in 3.3.1 and 3.3.2 is required. Onboard warranty service
will only be performed if the product serial number confirms that the onboard warranty
service has been purchased and is valid.
4. Warranty limitations
4.1 Raymarine warranty polic y does not apply to any product that has been subjected to
accident, abuse or misus e, shipping damage, alterations, corrosion, inc orrect and/or nonauthorized service, or products on which the serial numb er has been altered, mutilated or
removed.
4.2 Certain products do not carry the onboard warranty, as described in section 2 above,
unless the onboard warranty cover is purchased at the time of installation. The
purchaseable onboard warranty is only available on products purchased in specific
territories, for further details refer to the internet at
nearest Raymarine National Distributo r.
www.raymarine.com
or contact your
4.3 Products purchased ou tside the country of installation will not be covered by onboard
warranty.
4.4 Raymarine assumes no responsibility for damage incurred during installation or as a
result of improper installa tion.
4.5 This warranty does not cover routi ne system checkouts, a lignment/calibration,
seatrials or commissioning, unless req uired by replacement of part(s) in the area being
aligned.
4.6 Raymarine assumes no responsibility for damage caused by or to other equipment,
systems or components occasioned by improper or unauthorized connection, or use, of
the product.
4.7 Consumable items, including, but not limited to: fuses, batteries, drive belts, radar
mixer diodes, snap-in impeller carriers, impellers, impeller bearings, and impeller shafts
are specifically excluded from this warranty. A com plete list of the consumable items
relating to each product can be found in the Owner’s Handbook and/ or on the internet at
www.raymarine.com
4.8 All costs associated with tra nsducer replacement, other than the cost of the
transducer itself, are specifically excluded from this warranty.
4.9 Overtime/premium labour porti on of services outside of normal working hours is not
covered by this warranty.
4.10 If repairs are necessary under the warranty, the affected product must be forwarded
to a Raymarine facility or a Raymarine approved service agent, at the owner’s expense.
4.11 The Raymarine warranty does not cover a ny differences in material, coloring or size
between those alluded to in corporate advertising, literature or published on the internet,
which are not spec ifically objected to at the time of delivery.
4.12 Travel costs other than auto mileage, tolls and two (2) hours travel time, are
specifically excluded from the warranty on all products. Costs, which are ex cluded from
the coverage of this warranty, include but are not limited to; taxi fares, launch fees,
aircraft rental, subsistence, customs, shipping, and communications charges etc.
4.13 Neither Raymarine nor a Raymarine service agent shall be liable for any incidental,
indirect, consequential or special (including punitive or multiple) damages, nor shall
.
Page 29

25
Raymarine or a Raymarin e service agent be liable for any loss of profi t, business,
contracts, opportunity, goodwill or other similar loss. The liability o f Raymarine or a
Raymarine service agent to a customer under this warranty, whether for breach of
contract, tort, breach of statutory duty or otherwise, shall not exceed US$1,000,000.
Nothing in this para graph 4.13 shall limit the liability of Raymarin e or a Raymarine
service agent in respect of death or perso nal injury caused by its negligence, fraud or any
other liability which by law, cannot be excluded or limited.
4.14 All Raymarine products sold or provided hereunder are merely aids to navigation. It
is the responsibility of the user to exercise discretion and prop er navigational skill
independent of any Raymarine product.
Document Number 80009_1
January 2005
Page 30

26
Page 31

27
NO STAMP REQUIRED IF POSTED IN THE UK.
21 Manchester Street
Merrimack, NH03054-4801
Note: This information is held by Raymarine only and
shall not be made available to any other companies.
Raymarine may send you mailshots/details of any new
products.
Please tick this box if you do not wish to receive any
further information from Raymarine.
Raymarine UK Limited
Freepost PT 1127
Portsmouth
PO3 5BR
England
Page 32

Owner's name Boat's name/ Boat type/ Location
Mailing address
28
Commissioned by Commissioning date
Installed by Installation date
Purchased from Purchase date
Dealer address
To vailidate the warranty, the customer or dealer must fill in the
requested information below and mail to address shown on front.
Retain the other portion of this card for your records.
Detach and mail this portion within 48 hours.
UK, Europe, Middle and Far East, Africa and
Australasia
Owner's name Boat's name/ Boat type/ Location
Mailing address
Commissioned by Commissioning date
Installed by Installation date
Purchased from Purchase date
Dealer address
Do not distribute my name or information to third parties.
To vailidate the warranty, the customer or dealer must fill in the
requested information below and mail to address shown on front.
Retain the other portion of this card for your records.
Detach and mail this portion within 48 hours.
Americas and the Caribbean
Owner's occupation
Stick barcode label here
Owner's occupation
Stick barcode label here
 Loading...