

Page 1

C-Series Display
New Features
Document number: 81298-1
Date: January 2007
Page 2

C-Series New Features
Trademarks and registered trademarks
Autohelm, HSB, Raymarine, RayTech Navigator, Sail Pilot, SeaTalk and Sportpilot are registered
trademarks of Raymarine Limited. Apelco is a registered trademark of Raymarine Holdings Limited
(registered in all major marketing territories).
AST, Autoadapt, Auto GST, Autoseastate, Autotrim, Bidata, Marine Intelligence, Maxiview, On Board,
Raychart, Raynav, Raypilot, Raystar, ST40, ST60, Seaclutter, Smart Route, Tridata and Waypoint
Navigation are trademarks of Raymarine Limited.
Navionics is a registered trademark of Navionics Company, Italy.
All other product names are trademarks or registered trademarks of their respective owners.
Software in this product is based in part on the work of the Independent JPEG Group.
Contents of this handbook ©Raymarine UK 2006.
Page 3

1
Contents
Chapter 1: New Features of the C-Series Display Unit ..........................................1
1.1 Navionics support .......................................................................................... 1
1.2 Chart application ............................................................................................ 1
1.3 Graphical data ................................................................................................ 1
1.4 Autopilot control ............................................................................................ 1
1.5 Weather (US only) ......................................................................................... 2
1.6 Sirius Audio (US only) .................................................................................. 2
Chapter 2: Chart Application Updates ....................................................................3
2.1 Animated tides and currents .......................................................................... 3
To view tide and current animations ..........................................................3
Controlling the animation ..........................................................................4
2.2 Range rings .................................................................................................... 5
To turn range rings on or off ......................................................................5
2.3 Navionics combined data cards ..................................................................... 6
To display bathymetric information ..........................................................6
Chapter 3: Graphical Data .........................................................................................7
3.1 Compass bar .................................................................................................. 7
Turning the compass bar on and off ...........................................................7
Compass bar setup .....................................................................................8
3.2 Graphical engine data .................................................................................... 8
To set up an engine data page .....................................................................8
Engine tilt and trim ....................................................................................8
Genset data ................................................................................................8
To change the number of gensets ...............................................................9
Chapter 4: Autopilot Control ..................................................................................11
Emergency disengage .............................................................................11
4.1 Enabling and engaging the autopilot ............................................................11
To enable autopilot control ......................................................................11
To engage the autopilot in normal operation ...........................................11
To engage the autopilot from the Setup Menu ........................................ 12
To disengage the autopilot in normal operation ...................................... 12
Emergency disengage ............................................................................ 12
Autopilot Status Indicator ...................................................................... 13
Page 4

C-Series New Features
4.2 The autopilot control screen ........................................................................ 13
4.3 Waypoint arrival .......................................................................................... 14
…when there are more waypoints in your route ..................................... 14
…when you reach the last waypoint in your route ................................. 14
Chapter 5: Weather (US only) .................................................................................17
5.1 Overview ..................................................................................................... 17
5.2 Disclaimer .................................................................................................... 17
5.3 Setting up the weather application ............................................................... 17
Pre-requisites for using the weather application .................................... 18
Adding a weather application ................................................................. 18
Specifying the weather elements displayed ........................................... 18
5.4 The weather display ..................................................................................... 18
5.5 Moving around the weather map ................................................................. 19
5.6 Placing waypoints ........................................................................................ 19
5.7 Weather graphics ......................................................................................... 20
Precipitation (NOWRad) ....................................................................... 21
Storm Cast .............................................................................................. 21
Sea surface temperature (SST) ............................................................... 22
Canadian radar ........................................................................................ 22
Tracking storms ...................................................................................... 22
Lightning ................................................................................................ 23
Surface observation stations ................................................................... 23
City forecasts .......................................................................................... 24
Wind ....................................................................................................... 25
Waves ..................................................................................................... 25
Surface pressure ..................................................................................... 26
Viewing data at a particular location ...................................................... 26
5.8 Animated weather graphics ......................................................................... 26
Setting up animation ............................................................................... 26
Running the animation ........................................................................... 27
5.9 Viewing weather reports .............................................................................. 27
Tropical statements ................................................................................ 27
Marine warnings ..................................................................................... 28
Marine zone forecasts ............................................................................. 28
5.10 Watchbox warnings ..................................................................................... 29
Watchbox warning alerts ........................................................................ 29
Page 5

3
Displaying marine watchboxes .............................................................. 30
Displaying watchbox data ...................................................................... 30
5.11 Weather application setup ............................................................................ 31
Selecting the Weather Setup Menu ......................................................... 31
Weather Setup options ............................................................................ 31
Showing/hiding marine watchboxes and zone boundaries .................... 31
5.12 Troubleshooting ........................................................................................... 32
Chapter 6: Sirius Audio (US only) ...........................................................................33
6.1 To start using Sirius Radio ........................................................................... 33
6.2 Tuning to a channel ...................................................................................... 34
6.3 Browsing channels ....................................................................................... 34
Filtering categories from the browse ...................................................... 35
To filter categories .................................................................................. 35
6.4 Scanning channels ....................................................................................... 35
To scan channels ..................................................................................... 35
6.5 Hiding or showing channels and categories ................................................. 35
To hide or show a channel or category .................................................... 35
6.6 Presets .......................................................................................................... 36
To assign a channel to a preset ................................................................ 36
To delete a channel from a preset ............................................................ 36
To move a channel to a new preset ......................................................... 36
6.7 Parental locking ........................................................................................... 36
To enable blocking ................................................................................. 37
To set up a password ............................................................................... 37
To change an existing password ............................................................. 37
To block a channel .................................................................................. 37
To enter a password ................................................................................ 38
6.8 Favourite song alerts .................................................................................... 38
To enable favourite alerts ....................................................................... 38
To set up a song or artist alert .................................................................. 38
Page 6

C-Series New Features
Page 7
Important information i
Important Information
Intended use
The C-Series display unit can be used in GPS-based or marine radar-based navigation
systems on non-IMO/SOLAS class leisure vessels or small workboats.
This handbook tells you how to operate and maintain the C-Series display effectively.
For information on system integration and how to install the unit, refer to the C-Series
Installation Guide supplied with the display.
Safety notices
WARNING: Navigation Aid
This device is intended to be used as an aid to n avigation. Its
accuracy can be affected by many factors, including equipment
failure or defects, environmental conditions and incorrect
handling or use. It is the user’s responsibility to exercise
common prudence and navigational judgement. This device
should not be relied upon as a substitute for such prudence and
judgement.
WARNING:Product installation
This equipment must be installed in accordance with the instructions in the C-Series System Installation Guide. Failure to do so could result in poor product performance, personal injury and/or damage to the vessel.
WARNING:High voltage
The display unit and scanner unit contain high voltages.
Adjustments require specialized service procedures and tools
only available to qualified service technicians - there are no
user serviceable parts or adjustments. The operator should
never remove the display unit cover or attempt to service the
equipment.
WARNING:Electromagnetic energy The radar scanner transmits electromagnetic energy. Ensure that the scanner has been installed according to the recommendations given in the relevant scanner handbook. Avoid looking directly at the antenna.
Page 8

ii C-Series Display New Features
WARNING:Fishfinder sounder module
Removing the transducer cable from the rear of the fishfinder
sounder module whilst it is switched on can cause sparks. Only
remove the transducer cable after power has been switched
off. Ensure that the sounder module is mounted where it is well
ventilated and in an area free from flammable vapors.
CAUTION: Water Ingress
To prevent the ingress of water and consequent damage to the display, ensure that the chart card door is firmly closed. This can be confirmed by an audible click.
CAUTION: CompactFlash Cards
• Removing the CompactFlash card whilst information is being written to
or read from it may cause damage to the card and loss of all data. Use the
proper procedure detailed on
• Do not save data (waypoints, routes etc.) to a Navionics card as the charts
may be overwritten. When archiving use a different CompactFlash card.
• DO NOT use a metallic instrument such as a screwdriver or pliers to help
you remove a card, as doing this can cause irreparable damage.
page 18
to remove the card.
CAUTION: Global Positioning System Antenna
Do not connect or disconnect the GPS antenna from the display unit whilst power is switched on. Doing this may result in irreparable damage.
CAUTION: UV Light
To provide protection against the damaging effects of UV light, it is advisable to replace the sun cover provided when the display is not in use.
CAUTION: Cleaning the display
Take care when cleaning the display, to avoid damaging it:
(1) Do NOT wipe the display screen with a dry cloth, as this could scratch
(2) Do NOT use acid, ammonia based or abrasive products.
Disclaimer
Electronic charts are an aid to navigation designed to facilitate the use of authorized
government charts, not to replace them. Only official government charts and notices to
mariners contain the current information needed for safe navigation. The Captain is
responsible for their prudent use. The C-Series and its charts do not therefore exclude
the user from carrying the required official charts and documents.
the screen coating.
Raymarine does not warrant that this product is error-free or that it is compatible with
products manufactured by any person or entity other than Raymarine.
Page 9

Important information iii
This product uses digital chart data, bathymetric data, three-dimensional and
photographic imagery, and electronic information from the Global Positioning System
(GPS) which may contain errors. Raymarine does not warrant the accuracy of such
information and you are advised that errors in such information may cause the product
to malfunction. Raymarine is not responsible for damages or injuries caused by your
use or inability to use the product, by the interaction of the product with products
manufactured by others, or by errors in chart data or information utilized by the
product and supplied by third parties.
About this manual
This manual describes how to operate your C-Series display in conjunction with
Navionics cartography. It assumes that all peripheral equipment to be operated with it
is compatible and has been correctly installed.
This manual is intended for users of varying marine abilities, but assumes a general
level of knowledge of display use, nautical terminology and practices.
Technical accuracy
To the best of our knowledge, the technical information contained within this
handbook was correct at the time of printing. However, Raymarine cannot accept
liability for any inaccuracies or omissions it may contain.
Raymarine’s policy of continuous product improvement may mean specifications
change without notice. As a result, Raymarine cannot accept liability for any
differences between the product and this handbook.
Raymarine does not support after-sales or technical support for Navionics chart cards.
If you wish to file a report of an error or omission on a Navionics chart, please provide
the information to the Navionics web site at the link below:
http://www.navionics.com/DiscrepancyReports.asp
Raymarine does not necessarily support all the features in particular Navionics
cartography.
EMC conformance
All Raymarine equipment and accessories are designed to the best industry standards
for use in the recreational marine environment. Their design and manufacture
conforms to the appropriate Electromagnetic Compatibility (EMC) standards, but
correct installation is required to ensure that performance is not compromised.
Page 10

iv C-Series Display New Features
Multi-media chart cards
To use your C-Series Display as a navigation aid, you need charts with the appropriate
level of detail for the geographic area you wish to navigate. The charts are available in
electronic format on Navionics Chart cards.
To check the current availability of Navionics® chart card types and the latest feature
sets, visit www.navionics.com or www.navionics.it.
To obtain Navionics cards, contact your local dealer or visit the Navionics web site.
Alternatively, from anywhere in North America call Navionics toll-free on 1-800-848-
5896. Outside of North America, contact your local dealer or Navionics SpA on:
Phone: (+39) 0584 961696 or Fax: (+39) 0584 961309)
When you archive data, use only SanDisk CF memory cards. Other brands of CF
memory card may not work in your C-Series Display.
Disposal
Waste Electrical and Electronic Equipment (WEEE) Directive
The WEEE Directive requires the recycling of waste electrical and electronic
equipment. Whilst the WEEE Directive does not apply to some of Raymarine’s
products, we support its requirements as part of our environmental policy and
we ask you to be aware of how you should dispose of this product.
The crossed-out wheelie bin symbol found on a product signifies that it should not be
disposed of in general waste or landfill.
Please contact your local dealer, national distributor or Raymarine Technical Services
for information on product disposal.
Page 11

Chapter 1: New Features of the C-Series Display Unit 1
Chapter 1: New Features of the C-Series
Display Unit
This document describes features which have been added to the C-Series display unit
since the C-Series Display Reference Manual (document number 81221-2) was
written. All the content of that manual is still valid, and the features it covers still
operate as described.
You can now listen to Sirius Audio satellite radio broadcasts, view tide and current
animations, and make use of improved weather information. There is also autopilot
integration and improved graphical display of data, including a compass bar.
This document tells you how to use the new functions and features.
For installation information, refer to the C-Series Display Installation Manual
(document number 87020-2).
1.1 Navionics support
In addition to Gold and Platinum, the C-Series now supports the following Navionics
cartography:
• Silver
• Gold Plus
•HotMaps USA
•HotMaps Premium
• Fish ‘N Chip
For more information on Navionics charts, see www.navionics.com.
1.2 Chart application
A new Animate function shows tide and current data in animated sequences. You can
control the way these sequences are played, including setting the date for the
animation. The Chart application also now provides range rings.
1.3 Graphical data
You can now set the display unit to show a compass bar along the top of the screen,
and configure it to display various engine data.
1.4 Autopilot control
If you have a Raymarine autopilot and pilot head installed, you can access some of its
functions from the C-Series display.
Page 12

2 C-Series Display New Features
Note:
The display unit does not replace the pilot head: never use autopilot functions with-
out a pilot head installed.
1.5 Weather (US only)
Note:
The following weather features require the SR50 Sirius Receiver and separate subscrip-
tion.
The weather application superimposes histo rical, live and forecasted weather gra phics
on a world map. It also provides textual forecasts and warnings. These graphics and
their associated weather data enable you to determine the actual conditions in your
vicinity or at a particular location. Weather forecasts and warnings, detailing current
and predicted conditions, are regularly updated.
1.6 Sirius Audio (US only)
Note:
The following audio features require the SR50 Sirius Receiver and separate subscription.
The C-Series can control a Sirius audio receiver, giving you access to satellite radio
channels. You can also make use of features including preset channels, channel scan,
favourite song alerts, and parental locking.
Page 13

Chapter 2: Chart Application Updates 3
Chapter 2: Chart Application Updates
Updates to the Chart application allow you to view tide and current animations for a
24-hour period, set the display unit to overlay range rings on the chart view, and show
bathymetric data included on Navionics combined data cards.
This chapter tells you how to make use of the new Chart application features.
WARNING:Electronic charts are an aid to navigation designed to
facilitate the use of authorized government charts, not to replace
them. Only official government charts and notices to mariners
contain the current information needed for safe navigation. The
captain of the vessel is responsible for their prudent use. The C-Series
and its charts do not exclude the user from carrying the required
official charts and documents.
2.1 Animated tides and currents
You can set the date for the animation and choose to see the whole animation from the
beginning or start it at any point within the 24-hour period. You can also choose to
view the animation continuously or to step through it in increments of time you set.
To view tide and current animations
In the Chart application:
1. Highlight a tide or current icon.
2. Press OK to open the Object Info dialog box and toolbar.
3. Press the ANIMATE… softkey.
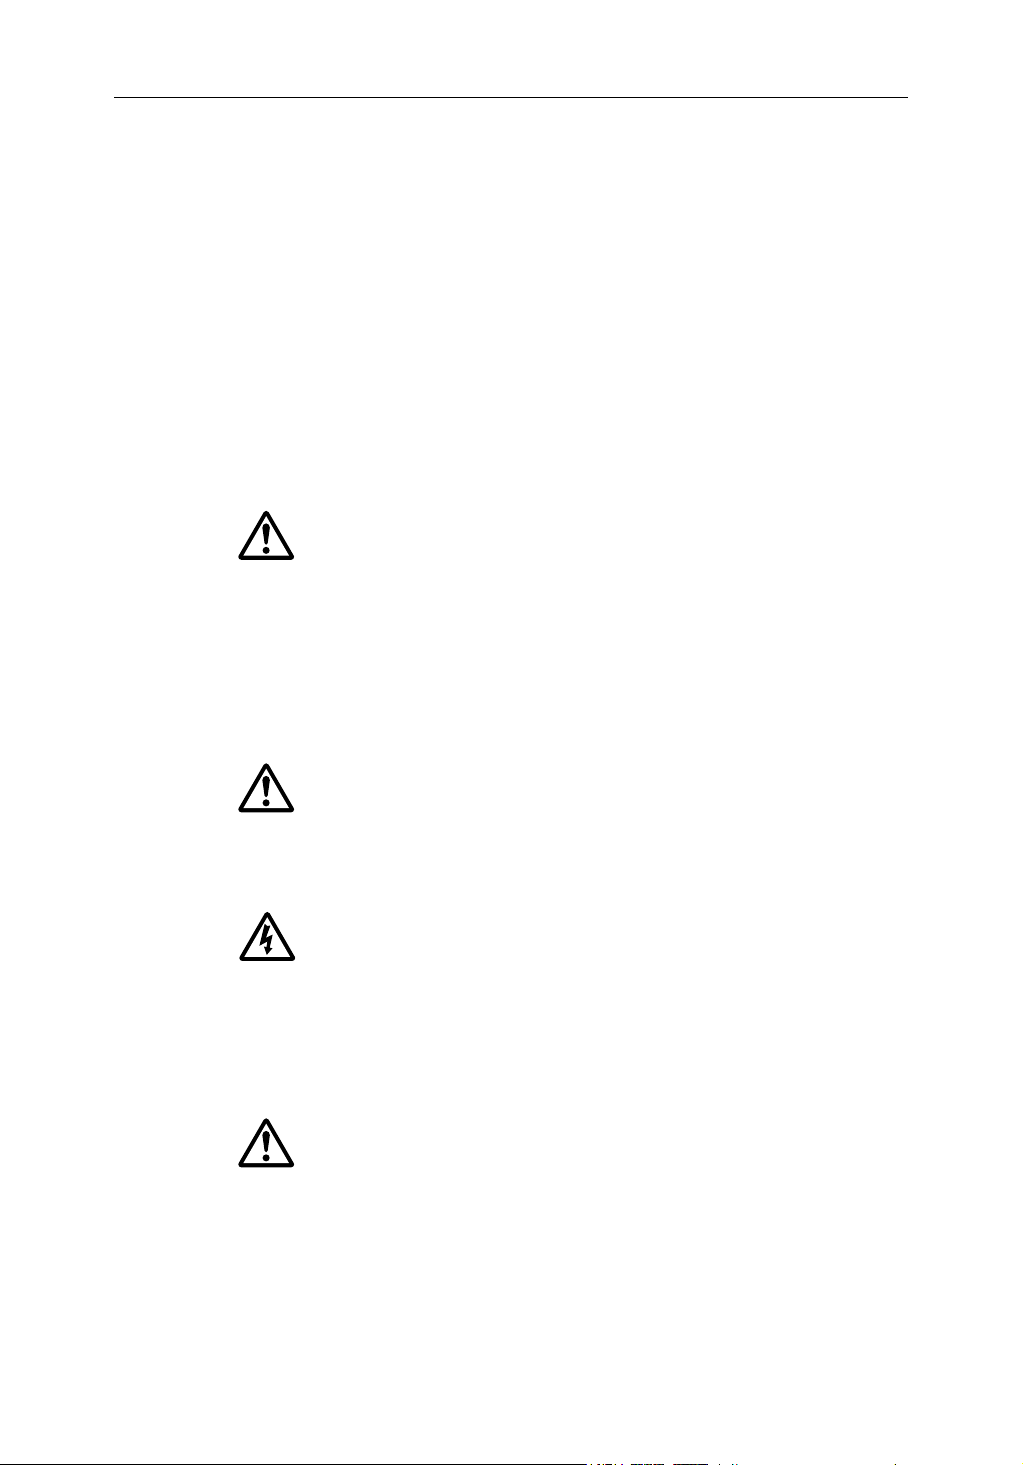
The Tide/Current Animation screen opens with animation paused.
Page 14
4 C-Series Display New Features
Direction and speed of current (green arrows)
Tide height
Press the ANIMATION PLAY/PAUSE softkey to start animation.
Animation time and date are displayed on the status bar; the animation starts from the
current time.
Controlling the animation
When you open the Tide/Current Animation screen, the toolbar provides softkeys to
stop and start the animation; step the animation forwards or backwards in time; set
the size of the step, or select a date for the animation.
The animation plays in a loop: when it reaches the end of a 24-hour animation period,
it starts again at the beginning.
To start or stop the animation
On the Tide/Current Animation screen:
• Press the ANIMATION PLAY/PAUSE softkey.
To view the animation in steps
On the Tide/Current animation screen:
• Press either the STEP BACK or STEP FWD softkeys.
Page 15

Chapter 2: Chart Application Updates 5
To set the step interval
The Set Time Interval softkey gives you control over the Step Forward and Step Back
functions.
1. If the animation is playing, press PAUSE.
2. Press the SET TIME INTERVAL softkey.
This displays a slider with the current time interval shown. Use the rotary controller to
adjust it (within the range of 15 to 120 minutes).
3. Press OK or CANCEL to save the new interval.
Note:
The animation must be paused for the Set Time Interval function to be available.
To set the animation date
1. Press the SET DATE softkey.
This displays the Edit Date screen and toolbar.
Table 2-1: Animation Date Toolbar
TODAY’S DATE Set the animation date to the current date.
PREV DATE Set the animation date to 24-hours previous to current
NEXT DATE Set the animation date to 24-hours ahead of current date.
EDIT DATE Opens the Edit Date pop-up screen: use the trackpad or
2. Press OK to save the new date and return to the Tide/Current Animation screen, which will update to display the tide or current for the date you chose.
Note:
Press CANCEL to ignore the date change and go back to the Tide/Current Animation
screen, leaving the date setting unchanged.
2.2 Range rings
Range rings give you an incremental representation of distance from your vessel to
help you judge distances at a glance. The rings are always centred on your vessel, and
the scale varies to suit your current zoom setting. Each ring is labelled with the distance
from your vessel.
To turn range rings on or off
In the Chart application:
date.
rotary controller to enter the date you want to see an animation for.
1. Press the PRESENTATION softkey.
2. Press the CHART LAYERS softkey.
Page 16

6 C-Series Display New Features
3. Select RANGE RINGS ON/OFF.
2.3 Navionics combined data cards
Some Navionics data cards provide detailed bathymetric information in addition to
standard chart information. You can choose between the standard chart view, or the
view displaying bathymetric contours.
To display bathymetric information
In the Chart application:
1. Press the PRESENTATION softkey.
2. Press the CHART LAYERS softkey.
3. Press the CHART TYPE softkey to toggle between FISH and NAV options.
•The FISH option displays bathymetric information.
•The NAV option displays the standard chart view.
If you select FISH and no data is available for your current position, the databar
displays (FISH) to indicate that you are in that mode but without data.
Page 17
Chapter 3: Graphical Data 7
Chapter 3: Graphical Data
The C-Series now gives you the option to display some navigation and engine data
graphically. You can configure the unit to display a compass bar, and to show
additional engine and genset (engine-driven electricity generator) data.
3.1 Compass bar
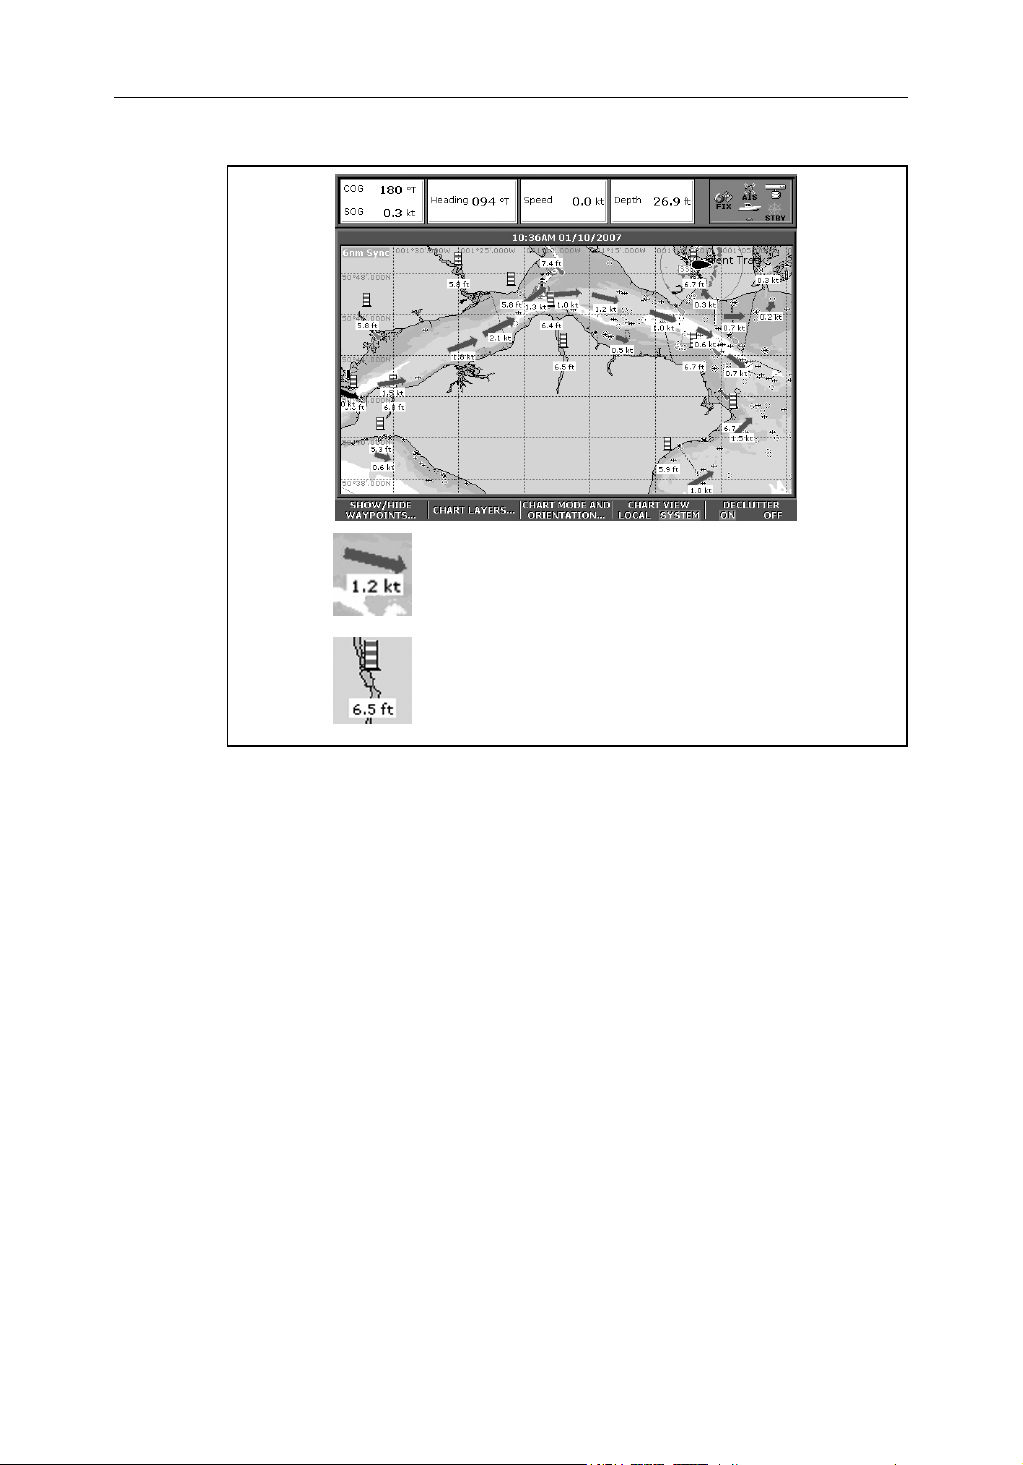
The compass bar gives you a continuous readout centred on your current heading or
course over ground (COG). Arrows at either end of the bar indicate current steer
direction.
Active waypoint
Bearing marker
•In heading mode, the bearing marker is RED.
•In COG mode, the bearing marker is GREEN.
• When you use the compass bar with an active waypoint, the bearing marker is
BLUE and the active waypoint symbol indicates the bearing to your waypoint.
Steer direction
Turning the compass bar on and off
You turn the compass bar on and off from the data toolbar.
• Press the DATA button.
Use the DATABAR softkey to turn the compass bar on or off.
Table 3-1: DATABAR Softkey Options
ON Displays the standard databar, at the top or side of the
screen depending on your setup options.
COMPASS Replaces the standard databar with the compass bar,
displayed along the top of the screen.
OFF Removes both the databar and the compass bar from your
display.
Page 18

8 C-Series Display New Features
Note:
When the compass bar is displayed the transducer icons remain visible in the top-right
section of the screen.
Compass bar setup
The compass bar is set to open in heading mode. To change this setting, press the
MENU button and go to the Databar Setup menu where you can select either Heading
or COG.
Note:
If MOB is activated while the compass bar is open, the compass is replaced with the
MOB toolbar. The compass bar returns when you cancel the active MOB.
3.2 Graphical engine data
You can now display engine tilt and trim data, and data for up to four engine-driven
electricity generators (gensets). You may need to set up a new page (or modify an
existing page set) for this data as an engine application window is not included in the
preconfigured page sets.
To set up an engine data page
1. Press and hold the PAGE button.
2. Select the page set you want to edit by pressing its corresponding softkey.
3. Highlight your preferred page layout and press OK.
4. In the application list, highlight engine and press OK.
Refer to the C-Series Reference Manual for more details on setting up page sets.
Engine tilt and trim
To display engine tilt or trim data:
1. Press the MENU button to open the Setup screen.
2. Select Panel Setup Menu.
3. Select a configuration.
4. Press the SELECT DATA… softkey.
5. In the Data Groups window, select Engine.
6. Select Engine Tilt or Tr im Tabs.
Genset data
To display genset data:
1. Press the SELECT DATA… softkey.
2. In the Data Groups window, select Genset.
Page 19

Chapter 3: Graphical Data 9
For a list of the data you can display for each genset, see
Options
.
Table 3-2, Genset Data
Table 3-2: Genset Data Options
Data Data type Data range
Speed Numeric or gauge —
Total hours Numeric —
Coolant temperature Numeric or gauge with num-
bers
Fuel temperature Numeric or gauge 0–150ºC
Oil pressure Numeric or gauge with num-
bers
Fuel rate Numeric —
Battery voltage Numeric or gauge with num-
bers
Average line voltage Numeric or gauge with num-
bers
0–150ºC
0–300ºF
0–300ºF
0–100 PSI
0–7 bar
0–750 KPa
8–24V
8–24V
Average AC frequency Numeric —
Status Text —
Load Numeric or gauge 0–100%
To change the number of gensets
The default number of gensets is one. You can configure the unit to display data for up
to four gensets:
1. Press the MENU button.
2. Select Panel Setup Menu…
3. Select Number of Gensets.
Page 20

10 C-Series Display New Features
Page 21

Chapter 4: Autopilot Control 11
Chapter 4: Autopilot Control
If you have a Raymarine autopilot installed, you can access some of its functions from
the C-Series display unit.
WARNING:The autopilot functions available on the C-Series display unit do not replace the autopilot control head. You must have a pilot control head installed before you enable or engage the autopilot.
Emergency disengage
You can disable the autopilot using the power key.
1. Press and release the power button.
2. Press the STANDBY softkey.
This puts the autopilot into standby mode.
4.1 Enabling and engaging the autopilot
To allow the C-Series to control autopilot functions, you need to enable autopilot
control on the display unit.
With autopilot control enabled, the unit lets you engage the autopilot whenever it has
a target waypoint. You can see information for the target waypoint on the Pilot Control
pop-up.
The default autopilot setting is
disabled
.
To enable autopilot control
On the C-Series display:
1. Press the MENU button to open the Setup Menu.
2. Select System Setup > System Integration > Autopilot Control >
Enabled.
3. Press the OK button.
To engage the autopilot in normal operation
When the autopilot is enabled, the unit prompts you to engage the autopilot whenever
you initiate a GOTO or FOLLOW ROUTE.
1. Select GOTO or FOLLOW ROUTE to display the Engage Pilot screen.
2. Select ENGAGE PILOT to display the Pilot Control screen.
If you press OK or CANCEL without engaging the autopilot, you go back to the
navigation screen with the autopilot disengaged.
Page 22

12 C-Series Display New Features
When the autopilot is engaged, or you hotspot an active route or waypoint, the toolbar
gives you the following options:
Table 4-1: Active Navigation Toolbar
STOP GOTO/FOLLOW Opens the Pilot Control screen. If the autopilot is in
track mode, the route complete alarm sounds.
ADVANCE WAYPOINT Opens the Pilot Control screen and provides the
AUTO and TRACK softkeys. The screen stays open
until you choose either AUTO or TRACK.
Note:
You can only perform individual advance waypoint operations: it is not possible to per-
form one track command for multiple advance waypoints.
To engage the autopilot from the Setup Menu
At any time, you can open the Pilot Control screen from the Setup menu:
1. Press MENU.
2. On the Setup Menu, select Autopilot Control.
3. Press the ENGAGE PILOT -TRACK- softkey.
Press OK or CANCEL to go back to the previous screen.
To disengage the autopilot in normal operation
You can disengage the autopilot from the Pilot Control screen.
1. Press the STANDBY softkey.
Emergency disengage
Alternatively, if the Pilot Control screen is not displayed, you can disable the autopilot
using the power key.
1. Press and release the power button.
2. Press the STANDBY softkey.
This puts the autopilot into standby mode.
Page 23

Chapter 4: Autopilot Control 13
Autopilot Status Indicator
An indicator in the top-right corner of the display unit tells you the current status of the
autopilot.
Table 4-2: Autopilot status indicators
Icon Autopilot mode
Standby.
Tra ck .
Auto.
No autopilot detected.
Autopilot alarm is active.
4.2 The autopilot control screen
The Pilot Control pop-up screen is displayed when you engage the autopilot in track
mode, at waypoint arrival, or when you select it from the Setup Menu. It gives you:
• Autopilot status
• Live navigation information
• Toolbar with softkeys to control the autopilot
Page 24

14 C-Series Display New Features
For a list of the softkeys available while the Autopilot Control screen is open, see
4-3, Autopilot Control Toolbar
Table 4-3: Autopilot Control Toolbar
AUTO Engage the autopilot and hold the current course (avail-
ENGAGE PILOT
-TRACK-
STANDBY Disengages the autopilot (only available when the autopi-
To go back to the Active Navigation screen without activating AUTO or TRACK, press
OK or CANCEL.
Note:
The STANDBY key replaces the REVIEW AND EDIT THIS ROUTE key.
.
able when the autopilot is in Track or Standby mode).
Track to the current target waypoint.
lot is engaged).
4.3 Waypoint arrival
…when there are more waypoints in your route
The C-Series display:
Table
• sounds the waypoint arrival alarm
• displays the Pilot Control screen, with information about the next waypoint
The toolbar gives you four options:
Press the ENGAGE PILOT -TRACK- softkey to engage the autopilot and continue to
the next waypoint in your route.
Press the CLEAR ALARM softkey to silence the alarm and keep the autopilot engaged
in auto mode, continuing on the current heading.
Press the STANDBY softkey to cancel the alarm and disengage the autopilot.
Press the AUTO softkey to cancel the alarm and engage the autopilot in auto mode.
Note:
If you make no selection within 30 seconds, the Next Waypoint alarm will sound.
…when you reach the last waypoint in your route
The C-Series display:
• sounds the waypoint arrival alarm
• displays the Pilot Control screen with ‘Last Waypoint’ in the Next Waypoint field.
The toolbar gives you three options:
Press CLEAR ALARM to silence the alarm and keep the autopilot engaged in auto
mode, continuing on the current heading.
Page 25

Chapter 4: Autopilot Control 15
Press STANDBY to silence the alarm and disengage the autopilot.
Press AUTO to silence the alarm and continue on the current locked heading with
autopilot engaged.
Page 26

16 C-Series Display New Features
Page 27

Chapter 5: Weather (US only) 17
Chapter 5: Weather (US only)
This application is only available for the Unites States if you have an SR50 Sirius
Receiver installed and separate subscription to the weather service. You can get
weather information for the rest of the world via a Navtex receiver. See the C-Series
Reference Manual for more information.
5.1 Overview
The weather application superimposes histo rical, live and forecasted weather gra phics
on a world map. It also provides textual forecasts and warnings. These graphics and
their associated weather data enable you to determine the actual conditions in your
vicinity or at a particular location. Weather forecasts and warnings, detailing current
and predicted conditions, are regularly updated.
For a basic weather glossary, please refer to the appendix at the rear of this manual. For
types of warnings, watches and advisories, refer to the NOAA website at
www.nws.noaa.gov
5.2 Disclaimer
The following caution is displayed on the C-Series unit each time you power it on if
weather data is being received.
CAUTION: ADVISORY ONLY
The weather information is subject to service interruptions and may
contain errors or inaccuracies and consequently should not be relied
upon exclusively. You are urged to check alternate weather information
sources prior to making safety related decisions. You acknowledge and
agree that you shall be solely responsible for use of the information and
all decisions taken with respect thereto. By using this service, you
release and waive any claims against Raymarine, Sirius Satellite Radio
Inc., WSI, and Navcast Incorporated with regard to this service.
5.3 Setting up the weather application
Before you can use the weather application you need to:
• Obtain a Sirius ID number. (For full details, please refer to your Sirius Installation
handbook.)
• Check the pre-requisites for using the application (see below).
• Customize a page set to include a weather application.
• Specify the weather elements that you wish to display.
Page 28

18 C-Series Display New Features
Pre-requisites for using the weather application
For your C-Series to display weather data, the system must be connected to an SR50
Sirius Receiver which is supplying the appropriate data. For your vessel to be displayed
and for weather reports to be available at your position, you need a fix for your boat’s
position and be within US coastal waters.
Note:
For further information on installing and commissioning a weather receiver, refer to the
SR50 Weather Receiver Installation Guide.
Adding a weather application
A weather application window is not included in the pre-configured page sets. You
therefore need to customize a page set to include one. Refer to the C-Series Reference
Manual for details.
Specifying the weather elements displayed
You can view textual reports or animated graphics and specify the weather elements
that you require:
1. Open a weather application window.
2. Press the DISPLAY GRAPHICS softkey.
3. Select the weather elements to display:
Repeat until all options set as required
Highlight required option
Enter option
Toggle ON or OFF as required
5.4 The weather display
The main features of the weather display are as follows:
OK
OK
D8563-1
Page 29

Chapter 5: Weather (US only) 19
Range Animation time/data
Signal strength
2400 nm Medium
FIND SHIP
DISPLAY
GRAPHICS...
12:00 22/11
ANIMATE
WEATHER...
Weather soft keys
5.5 Moving around the weather map
When you open the Weather application, a world map is displayed. Use the cursor to
move around the map and the range button to zoom in and out. For further details, see
the C-Series Reference Manual.
WEATHER
REPORTS...
PRESENTATION...
Status
bar
Marine
zone
Surface
observation
stations
Wave
heights
D8564_1
Note:
As resolution in the data is lost when you zoom out a long way, zoom in to display more
detail.
To re-centre the map on your boat, use the FIND SHIP soft key.
5.6 Placing waypoints
The waypoint button and its associated soft keys operate as normal when you are in
the weather application but you will need to move the active window to a radar or
chart application in order to see any waypoints that you have placed.
Page 30

20 C-Series Display New Features
5.7 Weather graphics
This section summarizes the weather symbols used within the weather application. For
details of each weather type, please refer to the appropriate section.
Weather symbols
24
22
Storm cast
Lightning
Surface observation stations (pink)
26
22
Storm Tracks symbols
Waves (blues) Canadian radar (Dark greens-yellow)
Or
Wind
Cities (grey)
Sea surface temperature
( green-yellow-orange)
NOWRad (green-yellow-red)
Snow (Blues),Mixture (Pinks)
Hurricane (Category 1-5)
Surface pressure
High / low pressure (blue & red)
Occluded front (purple)
Squall line (red)
Tropical storm
Warm front (red)
Stationary front (red-blue)
Dry line (red)
Tropical disturbance,
tropical depression
Cold front (blue)
Trough (brown)
1010
1012
Isobars (grey)
D8613_1
Page 31

Chapter 5: Weather (US only) 21
Precipitation (NOWRad)
NOWRad displays the type and level of precipitation:
IntensityPrecipitation typeColor code
Light green
Medium green
Dark green
Yellow
Orange
Light red
Dark red
Light Blue
Dark blue
Light pink
Dark pink
Storm Cast
Storm cast arrows indicate the direction
and speed of a storm.
To display details of the storm:
Rain
Rain
Rain
Rain
Rain
Rain
Rain
Snow
Snow
Mixed
Mixed
24
( 15-19 dBz )
( 20-29 dBz )
( 30-39 dBz )
( 40-44 dBz )
( 45-49 dBz )
( 50-54 dBz )
( 55 + dBz)
( 5-19 dBz )
( 20 + dBz )
( 5-19 dBz )
( 20 + dBz )
26
22
D 8569_1
Speed of
storm
Direction
of storm
D8926_1
26
OBJECT INFO
Storm
OK for more info
Position cursor over
Base of storm cast arrow
e.g.
OK
Storm ID
Echo Top
Direction
Speed
Time
Position
Attributes
Storm cast details displayed
Storm cast
VXNO
5.760NM
o
057
T
1.6kl
08:40AM
24o44'.700N/079o40'.440W
Hail Confirmed
D8925_1
Page 32

22 C-Series Display New Features
Sea surface temperature (SST)
The temperature range of the sea surface
is indicated by shading. This shading
ranges through blue/green/yellow/
orange/red.
For details of how to view the sea surface
temperature at a specific point, see
page 26
.
Canadian radar
Canadian radar shows the intensity of precipitation for Canada. Unlike NOWRad,
Canadian radar does not show the precipitation type.
Intensity in mm per hourColor code
D8570_1
Transparent
0.00 to 0.20 mm/hr
(nothing shown at very low precipitation)
Light green
Medium green
Dark green
Yellow
Orange
Light red
Dark red
0.21 to 1.00 mm/hr
1.01 to 4.00 mm/hr
4.01 to 12.00 mm/hr
12.01 to 24.00 mm/hr
24.01 to 50 .00 mm/hr
50.01 to 100 mm/hr
100.01+ mm/hr
Tracking storms
You can use the STORM TRACK function to monitor significant storms in your area.
These include tropical disturbances, depressions, storms and cyclones, hurricanes,
typhoons and super typhoons.
The system displays the track the storm has taken, its current and forecasted position,
the wind radii (current position only), direction and speed of travel.
o
Storm Tracks symbols
These symbols are displayed on screen in three different colours:
Grey - historical, Red - current, Orange - forecast
D 8963_1
Hurricane
(Category 1-5)
Tropical storm
Move the cursor over the symbol for additional information.
Tropical disturbance,
tropical depression
D8931_1
Page 33

Chapter 5: Weather (US only) 23
Tropical storm data
Tropical storm data can be displayed for a selected storm. This includes:
• The storm’s name, type, date and time.
• The position, direction and speed of travel of the storm.
• The pressure and maximum wind speed and gusts.
To display tropical storm data:
Tropical Storm Data
OBJECT INFO
Hurricane Category 2
OK for more info
Move cursor over storm
graphic to display storm
type
OK
Storm name
Storm ID
Storm Type
Direction
Speed
Max Wind Speed
Max gust Speed
Pressure
Date
Time
Position
Displays detailed information for
selected storm
EPSILON
AL292005
Hurricane Category 2
075oT
9.9kt
64.9kt
80.1kt
987mb
12/03/2005
3:00PM
34o30'.000N/044o24'.000W
D8573_1
Lightning
The system displays a lightning symbol at each cloud-to-ground strike recorded within
the last 5, 10 and 15 minutes:
Lightning Strikes
Strike recorded in
More recent strikes
overlay older ones
Strike recorded in
last 10 - 15 minutes
last 0 - 5 minutes
Strike recorded in
last 5 - 10 minutes
D8575_1
Surface observation stations
You can view current or historical weather data at surface observation stations.
All surface observations stations are represented by a pink symbol:
Buoy Station C - MAN WSI NWS
D8975-1
Page 34

24 C-Series Display New Features
To identify the station and display more associated weather data:
e.g.
OBJECT INFO
KSUT
OK for more info
Move cursor over station graphic
OK
Station Data
Time
Wind speed
Wind Direction
Wave Height
Sea Temperature
Visibility
02:36PM
19.4kt
o
t
003
13.1ft
o
50.0
F
0.540nm
Displays detailed information at
selected station
You can now select detailed live weather data for the selected observation station, if
required:
Station Report
KEYW
Key West, FL
METAR Automatic
o
23
33' .000N
o
081
45'.000W
08:26AM
21/12/2005
o
68.4
F
13.53km
-,--kh
-mb
-mb
---
o
036
T
13.0kt
-,-kt
-,-kt
o
-,-
F
-,-ft
-,-ft
--h--m--s
o
---
T
-,-ft
--h--m--s
o
T
---
-,-ft
--h--m--s
Station Data
Time
Wind Speed
Wind Direction
Wave Height
Sea Temperature
Visibility
Note:
Not all data is available for all stations.
02:36PM
19.4kt
o
003
t
13.1ft
o
50.0
F
0.540nm
VIEW FULL
REPORT...
Station ID
Station Name
Station Type
Latitude
Longitude
Time
Date
Air Temperature
Horizontal Visibility
Vertical Visibility
Sea Level Pressure
3 Hour Pressure Change
Pressure Tendancy
Wind Direction
Wind Speed
Peak Wind Speed
Gust Wind Speed
Water Temperature
Tidal Elevation
Wave Height
Wave Period
Dominant Swell Direction
Dominant Swell Height
Dominant Swell period
Lesser Swell Direction
Lesser Swell Height
Lesser Swell Period
D8576_1
D8578_1
City forecasts
The Cities option gives you access to details of city weather forecasts. Up to three
forecasts may be available:
e.g.
OBJECT INFO
OK for more info
Move cursor over city symbol
OK
Forecast for Summer Bay
Forecast for Monday
A mix of clouds and sun. High 22F.
Winds NNE at 5 to 10 mph.
Forecast for Monday night
Mostly coudy skies. Low near 20F.
Winds NW at 5 to 10 mph.
Forecast for Tuesday
Sunshine along with some passing clouds.
High near 25F. Winds NW at 5 to 10.
Displays detailed information for selected
city
D8579_1
Page 35

Chapter 5: Weather (US only) 25
Wind
This option displays the current wind direction and magnitude. You can choose (via the
Weather Setup Menu) to display the wind symbol as either an arrow or a wind barb.
Wind arrows give an indication of wind speed - the larger the arrow the stronger the
wind. Wind barbs give a more precise representation of wind speed:
Wind speed symbols
3-7 kts 8-12 kts 13-17 kts 18-22 kts 23-27 kts 28-32 kts 33-37 kts
53-57 kts
Notes: (1)
For details of how to view actual wind data at a specific point, see page 26.
(2)
For details of how to change the wind symbol, please refer to page 31.
Waves
This option displays the current wave height in 16 levels e.g.
Wave height ranges
Florida
38-42 kts
43-47 kts 48-52 kts
78-82 kts73-77 kts68-72 kts63-67 kts58-62 kts 88-92 kts83-87 kts 98-102 kts93-97 kts
Waves shown in
16 shades of colour from:
Reds - Highest waves
Greens - Intermediate waves
Blues - Lowest waves
etc.
D8571_1
Cuba
For details of how to view actual wave data at a specific point, see
page 26
D8603_1
.
Page 36
26 C-Series Display New Features
D
F'
W
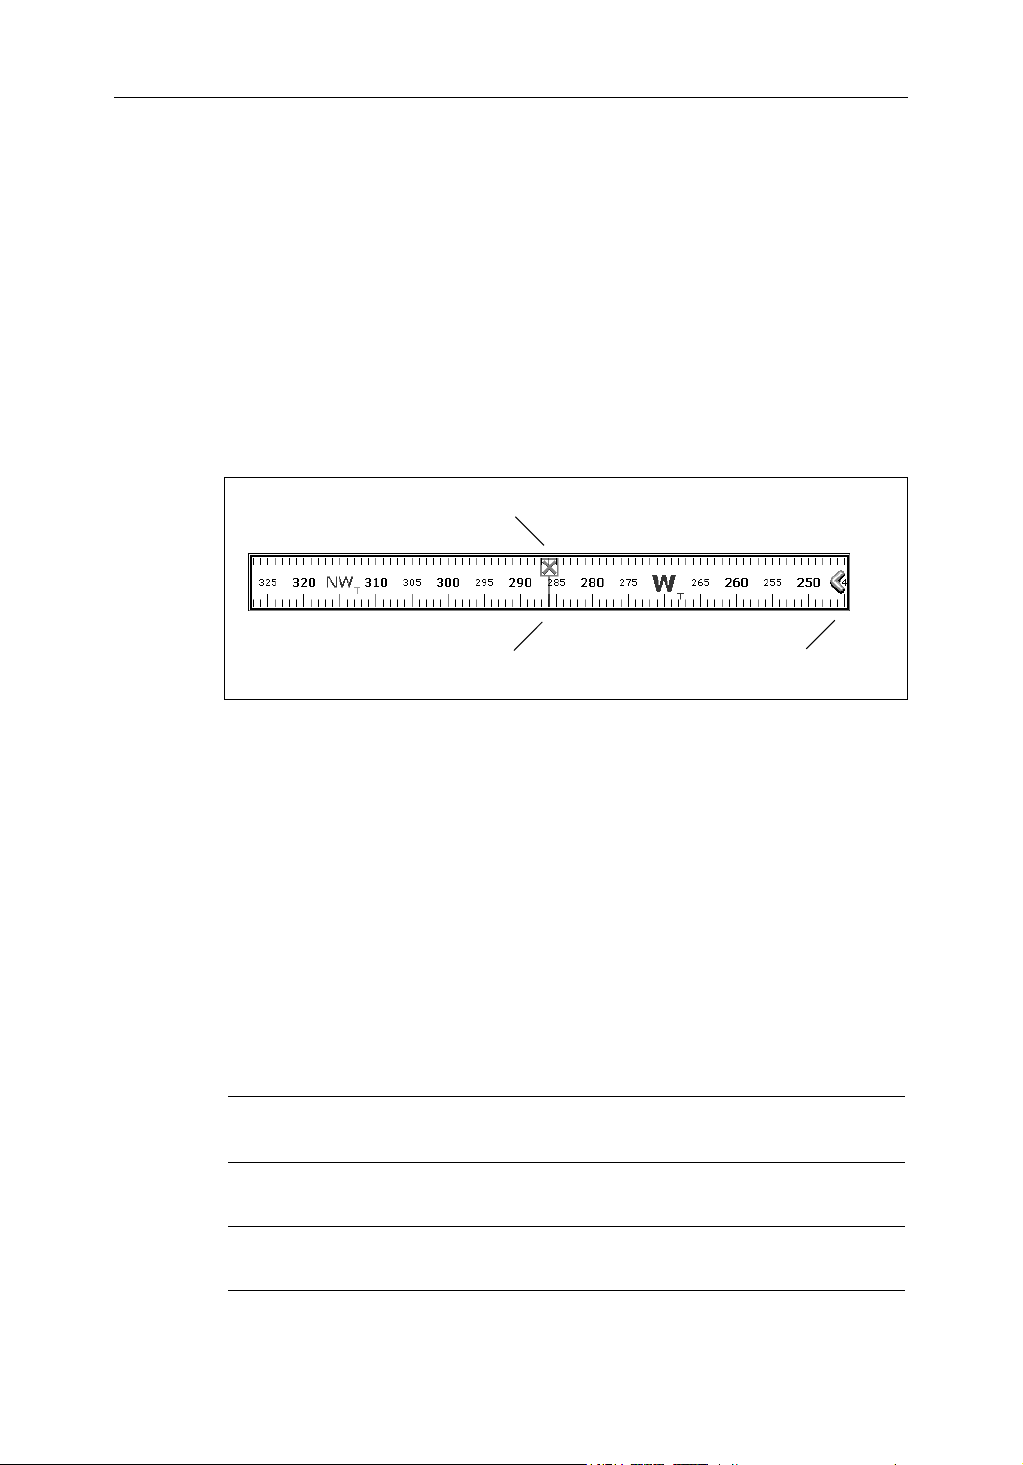
Surface pressure
This option shows surface pressure data using standard meteorological symbols:
High pressure
(blue)
Stationary front
High pressure
(red)
Trough (brown) Isobars (grey)
Squall line (red)
(red-blue)
Viewing data at a particular location
When required you can display the sea temperature, wind speed and direction, wave
height, precipitation intensity and type for a particular location. This also shows the
marine zone at the cursor position:
OK
Move cursor
to required
location
5.8 Animated weather graphics
Cold front (blue)Warm front (red)
Occluded front
(purple)
1010
1012
Dry line (brown)
Weather Info
Zone desription
North Altantic Ocean between 31N and 67N latitude and
between the East Coast North America and 35W lonitude
Zone ID
Precipitation Intensity
Precipitation Type
Sea Surface temperature
Wind Speed
Wind Direction
Wave Height
XXX
<5dBz
None
-.-oF
20.0kt
255
-.-ft
o
T (WSW)
D8651_1
D8572_1
The animated weather option allows you to view an animation from the current time for:
• The forecast for wind, wave or surface pressure.
• The weather radar history loop (NOWRad).
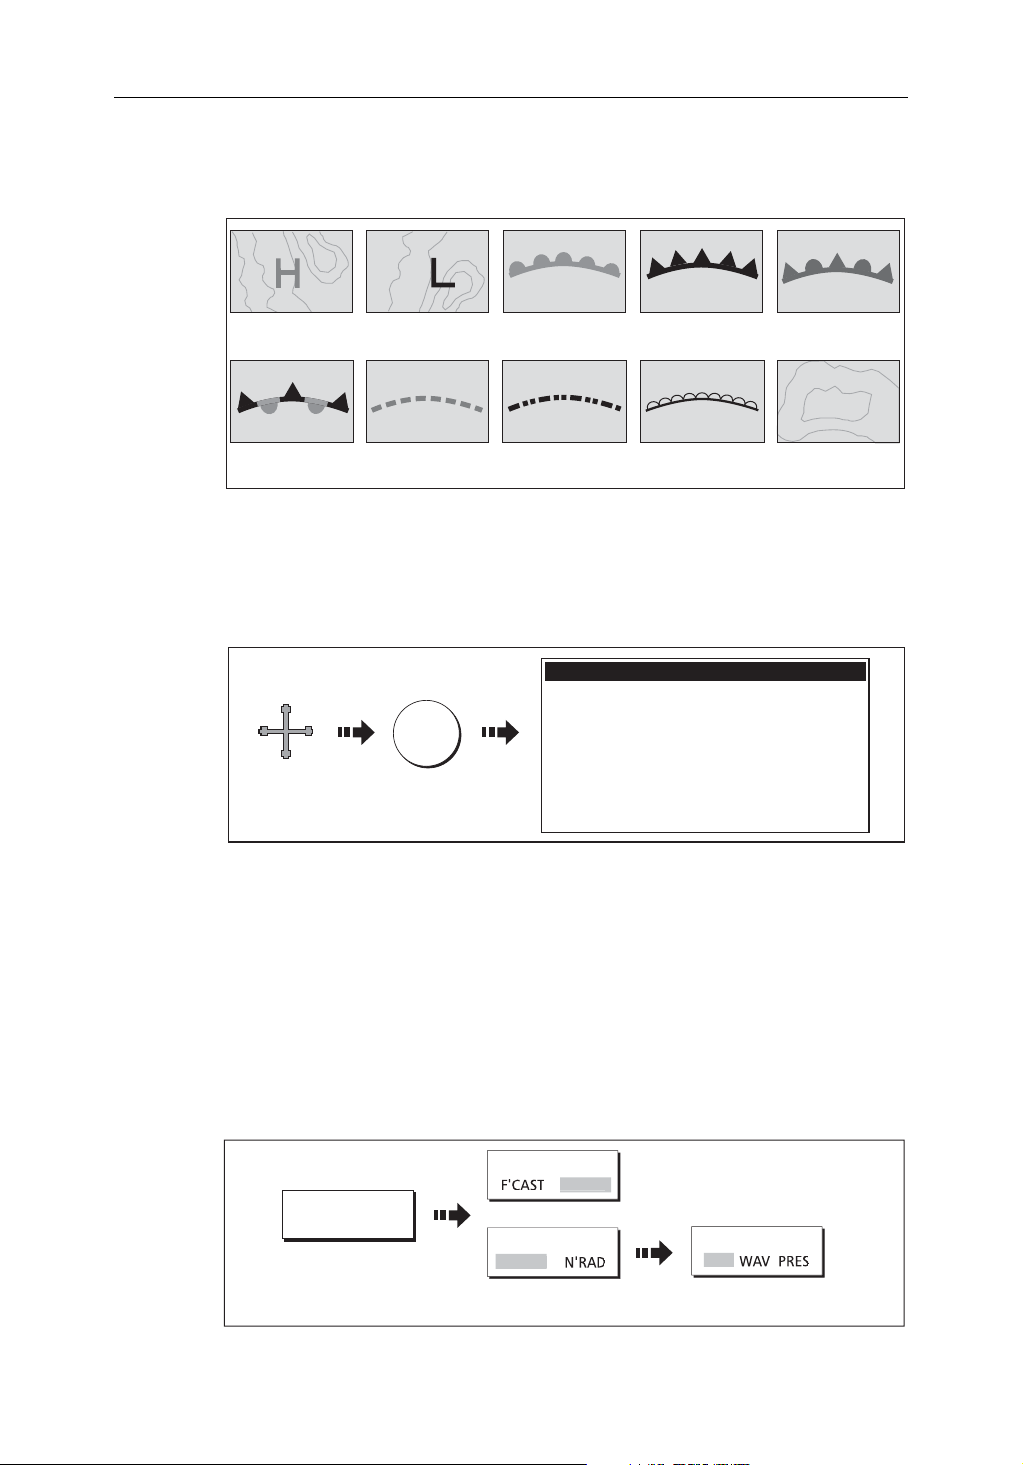
Setting up animation
To setup the animated weather graphic for forecasting (wind, wave or surface
pressure) or for the weather radar history loop:
ANIMATE TYPE
N'RA
ANIMATE
WEATHER...
OR:
ANIMATE TYPE
CAST
Toggle to required
option
FORECAST
IN
Select required
forecast option
D8580_1
Page 37

Chapter 5: Weather (US only) 27
Running the animation
Once you have set the animation type (see previous section) you can run the animation
feature:
ANIMATE
WEATHER...
The status bar indicates the time-frame displayed. The weather radar history provides
up to eight images of data covering the last two hours, at 15-minute intervals.
If at any time you need to pause the animation, for instance to examine the displayed
weather for a particular time frame, press PAUSE.
Notes: (1)
You cannot display information (by moving the cursor over a symbol) when animation is running. The range and trackpad controls do however remain operable
provided the PAUSE option has not been selected. Ranging /panning will cause
the animation to restart.
(2)
The animation will be switched to OFF, whenever the ACTIVE, PAGE, DATA, WPS/
MOB, MENU are pressed or when the animation screen is closed and you return
to the default weather screen.
5.9 Viewing weather reports
Your system will display reports for:
• Tropical statements.
• Marine warnings.
• Marine zone forecasts.
ANIMATE
ON
D8601_1
• Marine watchbox reports.
These weather reports are accessed via the WEATHER REPORTS soft key. Each report
type may contain several bulletins; the window can be scrolled to view all the data.
Tropical statements
To display the reports for the latest tropical weather statements:
WEATHER
REPORTS...
e.g
TROPICAL
STATEMENT
Tropical Statements
D8619_1
Page 38

28 C-Series Display New Features
SHIP
Marine warnings
To display a report for the current warnings (US coastal or near shore):
1. Select the MARINE WARNINGS option:
WEATHER
REPORTS...
MARINE
WARNINGS
2. Display the marine warnings for the zone around your cursor or boat:
Marine Warnings
FORECAST AT
Toggle to required
report position
Marine zone forecasts
These forecasts cover:
• US Coastal Weather Forecasts and Offshore Forecasts and High Seas Forecast, or
• Great Lakes Forecast and Near Shore Forecast, or
• Canadian Coastal Weather Forecast.
To display marine zone forecasts:
1. Select the MARINE ZONE FORECASTS option:
WEATHER
REPORTS...
MARINE ZONE
FORECASTS
D8618_1
D9058_1
D8617_1
2. Display the marine zone forecasts for the area around your cursor or boat:
Marine Zone Forecasts for
FORECAST AT
SHIP
Toggle to required
report position
D9057_1
Page 39

Chapter 5: Weather (US only) 29
5.10 Watchbox warnings
To display available watchbox warnings:
e.g.
Watchbox warnings
WEATHER
REPORTS...
WATCHBOX
WARNINGS
Watchbox warning alerts
When a tornado or thunderstorm warning is received, the system will generate a
watchbox alert:
Warning type and
period for which
warning is valid
Watchbox report
text
Use the trackpad or rotary control to scroll through the report as necessary.
D9012_1
D8606_1
You can set the range for how close to your current position the watchbox must be to
trigger the watchbox alert. The range can be set to OFF; 50; 150; 300; 500 and ALL.
Units vary according to the configuration of your system.
Clearing the alert
To clear an alert, press ACKNOWLEDGE. The alert is removed from the display. The
watchbox warning can still be viewed via the Weather Reports soft keys
Note:
If required, you can switch off the marine watchbox alarm (via the Weather Setup Menu
see page 31) or set the watchbox status to hide. Reports continue to be added to and/or updated in the database irrespective of the status that you have the alarm or show/hide feature set
to.
Page 40

30 C-Series Display New Features
E
Displaying marine watchboxes
When the marine watchboxes feature is set to ON (default), any regions for which a
watchbox is valid are highlighted on the weather map as a red polygon.
Watchbox
warning area
To show/hide watchboxes:
D8608_1
PRESENTATION...
Displaying watchbox data
To display the data relating to a particular watchbox:
1. Position the cursor over the watchbox.
2. Press OK to display the Object Info pop-up screen.
3. Press OK again to display the watchbox data.
WATCHBOX
HID
Toggle as required
D8607_1
Page 41

Chapter 5: Weather (US only) 31
5.11 Weather application setup
When a weather application is the active window, the set up for your weather
application can be changed from the standard configuration to suit your particular
needs. Although you will probably only do this when you first use this application, you
may decide to make subsequent adjustments once you become more familiar with the
system. Any settings that you change are retained even when you power off.
The Weather Setup Menu also provides the User ID for your weather receiver.
Selecting the Weather Setup Menu
To select the Weather Setup Menu:
MENU
Setup
Weather Setup Menu...
GPS Setup...
Compass Setup...
Highlight Weather
Setup menu
Enter Weather
Setup menu
Weather Setup Menu
Sirius Weather User ID 005458747775
Wind Symbol Arrow
Marine Watchbox Alerts 150nm
D8612_1
Weather Setup options
FUNCTION
Description
Sirius Weather User ID
OPTION
(Defaults in bold)
(as advised)
Details the Weather ID obtained from
Sirius and keyed in on your display.
Wind Symbol
Graphic used for wind symbol
Marine Watchbox Alerts
Enables alert when watchbox is issued.
Arrow
Barb
OFF
50nm
150nm
300nm
500nm
ALL
Showing/hiding marine watchboxes and zone boundaries
By default, the weather application displays marine zone boundaries and marine
watchboxes. If required, you can hide these options:
Page 42

32 C-Series Display New Features
SHO
E
MARINE ZONES
W
5.12 Troubleshooting
Problem Reason
Boat symbol not displayed No position fix
FIND SHIP soft key greyed-out No position fix
Boat symbol drawn as a solid circle No heading or COG available
‘No Connection’ message is displayed in the status
bar
PRESENTATION
WATCHBOX
HID
Toggle as required
No signal recei ved fr om SR50;
check cabling and that SR50 is
powered.
OK
D8660_1
Page 43

Chapter 6: Sirius Audio (US only) 33
Chapter 6: Sirius Audio (US only)
If you have a Sirius data receiver installed, you can use the C-Series display unit to
control satellite radio broadcasts. Refer to the SR50 documentation for installation
information.
The C-Series gives you access to basic and advanced audio functions. As well as
listening to radio broadcasts and browsing or scanning channels, you can set up
parental locks to limit access to selected channels and alerts to tell you when a
favourite song is being played.
6.1 To start using Sirius Radio
1. Press MENU.
2. On the Setup Menu, select Sirius Satellite Radio.
The Sirius Radio Control screen opens:
Information contained on the Sirius Radio Control screen includes:
• Current channel name, number and category
• Play data for the current channel
•Date and time
• Receiver ID and signal strength
Use the softkeys and trackpad to control audio functions. Use the rotary controller to
adjust volume.
Page 44

34 C-Series Display New Features
The softkeys give you access to the functions outlined in
Toolbar
.
Table 6-1: Sirius Audio Toolbar
MUTE ON/OFF
PRESETS…
SETUP CHANNELS…
ALERTS…
BROWSE…
6.2 Tuning to a channel
From the Sirius Control screen, you tune to channels using the trackpad on the C-Series
Display (or you can enter preset numbers dir ectly using the alphanumeric keypad if you
have one).
Table 6-1, Sirius Audio
Controls the mute setting.
Displays a list of preset channels and the full channel list with modify options. Use the trackpad or
rotary controller to scroll through the list of presets.
Gives access to the Edit Presets, Edit Alerts, Edit
Channel Access, Scan Channels softkeys.
Lets you set up an alert to tell you when favourite
songs or artists are played on any channel.
Scroll to view play data and to select channels, presets, or categories.
Trackpad up Next channel.
Trackpad down Previous channel.
Trackpad left First channel in the previous category.
Trackpad right First channel in the next category.
6.3 Browsing channels
The browse function allows you to view play data for channels without tuning to them.
To browse channels
1. On the Sirius Audio Control screen, press the BROWSE softkey.
Pressing this key displays the Channel List or Preset List for browsing. Toggle
between the two lists with the VIEW ALL/PRE softkey.
2. Use the rotary controller or trackpad to scroll through the channels.
3. Press the TUNE TO CHANNEL softkey (or the rotary controller) to listen to the selected channel.
To go back to the Sirius Control screen, press OK or CANCEL.
Page 45

Chapter 6: Sirius Audio (US only) 35
Filtering categories from the browse
This feature allows you to choose a category from which to browse channels; other
categories are excluded from the browse.
To filter categories
1. On the Browse screen, press the FILTER BY softkey.
2. Press the SELECT CATEGORY softkey.
3. Using the trackpad or rotary controller, select the category you want to browse.
4. Press OK.
6.4 Scanning channels
The Scan function automatically tunes to all channels in turn.
To scan channels
On the Sirius Radio Control screen:
1. Press the SETUP CHANNELS… softkey.
2. Select SCAN CHANNELS.
3. Use the SCAN ALL/PRE softkey to choose to scan all channels or only preset channels.
4. Press SELECT to stop the scan and listen to the active channel.
6.5 Hiding or showing channels and categories
You can select particular channels and categories to be excluded (hidden) from the
Browse and Scan sequences.
To hide or show a channel or category
On the Sirius Radio Control screen:
1. Press the SETUP CHANNELS… softkey.
2. Select EDIT CHANNEL ACCESS.
3. In the channel list, select the channel you want to hide. If you want to hide a category, select any channel in that category.
4. Toggle between hidden and shown states with either the CHANNEL SHOWN/HIDDEN or CATEGORY SHOWN/HIDDEN softkeys.
Page 46

36 C-Series Display New Features
6.6 Presets
You can assign up to 18 channels to presets to make tuning, scanning and browsing
easier. To assign a channel to a preset, use the PRESETS softkey from the main control
screen or the EDIT PRESETS softkey from any of the following screens:
• Setup channels
•Browse channels
At the Edit Preset Channels screen you can select a preset and assign a channel to it,
move the assigned channel to a different preset, or delete the assigned channel.
Toggle between the Preset Channels list and the Channel List either by using the
trackpad (left/right) or by pressing the appropriate softkey.
To assign a channel to a preset
1. Select an unused preset number from the Preset List.
2. Press the ASSIGN NEW CHANNEL softkey.
3. Select the target channel from the Channel List.
4. Press the ASSIGN TO PRESET softkey.
Note:
If the preset you want to use already has a channel assigned to it, delete the preset first.
To delete a channel from a preset
1. In the Preset Channels list, select the preset you want to clear.
2. Press the DELETE CHANNEL softkey.
To move a channel to a new preset
1. Use the rotary controller or trackpad to select the preset you want to move.
2. Press MOVE TO NEW PRESET.
3. Scroll to the preset you want to move the channel to.
4. Press MOVE TO NEW PRESET.
Note:
You can overwrite a channel that has already been assigned to a preset , but you will be
prompted to confirm the action.
6.7 Parental locking
You can set up blocks on certain channels so that they can only be played if a correct
password is entered. Parental locking must be enabled for the blocks on your selected
channels to be effective.
By default, blocking is not enabled.
Page 47

Chapter 6: Sirius Audio (US only) 37
To enable blocking
On the Sirius Radio Control screen:
1. Press the SETUP CHANNELS softkey.
2. Press the PARENTAL LOCK ON/OFF softkey so that ON is highlighted.
To set up a password
On the Sirius Radio Control screen:
1. Press the SETUP CHANNELS softkey.
2. Press the PARENTAL LOCK softkey to highlight ON.
3. At the Password Setup screen, enter and confirm your password and hint.
Use the rotary controller (or trackpad) to select characters and press the rotary
controller to accept them. Press OK to enter each field.
You can also access the password entry screen by pressing EDIT CHANNEL ACCESS
then CHANNEL ENABLED/LOCKED.
To change an existing password
1. Press the EDIT CHANNEL ACCESS softkey.
2. Press the EDIT LOCKOUT PASSWORD softkey.
3. Enter your old password, then the new password and hint.
To block a channel
On the Sirius Radio Control screen:
1. Press the SETUP CHANNELS softkey.
2. Press the EDIT CHANNEL ACCESS softkey.
3. In the Channel List, select the channel you want to block.
4. Press the CHANNEL ENABLED/LOCKED to highlight LOCKED.
5. Repeat steps 3-4 for each additional channel you want to block.
6. When you blocked all the channels you want, press the CLEAR key.
7. Ensure the parental lock is on (ON is highlighted on the PARENTAL LOCK ON/ OFF softkey).
8. At the prompt, enter your password.
Blocked channels remain visible in channel lists, but you cannot select them with the
trackpad and they are ignored by the scan function. They are marked as locked by an
icon next to the channel name.
Page 48

38 C-Series Display New Features
To enter a password
If you select a blocked channel from the channel list or want to block a channel when
the parental lock is on, you will be asked to enter the password.
1. Use the rotary control or trackpad to enter the password in the entry field.
2. Press OK to enter password.
After three incorrect attempts, the system displays your password hint.
6.8 Favourite song alerts
The favourites feature lets you set the C-Series to alert you when a favourite song or
artist is playing on any channel. You can define up to 10 favourites using the Alerts
softkey.
To enable favourite alerts
On the Sirius Radio Control screen:
1. Press the ALERTS… softkey to open the Edit Alerts screen.
2. Use the ALERTS ON/OFF softkey to toggle favourite alerts on and off.
To set up a song or artist alert
Press the ALERTS softkey to open the Edit Alerts screen. This screen shows ten
favourites and the song playing currently.
You can delete a favourite from the list, add the current song or artist to the list or
switch the favourites alert off.
1. Use the trackpad or rotary controller to select a favourite from the list.
2. If necessary, press DELETE to remove a favourite from the list.
3. Press ADD SONG or ADD ARTIST to assign the song or artist playing to the selected favourite.
If a song or artist is already assigned to the Favourite selected, you will be prompted to
overwrite the existing favourite or cancel.
You can also mark a channel or song as a favourite by pressing the ASSIGN TO
ALERT softkey while scanning.
When alerts are on and the system detects one of your favourites being played on any
channel, it will display an alert and sound the alarm.
• To tune to the channel playing the song, press TUNE TO CHANNEL. To ignore the
alert, press CLEAR ALERT.
Page 49

Appendix B: Abbreviations 39
Appendix A:List of Abbreviations
AIS Automatic Identification System km Kilometer
ALR Alarm kpa Kilo pascals
°C Degrees Centigrade KPH Kilometers per hour
°F Degrees Farenheit kt Knots
amp Amperes
Auto Automatic l litres
CAT Category Lat Latitude
CCFL Cold Cathode Fluorescent Lamp Lon Longitude
CDI Course Deviation Indicator m Metres
COG Course Over Ground Man Manual
C-Up Course up orientation MARPA Mini Automatic Radar Plotting
ky Kiloyards
CPA Closest Point of Approach MMSI Maritime Mobile Service Identity
DC Direct Current MOB Man Overboard
DSC Digital Selective Calling MPH Miles per hour
DSM Digital Sounder Module nm Nautical Mile
EBL Electronic Bearing Line
EMC Electromagnetic Compatibility N-Up North up orientation
ETA Estimated time of arrival OSH Automatic offshore mode
fa Fathoms PSI Pounds per square inch
ft Feet RM Relative motion
FTC Fast Time Constant
gal Gallons
GPS Global Positioning System
HBR Automatic harbor mode SHM Ships Heading Marker
HDFI High Definition Fish Imaging sm Statute Miles
HDG Heading SOG Speed Over Ground
NMEA
RTE Route
ROT Rate of turn
s seconds
Nat.Marine Electronics Association
H-Up Head up orientation SRM Safety Related Message
KHz Kilohertz STDBY Standby
Page 50

40 C-Series Display New Features
STN Channel
TCPA Time to Closest Point of
TM True motion
TTG Time To Go
TVG Time Variable Gain
TX Tra ns mi t
UTC Universal Time Constant
VMG Velocit y Made Good
VRM Variable Range Marker
WPT/ Waypoint/Waypoints
XTE Cross Track Error
Page 51

Appendix C 41
Appendix B: List of cursor labels
Label Feature Application
A/B Ruler line Chart
AIS AIS target Chart
COG Course Over Ground vector Chart
CTR centre of radar Radar
FLT Floating EBL/VRM Radar
GRD Guard zone Radar
HDG Heading vector Chart
MARPA MARPA target Radar
MOB Man Over Board marker Chart and radar
POS Vessel’s position Chart
RTE Route leg Chart
SHM Ship’s Heading Marker Radar
TIDE Tide indicator Chart
VRM/EBL VRM and EBL, 1 or 2 Radar
WIND Wind indicator Chart
WPT Waypoint Chart and radar
Page 52

42 C-Series Display New Features
Page 53

43
A
Abbreviations 39, 41
Alerts
watchbox warnings 29
cancelling
Animation
tides and currents 3–5
weather graphics
running
setting up
Autopilot control
disengaging
enabling
engaging
reaching waypoints
C
Canadian
22
radar
City forecasts
Compass bar
D
Display
weather application
F
Forecasts
24
city
marine zone
G
Glossary 39, 41
Graphics
animated weather 26
running
setting up
L
Lightning 23
M
Marine
alerts
27
zone forecasts
Menus
weather 30
setup options
Moving
around the weather map 19
Multi-media chart cards, see CompactFlash cards
iii
P
Precipitation
NOWRad
29
26
26
26
11–15
12
11
11
14
24
7
18
28
26
26
28
31
20
R
Radar
Canadian
Rain
20
NOWRad
Reports
marine alerts 27
tropical statements
S
Sea
surface temperature
temperature, at particular location
Setup
weather
weather application
Simulator
weather 32
Sirius audio
browsing stations
entering a password
tuning to a station
Snow
20
SST (Sea Surface Temperature)
Statements
tropical
Stations, surface observation
Storm cast
Storms
tracking 22
tropical
Surface observation stations
Surface pressure
Symbols
surface pressure 25
weather
T
Tracking
storms
Tropical statements
Tropical storms
Troubleshooting
weather
W
War ni ng s
marine alerts
watchbox
Watchbox warnings
data
displaying
22
20
30
33–38
27
21
22
25
19
22
22
32
29
30
data
displaying
30
29
27
21
26
17
34
38
34
21
23
23
27
27
29
29
Page 54

C-Series Display New Features
Wav e
height
25
at particular location
Weather
adding application 18
animated graphic
running 26
setting up
animated graphics
display
forecasts
city 24
marine zone
lightning
marine
alerts 27
zone forecasts
moving around map
NOWRad
overview
pre-requisites
radar
Canadian
rain
20
reports
marine alerts
tropical statements
viewing
sea surface temperature
sea temperature
at particular location 26
30
setup
application
options
simulator
20
snow
specifying elements
storm cast
storms
tracking 22
tropical
surface observation stations
surface pressure
symbols
surface pressure
tropical statements
troubleshooting
watchbox
data
displaying
wave height
waves
24
wind
speed and direction
26
18
23
20
17
17
22
27
17
31
32
21
22
19
32
29
30
29
26
25
28
25
26
27
28
18
27
19
25
27
21
26
23
Wind
direction and speed
at particular location
measuring
26
26
24
 Loading...