

Page 1
C-Series Widescreen
Multifunction Display
User reference handbook
C90W, C120W and C140W models
Page 2

Page 3

Trademarksandregisteredtrademarks
Autohelm,HSB,RayT echNavigator,SailPilot,SeaT alkandSportpilotareUKregisteredtrademarksofRaymarineUKLimited.
PathnderandRaymarineareUKregisteredtrademarksofRaymarineHoldingsLimited.45STV,60STV ,AST,Autoadapt,AutoGST ,
AutoSeastate,AutoTrim,Bidata,GSeries,HDFI,LifeT ag,MarineIntelligence,Maxiview,OnBoard,Raychart,Raynav ,Raypilot,RayT alk,
Raystar,ST40,ST60+,Seaclutter,SmartRoute,Tridata,UniControlandWaypointNavigationaretrademarksofRaymarineUKLimited.
Allotherproductnamesaretrademarksorregisteredtrademarksoftheirrespectiveowners.
Copyright©2008RaymarineUKLtd.Allrightsreserved.
ENGLISH
Documentnumber:81312-1
Date:November2008
Page 4

Page 5

Contents
Chapter1ImportantInformation...............................9
Safetynotices...................................................................9
TFTLCDDisplays..........................................................10
Wateringress.................................................................10
Disclaimers....................................................................10
CompactFlashcards.......................................................11
EMCconformance..........................................................11
Suppressionferrites........................................................11
Connectionstootherequipment......................................11
Declarationofconformity.................................................11
Productdisposal.............................................................12
Warrantyregistration.......................................................12
IMOandSOLAS.............................................................12
Technicalaccuracy.........................................................12
Chapter2Handbookinformation............................13
2.1Userreferencehandbookinformation.........................14
2.2Aboutthismanual.....................................................14
Chapter3Gettingstarted........................................15
3.1Multifunctiondisplaysystemintegration......................16
3.2Poweringthedisplayon/off........................................18
3.3Controls....................................................................19
3.4Usingbuttonsandsoftkeys........................................20
3.5Usingthecursor........................................................20
3.6Navigatingpagesandmenus.....................................21
3.7Initialsetup...............................................................25
Chapter4Managingdisplaydata...........................33
4.1CompactFlashcardsoverview...................................34
4.2Writingandretrievingdata.........................................36
4.3TransferringdatausingaPC.....................................37
4.4Operatinganetworkeddisplay...................................37
Chapter5Usingwaypoints.....................................39
5.1Waypoints................................................................40
5.2Howwaypointsareshownindifferent
applications.......................................................41
5.3Waypointplacement..................................................42
5.4Displayingthewaypointlist........................................42
5.5Waypointnavigation..................................................43
5.6Editingawaypoint.....................................................44
5.7Waypointgroups.......................................................46
5.8Passwordprotectingyourwaypoints...........................47
Chapter6Usingthechart........................................49
6.1Chartapplicationoverview.........................................50
6.2Ensuresafenavigation..............................................50
6.3Usingthechartsafely................................................51
5
Page 6

6.4Whatthechartdisplays.............................................51
6.5Chartcards...............................................................52
6.6Chartdatum..............................................................52
6.7Chartsetup...............................................................53
6.8Movingaroundthechart............................................59
6.9Chartpresentation.....................................................60
6.10Locatingyourvesselonthechartdisplay..................72
6.11Waypoints...............................................................73
6.12Routes....................................................................75
6.13Tracks....................................................................82
6.14Measuringdistancesandbearings...........................84
Chapter7Usingthe3Dchart..................................85
7.13Dchartoverview.....................................................86
7.23Dchartsetup..........................................................87
7.33Dchartcards..........................................................88
7.43Dchartdisplayoverview..........................................88
Chapter8Usingautopilotcontrol...........................95
8.1Disengagingtheautopilotinanemergency.................96
8.2Autopilotcontrol........................................................96
8.3Autopilotcontroloptions............................................98
8.4Autopilotalarms........................................................98
Chapter9Usingradar..............................................99
9.1Radaroverview.......................................................100
9.2Radarscannerpowermodes...................................100
9.3Radarrangeandimagequality................................101
9.4Radardisplayoverview...........................................104
9.5Dualrangeradaroperation(digitalscanners
only)...............................................................105
9.6Radarmodeandorientation.....................................106
9.7Radartuning—DIGITALscanners..........................109
9.8Radartuning—ANALOGscanners.........................1 14
9.9Waypoints..............................................................120
9.10Usingradartomeasuredistances,ranges,and
bearings.........................................................121
9.11Usingradartotracktargetsandavoid
collisions.........................................................124
9.12Radaralarms........................................................128
9.13Settingupyourradar.............................................129
Chapter10UsingAIS.............................................133
10.1AISoverview.........................................................134
10.2AISprerequisites...................................................135
10.3ClassesofAISdata...............................................136
10.4EnablingordisablingAIS.......................................137
10.5DisplayingAISvectors...........................................137
10.6AISstatussymbols................................................138
10.7AISsilentmode.....................................................138
10.8ViewingAIStargetinformation...............................139
10.9UsingAIStoavoidcollisions..................................140
6C-SeriesWidescreenuserreference
Page 7

10.10AISoptions.........................................................141
10.11AISalarms..........................................................142
10.12Buddytracking....................................................142
Chapter11UsingtheCourseDeviation
Indicator....................................................145
11.1CourseDeviationIndicatoroverview.......................146
11.2SelectingtheCDIapplication..................................146
11.3UsingtheCDIApplication......................................147
Chapter12Usingtheshnder............................149
12.1Fishnderintroduction...........................................150
12.2Thesonarimage...................................................151
12.3Fishnderpresets..................................................153
12.4Fishnderdisplaymodes.......................................154
12.5Fishnderrange....................................................157
12.6Fishnderpresentationoptions...............................159
12.7Fishnderwaypoints..............................................164
12.8Fishnderalarms...................................................165
12.9Settingupyourshnder.......................................166
Chapter13Usingtheenginemonitor...................171
13.1Enginemonitoroverview........................................172
13.2Displayingtheenginemonitorapplication...............172
13.3Settinguptheenginemonitorapplication................173
13.4Changingwhattheenginemonitordisplays............173
13.5Silencingenginemonitoralarms.............................174
Chapter14Usingthedataapplication.................175
14.1Dataapplicationoverview......................................176
14.2Pre-congureddatainthedataapplication.............176
14.3Customizingthedataapplication............................178
Chapter15Usingtheweatherapplication
(NorthAmericaonly)................................179
15.1Weatherapplicationoverview.................................180
15.2Weatherapplicationsetup......................................180
15.3Weatherapplicationdisplayoverview.....................181
15.4Weathermapnavigation........................................185
15.5Weatherreports....................................................185
15.6Stormtracking.......................................................186
15.7Animatedweathergraphics....................................187
Chapter16UsingSiriussatelliteradio(North
Americaonly)...........................................189
16.1Siriusradiooverview.............................................190
16.2DisplayingtheSiriusradioapplication.....................190
16.3Siriusradiobasicoperations..................................191
16.4Siriusradiopresets................................................192
16.5FavoriteSiriusradiosongalerts.............................193
16.6Siriusradioparentallocking...................................194
Chapter17UsingNavtex.......................................195
17.1Navtexoverview....................................................196
17.2Navtexsetup.........................................................196
7
Page 8

17.3ViewingandManagingNavtexMessages...............197
Chapter18Usingvideo..........................................199
18.1Videoapplicationoverview.....................................200
18.2Displayingthevideoapplication.............................201
18.3Changingthevideoaspectratio.............................201
18.4Adjustingthevideopicture.....................................202
Chapter19DSCVHFradiointegration.................203
19.1UsingaDSCVHFradiowithyourdisplay...............204
19.2EnablingDSCVHFradiointegration.......................205
Chapter20Customizingyourdisplay..................207
20.1Customizingpagesets..........................................208
20.2Customizingthedatabar........................................209
Chapter21Maintainingyourdisplay....................211
21.1Servicingandsafety..............................................212
21.2Routineequipmentchecks.....................................212
21.3Cleaning...............................................................213
21.4Cleaningthedisplaycase......................................213
21.5Cleaningthedisplayscreen...................................214
21.6Resettingyourdisplay...........................................214
22.3Navionicssupport..................................................219
Chapter22T echnicalsupport...............................217
22.1Raymarinetechnicalsupport..................................218
22.2Siriussupport........................................................218
8C-SeriesWidescreenuserreference
Page 9

Chapter1:ImportantInformation
Safetynotices
Warning:Ensuresafenavigation
Thisproduct(includingtheelectroniccharts)is
intendedforuseonlyasanaidtonavigation.Itis
designedtofacilitatetheuseofofcialgovernment
charts,NOTREPLACETHEM.Onlyofcial
governmentchartsandnoticestomarinerscontainall
thecurrentinformationneededforsafenavigation,
andthecaptainisresponsiblefortheirprudentuse.It
istheuser’sresponsibilitytouseofcialgovernment
charts,noticestomariners,cautionandproper
navigationalskillwhenoperatingthisoranyother
Raymarineproduct.
Warning:Productinstallationand
operation
Thisproductmustbeinstalledandoperatedin
accordancewiththeRaymarineinstructionsprovided.
Failuretodosocouldresultinpersonalinjury ,damage
toyourboatand/orpoorproductperformance.
Warning:Productinstallation
Thisequipmentmustbeinstalledinaccordancewith
theRaymarineinstructionsprovided.Failuretodoso
couldresultinpoorproductperformance,personal
injury,and/ordamagetothevessel.
Warning:Highvoltages
Thisproductcontainshighvoltages.DoNOTremove
anycoversorotherwiseattempttoaccessinternal
components,unlessspecicallyinstructedinthis
document.
Warning:Sonaroperation
•NEVERoperatethesounderwiththeboatoutof
thewater.
•NEVERtouchthetransducerfacewhenthesounder
ispoweredon.
•SWITCHOFFthesounderifdiversarelikelytobe
within25ft(5m)ofthetransducer.
Warning:Radarscannersafety
Beforerotatingtheradarscanner,ensureallpersonnel
areclear.
Warning:Radartransmissionsafety
Theradarscannertransmitselectromagneticenergy.
Ensureallpersonnelareclearofthescannerwhen
theradaristransmitting.
ImportantInformation
9
Page 10

Caution:Careofchartcards
Toavoidirreparabledamagetoand/orlossofdata
fromchartcards:
•Ensurethatchartcardsarettedthecorrectway
around.DONOTtrytoforceacardintoposition.
•DONOTsavedata(waypoints,routes,andso
on)toaNavionicschartcard,asthechartsmay
beoverwritten.
•DONOTuseametallicinstrumentsuchasa
screwdriverorplierstoremoveachartcard.
•DONOTremoveachartcardwhileinformation
isbeingwrittentoorreadfromit.
Caution:Ensurechartcarddooris
securelyclosed
Topreventwateringressandconsequentdamage
tothedisplay,ensurethatthechartcarddooris
rmlyclosed.Thiscanbeconrmedbyanaudible
click.
Caution:Cleaning
WhencleaningthisproductdoNOTuseacid,
ammonia-basedorabrasiveproducts,anddoNOT
usehighpressurewashing(jetwash)equipment.
TFTLCDDisplays
Thecolorsofthedisplaymayseemtovarywhenviewedagainst
acoloredbackgroundorincoloredlight.Thisisaperfectlynormal
effectthatcanbeseenwithallcolorLiquidCrystalDisplays(LCDs).
IncommonwithallThinFilmTransistor(TFT)LCDunits,thescreen
mayexhibitafew(lessthan7)wronglyilluminatedpixels.These
mayappearasblackpixelsinalightareaofthescreenorascolored
pixelsinblackareas.
Wateringress
Asitexceedsthewaterproofratingcapacityoutlinedbystandards
IPX6,subjectinganyRaymarineequipmenttocommercial
highpressurewashingequipmentmaycausewaterintrusion
andsubsequentequipmentfailure.Raymarinewillnotwarrant
equipmentsubjectedtohighpressurewashing.
Disclaimers
Thisproduct(includingtheelectroniccharts)isintendedtobeused
onlyasanaidtonavigation.Itisdesignedtofacilitateuseofofcial
governmentcharts,notreplacethem.Onlyofcialgovernment
chartsandnoticestomarinerscontainallthecurrentinformation
neededforsafenavigation,andthecaptainisresponsiblefortheir
prudentuse.Itistheuser’sresponsibilitytouseofcialgovernment
charts,noticestomariners,cautionandpropernavigationalskill
whenoperatingthisoranyotherRaymarineproduct.Thisproduct
supportselectronicchartsprovidedbythirdpartydatasuppliers
whichmaybeembeddedorstoredonmemorycard.Useofsuch
chartsissubjecttothesupplier’sEnd-UserLicenceAgreement
includedinthedocumentationforthisproductorsuppliedwiththe
memorycard(asapplicable).
10C-SeriesWidescreenuserreference
Page 11

Raymarinedoesnotwarrantthatthisproductiserror-freeorthatit
iscompatiblewithproductsmanufacturedbyanypersonorentity
otherthanRaymarine.
Thisproductusesdigitalchartdata,andelectronicinformationfrom
theGlobalPositioningSystem(GPS)whichmaycontainerrors.
Raymarinedoesnotwarranttheaccuracyofsuchinformationand
youareadvisedthaterrorsinsuchinformationmaycausethe
producttomalfunction.Raymarineisnotresponsiblefordamages
orinjuriescausedbyyouruseorinabilitytousetheproduct,bythe
interactionoftheproductwithproductsmanufacturedbyothers,or
byerrorsinchartdataorinformationutilizedbytheproductand
suppliedbythirdparties.
CompactFlashcards
CorrectinstallationisrequiredtoensurethatEMCperformanceis
notcompromised.
Suppressionferrites
Donotremoveferrite
Raymarinecablesmaybettedwithsuppressionferrites.These
areimportantforcorrectEMCperformance.Ifaferritehastobe
removedforanypurpose(e.g.installationormaintenance),itmust
bereplacedintheoriginalpositionbeforetheproductisused.
Useonlyferritesofthecorrecttype,suppliedbyRaymarine
authorizeddealers.
Navionicschartcards
TheDisplayispre-loadedwithNavionicschartdata.Ifyouwishto
usedifferentchartdata,youcaninsertNavionicschartcardsinto
theCompactFlashcardslotontheunit.
Usebrandedchartcards
Whenarchivingdata,RaymarinerecommendstheuseofSanDisk
CFmemorycards.OtherbrandsofCFmemorycardmaynotwork
inyourunit.
EMCconformance
BasicEMCconformancestatement.
Raymarineequipmentandaccessoriesconformtotheappropriate
ElectromagneticCompatibility(EMC)regulationsforuseinthe
recreationalmarineenvironment.
ImportantInformation
Connectionstootherequipment
Requirementforferritesonnon-Raymarinecables
IfyourRaymarineequipmentistobeconnectedtootherequipment
usingacablenotsuppliedbyRaymarine,asuppressionferrite
MUSTalwaysbeattachedtothecableneartheRaymarineunit.
Declarationofconformity
RaymarineLtd.declaresthattheC-SeriesMultifunctionDisplays
areincompliancewiththeessentialrequirementsofEMCdirective
2004/108/EC.
11
Page 12

TheoriginalDeclarationofConformitycerticatemaybeviewedon
therelevantproductpageatwww.raymarine.com
Productdisposal
DisposethisproductinaccordancewiththeWEEEDirective.
TheWasteElectricalandElectronicEquipment(WEEE)
Directiverequirestherecyclingofwasteelectricalandelectronic
equipment.WhilsttheWEEEDirectivedoesnotapplytosome
Raymarineproducts,wesupportitspolicyandaskyoutobeaware
ofhowtodisposeofthisproduct.
Warrantyregistration
ToregisteryourRaymarineproductownership,pleasetakeafew
minutestolloutthewarrantyregistrationcardfoundinthebox,or
visitwww.raymarine.comandregisteron-line.
Itisimportantthatyouregisteryourproducttoreceivefullwarranty
benets.Yourunitpackageincludesabarcodelabelindicatingthe
serialnumberoftheunit.Y oushouldstickthislabeltothewarranty
registrationcard.
Technicalaccuracy
Tothebestofourknowledge,theinformationinthisdocumentwas
correctatthetimeitwasproduced.However,Raymarinecannot
acceptliabilityforanyinaccuraciesoromissionsitmaycontain.In
addition,ourpolicyofcontinuousproductimprovementmaychange
specicationswithoutnotice.Asaresult,Raymarinecannotaccept
liabilityforanydifferencesbetweentheproductandthisdocument.
IMOandSOLAS
Theequipmentdescribedwithinthisdocumentisintendedforuse
onleisuremarineboatsandworkboatsnotcoveredbyInternational
MaritimeOrganization(IMO)andSafetyofLifeatSea(SOLAS)
CarriageRegulations.
12
C-SeriesWidescreenuserreference
Page 13

Chapter2:Handbookinformation
Chaptercontents
•2.1Userreferencehandbookinformationonpage14
•2.2Aboutthismanualonpage14
Handbookinformation13
Page 14

2.1Userreferencehandbookinformation
2.2Aboutthismanual
ThishandbookcontainsimportantinformationonusingtheC-Series
Widescreenrangeofmultifunctiondisplays.
Thehandbookisforusewiththefollowingmodels:
•C90WWidescreenMultifunctionDisplay
•C120WWidescreenMultifunctionDisplay
•C140WWidescreenMultifunctionDisplay
C-Serieshandbooks
TheC-SeriesWidescreenMultifunctionDisplayhasthefollowing
handbooksavailable.
AlldocumentsareavailabletodownloadasPDFsfrom
www.raymarine.com
C-Serieshandbooks
DescriptionPartnumber
Installationandcommissioning
instructions
Operatinginstructions(quick
reference)
Userreferencehandbook
87101
86135
81312
Thismanualdescribeshowtooperateyourmultifunctiondisplayin
conjunctionwithNavionicscartography.
Itassumesthatallperipheralequipmenttobeoperatedwithitis
compatibleandhasbeencorrectlyinstalled.Thismanualisintended
forusersofvaryingmarineabilities,butassumesagenerallevelof
knowledgeofdisplayuse,nauticalterminologyandpractices.
Additionalhandbooks
DescriptionPartnumber
ng
SeaTalk
14
referencemanual
81300
C-SeriesWidescreenuserreference
Page 15

Chapter3:Gettingstarted
Chaptercontents
•3.1Multifunctiondisplaysystemintegrationonpage16
•3.2Poweringthedisplayon/offonpage18
•3.3Controlsonpage19
•3.4Usingbuttonsandsoftkeysonpage20
•3.5Usingthecursoronpage20
•3.6Navigatingpagesandmenusonpage21
•3.7Initialsetuponpage25
Gettingstarted
15
Page 16
3.1Multifunctiondisplaysystem
MENU
CH
OK
16/9
HI/LO
SCAN WATCH
SQ
RAY240
WX
11.18.02
Weather receiver
External GPS
Personal
Computer
Fishfinder
DSM 30 & 300
SeaTalk
hs
switch
Instruments
Autopilot
AIS receiver
DSC VHF
C-Series display
Additional
C-Series display
Video/Camera
D11522_1
Digital Open Array radar scanner
Digital Radome scanner
or
integration
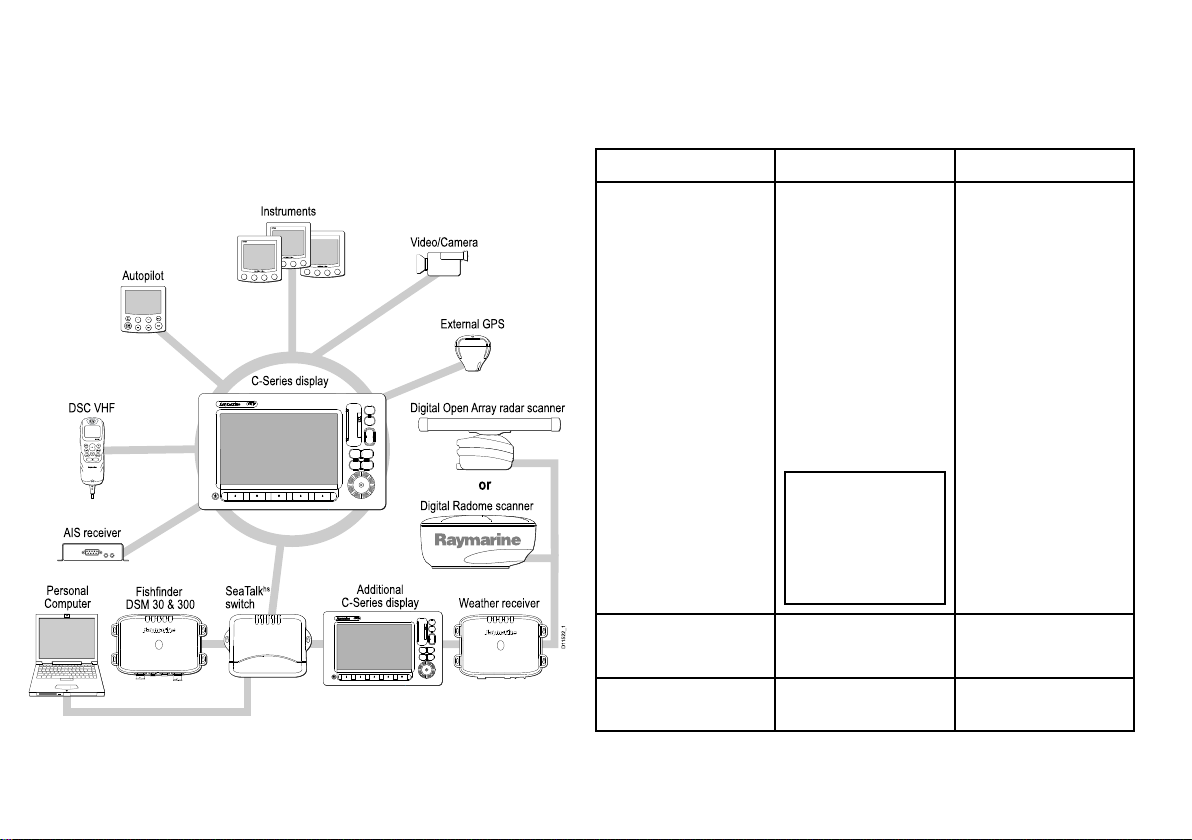
Youcanconnectanumberofexternaldevicestoyourmultifunction
display,providingadditionalfeaturesandfunctions.
Thefollowingdiagramillustratesthevariousexternaldevicesthat
canbeconnectedtoyourmultifunctiondisplay:
Yourmultifunctiondisplayusesanumberofprotocolstotransfer
databetweenthevariousdevicesinyournetworkedsystem.The
followingtabledetailswhichdevicesmaybeconnectedtoyour
display,andthetypeofconnectivity(intermsofprotocolsand
physicalinterfaces)thattheyusetoexchangedatawiththedisplay:
DeviceTypeSuitableDevicesConnectivity
Radar
•ONE4kilowattDigital
hs
SeaTalk
RadomeScanner ,
OR
•ONE4kilowattHD
DigitalOpenArray
Scanner,OR
•ONE4kilowattSHD
DigitalOpenArray
Scanner,OR
•ONE12kilowattSHD
DigitalOpenArray
Scanner
Note:HDand
SHDOpenArray
Scannersmust
beusingsoftware
versionV2.23or
later.
16C-SeriesWidescreenuserreference
Fishnder•ONEDSM30,OR
•ONEDSM300
Cartography—includedEmbedded(internal)
Navionicscartography
SeaTalk
Internalstorage
hs
Page 17

DeviceTypeSuitableDevicesConnectivity
Cartography—optional
ExternalNavionics
CompactFlashchart
card(includingPlatinum
level)
SiriusWeather/AudioSiriusSR100onlySeaTalk
AISAIS250,AIS500,or
AISClassAorClassB
receiver/transceiver
NavtexNavtexReceiver
FastHeadingSensorFastHeadingSensor
GPS—externalRaystar125GPSor
third-partyexternalGPS
receiver
InstrumentsAllcurrentRaymarine
instruments
Autopilot—RaymarineAllcurrentRaymarine
autopilots
Autopilot—thirdpartyThird-partyautopilots
VHFradio
RaymarineDSCVHF
radios
AdditionalMultifunction
Display
ONEC90W,C120W,or
C140W
Video/cameraCompositePALorNTSC
videosource
CompactFlashcardslot
hs
NMEA0183
NMEA0183(Navtex
protocol)
NMEA0183
SeaTalk,SeaT alk
NMEA0183
SeaTalk,SeaTalk
SeaTalk,SeaTalk
NMEA0183(waypoint
andbearinginformation)
NMEA0183,SeaT alk
SeaTalk,SeaTalk
ng
SeaTalk
BNCconnector
DeviceTypeSuitableDevicesConnectivity
Raytechcharting
software
ng
,or
ng
ng
hs
,
Raytechsoftware
versionV6.1
hs
SeaTalk
Gettingstarted
17
Page 18

3.2Poweringthedisplayon/off
Poweringthedisplayon
1.PressandholdthePOWERbuttonuntiltheRaymarinelogo
appears.
2.PressOKtoacknowledgethewarningwindow.
PoweringtheDisplayOff
1.PressandholdthePOWERbuttonuntilthecountdownreaches
zero.
Note:IfthePOWERbuttonisreleasedbeforethecountdown
reacheszero,thepoweroffiscancelled.
18C-SeriesWidescreenuserreference
Page 19
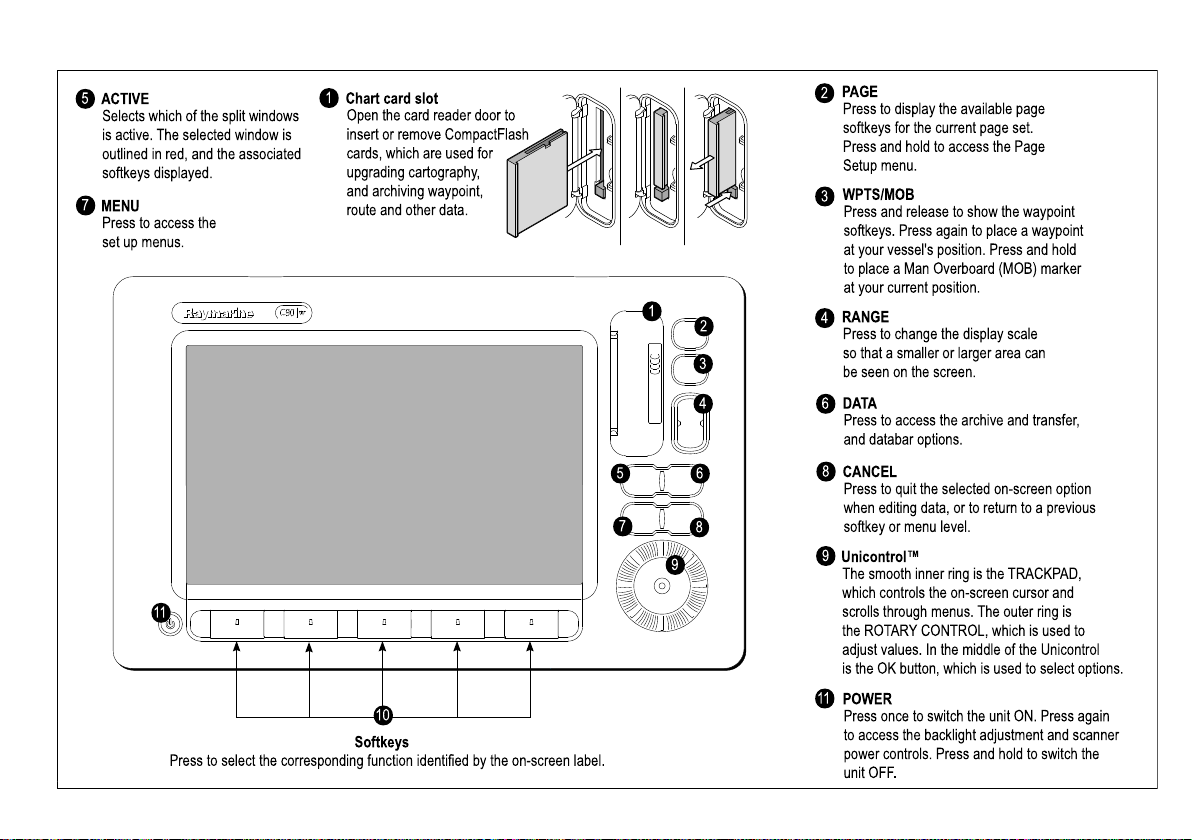
3.3Controls
Unicontrol™
The smooth inner ring is the TRACKPAD,
which controls the on-screen cursor and
scrolls through menus. The outer ring is
the ROTARY CONTROL, which is used to
adjust values. In the middle of the Unicontrol
is the OK button, which is used to select options.
ACTIVE
Selects which of the split windows
is active. The selected window is
outlined in red, and the associated
softkeys displayed.
MENU
Press to access the
set up menus.
RANGE
Press to change the display scale
so that a smaller or larger area can
be seen on the screen.
PAGE
Press to display the available page
softkeys for the current page set.
Press and hold to access the Page
Setup menu.
WPTS/MOB
Press and release to show the waypoint
softkeys. Press again to place a waypoint
at your vessel's position. Press and hold
to place a Man Overboard (MOB) marker
at your current position.
DATA
Press to access the archive and transfer,
and databar options.
CANCEL
Press to quit the selected on-screen option
when editing data, or to return to a previous
softkey or menu level.
Chart card slot
Open the card reader door to
insert or remove CompactFlash
cards, which are used for
upgrading cartography,
and archiving waypoint,
route and other data.
Softkeys
Press to select the corresponding function identified by the on-screen label.
1
2
3
4
5 6
7
8
9
10
1
2
3
4
5
6
7
8
9
11
11
POWER
Press once to switch the unit ON. Press again
to access the backlight adjustment and scanner
power controls. Press and hold to switch the
unit OFF.
Gettingstarted
19
Page 20
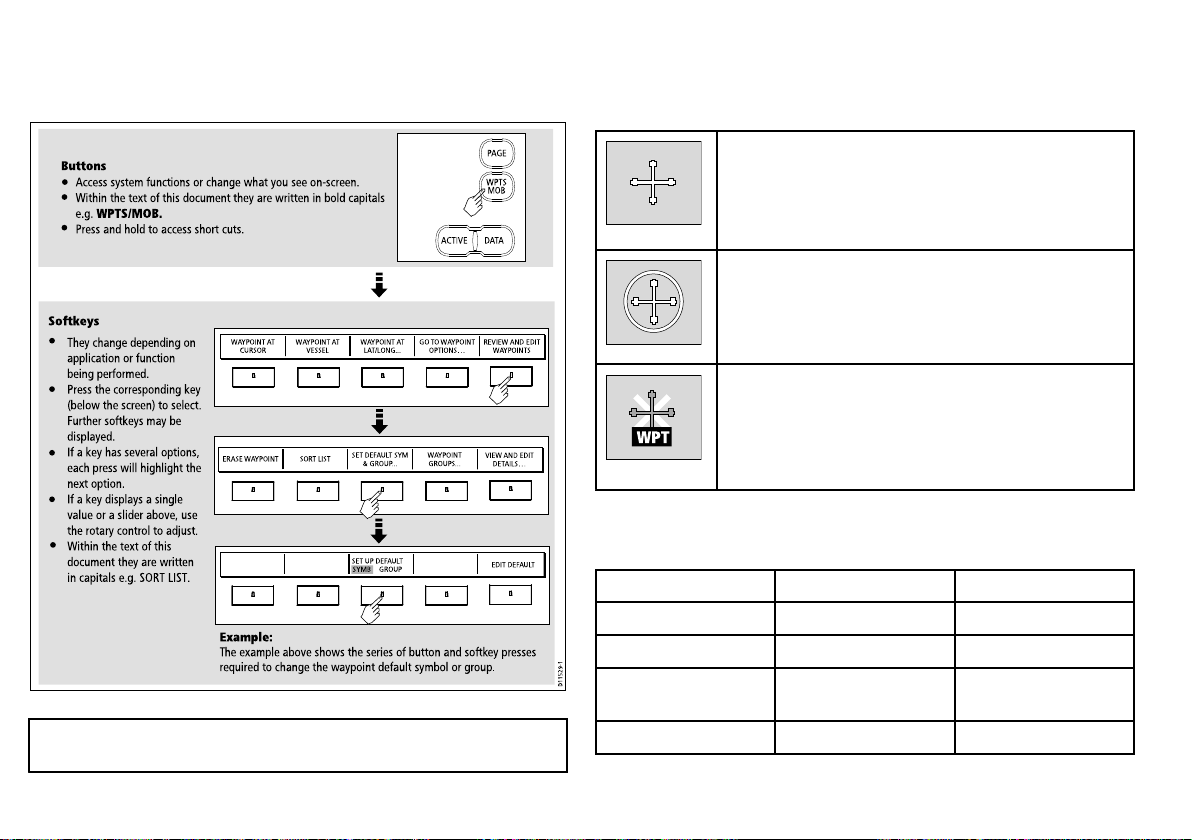
3.4Usingbuttonsandsoftkeys
WAYPOINT AT
CURSOR
WAYPOINT AT
VESSEL
WAYPOINT AT
LAT/LONG...
GO TO WAYPOINT
OPTIONS…
REVIEW AND EDIT
WAYPOINTS
ERASE WAYPOINT SORT LIST
SET DEFAULT SYM
& GROUP...
WAYPOINT
GROUPS...
VIEW AND EDIT
DETAILS…
EDIT DEFAULT
SET UP DEFAULT
SYMB GROUP
D11529-1
Example:
The example above shows the series of button and softkey presses
required to change the waypoint default symbol or group.
Access system functions or change what you see on-screen.
Within the text of this document they are written in bold capitals
e.g. WPTS/MOB.
Press and hold to access short cuts.
They change depending on
application or function
being performed.
Press the corresponding key
(below the screen) to select.
Further softkeys may be
displayed.
If a key has several options,
each press will highlight the
next option.
If a key displays a single
value or a slider above, use
the rotary control to adjust.
Within the text of this
document they are written
in capitals e.g. SORT LIST.
Buttons
Softkeys
PAGE
ACTIVE DATA
WPTS
MOB
D7366_3
D7368_2
D7369-2
WPT
3.5Usingthecursor
Thefollowingdiagramshowsyouhowtoselectfunctionsusingthe
buttonsandsoftkeys:
IntheChartandRadarapplications,thecursorisusedtomove
aroundthescreen:
Thecursorappearsonthescreenasawhitecross.
Ifthecursorhasnotbeenmovedforashortperiodoftime,
itchangestoacirclewithacrossinit,tomakeiteasierto
locateonthescreen.
Thecursoriscontext-sensitive-whenitisplacedoveran
objecte.g.awaypointorchartfeature,itchangescoloranda
labelorinformationassociatedwiththeobjectisdisplayed.
Note:Todisabletheaudible"beep"thatyouhearwhenabutton
orsoftkeyispressed,gotoMenu>DisplaySetup>KeyBeep.
20C-SeriesWidescreenuserreference
Listofcursorlabels
LabelFeatureApplication
A/B
AISAIStargetChart
COGCourseOverGround
CTRCenterofradar
Whenyouplacethecursorovercertainitems,thesoftkeys
changetoenableyoutoaccessrelatedoperations.
Rulerline
Chart
Chart
vector
Radar
Page 21
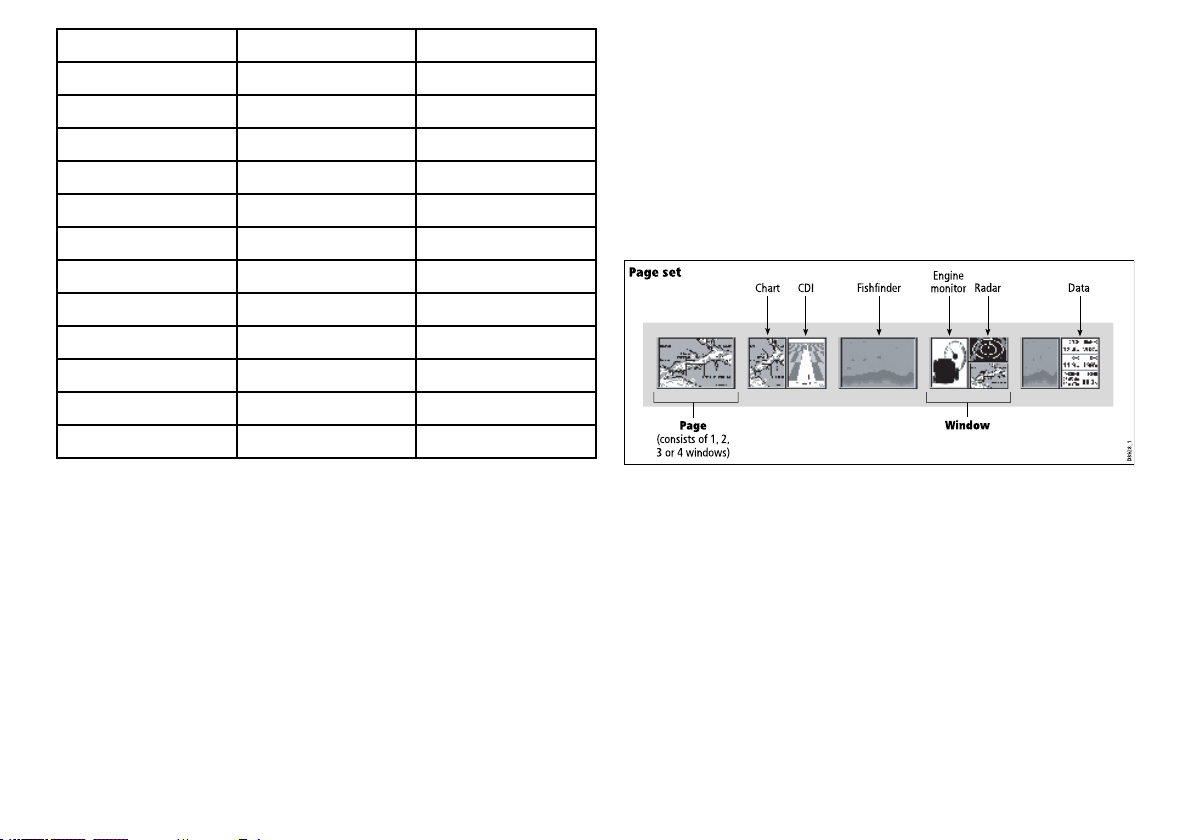
Page set
Pag e
(consists of 1, 2,
3 or 4 windows)
Window
D8928_1
CDIChart
Radar
Fishfinder
Engine
monitor
Data
LabelFeatureApplication
FLT
FloatingEBL/VRM
GRDGuardzone
HDG
Headingvector
MARPAMARPAtargetRadar
MOBManOverBoardmarkerChart,Radar
POS
Vessel’sposition
RTERouteleg
SHMShip’sHeadingMarker
TIDETideindicator
VRM/EBL
VRMandEBL,1or2Radar
WINDWindindicator
WPTWaypoint
3.6Navigatingpagesandmenus
Radar
Radar
Chart
Chart
Chart
Radar
Chart
Chart
Chart,Radar
Displayingapplications
Thevariousapplicationsthatmakeupyourmultifunctiondisplay
areshowninaseriesofscreensknownaspagesets.Thereare
4pre-conguredandoneemptypagesettochoosefrom.Each
pagesetcontains5pages.Thesepagesaremadeupof1,2,3or
4windowscombinedinvariousformats.Eachwindowcandisplay
anapplication:
Ifrequired,youcanchangethecombinationandlayoutofthese
pagesetstomeetyourparticularneeds.
Selectingapagesetandapplicationpage
1.PressandholdthePAGEbuttonuntiltheSelectPageSetdialog
appears.
2.Usingthetrackpad,highlighttherequiredpageset.
3.PresstheOKbuttontoselectthehighlightedpageset.An
applicationpagefromthatpagesetisdisplayed.
Gettingstarted
21
Page 22

4.PressthePAGEbuttonrepeatedlytotogglebetweenthe
availableapplicationpagesinthepageset.Alternatively ,usethe
appropriatesoftkeytoselecttherelevantapplicationpage.
Selectinganapplicationwindow
1.Whenmorethanoneapplicationisdisplayedatanyonetime,
theactiveapplicationwindowishighlightedwitharedborder:
2.PresstheACTIVEbuttontomovetheredbordertoanother
windowonthescreen.
3.PressandholdtheACTIVEbuttontoswitchthecurrently
highlightedwindowtofull-screenmode.
4.PressandholdtheACTIVEbuttontoreturnthescreento
split-windowmode.
22
C-SeriesWidescreenuserreference
Page 23
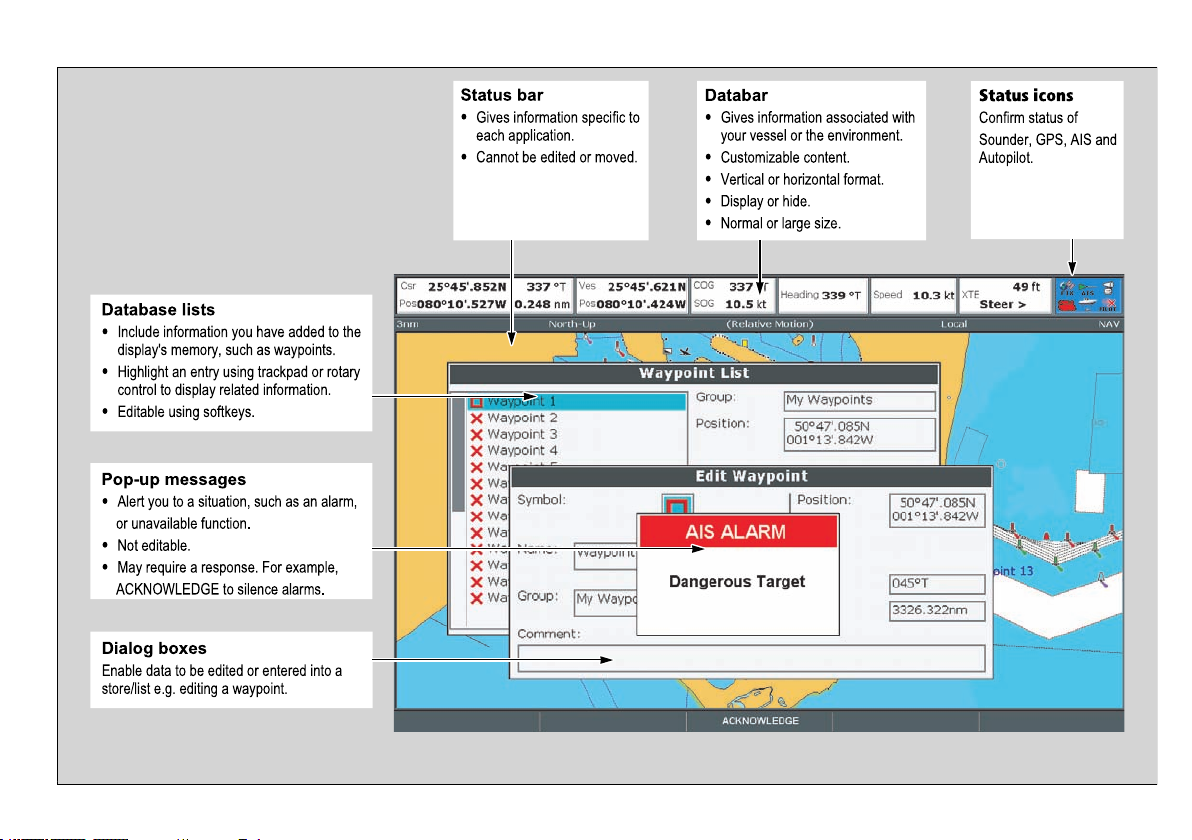
Screeninformation
Status bar
•
Gives information specific to
each application.
•
Cannot be edited or moved.
Databar
•
Gives information associated with
your vessel or the environment.
•
Customizable content.
•
Vertical or horizontal format.
•
Display or hide.
•
Normal or large size.
Database lists
•
Include information you have added to the
display's memory, such as waypoints.
•
Highlight an entry using trackpad or rotary
control to display related information.
•
Editable using softkeys.
Pop-up messages
•
Alert you to a situation, such as an alarm,
or unavailable function.
•
Not editable.
•
May require a response. For example,
ACKNOWLEDGE to silence alarms.
Dialog boxes
Enable data to be edited or entered into a
store/list e.g. editing a waypoint.
Status icons
Confirm status of
Sounder, GPS, AIS and
Autopilot.
Gettingstarted
23
Page 24
Editingdialogboxinformation
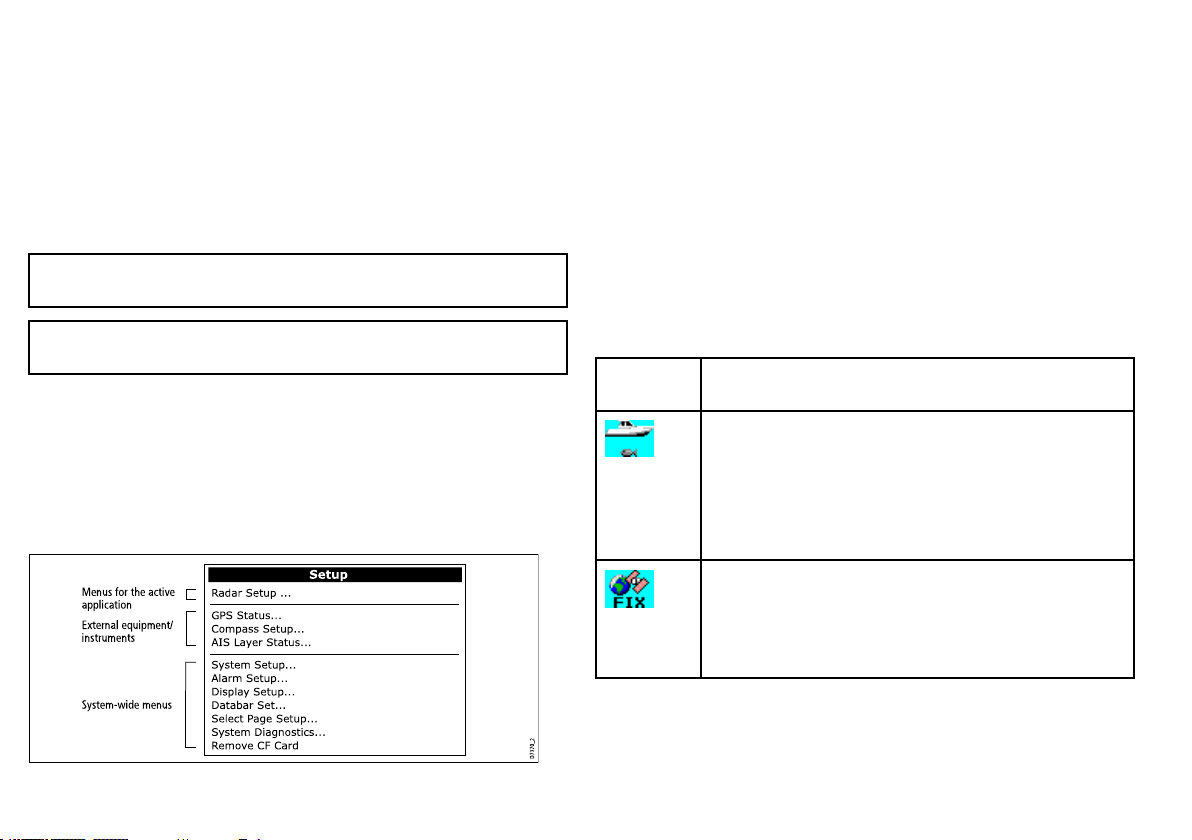
D7370_2
Menus for the active
application
External equipment/
instruments
System-wide menus
Setup
Radar Setup ...
GPS Status...
Compass Setup ...
AIS La yer Status...
Sy stem Setup ...
Alarm Setup ...
Displa y Setup ...
Databar Set...
Select P age Setup ...
Sy stem Diagnostics...
Remove CF Card
1.Inthedialogbox,usetherotarycontroltoselecttheeldyou
wanttoedit.
2.PresstheEDIT ...softkey.
3.Usethetrackpadandrotarycontroltoedittheinformationin
theeld.
4.ClickOKtoapplyanychanges.
5.RepeatSteps1to4untilalltherequireddetailshavebeen
changed.
Accessingamenu
1.PresstheMENUbutton.
2.Usingthetrackpadorrotarycontrol,highlighttherelevantmenu
item.
3.Pressthetrackpadrighttoselectthemenuitem.
4.RepeatSteps2to3fornavigatingsub-menus.
5.Onceyouhaveselectedtherelevantoption(s),presstheOK
buttontokeepanychangesandreturntotheapplication.
Note:Entriesindialogboxesarenotcasesensitive,socharacter
textcanbeenteredinupperorlowercase.
Note:EnabletheExtendedCharacterSetintheSystemSetup
Menuifyouneedtousespecialoraccentedcharacters.
Usingmenus
Menusenableyoutocongureyoursystemtoyourparticularneeds.
WhenevertheMenubuttonispressed,theSetupmenuisdisplayed.
Itcontainsalistofallthemenusavailablefortheactiveapplication,
togetherwithsystem-widemenus:
24
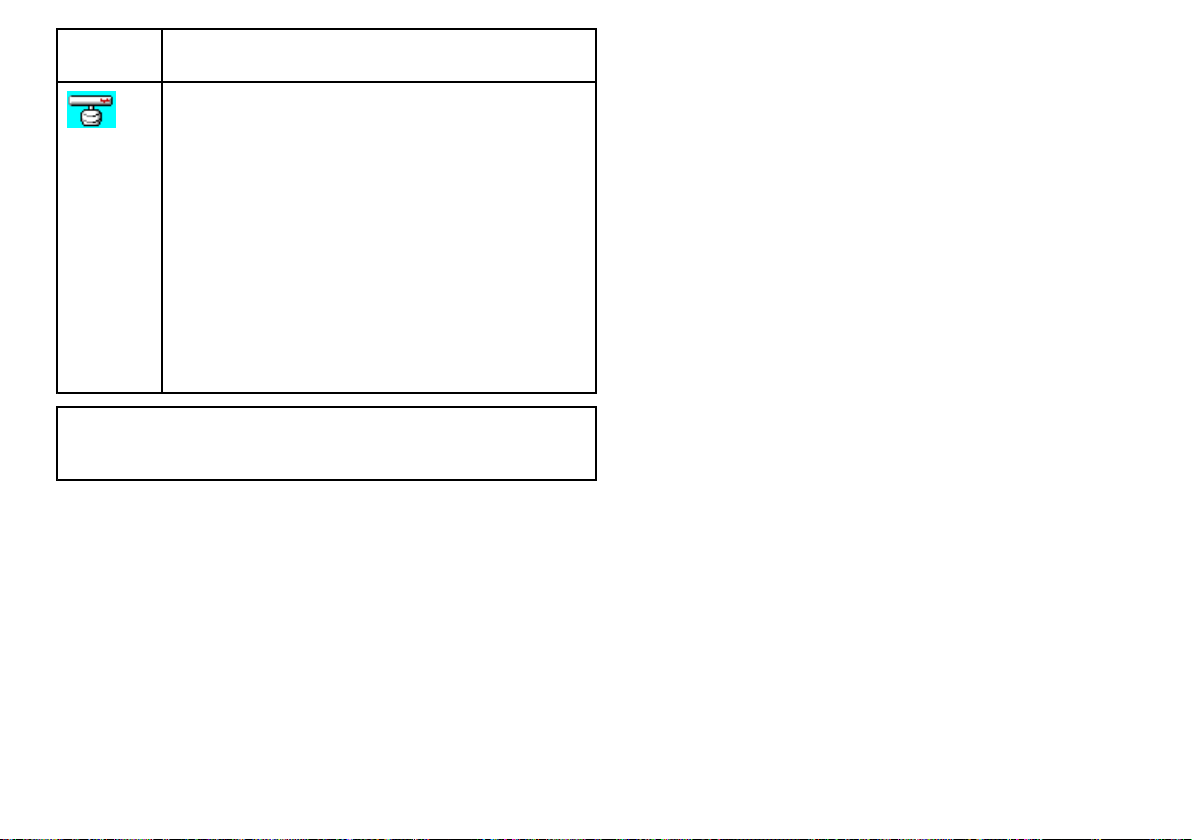
Statusicons
Thestatusiconsonthedatabarconrmwhethertheappropriate
connectionstoyourmultifunctiondisplayhavebeenmade.
Status
iconDescription
Theboatandshiconindicatesthecurrentstatusofyour
shnder:
•Iconanimated:connectiontoaDSMhasbeensuccessful.
•Iconstatic:theDSMisconnectedbutnottransmitting.
•Icongreyed-out:noDSMisconnected.
ThesatelliteiconindicatesthecurrentstatusofyourGPS:
•Fix:yourunitissuccessfullyconnectedtoaGPSreceiver.
•NoFix:yourunithasbeenunabletoconnecttoasuitable
GPSreceiver.
C-SeriesWidescreenuserreference
Page 25
Status
iconDescription
Thescannericonindicatesthecurrentstatusofyourradar
scanner:
•Iconrotates:thescanneristransmitting(TRANSMIT/TX
mode).
•Iconstatic:thescannerispoweredonbutisnotcurrently
transmitting(STANDBYmode).
•Icongreyed-out:thisindicatesthatthescanneriscurrently
poweredoff(OFFmode).
•Iconrotatesandisthenstatic:apowersavemodeinwhich
thescannerpowerson/offintermittently(TIMEDTRANSMIT
mode).
----
Note:TherearealsoadditionalstatusiconsforAISandAutopilot
functionality.Theseiconsaredescribedintherespective
chapters.
3.7Initialsetup
Initialsetupprocedures
Anumberoftasksmustbecompletedbeforeyouuseyourdisplay
forthersttime.
Whenyourstuseyourmultifunctiondisplayafterithasbeen
commissioned(seeInstallationGuide),werecommendthatyou
carryoutthefollowing:
•Setthelanguage,thedateandtimeformatandpreferredunits
ofmeasurement.
•Adjustthedisplaylighting.
Settingthelanguage,date/time,andunitsofmeasurement
1.PresstheMENUbutton.
2.Usingthetrackpad,highlighttheSystemSetupmenuitem.
3.PressrightonthetrackpadtoentertheSystemSetupmenu.
4.Usingthetrackpad,highlighttherequiredsetupitemfromthe
menu.
5.Usingthetackpadandrotarycontrol,adjustthevaluesforthe
setupitem.
6.RepeatSteps4and5foreachsetupitem(Language,Date/Time/
UnitsofMeasurement)thatyouwanttochange.
Adjustingthedisplaylighting
1.PressthePOWERbuttononce.Thebrightnesslevelcontrolis
displayed.
2.Usingtherotarycontrol,adjustthebrightnesslevelasrequired.
Gettingstarted
25
Page 26
3.T oswitchthecolorpalattebetweenDay(verybright)andNight
(dark)modes,pressthePALETTEsoftkeyandselecttheDAY
orNIGHToption.
GPSreceiverselection
Youmustcongureyourmultifunctiondisplaytouseeitherthe
internalGPSreceiver,oranexternally-connectedGPSreceiver.
Yourmultifunctiondisplayhasabuilt-in(internal)GPSreceiver.Itis
high-sensitivity,allowingreliableperformanceevenwiththedisplay
unitmountedbelowdecksorinanyorientation.Bydefault,your
multifunctiondisplaywillusethebuilt-inGPSreceiver.
However,youmayprefertoconnectyourmultifunctiondisplayto
anexternalGPSreceiver.Inthiscase,youmustcongureyour
multifunctiondisplaytousetheexternalGPSreceiverinsteadof
theinternalGPSreceiver .
withoutdatafromaGPSantenna,radarscanner,shnderorAIS
receiver.
TheSimulatormodeisswitchedon/offintheSystemSetupMenu.
Onceenabled,youcanusetheSimulator:
•Beforeinstallation:Connectthedisplaytoa12VDCpower
supply,fusedat1ampbyattachingtheredcorefromthepower
leadtopositive(+)andtheblackcoretonegative(-).
•Afterinstallation:Whilstinamarinaoratanchor.
Note:IncomingAISsafetymessagescannotbedisplayedwhile
thedisplayisinSimulatormode.
Note:AnysystemsettingsmadewhilstinSimulatormodearenot
transmittedviaSeaT alktootherequipment.
GPSSelectionforMultipleDisplays
Whenusingmultiplemultifunctiondisplays,ensurethatyouusethe
GPSreceiverwiththebestsignal.
YoumustdisabletheinternalGPSreceiveronanyadditional
displaysyouhaveconnectedtoyourmastermultifunctiondisplay.
IfyouareusinganexternalGPSreceiver,youmustdisablethe
internalGPSreceiveronALLdisplays.
SwitchingbetweeninternalandexternalGPSreceivers
1.PresstheMENUbutton.
2.Usingthetrackpad,selecttheInternalGPSmenuitem.
3.Usingthetrackpad,selecttheONoptiontousetheinternal
GPS,ortheOFFoptiontouseanexternalGPS.
4.PresstheOKbutton.
Simulatormode
TheSimulatormodeenablesyoutopracticeoperatingyourdisplay
26C-SeriesWidescreenuserreference
Enablingthesimulatormode
1.PressMenu.
2.SelecttheSystemSetupmenu.
3.SelecttheSimulatoritem,andchangeitsvaluetoOn.
Systemsetupmenu
ThefollowingtabledescribesthevariousoptionsintheSystem
Setupmenuforyourmultifunctiondisplay .
MenuitemDescriptionOptions
PositionModeDetermineshow
positioningdatais
displayed—as
Latitude/Longitude
coordinates,orLoran
TDs.
•Lat/Long(default)
•TDs
Page 27

MenuitemDescriptionOptions
TDSetup
WhenthePositionMode
(seeabove)issetto
TDs,youcanspecifythe
chainidentier,slave,
andASFvalues.
Simulator
Enablesordisables
simulatormode,
whichallowsyouto
practiceoperatingyour
multifunctiondisplay
withoutdatafroma
GPSantenna,shnder
(DSMsonar),orany
otherexternalunit.
BearingModeDetermineshowall
bearingandheading
dataisdisplayedin.
Thisdoesnotaffect
howthechartorradar
displaysaredrawn.
Chain
•Variousoptions,
dependingon
cartography.
Slave1/2
•Variousoptions,
dependingon
cartography.
ASF1/2
•–09.9to+09.9
•OFF(default)
•ON
•DEMO
•True(default)
•Magnetic
MenuitemDescriptionOptions
MOBDataType
Determineswhether
positionaldataordead
reckoningisdisplayed.
Assumingthatyour
vesselandtheMan
OverBoard(MOB)are
subjecttothesametide
andwindeffects,the
deadreckoningsetting
normallygivesamore
accuratecourse.
VariationSource
Thissetting
compensatesforthe
naturallyoccuringoffset
oftheearth’smagnetic
eld.WhensettoAuto,
thesystemautomatically
compensates,
anddisplaysthe
compensationvalue
inbrackets.Toenter
yourowncompensation
value,usetheManual
option,thenspecifythe
valueusingtheManual
Variationsetting(see
below).
•Dead
Reckoning(default)
•Position
•Auto(compensation
valuedisplayedin
brackets)(default)
•Manual
Gettingstarted
27
Page 28
MenuitemDescriptionOptions
ManualVariationWhentheVariation
Sourcemenuitemis
settoManual(see
above),youusethe
ManualVariation
settingtospecifythe
compensationvaluethat
youwanttouse.This
valueisalsotransmitted
toanyotherconnected
SeaTalkinstruments.
Language
Determinesthe
languagethatwillbe
usedforallon-screen
text,labels,menusand
options.
ExtendedCharacter
Set
Determineswhether
additionalaccented
charactersaremade
availablewhenyouare
enteringtext.
GroundTripReset
Resetsthechosen
groundtripdistance
countertozero.
•0degrees
East(default)
•Range:0to30
degreesEastorWest
•
Optionsvarydepending
onthegeographic
locationwhereyou
purchasedyour
multifunctiondisplay.
•OFF(default)
•ON
•GroundTrip1Reset
•GroundTrip2Reset
•GroundTrip3Reset
•GroundTrip4Reset
MenuitemDescriptionOptions
SettingsReset
Resetsallsystemsetup
menus,includingpage
setsandthedatabar,
tothefactorydefault
settings.Waypoints,
routesandtracksare
NOTdeleted.
SettingsandData
Reset
Resetsallsystemsetup
menus,includingpage
setsandthedatabar,
tothefactorydefault
settings.Waypoints,
routesandtracksARE
deleted.
Note:Forsystems
usingmultiple
multifunctiondisplays
(networkeddisplays),
thecompletesystem
databaseisdeleted
onthedatamaster
(primarydisplay).
Onlythewaypoints,
routesandtracks
willbedeleted
fromanyadditional
multifunction
displays.
ResetDefaults
conrmation
•YES
•NO
FactoryReset
conrmation
•YES
•NO
28C-SeriesWidescreenuserreference
Page 29
MenuitemDescriptionOptions
Date/TimeSetup
Theseoptionsenable
youtocustomizethe
dateandtimeformat
toyourrequirements.
Youcanalsospecify
alocaltimeoffset
fromUniversalTime
Constant(UTC),to
compensateforanytime
zonedifference.
UnitsSetupEnablesyoutospecify
theunitsusedfor
thefollowingkey
measurements:
•Distance
•Speed
•Depth
•Temperature
•Pressure
•Volume
Note:Ifthe
Distanceunitis
settoNauticalMiles
orStatuteMiles,and
thedatadisplayed
islessthan1unit,
thesystemdisplays
Gettingstarted
DateFormat
•mm/dd/yy
•dd/mm/yy
TimeFormat
•12hr
•24hr
LocalTimeOffset
•–013.0to+013.0
DistanceUnits
•Nautical
Miles(default)
•StatuteMiles
•Kilometers
SpeedUnits
•Knots(default)
•mph(milesperhour)
•kph(kilometersper
hour)
DepthUnits
•Meters
•Feet(default)
•Fathoms
MenuitemDescriptionOptions
theunitsinFeet.If
theDistanceunitis
settoKilometers,the
systemdisplaysthe
unitsinMeters.
SystemIntegration
Determinesthe
connectionsettings
forexternalequipment.
Thefollowingitems
areavailableinthe
sub-menu:
•AutopilotControl
—IfsettoEnabled,
thisoptionallows
youtocontrol
certainaspects
ofaconnected
pilotcontrolhead,
suchassending
commandstoengage
anddisengagethe
TemperatureUnits
•Fahrenheit(default)
•Celsius
PressureUnits
•Bar
•PSI(default)
•Kilopascals
VolumeUnits
•USGallons
•Imp(Imperial)
Gallons(default)
•Liters
AutopilotControl
•Disabled(default)
•Enabled
DSCMessage
•OFF(default)
•ON
SeaTalkAlarms
•ON(default)
•OFF
DataMaster
29
Page 30

MenuitemDescriptionOptions
autopilot.Ifsetto
Disabled,youwillnot
beabletocontrolthe
autopilotfromyour
multifunctiondisplay,
andallfunctionsmust
becontrolledfrom
thepilotcontrolhead
itself.
•DSCMessage—If
settoON,details
ofdistressDSC
messagesfroma
connectedDSCVHF
radiowillbedisplayed
onyourmultifunction
display.IfsettoOFF,
themessageswill
NOTbedisplayed
onyourmultifunction
display.
•SeaTalkAlarms—If
settoON,allsystem
alarmsgenerated
byanyconnected
SeaTalkunitswillbe
displayedonyour
multifunctiondisplay.
IfsettoOFF,the
alarmswillNOTbe
displayedonyour
multifunctiondisplay.
•DataAlarms—Ifyou
havemorethanone
•ON(default)
•OFF
BridgeNMEAHeading
•OFF(default)
•ON
SeaTalk2Keyboard
•OFF(default)
•ALL
•ONE
NMEAOutputSetup
•APB
•BWC
•BWR
•DBT
•DPT
•GGA
•GLL
•MTW
•MWV
•RMA
•RMB
•RMC
MenuitemDescriptionOptions
multifunctiondisplay
onthesamenetwork,
oneofthemmust
besetasthedata
master.Whenthis
optionissettoON,
themultifunction
displayyouare
currentlyusingwill
besetasthedata
master.
•BridgeNMEA
Heading—If
settoON,NMEA
headingdatawill
bebridgedontothe
SeaTalkdatabus,
andwillbesentto
allNMEA-connected
devices.IfsettoOFF,
NMEAheadingdata
willNOTbebridged
ontotheSeaTalk
bus.Anexampleofa
useforthissettingis
whenusingMARPA
withanexternal
fastheadingsensor,
inwhichcaseyou
shouldsetthisoption
toOFFtoensurethat
allNMEA-connected
unitsreceiveheading
datafromtheexternal
headingsensor.
•RSD
•RTE
•TTM
•VHW
•VLW
•WPL
•VTG
•ZDA
NMEAPortSetting
•NMEA4800(default)
•Navtex4800
•Navtex9600
•AIS38400
30C-SeriesWidescreenuserreference
Page 31

MenuitemDescriptionOptions
•SeaTalk2Keyboard
—SettoONE
orALLifyou
haveaSeaTalk2
keyboardconnected.
Otherwise,setto
OFF.
•NMEAOutputSetup
—allowsyouto
enableordisable
theindividualNMEA
output“sentences”for
eachNMEAport.
•NMEAPortSetting
—Allowsyou
tospecifythe
appropriateport
speedforthe
equipmentconnected
toeachNMEAport.
WhentheNavtex
4800orNavtex9600
optionisselected,
youwillbeableto
viewtheNavtex
messagelist.
MenuitemDescriptionOptions
WaypointPassword
Setup
Thismenuallowsyou
toenablepassword
protectionforwaypoints,
andtochangethe
password.
EnablePassword
•OFF(default)
•ON
ChangePassword
•DisplaysEdit
WaypointPassword
dialog.
Gettingstarted
31
Page 32

32C-SeriesWidescreenuserreference
Page 33

Chapter4:Managingdisplaydata
Chaptercontents
•4.1CompactFlashcardsoverviewonpage34
•4.2Writingandretrievingdataonpage36
•4.3TransferringdatausingaPConpage37
•4.4Operatinganetworkeddisplayonpage37
Managingdisplaydata
33
Page 34

4.1CompactFlashcardsoverview
CompactFlashcardsenableyoutouseadditionalcartographic
information,andsaveandarchivedata.
Theirusesinclude:
•Detailedcartographicinformation:Obtaindetailedcartographic
informationoftheareathatyounavigateusingNavionics®chart
cards.T ocheckthecurrentavailabilityofNavionicschartcard
types,pleasevisitwww.navionics.comorwww.navionics.it.The
amountofcartographicdetailshownvariesfordifferentareas
andfordifferentscales.Thechartscaleinuseisindicatedinthe
statusbar-thenumberrepresentsthedistanceinnauticalmiles
fromthetopofthechartwindowtothebottomofthechartwindow.
•Archiving:T oarchivewaypoints,routesandtracks.
•Saving:T osavewaypoint,routeandtrackdataforusebyother
equipment,suchasaPC.
Youcanremoveandinsertcardswhileachartisdisplayedprovided
thatyoufollowthecorrectprocedure.Thechartinformationis
retainedon-screenuntilthechartplotterredrawsthescreen;for
example,whenyoupanoutsidethecurrentarea,orusetheRange
buttontochangethechartscale.
Caution:Careofchartcards
Toavoidirreparabledamagetoand/orlossofdata
fromchartcards:
•Ensurethatchartcardsarettedthecorrectway
around.DONOTtrytoforceacardintoposition.
•DONOTsavedata(waypoints,routes,andso
on)toaNavionicschartcard,asthechartsmay
beoverwritten.
•DONOTuseametallicinstrumentsuchasa
screwdriverorplierstoremoveachartcard.
•DONOTremoveachartcardwhileinformation
isbeingwrittentoorreadfromit.
InsertingaCompactFlashcard
1.Checkthatyouareusingthecorrecttypeofcard(seeImportant
Information,atthebeginningofthismanual).
2.Openthechartcarddoor,locatedonthefrontrightofthedisplay.
3.Insertthecardasshowninthediagrambelow,withthelipofthe
cardfacingoutwards.Itshouldpositioneasily.Ifitdoesnot,DO
NOTforceit,checkthedirectioninwhichthelipisfacing.
4.Gentlypressthecardallthewayintothecardslot.
5.T opreventtheingressofwaterandconsequentdamage,close
thechartcarddoorandpressrmlyuntilaclickisheard.
34C-SeriesWidescreenuserreference
Page 35

D11530-1
Caution:Ensurechartcarddooris
securelyclosed
Topreventwateringressandconsequentdamage
tothedisplay,ensurethatthechartcarddooris
rmlyclosed.Thiscanbeconrmedbyanaudible
click.
RemovingaCompactFlashCard
5.Pressthecardejectbutton.
6.T opreventtheingressofwaterandconsequentdamage,close
thechartcarddoorandpressrmlyuntilaclickisheard.
7.PressOK.
1.Ifthemultifunctiondisplayispoweredon,presstheMENU
button.Otherwise,skiptoStep4.
2.HighlighttheRemoveCFCardmenuoption.
3.Usingthetrackpad,highlighttheRemoveCFCardmenuoption,
thenpressthetrackpadrighttoselectit.
4.Openthechartcarddoor,locatedonthefrontrightofthedisplay.
Managingdisplaydata
35
Page 36

4.2Writingandretrievingdata
Youcantransferdatabetweenanumberofdevicestohelpyou
backupandmanageyourwaypoints,routes,andtracks.
Yourmultifunctiondisplaycansaveupto3000waypoints,150
routesand15tracksindatabaselists.Oncethisnumberis
reachedyouwillneedtoarchivedatatoaCompactFlashcardfor
safe-keepingorretrievalatalaterdate.Alternatively,youcan
transferdatatoanotherinstrumentorPCusingNMEA.When
navigationisactive,youcanalsoreceivewaypoints,routesand
tracksfromaPC,SeaTalkandNMEAinstruments.
SavingdatatoaCompactFlashcard
Note:Raymarinestronglyrecommendsthatyousavedatato
aseparateCompactFlashcard,andnottoaNavionicscard
containingcartography .
1.InsertcardintotheCompactFlashcardslot
2.PresstheDATAbutton.
3.PresstheARCHIVEANDTRANSFERsoftkey.
4.PresstheSA VETOCARDsoftkey.
5.Selectthetypeofdatathatyouwanttosave(Waypoint,Route,
orTrack).
6.T osaveallitemsofthattypeofdata,presstheSA VEALL
softkey.
7.T osaveanindividualitemofdata,selecttheitemfromthelist
andpresstheSAVEsoftkey.
3.PresstheARCHIVEANDTRANSFERsoftkey.
4.PresstheRETRIEVEFROMCARDsoftkey.
5.Selectthetypeofdatathatyouwanttoretrieve(Waypoint,
Route,orTrack).
6.T oretrieveallitemsofthattypeofdata,presstheRETRIEVE
ALLsoftkey .
7.T oretrieveanindividualitemofdata,selecttheitemfromthelist
andpresstheRETRIEVEsoftkey .
Note:Ifthetypeofdatayouhaveselectedalreadyexistsinthe
display’smemory,usethesoftkeystoselectasuitableaction;
retrieveasnewdata,replaceexistingdata,orcancel.
ErasingdatafromaCompactFlashcard
1.InsertthecardintotheCompactFlashcardslot.
2.PresstheDATAbutton.
3.PresstheARCHIVEANDTRANSFERsoftkey.
4.PresstheERASEFROMCARDsoftkey.
5.UsetheSELECTLISTsoftkeytoselectthetypeofdatayou
wanttoerase.
6.T oeraseallthedata,presstheERASEALLsoftkey.
7.T oeraseanindividualitemofdatafromthelist,highlightthe
relevantentryinthelistandpresstheERASEsoftkey.
RetrievingdatafromaCompactFlashcard
1.InsertcardintotheCompactFlashcardslot
2.PresstheDATAbutton.
36C-SeriesWidescreenuserreference
Page 37

4.3TransferringdatausingaPC
4.4Operatinganetworkeddisplay
Youcantransferwaypointsorroutestoandfromyourdisplayanda
PCorinstrument,usingNMEA.
WiththeRayT echV6.0(orlater)softwareyoucantransferwaypoints
androutesviaaCompactFlashmemorycard.Suchtransfers
requirethatthePCisconnectedtothedisplay’sNMEAportvia
aserialdatacable.
Transferringwaypointandroutedata
1.PresstheDATAbutton.
2.PresstheARCHIVEANDTRANSFERsoftkey.
3.PresstheTRANSFERONNMEAsoftkey.
4.PresstheappropriatesoftkeytosendorreceiveNMEAdata.
Note:TheTRANSFERONNMEAsoftkeyisonlyavailablewhen
compatibleNMEAequipmentispoweredonandconnectedto
yourmultifunctiondisplay.
Youcanconnectanadditionalmultifunctiondisplayforamore
exibleandaccessiblesystem.
Ifyouhavemultifunctiondisplaysconnectedtogether(usinga
crossovercoupleroraSeaTalk
viewdataacrossalldisplays.However,therearesomefunctions
andsettingsthatarenot’seen’orsharedbyalldisplaysonyour
network.Theseexceptionsaredetailedbelow.
Exceptions
Thefollowingfunctionsandlocalsettingsonlyaffectthe
multifunctiondisplaythatyouarecurrentlyusing:
•Video—thepicturefromanyvideo/camerasourcewillonly
beshownonthedisplaythatthevideo/cameraisphysically
connectedto.
•Pageset—selectingaset,name,andapplicationsforaparticular
page.
•PowerOn/Offbutton(includingDay/Nightsettings).
•TheACTIVEwindowfunction.
•ThedisplayedpanelintheDataandEngineDataapplications.
•RadarandFishnderpresentationsettings.
•RadarVRMs,EBLs,andWakes.
•ChartpresentationsettingswhentheChartViewissettoLOCAL.
•Show/hidewaypoints,routes,ortracks.
•FishnderSetupMenuoptions(excludingTransducerSettings
andDSMSettings).
•Video,Databar,andDisplaySetupmenus.
•Databaron/offandconguration.
•Rulersettings.
hs
switch),youcaninput,edit,and
Managingdisplaydata
37
Page 38

DesignatingaDataMasterDisplay
Toensurethatthelatestsystemdata—suchasdatabasesof
waypoints,routesandtracks—isavailableatallmultifunction
displays,oneofthedisplaysmustbedesignatedasthe“data
master”.
Allsystemdataismanagedbythedatamaster.Thedisplaythathas
beendesignatedasthedatamastershouldalwaysbepowered-on
—preferablyrst,beforeanyadditionaldisplays.Thisisbecause
everytimeachangeismadetothesystemdata,thedatamasterwill
copyitsdatabasestoallotherdisplaysthatarecurrentlypowered
on.Ifthedatamasterisnotpowered-on,oradatamasterhasnot
beendesignated,analarmwillsound,andyouwillbepromptedto
selectamasterdisplay .
Note:Whenchangingthedesignateddatamasterdisplay,or
addinganadditionaldisplay ,ensurethatallyourdataisarchived
toaCompactFlashcardsothatyoucanrestoreitlaterinthe
eventofamistake.
Designatingthemasterdisplay
Thefollowingtaskmustbeperformedonthemultifunctiondisplay
thatyouwanttodesignateasthedatamaster:
1.PresstheMENUbutton.
2.Usingthetrackpad,selecttheSystemSetupmenuitem.
3.Usingthetrackpad,selecttheSystemIntegrationmenuitem.
4.Usingthetrackpad,selecttheDataMaster>ONoption.
5.PresstheOKbutton.
38C-SeriesWidescreenuserreference
Page 39

Chapter5:Usingwaypoints
Chaptercontents
•5.1Waypointsonpage40
•5.2Howwaypointsareshownindifferentapplicationsonpage41
•5.3Waypointplacementonpage42
•5.4Displayingthewaypointlistonpage42
•5.5Waypointnavigationonpage43
•5.6Editingawaypointonpage44
•5.7Waypointgroupsonpage46
•5.8Passwordprotectingyourwaypointsonpage47
Usingwaypoints
39
Page 40

5.1Waypoints
D9440_1
Default symbol
Awaypointisapositionmarkedonachart,radarorshnder
windowtoindicateasite(forshing,divingetc.)orasaplaceto
navigateto.Bydefault,allwaypointsareindicatedonscreenbya
waypointsymbol(x).Thissymbolcanbechangedifrequired.You
canalsoselectanalternativesymboltobeusedasthedefaultfor
newlycreatedwaypoints.
Waypointsareacorefeatureofyourmultifunctiondisplay.Theycan
becreatedinanyapplicationandaredisplayedontheradar,chart
andshnderwindows.Aseriesofwaypointscanbecombined
togethertoformaroute.Thedetailsofallwaypoints,irrespective
oftheapplicationtheywerecreatedin,arestoredinadedicated
waypointlistwhichwillholdupto3000waypoints.Allwaypointsare,
bydefault,placedintheMYWA YPOINTSgroup.Ifrequired,you
cancreatenewgroupsandchangethedefaultgroup.Ifnecessary,
waypointscanbearchivedtoaCompactFlashcardortransferred
toanotherNMEAcompatibleinstrument.Ifthesystemreceivesan
activewaypointoverSeaT alkorNMEA,itisdisplayedbutcannot
beedited.Ifrequired,youcanpreventaccessto,modicationand
sightofyourwaypointandroutedatabasesandfunctionsbymeans
ofapassword.
40C-SeriesWidescreenuserreference
Page 41

5.2Howwaypointsareshownindifferent
Wpt 2
Wpt 1
Active waypoint (boxed)
Alternative waypoint symbols
D11586_1
Active waypoint
D11587_1
WPT
WPT
WPT
WPT
D11588_1
applications
Inthechartandradarapplications,awaypointisrepresentedwhen
itisbothactive(displayedinabox)andinactive(nobox),asshown
inthefollowingdiagram:
WaypointsintheCDIand3Dchartapplications
IntheCDIapplication,awaypointisrepresentedonlywhenitis
active(displayedinabox):
WaypointsintheFishnderApplication
Whenawaypointiscreateditisrepresentedonshnderwindows,
byaverticallinelabelledWPT .Thissymbologycannotbechanged.
Usingwaypoints
41
Page 42

5.3Waypointplacement
Placingawaypointatthecursorposition
1.PresstheWPTSMOBbutton.
2.Movethecursortothepositiononthechartwhereyouwant
thewaypoint.
3.PresstheWA YPOINTATCURSORsoftkey.
4.PressOKorwait4seconds.
Placingawaypointatyourvessel’sposition
1.PresstheWPTSMOBbutton.
2.PresstheWAYPOINTA TVESSELsoftkey .
3.PressOKorwait4seconds.
4.Alternatively,presstheWPTSMOBbuttontwice,andthenpress
OK.
Placingawaypointataknownposition
1.PresstheWPTSMOBbutton.
2.PresstheWA YPOINTATLAT/LONsoftkey.
3.EntertheLatitude/Longitudeposition..
4.PressOKtwice.
5.4Displayingthewaypointlist
1.PresstheWPTS/MOBbutton.
2.PresstheREVIEWANDEDITWA YPOINTSsoftkey.
Sortingthewaypointlist
1.Displaythewaypointlist.
2.PresstheSORTLISTsoftkey.
3.PresstheSELECTSORTOPTIONsoftkey.
4.Usingthetrackpadorrotarycontrol,selectthecriteriabywhich
youwanttosortthelist(forexample,byName).
5.PresstheOKbuttontoapplythechange.
42
C-SeriesWidescreenuserreference
Page 43

5.5Waypointnavigation
4.Alternatively,positionthecursorovertheactivewaypoint,and
presstheSTOPGOTOsoftkey.
NavigatingtoawaypointusingtheWPTSMOB
button
1.PresstheWPTS/MOBbutton.
2.PresstheGOTOWA YPOINTOPTIONSsoftkey .
3.Selecttherequiredwaypointfromthelist.
4.PresstheGOTOWAYPOINTsoftkey.
Navigatingtoanexistingwaypointselected
onscreen
Inthechartapplication:
1.Positionthecursorovertherequiredwaypoint.
2.PresstheGOTOWAYPOINTsoftkey.
Thechartdisplaysadashedlinefromyourvesseltotheactive
waypoint,andnavigationcommences.
Note:Whenyouarriveatyourtargetwaypoint,amessage
willappear,andanalarmwillsound.Toacknowledgethe
messageandsilencethealarm,wait10secondsorpress
ACKNOWLEDGE.
Tostopnavigatingtoawaypoint
Note:Oncenavigationisnolongeractive,thewaypointsymbol
returnstoitsnormalunboxedstate,andthedashedlinebetween
yourboatandthewaypointisremoved.
1.PresstheWPTS/MOBbutton.
2.PresstheGOTOWA YPOINTOPTIONSsoftkey .
3.PresstheSTOPGOTOsoftkey.
Usingwaypoints
43
Page 44

5.6Editingawaypoint
Onceawaypointhasbeenplaceditcanbeeditedinavarietyof
ways.Y oucan:
•Changethewaypointdetails-name,symbol,grouporadda
comment.
•Moveawaypoint.
•Eraseawaypoint.
•Changethedefaultsymbolandgroupofnewlyplacedwaypoints.
Changingwaypointdetails
Inthechartapplication:
1.Usingthetrackpad,movethecursortotherelevantwaypoint.
Alternatively,selectawaypointfromtheWaypointList.
2.PresstheVIEWANDEDITDETAILSsoftkey.
3.Usingtherotarycontrol,highlighttheinformationyouwantto
change.
4.PresstherelevantEDIT ...softkey.
5.Usingtherotarycontrolandtrackpad,editthedetailsineach
eldasrequired.
6.PresstheOKbuttononcetoapplythechangesforasingleeld,
andtwicetoexittheEditWaypointdialog.
Note:Ifyoumakeaneditingmistake,pressCANCEL.
Changingawaypointsymbol
Inthechartapplication:
1.Usingthetrackpad,movethecursortotherelevantwaypoint.
Alternatively,selectawaypointfromtheWaypointList.
2.PresstheVIEWANDEDITDETAILSsoftkey.
3.PresstheEDITSYMBOLsoftkey.
4.Usingthetrackpad,highlighttherequiredsymbolinthelist
5.PresstheOKbutton.
Movingawaypoint
Movingawaypointusingthecursor
Inthechartapplication:
1.Usingthetrackpad,movethecursortotherelevantwaypoint.
2.PresstheMOVEWAYPOINTsoftkey.
3.Usingthetrackpad,dragthewaypointtothedesiredlocation.
4.PresstherelevantPLACEWAYPOINTsoftkey.
Note:Toabandonamovewaypointoperation,pressCANCEL.
Movingawaypointbyenteringnewcoordinates
Inthechartapplication:
1.Usingthetrackpad,movethecursortotherelevantwaypoint.
Alternatively,selectawaypointfromtheWaypointList.
2.PresstheVIEWANDEDITDETAILSsoftkey.
3.Usingtherotarycontrol,highlighttheinformationyouwantto
change.
4.PresstherelevantEDITsoftkey.
5.Usingtherotarycontrolandtrackpad,edittheinformationinthe
Position,BRG,andRNGeldsasappropriate.
6.PresstheOKbuttononcetoapplythechangesandtwiceto
exittheEditWaypointdialog.
44
C-SeriesWidescreenuserreference
Page 45

Note:Toabandonamovewaypointoperation,pressCANCEL.
Erasingwaypoints
ErasingaWaypointUsingtheCursor
Inthechartorradarapplication:
1.Usingthetrackpad,positionthecursoroverthewaypointyou
wanttoerase.
Thesoftkeyschangetoprovidewaypoint-relatedfunctions.
2.PresstheERASEWAYPOINTsoftkey.
3.PresstheYESsoftkeytoconrm.
4.PresstheOKbutton.
Note:Ifarouteishidden,itswaypointscanstillbedisplayed.If
youattempttoeraseawaypointfromahiddenroute,awarningis
displayed.
Erasingawaypointusingthewaypointlist
Inthechartorradarapplication:
1.PresstheWPTS/MOBbutton.
2.PresstheREVIEWANDEDITWAYPOINTSsoftkey.
3.Usingthetrackpad,highlightthewaypointyouwanttoerase.
4.PresstheERASEWAYPOINTsoftkey
5.PresstheYESsoftkeytoconrm.
6.PresstheOKbutton.
Erasingallwaypoints
Inthechartorradarapplication:
1.PresstheDATAbutton.
2.PresstheARCHIVEANDTRANSFERsoftkey.
3.PresstheERASEFROMDISPLAYsoftkey .
4.PresstheSELECTLISTsoftkeyuntiltheWPToptionisselected.
TheSystemWaypointListisdisplayed.
5.PresstheERASEALLWAYPOINTSsoftkey.
6.PresstheYESsoftkeytoconrm.
Note:Ifarouteishidden,itswaypointscanstillbedisplayed.If
youattempttoeraseawaypointfromahiddenroute,awarningis
displayed.
Note:Ifarouteishidden,itswaypointscanstillbedisplayed.If
youattempttoeraseawaypointfromahiddenroute,awarningis
displayed.
Usingwaypoints
45
Page 46

5.7Waypointgroups
Movingwaypointsbetweengroups
Providedthatyouhavenotchangedthedefaultgroup,allwaypoints
areautomaticallyplacedinthedefault“MyWaypoints”group
whentheyarecreated.Inordertomakeyourwaypointseasierto
manage,youcanorganizethemintogroupsofyourchoice.When
shing,forexample,youmayonlywishtoseethewaypointsthat
indicategoodshingsites.Otherwaypoints,say ,forracing,would
besuperuousatthistime.
Note:Awaypointcannotbeplacedinmultiplegroups.
Displayingthewaypointgrouplist
1.PresstheWPTSMOBbutton.
2.PresstheREVIEWANDEDITWAYPOINTSsoftkey.
3.PresstheWAYPOINTGROUPSsoftkey.
TheWaypointGroupListisdisplayed.
Makinganewwaypointgroup
1.DisplaytheWaypointGroupList:
i.PresstheWPTSMOBbutton.
ii.PresstheREVIEWANDEDITWAYPOINTSsoftkey.
iii.PresstheW AYPOINTGROUPSsoftkey.
2.PresstheMAKENEWGROUPsoftkey.
3.PresstheEDITGROUPNAMEsoftkey(orpressOKtoaccept
thedefaultname).
4.Usingtherotarycontrol,editthenameforthenewwaypoint
group.
5.PresstheOKbuttontosavethechanges.
1.DisplaytheWaypointGroupList:
i.PresstheWPTSMOBbutton.
ii.PresstheREVIEWANDEDITWAYPOINTSsoftkey.
iii.PresstheW AYPOINTGROUPSsoftkey.
2.Usingthetrackpad,selecttheappropriatewaypointgroupfrom
thelist.
3.PresstheMOVEBETWEENGROUPSsoftkey.
4.PresstheSELECTGROUPAsoftkey .
5.Usingtherotarycontrol,selectthewaypointgroupthatcontains
thewaypointyouwanttomove(knownasGroupA,orthe
“source”).
6.PresstheOKbutton.
7.Pressthetrackpadrighttoselectthewaypointgroupthat
youwanttomovethewaypointto(knownasGroupB,orthe
“destination”).
8.IftheGroupBlistdoesnotcontainthewaypointgroupyouwant
tomoveyourwaypointto,presstheSELECTGROUPBsoftkey ,
andusetherotarycontroltoselecttherequiredgroup.
9.PresstheMOVEWAYPOINTFROMsoftkey.
Thewaypointismovedtothenewgroup.
Changingthedefaultwaypointgroup
1.PresstheWPTSMOBbutton.
2.PresstheREVIEWANDEDITWAYPOINTSsoftkey.
3.PresstheSETDEF AULTSYM&GROUPsoftkey.
4.PresstheEDITDEFAULTsoftkey.
5.Usingthetrackpad,selectthewaypointgroupthatyouwantto
makethedefault.
6.PresstheOKbutton.
46C-SeriesWidescreenuserreference
Page 47

Note:T oabandonthegroupdefaultchangeoperation,press
CANCEL.
5.8Passwordprotectingyourwaypoints
Youcanpreventaccessto,modication,andvisibilityofyour
waypointsandroutesbyapplyingapassword.
Erasingawaypointgroup
1.DisplaytheWaypointGrouplist:
i.PresstheWPTSMOBbutton.
ii.PresstheREVIEWANDEDITWAYPOINTSsoftkey.
iii.PresstheW AYPOINTGROUPSsoftkey.
2.Usingthetrackpad,selectthewaypointgroupthatyouwantto
erase.
3.PresstheERASEGROUPsoftkey.
4.PresstheYESsoftkeytoconrm.
Showingandhidingwaypointgroups
Inthechartapplication:
1.PressthePRESENT ATIONsoftkey.
2.PresstheSHOW/HIDEWAYPOINTSsoftkey.
3.UsingtheSHOWBYsoftkey ,selecttheSHOWBYGROUP
option.
4.Alistofavailablewaypointgroupsisdisplayed.Usingtherotary
control,selectthewaypointgroupthatyouwanttoshoworhide.
5.UsingtheONCHARTsoftkey,selecttheSHOWorHIDEoption,
asappropriate.
6.RepeatSteps4to5foreachwaypointgroupyouwanttoshow
orhide.
PasswordConrmation
WhenPasswordProtectionisenabledandyouareattemptingto
accessapasswordprotectedfunctionforthersttimeduringa
power-cycle,thesystemwillrequestconrmationofyourpassword
beforeyoucan:
•AccessWPTSkeyfunctions.Thisdoesnotaffecttheoperationof
theMOBfunction.
•AccessROUTEsoftkeyfunctions.
•Createaroutefromatrack.Allothertrackfunctionsare
unaffected.
•Archiveortransferanywaypoints.
•EntertheWaypointPasswordSetupmenu.
Note:Onceyouhaveprovidedapasswordtothesystem,itmust
beenteredtoaccessthePasswordSetupsub-menu,regardless
ofthewhetherPasswordProtectionissettoONorOFF.
Note:Raymarinestronglyrecommendsthatyoubackupyour
waypointdataBEFOREpasswordprotectingyourwaypoints.
Thisissothat,intheeventthatyouforgetyourpassword,you
caneasilyrestoreyourwaypoints.
DisabledData/Functions
WhenPasswordProtectionisONandyouhavenotentereda
password,youwillNOTbeableto:
•Viewdetailsofwaypointandroutedatabases.
•Editwaypointsorroutes.
Usingwaypoints
47
Page 48

•Gotoanexistingwaypoint.
•Followaroute.
•Viewwaypointsonscreen(evenwhentheSHOW/HIDEstatus
issettoSHOW).
•Viewwaypointnamesonscreen(evenwhenWA YPOINTNAME
issettoON).
AllotheroptionsincludingGOTOCURSORareunaffected.
Specifyingapasswordforwaypoints
1.PresstheMENUbutton.
2.Usingthetrackpad,selecttheSystemSetupmenuitem,and
pressthetrackpadrighttoselectthemenuitem.
3.Usingthetrackpad,selecttheWaypointPasswordSetupmenu
item,andpressthetrackpadrighttoselectthemenuitem.
4.Usingthetrackpad,selecttheEnablePasswordmenuitem,and
pressthetrackpaddowntoselecttheONoption.
5.PresstheOKbutton.
6.Readthedisplayedwarning,andpresstheYESsoftkeyto
acceptit,asappropriate.
7.Usingthetrackpad,enterthepassword(1to16characters,and
casesensitive).
8.PresstheOKbutton.
9.RepeatSteps7to8toconrmthepassword.
10.Addahinttohelpyourememberthepassword(optional).
11.PresstheOKbutton.
Thepasswordisnowsetandprotectionenabled,althoughaccess
tothewaypointandroutefunctionsremainsavailableuntilyou
restartyourmultifunctiondisplay.
Changingthewaypointspassword
1.PresstheMENUbutton.
2.Usingthetrackpad,selecttheSystemSetupmenuitem,and
pressthetrackpadrighttoselectthemenuitem.
3.Usingthetrackpad,selecttheWaypointPasswordSetupmenu
item,andpressthetrackpadrighttoselectthemenuitem.
4.Usingthetrackpad,selecttheChangePasswordmenuitem,
andpressthetrackpadrighttoselectthemenuitem.
5.Usingthetrackpad,enteryournewwaypointspassword(1to16
characters,andcasesensitive).
6.PresstheOKbutton.
7.RepeatSteps5to6toconrmthepassword.
8.Enterahinttohelpyourememberthepassword(optional).
9.PresstheOKbutton.
Disablingpasswordprotectionforwaypoints
1.PresstheMENUbutton.
2.Usingthetrackpad,selecttheSystemSetupmenuitem,and
pressthetrackpadrighttoselectthemenuitem.
3.Usingthetrackpad,selecttheWaypointPasswordSetupmenu
item,andpressthetrackpadrighttoselectthemenuitem.
4.Whenprompted,enteryourexistingwaypointspassword.
5.PresstheOKbutton.
6.Usingthetrackpad,selecttheEnablePasswordmenuitem,and
pressthetrackpaduptoselecttheOFFoption.
7.PresstheOKbutton.
48C-SeriesWidescreenuserreference
Page 49

Chapter6:Usingthechart
Chaptercontents
•6.1Chartapplicationoverviewonpage50
•6.2Ensuresafenavigationonpage50
•6.3Usingthechartsafelyonpage51
•6.4Whatthechartdisplaysonpage51
•6.5Chartcardsonpage52
•6.6Chartdatumonpage52
•6.7Chartsetuponpage53
•6.8Movingaroundthechartonpage59
•6.9Chartpresentationonpage60
•6.10Locatingyourvesselonthechartdisplayonpage72
•6.11Waypointsonpage73
•6.12Routesonpage75
•6.13Tracksonpage82
•6.14Measuringdistancesandbearingsonpage84
Usingthechart
49
Page 50

6.1Chartapplicationoverview
6.2Ensuresafenavigation
WithsuitableheadingandpositiondatafromyourchartsandaGPS
module,yourmultifunctiondisplayenablesyouto
•Findoutwhereyouare.
•Interpretyoursurroundings.
•Measurethedistanceandbearingbetweentwopoints.
•Placewaypointsatspeciclocations.
•Navigatetoaspecicpoint.
•Buildandfollowaroute.
•Monitorwhereyouaregoing.
•Distinguishbetweenxedandmovingobjectsusingradaroverlay .
•Recordwhereyouhavebeen.
•Manageandeditroutesandtracks.
•ViewAISdata.
Youcanalsouseyourmultifunctiondisplaytocustomizeyourchart
applicationtoyourownparticularrequirementsandcircumstances.
Youcan:
•Alterthewaythechartisdrawninrelationtoyourboatandthe
directionyouaretravellingin(chartorientationandmotionmode).
•Manageandeditchartdatayouhaveentered.
•Controlthelevelofdetaildisplayedon-screen.
Ensuresafebasicnavigationatalltimes.
Thisproductisintendedonlyasanaidtonavigationandmust
neverbeusedinpreferencetosoundnavigationaljudgment.Only
ofcialgovernmentchartsandnoticestomarinerscontainallthe
currentinformationneededforsafenavigation,andthecaptainis
responsiblefortheirprudentuse.Itistheuser’sresponsibilityto
useofcialgovernmentcharts,noticestomariners,cautionand
propernavigationalskillwhenoperatingthisoranyotherRaymarine
product.
50C-SeriesWidescreenuserreference
Page 51

6.3Usingthechartsafely
Chart orientation
Motion mode
Status
bar
Current
position
Carto-
graphic
object
Active
waypoint
Chart view
AIS
target
6.4Whatthechartdisplays
Whenusingyourchartplotteryoushouldalwayscheckthataroute
issafe.
Zoomintocheckforhazards,suchassmallshoals,thatmay
notbeshownonasmallerscalechart.Untilyouarefamiliarwith
interpretingthechartdisplay,youshouldtakeeveryopportunityto
comparethedisplayedobjectswithvisualtargets,suchasbuoys
andcoastalstructures.Y oushouldpracticeharbourandcoastal
navigationduringdaylightandinclearweatherconditions.The
simulatormodecanalsobeusedtohelpyougainexperience.
Thechartdisplayhasanumberoffeaturestohelpyounavigate.
Thefollowingdiagramillustratesthemainfeatures:
Usingthechart
51
Page 52

6.5Chartcards
6.6Chartdatum
Chartcardscanbeusedwithyourmultifunctiondisplaytoprovide
chartdetailforspecicgeographicareas.
Yourmultifunctiondisplayissuppliedwithembeddedcartography
thatprovidesalevelofdetailsuitableforbasicnavigationina
specicgeographicarea.Ifyourequirechartswithahigherlevel
ofdetail,orforadifferentgeographicarea,itisnecessaryto
purchaseNavionics®chartcards.Tocheckthecurrentavailability
ofNavionicschartcardtypesandthelatestfeaturesets,visit
www.navionics.comorwww.navionics.it.T oobtainNavionicscards,
contactyourlocaldealerorvisittheNavionicswebsite.
InorderforyourGPSandcharttocorrelateaccuratelywithyour
papercharts,theymustbeusingthesamedatum.
ThedefaultdatumforyourdisplayisWGS1984.Ifthisisnot
suitable,youcanchangethesettingviatheChartSetupmenu.
Whenyouadjustthedatumofyourmultifunctiondisplay,a
RaymarineGPSwillautomaticallycorrelate.Ifyouhaveanexternal
thirdpartyGPS,youwillneedtocorrelatethisseparately.
52C-SeriesWidescreenuserreference
Page 53

6.7Chartsetup
Thesetupforyourchartanditscartographycanbechangedfrom
thestandardcongurationtosuityourparticularneeds.
Althoughyouwillprobablyonlydothiswhenyourstusethechart,
youmaydecidetomakesubsequentadjustmentsonceyoubecome
morefamiliarwiththesystem.Anysettingsthatyouchangeare
retainedevenwhenyoupoweroff.
Selectingthechartsetupmenu
Inthechartapplication:
1.PresstheMENUbutton.
2.Usingthetrackpad,highlighttheChartSetupmenuitem.
3.PressrightonthetrackpadtoentertheChartSetupmenu.
Chartsetupmenuoptions
ThefollowingtabledescribesthevariousoptionsintheChartSetup
Menuforyourmultifunctiondisplay .
MenuitemDescriptionOptions
ObjectInformationDetermineshowfurther
informationisaccessed
forcartographicareas
andobjects:
•OFF—Information
isdisplayedfora
cartographicobject
whenyoumovethe
cursorovertheobject
andpresstheOK
button.
•ALLON—
Informationis
displayedfor
cartographicobjects
andareaswhenyou
movethecursorover
anobjectorarea.
•PointsON—
Informationis
displayedfora
cartographicobject
whenyoumovethe
cursorovertheobject.
•OFF
•PointsON
•AllON(default)
Usingthechart
53
Page 54

MenuitemDescriptionOptions
VectorLengthThedistancethatyour
vesseltravelsinthe
timeperiodspeciedfor
thisoption,determines
thelengthofthevector
linesdrawnonthe
chartdisplay.This
affectsCOGandHDG
(heading)vectors.If
theInniteoptionis
selected,thevectorwill
extendtotheedgeof
thechartwindow.
VectorWidth
Setsthewidthof
theCOGandHDG
(heading)chartvector
lines.
RouteWidth
Setsthewidthofroutes.
MenuitemDescriptionOptions
•3mins
•6mins
•Innite(default)
RecordVesselTrack
By
Determineshowtrack
pointsarerecordedon
thechart:
•Auto—trackpoints
•Auto(default)
•Time
•Distance
areautomatically
created.
•Time—trackpoints
arecreatedbasedon
time.
•Distance—track
pointsarecreated
•Thin
basedondistance.
•Normal(default)
•Wide
•Thin
•Normal(default)
•Wide
54C-SeriesWidescreenuserreference
Page 55

MenuitemDescriptionOptions
TrackIntervalDeterminestheinterval
thatwillbeusedfor
trackpointcreation.
Theoptionsavailable
dependontheoption
selectedfortheRecord
VesselTrackBymenu
item,asfollows:
•Auto—IftheAuto
optionisselectedfor
theRecordVessel
TrackBymenu
item,nooptions
areavailableforthe
TrackIntervalmenu
item.
•Time—IftheTime
optionisselectedfor
theRecordVessel
TrackBymenuitem,
youcanusetheTrack
Intervalmenuitem
tospecifythetime
interval.
•Distance—Ifthe
Distanceoptionis
selectedforthe
RecordVesselTrack
Bymenuitem,you
canusetheTrack
Intervalmenuitemto
specifythedistance
interval.
IfTIMEisselectedfor
theRecordVessel
TrackBymenuitem:
•2secs
•5secs
•10secs
•30secs
•1min
•3min
•5min
•10min
•30min
IfDISTANCEisselected
fortheRecordVessel
TrackBymenuitem:
•0.02nm
•0.05nm
•0.1nm
•0.2nm
•0.5nm
•1.0nm
MenuitemDescriptionOptions
Datum
InorderforyourGPS
andcharttocorrelate
accuratelywithyour
papercharts,theymust
beusingthesame
datum.Thedefault
datumforyourdisplay
isWGS1984.Ifthisis
notsuitable,youcan
changethesetting.
Whenyouchangethe
datumsetting,thechart
gridwillsubsequently
moveaccordingto
thenewdatum,and
thelatitude/longitude
ofthecartographic
featureswillalsochange
accordingly.Thesystem
attemptstosetupany
GPStothenewmode,
andindicateswhether
thiswassuccessfulor
not.
•WGS1984(default)
•Listofavailable
datum
Usingthechart
55
Page 56

MenuitemDescriptionOptions
ChartOffset
Allowsyoutomove
thepositionofthe
chartinordertocorrect
forpositionerrorsin
thecartography.This
adjustmentisindicated
inthechartapplication
asadistancenorth/west
(+ve)orsouth/east
(-ve)fromyourvessel
position,toamaximum
of1000m.Whenyou
pressthetrackpadright
toselectthismenuitem,
theOFFSETsoftkeyis
displayed,enablingyou
toswitchchartoffsetON
orOFF.
•ON
•OFF(default)
Selectingthecartographysetupmenu
Inthechartapplication:
1.PresstheMENUbutton.
2.Usingthetrackpad,highlighttheCartographySetupmenuitem.
3.PressrightonthetrackpadtoentertheCartographySetupmenu.
Cartographysetupmenuoptions
ThefollowingtabledescribesthevariousoptionsintheCartography
SetupMenuforyourmultifunctiondisplay .
MenuitemDescriptionOptions
ChartDisplay
ChartGrid
ChartText
ChartBoundaries
Determinesthelevel
ofdetailshownonthe
chart.
Determineswhether
gridlinesrepresenting
longitudeandlatitude
aredisplayedonthe
chart:
•OFF—gridlinesare
NOTdisplayed.
•ON—gridlinesare
displayed.
Determineswhether
charttextisdisplayed
(placenamesandso
on).
•OFF—charttextis
NOTdisplayed.
•ON—charttextis
displayed.
Determineswhethera
lineindicatingthechart
boundaryisdisplayed.
•OFF—chart
boundaryisNOT
displayed.
•ON—chartboundary
isdisplayed.
•Simple
•Detailed(default)
•ExtraDetailed
•OFF
•ON(default)
•OFF
•ON(default)
•OFF
•ON(default)
56C-SeriesWidescreenuserreference
Page 57

MenuitemDescriptionOptions
SpotSoundings
Determineswhethera
numberindicatingdepth
isdisplayed.
•OFF—depthisNOT
displayed.
•ON—depthis
displayed.
SafetyContour
Areaswithdepthsthat
areSHALLOWERthan
thisspeciedvalueare
shadedinabluecolor
thatisdarkerthanareas
withdepthsthatare
GREATERthanthis
speciedvalue.
DepthContour
Thedepthcontouris
shownonthechart
displayasaline
indicatingthedepth
ataparticularposition.
•OFF
•ON(default)
•OFF
•7ft
•10ft
•16ft
•20ft
•33ft
•66ft(default)
•OFF
•16ft
•20ft
•33ft
•66ft
•ALL(default)
MenuitemDescriptionOptions
HideRocksDetermineswhether
rocksareshownor
hiddenonthechart,and
thedepthatwhichthey
areshown:
•OFF—rocksare
displayed.
•16ft—rocksare
hiddenatdepthsof
16ftandgreater.
•20ft—rocksare
hiddenatdepthsof
20ftandgreater.
•33ft—rocksare
hiddenatdepthsof
33ftandgreater.
•66ft—rocksare
hiddenatdepthsof
66ftandgreater.
Nav.MarksDetermineswhether
navigationmarksare
displayedonthechart:
•OFF—navigation
marksareNOT
displayed.
•ON—navigation
marksaredisplayed.
•OFF(default)
•16ft
•20ft
•33ft
•66ft
•OFF
•ON(default)
Usingthechart
57
Page 58

MenuitemDescriptionOptions
Nav.MarksSymbolsDetermineswhichsetof
navigationmarksymbols
isused—International,
orUS.Thesesymbols
correspondtopaper
charts.
LightSectors
Determineswhether
thesectoroflightcast
byaxedbeaconis
displayedornot.
•OFF—sectoroflight
isNOTdisplayed.
•ON—sectoroflight
isdisplayed.
Caution&Routing
Data
Determineswhether
cautionandroutingdata
isdisplayedornot.
•OFF—cautionand
routingdataisNOT
displayed.
•ON—caution
androutingdata
isdisplayed.
•International(default)
•US
•OFF
•ON(default)
•OFF
•ON(default)
MenuitemDescriptionOptions
MarineFeaturesWhenthismenuitem
issettoON,the
followingwater-based
cartographicfeatures
aredisplayed:
•Cables.
•Natureofseabed
points.
•Tidestations.
•Currentstations.
•Portinformation.
LandFeaturesWhenthismenuitemis
settoON,land-based
cartographicfeatures
aredisplayed.
ColoredSeabedAreas
Whenthismenuitemis
settoON,theseabed
isshowningreater
denitionincertain
areaswheretheextra
detailisavailable.
BackgroundColor
Determineswhatcolor
thebackgroundwater
willbeinanyareas
whereNavionics
cartographyisnot
available.
•OFF
•ON(default)
•OFF
•ON(default)
•OFF(default)
•ON
•White(default)
•Blue
58C-SeriesWidescreenuserreference
Page 59

MenuitemDescriptionOptions
BusinessServices
AerialPhotoOverlay
RoadsDetermineswhether
AdditionalWrecksDetermineswhether
Whenthismenuitem
issettoON,symbols
indicatingthelocation
ofabusinesswillbe
shown.
Determinesthearea
thatwillbedisplayedfor
aerialphotooverlay .
majorcoastalroadsare
displayedonthechart:
•OFF—coastalroads
areNOTdisplayed.
•ON—coastalroads
aredisplayed.
extendedinformationfor
newwrecksisdisplayed:
•OFF—extended
wreckinformationis
NOTdisplayed.
•ON—extended
wreckinformationis
displayed.
•OFF
•ON(default)
•OnLandandSea
•OnLand(default)
•OFF
•ON(default)
•OFF
•ON(default)
6.8Movingaroundthechart
Youcanmovearoundthechartusingthepanandzoomcontrols.
Acombinationofzoomingandpanningisrequiredtomovearound
thechartanddisplayanareaattheappropriatescale.
Note:Whenyoupanthechart,orwhenyouchangethescalein
autorangemode;themotionmodeissuspended.
Panningmovesthedisplayedcharttoadifferentarea.When
thecursorreachestheedgeofthescreen,thechartpans.
Whenyouzoomin,thechartscalechangestoshowasmaller
areainmoredetail.Conversely,ifyouzoomoutthechartarea
displayedisincreasedbutthedetailisreduced.
Note:Thecartographicdetailavailableonchartsvaries
accordingtothechartandthechartscale.Someareasprovide
detailatsmallerscalesthanothers.
Afeatureofthechartis‘autoscale’.Ifyouselectachartscalethat
doesnothavecartographicdetailinsomeareas,thechartwilluse
themostdetailedlevelavailableforthesurroundingareaandstretch
ittottheselectedscale.Thismeansthatyouwillneverhaveblank
orhatchedareasonyourscreen.Howevertheremaybesome
mis-alignmentofobjectswhichcrossthechartboundaryinthisarea.
Usingthechart
Zoominginandout
1.T ozoominclosertothepicture,presstheRANGEINcontrol.
59
Page 60

2.T ozoomoutfurtherfromthepicture,presstheRANGEOUT
control.
3.Pressandholdthebuttontozoomcontinuously .
Panningaroundthedisplay
1.T opanaroundthedisplay ,pressthetrackpadinthedirectionin
whichyouwanttopan.
2.Pressandholdthetrackpadintherelevantdirectiontopan
continuously.
Navigatingtothecursorpositiononthechart
1.Positionthecursoratthedesireddestinationonthechart.
2.PresstheGOTOsoftkey.
3.PresstheGOTOCURSORsoftkey.
Note:Thistargetwaypointisalsoidentiedontheradar.
6.9Chartpresentation
Thechartcanbeviewedinanumberofwaystosuityourneeds.
Youwillnormallyviewyourchartwiththevesselonscreenand
motionmode‘active’.Whenmotionmodeisactive,asyourvessel
moves,thechartisredrawntokeepthevesselonscreen.When
youzoomthechartinactivemode,thechartzoomsaboutyour
vesselposition.Alternatively,youmaybeplanningajourneyand
donotwantthecharttoredrawasyourvesselmoves.Youcan
suspendtheactivemotionmodebyusingthecursortopanthechart
orbyselectingFINDCURSOR.Whenmotionmodeissuspended,
themodeisshowninthestatusbarinparenthesise.g.(RELATIVE
MOTION);zoomoperatesaboutyourcursorposition.Providedthe
necessarydatatoascertainyourvessel’spositionisavailable,you
canactivatethemotionmode,byselectingFINDSHIP .
Changingthechartdisplay
Eachchartwindowcanbetailoredtomeetyourparticularneeds.
Youcan:
•Setthechartviewforindividualwindowsorsystemwide.
•Changehowthechartisorientated.
•Changethewayyourchartisdrawninrelationtoyourboat
movement.
Workingwithmultiplechartviews
Ifyouhavemorethanonechartwindow,youcaneithersharethe
presentationorpresenteachwindowindependently.Theoption
youhavechosenisindicatedonthechartstatusbarasLOCALor
SYSTEM.
60C-SeriesWidescreenuserreference
Page 61

SYSTEM
chartview
Whenachartapplicationisstarted,itdefaultstoSYSTEM
view.AnywindowssettoSYSTEMviewwillhavethesame
presentationasothersystemwindowsfor:
•Chartmodeandorientation.
•Chartlayers—radarandAIS.
•Radar/chartsynchronization.
•Show/hidewaypoints,routesandtracks.
•Declutter.
•Vectors.
Ifyouchangeanyoftheseoptionsinonewindow,allsystem
windowswillbeupdated.
LOCAL
chartview
WhenLOCALchartviewisselected,thepresentationforeach
windowissetindependently.
Selectinglocalorsystemchartview
Inthechartapplication:
1.PressthePRESENT ATIONsoftkey.
2.PresstheCHARTVIEWsoftkeytotogglebetweenLOCALand
SYSTEMchartviews.
Note:Themotionmodewillbesetbutnotsynchronizedacross
windowswhenthechartviewissettoSYSTEM.
Chartorientation
Theorientationofachartreferstotherelationshipbetweenthe
chartandthedirectionthatyouaretravellingin.
Itisusedinconjunctionwithmotionmodetocontrolhowyourboat
andchartrelatetooneanotherandhowtheyaredisplayedon
screen.Themodethatyouchooseisrestoredatpowerup.Any
changesthatyoumaketoachartwindowthatissettosystem
viewwillbereectedinallothersystemviewchartwindows.The
followingoptionsareavailable:
NorthUp(N-up)
InNorthUpmode,thechartorientationisxedwithtruenorth
upwards.Asyourheadingchangestheboatsymbolmoves
accordingly.Thisisthedefaultmodeforthechartapplication.
HeadUp(H-up)
HeadUpmodedisplaysthechartwithyourboat’scurrentheading
upwards.Astheheadingchangestheboatsymbolremainsxed
andthechartpicturerotatesaccordingly.
Note:T opreventcontinuousbackwardsandforwardsrotations
astheboatyawsfromside-to-side,thechartwillnotupdate
unlesstheheadingchangesbyatleast10degreesfromthelast
displayedorientation.
Note:ItisnotpossibletoselectHeadUpwhenthemotionmode
issettoTrue.
CourseUp(C-up)
InCourseUpmode,thechartpictureisstabilizedandshownwith
yourcurrentcourseupwards.Asyourboat’sheadingchanges,the
shipsymbolmovesaccordingly.Ifyouselectanewcourse,the
picturewillresettodisplaythenewcourseupwards.Thereference
usedforCourse-Updependsupontheinformationavailableata
giventime.Thesystemalwaysprioritizesthisinformationinthe
followingorder:
1.Bearingfromorigintodestination,i.e.intendedcourse.
Usingthechart
61
Page 62

2.LockedheadingfromanAutopilot.
D6839_3
0 Vessel offset
1/3 Vessel offset
2/3 Vessel offset
3.Bearingtowaypoint.
4.Instantaneousheading.
Ifheadingdatabecomesunavailablewhilstinthismode,awarning
messagewillbeshownandthechartuses0°headinginrelative
motion.
Settingthechartorientation
Inthechartapplication:
1.PressthePRESENT ATIONsoftkey.
2.PresstheCHARTMODEANDORIENTATIONsoftkey .
3.PresstheORIENT ATIONsoftkeyuntiltherequiredoption(H-UP,
N-UP,orC-UP)isselected.
4.PresstheOKbutton.
Maintainingaviewofyournavigation
Inthechartapplication:
1.PressthePRESENT ATIONsoftkey.
2.PresstheCHARTMODEANDORIENTATIONsoftkey .
3.PresstheMOTIONMODEsoftkey,andselecttheARoption.
Thechartwillautomaticallymaintainaviewofbothyourvesseland
thetargetwaypointonscreen.
Settingthemotionmode
Themotionmodecontrolstherelationshipbetweenthechartand
yourvessel.
Whilstmotionmodeisactive,asyourvesselmoves,thechartis
redrawntokeepthevesselon-screen.Thethreemotionmodesare:
•RelativeMotion
•TrueMotion
•Autorange
WhenyoupanthechartortoggleFindShip/CursortoCursor,the
motionmodeissuspended.Thisisindicatedinthestatusbarby‘(
)’aroundthemotionmodeandenablesyoutoviewanotherarea
ofthechartwhilstnavigating.Toresetthemotionmodeandreturn
yourvesseltothescreen,pressFindShip.Manuallychanging
therangeinautorangealsosuspendsmotionmode.Thedefault
settingisrelativemotionwithzerooffset.Themodethatyouselect
isrestoredatpowerup.WhenachartwindowissettoSystem
view,themotionmodewillbesetbutnotsynchronizedacrossother
systemviewwindows.
RelativeMotion(RM)withoptionalvesseloffset
WhenthemotionmodeissettoRelative,thepositionofyourvessel
isxedonthescreenandthechartpicturemovesrelativetoyour
vessel.Y oucanspecifyusingtheVesselOffsetsoftkey,whether
thevesselisxedinthecentreofthewindow(0offset)oroffsetby
1/3or2/3.Ifyouchangetheoffsetto1/3or2/3,theviewahead
ofyourvesselwillbeincreased.
62C-SeriesWidescreenuserreference
Page 63

InthefollowingexamplethemotionmodehasbeensettoRelative,
D6840_2
D6841-2
withavesseloffsetof1/3.Thevesselisxedintheoffsetposition
andthechartmovesaccordingly:
TrueMotion(TM)
WhenthemotionmodeissettoTrue,thechartisxedandthe
vesselmovesintrueperspectivetoxedlandmassesonthescreen.
Asthevessel’spositionapproachestheedgeofthescreen,the
chartpictureisautomaticallyresettorevealtheareaaheadofthe
vessel.
Note:ItisnotpossibletoselectTrueMotionwhentheorientation
issettoHeadUp.
Autorange
Autorangeselectsandmaintainsthelargestpossiblescaleofchart
thatwilldisplayboththevesselandthetargetwaypoint.Autorange
isnotavailableifradar-chartsynchronizationison.
Chartoffset
Chartoffsetenablesyoutocompensateforpositionerrorsinthe
cartographybymovingthepositionofthechart.
Thisadjustmentisindicatedasadistancenorth/west(+ve)or
south/east(-ve)fromyourvesselposition,toamaximumof1000m.
Toviewtheeffectsofanoffsetyoucanturnthefeatureonoroff.
Oncecalculated,theoffsetisappliedtoallcharts.
Note:Anyoffsetenteredwillbeappliedtoallchartsonthechart
card.Y oushouldthereforeensurethatthisfeatureisswitched
offonceyouhavecompensatedforthepositionerrorsinthe
cartography.Anychartingerrorsthatyoudiscovershouldbe
reportedtoNavionics.
Enablingchartoffset
1.PresstheMENUbutton.
2.Usingthetrackpad,highlighttheChartSetupmenuoption,and
pressthetrackpadrighttoselectit.
3.Usingthetrackpad,highlighttheChartOffsetmenuoption,and
pressthetrackpadrighttoselectit.
4.PresstheOFFSETsoftkey,andselecttheONoption.
Note:Ifyourvesselpositionisnotavailable,thecurrentchart
centerisusedasthereferencepoint.
Changingthechartoffsetvalue
1.PresstheMENUbutton.
2.Usingthetrackpad,highlighttheChartSetupmenuitem.Press
thetrackpadrighttoselectthemenuitem.
3.Usingthetrackpad,highlighttheChartOffsetmenuitem.Press
thetrackpadrighttoselectthemenuitem.
4.PresstheOFFSETsoftkeytoswitchChartOffsetON.
5.PresstheADJUSTN-SorADJUSTE-Wsoftkeyasappropriate,
andusetherotarycontroltochangethevalue.
Usingthechart
63
Page 64

6.PresstheOKbutton.
Resettingthechartoffsetvalue
1.PresstheMENUbutton.
2.HighlighttheChartSetupmenuoption,andpresstheright
cursorkeytoselectit.
3.HighlighttheChartOffsetoption,andpresstherightcursor
keytoselectit.
4.PresstheOFFSETsoftkeytoselecttheONoption.
5.PresstheSETOFFSETsoftkey.
6.PresstheCLEAROFFSETsoftkey.
Chartlayers
Aerialphotooverlay
Youcanoverlayanaerialphotoontothechartdisplay,helpingyou
tointerpretyourenvironmentanditsfeatures.
Ifyouareusingasuitablechartcard,youcanoverlayanaerial
photoontothechartdisplay.Thiscoversthenavigablewatersupto
threemilesinsidethecoastline.
Beyondtheselimits,thelandwillappeargreen,andtheresolutionis
dependentontheregioncoveredbythechartcardyouareusing.
UsingtheoptionsintheCartographySetupMenu,youcanspecify
whethertheaerialphotooverlayisdisplayedforlandareasonly,or
forlandandseaareas.
Youcanalsoadjusttheopacityoftheaerialphotooverlayifrequired.
Enablingaerialphotooverlay
Inthechartapplication:
1.PressthePRESENT ATIONsofttkey.
2.PresstheCHARTLA YERSsoftkey .
3.PresstheAERIALOVERLA YsoftkeyrepeatedlyuntiltheON
optionisselected.
4.PresstheOKbutton.
Specifyingaerialoverlayopacity
Inthechartapplication:
1.PressthePRESENT ATIONsofttkey.
2.PresstheCHARTLA YERSsoftkey .
3.PresstheAERIALOVERLA YsoftkeyrepeatedlyuntiltheON
optionisselected.
Theopacitygaugeisdisplayedabovethesoftkey.
4.Usingtherotarycontrol,selectthelevelofopacityrequired,
between1and100%.
5.PresstheOKbutton.
Specifyingtheaerialoverlayarea
Inthechartapplication,withaerialphotooverlayenabled:
1.PresstheMENUbutton.
2.Usingthetrackpad,selecttheCartographySetupmenuitem.
3.Usingthetrackpad,selecttheAerialPhotoOverlaymenuitem.
4.PressthetrackpadrighttoselecttheOnLandorOnLandand
Seaoption,asappropriate.
Note:WhentheCHARTVIEWmodeissettoSYSTEM,the
aerialphotooverlayisdisplayedinALLnetworkeddisplays.
64C-SeriesWidescreenuserreference
Page 65

5.PresstheOKbutton.
Radaroverlay
YoucancombinethechartwiththeradarorMARPAfunctionsto
providetargettrackingortohelpyoudistinguishbetweenxed
objectsandothermarinetrafc.
Youcanenhancetheuseofyourchartbycombiningitwiththe
followingradarfeatures:
•Radarrangesynchronization.
•MARP A.
•Radaroverlay(fordistinguishingbetweenxedandmoving
objects).
Radarrangesynchronization
Whensynchronizationisswitchedon:
•Theradarrangeinallradarwindows,changestomatchthechart
scale.
•‘Sync’isindicatedinthetopleft-handcornerofthechartwindow.
•Ifyouchangetheradarrange,inanyradarwindow,all
synchronizedchartviewschangescaletomatch.
•Ifyouchangethescaleofasynchronizedchartwindow,allradar
windowschangerangetomatch.
UsingtheradartoviewMARPAtargetsonthechart
TheMiniAutomaticRadarPlottingAid(MARPA)functionisused
fortargettrackingandriskanalysis.WhenMARPAissetupin
radarmodeorradaroverlay ,allMARPAtargetsaredisplayedinthe
chartwindowandassociatedMARPAfunctionscanbeaccessed
viathechart.
Usingradaroverlaytodistinguishbetweenxedandmoving
objects
Youcanoverlayradarimagedataoveryourchartimageallowing
betterdistinctionbetweenxedobjectsandothermarinetrafc.For
bestresults,switchonRadar-Chartsynchronizationtoensureradar
rangeandchartscalearesynchronized.
Enablinganddisablingradaroverlay
Inthechartapplication:
1.PressthePRESENT ATIONsoftkey.
2.PresstheCHARTLA YERSsoftkey .
3.PresstheRADAROVERLAYsoftkeyuntiltheONorOFFoption
isselected,asrequired.
Note:Ifradaroverlayisappliedtoachartwindowthatisset
tosystemview,theoverlaywillbedisplayedinallothersystem
viewchartwindows.
Changingtheradarrangefromthechartdisplay
Inthechartapplication:
1.PressthePRESENT ATIONsoftkey.
2.PresstheCHARTMODEANDORIENTATIONsoftkey .
3.PresstheCHARTSYNCsoftkeyuntiltheRDRoptionisselected.
4.PresstheOKbutton.
5.UsetheRANGEINorOUTcontroltochangetheradarrange.
Synchronizingthechartwiththeradarrange
Inthechartapplication:
1.PressthePRESENT ATIONsoftkey.
2.PresstheCHARTMODEANDORIENTATIONsoftkey .
3.PresstheCHARTSYNCsoftkeyuntiltheRDRoptionisselected.
Usingthechart
65
Page 66

Note:Radarrangesynchronizationisnotavailablewhenthe
chartmotionmodeissettoAUTORANGE.
2.Alternatively,withRadarOverlayswitchedon,pressthe
TARGETTRACKINGsoftkey.
Chartscaleandradarrangesynchronization
Youcansynchronizetheradarrangeinallradarwindowswiththe
chartscale.
Whensynchronizationisswitchedon:
•Theradarrangeinallradarwindowschangestomatchthechart
scale.
•‘Sync’isindicatedinthetopleft-handcornerofthechartwindow.
•Ifyouchangetheradarrange,inanyradarwindow,all
synchronizedchartviewschangescaletomatch.
•Ifyouchangethescaleofasynchronizedchartwindow,allradar
windowschangerangetomatch.
Synchronizingradarrangewithchartscale
Inthechartapplication:
1.PressthePRESENT ATIONsoftkey.
2.PresstheCHARTMODEANDORIENTATIONsoftkey .
3.PresstheCHARTSYNCsoftkeyuntiltheRDRoptionisselected.
4.PresstheOKbutton.
Note:Radarrangesynchronizationisnotavailablewhenthe
chartmotionmodeissettoAUTORANGE.
AccessingMARPAcontrolsonthechart
Inthechartapplication:
1.Selectthetargetusingthecursor.
TheMARPA-relatedsoftkeysaredisplayed.
Bathymetricdata
Youcanviewdetailedbathymetriccontourdatainthechart
applicationforuseduringshing.
Beforeyoucandisplaybathymetricdatainthechartapplication,you
musthaveNavionicschartcardswiththerelevantlevelofdetail.
WhenyouchangetheCHARTTYPEtotheFISHoption,bathymetric
dataisshownonthechart(whereavailable,basedonyourchart
card).
Enablingbathymetricdata
Inthechartapplication:
1.PressthePRESENT ATIONsoftkey.
2.PresstheCHARTLA YERSsoftkey .
3.PresstheCHARTTYPEsoftkeyrepeatedlyuntiltheFISHoption
isselected.
4.PresstheOKbutton.
AISobjects
YoucanviewAISobjectsinthechartdisplaytohelpyouavoid
collisions,andidentifyvessels.
IfyouhaveasuitableAISreceiverortransceiverconnectedtoyour
multifunctiondisplay,youcanusetheAISlayerto:
•DisplaytargetsforanyotherAIS-equippedvessels.
•Displayvoyageinformationbeingbroadcastedbythesetargets
—forexample,theirposition,course,speedandrateofturn.
66C-SeriesWidescreenuserreference
Page 67

•Displaybasicordetailedinformationforeachtargetvessel
includingsafety-criticaltargetdata.
•Setupasafezonearoundyourboat.
•ViewAISalarmandsafetyrelatedmessages.
TheChartLayersmenuisdisplayed.
4.Usingthetrackpad,selecttheAISObjectsmenuitem.
5.PressthetrackpadrighttoselecttheONoption.
6.PresstheOKbutton.
EnablingAISobjects
Inthechartapplication:
1.PressthePRESENT ATIONsoftkey.
2.PresstheCHARTLA YERSsoftkey .
3.PresstheCHARTLA YERSsoftkey .
TheChartLayersmenuisdisplayed.
4.Usingthetrackpad,selecttheAISObjectsmenuitem.
5.PressthetrackpadrighttoselecttheONoption.
6.PresstheOKbutton.
Rangerings
Displayingrangeringsonthechartenablesyoutomeasure
distances.
Rangeringsgiveyouanincrementalrepresentationofdistance
fromyourvesseltohelpyoujudgedistancesataglance.Therings
arealwayscentredonyourvessel,andthescalevariestosuityour
currentzoomsetting.Eachringislabelledwiththedistancefrom
yourvessel.
Enablingrangerings
Inthechartapplication:
1.PressthePRESENT ATIONsoftkey.
2.PresstheCHARTLA YERSsoftkey .
3.PresstheCHARTLA YERSsoftkey .
3Dchartviewlocator
Youcanshowa3Dviewlocatoronthe2Dcharttoindicatethe
boundariesoftheareacurrentlyshownonthe3Dchart.
The3Dviewlocatorisapolygonoutlinedinbluethatcanbe
overlayedonthe2Dchart.Asyourotateandpitchthevessel
symbolonthedisplay,orusethepanandzoomcontrols,theblue
polygonmovesonthe2Dcharttoindicatetheboundariesofthe
areacurrentlyshownonthe3Dchart.
Enablingthe3Dlocator
Inthechartapplication:
1.PressthePRESENT ATIONsoftkey.
2.PresstheCHARTLA YERSsoftkey .
3.PresstheCHARTLA YERSsoftkey .
TheChartLayersmenuisdisplayed.
4.Usingthetrackpad,selectthe3DLocatormenuitem.
5.PressthetrackpadrighttoselecttheONoption.
6.PresstheOKbutton.
Chartvectors
Chartvectorsshowadditionalinformationonthechartdisplay,
includingheadingandCOGvectors,andwindandtidearrows.
Usingthechart
67
Page 68

Arangeofvectorgraphicscanbesuperimposedontothechart
display.Thefollowingvectorscanbeindependentlyenabledor
disabled:
•HDG(heading)vector—showsthevessel’sheading,displayed
asalinewithanopenarrowhead.Itdoesnottakewindsortides
intoaccount.
•COG(CourseOverGround)vector—indicatesthevessel’sactual
course,andisdisplayedasalinewithtwoopenarrowheads.
•Windandtidevectors—windsandtidesaredisplayedaslines
withsolidarrowheadsinthedirectionofthewindortidalset.
Windarrowspointtowardsyourvessel,andtidalarrowspoint
away.Thewidthofthearrowindicatesitsstrength.
Note:ThelengthoftheHDGandCOGvectorlinesisdetermined
bythedistanceyourvesselwilltravelinthetimeyouhave
specied(3mins,6minsorInnite)intheChartSetupMenuat
thecurrentspeed.Anytimesthatyouspecifywillapplytoall
chartviews,andiftheInniteoptionisselected,thevectorwill
extendtotheedgeofthechartwindow.
Note:IfneitherSpeedOverGround(SOG)orheadingdatais
available,vectorscannotbedisplayed.
Enablinganddisablingchartvectors
1.PresstheDATAbutton.
2.PresstheCHARTVECTORSsoftkey.
3.Presstheappropriatesoftkeytoenableordisablethechart
vectorsyouwanttouse.
Declutteringthechart
Youcanreducetheamountofdetailshownonthechartby
de-clutteringthechartdisplay.
Iftherearealargenumberofcartographicobjectsinaparticular
area,youcanturnonthedeclutteroptiontohidethefollowing
cartographicobjects:
•T ext.
•Chartboundaries.
•Spotsoundings.
•Depthcontours.
•Lightsectors.
•CautionandroutingData.
•Landandmarinefeatures.
•Businessservices(ifavailableforyourcartography).
Declutteringthechartdisplay
Inthechartapplication:
1.PressthePRESENT ATIONsoftkey.
2.PresstheDECLUTTERsoftkeyandselecttheONoption.
Displayingdetailsoftidesandcurrents
Displayingdetailsoftides
Inthechartapplication:
1.Usingthetrackpad,positionthecursoroverthediamond-shaped
tidalsymbol.
2.PresstheOKbuttontodisplayinformationforthattide.
3.T odisplayadditionaltidaldata,presstheTIDALDATAsoftkey.
4.T omovethetimeselector,usethetrackpad.
68C-SeriesWidescreenuserreference
Page 69

5.T ochangethedisplayeddate,usetheappropriatesoftkeys.
Displayingdetailsofcurrents
Inthechartapplication:
1.Usingthetrackpad,positionthecursoroverthediamond-shaped
currentsymbol.
2.PresstheOKbuttontodisplayinformationforthatcurrent.
3.T odisplayadditionalcurrentdata,presstheCURRENTDAT A
softkey.
4.T omovethetimeselector,usethetrackpad.
5.T ochangethedisplayeddate,usetheappropriatesoftkeys.
Animatedtideandcurrentinformation
Youcansetthedatefortheanimationandchoosetoseethe
wholeanimationfromthebeginningorstartitatanypointwithin
the24-hourperiod.
Youcanalsochoosetoviewtheanimationcontinuouslyortostep
throughitinincrementsoftimethatyouset.
SymbolDescription
Directionandspeedofcurrent(green
arrows).
Tideheight.
Usingthechart
Viewinganimatedtideandcurrentinformation
Inthechartapplication:
1.Usingthecursor,highlightatideorcurrenticon.
2.PressOKtoopentheObjectInfodialogboxandtoolbar .
69
Page 70

3.PresstheAnimatesoftkey.
TheTide/CurrentAnimationscreenopenswiththeanimation
paused.
Controllingtideandcurrentanimations
Inthechartapplication,withatideanimationdisplayed:
1.T ostartorstoptheanimation,presstheANIMATION
PLAY/PAUSEsoftkey.
2.T oviewtheanimationinsteps,usetheSTEPBACKorSTEP
FWDsoftkeys.
3.T osettheanimationstepinterval,pauseanyplayinganimations,
andpresstheSETTIMEINTERVALsoftkey.
4.T osettheanimationdate,presstheSETDATEsoftkey.TheEdit
Datescreenshowsthefollowingoptions:
TODAY’S
DATE
PREVDATE
NEXTDATE
EDITDATE
5.PressOKtosavethenewdateandreturntotheTide/Current
Animationscreen,orCANCELtoignorethedatechangeand
returntotheTide/CurrentAnimationscreen,leavingthedate
settingunchanged.
Settheanimationdatetothecurrentdate.
Settheanimationdateto24-hourspreviousto
currentdate.
Settheanimationdateto24-hoursaheadof
currentdate.
OpenstheEditDatepop-upscreen:usethe
trackpadorrotarycontroltoenterthedateyou
wanttoseeananimationfor.
Additionalchartinformation
Youcandisplayadditionalinformationonthechartforcartographic
objects,ports,andmarinas.
Dependingonthechartcardyouareusing,youwillalsobeableto
viewsomeorallofthefollowingadditionalinformation:
•Detailsofeachcartographicobjectthatismarkedonthechart,
includingsourcedataforstructures,lines,openseaareas,and
soon.
•Detailsofports,portfeatures,andbusinessservices.
•Pilotbookinformation(similartowhatyouwouldseeinamarine
almanac).Pilotbookinformationisavailableatcertainports.
•Panoramicphotosofportsandmarinas.Theavailabilityofphotos
isindicatedbyacamerasymbolonthechartdisplay.
Note:Forfulldetailsofthefeaturesavailablewitheachchart
cardtype,refertotheNavionicswebsite:www .navionics.comor
www.navionics.it.
Usingtheportsearchoption
Inthechartapplication:
1.PresstheOKbutton.
2.PresstheSEARCHBYNAMEsoftkey.
3.PresstheEDITNAMEsoftkey.
4.Enterthenameoftheport,andpresstheOKbutton.
5.PresstheSEARCHsoftkey .
6.Ifthesearchreturnsmorethanoneport,highlighttherequired
port,andpressrightonthetrackpadtoselectit.
7.Usethetrackpadtoselectaserviceassociatedwiththatport.
Usingthecursortondaport
Inthechartapplication:
70C-SeriesWidescreenuserreference
Page 71

1.Selecttheappropriateportsymbolinthechartview .
Business services/points of inter est symbols
ishing
equipment
arking
iremen
etrol
repairs
ost Office
olice
Anchorage
ater
transport
rain
ourist
information
axi
station
repairs
eather
station
D8226_1
2.PresstheOKbutton.
3.Alistofservicesassociatedwiththeportisdisplayed.
4.PresstheVIEWDET AILSsoftkey.
5.Usethetrackpadtoselectaservice.
6.PresstheSHOWONCHARTsoftkeytocenterthescreenon
theselectedport,ifrequired.
Displayingdetailsofservicesandpointsofinterest
Inthechartapplication:
1.Usingthetrackpad,movethecursorovertheserviceorpoint
ofinterestsymbol.
2.PresstheOKbutton.Additionalinformationisdisplayed.
Businessservicesandpointsofinterestsymbols
Thelocationofvariousbusinessservicesandpointsofinterestis
indicatedbythefollowingsymbols:
Usingthechart
Displayingdetailsofobjectsandfeatures
Inthechartapplication:
1.Usingthetrackpad,movethecursorovertheobject.Thebasic
objectinformationwillbedisplayed.
2.PresstheOKbutton.Detailedinformationforthatobjectis
displayed.
71
Page 72

3.Iftheobjectyouhaveselectedhasmorethanonesubject
D6627-1
Boat symbol
area,usetherotarycontroltohighlightandselecttherequired
information.
Displayingpilotbookinformation
Inthechartapplication,whenaportsymbolisdisplayed:
1.Usingthetrackpad,movethecursorovertheportsymbol.
2.PresstheOKbutton.
TheObjectInfodialogisdisplayed.
3.Usingthetrackpad,highlightthePilotBookmenuitem,and
pressthetrackpadrighttoselectit.
4.Usingthetrackpad,highlighttherelevantbookorchapter.
5.PresstheVIEWPILOTBOOKsoftkey .
6.10Locatingyourvesselonthechart display
Yourcurrentpositionisrepresentedonscreenbyaboatsymbol.
Theboatsymbolisshownbelow:
IfneitherheadingnorCourseOverGround(COG)dataisavailable,
thevesselisshownasasolidcircle.Ifpositionaldatahasbeen
selectedfordisplay ,yourpositionwillbedisplayedinthedatabar
underVESPOS.
Displayingpanoramicphotos
Inthechartapplication,whenacamerasymbolisdisplayed,
indicatingtheavailabilityofaphoto:
1.Usingthetrackpad,movethecursoroverthecamerasymbol.
2.PresstheOKbutton.
3.PresstheVIEWPHOTOsoftkey.
72
Howtolocateyourvessel
Inthechartapplication:
1.PresstheFINDsoftkeyandselecttheSHIPoption.
Yourvesselisdisplayedinthecenterofthechart.
2.T omarkthisposition,presstheWPTSMOBbuttontwice,then
presstheOKbutton.
C-SeriesWidescreenuserreference
Page 73

6.11Waypoints
Waypointnavigation
Navigatingtoawaypointusingthecursor
Inthechartapplication:
1.Positionthecursoroverthewaypointyouwanttonavigateto.
2.PresstheGOTOWA YPOINTsoftkey.
NavigatingtoawaypointusingtheGOTOoption
Inthechartapplication:
1.PresstheGOTOsoftkey.
2.PresstheGOTOWAYPOINTOPTIONSorGOTOCURSOR
softkey,asappropriate.
3.Selecttherequiredwaypointfromthelist.
4.PresstheGOTOWAYPOINTsoftkey.
Navigatingtoanexistingwaypointselectedonscreen
Inthechartapplication:
1.Positionthecursorovertherequiredwaypoint.
2.PresstheGOTOWAYPOINTsoftkey.
Thechartdisplaysadashedlinefromyourvesseltotheactive
waypoint,andnavigationcommences.
Note:Whenyouarriveatyourtargetwaypoint,amessage
willappear,andanalarmwillsound.Toacknowledgethe
messageandsilencethealarm,wait10secondsorpress
ACKNOWLEDGE.
Tostopnavigatingtoawaypoint
1.PresstheWPTS/MOBbutton.
2.PresstheGOTOWA YPOINTOPTIONSsoftkey .
3.PresstheSTOPGOTOsoftkey.
4.Alternatively,positionthecursorovertheactivewaypoint,and
presstheSTOPGOTOsoftkey.
Note:Oncenavigationisnolongeractive,thewaypointsymbol
returnstoitsnormalunboxedstate,andthedashedlinebetween
yourboatandthewaypointisremoved.
Waypointediting
Movingawaypointbyenteringnewcoordinates
Inthechartapplication:
1.Usingthetrackpad,movethecursortotherelevantwaypoint.
Alternatively,selectawaypointfromtheWaypointList.
2.PresstheVIEWANDEDITDETAILSsoftkey.
3.Usingtherotarycontrol,highlighttheinformationyouwantto
change.
4.PresstherelevantEDITsoftkey.
5.Usingtherotarycontrolandtrackpad,edittheinformationinthe
Position,BRG,andRNGeldsasappropriate.
6.PresstheOKbuttononcetoapplythechangesandtwiceto
exittheEditWaypointdialog.
Note:Toabandonamovewaypointoperation,pressCANCEL.
Erasingawaypointusingthecursor
Inthechartapplication:
Usingthechart
73
Page 74

1.Usingthetrackpad,movethecursortotherelevantwaypoint.
Alternatively,selectawaypointfromtheWaypointList.
2.PresstheERASEWAYPOINTsoftkey.
3.PresstheYESsoftkeytoconrm,orNOsoftkeytocancel.
Hidingawaypointonthechartdisplay
Inthechartapplication:
1.PressthePRESENT ATIONsoftkey.
2.PresstheSHOW/HIDEWAYPOINTSsoftkey.
3.PresstheONCHARTsoftkeyrepeatedlyuntiltheHIDEoption
isselected.
4.PresstheOKbutton.
Waypointappearance
Showingandhidingwaypointnames
Inthechartorradarapplication:
1.IntheChartapplication,pressthePRESENT ATIONsoftkey .
2.PresstheSHOW/HIDEWAYPOINTSsoftkey.
3.UsingtheWAYPOINTNAMEsoftkey,selecttheWA YPOINT
NAMEONoptiontoshowwaypointnames,ortheWAYPOINT
NAMEOFFoptiontohidewaypointnames.
Note:Waypointsinanactiveroutearealwaysdisplayed,
regardlessofwhetherthedisplayissettoshoworhide.
3.UsingtheSHOWBYsoftkey ,selecttheSHOWBYGROUP
option.
4.Alistofavailablewaypointgroupsisdisplayed.Usingtherotary
control,selectthewaypointgroupthatyouwanttoshoworhide.
5.UsingtheONCHARTsoftkey,selecttheSHOWorHIDEoption,
asappropriate.
6.RepeatSteps4to5foreachwaypointgroupyouwanttoshow
orhide.
Showingandhidingwaypointsymbols
Inthechartapplication:
1.PressthePRESENT ATIONsoftkey.
2.PresstheSHOW/HIDEWAYPOINTSsoftkey.
3.UsingtheSHOWBYsoftkey,selecttheSHOWBYSYMoption.
4.Alistofavailablewaypointsymbolsisdisplayed.Usingthe
rotarycontrol,selectthewaypointsymbolthatyouwanttoshow
orhide.
5.UsingtheONCHARTsoftkey,selecttheSHOWorHIDEoption,
asappropriate.
6.RepeatSteps4to5foreachwaypointsymbolyouwanttoshow
orhide.
Showingandhidingwaypointgroups
Inthechartapplication:
1.PressthePRESENT ATIONsoftkey.
2.PresstheSHOW/HIDEWAYPOINTSsoftkey.
74
C-SeriesWidescreenuserreference
Page 75

6.12Routes
D8327_1
Sunda y Trip
Waypoint
Route name
Route
destination
Note:Aroutecanalsobecreatedfromatrack.
Arouteisaseriesofwaypointsusedtonavigateacourse.
Arouteisdisplayedonscreenasaseriesofwaypointslinkedbya
line.
Withroutesyoucan:
•Buildatemporaryroutethatyoufollowimmediately(Quick
Route).Ifyoudonotrenameaquickroute,itwillbeoverwritten
anditswaypointsdeletedwhenanewquickrouteisbuilt.
•Buildandsavearouteforlateruse,inwhichcasetherouteis
storedintheroutelist.
•Convertatrackofyourcourseintoaroute.
Oncecreatedyouhavetheoptiontoviewaroute’sdetails,amend
itscourse,edititsnameandcolororeraseit.Allrouteoptionscan
beaccessedviatheROUTESsoftkey.
Buildingaroute
Routescaneitherbebuiltonscreenorviathewaypointlist.Aroute
consistsof:
•Newwaypointsthatyouhavespecicallyplacedforthatroute;or:
•Existingwaypointsthatarealreadystoredinthesystem;or:
•Acombinationofnewandexistingwaypoints.
Upto150routescanbeaddedtoyoursystem,eachconsistingof
upto50waypoints.Aseachwaypointisadded,itisassignedan
indexnumbercorrespondingtoitspositionintherouteanddrawn
onthechartusingthecurrentlyspeciedsymbol.Thefollowing
shouldbenoted:
•Whenarouteisbeingbuiltitisnotactiveanddoesnotaffect
anycurrentnavigation.
•Y oucanincludeawaypointmorethanonceinaroute,butthe
samewaypointcannotbeplacedconsecutively.
•Y oucancreateanewroutewhentheroutelistisfullbutonsaving
this,youwillbepromptedtochooseanexistingroutetooverwrite.
•Y oucannotsaveanewrouteifanyofthewaypointswithinitare
currentlyactive.
•ThewayinwhichtheOKandCANCELbuttonsoperateis
differentwhenyouarebuildingandeditingroutes.
Buildingaroute
Buildingarouteusingnewwaypoints
Inthechartapplication:
1.PresstheNAVIGA TIONOPTIONSsoftkey.
2.PresstheROUTESsoftkey.
3.PresstheBUILDNEWROUTEsoftkey.
4.Usingthetrackpad,positionthecursoratthedesiredposition
ontheChart.
5.PressthePLACEWAYPOINTsoftkey.
6.RepeatSteps4to5foreachnewwaypoint,untiltherouteis
complete.
Usingthechart
75
Page 76

7.T ofollowtherouteimmediatelywithoutsavingitforfutureuse
(QuickRoute),presstheFOLLOW(QUICK)ROUTEsoftkey.
8.T osavetherouteforfutureuse,presstheSAVEROUTEsoftkey.
Note:Ifyouplaceawaypointatthewrongposition,pressthe
UNDOWAYPOINTsoftkey.
6.PresstheINSERTWAYPOINTsoftkey.
7.RepeatSteps4to5foreachexistingwaypointyouwanttoadd
totheroute,untiltherouteiscomplete.
8.T ofollowtherouteimmediatelywithoutsavingitforfutureuse
(QuickRoute),presstheFOLLOW(QUICK)ROUTEsoftkey.
9.T osavetherouteforfutureuse,presstheSAVEROUTEsoftkey.
Buildingarouteusingexistingwaypoints
Inthechartapplication:
1.PresstheNAVIGA TIONOPTIONSsoftkey.
2.PresstheROUTESsoftkey.
3.PresstheBUILDNEWROUTEsoftkey.
4.Usingthetrackpad,positionthecursoroveranexistingwaypoint
ontheChart.
5.PresstheUSETHISWA YPOINTsoftkey.
6.RepeatSteps4to5foreachexistingwaypointyouwanttoadd
totheroute,untiltherouteiscomplete.
7.T ofollowtherouteimmediatelywithoutsavingitforfutureuse
(QuickRoute),presstheFOLLOW(QUICK)ROUTEsoftkey.
8.T osavetherouteforfutureuse,presstheSAVEROUTEsoftkey.
Note:Ifyouplaceawaypointatthewrongposition,pressthe
UNDOWAYPOINTsoftkey.
Buildingarouteusingthewaypointlist
Inthechartapplication:
1.NAVIGATIONOPTIONSsoftkey.
2.PresstheROUTESsoftkey.
3.PresstheBUILDNEWROUTEsoftkey.
4.PresstheUSEWAYPOINTLISTsoftkey.
5.Usingthetrackpad,highlightthewaypointyouwanttousefrom
thewaypointlist.
Note:Ifyouinsertawaypointincorrectlyintoaroutethatyouare
buildingusingthewaypointlist,highlightthewaypointinthelist
andpresstheREMOVEWA YPOINTsoftkey.
Buildingaroutefromatrack
Creatingaroutefromatrackenablesyoutoretracethecourseof
thattrack.
Whenatrackisconvertedthesystemcreatestheclosestroute
throughtherecordedtrack,usingtheminimumnumberof
waypoints.Eachwaypointcreatedwillbesavedwiththedepthand
temperaturedata(ifapplicable)forthatposition.
76C-SeriesWidescreenuserreference
Page 77

Oncompletion,themaximumdeviationoftheroutefromthe
recordedtrackisdisplayedandthenewrouteisaddedtotheroute
list.Itcannowbedisplayed,editedanderasedetc.inthesame
wayasotherroutesinthesystem.
Note:Ifatrackbreakoccurs,onlythelastsegmentisconverted
toaroute.
Buildingaroutefromthecurrenttrack
Inthechartapplication:
1.PresstheNAVIGA TIONOPTIONSsoftkey.
2.PresstheTRACKSsoftkey.
3.PresstheCREATEROUTEFROMTRACKsoftkey.
4.Usingthetrackpad,selectthetrackyouwanttocreatetheroute
from.
5.PresstheCREATEROUTEFROMTRACKsoftkey.
6.PresstheYESsoftkeytonametheroute,orNOtoacceptthe
defaultroutename.
Aroutewillbecreated,andthecurrenttrackwillcontinuetobe
recordeduntilyoupresstheSTOPTRACKsoftkey .
Buildingaroutefromasavedtrack
Inthechartapplication:
1.,positionthecursoroverthetrackyouwanttocreatetheroute
from.
2.PresstheCREATEROUTEFROMTRACKsoftkey.
3.PresstheYESsoftkeytonametheroute,orNOtoacceptthe
defaultroutename.
Aroutewillbecreated,andthecurrenttrackwillcontinuetobe
recordeduntilyoupresstheSTOPTRACKsoftkey .
Addingawaypointatthestartofaroute
Inthechartapplication:
1.PresstheNAVIGA TIONOPTIONSsoftkey.
2.PresstheROUTESsoftkey.
3.PresstheREVIEWANDEDITROUTESsoftkey.
4.Usingthetrackpadorrotarycontrol,selecttherouteyouwantto
addawaypointto.
5.PresstheAMENDROUTECOURSEsoftkey.
6.PresstheUSEWAYPOINTLISTsoftkey.
7.Pressthetrackpadrighttohighlighttheright-handcolumnof
thelist.
8.Pressthetrackpadupuntilanew(empty)rowiscreatedatthe
topofthelist.
9.Pressthetrackpadlefttohighlighttheleft-handcolumnofthelist.
10.Usingthetrackpadorrotarycontrol,highlightthewaypointyou
wanttoinsertatthestartoftheroute.
11.PresstheINSERTWA YPOINTsoftkey .
12.PresstheOKbutton.
Addingawaypointwithinaroute
Inthechartapplication:
1.IntheChartorRadarapplications,usethetrackpadtomovethe
cursorovertheappropriatelegoftheroute.
2.PresstheINSERTWAYPOINTsoftkey.
3.Usingthetrackpad,movethecursorsothatitstretchestheleg
oftheroutetothedesiredpositiononthechart.
4.PressthePLACEWAYPOINTsoftkey.
Addingawaypointtotheendofaroute
Inthechartapplication:
1.PresstheNAVIGA TIONOPTIONSsoftkey.
Usingthechart
77
Page 78

2.PresstheROUTESsoftkey.
3.PresstheREVIEWANDEDITROUTESsoftkey.
4.Usingthetrackpadorrotarycontrol,selecttherouteyouwantto
addawaypointto.
5.PresstheAMENDROUTECOURSEsoftkey.
6.T odeneanewwaypointusingtheChart,positionthecursor
overtheappropriaterouteleg,andthendragittothenew
positionandpressthePLACEWA YPOINTsoftkey.
7.T oaddawaypointfromthewaypointlist,presstheUSE
WA YPOINTLISTsoftkey.
8.Pressthetrackpadrighttohighlighttheright-handcolumnof
thelist.
9.Pressthetrackpaddownuntilthelastentryinthelistis
highlighted.
10.Pressthetrackpadlefttohighlighttheleft-handcolumnofthelist.
11.Usingthetrackpadorrotarycontrol,highlightthewaypointyou
wanttoinsertatthestartoftheroute.
12.PresstheINSERTWA YPOINTsoftkey .
13.PresstheOKbutton.
Displayingtheroutelist
Inthechartapplication:
1.PresstheNAVIGA TIONOPTIONSsoftkey.
2.PresstheROUTESsoftkey.
3.PresstheREVIEWANDEDITROUTESsoftkey.
•Viewtheroutelistandthenselecttherequiredroute,or
•Selecttherequiredrouteon-screen.
TheTIMEandSOGoptionscanthenbeusedtoaidpassage
planningbydisplayingthetimeinhoursorasanET AandtheSOG
asactualorplanned.Iftherouteiscurrentlybeingnavigatedto
(active),thedataisupdatedtoshowbearing,distanceandtime
fromyourcurrentposition.
Displayingroutedetailsusingthecursor
Inthechartapplication:
1.Usingthetrackpad,positionthecursoroveranylegofthe
requiredroute.
2.PresstheREVIEWANDEDITROUTESsoftkey.
3.Usingthetrackpad,highlighttherequiredroutefromthelist.
4.PresstheROUTEDETAILSsoftkey .
Displayingroutedetailsusingtheroutelist
Inthechartapplication:
1.PresstheNAVIGA TIONOPTIONSsoftkey.
2.PresstheROUTESsoftkey.
3.PresstheREVIEWANDEDITROUTESsoftkey.
4.Usingthetrackpad,highlighttherequiredroutefromthelist.
5.PresstheROUTEDETAILSsoftkey .
Followingaroute
Displayingroutedetails
DetailsofallroutesthatyoucreateareheldintheRouteList.
Youcan:
78C-SeriesWidescreenuserreference
Whenyouarefollowingaroutetheactiverouteisshownonall
chartwindows.
Whenthedistancetothenextwaypointintherouteislessthanthat
speciedforthearrivalalarmradius,oryourvesselreachesthe
closestpointofapproachtothetarget(denedbyalinepassing
Page 79

throughthewaypointandperpendiculartotherouteleg),awarning
dialogisdisplayedandanalarmsounds.Oncethealarmis
acknowledgedthenextwaypointisselected,thedisplayupdates
toindicatethenextlegoftheroute,andthesystemsendsthenew
navigationdatatotheautopilot.
Thereareseveralwaystoselectthefollowrouteoption:
•UsingQuickRoute.
•Fromaselectedwaypointoranypointwithinaroute.
•Usingtheroutelist.
•Inreverseorder.
Followingarouteusingquickroute
Inthechartapplication:
1.Buildyourroute.
2.Afteraddingthenalwaypointinyourroute,presstheFOLLOW
(QUICK)ROUTEsoftkey.
Note:Y oucanstopfollowingarouteatanytimebypressing
theSTOPFOLLOWsoftkey.
Followingaroutefromaselectedwaypointorpointwithina
route
Inthechartapplication:
1.Usingthetrackpad,positionthecursorovertheappropriateleg
oftheroute,orawaypointintheroute.
2.PresstheFOLLOWTHISROUTEorFOLLOWFROMHERE
softkey.
Followingarouteusingtheroutelist
Inthechartapplication:
1.PresstheGOTOsoftkey.
2.PresstheFOLLOWROUTEOPTIONSsoftkey.
3.Usingthetrackpadorrotarycontrol,selecttherouteyouwantto
follow.
4.PresstheFOLLOWROUTEsoftkey.
Note:Y oucanstopfollowingarouteatanytimebypressing
theSTOPFOLLOWsoftkey.
Followingarouteinreverseorder
Inthechartapplication:
1.PresstheGOTOsoftkey.
2.PresstheFOLLOWROUTEOPTIONSsoftkey.
3.Usingthetrackpadorrotarycontrol,selecttherouteyouwantto
follow.
4.PresstheREVERSEANDFOLLOWsoftkey.
Note:Y oucanstopfollowingarouteatanytimebypressing
theSTOPFOLLOWsoftkey.
Advancingtothenextwaypointinaroute
Whilefollowingarouteinthechartapplication:
1.PresstheGOTOsoftkey,orpositionthecursorovertheroute.
2.PresstheADVANCEWA YPOINTsoftkey.
Note:Y oucanstopfollowingarouteatanytimebypressing
theSTOPFOLLOWsoftkey.
Usingthechart
79
Page 80

Note:Ifthecurrentdestinationisthelastwaypoint,thechart
advancesontotherstwaypointintheroute.
ResettingCrossTrackError(XTE)
Whilefollowingarouteinthechartapplication:
1.PresstheREST ARTXTEsoftkey.
Editingaroute
Onceyouhavecreatedaroute,itcanbeeditedinavarietyofways.
Youcan:
•Reversearoute.
•Amendthecourseofaroute(althoughyoucannoteditatarget
waypointthatyouarecurrentlynavigatingto).
•Changethenameorcolorofaroute.
•Erasearoute.
Note:Anactiveroutecanbeedited,withtheexceptionofthe
targetwaypoint.Ifawaypointbeingeditedbecomesthetarget,
thenthesystemshallcanceltheedit;thewaypointshallremainin
itsoriginalposition.
Changingthenameorcolorofaroute
Inthechartapplication:
1.PresstheNAVIGA TIONOPTIONSsoftkey.
2.PresstheROUTESsoftkey.
3.PresstheREVIEWANDEDITROUTESsoftkey.
4.Usingthetrackpad,highlighttherequiredroutefromthelist.
5.PresstheEDITNAMEANDCOLORsoftkey.
6.Usingthetrackpad,selecttheNameorColoreld.
7.PresstheEDITNAMEorEDITCOLORsoftkey ,asappropriate.
8.Usingthetrackpad,selectthenewnameofcolorfortheroute.
9.PresstheOKbuttontosavethechanges.
Note:Iftherouteyouareeditinghasbeensavedbypressing
theFOLLOW(QUICK)ROUTEsoftkey,therouteisnamed
“QuickRoute”bydefault.Changingitsnamepreventsitbeing
overwrittenthenexttimetheFOLLOW(QUICK)ROUTEsoftkey
isused.
Adjustingthethicknessofroutelines
Inthechartapplication:
1.PresstheMENUbutton.
2.Usingthetrackpad,selecttheChartSetupoption.
3.Usingthetrackpad,selecttheRouteWidthmenuitem.
4.Usingthetrackpad,selecttheappropriateroutelinethickness.
5.PresstheOKbutton.
Showingorhidingaroute
Inthechartapplication:
1.Usingthetrackpad,positionthecursorovertheappropriate
route.
2.PresstheHIDEROUTEsoftkey.
Movingawaypointwithinaroute
Inthechartapplication:
1.Usingthetrackpad,movethecursoroverthewaypointyouwant
tomove.
2.PresstheMOVEWAYPOINTsoftkey.
3.Usingthetrackpad,movethecursorsothatitstretchestheleg
oftheroutetothedesiredpositiononthechart.
80C-SeriesWidescreenuserreference
Page 81

4.PresstheOKbutton.
Removingawaypointfromaroute
Inthechartapplication:
1.Usingthetrackpad,movethecursoroverthewaypointyouwant
toremove.
2.PresstheREMOVEWAYPOINTsoftkey.
Reversingaroute
Inthechartapplication:
1.Ensurethatyouarenotfollowingaroute(presstheSTOP
FOLLOWsoftkeytostopfollowingaroute).
2.Positionthecursorovertheappropriateroute.
3.PresstheREVERSEROUTEsoftkey.
Thewaypointsintheroutearerenumbered,andtheroutename
ismoved.
Erasingaroute
Inthechartapplication:
1.PresstheNAVIGA TIONOPTIONSsoftkey.
2.PresstheROUTESsoftkey.
3.PresstheREVIEWANDEDITROUTESsoftkey.
4.Usingthetrackpad,highlighttherequiredroutefromthelist.
5.PresstheERASEROUTEsoftkey.
6.PresstheYESsoftkeytoconrmtheaction,ortheNOsoftkeyto
canceltheaction.
Note:Youcandeleteanyroute,exceptfortheonethatyouare
curentlyfollowing.Whenyouerasearoute,onlythosewaypoints
associatedwiththatroutearedeleted.
Usingthechart
81
Page 82

6.13Tracks
•Specifythedistancebetweeneachtrackpoint.
Youcancreateandsavetrackstokeepapermanentrecordof
whereyou’vebeen.
Atrackisanon-screentrailthatrepresentsthecourseyouhave
taken.Thistrailismadeupofaseriesoftrackpointswhichare
createdautomatically .
Withtracksyoucan:
•Reviewwhereyouhavebeen.
•Retraceyouroriginaljourneybyconvertingthetracktoaroute
andautomaticallyreversingit.
Ifrequired,atrackcanbepersonalizedandthetrackoptions
customizedtoyourownparticularneeds.Y oucan:
•Renameatrack.
•Changethecolorofatrack.
•Specifythetimeperiodbetweentrackpointcreation.
CreatingaTrack
Whenyouwanttorecordwhereyouhavebeen,youcanusethe
STARTTRACKsoftkeytostarttrackingyourjourney.Thetrackwill
thenbecreatedautomaticallyasyounavigateyourvessel.
Itisalsopossibletocreatearoutefromthetrack.
Creatingatrack
Inthechartapplication:
1.PresstheNAVIGA TIONOPTIONSsoftkey.
2.PresstheTRACKSsoftkey.
3.PresstheST ARTTRACKsoftkey .
Asyounavigateyourvessel,yourjourneyisautomaticallyrecorded
asatrack.
Note:Ifthepowerfailswhilstatrackisbeingrecordedorthe
positionxislost,abreakwilloccurinthetrack.Onlythelast
segmentofatrackcanbeconvertedintoaroute.
Note:Ifthemaximumnumberoftrackingpointsisreached,you
willbewarned.Thetrackwillcontinuetoberecordedwiththe
earliertrackingpointsbeingoverwritten.
Displayingthetracklist
Inthechartapplication:
1.PresstheNAVIGA TIONOPTIONSsoftkey.
2.PresstheTRACKSsoftkey.
82C-SeriesWidescreenuserreference
Page 83

3.PresstheREVIEWANDEDITTRACKSsoftkey.
Editingatrack
Onceyouhavecreatedatrack,itcanbeeditedinavarietyofways.
Youcan:
•Changethenameofatrack.
•Changethecolorofatrack.
•Eraseatrack.
Changingthenameorcolorofatrack
Inthechartapplication:
1.PresstheNAVIGA TIONOPTIONSsoftkey.
2.PresstheTRACKSsoftkey.
3.PresstheREVIEWANDEDITTRACKSsoftkey.
4.Usingthetrackpad,highlighttherequiredtrackfromthelist.
5.PresstheEDITNAMEANDCOLORsoftkey.
6.Usingthetrackpad,selecttheNameorColoreld.
7.PresstheEDITNAMEorEDITCOLORsoftkey ,asappropriate.
8.Usingthetrackpad,selectthenewnameofcolorforthetrack.
9.PresstheOKbuttontosavethechanges.
Showingorhidingatrack
Inthechartapplication:
1.PresstheNAVIGA TIONOPTIONSsoftkey.
2.PresstheTRACKSsoftkey.
3.PresstheREVIEWANDEDITTRACKSsoftkey.
4.Usingthetrackpad,highlighttherequiredtrackfromthelist.
5.UsetheTRACKONCHARTsoftkeytoselecttheSHOWor
HIDEoption,asappropriate.
Erasingatrack
Inthecfhartapplication:
1.,presstheNA VIGATIONOPTIONSsoftkey.
2.PresstheTRACKSsoftkey.
3.PresstheREVIEWANDEDITTRACKSsoftkey.
4.Usingthetrackpad,highlighttherequiredtrackfromthelist.
5.PresstheERASETRACKsoftkey.
6.PresstheYESsoftkeytoconrmtheaction,ortheNOsoftkeyto
canceltheaction.
Note:Y oucanalsoerasealltracks,usingtheARCHIVEAND
TRANSFERfunction.
Usingthechart
83
Page 84

6.14Measuringdistancesandbearings
Youcanusethedatabarinformationandtherulertomeasure
distancesinthechartapplication.
Youcandeterminethedistanceandbearing:
•fromyourboattothepositionofthecursor;
•betweentwopointsonthechart.
Positioningthechartruler
Inthechartapplication:
1.Usingthetrackpad,positionthecursoratthestartpointofyour
measurementorbearing.
2.PresstheDATAbutton.
3.PresstheRULERsoftkey.
4.Usingthetrackpad,positionthecursorattheendpointofyour
measurementorbearing.Therangeandbearingisdisplayed.
5.PresstheOKbuttontoxthenewrulerposition.
Repositioningthechartruler
Inthechartapplication,withtherulerdisplayed:
1.PresstheADJUSTAorADJUSTBsoftkeytoselectthestart
orendpoint,asappropriate.
2.Usingthetrackpad,movethecursortothenewrulerposition.
3.PresstheOKbuttontoxthenewrulerposition.
1.PresstheDATAbutton.
2.PresstheRULERsoftkey.
3.PresstheCLEARRULERsoftkey.
Clearingthechartruler
Inthechartapplication:
84C-SeriesWidescreenuserreference
Page 85

Chapter7:Usingthe3Dchart
Chaptercontents
•7.13Dchartoverviewonpage86
•7.23Dchartsetuponpage87
•7.33Dchartcardsonpage88
•7.43Dchartdisplayoverviewonpage88
Usingthe3Dchart
85
Page 86

7.13Dchartoverview
The3Dchartprovidesanumberoffeaturestohelpyounavigate
withyourvessel.
Note:Beforeyoucanusethe3Dchartapplicaton,your
multifunctiondisplaymustbereceivingaccurateheadingand
positiondatafromasuitablesource(suchasaGPS,for
example).Youmustalsohave3Dchartcardscontaining3D
cartographyfortheappropriatearea.
Safety
The3Dchartisanaidtovisualization.Whennavigatingwithyour
3Dchartyoushouldalsocheckyour2Dchartandensurethata
routeissafe.Untilyouarefamiliarwithinterpretingthe3Dchart,
youshouldtakeeveryopportunitytocomparethedisplayedobjects
withvisualtargets,suchasbuoysandcoastalstructures.You
shouldpracticeharbourandcoastalnavigationduringdaylightand
inclearweatherconditions.Thesimulatormodecanalsobeused
tohelpyougainexperience.
The3Dapplicationshouldnotbeusedasasubstituteforgood
navigationalpracticenorforofcialgovernmentpapercharts.Do
notusethisapplicationbeforeyouhavereadthischapter.
Usesforthe3DChart
3Dcartographyintroducesaneasy-to-usechartformatthatprovides
youwithathreedimensionalgraphicalviewoflandandsea
contoursaroundyourboat.Landmassesareshowningreen,the
shadedependingontheheightabovesealevel.Water ,thesea-bed
andsubmergedobjectsareshowninvaryingshadesofblue.
Muchoftheinformationavailableonaconventionalchartcanbe
showninthreedimensions,givingyouanaccurateeasy-to-view
imageoftheareaaroundyourboatthatcanhelpyouplan:
•Fishingspots.
•Whatshingpatterntouse.
•Saferoutes.
Iftheareathatyouareinisnewtoyou,orvisibilityispoor,3D
cartographycanhelptogiveyouthecondencetoknowwhereyou
areandwhatisaroundyou.Aswithaconventionalchart,active
waypointsandroutescanalsobeshownonthe3Dchart.
86C-SeriesWidescreenuserreference
Page 87

7.23Dchartsetup
Youcancongureanumberofoptionstotailorthe3Dchart
applicationtoyourrequirements.
Ideally,the3Dchartapplicationshouldbeconguredbeforerst
use.Youmayalsowanttomakeadditionaladjustmentsasyou
becomemorefamiliarwiththeapplication.
Note:Anychangesthatyoumaketothe3Dchartconguration
areretainedwhenyoupoweroffthedisplay.
Selectingthe3Dchartsetupmenu
Inthe3Dchartapplication:
1.PresstheMENUbutton.
2.Usingthetrackpad,selectthe3DChartSetupmenuitem,then
pressthetrackpadrighttoselectit.
3.Usethetrackpadtohighlighttherequiredmenuoption,then
pressthetrackpadrighttoadjustthesetting.
4.PresstheOKbuttontosaveyourchanges.
3Dchartsetupmenuoptions
Thefollowingtableexplainstheoptionsavailableinthe3DChart
SetupMenu.
FunctionDescriptionOptions
VesselSymbolThestyleofsymbolthat
VesselSizeUsethisoptiontospecify
AerialPhotoOverlay
ChartText
NavigationMarksDetermineswhether
representsyourvessel
onscreen.
thesizeofthesymbol
thatrepresentsyour
vesselonscreen.
Determineswhether
anaerialphotograph
isoverlayedonthe3D
chartdisplay.
Determineswhether
descriptivetext(such
asplacenames,for
example)appearson
thechart.
navigationmarksappear
onthechart.
•Sail
•Power
•Tiny
•Small
•Medium
•Large
•Huge
•ON
•OFF
•ON
•OFF
•ON
•OFF
FunctionDescriptionOptions
Center-of-ViewIndicator
Usingthe3Dchart
Determineswhethera
whitecrossisdisplayed,
indicatingthecentreof
view.
•ON
•OFF
87
Page 88

7.33Dchartcards
Mode
Shows mode
application is
working in.
Rotation
Shows in degrees true,
how far the on-screen
view has been rotated
from your boat's heading.
Range
Horizontal distance across
screen (halfway up the window
or at center of view). Shown in
selected system units.
Boat symbol
Boat's position on
chart. Select sail
or power boat.
Center-of-view
White cross indicates
center of chart view
at sea level.
North arr ow
3D indication of True
North in relation to
the chart view.
Depth scale
Approximate
depth beneath
your boat.
Waypoint
With arrival
circle
Cartogr aphic objects
Select objects for display
via the 3D Chart Setup
menu.
D11602_1
7.43Dchartdisplayoverview
Beforeyoucanusethe3Dchartapplication,youmusthavechart
cardscontainingtheappropriate3Dcartographicdata.
The3Dchartapplicationreliesonappropriatecartographicdata
storedonCompactFlashchartcards.Youmusthavechartcards
containing3Dcartographicdataforthegeographicareainwhich
youwanttonavigateyourvessel.
Chartcardscontainingapproriate3Dcartographicdataareavailable
fromthewww.navionics.comwebsite.
The3Dchartapplicationfeaturesanumberofdisplaymodesto
helpyounavigateyourvessel.
Thefollowingdiagramshowthevariouselementsofthedisplay:
3Dchartviewmodes
Youcanchangetheviewprovidedbythe3Dcharttogiveyoua
betterviewofyoursurroundings.
The3Dchartapplicationhastwomainviewingmodes:
•ActiveMotionmode
•Planningmode
88C-SeriesWidescreenuserreference
Page 89

ActiveMotionmode
Thisisthedefaultmodewhenyouopenthe3Dchartapplication,
providedthatthereisavalidx.Thescreenshowsanaerialview
ofthe3Dchartasifyouareaboveyourboat,slightlybehinditand
lookingforward(virtualeyepoint).Youcanalsoviewthechart
fromdifferentpositionsrelativetoyourboat.Asyourboatmoves
forwardthechartautomaticallyupdatesandrevealsthechanging
viewahead.
Note:InActiveMotionmode,youcanadjustthepitchwhenthe
ADJUSTONsoftkeyissettoCENTER,butrotatingorpanning
thechartwillputitintoPlanningmode(seebelow).
Planningmode
Planningmodeenablesyoutoviewanareaofthechart,different
totheoneinwhichyouarenavigating,sothatyoucananalyze
locationsandfeatures.Youcanusethecontrolstoviewaparticular
areafromdifferentangles,bearingsandranges.Thechartno
longerautomaticallykeepsyourboaton-screen.Whenyouarein
Planningmode,thecontrolsandfunctionsavailablearethesame
asforActiveMotionmode.
Selectingtheactivemotion3Dchartmode
The3DchartisinActiveMotionmodebydefault.T oreturntothis
modeatanytime:
1.PresstheFINDSHIPsoftkey .
The3Dchartisre-drawn,withyourvesselintheforward-looking
viewatyourcurrentposition.
Selectingtheplanning3Dchartmode
1.Usingthetrackpad,pantotheareaofthechartthatyouwant
toview.
The3Dchartplacesbracketsaroundtheviewoptionlisted
immediatelybelowthedatabartoindicatethatthechartisin
Planningmode.Anexampleofthisis(FWD).
3DChartViewOptions
Multiple3Dchartinstances
Youcandisplaymultiple3Dchartviewsbycreatingapagethat
showsthe3Dchartapplicationinuptofourwindowsatthesame
time.
Eachinstanceofthe3DchartapplicationcanbeinActiveModeor
Planningmode,asappropriate.
Displayingmultiple3Dcharts
1.PressandholdtheP AGEbuttonforthreeseconds,untilthe
SelectPageSetwindowappears.
2.Usingthetrackpad,highlightthepagesetthatfeaturesthe3D
chartapplication.
3.PresstheEDITP AGESETsoftkeytoeditthehighlightedpage
set.
4.Pressthesoftkeyassociatedwiththe3Dchartapplication.
5.Usingthetrackpad,highlightthepagelayoutstylethatsuitsthe
layoutandnumberofinstancesofthe3Dchartthatyouwant.
6.PresstheOKbutton.
7.Usingthetrackpad,highlightthe3Dchartapplicationinthelist.
8.PresstheOKbutton.
9.PresstheACTIVEbuttontoselectthenextwindowthatwillhost
aninstanceofthe3Dchartapplication.
10.Repearsteps8to9untilyouhavealltheinstancesofthe3D
chartapplicationthatyourequire.
Usingthe3Dchart
89
Page 90

11.PresstheOKbutton.
3Dchartdepthscale
Thedepthscaleviewoptionenablesyoutoaddanindicator
beneathyourvesselonthedisplay,providingavisualapproximation
ofthewaterdepthimmediatelybelowyourvessel.
Thisdepthscalemovesupanddowntoindicatetheapproximate
depthbelowyourvessel.Areasofwaterthataredeeperthanthe
depthscalelimitareshaded.Areasofwaterthatareshallowerthan
thedepthscalelimitareshowninalightershade.
Enablingordisablingthe3Dchartdepthscale
Inthe3Dchartapplication:
1.PressthePRESENT ATIONsoftkey.
2.Pressthe3DVIEWOPTIONSsoftkey .
3.PresstheDEPTHSCALEsoftkeyuntiltheONorOFFoptionis
selected,asappropriate.
4.PresstheOKbutton.
3Dchartvesselviewmodes
The3Dchartvesselviewmodesprovidedifferentperspectivesof
yourvesselonthe3Dchartdisplay
Therearefourviewingoptions:
•Forward(FWD)—providesaviewpointaboveandbehindyour
vessel,lookingforward.Thisisthedefaultoption.
•Starboard(STB)—providesaviewpointaboveandtotheportof
yourvessel,lookingstarboard.
•Aft(AFT)—providesaviewpointaboveandinfrontofyour
vessel,lookingaft.
•Port(PRT)—providesaviewpointaboveandtothestarboard
ofyourvessel,lookingtoport.
Whenoneoftheseoptionsisselected,theviewpointofthe3Dchart
ischangedtoshowadifferentarea.
Thevesselviewmodethatyouarecurrentlyinisindicatedjust
belowthedatabar.
Changingthe3Dchartvesselviewmode
Inthe3Dchartapplication:
1.PressthePRESENT ATIONsoftkey.
2.Pressthe3DVIEWOPTIONSsoftkey .
3.PresstheVIEWTOsoftkeyuntiltheFWD,STB,AFT,orPRT
optionisselected,asappropriate.
4.PresstheOKbutton.
3Dchartvesseloffset
The3DchartVesselOffsetoptionsdeterminethepositionofyour
vesselinrelationtothechart.
Youcanspecifywhethertheboatisxedinthecentreofthewindow
(0offset)oroffsetby1/3or2/3ofthescreen.Ifyouchangethe
offsetto1/3or2/3,theviewaheadofyourboatwillbeincreased.
Changingthe3Dchartvesseloffset
Inthe3Dchartapplication:
1.PressthePRESENT ATIONsoftkey.
2.Pressthe3DVIEWOPTIONSsoftkey .
3.PresstheVESSELOFFSETsoftkeyuntilthe0,1/3,or2/3option
isselected,asappropriate.
4.PresstheOKbutton.
3Dchartdetailexaggeration
Youcanexaggeratetheverticalsizeofobjectsonthe3Dchartto
makeiteasiertointerpretwhatyouareseeing.
90C-SeriesWidescreenuserreference
Page 91

Sometimesitiseasiertoseecertaintopographicalfeaturesifthey
d 3D image 3D image with aeria l overlay
D11603_1
areexaggerated.Adjustingtheexaggerationhastheeffectof
verticallystretchingobjectsonthechart,makingiteasiertosee
theirshapeandposition.Thiscouldbeparticularlyhelpfulifyou
areshing,forexample.
Adjustingthe3Dchartexaggeration
Inthe3Dchartapplication:
1.PressthePRESENT ATIONsoftkey.
2.Pressthe3DVIEWOPTIONSsoftkey .
3.PresstheADJUSTEXAGGERA TIONsoftkey.
4.Usingthetrackpad,selecttherequiredamountofexaggeration.
5.PresstheOKbutton.
3Dchartdecluttering
Youcandeclutterthe3Dcharttoreducetheamountofobjects
anddetailshown.
Navigatinginanareathatshowsalotofinformationonthechart,
suchasnavigationmarks,canbeconfusing.Dependingonyour
chartviewlevelitcanmakefeaturesorevenyourpositiondifcult
tosee.Declutterhelpsyoutoreducethisconfusionandmakethe
chartclearer,byremovingsomeobjectsfromview.
Declutteringthe3Dchart
Inthe3Dchartapplication:
1.PressthePRESENT ATIONsoftkey.
2.PresstheDECLUTTERsoftkeyuntiltheONorOFFoptionis
selected,asappropriate.
3.PresstheOKbutton.
Aerialphotooverlayon3Dchart
Youcanoverlayanaerialphotographonthe3Dchartdisplayto
helpyouinterpretyoursurroundings.
Aerialphotoscoverthenavigablewatersupto3milesinsidethe
coastline.Beyondtheselimitsthelandwillappeargreen(color
charts)andgrey(blackandwhitecharts).Thelevelofresolution
andtheavailabilityofacoloredoverlayisdependentontheregion
coveredbythechartcard.
Thefollowingimagesshowthedifferencebetweenthestandard3D
chartdisplay,andthe3Dchartdisplaywithaerialphotooverlay:
Overlayinganaerialphotoonthe3Dchart
Inthe3Dchartapplication:
1.PresstheMENUbutton.
2.Usingthetrackpad,selectthe3DChartSetupmenuitem,then
pressthetrackpadrighttoselectit.
3.Usingthetrackpad,selecttheAerialPhotoOverlaymenuitem.
Usingthe3Dchart
91
Page 92

4.Usingthetrackpad,selecttheONoptiontoenableaerialphoto
overlay,ortheOFFoptiontodisableit.
5.PresstheOKbutton.
3DChartNavigation
Movingaroundthe3Dchart
Inthe3Dchartapplication:
1.Usethetrackpadtomovemovethecursortoadifferentareaon
the3Dchart.
2.PresstheRangeOutbuttontoshowalargerareaofthe3D
chart.
3.PresstheRangeInbuttontoshowasmallerareaofthe3Dchart.
Locatingyourvesselonthe3Dchart
Inthe3Dchartapplication:
1.PresstheFINDSHIPsoftkey .
The3Dchartisre-drawn,withtheboatintheforward-looking
viewatyourcurrentposition.
Markingyourpositiononthe3Dchart
Inthe3Dchartapplication:
1.PresstheWPTSMOBbuttontwice.
TheEditWaypointdialogisdisplayed.
2.PresstheWPTSMOBbuttonagaintoacceptthedefault
waypointname,orenteranewname.
3.PresstheOKbutton.
Rotatingandpitchingyourvesselinthe3Dchart
Inthe3Dchartapplication:
1.PresstheADJUSTONsoftkeyuntiltheEYEoptionisselected
torotateorpitcharoundavirtualeyepoint.SelecttheCENTER
optiontorotateorpitcharoundthecenter-of-viewcrossonthe
screen.
2.PresstheADJUSTsoftkeyuntiltheROT ATEorPITCHoptionis
selected,asappropriate.
3.PresstheOKbutton.
Navigatingtoawaypointusingthe3Dchart
Inthe3Dchartapplication:
1.PresstheGOTOsoftkey.
2.PresstheGOTOWA YPOINTOPTIONSsoftkey .
TheWaypointListisdisplayed.
3.Usingthetrackpad,selectthewaypointyouwanttonavigateto.
4.PresstheGOTOWAYPOINTsoftkey.
Followingarouteusingthe3Dchart
Inthe3Dchartapplication:
1.PresstheGOTOsoftkey.
2.PresstheFOLLOWROUTEOPTIONSsoftkey.
TheRouteListisdisplayed.
3.Usingthetrackpad,selecttherouteyouwanttofollow .
4.PresstheFOLLOWROUTEsoftkey.
Usingthe2Dand3Dchartstogether
Youcandisplayboththe2Dand3Dchartson-screenatthesame
timetoaidyournavigation.
Iftheareainwhichyouarenavigatingisunfamiliar,orvisibilityis
poor,workingwith2Dand3Dchartapplicationsonthescreen
side-by-sidecangiveyouextracondenceandhelpyoundout
92C-SeriesWidescreenuserreference
Page 93

whatisaroundyou.Withthechartsdisplayedsidebyside,a
comprehensiveviewofthesurroundingareaisavailable.Aswithall
multiplepagesets,theactivewindowisindicatedbyaredborder.
Tomakechangestoanapplicationitmustbetheactivewindow.
Displaying2Dand3Dchartssimultaneously
1.PressandholdtheP AGEbuttonforthreeseconds,untilthe
SelectPageSetwindowappears.
2.Usingthetrackpad,highlightthepagesetthatfeaturesthe3D
chartapplication.
3.PresstheEDITP AGESETsoftkeytoeditthehighlightedpage
set.
4.Pressthesoftkeyassociatedwiththe3Dchartapplication.
5.Usingthetrackpad,highlightapagelayoutstylethatincludes
twowindows.
6.PresstheOKbutton.
7.Usingthetrackpad,highlightthe3Dchartapplicationinthelist.
8.PresstheOKbutton.
9.PresstheACTIVEbuttontoselectthesecondwindow,whichwill
hostthe2Dchartapplication.
10.RepeatSteps2to8toselectthe2Dchart.
11.PresstheOKbutton.
2Dand3Dchartsynchronization
Youcansynchronizetheheading,range,andpositioninformation
acrossboththe2Dand3Dchartstoaidnavigation.
When2d-3Dchartsynchronizationisenabled:
•When2D-3Dsynchronizationisenabled,itisindicatedby“2D-3D
Sync”inthechartapplicationstatusbar.
•Somesoftkeyfunctionsarenotavailablewiththisfeature,and
are“grayed-out”.
•PressingFINDSHIPfromanysynchronizedapplicationreturns
the3DcharttothedefaultActiveMotionmode,andsynchronizes
the2Dcharttothesameview.
•Anychangesmadetotheheading,rangeorpositionineither2D
or3Dchartswillbedisplayedinboth2Dand3Dwindows.
•Ifthe2DchartviewforthecurrentwindowissettoSYSTEM
andyouhavemultiplewindowsonapageoronmorethan
onemultifunctiondisplay,anychangesmadetoachartwillbe
reectedinallwindowsandallmultifunctiondisplays.
•Ifthe2DchartviewforthecurrentwindowissettoLOCAL,no
otherwindowswillbeaffected.
•Y oucansynchronizethe2Dchartwiththe3DchartORtheradar,
butyoucannotsynchronizethe2Dchartwithboththe3Dchart
andtheradar.
Synchronizingthe2Dand3Dcharts
Inthe2Dor3Dchartapplication:
1.PressthePRESENT ATIONsoftkey.
2.PresstheCHARTVIEWsoftkeyuntiltheSYSTEMoptionis
selected.
3.PresstheCHARTMODEANDPRESENT ATIONsoftkey .
4.PresstheCHARTSYNCsoftkeyuntilthe3Doptionisselected.
5.PresstheOKbutton.
3Dchartviewlocator
Youcanshowa3Dviewlocatoronthe2Dcharttoindicatethe
boundariesoftheareacurrentlyshownonthe3Dchart.
Usingthe3Dchart
93
Page 94

The3Dviewlocatorisapolygonoutlinedinbluethatcanbe
overlayedonthe2Dchart.Asyourotateandpitchthevessel
symbolonthedisplay,orusethepanandzoomcontrols,theblue
polygonmovesonthe2Dcharttoindicatetheboundariesofthe
areacurrentlyshownonthe3Dchart.
Displayingthe3Dviewlocatoronthe2Dchart
Inthe2Dchartapplication:
1.PressthePRESENT ATIONsoftkey.
2.PresstheCHARTLA YERSsoftkey .
3.PresstheCHARTLA YERSsoftkey .
4.Usingthetrackpad,selectthe3DLocatoroption.
5.Usingthetrackpad,selecttheONoption.
6.PresstheOKbutton.
94C-SeriesWidescreenuserreference
Page 95

Chapter8:Usingautopilotcontrol
Chaptercontents
•8.1Disengagingtheautopilotinanemergencyonpage96
•8.2Autopilotcontrolonpage96
•8.3Autopilotcontroloptionsonpage98
•8.4Autopilotalarmsonpage98
Usingautopilotcontrol
95
Page 96

8.1Disengagingtheautopilotinan emergency
Whilefollowingarouteusingtheautopilot:
1.PressandreleasethePOWERbutton.
2.PressthePILOTSTANDBYsoftkey .
Theautopilotisdisengaged,andputintostandbymode.
8.2Autopilotcontrol
Youcanuseyourmultifunctiondisplaytocontrolyourautopilot.
Note:Forinformationonconnectinganautopilotcontrolhead
toyourmultifunctiondisplay ,refertothedocumentationthat
accompaniestheautopilotcontrolhead.
WiththeAutopilotControlfunctionenabled,youcanuseyour
multifunctiondisplayto:
•Engagetheautopilotandinstructittofollowwaypointsinaroute.
•Disengagetheautopilot.
•Silencethewaypointarrivalalarm.
PilotControldialog
Theautopilotcontrolfunctionsonyourmultifunctiondisplayare
centeredaroundthePilotControldialog.Thisdialogisdisplayedin
thefollowingsituations:
•WhenyoupresstheGOTOorFOLLOWROUTEsoftkeyinthe
chartapplication.
•Whenyouarefollowingaroute,andplacethecursoroveran
activerouteorwaypointonthechart,andpresstheSTOPGOTO,
STOPFOLLOW,orADV ANCEWA YPOINTsoftkey.
•Whenyouarriveatatargetwaypoint.
Autopilotstatussymbols
Thevariousautopilotstatusmodesarerepresentedonyour
multifunctiondisplaybysymbols.
Theautopilot-relatedmodesareindicatedbyasymboldisplayed
inthedatabarofyourmultifunctiondisplay.
Thesesymbolsaredescribedinthefollowingtable:
96C-SeriesWidescreenuserreference
Page 97

SymbolDescription
AutopilotisinStandbymode.
AutopilotisinTrackmode.
AutopilotisinAutomode.
2.Usingthetrackpad,highlighttheSystemSetupmenuitem,then
pressthetrackpadrighttoselectit.
3.Usingthetrackpad,highlighttheSystemIntegrationmenuitem,
thenpressthetrackpadrighttoselectit.
4.Usingthetrackpad,highlighttheAutopilotControlmenuitem,
thenpressthetrackpadrighttoselectit.
5.Usingthetrackpad,selecttheEnabledoption.
6.PresstheOKbutton.
Noautopilotdetected.
Autopilotalarmactive.
Dodgemodeisactive.
FishModeisactive.
Autopilotcalibration.
Powersteeringactive.
WindVanemodeisactive.
Enablingtheautopilotcontrolfunction
1.PresstheMENUbutton.
Usingautopilotcontrol
Engagingtheautopilot
Inthechartapplication:
1.PresstheGOTOsoftkey.
2.PresstheGOTOCURSOR,FOLLOWROUTEOPTIONS,or
GOTOWA YPOINTOPTIONSsoftkey,asappropriate.
3.PresstheENGAGEPILOTsoftkey.
ThePilotControldialogisdisplayed.
4.Presstheappropriatesoftkeytoenabletheautopilot.
Disengagingtheautopilot
Inthechartapplicationwiththeautopilotengaged:
1.PresstheSTOPGOTOorSTOPFOLLOWsoftkeys:
ThePilotControldialogisdisplayed.
2.PresstheST ANDBYsoftkey .
Theautopilotisdisengaged,andputinstandbymode.
97
Page 98

8.3Autopilotcontroloptions
8.4Autopilotalarms
Yourmultifunctiondisplayenablesyoutonavigatetotarget
waypointsusingtheautopilotcontroloptions.
Whenyouarriveatawaypoint,thePilotControldialogisdisplayed,
providingthefollowingoptions:
OptionDescription
ENGAGEPILOT—TRACK
CLEARALARMSilencesthewaypointarrivalalarm.
STANDBYCancelsthewaypointarrivalalarm
AUTOCancelsthewaypointarrivalalarmand
Engagestheautopilotandcontinues
tothenextwaypointintheroute.This
optionisnotavailableifyouhave
reachedthelastwaypointintheroute.
Engagestheautopilotinautomode,
continuingonthecurrentheading.
anddisengagestheautopilot.
engagestheautopilotinautomode.If
youjustarrivedatthelastwaypointin
theroute,theautopilotcontinueson
thecurrentlockedheading.
Theautopilotfunctionsprovidealarmstoalertyoutosituationsthat
requireaction.
Yourmultifunctiondisplayshowsautopilotalarms,regardlessof
whetherthereisactivenavigationonthesystem.Ifpilotintegration
isenabled,andanalarmisraisedbytheautopilot,themultifunction
displayprovidesanaudiblealarmsound(providingthatthealarm
hasnotalreadybeensilenced).ThePilotControlscreenis
displayed,indicatinganewalarm.Additionally,thepilottransducer
iconisdisplayedinred,andremainsreduntilthealarmiscleared.
Silencingautopilotalarms
1.PresstheCLEARALARMsoftkey.
Thealarmissilencedandtheautopilotremainsengagedinauto
mode,continuingonthecurrentheading.
Silencingautopilotalarmsanddisengaging
autopilot
1.PresstheST ANDBYsoftkey .
Thealarmissilenced,andtheautopilotisdisengagedandputin
standbymode.
98C-SeriesWidescreenuserreference
Page 99

Chapter9:Usingradar
Chaptercontents
•9.1Radaroverviewonpage100
•9.2Radarscannerpowermodesonpage100
•9.3Radarrangeandimagequalityonpage101
•9.4Radardisplayoverviewonpage104
•9.5Dualrangeradaroperation(digitalscannersonly)onpage105
•9.6Radarmodeandorientationonpage106
•9.7Radartuning—DIGITALscannersonpage109
•9.8Radartuning—ANALOGscannersonpage114
•9.9Waypointsonpage120
•9.10Usingradartomeasuredistances,ranges,andbearingsonpage121
•9.11Usingradartotracktargetsandavoidcollisionsonpage124
•9.12Radaralarmsonpage128
•9.13Settingupyourradaronpage129
Usingradar
99
Page 100

9.1Radaroverview
9.2Radarscannerpowermodes
Radarisusedtoprovideinformationthatcanhelpyoutotrack
targetsandmeasuredistancesandbearings.
RadioDetectionAndRanging(RADAR)isusedatseatodetectthe
presenceofobjects(knownas‘targets’)atadistance,andifthey
aremoving,detecttheirspeed.
Radarworksbytransmittingradiopulses,thendetectingreections
ofthesepulses(echoes)fromobjectsintheareaanddisplayingthe
reectionsastargetsonyourdisplay.
Untilyouarefamiliarwithinterpretingtheradardisplay,every
opportunityshouldbetakentocomparetheradarscreenpatterns
withvisualtargets,suchasotherboats,buoysandcoastal
structures.Youshouldpractiseharborandcoastalnavigationduring
daylighthoursandinclearweatherconditions.
Digitalradar
Yourmultifunctiondisplaycanbeusedwithdigitalradarscanners.
Digitalradarscannersprovidearangeofadvantagesoveranalog
radar,makingiteasiertodiscernobjectsaroundyourvessel.
Digitalradarscannersprovide:
•Improvedtargetdetection.
•Full-colorimage.
•DualRangeoperation.
•SuperHDoption.Thiseffectivelyincreasesthetransmitterpower
byafactorofatleasttwo,andreducesthebeamwidthbya
similaramount.
Note:Y oumustconnectaSuperHDradarscannerinorderto
usetheSuperHDoption.
Theradarscannerhasanumberofpowermodes.
Theradarscannericoninthedatabarindicatesthepowerstatusof
theradarscanner.Thefollowingisanexplanationofeachstatus:
Radar
Mode
Transmit
(TX)
Standby
(STBY)
Off Scannerpoweredoffwhenradarnot
Timed
Transmit
RadarStatus
IconDescriptionofstatus
Rotatingicon,signifyingthatthescanner
isonandtransmitting.WhenSCANNER
issettoON,selectthismodetoactivate
thescanner.Thisistheusualmodeof
operation.
Staticicon,indicatingthatthescanneris
onbutnottransmitting,andtheantennais
notrotating.Antennadoesnotrotate,the
scannerdoesnottransmitandtheradar
dataisremovedfromthescreen.Thisisa
powersavemodeusedwhenradarisnot
neededforshorttimeperiods.Whenyou
returntotransmitmode,themagnetron
doesnotneedtowarmup.Thisisthe
defaultmode.
required,butdisplayisinuseforother
applications,suchasthechart.When
selected,thesystemcountsdown.During
thistimeyoucannotre-powerthescanner.
Scannerswitchesbetweenon/transmitting,
andstandbymode.Scannergoesinto
powersavemodewhenconstantuseof
radarisnotrequired.
100C-SeriesWidescreenuserreference
 Loading...