


Quick Start Guide ....................... 1
Guide de Démarrage Rapide .... 18
Guía de Inicio Rápido ............... 36


Important Information About Your IntelliRoute® TND™ 525
RAND MCNALLY DOCK: Keep your device up to date by downloading the Rand McNally Dock for your home
computer at www.randmcnally.com/dock and connecting your device with the USB cable provided.
POWER BUTTON: Press and hold the orange power button to turn the device on or off. The power button
can also be used for quick access to certain features while the device is running. See Preferences > General >
Quick Power Press for options. A red light indicates the battery is charging; a green light indicates the battery is
fully charged.
RESET: Use the reset button on the back of the device to restart. This will cancel the current route, but
preferences, address book, and other personal data will be saved.
LEARN MORE: Access Tutorial & Tips under Preferences > General on your device for more information,
or visit www.randmcnally.com/support to download the user manual.
Some screens include help tips. Tap this button to access.
WARNING: This product contains chemicals known to the State of California to cause cancer and/or other harm.
1
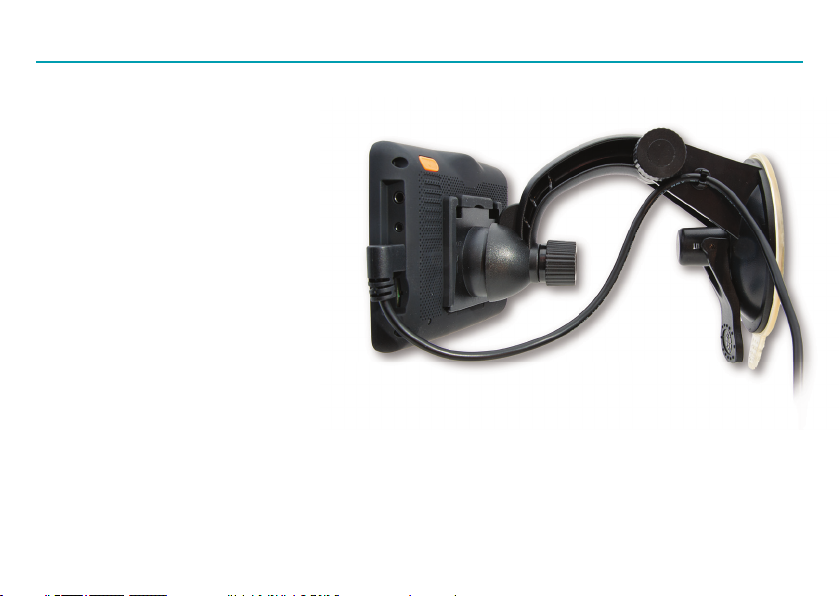
Install the Mount
NOTE: Follow all local regulations governing the placement of the mount. Select an area with a line of sight to the
sky and GPS satellites to ensure reliable GPS information.
1. Clean and dry the mounting area.
2. Remove the suction cup protective fi lm.
3. Adjust the angle of the mount using the
thumbscrew.
4. Pull the suction cup lever up to release
suction.
5. Plug the power cord into the device and
the vehicle’s 12-volt power source.
6. Slide the device onto the mount.
7. Place and hold the mount suction cup against the
mounting surface.
8. Press the suction cup lever down until it snaps into place.
9. Adjust the device so that it can be easily seen and does not block the driver’s line of sight.
2
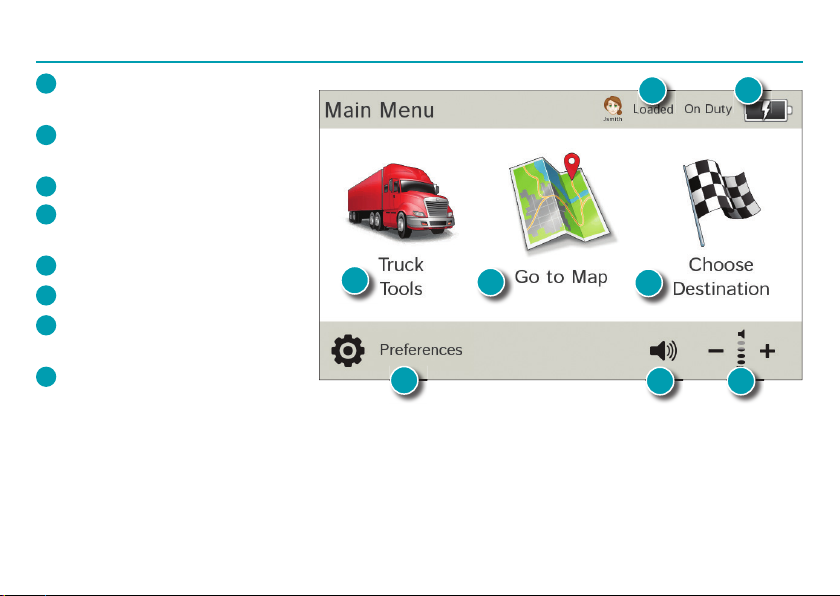
Main Menu
1
Enter truck information and access
truck-specifi c use tools.
2
Show location on the map and
view navigation instructions.
3
Choose a destination.
4
Select device, route and map
preferences. Access the tutorial.
5
Mute/unmute the speaker.
6
Adjust speaker volume.
7
Indicates charge when running on
battery.
Change driver profi le, trailer load,
8
or driver status.
1
4
2
8
3
5
Note: You can select different color schemes in Preferences > General > Skin Style. The following screen
images appear in the “Ice” style. Some screens may appear different, based on model number.
Note: From other screens, tap the Main Menu icon in the bottom right corner to return to the Main Menu.
7
6
3

Enter Truck Information and Set Warnings
1. Tap Truck Tools > Truck Info or Warnings.
2. Tap
3. Tap the option button to be changed.
4. Enter new settings.
5. Tap
and to view options.
to save changes.
On the left,
tap on an
option
Set Routing and Device Options
1. Tap Preferences.
2. Tap the General, Route or Map tab.
3. Tap
and
to view options.
4. Tap the option button to be changed.
5. Enter new settings.
6. Tap
to save changes.
4
On the left,
tap on an
option
On the
right,
enter
settings
for the
option
On the
right,
enter
settings
for the
option
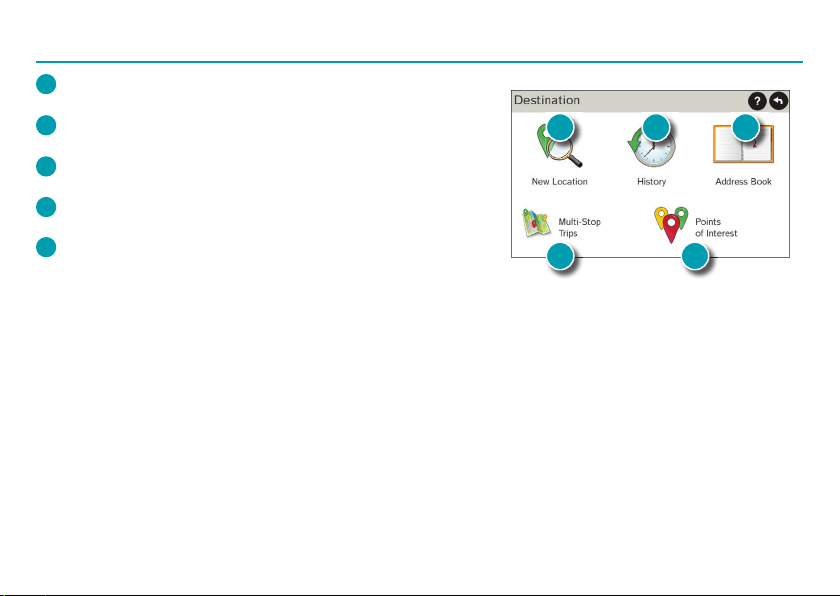
Destination
1
Route to a new location. (See page 6.)
2
Return to a previously entered address.
3
Access the Address Book.
Plan a multi-stop trip.
4
Route to a point of interest. (See page 10.)
5
1 2 3
4 5
5
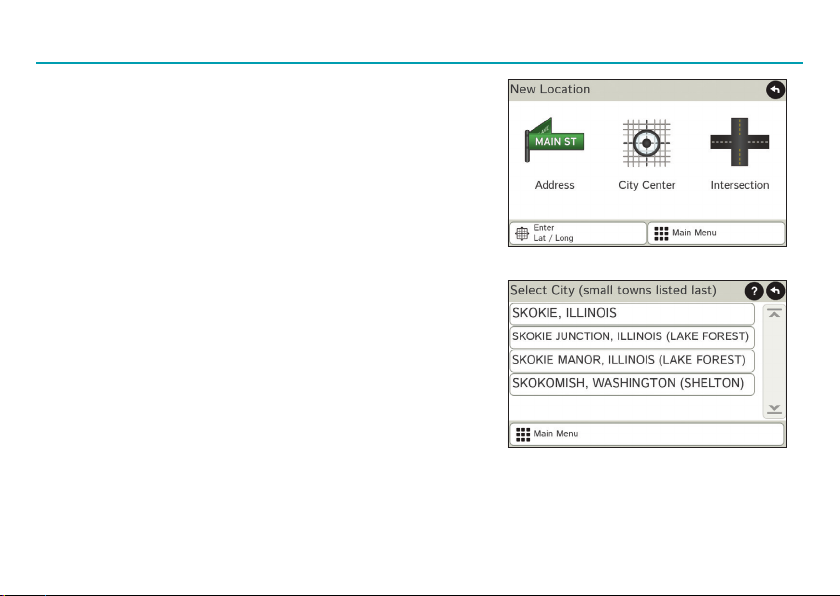
Route to a New Location
1. Tap Choose Destination > New Location.
2. Tap Address.
3. Enter the name of the city. (NOTE: As you type,
the keyboard displays only the next possible letter.)
4. Prompts appear in the top bar. Tap the city to
select. Or, tap List to view cities beginning with
the letter(s) you entered.
5. Enter the street name. (NOTE: If the letters you
need do not appear, tap Expand Search.)
6. Enter the house number. (NOTE: To enter the
house number before the street, tap the house
number button in the previous step.)
See Confirm Destination Window (page 7.)
Tips
• You can also route to a new location by City
Center, Intersection, or Latitude/Longitude,
or choose Address > Zip Code Search.
• View recent destinations by tapping Choose Destination > History. View recent cities by tapping Choose
Destination > New Location > Address > History.
• View saved locations by tapping Choose Destination > Address Book.
6
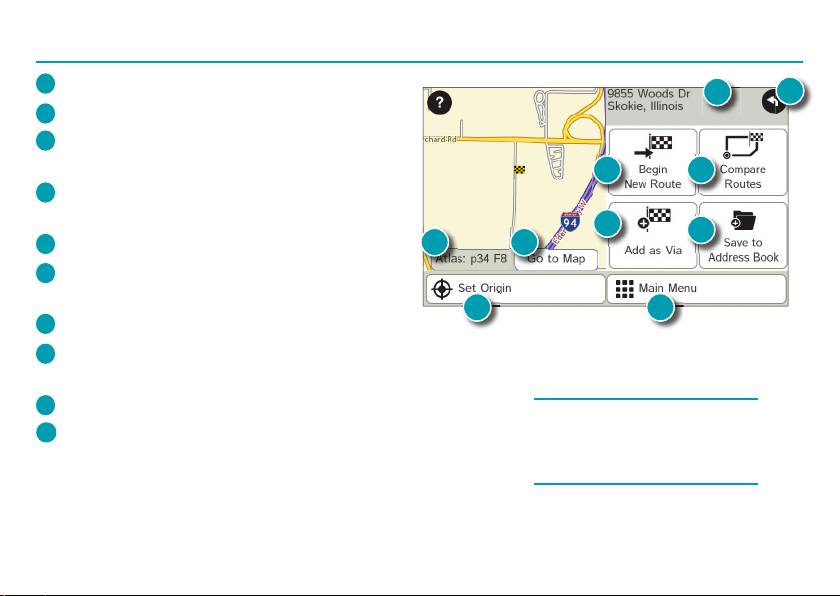
Confi rm Destination Window
1
Destination address.
2
Begin route to destination.
3
Compare a primary and alternate route and
choose one.
4
Add the location as a via point on the way to
a previously entered destination.*
Save the location to the Address Book.
5
Cross reference to printed Rand McNally
6
Motor Carriers’ Road Atlas.
7
View the map.
8
Change the starting location for a route to the
location displayed here.
9
Return to Main Menu.
10
Return to previous window.
*To manage via points, Tap Choose Destination >
Multi-Stop Trips. You can add up to 50 destinations in
a multi-stop trip, and optimize routing for trips of up to
10 stops.
6 7
8
1
2
4
3
5
9
NOTE: This window may include
additional buttons based on the
type of destination selected.
10
7
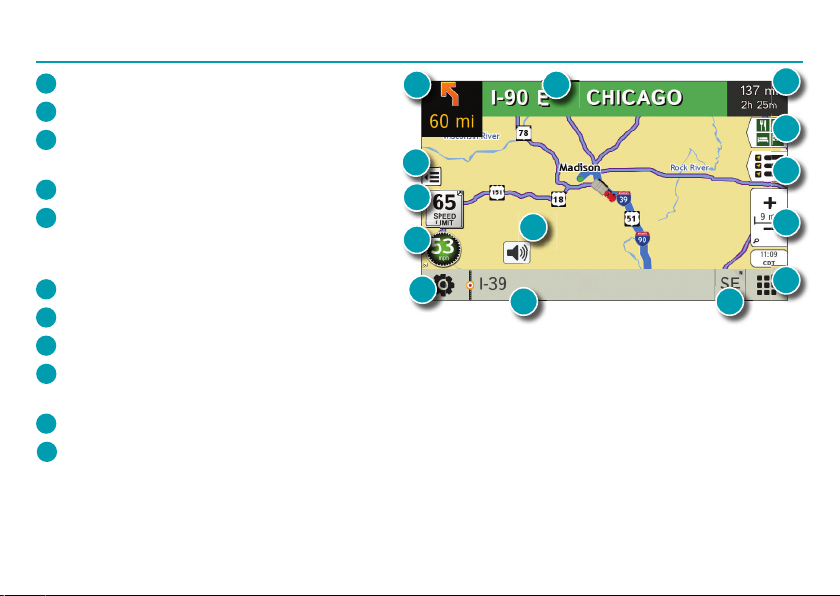
Route Map Window
1
Repeat spoken next-maneuver instructions.
2
Name of street you will turn onto next.
3
Show arrival time, remaining time, or other
options.
4
Slide out to show upcoming exit information.
5
Directions list slideout. Tap Route Display
Options to select detail view, highway view,
1
14
12
11
trip summary, or summary map view.
6
Zoom in/zoom out.
7
Return to Main Menu.
8
Current direction. Tap to select a map display option (Heading Up, North Up, or 3D View).
9
View current road name, upcoming cross road name, or city, county and state. Also displays advanced lane
10
guidance. Tap to change.
10
View and save current location, detour, or cancel a route.
11
Tap on the current speed to display the Virtual Dashboard. (NOTE: Turns red for speed warnings; set in
Truck Tools > Warnings.)
8
2
13
9
3
4
5
6
7
8
Route Map Window - continued
12
Current speed limit—orange for truck limit, white for general limit. Tap to open a “Tell Rand” about
speed limits.
13
Mute the speaker.
14
Minimize icons to show simply the map and next maneuver.
Junction View
When on a route, Junction View displays when you have an upcoming
maneuver. Once past the maneuver, Junction View closes and the
previous window displays.
1
Signs to follow for the next maneuver.
2
Number and direction of lanes for the next maneuver.
3
Distance to the upcoming maneuver. Distance decreases as
you approach the ramp.
4
Lane assist arrow.
5
Mute the speaker.
6
Return to previous window.
3
56
1
2
4
9
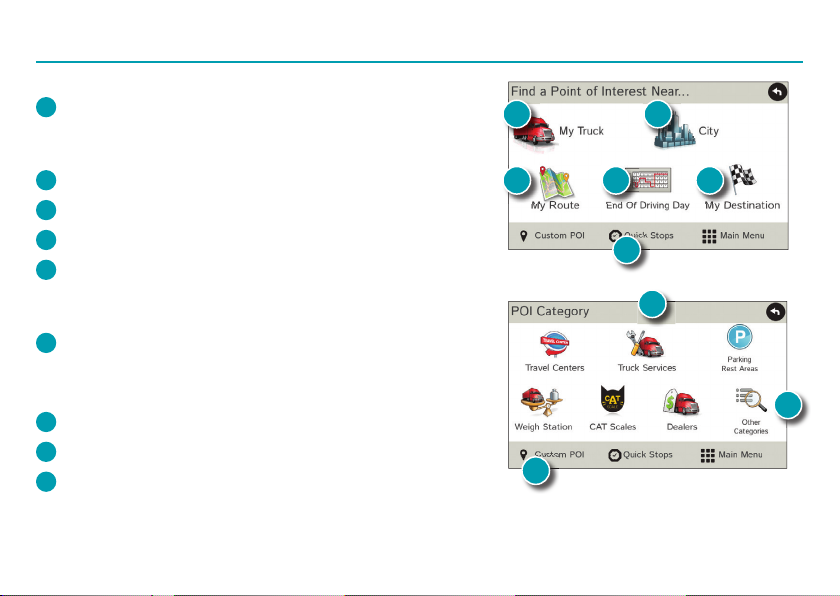
Find a Point of Interest (POI)
Tap Choose Destination > Points of Interest.
1
Find popular truck-friendly POIs near your current location.
Search for a POI:
2
Near your truck
3
In a particular city
4
Along your route
5
Along the last 30 minutes of your driving day
(using the time remaining in Truck Tools >
Timers)
6
Near your destination
2
4
3
5 6
1
7
POI Categories
7
Select a category.
8
Find restaurants, hotels, and other subcategories.
9
View custom POIs that have been uploaded
through the Rand McNally Dock.
10
8
9
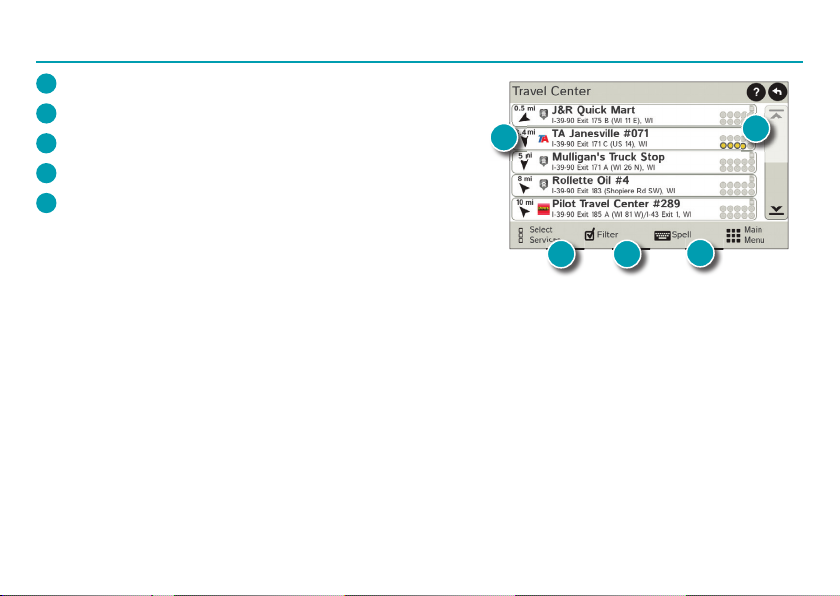
Find a Point of Interest (POI) - continued
10
Tap location to select.
11
View and edit ratings and comments.
12
Tap to search by available services.
13
Apply or remove services fi lter for search results.
14
Search POI by name.
10
11
12 13
14
11
Virtual Dashboard
1
Current direction of travel.
2
Displays current time at the yard, current location
1
and your destination.
3
Sunrise and sunset times based on vehicle location
3
4
(latitude/longitude) and day.
4
Current speed (above) and posted speed limit
(below).
5
Elevation at current location.
6
Percentage of current trip completed, distance to
next maneuver, and the number of miles and time
6
12
spent on the trip to this point.
7
Return to the Route Map Window.
8
Gather trip information for up to three trips. Includes odometer settings, hours, and speeds.
9
Reset trip information for the selected trip (Tab 1, Tab 2 or Tab 3).
10
Select to automatically reset the information in each tab after the vehicle has remained stationary
for the specifi ed number of hours.
11
View fuel logs and add fuel purchase information.
12
Match with truck's odometer to automatically update new fuel logs.
Tap the pencil to edit.
12
2
5
9
11
7
8
10
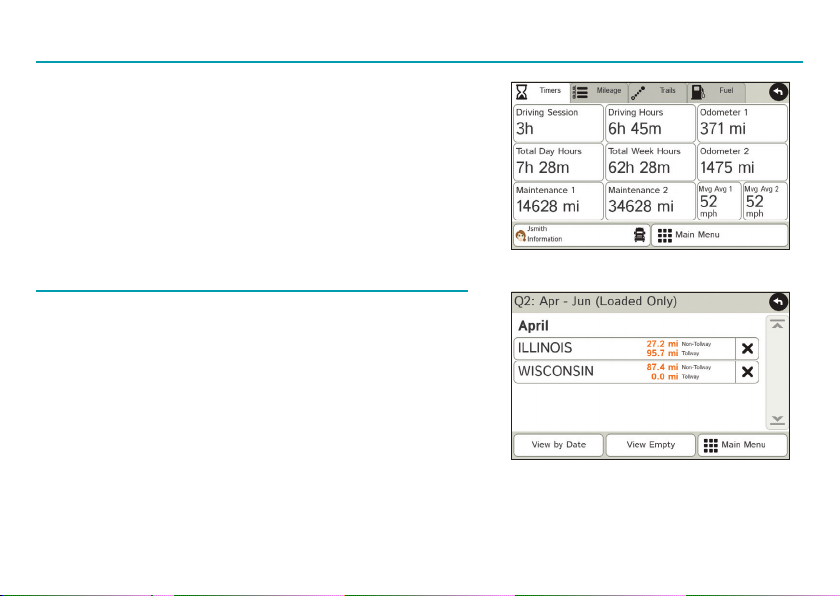
View Timers and Logs
1. Tap Truck Tools > Timers, Logs, Trails, Fuel.
2. Tap Timers to view timers, odometer readings, and average speed.
3. Tap on a field to change or reset the number.
NOTE: Countdown timers are controlled by the Driver
Status (Driving, On Duty, or Off Duty) selected on the
Main Menu.
To switch driver profiles, tap the driver information field.
4. Tap Logs to view a list of mileage logs by quarter.
5. Tap on a quarter to view individual logs by state.
NOTE: You can export logs to your computer through
the Rand McNally Dock.
13
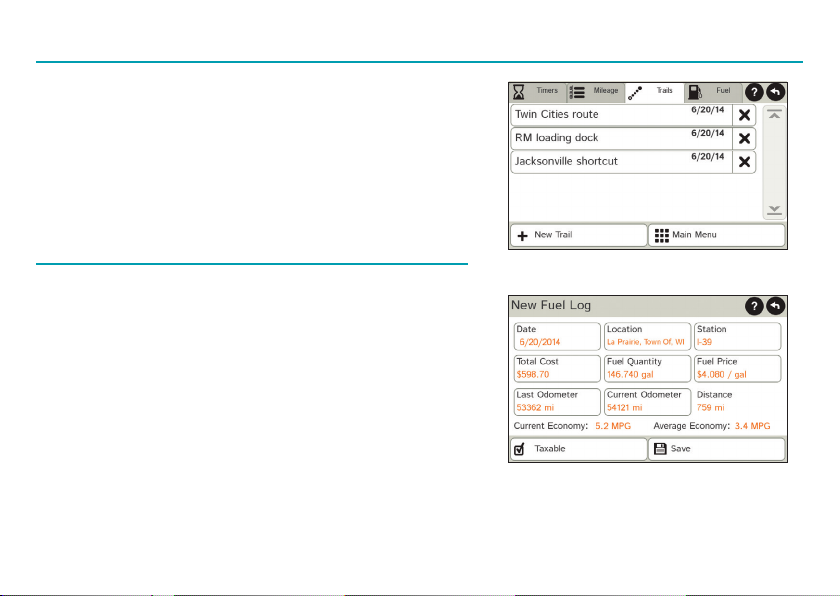
View Trails and Fuel
1. Tap Truck Tools > Timers, Logs, Trails, Fuel.
2. Tap Trails to record a “bread-crumb” path of GPS
coordinates where your truck has traveled.
3. Tap any record to view the trail, edit the name
or set the color.
4. Tap Show on Map to display the trail on the
Route Map Window.
5. Tap Fuel to view a list of fuel logs by quarter.
6. Tap on a quarter to view individual logs by state.
7. Tap Add Fuel to record the date, location and cost
of fuel purchase.
8. Tap on a field to make changes.
9. Check Taxable to include the purchase in the
fuel log.
10. Tap Save.
14

More Information
For a detailed description of the features of your device, please see the IntelliRoute® TND™ 525 User Manual.
The User Manual can be downloaded from the Rand McNally Dock, and is also available at
www.randmcnally.com/support.
Rand McNally Dock
The Rand McNally Dock enables you to receive software upgrades and access map updates, construction updates,
and additional features. Simply download the Dock software for your PC or Mac at www.randmcnally.com/dock
and connect your device using the USB cable provided.
With the Rand McNally Dock, you can also:
• Export mileage and fuel logs to your home computer
• Upload custom POIs, such as red light cameras, to your device
• Download the User Manual
• Access the Rand McNally support site and online store
• Read product news and announcements
• Send feedback and suggestions to Rand McNally through “Tell Rand”
™
15

Warnings, End-User License Agreement, and Warranty
Pay attention to road conditions and street signs, and obey all traffic and safety laws. Traffic laws and current traffic conditions must always be observed and take
precedence over the instructions issued by the TND
the navigation system may be in conflict. Some states prohibit the use of windshield mounts and may otherwise restrict the usage of navigation and other electronic devices in the
vehicle. It is the User’s responsibility to ensure compliance with all laws and regulations. The use of the navigation system does not relieve the User of his/her responsibilities. The User
is ultimately responsible for the vehicle under his/her control and should be aware of the surroundings at all times.
If after reading these statements the User decides not to accept these terms, the User should not use the TND
Rand McNally hereby grants you (“User”) a single-user non-exclusive, non-transferable license to use the Rand McNally IntelliRoute
referred to as the “TND
™
This TND
permitted by such license, the contents of this TND
written permission of Rand McNally. This TND
a limited license for use of this TND
content of this document and the TND
treaties.
THE USER MAY NOT:
• Use the TND
• Use the TND™ product to create any routing tables, files, databases or other compendiums.
• Copy, loan or otherwise transfer or sublicense the TND™ product, its software or content.
• Modify, or adapt the TND™ product in any way, or decompile, disassemble, reverse engineer or reduce to human readable form the TND™ product and software incorporated therein.
• Alter, remove or obscure any copyright notice, trademark notice, or proprietary legend from the TND™ product, its software or content.
This license will terminate automatically if User fails to comply with any of the terms of this license and User agrees to stop using the TND
update the TND
RM Acquisition, LLC d/b/a Rand McNally warrants that the TND™ product, and the component parts thereof, will be free of defects in workmanship and materials for a period of one
(1) year from the date of first use as determined by contact with GPS satellites. This warranty may be enforced by the first consumer purchaser (“Customer”), provided that the product
is utilized within the U.S.A. or Canada.
Rand McNally will, without charge, repair or replace (with a new or newly reconditioned unit), at its option, defective TND™ products or component parts. For repair or replacement
of defective TND™ products, Customer must contact Rand McNally at 1-800-333-0136 for return authorization and instructions. Customer will be required to have the product
registered via the Rand McNally Dock or, if Customer is unable to register the product electronically, Customer will be required to provide proof of date of first Customer purchase,
such as a duplicate copy of a sales receipt, for the warranty to be valid. When the product is connected to the Rand McNally Dock, the Dock will record the date of first use of the
device based on contact with GPS satellites. The Customer must pay any initial shipping charges required to ship the product for warranty service, but the return charges will be at
Rand McNally’s expense, if the product is repaired or replaced under warranty.
Repairs or replacements have a 90-day warranty. If the product sent in is still under its original warranty, then the new warranty is 90 days or to the end of the original one (1) year
warranty, depending on which is longer.
This warranty gives the Customer specific rights. Other rights may be available to Customer which vary from state to state.
™
product and the software incorporated in it and related documentation are furnished under license and may be used only in accordance with this license. Except as
product” (including software and associated data) ) for User’s own internal business or personal use and not for resale, sublicense or commercial use.
™
™
product on a network or file server, time-sharing or to process data for other persons.
™
product and is not obligated to furnish any revisions or updates to User.
16
™
product navigation system. The User should be aware of situations where current traffic conditions and the instructions from
™
product.
™
product and software may not be disclosed to third parties, copied or duplicated in any form, in whole or in part, without the prior
™
product and software contain proprietary and confidential information of Rand McNally and its licensors. Rand McNally grants User
product and the software incorporated in the TND™ product for its normal operation. By using the TND™ product, User acknowledges that the
™
product are the property of Rand McNally and its licensors and are protected by U.S. copyright, trademark and patent laws and international
®
TND™ trucking navigation product (hereinafter
™
product. Rand McNally may revise or

Exclusions: This limited warranty does not apply: 1) to any product damaged by accident; 2) in the event of misuse or abuse of the product or as a result of unauthorized alterations
or repairs; 3) if the serial number has been altered, defaced or removed; or 4) if the owner of the product resides outside of the U.S.A. or Canada.
Caution: Rand McNally makes no warranty as to the accuracy of completeness of the information in the TND™ product and disclaims any and all express,
implied or statutory warranties, including any implied warranty of merchantability or fitness for a particular purpose. It is the user’s responsibility to use this
product prudently. This product is intended to be used only as a travel aid and must not be used for any purpose requiring precise measurement of direction,
distance, location or topography.
RAND MCNALLY AND ITS LICENSORS DO NOT MAKE ANY OTHER WARRANTY OR REPRESENTATION, EITHER EXPRESS OR IMPLIED, WITH RESPECT TO THE TND™ PRODUCT,
INCLUDING ANY WARRANTY AS TO QUALITY, PERFORMANCE, TITLE OR NON- INFRINGEMENT. IN NO EVENT WILL RAND MCNALLY OR ITS LICENSORS BE LIABLE FOR ANY
INDIRECT, SPECIAL, INCIDENTAL, OR CONSEQUENTIAL DAMAGES ARISING OUT OF THE USE OR INABILITY TO USE THE TND™ PRODUCT, EVEN IF ADVISED OF THE POSSIBILITY OF
SUCH DAMAGES.
Some states do not allow limitations on how long an implied warranty lasts and/or do not allow the exclusion or limitation of incidental or consequential damages, so the above
limitations my not apply to some consumers.
The User agrees to allow User-provided information to Rand McNally to be used for internal business evaluation purposes, including, but not limited to, evaluating the effectiveness of the
services provided, methods to simplify or improve User experiences. Such information will not be used by third parties or in any way that discloses the identity of the User.
Rand McNally may make use of third party software in the TND
™
TND
product may be subject to other terms and conditions. The official third party copyright notices are provided at the end of this License.
The User agrees to indemnify, defend and hold Rand McNally and its licensors (including their respective licensors, suppliers, assignees, subsidiaries, affiliated companies, and the
respective officers, directors, employees, shareholders, agents and representatives of each of them) free and harmless from and against any liability, loss, injury (including injuries resulting
in death), demand, action, cost, expense or claim of any kind or character, including but not limited to attorney’s fees, arising out of or in connection with any use or possession by the
User of this TND
These terms and conditions constitute the entire agreement between Rand McNally (and its licensors and suppliers) and the User pertaining to the subject matter hereof, and supersedes
in their entirety any and all written or oral agreements previously existing between us with respect to such subject matter. The terms and conditions (including the license) may be
updated from time to time.
The above terms and conditions shall be governed by the laws of Illinois, without giving effect to (i) its conflict of laws provisions, or (ii) the United Nations Convention for Contracts
for the International Sale of Goods, which is explicitly excluded. The User agrees to submit to the jurisdiction of Illinois for any and all disputes, claims and actions arising from or in
connection with the Data provided to the User hereunder.
User shall not export the TND
are not parties hereto and have no obligations hereunder.
By using this product you agree to be bound both by the foregoing and to the terms of use found at www.randmcnally.com/truckgps.
Actual toll costs may vary from estimates depending upon a number of factors including inaccurate or imprecise source data and upon variable toll costs
which are dependent upon vehicle characteristics (class, axle number, weight, etc.) that vary across toll roads.
Restricted Rights Legend. For governmental agencies: Use, reproduction or disclosure is subject to restrictions set forth in subparagraph (c) (1) (iii) of the Right in Technical Data and
Computer Software clause at DFARS 52.227-7013, as amended.
Rand McNally, the Rand McNally logo, the globe design mark and IntelliRoute are registered trademarks and TND is a trademark of RM Acquisition, LLC, d/b/a Rand McNally.
Copyright © 2014 Rand McNally. All rights reserved. Portions © 2014 HERE. All rights reserved. This data includes information taken with permission from Canadian authorities, including
© Her Majesty the Queen in Right of Canada, © Queen’s Printer for Ontario. Portions © 2014 InfoGation. All rights reserved. Portions © 2014 The Trucker’s Friend.
Portions © 2014 TruckDown. All rights reserved. Patent pending. U.S. Patent Nos. 7,580,791 and 8,214,141.
™
product.
™
product in violation of any U.S. or foreign laws. Rand McNally’s licensors shall be third party beneficiaries of Rand McNally’s rights under this license, but
™
product. Notwithstanding the terms and conditions of this license, use of some third party materials included in the
17

Guide de Démarrage Rapide
18

Informations importantes concernant votre IntelliRoute® TND
LOGICIEL DOCK DE RAND MCNALLY: maintenez votre appareil à jour en téléchargeant le logiciel Dock de
Rand McNally sur votre ordinateur personnel à l'adresse www.randmcnally.com/dock puis en connectant votre
appareil à l'aide du câble USB fourni.
BOUTON D'ALIMENTATION: maintenez le bouton d'alimentation orange appuyé pour mettre l'appareil sous ou
hors tension. Ce bouton peut également être utilisé pour accéder rapidement à certaines fonctionnalités lorsque
l'appareil est sous tension. Consultez Préférences > Général > Appui rapide sur le bouton d'alimentation pour
découvrir les options. Un voyant rouge indique que la batterie est en cours de chargement; un voyant vert indique que
celle-ci est complètement chargée.
RÉINITIALISER: utilisez le bouton de réinitialisation à l'arrière de l'appareil pour redémarrer celui-ci. L'itinéraire
actuel est annulé, mais les préférences, le carnet d'adresses et toute autre donnée personnelle seront enregistrés.
POUR EN SAVOIR PLUS: utilisez votre appareil pour consulter Didacticiel et conseils sous Préférences >
Général afi n d'obtenir plus d'informations, ou bien rendez-vous à l'adresse www.randmcnally.com/support pour
télécharger le manuel d'utilisateur.
Certains écrans vous offrent des conseils. Toquez sur ce bouton pour y accéder.
ATTENTION: Ce produit contient des produits chimiques reconnus par l'État de Californie pour causer le cancer ou
d'autres dommages.
™
525
19

Installation du support
REMARQUE: Suivez toutes les réglementations locales en vigueur régissant le placement de la monture.
Sélectionnez une zone avec une vue dégagée du ciel et des satellites GPS pour assurer la transmission correcte des
informations.
1. Nettoyez et séchez la zone de fi xation.
2. Retirez le fi lm de protection de la ventouse.
3. Ajustez l'inclinaison du support à l'aide
de la vis de serrage.
4. Tirez le levier de la ventouse vers le haut
pour dégager celle-ci.
5. Branchez le cordon d'alimentation dans
l'appareil et dans la source d'alimentation
de 12 volts du véhicule.
6. Faites glisser l'appareil sur le support.
7. Maintenez la ventouse de la monture sur la surface de fi xation.
8. Baissez le levier de la ventouse jusqu'à ce que celle-ci soit engagée.
9. Ajustez l'appareil pour qu'il soit bien visible et ne perturbe pas le champ de vision du conducteur.
20

Menu principal
1
Saisissez les informations sur le
7
camion puis accédez aux outils
spécifi ques au camion.
2
Affi chez votre emplacement sur la
carte puis visualisez les instructions
de navigation.
3
Choisissez une destination.
4
Sélectionnez les préférences
d'appareil, d'itinéraire et de carte.
1
2
3
Accédez l'aide et les didacticiels.
5
Activez/désactivez la sourdine
du haut-parleur.
6
Ajustez le volume du haut-parleur.
7
Indique le niveau de charge lorsque l'appareil est alimenté par la batterie.
8
Modifi ez le profi l du conducteur, la charge de remorque ou l'état du conducteur.
4 5
REMARQUE: à partir d'autres écrans, toquez sur l'icône Menu principal dans le coin inférieur droit pour revenir au
Menu principal.
REMARQUE: vous pouvez sélectionner différentes combinaisons de couleurs sous Préférences > Général >
Style de l'apparence. Les saisies d'écran suivantes utilisent le style « Glace ».
8
6
21

Saisie des informations sur le camion et définition des avertissements
1. Toquez sur Outils de camion > Infos de
camion ou sur Avertissements.
2. Toquez sur
et pour afficher
les options.
3. Toquez sur le bouton de l'option à changer.
Toquez sur
l'une des
options à
gauche.
Saisissez les
paramètres
d'une option
sur la droite
4. Saisissez les nouveaux paramètres.
5. Toquez sur
pour enregistrer
les changements.
Définition des options d'itinéraire et d'appareil
1. Toquez sur Préférences.
2. Toquez sur l'onglet Paramètres Général,
Itinéraire ou Carte.
3. Toquez sur
et pour afficher
les options.
4. Toquez sur le bouton de l'option à changer.
5. Saisissez les nouveaux paramètres.
6. Toquez sur
pour enregistrer les changements.
22
Toquez sur
l'une des
options à
gauche.
Saisissez les
paramètres
d'une option
sur la droite

Destination
1
Naviguez vers une nouvelle destination. (Consultez la page 24.)
2
Revenez à une adresse saisie précédemment.
3
Accédez au carnet d'adresses.
4
Préparez un itinéraire à plusieurs étapes.
5
Naviguez vers un point d'intérêt. (Consultez la page 28.)
1 2 3
4 5
23

Itinéraire vers une nouvelle destination
1. Toquez sur Choisir la destination > Nouvel
emplacement.
2. Toquez sur Adresse.
3. Saisissez le nom de la ville. (REMARQUE: le clavier
affiche uniquement les prochaines lettres possibles.)
4. L'invite s'affiche sur la barre supérieure. Toquez pour
sélectionner la ville. Ou bien, toquez sur Lister pour
afficher les villes commençant par la ou les lettres que vous
avez saisies.
5. Saisissez le nom de la rue. (REMARQUE: pour saisir le
numéro de la maison avant la rue, toquez sur le bouton
Numéro de maison à l'étape précédente.)
6. Saisissez le numéro de la maison.
Consultez la fenêtre Confirmation de la destination (page 25).
Conseils
• Vous pouvez aussi tracer un nouvel itinéraire par
Centreville, Carrefour ou Latitude/Longitude, ou bien
choisissez Adresse > Recherche de code postal.
• Affichez les destinations récentes en toquant sur Choisir la destination > Historique. Affichez les villes
récentes en toquant sur Choisir la destination > Nouvel emplacement > Adresse > Historique.
• Affichez les emplacements enregistrés en toquant sur Choisir la destination > Carnet d'adresses.
24

Fenêtre de confi rmation de la destination
1
Adresse de la destination.
2
Début de l'itinéraire vers la destination.
3
Comparez l'itinéraire principal et l'itinéraire
alternatif puis effectuez votre sélection.
Ajout de l'emplacement comme point de passage
4
d’un itinéraire saisi précédemment.*
5
Enregistrement de l'emplacement dans le carnet
6 7
2
4
d'adresses.
6
Renvoi vers l'atlas imprimé
Atlas
de Rand McNally.
7
Affi chage de la carte.
8
Remplacement du point de départ d'un itinéraire
par celui actuellement affi ché.
9
Retour au menu principal.
10
Retour à la fenêtre précédente.
Motor Carriers’ Road
8
REMARQUE: cette fenêtre peut proposer
d'autres boutons en fonction du type de
destination sélectionné.
*Pour gérer les points de passage, toquez sur Choisir la destination > Itinéraire à plusieurs étapes.
Vous pouvez ajouter jusqu'à cinquante destinations pour un itinéraire à plusieurs étapes et optimiser un itinéraire
ayant jusqu'à dix étapes.
1
3
5
9
10
25

Fenêtre de la carte de l'itinéraire
1
Répétition de l'énoncé des instructions pour
la manœuvre suivante.
2
Nom de la prochaine rue sur laquelle vous allez
1
tourner.
3
Affi chage de l'heure d'arrivée, la distance restante
ou d'autres options.
4
Faire glisser pour affi cher les informations sur la
14
12
prochaine sortie.
5
Liste déroulante des directions. Toquez sur
11
Options d'affi chage d'itinéraire pour affi cher
une vue étape par étape, une vue d'autoroute ou
une vue de carte.
6
Zoom avant/arrière.
7
Retour au Menu principal.
Sélection d'une option d'affi chage de carte (se dirigeant vers, vers le nord ou affi chage 3D).
8
9
Affi che le nom de la route actuelle, le nom du croisement, ou de la ville, du comté et de l'État. Affi che
10
également une aide au changement de voie. Toquez pour changer.
10
Affi che et enregistre l'emplacement actuel, le détour, ou annule une route.
26
2
13
9
3
4
5
6
7
8

Fenêtre de la carte de l'itinéraire - suite
11
Toquez sur la vitesse actuelle pour affi cher le tableau de bord virtuel. (REMARQUE: devient rouge pour les
avertissements de limitation de vitesse; réglage sous Outils de camion > Avertissements.)
12
Limitation de vitesse actuelle — orange pour les camions, blanc pour les limitations générales. Toquez pour ouvrir
un « Signaler à Rand » sur les limitations de vitesse.
13
Mettre le haut-parleur en sourdine.
14
Minimise les icônes pour affi cher simplemente la carte et la prochaine manœuvre.
Affi chage des intersections
Lorsque vous êtes sur un itinéraire, l'affi chage des intersections
indique la prochaine manœuvre. Une fois la manœuvre terminée,
l'affi chage des intersections se ferme et la fenêtre précédente s'affi che.
1
Panneaux à suivre lors de la prochaine manœuvre.
2
Nombre et sens des voies lors de la prochaine manœuvre.
3
Distance avant la prochaine manœuvre. La distance diminue
alors que vous vous approchez de la bretelle d'accès.
4
Flèche de voie.
5
Mettre le haut-parleur en sourdine.
6
Retour à la fenêtre précédente.
3
56
1
2
4
27

Recherche d'un point d'intérêt (PI)
Toquez sur Choisir la destination > Points d'intérêt.
1
Trouvez des PI populaires adaptés aux routiers près de
votre emplacement actuel.
2
3
Recherchez un PI:
2
Près de votre camion
3
Dans une ville particulière
4
Le long de votre itinéraire
5
Le long des 30 dernières minutes de votre journé de
conduite (en utilisant le temps restant sous Outils de
camion > Compteurs)
6
Près de votre destination
Catégorie de PI
7
Sélection d'une catégorie.
8
Recherche de restaurants, hôtels et autres
sous-catégories.
9
Affi chage des PI personnalisés qui ont été chargés à
partir du logiciel Dock de Rand McNally.
28
4
5
6
1
7
8
9

Recherche d'un point d'intérêt (PI) - suite
10
Toquez sur un emplacement pour le sélectionner.
11
Affi chez et modifi ez les évaluations et commentaires.
12
Toquez pour lancer une recherche par services disponibles.
13
Appliquez ou retirez un fi ltre de services pour les résultats
de la recherche.
14
Recherchez le PI par nom.
10
11
12 13 14
29

Tableau de bord virtuel
1
Direction actuelle de déplacement.
2
Affi chage de l’heure actuelle au dépôt, à votre
1
2
emplacement actuel et à votre destination.
3
Heure de lever/coucher du soleil en fonction de
l'emplacement du véhicule (latitude/longitude) et
3
4
5
du jour.
4
Vitesse actuelle (nombre du haut) et limitation de
vitesse indiquée (nombre du bas).
5
Élévation à l'emplacement actuel.
6
Pourcentage de l'itinéraire actuel parcouru,
distance avant la prochaine manœuvre, et distance
6
12
9 10
ainsi que durée écoulées sur l'itinéraire.
7
Retour à la fenêtre de la carte de l'itinéraire.
8
Collecte des informations d'un maximum de trois itinéraires. Comprend les paramètres d'odomètre,
les heures et les vitesses.
9
Réinitialisation des informations de l'itinéraire sélectionné (Onglet 1, Onglet 2 ou Onglet 3).
10
Sélection de réinitialiser automatiquement les informations sous chaque onglet une fois que le véhicule est
resté immobilisé durant le nombre d'heures indiquées.
11
Toquez sur cette option pour affi cher les journaux de consommation en carburant puis ajoutez les informations
d'achat de carburant.
12
Faites correspondre à l'odomètre du camion pour automatiquement mettre à jour les journaux de carburant.
Toquez sur le crayon pour apporter une modifi cation.
30
11
7
8

Affichage des compteurs et carnets de bord
1. Toquez sur Outils de camion > Compteurs,
carnets de bord, pistes et carburant.
2. Toquez sur Compteurs pour afficher les compteurs,
les relevés d'odomètre et la vitesse moyenne.
3. Toquez sur un champ pour changer ou réinitialiser le
nombre.
REMARQUE: les compteurs de temps sont contrôlés par
le statut du conducteur (Conduite, En service ou Hors
service) sélectionné dans le Menu principal.
Toquez sur le champ d'information du conducteur pour
changer de profil.
4. Toquez sur Carnets de bord pour afficher une liste
des journaux kilométriques par trimestre.
5. Toquez sur un trimestre pour afficher les journaux
individuels par statut.
REMARQUE: vous pouvez exporter les journaux vers votre
ordinateur via le logiciel Dock de Rand McNally.
31

Affichage des pistes et du carburant
1. Toquez sur Outils de camion > Compteurs,
carnets de bord, pistes et carburant.
2. Toquez sur Pistes pour enregistrer une piste de
navigation des coordonnées de GPS représentant
le trajet de votre camion.
3. Toquez sur n'importe quel enregistrement pour
visualiser la piste, modifier le nom ou configurer la couleur.
4. Toquez sur Afficher sur la carte pour afficher la
piste sur la fenêtre de la carte de l'itinéraire.
5. Toquez sur Carburant pour afficher une liste des journaux de
carburant par trimestre.
6. Toquez sur un trimestre pour afficher les journaux individuels
par statut.
7. Toquez sur Ajouter du carburant pour enregistrer la date,
le lieu et le prix d'achat du carburant.
8. Toquez sur un champ pour apporter des modifications.
9. Toquez sur Imposable pour inclure l'achat dans le journal de carburant.
10. Toquez sur Sauver.
32

Informations supplémentaires
Pour une description détaillée des fonctionnalités de votre appareil, veuillez consulter le manuel d'utilisateur de
l'IntelliRoute® TND™ 525. Le manuel d'utilisateur peut être téléchargé à partir du logiciel Dock de Rand McNally, il
est également disponible à l'adresse www.randmcnally.com/support.
Rand McNally Dock
Le logiciel Dock de Rand McNally permet de mettre à jour le logiciel, de recevoir les dernières données de cartes, les
dernières informations sur les travaux en cours, et des nouvelles fonctionnalités. Il vous suffit de télécharger le logiciel
Dock pour votre PC ou Mac à l'adresse www.randmcnally.com/dock et de connecter votre appareil en utilisant le
câble USB fourni.
À l'aide du logiciel Dock de Rand McNally, vous pouvez également:
• exporter les journaux de kilométrage et de consommation de carburant vers votre ordinateur personnel.
• charger sur votre appareil des PI personnalisés, tels que les caméras de feux de circulation et les passages à
niveau.
• télécharger le manuel d'utilisateur.
• accéder au site d'assistance de Rand McNally et au magasin en ligne.
• accéder aux nouvelles sur les produits et aux annonces.
• envoyer des commentaires et des suggestions à Rand McNally en utilisant « Signaler à Rand ».
™
33

Avertissements, la licence conventionnelle pour l’utilisateur final, et la garantie
Prêtez attention à l’état des routes et aux plaques de rue et observez tous les arrêtés relatifs à la circulation ainsi que les lois relatives à la sécurité. Les arrêtés
relatifs à la circulation et l’état des routes doivent toujours être respectés et prévalent sur les instructions émises par le système de navigation du Produit TND™. L’utilisateur doit être
conscient des cas où l’état courant de la circulation et les instructions en provenance du système de navigation peuvent être en conflit. Certains États interdisent l’utilisation des systèmes
montés sur le pare-brise et peuvent par ailleurs restreindre l’utilisation de dispositifs de navigation ou de tout autre appareil électronique dans le véhicule. Il incombe à l’utilisateur de
s’assurer de la conformité avec toutes les lois et règlementations. L’utilisation du système de navigation ne doit pas libérer l’utilisateur de ses responsabilités. L’utilisateur est l’ultime
responsable du véhicule sous son contrôle et doit être en permanence conscient de son environnement.
Si après avoir lu les présentes déclarations, l’utilisateur décide de ne pas en accepter les conditions, l’utilisateur ne devrait pas utiliser le Produit TND
Par la présente, Rand McNally vous (« l’Utilisateur ») accorde une licence limitée à un seul utilisateur et non transmissible pour utiliser le produit de navigation pour camionneurs
®
TND™ de Rand McNally ci-après dénommé le « Produit TND™ » (y compris le logiciel et les données associées) pour la propre utilisation interne professionnelle ou personnelle
IntelliRoute
de l’utilisateur et non en vue de sa revente, de sa sous-licence ou de son utilisation commerciale.
Le présent Produit TND
générales de la présente licence. À l’exception de ce qui est autorisé au titre de la présente licence, le contenu du présent Produit TND™ et du logiciel ne peut être ni divulgué à des tiers
ni dupliqué sous quelque forme que ce soit, en tout ou partie, sans l’autorisation écrite préalable de Rand McNally. Le présent Produit TND™ et le logiciel contiennent des informations
exclusives et confidentielles de Rand McNally et de ses concédants. Rand McNally accorde à l’Utilisateur une licence limitée pour l’utilisation du présent Produit TND™ et du logiciel intégré
dans le Produit TND™ dans le cadre d’une utilisation normale. En utilisant le Produit TND™, l’Utilisateur reconnaît que le contenu du présent document et du Produit TND™ sont propriété
exclusive de Rand McNally et de ses concédants et sont protégés par les lois des États-Unis sur les droits d’auteur, les marques commerciales et les brevets ainsi que par des traités
internationaux.
L’UTILISATEUR NE PEUT PAS:
• Utiliser le Produit TND
• Utiliser le Produit TND
• Copier, prêter ou sinon transférer le Produit TND
• Modifier ou adapter le Produit TND
intégré.
• Altérer, retirer ou occulter tout avis de droits réservés, avis de marque commerciale ou légende exclusive du Produit TND
La présente licence cessera automatiquement si l’Utilisateur manque de se conformer à l’une quelconque des conditions de la présente licence et l’Utilisateur accepte d’arrêter d’utiliser le
Produit TND
RM Acquisition, LLC, opérant sous le nom de Rand McNally, garantit que le produit TND™ ainsi que les parties qui le composent seront exempts de tout défaut, matériel et main d’œuvre,
pendant une période d’un (1) an à compter de la date de première utilisation telle qu’elle est déterminée par les contacts avec les satellites GPS. Le premier acheteur au détail (le « Client »)
peut faire valoir la présente garantie pour autant que le produit soit utilisé à l’intérieur des États-Unis ou du Canada.
Rand McNally réparera ou remplacera (par un appareil neuf ou remis à neuf), sans frais et à sa discrétion, les produits TND™ ou les composants défectueux. Pour la réparation ou le
remplacement de produits TND™ défectueux, le Client doit contacter Rand McNally en composant le 1-800-333-0136 pour obtenir une autorisation de retour et des instructions. Afin que
la garantie soit valide, le Client doit enregistrer le produit via le logiciel Dock de Rand McNally ou, si le Client ne peut pas enregistrer le produit électroniquement, il sera exigé du Client qu’il
fournisse une preuve de la date du premier achat au détail, comme le double d’une copie d’un reçu de vente. Lorsque le produit est connecté au logiciel Dock de Rand McNally, ce dernier
enregistrera la date de première utilisation, laquelle est déterminé par les contacts avec les satellites GPS. Le Client doit payer tous les frais de l’expédition initiale nécessaire pour expédier le
produit pour une réparation sous garantie, mais les frais de retour seront à la charge de Rand McNally si le produit est réparé ou remplacé sous garantie.
Les réparations ou les remplacements sont couverts par une garantie de 90 jours. Si le produit envoyé est encore sous sa garantie d’origine, la nouvelle garantie est de 90 jours ou court
jusqu’à l’expiration de la garantie d’origine d’un (1) an, la durée la plus longue prévalant.
Cette garantie offre au Client des droits spécifiques. Des droits supplémentaires peuvent être accordés au Client en fonction de l’État.
™
et le logiciel qui y est intégré ainsi que la documentation associée sont fournis sous licence et peuvent être utilisés uniquement en se conformant aux conditions
™
sur un réseau ou sur un serveur de fichiers, en temps partagé ou pour traiter des données pour d’autres personnes.
™
pour créer des tableaux, fichiers, bases de données d’itinéraire ou tout autre recueil d’informations.
™
. Rand McNally peut réviser ou actualiser le Produit TND™ et n’est pas dans l’obligation de fournir de révisions ou de mises à jour à l’Utilisateur.
™
™
, son logiciel ou contenu ou bien en accorder une sous-licence.
de quelque manière que ce soit, ou bien décompiler, démonter, désosser ou rendre lisible sans l’aide d’une machine le Produit TND™ et le logiciel y étant
™
, son logiciel ou contenu.
34
™
.

Exclusions : la présente garantie limitée ne s’applique pas : 1) à tout produit endommagé par accident, (2) dans le cas de mauvaise utilisation ou d’abus du produit ou à la suite de
modifications ou de réparations non autorisées, (3) si le numéro de série a été altéré, trafiqué ou effacé, ou bien (4) si le propriétaire du produit réside en dehors des États-Unis ou du
Canada.
Mise en garde : Rand McNally ne donne aucune garantie quant à l’exactitude de l’exhaustivité des informations contenues dans le Produit TND™ et s’exonère des
garanties expresses, implicites ou prescrites par la loi, de quelque nature qu’elles soient, y compris toute garantie implicite de qualité ou de convenance à un usage
particulier. Il incombe à l’Utilisateur d’utiliser le présent produit avec prudence. Le présent produit doit être utilisé uniquement en tant qu’aide de voyage et ne doit
pas être utilisé à des fins nécessitant des mesures précises de direction, de distance, de localisation ou de typographie.
RAND MCNALLY ET CES CONCÉDANTS NE DONNENT AUCUNE GARANTIE NI DÉCLARATION, QU’ELLE SOIT EXPRESSE OU IMPLICITE, EU ÉGARD AU PRODUIT TND™, Y COMPRIS TOUTE
GARANTIE EU ÉGARD À LA QUALITÉ, LA PERFORMANCE, LE TITRE DE PROPRIÉTÉ OU L’ABSENCE DE CONTREFAÇON. EN AUCUN CAS RAND MCNALLY OU SES CONCÉDANTS NE SERONT
TENUS RESPONSABLES DE TOUT DOMMAGE INDIRECT, SPÉCIAL, ACCESSOIRE OU CONSÉCUTIF DÉCOULANT DE L’UTILISATION OU DE L’INCAPACITÉ D’UTILISER LE PRODUIT TND™, MÊME
EN ÉTANT AVISÉS DE LA POSSIBILITÉ DE TELS DOMMAGES.
Certains États n’autorisent aucune restriction sur la durée d’une garantie implicite et/ou n’autorisent pas l’exclusion ou la limitation des dommages accessoires ou consécutifs de telle sorte
que les restrictions énoncées ci-dessus peuvent ne pas s’appliquer à certains clients.
L’Utilisateur accepte que les informations fournies par l’Utilisateur à Rand McNally soient autorisées à être utilisées à des fins d’évaluation commerciale interne, y compris mais sans toutefois
s’y limiter, l’évaluation de l’efficacité des services fournis, des méthodes pour simplifier ou améliorer les expériences de l’Utilisateur. Ces informations ne seront pas utilisées par des tiers ou
d’une façon quelconque qui puisse divulguer l’identité de l’Utilisateur.
Rand McNally peut faire utilisation de logiciels de tiers dans le Produit TND
Produit TND™ peut être assujettie à d’autres conditions générales. Les avis officiels de droit d’auteur de tiers sont fournis à la fin de la présente licence.
L’Utilisateur accepte d’indemniser, défendre et dégager Rand McNally et ses concédants (y compris leurs concédants, fournisseurs, cessionnaires, filiales, entreprises affiliées respectifs ainsi
que leurs représentants officiels, administrateurs, employés, actionnaires, agents et représentants respectifs pour chacun d’entre eux) de tout responsabilité, perte, préjudice corporel (y
compris les blessures entraînant la mort), demande, action, coût, dépense ou droit d’action de tout type ou caractère, y compris mais sans toutefois s’y limiter les frais d’avocat, découlant ou
en rapport avec l’utilisation ou la possession par l’Utilisateur du présent Produit TND
Les présentes conditions générales constituent la totalité de l’accord passé entre Rand McNally (et ses concédants et fournisseurs) et l’Utilisateur afférant à l’objet de la présente et annulent
et remplacent dans leur totalité tous les accords écrits ou oraux, quels qu’ils soient, existant précédemment entre nous eu égard à cet objet. Les termes et conditions générales (y compris la
licence) peuvent être mises à jour de façon périodique.
Les conditions générales énoncées ci-dessus devront être régies par les lois de l’Illinois, sans donner lieu à un quelconque choix (i) d’une disposition de conflit de lois ou (ii) de la Convention
des Nations Unies sur les contrats de vente internationale de marchandises, ce qui est explicitement exclu. L’Utilisateur accepte de se soumettre à la juridiction de l’Illinois pour les litiges,
droits d’action et actions, quels qu’ils soient, découlant ou en rapport avec les données fournies à l’Utilisateur au titre de la présente.
L’Utilisateur ne devra pas exporter le Produit TND
tiers des droits de Rand McNally au titre de la présente licence mais ne sont pas des parties à la présente et n’encourent aucunes obligations au titre de la présente.
En utilisant le présent produit, vous acceptez d’être lié(e) à la fois par les dispositions qui précèdent et par les conditions d’utilisation stipulées sur le site www.randmcnally.com/truckgps.
Les tarifs réels de péage peuvent être différents des estimations en fonction d'un certain nombre de facteurs incluant les sources de données inexactes ou erronées et les tarifs de péage qui
dépendent des caractéristiques du véhicule (catégorie, nombre d'axes, poids, etc.) qui varient selon les stations de péage.
Légende des droits limités. Pour les organismes gouvernementaux : l’utilisation, la reproduction ou la divulgation est assujettie aux restrictions énoncées à l’Alinéa (c) (1) (iii) de la Clause sur
le droit aux données techniques et au logiciel du DFARS 52.227-7013, dans sa version amendée.
Rand McNally et IntelliRoute sont des marques déposées et TND est une marque de RM Acquisition, LLC, d/b/a Rand McNally.
Copyright © 2014 Rand McNally. Tous droits réservés. Part de droit d’auteur © 2014 HERE. Tous droits réservés. Les données présentes incluent des informations extraites avec l’autorisation
des autorités canadiennes, y compris © Sa Majesté la Reine du Chef du Canada, © Imprimeur de la Reine pour l’Ontario. Part de droit d’auteur © 2014 InfoGation. Tous droits réservés. Part
de droit d’auteur © 2014 The Trucker’s Friend. Part de droit d'auteur © 2014 TruckDown. Tous droits réservés. Numéros de brevet aux États-Unis : 7,580,791 et 8,214,141.
™
en infraction de l’une quelconque des lois des États-Unis ou étrangères. Les concédants de Rand McNally devront être des bénéficiaires
™
. Nonobstant les conditions générales de la présente licence, l’utilisation de matériaux de tiers inclus dans le
™
.
35

Guía de Inicio Rápido
36

Información importante acerca de su IntelliRoute® TND™ 525
RAND MCNALLY DOCK: Mantenga su dispositivo actualizado descargando Rand McNally Dock a la
computadora de su hogar desde el sitio www.randmcnally.com/dock y conectando su dispositivo con el cable
USB que se suministra.
BOTÓN DE ENCENDIDO: Presione y mantenga apretado el botón de encendido naranja para encender o
apagar el dispositivo. El botón de encendido se puede utilizar también para acceder rápidamente a determinadas
funciones mientras el dispositivo está en funcionamiento. Consulte Preferencias > General > Presionar
encendido rápido para ver las opciones. La luz roja indica que la batería se está cargando; la luz verde indica que
la batería se cargó totalmente.
REINICIAR: Use el botón en la parte posterior para reiniciar el dispositivo. De esta manera se cancelará la ruta
actual, pero se guardarán las preferencias, el libro de direcciones y otros datos personales.
MÁS INFORMACIÓN: Ingrese a Tutoriales y consejos en Preferencias > General en su dispositivo para
obtener más información o visite el sitio web www.randmcnally.com/support para descargar el manual del
usuario.Comuníquese con su proveedor de servicios inalámbricos para verifi car que no supera el límite de su plan
de datos.
Algunas pantallas incluyen consejos. Toque este botón para ingresar.
ADVERTENCIA: Este producto contiene chemicos que de acuerdo al estado de California pueden causar cancer o
otras formas de dano fi sica.
37

Instale el soporte
NOTA: Siga todas las reglamentaciones locales que se aplican a la colocación del soporte. Seleccione un área con
una vista clara del cielo y los satélites del GPS para garantizar que el GPS tenga información confi able.
1. Limpie y seque el área de soporte.
2. Retire la película protectora de la ventosa.
3. Ajuste el ángulo del soporte con el tornillo
de ajuste manual.
4. Tire la ventosa hacia arriba para que deje
de adherirse.
5. Conecte el cable al dispositivo y a la fuente
de alimentación de 12 voltios del vehículo.
6. Deslice el dispositivo en el soporte.
7. Coloque y sostenga la ventosa contra la
superfi cie del soporte.
8. Presione la ventosa hacia abajo hasta que se quede en el lugar.
9. Ajuste el dispositivo de tal forma que se pueda ver fácilmente y que no bloquee la vista del conductor.
38

Menú principal
1
Ingrese la información del camión
y a las herramientas específi cas de
uso del camión.
2
Muestra la ubicación en el mapa
y permite ver las instrucciones de
navegación.
3
Elija un destino.
Seleccione el dispositivo, la ruta y
4
las preferencias del mapa. Ingrese a
Tutoriales y consejos.
5
Desactive/active el altavoz.
6
Ajuste el volumen del altavoz.
7
Indica la carga cuando funciona a
1
4
2
batería.
8
Cambiar perfi l del conductor, carga
del tráiler o estado del conductor.
NOTA: De las otras pantallas, toque el ícono del Menú principal en el extremo superior derecho para regresar al
Menú principal.
NOTA: Puede seleccionar diferentes esquemas de colores en
Preferencias > General > Estilo de diseño.
En la siguiente pantalla, se muestran imágenes con estilo "hielo".
7
3
5
6
8
39

Ingrese la información del camión y configure las advertencias
1. Toque Herramientas camión
> Información del camión o
Advertencias.
2. Toque
y para ver las
opciones.
A la
izquierda,
toque una
opción.
A la derecha,
ingrese las
configuraciones
para la opción
3. Toque el botón de la opción a cambiar.
4. Ingrese la nueva configuración.
5. Toque
para guardar los cambios.
Configure las opciones de ruta y del dispositivo
1. Toque Preferencias.
2. Toque la solapa General, Ruta o Mapa .
3. Toque
y
opciones.
4. Toque el botón de la opción a cambiar.
5. Ingrese la nueva configuración.
6. Toque
para guardar los cambios.
40
para ver las
A la
izquierda,
toque una
opción.
A la derecha,
ingrese las
configuraciones
para la opción

Destino
1
Trazar la ruta a un nuevo lugar de destino. (Ver página 42.)
2
Regresar a una dirección previamente ingresada.
3
Ingresar a la libreta de direcciones.
4
Planifi car un viaje con varias paradas.
5
Trazar la ruta a un punto de interés. (Ver página 46.)
1 2 3
4 5
41

Ruta al destino nuevo
1. Toque Elija su destino > Nueva ubicación.
2. Toque Dirección.
3. Ingrese el nombre de la ciudad. (NOTA: Mientras escribe,
el teclado muestra solo la letra que probablemente siga.)
4. Aparece un aviso en la barra superior. Toque la ciudad que
desea seleccionar. O toque Lista para ver las ciudades que
comienzan con las letras que ingresó.
5. Ingrese el nombre de la calle. (NOTA: Si las letras que
necesita no aparecen, pulse Ampliar la búsqueda.)
6. Ingrese el número de casa. (NOTA: Ingresar el número de
casa antes de la calle, tocar el botón número de casa en el
paso anterior.)
Consulte Ventana para confirmar el destino (página 43.)
Consejos
• También puede usar una ruta a una ubicación nueva a
través de Centro de la ciudad, Intersección, o Latitud/
Longitud, o elegir Dirección > Código postal.
• Vea los destinos recientes tocando Elija su destino > Historial. Vea las ciudades recientes tocando
Elija su destino > Nueva ubicación > Dirección > Historial.
• Vea los lugares guardados tocando Elija su destino > Libro de direcciones.
42

Ventana para confi rmar el destino
1
Dirección del destino.
2
Comience la ruta al destino.
3
Comparar la ruta principal y la alternativa y elegir
una opción.
4
Agregue el lugar como un punto en el camino a
3
un destino ingresado previamente.*
5
Guarde el lugar en el libro de direcciones.
6
Compare con el atlas de carreteras para el
transporte automotor de
7
Vea el mapa.
8
Cambie el punto de partida para la ruta al lugar
Rand McNally.
que se muestra aquí.
9
Regrese al Menú principal.
10
Regrese a la ventana anterior.
*Para administrar los puntos, toque Elija su destino >
Viajes de paradas múltiples. Puede agregar hasta
cincuenta destinos en un viaje con varias paradas y
optimizar la ruta para hasta diez paradas.
6
1
10
32
7
4
8
5
9
NOTA: Esta ventana puede incluir
otros botones según el tipo de
destino seleccionado.
43

Ventana del mapa de la ruta
1
Repita las instrucciones habladas para la próxima
1
maniobra.
2
Nombre de la calle en donde doblará a continuación.
3
Muestra la hora de llegada, la distancia que
queda u otras opciones.
4
Deslice para mostrar la próxima información
14
12
de salida.
5
Lista lateral de direcciones. Toque Opciones de
11
visualización de la ruta para seleccionar cada
giro, carretera o vista del mapa.
6
Ampliar/Reducir.
7
Regrese a Menú principal.
8
Seleccione una opción para mostrar el mapa (Hacia el rumbo, hacia el norte o vista en 3D).
9
Vea el nombre del camino actual, el nombre de la próxima intersección, o la ciudad, el condado y el estado.
10
También se muestra una orientación de carril avanzada. Toque para cambiar.
10
Vea y guarde el lugar actual, el desvío o cancele una ruta.
11
Pulse en la velocidad actual para mostrar el Panel de información virtual.
(NOTA: Cambia a rojo para advertir sobre la velocidad; ponga Herramientas camión > Advertencias.)
44
2
13
9
3
4
5
6
7
8

Ventana del mapa de la ruta - continuación
12
Límite de velocidad actual: naranja para el límite para camiones, blanco para el límite general.
Pulse para abrir "Tell Rand" acerca de los límites de velocidad.
13
Desactive el altavoz.
14
Minimizar los iconos para mostrar simplemente el mapa y la siguiente maniobra.
Vista de la intersección
Cuando se encuentre en una ruta, la Vista de la intersección muestra
cuando tiene que realizar una próxima maniobra. Luego de realizar
la maniobra, se cierra la Vista de la intersección y aparece la ventana
anterior.
1
Señales para seguir a la próxima maniobra.
2
Número y dirección de los carriles para la próxima maniobra.
3
Distancia a la próxima maniobra. La distancia disminuye a
medida que usted se acerca a la rampa.
4
Flecha de asistencia de carriles.
5
Desactive el altavoz.
6
Regrese a la ventana anterior.
3
4
56
1
2
45

Encuentre un punto de interés (POI)
Toque Elija su destino > Puntos de interés.
1
Encuentre lugares de interés (POI) concurridos que pueden
usar los camiones cerca de la ubicación actual.
2
3
Busque un punto de interés (POI):
2
Cerca de su camión
3
En una ciudad en particular
4
En la ruta
5
En los últimos 30 minutos de su día de manejo
(use el tiempo restante en Herramientas camión >
Tomadores)
6
Cerca de su destino
Categoría del POI
7
Seleccione una categoría.
8
Encontrar restaurantes, hoteles y otras subcategorías.
9
Ver los POI personalizados que se cargaron a través
de Rand McNally Dock.
46
4
5 6
1
7
8
9

Encontrar un punto de interés (POI) - continuación
10
Toque la ubicación a seleccionar.
11
Vea y edite las califi caciones y los comentarios.
12
Toque para buscar los servicios disponibles.
13
Aplique o retire los fi ltros de servicios para los resultados
de la búsqueda.
14
Búsqueda de los puntos de interés (POI) por nombre.
10
12 13
11
14
47

Panel de información virtual
12
2
5
9 10
11
1
Dirección actual del viaje.
2
Muestra la hora actual en la yarda, la ubicación
1
actual y su destino.
3
Hora de la salida del sol/puesta del sol según la
3
4
ubicación del vehículo (latitud/longitud) y el día.
4
Velocidad actual (anterior) y límite de velocidad
publicado (a continuación).
5
Elevación en el lugar actual.
6
Porcentaje completado del viaje actual, distancia a
6
la próxima maniobra y la cantidad de kilómetros o
millas y el tiempo de viaje a ese punto.
7
Regresar a la Ventana del mapa de la ruta.
8
Recolectar información sobre el viaje para hasta tres viajes. Incluye la confi guración del odómetro, horas y
velocidades.
9
Restablecer la confi guración de la información sobre el viaje para el viaje seleccionado (Solapa 1, Solapa 2 o
Solapa 3).
10
Seleccionar para restablecer automáticamente la información en cada solapa luego de que el vehículo ha
permanecido estacionado por una cantidad de horas determinadas.
11
Toque para ver los registros de gasolina y agregar la información de compra de gasolina.
12
Combinar con el odómetro del camión para actualizar automáticamente los registros nuevos de combustible.
Tocar el lápiz para editar.
48
7
8

Ver los Temporizadores y los Registros
1. Toque Herramientas camión > Tomadores de
tiempo, Registros, Senderos, Combustible.
2. Toque Tomadores para ver los temporizadores, las
lecturas del odómetro y la velocidad promedio.
3. Toque en un campo para cambiar o reiniciar el número.
NOTA: Los temporizadores regresivos se controlan en el
Estado del conductor (Manejando, En servicio, o Fuera de
servicio) seleccionados en el Menú principal.
Para cambiar los perfiles del conductor, toque el campo de
información del conductor.
4. Toque Registros para ver una lista de registros de
kilómetros (o millas) por trimestre.
5. Toque en un trimestre para ver los registros individuales
por estado.
NOTA: Puede exportar los registros a su computadora a
través del Rand McNally Dock.
49

Ver Senderos y Gasolina
1. Toque Herramientas camión > Tomadores de
tiempo, Registros, Senderos, Combustible.
2. Toque Senderos para registrar un camino
“marcado” de las coordenadas del GPS donde su
camión haya viajado.
3. Toque cualquier registro para ver la pista, editar el
nombre o configurar el color.
4. Toque Mostrar en el mapa para mostrar la pista
en la ventana del mapa de la ruta.
5. Toque Combustible para ver una lista de
registros de gasolina por trimestre.
6. Toque en un trimestre para ver los registros
individuales por estado.
7. Toque Agregar combustible para registrar la
fecha, el lugar y el costo del precio de la gasolina.
8. Toque un campo para realizar cambios.
9. Marque Imponible para incluir la compra en el
registro de gasolina.
10. Toque Ahorrar.
50

Más información
Para una descripción detallada de las funciones de su dispositivo, consulte el manual de usuario del
IntelliRoute® TND™ 525. El manual de usuario se puede descargar del Rand McNally Dock, y también está disponible en
la página web www.randmcnally.com/support.
Rand McNally Dock
El Rand McNally Dock le permite recibir actualizaciones de software y acceder a las actualizaciones de los mapas,
de las construcciones y otras funciones. Simplemente descargue el software del Dock en su PC o Mac en
www.randmcnally.com/dock y conecte su dispositivo con el cable USB que se suministra.
Con el Rand McNally Dock, también puede:
• Exportar los kilómetros o millas y los registros de gasolina a la computadora de su hogar
• Cargar los POI personalizados, como las cámaras en los semáforos, los cruces ferroviarios, en su dispositivo
• Descargar el manual de usuario
• Acceder al sitio de soporte y a la tienda en línea de Rand McNally
• Leer las noticias y anuncios de los productos
• Enviar los comentarios a Rand McNally a través de “Tell Rand”
™
51

Avisos, acuerdo de licencia del Usuario final, y garantía
Preste atención a las condiciones del camino y a los señalamientos de las calles, y obedezca todos los reglamentos de tránsito y seguridad. Siempre deberán
respetarse los reglamentos de tránsito y las condiciones existentes del tráfico y deberán tener prioridad sobre las instrucciones emitidas por el sistema de navegación del producto TND
Usuario deberá estar pendiente de las situaciones donde las condiciones existentes del tráfico y las instrucciones del sistema de navegación pudieran entrar en conflicto. Algunos estados
prohíben el uso de montajes en el parabrisas y pueden restringir de alguna forma el uso de sistemas de navegación y otros dispositivos electrónicos en el vehículo. Es responsabilidad
del Usuario asegurarse de cumplir con todas las leyes y reglamentos. El uso del sistema de navegación no exime al Usuario de sus responsabilidades. El Usuario es en última instancia el
responsable del vehículo bajo su control y deberá estar siempre consciente de los alrededores.
Si después de leer estas declaraciones el Usuario decide no aceptar estos términos, el Usuario no deberá usar el producto TND
Por este medio, Rand McNally le concede a usted (el “Usuario”) una licencia única no exclusiva y no transferible para usar el producto de navegación para camiones Rand McNally
®
IntelliRoute
TND™ (en lo sucesivo “el producto TND™” que incluye software y datos asociados) para el propio negocio interno del Usuario o uso privado y no para reventa, concesión de
licencia a terceros o uso comercial.
Este producto TND
licencia. Salvo que tal licencia lo permita, el contenido de este producto TND
su totalidad o en parte, sin el previo permiso por escrito de Rand McNally. Este producto TND
licenciantes. Rand McNally concede al Usuario una licencia limitada para el uso de este producto TND
el producto TND
propiedad literaria (copyright), marca registrada y leyes de patentes y tratados internacionales de los EE.UU.
EL USUARIO NO PODRÁ:
• Usar el producto TND
• Usar el producto TND
• Copiar, prestar o de alguna forma transferir o conceder licencia a terceros del producto TND
• Modificar, o adaptar el producto TND
incorporado al mismo.
• Cambiar, quitar o enmascarar cualquier aviso de copyright, aviso de marca registrada, o leyenda patentada del producto TND
Esta licencia se terminará automáticamente si el Usuario no cumpliera con cualquiera de los términos de esta licencia y el Usuario consintiera en dejar de usar el producto TND
Rand McNally podrá revisar o actualizar el producto TND™ y no está obligado a proveer al Usuario ninguna revisión o actualizaciones.
RM Acquisition, LLC, también conocida como Rand McNally, garantiza que el producto TND™ y sus partes componentes no tendrán defectos de mano de obra ni de materiales por un periodo
de un (1) año a partir de la fecha del primer uso, según lo determine la comunicación con los satélites del GPS. Esta garantía podrá hacerla cumplir el primer comprador-cliente (el “Cliente”), a
condición de que el producto sea utilizado dentro de EE.UU. o Canadá.
Rand McNally reparará gratuitamente o sustituirá (por una unidad nueva o recién reacondicionada), a su propio parecer, los productos TND™ o sus partes componentes que presenten
defectos. Para reparación o reemplazo de productos TND™ defectuosos, el Cliente deberá comunicarse con Rand McNally al teléfono 1-800-333-0136 para solicitar autorización e
instrucciones para su devolución. Para que la garantía tenga validez, el Cliente debe haber registrado el producto a través del Dock de Rand McNally; en caso de que el Cliente no pueda
registrar el producto electrónicamente, se le pedirá una constancia de la fecha de compra original del dispositivo, como por ejemplo una copia del recibo de compra. Cuando el dispositivo
está conectado al Dock de Rand McNally, el Dock registrará la fecha en que el dispositivo fue usado por primera vez de acuerdo con el contacto con los satélites GPS. El Cliente deberá pagar
™
y el software incorporado al mismo, así como la documentación correspondiente, se otorgan bajo licencia y podrán ser usados únicamente de acuerdo con esta
™
, el Usuario acepta que el contenido de este documento y el producto TND™ son propiedad de Rand McNally y sus licenciantes y están protegidos por el registro de
™
en una red o servidor de archivos, tiempo compartido o procesar datos para otras personas.
™
para crear cualquier tabla de asignación de rutas, archivos, bases de datos u otros compendios.
™
de cualquier modo, o desensamblar, desmontar, hacer ingeniería inversa o reducir a forma legible para el humano el producto TND™ y el software
™
y el software no podrán ser dados a conocer a terceros, copiados o duplicados en cualquier forma, en
™
y el software contienen información patentada y confidencial de Rand McNally y sus
™
y el software incorporado al producto TND™ para su operación normal. Al usar
™
, su software o contenido.
™
(Dispositivo de Navegación para Camiones).
™
, su software o contenido.
52
™
. El
™
.

cualquier costo del embarque inicial requerido para transportar el producto al servicio de garantía, pero los gastos de devolución estarán a cargo de Rand McNally, si el producto es reparado
o sustituido conforme a la garantía.
Las reparaciones o los reemplazos tienen una garantía de 90 días. Si la unidad enviada todavía tiene vigente su garantía original, entonces la nueva garantía será de 90 días o cuando termine
la garantía original de un (1) año, según la que dure más tiempo.
Esta garantía le otorga derechos específicos al Cliente. El Cliente podrá tener también otros derechos que pueden variar de un estado a otro.
Exclusiones: Esta garantía limitada no cubrirá: 1) a todo producto que se dañe a causa de un accidente; 2) en caso de uso indebido o abuso del producto o como resultado de alteraciones o
reparaciones no autorizadas; 3) en caso de alteración, tachado o eliminación del número de serie; o 4) si el dueño del producto reside fuera de EE.UU. o Canadá.
Advertencia: Rand McNally no garantiza la exactitud ni la integridad de la información del producto TND™ y no se hace responsable de ninguna garantía expresa,
implícita o legal, incluyendo la garantía implícita de comerciabilidad o aptitud para un propósito en particular. Es responsabilidad del usuario usar este producto
con cuidado. Este producto está diseñado únicamente para ser usado como un asistente de viaje y no se debe utilizar con fines que requieran medidas precisas de
dirección y rumbo, ubicación o topografía.
RAND MCNALLY Y SUS LICENCIANTES NO DAN NINGUNA OTRA GARANTÍA NI REALIZAN NINGUNA OTRA DECLARACIÓN, YA SEA DE MANERA EXPRESA O IMPLÍCITA, EN RELACIÓN
CON EL PRODUCTO TND™, INCLUYENDO CUALQUIER GARANTÍA REFERENTE A SU CALIDAD, RENDIMIENTO, TÍTULO O DE “NO VIOLACIÓN”. EN NINGÚN CASO, RAND MCNALLY Y SUS
LICENCIANTES SERÁN RESPONSABLES POR DAÑOS INDIRECTOS, ESPECIALES, ACCESORIOS O DIRECTOS, O QUE RESULTEN COMO CONSECUENCIA DEL USO O DE NO PODER USAR EL
PRODUCTO TND™, AUNQUE HAYA CONOCIMIENTO PREVIO DE LA POSIBILIDAD DE TALES DAÑOS.
Algunos estados no permiten limitaciones a la duración de una garantía implícita ni la exclusión o la limitación que surja de daños accesorios o directos, por lo tanto las limitaciones anteriores
pueden no ser válidas para algunos clientes.
El Usuario está de acuerdo en permitir que Rand McNally utilice la información que ha otorgado y para que se utilice con propósitos internos de evaluación del negocio, incluyendo pero sin
limitarse a la evaluación de la efectividad de los servicios prestados con el fin de simplificar los métodos o mejorar las experiencias de los Usuarios. Tal información no será usada por terceros ni
tampoco se usará de manera que se pueda divulgar la identidad del Usuario.
Rand McNally podrá usar software de terceras personas en el producto TND
incluidos en el producto TND
El Usuario está de acuerdo en indemnizar, defender y mantener a Rand McNally y a sus licenciantes (incluyendo los respectivos licenciantes, proveedores, cesionarios, subsidiarios, compañías afiliadas
y a sus ejecutivos respectivos, directores, empleados, accionistas, agentes y a los representantes de cada uno de ellos) indemnes y exentos a causa de responsabilidades, pérdidas, daños (incluyendo
lesiones que puedan resultar en la muerte), demandas, litigios, costos, gastos o reclamaciones de cualquier tipo y especie, incluyendo pero sin limitarse a honorarios legales, resultantes de, o en
conexión con todo uso o posesión por parte del Usuario de este producto TND
Estos términos y condiciones constituyen el total del acuerdo entre Rand McNally (y sus licenciantes y proveedores) y el Usuario con respecto a los asuntos objeto del mismo, y sustituye en su
totalidad a cualquiera y a todos los acuerdos previos tanto hablados como escritos que han existido entre nosotros con respecto a los asuntos objeto del mismo. Los términos y condiciones
(incluyendo la licencia) se pueden poner al día en forma periódica.
Los términos y condiciones anteriores serán regidos por las leyes del estado de Illinois, sin tomar en consideración (i) las disposiciones relativas a conflictos de leyes, o (ii) la Convención de las
Naciones Unidas sobre los Contratos de Compraventa Internacional de Mercaderías, que quedará explícitamente excluida. El usuario está de acuerdo en someterse a la jurisdicción del estado de
Illinois para cualquiera y todas las disputas, reclamaciones y acciones que resulten de y en conexión con la Información otorgada al presente Usuario.
™
pueden quedar sujetos a otros términos y condiciones. Los avisos oficiales de copyright para terceras personas se enuncian al final de esta Licencia.
™
. No obstante lo dispuesto por los términos y condiciones de esta licencia, el uso de algunos materiales que vienen
™
.
53

El Usuario no exportará el producto TND™ en violación de leyes de los EE.UU. o extranjeras. Los licenciantes de Rand McNally serán los terceros beneficiarios de los derechos de Rand McNally bajo
esta licencia, pero no serán partes comparecientes y no tendrán obligaciones aquí.
Al usar este producto estará de acuerdo en quedar obligado tanto por lo anterior y por los términos de uso encontrados en www.randmcnally.com/truckgps.
Los costos de los peajes reales pueden variar de los estimaciones dependiendo de un número de factores incluyendo datos de origen inexactos o imprecisos y por los costos de los peajes variables
dependiendo de las características del vehículo (clase, número de ejes, peso, etcétera) que varían entre carreteras de peaje diferentes.
Clave de los Derechos Limitados. Para dependencias gubernamentales: El uso, reproducción o divulgación quedará sujeto a las restricciones expuestas en el subpárrafo
(c) (1) (iii) conforme a la enmienda de la cláusula DFARS 52.227-7013, de Los Derechos en Datos Técnicos y Software de Computadoras (the Right in Technical Data and
Computer Software).
Rand McNally y IntelliRoute son marcas comerciales registradas et TND es una marca registrada de RM Acquisition, LLC, d/b/a Rand McNally.
Copyright © 2014 Rand McNally. Todos los derechos reservados. Porciones © 2014 HERE. Todos los derechos reservados. Estos datos incluyen información tomada con el
permiso de las autoridades Canadienses, incluyendo © Her Majesty the Queen in Right of Canada, © Queen’s Printer for Ontario. Porciones © 2014 InfoGation. Todos los
derechos reservados. Porciones © 2014 The Trucker’s Friend. Porciones © 2014 TruckDown. Todos los derechos reservados. Números de patente en EE.UU. 7,580,791
y 8,214,141.
54

Notes
____________________________________________________________________________
____________________________________________________________________________
____________________________________________________________________________
____________________________________________________________________________
____________________________________________________________________________
____________________________________________________________________________
____________________________________________________________________________
____________________________________________________________________________
____________________________________________________________________________
____________________________________________________________________________
____________________________________________________________________________
____________________________________________________________________________
55

Notes
____________________________________________________________________________
____________________________________________________________________________
____________________________________________________________________________
____________________________________________________________________________
____________________________________________________________________________
____________________________________________________________________________
____________________________________________________________________________
____________________________________________________________________________
____________________________________________________________________________
____________________________________________________________________________
____________________________________________________________________________
____________________________________________________________________________
56


Support
www.randmcnally.com/support
800-333-0136
Support
www.randmcnally.com/support
800-333-0136
TND525-062314-001-v1
 Loading...