

Rademacher 3011 00 04, 16236011, 16154511 User guide

Electronic Roller Shutter Belt Winder RolloTron Comfort DuoFern
EN
Translation of the Original Operating and Assembly Manual
Item No.:
1623 45 11
1623 60 11 (Comfort DuoFern Plus)
1615 45 11 (Small belt)
VBD 590-2-1 (10.16)
i
Dear Customer,
EN
With your purchase of RolloTron Comfort DuoFern,
you have chosen a quality product manufactured by
RADEMACHER. Thank you for the trust you have placed
in us.
This roller shutter belt winder has been designed both in
order to provide optimal convenience and operability as
well as to ensure solidity and durability. Having applied
uncompromising quality standards, and carried out
thorough testing, we are proud to be able to present you
this innovative product.
It’s brought to you by all the
highly-qualified personnel here at
RADEMACHER.
These instructions...
...describe how to install the equipment, connect the
electrical system and operate your roller shutter belt
winder.
Before you begin, please read these instructions through
completely and follow all the safety instructions.
This manual is a component of the product. Please store it
in an easily accessible place. When passing the RolloTron
Comfort DuoFern on to a third party, this manual must be
passed on as well.
Damage resulting from non-compliance with these instructions and safety instructions will void the guarantee.
We assume no liability for any consequential damage.
2

i
Table of Contents
EN
i Dear Customer, ........................................................................2
1. Hazard symbols .......................................................................5
1.1 Levels of danger and signal words ....................5
1.2 Symbols and depictions used ............................. 5
2. Scope of delivery (item no. 1623 45 11) ..........................6
3. General view (item no. 1623 45 11) ..................................7
4. Display overall view................................................................8
5. Safety instructions .................................................................. 9
5.1 Proper use................................................................ 10
5.2 Improper use .......................................................... 11
5.3 Required expert knowledge of the
installer ..................................................................... 11
6. Permissible roller shutter belts........................................ 12
7. Functional description ....................................................... 13
7.1 Description of the safety functions ................ 14
7.2 Table 3: DuoFern network function table .... 15
7.3 Overview of local functions .............................. 16
8. General assembly instructions ........................................ 17
8.1 You will require the following tools ............... 17
8.2 Preparation for installation ................................ 18
9. Safety instructions for electrical connection ............. 20
9.1 Electrical connection ........................................... 21
10. Drawing in and fastening the belt ................................. 22
11. Mounting the RolloTron Comfort DuoFern ................ 24
12. Brief description of the button functions .................. 25
12.1 Brief description of the standard display
and main menu ..................................................... 26
12.2 Introduction to opening and closing the
menus ....................................................................... 27
13. Initial commissioning with the help of the
installation wizard................................................................ 28
14. Manual operation ................................................................ 32
14.1 Moving to a target position .............................. 33
14.2 Displaying weather data .................................... 34
15. DuoFern settings; brief description ............................... 35
15.1 Menu 9.9.1 - Logging DuoFern
devices on/off ........................................................ 36
15.2 Menu 9.9.2 - Set DuoFern mode ..................... 39
15.3 Menu 9.9.3 - Setting the solar mode.............. 41
15.4 Menu 9.9.4 - Switch weather data on/off ..... 43
15.5 Menu 9.9.5 - Display DuoFern address.......... 44
16. Menu overview / main menu .......................................... 45
16.1 [ AUTO ] Automatic mode; brief
description .............................................................. 46
16.1.1 Menu 1- Automatic mode on / off ... 47
16.2 Switching times (opening and closing
times) [ / ]; brief description ........................ 48
16.2.1 Menu 2 - Configuration of opening
and closing times [ / ] .................... 51
16.3 Automatic dusk function;
brief description .................................................... 55
16.3.1 Menu 3 - Customising the auto-
matic dusk function [ ] ................... 56
3
i
Table of Contents
EN
16.4 Automatic solar function; brief description ... 58
16.4.1 Menu 4 - Configuring the automatic solar function [ ] and
sunshine position ................................. 60
16.5 Automatic dawn function;
brief description .................................................... 62
16.5.1 Menu 5 - Customising the auto-
matic dawn time [ ] ......................... 63
16.6 Random function; brief description ............... 64
16.6.1 Menu 6 - Configuring the random
function [ ] ......................................... 64
16.7 Menu 9 - System settings [ ];
brief description .................................................... 65
16.7.1 Menu 9.1 - Set time / date [ ] and
Postcode [ PLZ ] ..................................... 66
16.7.2 Menu 9.2 - End point configu-
ration [ ] .............................................. 67
16.7.3 Menu 9.3 - Configure ventilation
position [ ] ....................................... 68
16.7.4 Menu 9.4 - Configure continuous
display lighting ...................................... 69
16.7.5 Menu 9.5 - Weekly pro-
gramme [ ] configuration .............. 70
16.7.6 Menu 9.6 - Configure motor
speed ......................................................... 71
16.7.7 Menu 9.7 - Switch button lock
on/off......................................................... 72
16.7.8 Menu 9.9 - DuoFern settings /
overview................................................... 73
17. Erase all settings, software reset ..................................... 74
18. Carry out hardware reset ................................................... 74
19. Removing the RolloTron Comfort DuoFern
(e.g. in the event of a move) ............................................. 75
20. Removing the belt in the event of unit failure .......... 77
21. What to do if... ? .................................................................... 78
22. Information about maintenance and care of
your equipment .................................................................... 81
23. Technical Specifications .................................................... 82
24. Tractive force diagrams ...................................................... 83
25. Factory settings .................................................................... 84
26. Time zone table .................................................................... 85
27. Simplified EU Declaration of Conformity .................... 86
28. Accessories ....................................................................... 86
29. Warranty conditions ............................................................ 87
4
i
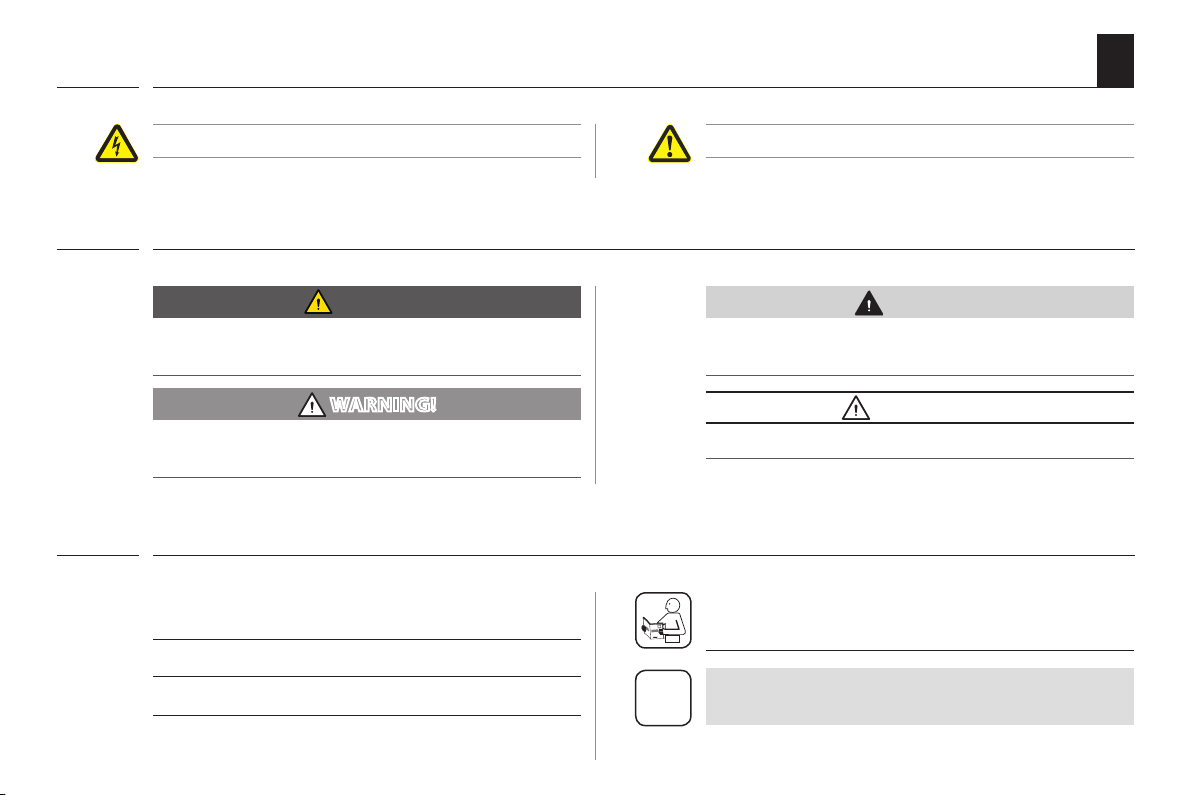
1. Hazard symbols
Danger of fatal electric shock Danger area / dangerous situation
EN
i
i
1.1 Levels of danger and signal words
DANGER!
This hazard will result in serious injury or death if not
avoided.
WARNING!
This hazard may result in serious injury or death if not
avoided.
1.2 Symbols and depictions used
1. Steps to be taken
2.
◆ Itemisation
1. List
CAUTION!
This hazard may result in minor or moderate injury if not
avoided.
ATTENTION!
This hazard may lead to property damage.
Please read the
respective manual
further useful information
i
5
i
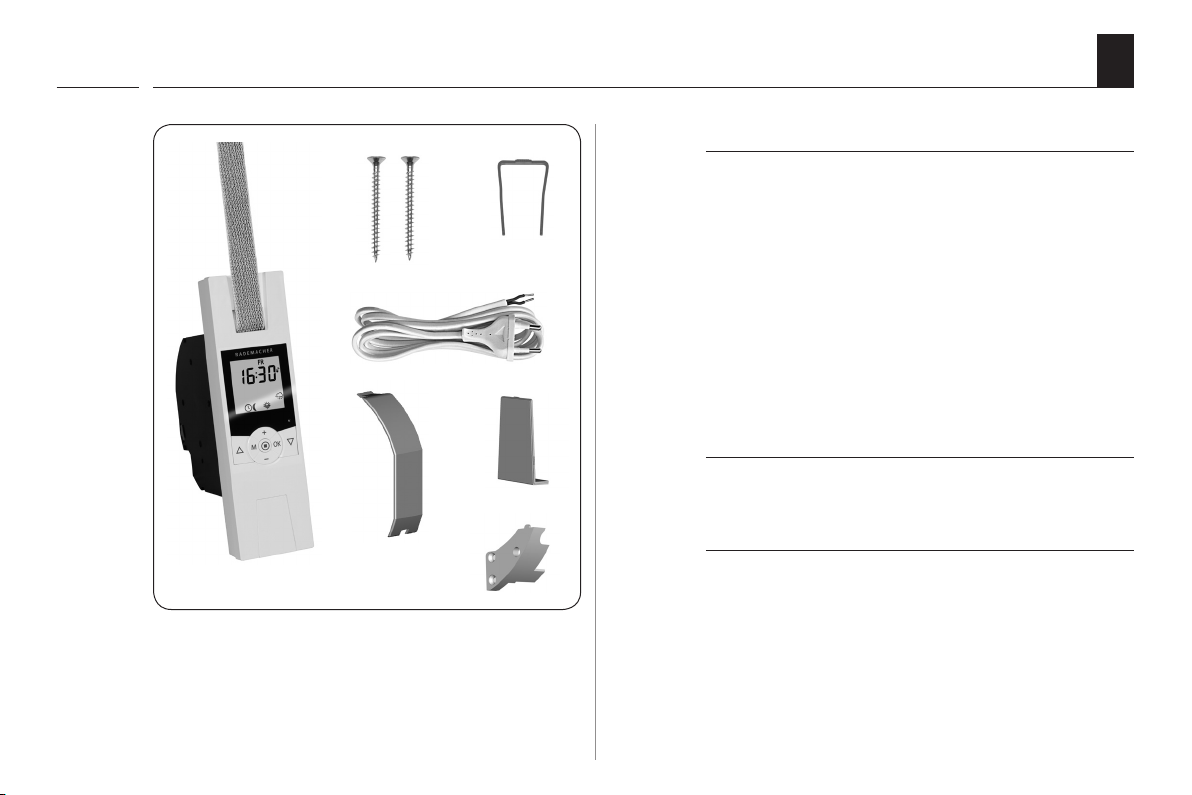
2. Scowpe of delivery (item no. 1623 45 11) *
* also applies to item numbers 1623 60 11 / 1615 45 11
2.
1.
3.
4.
EN
Legend
1. Belt winder RolloTron Comfort DuoFern or Comfort
DuoFern Plus
2. 2 x assembly screws (4 x 55 mm)
3. Disengaging bracket (in housing)
4. Connection cable with Euro-plug
5. Reel compartment cover
6. Cover plate
7. Traction relief mechanism incl. assembly screws
5.
6.
After unpacking please check and compare ...
the contents of the package with the above specified.
7.
6
Check the details on the type plate
Check that the voltage / frequency on the type plate corresponds to the local mains conditions.
+
-
i
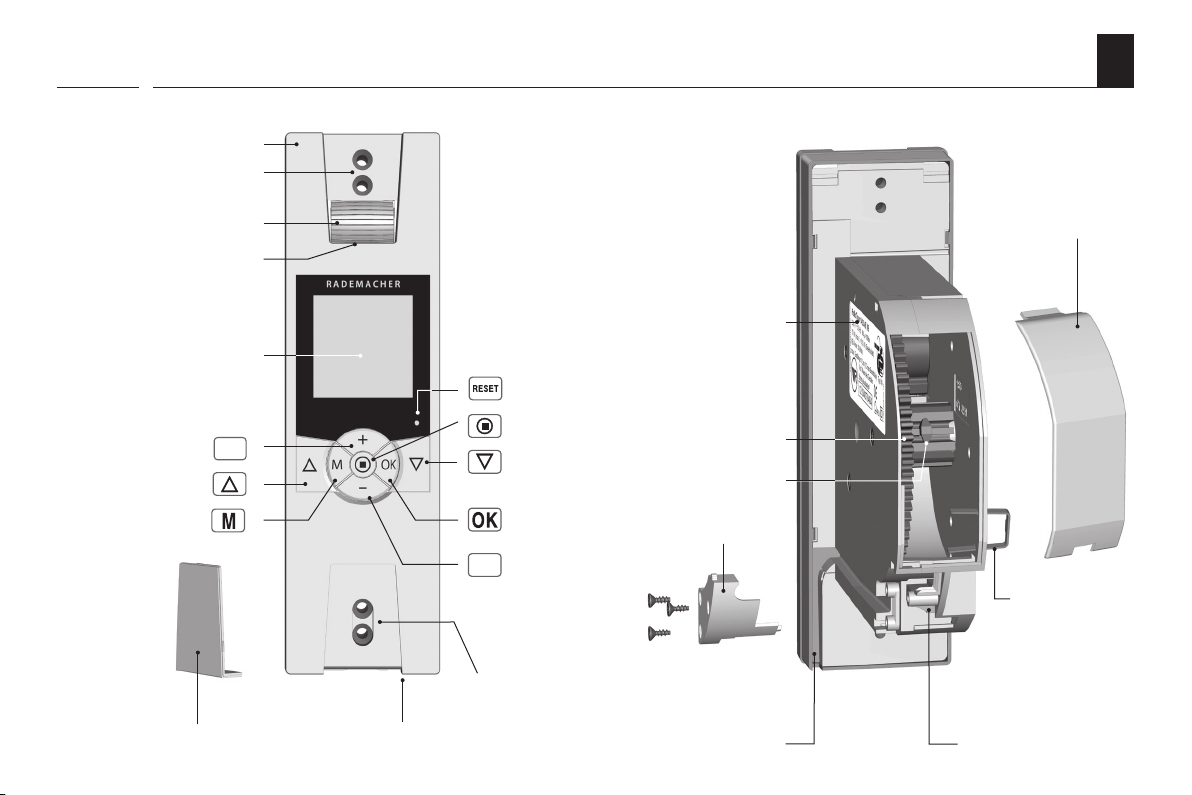
3. General view (item no. 1623 45 11) *
* also applies to item numbers 1623 60 11 / 1615 45 11
Front cover
Fastening holes
EN
Deflection roller
Belt inlet
Type plate
Display
Reset button
Plus button
Up button
Menu button
Cover plate
SET/Stop button
Down button
OK button
Minus button
Fastening holes
Traction relief
Reel
Fastening
hook
Cable ductConnection socket for the light sensor Connecting terminals
Reel compartment
cover
Disengaging
bracket
7

i
4. Display overall view
EN
Display symbol legend
[ MO ... SO ]
[ IST ]
[ PLZ ]
[ OFFSET ]
[ NORMAL ]
[ ASTRO ]
[ SENSOR ]
(MON...SUN) Week days
Time / setting parameters
Rain display
Button lock
ACTUAL value
Direction of travel - up / down
End point setting
Postcode
OFFSET (for Astro time)
Weekly programme
Switching modes
[ AUTO ]
[ m/s ]
[ klx ]
[ °C ]
[ % ]
[ SOLL ]
AUTO - automatic mode
Automatic mode off
Timer periods
Automatic dusk function
Automated solar function
Automatic dawn function
Random function
Wind display
System settings
DuoFern settings
Wind speed
(metres/second)
Brightness (kilolux)
Temperature (°C)
Dimension (percent)
SET - value
8
i
5. Safety instructions
EN
The use of defective equipment can lead to personal
injury and damage to property (electric shocks, short
circuiting).
◆ Never use defective or damaged equipment.
◆ Check the device and mains cable beforehand for
damage.
◆ Should you discover damage to the equipment,
please consult our customer service department
(see page 88).
Incorrect use leads to an
increased risk of injury.
◆ Train all personnel to use the RolloTron Comfort
DuoFern safely.
◆ This device may be used by children from 8 years of age
upwards as well as by persons with reduced physical,
sensory or mental capacities or with lack of experience
and knowledge if they are supervised or have been
instructed on how to use the device safely and if they
understand what dangers may resulted from this.
◆ Children must not play with the device.
◆ Cleaning and user maintenance may not be carried out
by children without supervision.
◆ Watch the moving roller shutters whilst carrying out
the settings and during normal operation, and keep
other people away from the area to avoid injury in the
event the shutters suddenly slip.
◆ Carry out all cleaning work on the roller shutters whilst
the device is disconnected from the mains power.
The mains socket and plug must be easily accessible
at all times.
Exceeding the maximum permissible running time
(KB) can overload and damage the RolloTron Comfort
DuoFern.
◆ The maximum permissible running time for a cycle may
not be exceeded when the equipment is in operation.
For this reason, the RolloTron Comfort DuoFern has an
automatic running time limit (KB) of four minutes.
◆ If the running time limit is triggered, then the RolloTron
Comfort DuoFern must be left for at least 12 minutes to
cool down. Full operational availability is re- established
after approx. one hour.
9

i
5. Safety instructions
EN
i
According DIN EN 13659, it is necessary to determine that
the movement conditions for the shutters are maintained
in accordance with EN 12045.
5.1 Proper use
Only use the RolloTron Comfort DuoFern for opening and
closing roller shutters with a permissible belt.
Mechanical locks of any kind are not suitable for automated operation with this device.
i
Only use original spare parts
from RADEMACHER.
◆ By doing so, you avoid the risk of malfunctions and
damage to your RolloTron Comfort DuoFern.
◆ As the manufacturer, we provide no guarantee for the
use of third-party components and accept no liability
for consequential damage resulting from such.
◆ All repairs to the RolloTron Comfort DuoFern must be
undertaken by authorised customer service personnel.
◆ The displacement must amount to at least 40 mm on
the lower edge in the rolled-out position with a force
of 150 N in the upwards direction.
◆ In doing so, it must be ensured that the extending
speed of the shutters for the final 0.4 m is less than
0.15 m/s.
Operating conditions
◆ Only operate the RolloTron Comfort DuoFern in dry
rooms.
◆ A 230 V / 50 Hz power supply, together with a site-
provided isolating device (fuse, MCB), must be permanently available at the installation location.
◆ An easily accessible 230 V / 50 Hz socket must be avail-
able at the installation site if the enclosed connecting
cable with Euro plug is being used.
◆ The roller shutters must run up and down smoothly
and should not stick.
◆ The mounting surface for the RolloTron Comfort
DuoFern must be flat.
10
i
5.1 Proper use
EN
i
i
◆ The installation and operation of the RolloTron Com-
fort DuoFern is only permitted for those systems and
devices where a malfunction in the transmitter or
receiver would not cause a danger to personnel or
property or where this risk is already covered by other
safety equipment.
Radio systems which transmit on the same frequency
can cause interference.
i
5.2 Improper use
Using the RolloTron Comfort DuoFern for purposes other
than previously mentioned is impermissible and is
regarded as improper use.
There is a risk to life caused through short circuiting
and electric shocks if the RolloTron Comfort DuoFern
is used outside.
◆ Never install or operate the RolloTron Comfort Du-
oFern outside.
Improper use can lead to serious injuries or property
damage.
◆ Never use the DuoFern radio system and its compo-
nents (e.g. RolloTron Comfort DuoFern) for remote
control of devices and systems with heightened safetyrelevant requirements or where there is a heightened
risk of accidents. This shall require additional safety
equipment. Observe the respective statutory regulations for the installation of such systems.
5.3 Required expert knowledge of the installer
The electrical connection, installation and commissioning of the RolloTron Comfort DuoFern must
only be carried out by a qualified electrician in accordance with the instructions in this manual.
11

i
6. Permissible roller shutter belts
EN
ATTENTION!
The RolloTron Comfort DuoFern may be damaged if
excessively long belts are used.
Only use belts of the permissible lengths.
The specifications are intended for guidance only and
apply to an ideal installation situation. The actual values
i
may vary due to local conditions.
Table 1: Permissible roller shutter belts
RolloTron:
Item No:
Belt width: Belt thickness: Maximum belt length
15 mm (Small-belt) 1.0 mm 7.6 m - - - - - -
1.0 mm - - - 7.6 m 15 m
23 mm (Standard belt)
1.3 mm - - - 6.2 m 12 m
1.5 mm - - - 5.2 m 11 m
Comfort DuoFern
(Small belt)
1615 45 11
Comfort
DuoFern
1623 45 11
Comfort
DuoFern Plus
1623 60 11
Table 2: Permissible shutter surface area (m2)
Roller shutter type: Weight/m
Plastic roller shutters (4.5 kg/m2) Approx. 6 m
Aluminium and wooden roller shutters (10.0 kg/m2) Approx. 3 m
2
Permissible shutter surface area (m2)
2
2
Approx. 6 m
Approx. 3 m
2
2
Approx. 10 m
Approx. 6 m
2
2
12

i
7. Functional description
EN
The RolloTron Comfort DuoFern is a roller shutter drive
designed for use inside. The unit is installed as a flushmounted device. The power supply is provided via the
enclosed connecting cable with plug or a fixed installed
lead.
The RolloTron Comfort DuoFern can be controlled individually on site or it can be integrated into a DuoFern network.
As soon as you integrate your RolloTron Comfort DuoFern
into a DuoFern network, you can make use of many functions offered by the corresponding DuoFern controllers.
The DuoFern receivers (actuators) and transmitters
must be connected to the DuoFern network.
You can find a detailed description of the various functions, configuration options and possible combinations
for the DuoFern system at:
http://www.rademacher.de/duofern.
Central control of several DuoFern devices with a single
RolloTron Comfort DuoFern.
A DuoFern network generally includes the DuoFern
central operating unit or the HomePilot® (together
with the associated user interface) as the central controllers.
Alternatively
DuoFern as a central controller. To do so, you must
configure the corresponding DuoFern mode (See page
39).
Selecting a DuoFern mode
The RolloTron Comfort DuoFern comes with three
DuoFern modes which enable you to specify how the
RolloTron behaves within the DuoFern network or local
installation on-site.
The following DuoFern modes are available for selection (see page 39).
[ 1 ] = DuoFern receiver
[ 2 ] = DuoFern transmitter
[ 3 ] = Local operation
you can also use the RolloTron Comfort
13
i
7.1 Description of the safety functions
EN
Soft-start / Soft-stop
The RolloTron Comfort DuoFern is equipped with a Softstart / Soft-stop function. Gentle starting and stopping
serves to protect the belt winder mechanics and the belt.
Obstacle detection
The movement of the belt is monitored. If the roller shutters hit an obstacle in the DOWN ( t ) direction, the belt
will stop moving and the belt winder is switched off.
Once the system has switched off, it is no longer
possible to directly operate the drive in the same
direction.
◆ Run the belt winder back in the opposite direction
and remove any possible obstacle.
◆ Subsequently it is possible to operate the drive in the
original direction again.
There is a risk of injury if the obstacle detection is not
working.
◆ The belt must be wound on as evenly as possible to
ensure safe and correct functioning of the obstacle
detection function.
◆ Please ensure that the belt winds as straight and evenly
as possible into the device during its subsequent cycle
after the obstacle detection system has triggered.
Overload cut-off
The RolloTron Comfort DuoFern is equipped with an
overload cut-off system.
If the drive jams in the UP ( ▲ ) cycle (for example, due to
ice), the belt winder will also switch off.
◆ Once the cause for the overload has been rectified,
the drive will be fully operational in both directions.
14

i
7.2 Table 3: DuoFern network function table
* WR ConfigTool with DuoFern central operating unit
DuoFern standard manual transmitter
DuoFern wall controller
Function Value range Factory setting
1. Manual operation Up / Stop / Down -
2. Direct drive to a %-position 0 - 100 % -
3. Manual mode on / off on / off Off
4. Timer on / off on / off On
5. Random function - -
6. Automatic dawn function - -
7. Automatic dawn function on / off on / off Off
8. Automatic dusk function - -
9. Automatic dusk function on / off on / off Off
10. Sun function - -
11. Automatic solar function on / off on / off Off
12. Sunshine position 0 - 100 % 50 %
13. Ventilation position on / off on / off Off
14. Ventilating position 1 - 99 % 80 %
15. Connectivity test - -
* The „WR ConfigTool“ software can be downloaded from our website at
www.rademacher.de
EN
HomePilot®
DuoFern environmental sensor
DuoFern central operating unit
Troll Comfort DuoFern
● ● ● ●
●
● ● ●
● ● ●
● ● ●
● ● ● ●
● ● ●
● ● ● ●
● ● ●
● ●
● ● ●
● ● ●
● ● ●
● ● ●
● ●
15

i
7.3 Overview of local functions
EN
16
◆ Display background illumination
◆ Operational demonstrator
◆ Manual operation
◆ Direct configuration and movement to a target posi-
tion
◆ AUTO/MANU - switchover
◆ Easy configuration with menu-driven operation
◆ Weekly programme:
● Weekly switching times (2 x)
– 1 x [ ] and 1 x [ ] for (MON...SUN) [ MO...SO ]
● Weekday and weekend switching times (4 x)
– 1 x [ ] and 1 x [ ] for (MON...FRI) [ MO...FR ]
– 1 x [ ] and 1 x [ ] for (SAT+SUN) [ SA+SO]
● Individual day switching times (14 x)
– 1 x [ ] and 1 x [ ] for (MON / TUES / WED /...
SUN) [ MO / DI / MI /... SO ]
● Activate a second switching time block,
(dual switching times, see page 49).
◆ Automatic dusk function
● Automatic darkness function with the Astro
programme
● Automatic darkness function with connected
light sensor
◆ Automatic solar function (with light sensor)
◆ Automatic dawn function with the Astro programme
◆ Random function
◆ Ventilating position
◆ End point setting
◆ Button lock
◆ System settings
◆ Permanent storage of the settings
◆ Automatic summer / winter changeover
◆ Obstacle detection
◆ Overload cut-off
◆ Soft-start and Soft-stop
Description and configuration of the individual local
functions
A precise description of the individual local functions
and settings is included starting on page 25.
DuoFern settings
The settings required for operating the equipment in a
DuoFern network are specified starting on page 35.
System settings
The individual device configuration is described beginning on page 65.
1
2
3
4
5
i
8. General assembly instructions
EN
i
Poor routing of the belt can cause the belt to fail and
leads to unnecessary loads on the RolloTron Comfort
DuoFern.
Install the belt winder so that the belt runs as straight as
possible into the device, in order to avoid unnecessary
friction and wear.
Incorrect installation can lead to
property damage.
Strong forces are exerted during operation of the system
which require secure installation on a firm base.
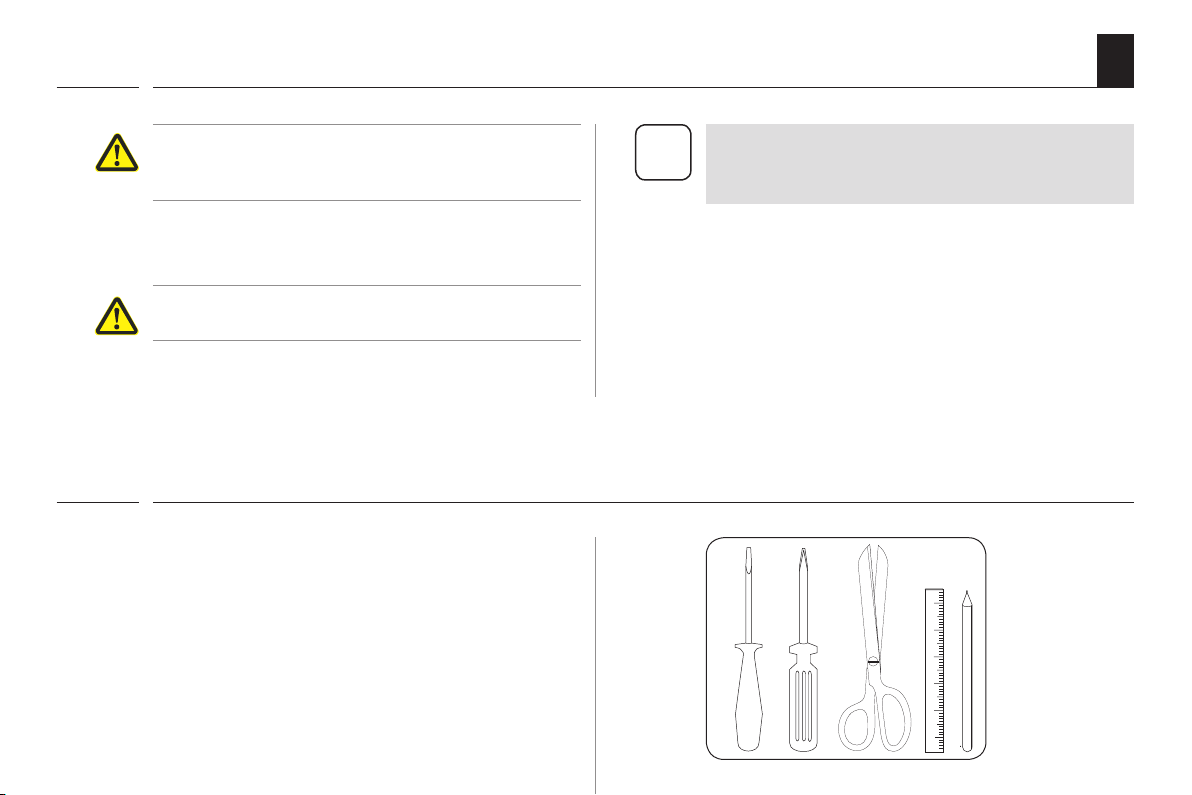
8.1 You will require the following tools
◆ Screwdriver
◆ Scissors
◆ Carpenter's gauge or measuring tape
◆ Pen
In order to ensure optimal operation, the RolloTron
Comfort DuoFern should not be installed near metal
i
objects.
17

i
8.2 Preparation for installation
Take measurements.
1.
Check that the belt box has sufficient space to house the RolloTron
Comfort DuoFern.
EN
18
+
-
All dimensions in mm
RolloTron Comfort DuoFern
Item no.:
1615 45 11 (small belt)
1623 45 11 (standard belt)
+
-
All dimensions in mm
RolloTron Comfort DuoFern Plus
Item no.:
1623 60 11 (standard belt)
i
8.2 Preparation for installation
Remove the old belt winder, if you are carrying out a con-
2.
version to an existing roller shutter system.
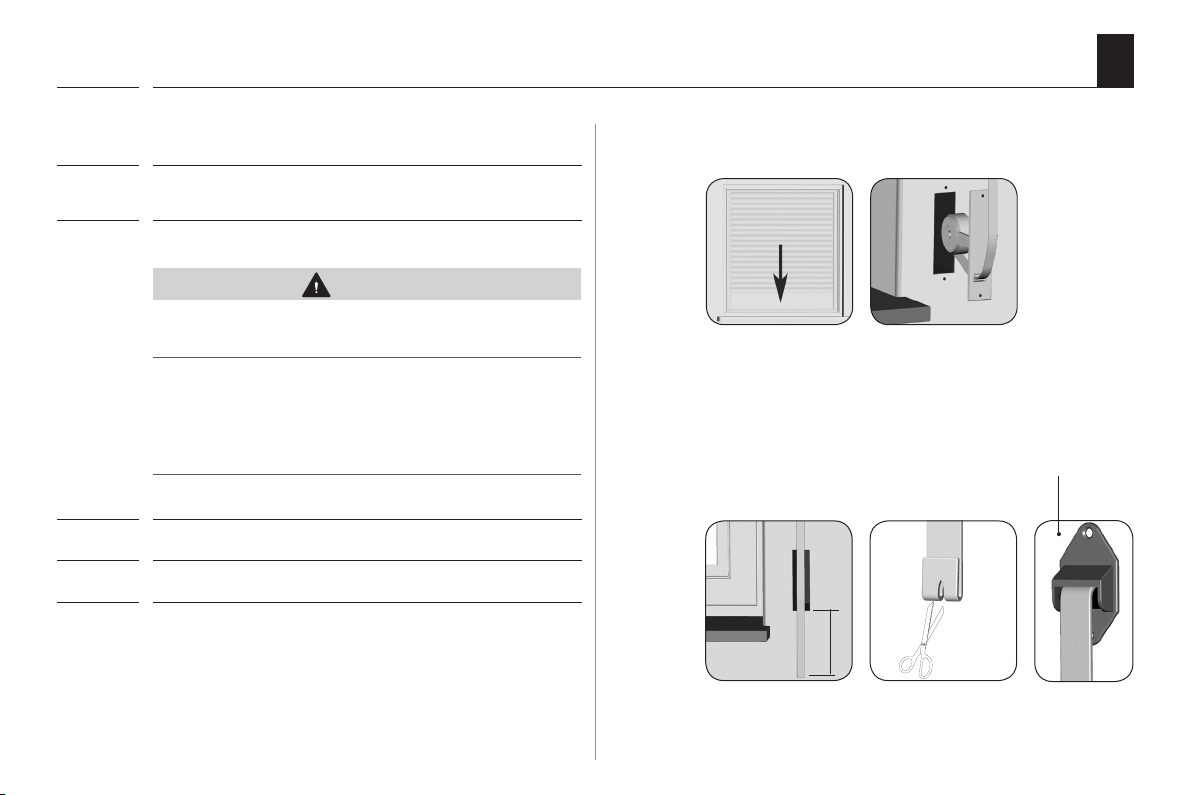
Let the roller shutter move fully down, until the slats are
2.1
completely closed.
Remove the old belt winder and unreel the belt.
2.2
CAUTION!
There is a risk of injury from the pre-tensioned
springs on the old belt winder.
◆ The spring unit of the old belt winder may suddenly
recoil when it is removed.
◆ Hold the spring unit firmly when loosening the belt
and allow it to recoil slowly until the spring unit has
completely unwound.
Prepare the belt.
3.
Cut the belt off approx. 20 cm under the belt box.
3.1
Fold the end of the belt over by approx. 2 cm and cut a
3.2
short slit in the centre. This enables you to subsequently
hook the belt onto the reel.
EN
Recommendation
The belt must run as straight and freely as possible. For
stiff roller shutters, mount a deflection roller on the belt
box. This helps to prevent unnecessary friction and wear
to the belt.
20 cm
Accessories, see page 86
19

i
9. Safety instructions for electrical connection
EN
DANGER!
Danger due to electric shock when working on all
electrical systems.
◆ Carry out all installation and connection work only in
an isolated, zero-volts state.
◆ Disconnect all phases of the mains power supply cable
and secure it to prevent any reconnection.
◆ Check the system for a zero-voltage status.
The electrical connection for the RolloTron Comfort
i
DuoFern can be made either with the supplied connecting cable or via a fixed laid cable.
20
i
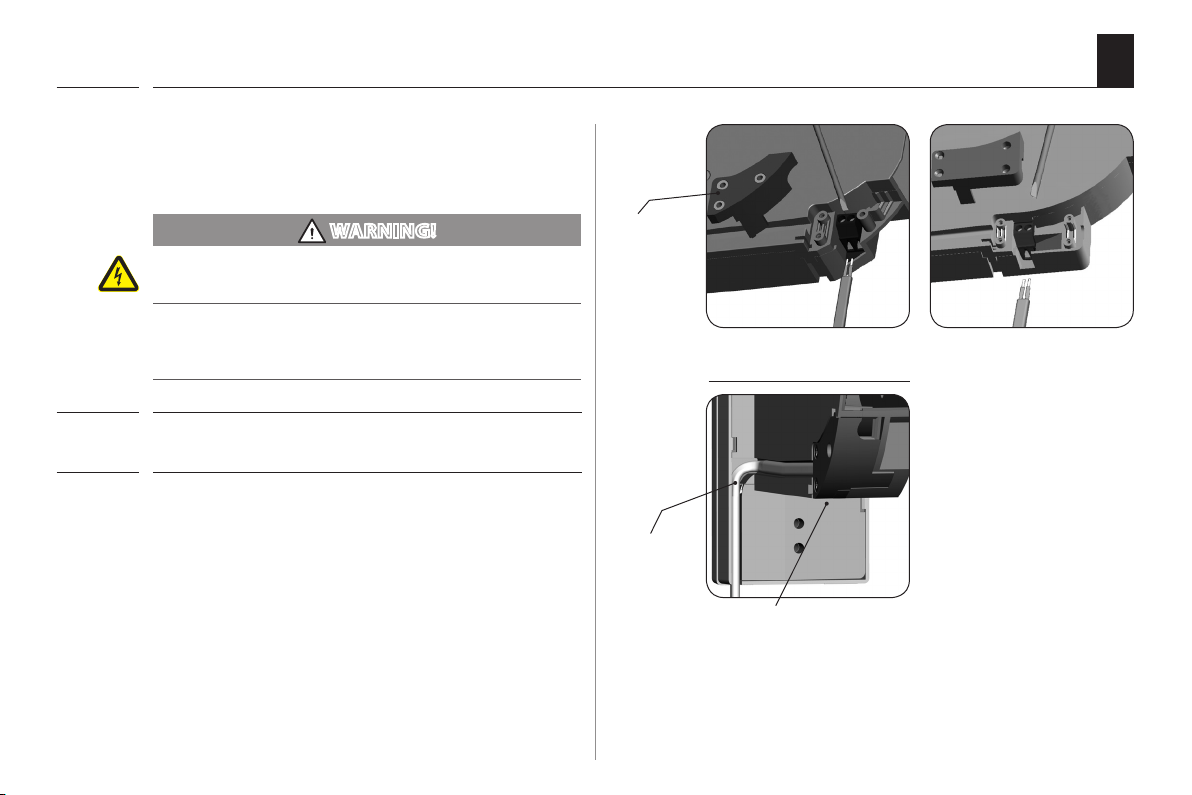
9.1 Electrical connection
Connect the provided connecting cable to the connecting
1.
terminals of the RolloTron Comfort DuoFern.
The colour coding is irrelevant for the installation.
EN
WARNING!
A damaged connecting cable may cause a short
circuit.
◆ Pay attention that cables are laid safely.
◆ The connecting cable may not be pinched when screw-
ing on the belt winder as this could lead to damage.
Lay the connecting cable in the cable duct of the RolloTron
2.
Comfort DuoFern.
Finally, screw on the traction relief mechanism with the
3.
screws provided.
Traction
relief
Cable duct
RolloTron
Comfort DuoFern
Traction relief
RolloTron
Comfort DuoFern Plus
21
i
10. Drawing in and fastening the belt
Insert the mains plug into the socket.
1.
CAUTION!
There is a risk of injury from the reel.
Never reach into the reel compartment when the motor
is running.
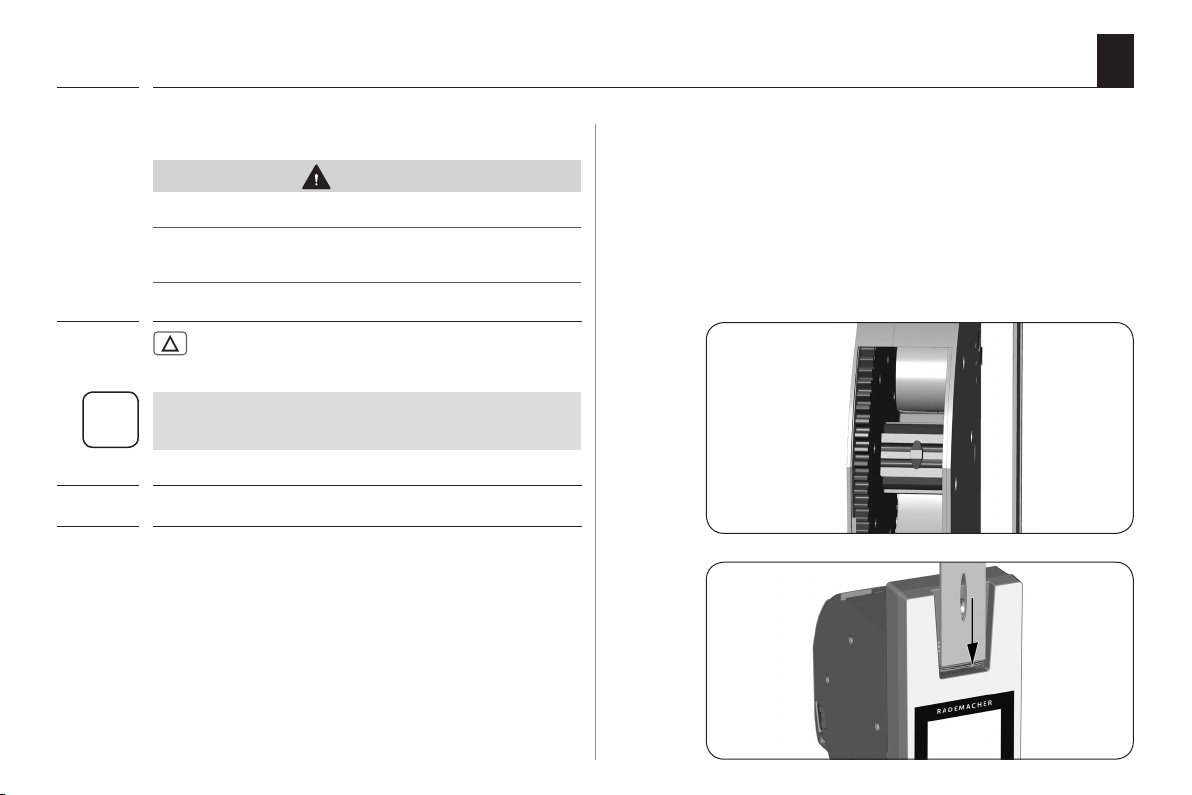
Press the Up button until the fastening hooks
2.
are easily accessible in the reel compartment.
As no end points have been set yet, the drive will stop
as soon as you release the button.
i
Always remove the mains plug from the socket.
3.
Next, draw-in the belt into the RolloTron Comfort DuoFern
4.
from the top.
EN
22

i
10. Drawing in and fastening the belt
Continue to feed the belt into the device as shown in the
5.
bottom right sectional diagram and subsequently slide the
belt over the fastening hooks from above.
Re-insert the mains plug into the socket.
6.
Press the Up button until the belt has wound
7.
completely once around the reel.
Pull the belt tight when winding, so that the deflection
8.
roller turns at the same time.
Remove the mains plug again from the socket again.
9.
Finally, place the provided reel compartment cover onto
10.
the reel compartment.
EN
Belt
Belt
End of belt
Fastening
hook
Belt path in
RolloTron Comfort DuoFern
23
i
11. Mounting the RolloTron Comfort DuoFern
Mount the RolloTron Comfort DuoFern as straight as possible, so that the belt can wind correctly.
Ensure that the RolloTron Comfort DuoFern sits freely in
the belt box and that it is not in contact with the masonry, otherwise noise will be generated during operation.
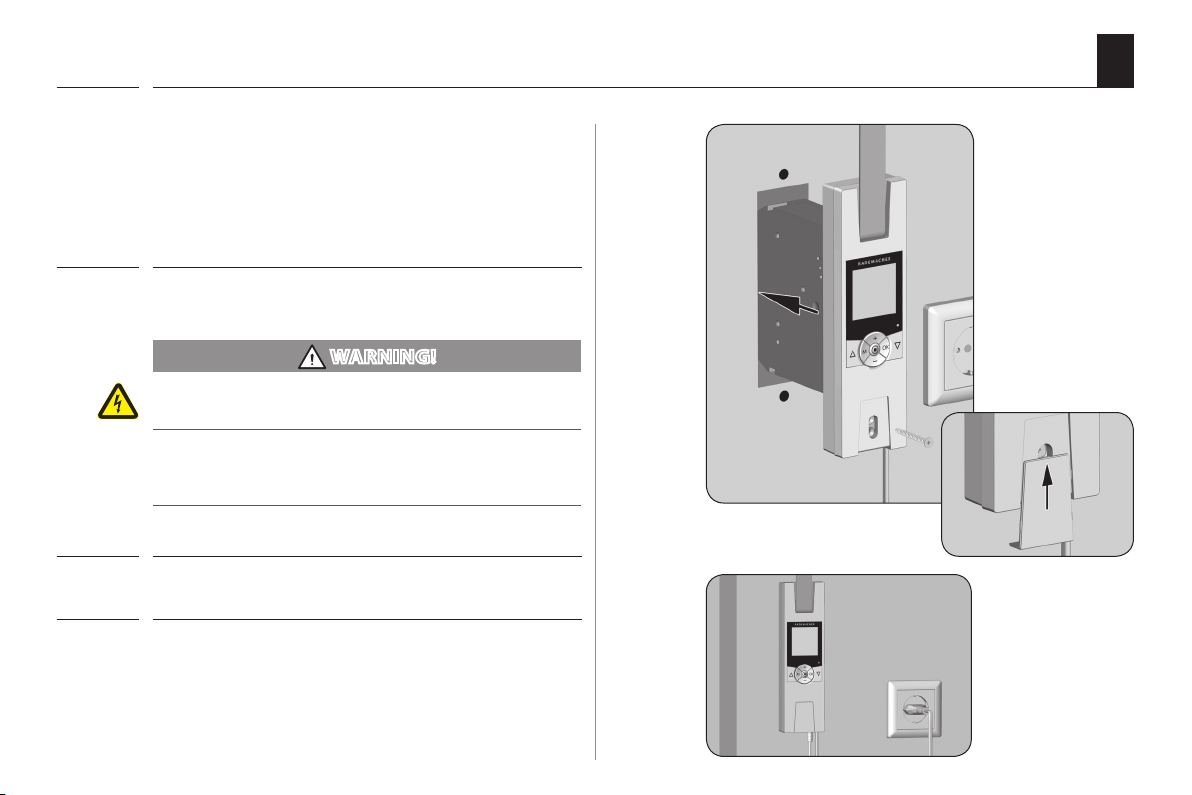
Slide the RolloTron Comfort DuoFern into the belt box and
1.
screw it tight using the screws provided.
WARNING!
A damaged connecting cable may cause a short
circuit.
Ensure that the connecting cable is laid correctly inside
the cable duct, otherwise it can be crushed and damaged
when the cover is screwed in place.
Slide the enclosed cover plate over the lower mounting
2.
holes.
Re-insert the mains plug into the 230 V / 50 Hz socket.
3.
EN
24

i
+
-
12. Brief description of the button functions
EN
Operating buttons [Up / Down]
◆ Manual operation [ Up ▲ / Down t ].
SET/Stop button, [ ]
◆ Configuration (setting) of various functions.
◆ Manual roller shutter stop.
Menu button, [ M ]
◆ Call up the main menu.
◆ Back to previous menu or standard display.
Plus/Minus buttons
◆ Setting of parameters (more / less).
◆ Pressing one of the buttons for an extended period
causes the numbers to change more quickly in the
respective direction.
◆ Configuration and movement to a target position.
[ OK ] button
◆ Confirms and opens the selected menu.
◆ Confirm and save entry.
◆ Continue to next entry.
[ Reset ] button, see page 7
◆ Carry out a hardware reset, see page 74.
25
i
12.1 Brief description of the standard display and main menu
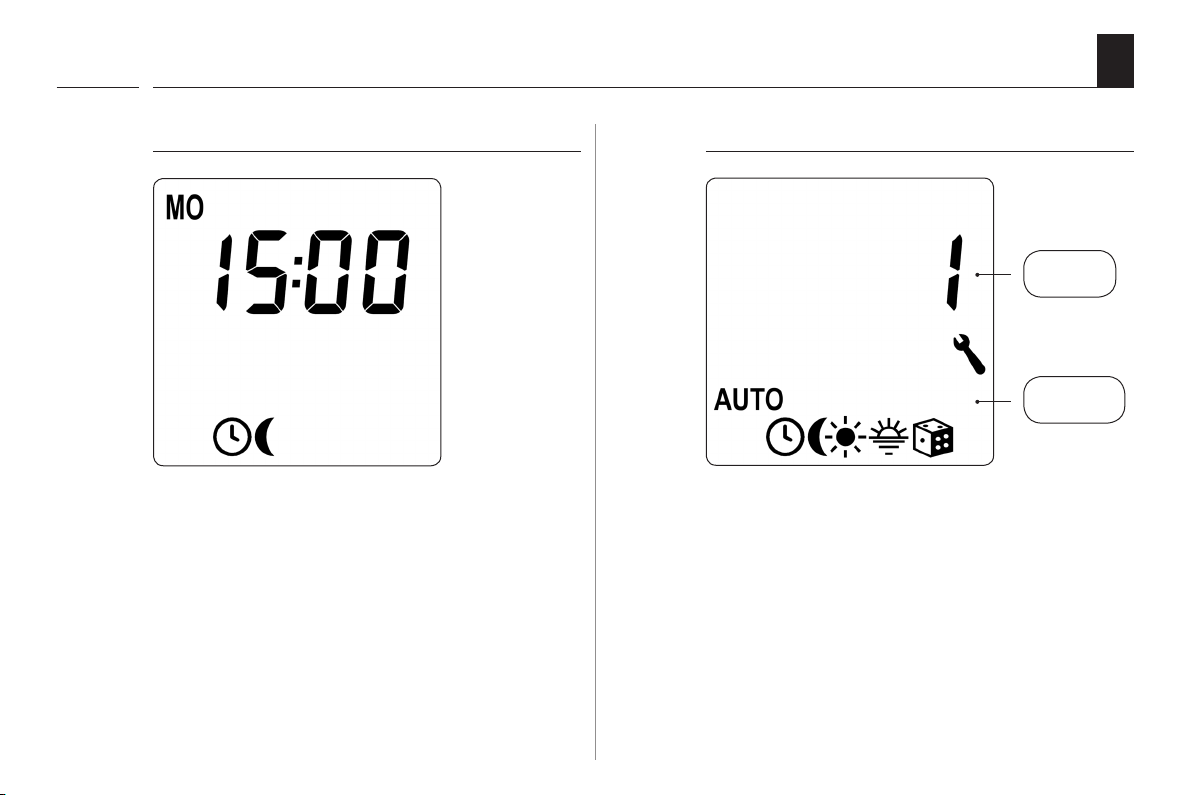
The standard display (example) The main menu
EN
Menu
number
Functions /
menus
26
◆ Displays the current day of the week and time.
◆ Displays the activated functions.
◆ Manual operation of the RolloTron Comfort DuoFern
is only possible from the standard display.
◆ Enables display and selection of the individual func-
tions and menus.
◆ Displays the respective menu number.
◆ Manual operation is not possible from the main
menu.
◆ No automatic switching commands will be executed
during the configuration process.
◆ If no button is pressed within 120 seconds, the
display automatically changes back to the standard
display.
+
-
+
-
i
12.2 Introduction to opening and closing the menus
EN
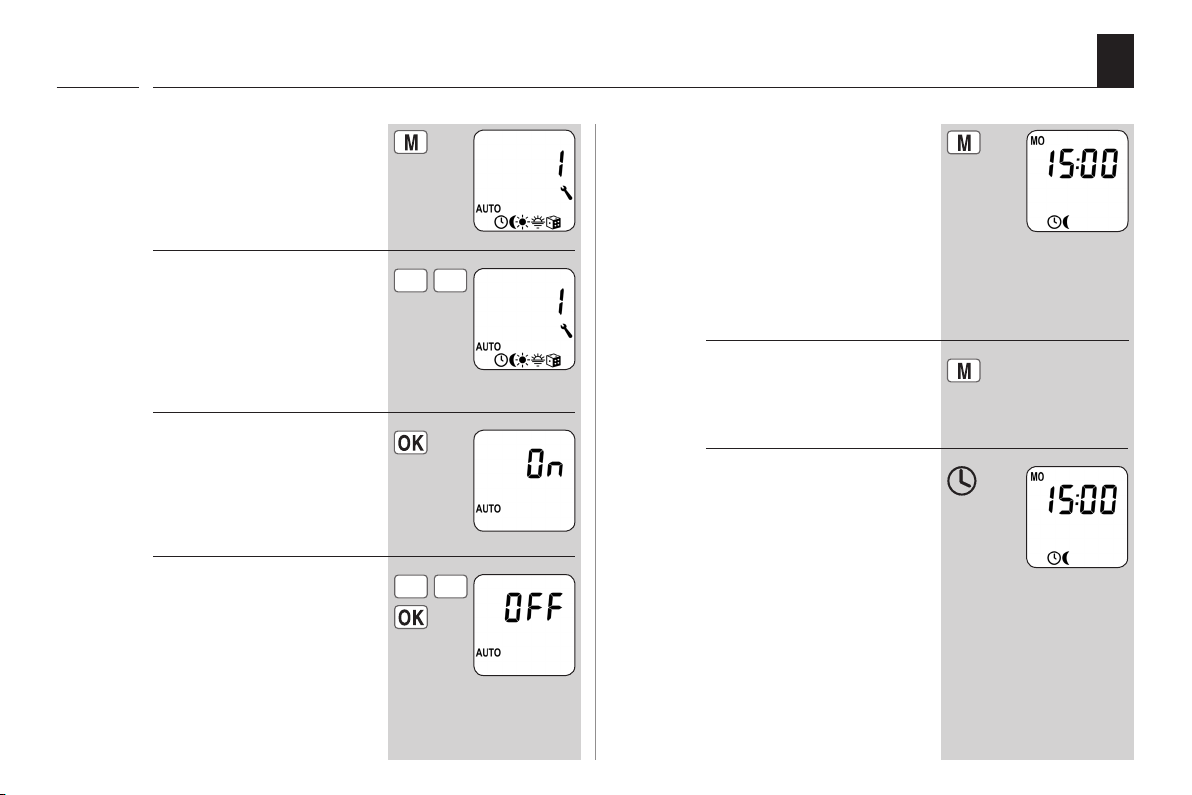
Call up the main menu.
1.
Pressing the [ M ]-button in
the standard display causes
the main menu to open.
Select the desired menu or
2.
menu number.
The selected menu is
indicated by a number and
a flashing icon.
Open the menu by press-
3.
ing the [ OK ] button.
Select the desired setting
4.
and confirm with [ OK ].
Example
Toggle back to the stand-
5.
ard display.
In order to do so, press and
hold the [ M ] button for
one second.
Pressing the [ M ] button
from any of the menus will
return you to the standard
display.
Briefly pressing the [ M ]
button causes the display
to go back one menu step.
If no button is pressed
within approx. 120 sec-
onds, the display changes
back to the standard
display.
1 sec.
▲
approx.
120 s
27
 Loading...