

Page 1
StorageCare Sage
StorageCare Sage
Dashboard and
StorageCare Sage Tape
Security
Introduction
StorageCare Sage™ Dashboard provides an at-a-glance view of your tape
drive and media health, status, and security settings. A significant feature
of the StorageCare Sage Dashboard is StorageCare Sage Tape Security,
which allows you to protect data on tape cartridges from unauthorized
access. StorageCare Sage Tape Security works with your current backup
software because it is managed entirely by StorageCare Sage Dashboard.
You can view StorageCare Sage Dashboard using the Windows
on your PC. Windows users can also view StorageCare Sage Dashboard via
the Device Manager.
StorageCare Sage Tape Security works with the following minimum
firmware and driver requirements:
Start button
Contents 0
Introduction................................................ 1
Installing StorageCare Sage Dashboard ... 1
Using StorageCare Sage Dashboard ......... 2
Opening the Application......................... 2
Refreshing the View ................................ 3
Getting Help............................................. 3
Using the Status Tab ..................................3
Viewing Health Status............................. 4
Viewing Cartridge Wear..........................4
Viewing Write Protection and Tape
Security Status.........................................4
Improving Backup Performance ............. 5
Using StorageCare Sage Tape Security .....5
Using Secure Keys.......................................6
Entering the Wrong Secure Key.................7
Using Automated Settings......................... 8
Clearing All Settings................................. 8
Using Auto Unlock .................................... 8
Using Auto Add Key..................................9
Avoiding Problems With Automated
Settings..................................................... 10
Scenario #1: Different Secure Keys .......10
Scenario #2: Drive Loses Power ............11
Tape Drive Minimum Firmware Version
Needed
DLT-S4 Any 4.0.36
DLT-V4 8.0 4.1.2
Minimum Device Driver
Version Needed
Installing StorageCare Sage Dashboard 0
Follow these instructions to install StorageCare Sage Dashboard:
1 Hook up your tape drive to your PC (see your drive's Product Manual
for instructions).
Page 2

StorageCare Sage Dashboard and StorageCare
2 Download StorageCare Sage Dashboard for your system as follows:
•
Windows Users: Install the latest device drivers for your product as follows: Go to
www.quantum.com
product, then download the latest device drivers. StorageCare Sage Dashboard is
bundled with the latest drivers and will install at the same time. Follow the
instructions in the Read Me file for specific installation instructions.
•
Symantec Backup Exec and NetBackup Users: Go to www.quantum.com and select
Service and Support > Downloads, then select your product, then download
StorageCare Sage Dashboard for Symantec Backup Exec and NetBackup.
3 Make sure your drive firmware is at least the minimum version required. If it is not,
then download the firmware to your PC from the Downloads page on
www.quantum.com
Note: To upgrade tape drive firmware, you must either create and
use a firmware update tape, or use xTalk Management
Console to write the firmware image to the tape drive.
Download xTalk Management Console from the Downloads
page on www.quantum.com
and select Service and Support > Downloads, then select your
, then upgrade the firmware on the tape drive.
.
Using StorageCare Sage Dashboard
StorageCare Sage Dashboard is easy to understand and use. If you need more
Opening the Application 0
information, the Getting Help
Once you have downloaded StorageCare Sage Dashboard, open the application either via
the Windows
Via the Start Button
1 Click your PC’s Windows Start menu button.
2 Select
3 Click either the
Via Device Manager (Windows Users Only)
1 Right-click My Computer.
2 Select Manage from the menu.
3 Select
Start button or the Device Manager as follows:
Programs > Quantum > Dashboard.
Status tab or the Tape Security tab depending on what you want to do.
System Tools > Device Manager > Tape Drives.
feature provides a detailed explanation.
0
0
4 Double-click the tape drive you want to view.
The Device Manager opens, displaying Device Manager tabs along with StorageCare
Sage Dashboard tabs.
2 Using StorageCare Sage Dashboard
Page 3
StorageCare Sage
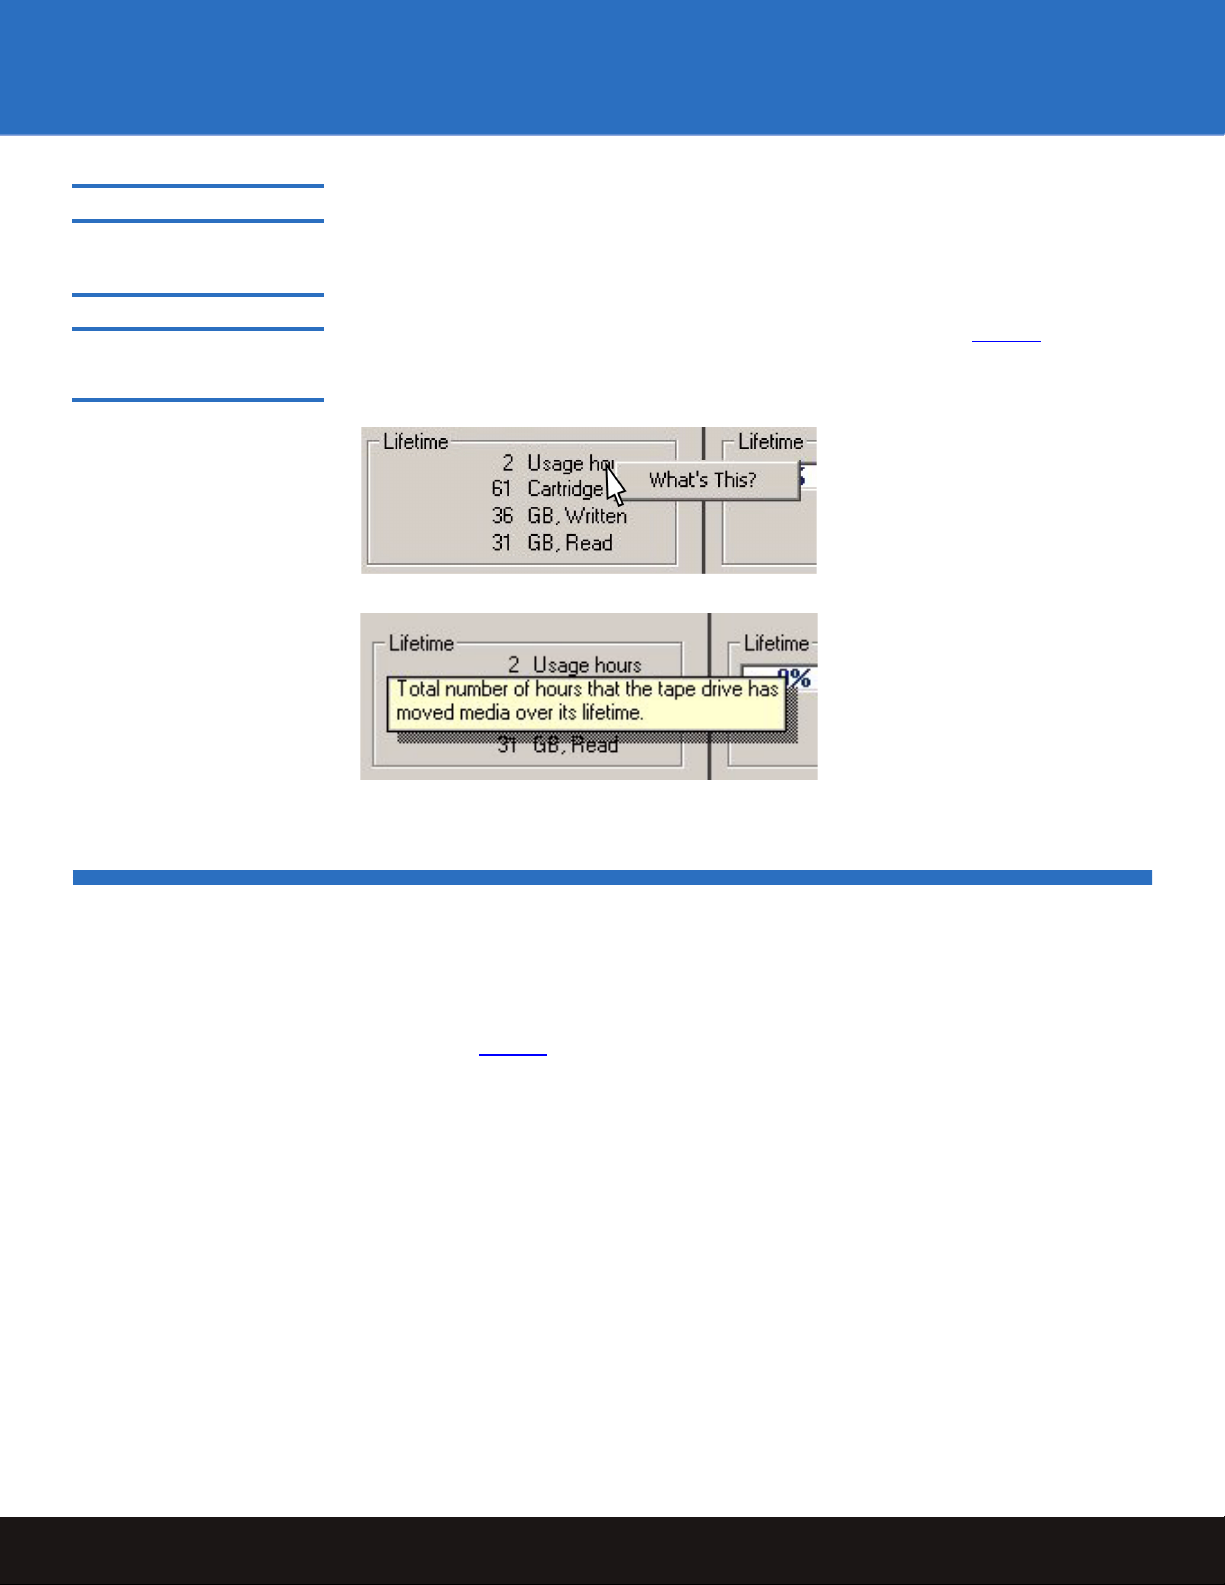
Right-click an item:
Click What’s This:
Refreshing the View 0
Getting Help 0
Figure 1 Getting Help
You must click the Refresh button after each load or unload of a cartridge in order to see
the new status and settings.
The embedded Help feature explains each screen item for you if needed. Simply right-click
any item and click
What’s This? to view a description of the item (see figure 1).
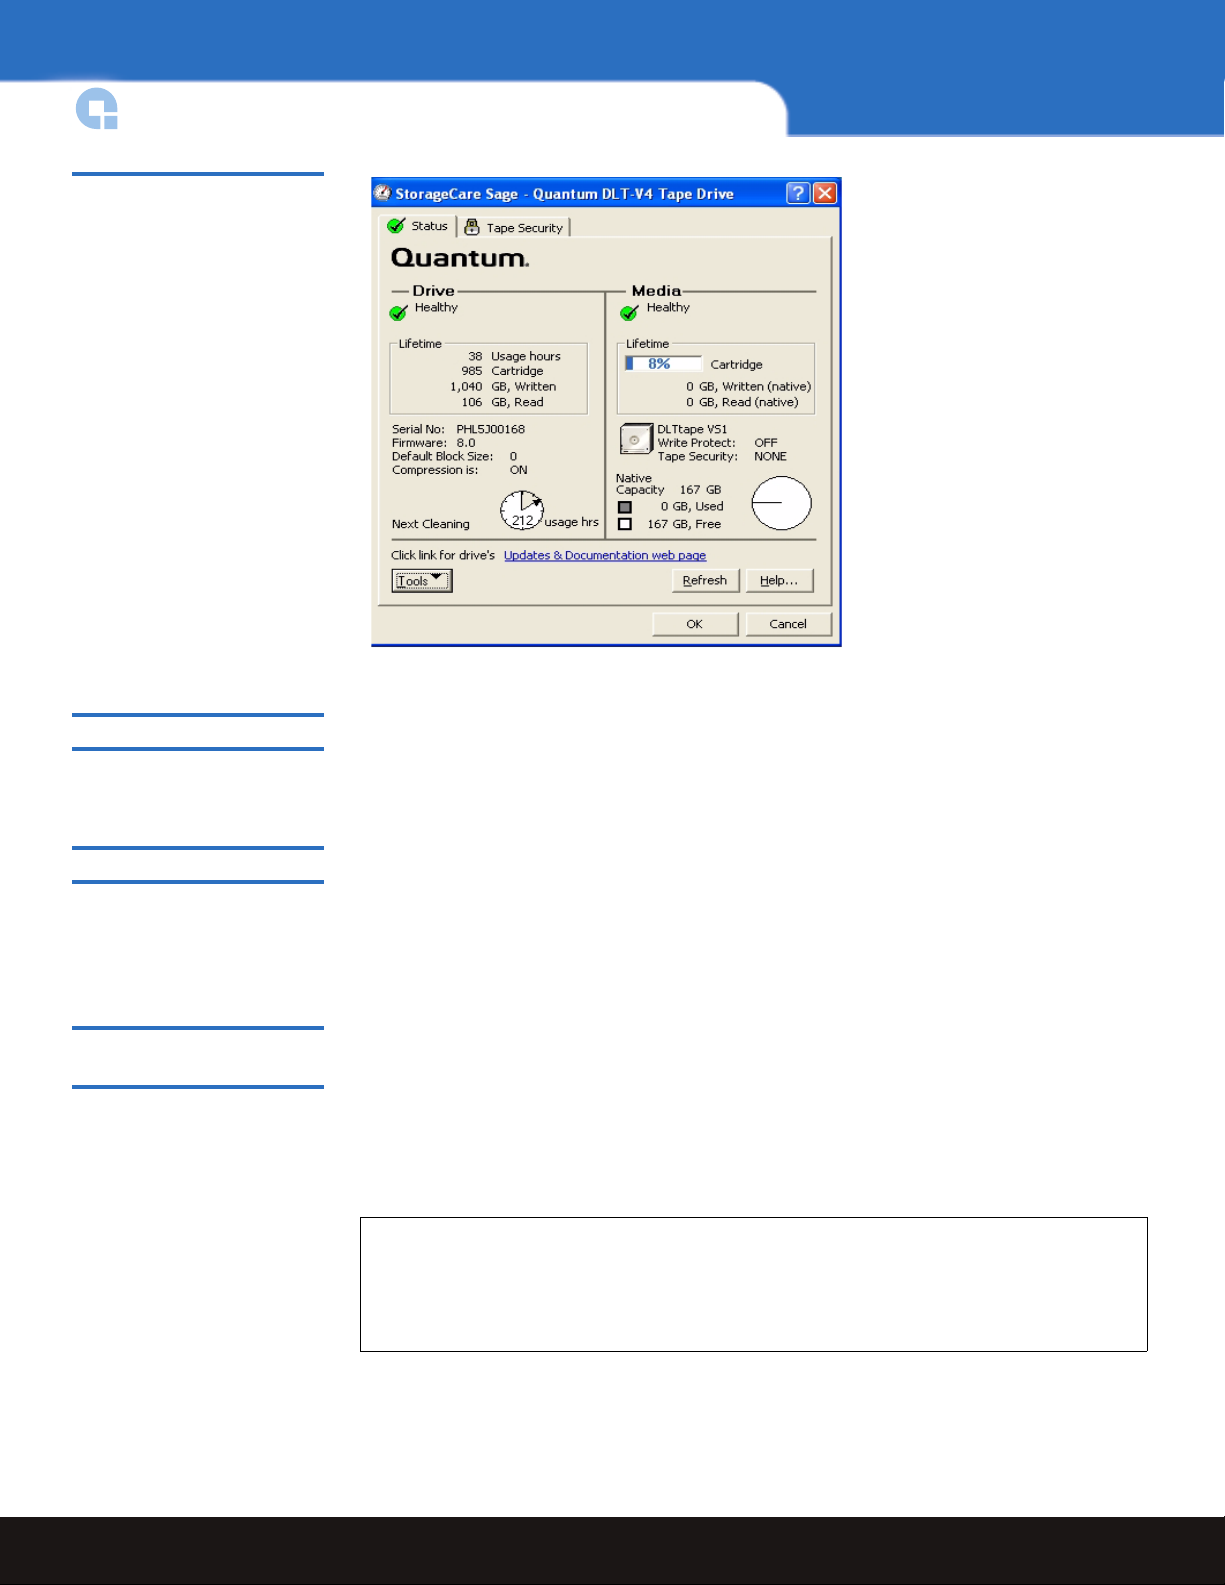
Using the Status Tab
The Status tab displays a snapshot of your drive and media’s current health, lifetime
usage, capacity, and security status. You can see at a glance when your tape drive or
cartridge needs repair or cleaning, and get information about what to do if there is a
problem (see figure 2
).
Using the Status Tab 3
Page 4
StorageCare Sage Dashboard and StorageCare
Figure 2 Status Tab
Viewing Health Status 0
Viewing Cartridge Wear 0
Viewing Write Protection and Tape Security Status 0
Drive and media health is shown via the Health icons. If the drive or media is not healthy,
a short description of the problem is displayed, along with a
More button. Click the More
button to find what actions you can take to address the issue.
Cartridge wear is based on number of load/unload cycles, number of times the tape
heads have passed over the same surface on the media, and number of hours the cartridge
has spent being read from or written to. The percentage of wear is shown in the Cartridge
Wear progress bar. The progress bar turns yellow at 75% and red at 90%. When cartridge
wear reaches 100%, the cartridge needs to be replaced.
The Write Protection status tells you if the media is write-protected with the manually
adjustable write-protect tab on the cartridge. If the write-protect tab is in the write-protect
position, the status shows ON. (See the tape drive product manual for instructions on
setting the write-protect tab.)
The Tape Security status tells you if the media is protected with a Secure Key and what
the security status is (status shows NONE, LOCKED, or UNLOCKED).
Note: Some backup systems cannot identify Secure Keys. They will indicate that a
cartridge is “write protected” if it has a Secure Key, even if the write-protect
tab is not set. If you get the “write protected” message, ensure the writeprotect tab is disabled; then, if that does not correct the error, check the
StorageCare Sage Dashboard Tape Security status.
4 Using the Status Tab
Page 5

StorageCare Sage
Improving Backup Performance 0
If you are running Windows XP and later operating systems, and you are not using
Windows native backup utility, Microsoft® Backup Support sends repeated SCSI status
requests to the drive, which can degrade backup performance. You can disable Microsoft
Backup Support by clicking the
Note: If you are running an operating system earlier than Windows XP, then this is
not an issue and you cannot disable Microsoft Backup Support.
Tools button and de-selecting MS-Backup Support.
Using StorageCare Sage Tape Security
StorageCare Sage Tape Security allows you to add an electronic Secure Key to tape
cartridges to protect them from unauthorized access. This Secure Key prevents or allows
reading and writing of data to a tape cartridge, and is particularly valuable for protecting
tapes that are transported offsite, where they could be lost or stolen.
Note: You cannot use Tape Security if the tape cartridge write-protect tab is in the
write-protect position. Manually slide the write-protect tab to the disabled
position to use Tape Security.
Caution: Make sure you keep track of the Secure Keys you assign. There is no way
to retrieve data in the event of a lost Secure Key! The key is encrypted, so
you cannot read the key from the cartridge, and you cannot bypass the key
to get to the data on the cartridge.
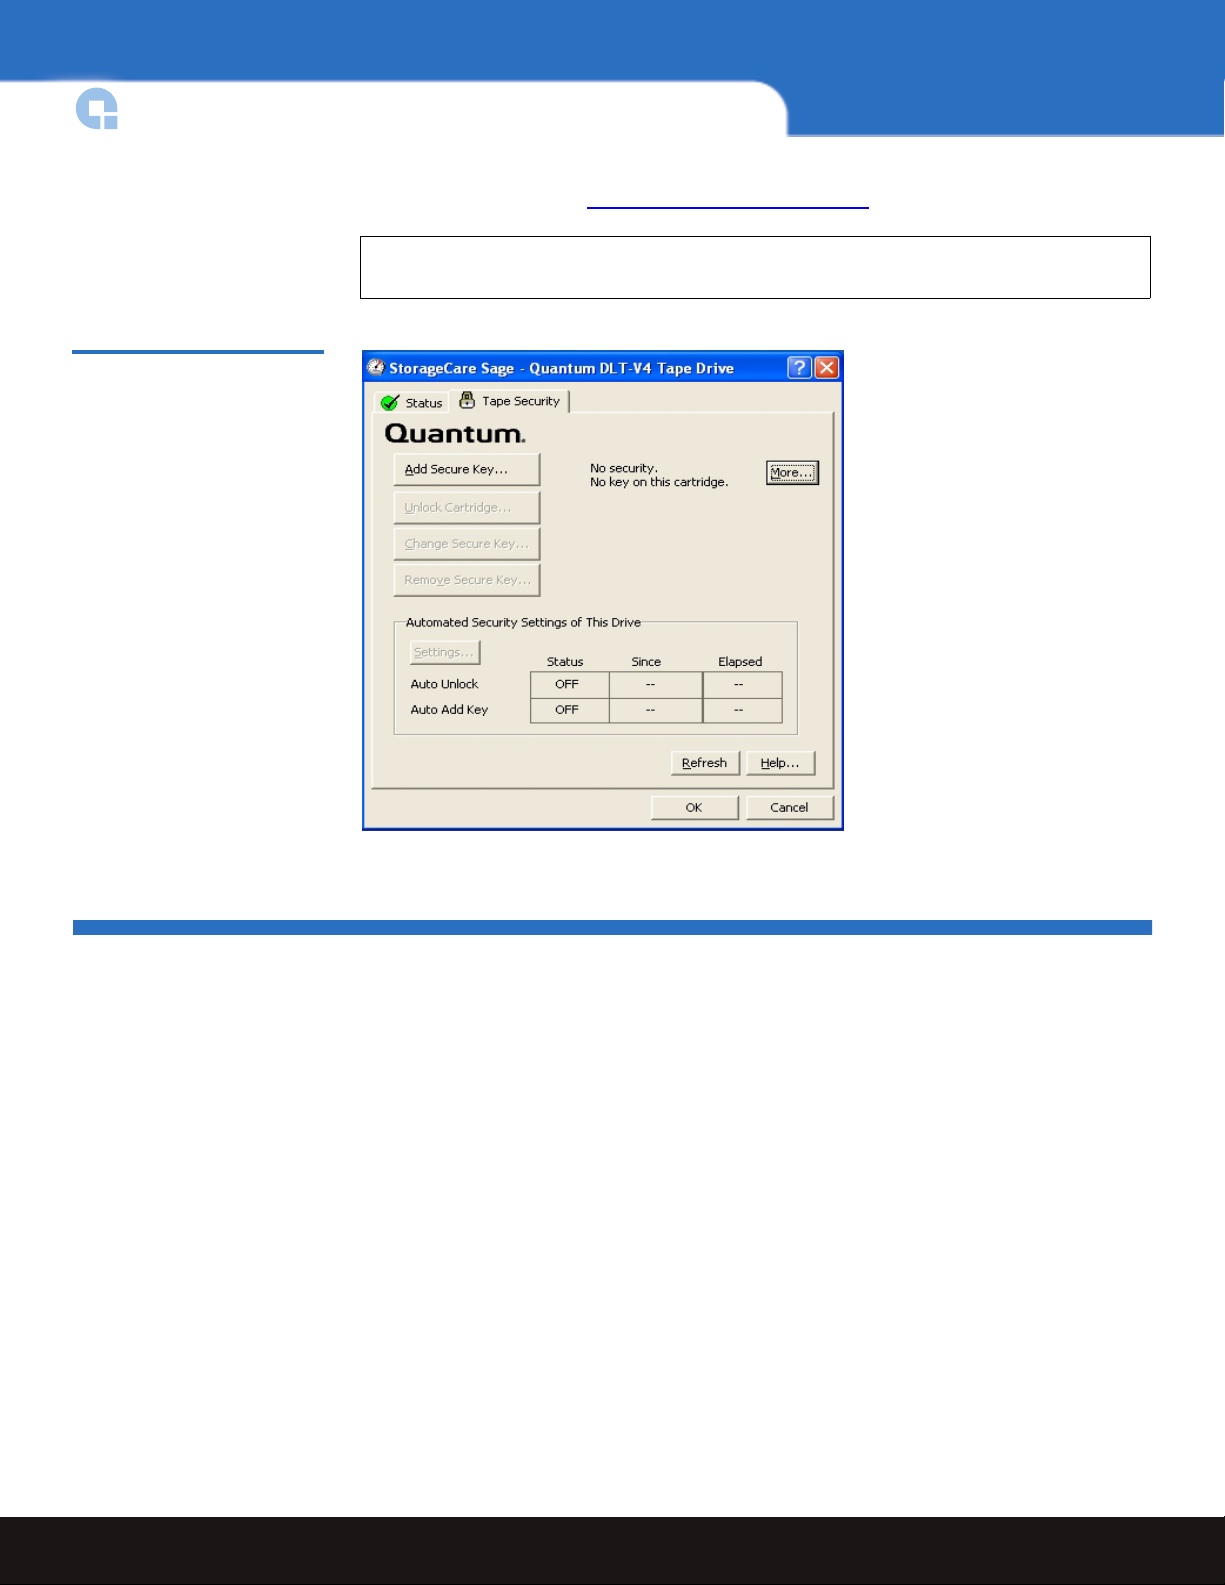
You access StorageCare Sage Tape Security via the
(see figure 3
• Add, change, and remove Secure Keys
• Unlock protected tape cartridges
• Automatically unlock tape cartridges protected with a specified Secure Key
• Automatically add Secure Keys to unprotected tape cartridges
When you add or change a Secure Key, the key is coded onto both the media and the tape
drive, where it remains until you change or remove the key.
Note: The Secure Key is also removed from the drive (but not from the media) if you
Once a Secure Key has been added to a cartridge, the cartridge is “locked” and cannot be
read or written to until it is “unlocked.” You can unlock the cartridge by entering its
). From here, you can:
turn off the drive, or if the drive loses power.
Tap e S e curity tab on the Dashboard
Using StorageCare Sage Tape Security 5
Page 6
StorageCare Sage Dashboard and StorageCare
Secure Key. You can also set your tape drive to automatically unlock cartridges with a
specified Secure Key (see “
Note: The tape drive remembers only ONE Secure Key: the last one entered (whether
it be from adding, unlocking, changing, or removing a Secure Key).
Figure 3 Tape Security Tab
Using Auto Unlock” on page 8).
Using Secure Keys
When you load a cartridge in the tape drive, the Lock icon on the Tape Security tab shows
you the status of the cartridge (no security, locked, or unlocked).
Use the buttons on the
unlock a protected cartridge.
The Secure Key is case-sensitive and may be any combination of letters, numbers, special
characters, or hex bytes. It must be at least 8 characters/bytes and no more than 32
characters/bytes in length.
When you add a Secure Key, change a Secure Key, or unlock a cartridge, the following
things occur:
• The Secure Key on both the media and the tape drive is reset to the last Secure Key
entered.
• Auto Unlock is reset to ON, regardless of whether it was on or off to begin with.
6 Using Secure Keys
Tape Securi ty tab to add, change, or remove a Secure Key, or to
Page 7

• The Secure Keys used for Auto Unlock and Auto Add Key are reset to the last Secure
Key entered. This could cause problems if you are not careful (see Avoiding Problems
With Automated Settings).
When you remove a Secure Key, the following things occur:
• The Secure Key is removed from both the media and the tape drive.
• The Secure Keys from both Auto Unlock and Auto Add Key are removed.
• The status of both Auto Unlock and Auto Add Key are set to OFF.
Note: To complete removal of the Secure Key from the media, you must unload the
tape cartridge.
Entering the Wrong Secure Key
If you enter the wrong Secure Key when attempting to unlock a cartridge, change a Secure
Key, or remove a Secure Key, you get an error message similar to the one shown in
figure 4
. Click OK and try the operation again.
StorageCare Sage
Figure 4 Secure Key Mismatch
Error
Figure 5 Error After 32 Failed
Attempts
After 32 failed attempts, you get an error message similar to the one shown in figure 5,
and you cannot do anything else. You must unload the cartridge from the drive, then
reload it, in order to continue.
Entering the Wrong Secure Key 7
Page 8

StorageCare Sage Dashboard and StorageCare
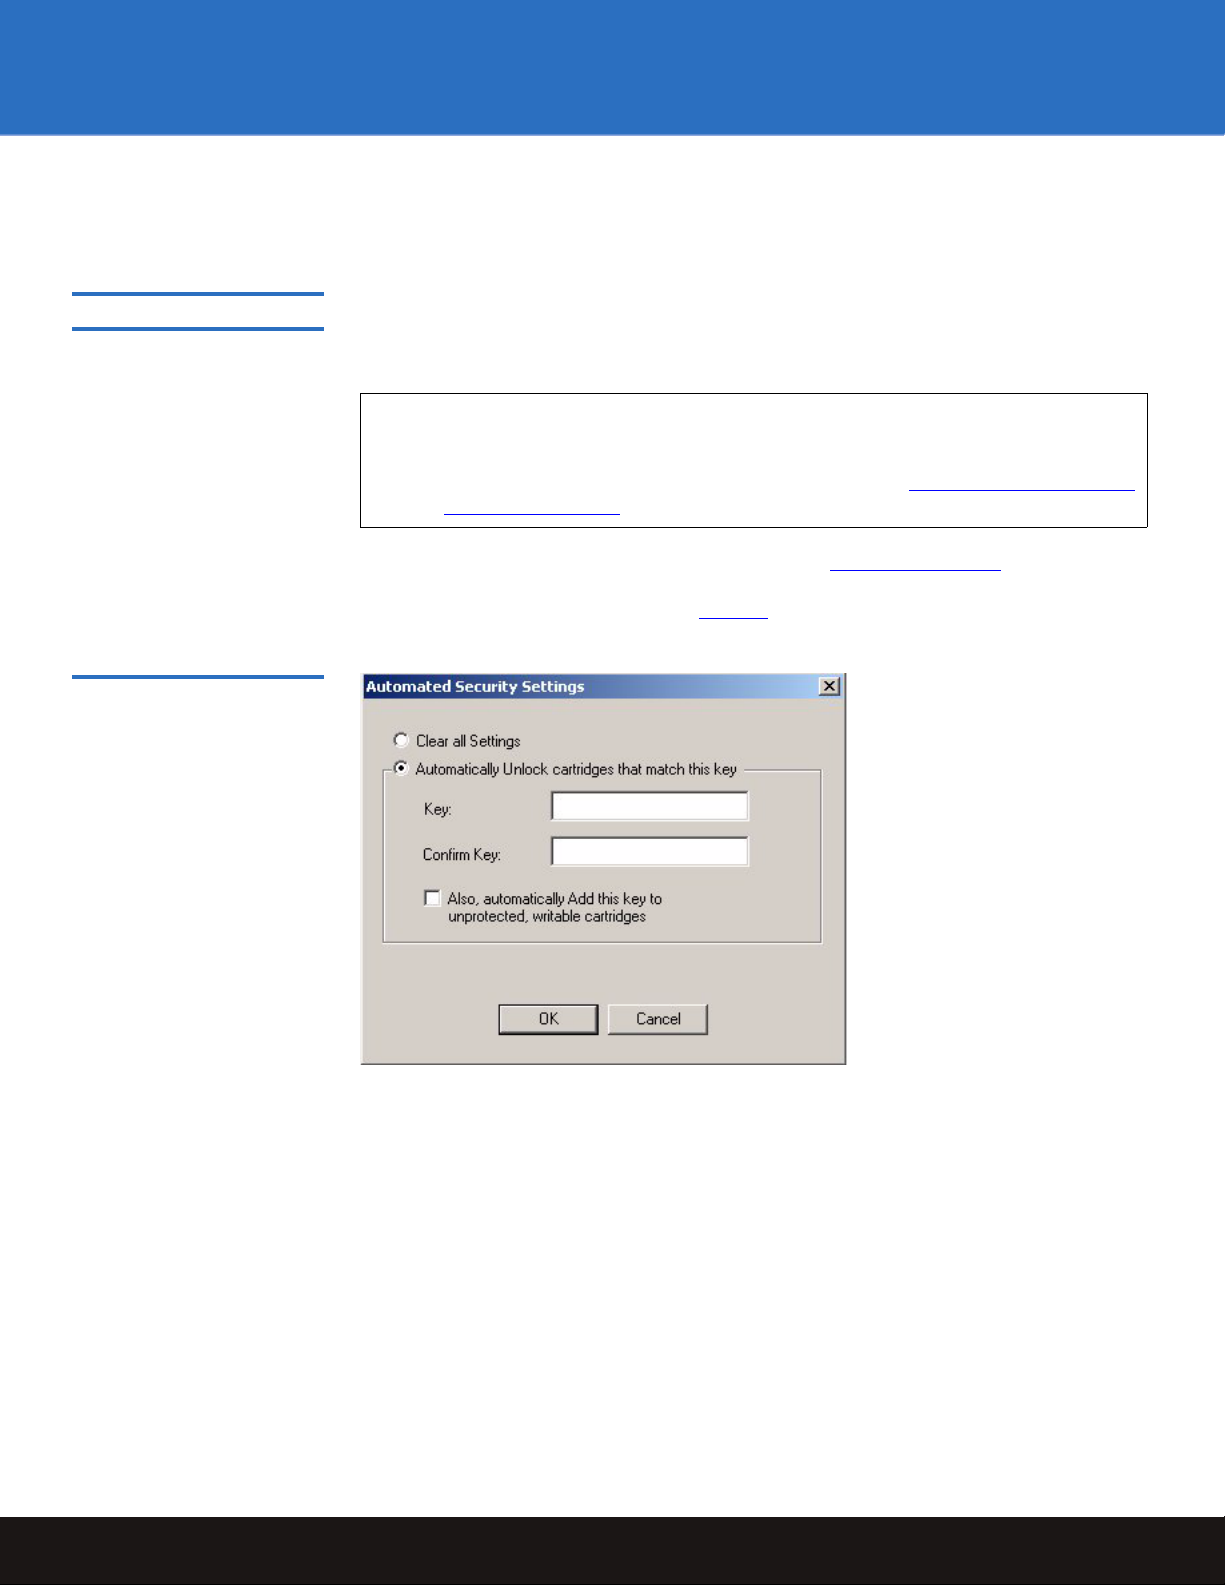
Using Automated Settings
The Automated Security Settings of This Drive section of the Tape Security tab shows you if
the Auto Unlock and Auto Add Key features are on or off, and allows you to clear all
settings and enable Auto Unlock and Auto Add Key. See figure 6
Security Settings
dialog box.
for the Automated
Clearing All Settings 0
Using Auto Unlock 0
This feature turns the Auto Unlock and Auto Add Key features OFF and removes the
Secure Key from the tape drive.
Now, when you insert any cartridge that has a Secure Key, the cartridge will be locked
and you will have to unlock it.
To clear all settings:
1 Unload the tape cartridge.
2 Click the
3 Click
4 Select the
5 Click
Note: Clear All Settings will also occur if you turn off the tape drive, or if the drive
This feature saves you time by automatically unlocking cartridges with a specified Secure
Key. The drive compares the Secure Key of a newly inserted cartridge to the Secure Key
on the drive. If the Secure Key on the cartridge matches the Secure Key on the drive, the
cartridge automatically unlocks and you can read from and write to the media. If the
Secure Keys do not match, you must manually unlock the cartridge.
Refresh button.
Settings.
Clear all settings radio button (see figure 6).
OK.
loses power.
Note: When you add a Secure Key, unlock a cartridge using a Secure Key, or change
a Secure Key, the Auto Unlock feature resets to ON and the newly entered
Secure Key becomes the key saved to the drive and used to compare inserted
cartridges against. This could cause problems if you are not careful (see
Avoiding Problems With Automated Settings
To turn Auto Unlock ON:
6 Unload the tape cartridge.
7 Click the
8 Click
9 Select the
figure 6
10 Enter the Secure Key in the
8 Using Automated Settings
Refresh button.
Settings.
Automatically Unlock cartridges that match this key radio button (see
).
Key field.
).
Page 9
11 Enter the same Secure Key in the Confirm Key field.
StorageCare Sage
Using Auto Add Key 0
Figure 6 Automated Security
Settings Dialog Box
12 Click
OK.
This feature automatically adds a specified Secure Key to any unprotected, writable
cartridges as they are loaded in the drive. This feature can be helpful if you want to
protect a number of cartridges with same Secure Key.
Note: If Auto Add Key is ON, when you add a Secure Key, unlock a cartridge using
a Secure Key, or change a Secure Key, the newly entered Secure Key becomes
the key automatically added to unprotected cartridges inserted in the drive.
This could cause problems if you are not careful (see Avoiding Problems With
Automated Settings).
To turn Auto Add Key ON, follow the procedure for Using Auto Unlock
additional step of selecting the final checkbox that states:
to unprotected, writable cartridges
(see figure 6).
Also, automatically Add this key
, with the
Using Automated Settings 9
Page 10

StorageCare Sage Dashboard and StorageCare
Avoiding Problems With Automated Settings
Because the tape drive can only remember one Secure Key, this means the Secure Key
used for the drive, Auto Unlock, and Auto Add Key always resets to the last Secure Key
entered. This may cause problems in two potential scenarios:
Scenario #1: Different Secure Keys 0
You set the Secure Key for Auto Unlock and Auto Add Key to 11111111. This
automatically unlocks all cartridges protected with Secure Key 11111111, and adds the
Secure Key 11111111 to all unprotected cartridges. Then you load a cartridge that is
protected with Secure Key 22222222.
Example A: Now the cartridge and drive Secure Keys do not match and you must unlock
the cartridge using Secure Key 22222222. Because the tape drive can only remember the
last Secure Key entered, the Secure Key for the drive, Auto Unlock, and Auto Add Key is
reset to 22222222. If you then load an unprotected cartridge, the Auto Add Key feature
will assign Secure Key 22222222 to the cartridge, not 11111111 as you originally intended.
Example B: Continuing on from Example A, if you then load a cartridge with Secure Key
11111111, it will not automatically unlock because the Secure Key is now 22222222 and no
longer matches the Secure Key on the drive.
Solution: Keep track of what Secure Keys are on each cartridge and reset the drive Secure
Key as necessary to make sure you are auto-adding the correct Secure Keys to
unprotected cartridges.
10 Avoiding Problems With Automated Settings
Page 11

StorageCare Sage
Scenario #2: Drive Loses Power 0
Any time the drive is turned off or loses power, both Auto Unlock and Auto Add Key are
reset to OFF and the Secure Keys are cleared from the tape drive. If you intend to
automatically add Secure Keys to all unprotected cartridges, and you don’t realize that
Auto Add Key is OFF, you may end up with unprotected cartridges that you thought
were protected.
Solution: Make sure you note whether Auto Add Key is ON or OFF, and what Secure
Keys are being assigned.
Avoiding Problems With Automated Settings 11
Page 12

StorageCare Sage Dashboard and StorageCare Sage
For assistance contact Quantum Technical Assistance center:
North America +1-800-284-5101
UK, France, and Germany 00800 4 QUANTUM
EMEA +44 1256 848 766
For worldwide support: www.quantum.com/contactsupport
Backup. Recovery. Archive. It’s What We Do.
©2008 Quantum Corporation. All rights reserved. Quantum, the Quantum logo, and all other
logos are registered trademarks of Quantum Corporation or their respective owners.
*81-81639-01 B01*
81-81639-01 B01
Quantum Corp. (NYSE: QTM) is the leading global storage company
specializing in backup, recovery and archive. Combining focused
expertise, customer-driven innovation, and platform independence,
Quantum provides a comprehensive range of disk, tape, media, and
software solutions supported by a world-class sales and service
organization. As a long-standing and trusted partner, the company works
closely with a broad network of resellers, OEMs, and other suppliers to
meet customer’s evolving data protection needs.
81-81639-01 B01 June 2008
 Loading...