

Page 1

Quantum Scalar LTFS
Appliance:
Rail Replacement
To replace the rails in your Scalar Linear Tape File System (LTFS) Appliance, refer
to the following sections:
• Turning Off the Scalar LTFS Appliance on page 1
• Preparing To Remove the Scalar LTFS Appliance on page 2
• Removing the Chassis and Rails From the Rack on page 2
• Replacing the Rails in the Rack on page 3
• Reinstalling the Chassis in the Rack on page 5
• Turning On the Scalar LTFS Appliance on page 7
Turning Off the Scalar LTFS Appliance
Follow these steps to cleanly shut down and power off the Scalar LTFS Scalar
LTFS Appliance:
1 Open an ssh connection to the Scalar LTFS Appliance, and log in as the
service user:
• User: service
• Password: The customer-supplied password.
2 Enter sudo rootsh.
3 Enter the password for the service user account a second time.
4 Enter /sbin/poweroff.
Both the operating system and the system software are gracefully shut
down, and then the system powers off.
© 2013 Quantum Corporation. All rights reserved. Quantum, the Quantum logo, DLT, DLTtape, the DLTtape logo, SuperLoader,
Scalar, DXi, StorageCare, StorNext, GoProtect, and Vision are registered trademarks of Quantum Corporation and its affiliates
in the United States and/or other countries. All other trademarks are the property of their respective owners. Quantum
specifications are subject to change.
6-68096-01 Rev A, December 2013
*6-68096-01 A*
Page 2

Quantum Scalar LTFS Appliance: Rail Replacement
6-68096-01 Rev A
December 2013
Preparing To Remove the Scalar LTFS Appliance
Before removing any part, do the following:
• Obtain the required tools:
• #2 PHILLIPS® screw driver
• Materials for labeling cables
• Request the assistance of another person to help you.
WARNING: Whenever you need to lift the Scalar LTFS Appliance, get others to
assist you. To avoid injury, do not attempt to lift the Scalar LTFS
Appliance by yourself. The Scalar LTFS Appliance weighs 57.54
pounds (26.1 kg). Two people are required to lift the unit
Note: You will be replacing only the damaged rails (chassis rails or rack rails)
and not the entire rackmount.
Removing the Chassis and Rails From the Rack
To remove the Scalar LTFS Appliance chassis from the rack, complete the
following steps:
Note: Before you begin this procedure, be sure you powered down the Scalar
LTFS Appliance (see Turning Off the Scalar LTFS Appliance on page 1).
1 Label the cables so that you can reconnect them to the correct ports.
2 Remove all power, SAS, Ethernet, and Fibre Channel cables from the back of
the Scalar LTFS Appliance.
3 Hold the power button in at least 20 seconds to discharge all of the
condensers before opening the Scalar LTFS Appliance.
4 Remove the PHILLIPS screws that are securing the Scalar LTFS Appliance to
the front of the rack.
5 Press the slide-release lock button on both rails and slide the system from
the rack (see Figure 1).
6 Lift up slightly to remove the Scalar LTFS Appliance out of the rail J-slots and
place it on a flat surface.
2 Preparing To Remove the Scalar LTFS Appliance
Page 3

Figure 1 Pulling the Scalar LTFS
Appliance From the Rack
Chassis
Quantum Scalar LTFS Appliance: Rail Replacement
6-68096-01 Rev A
December 2013
Rack rails
Chassis rail
7 To remove the rails, pull the latch release button on the end piece midpoint
and unseat each rail.
Replacing the Rails in the Rack
To replace the rails in the rack, complete the following steps:
Note: When replacing the rails refer to Figure 2 on page 4 for square holes
and Figure 3 on page 5 for round holes.
1 Position the left and right rail end pieces labeled FRONT facing inward and
orient each end piece to seat in the holes on the front side of the vertical
rack flanges.
2 Align each end piece in the bottom and top holes of the desired U spaces.
3 Engage the back end of the rail until it fully sets on the vertical rack flange
and the latch locks into place.
4 Repeat Step 1 through Step 3 to position and seat the front end piece on
the vertical rack flange.
Replacing the Rails in the Rack 3
Page 4
Quantum Scalar LTFS Appliance: Rail Replacement
6-68096-01 Rev A
December 2013
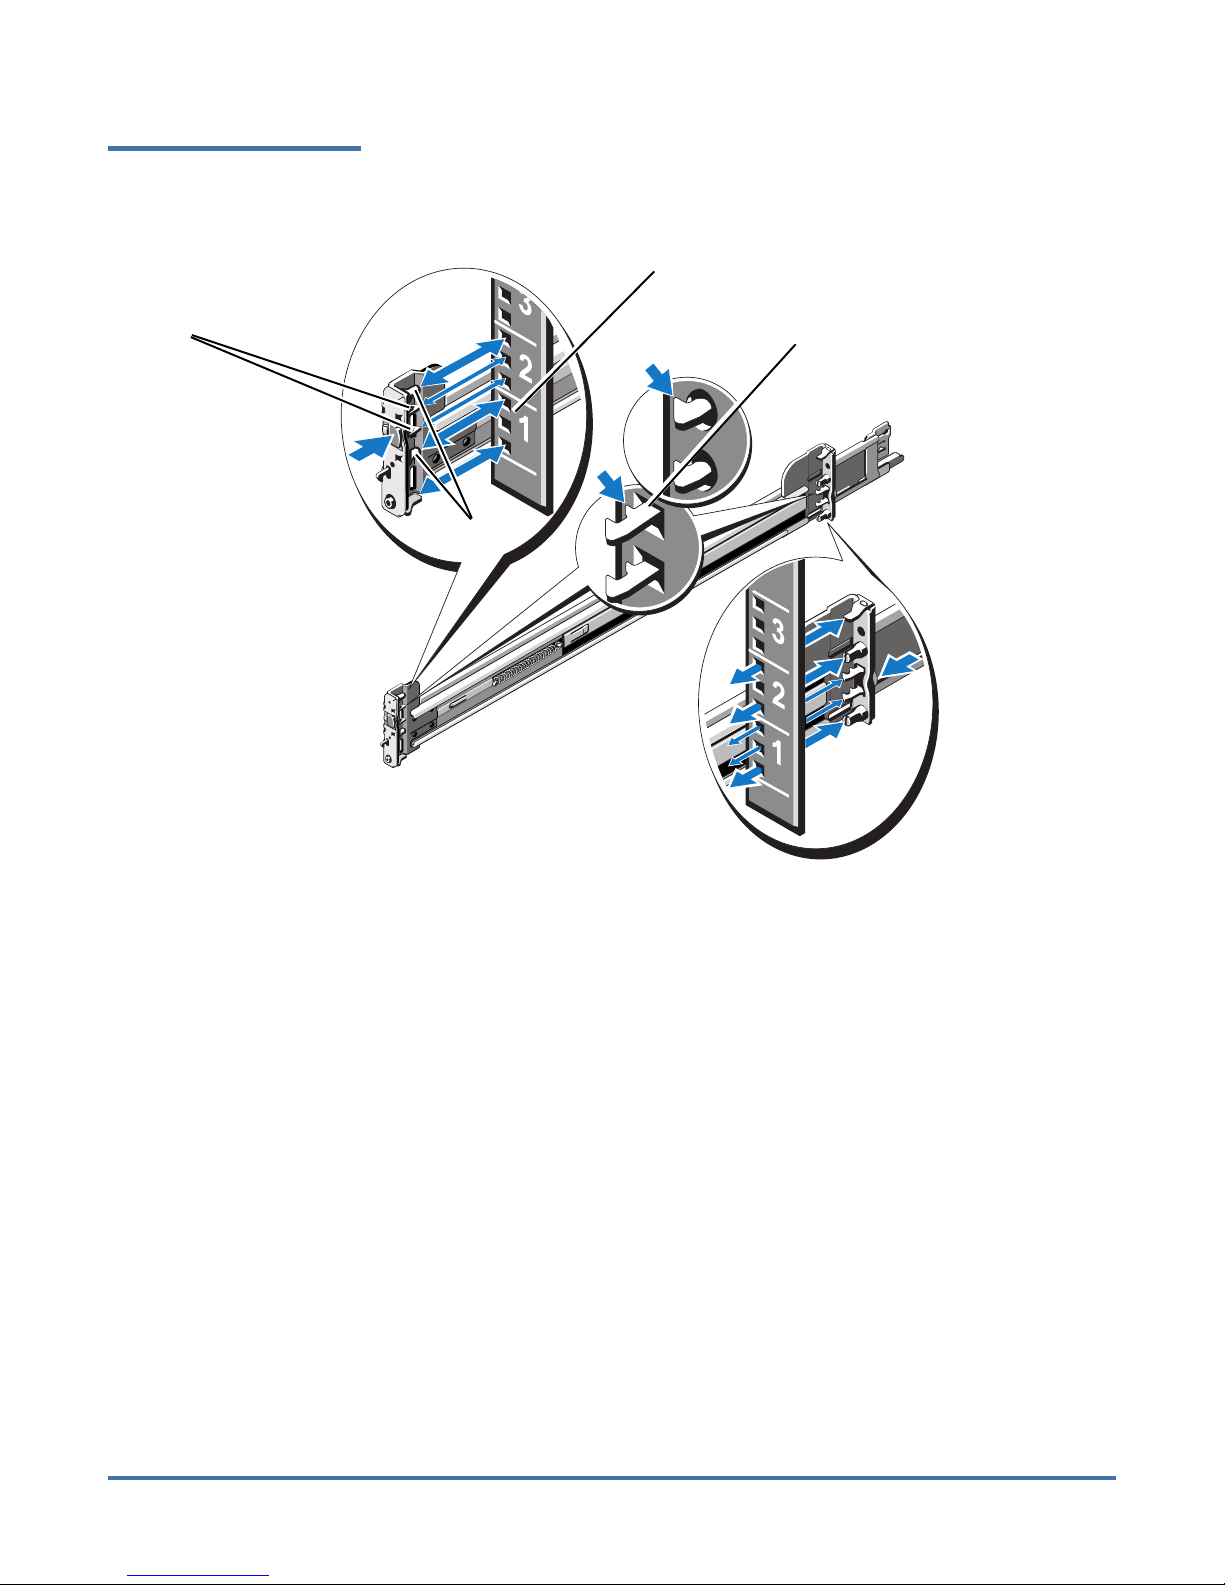
Figure 2 Installing the Tool-less
Rails (Square Holes)
Front side of rack rails
Rail teeth
Second tooth engaged
Back of rack
Release
button
Rail pegs
Release
button
Front of rack
4 Replacing the Rails in the Rack
Page 5
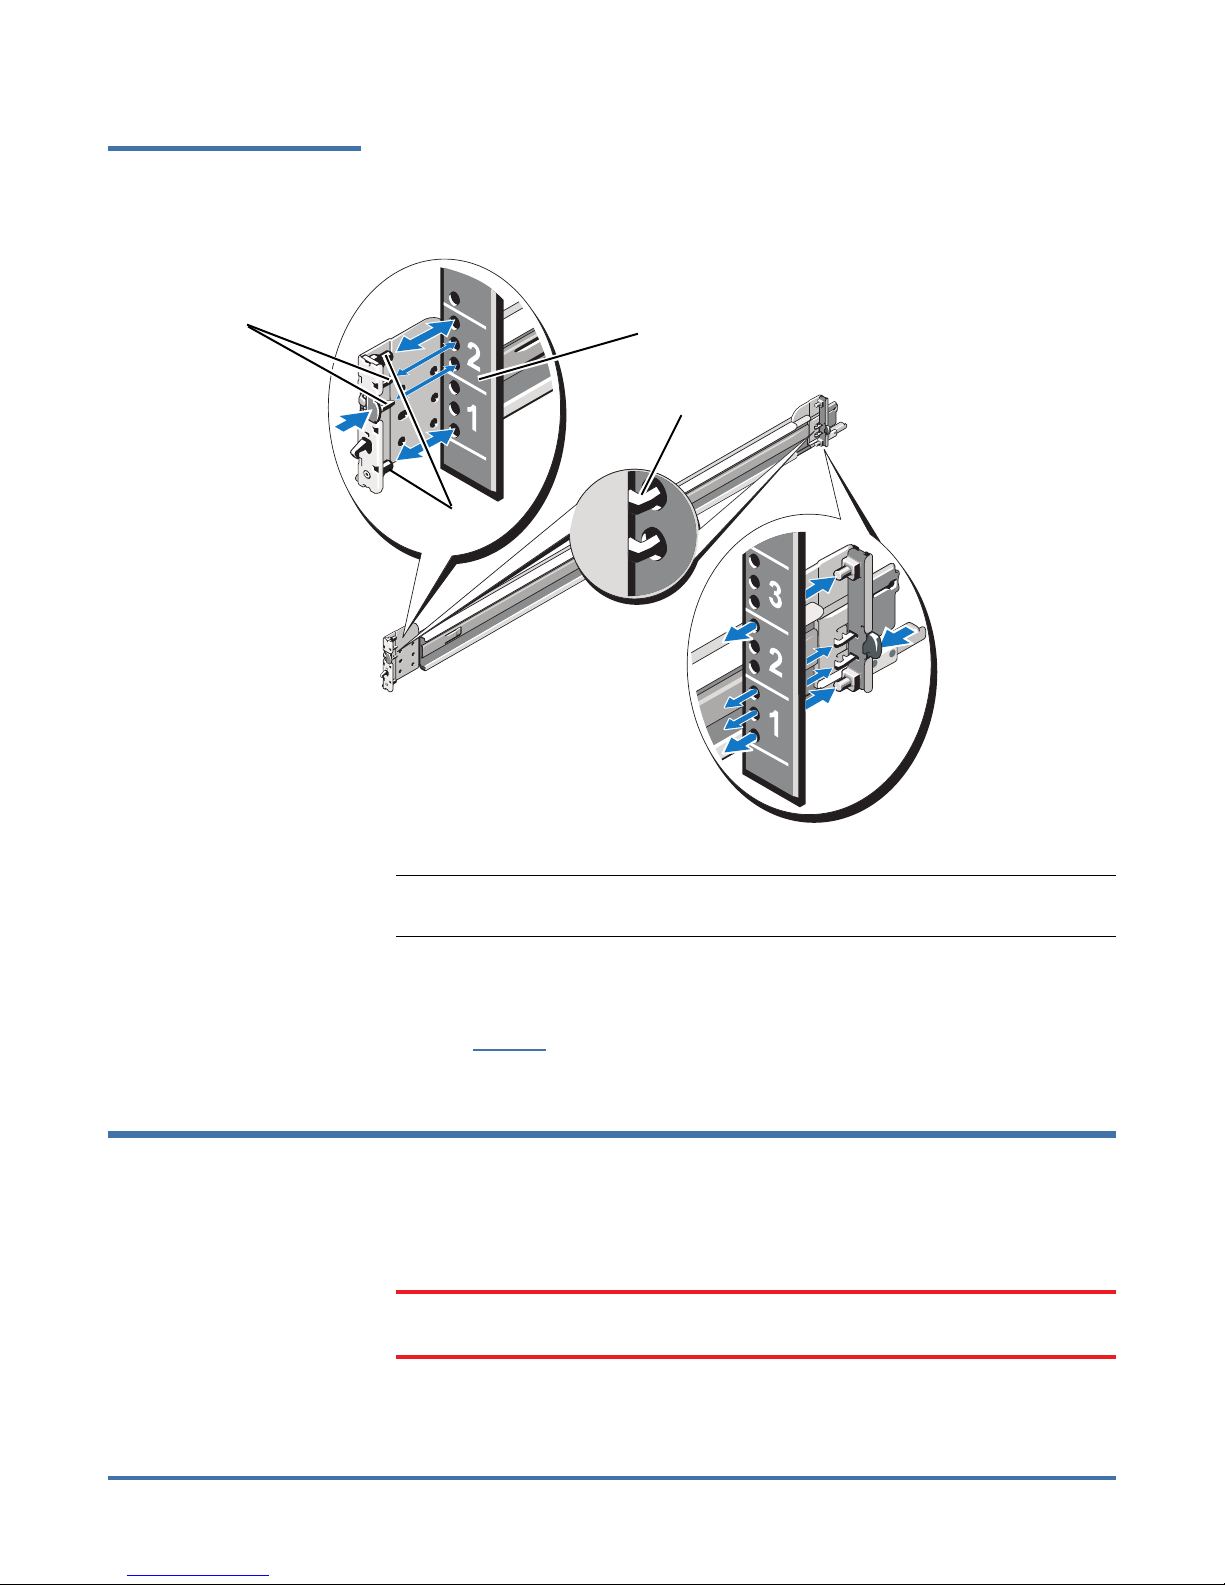
Figure 3 Installing the Tool-less
Rails (Round Holes)
Quantum Scalar LTFS Appliance: Rail Replacement
6-68096-01 Rev A
December 2013
Rail teeth
Release
button
Front of rack
Rail pegs
Front side of rack rails
Second tooth
engaged
Back of
rack
Release
button
Note: When using round hole rails, the Scalar LTFS Appliance may protrude
from the rack by approximately 1/8 inch (0.3175 cm).
5 Place the Scalar LTFS Appliance on a level surface and align the four J-slots
on the chassis rails with the corresponding pins on the system. Slide the
chassis rails towards the back of the system until each one locks into place
(see Figure 4 on page 6)
Reinstalling the Chassis in the Rack
To reinstall the Scalar LTFS Appliance chassis back into the rack, complete the
following steps:
WARNING: Ensure that the system is properly supported until the chassis rails
are locked into the slide rails on both sides.
Reinstalling the Chassis in the Rack 5
Page 6
Quantum Scalar LTFS Appliance: Rail Replacement
6-68096-01 Rev A
December 2013
WARNING: The Scalar LTFS Appliance weighs 37.3 lbs (16.9 KG). Two people
1 Pull the inner slide rails out of the rack until they lock into place.
2 Locate the rear rail standoff on each side of the Scalar LTFS Appliance and
lower them into the rear J-slots on the slide assemblies.
3 Rotate the Scalar LTFS Appliance downward until all the rail standoffs are
seated in the J-slots.
4 Push the Scalar LTFS Appliance inward until the lock levers click into place.
5 Press the slide-release lock button on both rails and slide the system into the
rack.
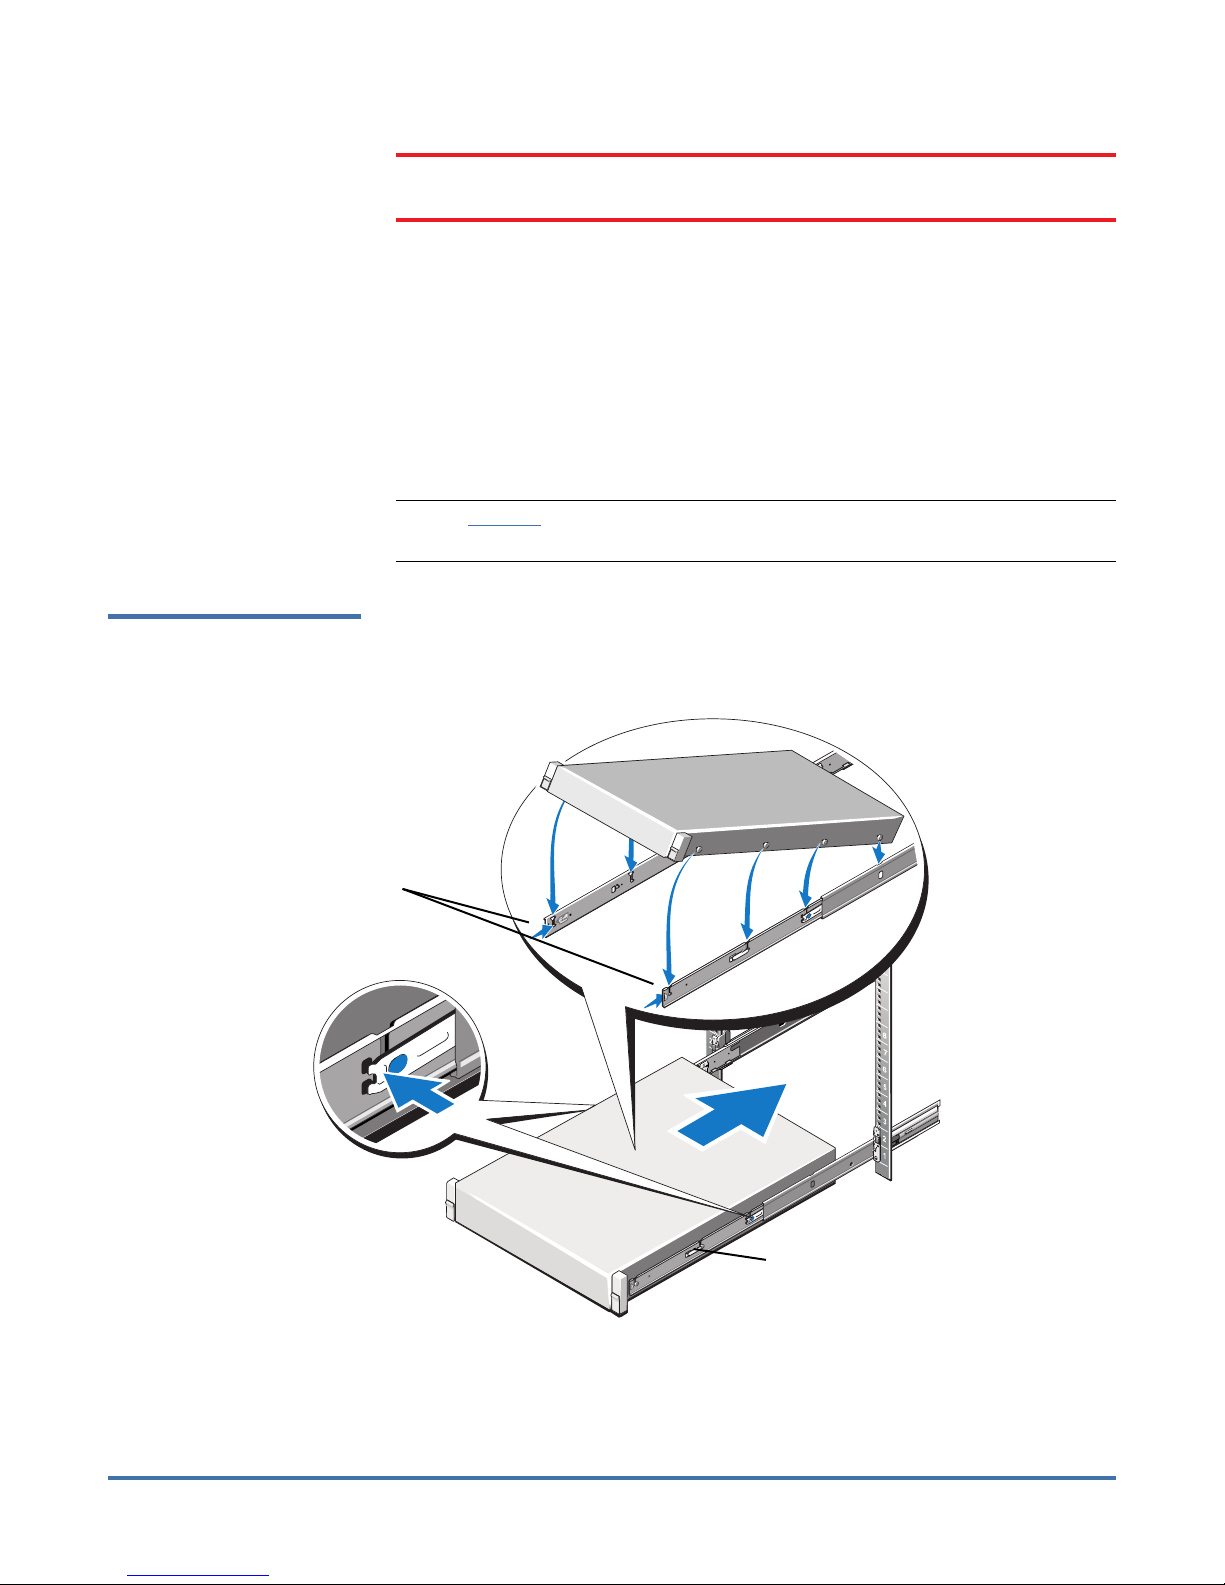
Note: Figure 4 shows nodes with the bezel; however, the bezel is actually
added after the components are installed in the rack.
Figure 4 Installing the Chassis
in a Rack
are required to lift the chassis.
Chassis Rails
Slide Release
Lock button
Back
Front
Server-to-rail latch
6 Insert and tighten the PHILLIPS screws that secure the Scalar LTFS Appliance
6 Reinstalling the Chassis in the Rack
to the front of the rack.
Page 7
Quantum Scalar LTFS Appliance: Rail Replacement
7 Re-attach all power, SAS, Ethernet, and Fibre Channel cables to the back of
the Scalar LTFS Appliance.
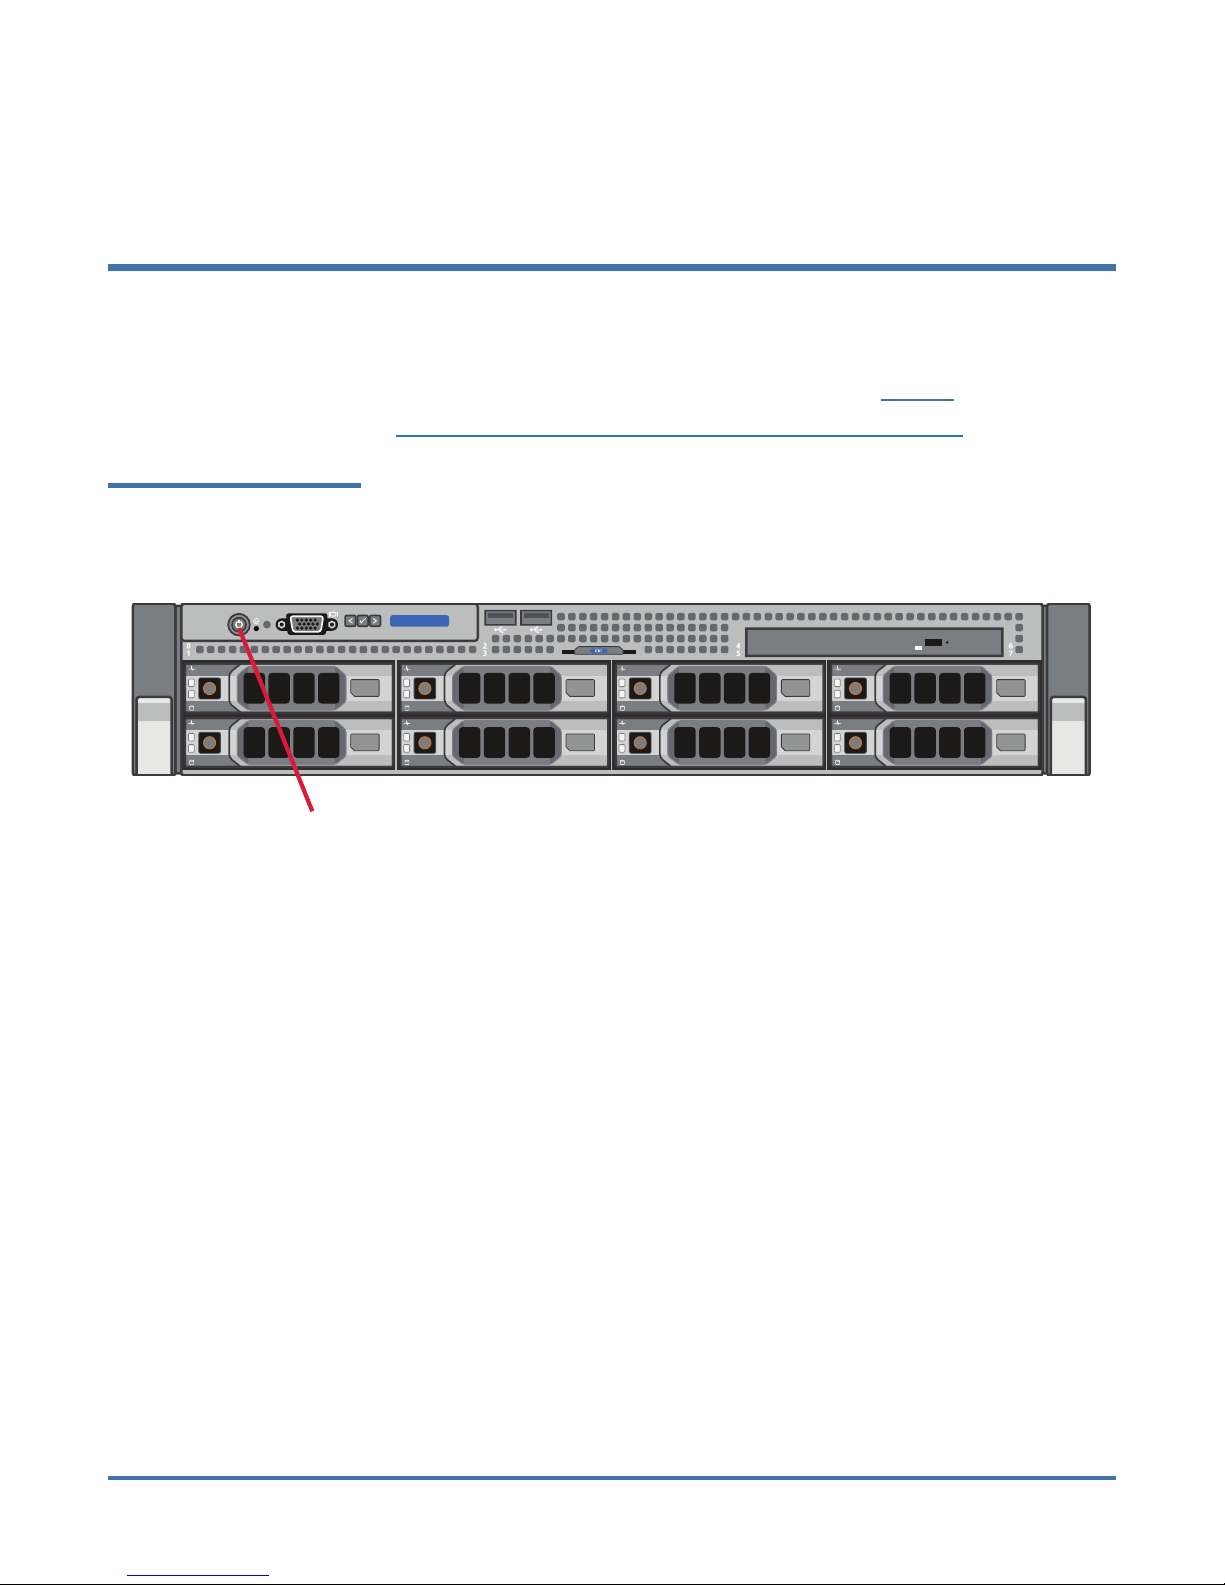
Turning On the Scalar LTFS Appliance
To turn the Scalar LTFS appliance back on: Push once on the power button
located on the front of the Scalar LTFS Appliance (see Figure 5).
Reviewers: Are there any other steps to powering on the LTFS?
Figure 5 Scalar LTFS Scalar LTFS
Appliance Power Button
6-68096-01 Rev A
December 2013
Power Button
Turning On the Scalar LTFS Appliance 7
Page 8

Quantum Scalar LTFS Appliance: Rail Replacement
6-68096-01 Rev A
December 2013
8 Turning On the Scalar LTFS Appliance
 Loading...