

Page 1

Scalar i40 and Scalar i80:
Tape Drive Installation
Quantum recommends that you install tape drives with the library power on. It
is faster and keeps all non-affected drives and partitions active. To do this,
carefully follow the instructions below, to prevent data loss or damage to the
®
Scalar
i40 or Scalar i80 library.
The tape drive always resides in a drive sled, a
one unit. If you order a new or replacement tape drive, it will already be
installed in a sled.
Caution: Do not remove the tape drive from the drive sled.
Note: For multiple tape drive installs in which you are changing control paths,
install and verify the tape drives one at a time, rather than all at once.
To install a tape drive in the library, refer to the following sections:
•
Taking ESD Precautions on page 1
•
Installing a Tape Drive on page 2
•
Replacing a Tape Drive with a Filler Plate on page 4
Taking ESD Precautions
To avoid damaging static-sensitive parts while performing this procedure,
observe the following precautions:
nd together they are effectively
• Use an antistatic wrist strap. If you do not have one, touch the outside of
the library on
discharge
© 2014 Quantum Corporation. All rights reserved. Quantum, the Quantum logo, DLT, DLTtape, the DLTtape logo, SuperLoader,
Scalar, DXi, StorageCare, StorNext, GoProtect, and Vision are registered trademarks of Quantum Corporation and its affiliates
in the United States and/or other countries. All other trademarks are the property of their respective owners. Quantum
specifications are subject to change.
6-68139-01 Rev A, September 2014
the sheet metal before touching any components,
static from your body.
*6-68139-01*
to
Page 2
Quantum Scalar i40/i80: Tape Drive Installation
Scalar i40 Scalar i80
6-68139-01 Rev A
September 2014
• Keep static-sensitive parts in their original shipping containers until ready
fo
r installation. Look for the ESD sticker to identify static-sensitive parts.
• Avoid touching connectors and other components.
Note: Dry climates and cold-weather heating environments have lower
relative humidity and are more likely to produce static electricity.
Installing a Tape Drive
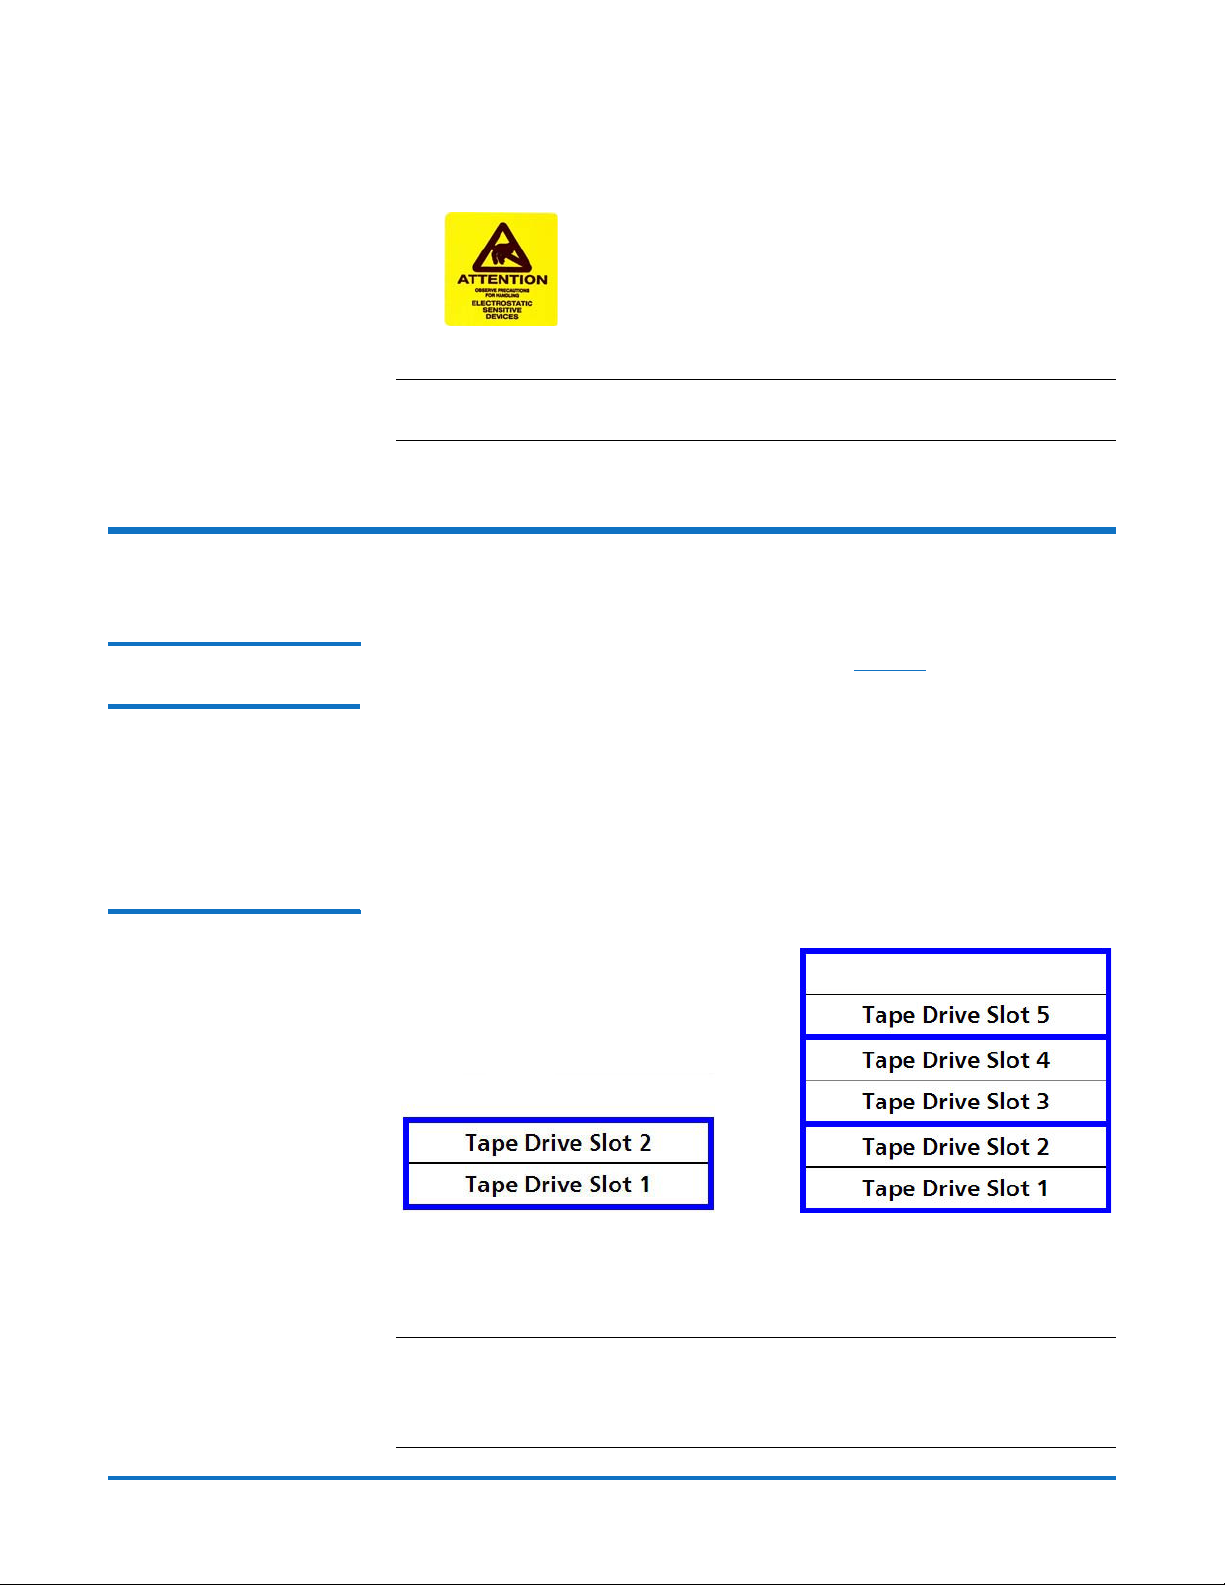
Tape Drive Slot Location Considerations
Figure 1 Acceptable
Installation Locations for FullHeight Tape Drives
Tape drives can only fit in certain slots, as shown in Figure 1. Slots are numbered
starting from the bottom and moving up.
• Scalar i40: Half-height tape drives can be installed in slots 1 and 2. A fullhe
ight tape drive can be installed in slot 1.
• Scalar i80: Half-height tape drives can be installed in slots 1, 2, 3, 4, and 5.
F
ull-height tape drives can be installed in slots 1, 3, and 5. The extra
whe
re slot 6 would be cannot hold a half-height tape drive, but will
accommodate a full-height tape drive installed in slot 5.
space
If possible, it is recommended to start installing the tape drives at the bottom
slot and work up, without leaving spaces between.
Note: If you need to remove one or more filler plates, unscrew the two
2 Installing a Tape Drive
thumbscrews securing the filler plate to the back of the library. Holding
the thumbscrews, pull the filler plate gently out of the library. Save the
filler plate in case you need to use it in the future.
Page 3

Figure 2 Installing a Tape Drive
Notch in
library
chassis
Drive sled “shelf”
slides in notch
Thumbscrews
Quantum Scalar i40/i80: Tape Drive Installation
6-68139-01 Rev A
September 2014
1 Insert the tape drive into the empty drive slot.
The “shelf” on the bottom of the drive sled fits into the notch in the library
chassis and slides on the plastic guide rails (see Figure
must be level to slide in smoothly. When the tape
2). The tape drive
drive is correctly inserted,
you will feel a slight “click” as the tape drive sled connector connects into its
mating connector in the library chassis.
2 Tighten the tape drive’s captive thumbscrews finger tight to secure the tape
drive to the library chassis.
The tape drive LED illuminates red for up to 30 seconds. Then the tape drive
fan starts and the LE
3 Connect the tape drive cable from the tape drive to
If the firmware on the newly installed tape drive is different fr
D turns amber, indicating that the tape drive is offline.
the host.
om the
standard configured on the library, the library will automatically autolevel
the new tape drive’s firmware upon installation. (See the
Scalar i80 User’s Guide
for details about tape drive firmware autoleveling).
Scalar i40 and
Autoleveling takes about 7 minutes. A message appears on the Operator
panel, indicating
that autoleveling is taking place.
If autoleveling is not required, the tape drive takes about 2 minutes to reach
a ready state.
4 If
needed, add the new tape drive to an existing partition or create a new
partition for it.
a F
rom the Web client, select Setup > Partitions.
b Com
plete the necessary screens.
Installing a Tape Drive 3
Page 4

Quantum Scalar i40/i80: Tape Drive Installation
6-68139-01 Rev A
September 2014
5 Bring the tape drive online, if it is not online already.
a F
rom the Operator panel, select Actions > Tape Drive and select
Change Mode.
b Sele
c Use the Up but
The tape drive LED turns green.
6 V
erify the installation by reviewing the Library Configuration report:
a F
b Make
erify that the host computer and backup applications can see the new tape
7 V
drive configuration correctly.
8 If
Replacing a Tape Drive with a Filler Plate on page 4).
Caution: Filler plates are required to maintain proper library cooling. Do
9 Run the tape drive diagnostic test on the newly installed tape drive to be
sure it is functioning correctly:
a Ins
b If
ct the tape drive you want to bring online and press Modify.
ton to change the mode to Online, then press Apply.
rom the Web client Reports > Library Configuration.
sure that the new drive is online, in the correct partition, and has
the control path status that you want. You may need to refresh your
Internet browser.
any empty slots remain, install a filler plate in the empty slot (see
not run the library with uncovered slots.
tall a scratch tape in the top I/E station slot.
manual cartridge assignment is enabled, assign the scratch tape to
the System partition.
c F
rom the Operator panel, select Tools > Diagnostics.
d Co
ntinue through the next few screens to run the tape drive test on the
replaced tape drive.
If a problem is found during testing, you receive a diagnostic ticket. See the
Scalar i40 and Scalar i80 User’s Guide
drive test.
for more information about the tape
Replacing a Tape Drive with a Filler Plate
The filler plate is half-height in size. If you remove a full-height tape drive, you
must install two filler plates to cover the opening.
1 The tape drive filler plate has no “top” or “botto
either way (see Figure
2 Slide
the filler plate into the slot, and tighten the thumbscrews.
3 on page 5).
m” orientation – it can go in
4 Replacing a Tape Drive with a Filler Plate
Page 5

Figure 3 Tape Drive Filler Plate
Tape Drive Filler
Plate
Captive thumbscrews
Quantum Scalar i40/i80: Tape Drive Installation
6-68139-01 Rev A
September 2014
Replacing a Tape Drive with a Filler Plate 5
Page 6

Quantum Scalar i40/i80: Tape Drive Installation
6-68139-01 Rev A
September 2014
6 Replacing a Tape Drive with a Filler Plate
 Loading...