


 Loading...
TS-x31P3
TS-231P3
TS-431P3
User Guide
Document Version: 1 13/05/2020
TS-x31P3 User Guide
Contents |
|
1. Preface |
|
About This Guide.......................................................................................................................................... |
3 |
Audience....................................................................................................................................................... |
3 |
Document Conventions................................................................................................................................ |
3 |
2. Product Overview |
|
About the TS-x31P3..................................................................................................................................... |
4 |
Hardware Specifications............................................................................................................................... |
4 |
Package Contents........................................................................................................................................ |
6 |
Components................................................................................................................................................. |
6 |
Front Panel............................................................................................................................................... |
6 |
Rear Panel................................................................................................................................................ |
7 |
System Board........................................................................................................................................... |
8 |
Drive Numbering....................................................................................................................................... |
8 |
Safety Information......................................................................................................................................... |
9 |
Installation Requirements........................................................................................................................... |
10 |
Setting Up the NAS..................................................................................................................................... |
10 |
3. Installation and Configuration |
|
Hardware Installation.................................................................................................................................. |
12 |
Installing Drives...................................................................................................................................... |
12 |
Replacing Memory Modules................................................................................................................... |
16 |
QTS Installation.......................................................................................................................................... |
26 |
Installing QTS Using Qfinder Pro........................................................................................................... |
26 |
Installing QTS Using the Cloud Key....................................................................................................... |
27 |
4. Basic Operations |
|
Power Button.............................................................................................................................................. |
30 |
Reset Button............................................................................................................................................... |
30 |
USB One Touch Copy Button..................................................................................................................... |
31 |
LEDs........................................................................................................................................................... |
31 |
Audio Alert.................................................................................................................................................. |
34 |
5. Troubleshooting |
|
Forcing Qfinder Pro or myQNAPcloud to Locate the NAS......................................................................... |
35 |
Hot-swapping Failed Drives........................................................................................................................ |
35 |
Recovering Unintentionally Removed Healthy Drives................................................................................ |
36 |
Support and Other Resources.................................................................................................................... |
36 |
6. Glossary |
|
CloudKey.................................................................................................................................................... |
37 |
myQNAPcloud Link..................................................................................................................................... |
37 |
myQNAPcloud............................................................................................................................................ |
37 |
myQNAPcloud ID........................................................................................................................................ |
37 |
Qfinder Pro................................................................................................................................................. |
37 |
QTS............................................................................................................................................................. |
37 |
7. Notices |
|
Limited Warranty......................................................................................................................................... |
38 |
Disclaimer................................................................................................................................................... |
38 |
1
GNU Public License.................................................................................................................................... |
38 |
FCC Notice................................................................................................................................................. |
46 |
CE Notice.................................................................................................................................................... |
46 |
SJ/T 11364-2006......................................................................................................................................... |
47 |
2

TS-x31P3 User Guide
1. Preface
About This Guide
This guide provides information on the QNAP TS-x31P3 NAS and step-by-step instructions on installing the hardware. It also provides instructions on basic operations and troubleshooting information.
Audience
This document is intended for consumers and storage administrators. This guide assumes that the user has a basic understanding of storage and backup concepts.
Document Conventions
Symbol |
Description |
|
Notes provide default configuration settings and other supplementary |
|
information. |
|
|
|
Important notes provide information on required configuration settings and other |
|
critical information. |
|
|
|
Tips provide recommendations or alternative methods of performing tasks or |
|
configuring settings. |
|
|
|
Warnings provide information that, when ignored, may result in potential loss, |
|
injury, or even death. |
|
|
Preface 3

TS-x31P3 User Guide
2. Product Overview
This chapter provides basic information about the QNAP TS-x31P3 NAS.
About the TS-x31P3
The TS-x31P3 is a user-friendly NAS designed for synchronization and remote access. The NAS is powered by an Annapurna Labs Alpine AL-314 dual-core processor and DDR3L RAM. Available in either 2-drive bay or 4-drive bay models, the TS-x31P3 supports SATA 6 Gbps and also backward compatible with SATA 3 Gbps. The TS-x31P3 includes 3 USB 3.2 Gen 1 ports and two gigabit LAN ports.
Hardware Specifications
Ordering P/N |
Drive bays |
Memory |
Power supply |
TS-231P3-2G |
2 |
2 GB |
Single |
|
|
|
|
TS-231P3-4G |
2 |
4 GB |
Single |
|
|
|
|
TS-431P3-2G |
4 |
2 GB |
Single |
|
|
|
|
TS-431P3-4G |
4 |
4 GB |
Single |
|
|
|
|
Component |
TS-231P3-2G |
TS-431P3-2G |
|
TS-231P3-4G |
TS-431P3-4G |
Processor |
|
|
|
|
|
CPU |
Annapurna Labs AL-314 |
|
|
|
|
Frequency |
Dual-core 1.7 GHz |
|
|
|
|
Architecture |
ARM 32-bit |
|
|
|
|
Encryption engine |
AES-256 |
|
|
|
|
Memory |
|
|
|
|
|
Pre-installed memory |
• 2 GB RAM: 1 x 2 GB DDR3 |
• 2 GB RAM: 1 x 2 GB DDR3 |
|
• 4 GB RAM: 1 x 4 GB DDR3 |
• 4 GB RAM: 1 x 4 GB DDR3 |
|
|
|
Memory slots |
1 x SODIMM DDR3L |
|
|
|
Important |
|
|
|
|
• |
Use only QNAP memory modules to maintain |
|
|
|
|
system performance and stability. For NAS devices |
|
|
|
|
with more than one memory slot, use QNAP |
|
|
|
|
modules with identical specifications. |
|
|
|
• |
Using unsupported modules may degrade |
|
|
|
|
performance, cause errors, or prevent the |
|
|
|
|
operating system from starting. |
|
|
|
|
||
Maximum memory |
8 GB RAM: 1 x 8 GB |
|
||
|
|
|
||
Flash memory |
512 MB (dual-boot OS protection) |
|
||
|
|
|
|
|
Storage |
|
|
|
|
|
|
|
||
Drive bays |
2 x 3.5-inch SATA 6 Gpbs |
4 x 3.5-inch SATA 6 Gbps |
||
|
|
|
|
|
|
|
Note |
|
|
|
|
|
||
|
|
The SATA 6 Gbps is backward compatible with the |
||
|
|
SATA 3 Gbps. |
|
|
|
|
|
|
|
Product Overview 4

TS-x31P3 User Guide
Component |
|
|
TS-231P3-2G |
|
TS-431P3-2G |
|
|
|
TS-231P3-4G |
|
TS-431P3-4G |
Drive compatibility |
3.5-inch bays: |
|
|||
|
• |
3.5-inch SATA hard disk drives |
|
||
|
• |
2.5-inch SATA hard disk drives |
|
||
|
• |
2.5-inch SATA solid-state drives |
|
||
|
|
|
Tip |
|
|
|
|
|
|
||
|
|
|
For the list of compatible drive models, go to https:// |
||
|
|
|
www.qnap.com/compatibility. |
||
|
|
|
|||
SSD cache acceleration support |
3.5-inch drive bays: 1 to 2 |
|
3.5-inch drive bays: 1 to 4 |
||
|
|
|
|
||
Hot-swapping |
Supported |
|
|||
|
|
|
|
|
|
Network |
|
|
|
|
|
|
|
|
|||
Gigabit Ethernet ports |
1 x GbE RJ45 |
|
|||
|
|
|
|||
2.5 Gigabit Ethernet ports |
1 x 2.5 GbE RJ45 |
|
|||
|
|
|
|
|
|
External I/O Ports & Expansion Slots |
|
|
|
|
|
|
|
|
|||
USB ports |
Front: 1 x USB 3.0 Type-A |
|
|||
|
|
|
Note |
|
|
|
|
|
|
||
|
|
|
This USB port supports One Touch Copy. |
||
|
|
|
|
|
|
|
Rear: 2 x USB 3.0 Type-A |
|
|||
|
|
|
|
|
|
Interface |
|
|
|
|
|
|
|
|
|
||
Buttons |
• |
Power |
|
||
|
• |
Reset |
|
||
|
• USB One Touch Copy |
|
|||
|
|
|
|
|
|
Dimensions |
|
|
|
|
|
|
|
|
|||
Form factor |
Tower |
|
|||
|
|
|
|||
Dimensions (H x W x D) |
161 x 102 x 219 mm |
|
161 x 160 x 219 mm |
||
|
(6.34 x 4.01 x 8.62 in) |
|
(6.34 x 6.30 x 8.62 in) |
||
Net weight |
1.35 kg (2.98 lbs) |
|
3 kg (6.61 lbs) |
||
|
|
|
|
|
|
Others |
|
|
|
|
|
|
|
|
|||
Power supply unit |
90W, 100-240V AC, 50/60 Hz |
|
|||
|
|
||||
System battery |
CR2032 lithium battery (3V, 225 mAh) |
||||
|
|
|
|||
Sound level |
19.2 db(A) |
|
19.5 db(A) |
||
|
|
|
|
|
|
|
|
|
Note |
|
|
|
|
|
|
||
|
|
|
The sound level was tested at a bystander position, |
||
|
|
|
which is within one meter of the NAS. The test NAS |
||
|
|
|
operated at low speed with the maximum number of |
||
|
|
|
drives installed. |
|
|
|
|
|
|||
Fans |
System: 1 x 120 mm, 12V DC fan |
|
|||
|
|
|
|||
Operating temperature |
0˚C to 40˚C (32˚F to 104˚F) |
|
|||
|
|
|
|
|
|
Product Overview 5
TS-x31P3 User Guide
Component |
|
TS-231P3-2G |
|
TS-431P3-2G |
|
|
TS-231P3-4G |
|
TS-431P3-4G |
Relative humidity |
• |
Non-condensing relative humidity: 5% to 95% |
||
|
• |
Wet-bulb temperature: 27˚C (80.6˚F) |
|
|
|
|
|
||
Security slot |
Kensington security slot |
|
||
|
|
|
|
|
Tip
Model specifications are subject to change without prior notice. To see the latest specifications, go to https://www.qnap.com.
Package Contents
Item |
|
Quantity |
TS-x31P3 |
1 |
|
|
|
|
AC power adapter |
1 |
|
|
|
|
Power cord |
1 |
|
|
|
|
Ethernet cables |
2 x Cat5e |
|
|
|
|
Drive tray keys |
2 |
|
|
|
|
Screws for 3.5-inch drives |
• |
TS-231P3: 8 |
|
• |
TS-431P3: 16 |
|
|
|
Screws for 2.5-inch drives |
• |
TS-231P3: 6 |
|
• |
TS-431P3: 12 |
|
|
|
Quick Installation Guide (QIG) |
1 |
|
|
|
|
Components
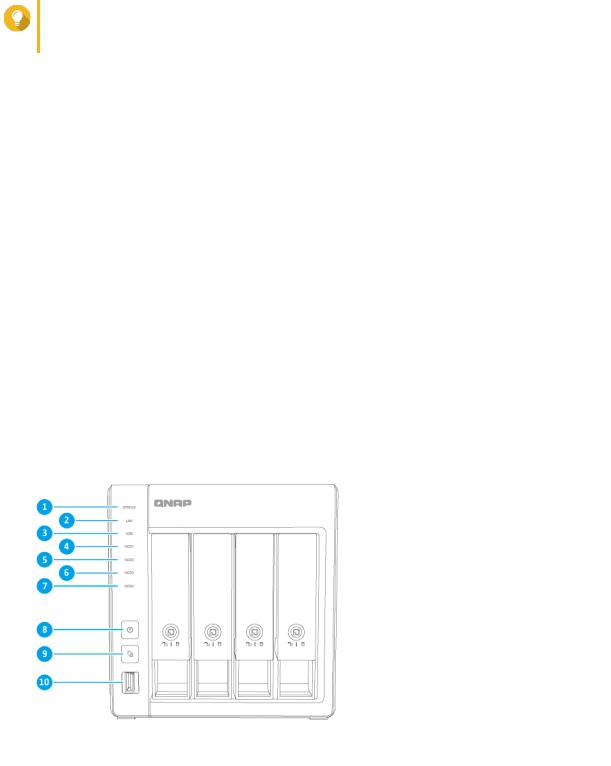
Front Panel
Product Overview 6
TS-x31P3 User Guide
No. |
|
Component |
No. |
Component |
1 |
Status LED |
|
6 |
Drive 3 LED |
|
|
|
|
|
2 |
LAN LED |
|
7 |
Drive 4 LED |
|
|
|
|
|
3 |
USB LED |
|
8 |
Power button |
|
|
|
|
|
4 |
Drive 1 LED |
|
9 |
USB One Touch Copy button |
|
|
|
|
|
5 |
Drive 2 LED |
|
10 |
USB 3.0 One Touch Copy Type-A port |
|
|
|
|
|
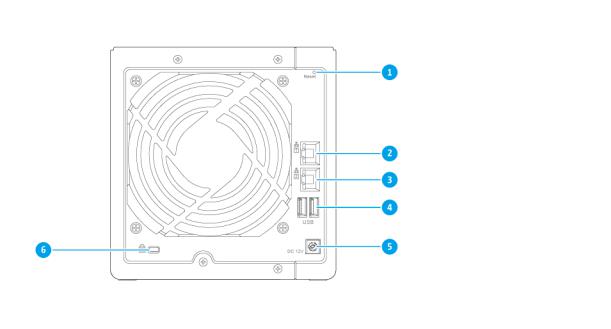
Rear Panel
No. |
Component |
No. |
Component |
1 |
Reset button |
4 |
USB 3.0 Type-A ports |
|
|
|
|
2 |
2.5 Gigabit Ethernet port |
5 |
Power input |
|
|
|
|
3 |
Gigabit Ethernet port |
6 |
Kensington security slot |
|
|
|
|
Product Overview 7
TS-x31P3 User Guide
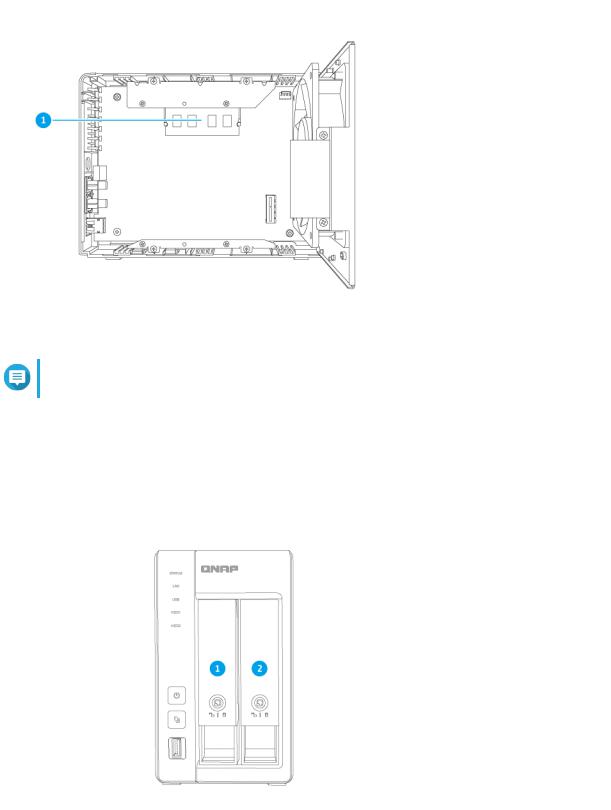
System Board
TS-431P3
Note
The image does not include the chassis.
No. |
|
Component |
No. |
Component |
1 |
Memory slot |
|
- |
- |
|
|
|
|
|
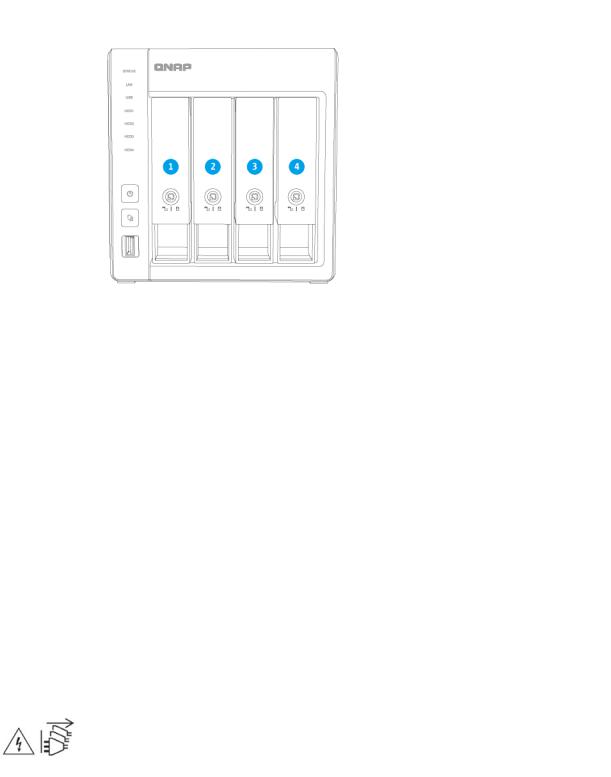
Drive Numbering
TS-231P3
Product Overview 8
TS-x31P3 User Guide
TS-431P3
Safety Information
The following instructions help ensure personal safety and environmental safety. Read these instructions carefully before performing any operations.
General Instructions
•The NAS should be stored in a secure location with restricted access, controlled through the use of a tool, lock and key, or any means of security.
•Only qualified, skilled, and authorized persons with knowledge of all restrictions, safety precautions, and installation and maintenance procedures should have physical access to the NAS.
•To avoid potential injury or damage to components, ensure that the drives and other internal system components have cooled before touching them.
•Observe electrostatic discharge (ESD) procedures to avoid potential injury or damage to components.
Power
•To reduce the risk of fire or electric shock, ensure that you only connect the power cord to a properly grounded electrical outlet.
•
The device may have one or more power supply unit (PSU) cords. To avoid serious injuries, a trained service technician must disconnect all PSU cords before installing or replacing system components.
System Battery
•To avoid potential battery explosion, causing injury or damage to components, ensure that you replace the existing battery with a battery of the same type.
Product Overview 9
TS-x31P3 User Guide
•Dispose of used batteries properly according to local regulations or the instructions of the battery manufacturer.
Moving Parts
•
Moving fan blades: Keep your body parts away from moving fan blades while the device is connected to a power source.
•
Moving components: Keep your body parts away from other moving components.
Installation Requirements
Category |
|
|
Item |
Environment |
• |
Room temperature: 0˚C to 40˚C (32˚F to 104˚F) |
|
|
• |
Non-condensing relative humidity: 5% to 95% |
|
|
• |
Wet-bulb temperature: 27˚C (80.6˚F) |
|
|
• |
Flat, anti-static surface without exposure to |
|
|
|
direct sunlight, liquids, or chemicals |
|
|
• |
Free from objects that may obstruct NAS |
|
|
|
ventilation or apply pressure to the NAS or |
|
|
|
power cord |
|
Hardware and peripherals |
• |
Storage drives |
|
|
|
|
Tip |
|
|
|
|
|
|
|
For the list of compatible expansion |
|
|
|
cards, go to https://www.qnap.com/ |
|
|
|
compatibility. |
|
• |
Network cable |
|
|
|
|
|
Tools |
• |
Phillips #1 or #2 screwdriver |
|
|
• |
Anti-static wrist strap |
|
|
|
|
|
Setting Up the NAS
Important
Read all safety requirements and information in Safety Information carefully before setting up the NAS or installing NAS components.
1.Place your NAS device in an environment that meets the requirements. For details, see Installation Requirements
2.Install the drives.
Product Overview 10
TS-x31P3 User Guide
For details, see the following:
•Installing 3.5-inch Hard Drives on 3.5-inch Trays
•Installing 2.5-inch Hard Drives or Solid-State Drives on 3.5-inch Trays
3.Connect the power cord and all applicable cables.
4.Power on the NAS.
5.Install QTS.
For details, see QTS Installation
6.Log on to QTS.
Product Overview 11

TS-x31P3 User Guide
3. Installation and Configuration
This chapter provides specific hardware and firmware installation and configuration steps.
Hardware Installation
This section provides information on installing drives, memory modules, and expansion cards.
Installing Drives
The TS-x31P3 is compatible with 3.5-inch hard drives, 2.5-inch hard drives, and solid-state drives. All drive bays support SSD cache acceleration.
Installing 3.5-inch Hard Drives on 3.5-inch Trays
Warning
•Installing a drive deletes all data on the drive.
•Observe electrostatic discharge (ESD) procedures to avoid damage to components.
Moving fan blades: Keep your hands and other body parts away from moving fan blades.
•
Other moving components: Keep your hands and other body parts away from other moving components.
1.Power off the NAS.
2.Remove the drive tray.
a.Pull the handle to release the tray.
b.Pull the tray out.
Installation and Configuration 12

TS-x31P3 User Guide
3.Install a drive on the tray.
a.Place the drive on the tray so that the holes on the sides of the drive are aligned with the holes on the sides of the tray.
b.Attach the screws.
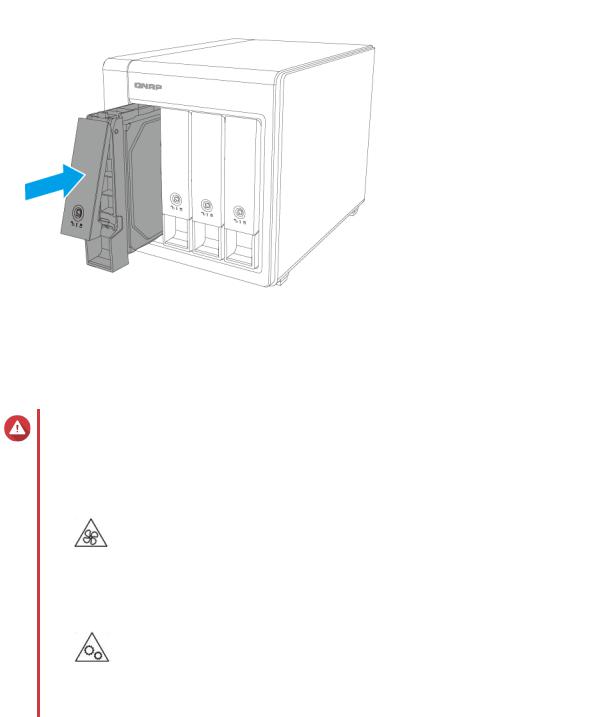
4. Load the tray into the bay.
Installation and Configuration 13
TS-x31P3 User Guide
a.Insert the tray into the bay.
b.Push the handle.
5. Power on the NAS.
Installing 2.5-inch Hard Drives or Solid-State Drives on 3.5-inch Trays
Warning
•Installing a drive deletes all data on the drive.
•Observe electrostatic discharge (ESD) procedures to avoid damage to components.
Moving fan blades: Keep your hands and other body parts away from moving fan blades.
•
Other moving components: Keep your hands and other body parts away from other moving components.
1.Power off the NAS.
2.Remove the drive tray.
a.Pull the handle to release the tray.
b.Pull the tray out.
Installation and Configuration 14
Loading...