

Page 1

GigWorks™
MKII-16 Switch
Model MKII-BASE16
Installer’s/User’s Manual
Publication No. 59003-01 Rev. A
Page 2

Ancor Communications Incorporated
6130 Blue Circle Drive
Minnetonka, MN 55343
(612) 932-4000
Release Number 01, Revision A ( December, 1998)
This release obsoletes all previous releases.
The following paragraph does not apply to the United Kingdom or any country where such provisions are inconsistent with local
law: THIS PUBLICATION is printed “AS IS” WITHOUT WARRANTY OF ANY KIND, EITHER EXPRESS OR IMPLIED,
INCLUDING, BUT NOT LIMITED TO, THE IMPLIED WARRANTIES OF MERCHANTABILITY OR FITNESS FOR A
PARTICULAR PURPOSE. Some states do not allow disclaimer of express or implied warranties in certain transactions;
therefore, this statement may not apply to you.
This publication could include technical inaccuracies or typographical errors. Changes are periodically made to the information
herein; These changes will be incorporated in new additions of the publication.
It is possible that this publication may contain reference to, or information about, products (machines and programs),
programming, or services that are not announced in your country. Such references or information must not be construed to
mean that such products, programming, or services will be offered in your country. Any reference to a licensed program in this
publication is not intended to state or imply that you can use only the licensed program indicated. You can use any functionally
equivalent program instead.
Copyright © Ancor Communications, Inc. 1997. All rights reserved.
GigWorks and GigVision are trademarks of Ancor Communications Inc.
IBM® is a registered trademark of IBM Corporation.
Microsoft, Windows, Windows for Workgroups, Windows NT, and Windows 95 are trademarks or Registered Trademarks of
Microsoft Corporation.
Note to US Government Users – Documentation and programs related to restricted rights – Use, duplication, or disclosure are
subject to the restrictions set forth in GSA ADP Schedule Contract.
Page 3

GigWorks MKII-16 Switch Model MKII-BASE16
Installer's/User's Manual 59003-01 Rev. A
Table Of Contents iii
Table Of Contents
Preface
1 How to Use This Manual
1 Intended Audience
2 Related Materials
2 Ancor Customer Service
3 Safety Notices
3 Communications Statements
6 Laser Safety Information
9 Accessible Parts
1. GigWorks™ MKII-16 Switch Model MKII-BASE16, General Description
1-1 GigWorks™ MKII-16 Switch Model MKII BASE16 General Description
1-1 Major Fibre Channel Port Features
1-2 Major Switch Management Features
1-4 Major Switch Chassis Features
1-5 Fibre Channel Ports
1-8 Front Panel Controls
1-8 Power Button
1-8 Continuous Test Button
1-8 Front Panel LEDs
1-8 Heartbeat LED (Yellow)
1-9 Logic Power Good LED (Green)
1-9 Power Supply Fail LED (Red)
1-9 Over Temperature LED (Red)
1-9 Port Logged-In LED (Green)
1-10 Port Activity LED (Yellow)
1-10 Chassis Back
1-10 AC Input Power Connector and Fuses
1-11 Power Supply(s)
1-12 Chassis Switch Panel
1-12 Switch Management Connector
2. Installation
2-1 Installation
2-1 1. Unpack/Inventory
2-2 2. Place or Mount the Equipment
2-4 3. Apply the IEC Class 1 Laser Information Label (If the installation is in Europe)
2-4 4 Install GBICs
2-5 5. Connect to AC Power
2-7 6. Check the Power On Self Test (POST) Results
2-8 7. Cable N or NL_Port Adapters to the Switch
2-12 Operating the Switch
Page 4

iv Table Of Contents
GigWorks MKII-16 Switch Model MKII-BASE16
59003-01 Rev. A Installer's/User's Manual
Table Of Contents
3. Switch Management
3-1 Introduction
3-1 GigWorks MKII Switch Utilities
3-3 Trivial File Transfer Protocol (TFTP)
3-3 Simple Network Management Protocol (SNMP)
3-4 Ethernet Cabling
3-5 Configuring the Switch Ethernet Port
3-5 Configuring the Ethernet Port Using the Switch Utilities
3-6 Configuring the Ethernet Port Using TFTP
3-7 Managing the Switch Using the GigWorks MKII Switch Utilities
3-7 Loading the Switch Utilities
3-7 Getting Started
3-8 Using the Switch Utilities
3-8 File
3-9 Help
3-9 Tabs Overview
3-10 Management Information
3-12 Management Information Tab Controls/Windows
3-13 Flash
3-15 Versions
3-17 Diagnostics Trace
3-17 Diagnostics Trace Overview
3-18 Diagnostics Enable Controls
3-19 Diagnostics Trace Display Controls
3-21 Setup
3-23 Chassis Configuration
3-26 Port Status
3-26 Port Status Window
3-27 Loop Devices Window
3-29 Zoning
3-30 Hard Zone Rules
3-31 Broadcast Zone Rules
3-31 Name Server Zone Rules
3-32 Zoning Screen
3-34 Name Server
3-36 Management Configuration
3-36 IP Network Configuration
3-37 SNMP Configuration
3-40 Managing the Switch Using TFTP
3-40 Retrieving the Current Switch Management Configuration File (config)
3-41 Transfer a New Management Configuration File to the Switch
3-42 The Switch Management Configuration File
3-43 Loading New Switch Control Code into Flash
3-44 Loading New Management Interfacer Flash (16-Port Switch only)
3-45 Loading New Management Interface Code Over an Invalid Management Interface Flash Load (16-Port Switch only)
3-45 Reset the Switch Using TFTP
3-46 Test the Switch File Transfer Process (16-Port Switch only)
3-47 Retrieving the Index of Valid Switch File Names
3-48 Managing the Switch Using Simple Network Management Protocol (SNMP)
3-48 Network Management
3-49 The Network Management Station
3-50 The Node Agents
3-50 The Management Information Bases (MIBs)
3-51 Standard MIBs
3-51 Experimental MIBs
3-51 Enterprise MIBs
3-52 The Simple Network Management Protocol
3-52 Data Collection Methods
Page 5

GigWorks MKII-16 Switch Model MKII-BASE16
Installer's/User's Manual 59003-01 Rev. A
Table Of Contents v
3-54 Community Types
3-55 Operation Types
3-56 Management Information Bases (MIBs)
3-57 Configuring SNMP
4. Diagnostics/Troubleshooting
4-1 Introduction
4-1 Power Supply Troubleshooting
4-5 Power-On-Self-Test (POST)
4-5 Overview
4-7 Heartbeat LED Blink Patterns
4-7 Normal (all pass)
4-7 Failure Blink Patterns
4-7 Test/Failure Descriptions
4-12 Continuous Test
4-12 Overview
4-13 Procedure
4-15 Fiber Continuity Tests
5. Removal/Replacement Procedures
5-1 Introduction
5-1 Input Fuse
5-1 Removal
5-2 Replacement
5-3 GBIC
5-3 Removal
5-5 Replacement
5-6 Power Supply
5-6 Removal
5-7 Replacement
Appendix A: Reference Information
A-1 Ancor Customer Service
A-1 GigWorks MKII-16 Switch Model MKII_BASE16 Specifications
A-1 Switch
A-3 Switch Maintainability
A-3 Fabric Management
A-4 Switch Mechanical
A-4 Switch Electrical
A-5 Switch Environmental
A-5 Switch Regulatory Specifications
A-6 Shortwave Laser GBIC (Multi-mode)
A-6 Longwave Laser GBIC (Single-mode)
A-7 Copper Inter-Enclosure GBIC (active)
A-7 Copper Intra-Enclosure GBIC (passive)
Appendix B: Ancor Customer Service
B-1 Ancor Customer Service
B-1 Help Desk
B-1 Hardware Support
B-2 Software Support
B-2 Customer Responsibilities
Table Of Contents
Page 6

vi Table Of Contents
GigWorks MKII-16 Switch Model MKII-BASE16
59003-01 Rev. A Installer's/User's Manual
Appendix C: Chassis Switch Panel
C-1 Chassis Switch Panel
C-2 Reset
C-2 Force Prom Mode
C-2 Watch Dog Timer Disable
C-3 Test Mode
C-4 Chassis#, Fabric#, Stage#, and Area# Configuration Switches
List Of Figures
1-1 Figure 1-1 GigWorks MKII-16 Switch Model MKII-BASE16
1-6 Figure 1-2 Chassis Front
1-7 Figure 1-3 Typical GBIC
1-10 Figure 1-4 Chassis Back
2-2 Figure 2-1 GigWorks MKII-16 Switch Model MKII-BASE16 Chassis Components
2-3 Figure 2-2 Cabinet Mounting Bracket
2-11 Figure 2-3 Cabling
3-4 Figure 3-1 Ethernet Connection
3-10 Figure 3-2 Management Information Tab
3-13 Figure 3-3 Flash Tab
3-15 Figure 3-4 Versions Tab
3-18 Figure 3-5 Diagnostics Trace Tab (Enables)
3-19 Figure 3-6 Diagnostics Trace Tab (Display
3-21 Figure 3-7 Setup Tab
3-23 Figure 3-8 Chassis Configuration Tab
3-26 Figure 3-9 Port Status Tab
3-29 Figure 3-10 Zoning Tab
3-34 Figure 3-11 Name Server Tab
3-36 Figure 3-12 Management Configuration Tab
3-49 Figure 3-13 Network Management Framework
3-53 Figure 3-14 Polling-Only Data Collection
3-53 Figure 3-15 Interrupt-Based Data Collection
3-54 Figure 3-16 Trap-Directed Polling Data Collection
4-5 Figure 4-1 Chassis Switch Panel
4-12 Figure 4-2 Continuous Test Button
A-8 Figure A-1 GigWorks MKII-16 Switch Model MKII-BASE16 Dimensions (Front and Back Views)
A-9 Figure A-2 GigWorks MKII-16 Switch Model MKII-BASE16 Dimensions (Top View)
C-1 Figure C-1 Chassis Switch Panel
C-2 Figure C-2 Reset 1µP Button
C-2 Figure C-3 Force PROM and Watchdog Switches
C-3 Figure C-4 Test Mode Configuration Switches
C-4 Figure C-5 Chassis #, Fabric #, Stage #, and Area # Configuration Switches
List Of Tables
4-2 Table 4-1 Troubleshooting Matrix (Single Power Supply)
4-3 Table 4-2 Troubleshooting Matrix (Dual Power Supplies)
Table Of Contents
Page 7

GigWorks MKII-16 SwitchModel MKII-BASE16
Installer's/User's Manual 59003-01 Rev. A
Preface 1
Preface
How to Use This Manual
This manual has five sections and three appendixes:
• Section 1 is an overview of the GigWorks™ MKII-16 Switch Model MKIIBASE16. It describes indicator lights and all user controls and connections.
• Section 2 explains how to install the Switch.
• Section 3 contains Switch Management information.
• Section 4 contains troubleshooting procedures, explains the Power On Self
Test (POST), and Continuous Test.
• Section 5 contains removal/replacement procedures for all field replaceable
units (FRUs).
• Appendix A contains reference information.
• Appendix B contains information about Ancor Customer Service and how
to contact us for assistance.
• Appendix C explains the switches on the Chassis Switch Panel.
Please read the communications statements and laser safety information
presented on the next pages in this Preface.
Intended Audience
This manual introduces users to the GigWorks™ MKII-16 Switch Model MKIIBASE16 and explains its installation and service. It is intended for users
competent in installing and servicing electronic equipment.
Page 8

2 Preface
GigWorks MKII-16 Switch Model MKII-BASE16
59003-01 Rev. A Installer's/User's Manual
Related Materials
The following manuals and materials are referenced in the text and/or provide
additional information.
• The following Fibre Channel Standards:
Fibre Channel Physical and Signaling Interface (FC-PH) ANSI X3.230-
1994.
Arbitrated Loop (FC-AL) ANSI X3.272-1996.
The Fibre Channel Standards are available from:
Global Engineering Documents, 15 Inverness Way East, Englewood,
CO 80112-5776 Phone: (800) 854-7179 or (303) 397-7956
Fax: (303) 397-2740
Ancor Customer Service
Phone: (612) 932-4040
Fax: (612) 932-4037 Attn: Customer Service
E-Mail: support@ancor.com
Web: www.ancor.com
Please refer to Appendix B in this manual for an explanation of Ancor Customer
Service.
Preface
Page 9

GigWorks MKII-16 SwitchModel MKII-BASE16
Installer's/User's Manual 59003-01 Rev. A
Preface 3
Communications Statements
Safety Notices
A Danger notice indicates the presence of a hazard that has the potential of
causing death or serious personal injury. Danger notices appear on the following
pages:
2-5, 2-6, and 5-6
A Warning notice indicates the presence of a hazard that has the potential of
causing moderate or minor personal injury. There are no Warning notices in this
manual.
A Caution notice indicates the presence of a hazard that has the potential of
causing damage to the equipment. There are no Caution notices in this manual.
Communications Statements
The following statements apply to this product. The statements for other products
intended for use with this product appear in their accompanying manuals.
Federal Communications Commission (FCC) Class A Statement
Note: This equipment has been tested and found to comply with the limits for a
Class A digital device, pursuant to Part 15 of the FCC Rules. These limits are
designed to provide reasonable protection against harmful interference when the
equipment is operated in a commercial environment. This equipment generates,
uses, and can radiate radio frequency energy and, if not installed and used in
accordance with the instruction manual, may cause harmful interference to radio
communications. Operation of this equipment in a residential area is likely to
cause harmful interference in which case the user will be required to correct the
interference at their own expense.
Neither the provider or the manufacturer are responsible for any radio or
television interference caused by unauthorized changes or modifications to this
equipment. Unauthorized changes or modifications could void the user's authority
to operate the equipment.
This device complies with Part 15 of the FCC Rules. Operation is subject to the
following two conditions: (1) this device may not cause harmful interference, and
(2) this device must accept any interference received, including interference that
may cause undesired operation.
Canadian Department of Communications Class A Compliance Statement
This equipment does not exceed Class A limits for radio emissions for digital
apparatus, set out in Radio Interference Regulation of the Canadian Department
of Communications. Operation in a residential area may cause unacceptable
interference to radio and TV reception requiring the owner or operator to take
whatever steps necessary to correct the interference.
Avis de conformité aux normes du ministère des Communications du Canada
Cet équipement ne dépasse pas les limites de Classe A d'émission de bruits
Page 10

4 Preface
GigWorks MKII-16 Switch Model MKII-BASE16
59003-01 Rev. A Installer's/User's Manual
Communications Statements
radioélectriques por les appareils numériques, telles que prescrites par le
Réglement sur le brouillage radioélectrique établi par le ministère des
Communications du Canada. L'exploitation faite en milieu résidentiel peut
entraîner le brouillage des réceptions radio et télé, ce qui obligerait le propriétaire
ou l'opérateur à prendre les dispositions nécwssaires pour en éliminer les causes.
CE Statement
The CE symbol on the equipment indicates that this system complies with the
EMC (Electromagnetic Compatibility) directive of the European Community
(89/336/EEC) and to the Low Voltage (Safety) Directive (72/23/EEC). Such
marking indicates that this system meets or exceeds the following technical
standards:
• EN60950, A1-A4 — “Safety of Information Technology Equipment,
Including Electrical Business Equipment”.
• EN 55022 (CISPR 22) Class A — “Limits and Methods of Measurement
of Radio Interference Characteristics of Information Technology
Equipment”.
• EN 50082-1/1997 — “Electromagnetic compatibility - Generic immunity
standard Part 1: Residential commercial, and light industry.”
• IEC1000-4-2/1995 — “Electrostatic Discharge Immunity Test” -
• IEC1000-4-3/1995 — “Radiated, Radio-Frequency,
Electromagnetic Field Immunity Test”
• IEC1000-4-4/1995 — “Electrical Fast Transient/Burst Immunity
Test”
• IEC1000-4-5/1995 — “Surge Immunity Test”
• IEC1000-4-6/1996 — “Immunity To Conducted Disturbances,
Induced By Radio-Frequency Fields”
• IEC1000-4-8/1993 — “Power Frequency Magnetic Field Immunity
Test”
• IEC1000-4-11/1994 — “Voltage Dips, Short Interruptions And
Voltage Variations Immunity Tests”
• EN61000-3-2/1995 — “Limits For Harmonic Current Emissions
(Equipment Input Current Less Than/Equal To 16 A Per Phase)”. Class A
• EN61000-3-3/1994 — “Limitation Of Voltage Fluctuations And Flicker In
Low-Voltage Supply Systems For Equipment With Rated Current Less
Than Or Equal To 16 A”.
• ENV50204/1995 — “Radio Frequency Susceptibility, Keyed Carrier”
Page 11

GigWorks MKII-16 Switch Model MKII-BASE16
Installer's/User's Manual 59003-01 Rev. A
Table Of Contents 5
VCCI Class A Statement
Translation:
This is a Class A product based on the standard of the Voluntary Control Council
For Interference by Information Technology Equipment (VCCI). If this
equipment is used in a domestic environment, radio disturbance may arise. When
such trouble occurs, the user may be required to take corrective actions.
Communications Statements
Page 12

6 Preface
GigWorks MKII-16 Switch Model MKII-BASE16
59003-01 Rev. A Installer's/User's Manual
Laser Safety Information
Laser Safety Information
The GigWorks 1062/16 MKII Switch may use Class 1 lasers to communicate
over the fiber optic conductors. The U.S. Department of Health and Human
Services (DHHS) does not consider Class 1 lasers to be hazardous. The
International Electrotechnical Commission (IEC) requires labeling information
that states that the lasers are Class 1. The following notices are given so you
understand the laser’s certification and classification, the laser type and their use
in the fiber optic transmitters, their usage restrictions, and labeling requirements.
Certification and Classification Information
The GigWorks 1062/16 MKII Switch may contain fiber optic interfaces known as
optical GigaBit Interface Converters (optical GBICs). Within each system, the
optical GBIC component assemblies are located on the front of the chassis. In the
U.S., all models of the optical GBIC product family are certified as Class 1 laser
products that conform to the requirements contained in the Department of Health
and Human Services (DHHS) regulation 21 CFR Subchapter J. The certification
is indicated by a label located on the plastic retainer of the optical GBIC
assembly. Outside of the U.S., all models of the optical GBIC product family are
certified as Class 1 laser component assemblies that conform to the requirements
contained in the International Electrotechnical Commission (IEC) standard IEC
825-1 (11/1993) and the CENELEC (European Committee for Electrotechnical
Standardization) European Normalization standard EN 60825-1 (1994). The
German testing institute VDE assigned the regulation number 3642* to the
certificate of conformity for the product family. The VDE conformity mark is
also located on the plastic retainer of the optical GBIC assembly. The DHHS
conformity label and the VDE conformity mark may not be visible when the
optical GBIC is installed in the system level product. A drawing, later in this
section, shows the Class 1 information label required by IEC 825-1. On this
system, the label is located on the top of the chassis.
Another Class 1 information label is supplied with the equipment. This label is
installed by the user during the installation procedure. The user is to install the
label where it is clearly visible whenever access to the optical ports is possible.
• Note:
VDE regulation number 3642 is for the IBM OLC/OLM/SOC product family.
Page 13

GigWorks MKII-16 Switch Model MKII-BASE16
Installer's/User's Manual 59003-01 Rev. A
Table Of Contents 7
Optical GBICs
Each optical GBIC is a single communications port. Each communications port
consists of a transmitter and receiver optical subassembly. The transmitter
subassembly contains internally a semiconductor laser diode of either: 1) the
gallium aluminum arsenide (GaAlAs) type emitting in the wavelength range of
770 to 860 nanometers (commonly referred to as Shortwave (SW)) or 2) indium
gallium arsenide phosphide (InGaAsP) type emitting in the wavelength range of
1270 to 1355 nanometers (commonly referred to as Longwave (LW)). Both SW
and LW discrete laser diodes are classified as Class 3B laser products rated at 5.0
milliwatts peak power. Once they are incorporated into the optical GBIC, the
product’s automatic power control and power monitoring system maintains the
average power that exits from an open fiber at a value below the Class 1 limit for
either SW or LW laser link products. In addition, for those GBIC products that
contain Open Fiber Control (OFC) the optical fiber link between two GBIC ports
is continuously monitored by the open fiber link detection and laser control safety
system; in the event of a break anywhere in the path, this control system prevents
laser emissions from exceeding Class 1 levels. For the non-OFC links, the optical
power from the laser transmitter is controlled and maintained at a lower power
level such that the power emitted from either an open fiber or an open laser
transmitter is guaranteed to be below the Class 1 limit. Class 1 laser products are
not considered to be hazardous. There are no user maintenance or service
operations or adjustments to be performed on any optical GBIC.
Usage Restrictions
Failure to comply with these usage restrictions may result in incorrect operation
of the system and possibly points of access that may emit laser radiation above
Class 1 limits established by the IEC and the U.S. DHHS.
1. Optical GBICs are designed and certified for applications using point-to
point optical fibre links only. Use of the product with multiple input or
multiple output optical links (for example, star couplers) is prohibited since
it is incompatible with the product’s design and function and may require
that the user certify the laser product again for conformance to the laser
safety regulations.
2. An optical GBIC that contains OFC will not allow normal data transmission
on the optical link unless it is connected to another GBIC that also contains
OFC with the same OFC timings.
Laser Safety Information
Page 14
8 Table Of Contents
GigWorks MKII-16 Switch Model MKII-BASE16
59003-01 Rev. A Installer's/User's Manual
Labeling Requirements
There are no caution or danger labels required for use of the optical GBIC since it
is a Class 1 laser component assembly. Within the U.S., the only laser safety label
required is the certification label that already appears on the plastic retainer of the
optical GBIC assembly. Outside of the U.S., the IEC 825 laser safety standard
requires that the system level product have a Class 1 information label
permanently attached and clearly visible whenever access to the optical ports is
possible. This label is supplied with the equipment and applied by the user during
the installation procedure. Refer to the Installation section of this manual. An
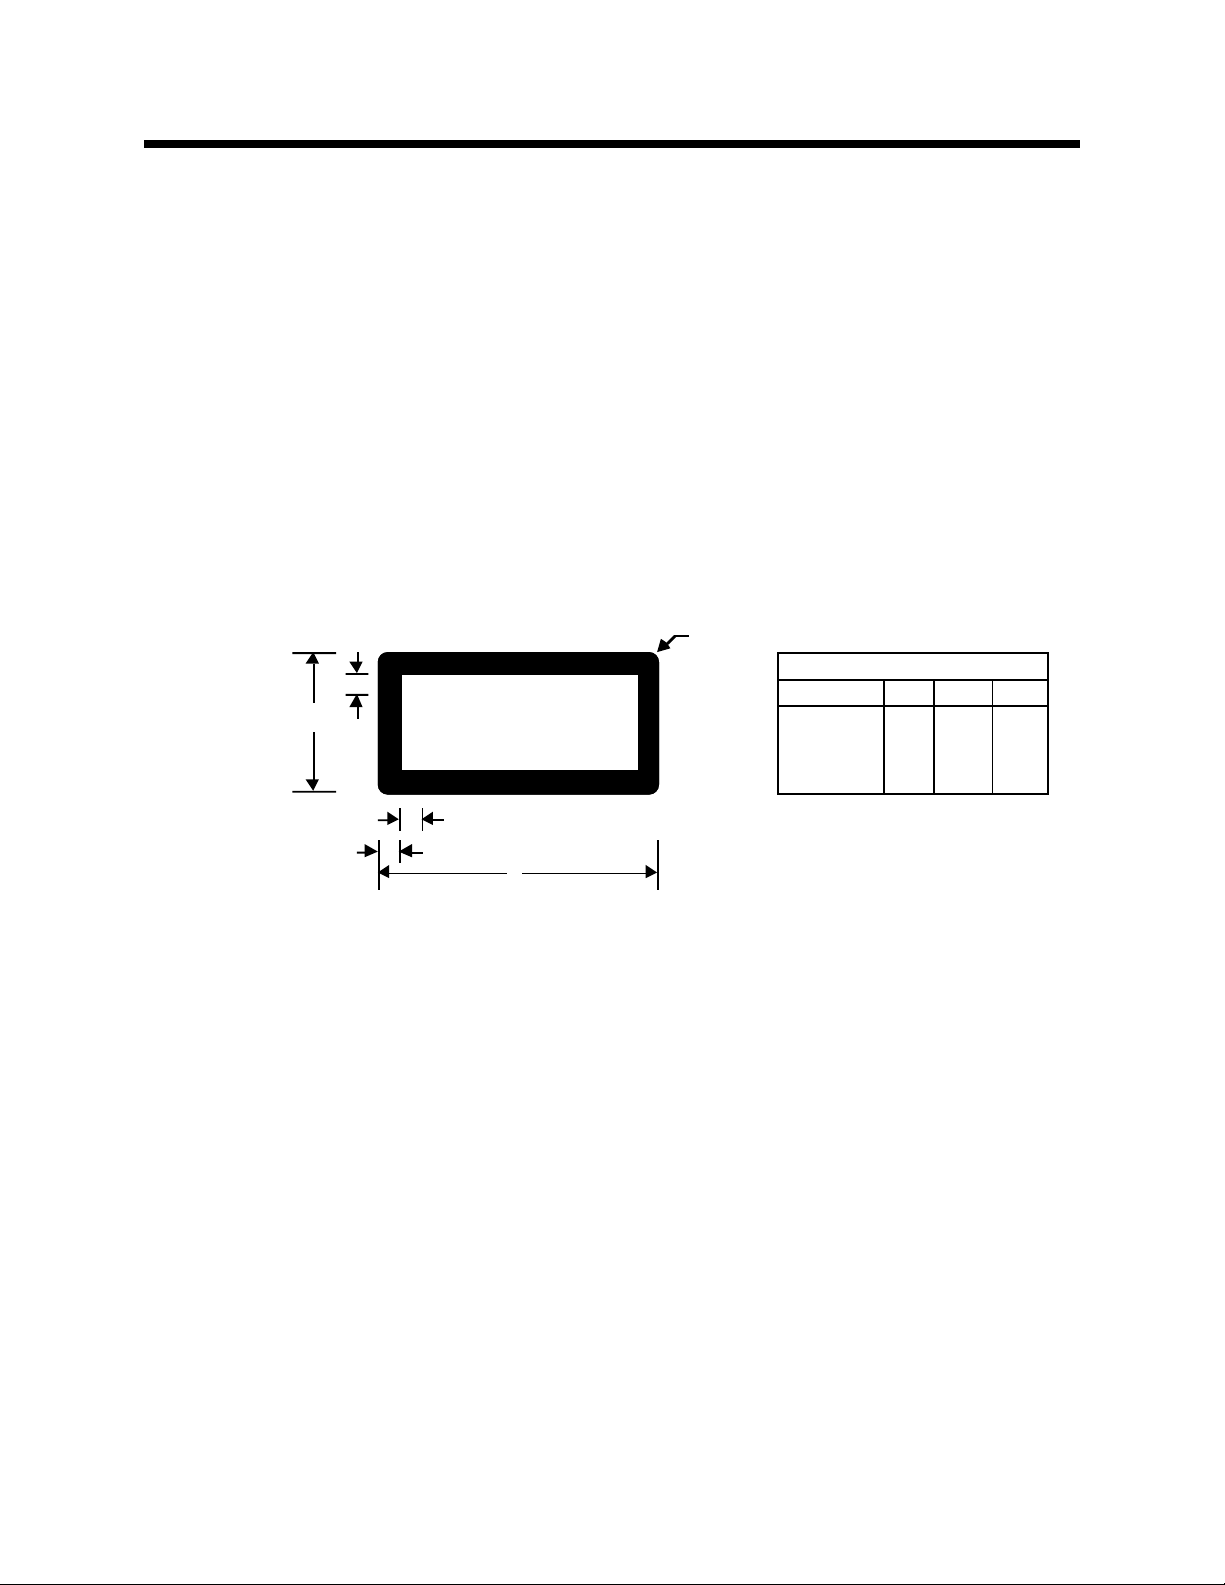
example of the IEC Class 1 information label and its dimensions, suitable for use
in most European countries, is shown below. The label consists of black printing
on a yellow background. The languages represented on this example label are
English, German, Finnish, and French and represent the minimum set for
acceptance of a Class 1 product in most European countries.
CLASS 1 LASER PRODUCT
TO IEC 825 (1984) + CENELEC HD 482 S1
LASER KLASSE 1
LUOKAN 1 LASERLAITE
APPAREIL A LASER DE CLASSE 1
G3AG3G2BRDimensions in mm
A x B
G2G3R
26 x 52 4 4 2
52 x 105 5 5 3.2
74 x 148 6 7.5 4
Laser Safety Information
Page 15

GigWorks MKII-16 Switch Model MKII-BASE16
Installer's/User's Manual 59003-01 Rev. A
Table Of Contents 9
Accessible Parts
The only Field Replaceable Units (FRUs) in the GigWorks MKII-16 Switch
Model MKII-BASE16 are:
• fuses associated with the AC power input,
• power supply(s), and
• interfaces to the interconnection media called GBICs.
Other than these FRUs, there are no accessible parts in the Switch chassis.
Removal of the top of the Switch chassis will void the warranty. Refer to Section
4 (Removal Replacement Procedures) for more information.
Pièces Accessibles
Les pièces remplaçables, Field Replaceable Units (FRU), du commutateur
GigWorks MKII-16 Switch modèle MKII-BASE16 sont les suivantes :
• Fusibles associés à l’entrée de courant c.a.
• Alimentation(s) de courant, et
• Interfaces aux media d’interconnexion appelés GBIC
Il n’y a aucune pièce accessible, à part les URC, dans l’enceinte du commutateur.
Le fait de retirer le dessus de l’enceinte du commutateur annulera la garantie. Se
reporter à la Section 4 (Procédures de retrait et remplacement) pour plus de
renseignements.
Zugängliche Teile
Nur die folgenden Teile im GigWorks MKII-16 Switch Model MKII-BASE16
können kundenseitig ersetzt werden:
• Sicherungen für den Wechselstromeingang
• Netzteil(e) und
• Schnittstellen für die Zwischenverbindungsträger, GBIC genannt.
Außer den oben genannten ersetzbaren Teilen sind keine Teile innerhalb des
Switch-Gehäuses zugänglich. Bei einem Entfernen der oberen Abdeckung des
Schaltergehäuses verfällt die Garantie. Weitere Informationen finden Sie im
Abschnitt 4 (Ausbauen der ersetzbaren Teile).
Accessible Parts
Page 16

10 Table Of Contents
GigWorks MKII-16 Switch Model MKII-BASE16
59003-01 Rev. A Installer's/User's Manual
Page 17

GigWorks MKII-16 Switch Model MKII-BASE16
Installer's/User's Manual 59003-01 Rev. A
General Description 1-1
Section 1 GigWorks™ MKII-16 Switch
Model MKII-BASE16 General Description
GigWorks™ MKII-16 Switch Model MKII-BASE16 General Description
The Switch is the Fabric component of a Fibre Channel compliant network. Figure 1-1 is an
illustration of the Switch.
Figure 1-1 GigWorks MKII-16 Switch
The Switch uses a two-dimensional switching architecture consisting of spacedivision and time-division interconnection techniques to implement the Fibre
Channel (FC) fabric. Space-division switching allows direct connections (FC Class 1
service) among all ports on the Switch. Time-division switching allows timemultiplexed connections (FC Classes 2 and 3) among all ports on the Switch.
Major Fibre Channel Port Features
Major Fibre Channel port features include:
• The Switch chassis has16 ports. Each port operates at 1062.5 megabaud.
• Half of the ports may be FL_Ports (Arbitrated Loop) or standard F_Ports (Fabric)
depending on their use. The remainder of the ports are F_Ports. Refer to the Front
Panel Controls and Fibre Channel Ports paragraphs later in this section for more
information.
COMMUNICATIONS, INC.
Page 18

1-2 General Description
GigWorks MKII-16 Switch Model MKII-BASE16
59003-01 Rev. A Installer's/User's Manual
General Description
• All ports used as F_Ports support Class 1, Class 2, Class 3, and Intermix
Fibre Channel service. Refer to the Reference Information appendix for
more information.
• All ports support the maximum Fibre Channel frame size (2148 bytes) for
all classes of Fibre Channel service.
• All ports used as FL_Ports support Class 2, and Class 3 Fibre Channel
service. Refer to the Reference Information appendix for more information.
• As an option, any or all ports can be Trunk Ports (T_Ports). T_Ports support
all three classes of service and interconnect chassis in a fabric composed of
multiple Switch chassis. T_Ports also “self discover” and are available in
groups of four. Any time you use one port in the group as a T_Port, all ports
in that group are T_Ports. The port groups are 1-4, 5-8, 9-12, and 13-16.
That is, if you use Port 6 as a T_Port, Ports 5, 7, and 8 can only be used as
T_Ports or not used at all. Contact your Ancor sales representative or sales
engineer for information about using your chassis in a multi-chassis fabric.
• Ports are supported by GigaBit Interface Converters (GBICs). GBICs
contain the transmitters and receivers that connect to the interconnection
media. Each GBIC is “hot pluggable”.
• You may populate 2 to 16 ports with GBICs. The choice of ports and
GBICs is yours.
The Switch has been validated with GBICs that support a variety of
interconnection media. Refer to the Fibre Channel Ports paragraphs later in this
section for more information.
Major Switch Management Features
The Switch supports management through:
• the Windows NT™ or Windows 95™-based GigWorks MKII Switch
Utilities,
• a Trivial File T ransfer Protocol (TFTP) server , and
• a built-in SNMP Agent.
• Optionally , the GigWorks MKII Switch Web-Based Management Interface
application is also available. This management interface is a Web-based
(Java) application.
The Switch Utilities require an Ethernet connection to each managed chassis. The Webbased Switch management application can manage multiple fabrics and can
manage multi-chassis fabrics through an Ethernet connection to any one chassis
in the fabric. Contact your Ancor sales representative or sales engineer for
Page 19

GigWorks MKII-16 Switch Model MKII-BASE16
Installer's/User's Manual 59003-01 Rev. A
General Description 1-3
General Description
information about the Web-based Switch management application.
Switch management allows you to:
• Set up the connection between the Ethernet port on a PC and the Ethernet port on
the Switch and track the communication that takes place over this connection
• Configure the Switch Management interface with its IP network configuration
parameters and SNMP configuration parameters
• Configure the Fabric Number of the chassis and Chassis Number
• Configure the Chassis Stage T ype for multistage fabrics
• Configure the Fibre Channel Timeouts
• Configure the desired Chassis State and read the actual Chassis State
• Configure the desired Port State and read the actual Port State
• Read and control the status of each port including:
• Read the Port Type for each fabric port
• Read the FL_Port Loop Status for each FL_Port
• Read the AL-PA (Loop Address) of all logged-in NL_Ports
• Configure Loop Ports including:
• Place any NL_Port into Loop Bypass Mode
• Place any or all NL_Ports back into normal Loop Mode
• Re-initialize the Loop
• Read Name Server Information for all logged-in ports
• Load new Switch control-processor firmware into the Switch’s control processor
Flash and Reset the Switch
• Display all the SNMP managed object provided by the Switch
• Display the Switch W orld W ide Name and all its hardware and software version
numbers
• Perform Diagnostics Trace operations on the Switch under the direction of Ancor
service personnel
• Divide the fabric ports into zones for more efficient and secure communication
among functionally grouped nodes. There are three types of zones and a port may
be defined in any or all of them.
• Hard Zones follow physical boundaries within a Single-Stage Switch chassis
and limit the communication of a port to only other ports in the same Hard
Zone. There may be as many as four Hard Zones and a particular port may be
in only one of them.
• Broadcast Zones allow the division of the fabric into as many as 16 zones that
define the area of Broadcasts. A particular port may be placed in one or more
Page 20

1-4 General Description
GigWorks MKII-16 Switch Model MKII-BASE16
59003-01 Rev. A Installer's/User's Manual
General Description
of these Broadcast Zones. A port will broadcast to all ports in the same
Broadcast Zone (or zones) in-which the port is defined. If Hard Zones are
enabled, Broadcast Zones may not cross the defined Hard Zone boundaries.
• Name Server Zones allow the division of the fabric into as many as 16 zones
that define which ports receive Name Server information. A particular port
may be defined in one or more of these Broadcast Zones. A port will receive
Name Server information for all ports in the same Name Server Zone (or
zones) in-which the port is defined. If Hard Zones are enabled, Name Server
Zones may not cross the defined Hard Zone boundaries.
• Load new Switch and management control firmware into the Switch via TFTP
• Retrieve and modify the Switch file named config via TFTP. This file contains
the current management configuration of the Switch management processes,
including the IP network configuration parameters, and the SNMP
configuration parameters.
• Manage the Switch using Simple Network Management Protocol (SNMP)
as the transport protocol
Refer to the Switch Management section of this manual for more information.
Major Switch Chassis Features
The following is an overview of the major features of the Switch chassis:
• You have the option to add a second power supply for total power supply
redundancy. When there are two power supplies, they each become “hot
pluggable”. Refer to the Power Supply paragraphs later in this section and
also to Section 4 for Removal Replacement procedures.
• You have the option to add control firmware that allows your MKII Switch
chassis to operate in a multi-stage interconnection fabric with other MKII
Switches. Switches in this multi-stage fabric may be connected in either
two-stage or three-stage topologies. These multi-stage topologies use crossconnecting (not cascading) for the fewest number of fabric hops between
users. Refer to the Reference Information appendix for more information.
• The Switch undergoes a battery of Power-On-Self-Tests (POSTs) each time
it is powered-up. POST provides one pass through the battery of tests but
does not test the GigaBit Interface Converters (GBICs). The POST uses the
Heartbeat LED to indicate pass or fail test conditions. Refer to the LED
paragraphs later in this section and the POST paragraphs in the
Troubleshooting section.
• The Switch contains a Continuous Test button on the front panel that, when
placed in the TST (T est) position, places the Switch in continuous test mode.
This continuous test mode requires that Loopback Plugs (provided with GBICs
Page 21

GigWorks MKII-16 Switch Model MKII-BASE16
Installer's/User's Manual 59003-01 Rev. A
General Description 1-5
General Description
ordered from Ancor) be placed on each port populated with a GBIC so that the
GBICs may be tested. Refer to the LED paragraphs later in this section and the
Continuous T est paragraphs in the T roubleshooting section.
• LEDs indicate the status of the Switch and each port. Refer to the Front
Panel LED paragraphs later in this section.
• The Switch contains an Ethernet connector that provides a connection to a
management station. The management station, running the Ancor Switch
Utilities or SNMP, provides a means to access such things as the Fibre
Channel Management Information Base (MIB) and upgrade the control
firmware held in the Switch’s Flash memory. Refer to the Chassis Back
paragraphs later in this section and the Switch Management Section of this
manual for more information.
• The Switch chassis is shipped from the factory physically configured with
rubber feet on its bottom that allow it to sit on a flat surface and stack.
Mounting brackets (in a separate packet shipped with the Switch) allow you
to mount it in a 19-inch rack. When mounted in a rack, the Switch must
be supported by rails or a shelf. Refer to the Installation section for the
install procedure and the Reference Information appendix for the
dimensions and type of rack.
Fibre Channel Ports
Refer to Figure 1-2. The 16 ports are numbered left to right 1 through 16. Ports 1,
2, 5, 6, 9, 10, 13, and 14 are F_Ports or FL_Ports depending on their use. These
ports discover their function (F or FL_Port) each time the cabled node executes a
Fibre Channel Login. Therefore, if the port cabling is changed from a connection
to an N_Port to a connection to an NL_Port or vise-versa, the function of the
connected Switch port will also change appropriately. These ports are marked on
the chassis front with a small white triangle on each side of the chassis opening.
The remaining Switch ports are F_Ports.
Port numbers are marked on the front of the chassis for a single-stage (one
chassis) Switch fabric.
Page 22

1-6 General Description
GigWorks MKII-16 Switch Model MKII-BASE16
59003-01 Rev. A Installer's/User's Manual
General Description
Figure 1-2 Chassis Front
Continuous Test button
(Must be OFF (IN) for
normal operation)
Power Supply Fail LED
(Red)
Over Temperature LED
(Red)
Logic Power Good LED
(Green)
Heartbeat LED
(Yellow)
Power
Button
Fibre Channel Port*
All ports shown on this drawing are
served by GBICs with SC -Type fiber
optic connectors.
Note in the top row of ports that the left/right order of the Receive (Rx) and
Transmit (TX ) connectors and the top/bottom order of the Traffic and Logged-In
LEDs are the reverse of the order for the bottom row of ports.
Port number
Traffic LED
(Yellow)
Logged-In LED
(Green)
Fibre Channel Port*
All ports shown on this drawing are
served by GBICs with SC -Type fiber
optic connectors.
TX RX
9
* Fibre Channel Port Notes:
Port number
Traffic LED
(Yellow)
Logged-In LED
(Green)
8
TX
RX
TST
OP
The White triangles
indicate that this
port may be used
as an F_Port or an
FL_Port.
2
4
6
8
10
12
14 16
1
35
7
9
11 13
15
TST
OP
COMMUNICATIONS, INC.
WORKS
™
Rx
Tx
Rx
Tx
Rx
Tx
Rx
Tx
Rx
Tx
Rx
Tx
Rx
Tx
Rx
Tx
RxTx RxTx RxTx RxTx RxTx RxTx RxTx RxTx
MKII
Page 23

GigWorks MKII-16 Switch Model MKII-BASE16
Installer's/User's Manual 59003-01 Rev. A
General Description 1-7
General Description
Currently, the following GBICs are certified for use:
Short-wavelength fiber optic GBICs 100-M5-SL-I or 100-M6-SL-I with
Open Fiber Control (OFC) support connection to legacy 1062 megabaud
Fibre Channel networks. The Optical Link Modules (OLMs) used by many
legacy Fibre Channel transmitters and receivers contain an internal OFC
system. The OFC is a safety interlock that detects when the optical link has
been interrupted and shuts down the laser. Each of the two transmitters in
the Fibre Channel link will try periodically to reestablish the link. The laser
pulse duration for this re-connect operation is very short. Newer designs of
fiber optic transmitters with lower launch powers (like those used in
GBICs) do not generally use OFC. However, if one end of a Fibre Channel
link has OFC, then both ends must have it.
Short-wavelength fiber optic GBICs 100-M5-SN-I or 100-M6-SN-I without
OFC to support connection to new non-OFC Fibre Channel components.
Long-wavelength fiber optic GBICs 100-SM-LC-L.
Copper Inter-Enclosure GBIC (Active) 100-TW-EL-S or 100-TP-EL-S with
either DB-9 or HSSDC connectors.
Copper Intra-Enclosure GBIC (Passive) 100-TW-EL-S or 100-TP-EL-S
with either DB-9 or HSSDC connectors.
Certified GBICs may be populated in any combination that suits your use. They
are “hot-pluggable” and you may snap them in/out without tools.
Refer to the Reference Information appendix for certified GBICs and their
specifications. Refer also to the Removal Replacement section of this manual for
more information. Figure 1-3 shows a typical GBIC. This one supports fiber optic
interconnection media.
Figure 1-3 Typical GBIC
GBIC Keyway
(One on each
side of the GBIC)
GBIC Latch
(One on each
side of the GBIC)
GBIC Connector
SC Fiber Optic
Connector
TX
RX
SC Connector
Keyways
Page 24

1-8 General Description
GigWorks MKII-16 Switch Model MKII-BASE16
59003-01 Rev. A Installer's/User's Manual
General Description
Front Panel Controls
Power Button
Figure 1-2 shows the location of the Power Button. The Power Button is
protected by a clear plastic cover that must be flipped UP in order to reach the
button. The Power button is an alternate-action switch (press it to turn it on and it
stays depressed, press it again to turn it off and the button releases).
When you press the Power button and turn it ON, you enable the logic voltages to
leave the Power Supply(s) and enter the Switch logic. The Logic Power Good LED
on the front of the chassis and the Power Good light on the back of the Power
Supply(s) will light to indicate that the Switch logic is receiving power within the
proper voltage range. Refer to the Front Panel LEDs for more information.
As long as the chassis is connected to AC power, the fan(s) run and the power
supply(s) produce the logic voltages (3.3 volts and 5 volts) required by the
Switch. As long as the Power button has not been depressed (still in the OFF
(out) position) the logic voltages do not leave the Power Supply, the Power Good
LED on the Power Supply(s) is not lit, and the Logic Power Good LED on the
front of the chassis is not lit.
Continuous Test Button
The Continuous Test button on the front panel is an alternate-action switch (press
it and it stays depressed, press it again and the button releases). This button must
be in the depressed (OP) position for normal operation. The Continuous Test
button initiates internal diagnostics when it is in the out (TST) position.
Figure 1-2 shows the location of the Continuous Test Button. The
Troubleshooting section in this manual describes the tests and the LED error
blink patterns that visually indicate the test failures.
Front Panel LEDs
Refer to Figure 1-2. LEDs visible through lenses in the front of the chassis
indicate chassis and port status. During a Reset operation (for about two seconds
at the beginning of power-up or as long as the Reset button is pressed) all LEDs
are forced ON. The following definitions are valid following the Power-On-
Self-Test (POST) and with the Continuous Test button in the OFF (IN)
position. Refer to Section 3 (Diagnostics/Troubleshooting) for information about
POST, LED definitions during Continuous Test, and how the LEDs act when the
control code (located in Flash memory) hangs up.
Heartbeat LED (Yellow)
The Heartbeat LED indicates the status of the internal Switch processor, the
results of Power-On-Self-Tests (POSTs) run at power-up, and tests initiated by
the Continuous Test button.
Page 25

GigWorks MKII-16 Switch Model MKII-BASE16
Installer's/User's Manual 59003-01 Rev. A
General Description 1-9
General Description
Following a normal power-up with the Continuous Test button in the OFF
position, the Heartbeat LED blinks about once per second to indicate that the
Switch passed the POSTs and the internal Switch processor is running.
Refer to Section 3 (Diagnostics/Troubleshooting) for more information about
Heartbeat LED error codes.
Logic Power Good (Green)
This LED is ON when any Power Supply is delivering power within normal
limits to the Switch logic (the Power Button must also be depressed). If you have
redundant power supplies, the Logic Power Good LED will stay ON even when
one power supply stops working and the other picks up the load. The LED will go
OFF when no supply is delivering the proper logic voltages.
Power Supply Fail LED (RED)
This LED is normally OFF. It comes ON only when one supply in a redundant
configuration fails but the other supply has picked up the load. When this LED is
ON, it is a signal to look at the Power Supply LEDs on the back of each Power
Supply to determine which supply failed. Refer to Figure 1-4 for the location of
the power supplies and their LEDs. This LED is not meaningful in a system with
only one Power Supply.
Over Temperature LED (Red)
Not used. OFF.
Port Logged-In LED (Green)
Each port has its own Logged-In LED.
Initially (immediately after the Switch successfully completes the POST, the
Switch holds all Port Logged-In LEDs OFF (no light). They each remain OFF
until their connected Fibre Channel Node Port (N_Port) or Node Loop Port
(NL_Port) is able to successfully perform a Fibre Channel Fabric Login. The
attached node initiates the login process. Following a successful login on a
particular port, the Switch turns the Port Logged-In LED ON (lit) for that port.
This shows that the port is properly connected and able to communicate with its
attached device. The LED for this port remains ON as long the port is still logged
in.
If the established link is broken (a fiber opens or the connected port goes out of
service), the Port Logged-In LED is shut OFF and the N or NL_Port device will
try to regain its logged in status. If the login is once again established, the Switch
turns the Port Logged-In LED back ON and communication continues.
Because the attached nodes initiate the Fibre Channel Login process it is
important to have the Switch operating before the attached nodes are
powered up. Some nodes only try to perform a Fibre Channel Login one
Page 26

1-10 General Description
GigWorks MKII-16 Switch Model MKII-BASE16
59003-01 Rev. A Installer's/User's Manual
General Description
time or several times over a short period of time when they are powered up.
If the Switch was not operable at that time, it would miss this login attempt
and the attached node may give up trying and require rebooting after the
Switch becomes operable.
Port Activity LED (Yellow)
Each port has its own Port Activity LED. The Port Activity LED for a particular
port is ON when Class 1, 2, or 3 frames are entering or leaving the port. The
Switch turns the LED ON for 50 msec. for each frame, so you should be able to
see it for one frame. This LED will not light for frames following an arbitrated
loop in bypass mode.
Chassis Back
Refer to Figure 1-4.
Figure 1-4 Chassis Back
AC Input Power Connector and Fuses
A standard 3-wire computer-type AC power cable (supplied with the Switch)
connects between the AC Input Power Connector and an AC outlet. Refer to the
Reference Information for the AC Power Requirements. See also Section 2 for
installation procedures.
Switch
Management
Connector
(Ethernet)
(RJ45)
Power Supply
Optional second Power Supply
AC Power
Input Connector
Input
Fuses (2)
Fan
(The Fan is part of the Power Supply.
Air enters the front of the chassis and
exits the back of the chassis.)
Finger Pulls (2)
Power Supply
Locking Screws (2)
Power Good Light
(Green)
Overheat Light
(Red)
Cover
Plate
(if no second
Power Supply)
Chassis Switch Panel
(Behind Cover Plate)
Page 27

GigWorks MKII-16 Switch Model MKII-BASE16
Installer's/User's Manual 59003-01 Rev. A
General Description 1-11
General Description
An Input Fuse Holder is incorporated into the AC Input Power Connector
assembly. It holds two input fuses. Refer to Section 3 for Troubleshooting
information, Section 4 for Removal Replacement, and the Reference Information
appendix for fuse size.
Power Supply(s)
The chassis has bays for two power supplies. When there is only one supply, it
can operate from either bay and the unused bay is covered with a plate.
The fan on a Power Supply also furnishes cooling for the Switch chassis. A
Power Supply fan draws air from the front of the chassis and expels it from the
back of the chassis. One Power Supply with its cooling fan is sufficient to operate
the Switch.
When there are two Power Supplies, they each become “hot pluggable”. That is,
either supply may be removed while the Switch is operating. As long as one good
supply remains in operation, the Switch will operate properly. Refer to Section 3
for troubleshooting procedures and Section 4 for Removal/Replacement
procedures.
The Power Supply(s) operate independently of the Power Button on the front of
the chassis. The supply(s) fan(s) starts to turn and the supply(s) start to produce
logic voltages as soon as the chassis is connected to AC power. These logic
voltages may, or may not, be enabled out of the power supply into the Switch
logic. That depends on the position of the Power Button on the front of the
chassis.
Each Power Supply has two lights that indicate its status. Refer to Figure 1-4 for
their location.
Power Good Light (Green)
The Power Good Light is ON when its supply is producing logic voltages
within their proper voltage ranges and the Power Button is depressed (ON).
The light is Off when its supply is not producing proper logic voltages or
the Power Button is out (OFF). The Power Button on the front of the chassis
must be in the ON position in order to enable the logic voltages into the
Switch logic.
Overheat Light (Red)
The Overheat Light is normally OFF. When the power supply senses an
overheat condition (airflow blocked or fan stopped) it turns the Overheat
Light On and disables its logic voltages. This will turn its own Power On
Light OFF and, if it was the only power supply in the Switch, it would
power down the Switch. If there was another power supply installed in the
Switch, the Power Supply Fail LED on the Switch’s front panel would turn
ON and the Switch would continue to operate with the other power supply.
Page 28

1-12 General Description
GigWorks MKII-16 Switch Model MKII-BASE16
59003-01 Rev. A Installer's/User's Manual
General Description
When the overheated power supply cools down, the power supply will
attempt to place itself back in service. If the cause for the overheating
condition is still present, the power supply will eventually overheat again
and the shutdown process will repeat. During the periods where both power
supplies are operating, the Power Supply Fail LED on the front of the
chassis will turn OFF. The Power Supply Fail LED will only be ON when
one of the two power supplies is actually failing.
Chassis Switch Panel
Refer to Figure 1-4 for the location of the Chassis Switch Panel. The Chassis
Switch panel contains a microprocessor Reset button, switches for bypassing the
Flash memory and Watchdog Timer, and Test Mode select switches. Use these
switches only under the direction of Ancor Customer Service. Refer to the
Chassis Switch Panel appendix for a description of these switches and buttons.
Switch Management Connector
The Switch Management Connector is an Ethernet 10BASE-T interface that
provides a connection to a management station. The management station, running
the Ancor Switch Utilities or SNMP, provides a means to access such things as
the Fibre Channel Management Information Base (MIB) and upgrade the control
firmware held in the Switch’s Flash memory.
Refer to the Switch Management Section of this manual for information about
how to connect the management station and manage the Switch.
Page 29

GigWorks MKII-16 Switch Model MKII-BASE16
Installer's/User's Manual 59003-01 Rev. A
Installation 2-1
Section 2 Installation
Installation
There are seven basic steps required to install the Switch.
1. Unpack
2. Place or Mount the Equipment
3. Apply the IEC Laser Safety Label (If the installation is in Europe)
4. Install the GBICs
5. Connect the Switch to AC power
6. Check the Power-On-Self-Test (POST) results
7. Cable Adapters to the Switch
1. Unpack
a. Unpack the Switch from the carton. There are no packing materials or
shipping fixtures located inside the chassis.
b. Ensure that the power cable has a plug that is suitable for your location.
Ancor supplies the Switch with a standard 3-wire computer-type power
cable. One end has an IEC 320 plug that mates with the power connector on
the back of the chassis. The other end must have a plug that is suitable for
your location. If the power cable has the wrong connection for your
location, you must supply your own. Refer to the specifications on page 2-6.
c. GBICs (if you have ordered them from Ancor) are packaged separately.
Ancor supplies one Loopback Plug for each type of GBIC you ordered. A
Loopback plug is a plug that, when fully inserted into a GBIC port,
interconnects transmit and receive for that port. In case of a suspected GBIC
failure, you may use these Loopback Plugs, in conjunction with a test, to
verify the operation of a GBIC. Refer to Continuous Test in the Power-OnSelf-Test descriptions in the Troubleshooting section of this manual for
more information.
Note:
This manual covers the installation and cabling of single-stage Switch chassis
only.
Page 30

2-2 Installation
GigWorks MKII-16 Switch Model MKII-BASE16
59003-01 Rev. A Installer's/User's Manual
Installation
2. Place or Mount the Equipment
The Switch may be placed on a flat surface and stacked or mounted in a 19” EIA
rack. The Switch comes physically configured for placing on a flat surface. That
is, it comes with rubber feet on the bottom and side-fillers installed. Refer to
Figure 2-1.
Figure 2-1 GigWorks MKII-16 Switch Model MKII-BASE16 Chassis Components
Shelf Mount
If you are not going to rack-mount the Switch, simply place it on a flat surface
being careful not to obstruct the airflow through the chassis (Allow 165mm (6.5”)
front and back. The airflow enters the front of the chassis and exits the back. The
top of each chassis has dimples for the rubber feet of a chassis stacked on top.
Rack Mount
If you mount the Switch in a rack, you must remove the side-fillers and install the
rack-mounting brackets supplied with the Switch. You may also need to remove
the Switch’s rubber feet. They are easily removable in case they are not
compatible with your rack. Without the rubber feet, the Switch occupies 2U of
space in an EIA rack. The following steps describe how to prepare the chassis for
rack mounting:
a. Remove the Face-plate by pulling it straight off the front of the chassis.
b. Remove the two Side-Fillers. They are each secured with six captive
COMMUNICATIONS, INC.
Side Fillers (2)
Face-plate
Side-Filler Mounting Screws
(6 on each side)
Page 31

GigWorks MKII-16 Switch Model MKII-BASE16
Installer's/User's Manual 59003-01 Rev. A
Installation 2-3
Installation
Philips-head screws, one in each hole in the Side Fillers.
c. Mount the Brackets. Refer to Figure 2-2. The Switch is shipped with a
package containing cabinet mounting brackets and screws. You may mount
these brackets on the front corners of the chassis or the back corners
depending on whether you want the Switch facing the back or front of the
cabinet.
d. Place the Switch in a 19” EIA rack and secure it with four (4) 10-32
machine screws (not supplied). The Switch must be supported in the rack on
rails or a shelf. If the Switch is supported by a shelf and the vertical space is
sufficient, you may leave the rubber feet on the Switch chassis. If the
vertical space is not sufficient, you may remove the rubber feet by turning
them counterclockwise by hand (or with a flat-blade screwdriver). Be
careful not to obstruct the airflow through the chassis (Allow 165mm (6.5”)
front and back.
e. Replace the Face-plate if possible. If the Switch is facing the front of the
rack the face-plate should fit. Replace the face-plate by aligning its
mounting studs with the appropriate holes in the chassis front and push it
straight back.
Do not obstruct the airflow through the chassis. The airflow enters the front
of the chassis and exits the back.
Figure 2-2 Cabinet Mounting Bracket
Bracket for mounting the
chassis in a rack or cabinet.
Note:
If you mount the Switch in a 19” EIA rack, it must be installed on rails or on a
shelf.
Page 32

2-4 Installation
GigWorks MKII-16 Switch Model MKII-BASE16
59003-01 Rev. A Installer's/User's Manual
Installation
3. Apply the IEC Class 1 Laser Information Label (If the installation is in Europe)
If the installation is in Europe, IEC regulations require that a Class 1 laser
information label be placed where it is clearly visible whenever access to the
optical ports is possible. The drawing below pictures the label.
Remove the paper on the back of the label and apply it to the equipment rack in a
place where it is clearly visible whenever access to the optical ports is possible.
4. Install GBICs
You may populate your Switch with 2 to 16 GBICs. The choice of ports and
GBICs is yours. The Switch has been validated with GBICs that support a variety
of interconnection media.
If you are populating your Switch with 16 GBICs that are all the same media
type, install them by following the instructions in the GBIC Replacement
procedure in the Removal/Replacement Procedures section of this manual.
If you are installing less than 16 GBICs and/or they are a mix of media types,
before you install them, refer to the Tuning paragraphs in Step 7 of this
procedure. The Tuning paragraphs give you information that will allow you to
use the Switch the most efficiently. Then, install them by following the
instructions in the GBIC Replacement procedure in the Removal/Replacement
Procedures section of this manual.
CLASS 1 LASER PRODUCT
TO IEC 825 (1984) + CENELEC HD 482 S1
LASER KLASSE 1
LUOKAN 1 LASERLAITE
APPAREIL A LASER DE CLASSE 1
Page 33

GigWorks MKII-16 Switch Model MKII-BASE16
Installer's/User's Manual 59003-01 Rev. A
Installation 2-5
Installation
5. Connect to AC Power
Danger:
An electrical outlet that is not correctly wired could place hazardous voltage
on metal parts of the Switch chassis. It is the responsibility of the customer to
ensure that the outlet is correctly wired and grounded to prevent electrical
shock.
Danger:
Une prise électrique dont les fils sont mal branchés peut créer une tension
dangereuse dans les pièces métalliques du châssis Switch. Pour éviter toute
secousse électrique, s’assurer que les fils sont correctement branchés et que la
prise est bien mise à la terre.
Gefahr:
Elektrosteckdosen, die nicht richtig verdrahtet sind, können gefährliche
Hochspannung an den Metallteilen des Switch-Gehäuses verursachen. Der
Kunde trägt die Verantwortung für eine vorschriftsmäßige Verdrahtung und
Erdung der Steckdose zur Vermeidung eines elektrischen Schlages.
Page 34

2-6 Installation
GigWorks MKII-16 Switch Model MKII-BASE16
59003-01 Rev. A Installer's/User's Manual
Installation
Danger:
This product is supplied with a 3-wire power cable and plug for the user’s
safety. Use this power cable in conjunction with a properly grounded outlet to
avoid electrical shock.
You may require a different power cable in some countries because the plug on
the cable supplied with the equipment will not fit your electrical outlet. In this
case you must supply your own power cable. The cable you use must meet the
following requirements:
For 125 Volt electrical service - The cable must be rated at 10 Amps
and be approved by UL and CSA.
For 250 Volt electrical service - The cable must be rated at 10 Amps,
meet the requirements of H05VV-F, and be approved by VDE, SEMKO,
and DEMKO.
Danger:
Pour la sécurité de l’utilisateur, l’appareil est livré avec un câble
d’alimentation trifilaire et une fiche. Pour éviter toute secousse électrique,
enficher ce câble à une prise correctement mise à la terre.
Dans certains pays les prises électriques sont de modèle différent; on ne peut y
enficher le câble de l’appareil. On doit donc en utiliser un autre ayant les
caractéristiques suivantes :
Alimentation 125 V - Câble pour courant nominal de 10 A, agréé LAC
et CSA.
Alimentation 250 V - Câble pour courant nominal de 10 A, conforme au
H05VV-F, et agréé VDE, SEMKO et DEMKO.
Gefahr:
Dieses Produkt wird mit einem 3-adrigen Netzkabel mit Stecker geliefert.
Dieses Kabel erfüllt die Sicherheitsanforderungen und sollte an einer
vorschriftsmäßigen Schukosteckdose angeschlossen werden, um die Gefahr
eines elektrischen Schlages zu vermeiden.
In manchen Ländern ist eventuell die Verwendung eines anderen Kabels
erforderlich, da der Stecker des mitgelieferten Kabels nicht in die
landesüblichen Steckdosen paßt. In diesem Fall müssen Sie sich ein Kabel
besorgen, daß die folgenden Anforderungen erfüllt:
Für 125 Volt-Netze: 10 Ampere Kabel mit UL- und CSA-Zulassung.
Für 250 Volt-Netze: 10 Ampere Kabel gemäß den Anforderungen der
H05VV-F und VDE-, SEMKO- und DEMKO-Zulassung.
Page 35

GigWorks MKII-16 Switch Model MKII-BASE16
Installer's/User's Manual 59003-01 Rev. A
Installation 2-7
Installation
Refer to Appendix A in this manual for Switch power requirements.
a. Connect the power cable to the back of the chassis.
b. Connect the other end of the power cable to a 3 wire, grounded, AC outlet
that delivers power in accordance with the power requirements specified in
Appendix A.
c. Press the Power Button. Refer to Figure 1-2 for its location.
The 3-wire grounded power circuit and the 3-wire power cable provide adequate
grounding for the Switch.
Logic Power Good LED
The Logic Power Good LED on the front of the chassis will light when the
internal power supply is supplying DC power within its normal operating limits
and the Power Button is depressed. Refer to Figure 1-2 for the location of the
LED.
If the Logic Power Good LED fails to light when the Power Button is depressed,
ensure that both ends of the power cord are properly plugged in, the AC power
source is turned ON, and that the input fuses are good.
If you have checked these things and the Power Good LED still is not lit, contact
Ancor Customer Service or your authorized maintenance provider. Do not
proceed to Step 6 unless the Power Good LED is lit.
6. Check the Power-On-Self-Test (POST) Results
When the Power Supply applies DC power to the Switch logic, the logic runs a
Power-On-Self-Test (POST) diagnostic. POST tests the condition of firmware,
memories, data-paths, and Switch logic and uses the Heartbeat LED to indicate
pass or fail conditions. Refer to the Power On Self Test paragraphs in the
Diagnostics and Troubleshooting section (Section 3) of this manual for a
description of POST.
About three seconds after the Power Good LED comes on, POST will be
complete. At this point the Heartbeat LED will start to indicate whether or not
there is a POST error. Check the Heartbeat LED. Figure 1-2 shows the location of
the Heartbeat LED.
If the Heartbeat LED is blinking about once every second, the POST passed and
you may go to the next step.
If the Heartbeat LED is not blinking once every second, the POST failed. Note
what the Heartbeat LED is indicating (by the flash pattern) and contact Ancor
Customer Service or your authorized maintenance provider. Do not proceed to
Note:
Following the connection of AC power to the chassis, the fans start turning
immediately but power is not applied to the logic until the Power button is
pressed.
Page 36

2-8 Installation
GigWorks MKII-16 Switch Model MKII-BASE16
59003-01 Rev. A Installer's/User's Manual
Step 7 unless the POST passed.
7. Cable N or NL_Port Adapters to the Switch
Ports
All 16 ports on the Switch may connect to N_Ports. Ports 1, 2, 5, 6, 9, 10, 13, and
14 may connect to NL_Ports or N_Ports. The type of media used (fiber optic
cable or copper) depends on the type of N or NL_Port adapters used and the type
of GBICs used in the Switch. You may populate the Switch with any assortment
of approved GBICs appropriate for your interconnection media type.
Tuning
You can optimize the system performance by connecting nodes which
interchange the greatest amount of traffic to ports on the Switch which are more
efficiently interconnected.
Connect nodes which interchange the least amount of traffic to ports on the
Switch which are less efficiently interconnected.
The most efficient performance is within a group of four ports. These groups are:
Ports 1-4
Ports 5-8
Ports 9-12
Ports 13-16
When a frame source-port and destination-port are within the same port group,
you will realize:
The lowest Class 2/Class 3 frame latency
The highest Class 2/Class 3 point-to-point bandwidth
The highest Class 2/Class 3 aggregate bandwidth
The lowest Class 1 connect and disconnect latency — Class 1 frame
latency, point-to-point bandwidth, and aggregate bandwidth are not
affected by port groups, and are always the theoretical maximum.
When a frame source-port and destination-port are not within the same port group
the interconnection is slightly less efficient.
Distance
The maximum distance between each adapter and the Switch depends on the type
of GBICs and the type of cable installed. Refer to the Reference Information in
Appendix A of this manual for this information. Also, the speed and Fibre
Channel Revision Level of each adapter must be compatible with the Switch and
the type of I/O media of each adapter must be compatible with the particular
GBIC on the Switch.
Hot-Pluggable
All GBICs and cables are “hot-pluggable”. That is, you may have the Switch
powered-up while you plug or unplug GBICs or cables of any interconnection
media type. Hot-swapping and unplugging does not affect other operating ports.
Installation
Page 37

GigWorks MKII-16 Switch Model MKII-BASE16
Installer's/User's Manual 59003-01 Rev. A
Installation 2-9
Installation
Incorrect Cabling
Cabling connected incorrectly will not damage the GBICs or the Switch.
N_Port Connections
Connect Fiber Channel N_Ports to F_Ports on the Switch. All 16 ports on the
Switch will function as F_Ports. The Switch will automatically discover which
N_Port is connected to which F_Port during Fibre Channel Login process as each
N_Port is powered up.
Fiber Optic Connections
Note in Figure 2-3 that each N_Port connects to the switch with a pair of
connectors. Connect the transmit connector on the N_Port to the receive
connector on the assigned F_Port. Connect the receive connector on the
N_Port to the transmit connector on the assigned F_Port.
Keys on “Duplex” cable assemblies (a connector-pair containing both
transmit and receive fastened together in one unit), prevent you from
connecting them incorrectly.
On the F_Port end of the connection, on the top row of F_Ports, the transmit
connector is the right-hand connector of each pair. On the bottom row of
F_Ports, the transmit connector is the left-hand connector of each pair.
On the N_Port end, you will have to consult the appropriate adapter or
device manual to determine which is which.
Copper Connections
HSSDC connectors are duplex cable assemblies. That is, both the transmit
and receive contacts are part of the same keyed plug assembly. You can’t
plug them in wrong.
NL_Port Connections
Ports 1, 2, 5, 6, 9, 10, 13, and 14 on the Switch will function as FL_Ports if
connected to NL_Ports. The Switch will automatically discover which
NL_Port(s) are connected to which FL_Port during Fibre Channel Login process
as each N_Port is powered up.
The Switch FL_Ports support Loop devices running Fibre Channel Public
Loop mode. Refer to the Fibre Channel FC-FLA specification.
Fiber Optic Connections
Keys on “Duplex” cable assemblies (a connector-pair containing both
transmit and receive fastened together in one unit), prevent you from
connecting them incorrectly.
On the FL_Port end of the connection, on the top row of FL_Ports, the
transmit connector is the right-hand connector of each pair. On the bottom
row of FL_Ports, the transmit connector is the left-hand connector of each
pair.
On the NL_Port end, you will have to consult the appropriate adapter or
device manual to determine which is which.
Page 38

2-10 Installation
GigWorks MKII-16 Switch Model MKII-BASE16
59003-01 Rev. A Installer's/User's Manual
Installation
Most NL_Port connections to the Switch are via Hubs or directly to storage
devices such as JBODs and disc arrays. Connect the transmit SC fiber optic
connector on the FL_Port to the receive SC fiber optic connector on the
NL_Port. Connect the receive SC fiber optic connector on the FL_Port to
the transmit SC fiber optic connector on the NL_Port.
In some cases you may need to connect a loop of NL_Ports to the Switch
without the use of a Hub. Note in Figure 2-3 that these NL_Ports are
connected in a loop from the transmit side of an FL_Port on the Switch,
through each NL_Port in the loop, then back to the receive side of the
original FL_Port on the Switch. Connect the transmit connector on an
FL_Port to the receive connector on the first NL_Port in the loop. Continue
to connect each NL_Port in the loop, transmit to receive. Then connect the
transmit connector on the last NL_Port in the loop to the receive connector
of the same FL_Port on the Switch that you connected to the first NL_Port
in the loop.
Copper Connections
HSSDC connectors are duplex cable assemblies. That is, both the transmit
and receive contacts are part of the same keyed plug assembly. You can’t
plug them in wrong. Connect one end of the cable to the Loop device and
the other end to a port on the FL_Ports on the Switch.
Page 39

GigWorks MKII-16 Switch Model MKII-BASE16
Installer's/User's Manual 59003-01 Rev. A
Installation 2-11
Installation
Figure 2-3 Cabling
N_Port
Rx
Tx
Rx
Tx
NL_Port
NL_Port
NL_Port
NL_Port
NL_Port
NL_Port
NL_Port
Rx
Tx
Rx
Tx
Rx
Tx
Rx
Tx
Rx
Tx
Rx
Tx
Rx
Tx
2
4
6
8
10
12
14 16
1
35
7
9
11 13
15
ON
OFF
COMMUNICATIONS, INC.
WORKS
™
Rx
Tx
Rx
Tx
Rx
Tx
Rx
Tx
Rx
Tx
Rx
Tx
Rx
Tx
Rx
Tx
N_Port
Rx
Tx
Rx
Tx
N_Port
Rx
Tx
Rx
Tx
RxTx RxTx RxTx RxTx RxTx RxTx RxTx RxTx
MKII
Rx
Tx
Fiber optic
connections
Fiber optic connections
JBOD
NL_Ports
NL_Ports
Hub
Loop of fiber optic
NL_Port work stations
(No Hub)
Loop devices
connected to Hub
Copper connections
Page 40

2-12 Installation
GigWorks MKII-16 Switch Model MKII-BASE16
59003-01 Rev. A Installer's/User's Manual
Operating the Switch
The Continuous Test button on the front of the Switch chassis and the switches on
the Chassis Switch Panel on the back of the Switch chassis are the only
operational controls. Place the Continuous Test button in the IN position for
normal operation. The Test mode switches must be set to 0 (POST). Refer to the
Chassis Switch Panel paragraphs in Section 1 of this manual. The default is 0.
The Switch becomes operational when:
• it is connected to an operational power source,
• the Power Button is in the ON (In) position,
• the Continuous Test button is in the OP (In) position,
• the Test Mode Switches are set to 0 (POST),
• and two or more Fibre Channel F or FL_Ports are cabled to their respective
operational N or NL_Ports respectively.
Installation
Page 41

GigWorks MkII-16 Switch Model MKII-BASE16
Installer's/User's Manual 59003-01 Rev. A
Switch Management 3-1
Section 3 Switch Management
Introduction
The Switch supports management through:
• the Windows NT™ or Windows 95™-based GigWorks MKII Switch
Utilities,
• a Trivial File T ransfer Protocol (TFTP) server , and
• a built-in SNMP Agent.
• Optionally , the GigWorks MKII Switch Web-Based Management Interface
application is also available. This management interface is a Web-based (Java)
application.
The Switch Utilities require an Ethernet connection to each managed chassis. The Webbased Switch management application can manage multiple fabrics and can
manage multi-chassis fabrics through an Ethernet connection to any one chassis
in the fabric. Contact your Ancor sales representative or sales engineer for
information about the Web-based Switch management application.
GigWorks MKII Switch Utilities
The GigWorks MKII Switch Utilities allows you to:
• Set up the connection between the Ethernet port on a PC and the Ethernet port on
the Switch and track the communication that takes place over this connection
• Configure the Switch Management interface with its IP network configuration
parameters and SNMP configuration parameters
• Configure the Fabric Number and Chassis Number
• Configure the Chassis Stage T ype for multistage fabrics
Cross-Connect or
Input-Output/Transfer (IOT)
• Configure the Fibre Channel Timeouts
RATOV
EDTOV
• Configure the desired Chassis State and read the actual Chassis State
On Line
Off Line
T est
Page 42

3-2 Switch Management
GigWorks MkII-16 Switch Model MKII-BASE16
59003-01 Rev. A Installer's/User's Manual
Introduction
• Configure the desired Port State and read the actual Port State
On Line
Off Line
T est
Failure (Read only)
• Read the status of each port including:
• Port Type for each fabric port
F_Port
FL_Port
T_Port (Trunk ports interconnect chassis in a multi-stage fabric.)
• Port Status for each fabric port
Logged In
Not Logged In
• FL_Port Loop Status for each FL_Port
• AL-PA of all logged-in NL_Ports
• Configure Loop Devices including:
• Place any NL_Port into Loop Bypass Mode
• Place any or all NL_Ports back into normal Loop Mode
• Re-initializing the Loop
• Read Name Server Information for all logged-in ports
• Load new Switch control-processor firmware into the Switch’s control processor
Flash and Reset the Switch
• Display all the SNMP managed objects provided by the Switch
• Display the Switch W orld W ide Name and all its hardware and software version
numbers
• Perform Diagnostics Trace operations on the Switch under the direction of Ancor
service personnel
• Divide the fabric ports into zones for more efficient and secure communication
among functionally grouped nodes. There are three types of zones and a port may
be defined in any or all of them.
• Hard Zones follow physical boundaries within a Single-Stage Switch chassis
and limit the communication of a port to only other ports in the same Hard
Zone. There may be as many as four Hard Zones and a particular port may be
in only one of them.
• Broadcast Zones allow the division of the fabric into as many as 16 zones that
Page 43

GigWorks MkII-16 Switch Model MKII-BASE16
Installer's/User's Manual 59003-01 Rev. A
Switch Management 3-3
Introduction
define the area of Broadcasts. A particular port may be placed in one or more
of these Broadcast Zones. A port will broadcast to all ports in the same
Broadcast Zone (or zones) in-which the port is defined. If Hard Zones are
enabled, Broadcast Zones may not cross the defined Hard Zone boundaries.
• Name Server Zones allow the division of the fabric into as many as 16 zones
that define which ports receive Name Server information. A particular port
may be defined in one or more of these Name Server Zones. A port will
receive Name Server information for all ports in the same Name Server Zone
(or zones) in-which the port is defined. If Hard Zones are enabled, Name
Server Zones may not cross the defined Hard Zone boundaries.
Trivial File T ransfer Protocol (TFTP)
TFTP allows you to:
• load new Switch firmware (8 and 16-port Switches)
• load new management control firmware into the 16-port Switch. (not necessary for
the 8-port Switch)
• retrieve and modify the current management configuration of the Switch
management processes, including the IP network configuration parameters,
and the SNMP configuration parameters.
Simple Network Management Protocol (SNMP)
SNMP allows you to manage the Switch using Simple Network Management
Protocol (SNMP) as the transport protocol.
Note:
Before you use any of the management interfaces you must:
• connect the Switch’s Ethernet interface to an Ethernet network and
• configure its IP network address, its IP subnetwork mask, and its IP
gateway address. You may configure these IP parameters using either
the Switch Utilities or TFTP.
Refer to the Ethernet Cabling and Configuring the Switch Ethernet Port
paragraphs in this section.
Page 44

3-4 Switch Management
GigWorks MkII-16 Switch Model MKII-BASE16
59003-01 Rev. A Installer's/User's Manual
Ethernet Cabling
The Switch is managed through the use of a customer-supplied management
station connected to the Switch via 10BASE-T Ethernet.
Figure 3-1 shows the location of the Switch Management connector and the
cable wiring. The Ethernet connection is hot-pluggable (that is, you may connect
the Ethernet cable with power applied to the Switch).
Figure 3-1 Ethernet Connection
1
8
Switch Management
Connector
(RJ-45)
10BASE-T Ethernet
Ethernet Switch Management Connector
directly to
Router, Management Station, or other Host
10BASE-T
Cross-over TP
Connection
Cross-over TP Connection
2
3
4
5
6
7
8
1
2
3
4
5
6
7
8
1
10BASE-T
Straight TP
Connection
Ethernet Switch Management Connector
to
Repeater, Ethernet Switch, or Hub
Straight TP Connection
2
3
4
5
6
7
8
1
2
3
4
5
6
7
8
1
Important Note:
If you are loading new Flash code
into the Switch, you must be
connected directly to the Switch
with a “Cross-over” cable.
Ethernet Cabling
Page 45

GigWorks MkII-16 Switch Model MKII-BASE16
Installer's/User's Manual 59003-01 Rev. A
Switch Management 3-5
Configuring the Switch Ethernet Port
Configuring the Switch Ethernet Port
Before the Switch can be managed using the Ethernet port, several management
parameters must be set correctly. At a minimum, the IP network address, the IP
subnetwork mask, and the IP gateway address must all be set. In addition, the
SNMP read, write, and trap community names may be set, as well as the SNMP
name, contact, and location. When managing a multi-chassis fabric with the
Switch Utilities, this setup is required for each chassis in the fabric. If you are
managing the multi-chassis fabric with the Web-based Switch management
application, this setup is required only for the chassis that is directly connected to
the Ethernet network.
To configure the Switch management parameters, install the Switch temporarily
on an isolated network with the subnet address 10.x.x.x (By default, the
Switch’s IP address is 10.0.0.1.). This network does not need to contain anything
more than the Switch and a single management host to configure the Switch. You
may then use either the Switch Utilities, the Web-Based Switch management
application, or TFTP to configure the Switch chassis’ Ethernet port.
Configuring the Ethernet Port Using the Switch Utilities
1. Connect the PC running the Switch Utilities, as per Figure 3-1. You may
connect the PC directly to the Switch or through a network. The Switch is
configured at the factory to use the IP address 10.0.0.1 and network mask
255.0.0.0. The PC must also be configured to use an address in the range
10.0.0.2 to 10.255.255.254, and to use the same network mask 255.0.0.0.
2. Follow the Loading the Switch Utilities and Getting Started paragraphs in
Managing the Switch Using the GigWorks MKII Switch Utilities to load and
start the Switch Utilities on the management station.
3. In the Setup Tab of the Switch Utilities, select Switch IP Address 10.0.0.1.
This allows you to communicate with the Switch chassis with its default IP
Address.
4. In the Management Configuration Tab, set the appropriate values for the
Network IP Address, Broadcast IP Address, Network Mask, and Gateway
Note:
The Switch cannot be managed through the Ethernet port without the
management station knowing the IP address of the Switch. If the IP
configuration of the Switch is lost, the Switch can be reset in PROM mode. In
Prom mode, the Switch always uses the default management parameters,
not the parameters defined in the configuration file. In this way, the
Switch can always be returned to a 10.0.0.x network and reconfigured. Contact
Ancor Customer Service for instructions on how to place your Switch chassis
into Prom mode.
Page 46

3-6 Switch Management
GigWorks MkII-16 Switch Model MKII-BASE16
59003-01 Rev. A Installer's/User's Manual
IP Address. When all parameters have been set correctly, click the Set
Parameters Button to set the values on the Switch chassis. The new values
will be saved on the Switch, and will take effect when the Switch is
powered down and back up (re-booted). You may also force the Switch to
begin using the new values immediately by clicking the Reset the Ancor
GigWorks MKII Management Only Button. Remember to write down the
new IP Address so you can use it to access this Switch when it is rebooted.
Configuring Multiple Switches
If you are performing an initial configuration on multiple Switches, you
must not connect the PC to more than one Switch at a time, since all
Switches will initially be using the same IP Address 10.0.0.1. To configure
more than one Switch, connect the PC to a single Switch at first, change its
IP network parameters, and when completed, connect the PC to the next
Switch to be configured. When you connect the PC to the next Switch,
remember to flush the ARP cache on the PC, since the Switch Ethernet
address will have changed, while the IP Address will still be the same
10.0.0.1. A typical command for doing this is: arp -d
10.0.0.1.
You are now ready to use the Switch Utilities. Paragraphs under the Using the
Switch Utilities will describe each Tab and supporting menus such as File, View,
and Help.
Configuring the Ethernet Port Using TFTP
To configure the Switch chassis:
1. Connect to the Switch using TFTP. This is a standard utility included in
most Unix and Windows NT workstations. Versions for other platforms can
be obtained from other vendors.
Because TFTP has no passwords, user authentication, or other security,
only trusted users should have access to the Switch through the
Ethernet port.
2. Select text file transfer mode.
3. Retrieve the Switch configuration file named config.
4. Use any text editor to modify the parameters of this configuration file.
5. Transfer the configuration file back to the Switch file config.
6. The Switch can now be powered down and moved to the production
network. When the Switch is powered up, it will execute with the new
parameter values defined in the configuration file.
Refer to the Managing the Switch Using TFTP paragraphs later in this section for
more detail.
Configuring the Switch Ethernet Port
Page 47

GigWorks MkII-16 Switch Model MKII-BASE16
Installer's/User's Manual 59003-01 Rev. A
Switch Management 3-7
Managing the Switch Using the GigWorks MKII Switch Utilities
Managing the Switch Using the GigWorks MKII Switch Utilities
The Switch Utilities allow you to manage the Switch through its Ethernet
interface.
Loading the Switch Utilities
In order to run the Switch Utilities, you must provide an IBM®, or compatible,
PC with an Ethernet output, running Windows NT™ version 4.0 or Windows
95™ (or later), and an Ethernet cable. You will use the cable to connect the PC to
the Switch Management Connector of the Switch. Instructions for the PC
installation and Switch Utilities operation follow.
1. Set the Power Switch on the PC to ON.
2 Boot the PC with Windows NT Version 4.0 or Windows 95 or later.
3. Use the following steps to Load the Switch Utilities software. Ancor
supplies the Switch Utilities software on two floppy diskettes.
Loading the Switch Utilities Software into a PC from Floppy Diskettes
a. Insert the Ancor MKII Switch Utilities - Disk 1 floppy into the floppy
drive.
b. Choose Run on the Start menu. The screen will display the Run dialog
box.
c. Enter: X:setup (where X is the drive letter of
the floppy drive) and press Enter.
Follow the prompts. The system will prompt you for the second disk.
When the Switch Utilities are loaded, remove the second floppy and proceed to
the Getting Started paragraphs.
Getting Started
After you have completed the PC Installation, including the loading of the Switch
Utilities software, use the following steps to start the Switch Utilities .
1. From the Start menu choose Program>Ancor>GigWorks MKII Switch
Utilities. The screen will display the application window with the Setup tab
selected.
The Setup tab is the first tab displayed in a set of tabs that allows various
operations on the Switch. All the tabs are described in the Using the Switch
Utilities paragraphs but first you must use the Ethernet Port Radio Button
in the Setup tab for some basic setup.
2 In the Setup Tab, make sure the Ethernet Port Radio Button is selected, and
set the IP Address field to the IP address of the switch to be managed. (All
Page 48

3-8 Switch Management
GigWorks MkII-16 Switch Model MKII-BASE16
59003-01 Rev. A Installer's/User's Manual
Switch Utilities
Switches come configured from the factory with the default address
10.0.0.1.)
3. Use the Setup Tab to read the UART statistics to make sure the Utilities can
connect to the Switch.
Using the Switch Utilities
The user interface to the Switch Utilities is a standard Windows™-type interface
structured like a set of tabbed file folders (Refer to Figure 3-2). Use the cursor to
click on any tab and the screen will display a dialog box for that tab. The dialog
box for the Setup tab is always the first that the system opens when entering the
Switch Utilities.
Each tab is supported by the File and Help menus.
These paragraphs assume that you understand standard Windows interface
practices (for example, how to control the cursor, use the keyboard, and how to
save files etc.).
File
File>Open
The Open command operates on the Flash tab only. The Open command prompts
you to select the file containing the new Switch control code to be loaded into
Flash memory.
File>Save
The Save command operates on a tab-by-tab basis. That is, if you perform a Save
command while the Setup tab is selected, the system saves the contents of the
data window of only the Setup tab. The first time you perform a Save for a
particular tab, the system treats it like a Save As command and prompts you to
name the file and indicate the location where you want the file to be saved. This
file name/location becomes the default for that tab. The second and subsequent
times you perform a Save command for that tab, the system appends the new
data to the content of the old file. If you perform a Save As command for that
same tab, you change the default file/location for the selected tab. The Switch
Utilities will remember these default file names/locations for each tab from
session to session.
You may use the same file name/location for each tab or have a different one for
File
Open Ctrl+o
Save Ctrl+s
Save As
Exit
Page 49

GigWorks MkII-16 Switch Model MKII-BASE16
Installer's/User's Manual 59003-01 Rev. A
Switch Management 3-9
Switch Utilities
each tab.
The system saves only the contents of the data window of each tab. That is, it
does not save such things as button settings. Tabs that do not contain any data,
such as the tab used to load new control code into Flash memory, have the Save
command disabled.
File>Save As
The Save As command operates on a tab-by-tab basis. That is, if you perform a
Save As command while the Setup tab is selected, the system saves the contents
of the data window of only the Setup tab. The Save As command prompts you to
name the file and indicate the location where you want the file to be saved. This
file name/location becomes the default for that tab. The Switch Utilities will
remember these default file names/locations for each tab from session to session.
The system saves only the contents of the data window of each tab. That is, it
does not save such things as button settings. Tabs that do not contain any data,
such as the tab used to load new control code into Flash memory, have the Save
As command disabled.
File>Exit
The Exit command closes the Switch Utilities application and returns to the
operating system.
Help
Help>About
The About command displays the version, copyright, and warranty service
information.
Tabs Overview
These Tab paragraphs explain each of the tabs from left to right, starting with the
Management Information tab.
Help
About
Page 50

3-10 Switch Management
GigWorks MkII-16 Switch Model MKII-BASE16
59003-01 Rev. A Installer's/User's Manual
Switch Utilities — Management Information
Management Information
Figure 3-2 Management Information Tab
Refer to Figure 3-2. The Management Information tab enables you to display all
the managed objects provided by the Switch. These objects consist of 11 tables,
divided into 5 functional groups. These groups are:
• fcFeConfig — Configuration
• fcFeOp — Operation
• fcFeError — Error
• anMkiiAccounting — Accounting
• fcFeCap — Capabilities
Each group has one or more tables associated with it. The Fibre Channel Fabric
Element MIB defines the fcFeConfig, fcFeOp, fcFeError, and fcFeCap groups.
The Ancor MKII Accounting MIB defines the anMkiiAccounting group. The
Ancor Utilities MIB defines the Ancor-specific configuration and parameters.
All MIBs are available on the Internet through the Ancor Customer Services link
Page 51

GigWorks MkII-16 Switch Model MKII-BASE16
Installer's/User's Manual 59003-01 Rev. A
Switch Management 3-11
Switch Utilities — Management Information
in the Ancor Web-site (www.Ancor.com).
Configuration Group Tables
• fcFabricName — Fabric Name — a universally unique name for the Fibre
Channel Fabric, including all nodes and switch elements
• fcElementName — Element Name — a fabric-unique name for this switch
element
• fcFeModuleCapacity — Module Capacity — the number of modules in this
switch element
• fcFeModuleTable — Module Table — a table of information about each
module in the switch element
• fcFPortConfigTable — Port Configuration Table — a table of the current
configuration parameters for each port in the switch element
Operation Group Tables
• fcFPortOperTable — F_Port Operations Table — a table of the operational
values of each port in the switch element
• fcFPortFlogiTable — F_Port Login Table — a table of the service
parameters defined during the last login
• fcFPortPhysTable — F_Port Physical Level Table — a table giving the
physical status of each port in the switch element
Error Group Tables
• fcFPortErrorTable — F_Port Error Table — a table of error counts for each
port in the switch element
Account Group Table
• anMkiiAccounting — a table of traffic statistics for each Fibre Channel port
Capability Group Tables
• fcFPortCapTable — Port Capabilities Table — a table of configuration
parameters supported by each port in the switch element
Page 52

3-12 Switch Management
GigWorks MkII-16 Switch Model MKII-BASE16
59003-01 Rev. A Installer's/User's Manual
Switch Utilities — Management Information
Management Information Tab Controls/Windows
Port Field
Enter the Fibre Channel port number for-which you want to read the SNMP
information. The range for a 16-port Switch is 1-16. The range for an 8-port
Switch is 1-8.
Group Select List
Select the Group that contains the desired table. You may select All or any one
group from the Group List.
Table Select List
Select the desired table. You may select All or any one table from the Table List.
Read Button
Press to read and display the selected table(s). The system reads the desired
information from the Switch and displays it in the Information Display Window.
Next Port Button
Press to increment the Fibre Channel Port Number and read and display the
selected table(s).
Previous Port Button
Press to decrement the Fibre Channel Port Number and read and display the
selected table(s).
Display Clear Button
Press to clear the Information Display Box. This button does not affect the
Switch.
Append Check Box
If checked, the system appends new information to the information already in the
Information Display Window.
If not checked, the system will clear the Information Display Window before it
displays the new information.
Information Display Window
The Information Display Window displays the selected MIB information.
Page 53

GigWorks MkII-16 Switch Model MKII-BASE16
Installer's/User's Manual 59003-01 Rev. A
Switch Management 3-13
Switch Utilities — Flash
Flash
Figure 3-3 Flash Tab
Refer to Figure 3-3. The Flash tab enables you to load new control code into the
Switch’s Flash memory and also to command the Switch to perform a Reset
operation.
In order to load new Flash Code, you must first connect the switch directly
to the PC used as a management Station using a “Cross-Over” Cable.
In the event that your Flash memory requires an update, Ancor Communications
will supply you with a binary Flash update file. This file may be available on a
floppy, CD-ROM, or it may be available over the Internet. In any case, load this
file on the PC (the one connected to the Switch’s Ethernet port) and select the
Flash tab in the Switch Utilities.
You may load new Flash code to the Switch’s Flash memory while the Switch is
operating under the old Flash code. The Switch will not use the new Flash code
until it is Reset. The Switch will Reset when you command a Reset operation
from the Switch Utilities Flash tab or you cycle the Power on the Switch.
Flash File Name
There are two ways you can enter the name and path to the file containing the
Page 54

3-14 Switch Management
GigWorks MkII-16 Switch Model MKII-BASE16
59003-01 Rev. A Installer's/User's Manual
Switch Utilities — Flash
new Flash code: You may place the cursor in the Flash File Name box and type
it, or you may click the Select button.
Clicking the Select button produces a standard Windows operating system dialog
box that allows you to open the Flash update binary file. When you open the
Flash update file, its path/name will appear in the Flash File Name box as you
would have typed it.
Load Flash
If you have selected a Flash file to load and its path/name appear in the Flash File
Name box, and you click the Load Flash button, the system will load the new
Flash (after asking you if you are sure).
If you have not selected a Flash file to load and its path/name does not appear in the
Flash File Path/Name box, and you click the Load Flash button, the system will
produce a standard Windows operating system dialog box that allows you to open
the Flash update binary file. When you open the Flash update file, its path/name
will appear in the Flash File Name box as you would have typed it. The system will
load the new Flash (after asking you if you are sure).
Cancel Button or the Flash Load Fails
In the event that you click the Cancel Button or the Flash load fails, the Switch
will still remain operable until you cause a Switch Reset (Assuming, of course,
that the Switch was operating before you attempted to load new Flash code). You
may try multiple times to load new Flash code without upsetting the operation of
the Switch as long as you don’t Reset the Switch.
If you do Reset the Switch, it will try to use the new Flash code and will discover
that it is bad. The Switch will display a Heartbeat error code of three blinks
indicating a Flash Checksum error. The Switch is still able to load new Flash
code but is not operable until the new code is successfully loaded and the Switch
is again Reset.
When the Flash load is successful, Reset the Switch to put the new Flash code
into operation.
Flash Load Progress
A progress bar shows the progress of the load and boxes indicate the number of
bytes sent and the total number of bytes in the transfer. The box under the
progress bar contains the status of the Flash load. This box will tell you when the
load is complete or that something went wrong. In case the Flash load fails, refer
to the Cancel Button or the Flash Load Fails paragraphs above.
Reset the Ancor GigWorks MKII Switch
When the Flash load is successful, click the Reset the Ancor GigWorks MKII
Switch button to Reset the Switch. This puts the new Flash code into operation.
In case the Flash load fails, refer to the Cancel Button or the Flash Load Fails
paragraphs above.
Page 55

GigWorks MkII-16 Switch Model MKII-BASE16
Installer's/User's Manual 59003-01 Rev. A
Switch Management 3-15
Switch Utilities — Versions
Versions
Figure 3-4 Versions Tab
Refer to Figure 3-4. The Version tab enables you to display and log the Switch
hardware and software version numbers. For a 16-port Switch it also displays the
settings of the switches on the Chassis Switch Panel which is located on the back
of the 16-port Switch chassis and read by the Switch at power-up. Windows in
the Version tab display these numbers.
World Wide Name
This number is the unique number of the Switch chassis.
Version Information
Message Version: This is the version number of the communication interface
between the Ethernet port and the Switch. This interface and its version number
are loaded as part of the Flash code. Therefore, this number could change
following a Flash load.
Flash Software Type: This indicates whether the Flash code is for a single-stage
Switch or a multiple-stage switch. This information is loaded as part of the Flash
code. Therefore, this information could change following a Flash load.
Flash Software Version: This is the version number of the control code in Flash
Page 56

3-16 Switch Management
GigWorks MkII-16 Switch Model MKII-BASE16
59003-01 Rev. A Installer's/User's Manual
Switch Utilities — Versions
memory. This number is loaded as part of the Flash code. Therefore, this number
could change following a Flash load.
Prom Software Version: This is the version number of the control code in
PROM. This number is read from the PROM. Therefore, this number could
change following a PROM change.
Hardware Version (PCB.ASIC): The number on the left side of the period is the
version number of the board in the Switch. The number to the right of the period
is the version number of the Switch ASIC.
Quadrants: Always equal to one in an 8 or 16-port Switch.
Chassis Type: This indicates that the Switch hardware is an 8 or 16-port Switch.
Chassis Number: This number represents bits 19 through 14 of the 24-bit Fibre
Channel Address.
Stage Number: In a single-stage Switch this number is not used.
Fabric Id: This number represents bits 20 through 23 of the 24-bit Fibre Channel
Address.
Module Address: This is the 24-bit Fibre Channel Address for the lowest
numbered Fibre Channel port on the Switch chassis.
Management Version: The version number of the Management firmware.
Switch on Front
Continuous Test: This shows the state of the Continuous Test Button on a 16-port
Switch. It is not used on an 8-port Switch.
Switches on Back
The FP (Force Prom) field indicates the position of the Force Prom switch on the
16-port Switch and the rotary Test Mode switch on an 8-port Switch. It will read
“Normal” if the switch/button is in the normal operate position. It will read Force
Prom if the switch/button is in the Force Prom position.
The remainder of the fields in this display show the states of the switches on the
16-port Switch Chassis Switch Panel (located on the back of the 16-port Switch
chassis). These switches are not used, except for the Test Mode switches which
are used at the factory.
Refresh Button
Reads the World Wide Name (8 or 16-port), Version Information (8 or 16-port),
the Continuous Test button (16-port Switch), and the switches on the back of the
16-port Switch chassis.
Page 57

GigWorks MkII-16 Switch Model MKII-BASE16
Installer's/User's Manual 59003-01 Rev. A
Switch Management 3-17
Switch Utilities — Diagnostics Trace
Diagnostics Trace
Diagnostics Trace Overview
The Diagnostics Trace tab allows Ancor service personnel to follow the progress
of selected operations as they proceed through the Switch. This tab is included in
the Switch Utilities for the customer because at some point, if you are
experiencing problems, an Ancor Service engineer may ask you to perform a
Diagnostics Trace, read the results, and send them back to the factory. Therefore,
use this tab only under the direction of Ancor Customer Service personnel.
A typical Diagnostics Trace scenario follows (Refer to Figure 3-5):
1. Press the Enables radio button to enable the Enables display and controls.
2. Use the Enables controls to read the current list of Diagnostics Trace
functions from the Switch.
3. Press the Trace Clear button to clear the Switch’s Diagnostics Buffer.
4. Use the Enables controls to select (highlight) one or more of the
Diagnostics Trace functions. Selecting a time stamp is optional (in the list
of functions).
5. Use the Enables controls to apply the selected Diagnostics Trace functions
to the Switch. This clears the Diagnostics Trace buffer (if you had it
selected in the list of functions) and activates the selected Diagnostics Trace
operations in the Switch. At this point the Switch is logging the progress of
the enabled Diagnostics Trace functions into the Diagnostics Trace Buffer.
The Ancor service engineer may have you perform a specific operation like
attempt a login from a node connected to the Switch or communicate
between devices interconnected through the Switch.
6. (Refer to Figure 3-5) Press the Display radio button to enable the Display
controls.
7. Use the Display controls to read and display the Switch’s Diagnostics Trace
Buffer.
8. Use File>Save to save the Display to a file.
9. Use the Enables controls to read the current list of Diagnostics Trace
functions from the Switch. This list will have the enabled Diagnostics Trace
functions highlighted.
10. Click the highlighted Diagnostics Trace functions to disable them.
11. Apply the list to the Switch with all Diagnostics Trace functions disabled
(not highlighted). This disables all Diagnostics Trace functions in the
Switch. After applying the list to the Switch, you may perform a Read
operation just to make sure the the list comes back from the Switch with all
the Diagnostics Trace functions clear (not highlighted).
12. Ancor Customer Service will explain how and where to send the file of the
Diagnostics Trace Buffer.
Page 58

3-18 Switch Management
GigWorks MkII-16 Switch Model MKII-BASE16
59003-01 Rev. A Installer's/User's Manual
Switch Utilities — Diagnostics Trace
Figure 3-5 Diagnostics Trace Tab (Enables)
Controls are divided into two groups, Enables and Display.
Diagnostics Enable Controls
Refer to Figure 3-5. The Enables controls allow you to read and display the
current list of Diagnostics Trace functions from the Switch. The display shows
which functions are enabled and which are disabled. The Enables controls also
allow you to enable or disable one or more of these functions, select from two
time stamps, and clear the Switch’s Diagnostics Trace Buffer.
Enables Radio Button
Activates the Enables controls and the Enables display on the Diagnostics Trace
Tab screen.
Enables Read Button
Reads the current list of Diagnostics Trace functions from the Switch. Any
Diagnostics Trace functions active in the Switch are shown highlighted in the
display.
Enables All Button
Select (highlight) all Diagnostics Trace functions. You may select Diagnostics
Trace functions one at a time by checking individual functions in the list.
Page 59

GigWorks MkII-16 Switch Model MKII-BASE16
Installer's/User's Manual 59003-01 Rev. A
Switch Management 3-19
Switch Utilities — Diagnostics Trace
Enables None Button
Deselect (remove the highlight from) all Diagnostics Trace functions. You may
deselect Diagnostics Trace functions one at a time by checking individual
selected (highlighted) functions in the list.
Enables Apply Button
Applies the list to the Switch and activates the Diagnostics Trace functions that
are selected in the list and deactivates any that were active and are now not
highlighted in the list.
Trace Clear Button
Press to erase the Switch’s Diagnostics Trace Buffer.
Enables Information Display Window
The Enables Information Display Window displays the list of Diagnostics Trace
functions and their current states read from the Switch during an Enables Read
operation.
Diagnostics Trace Display Controls
Refer to Figure 3-6. The Display controls allow you to read and display the
contents of the Switch’s Diagnostics Buffer.
Figure 3-6 Diagnostics Trace Tab (Display)
Page 60

3-20 Switch Management
GigWorks MkII-16 Switch Model MKII-BASE16
59003-01 Rev. A Installer's/User's Manual
Switch Utilities — Diagnostics Trace
Display Offset Box
The Offset is a hexadecimal address offset into the 4K circular Diagnostics Trace
Buffer.
Display Quantity Box
The Quantity is the hexadecimal number of lines/addresses you want to read.
Display Read Button
Press the Read button to read the number of Diagnostics Trace Buffer
addresses/lines specified by the Quantity box, starting at the address specified by
the Offset box and display them in the Display Information Display Window.
Display Read All Button
Press the Read All button to read the entire Diagnostics Trace Buffer and display
it in the Display Information Display Window.
Display Clear Button
Press the Clear button to clear the Display Information Display Window. This
button does not clear the Diagnostics Trace Buffer in the Switch. Refer to the
Trace Clear Button to clear the Diagnostics Trace Buffer.
Display Append Checkbox
If you check the box, the display will append the new information to the contents
of the Information Display Window. If you do not check the box, the display will
replace the old Information Display Window contents with the new information.
Display Information Display Window
The Display Information Display Window displays the information read from the
Switch’s Diagnostics Trace Buffer. Refer to the Append check box.
Page 61

GigWorks MkII-16 Switch Model MKII-BASE16
Installer's/User's Manual 59003-01 Rev. A
Switch Management 3-21
Switch Utilities — Setup
Setup
Figure 3-7 Setup Tab
Refer to Figure 3-7. The Setup tab enables you to set up the connection between
the Ethernet port on the PC and the Ethernet port on the Switch and to track the
communication that takes place over this connection.
The Setup tab also enables you to read and display UART statistics.
Ethernet Port Radio Button
The Ethernet Port Radio Button, when selected, causes the Utilities to
communicate to the Switch through the Ethernet port on the PC.
Ethernet IP Address Box
This is the IP Address that the Utilities application uses to communicate with the
Switch. The IP Address set in the Switch at the factory is 10.0.0.1. Therefore, the
first time you use the Utilities you must use this address. You may change the
Switch IP Address using the Mmanagement. Configuration Tab.
To change the IP Address that the Utilities application uses to communicate with
the Switch, select the IP Address and type the new address.
Page 62

3-22 Switch Management
GigWorks MkII-16 Switch Model MKII-BASE16
59003-01 Rev. A Installer's/User's Manual
Switch Utilities — Setup
UDP Port # Box
This is the UDP Port Number the Utilities application uses to communicate with the
proper application in the Switch. The default port number is 5000.
Use Sequence Checkbox.
For future use.
Serial Port Radio Button (Legacy Switches only)
Press the Serial Port Radio Button to enable communication via the legacy Switch RS-232
port. and the local PC Serial Port.
COMx Selection Box (Legacy Switches only)
The COMx Selection Box allows you to select the COM port on the PC through-which
you want to communicate. You may select from COM1, COM2, COM3, or COM4.
UART Stats Read Button
The UART Stats Read button causes the Switch Utilities to read the UART
Statistics and display them in the Setup tab data window. These statistics come
from a set of 32-bit counters that are counting the number of messages sent and
received and the number of various errors. The UART Stats Clear button clears
these counters.
These statistics are the most useful in the field as an indication of the quality of
the RS-232 connection. If you are getting any errors, check the serial cable and its
connection to the COM port on the PC and the Utility connector on the Switch.
UART Stats Clear Button
The UART Stats Clear button resets the UART Statistics Counters.
Information Display Window
The Information Display Window displays the UART Statistics.
Display Clear Button
The Display Clear button clears the Information Display Window.
Page 63

GigWorks MkII-16 Switch Model MKII-BASE16
Installer's/User's Manual 59003-01 Rev. A
Switch Management 3-23
Switch Utilities — Chassis Configuration
Chassis Configuration
Figure 3-8 Chassis Configuration Tab
Refer to Figure 3-8. The Chassis Configuration tab enables you to assign or
modify the Fabric ID, the Chassis Number, the Stage Type, Fibre Channel
timeouts for the chassis, and the Administrative State of each port on the chassis.
It also allows you to read the Operational State of each port on the chassis.
Fabric ID
Place the cursor in the Fabric ID box and type a fabric number. It represents bits
20 through 23 of the 24-bit Fibre Channel Address.
Press the Apply button to apply the Fabric ID to the chassis.
Chassis Number
The Chassis Number represents bits 19 through 14 of the 24-bit Fibre Channel
Address.
The Chassis Number is in the range of 00-63 and identifies a particular chassis within
the Input-Output/Transfer (IO/T) chassis group or a particular chassis within the CrossConnect (CC) chassis group in a multi-stage Switch fabric. IO/T and CC chassis are
Page 64

3-24 Switch Management
GigWorks MkII-16 Switch Model MKII-BASE16
59003-01 Rev. A Installer's/User's Manual
Switch Utilities — Chassis Configuration
both numbered beginning with 00.
Press the Apply button to apply the Chassis Number to the chassis.
Stage Type Radio Buttons
Any MKII Switch chassis can function as either of two Stage types. These are an
Input-Output/Transfer chassis (IO/T) or a Cross-Connect chassis (CC). Refer to
the fabric descriptions below for information about the two chassis types. Refer
also to the MKII Switch Multi-Stage Installer’s/User’s manual. Make the
appropriate selection in the Stage Type Radio buttons and press the Apply button
to apply the new Stage Type to the chassis.
Single-Stage Fabrics
In a single-stage Switch fabric (only one chassis in the fabric) the only
Chassis Type used is the IO/T chassis.
Two-Stage Fabrics
In a two-stage fabric, multiple chassis are meshed together forming a larger
fabric. In a two-stage fabric, all chassis are IO/T chassis. Some ports are
used as Input-Output fabric ports that connect to N and NL_Ports, and some
ports are used as Transfer ports that interconnect the chassis.
Multi-Stage Fabrics
In a multi-stage Switch fabric there are two types of chassis, IO/T and CC.
IO/T chassis provide input-output fabric ports that connect to N and
NL_Ports and also Transfer ports that connect to CC chassis. CC chassis
interconnect the IO/T chassis.
RTTOV
This box controls the Receiver_Transmitter_Timeout value for all ports on the
chassis. Select the box, type the new value. The number is in ms (2000 = 2
seconds).
Press the Apply button to apply the new timeout value to the chassis.
EDTOV
This box controls the Error_Detect_Timeout value for all ports on the chassis.
Select the box, type the new value. The number is in ms (2000 = 2 seconds).
Press the Apply button to apply the new timeout value to the chassis.
RATOV
This box controls the Resource_Allocation_Timeout value for all ports on the
selected chassis. Select the box, type the new value. The number is in ms (2000 =
2 seconds). Press the Apply button to apply the new timeout value to the chassis.
Page 65

GigWorks MkII-16 Switch Model MKII-BASE16
Installer's/User's Manual 59003-01 Rev. A
Switch Management 3-25
Switch Utilities — Chassis Configuration
Administration/Operation States
The Administration State is the state you would like the chassis and each of its
Ports to be in. The Operational State is the state they are actually in. You may
configure the chassis and each of its ports to be ON LINE or OFF LINE or in
Test.
Refresh Button
The Refresh button reads data from the Chassis and displays it. If you have made
any changes to the settings in this screen but have not sent it to the chassis with
the Apply button, the data read from the chassis will over-write your edited data.
Apply Button
The Apply button sends data to the Switch Chassis. You may edit or enter data in
this screen and it does not get sent to the Switch Chassis until you send it with the
Apply button.
Page 66

3-26 Switch Management
GigWorks MkII-16 Switch Model MKII-BASE16
59003-01 Rev. A Installer's/User's Manual
Switch Utilities — Port Status
Port Status
Figure 3-9 Port Status Tab
Refer to Figure 3-9. The Port Status tab enables you to find the status of all ports
on the Switch and any connected Loop devices and to control the Mode of the
port (F or FL) and to enable or bypass Loop devices.
The Port Status screen has two windows, Port Status and Loop Status. Each
window has three buttons for control. A description of these windows and their
associated buttons follows.
Port Status Window
The Port Status Window contains five fields to describe each Switch port and
three buttons for control. The fields are Port, Status, Mode, Login-Status, and
AL-Enabled. The three buttons are Refresh, Toggle AL-Enabled, and Save
Changes. Descriptions follow.
When you open the Port Status tab the Utilities application polls the Switch to
find the information for each port. As long as the Port Status tab is open, the Port
Status window does not refresh unless it is told to. Refer to the Refresh button.
Page 67

GigWorks MkII-16 Switch Model MKII-BASE16
Installer's/User's Manual 59003-01 Rev. A
Switch Management 3-27
Switch Utilities — Port Status
Port Field: The Port field lists each port on the Switch.
Status Field: The Status field tells whether a port is Online or Offline.
Mode Field: The Mode field tells whether a port is operating as an F_Port, an
FL_Port, or a T_Port (Trunk Port in a multi-stage fabric).
Login Status Field: The Login Status field indicates whether or not a port is
Logged in.
AL-Enabled Field: The AL-Enabled field is user controlled.
If the AL-Enabled field for a particular port is labeled Yes, the port is allowed to
“self discover” its mode by determining the type of node port it is connected to. If
it is connected to an N_Port, the Switch port will operate as an F_Port. If it is
connected to an NL_Port, the Switch port will operate as an FL_Port.
If the AL-Enabled field for a particular port is labeled No, the port is forced to an
F_Port. Thus, if you have a single loop device (NL_Port) that is able operate with
either an FL_Port or an F_Port you have the option to force it to operate on an
F_Port.
If the field for a particular port is labeled N/A, the port can only be an F_Port.
The default for all ports on an 8-port Switch or half of the ports on a 16-port
Switch is Yes. If you want to toggle the enable for a particular port to No, select
(highlight) the port and click the Toggle AL-Enabled button. The attached device
is forced Offline and must re-establish port login with the Switch. The NL_Port
must be able to operate with an F_Port in order to re-establish Online Status.
Toggle AL-Enabled Button: This button toggles the AL-Enabled field for the
selected port. If the selected port is an FL_Port, toggling the AL-Enabled field to
No will immediately force the attached node Offline. The attached node must be
able to log in and operate on an F_Port.
Save Changes Button: If you don’t save the changes, the next time the Switch
initializes, it will use the previous AL-Enable settings. Click the Save Changes
button to use the changes permanently.
Refresh Button: Refreshes the information in the Port Status window and Loop
Devices window if an FL_Port is highlighted.
Loop Devices Window
The Loop Devices Window contains three fields, AL_PA, Status, and LoginStatus and four control buttons, Reset & Reinitialize Loop, Reinitialize Loop,
Enable all on Loop, and Toggle Bypass/Enable.
When you first open the Port Status tab the Loop Devices window is blank.
Select (highlight) an FL_Port in the Port Status window and the Utilities
application will poll the Switch to get the loop information. If the selected port is
an F_Port, the Loop Devices window is blank.
The amount of information the Switch knows about the devices on a loop
Page 68

3-28 Switch Management
GigWorks MkII-16 Switch Model MKII-BASE16
59003-01 Rev. A Installer's/User's Manual
Switch Utilities — Port Status
depends on the capabilities of the loop devices and what has happened since the
loop was last initialized.
Generally, when a loop is initialized, all Enabled devices that successfully
initialize receive an AL_PA. Thus the Switch knows of their existence and can
report that fact to the Switch Utilities. There may be devices on the loop that are
not powered up or are in Bypass mode. These devices will not receive AL-PAs
and the Switch will not know of their existence. Therefore, the Switch will not
report on them to the Switch Utilities.
The Switch Utilities give you the ability (if the particular device has the ability)
to control the mode of the loop device. That is, you may Enable the device or
place it in Bypass Mode. If the device had received an AL_PA before it was
placed in Bypass Mode, the Switch still knows about it and can report on it to the
Switch Utilities. If you change the mode of a particular device from Enabled to
Bypass, the Switch Utilities will still know about the device. But if you then reinitialize the loop, that device (now in Bypass Mode) will not receive an AL_PA
and the Switch/Utilities will no longer know about it.
AL_PA Field: This field contains the AP_PA of the loop device.
Status Field: This field contains the current mode of the loop device (Enabled or
Bypass) and, if the device permits, is controllable through the Switch Utilities. To
toggle the mode, select (highlight) the device entry in the Loop Device window
and press the Toggle Bypass/Enable Button.
Login-Status Field: This field indicates whether or not the device is logged in or
not logged in.
Toggle Bypass/Enable Button: Press this button to toggle the mode of the
selected device. Remember that if you place a device in Bypass mode and then
re-initialize the loop, the device will lose its AL_PA.
Reset & Re-Initialize Loop Button: Press this button to both Reset and reinitialize the loop. Remember that devices that you placed in Bypass mode will
not receive an AL_PA and will disappear from the window when you click the
Refresh button.
Re-Initialize Loop Button: Press this button to re-initialize the loop. Remember
that devices that you placed in Bypass mode will not receive an AL_PA and will
disappear from the window when you click the Refresh button.
Enable all on Loop Button: Press this button to enable all the devices on the
loop that can be enabled. Click the Refresh Button to receive new status.
Refer to the Refresh Button described earlier in this tab description.
Page 69

GigWorks MkII-16 Switch Model MKII-BASE16
Installer's/User's Manual 59003-01 Rev. A
Switch Management 3-29
Switch Utilities — Zoning
Zoning
Figure 3-10 Zoning Tab
Zoning allows the user to divide the fabric ports into zones for more efficient and secure
communication among functionally grouped nodes. There are three types of zones and a
port may be defined in any or all of them.
• Hard Zones follow physical boundaries within a Single-Stage Switch chassis and
limit the communication of a port to only other ports in the same Hard Zone. There
may be as many as four Hard Zones and a particular port may be in only one of
them.
• Broadcast Zones allow the division of the fabric (one or more Switch chassis) into
as many as 16 zones (the Switch Utilities only support 4 zones at this time but each
zone is fabric-wide) that define the area of Broadcasts. A particular port may be
placed in one or more of these Broadcast Zones. A port will broadcast to all ports in
the same Broadcast Zone (or zones) in-which the port is defined. If Hard Zones are
enabled, Broadcast Zones may not cross the defined Hard Zone boundaries.
• Name Server Zones allow the division of the fabric (one or more Switch chassis)
into as many as 16 zones (the Switch Utilities only support 4 zones at this time but
Page 70

3-30 Switch Management
GigWorks MkII-16 Switch Model MKII-BASE16
59003-01 Rev. A Installer's/User's Manual
Switch Utilities — Zoning
each zone is fabric-wide) that define which ports receive Name Server information.
A particular port may be defined in one or more of these Name Server Zones. A
port will receive Name Server information for all ports in the same Name Server
Zone (or zones) in-which the port is defined. If Hard Zones are enabled, Name
Server Zones may not cross the defined Hard Zone boundaries.
Hard Zone Rules:
1. A Hard Zone is only valid if it is enabled.
2. Hard Zones apply only to single stage switch fabrics (one chassis).
3. There is a maximum of four Hard Zones (8-port or 16-port switch).
The Utilities number them 1 through 4.
4. All ports in a physical group must be in the same Hard Zone. Rule 7 defines
Physical groups.
5. Hard Zones may include multiple physical groups. Rule 7 defines Physical
groups.
6. An individual port can only be in one Hard Zone.
7. Hard Zones must follow physical group-boundaries.
The following port-groups define the boundaries for an 8-port Switch:
1,2 3,4 5,6 7,8
The following port-groups define the boundaries for a 16-port Switch:
1,2,3,4 5,6,7,8 9,10,11,12 13,14,15,16
8-Port Switch Zone examples:
a. Ports 1,2,3, and 4 in one zone, ports 5 and 6 in a second zone, and
ports 7 and 8 in a third zone.
b. Ports 1,2,5,6,7 and 8 in one zone, ports 3 and 4 in a second zone.
16-Port Switch Zone examples:
a. Ports 1, 2, 3,4, 5, 6, 7, and 8 in one zone, ports 9, 10, 11, and 12 in
a second zone, and ports 13, 14, 15, and 16 in a third zone.
b. Ports 1 through 12 in one zone, ports 13 through 16 in a second
zone.
8. If any port on the chassis is defined as being in an enabled Hard Zone, all
ports must be defined in enabled Hard Zones (No Hard Zone Orphans). A
Hard Zone Orphan is defined as a port not defined in any enabled Hard
Zone.
Page 71

GigWorks MkII-16 Switch Model MKII-BASE16
Installer's/User's Manual 59003-01 Rev. A
Switch Management 3-31
Switch Utilities — Zoning
Broadcast Zone Rules:
1. A Broadcast Zone is only valid if it is enabled
2. If Broadcast Zones are used on a Single Stage Switch in-which Hard Zones
are defined, the Broadcast Zones must not overlap Hard Zone boundaries.
For example: If Hard Zoning in an 8-port Single Stage Switch places
Port 6 in one zone and Port 7 in another zone, Broadcast Zoning must not
include Ports 6 and 7 in the same zone.
3. Broadcast Zones operate fabric-wide (Single Stage or Multi-Stage).
4. There is a maximum of 16 Broadcast Zones (independent of Name Server
Zones). The Web-based GUI and Utilities number them 1 through 16.
5. A port may be defined as being in one or more Broadcast Zones (Broadcast
Zones may overlap).
6. When a port sends a broadcast, the broadcast goes to all ports in the
Broadcast Zone (or zones) that the port is defined in.
7. All ports not defined as being part of any enabled Broadcast Zone are
Broadcast Zone Orphans. Broadcast Zone Orphans are all placed in the
same Broadcast Orphan zone.
Name Server Zone Rules:
1. A Name Server Zone is only valid if it is enabled.
2. If Name Server Zones are used on a Single Stage Switch in-which
Hardware Zones are defined, the Name Server Zones must not overlap
Hardware Zone boundaries.
For example: If Hard Zoning in an 8-port Single Stage Switch places
Port 6 in one zone and Port 7 in another zone, Name Server Zoning must
not include Ports 6 and 7 in the same zone.
3. Name Server Zones operate fabric-wide (Single Stage or Multi-Stage).
4. There is a maximum of 16 Name Server Zones (independent of Broadcast
Zones).
The Web-based management application and Utilities number them 1
through 16.
5. A port may be defined as being in one or more Name Server Zones (Name
Server Zones may overlap).
5. When a port receives Name Server information, it will receive information
about all ports in the Name Server Zone (or zones) that the port is defined
in.
Page 72

3-32 Switch Management
GigWorks MkII-16 Switch Model MKII-BASE16
59003-01 Rev. A Installer's/User's Manual
Switch Utilities — Zoning
6. All ports not defined as being part of any enabled Name Server Zone are
Name Server Zone Orphans. Name Server Zone Orphans are all placed in
the same Name Server Orphan zone.
Zoning Screen
Refer to Figure 3-10. The Zoning tab enables you to read the current zoning
assignments, make or change zoning assignments, and enable or disable zones.
The Zoning screen contains areas for managing ports in Hard Zones, Broadcast
Zones, and Name Server Zones. At this time, the Switch Utilities can only
manage four zones of each type. Both the 8 and 16-port Switches can manage
four Hard Zones, 16 Broadcast Zones, and 16 Name Server Zones.
Read Zoning Button: Press to read the current zoning information. The system
displays checkmarks in the appropriate boxes on the Right side of the screen to
show the zone status.
Apply Changes Button: Press to apply any changes made to the checkboxes on
the Right side of the screen. The checked/unchecked boxes take effect as soon as
they are applied.
Caution: The application of Hard Zones to an operating Switch will
disrupt all traffic and change the port addresses assigned to each device
on the Switch. Re-initializing connected devices may be necessary.
Clear Button: Press to clear all zoning checkmarks. Use the Apply Changes
Button to make the Clear take effect.
Number of Ports field: This field indicates the number of ports in the Switch.
Hard Zones: The Hard Zones area contains checkboxes for managing up to four
Hard Zones and up to 16 ports. Click a port checkbox in a particular Zone row to
define the port in that zone. The Utilities will automatically check the other ports
in that group to force the rule that all ports in a group must be in the same Hard
Zone. Click a checked checkbox to un-check it. When you check a box in a
particular zone, the Utilities will automatically check the Enabled checkbox for
that zone. You may un-check it if you wish. The Utilities do this to keep you from
forgetting to enable the zone.
Click the Enabled checkbox for a particular zone to enable the zone. Uncheck the
Enable box for a particular zone to disable the zone.
Press the Apply Changes Button to put the changes into effect.
Broadcast Zones: The Broadcast Zones area contains checkboxes for managing
up to four Broadcast Zones and up to 16 ports. Click a port checkbox in a
particular Zone row to define the port in that zone. The Switch will automatically
perform rules checking that will not allow you to violate the rule about not
Page 73

GigWorks MkII-16 Switch Model MKII-BASE16
Installer's/User's Manual 59003-01 Rev. A
Switch Management 3-33
Switch Utilities — Zoning
overlapping enabled Hard Zone boundaries. Click a checked checkbox to uncheck it. When you check a box in a particular zone, the Utilities will
automatically check the Enabled checkbox for that zone. You may un-check it if
you wish. The Utilities does this to keep you from forgetting to enable the zone.
Click the Enable checkbox for a particular zone to enable the zone. Uncheck the
Enable box for a particular zone to disable the zone.
Press the Apply Changes Button to put the changes into effect.
If the Switch chassis is part of a multi-stage Switch fabric you must connect the
Utilities to each Switch chassis containing fabric ports and set up the zones for
each. Keep in mind that a particular zone (for example Zone 1) is fabric wide and
any ports on the same or other Switch chassis that are placed in Zone 1, are in the
same zone.
Name Server Zones: The Name Server Zones area contains checkboxes for
managing up to four Name Server Zones and up to 16 ports. Click a port
checkbox in a particular Zone row to define the port in that zone. The Switch will
automatically perform rules checking that will not allow you to violate the rule
about not overlapping enabled Hard Zone boundaries. Click a checked checkbox
to un-check it. When you check a box in a particular zone, the Utilities will
automatically check the Enabled checkbox for that zone. You may un-check it if
you wish. The Utilities does this to keep you from forgetting to enable the zone.
Click the Enable checkbox for a particular zone to enable the zone. Uncheck the
Enable box for a particular zone to disable the zone.
Press the Apply Changes Button to put the changes into effect.
If the Switch chassis is part of a multi-stage Switch fabric you must connect the
Utilities to each Switch chassis containing fabric ports and set up the zones for
each. Keep in mind that a particular zone (for example Zone 1) is fabric wide and
any ports on the same or other Switch chassis that are placed in Zone 1, are in the
same zone.
Note: You may need to reboot the SCSI Initiators after Name Server zoning
changes in order to get them to read the Name Server.
Page 74

3-34 Switch Management
GigWorks MkII-16 Switch Model MKII-BASE16
59003-01 Rev. A Installer's/User's Manual
Switch Utilities — Name Server
Name Server
Figure 3-11 Name Server Tab
Refer to Figure 3-11. The Name Server tab enables you to poll the Switch for
Name Server information. When you open this tab, the Utility application polls
the Name Server to get the data. It does not refresh the screen again until you tell
it to. Refer to the Refresh button.
Port Field: This field contains the Switch port number.
FC-Addr Field: This field contains the Fibre Channel Port Identifier of the
connected device.
Port Type Field: This field contains the Port Type (N or NL) of the connected
device.
Port Name Field: This field contains the World Wide Name of the connected
adapter.
Node Name Field: This field contains the World Wide Name of the connected
host device.
FC-4 Field: This field contains the interpretation of any FC-4 types that the
Page 75

GigWorks MkII-16 Switch Model MKII-BASE16
Installer's/User's Manual 59003-01 Rev. A
Switch Management 3-35
Switch Utilities — Name Server
device has registered with the Name Server. This field is blank if there are no
registered FC-4 Types.
Refresh Button: Press the Refresh button to update the screen.
Page 76

3-36 Switch Management
GigWorks MkII-16 Switch Model MKII-BASE16
59003-01 Rev. A Installer's/User's Manual
Switch Utilities — Management Configuration
Management Configuration
Figure 3-12 Management Configuration Tab
Refer to Figure 3-12. The Management Configuration tab enables you to
configure the Ethernet port of the Switch to-which the management station is
connected.
IP Network Configuration
Use the IP Network Configuration area of this screen to read, modify, or write the
Switch Management port IP Address information.
Get IP Config. Button: Press to read the IP information displayed in the fields
to the Right of the button.
Set IP Config. Button: Press to write the IP information, displayed in the fields
to the Right of the button, into the Switch. This new IP Address information will
not take affect until the Switch is re-booted or the management firmware is reset
using one of the Reset buttons on the bottom of this screen.
You may also set the Switch to read its IP Network Configuration from a BootP
server by checking the “Use BootP” box. This tells the Switch to use BootP the
Page 77

GigWorks MkII-16 Switch Model MKII-BASE16
Installer's/User's Manual 59003-01 Rev. A
Switch Management 3-37
Switch Utilities — Management Configuration
next time it initializes instead of the values in the saved configuration.
Network IP Address: Use the Get IP Config Button to read the current IP Address
of the Switch Management port. The default set at the factory is 10.0.0.1. You may
modify this field by moving your cursor to the field and typing. You may write the
contents of this field to the Switch by pressing the Set IP Config. Button. If you have
changed the Network IP Address, be sure to write it down and use the Setup T ab to
change the IP Address used by the Utilities.
Network Mask: Use the Get IP Config Button to read the current Network Mask of
the Switch Management port. The default set at the factory is 255.0.0.0. You may
modify this field by moving your cursor to the field and typing. You may write the
contents of this field to the Switch by pressing the Set IP Config. Button.
ARP Timeout: Use the Get IP Config Button to read the current ARP Timeout
of the Switch Management port. This value is in hundredths of a second (.00).
The default set at the factory is 30000 (300.00 seconds). You may modify this
field by moving your cursor to the field and typing.You may write the contents of
this field to the Switch by pressing the Set IP Config. Button.
Broadcast IP Address: Use the Get IP Config Button to read the current
Broadcast IP Address of the Switch Management port. The default set at the
factory is 10.255.255.255. You may modify this field by moving your cursor to
the field and typing.You may write the contents of this field to the Switch by
pressing the Set IP Config. Button.
Gateway IP Address: Use the Get IP Config Button to read the current Gateway IP
Address of the Switch Management port. The default set at the factory is 0.0.0.0. You
may modify this field by moving your cursor to the field and typing. You may write
the contents of this field to the Switch by pressing the Set IP Config. Button.
Use BootP Checkbox: This tells the Switch to use BootP the next time it
initializes instead of the values in the saved configuration.
SNMP Configuration
Use the SNMP Configuration area of this screen to read, modify, or write the
Switch Management SNMP switch name, contact person, and Switch location.
Get SNMP Config. Button: Press to read the SNMP information displayed in
the fields to the Right of the button. This button will NOT read the
Community information.
Set SNMP Config. Button: Press to write the SNMP information, displayed in
the fields to the Right of the button, into the Switch. This information takes effect
immediately.
Name: Use the Get SNMP Config Button to read the current Name of the
Switch. The default set at the factory is undefined. You may modify this field by
Page 78

3-38 Switch Management
GigWorks MkII-16 Switch Model MKII-BASE16
59003-01 Rev. A Installer's/User's Manual
Switch Utilities — Management Configuration
moving your cursor to the field and typing. You may write the contents of this
field to the Switch by pressing the Set SNMP Config. Button.
Contact: Use the Get SNMP Config Button to read the current Name of the
Contact person. The default set at the factory is undefined. You may modify this
field by moving your cursor to the field and typing. You may write the contents
of this field to the Switch by pressing the Set SNMP Config. Button.
Location: Use the Get SNMP Config Button to read the current location of the
Switch. The default set at the factory is undefined. You may modify this field by
moving your cursor to the field and typing. You may write the contents of this
field to the Switch by pressing the Set SNMP Config. Button.
Send Authentication Traps Check Box: Check this box to send a trap to the
address in the Trap IP Address field in the event that an attempt is made to access
the Switch with the wrong Community Names.
Trap IP Address: This field contains the address used by Authentication Traps.
The default set at the factory is 127.0.0.1. This is the “Loopback” address (the
address that the Switch uses to send things to itself) therefore, if you don’t modify
this address, Authentication Traps will not go anywhere. You may modify this
field by moving your cursor to the field and typing. You may write the contents
of this field to the Switch by pressing the Set SNMP Config. Button.
Set SNMP Communities Button: Press to write the SNMP Communities
information, displayed in the fields to the Right of the button, into the Switch.
Read Community: Use this Field to modify the Read Community Name. This is
an ASCII string with a maximum of 64 bytes. This is a set-only field. The current
Read Community is not displayed. The default Read Community Name is
public. You may modify this field by moving your cursor to the field and
typing. You may write the contents of this field to the Switch by pressing the Set
SNMP Communities Button.
Write Community: Use this Field to modify the Write Community Name. This
is an ASCII string with a maximum of 64 bytes. This is a set-only field. The
current Write Community is not displayed. The default Write Community Name
is private. You may modify this field by moving your cursor to the field and
typing. You may write the contents of this field to the Switch by pressing the Set
SNMP Communities Button.
Trap Community: Use this Field to modify the Trap Community Name. This is
an ASCII string with a maximum of 64 bytes. This is a set-only field. The current
Trap Community is not displayed. The default Trap Community Name is
public. You may modify this field by moving your cursor to the field and
typing. You may write the contents of this field to the Switch by pressing the Set
SNMP Communities Button.
Page 79

GigWorks MkII-16 Switch Model MKII-BASE16
Installer's/User's Manual 59003-01 Rev. A
Switch Management 3-39
Switch Utilities — Management Configuration
Get IP Management Version Button: Press to read the current Management
firmware version. The screen displays the information in the field to the Right of
the button.
Reset the Ancor GigWorks MKII Management Only Button: Press to reset
the current Management firmware. If you have changed the Network IP Address, be
sure to write it down and use the Setup T ab to change the IP Address used by the
Utilities.
Reset the Ancor GigWorks MKII Switch and Management Button: Press to
reset the Switch and the current Management firmware.
Page 80

3-40 Switch Management
GigWorks MkII-16 Switch Model MKII-BASE16
59003-01 Rev. A Installer's/User's Manual
Managing the Switch Using TFTP
Managing the Switch Using TFTP
The firmware in the Switch can be upgraded using the Trivial File Transfer
Protocol (TFTP). This is a standard utility included in most Unix and Windows
NT workstations. Versions for other platforms can be purchased from other
vendors.
Because TFTP has no passwords, user authentication, or other security, only
trusted users should have access to the Switch through the Ethernet port.
Retrieving the Current Switch Management Configuration File ( config ):
The Switch file named config contains the current management configuration of
the Switch management processes, including the IP network configuration
parameters, and the SNMP configuration parameters.
To retrieve the Switch configuration file:
1 Connect to the Switch using TFTP.
2. Select text file transfer mode.
3. Retrieve the file named config.
The actual keystrokes for the above steps varies depending on the operating
system of the management station. For example, your TFTP session may look
like this if you are using a Unix system as a management station:
#tftp (Start TFTP)
tftp>connect 10.0.0.1 (Connect to the Switch. This example uses
the default netAddress for the Switch)
tftp> text (Select text file mode.)
text mode
tftp> get config (Retrieve the file named config. )
transferred 254 bytes in 0.5 seconds.
tftp> quit (Exit TFTP)
#cat config (Look at the contents of the config file.)
netAddress=10.0.0.1
netMask=255.0.0.0
broadcast=10.255.255.255
Note:
Before you use TFTP you must connect the Switch’s Ethernet interface to an
Ethernet network and configure its IP network address, its IP subnetwork
mask, and its IP gateway address. Refer to the Ethernet Cabling and
Configuring the Switch Ethernet Port paragraphs in this section.
Page 81

GigWorks MkII-16 Switch Model MKII-BASE16
Installer's/User's Manual 59003-01 Rev. A
Switch Management 3-41
Managing the Switch Using TFTP
gateway=0.0.0.0
arpTimeout=30000
snmpReadCommunity=public
snmpWriteCommunity=private
snmpTrapCommunity=public
snmpName=
snmpContact=
snmpLocation=
snmpDoAuthTrap=NO
snmpTrapAddress=127.0.0.1
#
Transfer a New Management Configuration File to the Switch:
The Switch contains a file called config which contains the current management
configuration of the Switch management processes, including the IP network
configuration parameters, and the SNMP configuration parameters.
Use the instructions in the Retrieving the Current Switch Management
Configuration File ( config ) paragraphs to read the Switch’s configuration file.
Use a text editor to modify the parameters in the configuration file and then
transfer it back to the Switch.
To transfer the Switch configuration file to the Switch:
1. Connect to the Switch using TFTP.
2. Select text file transfer mode.
3. Transfer the file named config.
If the file transfer succeeds, the new configuration file has been saved in the
management processor, and will be loaded next time the Switch is reset. A reset
operation takes place when the Switch power is cycled. You may also reset the
Switch using TFTP. This is described later in this section.
For example, your TFTP session may look like this if you are using a Unix
management station:
#tftp (Start TFTP)
tftp> connect 10.0.0.1 (Connect to the Switch)
tftp> text (Select text file transfer mode)
text mode
tftp> put config.new config (Transfer the file named config. )
transferred 257 bytes in 0.5 seconds.
tftp> quit (Exit TFTP)
#
Page 82

3-42 Switch Management
GigWorks MkII-16 Switch Model MKII-BASE16
59003-01 Rev. A Installer's/User's Manual
Managing the Switch Using TFTP
The new management configuration values will not take effect until the Switch is
reset. If the Switch’s IP address is changed and then the Switch is reset, it will no
longer respond to the previous IP address, but will now respond only to the newly
configured IP address.
The Switch Management Configuration File
The parameters of the Switch management configuration file (config ) are:
netAddress The IP network address. By default this is 10.0.0.1.
netMask The IP subnetwork mask. By default this is 255.0.0.0.
broadcast The IP broadcast address. By default this is 10.255.255.255. If
this parameter is omitted from the configuration, the Switch will
compute the correct broadcast address from netAddress and
netMask.
gateway The IP address of the network gateway. If this parameter is set to
0.0.0.0, the Switch will assume that no gateway is available.
arpTimeout The time in seconds to expire entries in the arp cache. By default
this is set to 30000 (about 8 hours).
snmpReadCommunity
The SNMP community name to be recognized for
SNMP Get and GetNext requests. By default this is the string
“public”.
snmpWriteCommunity
The SNMP community name to be recognized for
SNMP Set requests. By default this is the string “private”.
snmpTrapCommunity
The SNMP community name to be used in SNMP
Trap messages. By default this is the string “public”.
snmpName
The value of the SNMP Systems Group SysName variable. This is
usually identical to the host name, for example, “switch001”. The
default value for this parameter is the empty string, “”.
snmpContact
The value of the SNMP Systems Group SysContact variable.
This is usually set to identify the person or organization responsible
for maintaining the host, for example, “Joe Cable, x1234”. The
Note:
If any of these management configuration parameters are changed using
SNMP after the config file has been written by TFTP, but before the Switch
is reset, the SNMP process will save its now-current configuration into the
config file, over-writing and deleting the config file sent using TFTP. To
avoid this problem, reset the Switch immediately after the TFTP transfer.
Page 83

GigWorks MkII-16 Switch Model MKII-BASE16
Installer's/User's Manual 59003-01 Rev. A
Switch Management 3-43
Managing the Switch Using TFTP
default value for this parameter is the empty string, “”.
snmpLocation
The value of the SNMP Systems Group SysName variable. This
is usually set to identify the physical location of the Switch, for
example, “Wiring Closet B, 3rd floor, East”. The default value for
this parameter is the empty string, “”.
snmpDoAuthTrap
Whether the Switch SNMP agent should send SNMP
authentication traps. By default, traps are not sent.
snmpTrapAddress The IP address of the management station to which SNMP
traps should be sent. By default, this is the localhost address,
127.0.0.1.
Loading New Switch Control Code into Flash:
Load new flash code only under the direction of Ancor Customer Service. Ancor
will make this code available over the Internet. Move this executable module into
your local management station.
To load a new I/O processor flash into the Switch:
1. Connect to the Switch using TFTP.
2. Select binary file transfer mode.
3. Transfer the Switch processor control code into the Switch file named
mkiiload .
For example, if the new Switch control code is located in a local file named
s4switch.fls, then your TFTP session may look like this if you are using a Unix
management station:
#tftp (Start TFTP)
tftp> connect 10.0.0.1 (Connect to the Switch)
tftp> binary (Select binary file transfer mode)
binary mode
tftp> put s4switch.fls mkiiload (Transfer the file)
transferred 139278 bytes in 42.7 seconds.
tftp> quit
#
If the file transfer succeeds, the new Switch control code has been saved in the
Switch flash, and will be executed the next time the Switch is reset. A reset
operation takes place when the Switch power is cycled. You may also reset the
Switch using TFTP. This is described later in this section.
Page 84

3-44 Switch Management
GigWorks MkII-16 Switch Model MKII-BASE16
59003-01 Rev. A Installer's/User's Manual
Managing the Switch Using TFTP
If the Switch load process fails for any reason, the Switch control code saved in
the Switch flash is not valid and must be reloaded. If the Switch is reset with an
invalid control code in the Switch flash, it will automatically enter PROM mode.
In PROM mode, the Switch will not switch data traffic through the Fibre Channel
ports until a valid executable module is downloaded.
Loading New Management Interface Flash: (16-Port Switch only)
Load new flash code only under the direction of Ancor Customer Service. Ancor
will make this code available over the Internet. Move this executable module into
your local management station.
To load a new management interface flash into the Switch:
1. Connect to the Switch using TFTP.
2. Select binary file transfer mode.
3. Transfer the new management interface control code into the Switch file
named mkiimgmt.
For example, if the new management interface control code is in a local file
named s4mgmt.fls, then your TFTP session may look like this if you are using a
Unix management station:
#tftp (Start TFTP)
tftp> connect 10.0.0.1 (Connect to the Switch using TFTP)
tftp> binary (Select binary file transfer mode)
binary mode
tftp> put s4mgmt.fls mkiimgmt (Transfer the file)
transferred 142204 bytes in 42.9 seconds.
tftp> quit
#
If the file transfer succeeds, the new management interface code has been saved
in the Switch flash, and will be executed next time the Switch is reset. A reset
operation takes place when the Switch power is cycled. You may also reset the
Switch using TFTP. This is described later in this section.
If the Switch load process fails for any reason, the new management interface
code saved in the Switch flash is not valid and must be reloaded before the
Switch undergoes a reset operation. If the Switch is reset with an invalid
executable in flash, it will not automatically enter PROM mode, but will continue
to switch data normally through the Fibre Channel ports. However, the
management functions will not be available. The next procedure in this section
explains how to load new management interface code when an invalid executable
in flash was placed in execution by a reset operation.
Page 85

GigWorks MkII-16 Switch Model MKII-BASE16
Installer's/User's Manual 59003-01 Rev. A
Switch Management 3-45
Managing the Switch Using TFTP
Loading New Management Interface Code Over an Invalid Management Interface Flash Load: (16Port Switch Only)
If the Switch is reset with invalid Management interface code in flash, it will not
automatically enter PROM mode, but will continue to switch data normally
through the Fibre Channel ports. However, the management functions will not
operate.
This procedure explains how to load new management interface code when an
invalid executable in flash was placed in execution by a reset operation.
1. Set the Force PROM toggle switch on the Chassis Switch Panel to the ON
position. Refer to the Chassis Switch Panel appendix in this manual for the
location of the Force PROM (FP) switch.
2. Reset the Switch by cycling its power. The Switch will come up in PROM
mode.
3. Connect to the Switch using TFTP.
4. Select binary file transfer mode.
5. Transfer the new management interface code into the Switch file named
mkiimgmt..
6. Return the Force PROM toggle switch on the Chassis Switch Panel to the
OFF position.
If the file transfer succeeds, the new executable has been saved in the Switch
flash, and will be executed next time the Switch is reset. A reset operation takes
place when the Switch power is cycled. You may also reset the Switch using
TFTP. This is described later in this section.
Reset the Switch Using TFTP:
Reset the Switch via TFTP by attempting to read or write a file named reset. This
is not a valid file name on the Switch, but any request from a TFTP client to store
or retrieve a file named reset will cause the Switch to reset itself.
To reset the Switch using TFTP
1. Connect to the Switch using TFTP.
2. Select either binary or text file transfer mode.
3. Attempt either to upload or to download a file named reset.
The Switch will return the error message, “MKII RESET” before resetting.
Note: Since resetting the Switch disrupts service on the Fibre Channel ports, this
feature allows a possible denial-of-service attack on the Switch. Only trusted
users should have access to the management port on the Switch.
Page 86

3-46 Switch Management
GigWorks MkII-16 Switch Model MKII-BASE16
59003-01 Rev. A Installer's/User's Manual
Managing the Switch Using TFTP
Test the Switch File Transfer Process: (16-Port Switch Only)
The file named test on the Switch can be used to test TFTP file transfers. This
file is not used by any processes on the Switch, and can be read or written in
either binary or text mode.
To test TFTP file transfers to the Switch:
1. Connect to the Switch using TFTP.
2. Select either binary or text file transfer mode.
3. Transfer any local file of the selected type into the Switch file named test .
4. Retrieve the Switch file named test again under a different local file name.
5. Compare the two files.
If both file transfers complete successfully, the two local files will be identical.
For example, if you are sending the local file named testfile1 in binary mode,
then your TFTP session may look like this if you are using a Unix management
station:
#tftp (Start TFTP)
tftp> connect 10.0.0.1 (Connect to the Switch using TFTP)
tftp> text (Select text file transfer mode)
text mode
tftp> put testfile1 test (Transfer the file to the Switch)
transferred 100000 bytes in 39.6 seconds.
tftp> get test testfile2 (Retrieve the file fro the Switch)
transferred 100000 bytes in 9.1 seconds.
tftp> quit
#diff testfile1 testfile2 (Compare the files)
#
Page 87

GigWorks MkII-16 Switch Model MKII-BASE16
Installer's/User's Manual 59003-01 Rev. A
Switch Management 3-47
Managing the Switch Using TFTP
Retrieving the Index of Valid Switch File Names:
The Switch contains a file called index which lists the valid file names, their file
type (binary or text), and their read/write permissions. This index can be
retrieved by connecting to the Switch using TFTP in text file transfer mode and
getting the file named index .
To retrieve the index of valid Switch file names:
1. Connect to the Switch using TFTP.
2 Select text file transfer mode.
3. Retrieve the file named index .
For example, your TFTP session may look like this if you are using a Unix
management station:
#tftp (Start TFTP)
tftp> connect 10.0.0.1 (Connect to the Switch using TFTP)
tftp> text (Select text file transfer mode)
text mode
tftp> get index (Retrieve the file from the Switch)
transferred 254 bytes in 0.5 seconds.
#cat index (Look at the contents of the index file.)
Ancor MKII TFTP files:
config mgmt. CPU configuration rw text
index this list of files r- text
mkiiload Switch control code -w binary
mkiimgmt mgmt. interface code rw binary*
reset reset MKII switch rw either
test file transfer test file rw either*
#
Note* 16-Port Switch only.
Page 88

3-48 Switch Management
GigWorks MkII-16 Switch Model MKII-BASE16
59003-01 Rev. A Installer's/User's Manual
Managing the Switch Using SNMP
Managing the Switch Using the Simple Network Management Protocol (SNMP)
Network management is the process of planning, organizing, and controlling a
communications-oriented system. This involves two types of issues: softwarerelated (data security, overseeing applications, user accounts, and permissions)
and hardware-related. These paragraphs concentrate primarily on the second issue
-- the management of the network as a whole, using the Simple Network
Management Protocol (SNMP) as the transport protocol. The Switch uses SNMP
as the transport protocol. Network Management examines:
• Network Management
• The Network Management Station
• The Switch Node Agent
• The Management Information Bases (MIBs)
• The Simple Network Management Protocol (SNMP)
Network Management
Various forms of network management capabilities have been built into most
network hardware pieces which includes workstations, servers, network cards,
routers, bridges, hubs, etc. Because these nodes are generally dispersed
throughout a network configuration, the administrator relies on the built-in
communication functions to remotely query the status of the equipment as well as
receive alerts when problems occur. There are two fundamental goals when
designing and setting up a network management infrastructure to ensure optimal
management. First, management information traffic should not significantly
increase overall network traffic. Second, the node agent should not significantly
increase the processing overhead (thus, interfering with that node’s primary
function).
The basic concept of network management involves a network manager
exchanging information with processes (agents) residing within network nodes
using SNMP. The network management station communicates with the different
management processes to gather data and construct visual representations about
the status of the network. The network manager handles the overall network
software and inter-node communications. Support software provides a user
interface that allows the administrator to observe the condition of the entire
system as well as individual components, and monitor any specific node.
Note:
Before you use SNMP you must connect the Switch’s Ethernet interface to an
Ethernet network and configure its IP network address, its IP subnetwork
mask, and its IP gateway address. Refer to the Ethernet Cabling and
Configuring the Switch Ethernet Port paragraphs in this section.
Page 89

GigWorks MkII-16 Switch Model MKII-BASE16
Installer's/User's Manual 59003-01 Rev. A
Switch Management 3-49
Managing the Switch Using SNMP
Figure 3-13 illustrates the four main components involved in network management.
Figure 3-13. Network Management Framework
The Network Management Station
A network management station is a centralized node (usually a dedicated
workstation) connected to a network that runs some kind of network management
software application (manager). For example OpenView™ from Hewlet Packard,
NetView™ from IBM, Spectrum™ from Cabletron, or SunNet Manager™ from
Sun Microsystems. Generally, the manager supports and uses SNMP to monitor
the network and collect information from the agents in the network. The manager,
rather than the agents, has the intelligence to use and interpret the information
provided by the agents. This information enables the administrator to examine the
statistics and monitor the network for performance or operation problems. The
network management station provides the following principal functions:
Function Description
Managing Nodes The administrator can manage network nodes,
either remotely or locally, by issuing SNMP
commands from the management station and
receiving responses to queries. Most management
stations provide user-friendly interfaces.
Error Message Clearinghouse The management station receives error messages
from various managed nodes and initiates any
necessary pre-programmed actions. A good
implementation also retains a database of error
messages to provide a history of events for
diagnostics or troubleshooting.
Network Mapping The management station displays the network
layout map based on information collected from
various agents as well as MIB information in an
easy-to-understand manner. It can also show alarm
Node
SNMP
Agent
Management
Station
MIB
Software
SNMP
Manager
Node
SNMP
Agent
Page 90

3-50 Switch Management
GigWorks MkII-16 Switch Model MKII-BASE16
59003-01 Rev. A Installer's/User's Manual
Managing the Switch Using SNMP
symbols to alert the administrator to problems.
Statistics Displays Agents provide statistics about the overall
behavior of network components and the station
manager displays the information in either
numeric or graphical formats.
The Node Agents
The Switch has a built-in SNMP-compliant node agent. A management or node
agent is a specific software component that resides on a network node (such as
switches, routers, and servers). The agent collects information about that particular
node and/or its environment although the agent does not have the intelligence to use
the information. When a network node contains an agent, it is referred to as a
managed node. If the node is SNMP-compliant or SNMP-manageable, that means
the resident agent supports the SNMP protocol for information exchange.
When the agent communicates with the network management station, the
following main tasks are performed over this link:
Task Description
Information Provision The node agent provides information about the
network nodes to the management station.
MIB Entry Editing When requested by the network management station, the
node agent updates, adds, or removes entries (such as
routing table entries) in the database maintained by the
agent.
Error Reporting The node agent reports problems to the management
station and/or responds to the station’s status queries.
The Management Information Bases (MIBs)
A MIB is a database, maintained by a node agent, that contains configuration and
statistical data about nodes on a network as well as information pertaining to the
performance of the node and its connections to different network nodes. The
network manager queries the MIB through either the agent or proxy agent
software and can specify changes to the configuration. A MIB describes the
objects (or entries) included in the database. Each object has four properties that
define what each object looks like. MIB object properties include:
Property Description
Name This property defines the name of the particular object. For example,
sysUpTime. It is simply a label.
Syntax This property specifies the data type such as integer, octet string,
Page 91

GigWorks MkII-16 Switch Model MKII-BASE16
Installer's/User's Manual 59003-01 Rev. A
Switch Management 3-51
Managing the Switch Using SNMP
object identifier, or NULL. NULLs act as place holders reserved for
future use.
Access This property indicates the level of access to this particular object.
Legal values are: read-only, read-write, write-only, and not accessible.
Status This property defines the implementation requirement for this object:
mandatory (the managed node must implement this object); optional
(the managed node may implement this object); or obsolete (the
managed node need no longer implement this object).
The presence of objects, their names, and additional property values are part of
each MIB specification. Currently, there are three types of MIB specifications:
Standard MIBs
The standard MIB contains a set of objects that are well defined, known, and
accepted by the Internet standards group. There is a generic MIB defined for
managing network nodes. And, there are two versions of this standard MIB called
MIB-I and MIB-II. These MIBs contain standard managed objects that are
grouped into different functional categories.
Vendors may choose to implement MIB-I or MIB-II for their agents as well as
their network management software. That means if you use a MIB-I network
management station to query a MIB-II node, you will not get the full range of
possible data. Conversely, if you use a MIB-II network management station to
query a MIB-I node, many of the data displays on the console will read blank or
zero because of the unavailability of the extra objects.
Experimental MIBs
The experimental MIB contain MIBs that are not in the standard MIBs and are
not part of the private or enterprise MIBs. These MIBs may contain specific
information about other elements of the network and node management. When an
experimental MIB is proven effective and refined, it can be considered a standard
MIB. Some experimental MIBs include: T1 Carrier Objects, Ethernet-like
Objects, Token Ring-like Objects, and FDDI Objects.
The Fibre Channel Fabric MIB, supported by the GigVision Proxy Agents is an
Experimental MIB (Refer to Appendix D in this manual). Also, the Fibre Channel
Node MIB, supported by the GigVision Sub-agents, is an Experimental MIB
(Refer to Appendix C in this manual)
Enterprise MIBs
Enterprise MIBs are designed by individual companies for their own networking
nodes. For network management software that is not from the enterprise MIB
vendor to read these MIBs, the manager must know the MIB object names to
access them. Often the enterprise MIBs from a vendor are product-line or model
Page 92

3-52 Switch Management
GigWorks MkII-16 Switch Model MKII-BASE16
59003-01 Rev. A Installer's/User's Manual
Managing the Switch Using SNMP
specific. The Ancor MKII Accounting MIB is an enterprise MIB.
The Simple Network Management Protocol
SNMP is a well-defined, public standard that is widely used by the Internet
community. The SNMP was first developed to address router management issues
on the Internet and was designed to be protocol-independent (so it can be used
over IP, IPX, AppleTalk, OSI, and other transport protocols as necessary). SNMP
is a set of protocols and specifications that provides a means of collecting
network management information from nodes on the network. It also provides a
means for the nodes to report problems and errors to the network management
station.
SNMP was designed to allow network management station software to
communicate with agents in the managed nodes. The communication may
involve request messages from the management station, response messages from
the agents, or error messages (alarms) generated from the agents to the
management station. SNMP allows the administrator to remotely query existing
variables from an SNMP-compliant node as well as set new values.
Data Collection Methods
There are several processes that network management stations and nodes use to
communicate with each other. The procedures allow the management station to
systematically request data as well as provide a method for nodes to transmit
error messages to alert the management station about network problems. SNMPcompatible network components use the following data collection methods:
Polling-Only Data Collection
This method allows the management station total control of the communications.
The management station queries the nodes for statistics and data transmission at
regular, user-specified intervals. A disadvantage of this method is timeliness of
information, particularly errors. Polling-only requires a regulated interval and
node sequence for polls. Short intervals generate excessive, unnecessary traffic
and long intervals in the wrong order can result in delayed notification of
catastrophic events.
Figure 3-14 illustrates how an SNMP management station polls the managed
node for information.
Page 93

GigWorks MkII-16 Switch Model MKII-BASE16
Installer's/User's Manual 59003-01 Rev. A
Switch Management 3-53
Managing the Switch Using SNMP
Figure 3-14 Polling-Only Data Collection
Interrupt-Based Data Collection
This method provides immediate notification to the network management station
if an extraordinary event occurs (assuming the node has not crashed and the
communication path between the node and the management station remains
intact). A drawback of this method involves the resources required to generate the
error (or trap). If the error message contains a lot of information, the managed
node expends valuable time and resources generating the error rather than
performing its primary function.
Also, if several identical events occur back-to-back, excessive network
bandwidth is tied up with repeated information. It would be particularly
unfortunate if the errors pertained to network congestion. To avoid this,
thresholds can be established for the managed node regarding when to report
problems. However, threshold monitoring also requires agent resources to
determine the appropriateness of generating a trap.
Figure 3-15 illustrates how a managed node agent interrupts its operation to
report errors to the SNMP management station.
Figure 3-15 Interrupt-Based Data Collection
Trap-Directed Polling Data Collection
This method is a combination of the polling-only and interrupt-based data
collection processes and is a highly effective and efficient means of performing
network management. The management station polls the agents in the managed
nodes to collect data and then displays the data on the console in either numeric
Switch
SNMP
Agent
Mgmt
Station
ALERT! 55% at 4:20 PM
How Much Traffic?
12.5% at 4:15 PM
Mgmt
Station
Switch
SNMP
Agent
Page 94

3-54 Switch Management
GigWorks MkII-16 Switch Model MKII-BASE16
59003-01 Rev. A Installer's/User's Manual
Managing the Switch Using SNMP
or graphical representation allowing the administrator to easily diagnose and
manage the nodes and network traffic.
Additionally, agents in the managed nodes can report error conditions (such as
when user-set threshold levels have been exceeded) to the network management
station without waiting to be polled for the information. Using the combined
approach, when a managed node agent generates a trap, the network management
station can query the node for additional information.
Figure 3-16 illustrates the interaction between the SNMP management station and
managed node agent for information exchange.
Figure 3-16 Trap-Directed Polling Data Collection
Community Types
Each SNMP request is signed with an identifier called an SNMP community
name. Although SNMP places no restrictions on the bytes in the community
name, the node agent and management station may place specific restrictions on
the characters that may be used (such spaces, tabs, open square brackets, equal
signs, colons, semicolons, number signs, etc.) or on the length of the string (such
as, up to 32 characters). Three types of communities exist and each can have a
different name.
Community Type Description
Monitor Community This community name grants read access to SNMP MIBs.
For each SNMP query, the network management station
must include the monitor community name in the message.
By default, the monitor community name is set to “public.”
Control Community This name grants read and write access to the MIBs.
Because some MIB objects are read-only, even with the
correct control community name, a network management
station cannot modify the variables contained in the MIB.
By default, the control community is disabled so that MIBs
are not modified accidentally.
Switch
SNMP
Agent
Mgmt
Station
Link A
Link B
Provide status of Link A
and its costs
Link A: Status Up, Cost 5
ALERT! Link B Down
Page 95

GigWorks MkII-16 Switch Model MKII-BASE16
Installer's/User's Manual 59003-01 Rev. A
Switch Management 3-55
Managing the Switch Using SNMP
Trap Community This name needs to accompany trap messages. If it does
not match the name setting on the network management
station that receives the traps, the trap messages are
rejected and lost. By default, the trap community is set to
“public.”
Operation Types
The administrator uses several basic SNMP operations to obtain information from
managed node agents as well as edit the variables in MIB objects. The following
are the currently available SNMP operations:
File Name Location and Description
get-request / get-response Used to retrieve a single object in the MIB or query a
MIB; a get-request message receives a get-response
message.
get-next Used to traverse tables within the MIB or read
sequentially through a MIB.
set Used to manipulate (read-write) MIB objects or set a
value in the MIB.
trap Used to report alarms or events.
Page 96

3-56 Switch Management
GigWorks MkII-16 Switch Model MKII-BASE16
59003-01 Rev. A Installer's/User's Manual
Managing the Switch Using SNMP
Management Information Base (MIB)
Switch MIB objects consist of 8 functional groups. These groups are:
• system — MIB II Systems Group
• interface — MIB II Interfaces Group
• snmp — MIB II SNMP Group
• fcFeConfig — Configuration
• fcFeOp — Operation
• fcFeError — Error
• anMkiiAccounting — Accounting
• fcFeCap — Capabilities
• anMKiiUtility — MKII Utility MIB
Each group has one or more tables associated with it.
The Switch does not support the Accounting Group of the draft standard Fibre
Channel MIB. Instead, it supports the Ancor enterprise accounting MIB
anMKIIAccounting .
The Fibre Channel Fabric Element MIB defines the fcFeConfig, fcFeOp,
fcFeError, and fcFeCap groups. The Ancor MKII Accounting MIB defines the
anMkiiAccounting group. The Ancor Utilities MIB defines the Ancor-specific
configuration and parameters.
All MIBs are available on the Internet through the Ancor Customer Services link
in the Ancor Web-site (www.Ancor.com).
MIB II (RFC 1213) Groups
• system — high-level host information
• interface — configuration information, and traffic and error statistics for the
Ethernet interface
• SNMP — configuration information, and traffic and error statistics for the
SNMP agent
Configuration Group Tables
• fcFabricName — Fabric Name — a universally unique name for the Fibre
Channel Fabric, including all nodes and switch elements
• fcElementName — Element Name — a fabric-unique name for this switch
element
• fcFeModuleCapacity — Module Capacity — the number of modules in this
Page 97

GigWorks MkII-16 Switch Model MKII-BASE16
Installer's/User's Manual 59003-01 Rev. A
Switch Management 3-57
Managing the Switch Using SNMP
switch element
• fcFeModuleTable — Module Table — a table of information about each
module in the switch element
• fcFPortConfigTable — Port Configuration Table — a table of the current
configuration parameters for each port in the switch element
Operation Group Tables
• fcFPortOperTable — F_Port Operations Table — a table of the operational
values of each port in the switch element
• fcFPortFlogiTable — F_Port Login Table — a table of the service
parameters defined during the last login
• fcFPortPhysTable — F_Port Physical Level Table — a table giving the
physical status of each port in the switch element
Error Group Tables
• fcFPortErrorTable — F_Port Error Table — a table of error counts for each
port in the switch element
Account Group Table
• anMkiiAccounting — a table of traffic statistics for each Fibre Channel port
Capability Group Tables
• fcFPortCapTable — Port Capabilities Table — a table of configuration
parameters supported by each port in the switch element
MKII Utility MIB
• anMKiiUtility — an Ancor enterprise-specific MIB for MKII Switch
management Functions
Configuring SNMP
The Switch management configuration file defines the following SNMP
parameters:
snmpReadCommunity The SNMP community name to be recognized for
SNMP Get and GetNext requests. By default this is the string
“public”.
snmpWriteCommunityThe SNMP community name to be recognized for
SNMP Set requests. By default this is the string “private”.
snmpTrapCommunity The SNMP community name to be used in SNMP
Trap messages. By default this is the string “public”.
snmpName The value of the SNMP Systems Group SysName variable. This is
Page 98

3-58 Switch Management
GigWorks MkII-16 Switch Model MKII-BASE16
59003-01 Rev. A Installer's/User's Manual
Managing the Switch Using SNMP
usually identical to the host name, for example, “switch001”.
The default value for this parameter is the empty string, “”.
snmpContact The value of the SNMP Systems Group SysContact variable.
This is usually set to identify the person or organization responsible
for maintaining the host, for example, “Joe Cable, x1234”. The
default value for this parameter is the empty string, “”.
snmpLocation The value of the SNMP Systems Group SysName variable. This
is usually set to identify the physical location of the Switch, for
example, “Wiring Closet B, 3rd floor, East”. The default value for
this parameter is the empty string, “”.
snmpDoAuthTrap Whether the Switch SNMP agent should send SNMP
authentication traps. By default, traps are not sent.
snmpTrapAddress The IP address of the management station to which SNMP
traps should be sent. By default, this is the localhost address,
127.0.0.1.
The Switch management configuration file can be retrieved using TFTP, modified
using any text editor, and stored using TFTP onto the switch again. (See
Managing the Switch Using TFTP in this section for more information)
The MIB II Systems Group objects, sysName , sysContact , and sysLocation can
also be modified using SNMP.
Page 99

GigWorks MkII-16 Switch Model MKII-BASE16
Installer's/User's Manual 59003-01 Rev. A
Diagnostics/Troubleshooting 4-1
Section 4 Diagnostics/Troubleshooting
Introduction
Section 4 contains information to help you find problems.
Power Supply Troubleshooting helps you solve AC power and Power Supply
problems.
Power-On-Self-Test (POST) checks the condition of Switch with the exception of the
GBICs.
Continuous Test checks the condition of the Switch including the GBICs and
requires that you place a Loopback plug on each GBIC.
Fiber Continuity tests for open fibers in the cable network.
Power Supply Troubleshooting
Tables 4-1 and 4-2 are troubleshooting matrixes for finding AC source power and
Power Supply problems. They use indications such as LEDs and fan rotation to
find problems. Use Table 4-1 for chassis that contain one Power Supply. Use
Table 4-2 for chassis that contain two Power Supplies.
If the appropriate table does not lead you to the problem or if you need a new
Power Supply, notify Ancor Customer Service or your authorized maintenance
provider. Refer to Appendix B for information about how to contact Ancor
Customer Service.
Page 100

4-2 Diagnostics/Troubleshooting
GigWorks MkII-16 Switch Model MKII-BASE16
59003-01 Rev. A Installer's/User's Manual
Table 4-1 Troubleshooting Matrix (Single Power Supply)
ON - OK
AC source
disruption
Power Supply
voltage out of
range
Power Supply
overheat
Fan Failure
Chassis
Overheat
System Status
Front Panel
Lights
Logic Power Good LED (Grn)
Power Supply Fail LED (Red)
Over Temperature LED (Red)
Lights on
Back of
Power
Supply
Power Good LED (Grn)
Over Temperature LED (Red)
Fan
On
OffOnOffOnOff
Off
Off
Off
Off
Off
Off
OffOnOff
Off
Off
OffOnOn
Off
Off
Off
OffOnOnOnOn
Off
On
Shaded text in table denotes abnormal indications.
* The state of the Power Supply Fail LED is not applicable
in a system with one Power Supply.
Standby
Off
NA*
Off
Off
Off
On
Power Button Depressed (IN)
No
YesNAYes
Yes
Yes
Yes
Corrective Action
Press the Power Button (IN).
None
Check AC source, Plug, and
fuses.
Replace Power Supply/Fan.
Fix cause of overheat, else
replace faulty Power Supply.
Replace Power Supply/Fan.
Fix cause of overheat else
power down immediately.
Power Supply/Fan Troubleshooting
 Loading...