

Page 1
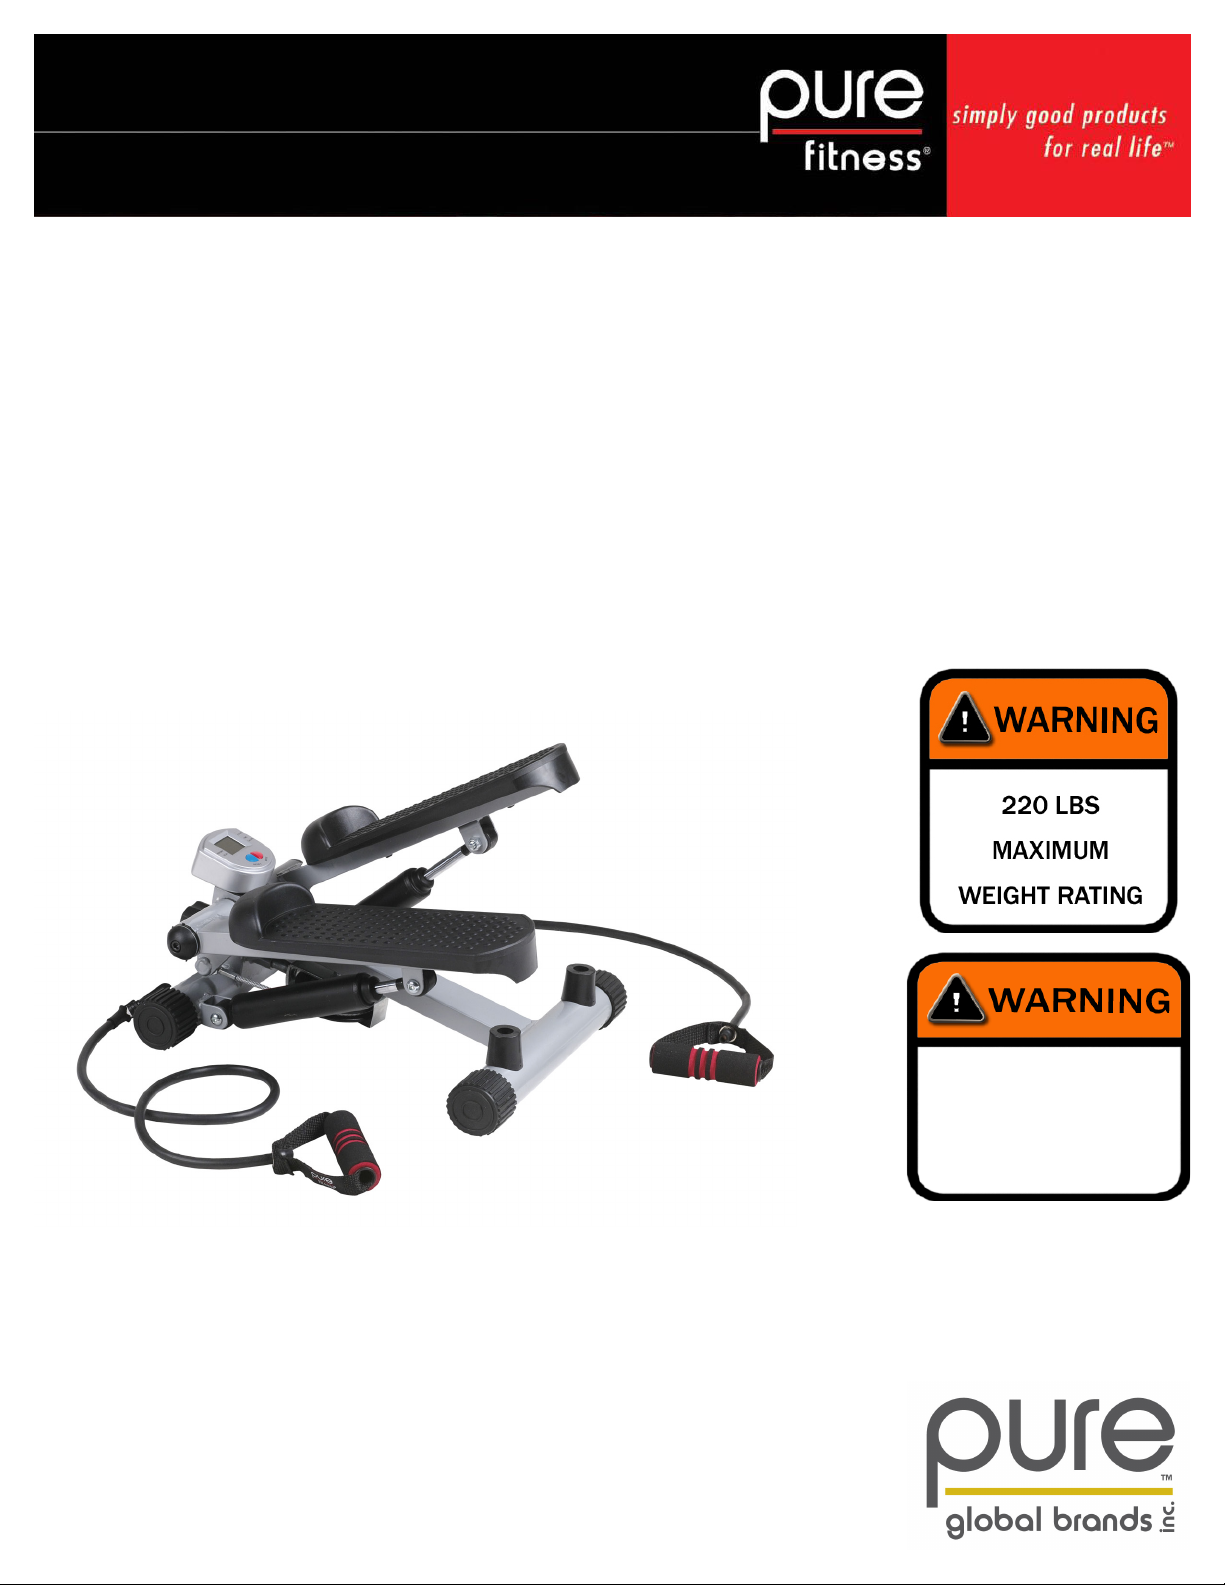
Pure Fitness Mini-Stepper
Model No. 8529MS
Owner’s Manual
Please read all the instructions before using this product.
Consult a physician before beginning any exercise program or strenuous activity
Do not allow more than one person on the Stepper at any time.
Do not allow small children to use unless supervised by an adult.
ADULT ASSEMBLY REQUIRED.
This product is not
suitable for children under
3 years of age. It contains
small parts which may
cause choking.
Pure Fitness is a Trademark of
Pure Global Brands, Inc.
Page 2

OWNERS MANUAL
CUSTOMER SERVICE INFORMATION
Thank you for purchasing our Pure Fitness™ Mini-Stepper.
At Pure Global Brands, we want all of our customers to be completely satised with their purchase.
Please take time to review the contents of the product you just received to make sure that all of the
parts are included. If you nd that any parts are missing or damaged, we will happily provide replacement parts at no charge within 30 days of purchase. Please keep in mind that for select damaged part
replacement requests, we will require a photo for submission to our quality control ofce.
To order these parts, or if you have any other questions or concerns about this Pure Global product,
please e-mail the Pure Global Brands, Inc. customer service department at customerservice@puregbi.com or contact us at 1-866-498-5269. You can also visit our website at: www.pureglobalbrands.com
If you request replacement parts, please be sure to include the following information in your correspondence:
YOUR NAME
YOUR MAILING ADDRESS
YOUR EMAIL ADDRESS
RETAILER WHERE YOU PURCHASED PRODUCT
DATE OF PURCHASE
ORDER # (IF AVAILABLE)
PRODUCT MODEL #: 8259MS
SERIAL #
PRODUCT NAME: Pure Fitness™ Mini-Stepper
PART # (located in manual)
QUANITITY NEEDED
PICTURE OF DAMAGED PART(s) – SUBMIT VIA Email , Fax, or Mail
Again, thank you for purchasing a Pure Global Brands product.
Sincerely,
Customer Service
Pure Global Brands, Inc.
1-866-498-5269
Page 3

LIMITED WARRANTY
Pure Global Brands, Inc. warrants this product to be free from defects in workmanship and materials
under normal use and conditions for the duration of the period outlined below FROM THE DATE OF
ORIGINAL PURCHASE. This Limited Warranty is not transferrable and is available only for the original purchaser of the Product. The Company’s obligation under this warranty is limited to replacing or
repairing the Product, at the discretion of the Company.
The various components of this equipment are warranted against defects and workmanship for the
following time period(s):
• Steel Frame 1-year.
• All Other Parts 90-Days
All warranty coverage extends only to the original retail purchaser from the date of purchase.
Pure Fitness’s obligation under this Warranty is limited to replacing or repairing, at Pure Fitness’s
option, the product at one of its authorized service centers. All products for which a warranty claim is
made must be received by Pure Fitness at one of its authorized service centers and accompanied by
sufcient proof of purchase (photocopy of the original store receipt, indicating the date of purchase).
All freight and handling fees are the responsibility of the consumer to pay, both to and from Pure Fitness. All warranty claims must be preauthorized by Pure Fitness. Preauthorization can be obtained by
calling 866-498-5269. This warranty does not extend to any product or damage to a product caused
by or attributable to freight damage, abuse, misuse, improper or abnormal usage, or repairs not provided by a Pure Fitness authorized service center or for products used for commercial or rental purposes. This warranty does not cover ordinary wear and tear, weathering, failure to follow directions,
improper installation, improper maintenance, or acts of Nature (such as damage caused by wind,
lightning, snow, water, or ice). Weather damage, damage caused by unauthorized repair work or
damage caused by improper use of the products are not covered by the product warranty. No other
Warranty beyond that specically set forth above is authorized by Pure Fitness.
Pure Fitness FITNESS IS NOT RESPONSIBLE OR LIABLE FOR INDIRECT, SPECIAL
OR CONSEQUENTIAL DAMAGES ARISING OUT OF OR IN CONNECTION WITH THE
USE OR PERFORMANCE OF THE PRODUCT OR OTHER DAMAGES WITH RESPECT
TO ANY ECONOMIC LOSS, LOSS OF PROPERTY, LOSS OF REVENUE OR PROFITS,
LOSS OF ENJOYMENT OR USE, COST OF REMOVAL, INSTALLATION OR OTHER
CONSEQUENTIAL DAMAGES. SOME STATES DO NOT ALLOW THE EXCLUSION OR
LIMITATION OF INCIDENTAL OR CONSEQUENTIAL DAMAGES. ACCORDINGLY, THE
ABOVE LIMITATION MAY NOT APPLY TO YOU. THE WARRANTY EXTENDED HEREUNDER IS IN LIEU OF ALL OTHER WARRANTIES AND Pure Fitness SPECIFICALLY
DISCLAIMS ANY IMPLIED WARRANTY OF MERCHANTABILITY OR FITNESS FOR A
PARTICULAR PURPOSE IS LIMITED IN ITS SCOPE AND DURATION TO THE TERMS
SET FORTH HEREIN. SOME STATES DO NOT ALLOW LIMITATION ON HOW LONG
AN IMPLIED WARRANTY LASTS. ACCORDINGLY, THE ABOVE LIMITATION MAY
NOT APPLY TO YOU.
This warranty gives you specic legal rights. You may also have other rights, which vary from state to
state.
Page 4

WARNING
CHOKING HAZARD – Small parts
NOT for children under 3 years.
! Warning!
While every attempt is made to ensure the highest degree of protection in all
equipment, we cannot guarantee freedom from injury. The user assumes all risks
of injury due to use. All merchandise is sold on this condition, which no
representative of the company can waive or change.
Page 5

WARNING
IMPORTANT – PLEASE READ!
WARNINGS – GENERAL SAFETY ADVICE
Please read these instructions in their entirety before use and retain for future reference.
Ensure that this product has been assembled correctly, per the instructions in the manual.
This manual is designed to help you assemble, adjust, maintain and use the product. It contains important information regarding your safety and your use of this equipment.
ALWAYS consult a physician before beginning any exercise program. Ask your doctor to evaluate
your present tness level and determine the exercise program that is most apporopriate for your particular age and/or physical condition.
IF YOU EXPERIENCE any pain or tightness in your chest, irregular heartbearts, shortness of
breath, faintness, dizziness, or other unusual discomfort while exercising, STOP and immediately
consult your physician and/or obtain medical assistance.
This machine is intended for indoor home use only, it is not designed for commercial use.
Before using this product, inspect your machine. Make sure that all nuts, bolts and hardware are tight
and in working order, check the hydraulic chambers for leakage, and ensure that the stretch cords are
securely in place. If not using the cords, make sure they are out of the way of the moving parts on the
Stepper and will not interfere with its normal use. Replace any worn, defective or missing parts before
resuming use.
DO NOT allow children to use, climb on, or play near this product.
NEVER allow more than one person at a time on this product.
Ensure that the product is on sturdy, level ground. If necessary, use a rubber mat under the machine
to reduce the possibility of slipping during use.
Warm up at least 5-10 minutes before each workout and to cool down for at least 5-10 minutes afterwards.
NEVER hold your breath while exercising.
Rest adequately between workouts to allow your muscles to tone and develop.
DO NOT wear loose tting clothing, belt buckles, or jewelry, including but not limited to rings, chains,
and pins before commencing exercise; this can be extremely dangerous.
DO NOT sit or kneel on the unit.
ALWAYS wear the appropriate tness footwear. DO NOT use this product barefooted or with socks
only.
Dispose of all packaging materials safely and per local ordinance.
Please retain this information for future reference.
Page 6

8529MS PARTS DIAGRAM/LIST
For your convenience, almost ALL of the parts on this list have been pre-assembled.
This list is for troubleshooting and parts identication ONLY.
Part # Description Quantity
1 Main Frame 1
2 Step Arm (Left) 1
3 Step Arm (Right) 1
4 Step Arm Link Cable Pulley Bracket 1 1
4a Step Arm Link Cable Pulley Bracket 2 1
5 M3 x 15mm Screws 2
6 M4 x 20mm Screws 2
7 M5 x 25mm Screws 4
8 M8 x 25mm Bolts 2
9 M8 x 40mm Hex Bolts 4
10 Elastic Bands w/ Handles 2
11 M10 x 45mm Hex Bolt 1
12 M8 Nylon Locknuts 4
13 M10 Nylon Locknuts 3
14 M6 Flat Washers 4
15 M8 Flat Washers 8
16 M10 Flat Washers 6
17 M19 Flat Washers 4
18 Step Arm Adjustment Knob 1
19 Grommet 1
20 Main Frame End Caps 4
21 Step Arm Support Bushings 4
22 Round Plastic End Caps 2
23 Step Arm Link Cable Pulley 1
24 Step Arm Link Cable 1
25 Step Arm Stoppers 2
26 Foot Plates 2
27 Hydraulic Cylinders 2
28 Monitor Mount 1
29 Monitor 1
30 Monitor Sensor Wire 1
Page 7

ASSEMBLY AND INITIAL SET-UP
For your safety and convenience, the Pure Fitness™ Mini-Stepper has a factory welded frame and
ships to you pre-assembled. To complete the assembly of your Stepper follow the simple steps outlined below.
1. Fit the Step Arm Height Adjustment Knob (18) into the hole in the front of the Main Frame and turn
it Clockwise “+” until you feel some resistance. DO NOT fully tighten this knob.
2. Remove the Battery Compartment Cover from the rear of the Exercise Monitor. Place the batteries
into the Battery Compartment, and replace the Battery Compartment Cover.
3. Connect the Exercise Monitor Sensor Wire (30) into the connector input on the rear of the Exercise
Monitor.
4.Slide the assembled Monitor onto the Exercise Monitor Mount.
5. Adjust the Step Height on your Mini Stepper. For initial set-up, a step height of approximately 6”
is advisable. To do this, use one hand to push down on one Step Arm Footplate (26), so it is fully
depressed. While holding this step down, turn the Step Arm Height Adjustment Knob in a Clockwise
“+” direction, allowing the other Step Arm Footplate to rise, until it is at a height of approximately 6”
above the rear stabilzer.
6. Attach Stretch Cords to the Main Frame by clipping the Stretch Cord hooks to the 2 welded
attachment loops on the front stabilizer bar.
RESISTANCE AND STEP HEIGHT ADJUSTMENT
The Hydraulic Cylinders on your Mini-Stepper are single acting, and their resistance levels have been
congured and set in the production process.
To intensify your workout, increase the height of the pedals by turning the Step Arm Height Adjustment Knob in a Clockwise “+” direction.
To decrease the intensity of your workout, decrease the height of the pedals by turning the Step Arm
Height Adjustment Knob in a Counter-clockwise “-” direction.
Page 8

MONITOR INSTRUCTIONS
FUNCTION BUTTONS:
MODE: This button cycles through the available Displays and turns the unit ON
RESET: Press the button once to reset unit data for the mode you are currently on.
Press the button and hold for 3 seconds to reset all values to zero.
NOTE: When the batteries are replaced, ALL values will reset to ZERO automatically.
FUNCTIONS & OPERATIONS
1.Battery Installation:
This monitor takes 2 x AA 1.5V batteries. Install batteries under the cover in the rear of the monitor.
Note: Replacing the batteries will reset ALL values on the monitor to ZERO.
2.Auto On/Off:
The system turns on when the MODE key is pressed or when you begin to use the Stepper.
The system turns off automatically approximately 4 minutes after you have stopped using the unit.
1. REPS/MIN-------------------------0~9999 (Steps per Minute)
2. CALORIES------------------------0~99.99 (Calories burned)
3. COUNT-----------------------------0~9999 (Number of Steps)
4. TIME--------------------------------0:00~59:59 (Duration of exercise)
5. SCAN-------------------------------6 SEC (Displays data (rotating) from all modes)
Note:
1.If the computer displays data abnormally, please remove the batteries and try again.
2.Battery Spec: 1.5V AA (2PCS).
3.Batteries must be removed from any equipment before disposal, and they must be disposed of/recycled separately in accordance with local and state regulations.
Page 9

EXERCISES
To improve your stamina, strength and improve your health, medical methods determining the most
efcient amount of training specically for your age, weight, height, and physical condition should
always be followed.
If you have not been physically active for an extended period of time and to also
avoid potential health risks, always consult a physician before starting any
exercise regimen.
Warm-up
Before every training you should warm-up for 5~10 minutes. Here you can do some stretching and
training with low resistance.
Cool down
To introduce an effective cool-down of the muscles and the metabolism the intensity should be drastically decreased during the last 5~10 minutes. Stretching is also helpful for the prevention of muscle
aches.
(SEE WARM-UP/COOL DOWN EXERCISES ON NEXT PAGES.)
Training session (With or without Stretch Cords)
If not using the Stretch Cords during your exercise, make sure that these cords are completely out of
the way of the moving parts on the Stepper, and will not interfere with its normal use.
The time-length of your training session can be calculated with the following general guidelines for a
normal, healthy individual:
Daily training: approx. 5-15 min. per session
2-3 x per week: approx. 15-25 min. per session
Once per week: approx. 30-45 min. per session
Success!
Even after a short period of regular exercise you will notice that the sessions will be continuously
easier and you will feel more t during your normal day. Choose xed hours for your training session
and do not start training too aggressively.
Page 10

WARM UP EXERCISES
A successful exercise program consists of a warm-up, aerobic exercise, and a cool-
Inner Thigh Stretch
Hamstring Stretch
Head Roll
Shoulder Lift
WARM UP/COOL DOWN EXERCISES
down. Do the entire program at least two and preferably three times a week, resting for
a day between workouts. After several months, you can increase your workouts to four
or five times per week.
Warming up is an important part of your workout, and should begin every session. It
prepares your body for more strenuous exercise by heating up and stretching out your
muscles, increasing your circulation and pulse rate, and delivering more oxygen to your
muscles. At the end of your workout, repeat these exercises to reduce sore muscle
problems. We suggest the following warm-up and cool-down exercises:
Sit with the soles of your feet together
with your knees pointing outward. Pull
your feet as close into your groin as
possible. Gently push your knees towards
the floor. Hold for 15 counts.
Sit with your right leg extended. Rest the
sole of your left foot against your right
inner thigh. Stretch toward your toe as far
as possible. Hold for 15 counts. Relax and
then repeat with left leg extended.
Rotate your head to the right for one
count, feeling the stretch up the left side
of your neck. Next, rotate your head back
for one count, stretching your chin to the
ceiling and letting your mouth open.
Rotate your head to the left for one count,
and finally, drop your head to your chest
for one count.
Lift your right shoulder up toward your ear
for one count. Then lift your left shoulder
up for one count as you lower your right
shoulder.
Page 11

WARM UP EXERCISES CONTINUED
Calf-Achilles Stretch
Toe Touch
Side Stretch
WARM UP/COOL DOWN EXERCISES
Lean against a wall with your left leg in
front of the right and your arms forward.
Keep your right leg straight and the left
foot on the floor; then bend the left leg
and lean forward by moving your hips
toward the wall. Hold, then repeat on the
other side for 15 counts
Slowly bend forward from your waist,
letting your back and shoulders relax as
you stretch toward your toes. Reach down
as far as you can and hold for 15 counts.
Open your arms to the side and continue
lifting them until they are over your head.
Reach your right arm as far upward toward
the ceiling as you can for one count. Feel
the stretch up your right side. Repeat this
action with your left arm.
Page 12

FREQUENTLY ASKED QUESTIONS
Question: “The monitor is not working, what can I do?”
Answer: IN MOST CASES WHERE THERE IS AN APPARENT FAILURE OF THE MONITOR, IT IS
DUE TO THE IMPROPER ATTACHMENT OF THE CABLE CONNECTION. PLEASE ENSURE THAT
THE PLUG IN THE REAR OF THE MONITOR IS SECURE. YOU SHOULD ALSO MAKE SURE
THAT THE BATTERIES ARE IN WORKING ORDER.
Question: “Is there any maintenance I need to do for my Stepper?”
Answer: YOU SHOULD ALWAYS DOUBLE CHECK TO MAKE SURE ALL YOUR BOLTS ARE
TIGHT AND SECURE, ENSURE THAT THE HYDRAULIC CHAMBERS ARE NOT LEAKING, AND
THAT THE STRETCH CORDS ARE SECURE IN THEIR HOUSING BEFORE BEGINNING USE. TO
CLEAN THE METAL AND PLASTIC COMPONENTS, A GENERAL HOUSEHOLD CLEANER CAN
BE USED, BUT PLEASE BE SURE TO FULLY DRY THE STEPPER AND FOOT PLATES BEFORE
USE. NEVER USE ANY KIND OF POLISH OR LUBRICANT ON THE FOOT PLATES.
Question: “Something was missing from the packaging,” “I need to purchase a replacement Stretch
Cord or other part” or “I discovered a damaged piece. What should I do?”
Answer: CONTACT CUSTOMER SERVICE AT: customerservice@puregbi.com or by calling
888-498-5269. YOU MUST HAVE YOUR PROOF OF PURCHASE AND/OR ORDER CONFIRMATION AVAILABLE TO BE CONSIDERED FOR WARRANTY REPLACEMENT. YOU MUST REPORT
MISSING PIECES WITHIN 30 DAYS FROM DATE OF PURCHASE. PLEASE BE AWARE THAT
UNDER OUR LIMITED WARRANTY, FOR SOME PARTS WE REQUIRE A PICTURE OF THE DAMAGED ITEM AND/OR RETURN OF THE ITEM TO OUR QUALITY CONTROL OFFICE FOR REVIEW.
 Loading...