

Page 1

DE
GB
FR
IT
ES
NL
DK
SE
CZ
TR
PL
RU
Manual
Page 2

2
DE
GB
FR
IT
ES
NL
DK
SE
CZ
TR
PL
RU
Deutsch
Beim Lesen der Gebrauchsanleitung die
Bildseite herausklappen.
English
Fold out the picture pages
when reading the user instructions.
Français
Lorsque vous lisez le manuel d’utilisation,
veuillez déplier les pages d’illustration.
Italiano
Per leggere le istruzioni per l uso
aprire le pagine ripiegate contenenti le figure.
Español
Al consultar el manual de instrucciones
abrir la hoja plegable.
Nederlands
Bij het lezen van de gebruiksaanwijzing
pagina’s met afbeeldingen uitklappen.
Dansk
Når brugsanvisningen læses,
skal billedsiderne klappes ud.
Svenska
Vid läsning av bruksanvisningen,
fall ut bildsidoma.
Česky
Při čteni návodu k odsluze rozložit
stránky s obrázky.
Türkçe
Kullanma Talimatının okunması esnasında
resim sayfalarını dıfları çıkartın.
Polski
Przy czytaniu instrukcji obsługi otworzyć
strony ze zdjęciami.
Русский
При чтении руководства по эксплуатации
просьба открывать страницы с рисунками.
4
5
6
7
8
9
10
11
12
13
14
15
Page 3
3
Fig. 1
Fig. 2
Fig. 3
Page 4

Anleitung zum Einstellen der MICRO-Bandsäge beim Arbeiten mit
dem Diamantband
NO 28 186
Die Kugellagerführung muss vor jedem Bandwechsel auf defekte Lager
hin überprüft und ggf. neu eingestellt
werden! Dazu bitte vorgehen wie
folgt:
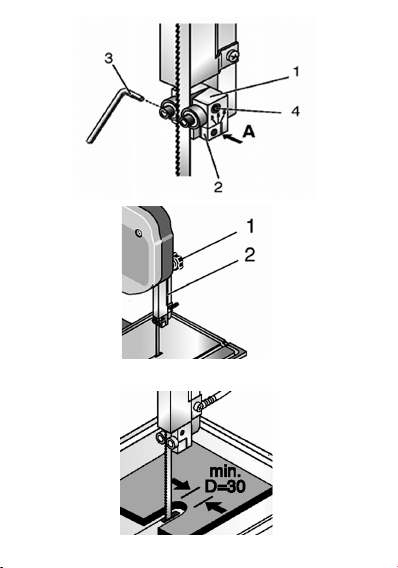
1. Das untere Lager der Bandführung 1
(siehe Fig. 1) muss zum Betrieb des
Diamanttrennbandes in der vordersten Position (siehe Markierung „3“ auf
Bandführung) stehen. Dazu mit Innensechskantschlüssel 3 Schraube A
lockern und den Vierkant 2 ganz nach
vorne schieben (Hinterkante des
Vierkantes schneidet die „3“-Markierung auf der Bandführung). Zum Einstellen siehe auch Bedienungsanleitung der Bandsäge! Anschließend
Schraube A wieder festziehen.
2. Da bei längerer Benutzung auch die
hintere Kante des Trennbandes verschleißt, müssen die beiden oberen
Lager so eingestellt werden, dass
auch die diamantierte Vorderseite
des Bandes zwischen die Lager
passt. Den Lagerabstand können Sie
mit einem Innensechskantschlüssel
an der Schraube 4 (Fig. 1) einstellen.
Beachten Sie: Eine zu stramm eingestellter Lagerabstand kann zum Verklemmen und somit zum Bruch des
Bandes führen.
3. Diamantband montieren und Bandspannung gefühlvoll einstellen, so
dass das Band von der Antriebsrolle
mitgenommen, aber nicht überdehnt
wird.
4. Vor dem Sägebeginn Führungsteil
knapp über dem Sägegut einstellen.
Dazu Knebelschraube 1 lockern (siehe Fig. 2), Führungsteil 2 in die gewünschte Position schieben und wieder Knebelschraube festklemmen
5. Beim Trennen auf gefühlvollen Vorschub achten! Der kleinste zu trennende Radius darf 30 mm nicht unterschreiten (Fig. 3).
6. Nach Arbeitsende Diamant-Trennband / Sägeband entspannen, um
Verformungen am Band oder der Umlenkrollen vorzubeugen.
Gewährleistungsbestimmungen
Alle PROXXON-Produkte werden nach
der Produktion sorgfältig geprüft. Sollte
dennoch ein Defekt auftreten, wenden
Sie sich bitte an den Händler, von dem
Sie das Produkt gekauft haben. Nur dieser ist für die Abwicklung aller gesetzlicher Gewährleistungsansprüche zuständig, die sich ausschließlich auf
Material- und Herstellerfehler beziehen.
Unsachgemäße Anwendung wie z.B.
Überlastung, Beschädigung durch
Fremdeinwirkung und normaler Verschleiß sind von der Gewährleistung
ausgeschlossen.
Weitere Hinweise zum Thema „Service
und Ersatzteilwesen“ finden Sie länderspezifisch auf www.proxxon.com.
4
DE
Page 5

Instruction for adjusting
the MICRO-Bandsaw for
working with the
diamond sawband
NO 28186
The ball-bearing guide of band saw
must be checked for defective bearings and, if applicable, adjusted new.
Proceed as follows:
1. The below bearing of the blade guide
1 (Fig. 1) must stand in the most front
position (see mark “3” at blade guide)
for using the diamond blade. Therefore please loosen screw A with the
Allen key and push the square 2 fully
ahead (trailing edge of the square
cuts the “3” mark on the blade guide).
For adjusting also read the In struction Manual. Afterwards tighten
screw A.
2. As the rear angle wears out after
lengthy use, both above bearings
must be adjusted in that way, that the
diamond coated front of the band fits
between the bearings. You can adjust the bearing clearance with an
Allen key at screw 4 (Fig. 1). Please
attend: A too tightly adjusted bearing
clearance can cause seizing and
thus breaking of the band.
3. Mount the diamond band and adjust
carefully the tension of the band, so
that it will be taken along by the
drive roll, but does not get overstretched.
4. Before starting to saw adjust the
guide component right above the
work piece. Therefore loosen toggle
screw (Fig. 2), push the guide component into designated position and
then jam the toggle screw
5. While sawing assure a sensitive
feed! The smallest possible sawing
radius is 30mm (Fig. 3).
6. After working, relax the diamond saw
blade to prevent deformation of the
band or the pulley.
Warranty provisions
All PROXXON products are thoroughly
inspected after production. Should a defect occur nevertheless, please contact
the dealer from whom you purchased
the product. Only the dealer is responsible for handling all legal warranty
claims which refer exclusively to material and manufacturer error.
Improper use, such as capacity overload, damage due to outside influences
and normal wear are excluded from the
warranty.
You will find further notes for each country regarding “Service and Spare Parts
Management” at www.proxxon.com.
5
GB
Page 6

Guide pour le réglage de
la MICRO-Scie à ruban
pour les travaux avec le
ruban diamanté
NO 28 186
Avant chaque changement de ruban, le
guide-lame à roulements à billes doit
être contrôlé quant à lʼexistence de
dommages sur les roulements et, le
cas échéant, être réglé de nouveau!
Pour cela, procéder comme suit:
1. Pour lʼutilisation du ruban diamanté, le
roulement à billes inférieur du guidelame 1 (cf. ill. 1) doit se trouver sur la
position la plus avancée (cf. marque
«3» sur le guide-lame). Pour cela, dévisser la vis A avec la clé Allen 3 et repousser le carré 2 complètement vers
lʼavant (lʼarête postérieure du carré
coupe la marque «3 » sur le guidelame). Pour le réglage, consulter également la notice dʼutilisation de la scie
à ruban! Ensuite, serrer de nouveau à
fond la vis A.
2. Comme lʼarête postérieure du ruban de
scie également sʼuse en cas dʼutilisation prolongée, les deux roulements à
billes supérieurs doivent être réglés de
telle sorte que la partie avant diamantée du ruban passe entre les roulements. Vous pouvez régler lʼécart entre
les roulements sur la vis 4 (ill. 1) avec
une clé Allen. Attention: Un écart trop
étroit entre les roulements peut entraîner le coincement et ainsi la rupture du
ruban.
3. Monter le ruban diamanté et régler
avec prudence la tension du ruban,
afin que ce dernier puisse être entraîné
par le galet dʼentraînement mais sans
surtension.
4. Avant de commencer à scier, amener
le guide juste au-dessus de la pièce à
découper. Pour cela, dévisser la molette 1 (cf. ill. 2), faire glisser le guide 2
jusquʼà la position souhaitée et resserrer ensuite la molette.
5. Lors de la découpe, assurer une
avance non brutale! Le diamètre à découper le plus petit ne doit pas être inférieur à 30mm (ill. 3).
6. Après le travail, détendre le ruban diamanté / le ruban de scie pour éviter
toute déformation du ruban ou des galets.
Conditions de garantie
Tous les produits PROXXON font l'objet
d'un contrôle soigneux à l'issue de leur fabrication. Si toutefois un défaut devait apparaître, veuillez contacter le revendeur
chez qui vous avez acheté le produit. Il
est seul habilité à gérer la procédure de
traitement de toutes les prétentions légales en matière de dommages et intérêts
relevant exclusivement des défauts de
matériaux ou de fabrication.
Toute utilisation non conforme, comme la
surcharge ou les dommages provoqués
par exercice d'une contrainte extérieure,
ainsi que l'usure normale, sont exclus de
la garantie.
Vous trouverez de plus amples informations concernant le « Service après-vente
et les pièces détachées », classées par
pays, à l'adresse www.proxxon.com.
6
FR
Page 7

Istruzioni per la regolazione della sega a nastro MICRO durante i
lavori con la lama
diamantata NO 28 186
Prima di ogni cambio del nastro è
necessario accertarsi che la guida
dei cuscinetti a sfera sia posizionata
correttamente ed eventualmente regolarla! A tal fine procedere nel
modo seguente:
1. Il cuscinetto inferiore della guida del
nastro 1 (vedi Fig. 1) per il funzionamento della lama diamantata deve
essere posizionato nella posizione
anteriore (vedi contrassegno „3“ sulla
guida del nastro). In questo modo allentare con la chiave esagonale 3 la
vite A e spingere lʼunità quadrata 2 in
avanti (il bordo posteriore dellʼunità
quadrata taglia il „3“ contrassegno
sulla guida del nastro). Per la regolazione si prega di osservare anche le
istruzioni per lʼuso della sega a nastro! Successivamente stringere nuovamente la vite A.
2. Poiché in caso di prolungato utilizzo
si usura anche il bordo posteriore
della sega è necessario che i due cuscinetti superiori vengano regolati in
modo tale che anche il lato anteriore
diamantato della sega entri nel cuscinetto. La distanza del cuscinetto può
essere regolata con la chiave esagonale sulla vite 4 (Fig. 1). Nota: una distanza del cuscinetto impostata troppo tesa potrebbe determinare un
blocco e quindi la rottura del nastro.
3. Montare la lama diamantata e regolare la tensione del nastro in modo
tale che il nastro possa essere guidato dal rullo, ma che non giri eccessivamente.
4. Prima di procedere a segare, posizionare lʼelemento guida poco sopra
lʼelemento da segare. Allentare a tal
fine la vite a levetta 1 (vedi Fig. 2),
spingere lʼelemento guida 2 nella posizione desiderata e bloccare nuovamente la vite a levetta
5. Durante le operazioni di tagli esercitare un avanzamento dolce! Il più piccolo raggio da tagliare non deve essere inferiore a 30mm (Fig. 3).
6. A fine lavoro sbloccare la sega diamantata / il nastro per prevenire deformazioni sul nastro o i rulli di rinvio.
Condizioni di garanzia
Dopo la produzione tutti i prodotti
PROXXON vengono sottoposti ad un
controllo accurato. Qualora si dovesse
comunque verificare un difetto, si prega
di rivolgersi al proprio rivenditore dal
quale si è acquistato il prodotto. Solo
questo è autorizzato a rispondere dei
diritti di garanzia previsti dalla legge che
si riferiscono esclusivamente a difetti di
materiale ed errori del produttore.
È escluso dalla garanzia qualsiasi utilizzo improprio quale ad es. un sovraccarico, un danneggiamento per effetti
esterni e la normale usura.
Ulteriori avvertenze sul tema „Assistenza e pezzi di ricambio“ sono disponibili
allʼindirizzo www.proxxon.com.
7
IT
Page 8

Instrucciones para el
ajuste de la sierra de
cinta MICRO al trabajar
con la cinta de diamante
NO 28 186
¡Antes de cada cambio de cinta, se
debe verificar la presencia de defectos
en los rodamientos y en caso dado
volver a ajustar la guía de rodamientos
de bolas! Para ello proceda de la siguiente manera:
1. El rodamiento inferior de la guía de cinta 1 (véase fig. 1) debe encontrarse
para el servicio de la cinta de seccionado de diamante, en la posición delantera (véase marcación „3“ en la guía
de la cinta). Para ello aflojar el tornillo
A con una llave de hexágono interior
de 3 y deslizar el cuadrado 2 completamente hacia delante (el canto trasero
del cuadrado corta la marcación „3“ sobre la guía de la cinta). ¡Para el ajuste
véase también las instrucciones de
manejo de la sierra de cinta! A continuación volver a apretar el tornillo A.
2. Dado que en caso de un uso prolongado también el canto trasero de la cinta
de seccionado se desgasta, los dos rodamientos superiores deben ser ajustados de tal manera, que también el
lado delantero diamantado de la cinta
se ajuste entre los rodamientos. La distancia entre rodamientos puede ajustarla con una llave de hexágono interior en el tornillo 4 (fig. 1). Observe:
una distancia entre rodamiento ajustada muy tensa puede conducir a un
atascamiento y de ese modo a la rotura de la cinta.
3. Montar la cinta de diamante y ajustar
su tensión de manera sensible, de tal
modo que la cinta sea arrastrada por
la polea de accionamiento pero que no
se sobredilate.
4. Antes de iniciar el aserrado, ajustar la
pieza de guía ligeramente sobre el producto a aserrar. Para ello aflojar el tornillo de muletilla 1 (véase fig. 2), deslizar la pieza de guía 2 a la posición
deseada y volver a apretar el tornillo de
muletilla.
5. ¡Durante el corte observar un avance
delicado! El radio de seccionado más
pequeño no puede estar por debajo de
30 mm (fig.3).
6. Tras finalizar el trabajo destensar la
cinta de seccionado de diamante/ cinta
de sierra, para prevenir deformaciones
en la cinta o en las poleas de reenvío.
Disposiciones de garantía
Todos los productos PROXXON se verifican cuidadosamente tras la producción.
Si a pesar de ello se presentara un defecto, diríjase por favor a su revendedor del
cuál ha adquirido el producto. Solo este
es responsable para la gestión de todos
los derechos legales de garantía que se
refieren exclusivamente a fallos de material y de fabricación.
Un uso indebido como p.ej. sobrecarga,
daños por acciones externas y desgaste
normal están excluidos de la garantía.
Otras indicaciones sobre el tema „Servicio técnico y gestión de repuestos” las encontrará específicas para cada país en
www.proxxon.com.
8
ES
Page 9

Handleiding voor het
instellen van de MICROlintzaag voor werken
met de diamantzaagband NO 28 186
De kogellagergeleiding moet voor iedere bandwissel op defecte lagers
worden gecontroleerd en evt. opnieuw worden ingesteld. U gaat daarvoor als volgt te werk:
1. De onderste lager van de bandgeleiding 1 (zie fig. 1) moet in de voorste
stand (zie markering „3“ op bandgeleiding) staan voor de werking van de
diamantzaagband. Daarvoor moet u
met inbussleutel 3 schroef A losdraaien en het vierkantje 2 helemaal naar
voren schuiven (achterkant van het
vierkantje snijdt de „3“-markering op
de bandgeleiding). Zie voor het instellen ook de handleiding van de
lintzaag. Aansluitend schroef A weer
vastdraaien.
2. Omdat bij langer gebruik ook de achterkant van de zaagband slijt, moeten de beide bovenste lagers zo
worden ingesteld, dat ook de gedia manteerde voorzijde van de band
tussen de lagers past. De lagerafstand kunt u met een inbussleutel via
schroef 4 (fig. 1) instellen. Let op het
volgende: een te strak ingestelde lagerafstand kan tot klemmen en daardoor ook breuk van de band leiden.
3. Diamantzaagband monteren en
bandspanning op gevoel instellen, zo
dat de band door de aandrijfrol wordt
meegenomen, maar niet wordt uitgerekt.
4. Voor u begint te zagen geleidingsdeel strak over het zaaggoed instellen. Daarvoor vleugelmoer 1 losdraaien (zie fig. 2), geleidingsdeel 2
in de gewenste stand schuiven en
weer met vleugelmoer vastklemmen
5. Bij het scheiden met gevoel bij de
aanzet blijven. De kleinste te scheiden straal mag niet minder zijn dan
30 mm (fig. 3).
6. Na afloop van het werk diamantscheidingsband / zaagband ontspannen om vervormingen van de band of
de omkeerrollen te voorkomen.
Garantiebepalingen
Alle PROXXON-producten worden na
de productie zorgvuldig getest. Mocht
er toch een defect optreden, dan kunt u
contact opnemen met de leverancier
van wie u het product hebt gekocht. Alleen de leverancier is voor de afwikkeling van alle wettelijke garantieclaims
die uitsluitend materiële of fabricagefouten betreffen, verantwoordelijk.
Ondeskundig gebruik zoals overbelasting, beschadiging door inwerking van
vreemde stoffen en normale slijtage zijn
uitgesloten van de garantie.
Verdere aanwijzingen over het thema
„Service en reserveonderdelen“ vindt u
per land gespecificeerd op www.proxxon.com.
9
NL
Page 10

Vejledning til indstilling
af MICRO-båndsav til
op gaver med diamantbelagt båndsavklinge
NO 28 186
Før der skiftes båndsavklinge, skal
det altid kontrolleres, om lejerne i
kuglelejeføringen er defekte, og de
justeres om nødvendigt. Det gøres
på følgende måde:
1. Båndføringens nederste leje (se fig.
1) skal stå i forreste stilling ved brug
af den diamantbelagte båndsavklinge (se markering „3“ på båndføringen). Med unbrakonøgle 3 løsnes
skrue A og firkant 2 skubbes helt
frem (firkantens bagerste kant skærer „3“-markeringen på båndføringen). Se også brugsanvisningen til
båndsaven mht. indstillingen! Stram
derefter skrue A igen.
2. Da klingens bagkant også bliver slidt
efter længere tids brug, skal de to
øverste lejer indstilles således, at
klingens diamantbelagte forside
også passer ind mellem lejerne. Lejeafstanden kan indstilles på skrue 4
(fig. 1) med en unbrakonøgle. Bemærk: Hvis lejeafstanden er indstillet
for stramt, kan klingen komme i
spænd og knække.
3. Monter den diamantbelagte savklinge og stram den med følelse, så den
tages med af drivhjulet, men ikke
overstrækkes.
4. Før man begynder at save, indstilles
føringsdelen, så den ligger lidt over
emnet. Det gøres ved at løsne
knebelskruen 1 (se fig. 2), skubbe føringsdelen 2 i den ønskede stilling og
stramme igen med knebelskruen.
5. Føl dig frem til fremføringstrykket,
mens du saver! Den mindste savradius må ikke være mindre end
30 mm (fig. 3).
6. Når du er færdig med at save, slækkes den diamantbelagte båndsavklinge, for at undgå deformation af
bånd eller styreruller.
Garantibestemmelser
Alle produkter fra PROXXON kontrolleres omhyggeligt efter produktionen.
Hvis der alligevel skulle være en defekt,
så kontakt den forhandler, hvor du har
købt produktet. Det er kun ham, der er
ansvarlig for afviklingen af den lovmæssige reklamationsret, som udelukkende
gælder for materiale- og produktionsfejl.
Forkert brug som f.eks. overbelastning,
beskadigelse på grund af udefra kommende påvirkninger og normal slitage
hører ikke ind under reklamationsretten.
Du kan finde yderligere oplysninger om
"Service og reservedele" for de enkelte
lande på www.proxxon.com.
10
DK
Page 11

Anvisning för inställning av MICRO-bandsåg
vid arbete med diamanterad klinga Nr 28 186
Kullagerstyrningen måste kontrolleras beträffande defekta lager före
varje klingbyte och ställas in på nytt
vid behov. Gör därvid enligt följande:
1. Det nedre lagret i klingmatningen (se
bild 1) måste vara i främsta läget (se
markering „3“ på klingmatningen) vid
användning av den diamanterade
klingan. Lossa skruven A med insexnyckeln 3 och skjut fyrkanten 2 helt
framåt (fyrkantens bakkant tangerar
markeringen „3“ på klingmatningen).
För inställning, se även bruksanvisningen för bandsågen. Dra sedan åt
skruven A igen.
2. Eftersom även bakkanten på klingan
slits vid längre tids användning ska
båda övre lagren ställas in så att
även klingans diamanterade framsida passar mellan lagren. Lageravståndet kan ställas in via skruven 4
(bild 1) med en insexnyckel. Observera: För snävt inställt lageravstånd
kan leda till fastklämning och därmed
brott på klingan.
3. Montera den diamanterade klingan
och ställ in klingspänningen med
känsla så att klingan förs med av
drivrullen men inte tänjs för mycket.
4. Innan sågning påbörjas, ställ in matningsdelen strax ovanför arbetsstycket. Lossa därvid vredet 1 (se bild 2),
skjut matningsdelen 2 till önskat läge
och kläm fast den med vredet igen.
5. Se till att matning sker med känsla
vid sågning. Den minsta radien som
ska sågas får inte underskrida 30
mm (bild 3).
6. Efter att arbetet slutförts, slacka den
diamanterade klingan/sågklingan för
att förhindra deformation på klingan
eller brytrullarna.
Garantivillkor
Alla PROXXON-produkter genomgår
noggranna kontroller efter tillverkningen. Om det ändå skulle inträffa någon
defekt ska ni kontakta återförsäljaren
som ni köpte produkten av. Det är endast återförsäljaren som är tillgänglig
för hantering av garantianspråk, som
uteslutande rör material- och tillverkningsfel.
Felaktig användning som t.ex. överbelastning, skador på grund av yttre påverkan och normalt slitage utesluts från
garantin.
Ytterligare landsspecifik information
gällande „Service och reservdelar” finns
på www.proxxon.com.
11
SE
Page 12

Návod k nastavení pásové pily MICRO při
práci s diamantovým
pásem NO 28 186
Před každou výměnou pásu je nutné
zkontrolovat, zda nejsou ve vedení s
kuličkovými ložisky poškozená ložiska, a v případě potřeby je znovu nastavit! Postupujte takto:
1. Dolní ložisko vedení pásu 1 (viz obr.
1) musí být při použití diamantového
řezacího pásu v přední poloze (viz
značka 3 na vedení pásu). K tomuto
nastavení povolte klíčem na vnitřní
šestihran 3 šroub A a hranol 2 posuňte úplně dopředu (zadní hrana
hranolu prochází značkou 3 na vedení pásu). K nastavení viz také návod
k obsluze pásové pily. Pak šroub A
opět utáhněte.
2. Protože se při delším používání opotřebuje i zadní okraj řezacího pásu, je
nutné nastavit obě horní ložiska tak,
aby se mezi ně vešel i diamantový
přední okraj pásu. Vzdálenost ložisek
lze nastavit klíčem na vnitřní šestihran pomocí šroubu 4 (obr. 1). Pozor:
Pokud jsou ložiska příliš blízko u
sebe, může dojít k sevření a prasknutí pásu.
3. Namontujte diamantový pás a s citem ho napněte tak, aby byl poháněn
hnací kladkou, ale nepřepínal se.
4. Před řezáním nastavte vodicí díl
těsně nad řezaný materiál. K tomu
povolte šroub s kolíkovou hlavou 1
(viz obr. 2), vodicí díl 2 posuňte do
požadované polohy a šroub opět
utáhněte.
5. Při řezání posouvejte materiál s
citem! Nejmenší poloměr, který lze
řezat, je 30 mm (obr. 3).
6. Po dokončení práce diamantový řezací pás / pilový pás povolte, aby se
nedeformoval pás a vodicí kladky.
Záruční podmínky
Všechny výrobky PROXXON se po výrobě pečlivě kontrolují. Pokud přesto
dojde k závadě, obraťte se prosím na
prodejce, u kterého jste výrobek koupili. Jen tento prodejce může vyřídit
veškeré zákonné nároky vyplývající ze
záruky, které se vztahují pouze na materiálové a výrobní vady.
Záruka se nevztahuje na závady způsobené nesprávným používáním, např.
přetížením, poškození cizím vlivem
nebo normálním opotřebením.
Další informace k tématu „Servis a náhradní díly“ pro jednotlivé státy najdete
na adrese www.proxxon.com.
12
CZ
Page 13

MICRO şerit testeresi
için ayarlama talimatı elmas şerit NO 28 186
ile çalışırken
Bilyeli yatak kılavuzu, her şerit değişiminden önce yatak hasarı konusunda
kontrol edilmeli ve gerektiğinde yeniden
ayarlanmalıdır! Lütfen aşağıdakiişlemleri takip ediniz:
1. Şerit kılavuzunun 1 alt yatağı (bakınız Şek. 1) elmas kesme şeridinin çalıştırılması için en ön pozisyonda bulunmalıdır (bakınız şerit kılavuzu
üstünde işaret „3“). Bunun için allen
anahtar 3 ile A cıvatasını gevşetiniz
ve dört köşe parçayı 2 iyice öne itiniz
(Dört köşe parçanın arka kenarı şerit
kılavuzu üstündeki „3“ işaretlemesini
keser). Ayarlamak için bakınız ayrıca
şerit testere kullanma kılavuzu! Ardından A cıvatasını tekrar sıkınız.
2. Uzun süreli kullanımda kesme şeridinin arka kenarı da aşındığından her
iki yatağın, şeridin elmaslı ön tarafının da yataklar arasına gireceği şekilde ayarlanması gerekir. Yatak mesafesini cıvatadan 4 (Şek. 1) bir allen
anahtarla ayarlayabilirsiniz. Unutmayınız: Çok gergin ayarlanmış bir yatak mesafesi şeridin sıkışmasına ve
kopmasına neden olabilir.
3. Elmas şeridi monte ediniz ve şerit
gerginliğini hassas bir şekilde ayarlayınız, ki tahrik makarası tarafından
şerit kavranabilsin, ancak fazla esnetilmesin.
4. Kesmeye başlamadan önce kılavuz
parçasını kesilecek malzemenin hemen üstüne ayarlayınız. Bunun için
sıkıştırma vidasını 1 gevşetiniz (bakınız Şek. 2), kılavuz parçasını 2 istediğiniz pozisyona itiniz ve yeniden
sıkıştırma vidasıyla sıkıştırınız.
5. Kesme işlemi sırasında hassas
avans vermeye dikkat ediniz! Kesilecek en küçük yarıçap 30mm’nin
altına düşmemelidir (Şek. 3).
6. Şerit veya yön makaralarının eğilmemesi için çalışma bitiminde elmas
kesme şeridini / testere şeridini gevşetiniz.
Garanti koşulları
Tüm PROXXON ürünleri üretimden
sonra özenle test edilir. Buna rağmen
bir arıza meydana gelirse, lütfen ürünü
satın aldığınız satış temsilcisine başvurunuz. Sadece o yalnızca malzeme ve
üretici hatalarıyla ilişkili yasal garanti taleplerinin işleme alınmasından sorumludur.
Aşırı yüklenme, yabancı etkisiyle hasar
ve normal aşınma gibi uygunsuz kullanım garanti kapsamına dahil değildir.
„Servis ve yedek parçalar“ konusuyla
ilgili açıklamaları ülkeler bazında
www.proxxon.com sayfasından bulabilirsiniz.
13
TR
Page 14

Instrukcja ustawiania
piły taśmowej MICRO
podczas pracy z taśmą
diamentową NO 28186
Przed każdą wymianą taśmy sprawdzić prowadnicę z łożyskami kulkowymi, czy nie są uszkodzone łożyska
i w razie potrzeby ustawić od nowa!
W tym celu należy postępować w
sposób następujący:
1. Dolne łożysko prowadnicy taśmy 1
(patrz Rys. 1) przy pracy z taśmą diamentową winno znajdować się w pozycji najbardziej wysuniętej do przodu (patrz znaczek „3“ na prowadnicy
taśmy). W tym celu poluzować śrubę
A za pomocą klucza imbusowego 3
i czworokąt 2 przesunąć całkiem do
przodu (krawędź tylna czworokąta
winna znajdować na znaczku „3” na
prowadnicy taśmy). Odnośnie ustawienia patrz również instrukcja obsługi pilarki taśmowej! Następnie dokręcić z powrotem śrubę A.
2. Ponieważ po dłuższym użytkowaniu
zużywa się również tylna krawędź
taśmy tnącej, obydwa łożyska górne
należy ustawić tak, aby diamentowana krawędź przednia znalazła się pomiędzy łożyskami. Odstęp pomiędzy
łożyskami można ustawić na śrubie
4 za pomocą klucza imbusowego 4
(Rys. 1). Należy pamiętać o tym, iż za
ciasno ustawiony odstęp może prowadzić do zakleszczenia się, a tym
samym do pęknięcia taśmy.
3. Zamontować taśmę diamentową i
ustawić z wyczuciem naprężenie piły
tak, by taśma była wprawiana w ruch
przez rolkę napędową, lecz aby nie
była nadmiernie naprężona.
4. Przed rozpoczęciem cięcia ustawić
element prowadnicy tuż nad przecinanym materiałem. W tym celu poluzować śrubę z pokrętką 1 (patrz Rys.
2), przesunąć element prowadnicy 2
do żądanego położenia i zacisnąć z
powrotem śrubą z pokrętką.
5. W czasie cięcia stosować delikatny
posuw! Najmniejszy promień cięcia
nie może być mniejszy niż 30 mm
(Rys. 3).
6. Po zakończeniu pracy zwolnić taśmę
tnącą /piłę taśmową, aby zapobiec
odkształceniom taśmy lub rolek napinających.
Warunki gwarancji
Wszystkie produkty firmy PROXXON są
poddawane starannej kontroli fabrycznej. Jeżeli jednak mimo wszystko wystąpią defekty, prosimy o kontakt ze
sprzedawcą produktu. Tylko on jest odpowiedzialny za realizację wszystkich
ustawowych uprawnień gwarancyjnych,
wynikających wyłącznie z wad materiałowych i produkcyjnych.
Nieprawidłowe użycie, np. przeciążenie, uszkodzenie przez wpływy obce
oraz normalne zużycie nie są objęte
gwarancją.
Więcej informacji na temat „Serwisu
oraz części zamiennych” można znaleźć dla poszczególnych krajów pod
adresem www.proxxon.com.
14
PL
Page 15

Руководство по
регулировке ленточной
пилы MICRO при работе
с алмазной лентой
NO 28 186
Перед каждой сменой ленты следует
проверить шариковую направляющую
на отсутствие дефектов опоры и при
необходимости заново отрегулировать! Для этого выполнить следующие
операции:
1. Для работы разрезной алмазной ленты нижняя опора 1 направляющей для
ленты (см. рис. 1) должна находиться
в крайнем переднем положении (см.
маркировку „3“ на направляющей для
ленты). Для этого при помощи шестигранного торцового ключа 3 ослабить
винт А и полностью выдвинуть вперед
четырехгранник 2 (задняя кромка четырехгранника пересекает маркировку „3“ на направляющей для ленты).
Для регулировки см. также руководство по эксплуатации ленточной пилы!
После этого снова затянуть винт А.
2. Поскольку в процессе продолжительной эксплуатации изнашивается также задняя кромка разрезной ленты,
обе верхние опоры должны быть отрегулированы таким образом, чтобы
между опорами проходила также передняя (алмазная) сторона ленты.
Расстояние между опорами можно отрегулировать винтом 4 (рис. 1) при помощи шестигранного торцового ключа.
Просьба учитывать: Слишком маленький отрегулированный зазор между
опорами может привести к заеданию
и тем самым к разрыву ленты.
3. Необходимо смонтировать алмазную
ленту и осторожно отрегулировать натяжение ленты, так чтобы лента захватывалась приводным роликом, не
подвергаясь при этом чрезмерному
растяжению.
4. Перед началом распиливания необходимо плотно установить направляющую деталь на обрабатываемом материале. Для этого ослабить тисковый
винт 1 (см. рисунок 2), сдвинуть направляющую деталь 2 в требуемое положение и снова затянуть тисковый
винт.
5. При резке необходимо применять медленную подачу! Минимальный разрезаемый радиус должен составлять не
менее 30 мм (рис. 3).
6. После завершения работы ослабить
натяжение разрезной алмазной ленты
/ ленточной пилы, чтобы предотвратить деформации ленты или направляющих роликов.
Гарантийные обязательства
Все изделия PROXXON после изготовления подвергаются тщательным испытаниям. Если все же обнаружится дефект,
обратитесь к Продавцу, у которого приобретено изделие. Именно он отвечает
по всем предусматриваемым законом
претензиям по гарантийным обязательствам, касающимся исключительно дефектов материалов и изготовления.
Гарантия не распространяется на ненадлежащее применение, такoе как,например, перегрузка, повреждение вследствие постороннего воздействия, а
также естественный износ.
Дополнительные указания по теме "Сервисное обслуживание и поставка запчастей" см. для соответствующих стран на
сайте www.proxxon.com.
15
RU
Page 16

16
Notes:
Page 17

Notes:
17
Page 18

Änderungen im Sinne des technischen Fortschritts behalten wir uns vor.
Art.-Nr. 28186-02 PR 712714702 J
 Loading...