

Page 1

Table of contents
Front panel ................................................................................................... 2
Rear panel ................................................................................................... 4
Unpacking ................................................................................................... 6
Set-up and installation ................................................................................ 7
Installing the spikes (optional) .................................................................. 7
Location......................................................................................................8
A word about cables ................................................................................ 8
A word about balanced output ............................................................. 9
Connecting digital sources to the PDP 3 ................................................ 9
Connecting the PDP 3's analog outputs ................................................ 9
Connecting the PDP 3's digital output (optional) ................................. 9
Power supply connection ...................................................................... 10
master power switch ............................................................................... 10
Care and maintenance ........................................................................... 11
Specifications ............................................................................................ 12
Pin assignments, male XLR balanced analog output ......................... 12
Pin assignments, female XLR digital input ............................................. 12
Troubleshooting ......................................................................................... 13
Service ....................................................................................................... 14
1
Page 2
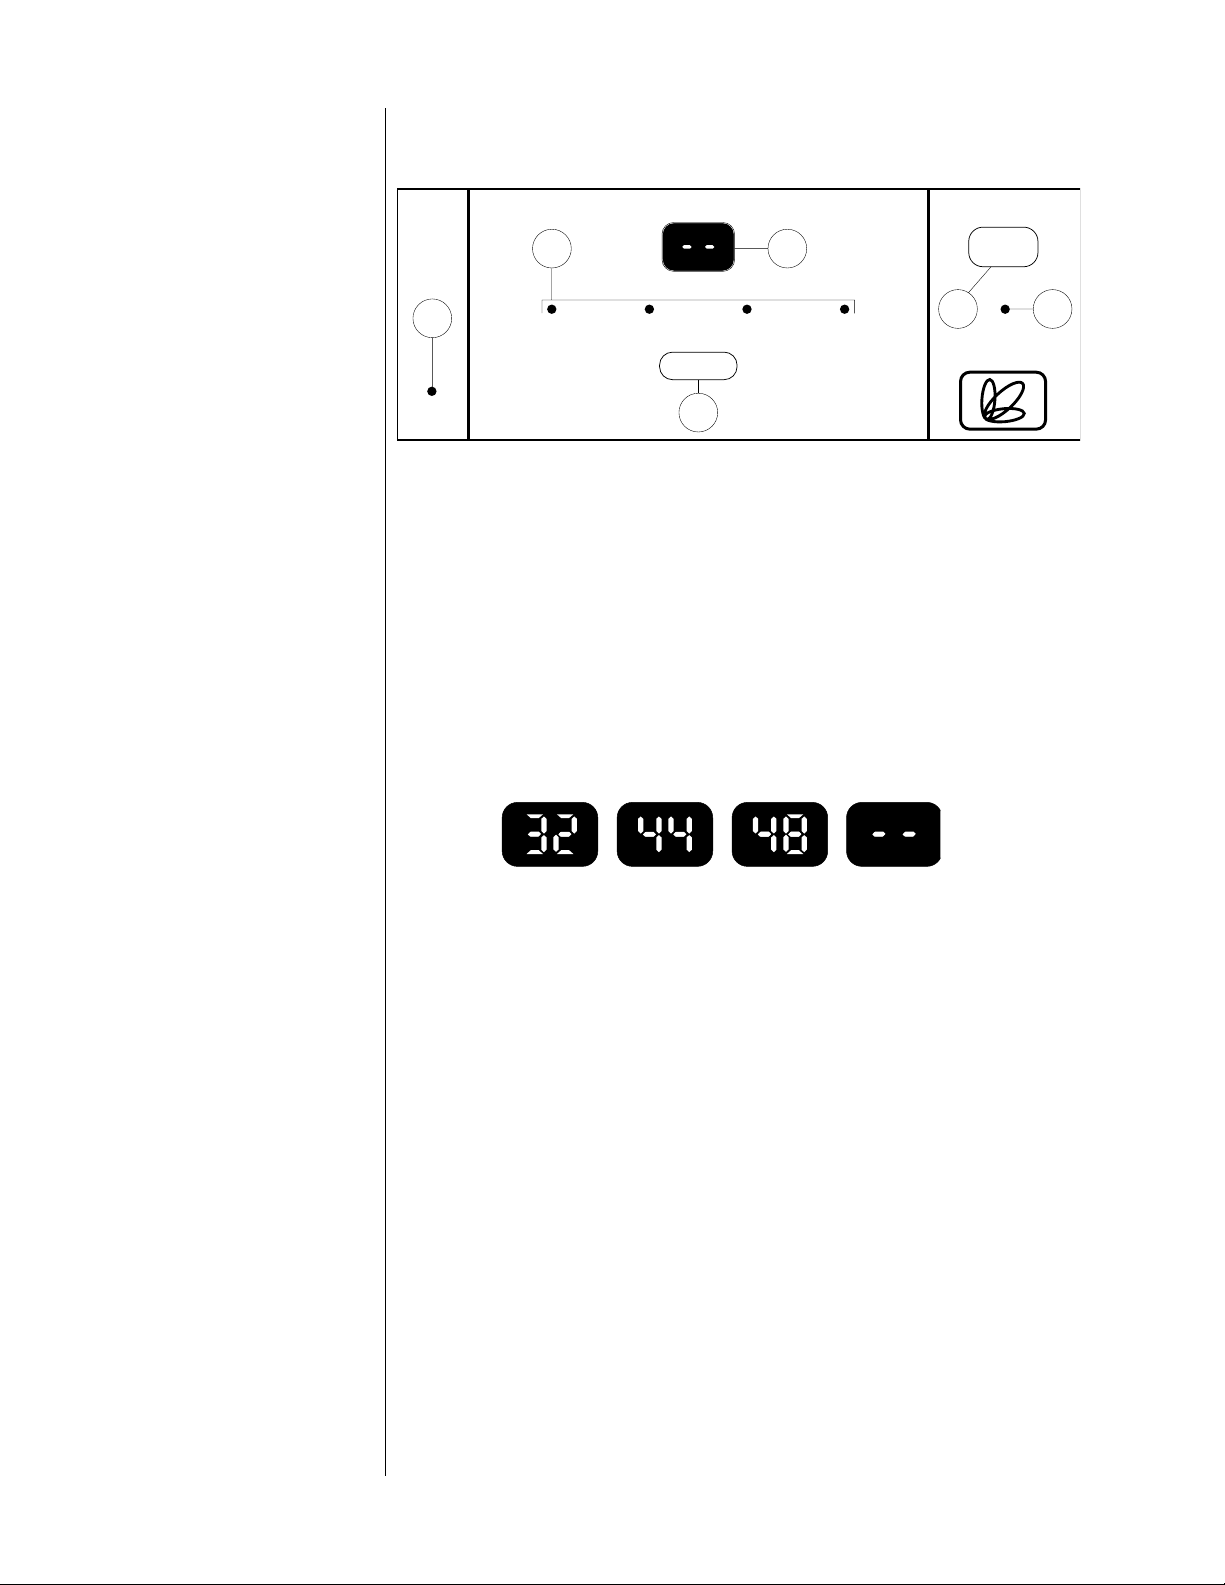
Front panel
4 3
6
source 1 source 2 source 3 source 4
standby
sampling frequency
1 2
select
emphasis
1 standby
When the master power switch on the rear panel is in the "|" (on)
position, pressing this button takes the PDP 3 out of “standby”
mode, turns the Display on, and makes the processor ready to
operate. (See “Rear panel” and “Set-up and installation.”)
2 Standby LED
This LED lights when the PDP 3 is in the standby mode.
3 sampling frequency Display
This Display shows the sampling frequency (expressed in kHz) for
the digital source you selected.
For digital FM, the Display will show 32; for compact disc digital
audio, the Display will show 44; for pre-recorded digital audio
tape, the Display will show 48. If no valid digital source is selected,
or if the selected source is inactive, the Display will show - - .
5
2
4 source LEDs
These LEDs light corresponding to the selected digital source.
5 select
Pressing this button selects the digital source, according to the
input connections on the rear panel. (See “Rear panel” and “Set-
up and installation.”)
Only one source at a time may be selected.
When the PDP 3 is taken out of the standby mode, the source last
selected before going into standby will be automatically selected
and the LED above that source will light; for example, source 1.
Pressing the select button at this point would select source 2;
pressing it again would select source 3, and so on. Pressing select
when source 4 is selected again selects source 1.
Page 3

6 emphasis LED
This LED lights when the PDP 3 detects recording pre-emphasis in a
digital program, and subsequently employs its de-emphasis
circuitry.
NOTE: The de-emphasis circuitry of the Proceed PDP 3 is designed
to be compatible with all known digital standards. Under certain
conditions, however, the emphasis LED will light in error (that is,
when the digital program doesn’t contain recording preemphasis).
This isn’t a malfunction of the PDP 3. Rather, it’s the result of
incorrect signals generated by the program source’s transport.
Depending on your transport and how you operate it, you may
never see this condition. Even when the condition exists, it has no
effect on sonic quality.
3
Page 4
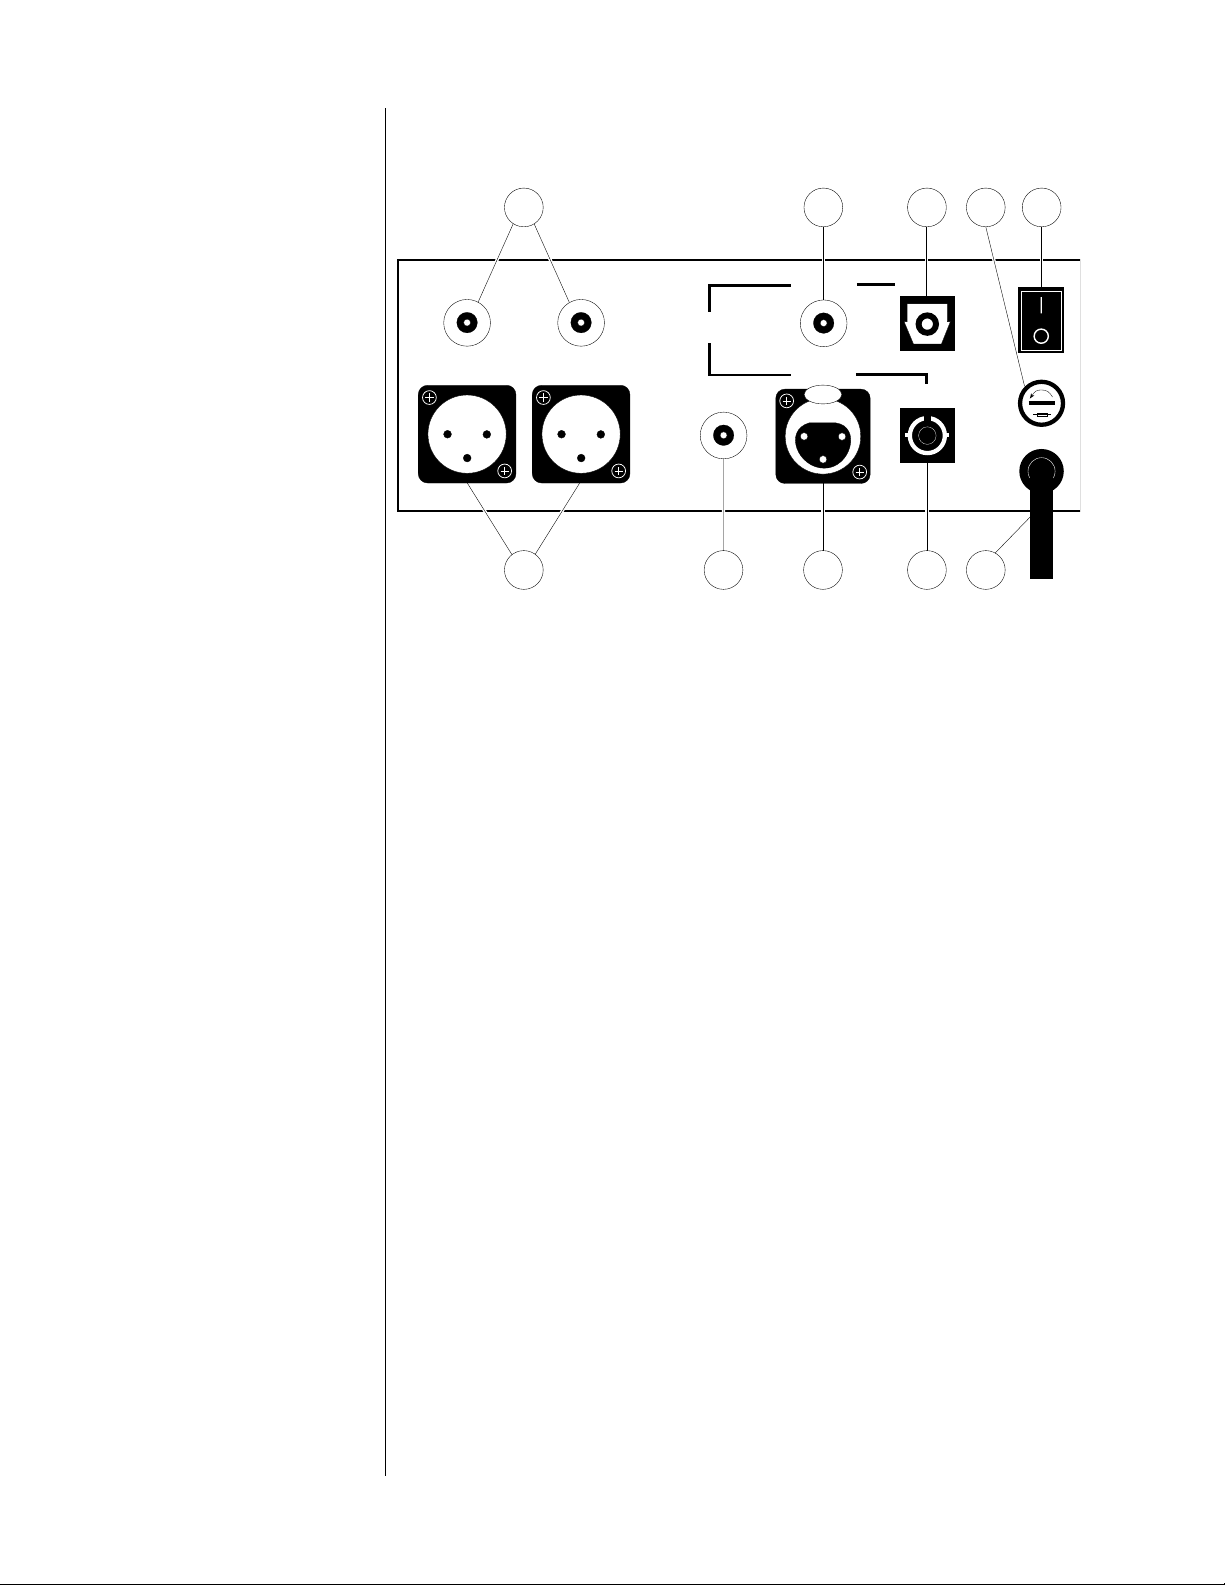
Rear panel
PRECAUTION
2
PROCEED® PDP 3
line out right line out left
digital
inputs
digital
out
75101
source 1source 3
master
power
source 4
PUSH
source 2
made in u.s.a.
3 4 8 6 9
1 master power
This switch turns the PDP 3 on and off. The switch must be in the "|"
(on) position for the processor to operate. (See "Set-up and
installation.")
NEVER operate the master power switch without first making sure
that power is turned off to your receiver, integrated amplifier, or
preamplifier/power amplifier.
2 Single-ended analog outputs
These outputs provide single-ended analog audio (via cables
equipped with RCA-type connectors) to a receiver, integrated
amplifier, or preamplifier equipped with unbalanced inputs. Most
components accept this type of output. (See "Set-up and
installation.")
3 Balanced analog outputs
These outputs provide balanced analog audio (via cables
equipped with XLR-type connectors) to a preamplifier, integrated
amplifier, or receiver equipped with balanced inputs. (See "Set-up
and installation.")
4 digital out
This output provides digital audio (via a cable equipped with
RCA-type connectors) to the digital input of a receiver,
integrated amplifier, preamplifier, or digital processor. (See "Setup and installation.")
5 source 1 digital input
This input accepts digital audio (via an optical cable equipped
with TOSLINK-type connectors) from the digital output of a digital
FM tuner, compact disc player, or digital audio tape recorder.
4
Page 5

6 source 2 digital input
This input accepts digital audio (via an optical cable equipped
with ST-type connectors) from the digital output of a digital FM
tuner, compact disc player, or digital audio tape recorder.
7 source 3 digital input
This input accepts digital audio (via a cable equipped with RCAtype connectors) from the digital output of a digital FM tuner,
compact disc player, or digital audio tape recorder.
8 source 4 digital input
This input accepts digital audio (via a cable equipped with XLRtype connectors) from the digital output of a digital FM tuner,
compact disc player, or digital audio tape recorder.
9 AC power cord
This cord supplies AC power to the PDP 3. (See "Set-up and
installation.")
10 Fuse
This holder contains the main fuse for the PDP 3. If the fuse ever
needs to be replaced, contact your Proceed dealer.
5
Page 6

Unpacking
Carefully open the shipping carton and remove the contents. You
should have:
■ Proceed PDP 3
■ Owner’s manual
■ Four spikes
■ Hex key
Save the shipping carton and all packing material. Though it may be
inconvenient to store, it’ll come in handy for shipping if you move, or if
the unit needs to be shipped for service.
Locate the serial number (on the back panel), and record it here:
■ Serial Number:
Keep your sales receipt where you can find it. You’ll need to show it
for any service during the warranty period. Take a moment now to
record some information from the receipt:
■ Date of purchase:
■ Proceed dealer:
■ Dealer’s address:
■ Dealer’s telephone number:
6
Page 7

Set-up and installation
To set up your Proceed PDP 3, you’ll need:
■ A soft cloth or towel (step 2)
■ A high-quality audio cable for each digital source you intend to
connect to the PDP 3 (step 6)
■ A pair of high-quality audio cables for connecting the PDP 3 to
your receiver, integrated amplifier, or preamplifier (step 7)
■ A high-quality audio cable for connecting the PDP 3's digital
output to another digital processor (optional; step 8)
1. Make sure that the PDP 3 is unplugged from the AC power supply
and disconnected from your receiver, integrated amplifier, or
preamplifier.
Installing the spikes
(optional)
2. Place the PDP 3 upright on a flat, stable surface. Carefully tip it so it
rests on its top; protect its finish with a soft cloth.
3. The PDP 3 is shipped so that it rests solidly on two wide “feet,”
positioned under the front and back of the unit.
You may want to explore the potential sonic advantages of
installing the specially designed “spikes” supplied with the unit.
One arrangement is to install the spikes under the corners of the
unit:
Four spikes,
mounted at the corners
7
Page 8

You may choose instead to install the spikes in a triangular
arrangement:
Three spikes,
mounted in a
triangular pattern
Location
PRECAUTION
A word about cables
Install the spikes one at a time.
the screw securing the foot to the base of the unit. Insert the
threaded end of the spike through the hole in the foot, then turn it
clockwise until it’s hand-tight. (Be careful not to over-tighten it.)
Repeat this procedure for each spike you install.
4. Turn the PDP 3 upright, and place it in the desired location.
The PDP 3 should be located on a level, stable surface. Avoid
placing it where it will be exposed to shocks or vibration (such as
on an unstable table or near large loudspeakers). For best
performance, locate the PDP 3 away from tuners, televisions, and
other sources of radio frequencies.
DON'T place the PDP 3 on top of another component, since its
base could block the other component’s ventilation. Interfering
with the PDP 3’s ventilation or that of another component could
cause either to overheat, resulting in damage to your system.
5.
Make sure that power is turned off to both the PDP 3 and your
receiver, integrated amplifier, or preamplifier/power amplifier.
■ The quality of the cables and connectors that you use with your
Proceed PDP 3 can noticeably affect the quality of the sound
that you hear from your speakers or headphones. For the best
performance, use the highest quality audio cables available.
Though there are many such cables to choose from, we
confidently recommend Madrigal HPC cables (for analog
signals) and Madrigal MDC (for electrical digital signals). See
your Proceed dealer for more information.
Using the supplied hex key, remove
8
Page 9

A word about
balanced output
■ The Proceed PDP 3 provides balanced analog output by way of
standard three-pin XLR-type connectors. This provides the
highest quality connection and, therefore, the best sound.
Terminated with the proper connector, balanced input on an
amplifier or power amplifier minimizes the chance of
“coloration” of the sound due to cabling. If you’re unfamiliar
with balanced interconnection and how it works with your
audio system, see your Proceed dealer for more information.
For instructions on connecting digital sources to the Proceed PDP 3,
see step 6.
For instructions on connecting the Proceed PDP 3’s balanced or
unbalanced analog outputs to your audio system, see step 7.
For instructions on connecting the Proceed PDP 3’s digital outputs
to your audio system, see step 8.
Connecting digital sources
to the PDP 3
Connecting the PDP 3's
analog outputs
6. Using a high-quality audio cable, connect the digital output of a
digital audio component (such as a digital FM tuner, compact disc
player, or digital audio tape recorder) to one of the inputs on the
rear panel of the PDP 3.
You may connect up to four digital sources to the PDP 3.
■ source 1 accepts digital audio via a cable equipped with
TOSLINK-type optical connectors.
■ source 2 accepts digital audio via a cable equipped with ST-
type optical connectors.
■ source 3 accepts digital audio via a cable equipped with RCA-
type connectors.
■ source 4 input accepts AES/EBU digital audio via a cable
equipped with XLR-type connectors.
7. Using a pair of high-quality audio cables, connect the PDP 3's line
out left and line out right to left and right
receiver, integrated amplifier, or preamplifier. Make sure to
connect the left output of the PDP 3 to the left input of the
receiver, integrated amplifier, or preamplifier, and likewise for the
right channel.
line-level
inputs of your
Connecting the PDP 3's
digital output (optional)
NEVER connect the PDP 3’s balanced or unbalanced outputs to
PHONO inputs.
8. Using a high-quality audio cable, connect the digital output of the
PDP 3 to the digital input of your receiver, integrated amplifier,
preamplifier, or digital processor.
NEVER connect the PDP 3’s digital output to PHONO inputs.
9
Page 10

Power supply connection
9. Connect the power supply cord of the PDP 3 to an unswitched
convenience outlet (like those on the rear panel of many audio
components). If you connect the PDP 3 directly to a wall outlet,
make sure that the outlet has polarized sockets.
master power switch
PRECAUTION
10. Set the master power switch on the rear panel to the “|” (on)
position, and allow the PDP 3’s circuitry to stabilize for several
minutes before operating it.
Note: The PDP 3 won't achieve its sonic potential right away —
sonic performance is close to the optimum after 350 hours (or
about two weeks of normal use). For the best performance, you
may leave it powered at all times, except when you won't be using
it for a long period (see "Important Safety Instructions").
The PDP 3 may be turned on and off without affecting its longevity.
When it is turned on after being left unpowered, allow about one
hour before expecting optimal sonic performance.
NEVER operate the master power switch without first making sure
that power is turned off to your receiver, integrated amplifier, or
preamplifier/power amplifier.
11. After making all connections and turning the master power switch
on, turn on the other components in your system.
10
Page 11

Care and maintenance
To clean your PDP 3, use a soft cloth moistened with plain water. Don’t
apply water, dusting sprays, solvents, abrasives, or cleaning fluids
directly to the cabinet.
11
Page 12

Specifications
■ Frequency response: 10 Hz - 20 kHz +0dB, -0.2dB
■ Total harmonic distortion (THD): 0.004% @ 1 kHz, 0dB
■ Dynamic range: 104dB (or better)
■ Signal-to-noise ratio: 107dB
■ Channel separation: 120dB
■ Intermodulation distortion (SMPTE IMD): 0.008%
■ Digital-to-analog conversion: Two precision 20-bit DACs
■ Filtering: 8x oversampling digital filter
Analog filter, linear phase to 40 kHz
■ Low-level linearity: Deviation unmeasurable to below -70dB,
approximately +1.0dB below -90dB
(undithered, ref 0dB @ 1kHz)
■ Output impedance: <1Ω
■ Mains voltage: 120 V U.S. service
■ Mains frequency: 50/60 Hz
■ Power consumption: 25W @ 120V, 60 Hz
■ Shipping weight: 22 lbs/9.98 kg
■ Overall dimensions
■ Width: 8.4 in/214 mm
■ Height: 3.4 in/87 mm
■ Depth: 15.625 in/397 mm
Pin assignments, male XLR
balanced analog output
Pin assignments, female
XLR digital input
Madrigal Audio Laboratories, Inc., reserves the right to change this
product’s features and specifications without notice.
Pin 1: Chassis ground
Pin 2: Signal + (non-inverted)
2
1
3
PUSH
21
3
Pin 3: Signal – (inverted)
Pin 1: Digital ground
Pin 2: DAS (Digital Audio Standard) input +
Pin 3: DAS input –
12
Page 13

Troubleshooting
In general, service problems with your PDP 3 should be referred to your
Proceed dealer. Before contacting your dealer, however, check to
see if the problem is listed here. If it is, try the suggested solutions. If
none of these solves the problem, contact your Proceed dealer.
1. The PDP 3 won’t function, and the display is dark.
■ The master power switch on the rear panel isn’t turned on.
PRECAUTION
NEVER operate the master power switch without first making
sure that power is turned off to your receiver, integrated
amplifier, or preamplifier/power amplifier.
■ The PDP 3 is in standby mode (check to see if the standby LED
is lighted; see “Front panel”). To take the PDP 3 out of standby,
press the standby button on the front panel.
■ The PDP 3 isn’t plugged into the power supply (either a wall
socket or a convenience outlet on your receiver, integrated
amplifier, or preamplifier).
■ The wall socket, adapter, extension cord, or convenience
outlet is faulty. Check all connections.
■ There’s a tripped circuit breaker or blown fuse in the wall
outlet’s circuit.
■ The PDP 3’s fuse is blown (contact your Proceed dealer).
2. No sound comes out of the speakers or headphones.
■ The proper source isn’t selected on the PDP 3.
■ The proper input isn’t selected on your receiver, integrated
amplifier, or preamplifier.
■ The audio cables are connected incorrectly.
13
Page 14

Service
If you have a service problem that you can’t solve by following the
suggestions in the “Troubleshooting” section, contact your Proceed
dealer. Your dealer will tell you what to do next.
It’s important that your Proceed PDP 3 be serviced only by an
authorized Proceed service facility. This will ensure that proper repairs
are made, and that your Proceed PDP 3 warranty stays in effect
throughout the warranty period.
14
Page 15

15
Page 16

MADRIGAL AUDIO LABORATORIES, INC.
2081 South Main Street, P.O. Box 781
Middletown, Connecticut 06457 USA
Telephone: (203) 346-0896 or 344-9300
Fax: (203) 346-1540
630108 ©1992 Madrigal Audio Laboratories, Inc. All rights reserved. Printed in U.S.A
16
Page 17

PR O C E E D
PDP 3 digital audio processor
17
Page 18

WARNING: TO REDUCE THE RISK OF FIRE OR ELECTRIC SHOCK,
DO NOT EXPOSE THIS APPLIANCE TO RAIN OR MOISTURE.
CAUTION
RISK OF ELECTRIC SHOCK
DO NOT OPEN
CAUTION: TO REDUCE THE RISK OF ELECTRICAL SHOCK,
DO NOT REMOVE COVER. NO USER-SERVICEABLE PARTS
INSIDE. REFER SERVICING TO QUALIFIED PERSONNEL.
The lightning flash with arrowhead symbol, within an equilateral triangle, is intended to alert the
user to the presence of uninsulated “dangerous voltage” within the product’s enclosure that may
be of sufficient magnitude to constitute a risk of electric shock to persons.
The exclamation point within an equilateral triangle is intended to alert the user to the presence of
important operating and maintenance (servicing) instructions in the literature accompanying the
appliance.
NOTICE
This equipment generates and uses radio frequency energy and if not installed and used properly, that is, in strict accordance with the
manufacturer’s instructions, may cause interference to radio and television reception. It has been type-tested and found to comply with
the limits for Class B computing devices in accordance with the specifications in Subpart J of Part 15 of FCC Rules, which are designed
to provide reasonable protection against such interference in a residential installation. However, there is no guarantee that interference
will not occur in a particular installation. If this equipment does cause interference to radio or television reception, which can be
determined by turning the equipment on and off, the user is encouraged to try to correct the interference by one or more of the following
measures:
■ Reorient the receiving antenna of the radio or TV.
■ Relocate the Digital Audio Processor with respect to the radio or TV.
■ Move the Digital Audio Processor away from the radio or TV.
■ Plug the Digital Audio Processor into a different outlet so that the Digital Audio Processor and radio or TV are on different branch
circuits.
If necessary, the user should consult the dealer or an experienced radio/television technician for additional suggestions. The user may
find the following booklet prepared by the Federal Communications Commission helpful:
“How to Identify and Resolve Radio-TV Interference Problems”
This booklet is available from the US Government Printing Office, Washington, D.C. 20402, Stock No. 004-000-00345-4.
18
Page 19

Important Safety Instructions
To get the best performance from your Proceed PDP 3, and for your safety, read and follow these important
safeguards.
1. Before operating the product, read all safety and operating instructions.
2. Keep all safety and operating instructions for future reference.
3. ALWAYS heed all warnings and cautions on the product and in the operating instructions.
4. ALWAYS follow all instructions for the operation and use of the product.
5. NEVER use the product near water (for example, near a bathtub, washbowl, kitchen sink, laundry tub, in a
wet basement, near a swimming pool or spa, etc.).
6. Openings and slots in the cabinet of the product are provided to prevent it from overheating. NEVER place
the product in a location that will interfere with its proper ventilation.
7. NEVER place the product near heat sources such as radiators, fireplaces, stoves, or appliances that produce
heat. Avoid placing the product where it will be subject to direct sunlight or low temperatures.
8. The product should ONLY be connected to a power supply as specified on the rear panel.
9. The product is equipped with a two-wire AC line plug (one blade is wider than the other). NEVER defeat the
grounding or polarization of the power supply cord.
10. To prevent electric shock, NEVER use the product with an extension cord, adapter, receptacle, or outlet unless
the blades on the plug can be fully inserted; the blades should NEVER be exposed.
11. ALWAYS route the power supply cord so that it won’t be walked on or pinched by items placed on or against
it. Pay particular attention at outlets, plugs, and where the cord exits the product.
12. NEVER clean the product with solvents such as alcohol, gasoline, benzene, etc.
13. Before cleaning the product, ALWAYS disconnect the power supply cord. Use a soft cloth; if necessary,
dampen the cloth with plain water. NEVER apply water or any other cleaner directly to the cabinet.
14. ALWAYS take care that liquids are not spilled into the product, and make sure that objects, excessive dust,
and pet hair don’t enter the unit.
15. If the product won’t be used for a long period, ALWAYS unplug the power cord.
16. If you detect smoke or an abnormal smell, ALWAYS unplug the product from the power supply. Immediately
contact your Proceed dealer or the nearest Proceed service facility.
17. The product should ALWAYS be serviced by qualified service personnel when:
■ The power cord or plug has been damaged; or ■ Objects have fallen into the unit; or
■ Liquid has been spilled into the unit; or ■ The unit has been exposed to rain or water; or
■ The unit does not operate properly; or ■ The product has been dropped; or
■ The cabinet has been damaged.
18. NEVER attempt to service the product beyond what is described in this owner’s manual. All service should
be performed by qualified service personnel.
19
Page 20

Thank you for choosing the Proceed PDP 3.
Manufactured under strict quality control, the Proceed PDP 3 is a superb example of state-of-the-art
digital technology.
Though you probably aren’t a newcomer to high-fidelity audio equipment, we urge you to read this
manual thoroughly and to carefully follow all operating and safety instructions. Used properly, the
Proceed PDP 3 will give you many hours of musical enjoyment.
20
 Loading...