


PPI 5440

Thank you for choosing
PPI
audio epuipment. Now, HANG ON!
PPI
products are engineered and manufactured to deliver a wild ride of
performance, sound quality, and reliability. This
PPI
product reflects our
commitment to offer you versatility and quality for years of incredible power
and listening enjoyment!
SERVICE
Do not attempt to service
PPI
products yourself. Performing exploratory
surgery on your audio equipment yourself will void the warranty. All parts of
your
PPI
gear have been built to our specifications. These parts are not
made available to any unauthorized
PPI
dealer nor are they for sale. Our
goal is to make sure that your
PPI
product will always perform as good as
the day it was purchased. Contact your authorized
PPI
dealer about obtain-
ing any warranty service through
PPI
. (See Warranty inside back cover.)
CAUTION!
The extended use of a high powered audio system may result in hearing loss
or damage. While
PPI
systems are capable of "Concert Level" volumes,
they are also designed for you to enjoy at more reasonable levels all of the
creative expressions made by musicians. Please stay seated while driving
and observe all local sound ordinances.

1
4-Way/5-Way Variable Crossover with RCA Outputs
QBASS™
Bass Boost
Balanced Differential Input Circuit
Speaker Lead High Level Inputs
High Voltage Input Capability
Gold Plated RCA, Speaker and Power Connectors
Mixed Mono/Stereo Operation
PPI4240
. . . . . . . . . . . . . . . L: 285mm/11.22”
W: 256mm/10.08”
H: 62mm/2.44”
PPI5440
. . . . . . . . . . . . . . . L: 435mm/17.12”
W: 256mm/10.08”
H: 62mm/2.44”
Power Bandwidth:. . . . . . . . . . 7Hz to 80kHz
Signal to Noise Ratio: . . . . . . . 105 dB
Total Harmonic Distortion:. . . . .05%
Input Sensitivity: . . . . . . . . . . . 100mV to 12V
Input Impedance:. . . . . . . . . . 10k Ohms
Load Impedance (Stereo): . . . 2 Ohms to 8 Ohms
Load Impedance (Bridge): . . . 4 Ohms to 8 Ohms
Supply Voltage: . . . . . . . . . . . 10V to 15V
Damping Factor:. . . . . . . . . . . >300
Slew Rate: . . . . . . . . . . . . . . . >45V/µs
QBASS™
Equalization: . . . . . Up to +12db Boost @ 40Hz

2
PPI4240
30W x 4 Channels @ 4 Ohms
60W x 4 Channels @ 2 Ohms
120W x 2 Channels @ 4 Ohms Bridged
PPI5440
30W x 4 Channels @ 4 Ohms
+ 120W x 1 Channel @ 4 Ohms
60W x 4 Channels @ 2 Ohms
+ 200W x 1 Channel @ 2 Ohms
120W x 2 Channels @ 4 Ohms Bridged
+ 120W x 1 Channel @ 4 Ohms
PPI4240
Front Variable 12db/Octave FULL/HPF/LPF 20-5kHz
Rear Variable 12db/Octave FULL/HPF/LPF 20-5kHz
Selectable FULL/HPF/LPF RCA Output
PPI5440
Front Variable 12db/Octave FULL/HPF/LPF 20-5kHz
Rear Variable 12db/Octave FULL/HPF/LPF 20-5kHz
Sub Variable 12db/Octave FULL/HPF/LPF 20-500Hz
PPI4240
Maximum Fuse Rating: 40 Amp (20 x 2)
PPI5440
Maximum Fuse Rating: 60 Amp (30 x 2)

3
The following formula is a guide to determine current draw so you can
choose the proper gauge power cable and fuses for your system. A 50%
amplifier efficiency rating is used as an average.
(Total 4-Ohm rate RMS output x 2) x 2 = Total Input Wattage
Total Input Wattage/Supply Voltage = Current Draw (in Amps)
Example:
Your
PPI4240
is 30 watts x 4 RMS @ 4-Ohms.
You would use the formula below:
30 x 4 = 120 watts Total Output
120W x 2 = 240W Input/12.5v = 19.2 amps Current Draw
Note: Notice that the total power is multiplied by two. This compensates for
the 50% efficiency of the amplifier. When you drop your impedance in half
you double the amperage.
Total Current Draw Length of Wire to Run (in Feet)
(in Amps) <3 <7 <10 <13 <17 <20 <22 <28
0 - 20 14 12 12 10 10 8 8 8
20 -35 12 10 8 8 6 6 8 4
35 -50 10 8 8 6 6 4 4 4
50 - 65 8 8 6 4 4 4 4 2
65 - 85 6 6 4 4 2 2 2 0
85 - 105 6 6 4 2 2 2 2 0
105 - 125 4 4 4 2 2 0 0 0
125 - 150 2 2 2 2 0 0 0 0
Note: The ground wire should be the same size as the power wire.
4
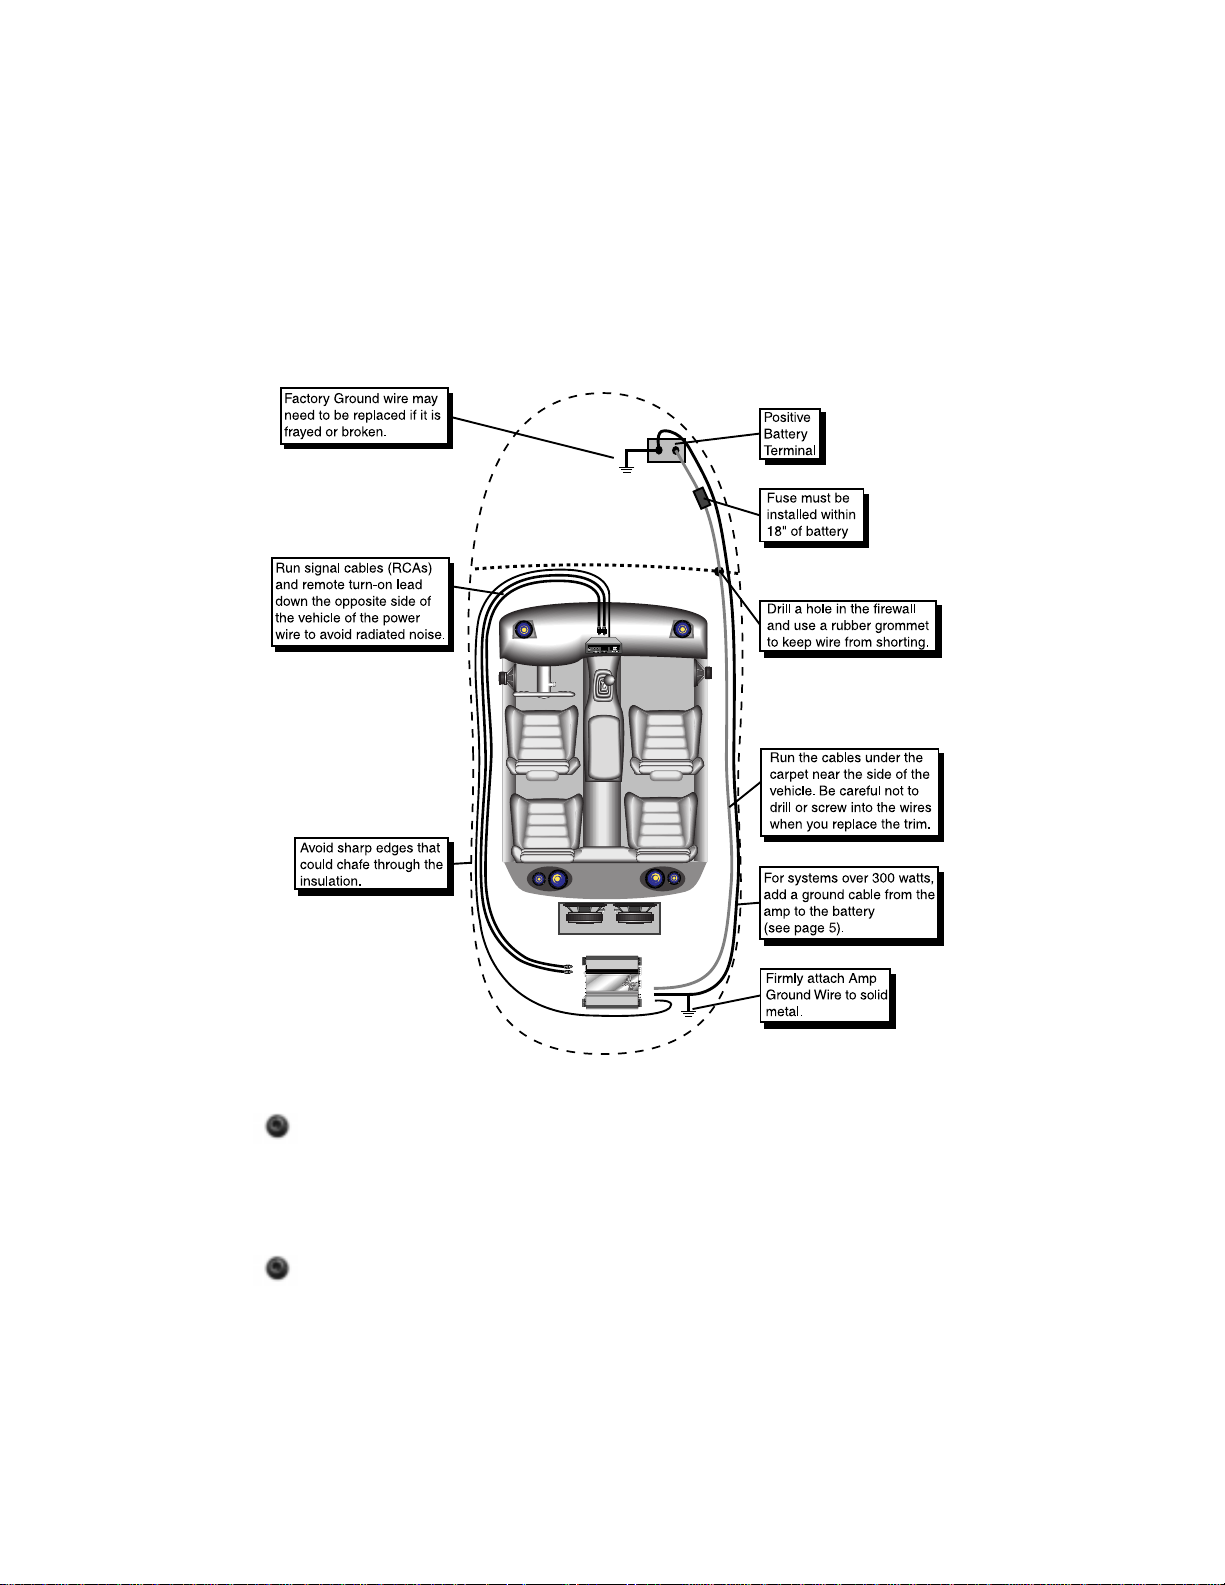
Before beginning, disconnect the negative (-) terminal of the battery prior
to working on the positive (+) terminal to prevent a short to ground.
This is important, unless you want to spend the rest of your life with a
nickname like "Sparky," or "Smokey." Reconnect the negative terminal
only after all connections have been made.
You will need to install an in-line fuse or circuit breaker in the power
wire within 18” of the batter y. This fuse or circuit breaker protects your
vehicle from fire in case the power wire shorts to the vehicle body.

5
Remote Turn-on
Your head unit should have a lead marked ‘remote’ or ‘ power antenna’ which
will be used to turn on your amplifier. Extend this lead through your vehicle
along with your RCA signal wires. Strip 1/4 inch of the insulation off the wire
and insert the end into the corresponding terminal on the amplifier.
Grounding
Locate an area near the amplifier(s) that is metal and clean an area about the
size of a quarter to bare metal. Inspect the area around and underneath to
be sure you won't drill into wires, brake or fuel lines, etc. Drill a pilot hole in
the middle of this area. Terminate the ground wire with a ring connector and
attach it to the bare metal using a #8 sheet metal screw and washer or prefer-
ably , a bolt, nut and a star washer (not supplied). We suggest crimping and
soldering this connection. After the connection is complete, coat the area (on
both sides) with silicone or some similar material to prevent rust from devel-
oping on the bare metal.
If your grand total current draw is over 50 amps (or total output power is over
300 watts), you should run a ground wire beside your power wire from the
battery to the amplifier(s) in addition to your regular ground wire. Keep the
ground and power wires as close together as possible, and use the same
gauge wire for both. This will ensure that you have a good ground path, and
may eliminate such potential problems as engine noise and overheated
amplifiers.
Once you have run both the power and ground wires, it's time to connect the
cables to the amplifier. Cut off excess wire and, using wire strippers, strip the
ends of the power and ground cables approximately 1/4 inch. Locate the
power and ground connectors on the amplifier. With a small phillips head
screw driver, loosen the screws before to you insert the cables. Insert the
wires into the appropriate hole, and tighten the screws. The
Power/Ground/Remote will accommodate 8 gauge wire for the
PPI4240
and the
PPI5440.
Speaker Wires
Using 16 gauge or larger, run the speaker wires from the amplifier location
through the vehicle to the speakers. Observe the same precautions for
routing these wires that you followed for running the power and remote
turn-on wires. Cut off excess and, using wire strippers, strip 1/4 inch of
insulation. Loosen the four outer screws on the top of the connector. Insert
the speaker leads into the end. Check to be sure you've maintained proper
polarity before securing each wire, and tighten the screws on the amplifier.

6
1. Battery Power
Connect the 12-volt constant power cable from the battery here.
2. Remote
Connect the remote turn on lead from you source unit here. This
connection will turn the amplifier on when the source unit is
powered up.
3. Ground
Connect your ground wire here. Make sure you use the same
gauge wire as your power cable.
4. Power LED
The LED will light up “GREEN” when the amplifier is powered on
and “RED” when it goes into protection.
5. Speaker Terminals
Insert your speaker cable here. Insert speaker wire into LEFT (+) and
RIGHT (-) for bridging.
6. Subwoofer Speaker Terminals
Insert the speaker cable for your subwoofer here.
FUSES
— 20 —
— 20 —
FUSES
REM GND+12V
POWER
BRIDGED
SPEAKER OUTPUT
PPI
4240
4
-channel
BRIDGED
RR
+RR -RL -FR +FR -FL + FL - RL +
(GREEN)
PROTECT
(RED)
POWER
FUSES
— 25 —
— 25 —
REM GND+12V
POWER
SPEAKER OUTPUT
PPI
5440
5
-channel
(GREEN)
PROTECT
(RED)
POWER
BRIDGED
BRIDGED
RR
+RR - SUB +SUB -RL -FR +FR -FL + FL - RL +
1 2 3 4 5 6
1 2 3 4 5
 Loading...