

Page 1
Operating Instructions and Parts Manual
Accu-Fence®
for Models 66, 72A, PM2000, PM3000
Powermatic
427 New Sanford Rd.
LaVergne, TN 37086 Part No. M-2195079Z
Ph.: 800-274-6848 Revision C 01/2015
www.powermatic.com Copyright © 2015 Powerm atic
Page 2

Warranty and Service
Powermatic warrants every product it sells against manufacturers’ defects. If one of our tools needs service or repair,
please contact Technical Service by calling 1-800-274-6846, 8AM to 5PM CST, Monday through Friday.
Warranty Period
The general warranty lasts for the time period specified in the literature included with your product or on the official
Powermatic branded website.
• Powermatic products carry a limited warranty which varies in duration based upon the product. (See chart
below)
• Accessories carry a limited warranty of one year from the date of receipt.
• Consumable items are defined as expendable parts or accessories expected to become inoperable within a
reasonable amount of use and are covered by a 90 day limited warranty against manufacturer’s defects.
Who is Covered
This warranty covers only the initial purchaser of the product from the date of delivery.
What is Co vered
This warranty covers any defects in workmanship or materials subject to the limitations stated below. This warranty
does not cover failures due directly or indirectly to misuse, abuse, negligence or accidents, normal wear-and-tear,
improper repair, alterations or lack of maintenance. Powermatic woodworking machinery is designed to be used with
Wood. Use of these machines in the processing of metal, plastics, or other materials outside recommended
guidelines may void the warranty. The exceptions are acrylics and other natural items that are made specifically for
wood turning.
Warranty Limitations
Woodworking products with a Five Year Warranty that are used for commercial or industrial purposes default to a
Two Year Warranty. Please contact Technical Service at 1-800-274-6846 for further clarification.
How to Get Technical Support
Please contact Technical Service by calling 1-800-274-6846. Please note that you will be asked to provide proof
of initia l p u rch a s e whe n calling. If a product requires further inspection, the Technical Service representative will
explain and assist with any additional action needed. Powermatic has Authorized Service Centers located throughout
the United States. For the name of an Authorized Service Center in your area call 1-800-274-6846 or use the Service
Center Locator on the Powermatic website.
More Informa tion
Powermatic is constantly adding new products. For complete, up-to-date product information, check with your local
distributor or visit the Powermatic website.
How State Law Appli es
This warranty gives you specific legal rights, subject to applicable state law.
Limitations on This Warranty
POWERMATIC LIMITS ALL IMPLIED WARRANTIES TO THE PERIOD OF THE LIMITED WARRANTY FOR EACH
PRODUCT. EXCEPT AS STATED HEREIN, ANY IMPLIED WARRANTIES OF MERCHANTABILITY AND FITNESS
FOR A PARTICULAR PURPOSE ARE EXCLUDED. SOME STATES DO NOT ALLOW LIMITATIONS ON HOW
LONG AN IMPLIED WARRANTY LASTS, SO THE ABOVE LIMITATION MAY NOT APPLY TO YOU.
POWERMATIC SHALL IN NO EVENT BE LIABLE FOR DEATH, INJURIES TO PERSONS OR PROPERTY, OR
FOR INCIDENTAL, CONTINGENT, SPECIAL, OR CONSEQUENTIAL DAMAGES ARISING FROM THE USE OF
OUR PRODUCTS. SOME STATES DO NOT ALLOW THE EXCLUSION OR LIMITATION OF INCIDENTAL OR
CONSEQUENTIAL DAMAGES, SO THE ABOVE LIMITATION OR EXCLUSION MAY NOT APPLY TO YOU.
Powermatic sells through distributors only. The specifications listed in Powermatic printed materials and on the official
Powermatic website are given as general information and are not binding. Powermatic reserves the right to effect at
any time, without prior notice, those alterations to parts, fittings, and accessory equipment which they may deem
necessary for any reason whatsoever.
Product Listing with Warranty Period
90 Days – Parts; Consumable items
1 Year – Motors, Machine Accessories
2 Year – Woodworking Machinery used for industrial or commercial purposes
5 Year – Woodworking Machinery
NOTE: Powermatic is a division of JPW Industries, Inc. References in this document to Powermatic also apply to
JPW Industries, Inc., or any of its successors in interest to the Powermatic brand.
2
Page 3

Table of Contents
Warranty and Servic e .............................................................................................................................. 2
Table of Contents .................................................................................................................................... 3
Specifica tions ................................................................................................................ .......................... 3
Unpac king ............................................................................................................................................... 4
Rail Installation on a Powermatic Table Saw ............................................................................................ 4
Installing the Front Rail......................................................................................................................... 5
Installing the Back Rail ......................................................................................................................... 5
Installing the Wood Extension Table ..................................................................................................... 6
Securing Wood Table to Front Rail ....................................................................................................... 7
Securing Wood Table to Back Rail ....................................................................................................... 8
Installing the Guide Tube ..................................................................................................................... 8
Mounting the Acc u-Fenc e .................................................................................................................... 9
Side Plate Replacement ..................................................................................................................... 11
Rail Install ation on a non-Powermatic Table Saw ................................................................................... 12
Installing the Front Rail....................................................................................................................... 12
Installing the Back Rail ....................................................................................................................... 13
Replacement Parts ................................................................................................................................ 14
Rail Assembly .................................................................................................................................... 14
Accu-Fence Parts .............................................................................................................................. 15
Accu-Fence Assembly........................................................................................................................ 16
Specifications
Fence side plate length:
For 10” cabinet saws ............................................................................................................. 37-3/8 ”
For 12” and 14” cabinet saws ................................................................................................ 45-5/8”
Fence width ...................................................................................................................................... 4-1/2”
Fence height:
For 10”, 12” and 14” cabinet saws ........................................................................................... 2-1/2”
Head length:
For 10”, 12” and 14” cabinet saws ............................................................................................... 16”
The above specifications were current at the time t his manual was published, but bec ause of our policy of
continuous im provement, Powerm atic reserves the right t o change specific ations at any time and without
prior notic e, wit hout incurring obligations.
3
Page 4
Unpacking
Open shipping cartons and check that all parts
are intact. Report any damage immediately to
your distributor. Read the instruction manual
thoroughly for assembly, alignment, and
maintenance instructions.
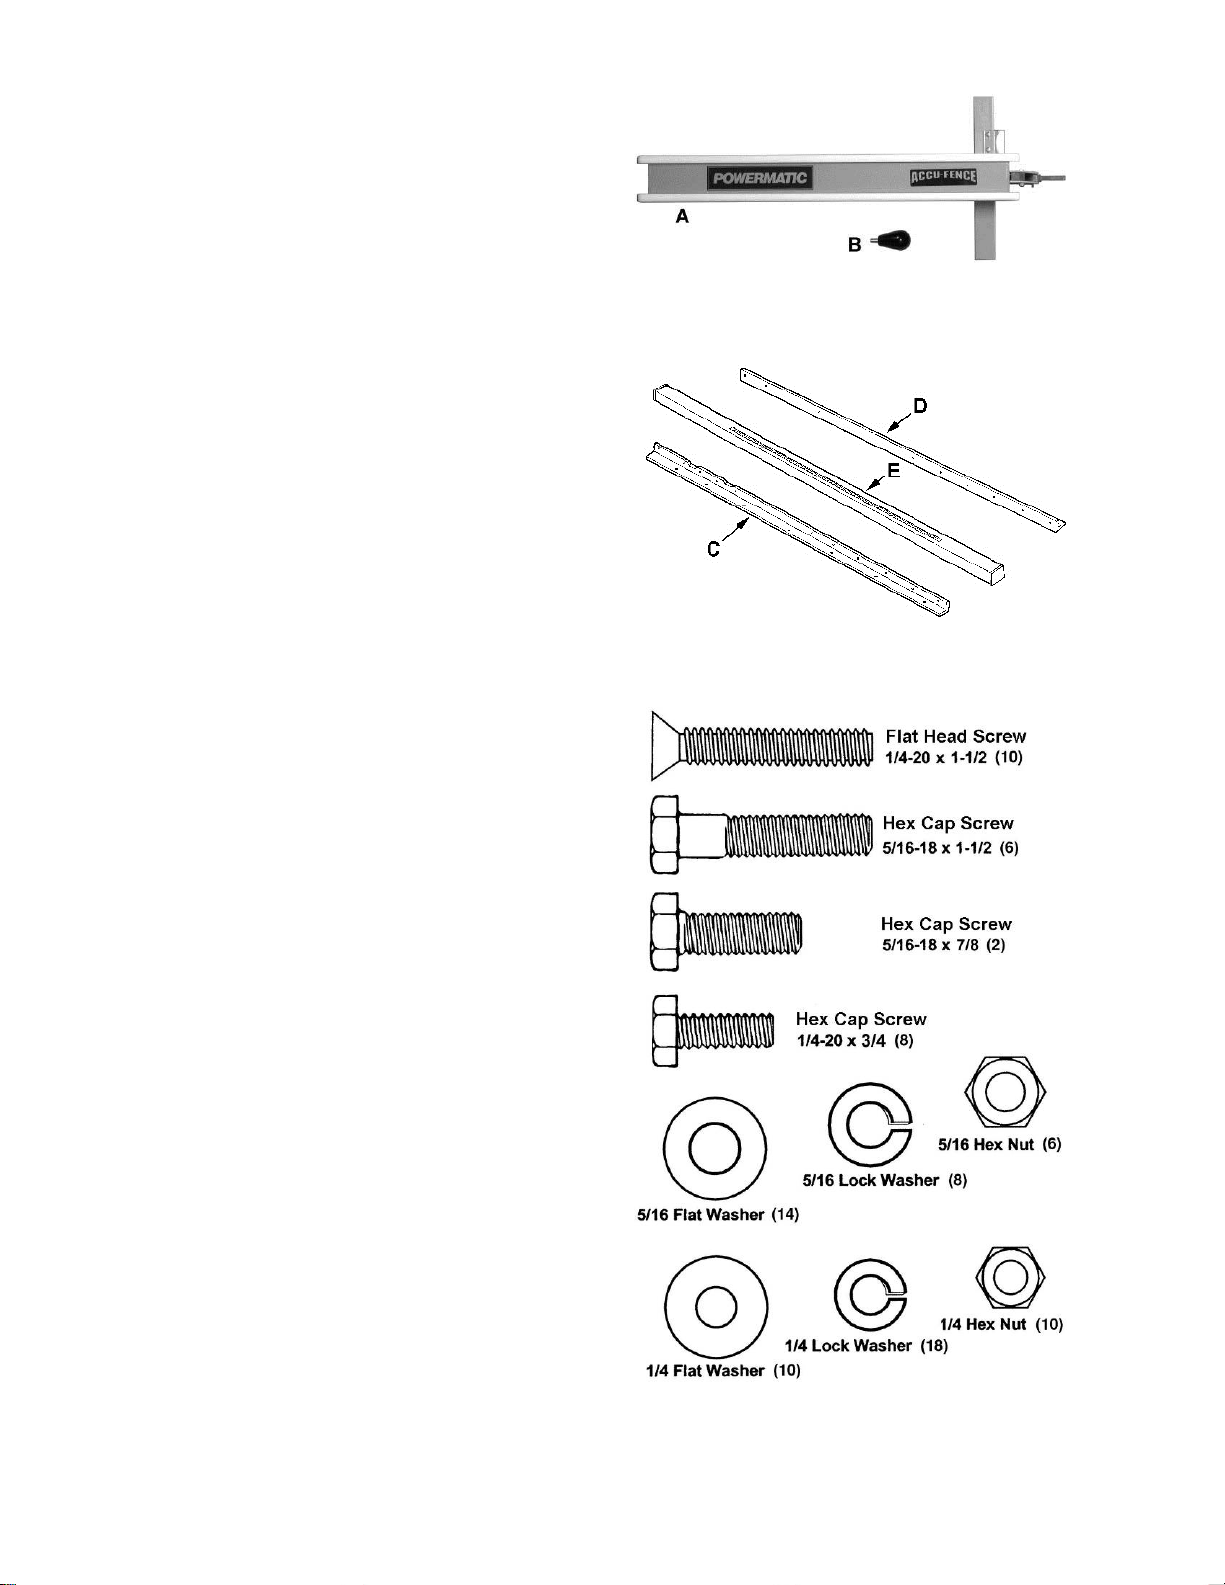
Box contents
Box One
1 Accu-Fence (A)
1 Lock Lever Knob (B)
2 Plastic Shims (not shown)
1 Owner’s Manual (not shown)
Box Two
1 Front Rail (C)
1 Back Rail (D)
1 Guide Tube (E)
2 End Caps (not shown)
1 Hardware Bag (see contents below)
Contents of Hardw ar e B ag (shown at right)*
02 5/16-18 x 7/8" Hex Cap Screw
06 5/16-18 x 1-1/2" Hex Cap Screw
14 5/16" Flat Washer
08 5/16" Lock Washer
06 5/16" Hex Nut
10 1/4-20 x 1-1/2" Flat Head Screw
08 1/4-20 x 3/4" Hex Cap Screw
10 1/4" Flat Washer
18 1/4" Lock Washer
10 1/4" Hex Nut
* NOTE: Hardware bag is shipped inside the
guide tube.
Contents of Box 1
Contents of Box 2
Rail Installation on a
Powermatic Table Saw
Tools required
10mm and 12mm wrenches
Cross-Point (“Philips”) screwdriver
5mm hex wrench
Adjustable square
Rubber mall et (or hammer and wood bloc k )
Straight edge
The following instructions are for installing the
Accu-Fence and Rail System on a Powermatic
Model 66, 72A, PM2000 or PM3000 table saw.
The rail s should bolt up to the Powermatic saw
without any drilling.
Contents of Hardw ar e B ag
4
Page 5
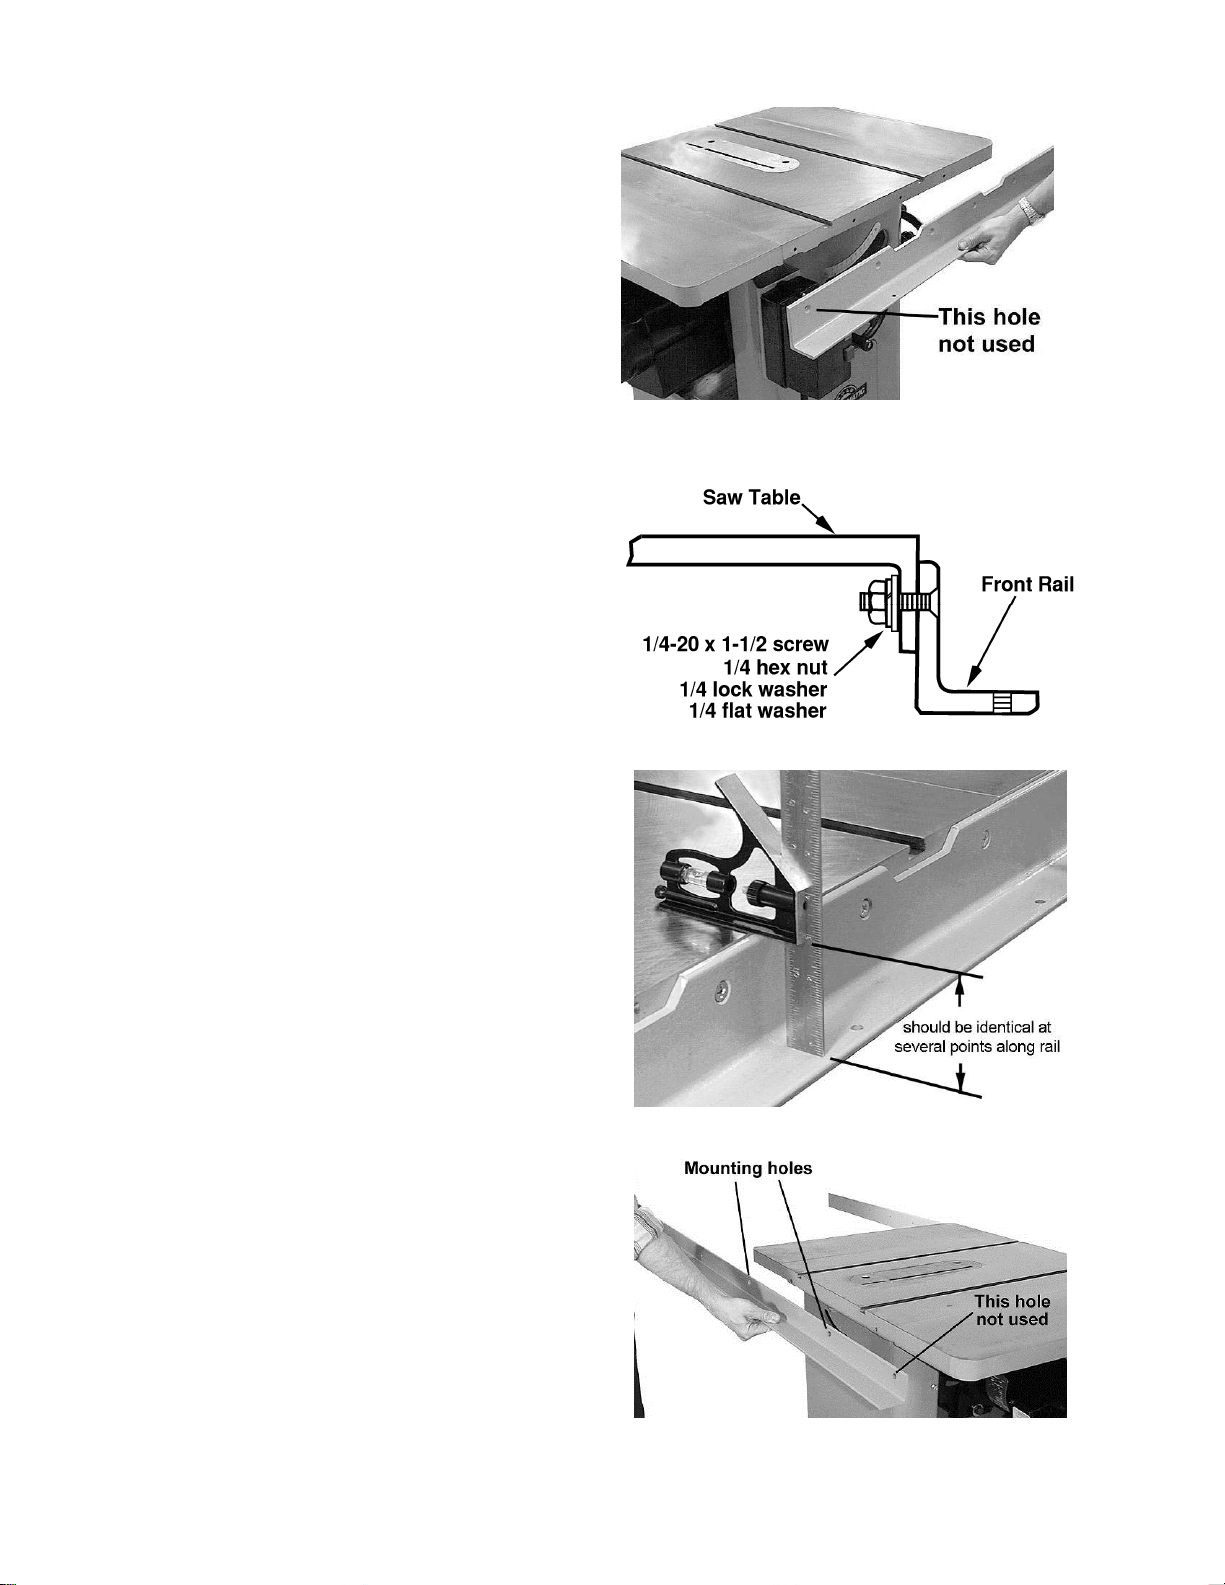
Installing the Front Rail
1. Identify the front rail, which is 3" x 3" with
notches on one side.
2. Align the holes on the notched side of the
front rail t o the hol es i n the f r ont edge of t he
table saw top, as shown in Figure 1. The
notches should fall below the miter slots in
the table.
Note: The rail's second hole from the left
should line up wit h the first hole in the tabl e
top as shown. The saw's extension wings
are not pre-drilled at the factory, so use of
the first hol e on the rail is optional.
3. Lightly secure the fr ont rail to the saw table
with four 1/4-20 x 1-1/2 flat head screws,
four 1/4 flat w ashers, f our 1/ 4 lock washers,
and four 1/4 hex nuts (Figure 2). Fingertighten only .
The front rail m ust be paral lel to the t able top i n
order for the Accu-Fence system to function
properly.
Figure 1
1. Pl ace an adjustable square on the table as
shown in Figure 3.
2. Check t he height of the front rail at several
locations along t he surface of the saw table.
The measurements should be the same
along the length of the rail. (Generally, this
dimension will be about 2-27/32”.)
3. When the front rail has been correctly
positioned, tighten all mounting screws
securely with a screwdriver and 10mm
wrench.
Installing the Back Rail
1. Locate the back rail which is 2" x 2" with
holes running al ong one si de only . T he back
rail should be installed parallel to the table
top.
Figure 2
Figure 3
2. Align the holes in the back rail to the holes in
the table top, as shown in Figure 4.
Note: The rail's second hole from the right
should line up wit h the first hole in the tabl e
top as shown. The saw's extension wings
are not pre-drilled at the factory, so use of
the first hol e on the rail is optional.
Figure 4
5
Page 6

Referring to Fi gur e 5:
3. Secure the back rail (A) to the pre-tapped
holes in the saw table (B) i n two places with
5/16-18 x 7/8 hex cap scr ews (C), 5/16 lock
washers (D), and 5/16 flat washers (E).
Finger tighten only.
4. Use the adjustable square to measure at
several points along the rail to achieve
parallel with table. Tighten screws securely
with a 12mm wrench.
Important: If you are installing an optional wood
extension table on your saw, it should be
installed first before mounting the guide tube.
This will prev ent having to mount and align t he
guide tube twic e.
If you are not mounting an optional wood table,
proceed to Installing t he Guide Tube on page 8.
Installing the Wood Extension Table
The wood extension table is an optional
accessory.
Tools required:
Electric drill
Philips screwdriver
10mm and 12mm wrenches
Four clamps
Straight edge
Hammer (or rubber m allet)
Installing the Legs
Legs are optional accessories. If your wood
table does not require legs, proceed to
“Installing the Table.”
Figure 5
1. Place the optional wood extension table
upside down. (U se a mat or cloth to prot ect
the surface) . Position the legs at the i nside
corners of t he wood table at the end where
the Powermatic logo is placed. See Figure
6.
Note: If you are usi ng a mobile base under
your saw, you may need to shift the
placement of the legs so that they rest
properly upon t he shelves of the base.
2. Drill pilot holes, making sure not to drill
completely through the table and sides.
3. Secure with the eight screws provided.
4. Turn the wood table ri ght-side up.
5. The f ootpads on the legs can be rotated to
help level the wood table with the saw
during the following procedure. Tighten the
nut against the end of the leg to secure a
footpad’s position.
Figure 6
6
Page 7

Installing the Table
The optional wood ext ension t able (i ncludi ng the
optional router table) sits flush against the saw
table and along the inside of the rails. The
Powermatic logo (or warning label on the router
table) should face outward. T he ex t ension tabl e
is not bolt ed to the saw table. It is bolted only t o
the rails.
The extension table and saw table must be
aligned properly so the Accu-Fence will slide
smoothly fr om one to the ot her .
1. Pl ace the extension table bet ween the rails
and up against the saw table, leaving the
extension t abl e raised just sli ghtly abov e the
saw table. Cl amp the extension table to the
front and back rails as shown in Figure 7.
Clamping pressure should be enough to
secure the table yet allow minor
adjustments.
2. Use a rubber m all et ( or a hammer and bl ock
of wood) to tap t he ext ension table up f lush
against the cast iron saw table (Figure 6).
Then tap down the extension table at
various point s along its edge where it meet s
the saw table, until it is level with the saw
table (Figure 8).
3. As one part of the edge becomes l evel with
the table, tighten the clamp on that side.
Then move to the other side and repeat,
until the full lengt h of the edge is level with
the saw table.
Figure 7
Figure 8
4. Lay a straight edge across both extension
table and saw table to ensure proper
leveling.
5. When extension table is properly aligned,
drill holes into the wood table using the
holes in the rai ls as your gui de. See F igure
9. (You may wish to drill 3/32" pilot holes
first. ) Drill 1/4" holes int o the front edge of
the table usi ng the holes in the front rail as a
guide. Dri ll 5/16" holes into the bac k edge
of the table using t he holes in the back rail
as a guide.
Securing Wood Table to Front Rail
Referring to Fi gur e 10:
Inser t six flat head screws (A) through the front
rail and wood extension table and secure with
six each flat was hers (B), lock washers (C) and
hex nuts (D). Finger - tighten only.
Figure 9
Figure 10
7
Page 8

Securing Wood Table to Back Rail
Referring to Fi gur e 11:
1. Insert six hex head screws (E) and flat
washers (F) through the back rail and
wooden extension t able and secure with six
flat was hers (F), lock washers (G) and hex
nuts (H). Finger- tighten only at this time.
2. Re-check the table for alignment along the
front and back rails. Make further
adjustments if necessary, then tighten all
screws and nuts.
Installing the Guide Tube
1. The guide tube m ounts to the front rail wi th
the scale facing t oward the operator (Figur e
12). Align the holes in the bottom of the
guide tube with the holes in the front rail.
When properly positioned the guide tube
should extend bey ond the f ront rai l about 6"
in both directions.
2. Fasten the guide tube to the rail from
beneath, with eight 1/4-20 x 3/4 hex cap
screws and eight 1/4 lock washers (Figure
13). Finger-tighten only.
3. The hol es in the front rail ar e over-si zed to
allow slight adjustment of the guide tube.
Pull the guide tube a way f rom the r ail as far
as it will go.
4. Measure the distance from edge of guide
tube to front rail; do this at both ends of the
guide tube to ensure that guide tube is
parallel to front rail. (The distance itself is
not important, but it should be the same
along the length of t he guide tube.)
Figure 11
Figure 12
5. Tighten all screws with a 10mm wrench.
6. Insert a plasti c end cap into t he ends of the
guide tube. Use a r ubber m all et if needed t o
gently push in the caps.
Figure 13
8
Page 9

Mounting the Accu-Fence
1. Screw the lock l ever knob i nto the threaded
handle on the Accu-F enc e ( see Figur e 14) .
The lock lever has three functional positions.
Referring to Fi gur e 15:
• The upright posit ion permits mounting
and removal of fence from the saw.
• The unlock position permits easy fence
positioning.
• The lower position locks the fence to the
front rail. The cam handl e shoul d be
pushed down firml y agai nst the pin.
2. Place the Accu-Fence on the table t op and
check the hei ght of the si de plates from the
table top. The Accu-Fence has been pre-set
at the factory for a side plate hei ght of 1/32"
from the t able top of your saw. If , however,
some misalignment has occurred during
shipment, you can easily reset your side
plates to the correct height as described in
the following section.
Setting the Side Plate Height
1. Figure 16 shows a fence where
misalignment of the side plates has
occurred; t he side plates are in cont act with
the front edge of t he table saw top.
2. Turn the Accu-Fence upside down and with
a rubber mallet (or a hammer and block of
wood), gentl y tap the side pl ates to create a
height greater than 1/32" from the table top.
Note: Do not use a steel faced hammer
directly on the side plates as this will
damage them.
Back Rail
Space should be 1/32"
along entire length of fence
Figure 14
Figure 15
Fence Side Plate
Table Top
Incorrect contact
Figure 16
Front Rail
Guide Tube
3. Reposition the Accu-Fence on the table and
place the plastic shims (included with the
shipping contents) beneath the side plates.
With the hammer and wood block, tap the
sides down until they contact the shims as
shown in Figure 17.
4. Remove the shim s. The Accu-Fence should
now have correctly posi tioned side plates.
Figure 17
9
Page 10

Adjusting Fence Parallel to the Miter Slot
Referring to Fi gur e 18:
1. Place the f ence (A) on the table (B). Adjust it
so the edge (C) l ines up with the right miter
slot (D) and lock it.
2. The locked fence must be even (parallel)
with the mite r slot from front to bac k.
3. If the fence is not even al ong the length of
the miter slot , unl ock and rem ov e it from the
guide rail (Figur e 19) .
4. Adjust one of the two setscrews (H, Figure
19) with a 5mm hex wrench unt il the fence is
even with t he miter slot edge al ong i ts enti r e
length when locked.
Note: You may need to re-adjust the clamping
pressure (described below) after aligning the
fence.
Clamping Pressure Adjustment
The Accu-Fence has been adjusted at the
factory to lock securel y when the lock handle is
pushed down. If adjustm ent is needed:
1. Unlock the fence.
Figure 18
2. Remove the fence from the guide rail
(Figure 19).
3. Adjust each of the t wo setscrews (H, Figure
19) exactly the same number of rotations
until the fence is hel d securely when the lock
handle is pushed down.
A clockwise rotation of the setscrews will
increase the cam pressure. Counterclockwise
rotation will dec r ease cam pr essure.
90° to the Table Adjustment
1. Place the fence on the saw table and lock it.
2. Place a square (E, Figure 18) on the table
next to the fence. The f ence should be 90°
to the table.
3. If adjustm ent is necessary, unlock the f enc e,
and turn one of the two nylon adjustment
screws (F, Fi gure 18) until the fence is 90°
to the table.
4. Lock the fence and check the adjustment
again.
Cursor Adjustment
1. Disconnect the table saw from the power
source.
Figure 19
2. Raise the saw blade abov e the t abletop.
3. Unlock the fence and slide it to
approximately four inches from the saw
blade.
4. Lock the fence.
10
Page 11

5. Measure the distance between the saw
blade and the inside of the f enc e.
6. Adjust the cur sor (G, F igure 18) to read t he
distance just measured and tighten the
cursor assembly to t he fence.
7. Take a test cut and confirm that the
adjustment is correct.
Note: If t he cursor does n ot have enough t ravel
to give the correct measurement, loosen the
guide rail and adjust as needed. If you still do
not get the correct measurement, loosen the
front rail and adjust as needed. If you have to
adjust the fr ont rail you will need to go through
the front rail assembly instructions again.
This adjustment must be checked whenever a
different blade is installed.
Side Plate Replacement
The Accu-Fence is specially designed to save
you many hours of down-time when side plates
need to be replaced. In an operation that can
last an entire day with other fences, the Accu-
Fence side replacement takes only a few
minutes.
Figure 20
Here's how it's done:
1. Turn the fence upside d own and loosen the
five 1/4 l oc k nuts with a 7/16 wrench through
the slots.
Note: A socket wrench can f it into the slot,
and will speed the process (Figure 20).
2. Remove the lock nuts.
3. Turn the fenc e on its side and pull the side
plate from the main frame (Figure 21).
4. Replacement side plates come with
fasteners already attached. With the fence
still on i ts side, al ign the new side plate so
that the att ached bol t s li ne up wit h the hol es
on the mai n frame. See Figure 21. Mount
the new side plate to the main frame.
5. Turn the fence on its back and secure the
side plate by lightly tightening all nuts.
6. Make any necessary adj ustments to t he si de
plate height (see Setting the Side Plate
Height on page 9).
Figure 21
11
Page 12

Rail Installation on a
non-Powermatic Table Saw
The following instructions are for installing the
Accu-Fence and Rail System on a table saw
other than a Powermatic model. Som e drilling i s
required.
Tools required
10mm and 12mm wrenches
Philips screwdriver
Adjustable square
Rubber mallet (or hammer and block of
wood)
Straight edge
Electri c drill with 1/4" and 5/16" bits
Installing the Front Rail
1. Identify the front rail, which is 3" x 3" with
notches on one side.
2. Place a mark 18" from the left end of the
front rail (Fi gure 22). This mark will be lined
up with the saw blade.
3. Lay a straight edge flush against the right
side of the saw blade, as shown in Figure
23, and place the notched side of t he front
rail against the saw table as shown. Hold
front rail to the saw table with clamps. Make
sure the mark on t he front rail lines up wit h
the left edge of the straight edge (and thus
in line with the blade) .
Figure 22
Figure 23
4. The front rail must be parallel to the table
top in order for the Accu-Fence system to
function properly. Place an adjustable
square on the table as shown in Figure 24.
5. Check t he height of the front rail at several
locations along t he surface of the saw table.
The measurements should be the same
along the length of the rail. Adjust as
needed.
6. When the front rail has been correctly
positioned, and y our mark still lined up wit h
the straight edge, drill 1/ 4" holes into t he lip
of the table saw top, using t he holes in the
front rail as a guide (Figur e 25) .
7. Lightly secure the fr ont rail to the saw table
with four 1/4-20 x 1-1/2 flat head screws,
four 1/4 flat w ashers, f our 1/ 4 lock washers,
and four 1/4 hex nuts (Figure 26). Fingertighten only .
Figure 24
12
Page 13

Installing the Back Rail
1. Locate the back rail which is 2" x 2" with
holes running along one side only. The
height of the back rail when attached to t he
saw is not crit ical, but it shoul d be paral lel t o
the table top.
2. Position the back rail approximately 9/16"
below the surf ace of the table top, wit h the
ends even with those of the front rail
(Figure 27). Hold the back rail to the saw
with clamps.
3. Drill 5/16" hol es into the lip of the sa w table
using the holes in the back rail as a guide
(see Figure 28).
Referring to Fi gur e 29 :
4. Insert hex cap screws (A) and flat washers
(B) through t he back rail and saw table and
secure with flat washers (B), lock washers
(C) and hex nuts (D). Finger- tighten only at
this time.
The rest of the installation is the same as with a
Powermatic table saw. Refer back to page 6 to
mount the optional wood ex tension table (if
applicable) and the guide tube on page 8, and
proceed fr om ther e.
Figure 25
Figure 26
Figure 27
Figure 28
Figure 29
13
Page 14

Replacement Parts
To order parts or reach our service department, call 1-800-274-6848, Monday through Friday (see our website
for business hours, www.powermatic.com). Having the Model Number and Serial Number of your machine
available when you ca ll will allow us to serve y ou quickly and accurately.
Rail Assembly
Index No. Part No. Description Size Qty
.................. 2653031Z ............PM2000//PM3000/66/72A Rail Ass embly - Standard ..... 50” rip ............................ 1
.................. 2653039Z ............PM2000/66 Rail Assembly – Short ................................. 30” rip ............................ 1
1 ................ 3653217 ..............Front Fence Rail – Standard (50” rip) ............................. 72” L .............................. 1
.................. 3653237 ..............Front Fence Rail – Short (30” rip) ................................... 52-1/2” L........................ 1
2 ................ TS-081F081 ........Fl at Head Screw ............................................................ 1/4-20 x 1-1/2 .............. 10
3 ................ TS-0720071 ........Lock Washer................................................................... 1/4 ............................... 18
4 ................ TS-0561011 ........Hex Nut........................................................................... 1/4-20 .......................... 10
5 ................ TS-0050031 ........Hex Cap Screw............................................................... 1/4-20 x 3/4 ................... 8
6 ................ 3254010 ..............Fron t Fence Guide – Standard (50” rip) ......................... 84” L .............................. 1
.................. 3254022 ..............Fron t Fence Guide – Short (30” rip) ............................... 64” L .............................. 1
7 ................ 3653218 ..............Back Fence Rail – Standard (50” rip) ............................. 72” L .............................. 1
.................. 3653238 ..............Back Fence Rail – Short (30” rip) ................................... 52-1/2” L........................ 1
8 ................ TS-0051071 ........Hex Cap Screw............................................................... 5/16-18 x 1-1/2 .............. 6
9 ................ TS-0680031 ........Flat Washer .................................................................... 5/16 ............................. 14
10 .............. TS-0561021 ........Hex Nut........................................................................... 5/16-18 .......................... 6
11 .............. TS-0720081 ........Lock Washer................................................................... 5/16 ............................... 8
12 .............. 6687008 ..............Scale............................................................................... 53 " L x 3/4" W ............... 1
.................. 6687013 ..............Scale............................................................................... 32" L x 3/4" W ............... 1
13 .............. 6166069 ..............Cap Plug ......................................................................... ...................................... 2
14 .............. TS-0051041 ........Hex Cap Screw............................................................... 5/16-18 x 7/8 ................. 2
.................. 2405120 ..............Hardware Kit (not shown) ............................................... ...................................... 1
15 .............. TS-0680021 ........Flat Washer .................................................................... 1/4 ............................... 10
14
Page 15

Accu-Fence Parts
Index No. Part No. Description Size Qty
.................. 2195079Z ............. 66 & PM2000 Accu-Fence Assembly .................... ............................................. 1
.................. 2195080 ............... 72A & PM3000 Accu-Fence Assembly .................. ............................................. 1
.................. 2726008 ............... Fen ce Side Plate (Models 66, PM2000) ................ ...................................... 1(set)
(includes one side plate (item 1) and items 15, 22)
.................. 2726009 ............... Fence Side Plate Kit (Models 72A, PM3000) ........ ............................................. 1
(includes two side plates (item 1) and items 15, 22)
1 ................ 2726009FSP ........ Fen ce Side Plate (Models 72A, PM3000) .............. ............................................. 2
(includes one side plate only, no fasteners)
2 ................ 2056033 ............... Fen ce Body (Weld Models 66, PM2000) ............... ............................................. 1
.................. 2056034 ............... Fen ce Body (Weld Models 72A, PM3000) ............. ............................................. 1
4 ................ 800708950D......... Cursor .................................................................... ............................................. 1
5 ................ 800708950C......... Cursor Bracket ....................................................... ............................................. 1
6 ................ 3575080 ............... Flu oroway Pad ....................................................... ............................................. 2
7 ................ 6813042 ............... Compressi on Spring .............................................. ............................................. 1
8 ................ 3215301 ............... Foot Cam ............................................................... ............................................. 1
9 ................ TS-0152031 ......... Carriage Bolt .......................................................... 5/16-18 x 1-1/2..................... 1
10 .............. TS-0151041 ......... Carriage Bolt .......................................................... 1/4-20 x 1-1/2....................... 1
11 .............. 6626031 ............... Sprin g Pin .............................................................. ............................................. 1
12 .............. TS-0640071 ......... Lock Nut ................................................................. 1/4-20................................... 1
14 .............. TS-0640081 ......... Lock Nut ................................................................. 5/16-18................................. 1
15 .............. XF2-9 ................... T-Square Bolt (66, PM2000) .................................. 1/4-20 x 3/4 ........................ 10
.................. XF2-9 ................... T-Square Bolt (72A, PM3000) ............................... 1/4-20 x 3/4 ........................ 12
17 .............. 3076232 ............... Locking Cam .......................................................... ............................................. 1
19 .............. 6430055 ............... Knob w/ Stud ......................................................... ............................................. 1
21 .............. XF-5 ..................... Nylon Adjustmen t Screw ........................................ ............................................. 2
22 .............. TS-0640071 ......... Lock Nut (66, PM2000) .......................................... 1/4-20................................. 10
.................. TS-0640071 ......... Lock Nut (72A, PM3000) ....................................... 1/4-20................................. 12
23 .............. TS-0271031 ......... Set Screw .............................................................. 3/8-16 x 3/8 .......................... 2
24 .............. 6166069 ............... Cap Plug ................................................................ ............................................. 1
25 .............. 3312341 ............... Powermatic Logo ................................................... ............................................. 1
26 .............. 3408241 ............... Accu-F ence Label .................................................. ............................................. 1
27 .............. XF2-108 ............... Pad ........................................................................ ............................................. 1
28 .............. TS-081D021 ......... Flat Head Machine Screw ...................................... 10-32 x 3/8 ........................... 2
29 .............. TS-0733031 ......... Ext. Tooth Lock Washer ........................................ #10 ....................................... 2
30 .............. TS-0560081 ......... Hex Nut .................................................................. 10-32.................................... 2
31 .............. TS-081D022 ......... Pan Head Machine Screw ..................................... 10-32 x 3/8 ........................... 2
32 .............. TS-0680021 ......... Flat Washer ........................................................... 1/4 ........................................ 2
15
Page 16

Accu-Fence Assembly
427 New Sanford Rd.
LaVergne, TN 37086
Phone: 800-274-6848
www.powermatic.com
16
 Loading...