

Page 1

PSW121
owners manual
Page 2

English
Important Safety Instructions
This product was designed and manufactured to meet strict quality and safety
standards. There are, however, some installation and operation precautions
which you should be particularly aware of.
1. Read Instructions. All the safety and operating instructions should
be read before the system is operated.
2. Retain Instructions. The safety and operating instructions should
be retained for future reference.
3. Heed Warnings. All warnings on the appliances and in the operating
instructions should be adhered to.
4. Follow Instructions. All operating and use instructions should be followed.
5. Cleaning. Unplug the appliance from wall outlet before cleaning. Do not
use liquid cleaners or aerosol cleaners. Use a damp cloth for cleaning.
6. Attachments. Do not use attachments not recommended by the product
manufacturer as they may cause hazards.
7. Water and Moisture. Do not use these appliances near water‹for example,
near a bath tub, washbowl, kitchen sink, or laundry tub, in a wet basement,
or near a swimming pool, and the like.
8. Accessories. Do not place these appliances on an unstable cart, stand, tripod,
bracket, or table. The audio/video products may fall, causing serious injury to
a child or adult, and serious damage to the products. Use only with a cart, stand,
tripod, bracket, or table recommended by the manufacturer, or sold with the appliances. Any mounting of the appliances should follow the manufacturer’s instructions, and should use mounting accessories recommended by the manufacturer.
9. Ventilation. Slots and openings in the cabinet are provided for ventilation
and to ensure reliable operation of the appliances and to protect them
from overheating, and these openings must not be blocked or covered.
The openings should never be blocked by placing the products on a bed,
sofa, rug, or other similar surface. This product should never be placed
near or over a radiator or heat register. This product should not be placed
in a built-in installation such as a bookcase or rack unless proper ventilation
is provided or the manufacturer’s instructions have been adhered to.
10 . Power Sources. This product should be operated only from the type
of power source indicated on the marking labels. If you are not sure
of the type of power supply to your home, consult your appliance
dealer or local power company.
11. Grounding or Polarization. This product is equipped with polarized alternatingcurrent line plugs (plugs having one blade wider than the other). This plug will fit into
the power outlet only one way. This is a safety feature. If you are unable to insert
the plug fully into the outlet, try reversing the plug. If the plug should still fail to fit,
contact your electrician to replace your obsolete outlet. Do not defeat the safety
purpose of the polarized plug.
12. Power Cord Protection. Power-supply cord should be routed so that it is not likely
to be walked on or pinched by items placed upon or against it, paying particular
attention to cords at plugs, convenience receptacles, and the point where they
exit from the appliances.
13. Lightning. For added protection for this audio/video product during a lightning
storm, or when it is left un-attended and unused for long periods of time, unplug
it from the wall outlet and disconnect the antenna or cable system. This will
prevent damage to the product due to lightning and power-line surges.
14. Power Lines. An outside antenna system should not be located in the vicinity
of overhead power lines or other electric light or power circuits, or where it can
fall into such power lines or circuits. When installing an outside antenna system,
extreme care should be taken to keep from touching such power lines or circuits
as contact with them might be fatal.
15. Overloading. Do not overload wall outlets and extension cords as this can result
in a risk of fire or electric shock.
16. Object and Liquid Entry. Never push objects of any kind into this product
through openings, as they may touch dangerous voltage points or short
out parts that could result in a fire or electric shock. Never spill liquid
of any kind on this audio/video product.
17. Servicing. Do not attempt to service this product yourself, as opening
or removing covers may expose you to dangerous voltage or other
hazards. Refer all servicing to qualified service personnel.
18. Damage Requiring Service. Unplug this product from wall outlets and
refer servicing to qualified service personnel under the following conditions:
a. When the power supply cord or plug is damaged.
b. If liquid has been spilled, or objects have fallen
into the product.
c. If the product has been exposed to rain or water.
d. If the product does not operate normally by following the operating
instructions. Adjust only those controls that are covered by the operating
instructions, as an improper adjustment of other controls may result
in damage and will often require extensive work by a qualified technician
to restore the product to its normal operation.
e. If the product has been dropped or the cabinet has been damaged.
f. When the product exhibits a distinct change in performance
this indicates a need for service.
19. Replacement Parts. When replacement parts are required, be sure the service
technician has used replacement parts specified by the manufacturer or that
the parts have the same characteristics as the original part. Unauthorized
substitutions may result in fire, electric shock or other hazards.
20. Safety Check. Upon completion of any service or repairs to this product,
ask the service technician to perform safety checks to determine that
the products are in proper operating condition.
21. Carts and Stands. The appliances should be used only with a cart
or stand that is recommended by the manufacturer. An appliance
and cart combination should be moved with care. Quick stops,
excessive force, and uneven surfaces may cause the appliance
and cart combination to overturn. Use caution when moving
the cart/apparatus combination to avoid injury from tip-over.
22. This product is not intended for use outdoors.
Safe Limits of Operation
Polk specifies the recommended amplification range for each of its passive
(non-amplified) loudspeakers. Typically that specification will be expressed
as a range of power such as 20-200 Watts (per channel). It is important to
understand what those numbers mean when choosing a receiver or amplifier
for your Polk loudspeakers. The lower number indicates the lowest continuous
rated power that will yield acceptable performance in a typical listening environment.
The higher number indicates the highest per channel power that should be used
with your Polk speakers. That number should not be confused with a “Power
Handling” specification, and it does not imply that the speaker will safely handle
that full amount of power on a long-term basis. We specify a wide range of power
ratings because not all electronics manufacturers use the same method for rating
power. In fact, high quality lower-rated amplifiers sound better and play louder
than low quality units with higher power rating.
Similarly, we recommend using amplifiers and receivers with rated power above
the Power Handling limits of our speakers because having extra power available
for short term peaks is conducive to better sound quality, maximum dynamic
range and effortless high volume output. But we strongly urge you not
to use the full power of your amplifier or receiver for daily listening.
Loudspeakers can be damaged when an amplifier, regardless of its wattage,
is made to play at higher listening levels than its power can clearly produce.
Operation at this level can result in very high levels of audible distortion originating
in the amplifier, which can add a harsh, gritty sound to your listening material.
If you hear distortion—turn the volume down or risk damaging your speakers.
You can damage just about any speaker, regardless of power rating,
if you drive an amplifier to or beyond the point of distortion.
Product Disposal
Certain international, national and/or local laws and/or regulations
may apply regarding the disposal of this product. For further detailed
information, please contact the retailer where you purchased this
product or the Polk Importer/Distributor in your country. A listing
of Polk Importer/ Distributors can be found on the Polk website
www.polkaudio.com or by contacting Polk at: 5601 Metro Drive,
Baltimore, Maryland 21215, USA. Phone: 1-410-358-3600;
in California: 1-800-377-7655.
For more information visit our website at www.polkaudio.com 3
Page 3
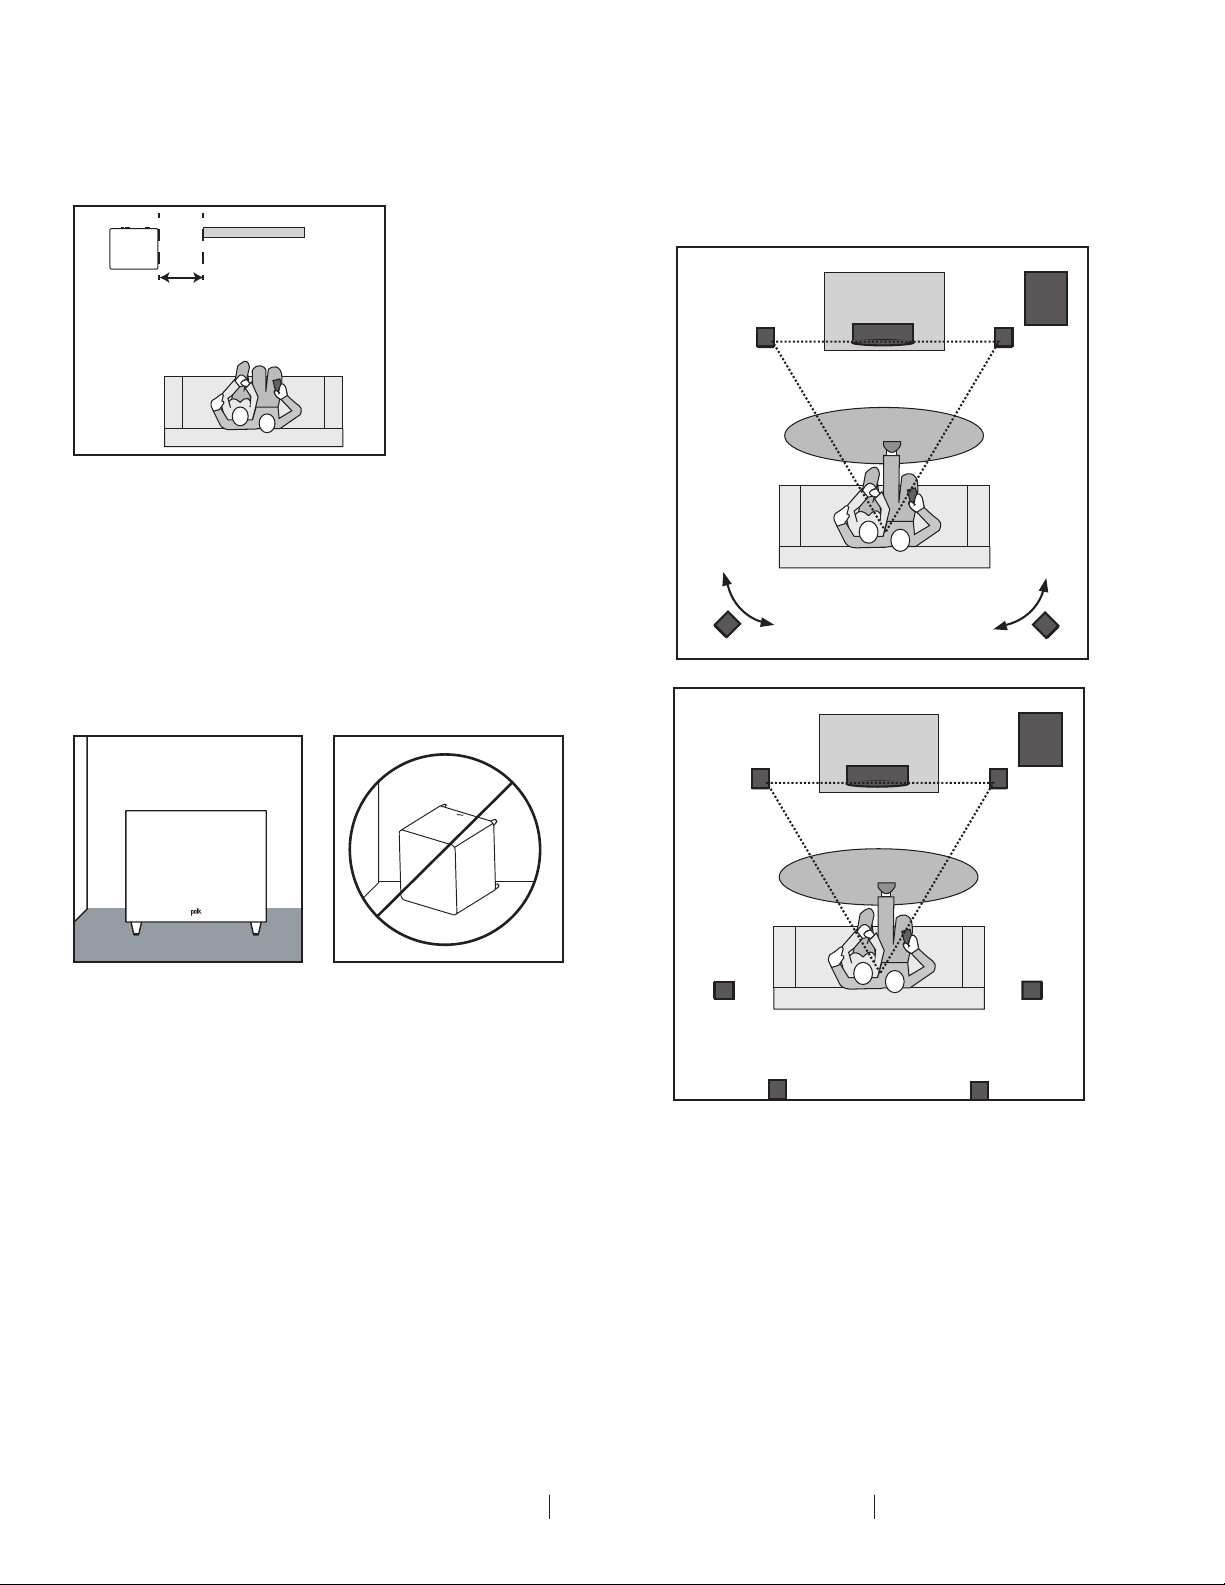
Placing Your Subwoofer in a Room
Your PSW Series subwoofer is not magnetically shielded. Do not place
near video monitors. (LCD, DLP and Plasma televisions are not affected
by magnetism.) Allow at least 18" (45cm) of space between your subwoofer
and any television, but if you do notice video distortion or discoloration,
immediately move the subwoofer away from the TV.
Suggested Speaker Placement
Suggested speaker placement with options for rear speaker placement.
Subwoofer should be placed more than six inches from wall anywhere
in the room.
Note: Additional satellite speakers may be purchased for 6.1, 7.1 or 9.2
surround systems by contacting Polk customer service at 1-800-377-7655.
SUB
18" - 24"
(46 cm - 61 cm)
Your PSW Series subwoofer offers many placement options: in an entertainment center, behind furniture, or next to a sofa or chair. You may place
your subwoofer anywhere in the room, but you’ll enjoy the best performance
when it’s on the same side of the room as your system’s front speakers.
Placing your subwoofer near a wall or in a corner will increase its loudness.
When placing your subwoofer in the room, always place your subwoofer
on its base feet side down. If you can at all avoid it, do not place your
subwoofer next to an open door.
We do recommend placing your subwoofer in different locations
within your room to learn what produces the best sound quality
for your listening environment.
TV
5.1
Left
Channel
Left Surround
7.1
Left
Channel
Center
Channel
Y
X=Y=Z
X
Center
Channel
Y
X
Sub
Right
Channel
Z
Right Surround
Sub
Right
Channel
Z
Left
Surround
Left Surround Back
4 Polk Customer Service 1-800-377-7655 (Outside US: 410-358-3600 Monday-Friday, 9:00 AM-5:30 PM Eastern Time polkcs@polkaudio.com
Right Surround Back
Right
Surround
Page 4
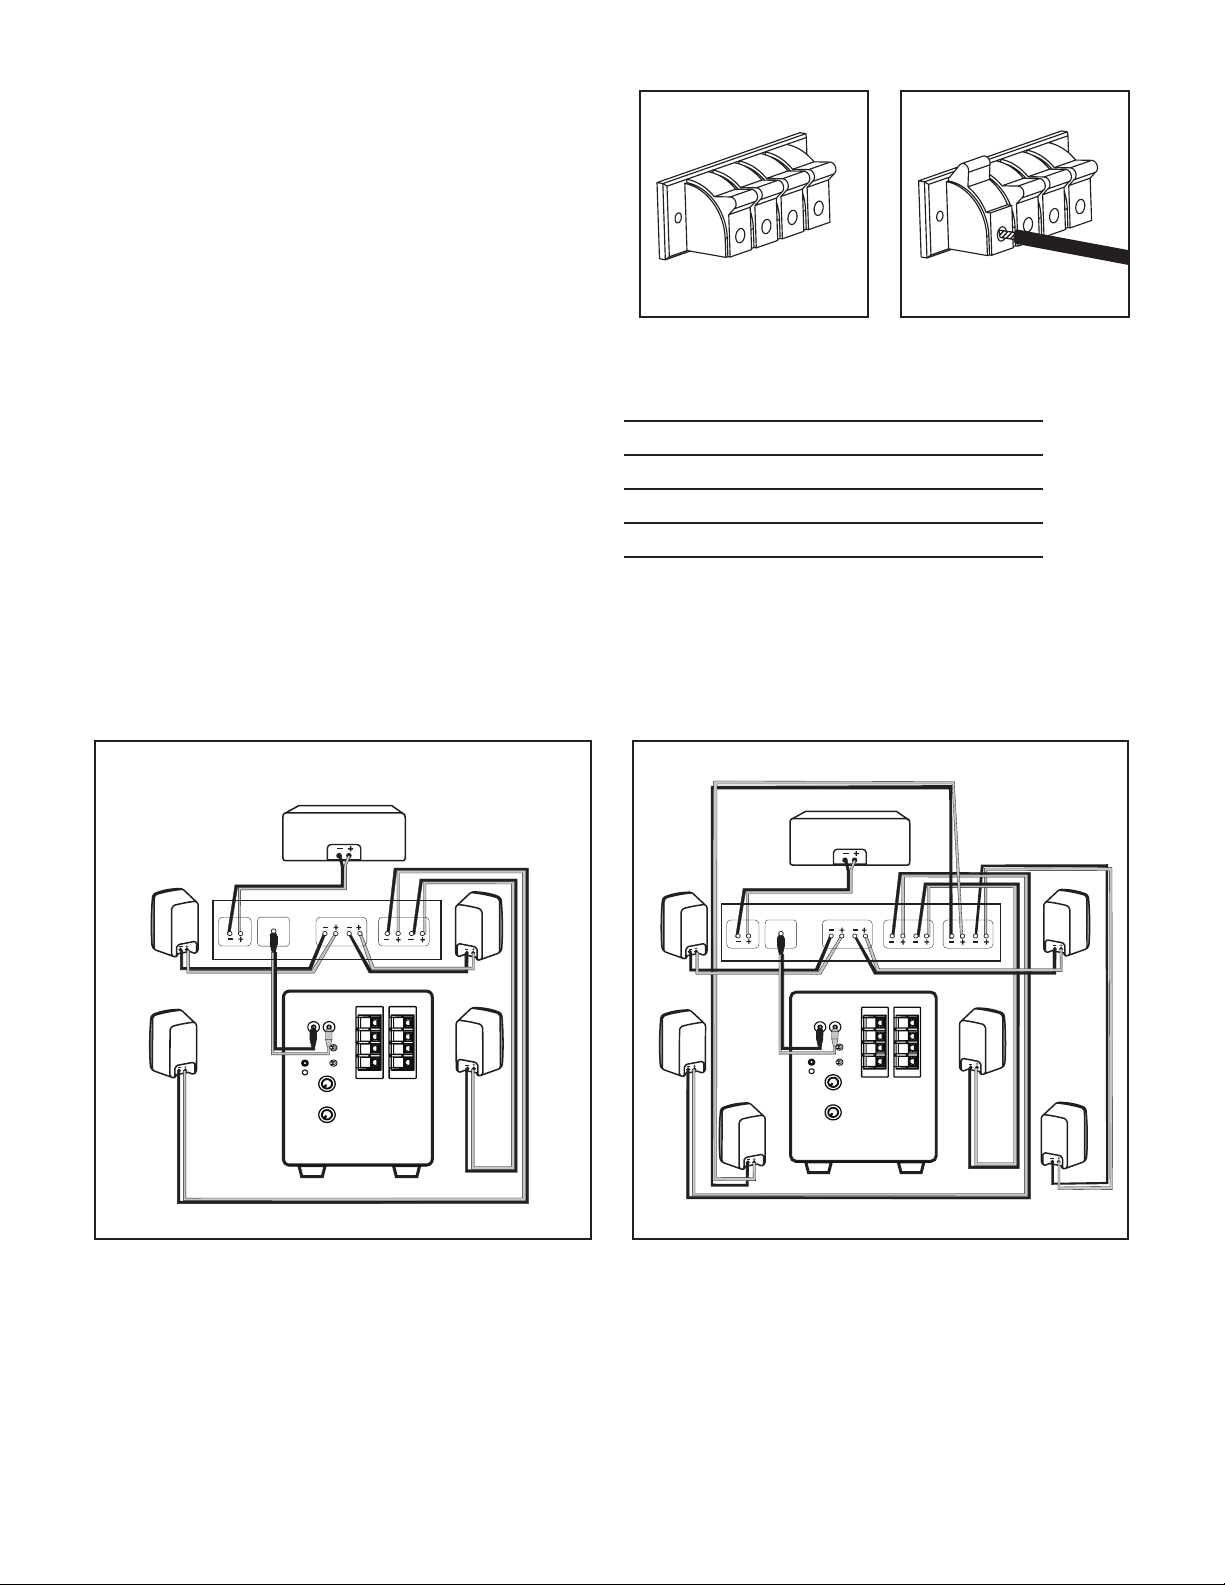
System Hookup Options
Important: Use only one of these options. Never combine hookup options.
Option #1
Receivers that include a “Sub Out” feature—the most common hookup
method with Dolby® Digital receivers.
Note that one of the speaker input terminals on the rear of the speaker is
marked red (+) and the other black (–). Make certain that you connect the
wire from the red (+) terminal of your receiver to the red (+) terminal on your
speaker, and the wire from the black (–) terminal of the receiver to the black
(–) terminal on your speaker. Speaker wire has some indication (such as color
coding, ribbing, or writing) on one of the two conductors to help maintain
consistency. If your subwoofer doesn’t seem to produce much bass, it is
most likely that one of the speaker wires is connected backwards. Double
check all connections for correct polarity.
Note: Use either the L or R Line input (another hookup option is to use
a Y-split cable and connect both L and R line inputs). After you make
this sub out connection, turn the “Low Pass” filter fully clockwise.
Connect all speakers directly to the receiver. When using method #1,
adjust your receiver’s speaker configurations as follows: set front,
center and surround speakers to “small.”
Receiver Settings:
Front, Center, and Surrounds = “SMALL”
Subwoofer = “ON,” or “YES,” or “PRESENT”
Set the crossover frequency on the receiver to 120 Hz.
Consult your receiver’s owner’s manual for speaker configuration.
Wire Recommendations
Runs Gauge
Lengths up to 25' 18 or 16
Lengths greater than 25' but less than 50’ 16 or 14
Lengths greater than 50' but less than 75’ 14 or 12
Lengths greater than 75' 12
5.1 7.1
Center Channel
Sub-out Receiver
Center
RCA Cable
RL
FrontSurround
LINE IN
PHASE
0° 180°
POWER
ON
100
LOW PASS
(Hz)
16080
VOLUME
MINMAX
SPEAKER LEVEL
OUTPUT
+
RL
LEFT
–
–
RIGHT
+
OFF
Subwoofer
RL
SPEAKER LEVEL
INPUT
LEFT
RIGHT
+
–
–
+
Sub-out Receiver
Center
RCA Cable
Center Channel
LOW PASS
VOLUME
(Hz)
LINE IN
MINMAX
RL
PHASE
0° 180°
POWER
ON
100
RL RL
FrontSurround Surround Back
SPEAKER LEVEL
SPEAKER LEVEL
OUTPUT
INPUT
+
RL
LEFT
–
–
RIGHT
+
OFF
16080
Subwoofer
+
LEFT
–
–
RIGHT
+
For more information visit our website at www.polkaudio.com 5
Page 5
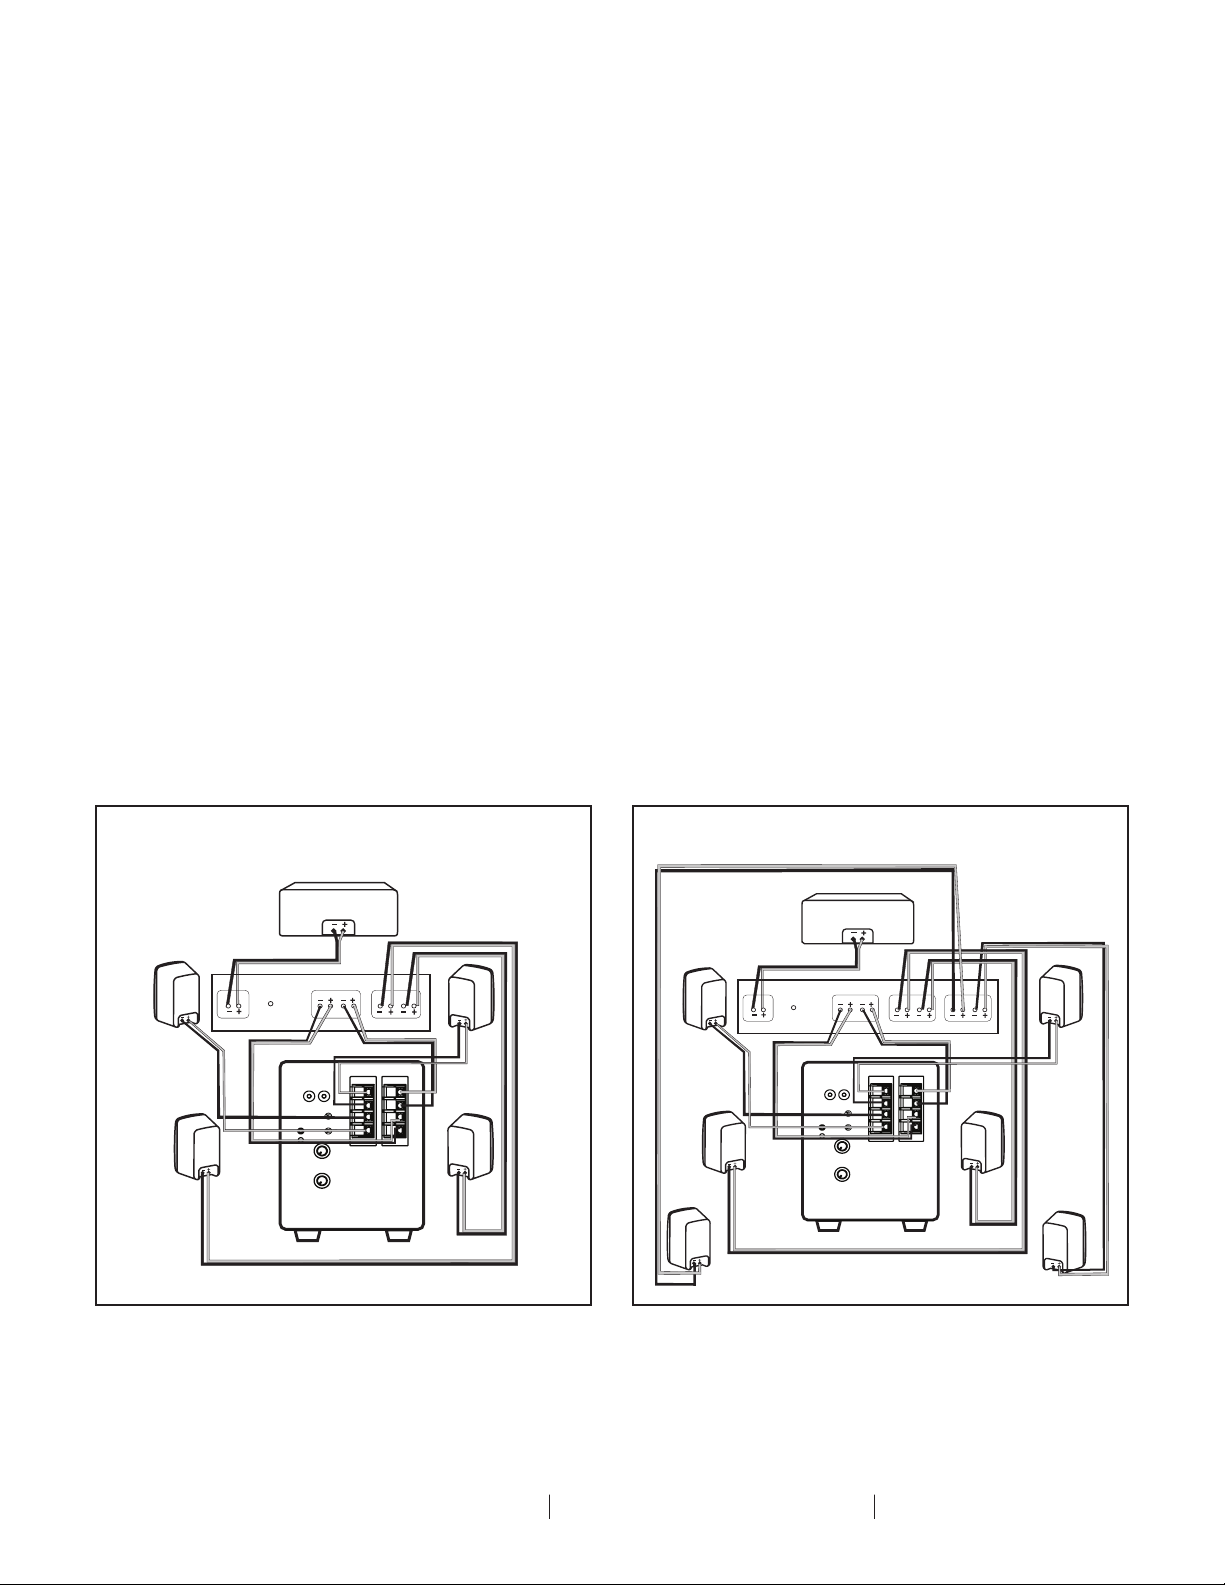
Option #2
Two channel or Dolby Pro Logic receiver with no “Sub Out.”
If you elect to use the speaker level inputs, use two-conductor 16 gauge
or thicker speaker wires. See your Polk dealer for wire recommendations.
Note that one of the speaker input terminals on the rear of the speaker is
marked red (+) and the other black (–). Make certain that you connect the
wire from the red (+) terminal of your receiver to the red (+) terminal on your
speaker, and the wire from the black (–) terminal of the receiver to the black
(–) terminal on your speaker. Speaker wire has some indication (such as color
coding, ribbing, or writing) on one of the two conductors to help maintain
consistency. If your subwoofer doesn’t seem to produce much bass, it is
most likely that one of the speaker wires is connected backwards. Double
check all connections for correct polarity.
Strip 1/2" (12mm) of insulation from each of the two conductors on both
ends to expose the bare wire. Twist the exposed wire of each conductor
to form two unfrayed strands.
•Connecttheleftandrightfrontspeakeroutputsofyourreceiver
to the speaker level inputs of the powered subwoofer using
speaker wire.
•Then,connecttheleftandrightfrontspeakersusingspeaker
wire from the speaker level outputs from the powered subwoofer.
•Connectthecenterchannelspeakerdirectlytothecenter
channel output from your receiver.
•Connecttherearsurroundsatellitesdirectlytotherear
or surround channel outputs from your receiver.
Receiver Settings:
Front speakers = LARGE
Subwoofer = “OFF” or “NO”
Center and Surrounds = SMALL
Crossover Frequency = 120 Hz
5.1 7.1
Center Channel
RCA Cable
Sub-out Receiver
Center
LOW PASS
VOLUME
(Hz)
LINE IN
MINMAX
RL
PHASE
0° 180°
POWER
ON
100
RL
Front Surround
SPEAKER LEVEL
SPEAKER LEVEL
OUTPUT
INPUT
+
RL
LEFT
–
–
RIGHT
+
OFF
16080
Subwoofer
+
LEFT
–
–
RIGHT
+
RCA Cable
Sub-out Receiver
Center
Center Channel
RL
RL RL
Front Surround Surround Back
SPEAKER LEVEL
SPEAKER LEVEL
OUTPUT
+
RL
LEFT
–
–
RIGHT
+
OFF
Subwoofer
INPUT
LOW PASS
VOLUME
LINE IN
PHASE
0° 180°
POWER
ON
100
(Hz)
16080
MINMAX
+
LEFT
–
–
RIGHT
+
6 Polk Customer Service 1-800-377-7655 (Outside US: 410-358-3600 Monday-Friday, 9:00 AM-5:30 PM Eastern Time polkcs@polkaudio.com
Page 6
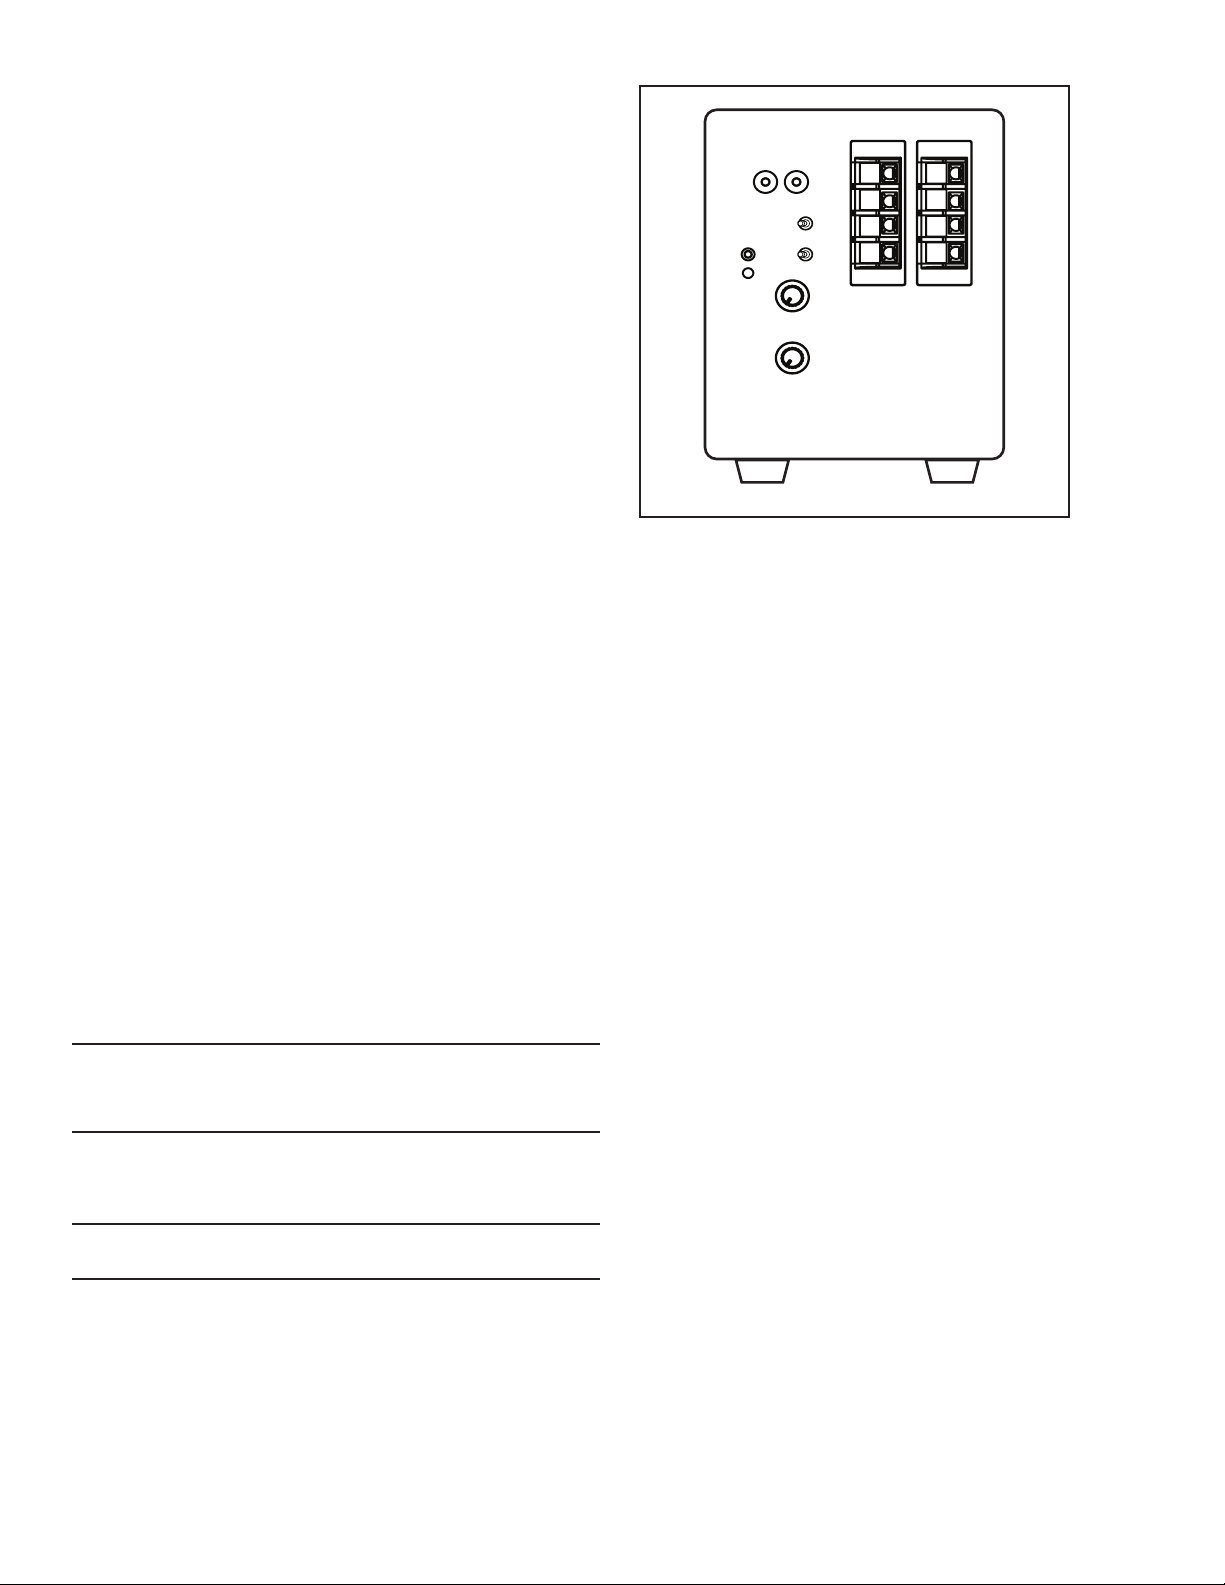
Adjusting Your System
Subwoofer Adjustments
Your powered subwoofer offers a range of setting options. We recommend
the following settings as starting points, but the settings that are best for you
depend upon your speaker placement, electronics and personal taste. After
you’ve become familiar with what the settings do, experiment with alternate
options to find the method that works best for your system setup. You’ll find
an informative article on “Subwoofer Positioning and Adjustment” in the set
up section at: http://www.polkaudio.com/polk-university/articles/bassmanagement-and-subwoofer-connections.
Note: When you set up your subwoofer for the first time, you will probably
have to make adjustments several times before you hear what you personally
like. Start with the volume at 50%.
AC Power Connection and Auto On/Off
Your subwoofer features auto on/off circuitry, marked “auto” on the power
switch, which automatically turns your subwoofer on when it senses a
program signal. We recommend the “auto” setting if your subwoofer is
always receiving power (ie, if it’s plugged into a wall outlet).
When no signal is present, the circuit turns the subwoofer off after 15
minutes. If you are concerned about the brief delay between when the music
starts and when the subwoofer turns on, simply leave your subwoofer in
the “On” position. You may want to leave your system unplugged during
extended periods of non use, such as during a vacation.
Fine Tuning Your Subwoofer
•Volume—Adjust by ear using a wide variety of CDs and video sources.
Adjust for deep, powerful bass without “boominess.”
•Low Pass—Note: This control should be turned all the way up when
the subwoofer is connected with Method #1 (LINE IN). This control
adjusts the frequency range over which the subwoofer operates. If
male vocals sound “thin,” turn this control up until the voice sounds
rich but not “boomy.” If male vocals sound too “thick” or “chesty,”
turn this control down until the voice sounds natural.
•Phase Switch—Sit in your favorite listening position. Play music
(not a movie) with a walking bass line. We recommend playing jazz
or country music. Now listen carefully for the point at which the
subwoofer transitions to your main speakers. This is the crossover
point, and this point should be below the frequency of a male human
voice. Whichever phase setting sounds louder or fuller at the
subwoofer’s crossover (transition) point is the optimum setting.
Sometimes no difference will be heard.
LOW PASS
(Hz)
VOLUME
LINE IN
100
MINMAX
PHASE
0° 180°
POWER
ON
16080
RL
OFF
LEFT
RIGHT
+
–
–
+
SPEAKER LEVEL
OUTPUT
SPEAKER LEVEL
INPUT
LEFT
RIGHT
+
–
–
+
Rear Amp Panel
Power Switch Settings:
On = Green LED
Off = Red LED (no signal)
Auto
No signal = Red LED
Signal = Green LED
Technical Assistance and Service
If, after following these hook up directions, you experience difficulty, please
double-check all wire connections. Should you isolate the problem to the
speaker, contact the authorized Polk Audio dealer where you made your
purchase, or call Polk Audio’s friendly Customer Service Department at
1-800-377-7655 (calls from US or CAN only), (Outside the US or CAN,
410-358-3600), 9am to 5:30pm EST, Monday through Friday. You may
also contact us via email: polkcs@polkaudio.com. For more detailed
hookup information and manual updates, visit: www.polkaudio.com.
Troubleshooting
No sound coming from subwoofer If hookup is “Sub Out” to LINE IN, is your
receiver set to “Subwoofer—yes” If hookup
is via speaker wire, check that the polarity of
the wires is correct.
Subwoofer doesn’t sound right If hookup is “Sub Out” to LINE IN, is your
receiver set to “Subwoofer—yes” If hookup
is via speaker wire, check that the polarity of
the wires is correct.
Subwoofer has no power Check outlet; check fuse after unplugging
the subwoofer and calling customer service.
For more information visit our website at www.polkaudio.com 7
Page 7

Limited Warranty
Polk Audio, Inc., warrants to the original retail purchaser only. This warranty
will terminate automatically prior to its stated expiration if the original retail
purchaser sells or transfers the Product to any other party.
Polk Audio, Inc., warrants, to the original retail purchaser only, that
the LOUDSPEAKER(S), PASSIVE CROSSOVER COMPONENT(S) and
ENCLOSURE on this Polk Audio Loudspeaker Product will be free from
defects in material and workmanship for a period of five (5) years from the
date of original retail purchase from a Polk Audio Authorized Dealer.
Furthermore, Polk Audio, Inc., warrants, to the original retail purchaser only,
that any AMPLIFIER OR OTHER ELECTRONIC COMPONENT that may be
included in this Polk Audio Loudspeaker Product will be free from defects
in material and workmanship for a period of three (3) years from the date of
original retail purchase from a Polk Audio Authorized Dealer.
To allow Polk Audio to offer the best possible warranty service, please
register your new product online at: www.polkaudio.com/registration or call
Polk customer service 800-377-7655 in the USA and Canada (outside the
USA: 410-358-3600) within ten (10) days of the date of original purchase.
Be sure to keep your original purchase receipt.
Defective Products must be shipped, together with proof of purchase,
prepaid insured to the Polk Audio Authorized Dealer from whom you
purchased the Product, or to the Factory at 1 Viper Way Vista, CA 92081.
Products must be shipped in the original shipping container or its equivalent;
in any case the risk of loss or damage in transit is to be borne by you. If upon
examination at the Factory or Polk Audio Authorized Dealer it is determined
that the unit was defective in materials or workmanship at any time during
this Warranty period, Polk Audio or the Polk Audio Authorized Dealer will, at
its option, repair or replace this Product at no additional charge, except as
set forth below. All replaced parts and Products become the property of Polk
Audio. Products replaced or repaired under this warranty will be returned to
you, within a reasonable time, freight prepaid.
This warranty does not include service or parts to repair damage caused
by accident, disaster, misuse, abuse, negligence, inadequate packing
or shipping procedures, commercial use, voltage inputs in excess of the
rated maximum of the unit, cosmetic appearance of cabinetry not directly
attributable to defect in materials or workmanship, or service, \repair, or
modification of the Product which has not been authorized or approved by
Polk Audio. This warranty shall terminate if the Serial number on the Product
has been removed, tampered with or defaced.
This warranty is in lieu of all other expressed Warranties. If this Product is
defective in materials or workmanship as warranted above, your sole remedy
shall be repair or replacement as provided above. In no event will Polk Audio,
Inc. be liable to you for any incidental or consequential damages arising
out of the use or inability to use the Product, even if Polk Audio, Inc. or a
Polk Audio Authorized Dealer has been advised of the possibility of such
damages, or for any claim by any other party. Some states do not allow the
exclusion or limitation of consequential damages, so the above limitation and
exclusion may not apply to you.
All implied warranties on this Product are limited to the duration of this
expressed Warranty. Some states do not allow limitation on how long an
implied Warranty lasts, so the above limitations may not apply to you. This
Warranty gives you specific legal rights, and you also may have other rights
which vary from state to state.
This Warranty applies only to Products purchased in Canada, the United
States of America, its possessions, and U.S. and NATO armed forces
exchanges and audio clubs.
The Warranty terms and conditions applicable to Products purchased in
other countries are available from the Polk Audio Authorized Distributors in
such countries.
8 Polk Customer Service 1-800-377-7655 (Outside US: 410-358-3600 Monday-Friday, 9:00 AM-5:30 PM Eastern Time polkcs@polkaudio.com
Page 8

Français
Consignes de Sécurité Importantes
Ce produit a été conçu et fabriqué pour répondre à de strictes normes de qualité
et de sécurité. Veuillez cependant porter attention aux consignes de sécurité suivantes
se rapportant à son installation et à son utilisation.
1. Lisez toutes les consignes de sécurité et d’utilisation avant d’utiliser cet appareil.
2. Conservez les instructions de sécurité et d’opération pour référence future.
3. Observez les consignes contenues dans ce manuel et affichées sur le produit.
4. Suivez toutes les instructions d’opération et d’utilisation
5. Nettoyage. Débranchez l’appareil avant de le nettoyer. N’utilisez jamais
de nettoyant liquide ou en aérosol. Utilisez un chiffon humide.
6. Accessoires. N’utilisez jamais d’accessoires non recommandés
par le fabricant. Ils pourraient provoquer un danger.
7. Eau et humidité. N’utilisez jamais cet appareil près d’une source d’eau
ou d’humidité-par exemple près d’une baignoire, d’un évier, d’un lavabo
ou dans un sous-sol humide ou près d’une piscine ou autre source d’eau.
8. Accessoires. Ne placez jamais ce produit audio-visuel sur un charriot, socle,
meuble ou support instable. Le produit pourrait tomber, s’endommager et/ou
blesser grièvement un enfant ou un adulte. Utilisez uniquement un charriot,
socle, meuble ou support spécifié par le fabricant ou vendu avec le produit.
Toute installation du produit doit se faire selon les directives du fabricant
et en utilisant des accessoires recommandés par le fabricant.
9. Aération. Les ouvertures et les fentes situées sur le boîtier préviennent la surchauffe
et assurent la fiabilité du produit et ne doivent jamais être couvertes ou obstruées.
Elles ne doivent jamais être obstruées en plaçant le produit sur un lit, un sofa,
un tapis ou autre surface similaire. Ce produit ne doit jamais être installé sur
ou à proximité d’un radiateur ou d’un registre de chaleur. Ce produit ne doit
pas être installé dans un meuble, une bibliothèque ou un bâti à moins d’assurer
une aération adéquate ou d’observer les directives du fabricant.
10. Alimentation CA. Ce produit ne doit être utilisé qu’avec le type d’alimentation
CA spécifié sur l’étiquette apposée au produit. Si vous ne connaissez pas
le type d’alimentation utilisé dans votre région, communiquez avec le revendeur
du produit ou avec votre fournisseur local d’électricité.
11. Mise à la terre et polarisation. Ce produit est muni d’une fiche d’alimentation CA
polarisée (une des deux broches étant plus large que l’autre). Cette fiche ne peut
être in sérée dans la prise de courant que d’une seule façon. C’est un dispositif de
sécurité. Si vous ne parvenez pas à bien insérer la fiche dans la prise de courant,
renversezla. Si vous ne parvenez toujours pas à insérer la fiche dans la prise de
courant, faites remplacer la prise obsolète par un électricien. Ne contournez
jamais le dispositif de sécurité de mise à la terre de la fiche polarisée.
12. Protection du cordon d’alimentation CA. Les cordons d’alimentation CA doivent
être disposés hors des zones passantes où ils risquent d’être écrasés, pincés
ou endommagées, particulièrement à proximité des prises de courant, des blocs
multiprises et à la sortie de l’appareil.
13. Foudre et surtension. Pour assurer la protection de ce produit contre la foudre
ou la surtension lorsqu’il n’est pas utilisé pour de longues périodes, débranchez
son cordon d’alimentation de la prise de courant CA et déconnectez le système
de câble ou d’antenne.
14. Lignes électriques. Une antenne extérieure ne doit pas être installée à proximité
de lignes électriques aériennes ou autres dispositifs électriques ou d’éclairage sur
lesquels elle pourrait tomber. Lors de l’installation d’une antenne extérieure, il est
impératif de vousassurer que cette dernière ne pourra jamais entrer en contact avec
de tels disposi tifs ou lignes électriques. Il pourrait y avoir danger de mort.
15. Surcharge. Ne surchargez jamais les prises de courant, les rallonges ou les blocs
multiprises; cela pourrait constituer un risque d’incendie ou de choc électrique.
16. Objets et liquides. N’insérez jamais d’objets dans les ouvertures de ce produit.
Ils pourraient entrer en contact avec des points de voltage dangereux ou provoquer des courts-circuits; cela pourrait provoquer un risque d’incendie
ou de choc électrique. Ne renversez jamais deliquides sur le produit.
17. Service. Ne tentez jamais de réparer ce produit vousmême car ouvrir son
boîtier ou en retirer le couvercle pourrait vous exposer à des voltages dangereux ou à d’autres dangers. Confiez tout service à un technicien qualifié.
18. Dommages et service. Débranchez l’appareil de la prise CA et contactez
un réparateur qualifié lorsque:
a. le cordon d’alimentation a été endommagé.
b. un objet ou du liquide s’est introduit dans le produit.
c. le produit a été exposé à la pluie ou à de l’eau.
d. le produit ne fonctionne pas normalement selon les instructions du fabricant.
Réglez uniquement les contrôles spécifiés dans le manuel de l’utilisateur
car le réglage inapproprié de certains autres contrôles pourrait endommager
le produit et requérir l’intervention d’un réparateur qualifié pour le remettre
en ordree. le produit a subi une chute ou son boîtier a été endommagé.
e. le produit ne semble pas fonctionner normalement—ce qui indique
la nécessité de service.
19. Pièces de rechange—Lorsque des pièces de rechange sont requises,
assurez-vous que le technicien de service utilise des pièces de rechange
spécifiées par le fabricant ou des pièces ayant les mêmes caractéristiques
que les pièces d’origine. Des substitutions non autoriséesrisquent de
provoquer un incendie, des chocs électriques ou d’autres dangers.
20. Contrôle de sécurité—Après chaque contrôle technique ou réparation
de cet appareil, demandez au technicien d’effectuer un contrôle pour
assurer que l’appareil est en bon état de fonctionnement.
21. Chariots et socles. Les appareils doivent être utilisés uniquement
avec des chariots ou des socles recommandés par le fabricant.
Un appareil sur chariot doit être déplacé avec soin. Des arrêts
soudains, une poussée excessive ou une surface inégale pourraient
provoquer le renversement du chariot avec risque de blessures.
22. Ce produit n’est pas conçu pour utilisation extérieur.
Limites D’Opération
Polk spécifie la marge de puissance d’amplification recommandée pour chacun de ses
haut-parleurs non amplifiés. Cette spécification est typiquement exprimée en watts par
canal (par ex. 20-200 W/canal). Il est important de bien comprendre la signification de
ces chiffres avant de choisir un amplificateur pour vos haut-parleurs Polk. Le premier
chiffre indique la puissance nominale minimum requise pour assurer une performance
adéquate dans une pièce de dimensions normales. Le deuxième chiffre indique la
puissance nominale maximum admissible par vos haut-parleurs – ce chiffre ne doit
pas être confondu avec la spécification «capacité de puissance» et n’implique pas que
le haut-parleur peut soutenir cette puissance de façon continue. Nous spécifions une
marge de puissance d’amplification étendue parce que les fabricants de composants
électroniques n’utilisent pas toujours la même méthode pour déterminer la puissance
admissible. En fait, les amplificateurs moins puissants de qualité supérieure donnent
un meilleur rendement que les amplificateurs plus puissants de qualité inférieure.
C’est pour cette même raison que nous vous recommandons d’utiliser un amplificateur
ou un récepteur d’une puissance nominale plus élevée que la capacité de puissance
spécifiée pour vos haut-parleurs. En effet, cette réserve de puissance leur permettra
de reproduire les crêtes sonores momentanées sans peine et sans distorsion, assurant
une gamme dynamique optimale et une performance maximale—même à haut volume.
Il est quand même fortement déconseillé d’écouter votre chaîne audio «à fond la
caisse» en tout temps.
Un haut-parleur peut être endommagé lorsqu’un amplificateur, quelle que soit
sa puissance, est poussé au-delà de ses limites. L’amplificateur surchargé génère
alors un niveau élevé de distorsion audible, le son devenant rauque et éraillé. Si
vous entendez de la distorsion, baissez le volume sinon vous risquez d’endommager
vos haut-parleurs. Un haut-parleur, quelle que soit sa capacité de puissance, risque
d’être endommagé lorsque l’amplificateur est poussé au-delà de ses limites
et génère de la distorsion.
Récupération du Produit
Certaines lois ou certains règlements internationaux, nationaux
et/ou région-aux pourraient s’appliquer à la récupération de ce
produit. Pour plus d’infor-mation, communiquez avec le revendeur
de ce produit ou avec l’impor-tateur/distributeur de ce produit
dans votre pays. Vous trouverez la liste des importateurs/distributeurs des produits Polk sur le site www.polkaudio.com ou
en communiquant avec Polk: 5601 Metro Drive, Baltimore,
Maryland 21215, USA—Tél.: +1 410 358-3600
For more information visit our website at www.polkaudio.com 9
Page 9

Où Installer votre Subwoofer
Votre subwoofer de Série PSW n’est pas blindé. Ne l’installez jamais
à proximité d’un moniteur vidéo à écran cathodique (les écrans LCD,
DLP et à plasma ne sont pas affectés par le magnétisme). Ne l’installez
jamais à moins 45 cm (18 po) d’un téléviseur. Si vous constatez
de la distorsion ou de la décoloration vidéo, éloignez immédiatement
votre subwoofer du téléviseur.
Suggested Speaker Placement
Cette suggestion offre aussi des options d’emplacement pour
les enceintes arrière.Le subwoofer doit être toujours placé à plus
de 15 cm de n’importe quel mur.
Note: Vous pouvez vous procurer des enceintes satellites additionnelles
pour systèmes 6.1, 7.2 ou 9.2 en contactant le Service à la Clientèle
de Polk au: 1-800-377-7655.
SUB
18" - 24"
(46 cm - 61 cm)
Vous pouvez installer votre subwoofer de Série PSW à peu près n’importe
où dans la pièce—dans un meuble audio-vidéo, derrière le mobilier ou à
côté d’un divan ou d’un fauteuil—mais vous obtiendrez de meilleurs résultats
si vous l’installez du même côté de la pièce que vos enceintes principales
avant. Sachez que le volume des graves est accentué lorsque vous placez
le subwoofer au ras d’un mur ou dans un coin. Le subwoofer doit toujours
être installé debout et sur ses pieds. Si possible, ne l’installez pas à proximité
d’une porte ouverte.
Expérimentez. Placez successivement votre subwoofer à différents endroits
dans la pièce afin de déterminer sa position idéale pour le meilleur équilibre
sonore possible.
TV
5.1
Canal
Gauche
X
Surround Gauche
7.1
Canal
Gauche
X
Canal
Central
Y
X=Y=Z
Canal
Central
Y
Sub
Canal
Droit
Z
Surround Droit
Sub
Canal
Droit
Z
Surround
Gauche
Surround Gauche Arriére
10 Polk Customer Service 1-800-377-7655 (Outside US: 410-358-3600 Monday-Friday, 9:00 AM-5:30 PM Eastern Time polkcs@polkaudio.com
Surround Droit Arriére
Surround
Droit
Page 10

Options de Connexion
Important: Utilisez une seule de ces options. Ne combinez jamais
ces options de connexion.
Option #1
Récepteurs dotés de la fonction «Sub Out»—la méthode de raccord la plus
courante pour récepteurs Dolby Digital.
Note: Les borne d’entrée h.-p. à l’arrière du subwoofer sont rouge (+) et
noire (–). Assurez-vous de bien raccorder le fil provenant de la borne rouge
(+) de votre récepteur à la borne rouge (+) de votre enceinte et le fil noir (–)
provenant de la borne noire (–) de votre récepteur à la borne noire (–) de
votre enceinte. La polarité de la plupart des câbles à deux conducteurs est
codée (couleur, nervure ou écriture) pour faciliter son identification. Si votre
subwoofer ne semble pas générer assez de graves, il est probable que la
polarité d’un des câbles de haut-parleur soit inversée. Assurez-vous que la
polarité de tous les conducteurs est respectée.
Note: Utilisez soit l’entrée L (gauche) ou R (droite)—vous pouvez aussi
utiliser un adaptateur en Y pour jumeler les entrées de ligne L et R. Après
avoir fait la connexion Sub Out, réglez le contrôle Low Pass au maximum
dans le sens horaire.
Raccordez toutes les enceintes directement au récepteur. Pour l’option #1,
réglez les contrôles de haut-parleurs de votre récepteur comme suit: «Small»
(petit) pour les haut-parleurs «Front» (avant), «Center» (centre) et «Surround»
(ambiophoniques).
Réglage du réceteur:
«Small» (petit) pour les haut-parleurs «Front» (avant), «Center» (centre) et
«Surround» (ambiophoniques). Réglez le contrôle du subwoofer à «ON,»
«YES,» ou «PRESENT.» Réglez le contrôle de la fréquence de séparation
du récepteur à 120 Hz.
Consultez le manuel d’utilisation de votre récepteur pour établir
la configuration de vos enceintes.
Type de câble: recommandations
Longueur Calibre
Jusqu’à 8 m 18 ou 16
Plus de 8 m mais moins de 15 m 16 ou 14
Plus de 15 m mais moins de 22 m 14 ou 12
Plus de 22 m 12
5.1 7.1
Canal Central
Sub-out Receiver
Central
Câble de RCA
RL
AvantSurround
LINE IN
PHASE
0° 180°
POWER
ON
100
LOW PASS
(Hz)
16080
VOLUME
MINMAX
SPEAKER LEVEL
OUTPUT
+
RL
LEFT
–
–
RIGHT
+
OFF
Subwoofer
RL
SPEAKER LEVEL
INPUT
LEFT
RIGHT
+
–
–
+
Sub-out Receiver
Central
Câble de RCA
Canal Central
LOW PASS
VOLUME
(Hz)
LINE IN
MINMAX
RL
PHASE
0° 180°
POWER
ON
100
RL RL
AvantSurround Surround Arriére
SPEAKER LEVEL
SPEAKER LEVEL
OUTPUT
INPUT
+
RL
LEFT
–
–
RIGHT
+
OFF
16080
Subwoofer
+
LEFT
–
–
RIGHT
+
For more information visit our website at www.polkaudio.com 11
Page 11

Option #2
Récepteur stéréo ou Dolby Pro Logic sans sortie «Sub Out».
Si vous utilisez les entrées «speaker level» (niveau h.p.), utilisez du câble
de haut-parleur à deux conducteurs de calibre 16 ou plus gros. Consultez
votre revendeur Polk pour des conseils en matière de câblage.
Notez que les borne d’entrée haut-parleur à l’arrière du subwoofer sont
rouge (+) et noire (–). Assurez-vous de bien raccorder le fil provenant de la
borne rouge (+) de votre récepteur à la borne rouge (+) de votre enceinte
et le fil noir (–) provenant de la borne noire (–) de votre récepteur à la borne
noire (–) de votre enceinte. La polarité de la plupart des câbles à deux
conducteurs est codée (couleur, nervure ou écriture) pour faciliter son
identification. Si votre subwoofer ne semble pas générer assez de graves,
il est probable que la polarité d’un des câbles de haut-parleur soit inversée.
Assurez-vous que la polarité de tous les conducteurs est respectée.
Retirez 12 mm (1/2 po) d’isolation de chaque conducteur aux deux bouts
du câble pour exposer les brins métalliques. Tordez les brins de chaque
conducteur pour former deux torons non éraillés.
•Raccordezlessortieshaut-parleurgaucheetdroitedevotrerécepteur
aux entrées «speaker level» (niveau h.-p.) de votre subwoofer avec du
câble de haut-parleur.
•Raccordezensuitelesenceintesavantgaucheetdroiteaux
sorties «speaker level» (niveau h.-p.) du subwoofer avec du
câble de haut-parleur.
•Raccordezl’enceinteducanalcentraldirectementàlasortie
du canal central (center channel) de votre récepteur.
•Raccordezlesenceintessatellitesarrière-ambiophoniques
directement aux sorties des canaux arrière ou ambiphoniques
(rear—surround) de votre récepteur.
Réglage du récepteur:
Enceintes avant = «LARGE»
Subwoofer = «OFF» ou «ON»
Enceintes centrale et ambiophoniques = «SMALL»
Fréquence de séparation = 120 Hz
5.1 7.1
Canal Central
Câble de RCA
Sub-out Receiver
Central
LOW PASS
VOLUME
(Hz)
LINE IN
MINMAX
RL
PHASE
0° 180°
POWER
ON
100
RL
Avant Surround
SPEAKER LEVEL
SPEAKER LEVEL
OUTPUT
INPUT
+
RL
LEFT
–
–
RIGHT
+
OFF
16080
Subwoofer
+
LEFT
–
–
RIGHT
+
Câble de RCA
Sub-out Receiver
Central
Canal Central
RL
RL RL
Avant Surround Surround Arriére
SPEAKER LEVEL
SPEAKER LEVEL
OUTPUT
+
RL
LEFT
–
–
RIGHT
+
OFF
Subwoofer
INPUT
LOW PASS
VOLUME
LINE IN
PHASE
0° 180°
POWER
ON
100
(Hz)
16080
MINMAX
+
LEFT
–
–
RIGHT
+
12 Polk Customer Service 1-800-377-7655 (Outside US: 410-358-3600 Monday-Friday, 9:00 AM-5:30 PM Eastern Time polkcs@polkaudio.com
Page 12

Réglage de votre Systéme
Réglage du Subwoofer
Votre subwoofer vous offre plusieurs options de réglage. Nous vous
recommandons le réglage suivant comme point de départ mais le réglage
idéal dépend de vos composants électroniques, de l’emplacement de vos
enceintes et de vos préférences personnelles. Après vous être familiarisé
avec les divers réglages et leurs effets, essayez différentes combinaisons
jusqu’à ce que vous obteniez l’équilibre acoustique qui vous satisfait.
Vous trouverez un article informatif sur le réglage et le emplacement des
subwoofers («Subwoofer Positioning and Adjustment») dans la section
«set up» du site suivant: http://www.polkaudio.com/polk-university/articles/
bass-management-and-subwoofer-connections.
Note: Lorsque vous installez votre subwoofer pour la première fois, il est
normal d’essayer plusieurs réglages avant d’obtenir le son qui vous satisfait.
Commencez avec le volume à 50%.
Branchement au Secteur ca et Circuit «Auto On/Off»
Votre subwoofer est doté d’un circuit de mise sous-hors tension «auto
on/off» automatique identifié par «auto» sur l’interrupteur. Il met votre
subwoofer sous tension lorsqu’il détecte la présence d’un signal audio
et le met hors tension après 15 minutes d’absence de signal. La position
«auto» est recommandée lorsque votre subwoofer est branché en
permanence dans une prise de courant active.
Si vous désirez éviter le court délai qui peut parfois se produire entre
le début de la musique et la mise sous tension du subwoofer, laissez
tout simplement le subwoofer à la position «ON». Il est recommandé
de débrancher votre subwoofer du secteur lors de périodes de nonutilisation prolongées (comme des vacances).
SPEAKER LEVEL
OUTPUT
LOW PASS
(Hz)
VOLUME
LINE IN
PHASE
0° 180°
POWER
ON
100
MINMAX
+
RL
LEFT
–
–
RIGHT
+
OFF
16080
Panneau Arriére Amplificateur
Réglage du commutateu:
On (marche) = DEL verte
Off (arrêt) = DEL rouge (pas de signal)
Auto
Pas de signal = DEL rouge
Signal = DEL verte
SPEAKER LEVEL
INPUT
LEFT
RIGHT
+
–
–
+
Réglage Précis de votre Subwoofer
•Volume—Réglez le volume du subwoofer à l’oreille en écoutant une
variété de CD et de sources vidéo. Recherchez des graves puissants
et profonds mais sans résonance indue ou grondement excessif.
•«Low Pass» (passe-bas)
—Ce contrôle doit être réglé au maximum
lorsque le subwoofer est raccordé selon l’option #1 «LINE IN»). Ce
contrôle détermine la gamme de fréquences reproduite par le sub woofer. Si les voix masculines semblent trop «minces», montez ce
contrôle jusqu’à ce le son des voix soit naturel et chaleureux mais
sans résonance indue. Si le son des voix masculines semble trop
«gras» ou «pâteux» baissez ce contrôle jusqu’à ce que le son
soit naturel et bien équilibré.
•Commutateur de phase—Asseyez-vous à votre position d’écoute
préférée. Faites jouer de la musique (pas un film) contenant une ligne
de basse rythmique continue, comme du jazz ou du «country.» Écoutez
attentivement et tentez de déterminer à quelle fréquence les graves
du subwoofer s’entrecroisent avec les graves de vos enceintes
principales. C’est le point de croisement des fréquences—qui devrait
toujours être sous les fréquences inférieures d’une voix masculine.
Réglez le commutateur de phase à la position qui donne le meilleur
équilibre entre le subwoofer et les enceintes principales. En certains
cas il n’y aura presque pas de différence entre les deux positions.
Guide de Dépannage
Le subwoofer n’émet
aucun son
Le subwoofer émet
un son médiocre
Si le raccord est «Sub Out» à «LINE IN,» votre récepteur
est-il réglé à «subwoofer—oui» («Subwoofer—yes»)?
Si le raccord est par câbles de h.-p., assurez-vous
que la polarité est respectée.
Si le raccord est «Sub Out» à «LINE IN», votre récepteur
est-il réglé à «subwoofer—oui» («Subwoofer—yes»)?
Si le raccord est par câbles de h.-p., assurez-vous
que la polarité est respectée.
Service ou Assistance Technique
Si, après avoir suivi toutes les instructions, vous éprouvez toujours des
difficultés, vérifiez de nouveau tous les raccords et connexions. Si vous
en concluez que le problème est relié à l’enceinte, communiquez avec
votre revendeur Polk ou contactez le Service à la Clientèle de Polk au
1-800-377-7655 (Canada ou É.-U. seulement), du lundi au vendredi,
de 9h00 à 17h30, HNE. À l’extérieur des É.U. et du Canada,
composez le: 410-358-3600.
Le subwoofer
ne s’allume pas
Vérifiez la prise de courant. Débranchez le subwoofer
et vérifiez son fusible.
For more information visit our website at www.polkaudio.com 13
Page 13

Garantie Limitée
La garantie de Polk Audio, Inc., n’est valide que pour l’acheteur au
détail original. La garantie sera automatiquement annulée avant sa date
d’expiration spécifiée si l’acheteur original vend ou transfère le produit
à tout autre parti.
Polk Audio, Inc., garantit - à l’acheteur au détail original seulement - que
le ou les HAUTPARLEUR(S), COMPOSANTE(S) DE FILTRE PASSIF et
CAISSON(S) de ce produit Polk Audio seront exempts de tout défaut
attribuable aux pièces d’origine et à la main d’oeuvre pour une période de
cinq (5) ans à partir de la date de l’achat au détail original chez un revendeur
agréé Polk Audio.
En outre, Polk Audio, Inc., garantit - à l’acheteur au détail original
seulement - que TOUT AMPLIFICATEUR OU TOUT AUTRE COMPOSANTE
ÉLECTRONIQUE qui pourrait faire partie ce produit Polk Audio sera exempt
de tout défaut attribuable aux pièces d’origine et à la main d’oeuvre pour une
période de trois (3) ans à partir de la date de l’achat au détail original chez un
revendeur agréé Polk Audio.
Pour permettre à Polk Audio de vous offrir le meilleur service de garantie
possible, veuillez enregistrer votre nouveau produit en ligne à l’adresse web:
www.polkaudio.com/registration - ou contactez le Service à la Clientèle
de Polk au 800-377-7655 aux États-Unis et au Canada (à l’extérieur des
É.U.:410-358-3600) dans les dix (10) jours suivant la date de l’achat original.
Assurezvous de conserver votre reçu d’achat original.
Les produits défectueux doivent être expédiés, avec une preuve d’achat,
francs de port et assurés, au revendeur agréé Polk Audio de qui vous avez
acheté le produit, ou à l’usine Polk Audio,1 Viper Way Vista, CA 92081.
Les produits doivent être expédiés dans leur carton d’expédition original
ou dans un contenant équivalent. Le propriétaire doit assumer tout risque
de perte ou de dommage en transit.Si, suite à l’examen du produit à
l’usine Polk ou chez le marchand agréé Polk Audio, il est déterminé que la
défectuosité est imputable aux matériaux d’origine ou à la main d’oeuvre au
cours de la période de la garantie spécifiée, Polk Audio ou le revendeur Polk
Audio, à sa guise, réparera ou remplacera le produit sans frais additionnels et
selon les conditions décrites ci-dessous.
Toute pièce ou produit remplacé devient la propriété de Polk Audio. Les
produits réparés ou remplacés sous la garantie vous seront expédiés francs
de port dans un délai raisonnable.
Cette garantie n’inclut pas le service ou les pièces nécessaires à la réparation
des dommages provoqués par accident, désastre, abus, négligence, mode
d’expédition ou emballage inadéquat, utilisation commerciale, tensions
supérieures au maximum prescrit pour l’unité, aspect visuel du meuble non
directement attribuable à un défaut de pièces d’origine ou de main d’oeuvre,
ou par le service, la réparation, ou toute modification du produit qui n’a pas
été autorisé ou approuvé par Polk Audio. Cette garantie sera annulée si le
numéro de série sur le produit a été enlevé, altéré ou falsifié.
Cette garantie prend préséance sur toutes autres garanties énoncées. Si la
défectuosité de ce produit est imputable aux pièces d’origine ou à la main
d’oeuvre selon les conditions de la garantie exprimées ci-dessus, votre
seul recourt sera la réparation ou le remplacement selon les conditions
décrites ci-dessus. Dans aucun cas Polk Audio, Inc. pourra-t-elle être tenue
responsable pour tout dommage accessoire ou indirect causé par l’utilisation
ou par l’incapacité d’utilisation du produit, même si Polk Audio, Inc. ou un
revendeur agréé Polk Audio, a été avisé de la possibilité de tel dommage,
ou pour toute réclamation par tout autre parti.
Certains états ne permettant pas l’exclusion ou la limitation des dommages
indirects, les limitations et exclusions exprimées ci-dessus pourraient
ne pas s’appliquer dans votre cas.
Toutes les garanties tacites sur ce produit sont limitées à la durée de la
garantie énoncée. Certains états ne permettant pas la limitation de la durée
d’une garantie tacite, les limitations ci-dessus pourraient ne pas s’applquer
dans votre cas. Cette garantie vous accorde des droits légaux spécifiques;
vous pourriez également avoir d’autres droits qui pourraient varier d’état
en état.
Cette garantie s’applique seulement aux produits achetés au Canada,
aux États-Unis d’Amérique et ses possessions, et dans les clubs audio
et d’échange des forces armées des É.U. et de l’OTAN. Les modalités
et les conditions de garantie applicables aux produits achetés dans
d’autres pays sont disponibles chez les distributeurs agréés Polk Audio
établis dans ces pays.
14 Polk Customer Service 1-800-377-7655 (Outside US: 410-358-3600 Monday-Friday, 9:00 AM-5:30 PM Eastern Time polkcs@polkaudio.com
Page 14

Español
Instrucciones Importantes de Seguridad
Este producto ha sido diseñado y fabricado para satisfacer estrictas normas
de calidad y seguridad. Sin embargo, hay ciertas precauciones de operación
e instalación que usted debe tener en cuenta en particular.
1. Lea las instrucciones. Todas las instrucciones de seguridad y operación
deben leerse antes de operar el sistema.
2. Guarde las instrucciones. Las instrucciones de seguridad y operación
deben guardarse para poder consultarlas en el futuro.
3. Respete las advertencias. Todas las advertencias escritas en los aparatos
y en las instrucciones de operación deben respetarse.
4. Siga las instrucciones. Todas las instrucciones de operación y uso deben seguirse.
5. Limpieza. Antes de limpiar el aparato, desenchúfelo del tomacorriente. No use
limpiadores líquidos ni en aerosol. Limpie el producto con un paño húmedo.
6. Agregados. No utilice agregados que el fabricante del producto no haya
recomendado, porque pueden causar peligros.
7. Agua y humedad. No use el aparato cerca del agua; por ejemplo, cerca
de una bañera, lavabo, fregadero de cocina o lavandería, en un subterráneo
húmedo, ni cerca de una piscina o lugares similares.
8. Accesorios. No coloque el aparato en carritos, pedestales, trípodes, soportes
o mesas inestables. El producto de audio/video puede caerse y causar lesiones
graves a niños o adultos y daños graves al producto. Use el aparato solamente
con el carrito, pedestal, trípode, soporte o mesa recomendado por el fabricante
o vendido con el aparato. Todo montaje del aparato se debe hacer siguiendo
las instrucciones del fabricante y con los accesorios de montaje recomendados
por el fabricante.
9. Ventilación. Las ranuras y aberturas de la caja son para ventilar el aparato,
asegurar su funcionamiento confiable y evitar que se sobrecaliente; por lo tanto,
no se deben ni bloquear ni cubrir. Las aberturas no se deben bloquear nunca
poniendo el aparato en una cama, un sofá, una alfombra u otra superficie similar.
Este producto no se debe colocar nunca sobre un radiador o una rejilla de calefacción. Este producto no se debe instalar en una estructura empotrada, tal como
una estantería o un librero, a menos que se le dé ventilación apropiada
o se respeten las instrucciones del fabricante.
10. Fuentes de alimentación. Este producto debe funcionar conectado exclusivamente
a una fuente de alimentación del tipo indicado en sus etiquetas. Si no está seguro
del tipo de fuente de alimentación de su casa, consulte al distribuidor de aparatos
o a la compañía local de electricidad.
11. (Sólo América del Norte) Conexión a tierra o polarización. Este producto viene equipado con enchufes de línea de alimentación de corriente alterna polarizados (una
pata más ancha que la otra). Como medida de seguridad, este enchufe entra en el
tomacorriente de una manera solamente. Si no puede insertar completamente el
enchufe, déle vuelta. Si aun así no entra, consulte a un electricista para que cambie
el tomacorriente obsoleto. No anule la seguridad implícita en el enchufe polarizado.
12. Protección del cordón de alimentación. Encamine el cordón de alimentación de
manera que sea poco probable que sea pisado o aplastado por objetos que se le
coloquen encima o se le apoyen, en particular cerca del enchufe, cerca del tomacorriente y en el punto en que el cordón sale del aparato.
13. Rayos. Para aumentar la protección de este producto de audio/video durante una
tormenta eléctrica, o cuando se deje solo o no se use durante largos períodos de
tiempo, desenchúfelo del tomacorriente y desconecte la antena o el sistema de
cable. Esto evitará daños al producto causados por rayos o subidas de voltaje.
14. Líneas de alta tensión. El sistema de antena exterior no debe colocarse cerca de
líneas de alta tensión suspendidas u otros circuitos de alimentación o luz eléctrica,
ni donde al caer pueda hacer contacto con tales líneas o circuitos de alimentación.
Cuando instale un sistema de antena externa, debe tener sumo cuidado de evitar
tocar tales circuitos o líneas de alta tensión, pues tal contacto puede ser mortal.
15. Sobrecarga. No sobrecargue los tomacorrientes ni las extensiones, pues esto
puede dar como resultado un peligro de incendio o descarga eléctrica.
16. Entrada de objetos y líquidos. Nunca meta objetos de ningún tipo en este
producto a través de las aberturas, pues pueden hacer contacto con puntos
de voltajes peligrosos o hacer cortocircuitos que podrían causar un incendio
o una descarga eléctrica. Nunca derrame líquidos de ningún tipo sobre
este producto de audio/video.
17. Servicio. No intente hacerle servicio a este producto usted mismo, pues
abrirlo o quitarle las cubiertas puede exponerlo a usted a voltajes peligrosos
u otros peligros. Encargue todo servicio al personal de servicio calificado.
18. Daños que requieren servicio. Desenchufe el producto y encargue
el servicio al personal de servicio calificado cuando:
a. Se haya dañado el enchufe o el cordón de alimentación.
b. Hayan caído líquidos u objetos dentro del aparato.
c. El producto haya sido expuesto a la lluvia o a la humedad.
d. El producto haya dejado de funcionar normalmente a pesar de que se
hayan seguido las instrucciones. Ajuste sólo los controles mencionados
en las instrucciones de operación, pues ajustar incorrectamente otros
controles puede causar daños y, a menudo, restablecer el funcionamiento
normal del producto requerirá un extenso trabajo técnico calificado.
e. El producto se haya dejado caer o la caja haya sido dañada.
f. El producto manifieste un cambio notable de rendimiento;
esto indica la necesidad de servicio.
19. Piezas de repuesto. Cuando se requieran piezas de repuesto, asegúrese de que
el técnico de servicio haya utilizado las piezas de repuesto especificadas por el
fabricante o que las piezas tengan las mismas características que la pieza original.
Las sustituciones no autorizadas pueden dar como resultado un incendio, una
descarga eléctrica u otros peligros.
20. Revisión de seguridad. Al terminar cualquier servicio o reparación de este producto,
pídale al técnico de servicio que lleve a cabo verificaciones de seguridad para
determinar que el producto esté en buenas condiciones de funcionamiento.
21. Carritos y pedestales. El aparato se debe utilizar solamente con
el carrito o pedestal recomendado por el fabricante. Las combinaciones de aparato y carrito deben moverse cuidadosamente. Parar
repentinamente, ejercer demasiada fuerza y pasar por superficies
desniveladas puede hacer que la combinación de aparato y carrito
se vuelque. Tenga cuidado cuando mueva la combinación de aparato
y carrito para evitar lesiones causadas por volcamiento.
22. Este producto no es para usar al aire libre.
Límites de Seguridad de Funcionamiento
Polk especifica el intervalo de amplificación recomendado para cada uno de sus altavoces pasivos (sin amplificación). Por lo general, la especificación se presenta en forma
de intervalo de potencia, tal como 20 a 200 W (por canal). Es importante entender lo
que estos números significan cuando se escoge un receptor o un amplificador para
los altavoces Polk. El número inferior indica la potencia nominal continua mínima que
produce fidelidad aceptable en un ambiente normal de audición. El número superior
indica la potencia máxima por canal que se puede aplicar a los altavoces Polk. Estos
números no se deben confundir con la especificación de “procesamiento de potencia”
ni implican que el altavoz puede procesar con seguridad esa potencia total durante
un largo período de tiempo. Especificamos una amplia gama de valores nominales
de potencia porque los fabricantes de dispositivos electrónicos calculan la potencia
nominal de diferentes maneras. De hecho, los amplificadores de alta calidad con
baja potencia nominal suenan mejor y más fuerte que las unidades de baja calidad
con alta potencia nominal.
De manera similar, recomendamos amplificadores y receptores con valores de potencia
nominal por encima de los límites de procesamiento de potencia de nuestros altavoces,
dado que disponer de potencia adicional para máximos de corta duración produce
mejor calidad de sonido, máxima gama dinámica y salida de alto volumen sin esfuerzo.
No obstante, recomendamos enfáticamente no escuchar música todos los días
a la potencia máxima del amplificador o receptor.
Los altavoces se pueden dañar cuando el amplificador, independientemente de su potencia en vatios, funciona a niveles de audición mayores de los que su potencia puede
producir claramente. El funcionamiento a este nivel puede dar como resultado alta distorsión audible originada en el amplificador, que puede agregar un sonido discordante
y arenoso al material de audición. Si oye distorsión, baje el volumen o arriésguese a
dañar los altavoces. Cualquier altavoz se puede dañar, independientemente de su
potencia nominal, si el amplificador se hace funcionar más allá del punto de distorsión.
Eliminación del Producto
Es posible que haya leyes y/o reglamentos internacionales, nacionales y/o locales sobre la eliminación de este producto. Para obtener
información más detallada, comuníquese con el distribuidor a quien le
compró este producto de Polk o al importador o distribuidor en su país.
Puede obtener una lista de importadores y distri-buidores de Polk en el
sitio Web de Polk, www.polkaudio.com, o comuni-cándose con Polk:
5601 Metro Drive, Baltimore, Maryland 21215, USA. Teléfono:
+1 410 358-3600.
For more information visit our website at www.polkaudio.com 15
Page 15

Colocación del Subwoofer en una Sala
Su subwoofer de la serie PSW no tiene blindaje magnético. No lo coloque
cerca de monitores de video (el magnetismo no afecta a las pantallas de
televisión de LCD, DLP y plasma). Deje por lo menos 45 cm (18 plg.) de
separación entre el subwoofer y todo televisor pero, si nota distorsión o
decoloración del video, aleje inmediatamente el subwoofer del televisor.
SUB
18" - 24"
(46 cm - 61 cm)
TV
Sugerencias para la Ubicación de Altavoces
Sugerencias para la ubicación de altavoces con opciones para
la ubicación de los altavoces traseros. El subwoofer debe colocarse
a más de seis pulgadas de la pared en cualquier lugar de la sala.
Nota: Se pueden comprar altavoces satélite adicionales para
sistemas surround 6.1, 7.1 ó 9.2 llamando al Servicio al cliente
de Polk, cuyo número es 1-800-377-7655.
5.1
Canal
Central
Sub
Su subwoofer de la serie PSW ofrece muchas opciones de colocación:
en un centro de entretenimiento, detrás de un mueble o al lado de un
sofá o sillón. Usted puede colocar el subwoofer en cualquier lugar de la sala,
pero disfrutará del mejor rendimiento posible cuando esté en el mismo lado
de la sala que su sistema de altavoces frontales. Poner el subwoofer cerca
de la pared o en una esquina le aumenta el volumen. Cuando coloque el
subwoofer en una sala, póngalo siempre sobre la base, con las patas hacia
abajo. Si puede evitarlo, no coloque el subwoofer junto a una puerta abierta.
Recomendamos que ponga el subwoofer en diferentes lugares
de la sala para descubrir el que produce la mejor calidad de sonido
para su ambiente de audición.
Canal
Izquierdo
X
Surround Izquierdo
7.1
Canal
Izquierdo
X
Y
X=Y=Z
Canal
Cental
Y
Canal
Derecho
Z
Surround Derecho
Sub
Canal
Derecho
Z
Surround
Izquierdo
Surround Izquierdo Trasero
16 Polk Customer Service 1-800-377-7655 (Outside US: 410-358-3600 Monday-Friday, 9:00 AM-5:30 PM Eastern Time polkcs@polkaudio.com
Surround Derecho Trasero
Surround
Derecho
Page 16

Opciones de Cableado del Sistema
Importante: Aplique solamente una de las opciones.
No combine opciones de cableado.
Opción N° 1
Receptores con función de salida de subwoofer (SUB-OUT). Es el método
de conexión más común para receptores con Dolby® Digital.
Nota: Observe que una de las terminales en la parte posterior del altavoz
es roja (+) y la otra es negra (–). Conecte el cable de la terminal roja (+) del
receptor a la terminal roja (+) del altavoz, y el cable de la terminal negra (–)
del receptor a la terminal negra (–) del altavoz. El cable de altavoz tiene una
indicación (código de colores, nervadura, texto, etc.) en uno de los dos
conductores para facilitar la uniformidad de la instalación. Si el subwoofer
parece no producir muchos bajos, lo más probable es que uno de los
cables esté conectado al revés. Asegúrese bien de que todas las
conexiones tengan la polaridad correcta.
Nota: Conecte la salida de subwoofer a la entrada de línea izquierda (L) o
la entrada de línea derecha (R) (otra de las opciones es conectar la salida
de subwoofer a las dos entradas de línea (L y R) con un cable divisor en
Y). Después de hacer esta conexión de salida de subwoofer, gire el filtro de
pasabajas (Low Pass) al máximo en el sentido de las manecillas del reloj.
Conecte todos los altavoces directamente al receptor. Cuando aplique
el método N° 1, las configuraciones de altavoz del receptor deben ser
las siguientes: altavoces frontales, central y surround en la posición
SMALL (pequeño).
Configuraciones del receptor:
Altavoces frontales, central y surround: SMALL (pequeño).
Subwoofer: ON (encendido), YES (sí) o PRESENT (presente).
Fije la frecuencia de crossover del receptor en 120 Hz.
Consulte el manual del propietario del receptor para ver las
configuraciones de altavoz.
Recomendaciones de Cable
Trayectos Calibre
De hasta 25 pies 18 ó 16
Entre 25 y 50 pies 16 ó 14
Entre 50 y 75 pies 14 ó 12
Más de 75 pies 12
5.1 7.1
Canal Central
Central
Cable RCA
Salida de
Subwoofer
LOW PASS
VOLUME
(Hz)
LINE IN
MINMAX
Receptor
RL
Delantero
+
RL
LEFT
–
PHASE
0° 180°
–
RIGHT
POWER
+
ON
OFF
100
16080
Subwoofer
SPEAKER LEVEL
OUTPUT
RL
Surround
SPEAKER LEVEL
INPUT
LEFT
RIGHT
+
–
–
+
Central
Cable RCA
Salida de
Subwoofer
Canal Central
Receptor
RL
Delantero Surround Surround Tr asero
LINE IN
PHASE
0° 180°
POWER
ON
100
LOW PASS
(Hz)
VOLUME
MINMAX
SPEAKER LEVEL
+
RL
LEFT
–
–
RIGHT
+
OFF
16080
Subwoofer
OUTPUT
RL RL
SPEAKER LEVEL
INPUT
+
LEFT
–
–
RIGHT
+
For more information visit our website at www.polkaudio.com 17
Page 17

Opción N° 2
Receptor de dos canales o Dolby® Pro Logic sin función de salida
de subwoofer (SUB-OUT).
Si decide conectar a las entradas de altavoz del subwoofer, hágalo con
cables de altavoz de dos conductores de por lo menos calibre 16. Consulte
a su proveedor Polk para obtener recomendaciones sobre los cables.
Observe que una de las terminales en la parte posterior del altavoz es roja (+)
y la otra es negra (–). Conecte el cable de la terminal roja (+) del receptor a
la terminal roja (+) del altavoz, y el cable de la terminal negra (–) del receptor
a la terminal negra (–) del altavoz. El cable de altavoz tiene una indicación
(código de colores, nervadura, texto, etc.) en uno de los dos conductores
para facilitar la uniformidad de la instalación. Si el subwoofer parece no
producir muchos bajos, lo más probable es que uno de los cables esté
conectado al revés. Asegúrese bien de que todas las conexiones tengan
la polaridad correcta.
Quítele 12 mm (1/2 plg.) de aislamiento a los extremos de cada uno
de los cables para exponer el conductor. Retuerza el conductor expuesto
de cada cable para formar dos hebras sin hilachas.
•Concabledealtavoz,conectelassalidasdealtavozfrontales
izquierda y derecha de su receptor a las entradas de altavoz
del subwoofer alimentado.
•Luego,concabledealtavoz,conectelosaltavocesfrontalesizquierdo
y derecho a las salidas de altavoz del subwoofer alimentado.
•Conecteelaltavozdecanalcentraldirectamentealasalida
de altavoz central de su receptor.
•Conectelossatélitessurroundtraserosdirectamentealassalidas
de canales traseros o surround de su receptor.
Configuraciones del receptor:
Altavoces frontales: LARGE (grande)
Subwoofer: OFF (apagado) o ON
Altavoces surround: SMALL (pequeño)
Frecuencia de crossover: 120 Hz
5.1 7.1
Canal Central
Cable RCA
Central
Salida de
Subwoofer
LOW PASS
VOLUME
(Hz)
LINE IN
MINMAX
Receptor
RL
Delantero
+
RL
LEFT
–
PHASE
0° 180°
–
RIGHT
POWER
+
ON
OFF
100
16080
Subwoofer
SPEAKER LEVEL
OUTPUT
RL
Surround
SPEAKER LEVEL
INPUT
LEFT
RIGHT
+
–
–
+
Cable RCA
Central
Salida de
Subwoofer
Canal Central
Receptor
RL
RL RL
Delantero Surround Surround Trasero
SPEAKER LEVEL
SPEAKER LEVEL
OUTPUT
+
RL
LEFT
–
–
RIGHT
+
OFF
Subwoofer
INPUT
LOW PASS
VOLUME
LINE IN
PHASE
0° 180°
POWER
ON
100
(Hz)
16080
MINMAX
+
LEFT
–
–
RIGHT
+
18 Polk Customer Service 1-800-377-7655 (Outside US: 410-358-3600 Monday-Friday, 9:00 AM-5:30 PM Eastern Time polkcs@polkaudio.com
Page 18

Ajuste del Sistema
Ajustes del Subwoofer
Su subwoofer alimentado ofrece una variedad de opciones de configuración.
Recomendamos las siguientes configuraciones como puntos de partida,
pero las mejores configuraciones para usted dependen de la colocación de
sus altavoces, los componentes electrónicos y su gusto personal. Después
de familiarizarse con lo que producen las configuraciones, experimente con
opciones alternas a fin de encontrar la mejor configuración del sistema para
usted. Hay un artículo informativo sobre ajuste y colocación de subwoofers
en la sección de configuración del sitio Web http://www.polkaudio.com/
polk-university/articles/bass-management-and-subwoofer-connections.
Nota: Cuando configure su subwoofer por primera vez, es probable que
tenga que hacer ajustes varias veces hasta que oiga lo que personalmente le
gusta. Comience con el volumen a 50%.
Conexión de Alimentación de Corriente Alterna
y Apagado y Encendido Automático
Su subwoofer tiene circuitos de encendido y apagado automático,
marcados con la palabra AUTO en el interruptor de alimentación, que
encienden automáticamente el subwoofer cuando detectan la señal de
un programa. Recomendamos que ponga el interruptor en la posición
AUTO si el subwoofer recibe energía eléctrica continuamente (es decir,
si está conectado a un tomacorriente).
Cuando no hay señal, el circuito apaga el subwoofer después de 15
minutos. Si a usted le preocupa la breve demora entre el momento en
que comienza la música y el momento en que se enciende el subwoofer,
simplemente deje el subwoofer en la posición ON (encendido). Es
recomendable dejar el sistema desenchufado durante largos períodos de
tiempo en que no lo vaya a usar, como ocurre durante unas vacaciones.
Ajuste Preciso del Subwoofer
•Volumen—Ajuste de oído el volumen por medio de una extensa variedad
de discos compactos (CD) y fuentes de video. Ajuste para obtener bajos
profundos y potentes, sin “sonido retumbante.”
•Pasabajas—Nota: Este control se debe subir al máximo cuando el
subwoofer esté conectado según el método 1 (LINE IN {entrada de
línea}). Este control ajusta la gama de frecuencias en la cual funciona
el subwoofer. Si las voces masculinas suenan “finas,” suba este control
hasta que la voz suene fuerte sin retumbar. Si las voces masculinas
suenan demasiado “gruesas” o “graves,” baje este control hasta
que la voz suene natural.
•Conmutador de fase—Siéntese en su posición de audición favorita.
Toque música (no la banda de sonido de una película) con una línea
de bajos uniforme; recomendamos jazz o country. Esté atento al punto
en que el subwoofer hace la transición a los altavoces principales.
Éste es el punto de transición, y este punto debe estar por debajo
de la frecuencia de la voz masculina. Cualquiera que sea la fase que
produce el sonido más fuerte o más lleno en el punto de transición
es el ajuste óptimo. A veces no se oye ninguna diferencia.
LOW PASS
(Hz)
VOLUME
LINE IN
100
MINMAX
PHASE
0° 180°
POWER
ON
16080
RL
OFF
LEFT
RIGHT
+
–
–
+
SPEAKER LEVEL
OUTPUT
SPEAKER LEVEL
INPUT
LEFT
RIGHT
+
–
–
+
Panel trasero del amplificador
Configuraciones del interruptor de alimentación:
Encendido (On) = Indicador luminoso verde
Apagado (Off) = Indicador luminoso rojo (no hay señal)
Auto
No hay señal = Indicador luminoso rojo
Hay señal = Indicador luminoso verde
Servicio y Asistencia Técnica
Si tiene problemas después de seguir las instrucciones de cableado,
revise bien todas las conexiones de cables. Si determina que el problema
está en el altavoz, póngase en contacto con el proveedor autorizado de
Polk donde hizo su compra o llame al Departamento de Atención al Cliente
de Polk al teléfono 1-800-377-7655 (solamente llamadas dentro de EE.UU.
o Canadá). Fuera de EE.UU. y Canadá, llame al 410-358-3600 entre
las 9 a.m. y las 6 p.m., hora del este, de lunes a viernes.
Detección y Resolución de Atverías
No sale sonido del subwoofer Si el cableado es salida de subwoofer
(SUB OUT) a LINE IN, ¿tiene su receptor
la configuración “subwoofer—YES (sí)?”
Si el cableado es por cable de altavoz,
asegúrese de que la polaridad de los
cables sea correcta.
El subwoofer no suena bien Si el cableado es salida de subwoofer
(SUB OUT) a LINE IN, ¿tiene su receptor
la configuración de “subwoofer—YES (sí)?”
Si el cableado es por cable de altavoz,
asegúrese de que la polaridad de los
cables sea correcta.
El subwoofer no tiene alimentación Revise el enchufe; revise el fusible des-pués
de desenchufar el subwoofer y llamar al
servicio de atención al cliente.
For more information visit our website at www.polkaudio.com 19
Page 19

Polk Audio
5601 Metro Drive
Baltimore, Maryland 21215
(800) 377-7655
Polk Audio is a DEI Holdings, Inc. Company.
Polk is a trademark of Polk Audio, Inc.
HBP2796
 Loading...