

Page 1
PDC-800 Camera
Quick Start Guide
Page 2

Quick Start Guide
Polaroid PDC-800 Camera
Contents
Introduction 3
Using this guide 3
What you need 3
If you need help 3
Safety precautions 3
Familiarizing yourself with the camera controls 4
Setting up the camera 6
Taking pictures 7
Viewing pictures you have taken 9
Transferring pictures to your computer 10
Connecting the camera to your computer 10
Starting the PhotoStudio application 11
Downloading (copying) still pictures to your computer 11
Downloading still pictures and audio 14
Downloading continuous mode pictures 14
Enhancing pictures with PhotoStudio software 15
Importing pictures to other applications 15
Importing still picture files directly 15
Using the Windows clipboard for all picture types 16
Erasing pictures from the camera 16
Erasing pictures individually 17
Erasing all pictures at once 17
Picture storage capacity 18
PDC-800 Quick Start – Page 1
Page 3

Selecting and using memory cards 19
Purchasing memory cards 19
Memory card capacities 19
Inserting and removing memory cards 20
Initializing (formatting) memory cards 20
Changing the camera date and time 22
Selecting the image quality mode 22
Selecting the recording mode 23
Installing PhotoStudio software 24
Other camera features 24
Important operating tips 25
Extending battery life 25
Holding the camera 25
Taking still pictures in rapid sequence 25
Pausing at off when moving the camera main switch 25
Camera care and troubleshooting 25
PDC-800 Quick Start – Page 2
Page 4

Quick Start Guide
Polaroid PDC-800 Camera
Introduction
Using this guide
Use this guide to perform the basic tasks of taking pictures with your PDC800 camera and downloading (copying) them from the camera to your
computer with PhotoStudio software. For more detailed information about
the camera and PhotoStudio software, refer to the
Manual
and the
PhotoStudio User Manual
.
What you need
To perform the tasks in this guide, you need the following PDC-800
components:
PDC-800 Operation
PDC-800 camera
•
PDC-800 serial cable
•
Four AA batteries
•
AC adapter
•
•
PhotoStudio
PDC-800 LCD monitor (optional)
•
Memory card (optional)
•
setup diskettes
To use Polaroid PhotoStudio software for downloading and processing PDC800 pictures, you must also have a computer meeting these requirements:
IBM-compatible with 486 pro-
•
cessor (Pentium recommended)
4 MB of RAM (16 MB
•
recommended)
20 MB of available disk space
•
(40 MB recommended)
640x480 screen resolution (800x
•
600 recommended)
256-color display (true color, 16
•
or 24 bit, recommended)
Windows 3.1 or Windows 95
•
operating system
If you need help
For technical assistance, call toll-free from within the U.S.A.: 1-800-432-5355,
Monday through Friday, 8 a.m. to 8 p.m. (Eastern time).
Safety precautions
Before using the PDC-800 for the first time, review the safety precautions
recommended in the
PDC-800 Operation Manual
.
PDC-800 Quick Start – Page 3
Page 5
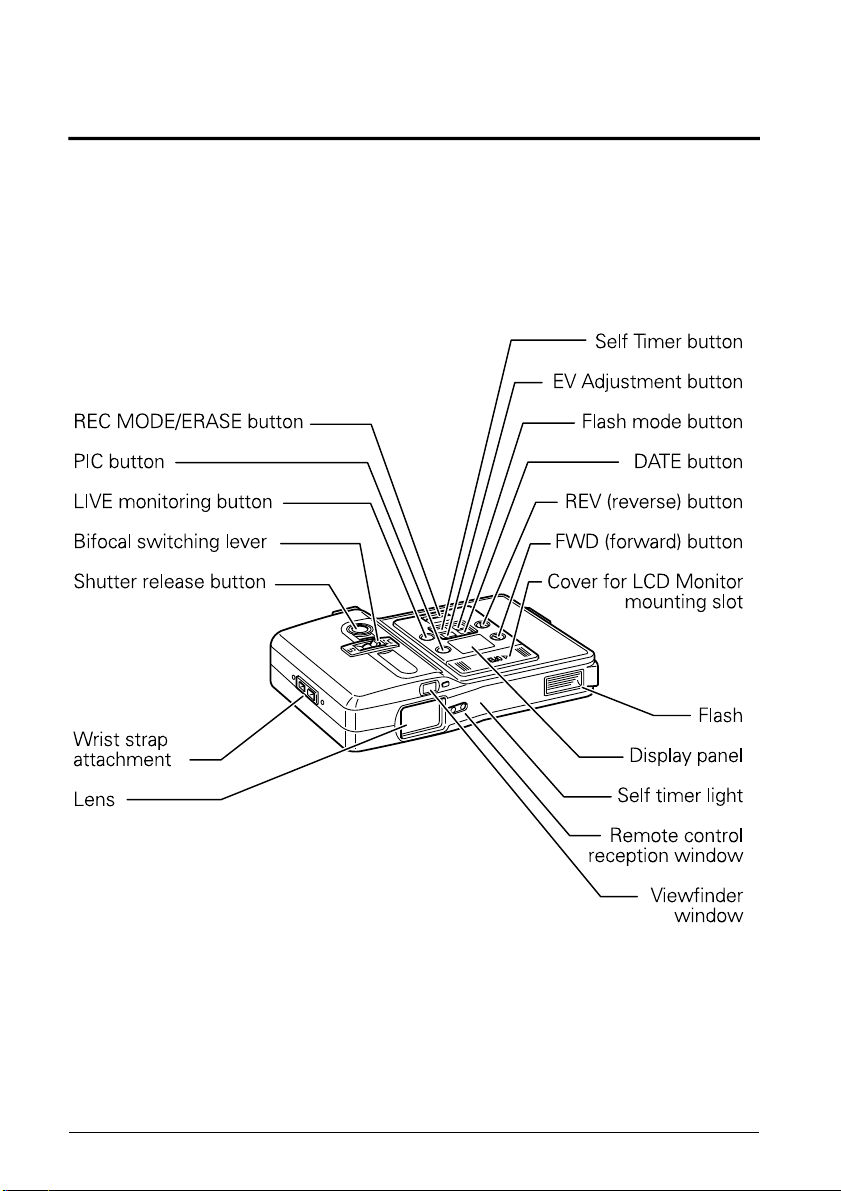
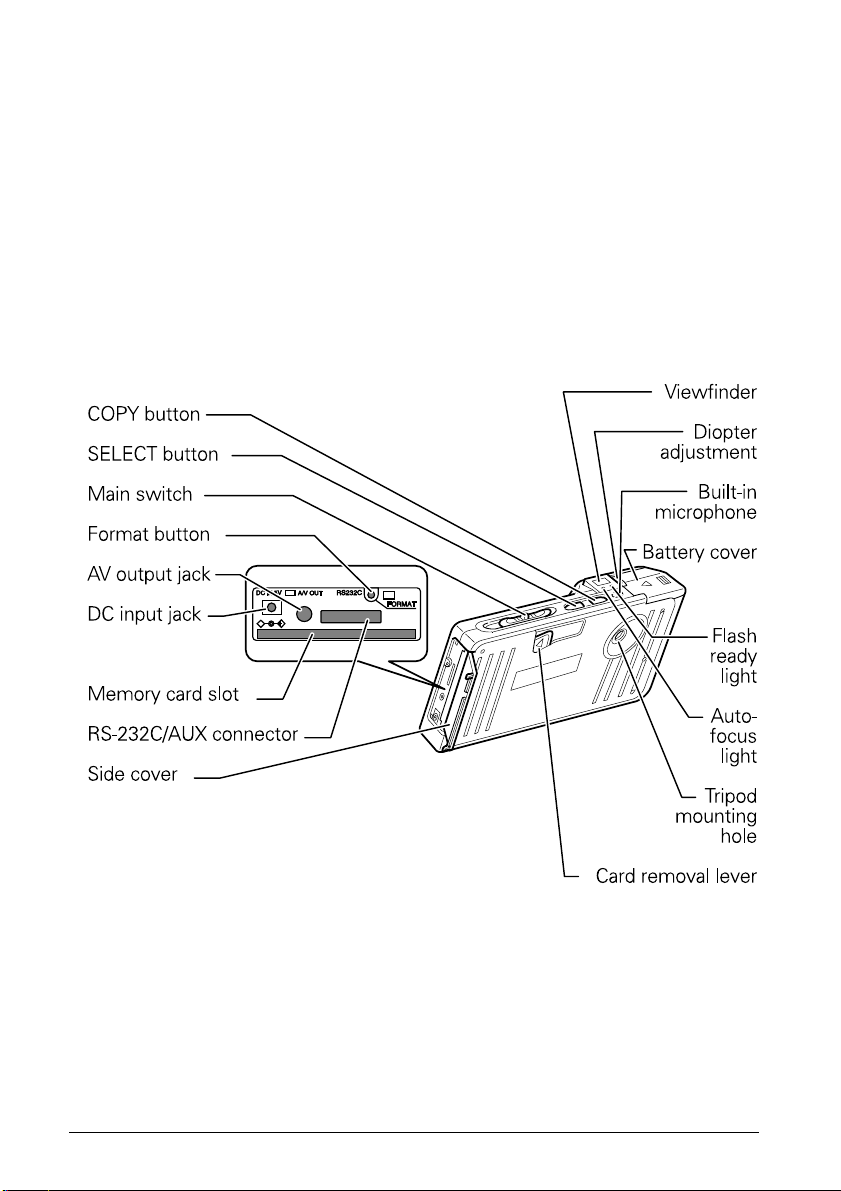
Familiarizing yourself with the camera controls
Before setting up or using the PDC-800 camera for the first time, review the
camera controls and connections shown below and on the next page.
PDC-800 Quick Start – Page 4
Page 6
+
PDC-800 Quick Start – Page 5
Page 7
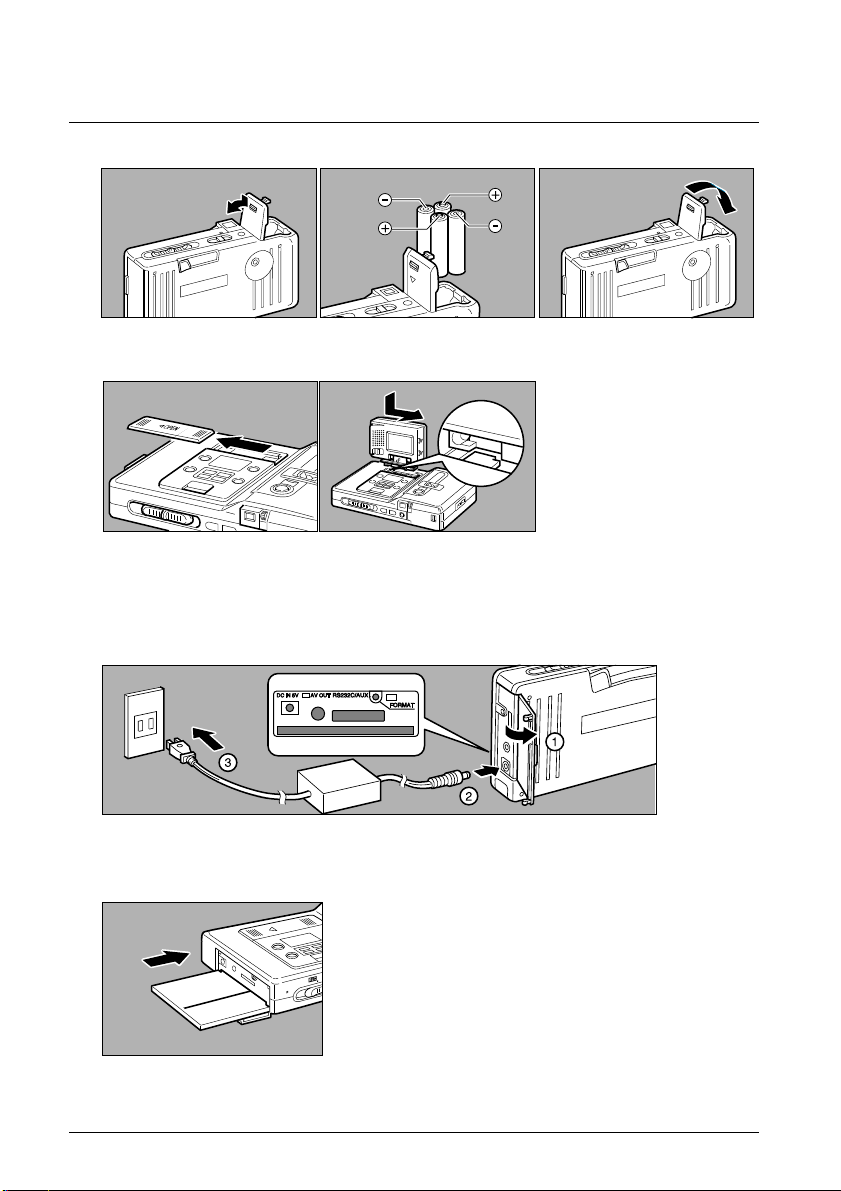
Setting up the camera
1 Insert four AA alkaline batteries.
2 If you are using the optional LCD monitor, attach it to the camera.
3 If you are using the optional AC adapter, connect it to the camera. The
adapter is highly recommended for conserving battery power during
picture viewing and downloading, especially with the optional LCD
monitor.
4 If you are using an optional memory card, insert it into the camera. A new
card may also require initialization (“formatting”), described on page 20.
5 Set the correct date and time on the camera, if necessary. (See page 22.)
PDC-800 Quick Start – Page 6
Page 8
Taking pictures
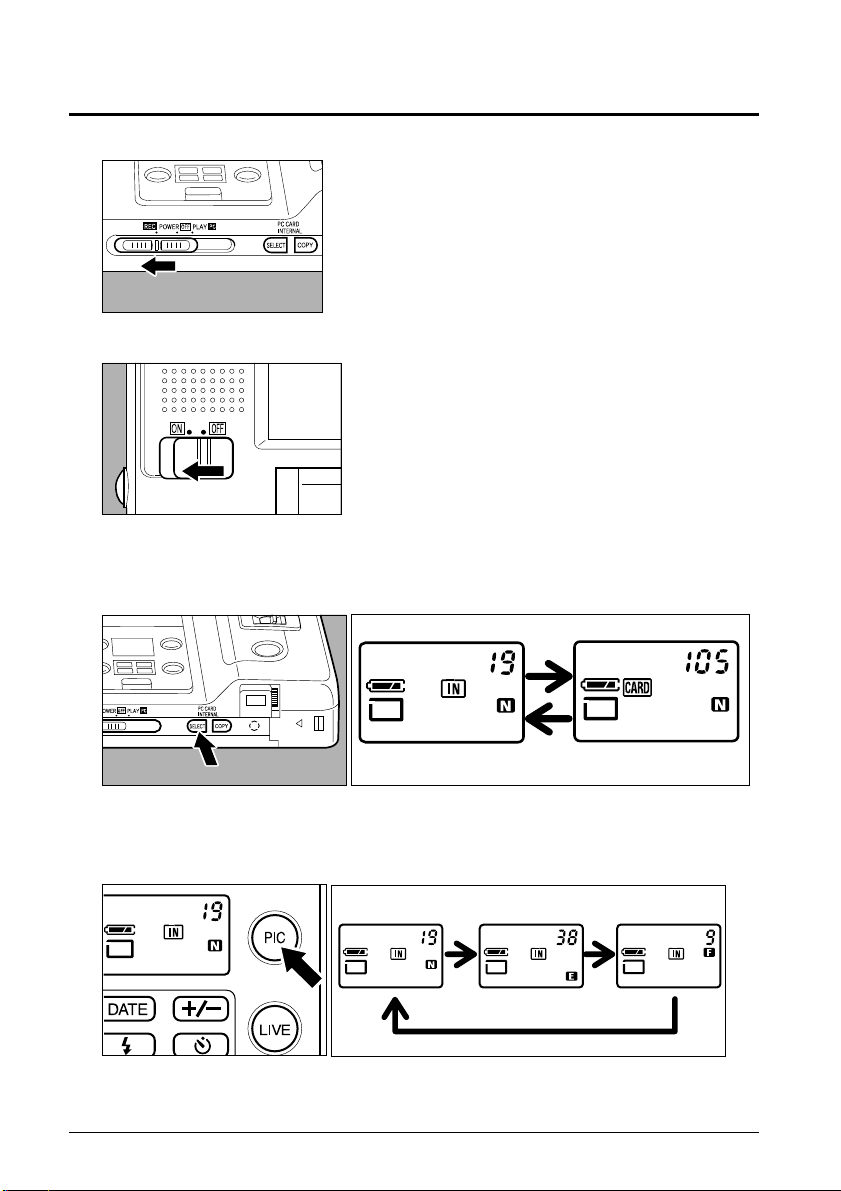
1 Slide the camera main switch to REC.
2 If you're using the optional LCD monitor, turn its power switch to ON.
3 Choose either internal memory or a memory card for picture storage by
pressing and holding the Select button until IN or CARD appears on the
display panel.
Memory card selectedInternal memory selected
4 Select the image quality mode by pressing the PIC button. For most
picture-taking, select N (normal) or F (fine). See page 22 for more details
about image quality choices.
NORMAL MODE ECONOMY MODE FINE MODE
PDC-800 Quick Start – Page 7
Page 9

5 Select the desired recording mode by pressing the REC MODE/ERASE
button until the desired recording mode symbol appears on the display
panel. For most pictures, use the Still Picture mode (
). See page 23 for
more information about recording modes.
Still Picture Mode
Still Picture
& Audio Mode
Audio ModeDocument Mode
Continuous
Mode
6 Hold the camera properly for picture taking. Do not block the lens or flash
with your fingers.
7 View the scene through the viewfinder (or press the LIVE button on the
camera to view the scene on the optional LCD monitor) and compose the
picture.
8 Select standard or wide-angle view by moving the Bifocal switching lever.
PDC-800 Quick Start – Page 8
Page 10

9 Press the shutter release button half-way to activate autofocus, then
continue pressing the shutter release button smoothly all the way down to
take the picture.
Note: When taking several pictures in rapid sequence while in the Still Picture
mode, wait at least 1 second between pictures to prevent recording errors.
Viewing pictures you have taken
You can use the following steps to view the pictures in the camera with
television or the optional LCD monitor. If possible, use the AC adapter while
viewing pictures to conserve battery power.
1 If you are using television, attach the camera to the television video-in and
audio-in connectors using the camera AV cable. Turn the television on. (If
necessary, refer to the television instructions for using the video-in
connector.)
2 Slide the camera main switch to PLAY. If you're using the optional LCD
monitor, also turn its power switch to ON.
PDC-800 Quick Start – Page 9
Page 11

3 Choose either internal memory or the memory card as the source by
Memory card selectedInternal memory selected
pressing and holding the Select button until IN or CARD appears on the
display panel.
4 Press the FWD or REV button to move forward or back through the
pictures.
Transferring pictures to your computer
Before using the procedures in this section for the first time, install the
PhotoStudio software on your computer as described on page 24.
Connecting the camera to your computer
1 Slide the camera main switch to POWER OFF.
PDC-800 Quick Start – Page 10
Page 12

2 Attach the serial cable provided to the RS-232C/AUX connector (a) on the
camera. Attach the other end of the cable (b) to a serial (COM) connector
on your computer.
3 Follow your computer instructions to set up the serial port associated with
the connector.
Starting the PhotoStudio application
1 Start your computer and wait for the Windows desktop to appear.
2 If you are using the Windows 95 operating system: Click the Start button,
point to Programs, point to PhotoStudio, and click PhotoStudio 2.0.
If you are using Windows 3.1 or Windows NT operating system: Double-
click the PhotoStudio program group, and double-click PhotoStudio 2.0.
3 Wait for the PhotoStudio application window to appear.
Downloading (copying) still pictures to your computer
1 If possible, use the AC adapter to conserve the battery power.
2 Slide the camera main switch to PLAY.
PDC-800 Quick Start – Page 11
Page 13

3 Click the File menu and select Download Polaroid Files to display the
Download Options box.
4 Select PDC-800 as Source. (Serial Port selection is automatic; you do not
need to edit it.)
5 Click Add to Album and choose New Album as the album name.
6 Choose an image format (J6i, JPG, BMP, or TIF) from the Save Images As
box. (BMP is the recommended format for applications running under the
Windows operating system. See the
information about file formats.)
7 Click OK to display the Download from Polaroid Camera box.
PhotoStudio User Manual
for more
8 To download all the pictures in the camera, click Select All.
To download some of the pictures, advance from one picture to the next
by clicking the >> or << button. When the number of a picture to be
downloaded appears or the picture appears on the LCD monitor, click the
Current Frame checkbox to select it. Continue advancing and selecting
until you select all the pictures you want to download.
PDC-800 Quick Start – Page 12
Page 14

9 Click OK to start downloading the pictures from the camera to the
computer. Each picture appears in an album frame after downloading.
10 Wait for a short audible tone from the camera, indicating that all the
selected pictures have been downloaded.
11 If you want, type a description of the album contents in the Description
box at the bottom of the Album window.
12 Click Save to display the Save New Album box.
13 Type a name for the album and click OK.
The pictures you downloaded are visible in the Album window, and a file
name appears below each picture. (The image files in the Polaroid sub-
folder of the Pstudio folder, on the drive with the PhotoStudio program
files.)
14 To edit (rotate, retouch, crop, etc.) or print one or more of the album
images with PhotoStudio software, go to
PhotoStudio software
To import the pictures to another application for editing, presentation or
printing, go to
).
Importing pictures to other applications
PDC-800 Quick Start – Page 13
Enhancing pictures with
on page 15.
Page 15

Downloading still pictures and audio
To download still pictures with audio (pictures taken in the Still Picture &
Audio mode) from the PDC-800 camera to the computer, use the steps in the
previous section. To keep the recorded sound with the file, however, you must
choose the J6i format for saving the files.
After saving the still pictures with audio in a PhotoStudio album, you can
import them into other applications as AVI files. See
other applications
on page 15.
Importing pictures to
Downloading continuous mode pictures
You cannot download (copy) continuous mode pictures directly from the
PDC-800 camera to your computer. You must first record or copy the pictures
onto a memory card. (If necessary, see the
copy pictures from the camera internal memory to a memory card.) Next,
remove the memory card from the PDC-800 camera and connect the card to a
PCMCIA adapter on your computer.
After connecting the memory card to your computer as described above, use
these steps to download the pictures from the card to your computer:
1 Start the PhotoStudio application.
2 Click the File menu and select Download Polaroid Files to display the
Download Options box.
PDC-800 Operation Manual
to
3 Select Disk Drive as Source.
4 Click Add to Album and choose New Album as the album name.
5 Choose J6i as the image format from the Save Images As box.
6 Click OK to display the Copy to Album box.
7 Select the drive letter representing the PCMCIA port to display all the files
on the memory card.
8 Select files by holding the Control key and clicking on the file names you
want to download.
9 Click Open to start downloading the pictures from the camera to the
computer. Each picture appears in an album frame after downloading.
10 Wait for a short audible tone from the camera, indicating that all the
selected pictures have been downloaded.
11 If you want, type a description of the album contents in the Description
box at the bottom of the Album window.
PDC-800 Quick Start – Page 14
Page 16

12 Click Save to display the Save New Album box.
13 Type a name for the album and click OK.
The pictures you downloaded are visible in the Album window, and a file
name appears below each picture. (The image files in the Polaroid sub-
folder of the Pstudio folder, on the drive with the PhotoStudio program
files.)
14 To import the pictures to another application, go to
other applications
on page 15.
Importing pictures to
Enhancing pictures with PhotoStudio software
After you download pictures from the PDC-800 camera and display them in a
PhotoStudio Album window as described in the previous section, you can use
PhotoStudio software to edit or print one or more of them.
To open an image file (picture) in the PhotoStudio application for editing or
printing, double-click on the picture in the Album window. After the picture
appears in its own PhotoStudio window, follow the instructions in the
PhotoStudio User Manual
to edit or print it.
Importing pictures to other applications
After downloading pictures from the camera to your computer, you have
several ways to import them to other applications for enhancement,
presentation or printing. Two effective methods are presented below, but you
can also refer to your Windows documentation or application instructions for
other techniques.
Importing still picture files directly
If you selected JPG, BMP or TIF file format when you downloaded the
pictures to your computer, you can import the pictures directly into most
graphics, presentation and word processing applications. (For files in the J6i
format, you must use the Windows clipboard as described below.)
For the picture-importing steps, refer to the instructions with your application.
You can identify a picture you want to import by the file name below it in the
PhotoStudio Album window. (You'll find the image files in the Polaroid subfolder of the Pstudio folder, on the drive with the PhotoStudio program files.)
PDC-800 Quick Start – Page 15
Page 17

Using the Windows clipboard for all picture types
Still pictures
Use the Windows clipboard to import still pictures to your application by
double-clicking on a picture in the PhotoStudio Album window. When the
picture appears in its own PhotoStudio window, click the Edit menu and
select Copy.
Next, open your graphics, presentation or word-processing application.
Follow the application instructions for pasting a picture from the Windows
clipboard into your current document. (For most applications, click the Edit
menu and select Paste.)
Still pictures with audio or continuous-mode pictures
If the picture to be imported was taken in the Still Picture & Audio mode or
in Continuous mode, double-click on the picture in the PhotoStudio Album
window to display the Playback Options box. Then choose Play Video, Save
Played AVI, a resolution and a color mode. Click OK to display the picture,
play the audio or continuous picture sequence, and save the picture and sound
as an AVI file.
Next, click anywhere in the AVI window with the right mouse button to
display a pop-up menu. Choose Copy from the pop-up menu to copy the
picture and sound to the Windows clipboard. Open your graphics,
presentation or word-processing application and follow the application
instructions for pasting the AVI file from the Windows clipboard into your
current document. (For most applications, click the Edit menu and select
Paste.)
Erasing pictures from the camera
After you download your pictures from the PDC-800 camera to your
computer, use one of the following procedures to erase the pictures from the
camera before you take more pictures. You can also use the individual picture
erasing procedure to erase an unsatisfactory picture immediately after you
take it.
PDC-800 Quick Start – Page 16
Page 18

Erasing pictures individually
1 Turn the camera main switch to PLAY.
2 Choose to erase pictures from either the internal memory or the memory
card by pressing and holding the Select button until IN or CARD appears
on the display panel.
3 Press the REC MODE/ERASE button to display Erase on the camera
display panel.
4 Press the FWD or REV button until the number of a picture to be erased
appears on the display panel or the picture appears on the LCD monitor,
then press the shutter release button to erase the picture.
5 Repeat step 4 as necessary to erase additional pictures.
6 Press REC MODE/ERASE to exit from Erase mode.
Erasing all pictures at once
1 Turn the camera main switch to PLAY.
2 Choose to erase pictures either from the internal memory or memory card
by pressing and holding the Select button until IN or CARD appears on
the display panel.
PDC-800 Quick Start – Page 17
Page 19

3 Open the side cover of the camera, and press the FORMAT button with a
ball-point pen until “Fo” appears on the display panel.
4 Press and hold the shutter release button until the camera emits a short
tone.
5 Wait until the counter display returns to “0,” indicating that all pictures
have been erased and the internal memory or the memory card has been
initialized.
Picture storage capacity
The number of pictures you can store in the PDC-800 internal memory
depends on the image quality mode and recording mode you use. For
example, a picture taken in the F (fine) quality mode and the Still Picture &
Audio recording mode requires more storage space than a picture taken in the
E (economy) quality mode and the Still Picture mode.
The following table shows how many pictures you can store in the PDC-800
internal memory at various image quality and recording modes.
Image quality
Fine Normal Economy
Still Picture mode
Still Picture & Audio mode
Continuous mode
Document mode
Audio mode
PDC-800 Quick Start – Page 18
9 pictures 19 pictures 38 pictures
71219
91938
91938
7 minutes 46 seconds
Page 20

You can increase PDC-800 storage capacity by using the optional memory
cards described in the following section.
Selecting and using memory cards
Optional, removable memory cards increase the PDC-800 picture storage
capacity. The amount of increased storage depends on the storage capacity of
each card and the number of cards you have.
Purchasing memory cards
You can purchase additional memory cards at many computer and electronic
stores. Memory cards used with the PDC-800 must be one of the following:
Flash memory cards conforming to ATA standard
•
Type I or II memory cards conforming to PCMCIA 2.1, JEIDA 4.2 standard,
•
with 40-megabyte maximum capacity and 300-nanosecond maximum write
cycle
Flash memory cards conforming to AIMS standard, with 40-megabyte
•
maximum capacity
Memory card capacities
Memory cards are available in various storage capacities. The table below
provides the picture storage capacities of typical memory cards.
4 MB memory card
Still Picture mode
Still Picture & Audio mode
Continuous mode
Document mode
Audio mode
10 MB memory card
Still Picture mode
Still Picture & Audio mode
Continuous mode
Document mode
Audio mode
PDC-800 Quick Start – Page 19
Image quality
Fine Normal Economy
18 pictures 38 pictures 76 pictures
14 24 38
18 38 76
18 38 76
15 minutes 30 seconds
Image quality
Fine Normal Economy
52 pictures 105 pictures 210 pictures
43 74 114
52 105 210
52 105 210
43 minutes 0 seconds
Page 21

20 MB memory card
Still Picture mode
Still Picture & Audio mode
Continuous mode
Document mode
Audio mode
Fine Normal Economy
105 pictures 211 pictures 422 pictures
87 149 230
105 211 422
105 211 422
Image quality
86 minutes 33 seconds
Inserting and removing memory cards
To insert a memory card, open the camera side cover. Make sure the top
surface of the card is facing upward, and insert the card into the camera in the
direction indicated on the card. Gently press the card into the slot until the
end of the card does not extend out of the slot.
To remove the memory card, open the camera side cover and slide the card
ejection lever as shown.
Initializing (formatting) memory cards
Before you can use a new memory card with the PDC-800, you must initialize
it according to the steps below. You should also initialize memory cards that
have been initialized for other devices or have been through more than 4000
record and playback cycles.
PDC-800 Quick Start – Page 20
Page 22

1 Insert the memory card into the camera as described above.
2 Turn the camera main switch to PLAY.
3 Press and hold the Select button until CARD appears on the display panel.
4 Open the side cover of the camera, and press the FORMAT button with a
ball-point pen until “Fo” appears on the display panel.
5 Press and hold the shutter release button until the camera emits a short
tone, indicating that initializing has started.
6 Wait until “0” appears on the counter display, indicating that the memory
card has been initialized.
PDC-800 Quick Start – Page 21
Page 23

Changing the camera date and time
1 Slide the camera main switch to REC.
2 Press and hold the DATE button until the year on the display panel starts
flashing.
3 Press the FWD or REV button to display the current year.
4 Press the DATE button again to start the month designation flashing, and
press the FWD or REV button to display the current month.
5 Continue pressing the DATE button, then changing the flashing value with
the FWD or REV button until you have set the day, hour and minute
correctly.
6 Press the DATE button to exit from the date and time adjustment mode
and start the clock.
Selecting the image quality mode
The PDC-800 offers three image quality modes: fine (F), normal (N), and
economy (E). The F (fine) and N (normal) image quality modes provide
excellent results when pictures are printed at normal size (3.75" x 5").
Use the E (economy) mode only when the pictures will be displayed on a
screen or printed at smaller sizes. When you do not require maximum image
quality, the E (economy) mode lets you store more pictures in the camera
internal memory or on an image card. (See page 18 and 19 for internal
memory and memory card capacities at various mode settings.) Pictures taken
in the E mode also download more quickly to your computer.
To change the image quality mode, slide the camera main switch to REC.
Then press the PIC button until F, N, or E appears on the display panel.
Note: You cannot change the image quality mode when a live image is visible
on the LCD monitor. Press the LIVE button to turn off the LCD display, press
the PIC button to choose the desired image quality, then press the LIVE
button again to display a live image.
PDC-800 Quick Start – Page 22
Page 24

Selecting the recording mode
The PDC-800 has five recording modes:
Display
Recording
mode
Still Picture
panel
symbol Description
Records one picture at a time.
Still Picture
& Audio
Continuous
Document
Audio
Because the most popular recording mode is Still Picture, most of the
instructions in this guide refer to that mode. See the
Manual
To choose the recording mode, slide the camera main switch to REC. Then
press the REC MODE/ERASE button until the symbol for the desired mode
appears on the display panel.
for information about the other recording modes.
Records one picture at a time, along with
approximately 10 seconds of audio from the
microphone built into the camera below the
viewfinder.
Records a sequence of pictures, at a rate of about one
picture per second, as long as the shutter release
button is held down.
Records one high-contrast picture at a time. Suitable
for photographing documents containing text and
line-drawings.
Records up to about 8 minutes of audio (from the
built-in microphone) on the camera internal memory.
Memory cards can also be used for longer recording
times.
PDC-800 Operation
Note: You cannot change the recording mode when a live image is visible on
the LCD monitor. Press the LIVE button to turn off the LCD display, press
the REC MODE/ERASE button to choose the desired mode, then press the
LIVE button again to display a live image.
PDC-800 Quick Start – Page 23
Page 25

Installing PhotoStudio software
Use these steps to install PhotoStudio software on your computer for
transferring pictures from the PDC-800 camera to your computer. (For
computer requirements, see
What you need
1 Start your computer and wait for the Windows desktop to appear.
on page 3.)
2 Insert the disketted labeled
into the floppy disk drive.
Setup
Windows 3.x and Windows 95/NT Disk 1 –
3 If you are using the Windows 95 operating system, click the Start button
and select Run.
If you are using Windows 3.1 or Windows NT operating sytem, click the
File menu and select Run.
4 Type a:\setup and click OK.
5 Follow instructions on the screen to complete the installation.
Other camera features
The PDC-800 camera has many capabilities not described in this quick start
guide. See the
PDC-800 Operation Manual
features:
Continuous mode recording
•
Document recording
•
Audio recording
•
No-flash and forced-flash pictures
•
Indicator lights
•
Focus lock
•
Live monitoring (with manual focus)
•
Self-timer
•
for more details about these
Copying images from internal
•
memory to a memory card
Exposure adjustment or
•
compensation (EV adjustment)
Macro (close-up) pictures
•
Auto power-off
•
Audible indicator (buzzer)
•
PDC-800 Quick Start – Page 24
Page 26

Important operating tips
Extending battery life
Four alkaline AA camera batteries may have a shorter life than the 300
pictures estimated in the
whenever possible to extend battery life. For greater economy, you can use
rechargeable NiCad or NiMH batteries in place of alkaline batteries.
PDC-800 Operation Manual
Holding the camera
When taking pictures, hold the camera as shown below.
fingers away from the lens and flash.
Taking still pictures in rapid sequence
When taking several pictures in rapid sequence while in the Still Picture mode,
wait at least 1 second between pictures to prevent recording errors.
Pausing at off when moving the camera main switch
When moving the camera main switch from REC to PLAY or from PLAY to
REC, pause briefly at the OFF position to avoid memory card reading errors.
. Use the AC adapter
Be sure to keep your
Camera care and troubleshooting
Refer to Chapter 5 of
handling, care and troubleshooting.
PDC-800 Operation Manual
PDC-800 Quick Start – Page 25
for detailed camera
 Loading...