

Page 1
Quickstart Card
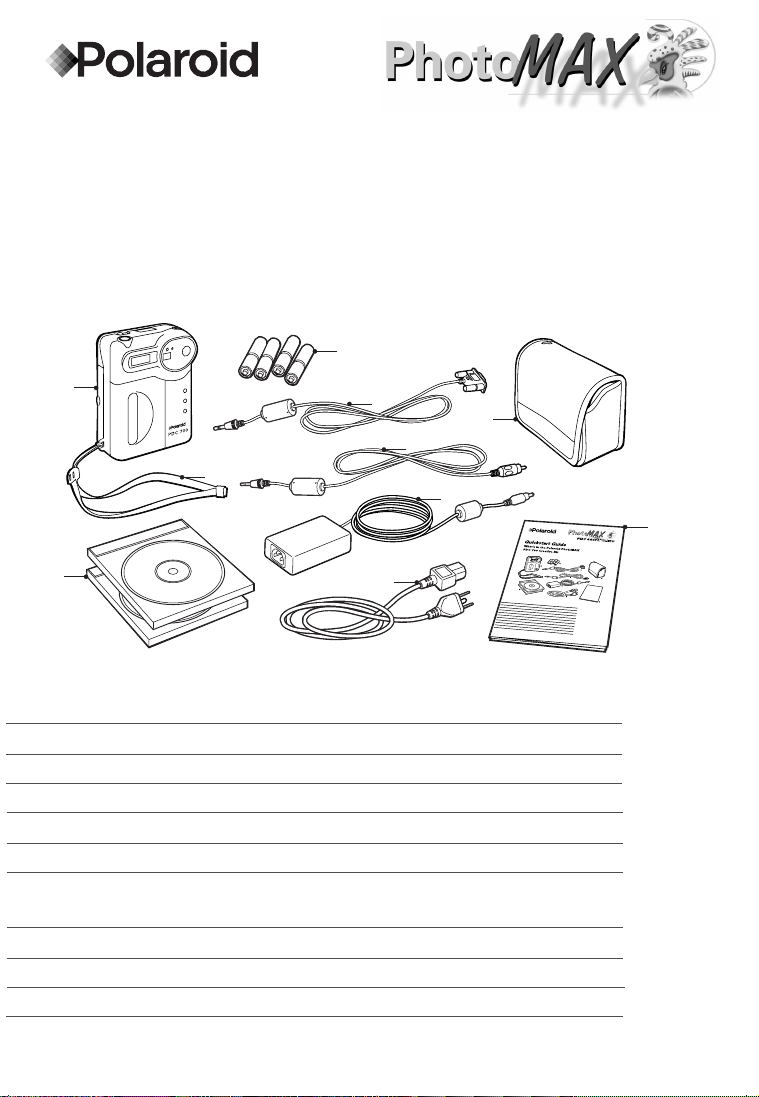
What’s in the Polaroid PhotoMAX PDC 700
Digital Camera Creative Kit?
a Polaroid PDC 700 Digital Camera
b Four AA batteries
c Camera-to-computer cable (RS-232C serial cable)
d Camera case
e Wrist strap
f Camera-to-TV cable (video cable)
g Polaroid PhotoMAX Image Maker Software CD-ROM
& Polaroid PhotoMAX Pro Software CD-ROM
h AC power adapter
i AC power adapter cord
j Polaroid PhotoMAX PDC 700 QuickStart Card
a
b
c
d
e
f
g
h
i
j
Page 2
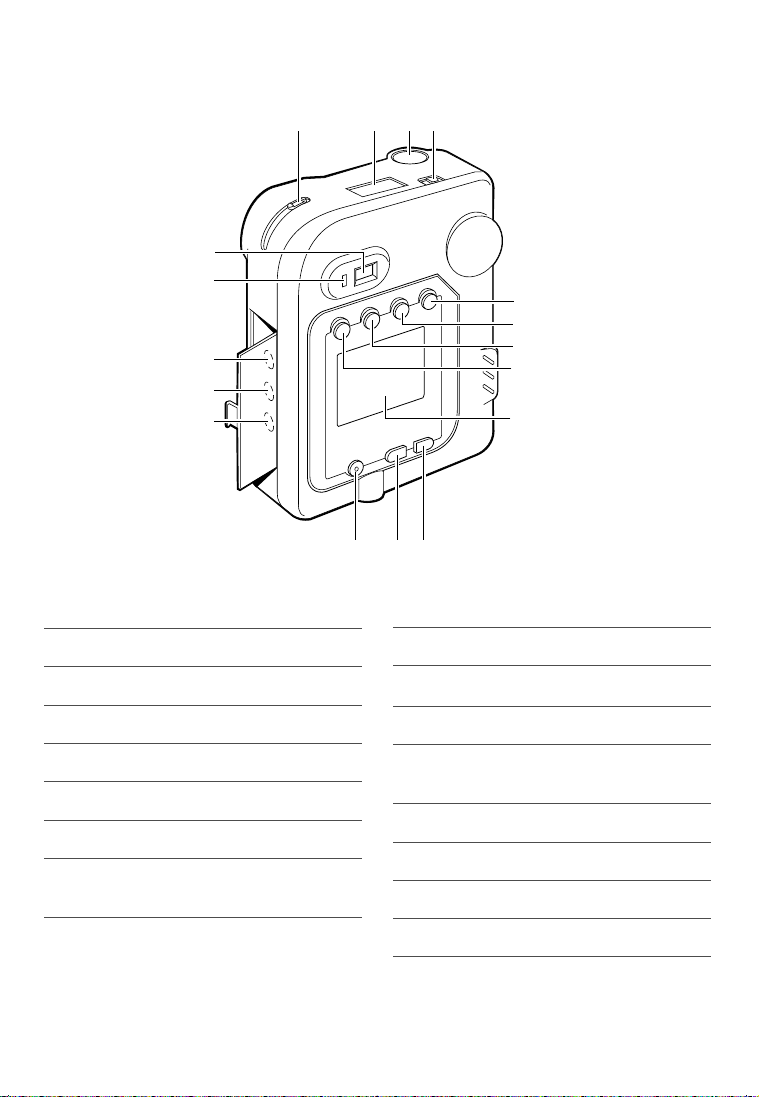
Camera Features
abcd
e
f
g
h
i
jkl
m
o
q
p
n
a Lens setting slider
b Status panel
c Shutter button
d Power switch
e Play/record mode button
f Menu mode ON button
g Erase/SFN (resolution) button
h Thumbnail display/EV setting
button
i LCD display
j Next/self-timer button
k Previous/flash button
l LCD display ON/OFF button
m Camera-to-computer connector
(serial connector)
n AC adapter connector
o Camera-to-TV connector
p Green LED
q Optical viewfinder
©1999 Polaroid Corporation, Cambridge, MA 02139, U.S.A., owner of the trademarks “Polaroid”, “Polaroid PhotoMAX” and
“PDC”. “MAX the Bird” ©1998 Polaroid Corporation. All rights reserved. Printed in U.S.A.
Page 3
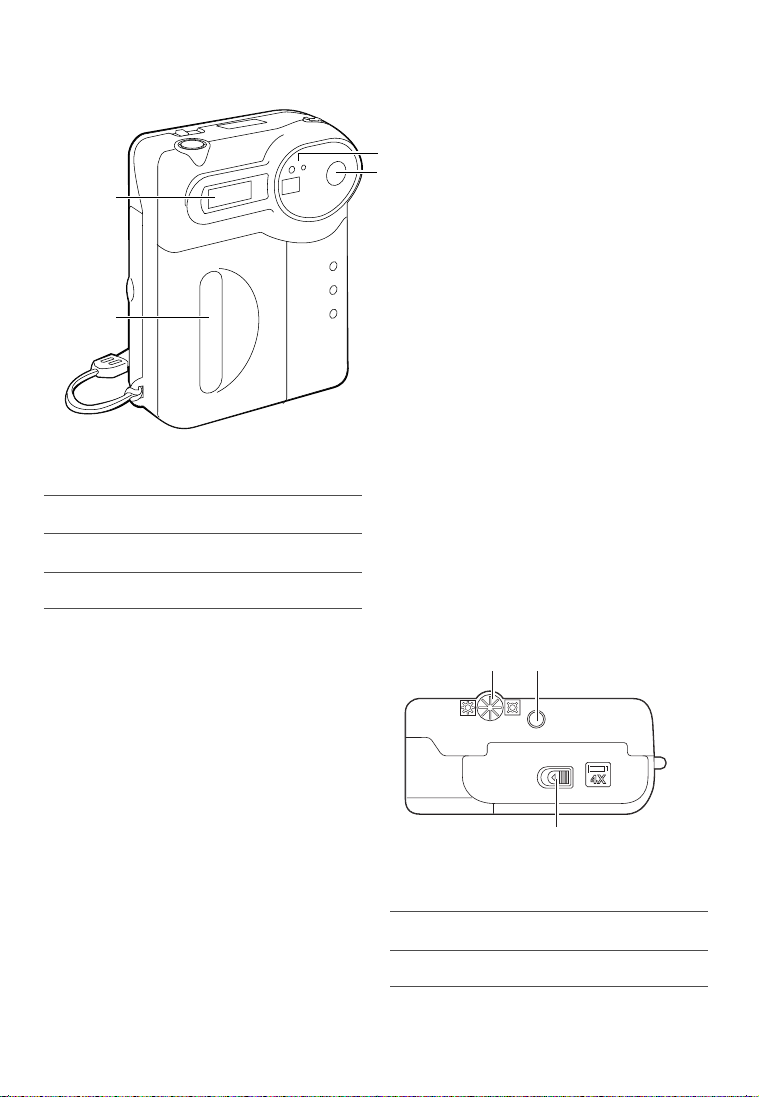
a
b
c
d
a Self-timer LED indicator
b Optical viewfinder
c Hand grip
d Flash
ab
c
Bottom View
a LCD brightness adjustment dial
b Tripod socket
c Battery compartment latch
Camera Features
Page 4

Status Panel
AUTO
a Flash setting:
Autoflash
(default setting)
Flash fires automatcally
when needed.
Fill flash
Use when light is behind
subject or on cloudy days.
No flash setting
Flash does not fire.
Use where flash is pro-
hibited or when shooting
a metallic or shiny sur-
face.
b Image counter:
Number of images left in
memory (Record mode)
Current picture number in
sequence (Playback
mode)
Resolution mode S-F-N
c (4 MB internal memory):
Superfine 22 pictures
Fine (default) 45 pictures
Normal mode 90 pictures
Superfine 12 pictures
Fine (default) 25 pictures
Normal mode 50 pictures
d Battery status
This icon indicates the
power status of the
batteries in your camera
640 x 480
resolution
1024 x 768
resolution
a
b
cd
V
Page 5

Function Buttons
f
g
h
a
Press the Multiple
Display grid icon ( )
to review pictures in
Playback mode.
Press the EV button
( ) in Record mode
to manually change the
Exposure Value (EV)
(including f-stop and
shutter speed).
b
Press the Erase ()
button to delete images
in Playback mode.
Press the SFN ( )
button in Record mode
to set image resolution.
d
Press the Playback
button ( ) to review
pictures and choose
options in Playback
mode.
Press the Record
button ( ) to take
pictures and choose
options in Record mode.
c
Press the Menu ( )
button to turn on the
LCD Display Menu.
e
LCD Display.
f
Press the plus button
( ) to go to the next
selection in the LCD
Diplay menu. Press the
self-timer button ( )
to use the self-timer in
Record mode.
g
Press the minus button
( ) to go to a previ-
ous selection on the
LCD Display menu.
Press the flash button
( ) to change flash
settings in Record
mode.
h
Press the ON/OFF
button ( ) to
turn the power on and
off to the LCD display.
abcd
e
Page 6
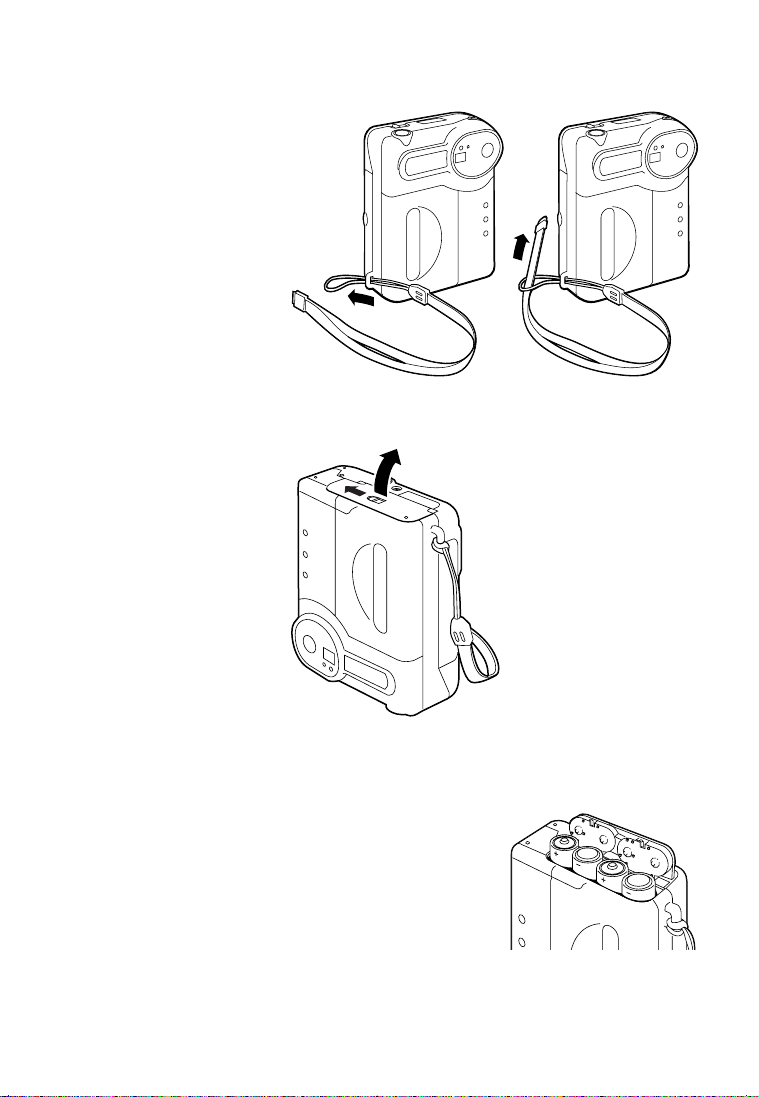
Preparing the Camera
Insert the wrist strap
through the ring on the
side of the camera.
Push the opposite end
of the strap through the
loop and pull.
Open the battery
compartment on the
bottom of the camera.
Insert four AA-batteries
into the compartment
as shown.
Page 7

Taking a Picture
You can take pictures using the optical viewfinder or using
the LCD display.
Use the optical viewfinder to save batteries.
Use the LCD display when using the macro lens
to take close-ups of subjects.
a
b
ce
a Turn the camera on.
b Select the lens:
Normal lens
18” - infiniti
Macro lens
8 - 18”
c Check the status panel. See
the other side of this card
for more information.
d Turn on the LCD viewfinder
or look through the optical
viewfinder. Frame your
subject.
e Press the shutter button.
d
Questions? Need help?
1-800-432-5355
7 days a week, 8 am - 8 pm EST
www.polaroid.com
e
To take a picture
:
Page 8

Transferring Pictures to Your Computer
1 Turn off your computer
and any peripherals
(scanner, printer).
2 Connect the serial cable
to the serial port on
your computer.
3 Connect the other end
to the serial port
(DIGITAL) on the
camera.
4 Connect one end of the
AC adapter to the AC
adapter connector
(DC IN 7V) on the
camera.
5 Connect the other end
of the cable to an AC
power outlet.
6 Turn on your computer.
7 Turn on your camera.
8 Double-click the PhotoMAX icon your
desktop to open the Polaroid PhotoMAX
Image Maker Software
9 Click Get Photo. Click From Album or Camera. Click
Download from Camera.
Note:
To transfer images, Polaroid PhotoMAX Image Maker
Software must be installed on your computer.
To find out more about Polaroid PhotoMAX Image
Maker Software, see the Quickstart Guide included in
the software CD-ROM case.
 Loading...