

Page 1
Polaroid Digital Camera
PDC-2000
User Guide for Macintosh or
Windows applications
high-quality
color
Capture
images
Page 2

Table of Contents
Quick startup vii
1 Introduction 1
Typical PDC-2000 workflow 2
System requirements 2
Macintosh systems 3
PC systems 3
Technical assistance 3
Using this manual 4
2 Setting up 7
Unpacking 7
Optional accessories 9
Setting up the PDC-2000 camera 10
Attaching the camera straps 10
Setting the SCSI ID 11
Installing and charging the batteries 14
Connecting the camera to your Macintosh 17
If the PDC-2000 is the only SCSI device 18
If your Macintosh has other SCSI devices 19
Connecting to an Apple PowerBook 20
i
Page 3

Setting up your Macintosh for the PDC-2000 21
Installing the plug-in software 21
Installing PDC-2000 Direct 22
Verifying camera internal settings from your Macintosh 22
Connecting the camera to your PC 23
If the PDC-2000 is the only SCSI device 24
If your PC has other SCSI devices 25
Setting up your PC for the PDC-2000 26
Choosing the software to install 26
Installing the TWAIN driver 27
Installing the plug-in software 27
Installing PDC-2000 Direct 28
Verifying camera internal settings from your PC 28
Disconnecting the camera from your computer 29
3 Using the PDC-2000 camera 33
Getting acquainted 34
LCD panel 37
Viewfinder indicators 39
Sound indicators 40
Capture and Index modes 40
Automatic shutoff 41
ii
Page 4

Taking pictures 41
Turning on the camera 41
Setting to stand-alone mode 42
Selecting Capture mode 43
Setting the camera for current lighting conditions 43
Holding the camera 44
Framing and taking the picture 44
If you see a viewfinder warning 45
Using flash 46
Using Auto Focus 48
Using Focus Lock 48
Compensating for backlighting 49
Labeling pictures 50
Editing the default picture label 51
Editing a single picture’s label 53
Erasing pictures 55
Erasing a single picture 55
Erasing all pictures 57
Unerasing pictures 58
4 Using the PDC-2000 with your Macintosh 61
The PDC-2000 windows 62
Working with pictures in the camera 65
Viewing pictures in the camera 65
Selecting thumbnails 66
Previewing pictures with PDC-2000 Direct 67
Viewing picture information 67
iii
Page 5

Rotating pictures 68
Editing a picture label 68
Transferring pictures from the camera
to the computer 69
Deleting pictures from the camera 71
Operating the camera from the Macintosh 72
Changing operating preferences 75
Available options 75
Changing the preferences 77
Releasing the camera from computer control 80
Releasing the camera 80
Restoring computer control 81
5 Using the PDC-2000 with your PC 83
The PDC-2000 windows 84
Working with pictures in the camera 87
Viewing pictures in the camera 87
Selecting thumbnails 89
Previewing pictures with PDC-2000 Direct 89
Viewing picture information 89
Rotating pictures 90
Editing a picture label 90
Transferring pictures from the camera
to the computer 91
Deleting pictures from the camera 93
iv
Page 6

Operating the camera from the PC 94
Changing operating preferences 97
Available options 97
Changing the preferences 99
Releasing the camera from computer control 102
Releasing the camera 102
Restoring computer control 103
6 Maintenance and troubleshooting 105
Caring for the camera batteries 105
Recommended battery types 106
Charging the batteries in the camera 106
Charging the batteries outside the camera 108
Replacing the camera batteries 110
Troubleshooting error messages 111
PDC-2000 full one-year warranty 114
Service 115
Polaroid Offices and Service Centers 116
Radio and television interference 118
PDC-2000 camera specifications 121
Software license agreements 123
Index 129
v
Page 7

Setting up
Quick startup
For more information, see the page indicated.
Page
(Macintosh)
7 7 1 Unpack the PDC-2000 camera.
11 11 2 Set the camera’s SCSI ID.
14 14 3 Install and charge the camera batteries.
17 23 4 Connect the camera to your computer.
21 27 5 Install the PDC-2000 plug-in, TWAIN
75 97 6 Set the camera internal settings (date,
Page
(PC/Windows) Steps
driver or PDC-2000 Direct on your
computer.
time, user name, etc.).
Quick startup vii
Page 8

Taking pictures
Page
(Macintosh)
29 29 1 Disconnect the PDC-2000 camera from
41 41 2 Turn on the camera.
43 43 3 Set the camera for the current lighting
44 44 4 Frame and take a picture.
50 50 5 Label your pictures (optional).
Page
(PC/Windows) Steps
the computer.
conditions (daylight, incandescent or
fluorescent).
Viewing and transferring the pictures in the camera
Page
(Macintosh)
17 23 1 Connect the camera to the computer.
65 87 2 View thumbnails (small representations)
69 91 3 Select and transfer the pictures to the
Page
(PC/Windows) Steps
of the pictures stored in the camera.
computer.
viii
71 93 4 Delete the pictures from the camera.
Page 9

1 Introduction
The Polaroid PDC-2000 Digital Camera captures high-quality
color pictures electronically. PDC-2000 pictures contain up to
16.7 million colors and can be saved as high resolution
(600x800 pixels) or super-high resolution (1200x1600 pixels)
pictures.
The PDC-2000 has all the features of an automatic compact
35mm camera, including automatic exposure, electronic flash
and automatic focus. These features produce correct
exposure, accurate colors and sharp focus under a great
variety of picture-taking conditions. Manual overrides are
also provided for unusual conditions.
Using the Macintosh or Microsoft Windows software
provided with the camera, you can view the pictures taken
with the PDC-2000 camera and transfer them to the
computer. You can then use an image-processing application
to manipulate, enhance, save and print the pictures.
When the camera is connected to your computer, you can
control the camera and take pictures via the computer
keyboard or mouse. This is useful when the camera is used in
a stationary setup.
Introduction 1
Page 10

Typical PDC-2000 workflow
To help you understand the full capabilities of the PDC-2000
camera, a typical workflow sequence is presented below.
After you become familiar with PDC-2000 features, you can
use the camera in other ways to best suit your imaging needs.
1 Take pictures with the camera (Chapter 3).
2 Connect the camera to your computer (Chapter 2).
3 Use your computer to view the pictures stored in the camera
(Chapter 4 for Macintosh, Chapter 5 for PCs).
4 Select the pictures you want to keep and transfer them to the
computer (Chapter 4 or 5).
5 Edit or enhance any of the pictures using an image-processing
application such as Adobe Photoshop. (See instructions with
the application.)
6 Print the picture or use it in another application, such as a
desktop publishing application. (See instructions with the
application.)
As an alternative sequence for studio or other stationary
setups, you can leave the PDC-2000 camera permanently
attached to the computer. With the camera connected to the
computer, you can operate the camera controls and take
pictures using the computer’s display, keyboard or mouse.
System requirements
Using the PDC-2000 software to view and manipulate
pictures taken with the PDC-2000 camera requires the
following hardware and software. If you do not have the
required configuration, contact your Polaroid dealer.
2
Page 11

Macintosh systems • A Macintosh family computer with at least a 68020 processor
and 8 megabytes (MB) of RAM. (16 MB is recommended.)
• Apple system software version 7.1 or later.
• An image-processing application, such as Adobe Photoshop,
compatible with Adobe Photoshop plug-in modules, is
recommended for working with PDC-2000 pictures. If you do
not have such an application, you can use PDC-2000 Direct
(packaged with the PDC-2000 camera) to transfer pictures
from the camera and to control the camera from the
computer.
PC systems • An IBM PC or compatible, with at least a 33 MHz 486SX
microprocessor and 8 MB of RAM. (A Pentium processor and
16 MB of RAM is recommended.)
• An ASPI-compliant SCSI adapter.
• A video adapter and monitor capable of displaying 24-bit
color (16.7 million colors) is recommended for optimal
display of PDC-2000 pictures.
• MS-DOS 5.0 or higher.
• Microsoft Windows 3.1 or later.
• An image-processing application, such as Adobe Photoshop,
that is either TWAIN-compliant or compatible with Adobe
Photoshop plug-in modules, is recommended for working
with PDC-2000 pictures. If you do not have such an
application, you can use PDC-2000 Direct (packaged with the
PDC-2000 camera) to transfer pictures from the camera and
to control the camera from the computer.
Technical assi stance
Call toll-free from within the U.S.A.: 1-800-432-5355,
Monday through Friday, 8 a.m. to 8 p.m.(Eastern time), or
fax to: 781-386-9688. You can also contact Polaroid
Introduction 3
Page 12

Using this manual
Technical Support on CompuServe (“GO Polaroid”) or write
to Polaroid Electronic Imaging Technical Support, 565-3B
Technology Sq., Cambridge, MA 02139.
In Canada, call toll-free: 1-800-268-6970. Outside the U.S.A.
and Canada, please contact the Polaroid office nearest you.
See Polaroid Offices and Service Centers on page 116.
For the latest PDC-2000 product information, updates and
bulletins, access the Polaroid World Wide Web site at
http://www.polaroid.com.
This book explains how to set up and use your Polaroid
PDC-2000 camera. It also includes the procedures for
installing the PDC-2000 software on your Macintosh
computer or PC, and for taking, viewing and saving pictures
taken with the PDC-2000 camera. These instructions assume
that you are familiar with the operation of your Macintosh
computer or PC with Microsoft Windows.
Here’s what you’ll find inside:
Quick startup: Summarizes instructions for setting up the
PDC-2000 camera and software, and for taking pictures and
transferring them to the computer.
1 Introduction: Briefly describes the PDC-2000 camera, lists
system requirements and explains how to obtain technical
assistance.
2 Setting up: Explains how to install the camera batteries,
install the PDC-2000 software on your Macintosh computer
or PC, and connect the PDC-2000 camera to your computer.
3 Using the PDC-2000 camera: Explains the PDC-2000
camera controls, and provides instructions for taking and
labeling pictures.
4
Page 13

4 Using the PDC-2000 with your Macintosh: Tells you how
to use your Macintosh computer to view pictures taken with
the PDC-2000 camera, how to transfer them from the camera
to your Macintosh, and how to operate the camera from your
Macintosh.
5 Using the PDC-2000 with your PC: Tells you how to use
your IBM-compatible computer and Windows to view
pictures taken with the PDC-2000 camera, how to transfer
them from the camera to your PC, and how to operate the
camera from your PC.
6 Maintenance and troubleshooting: Contains
battery-replacement instructions, solutions to problems that
might occur, and warranty and service information.
Introduction 5
Page 14

Page 15

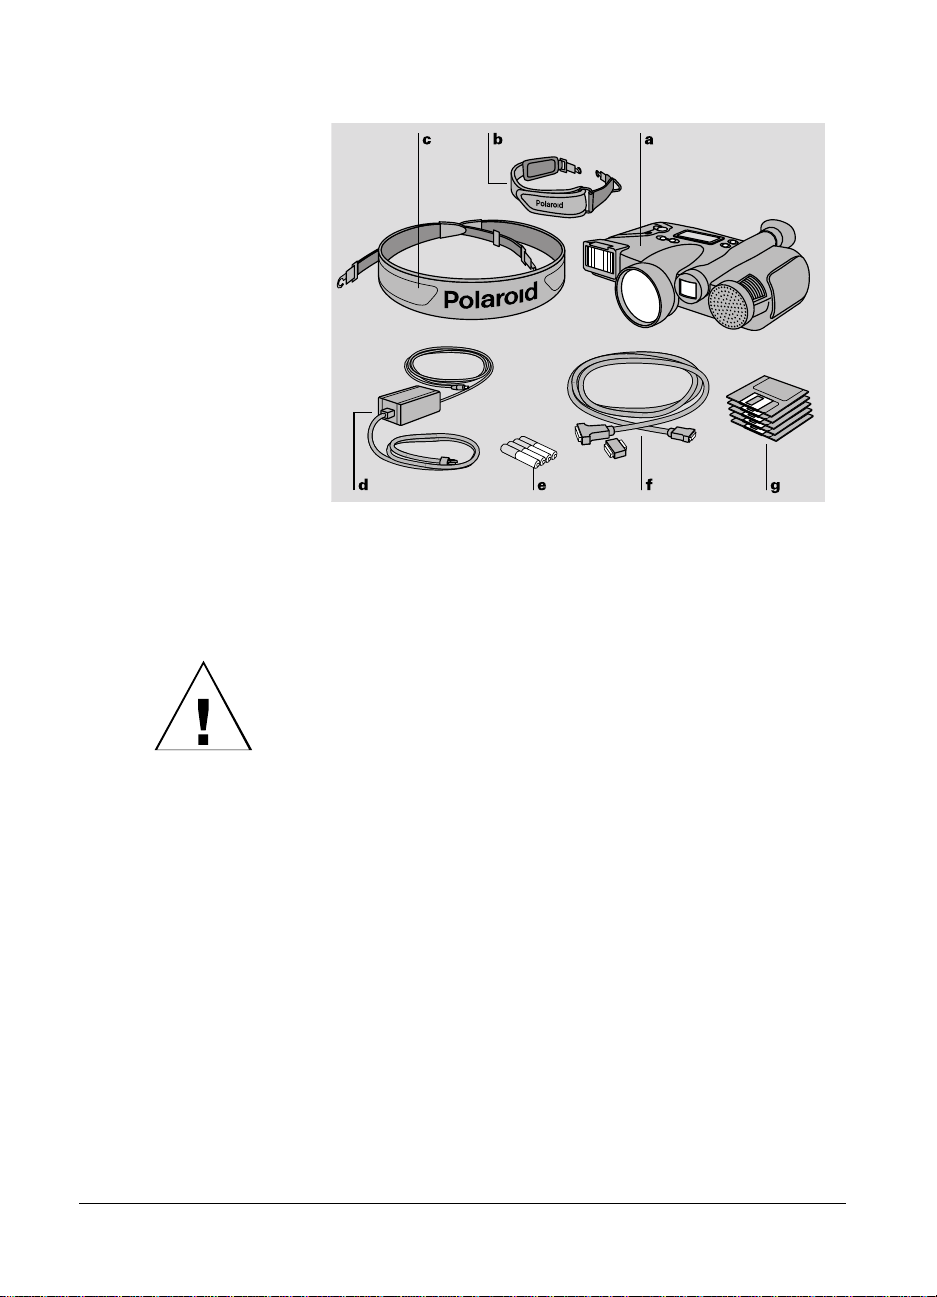
Unpacking
2 Setting up
Listed below are the components in the PDC-2000 camera
package. If any is missing, contact your dealer immediately.
a PDC-2000 camera with 38mm-equivalent lens
b Hand strap
c Shoulder strap
d Power adapter/trickle charger: Recharges the NiCad batteries
in the camera and provides power for the camera while the
batteries are charging.
e Camera batteries: Four “AA” NiCad rechargeable batteries.
f SCSI cable (1 meter) and DB25/50 pin Centronics adapter:
Connect the PDC-2000 camera to a Macintosh computer or
PC SCSI port.
g Software diskettes: PDC-2000 plug-in software for Macintosh
and Windows, TWAIN driver (for Windows only) and
Polaroid PDC-2000 Direct camera utility software for
Macintosh and Windows.
Setting up 7
Page 16
Note: Please be sure to fill out and return the registration card
packed with the PDC-2000 camera. As a registered owner,
you will be among the first to receive information about
PDC-2000 software updates and the availability of new
PDC-2000 products.
WARNING: NOTHING INSIDE THE PDC-2000 CAMERA
EXCEPT THE BATTERIES IS USER-SERVICEABLE. TO
AVOID THE POSSIBILITY OF DAMAGING THE
CAMERA OR VOIDING THE WARRANTY, DO NOT
DISASSEMBLE THE CAMERA.
8
Page 17

Optional accessories
You may have also purchased one or more of the following
optional accessories for the PDC-2000 camera. (Any
necessary instructions are packaged with each accessory.)
60mm-equivalent lens: Interchangeable lens for enlarging
more distant subjects.
SCSI host adapter: Adapter board for adding a SCSI port to
IBM-compatible computers (PCs) for communicating with the
PDC-2000 camera and other SCSI devices.
SlimSCSI adapter kit: Adapter, 1-meter cable and software for
connecting the PDC-2000 camera to the PCMCIA slot of a
PC notebook computer.
110-volt 5-hour battery charger: Fully charges the PDC-2000
NiCad batteries in 5 hours from AC power.
12-volt auto adapter and recharger: Recharges the batteries in
the camera and provides power for the camera from an
automotive lighter socket.
2-meter SCSI system cable: Provides extra length for
convenience while taking pictures with the camera connected
to the computer (not for use with Apple PowerBook
computers).
Carrying case: Soft case with shoulder strap for the
PDC-2000 camera and accessories.
Setting up 9
Page 18
Setting up the PDC-2000 camera
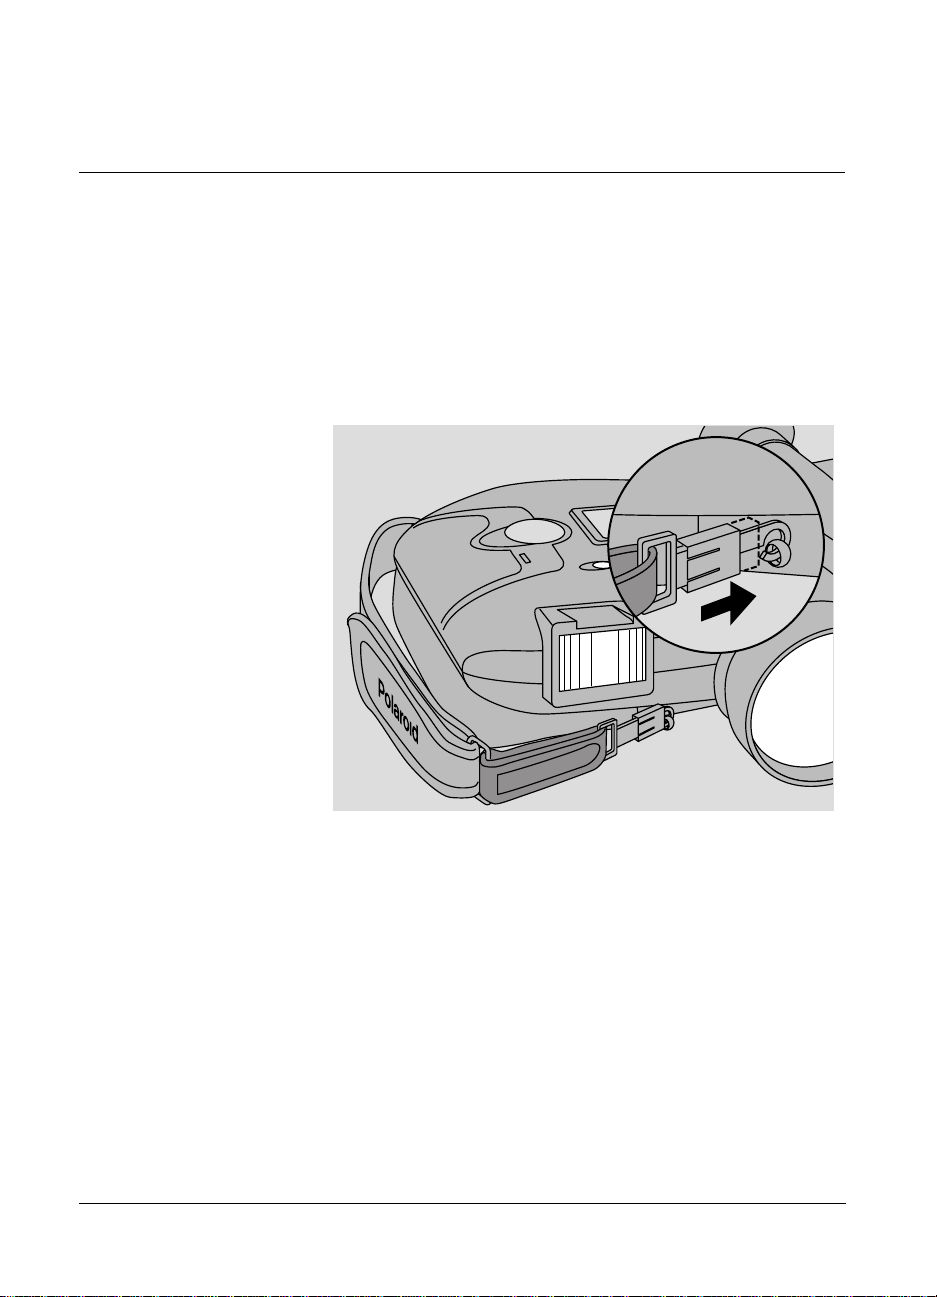
Attaching the
camera straps
A hand strap and a shoulder strap are provided with the
PDC-2000 camera. To help prevent damage to the camera
and to make camera handling easier, attach one or the other.
(You cannot attach both at the same time.)
To attach the hand strap, connect the ends of the strap to the
eyelets on the front and the back of the camera. Slide the
plastic sleeve on each hook toward the eyelet until it snaps to
lock the strap.
10
Page 19
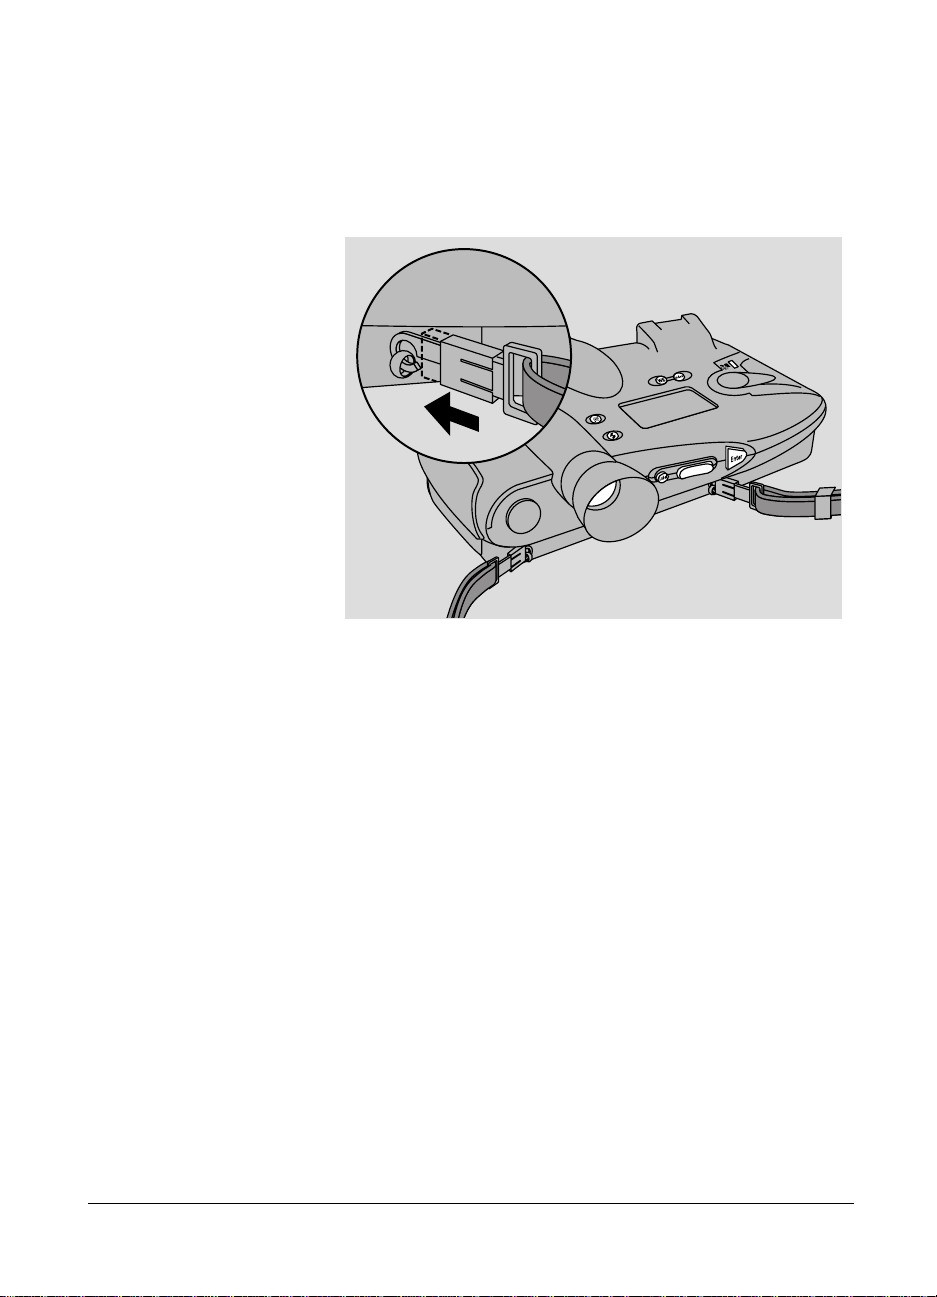
To attach the shoulder strap, connect the ends of the strap to
the eyelets on the back of the camera as shown. Be sure to
slide the plastic sleeve on each hook toward the eyelet until it
snaps, locking the strap securely.
Setting the SCSI ID The PDC-2000 camera is a Small Computer Systems Interface
(SCSI) device. You can connect up to seven SCSI devices to
your computer, one to another in a SCSI chain.
Note: If you are connecting the PDC-2000 camera to an IBM
PC or compatible computer, the computer must have an
ASPI-compliant SCSI adapter. (See System requirements on
page 2.)
The PDC-2000 camera’s SCSI ID is preset to 4 at the factory.
You do not need to change this number unless another SCSI
device in the chain is already using it. To determine whether 4
is already being used, check the user guides of the other
devices or run a SCSI utility program.
Setting up 11
Page 20
WARNING: EACH SCSI DEVICE CONNECTED TO
YOUR COMPUTER MUST HAVE ITS OWN UNIQUE ID
NUMBER SO YOUR COMPUTER CAN DISTINGUISH IT
FROM OTHER ATTACHED SCSI DEVICES. USING TWO
OR MORE DEVICES WITH THE SAME ID NUMBER CAN
CAUSE THEM TO MALFUNCTION. YOU CAN LOSE
DATA AS A RESULT.
If the PDC-2000 is your only external SCSI device or no other
device in the chain is using ID 4, skip the rest of this section
and go on to Installing and charging the batteries on page 14.
If you must change the camera’s SCSI ID, use the following
steps:
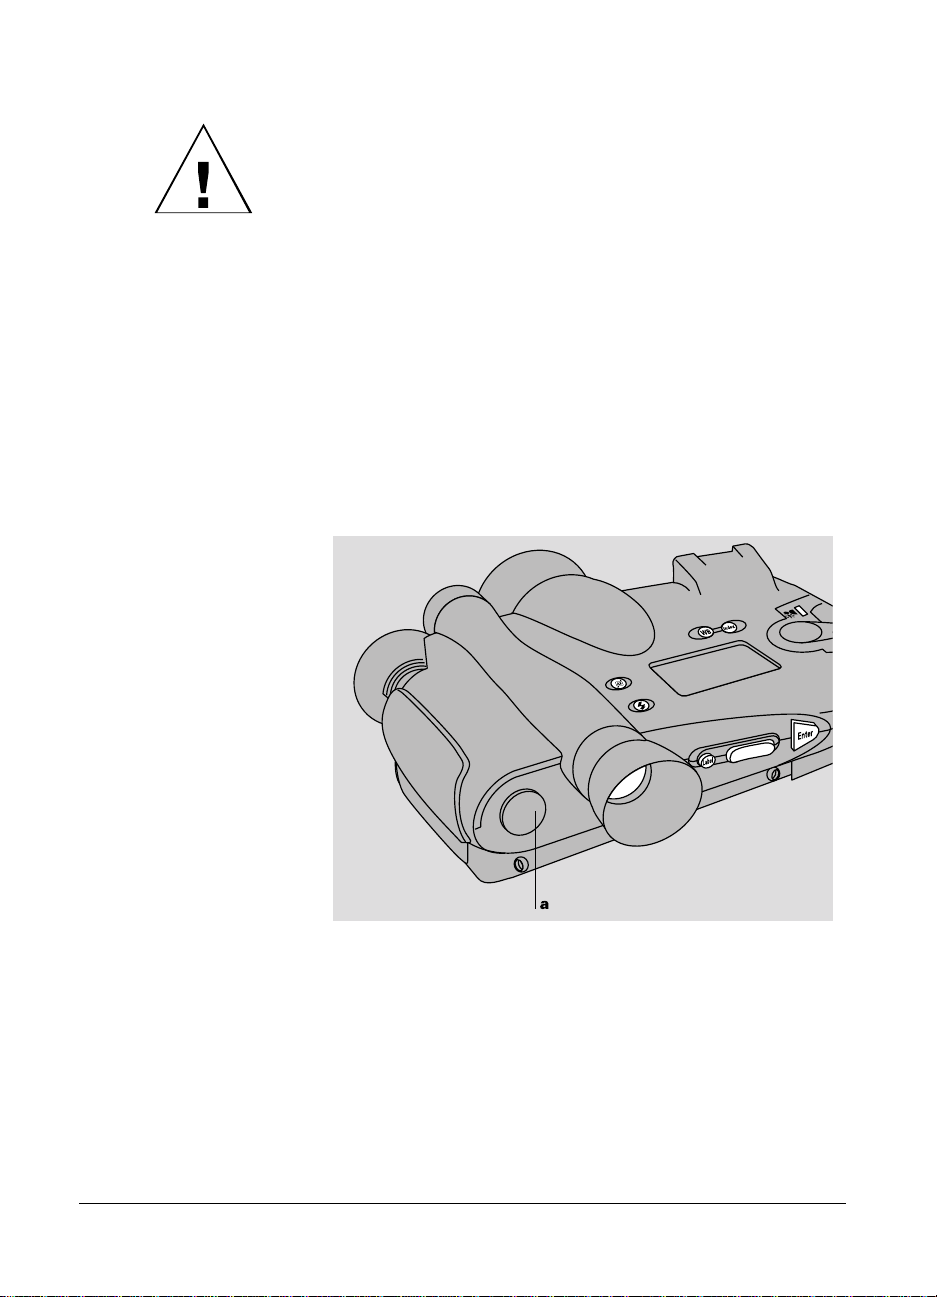
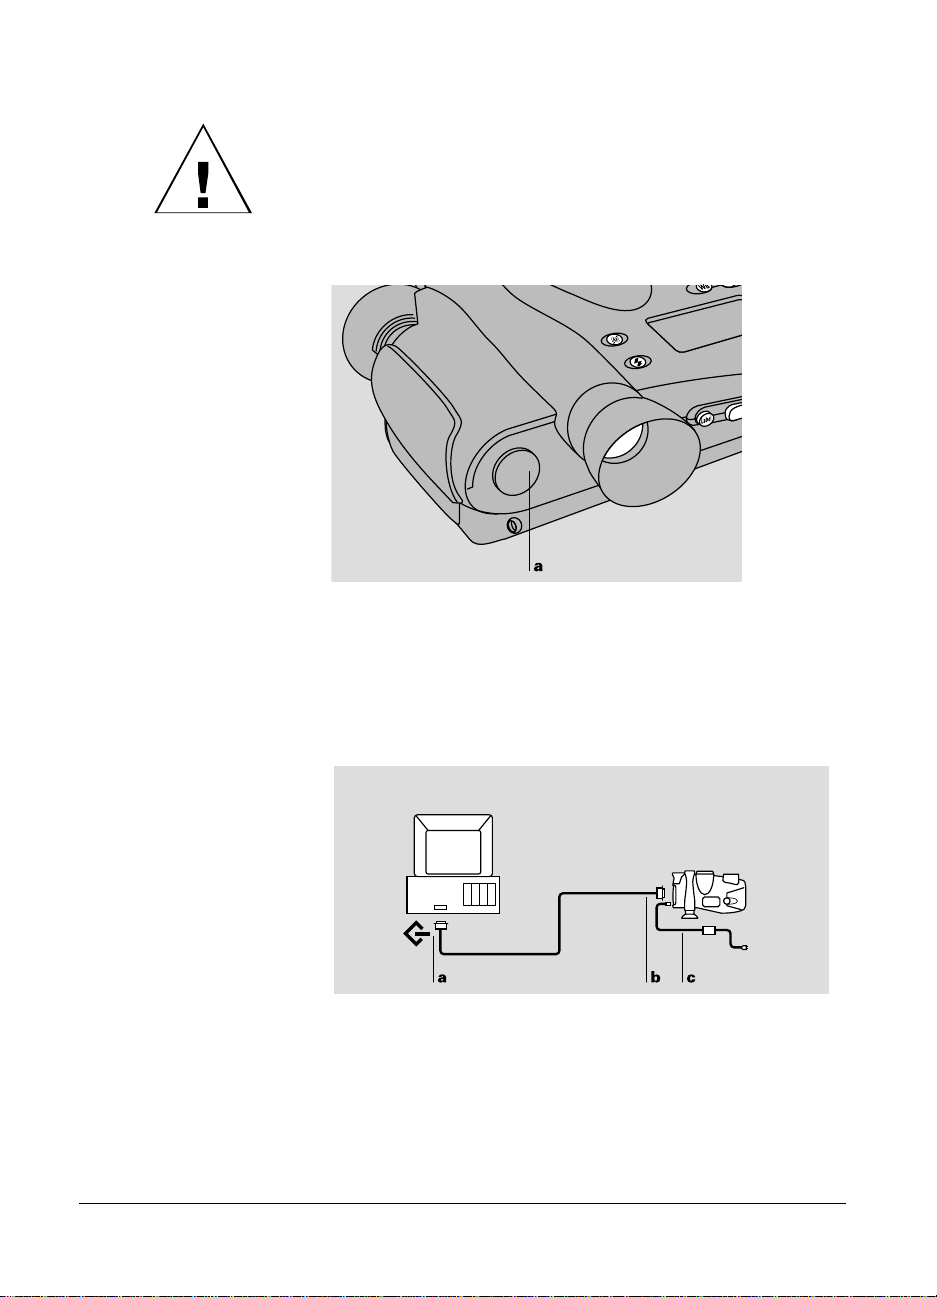
1 Make sure the camera power is off and the camera is
disconnected from the computer. If the camera is on, turn it
off by pressing the power button (a).
12
Page 21
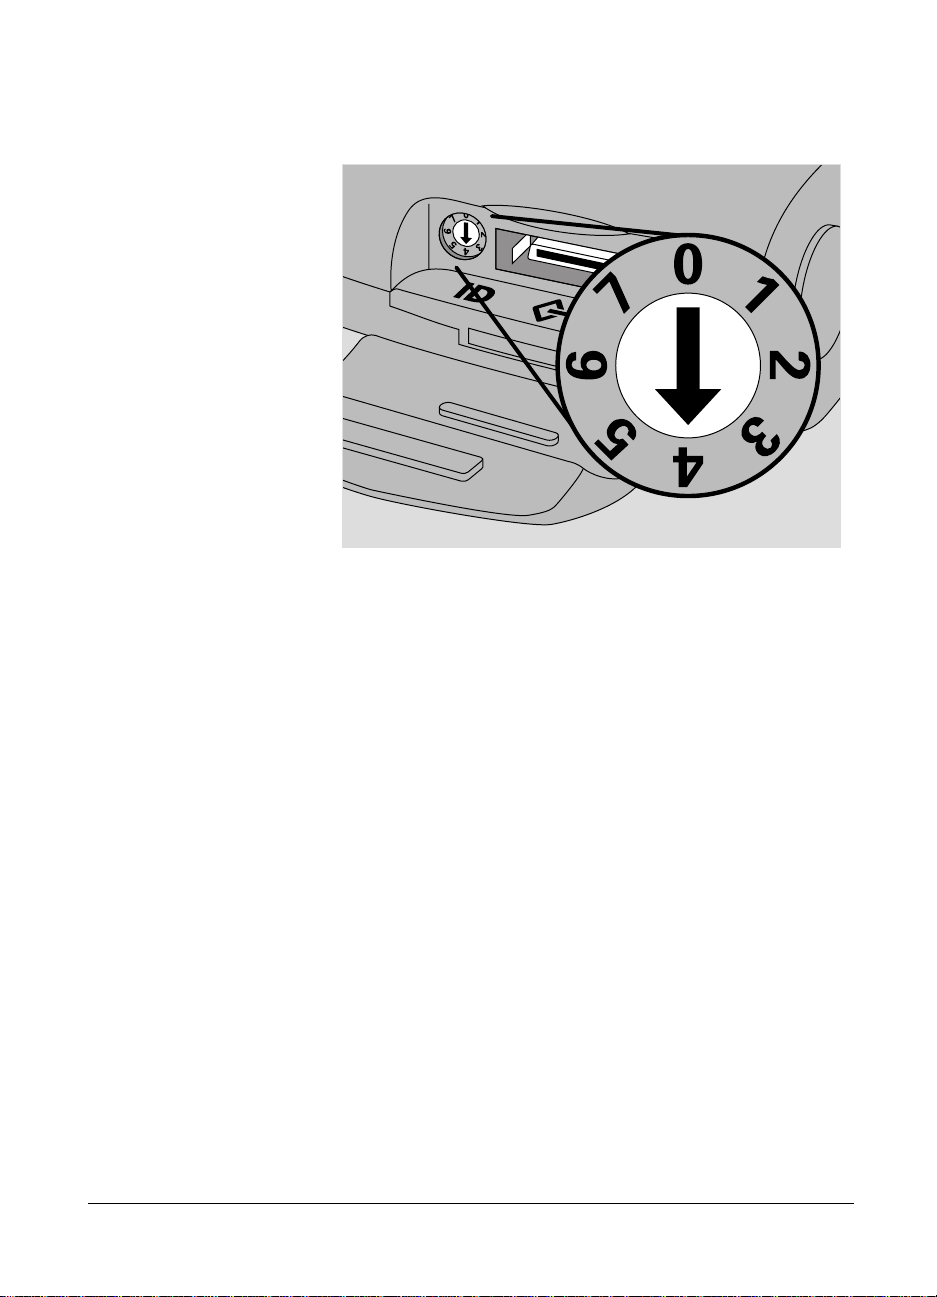
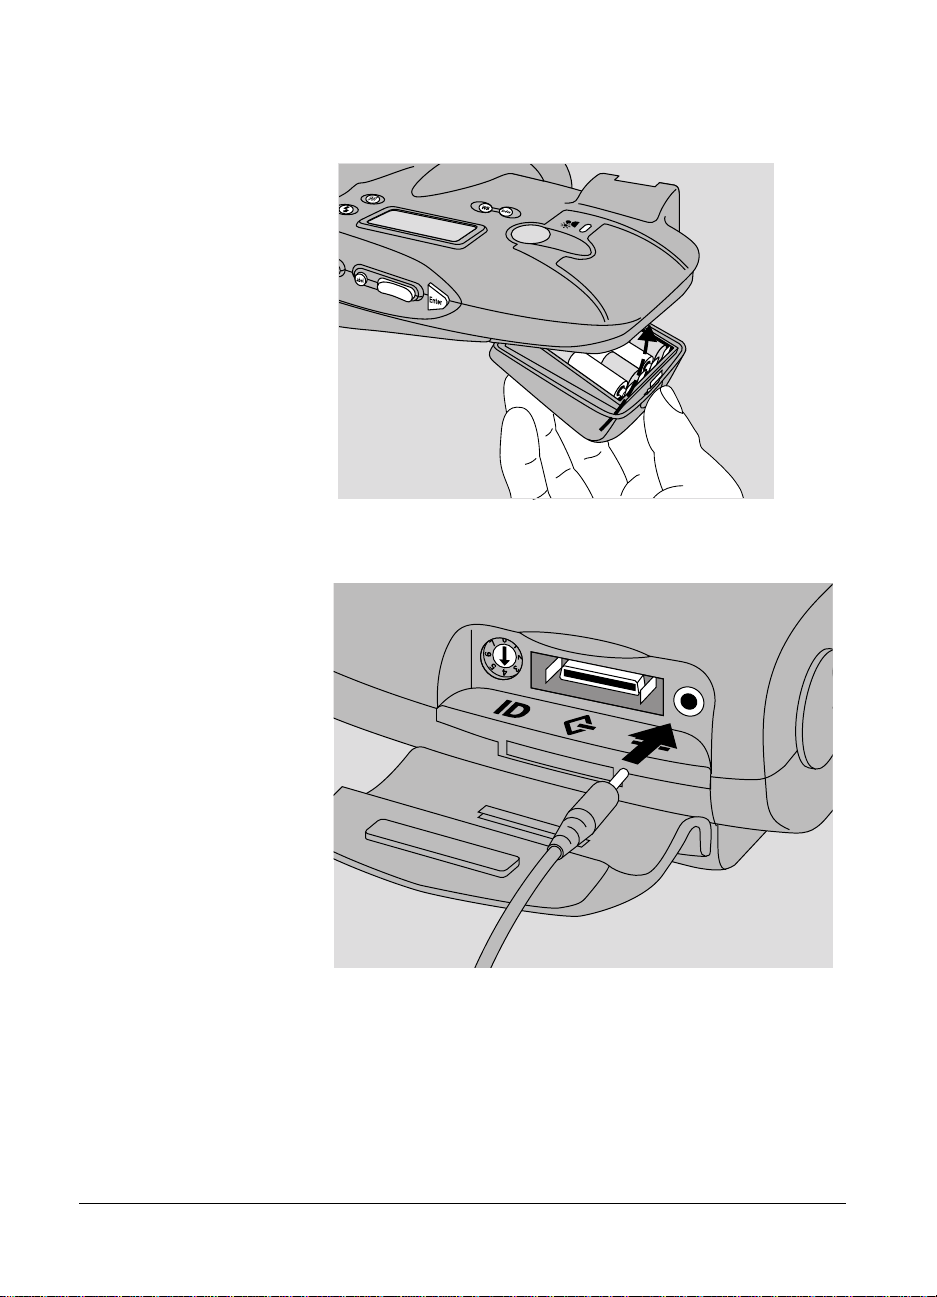
2 Open the connector cover and locate the SCSI ID selector.
3 Insert a small screwdriver into the slot and rotate the selector
until the arrow points to the desired SCSI ID.
Note: Do not use 7 or 0, which are customarily used for the
computer and for Macintosh hard drives. In addition, 3 is
often used for internal CD-ROM drives.
4 Close the connector cover.
Setting up 13
Page 22
Installing and charging
the batteries
The four NiCad “AA” rechargeable batteries packaged with
the PDC-2000 camera are shipped uncharged. To use the
camera, you must install the batteries and charge them as
described below.
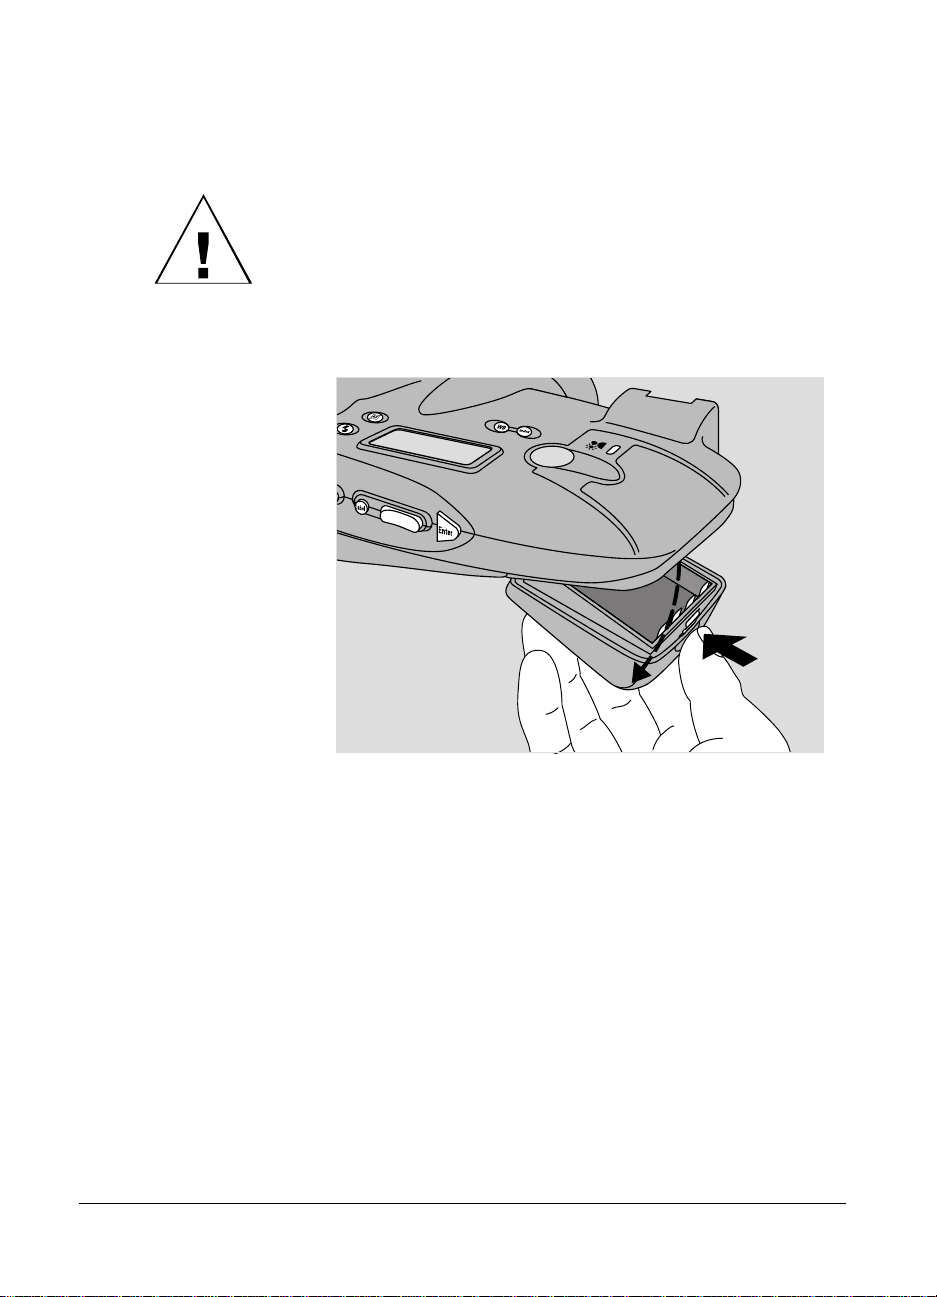
1 Unlatch and remove the PDC-2000 battery holder from the
camera.
14
Page 23
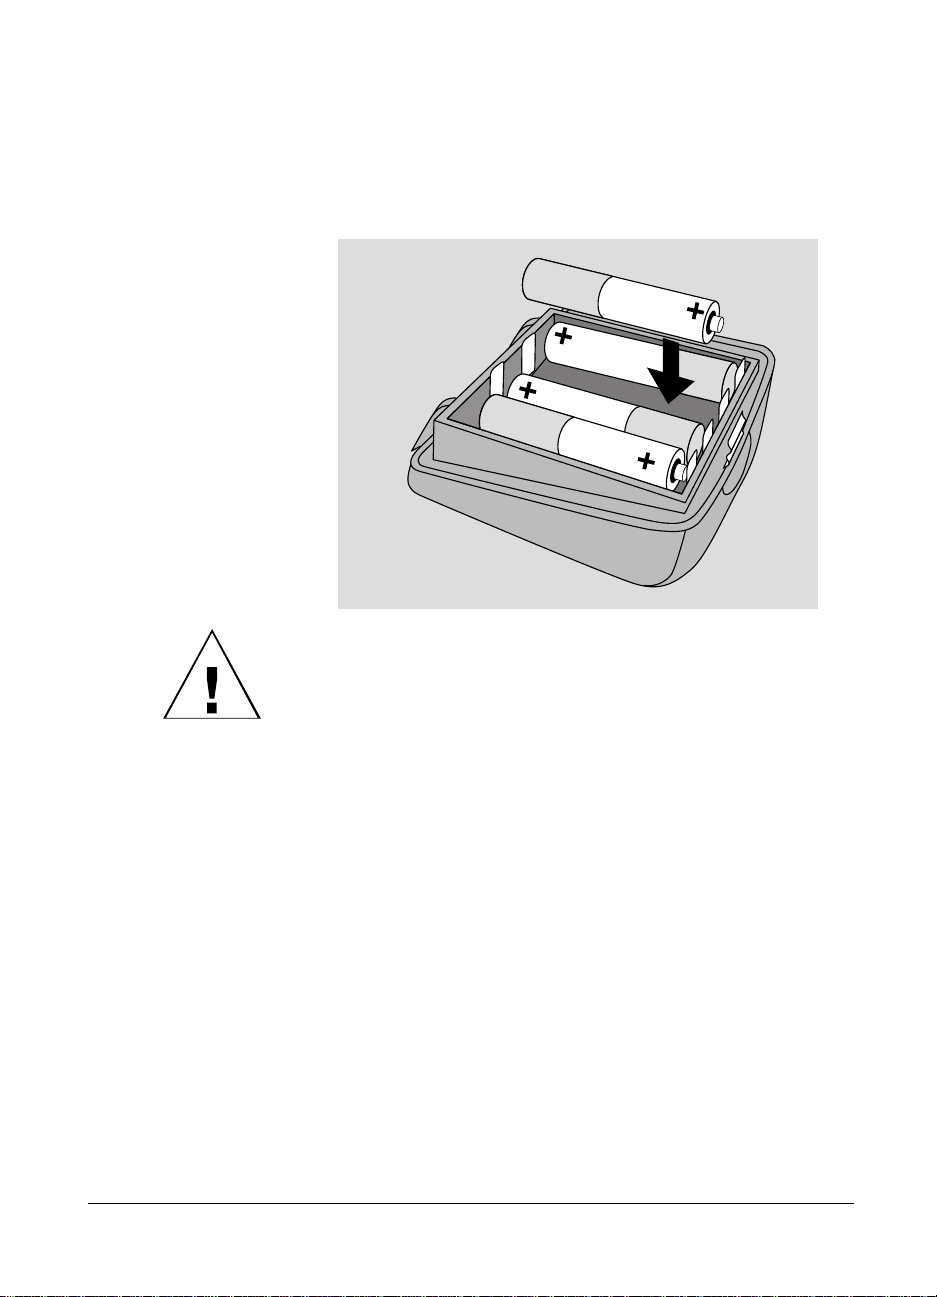
2 Unwrap and install the four “AA” NiCad batteries provided,
observing the battery orientation label in the battery holder.
(Install the two outside batteries first, then install the two
inside batteries.)
WARNING: USE ONLY THE BATTERIES PROVIDED OR
THE “AA” NICAD RECHARGEABLE BATTERY TYPES
RECOMMENDED ON PAGE 106. OTHER TYPES, SUCH
AS ALKALINE OR LITHIUM “AA” BATTERIES, WILL
NOT OPERATE THE CAMERA, AND MAY CAUSE
INJURY OR DAMAGE THE CAMERA IF YOU ATTEMPT
TO CHARGE THEM AS DESCRIBED BELOW.
Setting up 15
Page 24
3 Engage the battery holder and close it, making sure it latches.
4 Connect the power adapter/trickle charger to the camera and
to AC power.
16
Do not operate the camera until the batteries have charged
for about 6 hours. After this 6-hour period, you can use the
camera while the batteries continue to charge.
Page 25

Note: The camera is not operable without the batteries, even
if the power adapter/trickle charger is connected.
Charge the new batteries completely by leaving the charger
connected to the camera for about 12 hours. (After this initial
charging, the batteries will recharge completely in about 6
hours.)
WARNING: USE ONLY THE POWER ADAPTER/
TRICKLE CHARGER PROVIDED FOR CHARGING THE
BATTERIES WHILE THEY ARE IN THE CAMERA.
OTHER ADAPTERS AND CHARGERS SIMILAR IN
APPEARANCE ARE AVAILABLE, BUT THEY CAN
OVERHEAT THE BATTERIES AND CAUSE INJURY OR
CAMERA DAMAGE.
You can also charge the batteries outside the camera with
optional 110-volt 5-hour battery charger (see Optional
accessories on page 9) or another charger compatible with
your local AC voltage and designed for NiCad “AA”
batteries. Carefully follow the instructions provided with the
charger you are using.
Connecting the camera to your Macintosh
The PDC-2000 camera is an internally terminated SCSI device
designed to connect to the SCSI port of your Macintosh
computer. How you connect the PDC-2000 depends on
whether you have other SCSI devices connected to your
computer.
Note: Be sure to set the camera’s SCSI ID as described on
page 11 before connecting the camera.
Setting up 17
Page 26
WARNING: DO NOT CONNECT OR DISCONNECT THE
PDC-2000 CAMERA OR ANY OTHER SCSI DEVICE
WHILE THE DEVICE OR YOUR COMPUTER IS TURNED
ON. DOING SO COULD DAMAGE THE DEVICE, YOUR
COMPUTER, OR BOTH. (TURN OFF THE CAMERA BY
PRESSING POWER BUTTON a.)
If the PDC-2000 is the
only SCSI device
If the PDC-2000 camera is the only external SCSI device
being used with your computer, turn off the computer and the
camera. Then connect the SCSI system cable provided to the
computer’s SCSI port (a). The port is marked with a SCSI
symbol for easy identification. Connect the other end of the
system cable (b) to the camera’s SCSI connector.
Use only the SCSI cable provided with the camera. Other
cables may appear similar, but could damage the camera or
your computer.
18
Page 27
After connecting the SCSI cable, connect the camera to AC
power using the power adapter/trickle charger (c).
IMPORTANT: ALWAYS CONNECT THE CAMERA TO
AC POWER WHEN IT IS CONNECTED TO THE
COMPUTER. IF THE CAMERA OR ANY OTHER SCSI
DEVICE TURNS OFF WHILE CONNECTED, IT COULD
CORRUPT DATA ON YOUR HARD DISK.
If your Macintosh has
other SCSI devices
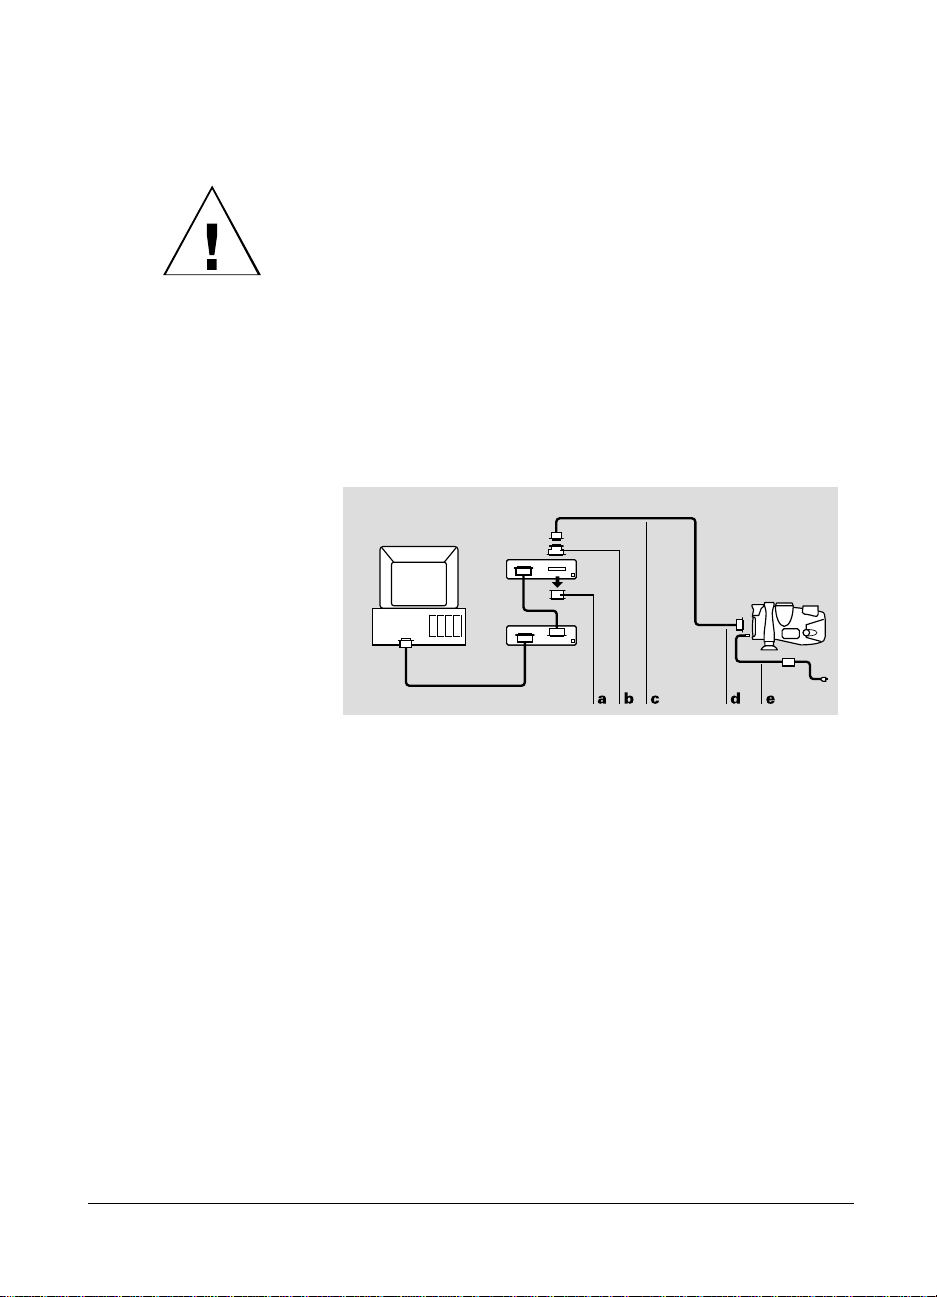
Because the PDC-2000 camera is internally terminated, you
must install it as the last device in your SCSI chain as follows:
1 Turn off the computer, all SCSI devices, and the camera.
2 Remove the terminator (a) from the last SCSI device in your
SCSI chain.
Note: Keep the terminator. You must reconnect it if you use
the computer while the camera is not attached.
3 Attach the DB25/50 pin Centronics adapter (b) to the end of
the SCSI system cable (c).
Use only the cable provided with the camera. Other cables
may appear similar, but could damage the camera or your
computer.
4 Connect the DB25/50 pin Centronics adapter (b) to the
connector from which you removed the terminator.
Setting up 19
Page 28

5 Connect the other end of the SCSI system cable (d) to the
SCSI connector on the PDC-2000 camera.
6 Connect the camera to AC power with the power
adapter/trickle charger (e).
IMPORTANT: ALWAYS CONNECT THE CAMERA TO
AC POWER WHEN IT IS CONNECTED TO THE
COMPUTER. IF THE CAMERA OR ANY OTHER SCSI
DEVICE TURNS OFF WHILE CONNECTED, IT COULD
CORRUPT DATA ON YOUR HARD DISK.
Connecting to an
Apple PowerBook
In addition to the cables and adapters described in the
previous sections, Apple PowerBook computers require an
HDI-30/DB25 adapter (available from Macintosh dealers) to
connect the PDC-2000 SCSI system cable to the PowerBook
SCSI port. (Do not use a SCSI dock adapter or a cable-type
adapter. These adapters may not work and could corrupt
data on your PowerBook hard disk.)
Other than the exceptions above, follow the instructions for
connecting to Macintosh computers (starting on page 17)
when connecting the PDC-2000 camera to an Apple
PowerBook computer.
WARNING: WITH POWERBOOK COMPUTERS, USE
ONLY THE 1-METER SCSI SYSTEM CABLE (PROVIDED
WITH THE PDC-2000) TO CONNECT THE CAMERA TO
THE COMPUTER OR TO THE LAST DEVICE IN THE
SCSI CHAIN. LONGER CABLES MAY CORRUPT DATA
OR DAMAGE THE COMPUTER’S HARD DRIVE.
20
Page 29

Setting up your Macintosh for the PDC-2000
To view PDC-2000 pictures stored in the camera, transfer
pictures from the camera to your computer, operate the
camera through the computer, or change camera setup
options, you must install one of the following programs on
your Macintosh. Both are provided with the PDC-2000
camera.
• PDC-2000 plug-in software Using the plug-in after it is
installed requires an image-processing application (not
provided) compatible with Adobe Photoshop plug-in modules.
• PDC-2000 Direct software If you do not have an image
processing application compatible with Photoshop plug-in
modules, you must install PDC-2000 Direct to use the
PDC-2000 with your computer. (If you install PDC-2000
Direct, you do not need the plug-in software described above
to use it.)
Installing the
plug-in software
To install the PDC-2000 plug-in software on your Macintosh:
1 Insert the PDC-2000 plug-in installation disk into an internal
or external drive.
2 If the disk contents are not already visible, open the disk.
3 Be sure to read any Read Me file included on the disk. The
Read Me file contains important late-breaking product
information that may affect installation or use.
4 Double-click the Installer icon to open the Installer program.
5 Click the Install button and follow instructions on the screen
to choose and Acquire/Export folder.
6 When an on-screen message indicates that installation has
been completed, click OK.
7 Restart your computer.
Setting up 21
Page 30

Installing PDC-2000
Direct
Use the following steps to install PDC-2000 Direct:
1 Insert the PDC-2000 Direct for Macintosh installation disk
into an internal or external drive.
2 If the disk contents are not already visible, open the disk.
3 Be sure to read any Read Me file included on the disk. The
Read Me file contains important late-breaking product
information that may affect installation or use.
4 Double-click the Installer icon to open the Installer program.
5 Click the Install button and follow instructions on the screen.
6 When an on-screen message indicates that installation has
been completed, click OK.
7 Restart your computer.
Verifying camera internal settings from your Macintosh
The PDC-2000 camera stores the following settings in its
internal memory:
• User name
22
• Default picture label
• Current date
• Current time
• Automatic shutoff timeout values
• Camera sound indicator status
Before using the PDC-2000 camera for the first time, verify
(and change, if necessary) these settings by following
instructions in Changing operating preferences on page 75.
Page 31

After verifying the camera’s internal settings, proceed as
follows:
If you intend to take pictures with the camera disconnected
from the computer, close your image-processing application
or PDC-2000 Direct by choosing Quit from the File menu.
Then turn off the computer and the camera, and disconnect
the camera as described on page 29. Refer to Using the
PDC-2000 camera on page 33 for picture-taking instructions.
If you will take pictures while using the computer to control
the camera, leave the camera connected to the computer.
Refer to Using the PDC-2000 with your Macintosh on
page 61.
Connecting the camera to your PC
The PDC-2000 camera is an internally terminated SCSI device
designed to connect to a SCSI adapter on your
IBM-compatible computer. How you connect the PDC-2000
depends on whether you have other SCSI devices connected to
your computer.
Note: Be sure to set the camera’s SCSI ID as described on
page 11 before connecting the camera. Also, your
IBM-compatible computer must have an ASPI-compliant SCSI
adapter for attaching the camera. See System requirements on
page 2 for more information.
Setting up 23
Page 32

WARNING: DO NOT CONNECT OR DISCONNECT THE
PDC-2000 CAMERA OR ANY OTHER SCSI DEVICE
WHILE THE DEVICE OR YOUR COMPUTER IS TURNED
ON. DOING SO COULD DAMAGE THE DEVICE, YOUR
COMPUTER, OR BOTH. (TURN OFF THE CAMERA BY
PRESSING POWER BUTTON a.)
If the PDC-2000 is
the only SCSI device
If the PDC-2000 camera is the only external SCSI device
being used with your computer, turn off the computer and the
camera. Then connect the SCSI system cable provided to the
computer’s SCSI port (a). Connect the other end of the system
cable (b) to the camera’s SCSI connector.
Use only the cable provided with the camera. Other cables
may appear similar, but could damage the camera or your
computer.
24
Page 33

After connecting the SCSI cable, connect the camera to AC
power using the power adapter/trickle charger (c).
IMPORTANT: ALWAYS CONNECT THE CAMERA TO
AC POWER WHEN IT IS CONNECTED TO THE
COMPUTER. IF THE CAMERA OR ANY OTHER SCSI
DEVICE TURNS OFF WHILE CONNECTED, IT COULD
CORRUPT DATA ON YOUR HARD DISK.
If your PC has other
SCSI devices
Follow the steps below if your computer has other external
SCSI devices in addition to the PDC-2000 camera. Because
the PDC-2000 camera is internally terminated, you must
install it as the last device in your SCSI chain as follows:
1 Turn off the computer, all SCSI devices, and the camera.
2 Remove the terminator (a) from the last device in your SCSI
chain.
Note: Keep the terminator. You will need to reconnect it if
you wish to use the computer while the camera is
disconnected from it.
3 Attach the DB25/50 pin Centronics adapter (b) to the end of
the SCSI system cable (c).
Use only the cable provided with the camera. Other cables
may appear similar, but could damage the camera or your
computer.
4 Connect the DB25/50 pin Centronics adapter (b) to the
connector from which you removed the terminator.
Setting up 25
Page 34

5 Connect the other end of the SCSI system cable (d) to the
SCSI connector on the PDC-2000 camera.
6 Connect the camera to AC power using the power
adapter/trickle charger (e).
IMPORTANT: ALWAYS CONNECT THE CAMERA TO
AC POWER WHEN IT IS CONNECTED TO THE
COMPUTER. IF THE CAMERA OR ANY OTHER SCSI
DEVICE TURNS OFF WHILE CONNECTED, IT COULD
CORRUPT DATA ON YOUR HARD DISK.
Setting up your PC for the PDC-2000
To view PDC-2000 pictures stored in the camera, transfer
pictures from the camera to your computer, operate the
camera through the computer, or change camera setup
options, you must install one of the following programs on
your PC. All are provided with the PDC-2000 camera.
• PDC-2000 TWAIN driver Using the TWAIN driver requires
an image-processing application (not provided) compatible
with the TWAIN specification.
Choosing the
software to install
26
• PDC-2000 plug-in software Using the plug-in requires an
image-processing application (not provided) compatible with
Adobe Photoshop plug-in modules.
• PDC-2000 Direct software If you do not have an image
processing application compatible with TWAIN or Photoshop
plug-in modules, you must install PDC-2000 Direct to use the
PDC-2000 camera with your computer.
The TWAIN driver is recommended for use with the
PDC-2000, since it is compatible with most Microsoft
Windows image processing applications capable of acquiring
images. (This includes Adobe Photoshop for Windows.)
Page 35

If you are using an application not compatible with TWAIN
but compatible with Photoshop plug-in modules, install the
plug-in instead.
Note: To avoid possible conflicts between the TWAIN driver
and the plug-in module, do not install both.
If you do not have an application compatible with either
TWAIN or Photoshop plug-ins, install PDC-2000 Direct. You
do not need the TWAIN driver or the plug-in to use
PDC-2000 Direct.
Installing the
TWAIN driver
Installing the plug-in
software
To install the TWAIN driver:
1 Turn on the computer and start Windows.
2 Insert the TWAIN driver diskette into the floppy drive.
3 From the Program Manager menu, choose Run.
4 Type a:\setup (or b:\setup if the diskette is in drive B) and
click OK.
5 Follow instructions on the screen to complete the installation.
6 Remove the diskette from the floppy drive.
To install the plug-in module:
1 Turn on the computer and start Windows.
2 Insert the plug-in module diskette into the floppy drive.
3 From the Program Manager menu, choose Run.
4 Type a:\setup (or b:\setup if the diskette is in drive B) and
click OK.
An initial dialog message box appears, followed by a
PDC-2000 Setup dialog box indicating a drive and directory
for the PDC-2000 plug-in files.
Setting up 27
Page 36

5 To use the drive and directory displayed in the dialog box,
click Continue.
To change the drive or directory, enter the new location
before clicking Continue.
6 Follow instructions on the screen to complete the installation.
7 Remove the diskette from the floppy drive.
Installing PDC-2000
Direct
To install PDC-2000 Direct:
1 Turn on the computer and start Windows.
2 Insert the PDC-2000 Direct for Windows diskette into the
floppy drive.
3 From the Program Manager menu, choose Run.
4 Type a:\setup (or b:\setup if the diskette is in drive B) and
click OK.
5 To use the drive and directory displayed in the dialog box,
click Continue.
To change the drive or directory, enter the new location
before clicking Continue.
6 Follow instructions on the screen to complete the installation.
7 Remove the diskette from the floppy drive.
Verifying camera internal settings from your PC
The PDC-2000 camera stores the following settings in its
internal memory:
28
• User name
• Default picture label
• Current date
Page 37

• Current time
• Automatic shutoff timeout values
• Camera sound indicator status
Before using the PDC-2000 camera for the first time, verify
(and change, if necessary) these settings by following
instructions in Changing operating preferences on page 97.
After verifying the camera’s internal settings, proceed as
follows:
If you intend to take pictures with the camera disconnected
from the computer, close your image-processing application
by choosing Exit from the File menu. Then turn off the
computer and the camera, and disconnect the camera as
described below. Refer to Using the PDC-2000 camera on
page 33 for picture-taking instructions.
If you wish to take pictures while using the computer to
control the camera, leave the camera connected to the
computer. Refer to Using the PDC-2000 with your PC on
page 83.
Disconnecting the camera from your computer
If you want to take pictures with the PDC-2000 camera away
from the computer, use the following steps to disconnect it.
Note: The procedure below disconnects the camera cable
from the computer. To use the camera controls for taking
pictures without disconnecting the camera from the
computer, see Releasing the camera from computer control
on page 80 (Macintosh) or page 102 (PC) instead.
1 Turn off the computer.
Setting up 29
Page 38

2 Turn off the camera by pressing the Power button (a).
WARNING: DO NOT CONNECT OR DISCONNECT THE
PDC-2000 CAMERA OR ANY OTHER SCSI DEVICE
WHILE THE DEVICE OR YOUR COMPUTER IS TURNED
ON. DOING SO COULD DAMAGE THE DEVICE, YOUR
COMPUTER, OR BOTH.
3 Disconnect the camera cable from the computer or from the
SCSI device to which it is connected.
4 Disconnect the camera cable from the camera by pressing the
latching levers and pulling straight out.
30
Page 39

5 If other SCSI devices are connected to your computer and you
wish to use the computer while the camera is disconnected,
install a terminator on the SCSI device connector to which the
camera was attached.
Setting up 31
Page 40

Page 41

3 Using the PDC-2000 camera
Using the Polaroid PDC-2000 camera is similar to using a
conventional 35mm point-and-shoot camera. But instead of
storing pictures on photographic film, the PDC-2000 camera
stores electronic images internally or on a computer
connected to the camera.
Used in the stand-alone mode, the camera stores up to 40
pictures (model PDC-2000/40) or 60 pictures (model
PDC-2000/60) internally. The camera controls allow you to
control the use of flash, automatic focus, white balance and
other features just as you would operate any other camera.
You can also attach a label to each picture and erase pictures
you don’t want to keep.
When connected by a cable (tethered mode) to a computer
running PDC-2000 software, the camera can be controlled
with the computer keyboard and mouse, and its viewfinder
image appears on the computer screen. In this mode, it
transfers each picture as it is taken directly to the computer
for viewing, printing, editing or storing. In the tethered mode,
the camera can also send all its stored pictures to the
computer at once.
Using the PDC-2000 camera 33
Page 42

Getting acquainted
This chapter explains how to use the camera in the
stand-alone mode. To use your computer for controlling the
camera during picture-taking and to transfer pictures from the
camera to your computer, see Using the PDC-2000 with your
Macintosh (page 61) or Using the PDC-2000 with your PC
(page 83).
Note: The model PDC-2000/T has no internal picture storage
and is intended only for use while connected to a computer
(tethered mode).
34
a Flash: Provides controlled subject lighting for correctly
exposed and color-balanced pictures.
b Lens: Directs and focuses light into camera for capturing
pictures.
c LCD panel: Displays picture numbers and labels, along with
symbols (icons) indicating camera conditions and errors. See
LCD panel on page 37.
Page 43

d SCSI address selector: Sets the camera’s SCSI address
(required for communication with your computer).
e SCSI cable connector: Provides a connection to your
computer via the SCSI cable provided.
f Battery charger connector: Connection for the battery charger.
g Viewfinder: Used for framing pictures. Also displays signals
informing the operator about camera conditions. See
Viewfinder indicators on page 39.
h Power button: Turns the camera power on and off.
i Erase button: Used in the Index mode to erase pictures from
the camera. (See Erasing pictures on page 55.) Also used in
the Index or Capture mode to erase or edit picture labels. (See
Labeling pictures on page 50.)
j Label button: Activates or deactivates the Label field in the
LCD panel for creating or editing picture labels. See Labeling
pictures on page 50.
k Scroll buttons: When the camera is in the Index mode, scrolls
through the numbers and labels of the pictures stored in the
camera. If the Label field is active, scrolls through the list of
Using the PDC-2000 camera 35
Page 44

alphanumeric characters for insertion in a label. (See Labeling
pictures on page 50.)
l Enter button: If the Label field is active, enters the currently
displayed character in the space above the cursor and moves
the cursor to the right. (See Labeling pictures on page 50.)
m Shutter button: Pressing half-way down focuses the camera
and measures available light for automatically setting
exposure. Pressing fully takes a picture. Also used with other
buttons to delete pictures from the camera.
n Backlight Compensation button: Increases exposure for
correct subject lighting in backlighted scenes. See
Compensating for back lighting on page 49.
o Battery compartment: Holds the four rechargeable NiCad
“AA” batteries powering the camera.
p Index button: Changes the camera to Index mode for
scrolling through picture numbers and labels and deleting
pictures. Pressing a second time returns the camera to Capture
mode for taking pictures. (See Capture and Index modes on
page 40 for more information.)
q White Balance button: Sets the camera for accurate color
rendition in daylight, incandescent light or fluorescent light.
See Setting the camera for current lighting conditions on
page 43.
36
r Auto Focus button: Disables automatic focus and sets focus
distance at infinity. See Using Auto Focus on page 48.
s Flash button: Sets flash for automatic, on or off. See Using
flash on page 46.
Page 45

LCD panel The LCD panel on the PDC-2000 camera displays text and
symbols indicating various camera settings and error
conditions.
a Time and date. When the camera is in Capture mode,
displays the current time and date. To set, see Changing the
preferences on page 77 (Macintosh) or page 99 (PC). When
the camera is in Index mode, displays the time and date the
currently displayed picture was taken.
b White balance indicator. Displays current lighting conditions
setting: (blank) daylight, ( ) incandescent light, ( )
fluorescent light.
To change the white balance setting, see Setting the camera
for current lighting conditions on page 43.
c
Flash setting indicator. Displays current flash setting: ( )
automatic flash, ( ) flash on, (blank) flash off.
To change the setting, see Using flash on page 46.
Using the PDC-2000 camera 37
Page 46

d Auto Focus indicator. Displays current auto focus setting:
( ) Auto Focus on, ( ) Auto Focus off.
To change the setting, see Using Auto Focus on page 48.
e Picture counter. When the camera is in the Capture mode,
displays the number of pictures stored in the camera. In the
Index mode, displays the number of the picture being
reviewed.
f
Battery level indicator. Displays current battery level: ( )
fully charged, ( ) discharged, and other levels.
Discharged batteries should be recharged (see Caring for the
camera batteries on page 105) or replaced with charged
batteries.
g Sound indicator. Displays status of camera sound: (blank)
sound on, ( ) sound off.
To change the setting, see Changing operating preferences on
page 75 (Macintosh) or page 97 (PC).
h Mode indicator. Displays the current mode setting: (blank)
Capture mode, (“Index”) Index mode.
To change the setting, press the Index button described on
page 36.
38
i Backlight compensation indicator. Displays backlight
compensation setting: ( ) on, (blank) off.
To change the setting, see Compensating for back lighting on
page 49.
j Label area. Displays a 10-character label for the current
picture. (Also used for displaying messages, as described in
item l.)
Page 47

k Error indicator. Displays “Error” when an error condition
exists (low light, low battery, flash not ready, disk full or
internal hardware error). See page 111 for error message
troubleshooting information.
l Message area. Displays error messages (low light, low battery,
flash not ready, disk full or internal hardware error), and
confirmation messages for erasing pictures and connecting the
camera to the computer. (Also used for displaying labels, as
described in item j.)
Viewfinder indicators For convenience while taking pictures, the PDC-2000
provides a yellow LED and a red LED at the bottom of the
viewfinder. If an error condition occurs, these indicators light
to alert you.
Indicator Meaning
Yellow Flash has not completely
charged or picture being
stored
Blinking red (when Shutter
button partially depressed)
Insufficient light, storage
disk full, low battery or
internal hardware error
Using the PDC-2000 camera 39
Page 48

When a blinking red LED appears in the viewfinder, the LCD
panel also displays an explanatory error message. (See LCD
panel on page 37.)
Sound indicators The PDC-2000 provides audible tones to help alert you to the
following operating or error conditions:
Sound Meaning
One high-pitched tone when
camera power turned on
Two high-pitched tones
Camera is ready to take
pictures
Low battery
followed by a low-pitched
tone when Shutter button
pressed half way
Two high-pitched tones
when Shutter button pressed
half way
One or two low-pitched
tones when camera turned
Insufficient light, flash not
ready, storage disk full or
internal hardware error
Internal hardware error or
special condition
on
One or more low-pitched
tones followed by camera
Battery power insufficient for
camera operation
powering off
When two high-pitched tones or a low-pitched tone indicate
an error condition, the LCD panel also displays an
explanatory message. (See LCD panel on page 37.)
If you wish, you can turn camera sound off for the error
condition signals. See Changing the preferences on page 77
(Macintosh) or page 99 (PC).
Capture and Index modes The PDC-2000 has two modes of operation: Capture and
Index. You select the mode by pressing the Index button.
40
The Capture mode is used for picture-taking. You can also
edit the default picture label while you are in the Capture
mode. (See Labeling pictures on page 50 for more
information.)
Page 49

The Index mode allows you to use the Scroll buttons to scroll
through the numbers, times, dates and labels of the pictures
stored in the camera. In the Index mode, you can also delete
pictures and edit individual labels.
Automatic shutoff To help conserve battery power, the PDC-2000 has an
automatic shutoff feature that turns off the camera after a
preset period of inactivity (2 minutes, unless you change it as
described below). The camera also turns off the viewfinder
image, which can be displayed on the computer screen when
taking pictures with the camera connected to the computer, if
the camera remains inactive for a preset period.
The automatic shutoff timeout periods can be adjusted
through the camera’s internal settings. See Changing the
preferences on page 77 (Macintosh) or page 99 (PC).
Note: Automatic shutoff is disabled while the camera is
connected to AC power and is under computer control
(displaying “connected” on the LCD panel).
Taking pictures
Turning on the camera To turn on the PDC-2000 camera, press the Power button (a).
Using the PDC-2000 camera 41
Page 50

When you press the Power button, the camera performs a
brief self-test, then displays a normal LCD panel. If the sound
indicators are enabled, the camera also emits a short,
high-pitched tone to indicate that it passed the self-test and is
ready to take pictures.
If the camera detects any problems or errors during its
self-test, it displays an error message on the LCD and emits
one or two short, low-pitched tones. (For more information
about error messages, see Troubleshooting error messages on
page 111.)
Setting to stand-alone
mode
If your PDC-2000 camera is connected to a computer, you
must release it from computer control to operate in the
stand-alone mode.
Use either of these two methods to release it:
• Use the computer to release the camera. (See Releasing the
camera from computer control, page 80 for Macintosh or
page 102 for PC.)
• Disconnect the camera from the computer. (See Disconnecting
the camera from your computer on page 29.)
WARNING: DO NOT DISCONNECT OR CONNECT
ANY DEVICE WHILE THE DEVICE OR YOUR
COMPUTER IS TURNED ON. DOING SO COULD
DAMAGE THE DEVICE, YOUR COMPUTER, OR BOTH.
42
Page 51

Selecting Capture mode Before taking pictures, make sure the camera is in the Capture
mode. If the camera is in the Index mode instead, the word
“Index” (a) appears in the LCD panel. Set the mode to
Capture by pressing the Index button.
Setting the camera for
current lighting conditions
To achieve accurate colors, you must choose the white
balance setting that matches lighting conditions in the scene.
Using an incorrect setting can give your pictures an unnatural
yellow, blue or green tint.
Use the daylight setting for taking pictures outdoors, or when
taking pictures with the flash set to Automatic or On (see
Using flash on page 46).
When taking pictures indoors without flash under
incandescent or fluorescent lighting, change the camera to the
appropriate setting by pressing the White Balance button
(WB).
Using the PDC-2000 camera 43
Page 52

When either incandescent ( ) or fluorescent ( ) lighting is
selected, the appropriate symbol appears on the LCD panel
(a). When daylight is selected, no symbol is visible.
Holding the camera The PDC-2000 camera is designed so you can easily hold it
steady during picture-taking. When you hold the camera as
shown, you can comfortably reach the shutter button while
viewing the scene through the viewfinder.
If you hold the camera vertically (for portraits, for example),
be sure the flash is at the top as shown.
Framing and taking
the picture
44
After setting the mode and lighting setting, hold the camera
correctly and view the scene to be captured through the
viewfinder. If necessary, move closer or farther away from the
subject while looking through the viewfinder to get the
framing you want. (If you wear eyeglasses, fold back the
rubber eyecup on the viewfinder for easier viewing.)
Page 53

With the normal 38mm-equivalent lens, the PDC-2000
camera can focus on subjects as close as 10 inches (26cm)
from the lens. When framing subjects less than 2 feet (61cm)
from the lens, leave some extra space between your subject
and the left and right edges of the viewfinder. At close
distances, some of the area near the edges of the viewfinder
may not be captured in the picture.
Note: When the normal 38mm-equivalent lens is installed on
the camera, use the full viewfinder for framing your picture.
The frame visible in the viewfinder is for framing with the
optional 60mm-equivalent lens.
When the subject is framed, press the shutter button slightly
while watching for a yellow or red warning indicator at the
bottom of the viewfinder.
If no warning indicator is visible, take the picture by pressing
the shutter button completely. (If a red or yellow warning
indicator is visible in the viewfinder, release the button and
refer to If you see a viewfinder warning below before taking
the picture.)
Before or after taking the picture, you can label it as described
on page 50 for easy identification.
If you see a viewfinder
warning
If a yellow or red warning indicator is visible in the
viewfinder when you are about to take a picture, release the
shutter button and take the steps indicated below before
continuing:
Indicator Meaning and corrective action
Yellow Flash has not completely charged or
previous picture still being stored;
wait until the LED goes out before
taking the picture
Using the PDC-2000 camera 45
Page 54

Indicator Meaning and corrective action
Blinking red Insufficient light; use flash (page 46)
or
Camera storage disk is full; erase
one or more pictures (page 55) or
transfer the stored pictures to the
computer (page 69 for Macintosh,
page 91 for PC)
or
Low battery power; recharge
batteries (page 106)
or
Hardware error; see
Troubleshooting error messages
(page 111)
Note: When you see the blinking red LED in the viewfinder,
look at the LCD panel for more information about the
problem.
Using flash The PDC-2000 camera provides three flash modes for
optimum picture quality under a great variety of lighting
conditions:
46
Automatic
()
Camera automatically
determines whether or not to
use flash
On ( )
Flash fires with every picture
Off (blank) Flash never fires
Automatic ( ) is the recommended setting, and should
produce correctly lighted pictures under most conditions. The
flash is effective up to 15 feet (4.6m) from the subject.
Use the flash On ( ) setting when conditions might cause
the automatic flash system to mistakenly determine that flash
is not needed. Outdoors, for example, overall scene lighting
may be adequate but the main subject may be in shadow. In
this case, the automatic flash would not fire and the subject
would be too dark. In this case, using the flash On setting
would expose the subject correctly.
Page 55

When flash is set to Automatic or On, make sure the white
balance is set for Daylight. (See Setting the camera for current
lighting conditions on page 43.)
Use the flash Off (no symbol) setting when sufficient light is
available and you do not wish to fire the flash.
To change the flash setting, press the Flash button ( ) until
, or no symbol, as appropriate, appears in the LCD
panel (a).
Using the PDC-2000 camera 47
Page 56

Using Auto Focus The PDC-2000 camera features automatic focus that
produces sharp pictures under most conditions. To disable
automatic focus and set focus to infinity (for taking pictures
through a window, for example), press the Auto Focus button
( ) to display the Auto Focus Off symbol ( ) on the LCD
panel (a).
You can reset to Auto Focus On ( ) by pressing the Auto
Focus button again. The camera automatically resets to Auto
Focus On when the camera is turned on.
Using Focus Lock The Focus Lock feature lets you achieve sharp focus when the
main subject is not centered in the picture.
To use Focus Lock, center the subject in the viewfinder and
press the Shutter button half-way down to lock the focus
distance. While continuing to hold the Shutter button,
reframe the picture as desired. Then press the Shutter button
all the way to take the picture.
48
Page 57

Compensating for back
lighting
The PDC-2000 camera’s exposure system automatically
adjusts to most lighting conditions. But when the background
is much brighter than your subject or “back-lighted,” the
subject may turn out too dark (a). Using the Backlight
Compensation feature increases the brightness of the entire
picture to produce a correctly exposed subject (b).
Turn on Backlight Compensation by pressing the Backlight
Compensation button ( ).
A symbol ( ) in the LCD panel (a) indicates that Backlight
Compensation is on. The camera automatically turns
Backlight Compensation off after you take a picture or when
the camera is turned on.
Using the PDC-2000 camera 49
Page 58

Labeling pictures
To help identify your pictures, you can use the camera
controls to assign a 10-character label to each one. This label
appears on the camera’s LCD panel (a) whenever the picture
number is displayed, and it remains with the picture when it
is transferred to the computer.
With the procedures in this section, you can edit the default
picture label applied to all pictures taken after the default
label is entered. (Your PDC-2000 camera was shipped with
“POLAROID” as the default picture label.) You can also edit
this default label to create unique labels for individual
pictures any time after the pictures are taken.
50
Page 59

Note: You can also use your computer to edit the default
picture label or change individual picture labels for pictures
being transferred to the computer. For more information, see
Chapter 4 (Macintosh) or Chapter 5 (PC).
Editing the default
picture label
Use the following steps to edit the default picture label stored
in the camera. This label will appear on all pictures taken
after the label is edited.
1 If the camera is in the index mode (indicated by “Index” on
the LCD panel), press the Index button to remove “Index”
and change the mode to Capture.
The current default picture label (a) is visible.
Using the PDC-2000 camera 51
Page 60

2 Press the Label button to display a blinking cursor (b) under
the first empty character space in the LCD panel label field.
If no default label exists, the cursor appears in the first
character space of the label field.
3 Press the Erase button once to erase the last character of the
label, twice to erase the last two characters, etc. To erase the
entire label, hold the Erase button for 3 seconds or longer.
If no picture label exists, it is not necessary to press the Erase
button.
52
4 To insert a new character at the cursor location, press the
Scroll button until the desired character appears in the space.
Press the Enter button to store the character and move the
cursor to the next space.
Note: Only upper case (capital) letters, numerals, hyphen (-)
and space are available for labels.
To leave a blank space, press the Enter button without
entering a character.
5 Repeat step 4 until you have completed the label (up to 10
characters and spaces).
Page 61

6 Exit from the Label mode by pressing the Label button.
To individualize the default label for a single picture, use the
procedure in the following section.
Editing a single picture’s
label
Use the following steps to edit an individual picture label:
1 If the camera is not in the Index mode (indicated by “Index”
(a) on the LCD panel), press the Index button to change to
the Index mode. (It may take a few seconds for “Index” to
appear.)
2 If the number (b) of the picture receiving the new label is not
displayed in the LCD panel, press the Scroll button until the
desired picture number and label (c) appear.
Using the PDC-2000 camera 53
Page 62

3 Press the Label button to display a blinking cursor (c) under
the first empty space in the LCD panel label field.
4 Press the Erase button once to erase the last character of the
label, twice to erase the last two characters, etc. To erase the
entire label, hold the Erase button for 3 seconds or longer.
If no picture label exists, it is not necessary to press the Erase
button.
5 To insert a new character at the cursor location, press the
Scroll button until the desired character appears in the label
space. Press the Enter button to store the character and move
the cursor to the next space.
54
To leave a blank space, press the Enter button without
entering a character.
6 Repeat step 5 until you have completed the new label (up to
10 characters and spaces).
7 Exit from the Label mode by pressing the Label button.
Page 63

Erasing pictures
Erasing a single
picture
When you reach the camera’s picture-storage limit (40 or 60
pictures, depending on your camera model) or you want to
retake pictures for any reason, you will need to erase one or
more pictures from the camera’s internal storage.
If you are using the camera in the stand-alone mode, use the
following procedure to erase pictures. (If the camera is
connected to the computer, use the computer to erase pictures
from the camera. For that procedure, see Deleting pictures
from the camera on page 71 for Macintosh or page 93 for
PC.)
1 Place the camera in the Index mode (a) by pressing the Index
button. (It may take a few seconds for “Index” to appear.)
Using the PDC-2000 camera 55
Page 64

2 Press the Scroll button until the number (b), label (c), if used,
and date and time (d) of the desired picture appears in the
LCD panel.
3 Simultaneously press and release the Erase button and the
Shutter button to display a confirmation message (e) on the
LCD panel. (Be sure to press the Shutter button all the way.)
56
4 To erase the picture, press the Erase button a second time. (If
you decide not to erase the picture, do not press the Erase
button. Instead, wait for the confirmation message to
disappear or press the Enter button.)
Page 65

Erasing all pictures
5 Repeat steps 2, 3 and 4 as needed to erase additional pictures.
Important: When you erase a picture, the picture numbers
change to produce a continuous sequence starting at 1 for all
remaining pictures. When erasing multiple pictures, you
should erase the highest-numbered picture first to avoid
accidentally erasing pictures you want to keep.
6 To change to Capture mode for taking more pictures, press
the Index button.
WARNING: THIS PROCEDURE ERASES ALL PICTURES
STORED IN THE CAMERA. IF YOU WANT TO KEEP
ANY PICTURES, BE SURE TO TRANSFER THEM TO
THE COMPUTER (SEE PAGE 69 FOR MACINTOSH OR
PAGE 91 FOR PC) BEFORE USING THE STEPS BELOW.
1 Place the camera in the Index mode (a) by pressing the Index
button. (It may take a few seconds for “Index” to appear.)
Using the PDC-2000 camera 57
Page 66

2 Simultaneously press and hold the Erase button and the
Shutter button for 5 seconds to display “erase all?” (b) on the
LCD panel. (Be sure to press the Shutter button completely.)
Release the buttons when the message appears.
3 To erase all the pictures, press the Erase button a second time.
(If you decide not to erase the pictures, do not press the Erase
button. Instead, wait for the confirmation message to
disappear or press the Enter button.)
4 To change to Capture mode for taking more pictures, press
the Index button.
Unerasing pictures If you accidentally erase one or more pictures from the
camera, you may be able to recover (“unerase”) them with
the following procedure.
Note: These steps restore only the most recently taken
pictures. If you erase pictures and then take more before you
attempt recovery, the new pictures may overwrite the ones
you want to recover.
1 Turn the camera off by pressing the Power button.
58
Page 67

2 Simultaneously press and hold the Power button and the Auto
Focus button until “restored” appears on the LCD panel
(about 2 seconds), then release the buttons.
3 Transfer the pictures you want to keep to your computer (see
page 69 for Macintosh or page 91 for PC).
Note: Restoring pictures is likely to change the picture
numbers. Use care in choosing the pictures to be transferred.
4 Erase all the pictures from the camera. (See Erasing all
pictures on page 57, or see Chapter 4 or 5 to use your
computer for erasing the pictures.)
Note: Because this procedure restores all pictures on the
camera’s storage disk, the LCD displays “disk full” if you
attempt to take additional pictures without performing steps
3 and 4.
Using the PDC-2000 camera 59
Page 68

Page 69

4 Using the PDC-2000 with
your Macintosh
To transfer and work with pictures from the PDC-2000
camera on your Macintosh, you use the PDC-2000 plug-in
module with an image-processing application, such as Adobe
Photoshop. If you do not have an application compatible with
plug-in modules, you can still work with the camera through
your Macintosh by installing PDC-2000 Direct. (See Chapter
2 for software installation information.)
With the PDC-2000 camera connected to your computer and
either the PDC-2000 plug-in or PDC-2000 Direct software
installed, you can perform the following operations:
View the pictures stored in the camera You can quickly view
all the pictures in the camera by displaying miniature
representations of them (called thumbnails) in a single
window.
Transfer multiple pictures You can use the thumbnail view to
choose and transfer pictures from the camera to your
computer.
Using the PDC-2000 with your Macintosh 61
Page 70

Operate the camera through the computer You can take
pictures by using your computer keyboard or mouse, while
using the computer screen as a viewfinder. This is particularly
convenient for studios and other stationary setups.
Change camera setup You must use the PDC-2000 software
to change the PDC-2000 camera’s internal date, time, user
name and other settings stored in the camera.
The PDC-2000 windows
When you use the PDC-2000 plug-in software from within an
image-processing application or when you launch PDC-2000
Direct, three different windows are available:
Transfer Pictures window The Transfer Pictures window
displays thumbnail representations of pictures in the camera.
62
From the Transfer Pictures window, you can:
• Transfer selected pictures from the camera to the computer.
• Rotate selected pictures in 90-degree increments.
• Edit picture labels.
Page 71

• View picture information, including date, time, user name,
and camera settings in effect when the picture was taken.
• Delete selected pictures from the camera.
Take Pictures window The Take Pictures window lets you
control the camera through the computer.
With the Take Pictures window you can:
• Display a viewfinder image on your computer screen for
framing pictures.
• Change the viewfinder orientation from landscape to portrait
or vice versa.
• Change the camera settings for flash, lighting conditions,
automatic focus and backlight compensation just as you
would with the controls on the camera.
• Take a picture and immediately transfer it to the computer.
Using the PDC-2000 with your Macintosh 63
Page 72

Set Preferences window The Set Preferences window lets you
change the internally stored camera settings and the way
pictures are transferred from the camera to the computer. It
also allows you to release the camera from computer control
without disconnecting the camera cable.
From the Set Preferences window you can:
• Change the user name (recorded with each picture).
• Change the default picture label.
64
• Change the camera’s internal clock settings to match the
computer’s time and date settings.
• Change the camera’s automatic shutoff settings.
• Select the resolution of pictures transferred from the camera
to the computer.
• Turn the camera sound indicators off and on.
• Release the camera from computer control (for taking
pictures using the camera’s controls while the camera is
connected to the computer).
Page 73

• Set “Expert Preferences” for transferring pictures to an image
processing application or directly to a file on your computer’s
disk, for keeping the PDC-2000 plug-in active or closing it
after each transfer operation, and for enabling or disabling
the display of thumbnail images from the camera.
Working with pictures in the camera
Using either the PDC-2000 plug-in software with your
image-processing application or PDC-2000 Direct, you can
look at thumbnails (small representations) of pictures stored
in the camera without transferring them to the computer.
While viewing the thumbnails on your computer screen, you
can rotate pictures, transfer pictures to the computer, or
delete pictures from the camera.
Viewing pictures
in the camera
To display thumbnails of the pictures stored in the camera:
1 Connect the camera to your computer. If necessary, see
Connecting the camera to your Macintosh on page 17.
2 Turn on the camera by pressing the Power button (a).
3 Turn on your computer.
Using the PDC-2000 with your Macintosh 65
Page 74

4 Start an image-processing application compatible with
Photoshop plug-ins, or start PDC-2000 Direct.
5 If you are using PDC-2000 Direct, skip to step 6.
If you are using a plug-in compatible image processing
application, choose Acquire from the File menu, then choose
PDC-2000.
6 If the Transfer Pictures window is not visible, click on the
Transfer Pictures button to display it.
If all the thumbnails cannot fit in the window, click on the
vertical scroll bar to view additional thumbnails.
Selecting thumbnails Before you can perform operations (rotate, delete, etc.) on the
pictures represented by the thumbnails in the Transfer
Pictures window, you must select one or more of the
thumbnails.
To select a single thumbnail, click it once or press the arrow
keys to move to the thumbnail you want to select. A red
border appears around the thumbnail. If all the thumbnails
do not fit in the window, the rows of thumbnails
automatically scroll as you use the arrow keys.
66
Page 75

To select several thumbnails, press and hold the Shift key and
then click the thumbnails or use the arrow keys. To select all
the thumbnails, click the Select All button or hold down the
z (Command) key and press the A key.
To deselect one thumbnail, press and hold the Shift key and
click the selected thumbnail. To deselect all thumbnails, click
the Select All button (or hold down the z key and press the A
key) a second time.
Previewing pictures with
PDC-2000 Direct
Viewing picture
information
If you are using PDC-2000 Direct, you can enlarge any
thumbnail to a 400x300-pixel preview image for closer
viewing.
To view a preview image, click on the thumbnail to select it.
Choose Preview from the File menu, or hold down the z
(Command) key and press the O key.
While viewing the preview image, you can save the picture to
your computer’s hard disk by choosing Save As from the File
menu.
To close the preview image, click on the Close box in the
upper left corner of the Preview window.
When the Transfer Pictures window is open, you can display
the following information about any picture represented in
the window:
• Picture label
• User name
• Date and time picture was taken
• Focus distance
• Camera settings when picture was taken (light source, flash,
autofocus, backlight compensation)
Using the PDC-2000 with your Macintosh 67
Page 76

To view this information for any picture, select the desired
thumbnail as described on page 66. Then choose the Get Info
button or hold down the z (Command) key and press the I
key.
To view abbreviated picture information, hold down the
Option key while clicking on a thumbnail.
Rotating pictures You can rotate a picture in 90-degree increments to change its
orientation from landscape to portrait or vice versa. The
rotation will not be saved unless you transfer the picture to
the computer.
To rotate one or more pictures:
1 View the pictures in the camera as described on page 65.
2 Select one or more pictures to be rotated. (See Selecting
thumbnails on page 66.)
3 Rotate the selected pictures 90 degrees by clicking the Rotate
button or hold down the z (Command) key and press the R
key.
4 To rotate the pictures further, continue to click the Rotate
button again or hold down z and press R.
Note: To rotate the selected thumbnails back to their original
orientation, hold down z and Shift, and press R.
Editing a picture label If necessary, you can edit individual picture labels in the
Transfer Pictures window. To edit the label text, click on the
label and use the keyboard. You can move among labels by
either clicking with the mouse or pressing the Tab key.
Note: Unlike individual labels created with the camera
controls as described in Editing a single picture’s label on
page 53, labels edited with the computer are not saved in the
camera. They remain visible only while you are viewing the
Transfer Pictures window.
68
Page 77

Transferring pictures
from the camera to
the computer
While viewing pictures stored in the camera, you can choose
those you want to keep and then transfer them to the
computer. If you are using Adobe Photoshop or another
application compatible with Photoshop plug-ins, you can
transfer them to the image-processing application or directly
to an image file on your computer’s hard disk. (You choose
the method of transfer through the Expert Preferences button
in the Set Preferences window. See Changing the preferences
on page 77.) If you are using PDC-2000 Direct, you can only
transfer the pictures directly to your computer’s hard disk.
When you transfer the pictures from the camera to an image
processing application, you save each one by using the Save
As command in the application.
Most image-processing applications allow you to choose a file
format for the pictures you are saving. (A file format is a way
of organizing the image data so the computer can display and
work with it.) See instructions with your image-processing
application for a description of formats available to you.
If you prefer to save the pictures directly to your computer’s
hard disk or if you are using PDC-2000 Direct, your pictures
are saved as TIFF files in the folder of your choice.
Transferring pictures to an application
Use the following steps to transfer one or more pictures to the
computer through your image-processing application. (These
instructions do not apply to PDC-2000 Direct because it only
saves pictures directly to disk.)
Note: If necessary, disable the option that transfers pictures
directly to disk or change the resolution (800x600 or
1600x1200) of the pictures being transferred before starting
this procedure. (See Changing the preferences on page 77.)
Using the PDC-2000 with your Macintosh 69
Page 78

Tip: If the Transfer button displays a diskette, the Expert
Preferences are set to transfer directly to disk and must be
changed before starting.
1 View the pictures in the camera as described on page 65.
2 Select one or more pictures to be transferred. (See Selecting
thumbnails on page 66.)
3 Click the Transfer button or hold down the z (Command)
key and press the T key.
Each selected picture appears in your image-processing
application.
Note: When you transfer several pictures, your image-
processing application may display them on top of one
another. To view the different image windows, drag each one
slightly to tile them.
4 If the Transfer Pictures window is still visible, close it.
5 Save a picture as follows:
a. In the image-processing application, click on a picture to
make its window active.
b. Choose Save As from the application’s File menu.
70
c. Follow the instructions with your image-processing
application to save the picture in the desired format and
in the desired folder on your hard disk.
6 Repeat step 5 as needed to save all the transferred pictures.
Note: Some applications may not allow you to transfer all the
pictures at once with this method. If some of the pictures do
not transfer from the camera to the application, repeat steps 2
through 7 as needed to transfer additional pictures.
Page 79

Transferring pictures directly to disk
Use the following steps to transfer one or more pictures
directly from the camera to the computer’s hard disk without
passing through your image-processing application. (If you
are using PDC-2000 Direct, you must use this procedure to
transfer pictures from the camera to your computer.)
Note: If necessary, enable the option that transfers pictures
directly to disk or change the resolution (800x600 or
1600x1200) of the pictures being transferred before starting
this procedure. (See Changing the preferences on page 77.)
Tip: If the Transfer button displays a diskette, the Expert
Preferences are set to transfer directly to disk and does not
need to be changed before starting.
1 View the pictures in the camera as described on page 65.
2 Select one or more pictures to be transferred. (See Selecting
thumbnails on page 66.)
3 Click the Transfer button or hold down the z (Command)
key and press the T key.
4 Select a folder to receive the pictures. (You can also create a
new folder for the pictures by clicking on the New Folder
button.)
Deleting pictures from
the camera
5 Click OK to transfer the pictures.
Use the following procedure to delete pictures from the
camera.
If you want to keep any of the pictures you are about to
delete, be sure to transfer them to the computer before
deleting them from the camera. See Transferring pictures from
the camera to the computer on page 69.
To delete pictures from the camera:
1 View the pictures in the camera as described on page 65.
Using the PDC-2000 with your Macintosh 71
Page 80

2 Select one or more pictures to be deleted. (See Selecting
thumbnails on page 66.)
3 Use one of these methods to display a confirmation dialog
box:
• Click the Delete button.
• Press the Delete key.
• Hold down the z (Command) key and press the D key.
4 To delete the selected pictures from the camera, click OK in
the confirmation dialog box.
Note: If you are not deleting all the pictures from the camera,
those remaining will be renumbered. For example, you may
decide to delete all pictures except 4 and 23. In this case,
picture 4 becomes picture 1, and picture 23 becomes picture 2.
Operating the camera from the Macintosh
If the camera is connected to the computer, you can control
the camera with the mouse and the keyboard, and you can
display a “live” viewfinder image on your computer screen.
This is useful if you use the camera in a stationary setting.
72
To take pictures using the computer:
1 Connect the camera to your computer. If necessary, see
Connecting the camera to your Macintosh on page 17.
Page 81

2 Turn on the camera by pressing the Power button (a).
3 Turn on the computer.
4 Start an image-processing application compatible with
Photoshop plug-in modules or start Polaroid PDC-2000
Direct.
5 If you are using PDC-2000 Direct, skip to step 6.
If you are using an image-processing application, choose
Acquire from the File menu, then choose PDC-2000.
6 If necessary, change the resolution (800x600 or 1600x1200)
of the pictures transferred to the computer. (See Changing the
preferences on page 77.)
Using the PDC-2000 with your Macintosh 73
Page 82

7 If the Take Pictures window is not visible, display it by
clicking on the Take Pictures button.
8 Click the View Finder button (or hold down the z key and
press the V key) to display a viewfinder image in the Take
Pictures window.
9 To change the orientation of the image in the viewfinder,
choose Landscape or Portrait as appropriate. (You can also
hold down the z key and press the R key to change between
Landscape and Portrait.)
74
10Select the Flash setting you want to use from the drop-down
list. See Using flash on page 46 for more information.
11Choose a Light setting that matches the lighting conditions in
the current scene. See Setting the camera for current lighting
conditions on page 43.
12Select or deselect the Auto Focus option. See Using Auto
Focus on page 48.
13If necessary, select Backlight Compensation. See
Compensating for back lighting on page 49.
Page 83

14When the picture is framed as desired, click the Snap button
(or hold down the z key and press the S key) to capture the
picture and transfer it to your image processing application or
to a Preview window in PDC-2000 Direct.
Note: To snap the picture after a preset delay, click on the
timer button (next to the Snap button) instead of the Snap
button. Enter the desired time delay, then click Start Timer to
begin the specified interval.
15If you are using an image processing application, close the
Take Pictures window (if it is still open) and follow
instructions with your application to view, edit or save the
picture.
If you are using PDC-2000 Direct, choose Save from the File
menu.
Changing operating preference s
Available options Using the PDC-2000 plug-in, you can set the following
preferences. These preferences remain unchanged until you set
them again.
User name The user name stored in the camera is attached to
each picture. After a picture is taken, you can view the user
name to help identify the photographer or the camera by
using the Get Info button in the Transfer Pictures window.
(See Viewing picture information on page 67.) Changing the
user name affects only pictures taken after the changes are
made. Pictures taken earlier and stored in the camera retain
the user name in effect when they were taken.
Using the PDC-2000 with your Macintosh 75
Page 84

Default picture label The default picture label is attached to
each picture when it is taken. This label appears below each
thumbnail image in the Transfer Pictures window to help
identification. It is also visible in the camera’s LCD panel.
After taking a picture, you can change its label from the
default to an individualized description by using the camera
controls (see Labeling pictures on page 50) or by using the
PDC-2000 plug-in software (see Editing a picture label on
page 68). Changing the default picture label affects only
pictures taken after the changes are made. Pictures taken
earlier and stored in the camera retain the label in effect when
they were taken. (The default picture label can also be
changed with the camera controls as described in Chapter 3.)
Current date and time The camera’s internal clock settings are
attached to each picture to indicate the date and time the
picture was taken. You can view the camera’s current date
and time settings in the camera LCD panel (see page 37).
Changing the date or time affects only pictures taken after the
changes are made. Pictures taken earlier and stored in the
camera retain the settings in effect when they were taken.
Automatic shutoff timeouts The timeout settings determine
how long the camera remains inactive before the viewfinder
image on the computer and the main camera power
automatically turn off to conserve battery power. The
automatic shutoff for camera power does not operate when
the camera is under computer control (displaying
“connected” in the LCD panel) and connected to AC power.
76
Picture resolution The PDC-2000 can be set to transfer its
internally stored pictures as either high resolution (800x600)
or super-high resolution (1600x1200) images. The selected
picture resolution option is applied to the pictures during
transfer from the camera to the computer. It does not affect
the way the pictures are taken or stored in the camera.
Camera sound indicators You can disable the camera’s
audible error signals. (See Sound indicators on page 40 for a
description of these indicators.)
Page 85

Expert preferences You can choose to transfer pictures from
the camera to an image processing application or directly to a
file on disk, to keep the PDC-2000 plug-in active or close it
after each transfer operation, and to disable display of
thumbnail images from the camera for faster plug-in launch.
Changing the preferences To change any of the preference settings described above:
1 Connect the PDC-2000 camera to the computer as described
on page 17.
WARNING: DO NOT CONNECT OR DISCONNECT THE
PDC-2000 CAMERA OR ANY OTHER SCSI DEVICE
WHILE THE DEVICE OR YOUR COMPUTER IS TURNED
ON. DOING SO COULD DAMAGE THE DEVICE, YOUR
COMPUTER, OR BOTH.
2 Turn on the camera by pressing the Power button (a).
3 Turn on the computer.
4 Start an image-processing application compatible with
Photoshop plug-in modules or start Polaroid PDC-2000
Direct.
5 If you are using PDC-2000 Direct, skip to step 6.
If you are using an image-processing application, choose
Acquire from the File menu, then choose PDC-2000.
Using the PDC-2000 with your Macintosh 77
Page 86

6 If the Set Preferences window is not visible, click the Set
Preferences button to display it.
7 Change one or more of the settings as needed:
Name or default picture label Click the Set button and type
new entries. (Only upper case letters, numerals, hyphens and
spaces can be used in the default picture label.)
Camera internal clock Click the Synchronize button to set
the camera to the computer’s date and time settings.
Automatic shutoff timeouts Click the appropriate scroll
buttons to change the viewfinder timeout (range: 1-100
seconds) or the camera power-off timeout (range: 1-60
minutes).
78
Picture resolution Click on the desired resolution button
(800x600 or 1600x1200).
Camera sound indicators Turn on or off by clicking on the
Sound check box.
Page 87

Expert preferences Set the following options:
Picture transfer
method
Plug-in behavior
after transfer
Thumbnail display Disable the option for loading
8 Return to the image-processing application or close
PDC-2000 Direct by clicking the Close box in the upper left
corner of the Set Preferences window.
Transfer pictures either to disk or
to your image-processing
application.
Note: An icon on the Transfer
button in the Transfer Pictures
window indicates the current
setting. A disk icon indicates
transfer to disk, and an
application window indicates
transfer to your image-processing
application.
Choose to close the plug-in and
return to the image processing
application after picture transfer
or to leave the plug-in active.
thumbnail images from the
camera to the Transfer Pictures
window, allowing the plug-in to
launch faster.
Using the PDC-2000 with your Macintosh 79
Page 88

Releasing the camera from computer control
You may wish to release the PDC-2000 camera from
computer control so you can operate it via the controls on the
camera and store pictures in the camera without
disconnecting the camera from the computer.
Releasing the camera To release the camera from computer control, use these steps:
1 Start an image-processing application compatible with
Photoshop plug-in modules or start Polaroid PDC-2000
Direct.
2 If you are using PDC-2000 Direct, skip to step 3.
If you are using an image-processing application, choose
Acquire from the File menu, then choose PDC-2000.
3 If the Set Preferences window is not visible, click the Set
Preferences button to display it.
4 To release the camera from computer control, click the
Release Camera button (or hold down the z key and press
the R key).
A Release Camera dialog box appears.
80
5 If you expect to restore the camera to computer control soon,
leave the dialog box open.
To return to the image-processing application or exit from
PDC-2000 Direct, click on the Quit button.
6 After releasing the camera, refer to Chapter 3 for camera
operating instructions.
WARNING: DO NOT TURN OFF THE CAMERA OR
DISCONNECT IT FROM THE COMPUTER AFTER IT
HAS BEEN RELEASED FROM COMPUTER CONTROL.
DOING SO COULD DAMAGE YOUR COMPUTER OR
CORRUPT DATA ON YOUR HARD DISK.
Page 89

If you want to turn off the camera while its cable is connected
to the computer, use the procedure recommended for any
SCSI device: (1) turn off the computer, and (2) turn off the
camera. To disconnect the camera from the computer, see
Disconnecting the camera from your computer on page 29.
Restoring computer
control
After releasing the camera from computer control as
described above, you can place the camera back under
computer control with these steps:
If the Release Camera dialog box is still visible
If you left the Release Camera window visible as described in
the previous section, click on the Reconnect button to restore
camera control to the computer.
If the Release Camera dialog box is not visible
If you returned to the image-processing application or closed
PDC-2000 Direct after releasing the camera from computer
control, use the following steps to restore camera control to
the computer:
1 Start your image-processing application or PDC-2000 Direct.
2 If you are using PDC-2000 Direct, skip to step 3.
If you are using an image processing application, choose
Acquire from the File menu, then choose PDC-2000.
3 If the Take Pictures window is not visible, click the Take
Pictures button to display it and restore camera control to the
computer.
Using the PDC-2000 with your Macintosh 81
Page 90

Page 91

5 Using the PDC-2000 with
your PC
To transfer and work with pictures from the PDC-2000
camera on your PC, you use the PDC-2000 TWAIN driver or
plug-in module with an image-processing application, such as
Adobe Photoshop. If you do not have an application
compatible with TWAIN or plug-in modules, you can still
work with the camera via your PC by installing PDC-2000
Direct. (See Chapter 2 for software installation information.)
With the PDC-2000 camera connected to your computer and
the PDC-2000 TWAIN driver, the plug-in or PDC-2000
Direct software installed, you can perform the following:
View the pictures stored in the camera You can quickly view
all the pictures in the camera by displaying miniature
representations of them (called thumbnails) in a single
window.
Transfer multiple pictures You can use the thumbnail views
to choose and transfer pictures from the camera to your
computer.
Using the PDC-2000 with your PC 83
Page 92
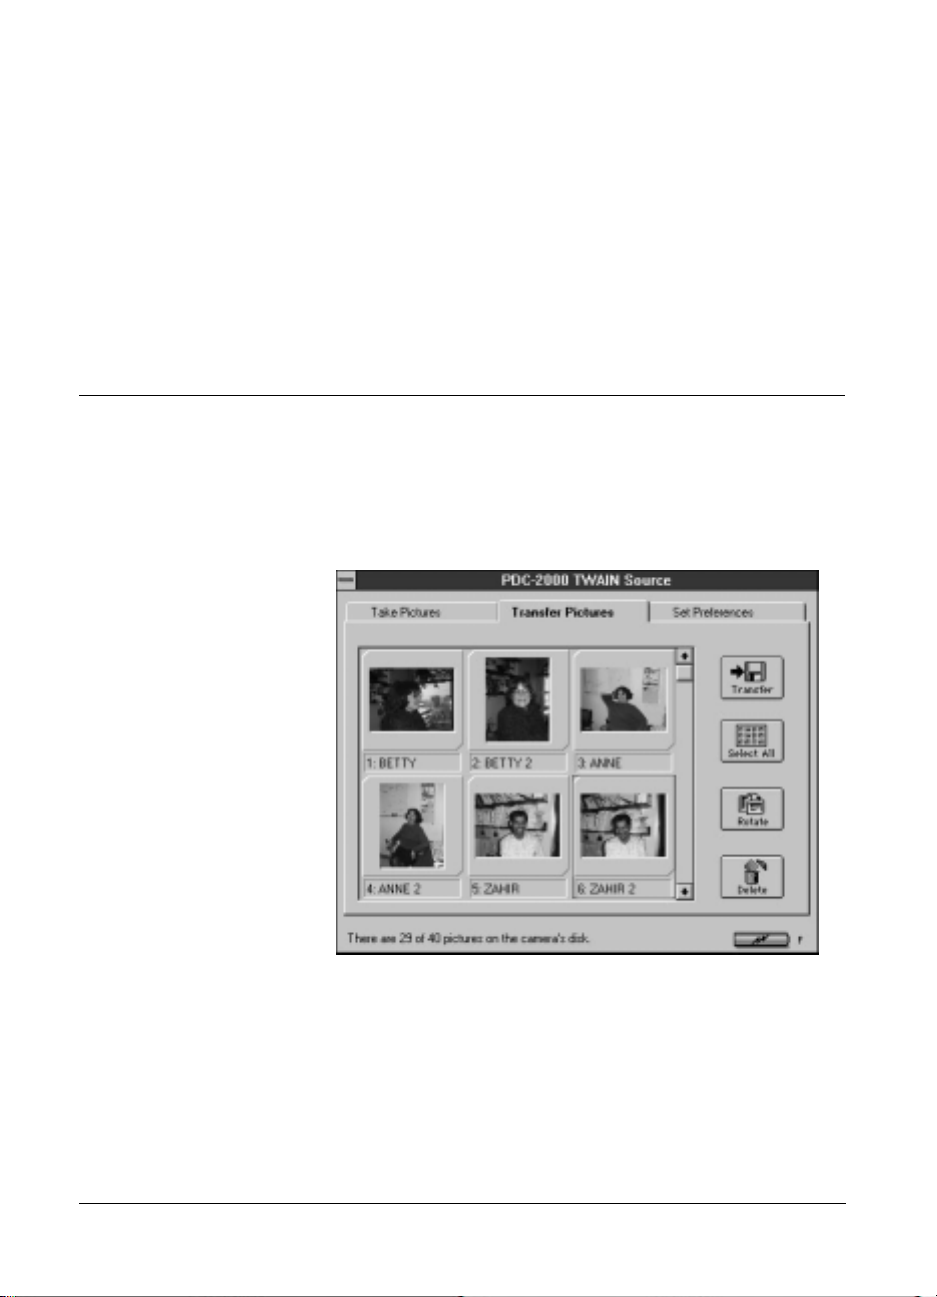
Operate the camera through the computer You can take
pictures by using your computer keyboard or mouse, while
using the computer screen as a viewfinder. This is particularly
convenient for studios and other stationary setups.
Change camera setup You must use the PDC-2000 software
to change the PDC-2000 camera’s internal date, time, user
name and other settings.
The PDC-2000 windows
When you start PDC-2000 software (TWAIN driver, plug-in
or PDC-2000 Direct), three different windows are available:
Transfer Pictures window The Transfer Pictures window
displays thumbnail representations of the pictures in the
camera.
84
From the Transfer Pictures window, you can:
• Transfer selected pictures from the camera to the computer.
Page 93

• Rotate pictures in 90-degree increments.
• Edit picture labels.
• View picture information, including date, time, user name,
and camera settings in effect when the picture was taken.
• Delete selected pictures from the camera.
Take Pictures window The Take Pictures window lets you
control the camera through the computer while taking
pictures.
With the Take Pictures window you can:
• Display a viewfinder image on your computer screen for
framing pictures.
• Change the viewfinder orientation from landscape to portrait
or vice versa.
• Change the camera settings for flash, lighting conditions,
automatic focus and backlight compensation just as you
would with the controls on the camera.
• Take a picture and immediately transfer it to the computer.
Using the PDC-2000 with your PC 85
Page 94

Set Preferences window The Set Preferences window lets you
change the camera’s internally stored settings and the way
pictures are transferred to the computer.
From the Set Preferences window, you can:
• Change the user name recorded with each picture.
• Change the default picture label.
• Change the camera’s internal clock settings to match the
computer’s time and date settings.
86
• Change the camera’s automatic shutoff settings.
• Select the resolution of pictures transferred from the camera
to the computer.
• Turn the camera sound indicators off and on.
• Release the camera from computer control (for taking
pictures using the camera’s controls while the camera is
connected to the computer).
• Set “Expert” preferences for transferring pictures to an image
processing application or directly to files on you computer’s
hard disk.
Page 95

Working with pictures in the camera
Using the PDC-2000 software (TWAIN driver, plug-in or
PDC-2000 Direct), you can look at thumbnails (small
representations) of pictures stored in the camera without
transferring them to the computer. While viewing the
thumbnails on your computer screen, you can rotate pictures,
transfer pictures to the computer, or delete pictures from the
camera.
Viewing pictures in
the camera
To display thumbnail images of the pictures stored in the
camera:
1 Connect the camera to your computer. If necessary, see
Connecting the camera to your PC on page 23.
2 Turn on the camera by pressing the Power button (a).
3 Turn on your computer.
4 Start your TWAIN compliant or plug-in compatible
application, or start PDC-2000 Direct.
Using the PDC-2000 with your PC 87
Page 96

5 If you are using PDC-2000 Direct, wait for the Transfer
Pictures window to appear.
If you are not using PDC-2000 Direct, use one of the methods
below to display the Transfer Pictures window:
• If you are using Adobe Photoshop and the TWAIN driver,
pull down the File menu and choose Select TWAIN and
PDC-2000. Click on OK. Pull down the File menu again and
choose Acquire TWAIN.
88
• If you are using a TWAIN compliant application other than
Adobe Photoshop, refer to the application’s instructions for
acquiring images.
• If you are using a plug-in compatible application, pull down
the File menu, choose Acquire, and choose PDC-2000.
Note: If no pictures are stored in the camera, the Take
Pictures window appears instead of the Transfer Pictures
window.
If all the thumbnails do not fit in the window, use the vertical
scroll bar to view additional thumbnails.
Page 97

Selecting thumbnails Before you can perform operations (rotate, delete, etc.) on the
pictures represented by the thumbnails in the Transfer
Pictures window, you must select one or more of the
thumbnails.
To select a single thumbnail, click on it once or press the
arrow keys to move to the thumbnail you want to select. A
color border appears around the thumbnail. (If all thumbnails
are displayed in the window, click on the vertical scroll bar to
see more.)
To select several thumbnails, press and hold the Control key
and then click the thumbnails. To select all the thumbnails,
click the Select All button.
To deselect a thumbnail, press and hold the Control key and
click the thumbnail. To deselect all thumbnails, hold the
Control key and click the Select All button.
Previewing pictures with
PDC-2000 Direct
Viewing picture
information
If you are using PDC-2000 Direct, you can enlarge any
thumbnail to a 400x300-pixel preview image for closer
viewing.
To view a preview image, click on the desired thumbnail with
the right mouse button to display a pop-up menu. Then
choose Preview from the menu.
While viewing the preview image, you can save the picture to
your computer’s hard disk by choosing Save As from the File
menu.
To close the preview image, double click on the Command
box in the upper left corner of the Preview window or choose
Close from the File menu.
When the Transfer Pictures window is open, you can display
the following information about any picture represented in
the window:
• Picture label
• User name
Using the PDC-2000 with your PC 89
Page 98

• Date and time picture was taken
• Focus distance
• Camera settings when picture was taken (light source, flash,
auto focus, backlight compensation)
To view this information for any picture, click on the desired
thumbnail with the right mouse button to display a pop-up
menu. Then choose Get Info from the menu.
Rotating pictures You can rotate pictures in 90-degree increments to change
their orientation from landscape to portrait or vice versa. The
rotation will not be saved unless you transfer the pictures to
the computer.
To rotate one or more pictures:
1 View the pictures in the camera as described on page 87.
2 Select one or more pictures to be rotated. (See Selecting
thumbnails on page 89.)
3 Rotate the selected pictures 90 degrees by clicking the Rotate
button. (To rotate the pictures further, continue to click the
Rotate button.)
Editing a picture label If you wish, you can edit a picture label in the Transfer
Pictures window.
90
To edit a label, click on the desired thumbnail with the right
mouse button to display a pop-up menu. Then choose Edit
Label to display an Edit Label dialog box. Type a new label
for the picture and choose OK.
Note: Unlike individual labels created with the camera
controls as described in Editing a single picture’s label on
page 53, labels edited with the computer are not saved in the
camera. They remain visible only while you are viewing the
Transfer Pictures window.
Page 99

Transferring pictures
from the camera to
the computer
While viewing pictures stored in the camera, you can choose
those you want to keep and then transfer them to the
computer.
If you are using Adobe Photoshop or another TWAIN or
plug-in compatible image processing application, you can
transfer them either to the application or directly to your
computer’s hard disk. (You choose the method of transfer
through the Set Preferences window. See Changing the
preferences on page 99.) If you are using PDC-2000 Direct,
you can only transfer the pictures directly to your hard disk.
When you transfer the pictures from the camera to an
image-processing application, you must save each one using
the Save As command in the application. Most
image-processing applications allow you to choose a file
format for the pictures you are saving. (A file format is a way
of organizing the image data so the computer can display and
work with it.) See instructions with your image-processing
application for a description of formats available to you.
If you prefer to transfer the pictures from the camera directly
to your computer’s hard disk, they are saved as TIFF files in
the directory of your choice.
Transferring pictures to an application
Use the following steps to transfer one or more pictures to the
computer through your image-processing application. (If you
are using PDC-2000 Direct, you must transfer your pictures
directly to disk as described above.)
Note: If necessary, disable the option that transfers pictures
directly to disk or change the resolution (800x600 or
1600x1200) of the pictures being transferred before starting
this procedure. (See Changing the preferences on page 99.)
Tip: If the Transfer button displays a diskette, the Expert
Preferences are set to transfer directly to disk and must be
changed before starting.
Using the PDC-2000 with your PC 91
Page 100

1 View the pictures in the camera as described on page 87.
2 Select one or more pictures to be transferred. (See Selecting
thumbnails on page 89.)
3 Click the Transfer button.
Each selected picture appears in your image-processing
application.
Note: When you transfer several pictures, your
image-processing application may display them on top of one
another. To view the different image windows, drag each one
slightly to tile them.
4 Save a picture as follows:
a. In the image-processing application, click on a picture to
make its window active.
b. Choose Save As from the application’s File menu.
c. Follow the instructions with your image-processing
application to save the picture in the desired format and
in the desired directory on your hard disk.
5 Repeat step 4 as needed to save all the transferred pictures.
Note: Some applications may not allow you to transfer all the
pictures at once with this method. If some of the pictures do
not transfer from the camera to the application, repeat steps 1
through 6 as needed to transfer additional pictures.
92
Transferring pictures directly to disk
Use the steps below to transfer one or more pictures directly
from the camera to the computer’s hard disk without passing
through your image-processing application.
Note: If necessary, enable the option that transfers pictures
directly to disk or change the resolution (800x600 or
1600x1200) of the pictures being transferred before starting
this procedure. (See Changing the preferences on page 99.)
 Loading...