

Page 1
Rev. 1, June 10, 2002
Page 2

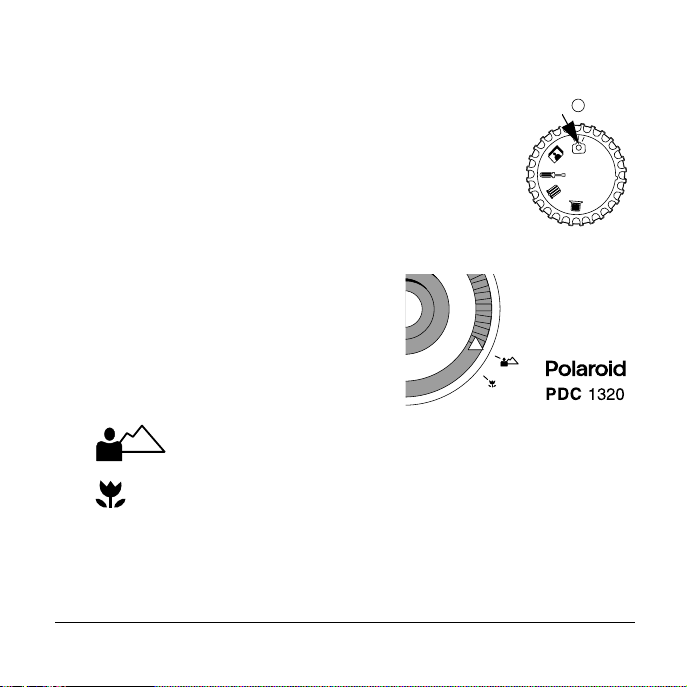
W elcome to the Polaroid PDC 1320 Camer a!
Congratulations on purchasing the Polaro id Pho t oMA X PDC 1320 Complete
Digital Came ra K i t. This k it co ntains everything y o u need to enter the worl d of
digital i ma ging. A fte r taki ng phot os , you will find i t easy to tra nsf er them to y our
compute r, edit, and correct your images— even display them on your television!
Once the photos are on your computer, you can us e the ArcSoft PhotoMAX
Image Maker Software to change them in creative ways, include them in email,
and print them.
Your digital camera and software are easy to use and are designed to work
together to produce high quality results. Use your imagination and have fun!
What is in this manual
•
The first part of this user’s manual, “Quick Start: T aking Your First Photo,”
walks you through ten easy steps that will have you taking successful photos
in no time.
•
The second section, “Advanced Features and Settings,” explains the more
sophi sticated functions of the came r a and how to make them work fo r you.
Polaroid PhotoMAX PDC 1320 Digital Camera User’s Manual 1
Page 3

Quick Start: Taking Your First Photo
Unpack your camera kit
Step 1
a Camera ca se
b Polaroid PDC 1320 camera
c Wrist strap (attached to ca mera)
d User’s manual
e ArcSoft PhotoMAX Image Maker
f Four AA batteries
g AC power adapter
:
Software CD-ROM
a
d
b
e
c
f
h Camera-to-computer USB cable
i Camera-to -TV video cable
2 Questions? www.PolaroidDigital.com
g
h
i
Page 4
Step 2
Review the cam er a’s features
:
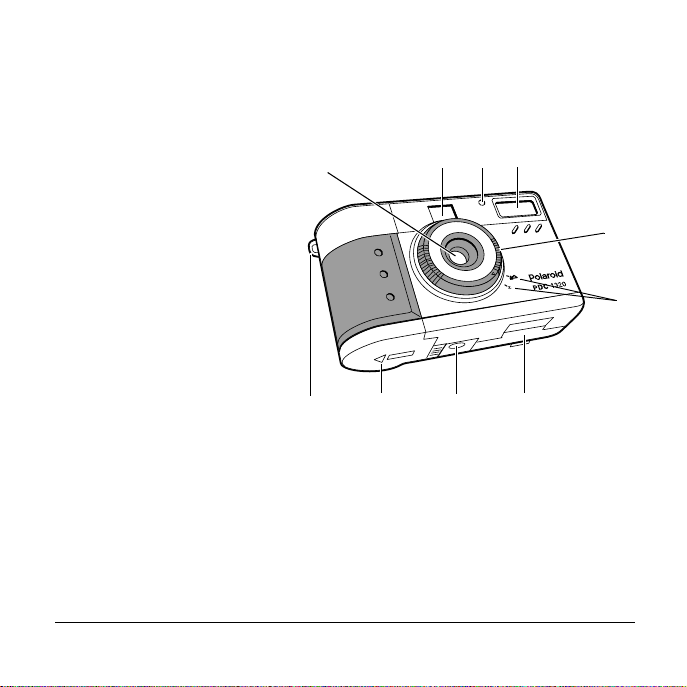
Front view
a Optical viewfin der
b Self-timer indicator
c Flash
d Focus ring
e Focusing distance
f Lens
g Wris t strap slot
h Battery compartment
i Tripod mount
j CompactFlash memory card compartment
Polaroid PhotoMAX PDC 1320 Digital Camera User’s Manual 3
f
g
a
b
h
i
c
d
e
j
Page 5
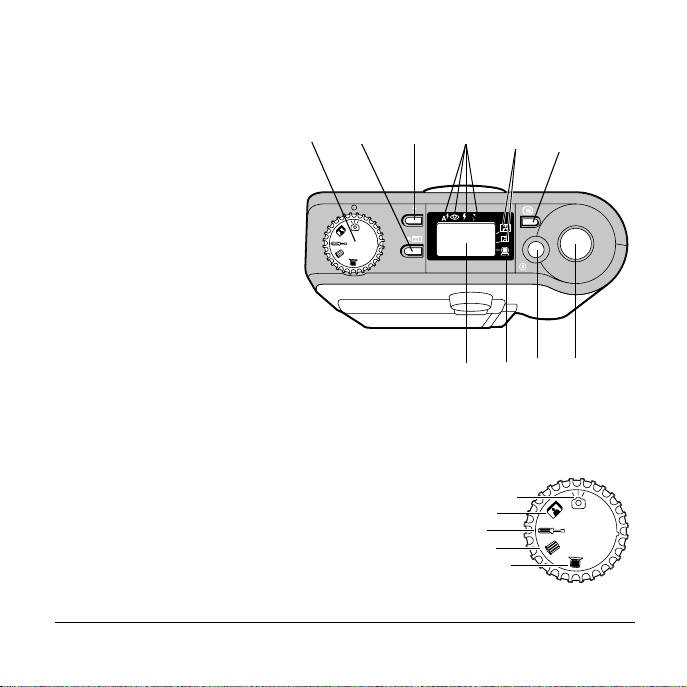
Top view
a Mode dial
b Photo quality and
resolution button
c Flash s e tti ng button
d Fl ash settin gs
e Photo resolution settings
f LCD menu on/off button
g Status LCD
h PC connection indicator
i Camera on/off button
j Shutter button
a
c
b
d
g
Mode dial
a Record mode
b Play mode
c Setup mode
d Delete mode
e PC connection mode
4 Questions? www.PolaroidDigital.com
e
f
h
a
b
c
d
e
j
i
Page 6
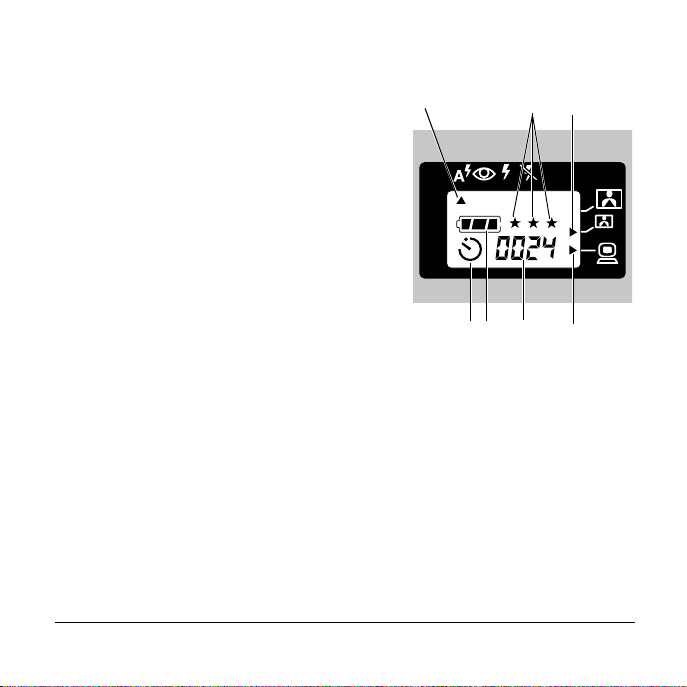
Status LCD
a Flash s e tting poi nter
b Self-timer indicator (when in use)
c Battery power indicator
d Photo s remaining indicator
e PC connection indicator (when in use)
f Photo resolution indicator
g Photo quality indicator
Polaroid PhotoMAX PDC 1320 Digital Camera User’s Manual 5
a
cb d e
g
f
Page 7
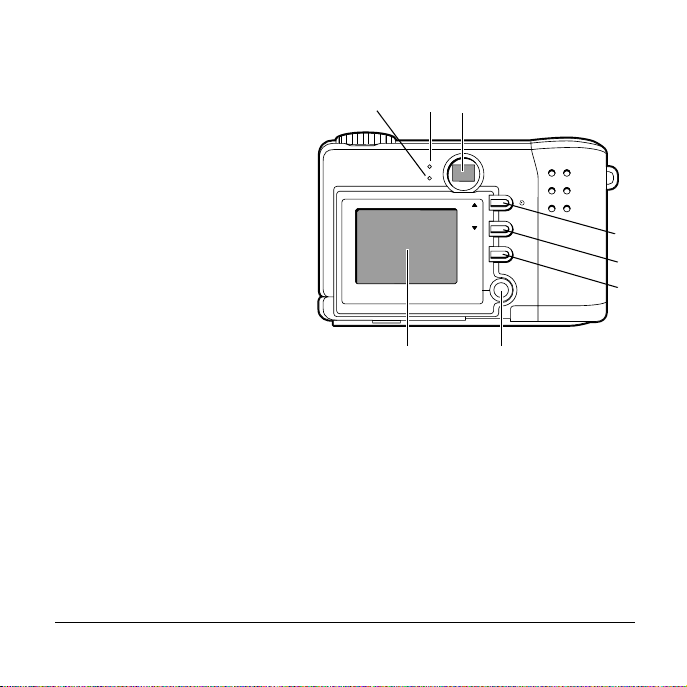
Rear view
b
a Camera po wer/status
a
c
indicator
b CompactFlash memory card
indicator
c Optical viewfin der
d L CD scroll up button/self-
timer button
e LCD scroll down button
f OK button
g Color LCD on/off and
h
photo viewing button
h Color LCD (menu/viewfinder)
6 Questions? www.PolaroidDigital.com
OK
e
f
g
d
Page 8
Sideview
a USB connection
b V ideo connection
c AC power adapter connection
a
b
c
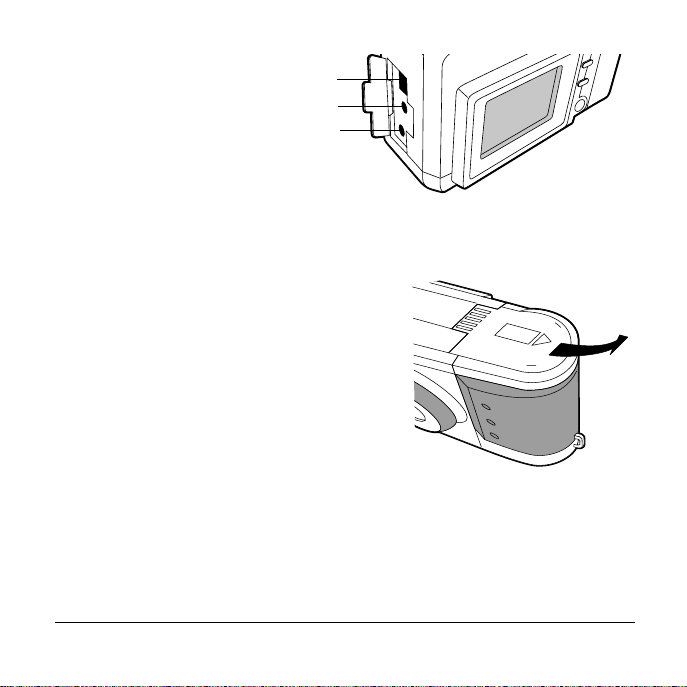
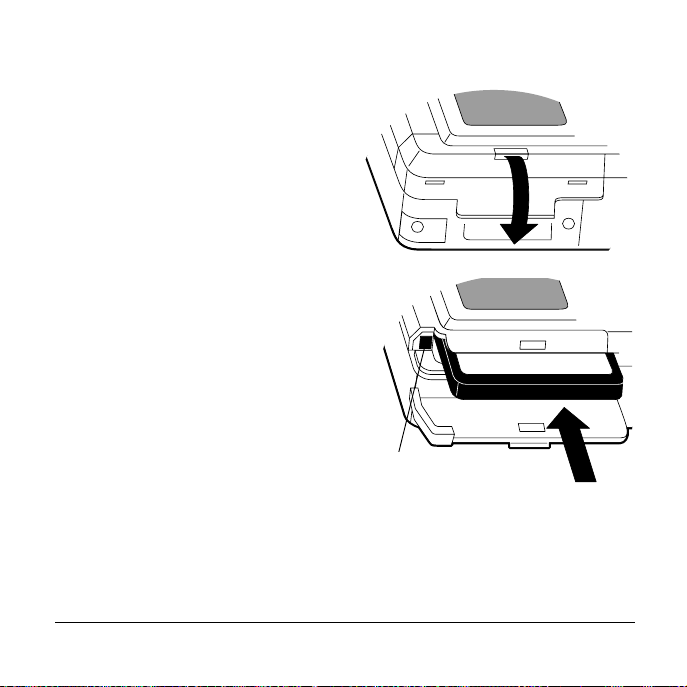
Step 3
a Open the battery compartment cover on
the bottom of the camera by sliding the
cover out to the side as far as it will go and
lifting it.
Install the camera’s batteries
:
Polaroid PhotoMAX PDC 1320 Digital Camera User’s Manual 7
Page 9
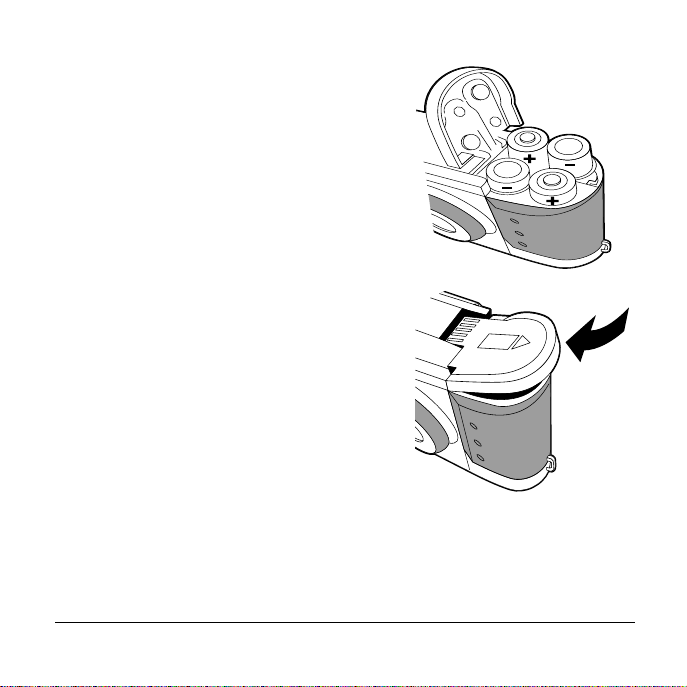
b Insert four AA batteries with the + and -
termi nals placed a s sh own.
c Close the cover of the battery
compa rtment secu rely.
If you feel resistan c e, do no t force the
cover. Slide it out to the side as far as it will
go, press it down flat against the camera
base, and slide it back into the base to lock
it closed.
Note: To learn more about batteries, such as
which ones to use and how to tell if
your batteries are running low, see page 16
8 Questions? www.PolaroidDigital.com
.
Page 10
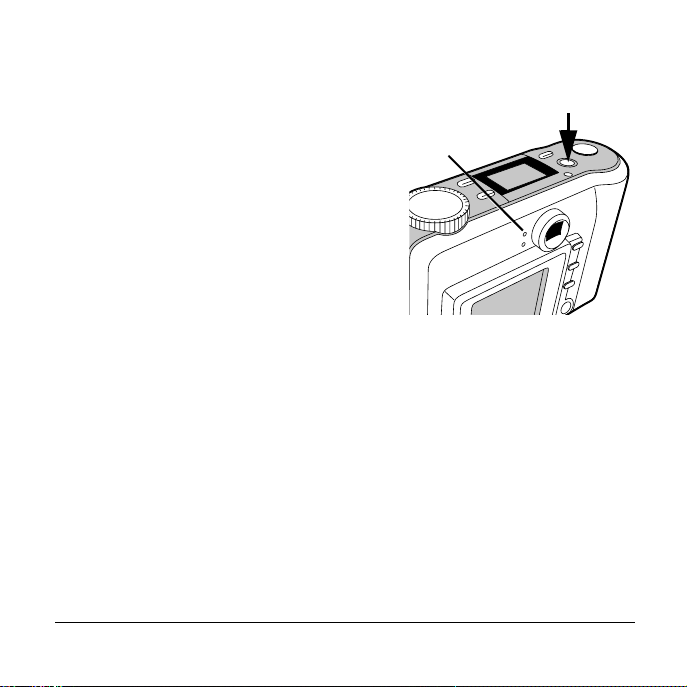
Step 4
Turn the camera on
:
a Press the yellow ca mera on/off button (a)
on the top of the camera.
b
b Wait for the green power/status indicator
light (b) on the back of the camera to stop
blinking before you take a photo.
Note: To conserve battery life, the color LCD
turns off after 90 seconds and goes into
“sleep mode.” While the camera is in
sleep mode, the green power/status
indicator light (b) stays on. (Be sure to turn off the color LCD when it is
not needed.) Pressing an y b u tton or rotating the mo de dial im m ediately
returns the cam era t o a po wered-up state. The cam era sh u t s off
completely after three minutes of inactivit y, unless you are using an AC
adapter (page15).
Polaroid PhotoMAX PDC 1320 Digital Camera User’s Manual 9
a
Page 11
Step 5
Turn the m ode dial to Record
:
The Record mode (a) is on the mode dial on the top of the
camera.
To learn more about the camera’s modes, see pag e24.
Step 6:
Turn the focu s ing ring on the front of the
camera t o set t he c orr ect d ist anc e b etwee n y ou
and your subject:
10 Questions? www.PolaroidDigital.com
Turn the focusing ring
2 feet (.6 m) to infinity
Use this setting for most subjects.
1 to 2 feet (.3 to .6 m)
Use this macro setting for close-up photos.
a
Page 12

Step 7:
The camera is pre- set to A ut o flash, which means the flash fires when the lighting
situation cal ls for i t. If you want to use a different setting, see pag e 27.
Stand 3 to 8 feet (1 to 2.5 m) from your subject for best results with flash.
If the flash fires, you cannot take another photo until
the power/status indicator (a) on the back of the
camera stops blinking.
Use the flash (if desired)
a
Step 8:
Stand the correct
distance from your subject
• Outdoors (no flash): 2 feet (.6 m) or more
from your subject
• Indoors (with flash): 3 to 8 feet (1 to 2.5 m) from your subject
Polar oid PhotoMAX PDC 1320 Digital Camera User’s Manual 11
Page 13

Step 9:
Frame the photo
You can fr ame your photo in one of two
ways:
• Use the framing lines in the
optical viewfinder (a).
• Use the color LCD (b).
To see an image in the color
LCD, press the yellow LCD
on/off button (c) on the back of
the camera.
Note: The color LCD uses
additional battery pow e r.
Step 10:
Press down the shutte r but ton (a) to take the photo.
Do not move the camera until you hear a click.
12 Questions? www.PolaroidDigital.com
Press the shutter button
b
a
OK
c
a
Page 14

The Next Step
Now that you have taken your first p hoto, spen d some time with the next
section, “Advanced Features and Settings.” It tells you how to:
•
Transfer your photos to your computer so you can edit or email them
(page 58).
•
See your p h otos on a television (page 41).
You will also learn about using other exciting features of your Polaroid PDC
1320 camera, such as:
•
CompactFlash memory card support (page 18)
•
Self-timer (page29)
•
Digital zoom (pag e34)
•
Photo Quickview (page 36)
•
DPOF printing (page 43)
•
Menu options (page 48)
Take a look at the next section and see how you can make your camera work for
you!
Polar oid PhotoMAX PDC 1320 Digital Camera User’s Manual 13
Page 15

Advanced Features a nd Settin gs
This is what you will find in this sectio n:
•
Using an AC Adapter or Batteries (page15)
•
Storing Photos in Memory (page 18)
•
Formatting Memory (page22)
•
Using the Mode Dial and Menus (page 24)
•
Setting th e Focusing Distanc e (page26)
•
Using the Flash (page 27)
•
Using th e Self-Timer (page29)
•
Reading the Photos Remainin g Indicator (page30)
•
Setting the Photo Quality an d Ph oto Resolutio n (page 31)
•
Using Digital Zoom (page34)
•
Reviewing and Deleting Photos in Quickview (page36)
•
Viewing Photos (page36)
•
Viewing Your Photos on T elevision (page 41)
•
Printing Photos (page43)
•
Deleting Photos (page 45)
•
Using M en u Options (page 48)
•
Installing PhotoMAX Software (page 56)
•
Transferring Photo s to Your Com pu ter (page 58)
•
Accessing Photos in PhotoMAX Software (page 61)
•
Getting Help with PhotoMAX Sof tware (page 64)
14 Questions? www.PolaroidDigital.com
Page 16

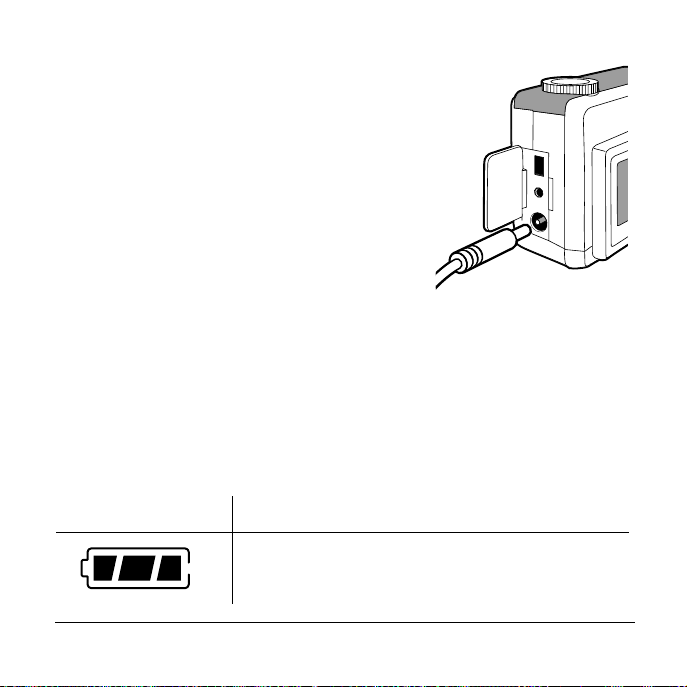
Using an AC Adapter or Batteries
You can use the camera’s AC adapter or four AA batteries.
AC adapter
Caution: Always turn your camera off before inserting or removing the AC
adapter.
To maximize the life of your camera’s batteries, use the AC adapter whenever
possible. For example, always use the AC adapter when you:
•
Review st ore d photos on the color LCD
•
Display photos on your television using the video cable
•
Transfer photos to your computer using the USB cable
Note: When you use an AC adapter, the camera will remain on for 30 minutes
of inactivity before it shuts itself off.
The AC adapter may become wa rm to the touch afte r extended periods
of use. This is no cause for alarm.
Using the AC adapter will not recharge rechargeable batteries.
Polar oid PhotoMAX PDC 1320 Digital Camera User’s Manual 15
Page 17
1
Press the on/off butto n to tu rn the camera
off.
2
Connec t one end of the A C ada pte r to the AC
connection on t he camera.
3
Connect the other end of the AC adapter to a
grounded electrical outlet .
4
Press the camera on/off button to turn the
camera on.
Batteries
Use only AA high-capacity super alkaline or lithium disposable batteries or
NiCad or NiMH rechargeable batteries. Never mix old batteries with new
batteries, different types of batteries, or batteries from different manufacturers.
Battery Status
The battery icon in the status LCD shows how much energy remains in the
batteries.
Battery Icon Battery Status
Fully charged
16 Questions? www.PolaroidDigital.com
Page 18

Moderately charged
Low charge—You can still take photos, but if the
power drops very low, the flash and color LCD will
not function. As battery power drops still lower, the
camera eventually shuts down, and you will need to
replace all four batteries.
Empty— Replace the batteries immediately.
Keep a set of extra batteries handy, especially on a trip, when it may be hard to
find replacement batteries.
When not using the camera, shut it off. And when not using the camera for more
than a few days, remove the batteries.
Note: Your photos are never lost when you change batteries. They always
remain in memory.
Polar oid PhotoMAX PDC 1320 Digital Camera User’s Manual 17
Page 19

Stori n g Ph ot os in Memory
You can store your photos in the camera’s internal memory or an optional
CompactFlash memory card.
The camera’s internal memory
The Polaroid PDC 1320 camera automatically stores your photos i n 8MB of
internal memory. Depending on the camera’s photo-quality setting (page31), its
internal memory normally stores from 17 to 50 photos at 1280 x 960 resolution
or 34 to 138 photos at 640 x 480 resolution. If there is no space left in the
camera’s internal memory and you try to take a photo, a message on the LCD
tells you that the camera’s memory is full. You need to delete photos from the
camera’s memory (page45) or transfer photos to your computer (page 58).
An optional CompactFlash card
The Polaroid PDC 1320 camera includes a slot for an optional A TA Type I
CompactFlash memory card of up to 128 MB so you can add more memory as
needed. For more information about CompactFlash memory cards, see your
local r e ta i ler.
18 Questions? www.PolaroidDigital.com
Page 20

Whenever you insert a CompactFlash memory card into the camera, photos are
stored on the card and not in the camera’s internal memory. Photos already in
the camera’s internal memory remain there, and you can access them by
removing the CompactFlash card.
If there is no more space left in the memory card and you try to take a photo, a
messag e on the LCD tells you that the memory card is full. You need t o delete
photos from the memory card (page 45) or transfer photos to your computer
(page 58).
If you delete photos when a CompactFlash memory card is in the camera, the
photos are delete d from the memory card. If you want to delete photos from the
camera’s internal memory, make sure a memory card is not in the camera.
Caution:You must format a memory card (page 22) if it is new or has not been
used in your Polaroid PDC 1320 camera before.
Always turn the camera off before you insert or remove a memory card.
Otherwise, the memory card could be damaged or the photos stored on it
corrupted.
Note: For an explanation of card-related error messages that may appear on
the color LCD, see page65.
Polar oid PhotoMAX PDC 1320 Digital Camera User’s Manual 19
Page 21
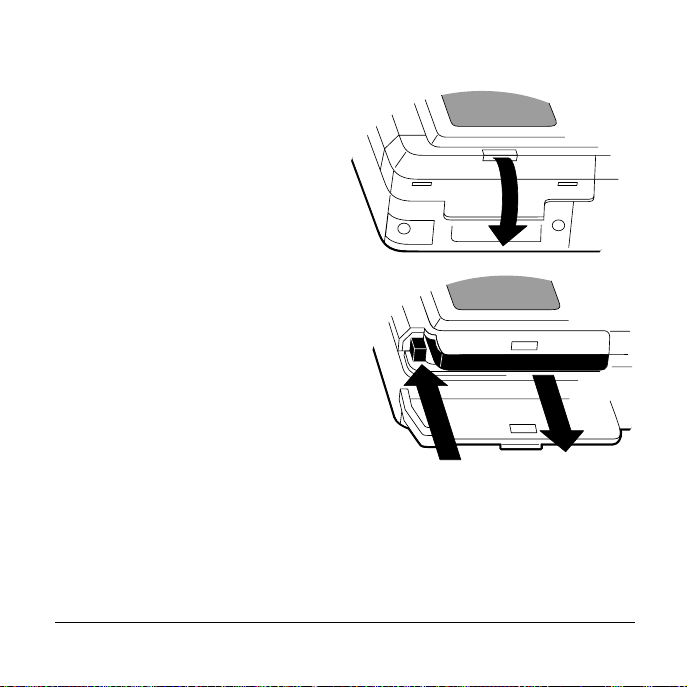
Inserting a Co mp a c tF la s h card
1
Turn the camera off.
2
Open the memory compartment
cover on the bottom of the camera.
3
Insert the card with the raised lip
facing up. Push it carefully but firmly
into the slot
The card only fits correctly into the
slot one way. When the card is
inserted completely, the eject
button (a) next to the card pops out.
Note: If the card does not seem to
fit correctly, do not force it.
Turn the card over and retry.
4
Close the memory compartment cover.
20 Questions? www.PolaroidDigital.com
a
Page 22
Rem oving a Com pactF l a s h car d
Turn the camera off.
1
2
Open the memory compartment
cover.
3
Push th e eject b utton (a) next to
the memory card.
4
Grasp the edge of the memory card
and pull it out.
5
Close the memory compartment
cover.
a
Polar oid PhotoMAX PDC 1320 Digital Camera User’s Manual 21
Page 23

Formatting M emory
Always format a new Compact Flash memory card before you use it . In fact,
format any CompactFlash memory card unless it has been used in your Polaroid
PDC 1320 camera before.
You may occasionally need to reformat the camera’s i nternal memory or a
CompactFlash memory card to delete stored photos or eliminate corrupted files.
Note: When you reformat a Compa ctFlash memor y card that i s already in the
camera, all photos on the card are deleted. However, photos stored in the
camera’s internal memory are not.
To format a CompactFlash memory card, start with step 1 below. To format the
camera’s internal memory, be sure there is no CompactFlash memory card in the
camera and start wit h s tep 3.
1
Turn the camera off.
2
Insert a CompactFlash memory card (page 20) unless one is already in the
camera.
3
Turn the camera on.
Caution:Never turn the camera off while reformatting is in progress.
22 Questions? www.PolaroidDigital.com
Page 24

4
Turn the mode dial to Setup (a).
The SETUP MENU appears in the color LCD.
5
Use the LCD scroll down button to highlight
FORMAT M ED IA.
6
Press the OK button.
7
Use the LCD scroll buttons to highlight YES and then
press OK. A message asks if you are sure you want to
format memory.
8
Highlight YES and then press OK. The camera displays the message,
FORMAT COMPLETE.
9
Press OK and return to the SETUP MENU. (If you select NO, the
camera r et urn s t o the SETUP MENU without formatting memory.)
10
To exit the SETUP MENU, turn the mode dial to another setting.
For an explanation of related error messages that m ay ap pear on the color LCD,
see page 65.
Note: If you cannot form a t the card, it may be defective. Return it to the
retailer where you purchased it.
Polar oid PhotoMAX PDC 1320 Digital Camera User’s Manual 23
a
Page 25
Using the Mode Dial and Menus
The mode dial on your Polaroid PDC 1320 camera has five modes that you use
to perform different functions:
Record mode. Take photos and adjust photo settings.
Play mode. View photos you have ta ken.
Setup mode. View and set camera options.
Delete mode. Delete photos you have taken.
PC mode. Transfer stored photos from your camera to your
computer.
The Record, Play, Setup, and Delete modes each have their own menus. For a list
of each menu’s options and a description of each option, see page 48.
24 Questions? www.PolaroidDigital.com
Page 26

The steps below are general instructions for changing menu options. They apply
to all menus:
1
Turn the camera on.
2
Turn the mode dial to a mode, and the mode’s menu appea rs in the color
LCD. (The PC mode does not have a menu.)
Note: If the camera is in Record or Play mode,
press the menu button (a) on the top of
the camera to turn the menu on.
3
Use the LCD scroll up or down buttons to
highlight a desired menu option i n yellow.
4
Press the OK button to select the highlighted
item you want to change. Th e li ne at the bottom
of the menu turns from blue to green and two
smal l sc r oll ic o ns appear at the left .
Note: T o m ove to another menu option without making a change,
pressOK.
5
To select an option in the green menu line, use the scroll up or down
buttons.
6
Press OK to confir m the new s etting, and you return to the high lighted
menu option.
7
To exit the RECORD MENU or PLAY MENU, press the menu button
to turn the menu off. If you want to exit a different menu, turn the mode
dial to a nother setting.
Polar oid PhotoMAX PDC 1320 Digital Camera User’s Manual 25
a
Page 27

Setting the Focusing Distance
Rotate the distance ring around the camera’s lens, to set the correct camera-tosubject distance when you are not using flash.
Distance Icon Distance
2 feet (.6 m) to infinity
Use this setting for most subjects.
1 to 2 feet (.3 to .6 m)
Use this macro setting for close-up photos.
Caution:Do not use flash for macro photos.
For best results using the macro setting:
•
Make sure you have adequate lighting.
•
Use the color LCD to frame your photo.
•
Use a tripod or another stable support. Hand-holding the camera may
result in a blurred image.
26 Questions? www.PolaroidDigital.com
Page 28

Using the Flash
To select a flash setting, turn the mode dial to Record.
The flash button (a) on the top of the
camera lets you cycle through the flashmode icons (b) in the status LCD. The
default setting is Auto flash.
The optimum camera-to-subject flash range
is 3 to 8 feet (1 to 2.5 m).
If you use flash, wait until the power/status
indicator stops blinking before you take
anothe r photo.
Flash Icon Flash Setting
Auto flash:
• The flash fires automatically as needed.
• Use this setting to take most photos.
Red eye:
• Use this setting to avoid red glare i n your subject’s
eyes.
• The camera fires a brief, preflash flash before the
regular flash.
Polar oid PhotoMAX PDC 1320 Digital Camera User’s Manual 27
a b
Page 29

Flash Icon Flash Setting
Forced flash:
• The flash fires for every photo.
• Use indoors in low light. Using this setting in
bright light may overexpose the photo.
• Use in high-contrast situations to provide filllight.
No flash:
• The flash does not fire.
• Use where flash is prohibited or may be
distracting. Also use when shooting toward a
reflective surface, such as a window or mirror.
• If you do not have enough light when using this
setting, your photos will be too dark.
• Use for outdoor photos.
28 Questions? www.PolaroidDigital.com
Page 30
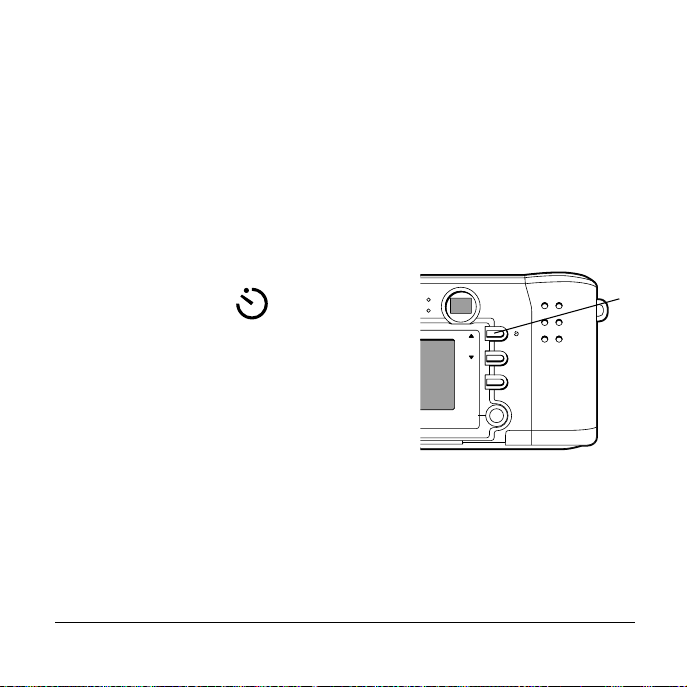
Using the Self-timer
The self-timer button (the same as the color LCD scroll up button) on the
camera back lets you take a photo ten seconds after you press the shutter button.
The self-timer works only for the next photo taken, and then it turns itself off.
Note: For best results, use a tripod or a stable surface.
1
Turn the camera on.
2
Turn the mode dial to Record.
3
Press the self-timer button (a).
The self-timer icon appears in the
status LC D.
Note: To canc el th e sel f-timer, press the
self-timer button again.
4
Frame the photo using the optical
viewfinder or the color LCD viewfinder.
5
Press the shutter button. The red self-timer
indicator on the front of the camera blinks for ten seconds. The indicator
blinks rapidly immediately before the photo is taken.
Polar oid PhotoMAX PDC 1320 Digital Camera User’s Manual 29
OK
a
Page 31

Reading the Photos Remaining Indicator
This indicator in the status LCD shows the number of ph o to s remaining in the
camera’s intern al memory (or an inserted CompactFlash card). The informa tion
varies depending on what mode the camera is in:
•
In Record mode, the indic ator shows the number of photos left to take at
the current photo resolution and quality setting. (See page31 for
information about these settings.) The number counts down as you take
photos, and i t may be dif ferent for each photo quality and resolution
setting.
•
In Play mode and Delete mode, the indicator shows the number of the
photo currently displayed on the color LCD.
The photo indicator number also varies depending on the file size of the ph otos
you take. For example, a photo of a solid colored wall is a smaller file size than a
photo of an intricate garden scene. A photo of a visually simple scene may not
cause the p hoto count to change, althoug h the photo is s till safely stored in
memory.
30 Questions? www.PolaroidDigital.com
Page 32

Setting the Photo Quality and Photo Resolution
In Record mode, pressing the photo quality
and resolution button (a) on the top of the
camera cy c les th rou gh sett ings that a ffect the
quality of your photos, the size of your
digital photo files, and the number o f photos
your camera can store.
a
c
b
• Th e photo qua lity settin g (b) —
indicated by the number of stars in the
status LC D — refers to the type of image compression used for each photo
resolution setting. The lower the compression (the more stars), the better
the quality. A photo with lower compression takes up more memory but
produces a higher quality digital photo when printed. Lowe r co mpr es sion
also reduces the number of photos the camera can store.
• The photo resolution setting (c) — indic ated by the small an d large pictur e
icons on the top of the camera — refers to the number of pixels in a digital
photo. The higher the resolution, the more pixels in your photo and the
more memory the photo uses. A higher resolution takes up more memory
but produces a higher quality digi tal photo when printed.
Polar oid PhotoMAX PDC 1320 Digital Camera User’s Manual 31
Page 33

These are the high-resolution options and the approximate number of photos
you can expect the camera to hold at each setting.
Icons Photo Quality and Resolution Approximate
Number of Ph ot os
1280 x 960 pixels (default)
(Superfine) Low compression.
Best quality for printing but
largest file size (default).
(Fine) M edium compression. 25
(Normal) High compression
but smallest file size.
Note: The number of photos you can take at each setting is based on the
camera’s 8 MB of internal memory. If you use a CompactFlash memory
card with additional memory, you will be able to take more photos.
32 Questions? www.PolaroidDigital.com
17
50
Page 34

These are the low-resolution options and the approximate number of photos
you can expect the camera to hold at each setting.
Icons Photo Quality and Resolution Approximate
Number of Ph ot os
640 x 480 pixels (default)
(Superfine) Low compression.
Best quali ty for email and web
pages but largest file size
(default).
(Fine) M edium compression. 69
(Normal) High compression
but smallest file size.
Note: The number of photos you can take at each setting is based on the
camera’s 8 MB of internal memory. If you use a CompactFlash memory
card with additional memory, you will be able to take more photos.
In Record mode, the status LCD shows the p h oto quality and resolution set ti ng
of the last photo taken. This setting is applied to the next photo you take unless
you change the setting.
Polar oid PhotoMAX PDC 1320 Digital Camera User’s Manual 33
34
138
Page 35

In Play mode, the status LCD shows the photo qual ity and resolution of th e
image currently displayed on the color LCD, as well as the flash mode in which
the photo was taken. In addition, if you press the color LCD on/ off button while
the camera is in Play mode, the photo’s resolution appears at the bottom of the
photo.
Note: When you press the photo quality and resolution button, the photos
remaining indicator changes to show how many more photos you can
take at that quality and resolution.
Using Digital Zoom
This feature lets y ou “zoom” in on the centra l area of an im ag e and photograph
only the enlarged portion of the picture.
1
Set the photo resolution of the camera to 1280x960 (page31). Digital zoom
only works in this higher resolution.
2
Turn the mode dial to Record and turn the color LCD on by pressing the
yellow button on the back of the camera.
34 Questions? www.PolaroidDigital.com
Page 36

3
Frame the photo in the color LCD.
4
Press the OK button on the back of
the camera. The central portion of
the image enlarges twice to fill the
color LCD and 2xZOOM appears
in the upper left corner of the LCD.
(If you want to return to the
original image, press OK again.)
5
Press the shutter button, and the
camera ph ot o graph s t h e enl a rg ed
portion.
6
Press OK to return to the original
image.
Note: Digital zoom applies to only one
phot o at a ti me. If y ou want t o
use digital zoom again, begin
with step 1 above.
Polar oid PhotoMAX PDC 1320 Digital Camera User’s Manual 35
Page 37

Reviewing and Deleting Photos in Quickview
Quickview le ts you see and delete photos immed iately after you take them.
To turn Quickview on, select QUICKVIEW in the RECORD MENU. Then
select ON. (For more detailed information about using menus, see page24.)
With Quickview on:
1
Turn the mode dial to Record and take a photo.
2
The photo you have just taken displays for three seconds on the color LCD
(even if the LCD is off). The message, DELETE CURRENT?, appears at
the bottom of the photo, giving you several seconds to decide whether you
want to delete the photo.
3
T o delete the photo, press OK. To sav e the ph oto , do no thin g and the pho to
will be stored in memory.
Viewin g Ph ot os
In Play mode, pressing the color LCD button three times lets you cycl e th rough
three types of di splays of phot os you ha ve taken:
•
A single photo without text
•
A single photo with text information about the photo
•
Thumbnails, which are miniatures of all the photos stored in the camera
36 Questions? www.PolaroidDigital.com
Page 38

Single photo without text
•
Turn the mode dial to Play. The last photo taken appears as a single image
in the LCD.
•
Press the up or down scroll b utton to see each photo stored in memory
displayed seque ntially o n th e color LCD.
Single photo with text
•
With a photo displ aye d on the color LCD, press the LCD button. The
following information appears at the bottom of the photo: the photo
quality and resolution (number of pixels and a photo quality designation —
N for normal, F for fine, or S for superfine) as well as a photo file icon
and the number of the photo.
If the photo ha s been tagged for DPO F printing (page43), you will also see
a small p ri nter ico n at the bottom of t h e p h oto.
•
Pressing the scroll up or down buttons displays additional photographs
with infor mation dis played at the bottom.
Polar oid PhotoMAX PDC 1320 Digital Camera User’s Manual 37
Page 39
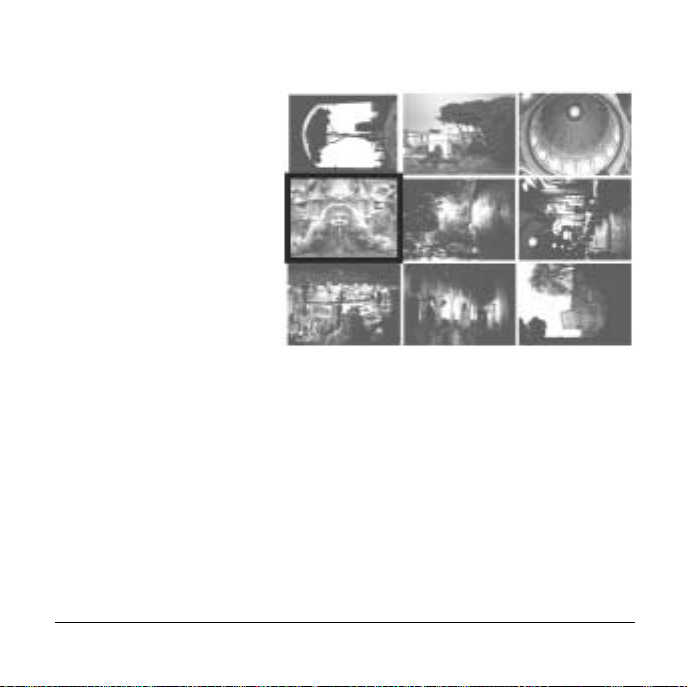
Thumbnails
•
Press the LCD button a
second time to see the
photos you ha ve taken
as miniature
thumbnails, as shown at
right.
•
The last photo that
appeared as a single
image on the color LCD
is highlighted with a red
border.
•
Use the scroll up or
down button to highlight a thumbnail ph oto you want to see enlarged or
move through addition al gr oups of thumbnails.
•
Press OK to see a highlighted thumbn a il enla rged to fill the LC D.
Press the color LCD a third time and you return to the single photo without text.
For i nformation on how to delete a photo, see page 45.
38 Questions? www.PolaroidDigital.com
Page 40

Viewing an enlar ged a r ea
You can look at an enlarged
quadrant of a photo:
1
T urn the mode dial to Play. The
last phot o taken ap pears in the
color LCD. (You can look at an
enlarged quadrant of this
photo or use the scroll arrows
to view a different photo.)
2
Press OK to see the upper-left
corner of t he phot o enlar ged two
times.
3
Press the color LCD button to
see a small blue indicator in the
upper left corner of the enlarged
area. A red rectangle appears in
the indicator. It tells you which
quadrant of the photo you are
viewing.
4
Press the up or down scroll button to move from one quadrant to another.
5
Press OK twice to return to the original photo.
Polar oid PhotoMAX PDC 1320 Digital Camera User’s Manual 39
Page 41

If you want to see an even more detailed, enlarged area of the same photo:
1
Follow steps 1 through 3 above.
2
Press OK. The area you were
viewing enlarges an additio nal
two times, and the blue
indicator in the upper left
corner expands to show 16
segm ents. (The ind icator is
enlarged in the illustration.)
3
Press the up or down scroll
arrow, and the small red
rectangle in the indicator
shows y o u which area of th e
photo you are viewing.
4
Press OK to return to the original photo.
Viewing a slide show
You can r eview your photos as a sli desh o w and set how l on g the dela y is betw een
photos.
1
Select SLIDESHOW in the PLAY MENU. (For detail ed information
about using menus, see page 24.)
40 Questions? www.PolaroidDigital.com
Page 42

2
Select a delay from 2 to 10 seconds between photos. The default is
4 seconds.
3
Press OK. The last photo you took appears in the color LCD, and the
slideshow begins.
4
To stop the slideshow, press any button on the back of the camera, turn the
mode dial, or turn off the camera.
You need to select SLIDESHOW in the PLAY MENU each time you want to
see a slideshow, even if you do not change the delay.
Note: It is great fun to see your slideshow displayed on your television. T o learn
how to do this, see the next section.
Viewing Your Photos on Television
The Polaroid PDC 1320 camera lets you display the photos you have taken on
your television screen. The first step is to select the video mode that is correct for
the country where you live.
To select a video mo de, select VIDEO MODE in the SETUP MENU. Then
select NTSC (default) or PAL. (For more detailed information about using
menus, see page 24.)
•
Select NTSC for North America, Japan, and South America, among other
countries.
•
Select PAL for Europ e and Asia, among other countries.
Note: Whe n yo u tu rn the cam era of f, the set tin g return s to the def aul t, NTSC.
Polar oid PhotoMAX PDC 1320 Digital Camera User’s Manual 41
Page 43

Connecti ng the c amer a to your telev is ion
1
Make sure your camera and television are off.
2
To conserve batteries, use the AC adapter (a).
3
Plug one end of the video cable into the video port
on the camera (b) and the other end into the
video input port on your television.
4
T urn the TV on and set it to the c han nel y ou use t o
view videos.
Note: For information about using your TV for
video input see the TV’s manual.
5
Turn the TV’s mode to video.
6
Turn on your camera and turn the mode dial to Play. The last photo taken
appears on the TV screen.
7
Press the color LCD up or down button to scroll through each ph oto stored
in your camera’s memory or a CompactFlash memory card (if one is
inserted). You can view your photos in different ways:
• As a slideshow on your television (p ag e 40).
• As a single p h oto, a photo wit h text information dis played at the
bottom, or miniature thumbnails (page36).
8
To delete photos displayed on your television, see page 45.
42 Questions? www.PolaroidDigital.com
b
a
Page 44

After you have set up your TV to disp lay photos from your camera, you can also
take photos using your TV as a viewfinder. Turn the camera to Record mode and
press the color LCD button to turn on the camera’s LCD v iewfinder. Then aim
your camera and frame the image in your TV screen.
Printi ng Photo s
The Digital Print Order Interface (DPOF) feature lets you “tag” your photos fo r
printing directly from your camera’s CompactFlash memory card to a DPOF-
enabled printe r, such as the Po laroid P500 prin te r.
Note: DPOF only works if you are using a CompactFlash memory card.
1
Make sure the color LCD is displaying the photo you want to print
(page 36).
2
Select DPOF in the PLAY MENU . (For more detailed information
about using menus, see page 24.)
3
Press OK, and the DPOF submenu appears.
4
Specify the following DPOF options:
• PRINT QUANTITY. Select the number of photos to print, from
1 to 9. The default is 1.
• PRINT SIZE. Select the size of the print: PRINTER STD
(default), 3x5, 4x6, 5x7, or 8x10.
• PRINT ENABLE. The optio ns are ON (defa ult) and OFF. To untag
a previously tagged photo , select OFF.
Polar oid PhotoMAX PDC 1320 Digital Camera User’s Manual 43
Page 45

5
To exit the DPOF submenu, press the menu button and the PLAY
MENU appears.
6
Repeat steps 1 through 5 for each photo you want to tag.
Note: If you tag a photo for DPOF printing, a printer icon appears at the
bottom of the photo when text is displayed (p ag e 3 7).
When you are ready to print photos, remove the CompactFlash memory card
from the camera (page21) and insert it into your DPOF-enabled printer. For
information about using the memory card with a DPOF-enabled printer, see
your printer’s user manual or the printer’s online help.
Quick DPOF tagging
You can quickly tag a photo for printing when you are using a Co m pactFlash
memory card. When the camera is in Play mode and you view a photo with
informational text at the bottom (page 37), press the shutter button. The photo
is tagged for DPOF printing, and a printer icon appears in the informational
text. (To untag a previously tagged photo, press the shutter button again.) You
can use the scroll button s to cycle through other photos and press the shutter
button to tag or untag t h em .
Note: When you tag a photo using this method, the default DPOF settings are
used.
44 Questions? www.PolaroidDigital.com
Page 46

Deleting Photos
Caution:Once you delete a photo, it cannot be retrieved. It is gone forever! Also,
when you delete one or more photos, the remaining photos are
renumbered.
Using Quic kview
Quickview lets you see and delete a photo immediately after you have taken it. T o
learn how to delete a photo using Quickview, see page36.
Deleting a single photo
Note: If you want to delete a photo from a CompactFlash memory card, be
sure to insert the card. To delete a photo stored in the camera ’s internal
memory, remove the memory card.
1
Turn the mode dial to Delete . The last photo you took appears in the
color LCD. T ext such as the photo’s re solu tion, quality , and n umber appea rs
at the bottom.
2
Use the scroll up or down arrow to move through previously taken photos
and locate the photo yo u wa n t to delete .
3
Press the menu button and the DELETE MENU appears. DELETE
CURRENT? is highlighted. (If you decide not to delete the photo, press
the menu button to exit the menu and return to the displayed photo.)
Polar oid PhotoMAX PDC 1320 Digital Camera User’s Manual 45
Page 47

4
Press OK and a message appears asking you to confirm that you want to
delete the currently displayed photo. The message also tells you the file
name and the folder that contains the file, for example:
100_POLA\POL_0003.
5
Press the up scroll button to select YES.
6
Press OK and the photo is deleted. The next photo you took appears in the
color LCD. (If you select NO, the photo not deleted remains displayed in
the LCD.)
Deleting all photos
Note: If a CompactFlash memory card is in the camera, only the photos on the
card are deleted. To delete all the photos stored in the camera’s internal
memory, remove the memory card.
1
Turn the mode dial to Delete . The last photo you took appears in the
color LCD.
2
Press the menu button and the DELETE MENU appears.
3
Use the scroll down arrow to highlight DELETE ALL?. (I f you decide
you do not want to delete all photos, press the menu button to exit the
menu and return to the displayed photo.)
4
Press OK and a message appears asking you to confirm that you want to
delete all photos.
5
Press the up or down scroll button to select YES.
46 Questions? www.PolaroidDigital.com
Page 48

6
Press OK and all the photos stored in memory are deleted. (If you select
NO, the photos are not deleted and the last photo you took appears in the
color LCD.)
Formatting memory
When you format the camera’s internal memory or a CompactFlash memory
card, all the photos stored in memory are deleted. For more information, see
page 22.
Using Ph otoMAX Softw are
You can delete photos from the camera when it is connected to the ArcSoft
PhotoMAX Image Maker Software. For more information, see the PhotoMax
Onlin e User’s G u i de (the software online help).
Polar oid PhotoMAX PDC 1320 Digital Camera User’s Manual 47
Page 49

Using Menu Op tions
This section describes e ach me n u op tio n i n alphabe tical o rd er acc ordi ng t o t he
name of the option. The first column also tells you the menu in which the option
is located. For gene ral in s tru ctions on ac cessing menus a nd c han ging options,
see page 24.
Option Description and Settings
COPY TO CF
CARD
• PLAY MENU
48 Questions? www.PolaroidDigital.com
Copi e s phot os from th e camera’s internal memory to
an optional CompactFlash (CF) memory card.
• YES (default). Cop ies a ll s t or ed pho tos t o t he
memory card. A message tells you that all images
have been copied. If the memory card becomes full
before all photos are copied, a message tells you
how many photos have been copied.
• NO
Note: When photos are copied to a memory card,
they retain their original numbers.
Page 50

Option Description and Settings
DELETE ALL?
• DELETE MENU
DELETE
CURRENT?
• DELETE MENU
Polar oid PhotoMAX PDC 1320 Digital Camera User’s Manual 49
Deletes all photos stored in the camera’s internal
memory or a CompactFlash memory card (if one is
in the camera). Press OK to select this option. A
messag e as k s you to confirm th at you wan t t o delete
all photos.
• YES. Deletes all photos.
• NO (default). Returns you to the previously
displayed photo.
Deletes the cu rren tl y displ a yed photo . P ress OK to
select t h is option . A mess a g e a s ks y o u to confirm t hat
you want to delete the photo. It also shows you the
file name and the folder that contains the file
(e.g., 100_POLA\POL_0003).
• YES. Deletes the photo.
• NO (default). Returns you to the displayed photo.
Page 51

Option Description and Settings
DPOF
• PLAY MENU
50 Questions? www.PolaroidDigital.com
Lets you “tag” a photo to specify that you want it
prin ted on a Digital Print Order Interf ace (DPOF)enabled printer.
Press OK to select DPOF, a nd the DPOF submenu
appears. You can select the number of photos you
want to pri nt and th eir size as wel l as turn the DPOF
function on or of f.
For more information, see page43.
Note: To exit the DPOF submenu, press the menu
button.
Page 52

Option Description and Settings
EV
COMPENSATION
• RECORD MENU
Sets the exposure-value (EV) brightness, which
controls how much light enters the camer a . If a
photo comes out too dark or too light, use this
setting to lighten or darken the next photo.
• 0.0 (default): no compensation
• -0.3 to -1.8: Makes photos progressively darker
• +0.3 to +1 .8: Ma kes photos progressively
lighter
When you turn the camera off, the setting returns
to 0.0.
FORMAT MEDIA
• SETUP MENU
Polar oid PhotoMAX PDC 1320 Digital Camera User’s Manual 51
Allows y ou t o form at or refo rma t either the
internal camera memory or a CompactFlash
memory card, if one is inserted.
• NO (default)
• YES. A message tells you when the formatting
is complete.
Page 53

Option Description and Settings
LANGUAGE
• SETUP MENU
LCD
BRIGHTNESS
• PLAY MENU
• RECORD
MENU
52 Questions? www.PolaroidDigital.com
Sets the language to appear in all the menus.
• ENGLISH (default)
• FRENCH
• GERMAN
• SPANISH
• PORTUGESE
• JAP ANESE
• TRADITIONAL CHINESE
Press OK and the menus appear in the language you
have chosen.
The option you select is retained when you turn the
camera off.
Adjusts the brightness of the color LCD from -5 to
+5. The default is 0.
The LCD screen gets lighter or darker as you change
the settings.
The option you select is retained when you turn the
camera off.
Page 54

Option Description and Settings
QUICKVIEW
• RECORD
MENU
RESET TO
DEFA ULT
• SETUP MENU
Polar oid PhotoMAX PDC 1320 Digital Camera User’s Manual 53
Briefly displays the photo you have just taken on the
color LC D. A messag e ap p ears gi vi ng you th e op ti on
to delete the photo (page 36).
• ON
• OFF (default). Use this option to conserve battery
power.
The option you select is retained when you turn the
camera off.
Restores all camera settings to their factory-default
settings.
Page 55

Option Description and Se ttin gs
SLIDE SHOW
• PLAY MENU
SOUND
• SETUP MENU
54 Questions? www.PolaroidDigital.com
Displays stored photos as a full-screen slide show on
the color LCD. You can specify from 2 to 10 seco n ds
as the delay between photos. The default is
4 seconds.
To start the slide show, go to the PL AY MENU and
accept the default delay setting or select another
delay setting. The slide show begins when you press
OK.
To stop the slide show, press any button on the back
of the camera or switch to another camera mode.
The option you select is retained when you turn the
camera off.
Turns on or off a short beep th at sounds wh en you
press any camera button.
• ON (default)
• OFF
The option you select is retained when you turn the
camera off.
Page 56

Option Description and Settings
VIDEO MODE
• SETUP MENU
WHITE
BALANCE
• RECORD
MENU
Polar oid PhotoMAX PDC 1320 Digital Camera User’s Manual 55
Selects either NTSC (default) or PAL as the type of
video output for your television.
The setting returns to NTSC when you turn the
camera off.
Balances lighting so your photos are not tinted with
strange colors. For example, photos taken in
fluorescent light without white-balance
compensation have a green tint.
Note: The flash is disabled when you select a white
balance setting.
• AUTO (default): Appropriate for most situations
• TUNGSTEN: Indoors in light-bulb illumination
• FLUORESCENT: Indoors in fluorescent
illumination
• SHADE: Outdoors in shade
• SUN: Outdoors in sunlight
When you turn the camera off , the sett ing returns to
AUTO.
Page 57

Installing PhotoMAX Software
After you tak e photos with your Polaroid PDC 1320 camera, you will want to
transfer them to your co m puter . To do this, firs t install th e ArcSoft Pho toMAX
Image Maker Software included in your kit. Installing the software also installs
the driver for your camera. The software lets you print and email your photos
and manipulate them in fun and interesting ways.
Before you install the software make sure your computer meets these minimum
system requirements:
•
200 MHz Pentium processor or equivalent
•
Compatible with Microsoft W indows 98, Me, or 2000
•
32 MB RAM and 195 MB available hard disk space
•
Available USB port
•
High-color display with 800 x 600 DPI resolution or higher
•
2x or faster CD-ROM drive
•
Mouse
56 Questions? www.PolaroidDigital.com
Page 58

Now follow these easy steps to install the software:
1
Turn your computer on .
2
Insert the software CD in your PC.
If the installation program does not start automatically:
a Select Run from the Windows Start menu.
b Click Browse and select your CD-ROM drive.
c Select Setup.exe from the CD-ROM.
d Click Open.
e Click OK. The installation program begins.
3
Follow the instructions on your computer screen.
4
At the final prompt click Finish.
Caution: You must restart your computer after installing the software.
Polar oid PhotoMAX PDC 1320 Digital Camera User’s Manual 57
Page 59

Transferring Photos to Your Comput er
Caution: Do not connect the camera to your computer until after you install the
ArcSoft PhotoMAX Image Maker Software and restart your computer.
1
Turn the camera off an d co n nec t the camera to t he AC
adapter (a).
2
Turn the camera on.
Note: It is important that you keep your camera on
during th i s entire process .
3
Turn the mode dial to PC . PC appears in th e
status LCD and an arrowhead points to the PC icon.
4
Connect the USB cable to the USB port o n th e back of
your computer. Check your computer’s user manual
for the locations of the comp uter’s USB ports.
5
Connect the other end o f the USB cable to the USB port on the camera (b).
Caution:If the USB connection is not tight, the plug may pull out. Check that it is
fully inserted every time you transfer photos.
The computer may tell you that it has located the camera and is updating
the computer’s database.
58 Questions? www.PolaroidDigital.com
b
a
Page 60

6
Go to your PC ’s desktop and double-click My Computer. Your camera
is treated like a separate disk drive with its own icon labeled Removable
Disk. The next available drive letter is used for the camera.
7
Double-click Removable Disk .
8
If your camera has a CompactFlash memory card inserted in it,
Removable Disk contains a folder called Dcim.
a Double-click Dcim to see a folder called 100_Pola.
b Double-click 100_Pola to see your photo files, such as
Pol_0001.jpg, Pol_0002.jpg, and so on.
9
If your camera does not have a CompactFlash memory card inserted in it,
Removable Disk contains a folder called Polaroid.
a Double-click Polaroid to see a fold er called 100_Pola.
b Double-click 100_Pola to see your photo files, such as
Pol_0001.jpg, Pol_0002.jpg, and so on.
10
Click the file name once, and, depending on how you have configured your
view options, your photos may display as miniatures in the folde r window.
11
Double-click the file name if you want to open the photo in your default
Internet browser. From here, you can save the photo to your computer
using the Windows File Save As command or print the photo.
Caution: At this point, you have not copied the photos in your camera to your
comp ut er. To ensu r e t h a t y o u r p h ot o s a r e no t accidentall y lo st , cop y a ll
your photos to a folder on your hard drive (see the next step).
Polar oid PhotoMAX PDC 1320 Digital Camera User’s Manual 59
Page 61

12
To copy all your photos from your camera to your computer, highlight
them and drag them to your desktop or to another folder of your choice. As
you drag the photo files to a location on your computer, the power/status
indicator light on the back of the camera blinks orange. Polaroid
recommends that you copy your files into C:\My Documents\My
Pictures because this will make it easy to access your photos using the
PhotoMAX Software.
13
You need to delete the files from your camera to make room for more
photos. To delete a photo from the camera after you copy it to the
computer, highlight the photo’s file name and press the computer’s
Delete key. You can also delete photos using Delete mode (page 45).
14
If you are using a Window s 2000 or W indows Me system, follow these steps
to turn the cam era off after you transfer photos to your computer.
Caution: Do not turn the camera off or pull the US B connector from the camera
until you follow the instructions below.
a Double-click the device unplug icon in the lower right corner of
your computer scre en.
b Follow the instructions that appear on your screen to disconnect the
camera from your computer correctly.
c Remove the USB connector from the camera and turn the camera off.
Note: If you pull the USB connec tor out of the camera bef ore following
the steps above, your system displays the message, Unsafe
Removal of Device. Follow the instructions displa yed on yo ur
computer screen.
60 Questions? www.PolaroidDigital.com
Page 62

Accessing Photos in PhotoMAX Software
Now that you have transferred your photos to your computer, you can have fun
with them using the many exciting features of the ArcSoft PhotoMAX Image
Maker Software.
Caution: Before you work with your photos in the software, be sure that you have
copied the photos from your camera to a folder on your hard drive
(page58). Until you do this, your photos are stored only in your
camera, not your computer.
1
Open the software by
double-clicking the
PhotoMAX 4 icon on
your desktop. The
Get Photo button is
automatically highlighted.
Polar oid PhotoMAX PDC 1320 Digital Camera User’s Manual 61
Get
Photo
Page 63

2
If you stored your photos in C:\My Documents\My Pictures:
a Click t he d o wn arrow (a) in the
Sample list and then select
[New].
b If you like, replace New Album
(b) with a new name for the folder
that co ntains your p h otos. (Rightclick Album to see help.)
c Click the Add button . Awindow opens showing your photo
files in C:\My Documents\My Pi ctur es.
d Highlight on e or m ore photo
files and click Open. The
thumb nail im ag es of the
photos you s ele cted a ppe ar
below th e softwar e image
tray(c).
c
62 Questions? www.PolaroidDigital.com
ab
Page 64

e Double-click a thumbnail to
I
open it in the image tray.
3
If you stored your photos in a different
folder:
a Click the Add button
and browse to find your folder.
b In the Open window, go to the
location on your hard drive
wher e you sto red your photos.
c Double-click the folder
containing your photo files and
open the ph oto that you want to work with. Th e photo appe ars in the
image tray.
For information about manipulating your photos, see the next section, “Getting
Help with PhotoMAX Software.”
Polar oid PhotoMAX PDC 1320 Digital Camera User’s Manual 63
mage Tray
Page 65

Getting Help with PhotoMAX Software
•
Select the ? button to open the PhotoMAX Online
User’s Guide (the software online help). This
provides an index and step-by-step procedures for
using the software to manipulate and enhance your
photos.
•
You can also get help with any button or feature in
the software by moving your mouse cursor over it
and clicking the right mouse button. This brings up
context-sensitive help that explains the software
button or f eature.
•
Visit our Help site on the web for more information:
www.PolaroidDigital.com
64 Questions? www.PolaroidDigital.com
? button
Page 66

Camera Troubleshooting
Your Polaroid PDC 1320 camera may display the following error messages on its
color LCD:
LCD Message Meaning and Corrective Action
CARD ERROR
MEMORY ERROR
Polar oid PhotoMAX PDC 1320 Digital Camera User’s Manual 65
• The ca m era is not abl e to access the
CompactFlash memory card. Reinsert the
card (page 20) and try again or replace the
card.
• A problem has occurred with the camera’s
internal memory. Turn off the camera and
then turn it on aga in. If you are using a
CompactFlash memory card, remove the
card (page 21) and then insert it again
(page 20). If the problem persists, contact
Polaroid technical support (page71).
Page 67

LCD Message Meaning and Corrective Action
MEMORY FULL
MEMORY FULL
[#] OF [#] IMAGES
COPIED
66 Questions? www.PolaroidDigital.com
• The CompactFlash card or the camera’s
internal memory may be full. Delete
photos (page 45) or transfer photos to your
computer (page 58). After you transfer
photos to your computer, delete those
photos from the card (page 45).
• The CompactFlash card may have become
unstable. Install a new card (page 20).
• While you were copying photos from the
camera’s internal memory to a
CompactFlash memory card, the card
became full. The indicated number of
photos were successfully copied to the
memory card. Remove the card from the
camera (page21) and then delete the
photos you just copied from the camera’s
internal memory.
• To copy more photos, insert another
memory card (page20) and reinitiate the
copying process (page 48).
Page 68

LCD Message Meaning and Corrective Action
NO CARD
NO IMAGES
USB ERROR
Polar oid PhotoMAX PDC 1320 Digital Camera User’s Manual 67
• Insert a memory card (page20) before you
format the card or copy photos to it.
• No photos are stored in the camera’s
internal memory or a CompactFlash
memory card.
• The time allotted to transfer photos from
the camera to your computer has been
exceeded. Disconnect the camera, being
careful to follow the special instru ctions on
page 60. Then reconnect the camera
(page 58) and try again. If the problem
persists, cont act Pol aroid t echn ical suppo rt
(page 71).
Page 69

Camera Precautions
•
This camera is battery operated. Su pervise child re n when the camera is
operated by them or used in their presence. To avoid electrical shock, do
not expose the camera to, or immerse it in, any fluids. Do not disassemble
or operate the camera if dropped or damaged. Contact a Polaroid Service
Center for repair information.
•
Do not open the camera case or attempt your own repairs. High-voltage
internal components create the risk of electrical shock when exposed.
Return your camera to authorized Polaroid service providers for all
maintenance and repairs.
•
Keep the camera away from all fluids. Moisture creates the danger of fire
and electrical shock. Do not use the camera in the rain, at the seashore, or
any location where there is the possibility of exposure to fluids.
•
Turn the camera off, unplug the AC adapter, and remove the batteries
immediately if the camera is exposed to water or any other fluid.
•
Do not open the battery compartment or unplug the AC adapter while the
camera is on. If the camera l os es power while processing a new p hot o, the
photo cannot be stored and may cause corruption of other store d photos.
68 Questions? www.PolaroidDigital.com
Page 70

Limited Warranties
One Year Limited Warranty
Polaroid PhotoMAX PDC 1320 Digital Camera
Polaroid w ill, at our option, re pair or r eplace an y u nit found defective in m anu facture
within the w arra nty per iod. The w a rranty pe riod is de termined by the dat e o f
purchase. Keep the r ece ipt as proof of purchase. Otherwise, the warranty period is
determined by the da te of ma nu facture.
This warranty does not apply to damage caused by accident, misuse or tampering,
and excludes all consequential damages except in jurisdictions not allowing such
exclusions or limitations.
Nin ety D a y Lim ited Warranty
ArcSoft PhotoMAX Image Maker Software
Polaroid w arrants that the software media will be free of defects in materials and
workmanship for a period of 90 days from the date of purchase. Po laroid
Corporation's entire liability and your exclusive remedy shall be to repair or replace
the softw are that does not mee t Polaro i d C orporation 's Limited Warranty and is
returned to P ola roid with a co py of your sales receipt. This Limited Warranty is void
if failure of the software has resulted from accident, abuse, or misapplication. Any
replacemen t software will be warranted for the rem a ind er o f the original warranty
period or 30 days, whichever is longer .
Polaroid ma kes no other warranties with respect to the software, either express or
impl ied , inc l ud i ng bu t n o t l im it ed t o imp lie d w a rran tie s o f m e r c h an ta b ility a nd
fitness fo r a p art icu la r purpose .
Polar oid PhotoMAX PDC 1320 Digital Camera User’s Manual 69
Page 71

FCC Notice
This device complies with Part 15 of the FCC rules. Operation is subject to the following
two conditions: (1) This device may not cause harmful interference, and (2) this device
must accept any interference recei ved , including interference that may cause undesired
operation.
Warning: Changes or modifications to this equipment not expressly approved by the
party responsible for compliance could void the user’s authority to operate
the equipment.
Note: This equipment has been tested and found to comply with the limits for a Class B
digital device, pursuant to Part 15 of the FCC rules. These limits are designed to
provide reasonable protection against harmful interference when the equipment
is operated in a residential installation.
This equipment generates, uses, and can radiate radio frequency energy and, if not
install e d an d u se d i n ac c o r dance wit h the ins tr uc tio n m an u a l, may caus e ha rmf u l
interference to radio communications. However, there is no guarantee that interference
will not occur in a particular installation.
If this equipment does cause harmful interference to radio or television reception, which
can be dete rmined by turning the equipment off and on, the user is encouraged to try to
correct the interference by one or more of the following measures:
•
Reorient or relocate the receiving antenna.
•
Increase the separation between the equipment and the receiver.
•
Connect the equipment into an outlet on a circuit different from that to which the
receiver is connected.
•
Use the USB cable shipped with this unit, which must be used to ensure compliance
with the Class B FCC limits.
•
Consult the dealer or an experienced radio/TV technician for help.
70 Questions? www.PolaroidDigital.com
Page 72

Contacting Polaroid
Polaroid Corporation provides technical support for digital cameras at
www.PolaroidDigital.com, and within the United States by calling
800-897-0356 from 8 a.m. to 8 p.m. EST, 7 days a week. Please note that phone
support and repair services are regional and may not be available for a particular
product outside the country where it was purchased. To obtain parts for cameras
purchased in the United States, call 800-343-4846 from 9 a.m. to 5 p.m. EST,
Mon. -Fri. (Note: No technical su pport is available at this number.) A list of
Polaroid international sales and customer support offices is available at
www.polar oid.com/service/phone.html.
© 2001 Polaroid Corporation, Cambridge, MA 02139, U.S.A., o wn er of the
trademarks “Polaroid and Pixel Design,” “Polaroid PhotoMAX,” “PDC,” and
Max the Bird (and Design) © 1998-2001. All other product names may be the
property of their respecti ve own ers. Al l rights rese rved. P rin te d in the U.S.A.
PU-21821M-0 06/01
Polar oid PhotoMAX PDC 1320 Digital Camera User’s Manual 71
Page 73

Digital Camera
Tips, Tricks,
Terms, and Techniques
What kind of batteries should I use?
Caution: Never open your camera’s battery compartment door to remove the batteries
while the camera is still on. This could damage your camera.
Use only high-capacity super alkaline or lithium disposable batteries or NiCad
•
or NiMH rechargeable batteries with your Polaroid digital camera.
Never mix old batteries with new batteries, different types of batteries, or
•
batteries from different manufacturers.
Do not expose batteries to direct heat or dispose of them by burning. Dispose of
•
batteries according to local laws and regulations.
Remove batteries from the camera if you are not going to use it for an extended
•
period of time.
Remove dead batteries from the camera. Dead batteries may leak and cause
•
significant damage to your camera.
If you are using rechargeable batteries, using the AC adapter will not recharge
•
them. For more information about how to recharge the batteries, see the
instructions provided by the battery manufacturer.
Note: Camera damage caused by misuse of batteries is not covered under your
camera’s Warranty.
When should I use the AC adapter?
Caution: Never insert or remove an AC power adapter while the camera is on. This
could damage your camera.
If your digital camera comes with an AC power adapter, use it whenever possible to
maximize the life of your camera batteries. For example, always use the AC adapter
when transferring photos into your computer. Here are some additional guidelines
for using the AC adapter:
Use only the AC adapter that came with your camera. Using a different AC
•
adapter may damage your camera.
Turn the camera power off before connecting or disconnecting the AC adapter.
•
Grasp the plug, not the cord, when you unplug the adapter from an outlet. Avoid
•
bending, pulling, or twisting the AC adapter cord. Do not try to lengthen the
cord by splicing it to another wire.
Replace a damaged power cord with a new one (to avoid electrical shock).
•
Polaroid Digital Camera Tips, Tricks, Terms, and Techniques 1
Page 74

Note: The AC adapter may become warm to the touch after extended periods of use.
This is no cause for alarm.
If you are using rechargeable batteries, using the AC adapter will not recharge
them. For more information about how to recharge the batteries, see the
instructions provided by the battery manufacturer.
How many photos does my camera hold?
Normally, a photo taken at 640x480-pixel resolution produces a JPEG data file about
100K in size. So, each megabyte of storage—in the camera’s internal memory, on a
memory card, or on your PC’s hard disk—may hold around ten 640x480 photos.
About four times this number of photos can be stored per megabyte, if they are shot
at 320x240-pixel resolution.
The actual number of photos that your camera can hold depends on many factors:
The amount of storage in the camera’s internal memory and/or a memory card
•
Pixel resolutions used when taking each photo (higher resolutions produce
•
better photos, which take up more storage space)
Photo quality settings (the JPEG compression ratio that you selected when you
•
took each photo—lower compression produces a higher-quality photo, which
takes up more storage space)
Visual complexity of the photos taken (complex scenes containing a lot of detail
•
and color changes take up more storage space)
Available storage (internal to the camera or in a memory card)
•
If your camera runs out of space for photos, transfer photos from the camera to your
PC and then delete the photos from the camera.
Warning: Once you delete the photos, they are gone forever!
How can I take better photos?
Note: Some digital cameras do not have a flash.
If your camera includes both an optical viewfinder and an LCD viewfinder:
Use the optical viewfinder:
•
• For faster processing and flash recycle time
• To optimize battery life
Use the LCD viewfinder:
•
• To see the photo framed exactly as it will be taken
• When taking photos of subjects close to the camera
2 Polaroid Digital Camera Tips, Tricks, Terms, and Techniques
Page 75

Here are more tips for taking better photos:
To take the BEST photos that your camera can produce, use its highest resolution
•
and quality settings. (But be aware that these highest-quality photos will take up
much more storage space in the camera and on your computer.)
Keep the sun behind you or at your side. Avoid having the sun directly overhead.
•
Do not use the flash outdoors. This produces an overexposed image.
•
In low light conditions or when using a self-timer, use a tripod to avoid camera
•
movement during exposure.
Avoid extreme temperatures, which can affect battery performance.
•
Keep the subject within the flash range specified in the camera manual.
•
Avoid shooting toward reflective objects to avoid hot spots in your photos. Turn
•
the flash off if you cannot avoid shooting toward reflective objects.
Periodically clean the lens, LEDs, and LCD panels with a soft, lint-free cloth. Do
•
not use cleaning solutions or chemically-treated tissues.
What is photo “resolution”?
Resolution refers to the number of pixels in a digital photo. A 640x480-pixel photo
contains four times the number of “picture elements” (and hopefully four times the
image detail) as a 320x240 photo. So the 640x480-pixel photo produces a better
looking image and a better quality printout. But, the 640x480 photo also takes up
more storage space in the camera’s internal memory, on a memory card, or on your
PC’s hard disk.
What is photo “quality”?
A digital photo’s quality depends on both its resolution (defined above) and the JPEG
file compression that the camera applies when you take the photo. This JPEG
compression is measured in terms of how many pixels captured by the camera’s image
sensor are replaced by one pixel in the stored image file. Less compression produces a
better looking image that takes up more storage space. Many Polaroid digital cameras
offer you several photo-quality options.
Generally, if you photograph the same scene at a series of camera settings (ranging
from the lowest resolution and JPEG quality all the way up to the highest), you may
notice the following differences as resolution and “quality” increase:
The photos will become larger on your PC monitor.
•
You may notice increasing image detail, both when the photos are displayed on
•
your PC monitor and when they are printed.
You may notice smoother color changes in displayed and printed photos. (You
•
may see less of the color “banding” that sometimes appears in low-res photos.)
Polaroid Digital Camera Tips, Tricks, Terms, and Techniques 3
Page 76

How do I get the best printouts of my photos?
This is a tough question to answer exactly, since the results you achieve depend very
much on the printer you use. In general, laser printers and laser-printer paper do not
perform as well as inkjet printers, which can use specially coated papers.
Regardless of the printer you use, here are some guidelines for getting the best prints
possible:
Remember that you are constrained by your printer’s resolution. A 300-dot-per-
•
inch printer cannot reproduce all of the detail contained in a 1200-dot-per-inch
image.
For best results printing a 640 x 480-pixel photo, print it at about 4 x 3 inches in
•
size. (Please experiment, though, because some printers can produce quite
acceptable 6.5 x 5-inch copies of a 640 x 480 image.)
To change the print size of a photo using your PhotoMAX Image Maker
•
Software:
Double-click the software icon to launch it.
1
Click From File (bottom left of window).
2
Click Browse, and in the Open window, find and double-click the
3
desired photo file. The photo will appear in the software’s image tray.
Click Print (left side of window) and then click Standard Printing
4
(bottom of window). A printing window appears, showing you the current
default size for the printed image. This is generally the recommended size,
and if you want to try it, click Print (bottom of window).
But if you want to resize the photo, first select Inches or Cm (just below
5
the image tray). A grid appears, made up of squares representing whole
inches or centimeters.
Click the center of the photo and, while holding the mouse button down,
6
drag the photo and place its lower-left corner at any grid crossing. Then
release the mouse button.
Click the white box at the upper-right corner of the photo, and while
7
holding the mouse button down, drag the corner toward the center of the
photo (to make it smaller) or away from the center (to make it bigger).
When the photo reaches the desired size, release the mouse button. (The
grid lines will help you estimate the photo size.)
Click the appropriate paper Orientation button (upper right), click
8
Printer Setup (if you want to configure your printer), and then click
Print (bottom of window).
4 Polaroid Digital Camera Tips, Tricks, Terms, and Techniques
Page 77

How do I email photos?
There are two ways to email photos:
• If your email software is MAPI compliant, you can email photos directly
from the PhotoMAX Image Maker software.
Open the PhotoMAX software.
a
Display your photo in the PhotoMAX image tray.
b
Click
c
Click
d
Choose the image size you want to send. (
e
Click
f
In the
g
Other MAPI compliant email
.
Save
.
Email
.
Send
Email Server Setup
Small
window, choose either
. Click OK.
is recommended.)
AOL email
or
The photo is automatically attached to a blank message.
Address and write your email message.
h
i
Click the
button in your email window.
Send
• If your email software is not MAPI compliant, you must follow the
manual file-attachment procedure for your email system.
What is “exposure-value brightness compensation”?
Sometimes, a photo may come out too dark or too light. Many Polaroid digital
cameras use exposure-value brightness compensation to fix this problem. If your
camera includes this feature:
A larger numeric setting produces a lighter photo.
•
A smaller numeric setting produces a darker photo.
•
Note: You may also want to lighten or darken your photos to achieve special lighting
effects.
Polaroid Digital Camera Tips, Tricks, Terms, and Techniques 5
Page 78

What is “white-balance compensation”?
If you are shooting indoors without a flash, or in other unusual lighting conditions,
your digital photos may be tinted with strange colors (such as orange, green, or blue).
Many Polaroid digital cameras use white-balance compensation to fix this problem. If
your camera includes this feature:
Use the camera’s automatic white-balance setting for most lighting conditions.
•
If flash is prohibited or not being used indoors, you may want to try the camera’s
•
fluorescent, or tungsten setting, depending on the source of the prevailing
lighting.
How do I install my software CD?
To install the software:
1 Turn your computer on.
2 Check that your computer meets the following requirements:
200 MHz Pentium processor or equivalent
a
Compatible with Microsoft Windows 98, Me, or 2000
b
32 MB RAM
c
195 MB available hard disk space
d
Available USB port (Windows 98, Me, or 2000)
e
High-color display with 800 x 600 DPI resolution or higher
f
2x or faster CD-ROM drive
g
Mouse
h
3 Insert the software CD into your PC’s CD-ROM drive.
If the installation program does not start automatically:
Select
a
Click
b
Select
c
Click
d
Click OK. The installation program begins.
e
from the Windows
Run
Browse
Setup.exe
Open
and select your CD-ROM drive.
from the CD-ROM.
.
Start
menu.
4 Follow the instructions on your computer screen.
5 At the final prompt, click
Caution:
6 Polaroid Digital Camera Tips, Tricks, Terms, and Techniques
You must restart your computer after installing the software.
Finish.
Page 79

How do I connect the digital camera to my PC?
See the camera User’s Manual for complete instructions.
Can I transfer photos to a Macintosh computer?
You can, even though the software that comes with Polaroid PhotoMAX cameras is
not Macintosh compatible! Many PhotoMAX digital cameras use Type I
CompactFlash memory cards, and you can buy a low-cost CompactFlash card reader
from many electronic stores and Web merchants. If you purchase a reader with a
Macintosh USB interface (including required software), you can remove the
CompactFlash memory card from the PhotoMAX camera, insert it into the reader
and download your photos to your Macintosh computer.
Troubleshooting tips
The digital camera has no power:
Turn the camera off and then on again. The camera may have automatically
•
turned off to save battery power.
Check that the battery terminals (+ and –) are correctly orientated as shown
•
inside the battery compartment.
The batteries may be dead. Replace all batteries.
•
Use the AC adapter whenever possible. Check to make sure that the AC adapter
•
is firmly attached to the digital camera.
The Polaroid software does not seem to see the digital camera:
•
Check that the digital camera is turned on. Also use the AC adapter when
transferring photos, to avoid losing battery power.
Reconnect the camera to the computer, as described in the User’s Manual.
•
The computer’s USB port may have a conflict. For example, another software
•
application or hardware device (such as a hand-held computer device) may be
using the USB port settings. Turn these other software and hardware devices off
when the digital camera is connected to your computer. Contact the device
manufacturer for further assistance.
Your computer may have an internal BIOS conflict. Read the instructional
•
manual and other documentation that came with your computer, or check with
the computer manufacturer for more information.
Polaroid Digital Camera Tips, Tricks, Terms, and Techniques 7
Page 80

Cannot take a photo:
If any LED indicators on the camera blink after you take a photo, wait until they
•
stop blinking before you take another photo.
The camera’s internal memory or optional memory card may be full. Transfer
•
photos to your computer and delete photos from the camera to free up space.
If you are using a memory card, check that it is properly inserted. Turn off the
•
camera, remove and correctly reinsert the memory card, and turn on the
camera.
If you are using a memory card, it may be corrupted. Reformat the memory card
•
or purchase a new memory card.
The camera may be connected to your computer. You may be able to take photos
•
using the Polaroid software controls. If not, turn the camera off, disconnect it
from the computer, and turn the camera on again to take photos.
The camera LCDs do not turn on:
•
The camera may be connected to a computer. Turn the camera off, disconnect it
from the computer, and turn the camera on again.
The batteries may be weak. Replace the batteries or use the AC adapter. To save
•
battery power, use the optical viewfinder when composing photos.
The live image in the LCD viewfinder looks “jumpy”:
Many Polaroid digital cameras include an LCD viewfinder, which shows you the
•
actual live photo before you take it. This LCD display may look jumpy when the
camera is being used in low light conditions. Increase the amount of light, or use
the optical viewfinder to compose your photo.
The flash does not work (in cameras that have a flash):
•
The flash may be turned off. Turn the flash on and use the camera’s automatic
flash setting for best results.
If the camera may be in its automatic flash setting, and the flash sensor
•
determined that there was sufficient light to take the photo without the flash.
The flash may be charging. Wait until the flash LED stops blinking before taking
•
another photo.
The batteries may be dead. Replace the batteries in the camera or use the AC
•
adapter.
8 Polaroid Digital Camera Tips, Tricks, Terms, and Techniques
Page 81

The photo looks blurry:
Note: Some digital cameras do not have a flash.
The subject of your photo may have moved while the photo was taken. Have
•
your subject remain still while taking a photo.
The digital camera may have moved while the photo was taken. Hold the camera
•
steady while taking a photo, or use a tripod. There is a tripod mount on the
bottom of the camera.
The photo may have been taken in dim light with the flash turned off. Either
•
attach the camera to a tripod, or turn the flash on and set it to automatic flash.
If the camera has a macro (close-up) function, you may have left it on when
•
taking a non-macro photo. Turn the macro function off.
The camera may be too close to the subject. Follow the recommended camera-
•
to-subject distances specified in the User Manual.
The photo looks too dark:
Note: Some digital cameras do not have a flash.
There may not have been enough available light for the photo. If your camera
•
offers exposure-value brightness compensation, set it to a higher numerical
value. Also try turning the flash on to increase the amount of light.
A light source may have been behind your subject. Retake the photo with the
•
light source behind your back or to your side. If you must shoot towards a light
source, turn the flash on and set the flash to always fire (a setting usually called
Forced Flash).
The subject may have been too far away from the flash. Make sure that the
•
subject is within the optimal flash range described in your camera manual .
The photo looks too light:
Note: Some digital cameras do not have a flash.
There may have been too much light for the photo. If your camera offers
•
exposure-value brightness compensation, set it to a lower numerical value. Also
try turning the flash off to decrease the amount of light.
The flash may be set to always fire (a setting usually called Forced Flash) and the
•
current lighting conditions may not require flash. For best results in most
conditions, use the camera’s automatic flash setting.
A bright object or light may be in the photo. Turn the flash off or try taking the
•
photo from a different angle to move the bright light out of the photo.
The subject may have been too close to the flash. Turn the flash off or take the
•
photo from a greater distance.
Polaroid Digital Camera Tips, Tricks, Terms, and Techniques 9
Page 82

The photo has an unnatural color:
Note: Some digital cameras do not have a flash.
The flash may be off or not firing indoors, where the general lighting is either
•
from fluorescent or tungsten bulbs. Try setting the flash to always fire (a setting
usually called Forced Flash). If your camera offers white-balance compensation,
also try its automatic, fluorescent, or tungsten settings (depending on the source
of the prevailing lighting).
Other safety precautions
Observe the following precautions when you use this digital camera:
This camera is battery operated. Supervise children when the camera is operated
•
by them or used in their presence. To avoid electrical shock, do not expose the
camera to or immerse it in water or other fluids. Do not disassemble or operate
the camera if dropped or damaged. Contact a Polaroid Service Center for repair
information.
Do not open the camera case or attempt your own repairs. High-voltage internal
•
components create the risk of electrical shock when exposed. Return your
camera to authorized Polaroid service providers for all maintenance and repairs.
Keep the camera away from water and other liquids. Moisture creates the danger
•
of fire and electrical shock. Do not use the camera in the rain, at the seashore, or
any location where there is the possibility of exposure to liquids.
Turn the camera off, unplug the AC adapter, and remove the batteries
•
immediately if the camera is exposed to water or any other liquid.
Do not open the battery compartment, unplug the AC adapter, or remove an
•
internal memory card while the camera is on. If the camera loses power while
processing a new photo, the photo cannot be stored and may cause corruption of
other stored photos.
10 Polaroid Digital Camera Tips, Tricks, Terms, and Techniques
Page 83

PDC 1320
Technical Support Information
(This information replaces that found on Page 71)
Polaroid Corporation provides technical support for digital cameras at
http://www.polaroid.com/
800-897-0356 from 10 A.M. to 7 P.M. EST, (Mon - Fri) and 10 A.M.
to 4 P.M. EST (Sat). Please note that phone support and repair services are
regional and may not be available for a particular product outside the
country where it was purchased. To obtain parts for cameras purchased in
the United States, call 800-343-4846 from 9 a.m. to 5 p.m. EST, Mon. - Fri.
(Note: No technical support is available at this number.) A list of Polaroid
international sales and customer support offices is available at
http://www.polaroid.com/service/phone.html
, and within the United States by calling
.
 Loading...