

Page 1
Quickstart Card
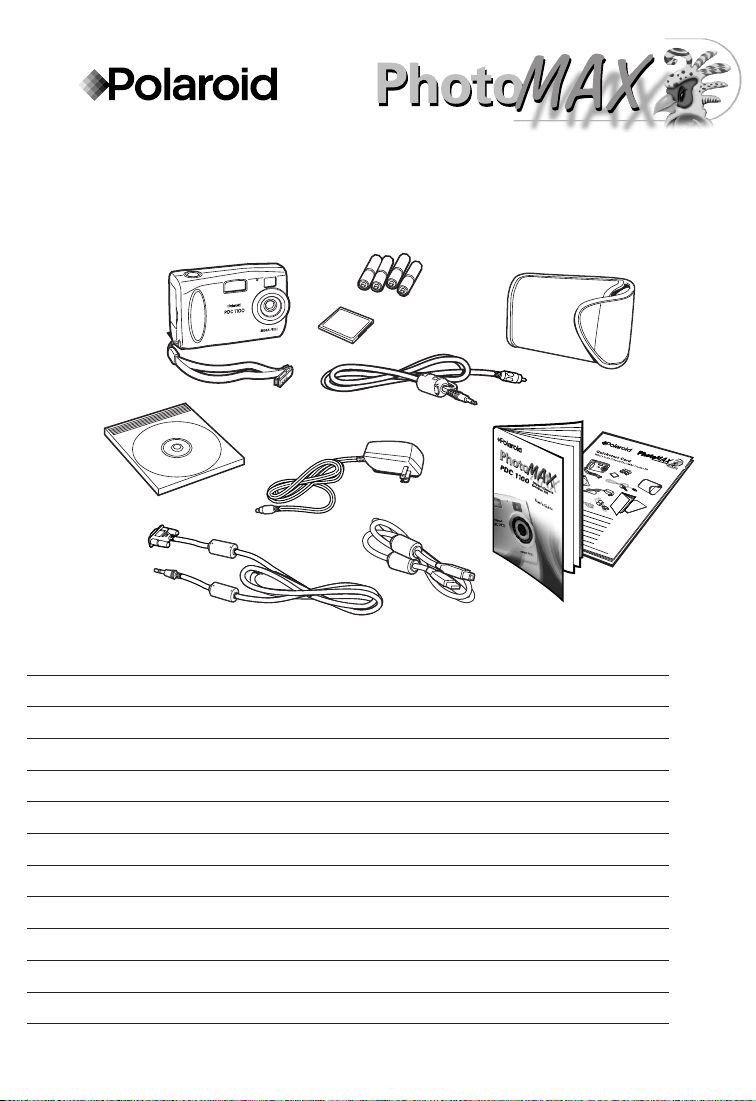
What’s in the Polaroid PhotoMAX
PDC 1100 Digital Camera Creative Kit?
a
b
g
k
Polaroid PDC 1100 Digital Cameraa
Wrist strap (with removable memory clip)b
4 MB removable memory cardc
Four AA batteriesd
Video cablee
Camera casef
Polaroid PhotoMAX Image Maker Software CD-ROMg
AC adapterh
Polaroid PhotoMAX PDC 1100 User’s Guidei
Quickstart cardj
RS-232C serial cablek
USB cablel
h
d
c
f
e
i
l
j
Page 2
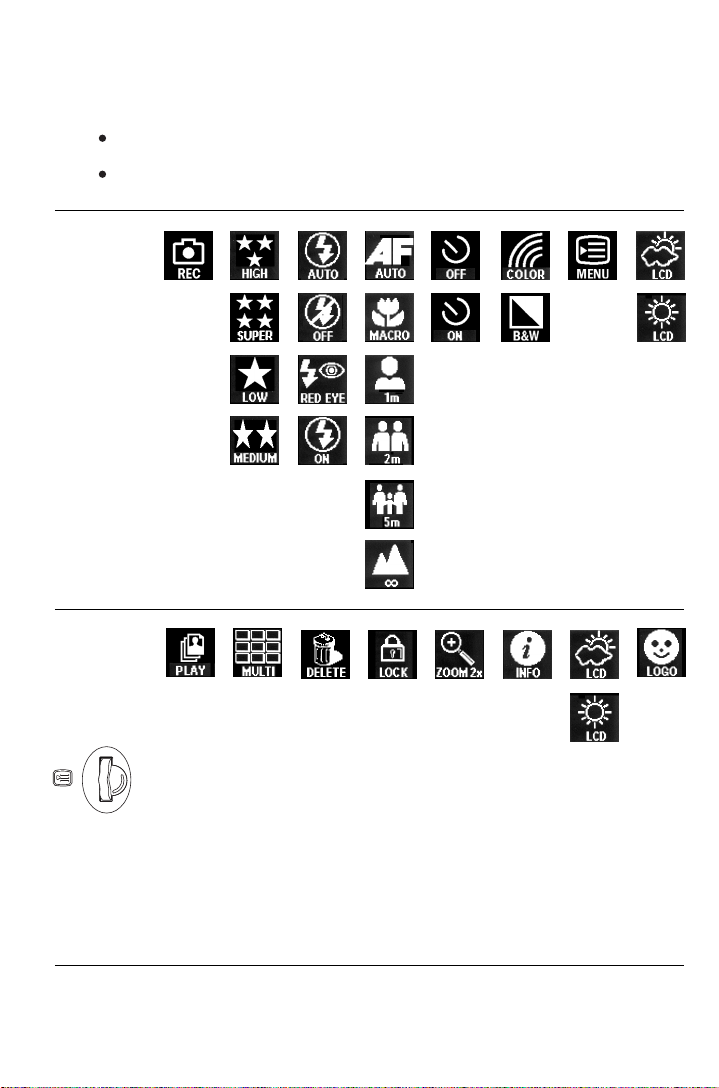
The camera has two LCD menus:
REC (Record) to take photos.
PLAY (Playback) to review photos stored in memory.
RECORD
PLAYBACK
Press the Menu Dial to display menu options, change
between Record and Playback mode, and make a selection.
Turn the Menu Dial to scroll between different menu
choices and settings.
Refer to the Polaroid
PhotoMAX PDC 1100 User’s Guide for more information.
©1999 Polaroid Corporation, Cambridge, MA 02139, U.S.A., owner of the trademarks
"Polaroid", "Polaroid PhotoMAX" and "PDC". "MAX the Bird" ©1998 Polaroid Corporation.
All other product names may be the property of their respective owners. All rights
reserved. Printed in U.S.A. PU-21203Q-0
Page 3
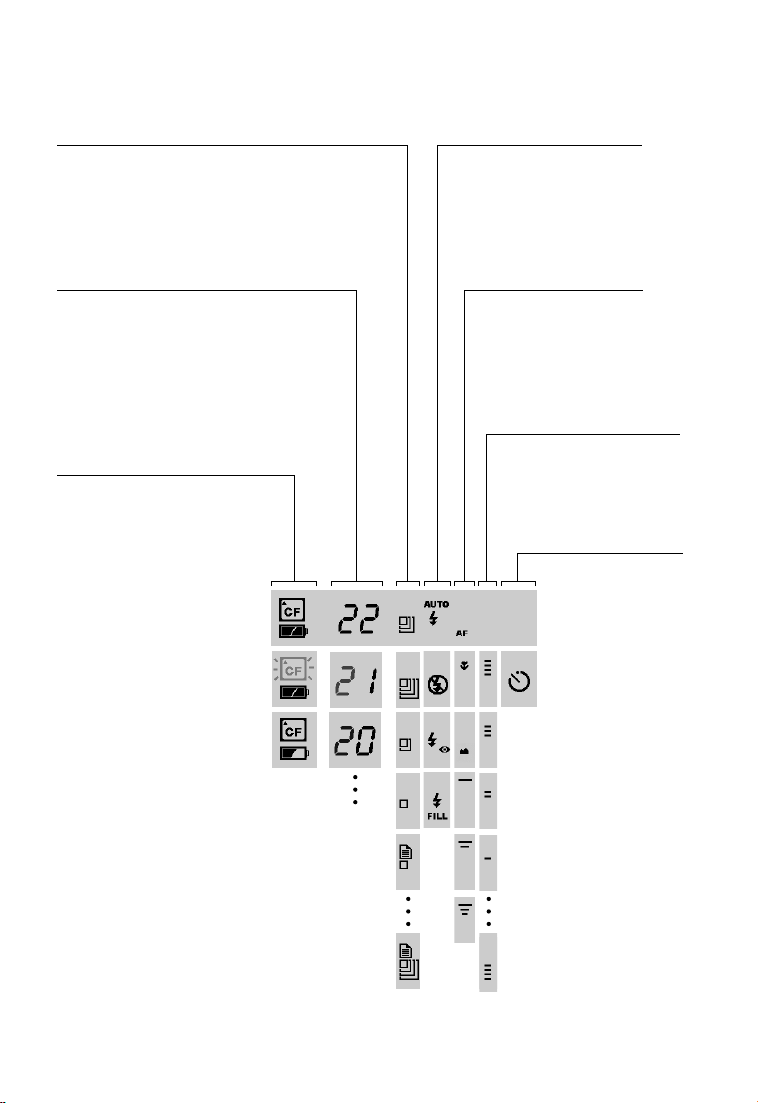
Pixel resolution/color setting
• Color: low to super
• Black & white: low to super
Flash setting
• Autoflash
• Fill flash on
• Flash off
• Red eye reduction
Number of images remaining
- Low resolution
36
- Medium resolution
16
- High resolution
12
- Super resolution
6
Memory card & battery status
• Memory card in slot
• No memory card in slot
(blinking)
• Battery good
• Battery low
Lens setting
• Auto focus
• Macro
• Infinity
• Fixed focus: 3, 7, 16 ft
Exposure setting
• Normal
• Light +1. +2, +3, +4
• Darken -1, -2, -3, -4
Self-timer setting
• On/off
Page 4
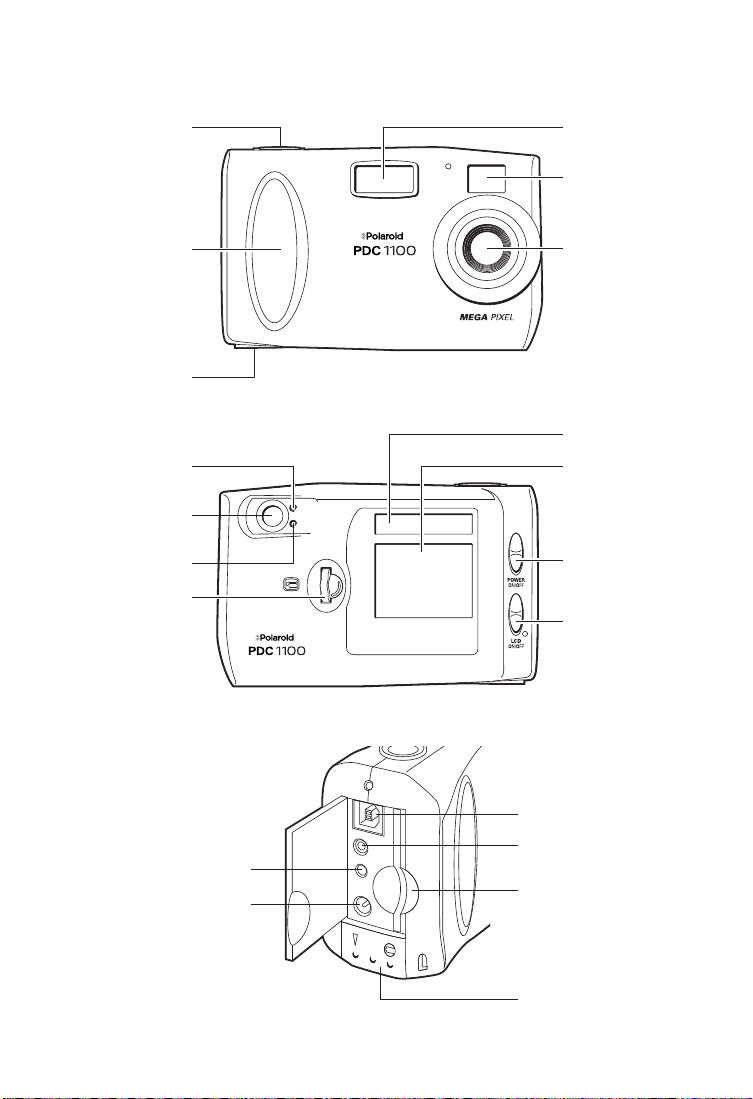
Camera features Status panel display Control panel
Shutter button Flash
Optical viewfinder
Hand grip
Tripod socket
Ready indicator
Optical viewfinder
Wait indicator
Menu dial
Serial cable connection
AC adapter connection
Lens
Status panel
LCD display
Power switch
LCD display switch
USB cable connection
Video cable connection
Memory card slot
Battery compartment
Page 5

Getting the camera ready
Load batteries
Open the battery compartment.
Slide the cover lock to the unlocked
position and push forward to open.
Insert four AA batteries into the
compartment.
Do not mix old batteries with new
batteries, or different manufacturer’s
batteries together.
To extend battery life, use the AC adapter
whenever possible or purchase
rechargeable batteries.
Connect one end of the AC adapter
to the AC power connector on the
camera.
Connect the other end to a grounded
electrical outlet.
Attach wrist strap
Attach the wrist strap to the camera
as shown.
Cover lock
AC power
connection
Insert memory card
Turn the camera power off.
Insert the memory card into the
slot (with the label side of the card
facing the rear of the camera).
Use the clip to remove the memory
card from the camera.
Do not insert or remove the memory
card while the camera power is on.
You must insert the memory card
before you can turn on the camera.
Page 6

Taking photos
You can take a photo using the optical viewfinder or the
LCD display.
Use the optical viewfinder to save battery power.
Ready indicator
Optical
viewfinder
Status panel
LCD display
Shutter button
Wait indicator
Power switch
LCD display
switch
Use the LCD display to frame photos when using the Macro
lens setting. See the User’s Guide (included in kit) for more
information on changing camera settings.
Slide the power switch up to turn on the camera.1
Slide the LCD display switch up to turn on the LCD display
2
if needed.
Wait until the flash has charged. The flash icon blinks on
3
the Status panel display while the flash is charging. You
cannot take a photo while the flash is charging.
Flash icon blinks
until flash is ready
Page 7

Press shutter
button half-way
to focus
Frame photo
using optical
viewfinder or
LCD display
Flash range = 3ft -10 ft
(1m - 3m)
Wait until the green LED light appears. The camera
is now focused and ready to take a photo.
Hold the camera steady and press the shutter button down
4
firmly.
The red LED light appears and the photo appears
on the LCD display while it processes. Wait until
the image is fully processed before taking another
photo.
Transferring photos to your computer
The are two ways of transferring digital photos to your
computer.
RS-232 Serial port connection.
USB port connection. USB supported only for Windows 98.
You can also purchase an optional external memory card
reader. See your computer retailer for more information.
Page 8

To connect using the serial cable
Turn off your computer and all
1
peripherals (scanner, printer).
Connect the serial cable to the
2
serial port on the camera and
then to your computer.
Connect the AC adapter to the AC
3
power connection on the camera.
Plug the AC adapter into a
4
grounded electrical outlet.
Turn on your computer.5
Turn on your camera.6
Double click the Polaroid PhotoMAX
7
icon on your desktop.
To connect using the USB cable
Connect the USB cable to the
1
USB port on the camera and then
to your computer.
Connect the AC adapter to the AC
2
power connection on the camera.
3
Plug the AC adapter into a
grounded electrical outlet.
Serial port
AC power
connection
USB port
AC power
connection
Turn on your camera.4
Double click the Polaroid PhotoMAX
5
icon on your desktop.
 Loading...