

Page 1
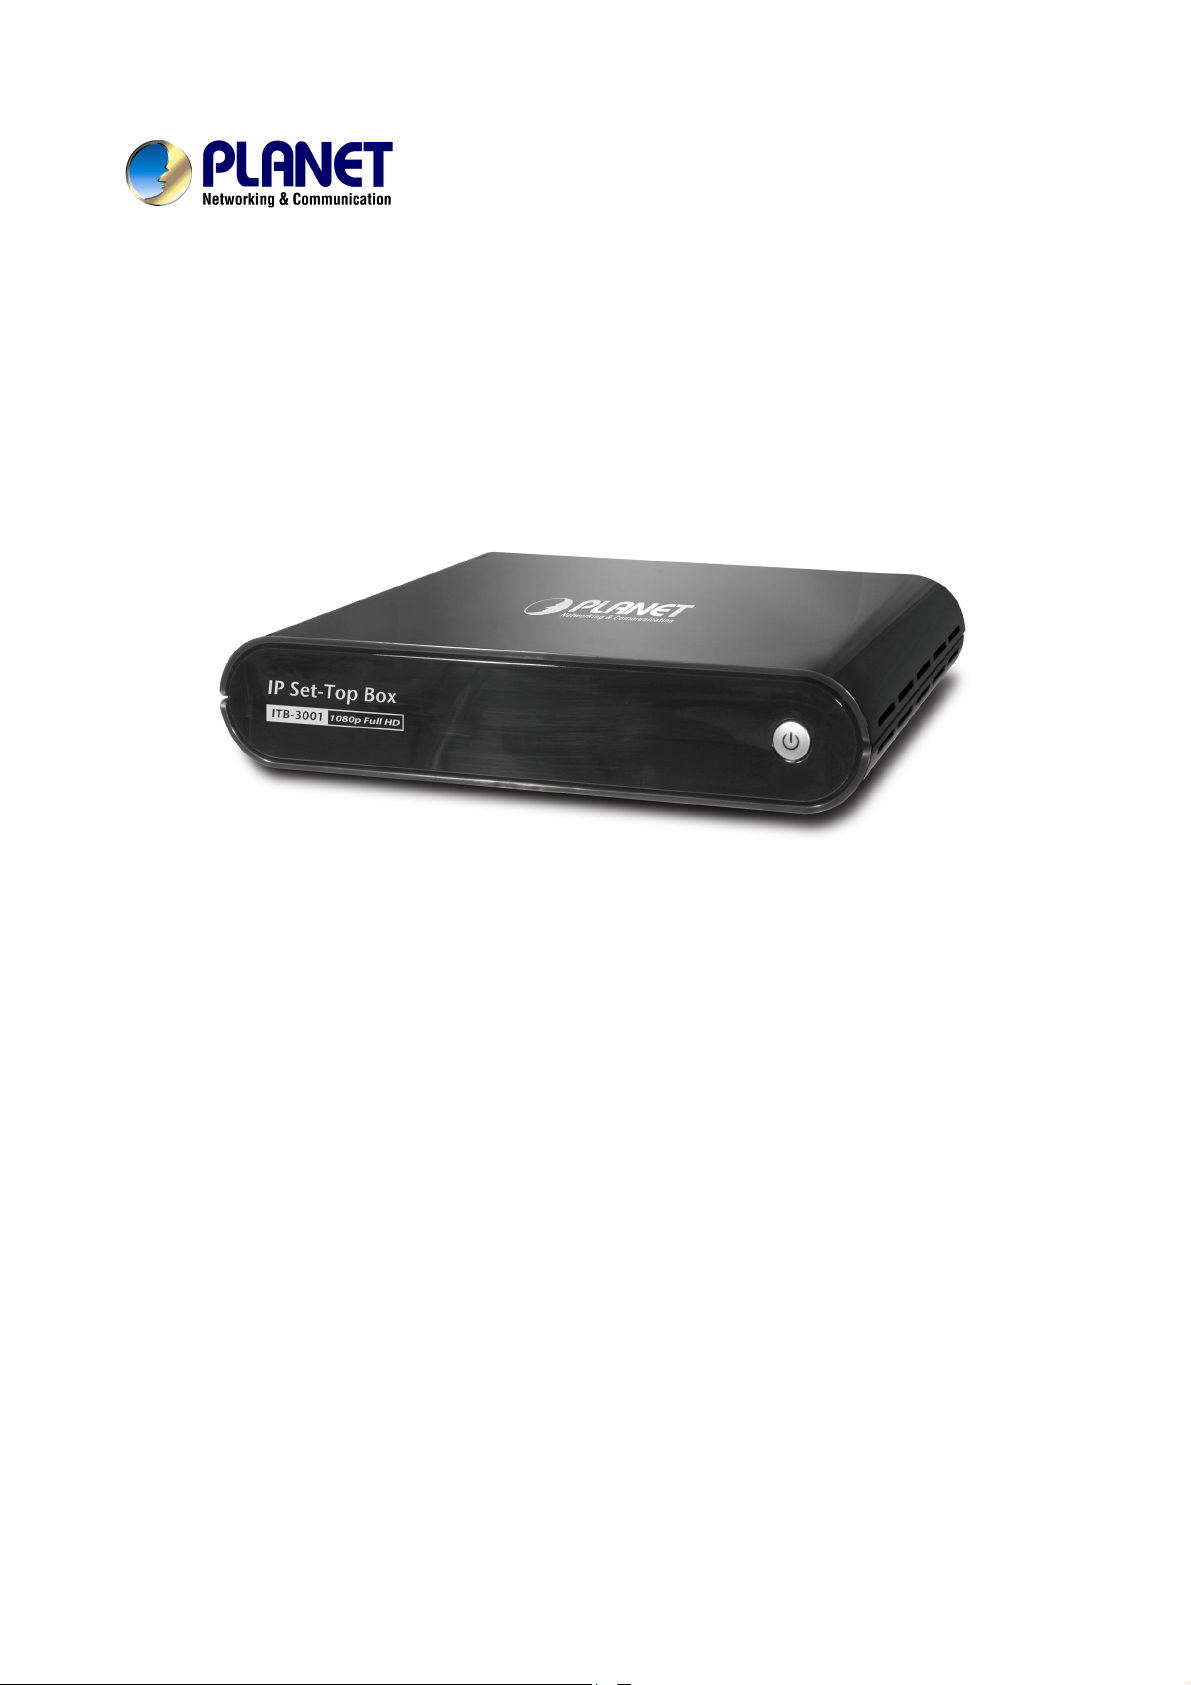
High Definition IP Set-Top Box
ITB-3001
User’s manual
Version 1.0.1
Page 2

Copyright
Copyright© 2010 by PLANET Technology Corp. All rights reserved. No part of
this publication may be reproduced, transmitted, transcribed, stored in a
retrieval system, or translated into any language or computer language, in any
form or by any means, electronic, mechanical, magnetic, optical, chemical,
manual or otherwise, without the prior written permission of PLANET.
PLANET makes no representations or warranties, either expressed or implied,
with respect to the contents hereof and specifically disclaims any warranties,
merchantability or fitness for any particular purpose. Any software described in
this manual is sold or licensed "as is". Should the programs prove defective
following their purchase, the buyer (and not this company, its distributor, or its
dealer) assumes the entire cost of all necessary servicing, repair, and any
incidental or consequential damages resulting from any defect in the software.
Further, this company reserves the right to revise this publication and to make
changes from time to time in the contents hereof without obligation to notify any
person of such revision or changes.
All brand and product names mentioned in this manual are trademarks and/or
registered trademarks of their respective holders.
Federal Communication Commission Interference Statement
This equipment has been tested and found to comply with the limits for a Class B
digital device, pursuant to Part 15 of FCC Rules. These limits are designed to
provide reasonable protection against harmful interference in a residential
installation. This equipment generates, uses, and can radiate radio frequency
energy and, if not installed and used in accordance with the instructions, may
cause harmful interference to radio communications. However, there is no
guarantee that interference will not occur in a particular installation. If this
equipment does cause harmful interference to radio or television reception,
which can be determined by turning the equipment off and on, the user is
encouraged to try to correct the interference by one or more of the following
measures:
1. Reorient or relocate the receiving antenna.
2. Increase the separation between the equipment and receiver.
3. Connect the equipment into an outlet on a circuit different from that to which
the receiver is connected.
4. Consult the dealer or an experienced radio technician for help.
2
Page 3

FCC Caution
To assure continued compliance (example-use only shielded interface cables
when connecting to computer or peripheral devices). Any changes or
modifications not expressly approved by the party responsible for compliance
could void the user’s authority to operate the equipment.
This device complies with Part 15 of the FCC Rules. Operation is subject to the
Following two conditions: (1) This device may not cause harmful interference,
and (2) this Device must accept any interference received, including interference
that may cause undesired operation.
Federal Communication Commission (FCC) Radiation Exposure
Statement
This equipment complies with FCC radiation exposure set forth for an
uncontrolled environment. In order to avoid the possibility of exceeding the FCC
radio frequency exposure limits, human proximity to the antenna shall not be
less than 20 cm (8 inches) during normal operation.
R&TTE Compliance Statement
This equipment complies with all the requirements of DIRECTIVE 1999/5/EC OF
THE EUROPEAN PARLIAMENT AND THE COUNCIL OF 9 March 1999 on radio
equipment and telecommunication terminal Equipment and the mutual
recognition of their conformity (R&TTE)
The R&TTE Directive repeals and replaces in the directive 98/13/EEC
(Telecommunications Terminal Equipment and Satellite Earth Station Equipment)
As of April 8, 2000.
WEEE Regulation
To avoid the potential effects on the environment and human health as
a result of the presence of hazardous substances in electrical and
electronic equipment, end users of electrical and electronic equipment
should understand the meaning of the crossed-out wheeled bin symbol. Do not
dispose of WEEE as unsorted municipal waste and have to collect such WEEE
separately.
3
Page 4

Safety
This equipment is designed with the utmost care for the safety of those who
install and use it. However, special attention must be paid to the dangers of
electric shock and static electricity when working with electrical equipment. All
guidelines of this and of the computer manufacture must therefore be allowed at
all times to ensure the safe use of the equipment.
Revision
User’s Manual for High Definition IP Set-Top Box
Model: ITB-3001
Rev: 1.1 (June. 2010)
Part No. EM-ITB3001v1.1.doc
4
Page 5

Table of Contents
CHAPTER 1 INTRODUCTION .....................................................................6
1.1 Feature .......................................................................................6
1.2 Package Contents .........................................................................7
1.3 Physical Details ............................................................................7
CHAPTER 2 INSTALLATION .................................................................... 13
2.1 Getting Start.............................................................................. 13
CHAPTER 3 CONFIGURAITON ................................................................. 19
3.1 Wired Network Setup .................................................................. 19
3.1.1 DHCP................................................................................. 20
3.1.2 Static IP............................................................................. 21
3.2 File Sharing Configuration............................................................ 22
CHAPTER 4 PLAY MEDIA ........................................................................ 27
4.1 USB Media................................................................................. 27
4.2 PC Media ................................................................................... 28
4.3 UPnP......................................................................................... 28
4.4 Playlist ...................................................................................... 28
4.5 File Search ................................................................................29
4.6 Video Playback ...........................................................................30
4.6.1 Full Screen Mode................................................................. 31
4.7 Music Playback ........................................................................... 32
4.8 Photo Playback........................................................................... 33
CHAPTER 5 BONUS FEATURES................................................................ 35
5.1 BT Download.............................................................................. 35
5.2 Flicker....................................................................................... 37
5.3 VLC Station ............................................................................... 37
CHAPTER 6 SETUP MENU ....................................................................... 40
6.1 Audio........................................................................................ 40
6.2 Video ........................................................................................ 42
6.3 System ..................................................................................... 42
6.4 Other........................................................................................ 43
APPENDIX A: Trouble Shooting ...............................................................44
APPENDIX B: Product Specificaiton.......................................................... 45
5
Page 6

CHAPTER 1 INTRODUCTION
High Definition IP Set Top Box ITB-3001is PLANET's latest IP STB that
supports videos up to High Definition (HD) 1080P formats. With the next
generation multimedia streaming technology, home users can enjoy high
quality videos entertainment without having to go to video rental stores or
even use Pay-Per-View.
The ITB-3001offers DLNA / UPnP AV services, based on MPEG-4/H.264/DTS
compression technology to reach wider audience or achieve higher density of
service that thus increases bandwidth efficiency. The IP STB allows the users
to enjoy IP multicast video and home networking service.
IP Set-top Box is advanced customer premises equipment (CPE) device for
delivering streaming video, audio, and IPTV directly from Internet to Teclos
subscribers. The ITB-3001is designed to meet service provider's deployment
requirements for IP-based multimedia service delivery and it is easy to be
installed even by subscribers. Once the UPnP connection is set up, you can
huddle on the sofa using supplied remote control to search and enjoy your
favorite IPTV, Video, and Music in your home networking.
The PLANET IP Set-Top Box guarantees the best multimedia experience for
its users with the advanced features such as real RMVB and DivX. In addition
to its super analog video and audio outputs, the ITB-3001also provides HDMI
component outputs and Dolby digital to enable the users to enjoy high
definition video.
1.1 Feature
z
Dolby Digital, DTS Compliant
z
UPnP AV, DLNA AV Compliant
z
Multicast IPTV & Video-on-Demand (VoD)
z
Broadcast TV & Time-Shift TV
z
Integrated HDMI & Full HD (1080P) TV
z
Electronic Program Guide and Digital rights management
z
User-friendly Graphical On-Screen Menu
z
Supports Multiple file formats
6
Page 7
z
Built-In BitTorrent download engine and Internet Media such as RM/RMVB,
DivX, etc
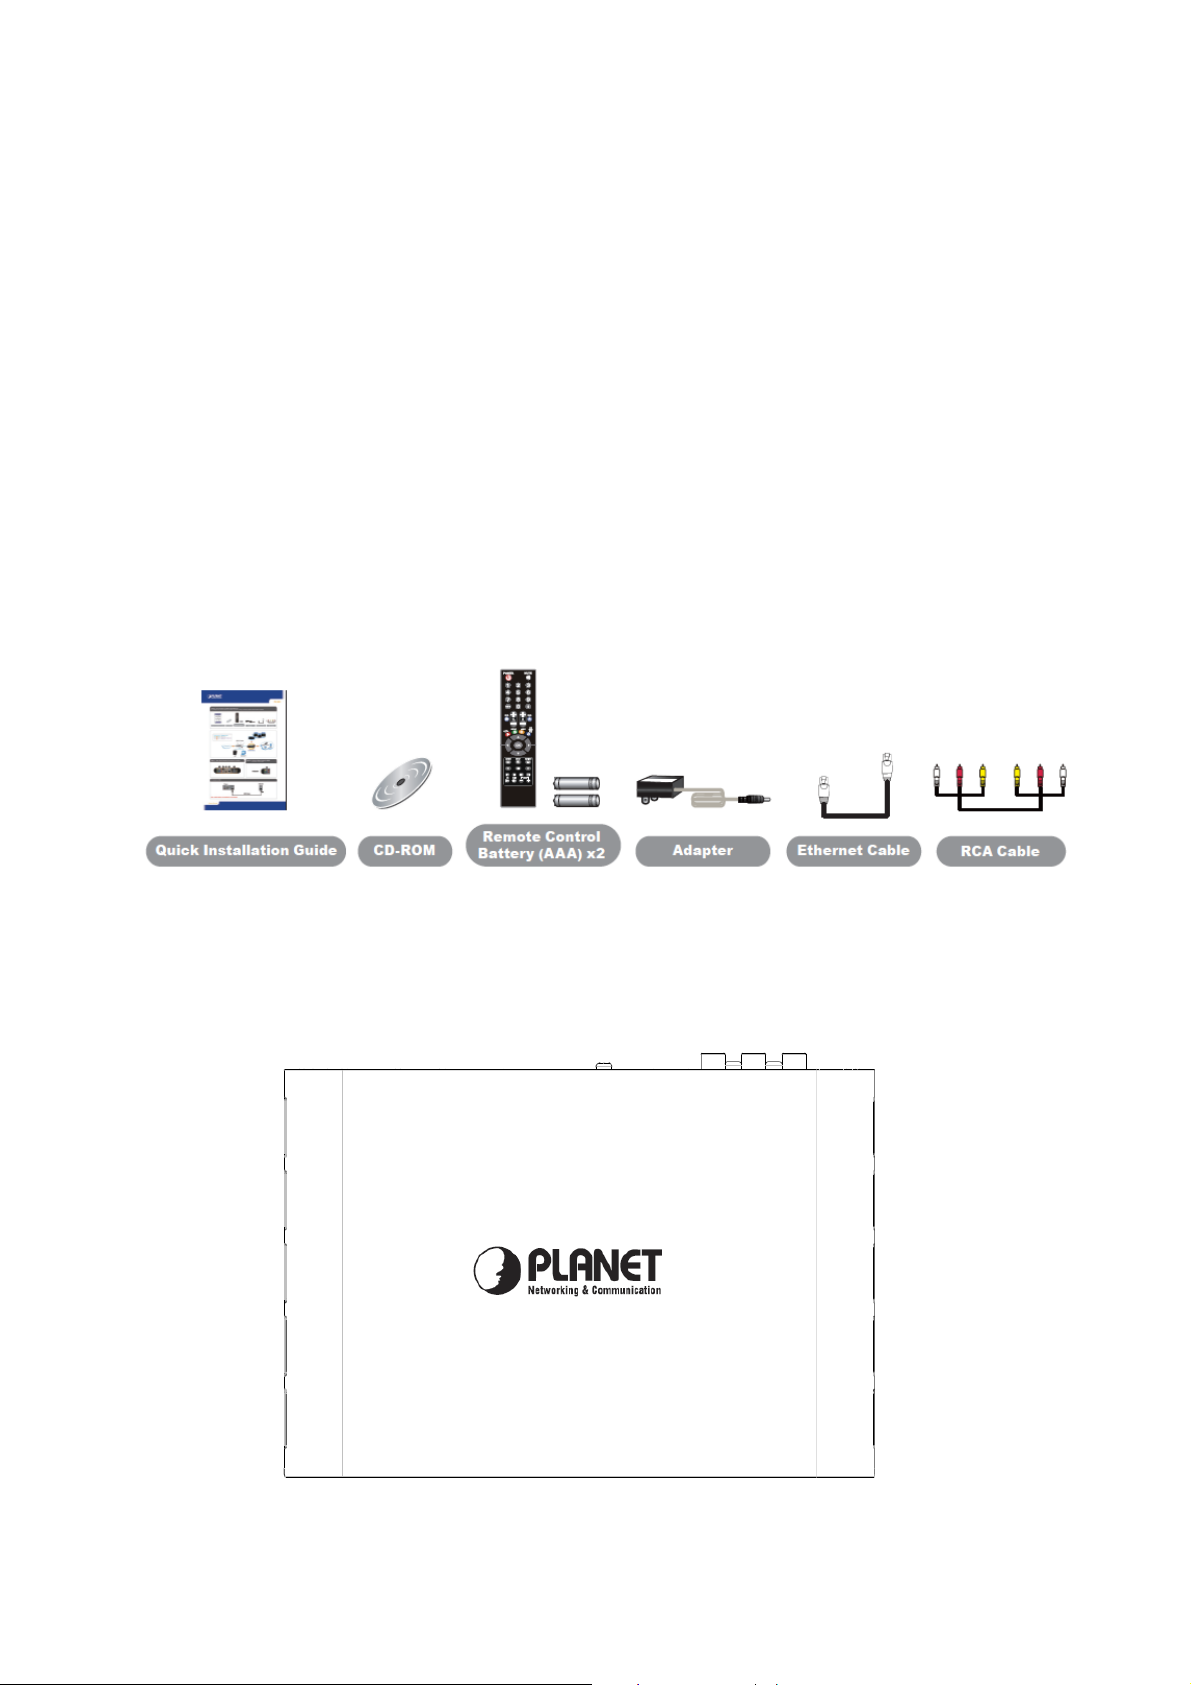
1.2 Package Contents
ITB-3001 Unit x 1
Quick Installation Guide x 1
CD-ROM x 1 (Include Quick Guide and User Manual)
Remote Controller x 1
Battery (AAA) x 2
Power Adapter x 1
RJ-45 Cable x 1
AV Cable (RCA) x 1
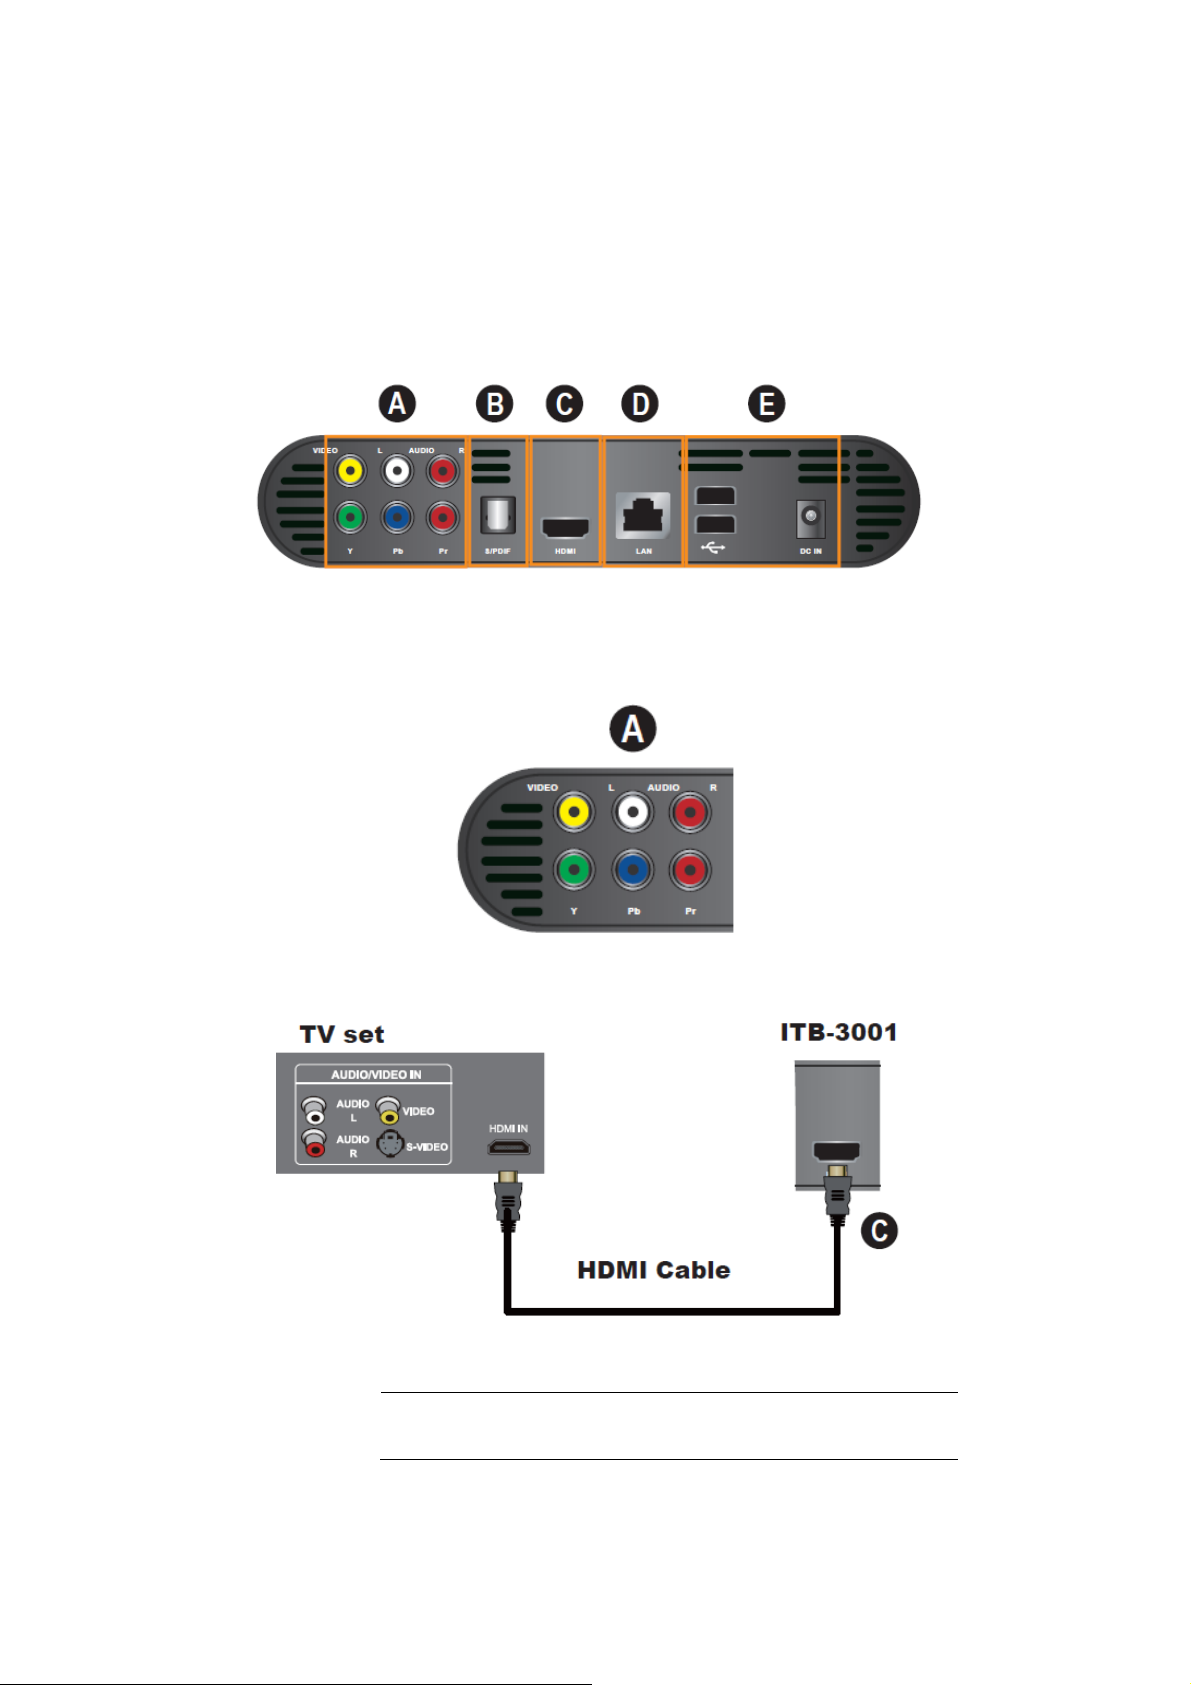
1.3 Physical Details
Top Panel
7
Page 8
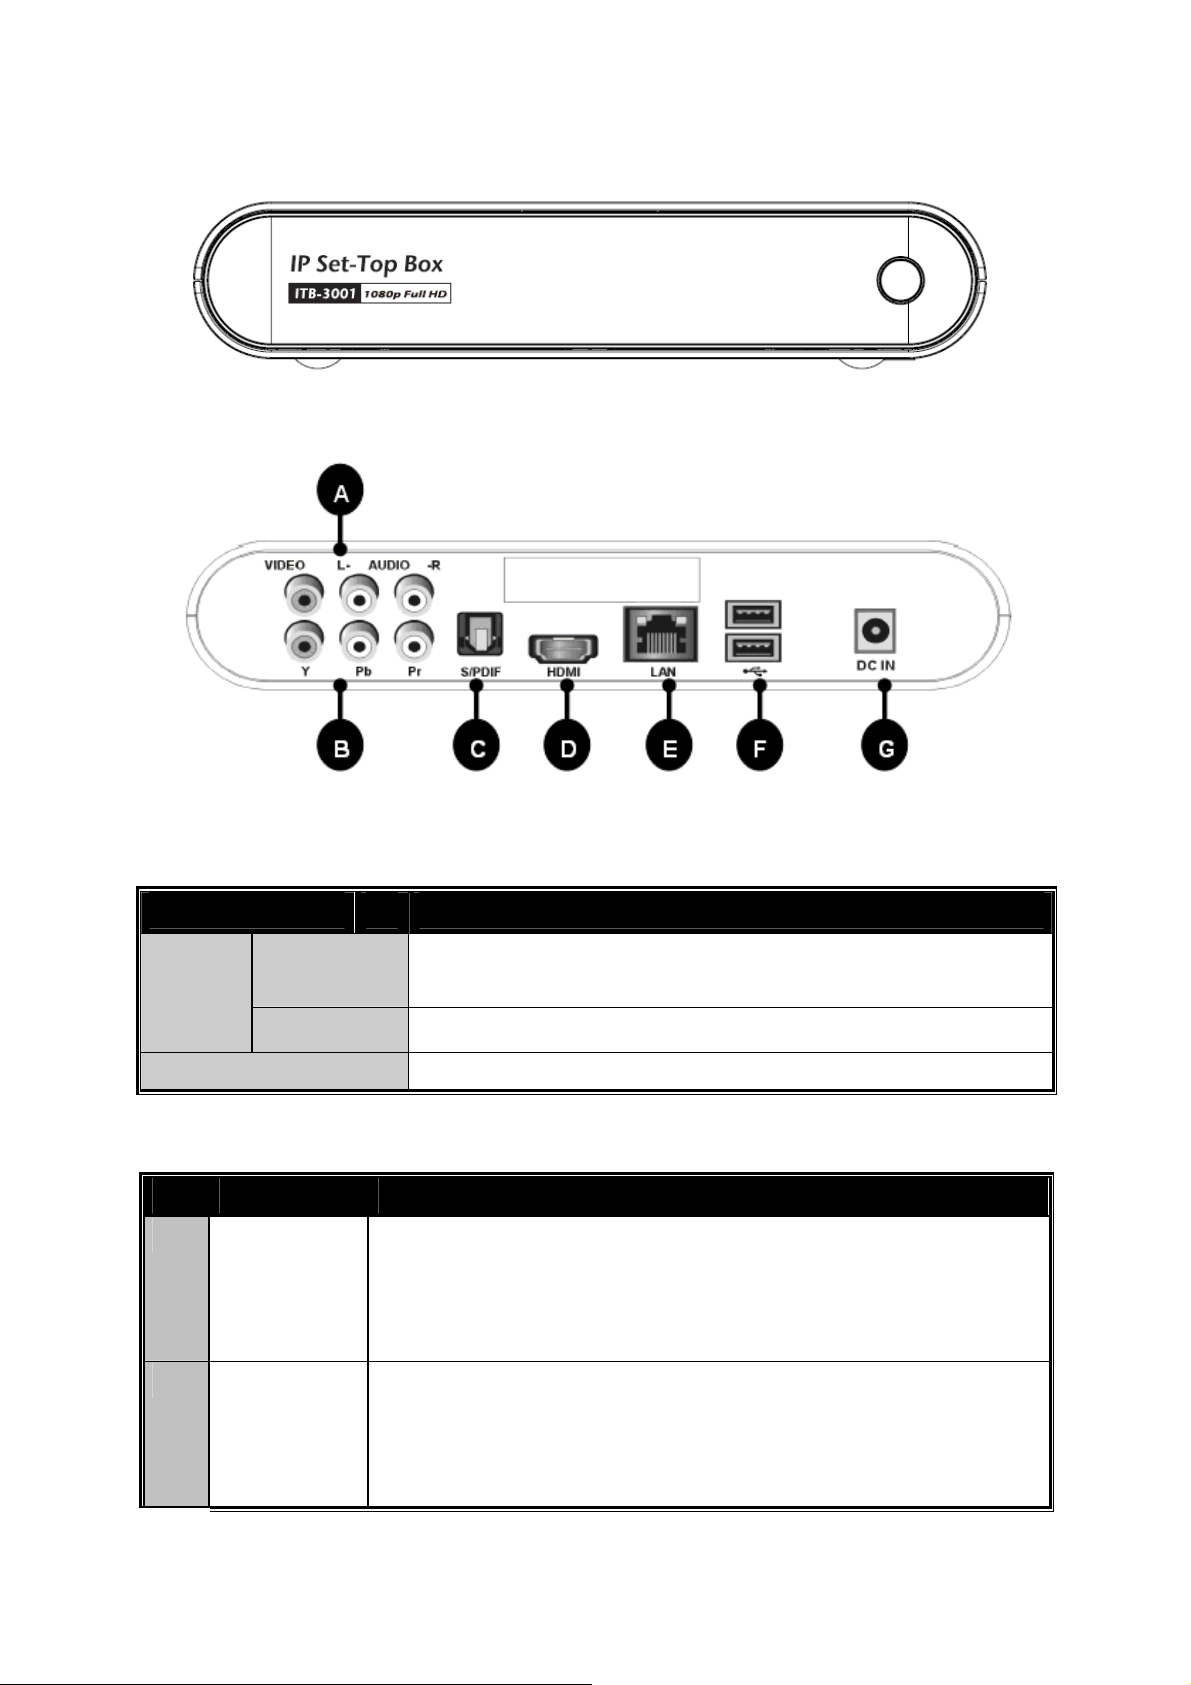
Front Panel
Rear Panel
Front Panel and LED Definition
Connector Description
Power
ON/OFF The LED light will turn “Blue” color when turn on the
STB
Standby The LED light will turn “Red” color
LAN Access LAN with “Blue” color
Rear Panel Port and Button Definition
No. Connector
A Audio
L-/R-
Use AV cable to connect to the VIDO IN/ AUDIO L/R IN
jacks on the TV sets or Home Entertainment systems in
Description
your home in your home by using VIDEO
VIDEO
(Yellow)/AUDIO L (White)/R (Red) cables.
B Y/Pb/Pr Connect to a Y/Pb/Pr-compatible display using three
video (Y/Pb/Pr) and two audio jacks (AUDIOL/R),
through a component video cable with green, blue, and
red connectors.
8
Page 9
C
S-PDIF
Using an optical digital audio (also called S/PDIF) cable
to connect to S-PDIF port of the TV sets or Home
Entertainment systems in your home.
D HDMI Connects to the HDMI jack on the display, a single cable
transmits both audio and video data.
E LAN Connects to the Ethernet cable with RJ-45 Ethernet
connector.
F USB P
lug the supported USB devices into USB ports, such as USB
hard drives, cameras and camcorders.
G DC IN Connects to the DC power adapter.
RReemmoottee CCoonnttrroolllleerr
9
Page 10
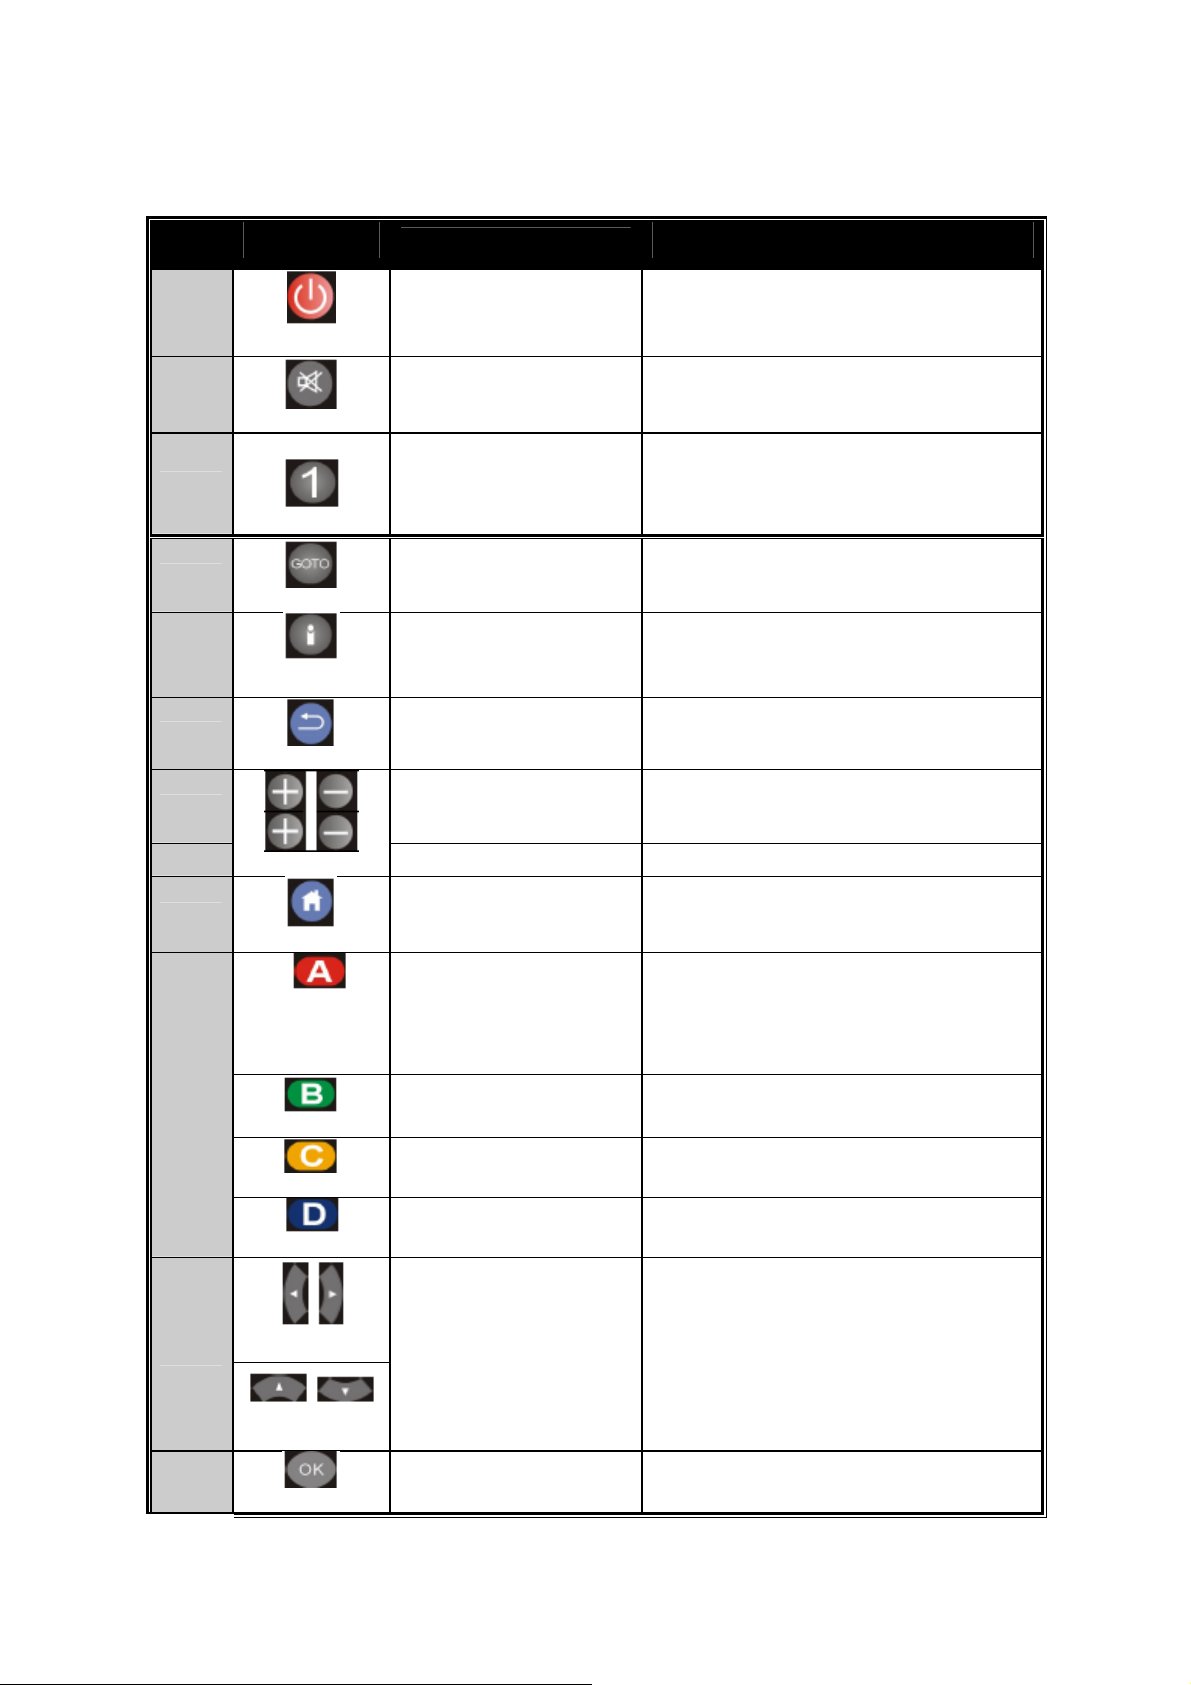
Keypad Definition
No.
A
Connector
POWER Turn on/ off system
Description
B
MUTE Mute/ Resume audio
C
NUMERS
0-9 number keys for selecting
desired options.
D
GOTO Video/movie chapter selection.
E
F
INFO
BACK Return to the previous display.
Display the information of
media files while in play mode.
Volume up (0-28), default is
G VOL
16; Volume down (0-28),
default is 16.
H
CANNEL Channel up/Channel down.
I
J
K
L
HOME Hot key to the main OSD menu.
Press once to mark desired
REPEAT A-B
repeat point A, press again to
mark desired repeat point B,
and press yet again to turn this
feature off.
REPEAT
Enable/disable repeat of file
playback.
ANGLE Switch DVD display angles.
DVD MENU Show DVD Menu.
Navigate Navigate through m
Buttons
or media libraries.
enu screen
OK Confirm or select.
10
Page 11

M
N
O
ASPECT
Pan Scan 4:3 /Letter Box 4:3 /
Wide Screen16:9/ Full Screen.
SETUP Enter setup menu.
SUBTITLE Switch subtitle files.
11
Page 12
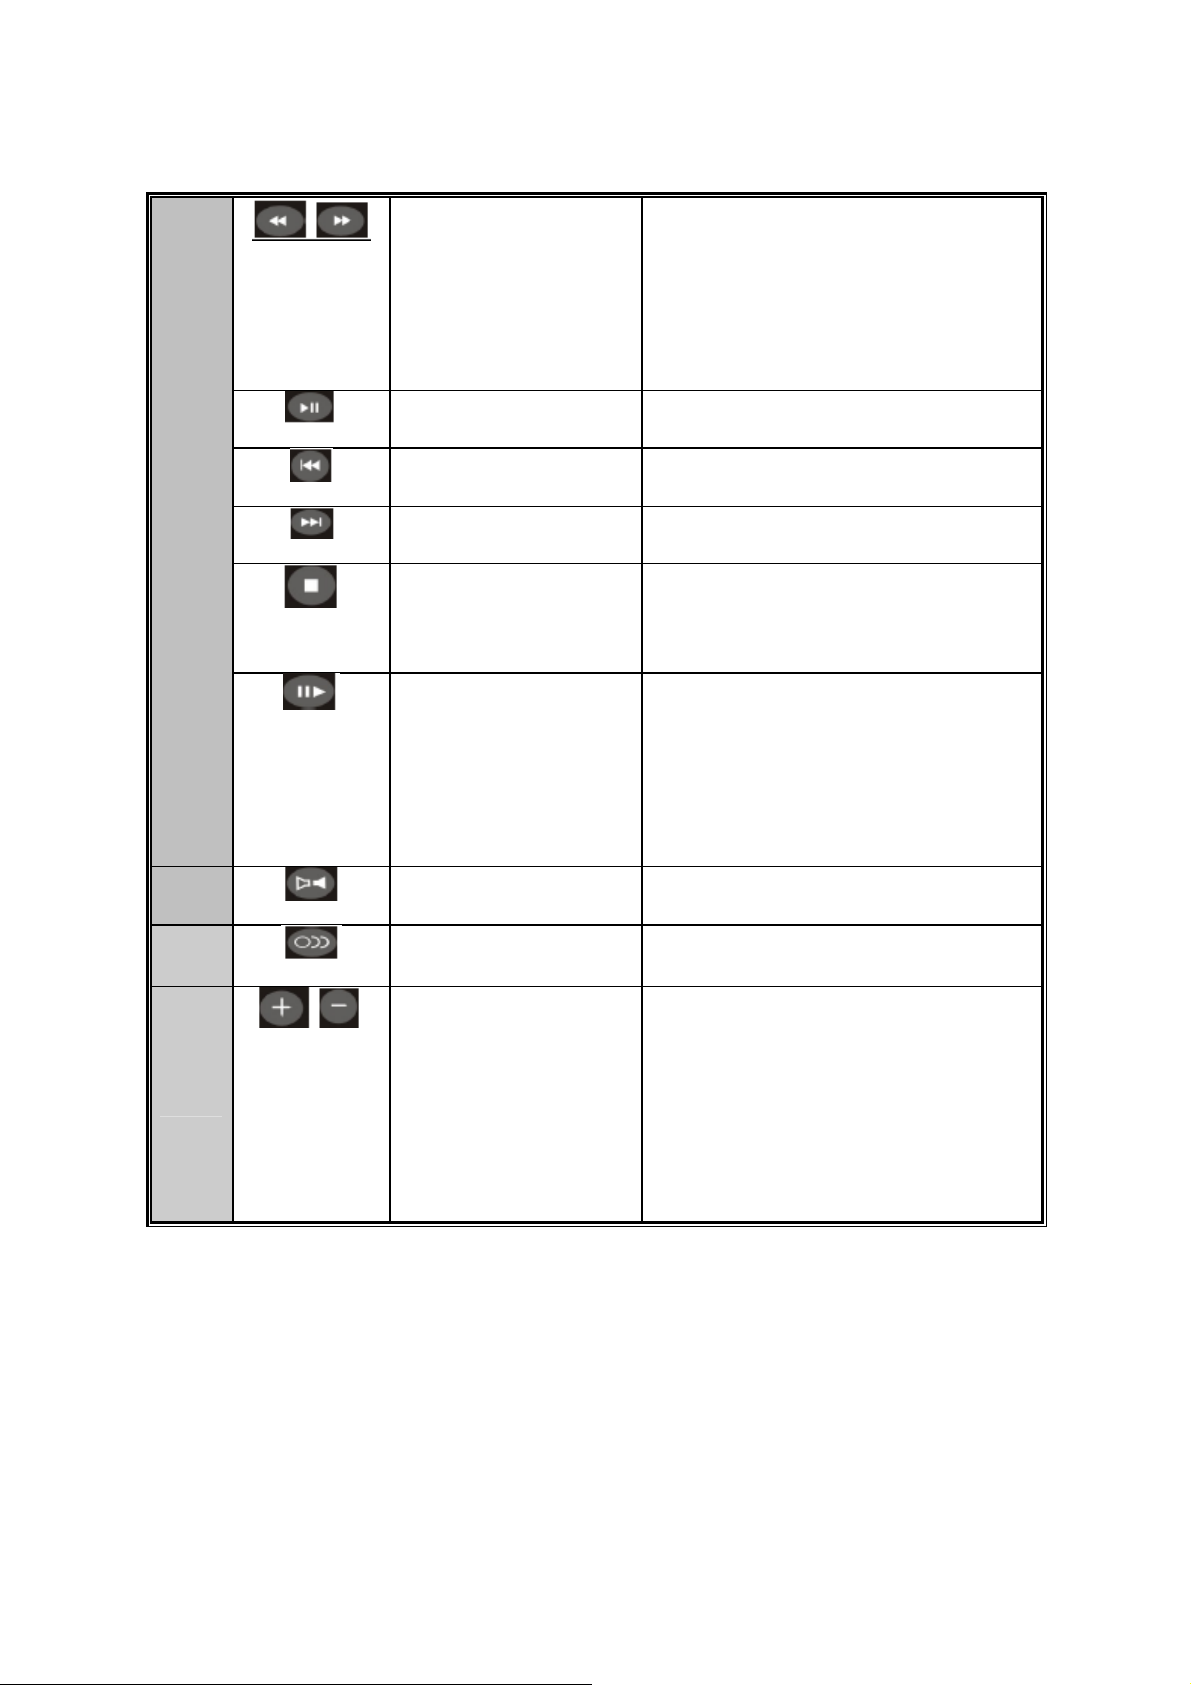
g
Media Scan Backward/Forward
PREV / NEXT
during audio/video playback.
Supports the following speeds:
1x, 1.5×, 2×, 4×, 8×, 16×,
32×.
P
Q
R
PLAY/PAUSE Play media / Pause media.
PREV
NEXT
Media Skip Previous.
Media Skip Next.
Stop playback and return to the
STOP
previous
Screen.
Slow motion through video
SLOW MOTION
playback.
Supports the following speeds:
1x, 3/4×, 1/2×, 1/4×, 1/8×,
1/16×.
L/R Switch Left/Right speaker.
AUDIO Switch audio outputs.
S
Enlar
2x, 3x, 4x, 8x). Reduce image
e image on video mode (,
on video mode
ZOOM
(4/5x, 3/4x, 2/3x,
1/2x).Enlarge image on photo
mode(Fit, 2x, 4x, 8x, 16x)
12
Page 13
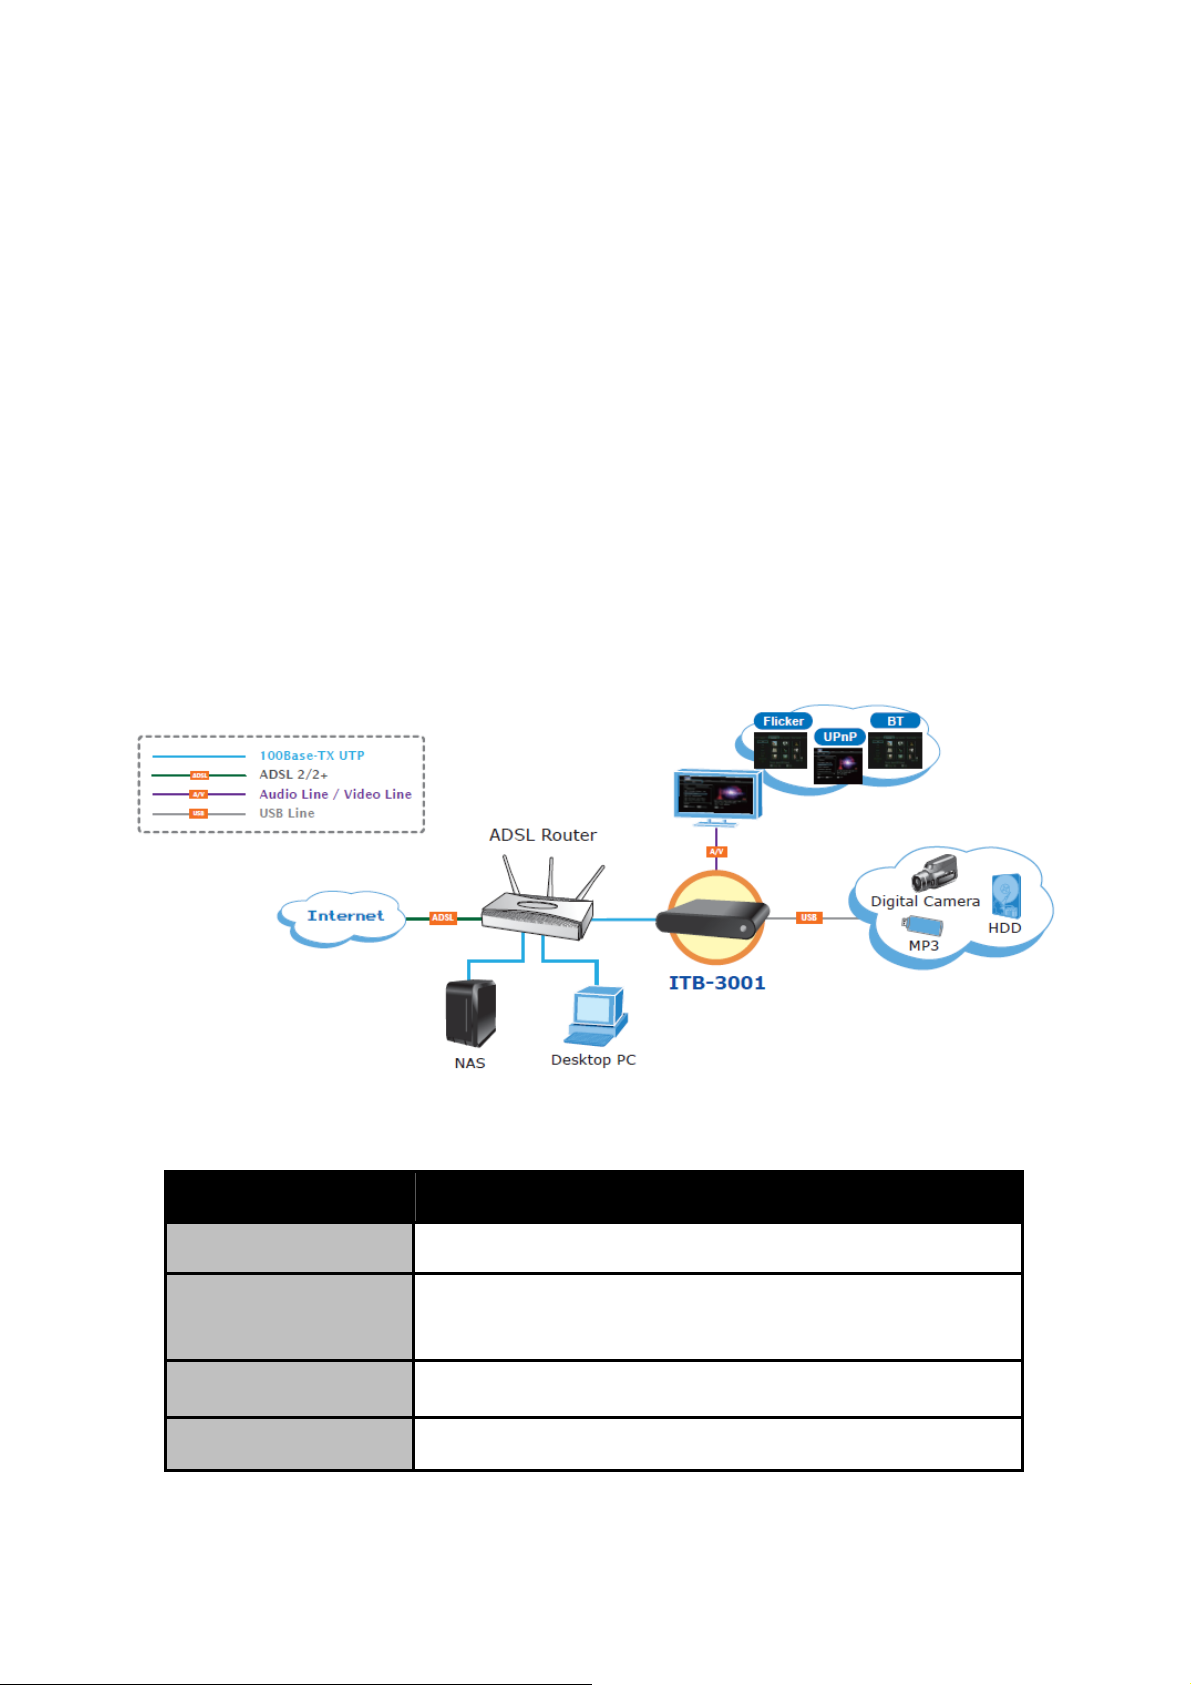
CHAPTER 2 INSTALLATION
This chapter offers information about installing your IP Set-Top Box. If you
are not familiar with the hardware or software parameters presented here,
please consult your service provider for the values needed.
2.1 Getting Start
This chapter shows you how to configure these steps to connect ITB-3001,
and the following figure is the Rear Panel of IP Set-Top Box.
Connection Diagram
Following is a connection example with network and UPnP devices.
Match the cables to the connections on your TV or display. Your choices of
connection include:
Cable Description
HDMI For both audio and video output
Composite (AV) For composite video (yellow) and stereo audio
(white and red)
Y/Pb/Pr (RGB) For component video output
S/PDIF For audio output
13
Page 14
Make sure you have the appropriate cables for connecting. Take care to
watch the colors of the plugs on the cable.
Step1: REAR PANEL-IDENTIFY CONNECTOR LOCATION
Step2: TO SELECT VIDEO OUTPUT BY HDMI, OR AV CABLE
2-1. Connect via HDMI
"Note
HDMI cable is not bundle in the package
14
Page 15
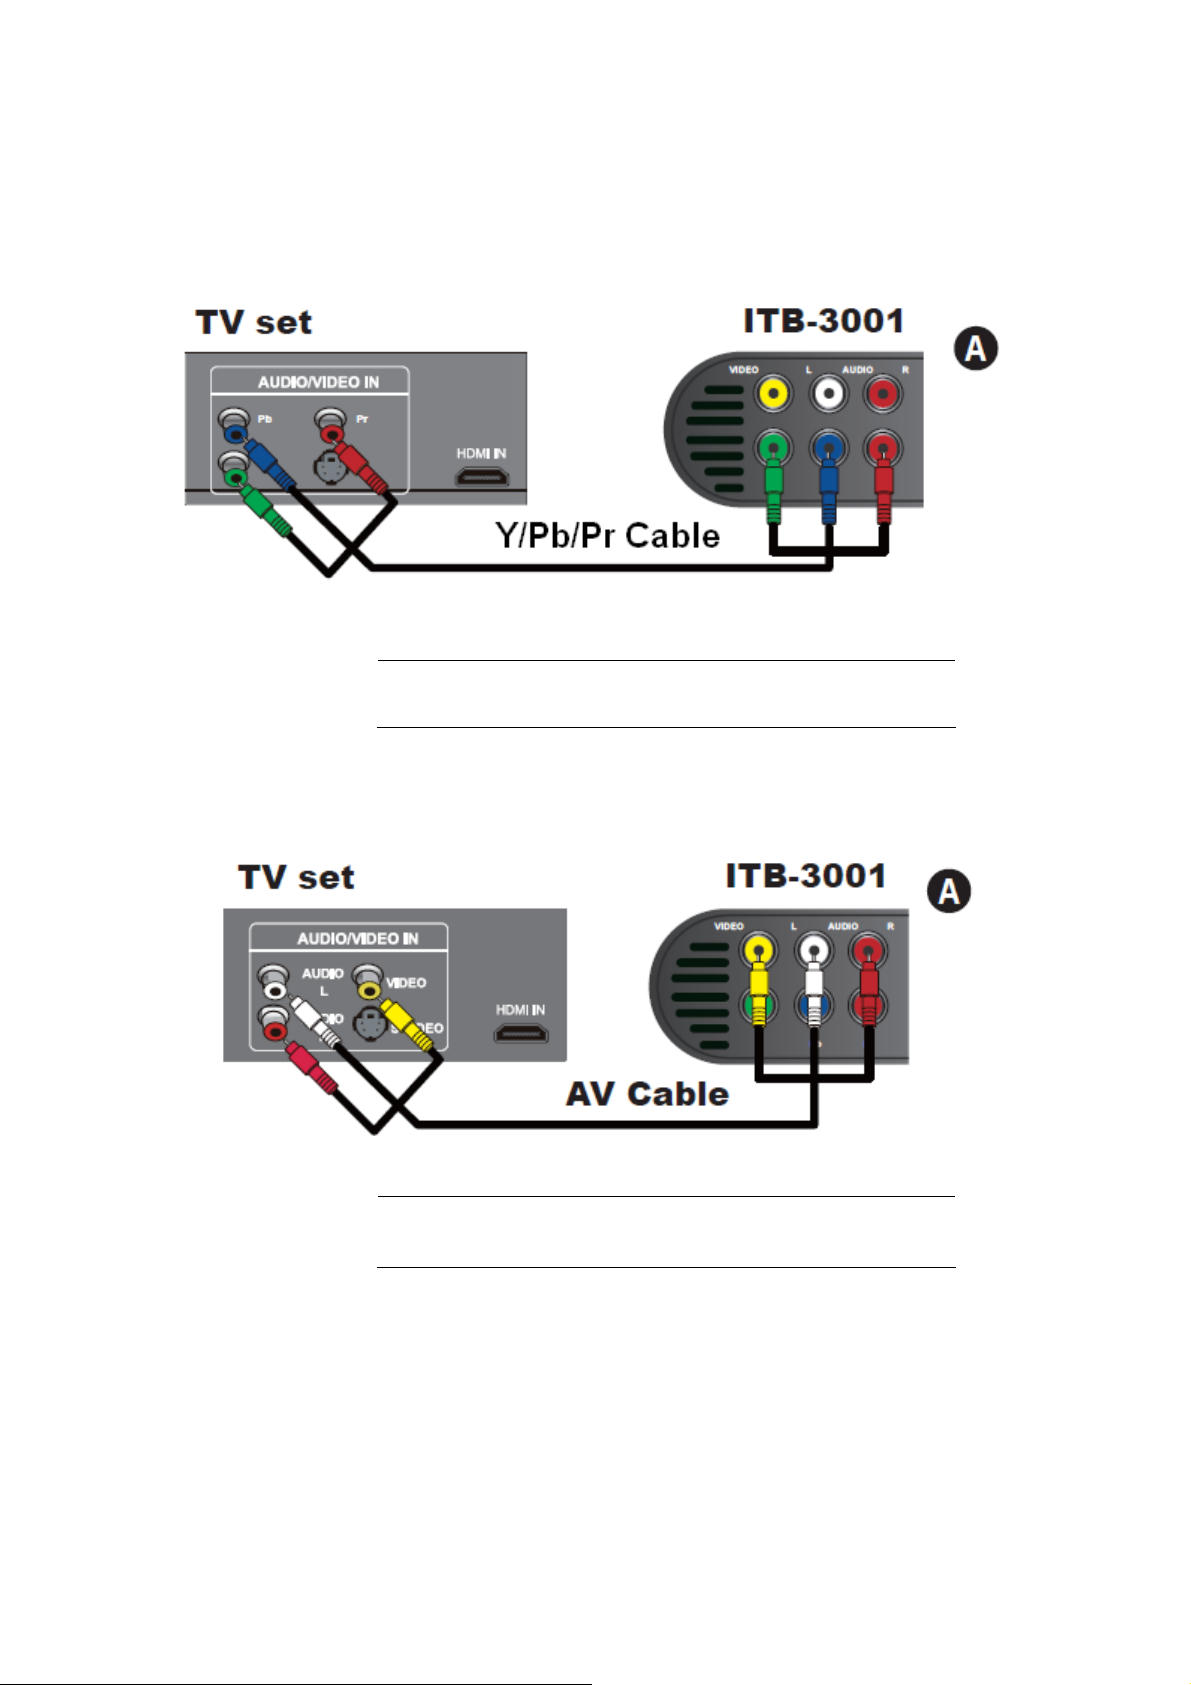
2-2. Connect via Y/Pb/Pr or Composite Video cable (with Audio
cable)
2-2-1. Connect via Y/Pb/Pr cable
"Note
Y/Pb/Pr cable is not bundle in the package
2-2-2. Connect via AV cable
"Note
RCA Audio is also available for audio output
15
Page 16

g
2-2-3. Connect via S/PDIF cable
S/PDIF (Sony/Philips Di
ital Interconnect Format and it is
"Note
not bundle in the package
Step3: CONNECT ETHERNET CONNECTOR
16
Page 17

Step4: CONNECT USB DEVICES IF AVAILABLE
"Note
The USB cable is not bundle in the package
Step5: CONNECT POWER ADAPTER
Step6: INSTALL BATTERIES IN REMOTE CONTROL
17
Page 18

Step7: TURN ON THE ITB-3001
1. When DC power applied, the red LED light indicates standby mode.
2. To turn on the device, press Power button.
3. The blue LED light indicates Power on.
18
Page 19

CHAPTER 3 CONFIGURAITON
3.1 Wired Network Setup
Network Connections: needed only when using “PC Media”, and “Torrent
Download” features.
If your wired network equipment such as the IP Sharing router or AP (Access
Point), uses DHCP to assign IP address, by default the ITB-3001 will
automatically request the IP and other related information to set up the
ITB-3001 over the network in DHCP mode (under Setup> Network
>Wired).
If your network does not have DHCP server, switch to the Static IP mode
(under Setup> Network >Wired) and set up various parameters manually.
19
Page 20

3.1.1 DHCP
Button Description
Step1:
To access “Setup” on the main menu.
Select “Network”.
+
Step 2:
Select “Wired” on the Network menu.
Select “DHCP”.
Step 3:
+
To implement DHCP network setting. The ITB-3001 will
automatically receive its IP address from a DHCP sever
that is built into the access point or IP sharing router.
20
Page 21

3.1.2 Static IP
Button Description
+
"Note
Step1:
Select “Wired” on the Network menu.
Select “Static IP”.
Step 2:
Input the value IP Address, Subnet mask,
+
Gateway, and DNS text box respectively.
Please acquire information of these setting values from your
ISP (Internet Service Provider) first.
21
Page 22

3.2 File Sharing Configuration
This function allow the ITB-3001 as a simple NAS device, you can access
folders located on the ITB-3001 for viewing, renaming, moving and deleting
by networking from your remote computer.
To activate this feature, please make sure:
z
The ITB-3001 is connected to the network;
z
The network is properly set up. For more information on this part, please
refer to “Step 2” in “Setting up ITB-3001” section, and “Network” under
“Setup Menu”.
To allow the ITB-3001 to access folders on your computer, you need:
1) ITB-3001 already connected to the network
2) To designate the folders/files on your PC as shared resources.
Please refer to Microsoft’s official website:
http://www.microsoft.com/windowsxp/using/networking/setup/homenet.m
spx to see the initial and detailed process of Home Network Setup in Windows
XP. Please refer to the following instructions to allow the ITB-3001 to access
the shared folders on the remote PC.
22
Page 23

Step1: Right click on the folder to be shared and select Sharing and
Security.
Step2: If this is the first time you intend to share a folder, Windows XP will
prompt a warning message, urging you to use the Network Setup Wizard for
safety purpose. Choose to either run the Wizard or do it yourself. XP will
display another warning. If you want the firewall enabled, select Use the
wizard to enable file sharing. Otherwise, select enable file sharing.
File sharing may lead to security problems since, by definition, it
gives other users access to the content of a part of the hard
"Note
drive. As a result, it is essential that you share only folders for
which it would not be extremely important if their contents are
revealed.
Step 3: You may now specify a “Share Name”, which will be used for users
on the network to access the shared folder. The icon of the shared folder will
be changed to showing a hand holding the folder.
23
Page 24

If your operating system is Windows Vista, please refer to the following
instructions:
1. Open the Control Panel and then open Network and Sharing Center.
2. Click the down arrow to the right of File Sharing to expand it.
3. Click Turn on file sharing and then click Apply.
You may also refer to Setup menu on the OSD screen of ITB-3001 to select
wired connection.
You may also refer to Setup menu on the OSD screen of THE PRODUCT to
select wired connection.
File Sharing Configurations (With Windows Vista)
File sharing involves making the media content of one or more files / folders
(on your PC) available through the network. By “enabling” this file sharing, you
can view these files / folders (on your PC) to be accessed / viewed on your THE
PRODUCT (on the same network).
24
Page 25

g
File sharing may lead to security problems since, by definition, it
ives other users access to the content of a part of the hard
drive. As a result, it is essential that you share only folders for
"Note
which it would not be extremely important if their content were
revealed (or destroyed); Furthermore, you are strongly advised
against sharing a whole partition of your hard drive. This
operation is specifically discouraged if you do not trust the other
network users!
Enable “File Sharing” under Windows Vista
z
On your PC, Click Start, right-click Network, and then click Properties.
z
A new Window titled “Network and Sharing Center” pops up.
z
In the “Sharing and Discovery” section of the Network and Sharing Center
window, click the down arrow next to File sharing.
z
Within the File sharing settings, click Turn on file sharing, and then click
Apply.
z
To enable public folder sharing, do the following:
I. In the Sharing and Discovery section of the Network and Sharing Center
window, click the down arrow next to Public folder sharing.
II. Within the Public folder sharing settings, click “Turn on sharing so anyone
with network access can open, change, and create files”.
III. Click Apply.
Once the “File Sharing” is enabled in Windows-Vista,
Click Start, and then click Computer.
z
In the Computer window, navigate to the folder containing the folder that
you want to share.
z
Right-click the folder that you want to share, and then click Share. The File
Sharing window is displayed.
z
Use the File Sharing window to select the Guest or Everyone account. This
is equivalent to simple file sharing in Windows XP.
z
When complete, click Share, and then click Done.
25
Page 26

How to share file folder in Windows 7
1. Run "local security policy" applet under administrative tools.
If you don’t see administrative tools, enable it under the properties of the
start menu
2. Under local policies>user rights assignment “deny access to the computer
from the network" REMOVE user "guest"
3. Under local policies>user rights assignment “Access this computer from
the network”->add ‘EVERYONE’ and ‘ANONYMOUS LOGON’
4. Under local policies>security options> Accounts: Limit local account use of
blank passwords. Change to "disabled"
5. Under local policies>security options> Network Access: Shares that can
be accessed anonymously- put in the name of your share
6. Enable the guest account set the guest password to blank
7. Check the share permissions on your share and make sure it has
EVERYONE "read"
8. Check the file permissions on the files in your share and make sure it has
EVERYONE "read"
26
Page 27

CHAPTER 4 PLAY MEDIA
4.1 USB Media
ITB-3001 searches and plays all available images, music and video files on
the external device with USB interface automatically.
Depends on the specification of USB that each USB port provide
"Note
0.5A to USB device, please use with extra power-provided USB
device if the USB device needs more electricity.
Button
+
+
+
Enter OSD Menu > Play Media
Under Play Media, select the media source from USB
Device/ PCs/ UPnP/ Playlist.
Open your selected folders. There will a folder/file
list on the left.
Play the selected video/music/photo file.
Description
27
Page 28

4.2 PC Media
Connect ITB-3001 to your PC using a USB 2.0 cable. By connecting your PC in
the Local Area Network, you can play the media files from the remote PCs.
Please confirm the network settings and sharing files setup have been
finished successfully. (See Chapter 3 for more information.)
The limitation on the HD video content playback over the
network: The HD video quality may suffer when the video is
"Note
streamed over the network. This is caused by intranet
environment limitations. As a result, users might sometimes
experience unsmooth video playback.
4.3 UPnP
UPnP (Universal Plug and Play) allows you to connect UPnP-enabled devices
(available on the network) and share their content with the media player.
When you enter UPnP application, the ITB-3001 will automatically detect the
PCs inside LAN. Please make sure that your PC supports Windows Media
Player Version 11 and higher. Due to compatibility issue, some PCs may not
be able to support UPnP.
4.4 Playlist
Playlist allows you select a sequence of music, photo and video files stored on
the HDD. You can configure any sequence of music, photos, and video files to
create a playlist.
"Note
Playlist cannot be save except on USB media and do not allow
for playback of networked media.
28
Page 29

Button Description
+
Add to Playlist Select/cancel the files which will be added.
Edit Rename/delete file.
For the files added to the playlist, ITB-3001 will separate the
"Note
media files by video/music/photo tags.
4.5 File Search
File search allows you to find the file you want by typing related key word on
the screen keyboard.
Button Description
To access Video, Audio, Photo on the main menu.
"Note
Type the related keywords on the screen keyboard for
+
file search.
The function is only available for HDD Media.
29
Page 30

4.6 Video Playback
Button Description
Enter Play Media > Video Playback.
+
Navigate the media file you want to play. The
Edit Rename /Delete file.
preview window will show the highlighted video.
30
Page 31

+
Add to
Playlist Add selected file to Playlist
Back Return to previous display.
Full screen mode.
4.6.1 Full Screen Mode
Button Description
Play/pause selected file.
Rewind/Forward
Slow motion.
Zoom Zoom in/out on photos or movies.
Volume Increase/decrease the volume.
Mute Mute the sound.
GOTO Video/movie chapter selection.
Subtitles Switch subtitle files.
Info Display the info of media files in play mode.
Audio Switch audio outputs.
L/R Enable/disable Left/Right speaker.
Return to previous file.
Go to next file.
To adjust the size of the subtitle.
To move the position of the subtitle
Stop playback and leave full screen mode.
31
Page 32

4.7 Music Playback
+
Button Description
To access Music on the main menu.
+
Navigate the media file you want to play. The
Edit Rename /Delete file.
Add to
Playlist Add selected file to Playlist.
Back Return to previous display.
preview window will show the file details of
highlighted file.
Play selected file.
Play/pause selected file.
Volume Increase/decrease the volume.
Fast forward.
Rewind.
Previous file.
Next file.
32
Page 33

Mute Mute the sound.
Info Display the info of media files in play mode.
Stop playback and return to the previous
display
Music will continue playing as background music when
"Note
you leave MUSIC PLAYBACK menu. Press to stop
playing.
4.8 Photo Playback
Button Description
Enter Play Media > Photo Playback
+
Navigate the media file you want to play. The
preview window will show the file details of
highlighted file.
33
Page 34

+
Edit Rename /Delete file.
Add to
Playlist Add selected file to Playlist.
Back Back to previous display.
Full Screen Mode
Button Description
Thumbnail mode.
Full screen mode.
Previous picture. / Next picture.
Rotate the viewing picture counterclockwise
Rotate the viewing picture clockwise.
Leave full screen mode.
"Note
You can choose the preferred slide show effects in Setup menu. If
you’d like to turn off the function, please enter Setup > Other>
Transition Effect.
To add background music to the slide show, simply add the music
file(s) to the same photo folder. Otherwise, there will be no
background music when viewing the slideshow.
34
Page 35

CHAPTER 5 BONUS FEATURES
5.1 BT Download
BitTorrent is the leading and the most common peer-to-peer file-sharing
communications protocol. The ITB-3001 built-in BitTorrent client/engine
allows this product to download media files to the external USB device or to
the remote PC. This BT download process is computer-free. First, you need to
prepare at least one USB hard drive with at least 20GB of free capacity, in the
format of NTFS or EXT-3, and connect it to the USB port on the rear panel of
the ITB-3001.
"Note
"Note
Please do not download illegal files or contents.
Strongly suggests to use another HDD for Torrent
Download, DO NOT use the HDD that mixed important
information.
To activate this feature, please make sure:
z
The ITB-3001 is connected to the network;
35
Page 36

z
The network is properly set up. For more information on this part, please
refer to “Step 2” in “Setting up ITB-3001” section, and “Network” under
“Setup Menu”.
In order to keep the system efficiency, the torrent
"Note
download would be suspended while playing media or
turning on other services.
Step 1: Connect external hard drive device into THE PRODUCT USB port.
Step 2: Choose either from the external hard drive or the remote PC that you
can search and implant the .torrent seeds.
Please make sure torrent seeds are already imported to the
external hard drive or on the network PC before downloading
"Note
media files associated with the .torrent seeds to your PC or USB
devices. Files cannot be downloaded if there is less than 10% of
the capacity left on the USB drive.
36
Page 37

Step 3: Select .torrent files to download, and then you can see the download
process page. To ensure the system’s efficiency, only 3 download tasks will
take place simultaneously, and each .torrent file will be downloaded in
sequence.
"Note
Button Description
In order to keep the system efficiency, the torrent download
would be suspended while playing media or turning on other
services
Start / Pause torrent files in scheduling.
Delete torrent files in scheduling.
Adjust the priority of torrent files in scheduling.
Previous page. / Next page.
5.2 Flicker
The ITB-3001 supports Flicker viewing; you also can search photos you
want to see on this function.
5.3 VLC Station
This chapter shows you how to setup a computer to work with the STB in a
demonstration scenario. This demonstration used example files contained
on the CD that came with your STB
37
Page 38

You can setup your computer act as a “Media Server”. The video data from
the Media Server can be supplied to the STB. The Media Server and STB must
in the same subnet.
For example, the media server’s IP address is 192.168.0.200 and the STB is
192.168.0.100. You have assigned static IP address (rather than using
DHCP) because the media server must have a fix IP address that does not
change.
Step 1: Select the [B] Add New RTP Station
The URL would be:
Channel 1: rtp://239.0.0.2:1234
Channel 2: rtp://239.0.0.3:1234
Step 2: Setup the Media Server, and install the software from the supplied
CD-ROM. Please click on the “StartServer”.
38
Page 39

The stream will start, and on the TV screen will also show the steam.
39
Page 40

CHAPTER 6 SETUP MENU
Button Description
Cancel Back to main OSD display.
Rename Rename the selected file.
Delete Delete the selected file.
Add to Playlist Add selected file to Playlist.
6.1 Audio
Button
Enter “Audio” setup menu. Select the item for
Description
+
+
adjustment.
Select the item for adjustment.
Confirm the change.
Return to previous display.
40
Page 41

Item Options
Night Mode On/Off
HDMI LPCM
HDMI RAW
Digital Output
SPDIF LPCM
SPDIF RAW
L/R
Change Audio L/R
L/L
R/R
LPCM / RAW Mode
LPCM mode means decode audio then down-mix to 2 CH output.
RAW mode means no audio decoding, just by pass through to amplifier for
audio decoding.
AUDIO SETUP-“Night Mode” (aka Dynamic Range Control)
When the Night Mode is enabled the sound level of compatible audio
soundtracks will be dynamically compressed. Dynamic range control (DRC)
increases low-level audio content (such as the dialog in the movies),
making it easier to be heard at low volume levels while reducing the
intensity of higher-level audio content at the same time.
“When you're listening to movie dialogue late at night and have to turn down
the volume during loud scenes, the dynamic range suffers and you may miss
some dialogue and other sounds. With the Night Mode on, you can reduce the
volume but still enjoy proper tonal balance and dynamic range.”
41
Page 42

6.2 Video
Button
+
+
Item Options
Aspect Ratio
Resolution
Enter “Audio” setup menu.
Select the item for adjustment.
Confirm the change.
Return to previous display.
Pan Scan 4:3
Letter Box 4:3
Wide Screen 16:9
Full Screen
HDMI Auto / 480i / 576i / 480P / 576P
720P 50HZ /720P 60HZ
1080i 50HZ / 1080i 60HZ
Description
6.3 System
Button Description
+
+
Item Options
Menu Language
1080P 50HZ / 1080P 60HZ
Enter “Audio” setup menu.
Select the item for adjustment.
Confirm the change.
Return to previous display.
English/ Traditional Chinese/ Japanese/
Spanish/ French / German/ Italian/ Russian/
Simplified Chinese / Swedish / Polish/
Romanian/ Greek/ Thai
42
Page 43

Subtitle Encoding
Unicode (UTF8)/ Simplified Chinese (GBK)/
Traditional Chinese (BIG5)/ Japanese(S-JIS)/
Western/ Turkish/ Central European/ Greek/
Cyrillic/ Hebrew/ SE European.
System info
Software Update
Default Setting Cancel/OK
Version/BOX ID/ Customer ID/ MAC / IP
Address/ Subnet Mask/ Gateway/ DNS
Online Update
USB Update
6.4 Other
Button Description
Enter “Audio” setup menu.
+
+
Select the item for adjustment.
Confirm the change.
Return to previous display.
Item Options
Resume Play Off/On
Slide Show Timer Off/2,5,10,30 Seconds/1,2 Minutes.
Transition Effect
Background Music Off/On
Screen Saver Off/On
Movie Preview Off/On
Off/Cross Fade/Left to Right/Top to
Bottom/Waterfall/Snake/Dissolve/Strip
Left Down/All Effect Shuffle.
43
Page 44

APPENDIX A: Trouble Shooting
The following reference list represents situations that you may encounter,
and methods for remedy. Please refer to this checklist prior to contacting
qualified service personnel.
Symptom Remedy
No picture is displayed.
When entering “PC Media”
menu, the available PC list is
not displayed.
z Check the power cord connection. Or connect
the power cord to another power outlet.
z Are the VIDEO/ AUDIO cables or HDMI Cable
loose or disconnected? Make sure one of
connections is correct.
Try the “SOURCE” button on the remote control
of the external display/ TV, to select the correct
input source.
z Check your wired connection to make sure
that it’s working properly. Use an Ethernet
LAN cable to connect from the Network jack of
the ITB-3001 to the network router or Access
Point.
z Check your Network Setting of the Setup
menu.
Check the setting on the shared folder/file on
your computer.
On “USB Media” menu under
the main menu, no USB
device is searched.
The BT multimedia files can’t
be downloaded.
z
Check USB device is already firmly connected.
Check the format of your USB drive: is it in
NTFS/EXT-3 format?
z
For BitTorrent, users need to set up port
forwarding on the TCP range 6881-6890 of
Access Point or IP sharing.
z
Your Internet bandwidth will limit BT
download speed
BT is a peer- to-peer download technology. It
requires more people or torrents to share the
files at the same time.
You can also visit the FAQ page on www.planet.com.tw
44
Page 45

APPENDIX B: Product Specificaiton
Product
Model
Hardware Specification
Video Output
Audio Output Audio L/R
Port
Ethernet
USB 2 USB 2.0 (Host External Storage support)
LED Indicators
Power Switch 1 Power On / Off Switch on front panel
Decoding Up to 1080p (RMVB up to 720p)
Software Specification
High Definition IP Set-Top Box
ITB-3001
HDMI Auto(480p,720p,1080i,1080p), YPbPr and
Component Video
1Ethernet:10/100Mbps, Half or Full Duplex, Autonegotiation, Auto MID/MID-X
1 Power LED light on front panel
1 Network LED light on front panel
Media
Format
Video
Audio
Photo
MPEG1 (AVI/MKV/TS/DAT/MPG/MPEG/VOB)
MPEG2 (MKV/DAT/MPG/MPEG/VOB/ISO/IFO/TS/TP) /
M2TS
MPEG4 (AVI/MP4/MKV/MOV/WMV/ASF)
DivX 3/4/5/6, Xvid (AVI/MKV/MP4/MOV)
H.264 / AVC (TS/AVI/MP4/MKV/MOV/FLV) / M2TS
VC-1 (TS/AVI/ASF/WMV)/M2TS
WMV9 (ASF/WMV)
Real Video 8/9/10 (RM/RMVB), up to 720p
MPEG I Layer 1,2,3(2-CH) and MPEG II Layer 1,2
(Multi-Channel)
LPCM,ADPCM,FLAC,AAC,WAV and OGG Vorbis
Dolby® Digital Plus / AC3
Supports 7.1 / 5.1 down mix to 2 channel outputs
DTS 2.0 + Digital Out®
Supports 7.1 down mix to 2 channel outputs
RA1/RA-cook/RA-lossless
WMA
HD JPEG with unlimited resolution
GIF
45
Page 46

PNG
BMP
TIF
TIFF
Subtitle
SRT, SMI, SUB, SSA, and IDX+SUB
EXT3
Reading Storage File
System
NTFS
FAT16/32
HFS+
Writing Storage File
EXT3
NTFS
System
Environmental
Dimension
204× 145× 40 mm
(W x D x H)
Weight 420 g
Cables
AV Cable (RCA) x 1
RJ-45 Cable x 1
Power 12V DC, 2A
Operating Temp. 0 ~ 45 Degree C
Storage Temp. -25 ~ 55 Degree C
Operating Humidity 80 % RH Non-condensing
Storage Humidity 80 % RH Non-condensing
Emission FCC, CE
46
Page 47

EC Declaration of Conformity
For the following equipment:
*Type of Product :
*Model Number :
High Definition IP Set-Top Box
ITB-3001
* Produced by:
Manufacturer‘s Name : Planet Technology Corp.
Manufacturer‘s Address : 11F, No. 96, Min Chuan Road, Hsin Tien
Taipei, Taiwan, R.O.C.
is herewith confirmed to comply with the requirements set out in the Council Directive on the
Approximation of the Laws of the Member States relating to Electromagnetic Compatibility
(2004/108/EC).
For the evaluation regarding the Electromagnetic Compatibility, the following standards were
applied:
EN 55022 (2006, Class B)
EN 61000-3-2 (2006, Class A)
EN 61000-3-3 (1995 + A1: 2001 + A2: 2005)
EN 55024 (1998 + A1: 2001 + A2: 2003)
IEC 61000-4-2 Edition 1.2 (2001-04)
IEC 61000-4-3 Edition 3.0 (2006)
IEC 61000-4-4 (2004)
IEC 61000-4-5 Edition 2.0 (2005)
IEC 61000-4-6 Edition 2.2 (2006)
IEC 61000-4-8 Edition 1.1 (2001-03)
IEC 61000-4-11 Second Edition (2004-03)
Responsible for marking this declarati o n i f the:
⌧
Manufacturer Authorized representative established within the EU
Authorized representative established within the EU (if applicable):
Company Name: Planet Tech no l og y Cor p.
Company Address: 11F, No.96, Min Chuan Road, Hsin Tien, Taipei, Taiwan, R.O.C
Person responsible for making this declaration
Name, Surname Jonas Yang
Position / Title : Product Manager
Taiwan
26th Jan., 2010
Place Date Legal Signature
PLANET TECHNOLOGY CORPORATION
e-mail: sales@planet.com.tw http://www.planet.com.tw
11F, No. 96, Min Chuan Road, Hsin Tien, Taipei, Taiwan, R.O.C. Tel:886-2-2219-9518 Fax:886-2-2219-9528
 Loading...