

Page 1

Copyright
CE mark Warning
Copyright (C) 2002 PLANET Technology Corp. All rights reserved.
The products and programs described in this User’s Manual are licensed products of PLANET
Technology, This User’s Manual contains proprietary information protected by copyright, and this
User’s Manual and all accompanying hardware, software, and documentation are copyrighted.
No part of this User’s Manual may be copied, photocopied, reproduced, translated, or reduced to
any electronic medium or machine-readable form by any means by electronic or mechanical.
Including photocopying, recording, or information storage and retrieval systems, for any purpose
other than the purchaser's personal use, and without the prior express written permission of
PLANET Technology.
Disclaimer
PLANET Technology does not warrant that the hardware will work properly in all environments
and applications, and makes no warranty and representation, either implied or expressed, with
respect to the quality, performance, merchantability, or fitness for a particular purpose.
PLANET has made every effort to ensure that this User’s Manual is accurate; PLANET disclaims
liability for any inaccuracies or omissions that may have occurred.
Information in this User’s Manual is subject to change without notice and does not represent a
The is a class B device, In a domestic environment, this product may cause radio interference, in
which case the user may be required to take adequate measures.
Trademarks
The PLANET logo is a trademark of PLANET Technology. This documentation may refer to
numerous hardware and software products by their trade names. In most, if not all cases, these
designations are claimed as trademarks or registered trademarks by their respective companies.
Revision
User’s Manual for PLANET Internet Subscriber Gateway:
Model: ISG-101
Rev: 1.0 (Jan. 2002)
Part No. EM-ISG101V1
commitment on the part of PLANET. PLANET assumes no responsibility for any inaccuracies
that may be contained in this User’s Manual. PLANET makes no commitment to update or keep
current the information in this User’s Manual, and reserves the right to make improvements to
this User’s Manual and/or to the products described in this User’s Manual, at any time without
notice.
If you find information in this manual that is incorrect, misleading, or incomplete, we would
appreciate your comments and suggestions.
Page 2

Table of Contents
4-2-3 Configuration Menu…………………………………………………………. 26
1 Introduction …………………………………………………………………………….. 6
1-1 Feature………………………………………………………………………………. 6
1-2 Precautions………………………………………………………………………….. 7
2 Product Description……………………………………………………………………. 8
2-1 Hardware…………………………………………...………………………………… 8
2-2 Technical Specifications…………………………………………………………… 9
3 Installation……………………………………………………………………………….. 13
3-1 Package Contents…………………………………………………………………… 13
3-2 Installation Requirements…………………………………………………………... 13
3-3 Getting started……………………………………………………………………… 14
4 User Interface……………………………………………………………………….…… 16
4-1 Console……………………………………………………………………………….. 16
4-1-1 Login…………………………………………………………………………...18
4-1-2 Main Menu…………………………………………………………………… 18
4-1-3 System Configuration……………………………………………………… 19
4-1-4 System Status……………………………………………………………… 21
4-2-4 System Configuration……………………………………………………….. 27
4-2-5 Subscriber Management……………………………………………………. 29
4-2-6 Subscriber Control…………………………………………………………… 30
4-2-7 Customize Login UI…………………………………………………………. 32
4-2-8 Add Subscribers ……………………………………………………………... 35
4-2-9 Subscribers List……………………………………………………………… 36
4-2-10 Current Users……………………………………………………………….. 37
4-2-11 Import Subscribers…………………………………………………………. 37
4-2-12 Advertisement Link Configurations………………………………………. 38
4-2-13 Pass through IP & MAC…………………………………………………… 40
4-2-14 Virtual Server Table………………………………………………………… 41
4-2-15 System Status………………………………………………………………. 42
4-2-16 DHCP Client Table…………………………………………………………. 43
4-2-17 Utilities Menu……………………………………………………………….. 43
4-2-18 Firmware Upgrade…………………………………………………………. 44
4-2-19 Change Password………………………………………………………….. 44
4-2-20 Restart……………………………………………………………………….. 45
4-1-5 Utilities Menu………………………………………………………………… 22
4-1-6 Firmware Upgrade…………………………………………………………… 22
4-1-7 Change Password…………………………………………………………… 23
4-1-8 Restart………………………………………………………………………… 23
4-1-9 Factory Setting………………………………………………………………. 24
4-2 Web-Based Configurator…………………………………………………………… 24
4-2-1 Login…………………………………………………………………………... 25
4-2-2 Main Menu…………………………………………………………………… 26
PLANET ISG-101
4-2-21 Logout……………………………………………………………………….. 45
4-3 Subscriber Applications…………………………………………………………….. 45
4-3-1 Subscriber Login Steps………………………………………………………… 46
4-3-2 Subscriber Limitation…………………………………………………………… 46
4-3-3 Extra Feature…………………………………………………………………… 50
Appendix A: Signal Connection Arrangements………………………………………….. 56
Appendix B: Regulations/EMI Compliance……………………………………………… 59
Internet Subscriber Gateway
Page 3

1 Introduction
6
7
The Internet Subscriber Gateway ISG-101 is deployed in a broadband service network for
high-speed access the Internet. The Internet Subscriber Gateway can immediately recognize
new users on the network (and remember returning users) and redirect their browser to a
proprietary Web page. That is to say, user needn’t change their network configuration to
access the Internet, just plug and play.
1-2 Precautions
Never remove or open the cover. You may suffer serious injury if you touch these parts.
The ISG-101 is powered from 100/240 VAC. A standard IEC connector is used for the
power cable.
The product is a freestanding or rack-mounted unit with two Ethernet ports (WAN and LAN), a
serial port for system management and administration. After the initial setup and network
configuration is established, the product is easily managed by a network administrator through
a Web management interface or the onboard serial port.
1-1 Feature
Plug and Play-Support All Network Configurations
The ISG-101 provides instant Internet access by using your own notebook PC without the
hassle of configuration setting. This innovative sophisticated design enables instant
Internet access wherever traveling may take you. Easy to use plug-and-play access to
broadband networks.
Remote Authentication Dial-In User Service
The Internet Subscriber Gateway supports RADIUS client. RADIUS enables ISPs to
maintain a very large central database of users (potentially in the millions).
Proprietary Authentication Server
The Internet Subscriber Gateway provides proprietary authentication server which is
allowed administer to control user’s login name and password.
Remote Configuration
The administrator can access this system by using web browsers such as Netscape
Navigator or Microsoft Internet Explorer. This system allows a remote user to view and/or
modify system configuration via Internet.
Advertisement URL link
ISP could specify the advertisement URL link. The advertisement Web page will show on
the browser when the subscribers start Network access.
PLANET ISG-101
Internet Subscriber Gateway
Page 4

2 Product Description
8
9
Chapter 2 provides illustrations of the front and rear panels of the ISG-101 and detailed
technical specifications including information about LEDs, connectors, cables, environmental
and compliance specifications.
2-1 Hardware
Outlook
Rear Panel
Figure 2-3 ISG-101 Rear Panel
1. AC Power Connector: Plug in the female connector of the provided power cord into the
Figure 2-1 ISG-101 Outlook
Front Panel
Figure2-2 ISG-101 Front Panel
1. Console Ports: Standard RS232 DB 9 female Connector for system configuration.
2. System LEDs: Power LED glows when the device is turned on.
3. LAN Port: crossover 10/100M Ethernet port connects to any Ethernet network.
4. LAN Port LEDs:
10 Link LED: glows when a 10M network is connected;
100 Link LED: glows when a 100M network is connected
Act LED: flash when there is a reception or transmission of data occurring.
5. WAN Port: parallel 10/100M Ethernet port connects to any Ethernet network.
6. WAN Port LEDs:
10 Link LED: glows when a 10M network is connected;
100 Link LED: glows when a 100M network is connected
ISG-101 rear panel socket, and the male terminal into a power outlet. Input voltages range
from 90~240 V.
2. System Fan/Vents: This fan is used to circulate air inside the ISG-101 and also to dissipate
heat. The vents on both sides also serve the same purpose. Do not block these openings,
and leave adequate space at the rear and sides of the device.
2-2 Technical Specifications
Hardware Specifications
Network Specification
.IEE802.3 10BaseT Ethernet
.IEE802.3u 100BasedTX Fast Ethernet
.Supports 1024 users concurrently
.Throughput: Line rate at 20Mbps
Connectors
.Ethernet Port: Two RJ-45 connectors for 10/100M Ethernet port
.Serial Port: 1 DB9 Female RS232 Console Interface
Power Requirement
.Internal universal switching power supply
.100-220 VAC, 50/60 Hz
.Power Consumption: 5V, 15 Watts, 3 Amp.
Act LED: flash when there is a reception or transmission of data occurring.
PLANET ISG-101
Internet Subscriber Gateway
Page 5

Led Indicators
10
11
Home Page Redirection
.10/100M Ethernet Ports: WAN, LAN port LINK10, LINK100, ACT indications
.POWER ON/OFF Indication
Dimension
.Size: 1U Rack-mount-sized 440(W) x 116(L) x 44(H) mm
.Weight: About 1.7 kg (Net)
Environment Conditions
.Operating Temperature: 0 to 45℃
.Storage Temperature: -10 to 65℃
.Humidity: 10% to 90% non-condensing
Compliance
.FCC part 15 Class B
.VCCI Class B
Software Specifications
Address Translate Function
This function can accommodate all network configuration, including DHCP, DNS, proxies
and dynamic and static IP address assignments. That is, whenever a subscriber login, the
ISG-101 automatically translates their computer’s network settings to provide them with
seamless access to the broadband network. Subscribers no longer need to alter their
computer network configuration settings.
Email Redirection
The ISG-101 will rewrite subscriber’s original message of E-mail according to SMTP rules
and sent it out via the specified Email server. This function could help subscribers to send
E-mail via the local E-mail server when their default Email server is out of work.
DNS Redirection
The DNS Redirection function would provide local DNS server when subscriber’s
configured DNS server is behind a firewall or located on a private intranet.
The ISG-101 enables solutions providers to redirect subscribers to a portal web site of their
choice. This allows the solution provider to generate online advertising revenues and increase
business exposure.
DHCP Function
The Internet Subscriber Gateway will follow RFC2131 that is designed to supply dynamic IP
addresses.
RADIUS Client
RADIUS (Remote Authentication Dial-In User Service) Attribute Support reduces costs and
improves services levels by enabling service providers to easily manage and maintain a very
large central database of subscribers.
Internal User Account Management
The Internet Subscriber Gateway contains a user account database. And when the
subscriber starts to access the Internet, the ISG-101 will send a Web page to ask checking
user’s ID and password.
Virtual Server
Enables administrator to expose WWW, FTP and other services on your LAN to be
accessible to Internet users under the NAT Network.
Support VPN (Virtual Private Network)
The ISG-101 can allow subscriber to create VPN networks using the Internet as the medium
for transporting data.
Customize Subscriber Login in page
For different market, ISG-101 allow administrator to set customize login page for the
subscribers. The advance pattern includes welcome notes, company logo, page color, article,
comments and information items.
PLANET ISG-101
Internet Subscriber Gateway
Page 6
Pass through IP and MAC Address
12
13
Some network devices might be constructed under the Internet Subscriber Gateway.
However these devices needn’t be checked and authorized. The ISG-101 provides a pass
through table and the administrator can control which devices can be pass through with
authentication.
3 Installation
This section describes equipments unpacking, pre-installation considerations and different
applications.
3-1 Package Contents
Carefully unpack the contents of the package and verify them against the checklist below
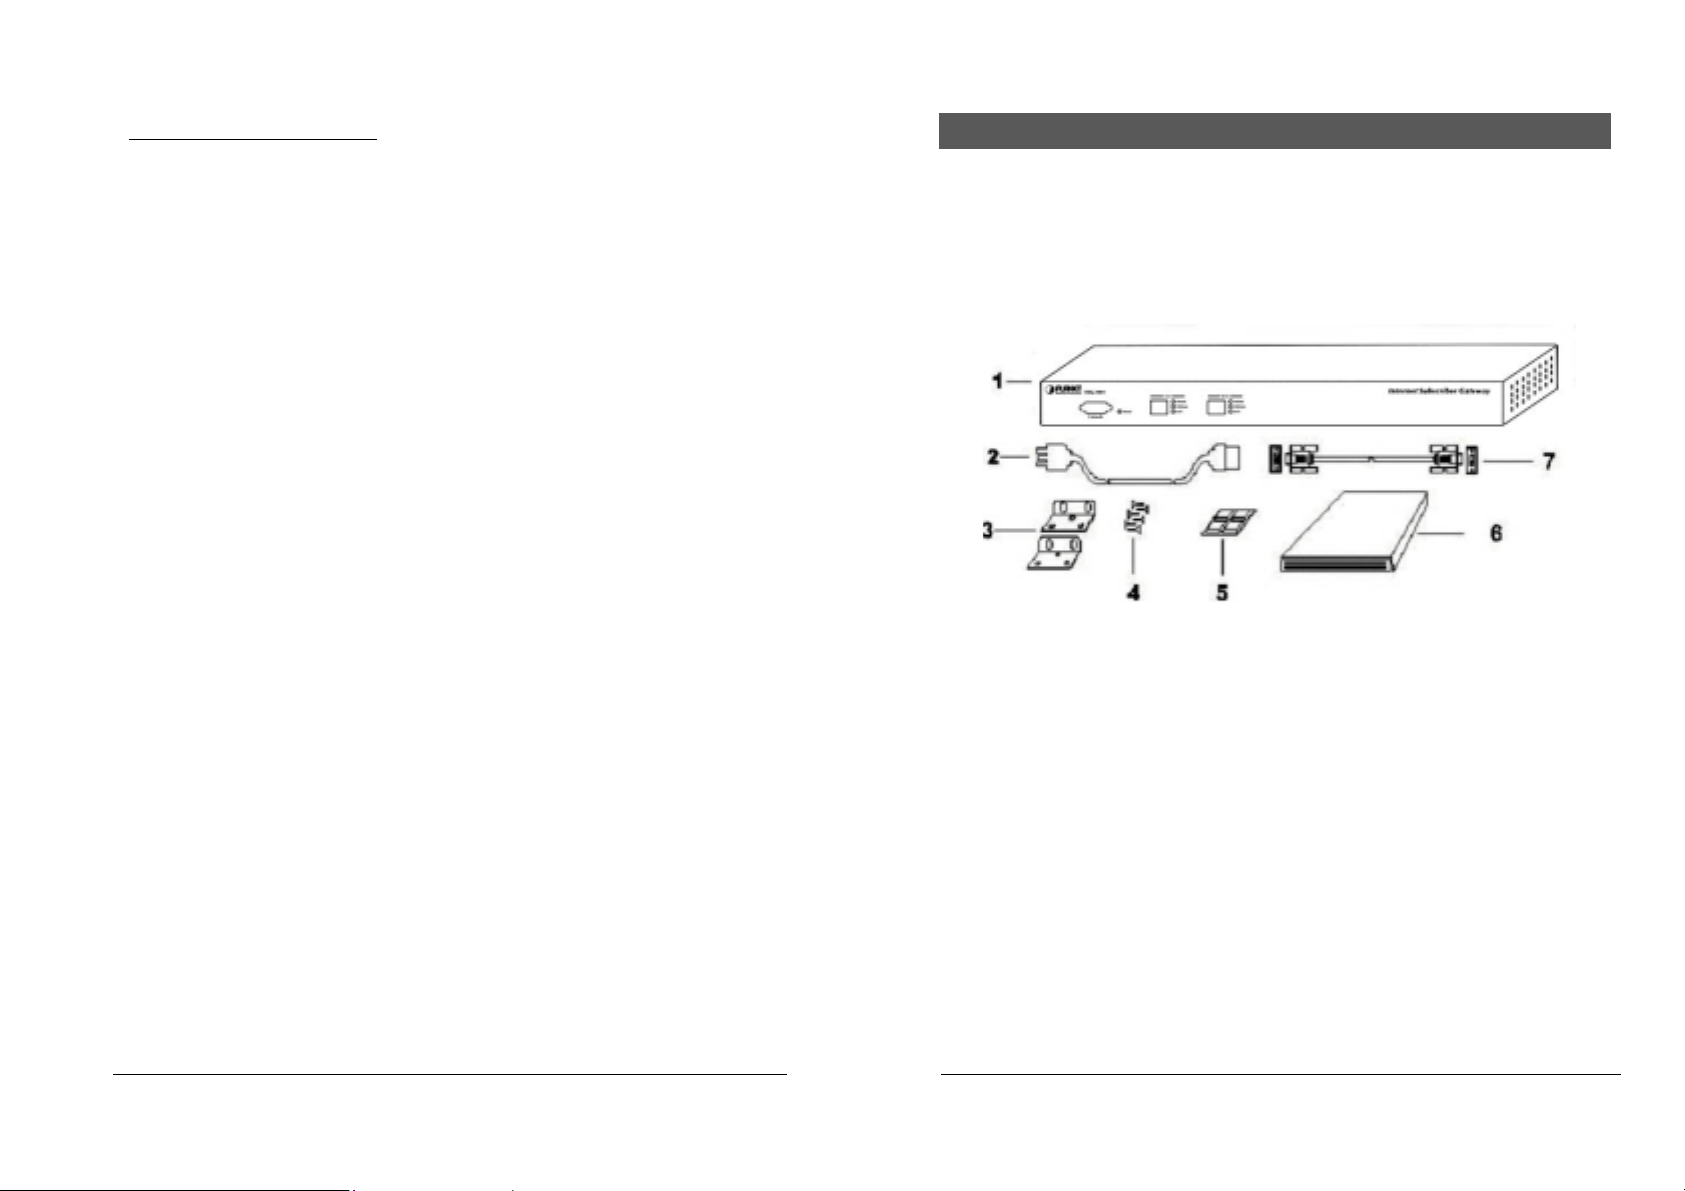
Figure 3-1 Package Contents
1. One ISG-101 Internet Subscriber Gateway body
2. One Power Code
3. Two rack-mounting brackets
4. Six screws
5. Four rubber feet
6. One User’s Manual
7. One DB-9 male/Female serial cable (RS-232 console cable)
3-2 Installation Requirements
Before installing the ISG-101 Internet Subscriber Gateway, make sure your network meets the
following requirements.
Mechanical Requirements
The ISG-101 is to be installed only in a restricted access area per National Electrical Code
Articles 110-16, 110-17, and 110-18. It is suitable for mounting over a noncombustible surface
only. The ISG-101 can be mounted in a rack, or on the table or shelf. Locate the unit near the
outlet. And the ISG-101 ships with two brackets and six screws for mounting in a 19” rack.
PLANET ISG-101
Internet Subscriber Gateway
Page 7
Network Requirements
14
15
The ISG-101 will access the Internet through XDSL, Cable Modem or other type of leased-line
with one EIA/TIA-568 Category 5 UTP Ethernet cable.
Figure 3-2 Network diagram
Electrical Requirements
The ISG-101 is powered from 100/240 VAC. A standard IEC connector is used for the power
cable. Follow all applicable electrical codes. Frame ground should be tied to a common
grounding point using #18AWG cable.
3-3 Getting started
Installation Steps:
1. Place the ISG-101 on a flat work surface.
2. Connect the power cord
3. Connect the DB9 male-to-female serial cable between the ISG-101 and your computer.
4. Power up your computer and turn on the ISG-101.
5. Start a Hyper Terminal session to communicate with the ISG-101 via the serial interface.
6. Log in to the Console User Interface.
7. Establish the start-up configuration parameters for the ISG-101.
8. Logout and restart for saving the ISG-101 parameters.
9. Connect the WAN network to the ISG-101.
10. Configure the further parameters via a web browser.
11. Connect the LAN network to the ISG-101 and ISG-101 system is now ready for provide
Internet plug and play service.
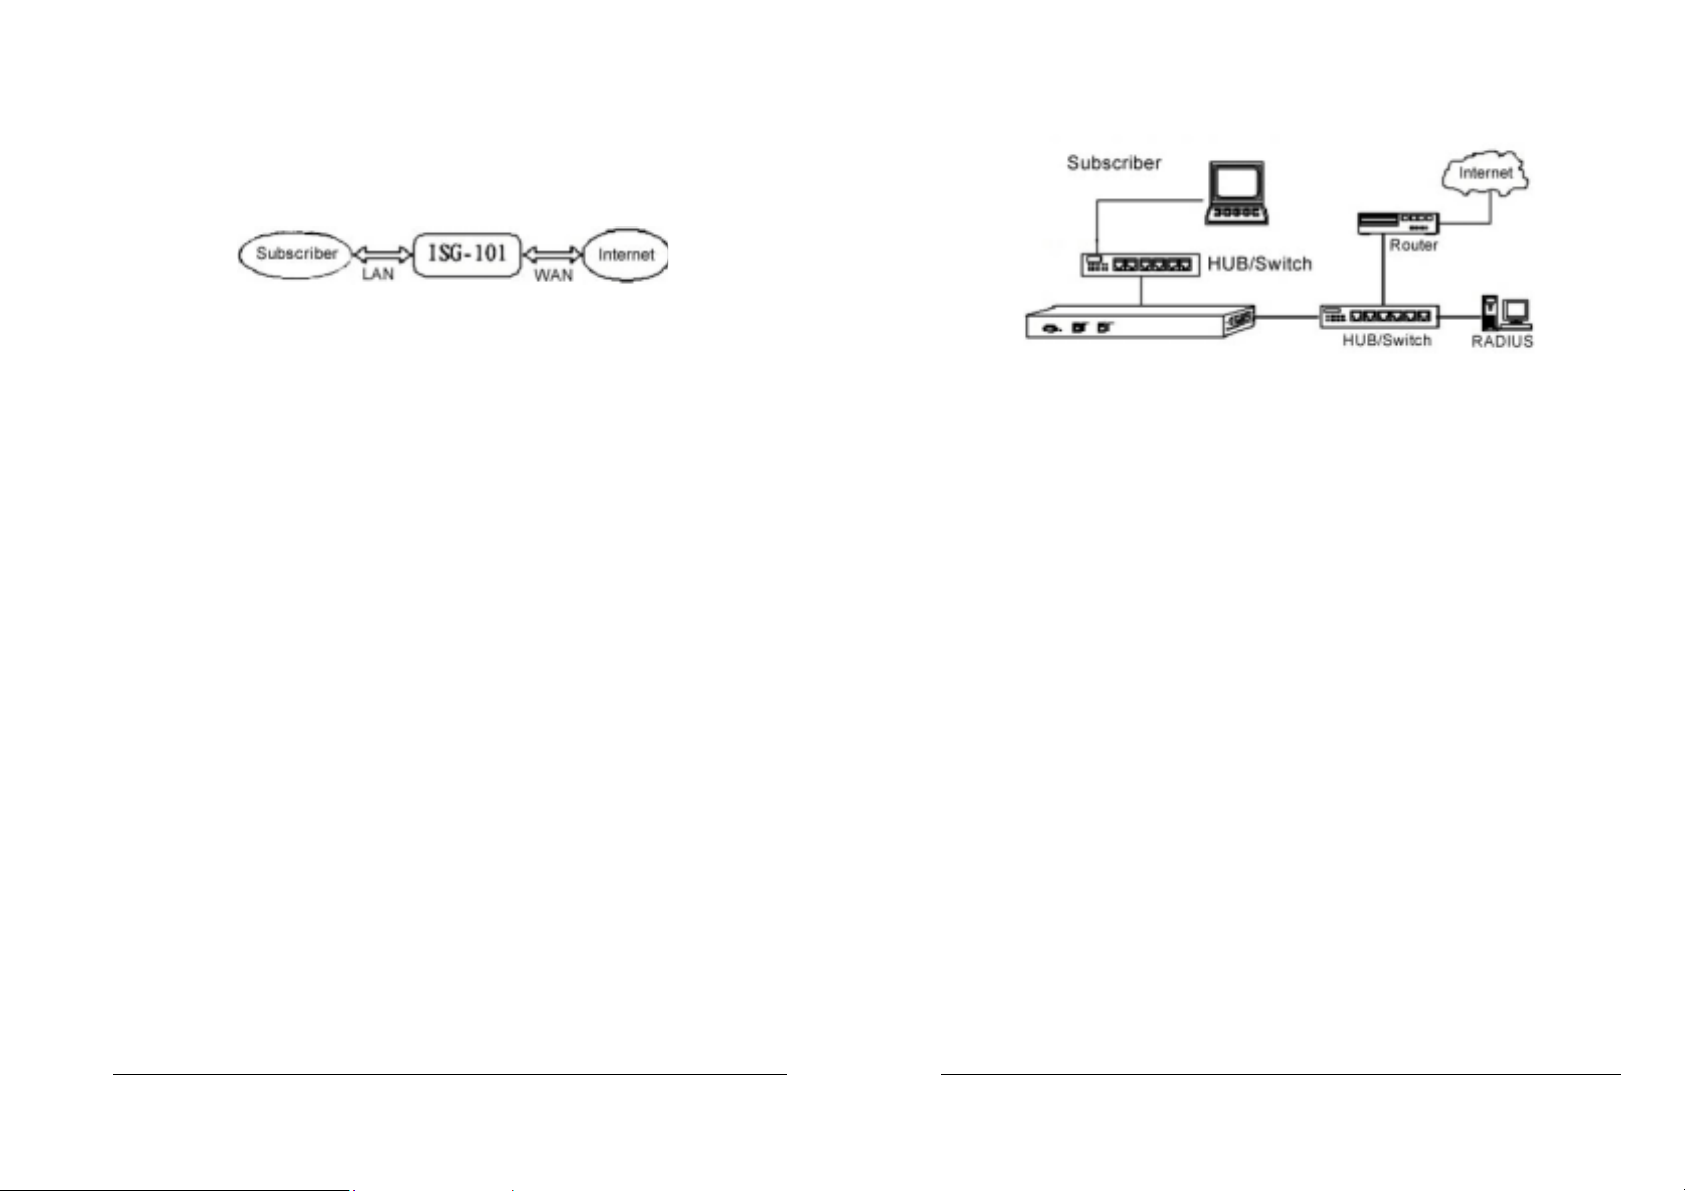
Network Architecture
Figure 3-3 ISG-101 basic connections
The Internet Subscriber Gateway sits in a local aggregation access points on a network,
usually paired with a router. For example:
PLANET ISG-101
Internet Subscriber Gateway
Page 8

4 User Interface
16
17
10. If you intend to use this PC and serial connection in the future, save this configuration by
selecting “Files/Save As” and entering the name of the file for this configuration.
The PLANET ISG-101 offers friendly user interface, one is console user interface and other is
Web user interface. However, the Console UI provides only basic system configuration and
Status. For advanced function, please use the Web Configurator.
4-1 Console
To access the ISG-101 User Interface, the system operator needs to connect a VT100 terminal
and a PC running a VT100 compatible terminal emulation program to the ISG-101 Console
port by using the provided DB9 RS-232 cable.
Follow these steps to set up your first local serial console port session using the Window98/2K
Terminal emulation program HyperTerminal.
1. From the Windows screen, click on the Start button.
2. From the Start menu, choose “Programs” (or Open file Hypertrm.exe).
3. From the Programs menu, choose “Accessories”
4. From the Accessories menu, select the HyperTerminal folder. Click on the HyperTerminal
icon.
5. From the connection Description windows, enter a name (i.e., ISG-101) and choose an
6. When the Phone Number window opens, click on the “Cancel” button.
7. From the File menu, choose “Properties.”
8. From the Properties windows, click on the “Configure” button.
icon for the connection. Click ”OK”.
11. Once you have completed configuring your serial terminal, use the following steps to
logon to your ISG-101. If you have not already done so, use a male-female DB-9 serial
communication cable to connect the COM port on your PC to the Console port on the
front of the ISG-101.
12. Go to the Call menu and select Connect.
13. If you have not completed initial power up, power up the ISG-101 now. Y ou will see Figure
4-1.
14. To verify that you have a correctly configured your Console port press <Enter> and the
Login Display screen will display.
15. If your serial terminal remains blank, make sure that you entered the correct parameters
in Step7. Also, verify that you are using the correct cable, that the cable is not damaged,
and that you have good cable connections.
ISG-101 Boot ROM Version 1.00
Ethernet Address:
- - - - - - - - - - - - - - - - - - - - - - - - - - - -
- - - - - - - - - - - - - - - - - - - - - - - - - - - -
- - - - - - - - - - - - - - - - - - - - - - - - - - - -
Loading...
Figure 4-1 Serial/Session Display
9. From the COM1 Properties windows, set the following parameters:
Baud Rate: 9600
Date bits: 8
Parity Checking: None
Stop bits: 1
Flow control: None
Click “OK”
PLANET ISG-101
Internet Subscriber Gateway
Page 9

4-1-1 Login
18
19
ISG-101 Internet Subscriber Gateway
(c) 2002 Copyright PLANET Technologies Inc. All Rights Reserved.
Version 1.02.11
Username:
Password:
Figure 4-2 Login menu display
The default Username is “admin”. The default Password is “password”.
User can change password setting after accessing the ISG-101 system.
Notice: The administrator can change the password via the utilities item.
4-1-2 Main Menu
Main Menu
1) System Configuration
2) Status
3) Utilities
4) Restart
5) Logout
6) Factory Setting
Figure 4-3 Main Menu Screen
1) System Configuration: Including ISG-101 system basic parameter setting.
2) Status: Display ISG-101 system basic status.
3) Utilities: Including firmware and configuration upload/download and change password
capability.
4) Restart: Restart the ISG-101 system
5) Logout: Logout the ISG-101 serial session
6) Factory Setting: Erase all setting and back to the original factory setting
4-1-3 System Configuration
System Configuration
System Name : ISG-101
Console Baud Rate : 9600
Auto Logout Timer : 10
WAN Configuration
IP Address : 210.1.1.2
Subnet Mask : 255.255.255.0
Gateway : 210.1.1.1
Web Server Port : 80
DHCP Configuration
DHCP Service? (D/R/S) : D
E-Mail Server IP Address :
Primary DNS IP Address :
Secondary DNS IP Address :
Enter system name.
Figure 4-4 System Configuration Screen
1) System Name: You can assign a name to this unit. Up to 32 characters are allowed.
2) Console Baud Rate: The Console Baud Rate is only relative to connection of console. There
are three different rates: 9600, 19200, or 38400.
3) Auto Logout Timer: Enter 0 for never time out or 1 to 60 for timeout minutes.
4) WAN Configuration: Enter WAN port IP Address Configuration such like IP address, subnet
mask and gateway. The Web server port default is 80, however some user may set up the
ISG-101 under the NAT network. The administrator has to set the special Web server port so
that ISG-101 can be remote access under NAT network.
Notice: The web server port allowed range is from 8000 to 8099 if administrator wants to remote
access under NAT Network. For access the ISG-101 system under NAT, please tab the
“http://WAN Port IP Address: Port Number”. The function of remote access ISG-101
system will be released after V1.00.02 version. For the release news please check the
PLANET Web Site or PLANET Support Team.
Enter a numeric that you need between 1~6 and press ‘Enter’ to the subdirectory.
PLANET ISG-101
Internet Subscriber Gateway
Page 10

5) DHCP Configuration: There are three types of DHCP Services. Enter 'D' to disable the
20
21
by firewall or NAT network. ISG-101 provides an extra Email server parameter to forward the
DHCP server function, 'R' to enable DHCP Relay function, or 'S' to enable DHCP Server
function.
Notice: The parameters will display on the screen only when the relative item is chosen.
DHCP Relay function: To route DHCP through an external server, the administrator needs to
enable the DHCP Relay and assign a valid DHCP server IP address.
Server IP Address: Tab the DHCP relay server IP address.
Agent IP Address: Tab the relay agent IP address, normally enter the ISG-101 WAN IP is OK.
Notice: You must disable the DHCP server before enable the DHCP relay. Both features can’t
be enabled concurrently.
Enable DHCP server function: ISG-101 include a DHCP sever inside. To enable this function
please choose the DHCP service as ‘S’, and set the DHCP server information.
Server IP Address: Tab the DHCP server IP address.
Start IP Address: Tab the DHCP pool start IP.
End IP Address: Tab the DHCP pool end IP.
Subnet Mask: Tab the DHCP subnet mask.
Lease Time: Tab the DHCP lease time. The maximum of DHCP lease time is 71582788
minutes.
Notice: To set up the DHCP pool that is the same network with WAN port you just tab the WAN
subscriber’s Email. The ISG-101 not only forwards the subscribers’ E-mail via other E-mail
server but also changes the SMTP header. The recipient of your E-mail sees the message as if
you sent it from your local Internet Service Provide, not form the hotel or other place.
Notice: Before setting this sever, please make sure the E-mail sever relay function is opened.
4-1-4 System Status
System Status
System Name : ISG-101
Console Baud Rate : 9600
Auto Logout Timer : 10
WAN Configuration
IP Address : 210.1.1.2
Subnet Mask : 255.255.255.0
Gateway : 210.1.1.1
Web Server Port : 80
DHCP Configuration
DHCP Service? (D/R/S) : Disable
E-Mail Server IP Address : N/A
Primary DNS IP Address : 168.95.1.1
Secondary DNS IP Address : 140.112.1.2
port IP address. If you want to set up a NAT DHCP pool please type the same network IP
Address with NAT network as the DHCP server IP address.
6) DNS IP Address: Enter the IP address for the DNS servers (located at the customer’s
network operating center where DNS requests are sent)
Notice: The secondary DNS servers are only initialized if the primary DNS server is unavailable.
7) E-mail Server IP Address: To prevent some subscriber’s original Email server may protect
PLANET ISG-101
Press any key to return.
Figure 4-5 System Status Screen
System Status is only displaying system information from screen no authority to change any
setting.
Notice: If the system parameter information is not available, the column will display N/A.
Internet Subscriber Gateway
Page 11

4-1-5 Utilities Menu
22
23
Utilities Menu
1) Firmware Upgrade
2) Change Password
3) Return to Main Menu
Enter selection:
Enter a numeric between 1-3.
Figure 4-6 Utilities Menu Screen
1) Firmware Upgrade: ISG-101 allow user to upgrade last firmware.
Step 4. Specify the firmware located folder by selecting the menu item "setup".
Step 5. Connect to the ISG-101 with console port or web browser.
Step 6. Access to Figure 4-7 screen and specify the TFTP server IP address and the filename
that you wish to upgrade.
Step 7. Executive and you will finish the upgrade procedures.
4-1-7 Change Password
Change Administrator Password
Enter the old password :
Enter the new password :
Confirm the new password :
2) Change Password: ISG-101 allow user to change password.
3) Return to Main Menu: Leave this page and return to Main Menu screen.
4-1-6 Firmware Upgrade
Firmware Upgrade
TFTP Server IP Address :
Download Filename : ISG101.BIN
Enter the IP of TFTP server.
Figure 4-7 Firmware Upgrade Screen
The ISG-101 uses TFTP Download to upgrade firmware. User needs to specify TFTP server IP
address and the filename that you wish to download.
TFTP server IP Address: Enter the TFTP server IP address.
Download Filename: Enter the Download file name.
How to make a TFTP download
Step 1. Get the TFTP server software firstly.
You can get TFTP server from all PLANET distributors or PLANET web site or any other
TFTP server software.
Step 2. Copy the TFTP server application to a specified folder (any folder is ok).
Step 3. Execute the TFTP server application by double click on it.
Enter the old password.
Figure 4-8 Change Password Screen
The Password Change screen allows you to change an existing password.
Notice: A permitted password string is from 8 to 20. The characters are limited by alphabets and
numerals.
4-1-8 Restart
Restart System (Y/N)?
Enter the command key and press enter.
Figure 4-9 Restart Screen
ISG-101 system can be restart by software; the administrator doesn’t need to turn off the power.
This function can help you when making multiple changes to different menu function and you
want to reboot just one time after completing all your changes.
Tab ‘Y’ and then press ‘Enter’ key to restart the system. Tab ‘N’ and then press ‘Enter’ to return
to the Main Menu screen.
PLANET ISG-101
Internet Subscriber Gateway
Page 12

4-1-9 Factory Setting
24
25
Change to factory setting and the system will be restarted!
Are you sure (Y/N)? Y
To reserve the user profiles (Y/N): Y
To access the PLANET Web-based Configurator, please follow these operations:
1. Start your Web-browser program (for example, IE) on your workstation.
2. In the host IP or location box in your web browser session, type ISG-101’s IP address:
http:// ”ISG-101’s IP-address” and press <Enter>.
Enter the command key and press enter.
Figure 4-10 Factory Setting Screen
If you enter “Y” the ISG-101 system will erase all setting, and back to the original factory setting.
There are two different choices after you decided to change to the factory setting.
One is to change all the parameters into factory setting but only reserve the user profiles
(subscribers’ table). The other is to clear all the parameters into factory setting including the
user profiles.
4-2 Web-Based Configurator
Before first time use of PLANET ISG-101’s Web-based configuration utility, make sure your
system meets both of the following requirements:
1. You have already obtained an IP address for your ISG-101 assigned by your ISP. You can
check ISG-101 system status via the RS-232 console cable.
2. You have already connected the ISG-101 to the Network.
After you check this point you may connect by using any Web-browser to access the ISG-101
Web-based Configurator form any remote location via the Internet!
Notice: ISG-101 Firmware version V1.00.01 didn’t support remote access if the ISG-101 is
under the NAT function Network (masquerade IP). The new function will support this feature. For
new released information please check the PLANET Web site or contact with PLANET Support
Team.
3. After the Internet connection with ISG-101 is established, you will be prompted to enter your
username (“admin”) and password (default is “password”) in the Login screen.
4. ISG-101 Web-based Configurator session has now started and you can navigate in this
configuration utility just as easily as in a regular Internet www site.
4-2-1 Login
Figure 4-11 Web-based Configuator Login Screen
The ISG-101 default Username is “admin” and Password is “password’.
Notice: The capital letters and lowercase letters need to be differentiated.
Using the Web-based Configurator
The PLANET Web-based Configurator makes it easy for you to access the ISG-101
configuration utility without direct cable connection. It allows a remote control to modify the
ISG-101’s configuration settings via Internet, by using any regular Web-such as Internet
Explorer or Netscape Navigator.
PLANET ISG-101
Internet Subscriber Gateway
Page 13

4-2-2 Main Menu
26
27
Figure 4-12 Web-based Configuator Main Menu Screen
After a valid username and password have been provided, the ISG-101 Web-based
Configurator displays the Main Menu available.
1) Configuration: Including ISG-101 system parameter setting.
2) Status: Display ISG-101 status.
3) Utilities: Including firmware and configuration change password capability.
4) Restart: Restart the ISG-101 system form the remote site.
5) Logout: Logout the ISG-101 Web Configurator session.
4-2-3 Configuration Menu
(using RADIUS or internal accounting management), customize login page, subscriber
logout timer etc.
3) Advertisement Link: Send the plus advertisement link to the subscribers when the subscriber
starts the ISG-101 service.
4) Pass Through IP & MAC: allow administrator to set some special devices pass through the
ISG-101 system. Because some network devices might be constructed under the Internet
Subscriber Gateway. However these devices needn’t be checked and authorized. The
ISG-101 provides a pass through table and the administrator can control which devices can
be pass through with authentication.
5) Virtual Server Table: Enables administrator to expose WWW, FTP and other services on your
LAN to be accessible to Internet users under the NAT Network.
4-2-4 System Configuration
Figure 4-13 Web-based Configuator Configuration Menu Screen
1) System: Define the ISG-101 System configuration.
2) Subscriber Management: Manage subscribers information such like management type
PLANET ISG-101
Figure 4-14 Web-based Configuator System Configuration Screen
1) System Name: You can assign a name to this unit. Up to 32 characters are allowed.
2) Console Baud Rate: The Console Baud Rate is only relative to connection of console. There
are three different rates: 9600, 19200, or 38400.
Internet Subscriber Gateway
Page 14

3) Date/Time: The valid setting of year is from 1999 to 2035.
WAN port IP address. If you want to set up a NAT DHCP pool please type the same
29
28
4) WAN Configuration: Enter WAN port IP Address Configuration such like IP address, subnet
mask and gateway. The Web server port default is 80, however some user may set up the
ISG-101 under the NAT network. The administrator has to set the special Web server port so
that ISG-101 can be remote access under NAT network.
6) DNS IP Address: Enter the IP address for the DNS servers (located at the customer’s network
operating center where DNS requests are sent)
Notice: The secondary and tertiary DNS servers are only initialized if the primary DNS server is
unavailable.
Notice: The web server port allowed range is from 8000 to 8099 if administrator wants to remote
access under NAT Network. For access the ISG-101 system under NAT, please tab the “http://
WAN Port IP Address: Port Number”. For Example: “http://210.1.1.5:8002”. The function of
remote access ISG-101 system will be released after V1.00.02 version. For the release news
please check the PLANET Web Site or contact PLANET Support Team.
5) DHCP Configuration:
DHCP Disable: Disable DHCP function.
DHCP Relay function: To route DHCP through an external server, the administrator needs to
enable the DHCP Relay and assign a valid DHCP server IP address.
Server IP Address: Tab the DHCP relay server IP address.
Agent IP Address: Tab the relay agent IP address, normally enter the ISG-101 WAN IP is
OK.
DHCP Server: ISG-101 include a DHCP sever inside. To enable this function please choose
the DHCP Server item, and set the DHCP server information.
Server IP Address: Tab the DHCP server IP address.
Start IP Address: Tab the DHCP pool start IP.
End IP Address: Tab the DHCP pool end IP.
Subnet Mask: Tab the DHCP subnet mask.
Lease Time: Tab the DHCP lease time. The maximum of DHCP lease time is 71582788
minutes.
Notice: 1. You must disable the DHCP server before enable the DHCP relay. Both features
can’t be enabled concurrently.
2.To set up the DHCP pool that is the same network with WAN port you just tab the
network IP Address with NAT network as the DHCP server IP address.
7) E-mail Server IP Address: To prevent some subscriber’s original Email server may protect by
firewall or NAT network. ISG-101 provides an extra Email server parameter to forward the
subscriber’s Email. The ISG-101 not only forwards the subscribers’ E-mail via other E-mail
server but also changes the SMTP header. The recipient of your E-mail sees the message as
if you sent it from your local Internet Service Provide, not form the hotel or other place.
Notice: Before setting this sever, please make sure the E-mail sever relay function is opened.
4-2-5 Subscriber Management
Figure 4-15 Web-based Configuator Subscriber Management Screen
1) Subscriber Control: Including deciding to check subscriber’s username & password or not and
which authentication function will be used.
2) Customize Login UI: For some Hotels or ISPs, they may hope to have a customize
subscriber’s login page to the users. This function helps they to realize the ideal. The page
elements are including company logo, welcome note, background color, article etc. Certainly
the administrator can decide to use only stand form.
PLANET ISG-101
Internet Subscriber Gateway
Page 15

3) Add subscribers: Add the subscribers’ username and password in the internal database.
30
31
Disable: If to disable this function means that subscribers can access the Internet without any
Notice: This item will display only when the subscriber management type is “Proprietary”. See
also “Subscriber Control” item.
4) Subscriber List: List all the subscribers’ table and the administrator can click the check box to
delete the listing subscribers’ data.
5) Current Users: Display currently on line subscriber’s information, such like username,
password and MAC address.
6) Import Subscribers: To maintain a subscriber database via web UI might not be so convenient.
Therefore, the ISG-101 provides to import a subscriber’s data base file via TFTP server.
4-2-6 Subscriber Control
check. The subscriber can just click the web browser and surf the Internet.
Logout Timer: This item will display only when the Subscriber Control is set as “Enable”. If the
Logout Timer is set as 3 minutes, it means if the subscriber doesn’t send packet in 3 minutes,
the subscriber will logout automatically. If the subscriber is off-line over the logout time, he
must re-login again for Internet service.
2) Management Type:
There are two different types for subscriber management. One is the proprietary or internal
authentication system and the other is RADIUS server. The maximum subscriber number of
internal authentication system is 250. The RADIUS parameters will display only when the
RADIUS item is selected.
Proprietary: Internal authentication system, allow administrator to control the subscriber
database via ISG-101 internal function.
RADIUS: The ISG-101 supports Remote Authentication Dial-In User Service (RADIUS).
RADIUS is an authentication and accounting system used by many Internet Service Providers
(ISPs).
RADIUS enables ISPs to maintain a very large central database of subscribers. By using
RADIUS, Service Providers can implement policy –based management of their subscriber
Figure 4-16 Web-based Configuator Subscriber Control Screen
1) Subscriber Control:
Enable: If to enable this function means the subscribers’ user ID must be checked. That is to
say, when subscriber wants to access the Internet, they must click the Web browser. And
then there will display the subscriber login web page. And after entering the username and
password, the subscriber can use the Internet service.
PLANET ISG-101
database. The RADIUS also helps ISP to collect accounting data such like login time and
logout time.
RADIUS Server IP: Enable or Disable connects with RADIUS server.
Authentication Port: Enter the authentication port number, and the number must match with the
Radius server setting. The allowed numbers are from 0 to 34463.
Accounting Port: Enter the accounting port number, and the number must match with the Radius
server setting. The allowed numbers are from 0 to 34463.
Radius Secret Key: Enter the Radius secret key, and the key number also has to match with the
Server setting. Up to 64 characters are allowed.
Accounting Service: Enable or Disable the accounting service.
Internet Subscriber Gateway
Page 16

Notice: The RADIUS Server follows the RFC 2138 and RFC 2139 stand. And the authentication
32
33
port number is 1645 and 1812. The administrator can configure the port number according to his
own RADIUS server.
For more detail information of RADIUS please check the manual of your RADIUS server.
4-2-7 Customize Login UI
Red, Green, and Blue, where each component has a hexadecimal value of from 00 to FF.
000000 is black and FFFFFF is white.)
Article: The article is allowed the administrator to input a paragraph in the subscriber login page
for advisement or announcement. The maximum character of the article is 1024.
Article Text Color: The article text color can be specified color. For the specified text color format
please views the color grid. The allowed format is Hexadecimal
Article Background Color: The article background can be specified color. For the background
color format please views the color grid. The allowed format is Hexadecimal (RGB values of
Red, Green, and Blue, where each component has a hexadecimal value of from 00 to FF.
000000 is black and FFFFFF is white.)
Information: Allow the administrator to input the text information such like address, telephone
number and fax information. The maximum character of the information is 80.
Comments: Allow the administrator to input the text comments such like “Pleas Contact to our
Customer Service Center, EXT 142”. The maximum character of the information is 80.
Figure 4-17 Web-based Configuator Customer Login UI Screen
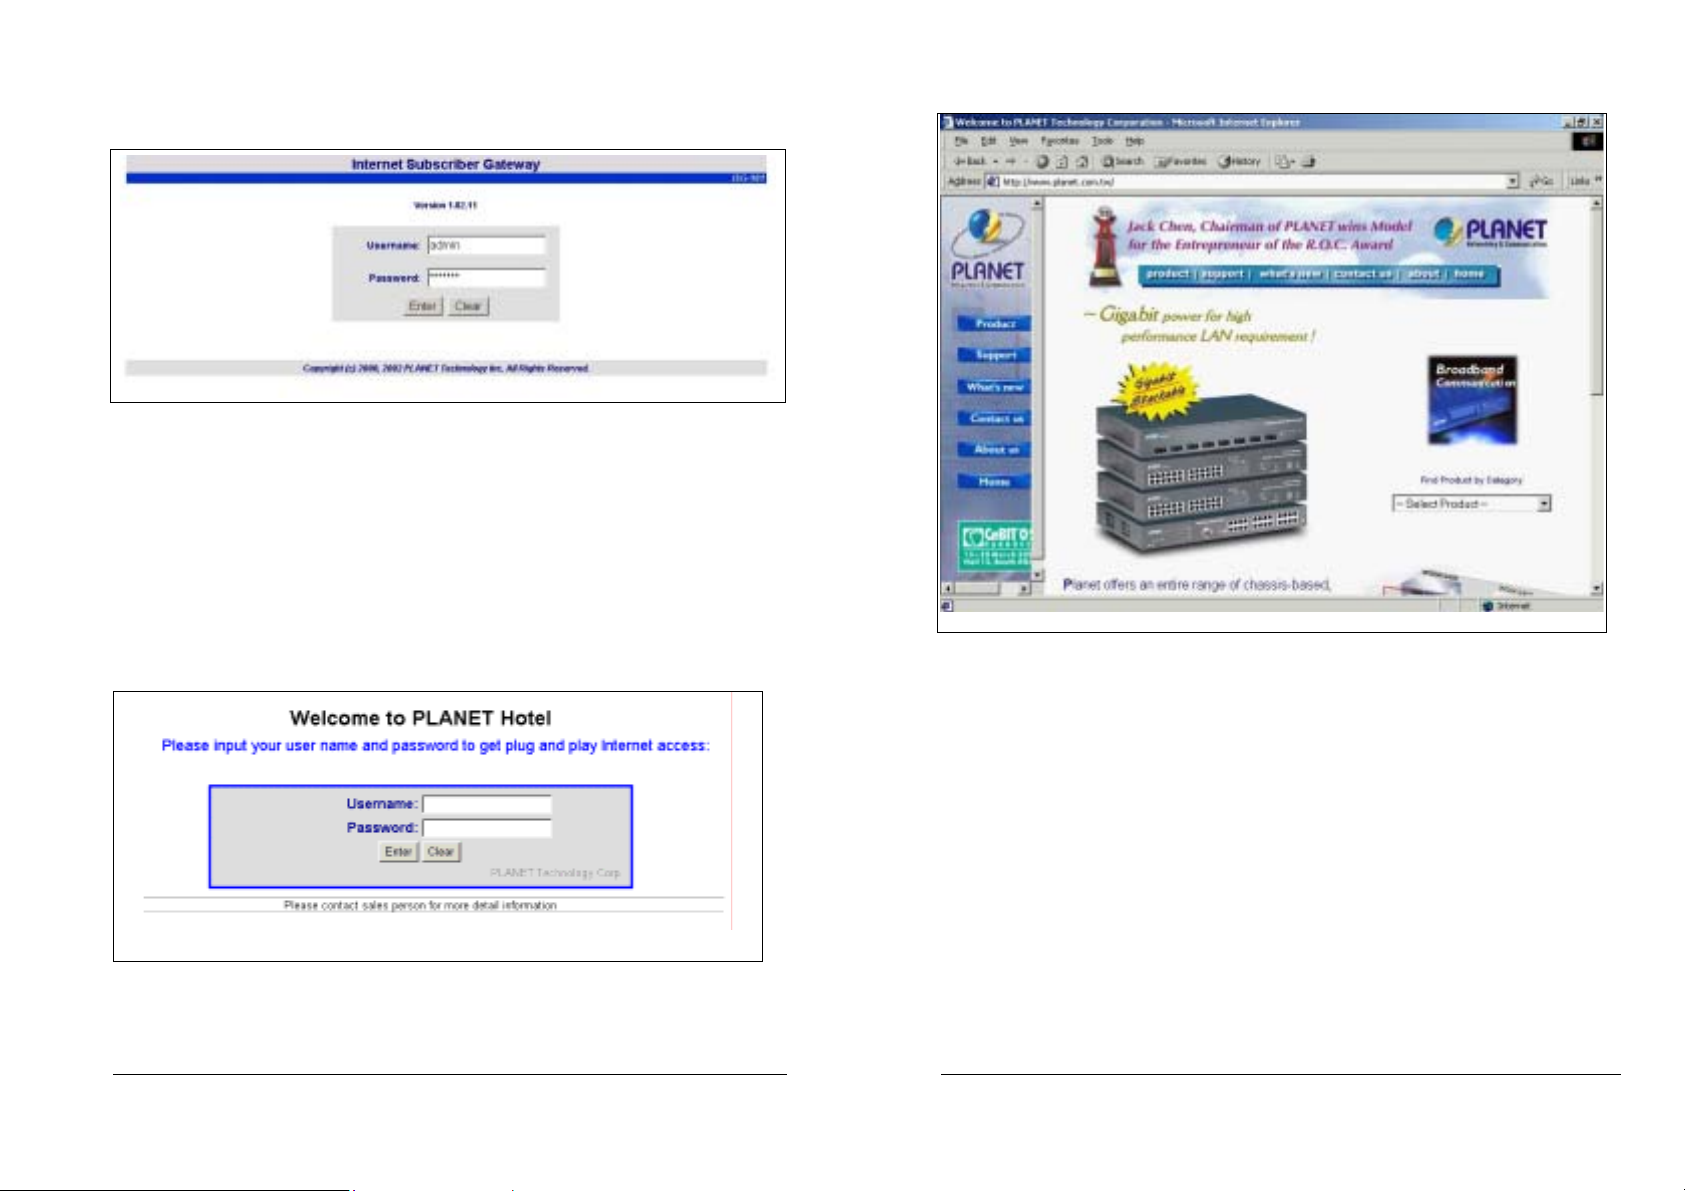
Selection: The ISG-101 provides two different login page formats. One is “Standard”, this is
ISG-101 default login page, can’t be changed. The other is ”Advanced”, that is to say,
administrator can design the subscriber login page by himself.
Welcome Image: You can choose “None” or “Default Image”..
Welcome Slogan: The maximum allowed length is 80 characters.
Page Background: The page background can be none or specified color. For the background
color format please views the color grid. The allowed format is Hexadecimal (RGB values of
PLANET ISG-101
Figure 4-18 Standard Subscriber Login Page Screen
Internet Subscriber Gateway
Page 17

34
35
Figure 4-19 Advanced Subscriber Login Page Screen Sample
4-2-8 Add Subscribers
Figure 4-21 Web-Based Configurator Add Subscribers Screen
The internal authentication database allows 250 user’s records. To add the subscribers to the
database please enter the username in the “username” column and password in the “password”
column. For the username 1~32 characters are allowed. For the password 0-20 characters are
Figure 4-20 Web-Based Configurator Background Color Grid Screen
PLANET ISG-101
allowed. And you can add 10 records for once.
Internet Subscriber Gateway
Page 18

4-2-9 Subscribers List
36
37
Figure 4-22 Web-Based Configurator Subscribers List Screen
The Subscriber List will list all the user profiles in the internal database. And the administrator
can press the “Username” button or “Password” button to sort the data column. And the
administrator can click the checking boxes and press “Delete” button to delete subscribers’
data from the table.
4-2-10 Current Users
Figure 4-23 Web-Based Configurator Current Users Screen
The Current Users table lists the on-line subscribers. The Administrator can press the button on
top of the columns to sort the data. The current users information includes the username,
password and MAC address.
4-2-11 Import Subscribers
PLANET ISG-101
Figure 4-24 Web-Based Configurator Current Users Screen
To maintain a subscriber database via web UI might not be so convenient. Therefore, the
Internet Subscriber Gateway
Page 19
ISG-101 provides to import a subscriber’s data base file via TFTP server.
38
39
Enter your TFTP server IP address in the “TFTP Server IP Address” column and import file
name in the “File Name” column. The import file text format is as followings:
user1,password1
user2,password2
user3,passowrd3
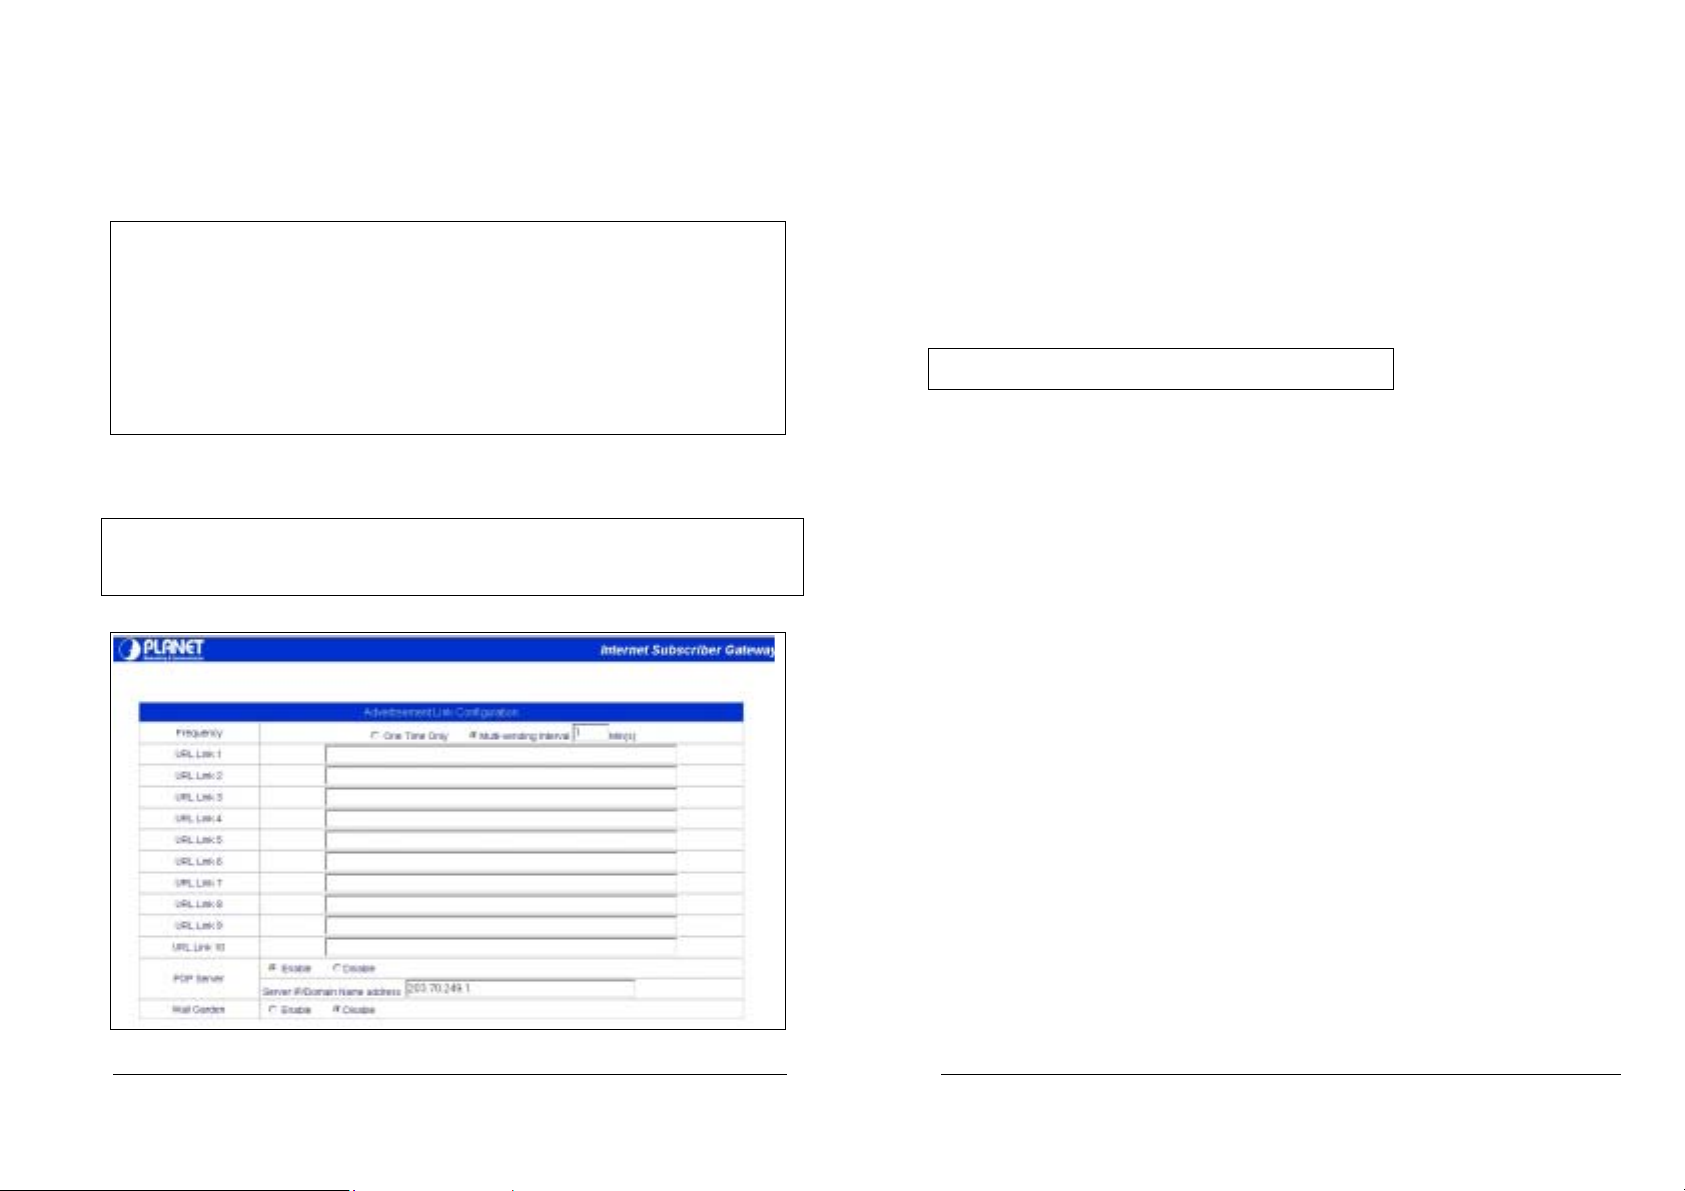
The Frequency can be chosen One Time Only or Multi-sending. One Time Only means to send
the advertisement link once after the subscriber Login. The Multi-sending means to send the
advertisement link every interval minutes.
The Advertisement Link Configuration allows the administrator to input ten different websites in
the table for advertisement. And these 10 websites will display to the subscribers at random
when the subscribers login in the ISG-101 system. The input format can be
“http://www.planet.com.tw” or “www.planet.com.tw”.
user4,password4
Figure 4-25 Import Subscribers File Format Screen
Username and password divide by common. For different users please divide by Enter Key.
Notice: For the username 1~32 characters are allowed. For the password 0-20 characters are
allowed. The wrong data might cause the user profile error.
4-2-12 Advertisement Link Configurations
Notice: The maximum allowed input string is 80 characters.
PLANET ISG-101
Figure 4-26 Import Subscribers File Format Scree
Internet Subscriber Gateway
Page 20

4-2-13 Pass through IP & MAC
40
41
Figure 4-27 Import Subscribers File Format Screen
There are some devices such like server or gateway must pass through the ISG-101, or
ISG-101 will check their packets and ask for username and password.
There are 40 entries can input the pass through IP Address and 10 entries can input the MAC
address. For input the IP address, please use this format such like “210.208.122.1”.
For input the MAC address please use this format” 00-50-BA-8D-22-96”.
4-2-14 Virtual Server Table
Figure 4-28Virtual Server Table Screen
This product’s NAT firewall filters out unrecognized packets to protect your Intranet, so all hosts
behind this product are invisible to the outside world. If you wish, you can make some of them
accessible by enabling the Virtual Server table. A virtual server is defined as a Service Port, and
all requests to this port will be redirected to the computer specified by the IP Address.
For example, if you have an FTP server (port 21) at 192.168.123.1and a Web server (port 80) at
192.168.123.2, then you need to specify the following virtual server-mapping table:
IP Address Server Port Virtual Port Application
192.168.123.1
192.168.123.2
21 80001 FTP
80 80002 HTTP
Notice: The MAC address must use the “-“ symbol for input the data string.
PLANET ISG-101
Notice: All the parameters must be set for the sake of regular execute. The Virtual Port controls
the corresponding mapping table; do not type the same virtual port number in this
column. The permitted virtual port numbers are from 80001 to 80002.4-2-14 Status Menu
Internet Subscriber Gateway
Page 21

Figure 4-29 Web Configurator Status Menu Screen
42
43
4-2-16 DHCP Client Table
1) System: Display the all the system configuration parameter.
2) DHCP Client Table: Display the DHCP client status. The client IP and MAC address are
showed in the table.
4-2-15 System Status
Figure 4-30 Web Configurator System Status Screen
Figure 4-31 Web Configurator DHCP Client Table Screen
Display the DHCP clients’ information including the assigned IP address and DHCP clients’ MAC
address. The buttons on the top of the columns can sort the column data.
System Status is only displaying system information from screen no authority to change any
setting.
Notice: If the system parameter information is not available, the column will display N/A.
4-2-17 Utilities Menu
Figure 4-32 Web Configurator Utilities Menu Screen
1) Firmware Upgrade: Allow administrator to upgrade the ISG-101 last firmware.
2) Change Password: Allow administrator to change password.
Display the ISG-101 system basic information including the System Name, Console Port Baud
Rate, WAN, DHCP Configuration, DNS, E-mail Server Information.
PLANET ISG-101
Internet Subscriber Gateway
Page 22
4-2-18 Firmware Upgrade
44
45
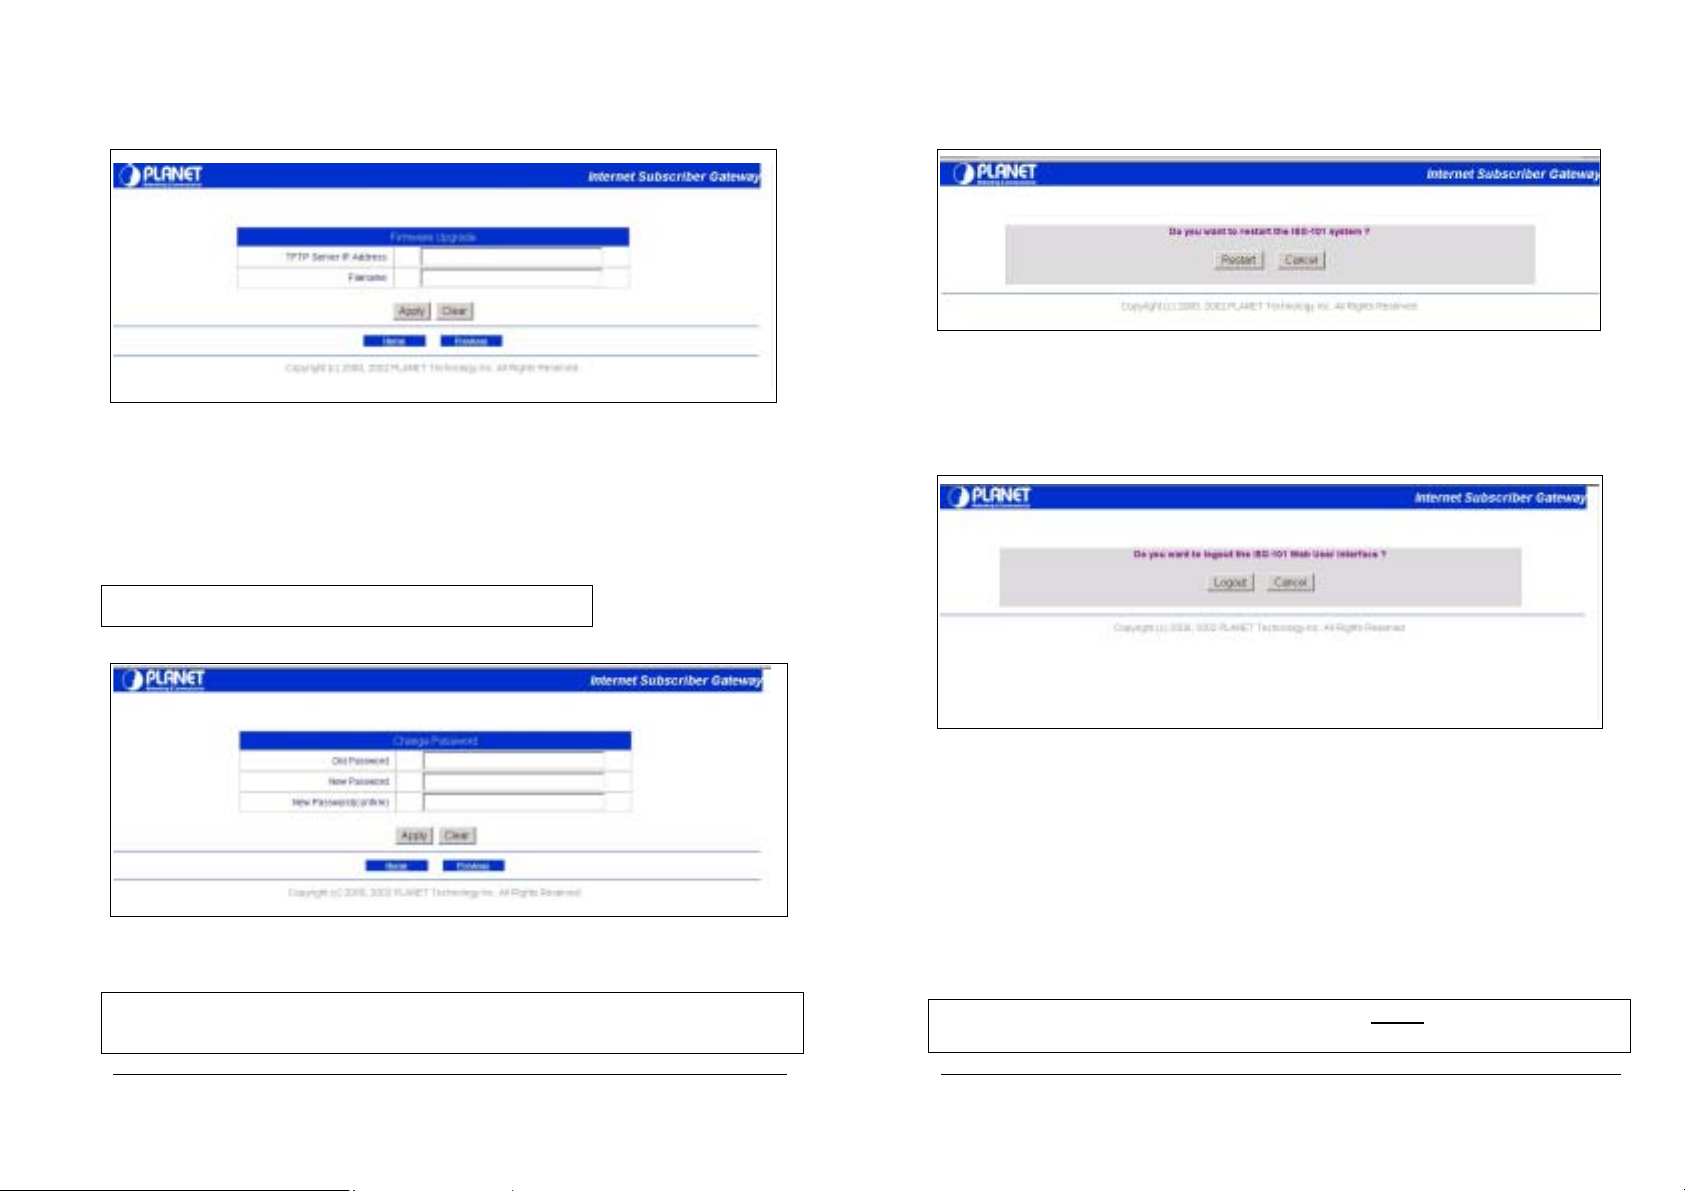
4-2-20 Restart
Figure 4-35 Web Configurator Restart Screen
Figure 4-33 Web Configurator Firmware Upgrade Screen
The ISG-101 uses TFTP Download to upgrade firmware. User needs to specify TFTP server IP
address and the filename that you wish to download.
TFTP server IP Address: Enter the TFTP server IP address.
File Name: Enter the Download file name.
Notice: How to make a TFTP download please refer to the 4-1-6
4-2-19 Change Password
Figure 4-34 Web Configurator Change Password Screen
Press the “Restart” button and the system will be restart after 30 seconds. Or press the “cancel”
button return to the main menu.
4-2-21 Logout
Figure 4-36 Web Configurator Logout Screen
Press the “Logout” button and the System would logout to the Login page. Or press Cancel to
return to the main menu.
4-3 Subscriber Applications
The subscribers that connect under the ISG-101 can surf the Internet without change any
network configuration. Just plug the hardware connection and enter the Username and
The Password Change screen allows you to change an existing password.
Notice: A permitted password string is from 8 to 20. The characters are limited by alphabets and
numerals.
PLANET ISG-101
Password, which was provided by the Local Service Provider.
Notice: If the Service Provider set the Subscriber Control as Disable then the subscribers need
no username and password. See also 4-2-6.
Internet Subscriber Gateway
Page 23
4-3-1 Subscriber Login Steps
46
47
Figure 4-37 Standard Subscriber Login Screen
1) After connecting all the hardware devices, subscriber must run the Web Browser program,
such like Microsoft Internet Explore or Netscape Communications Navigator to register the
account to the ISG-101. And after running the Web Browser program, there will be
displaying the ISG-101 login page like Figure 4-37 or Figure 4-38
2) Enter the Username and Password, which is configured in the ISG-101 system (ProprietaryInternal authentication system) or RADIUS server.
3) After Login, the Advertisement link will display on the screen such like the Figure 4-39
Figure 4-38 Sample for Advanced Subscriber Login Page
PLANET ISG-101
Figure 4-39 Sample for Advanced Subscriber Login Page
4) After finishing the register process, subscriber can use E-mail, Web Browser, NetMeeting, and
so on.
If user disconnects over the Logout timer set in Subscriber Control (see also 4-2-6), the ISG-101
will regard as the user already logout. If user wants to connect the Internet again, he must have
to re-login.
4-3-2 Subscriber Limitation
The ISG-101 Internet Subscriber Gateway is designed for Global IP (Public IP) used. However,
some Service Provider might construct in Private IP (NAT IP). This might easy to make IP
conflict problem. Some IP conflict samples as followings:
Internet Subscriber Gateway
Page 24

Subscriber Fixed NAT IP was Conflict with
the Public IP
and
Subscriber Fixed NAT IP was Conflict with one
101 WAN port but in
the
101
WAN Port is same Network with these two
101 is different
network with two conflict IP PCs. These two PC
will show conflict IP message but these two PCs
48
49
One subscriber Fixed IP was Conflict with
ISG-101 WAN Port NAT IP.
To avoid this IP conflict cases please configure
the more infrequently used network for DHCP
pool such like “192.168.223.X”, ”172.29.X.X”,
“10.59.X.X”. And we suggest using
for ISG-101 WAN Port.
Figure 4-40 IP Conflict Case A
Subscriber Fixed NAT IP was Conflict with
ISG-101 LAN Port NAT IP.
To avoid this IP conflict case please configure
the more infrequently used network for LAN IP’s
pool such like “192.168.223.X”,”172.29.X.X”
“10.59.X.X”.
Figure 4-41 IP Conflict Case B
PC which outside the ISGthe LAN.
To avoid this IP conflict cases please configure
the more infrequently used network for the
Network between Router & ISG-101 such like
“192.168.223.X”, ”172.29.X.X”, “and
10.59.X.X”.
Figure 4-42 IP Conflict Case C
other (DHCP Client or fixed IP). The ISG-
subscribers’ PC.
To avoid this IP conflict cases please configure
the more infrequently used network for the
Network between Router & ISG-101 such like
“192.168.223.X”, ”172.29.X.X” “10.59.X.X”.
The other case is even ISG-
can surf the Internet normally.
To avoid this case please using V-LAN Switch.
Figure 4-43 IP Conflict Case D
Notice:
1. Some subscribers might have the proxy server configuration in the web browser, for this case
the subscribers must cancel the proxy server settings. However, PLANET will support the
new firmware in the future to leave out this effort. For late released information, please check
the PLANET Web Site.
2. Some subscribers can access the Internet regularly but might not be able to send and receive
the E-mail normally. This is according to the subscriber’s settings and the subscriber’s E-mail
service provider. Some ISP doesn’t support the Internet mail, users are limited to send and
receive E-mail from the specified network. Furthermore, some subscribers are unable to
send/receive E-mail because their E-mail server address is private IP (IP masquerade). For
E-mail redirection function please check the page 22 “7) Email server IP address”
PLANET ISG-101
Internet Subscriber Gateway
Page 25

3. The Internet Subscriber Gateway supports Plug and Play function to the subscriber who’s
50
51
PCs can access the Internet regular in his company or home except by PPP or PPPoE. That
is said the IP settings of Subscriber’s PC must be DHCP Client or Fixed IP with fully
parameter. For example: the subscriber’s IP is fixed IP but the DNS setting is empty.
4-3-3 Extra Feature
1. On Line Sign up
2. POP Server
The Advertisement POP server settings will allow this server IP pass through so that the server
can send the advertisement page to Subscriber without obstruction.
3. RADIUS Prepaid dialogue
This function supports the unauthorized user can register their username and password on line.
This function support only when you enable the Radius Server, the Connecting Duration will
control the time “how many minutes the user can connect to the server. And please enter the
IP of the Account Server and URL page that you would like subscriber linked.
PLANET ISG-101
Internet Subscriber Gateway
Page 26

base on day or hour. The unit cost can help administrator to account subscriber usage fee. And
52
53
the currency parameter can show on the screen to notify your billing currency.
If we start the RADIUS prepay function, the system will show the Logout Window on the
subscriber’s PC. If the subscriber would like logout, he must press the Logout button in this
window and the system will disconnect. For the illegal closed session window, the “Invalid
Logout” window will pop-up to the subscriber. And if the credit of usage is going to run out
the “Message Alert” will pop up and ask you to replenish your credit. Furthermore, if you
logout successfully the system will also pop up a window and remind your remaining time.
4. Simple Billing System for Propriety Account management
The add subscriber allows administrator creating the subscriber’s account one by one. And for
the prepay service, please select the number of the purchased unit. The counter will start to
count when the subscriber login the system. Once the purchased timing is exhausted, the
system will kick the subscriber out. For the post-pay service please set the purchase unit as “0”,
the system would not kick out any subscriber until the administrator delete this account.
Select billing mechanism “Enable” and will display “Unit Time” and “Unit Cost” and “Currency
“ column. The unit time can select “by Day” or “by hour”. These mean that the charge unit may
PLANET ISG-101
Internet Subscriber Gateway
Page 27

Press the “Create Account” button after typing the account information. And the screen will
54
55
display the charge form (including username, password, register time, price parameter etc.)
The administrator or clerk may print out this page as a receipt.
If administrator presses the “Account Modify” button the account information will list on the
screen. If the subscriber already login, the system will list the login time and count the expired
time (if prepay the fee already).
Notice: For the post-pay service the system wouldn’t show the expired time.
Click the check box and press “Delete” button if you wish to kick out the subscriber. And then the
check box will become a “*” symbol. Once you press the “Delete” button again, the subscriber
The Account Information can display the information of username, password, MAC address
and Login Time and purchased units.
record will be erased entirely.
You can also press the “Display” button and will display the Account List page. And if the
subscriber asked to change his purchase units, the administrator can modify the units’ column
and press “Apply“ button. And administrator can press the Username, Login Time or Expired
Time button to sorting the subscriber’s information.
PLANET ISG-101
Internet Subscriber Gateway
Page 28

Appendix A: Signal Connection Arrangements
2345678
2345678
56
57
RJ-45 Ethernet Port
The ISG-101 RJ-45 Ethernet port can connect to any networking device that use a standard
LAN interface, such as a Hub/Switch Hub or Router. Use unshielded twisted-pair (UTP) or
shield twisted-pair (STP) cable to connect the networking device to the RJ-45 Ethernet port.
Depending on the type of connection, 10Mbps or 100Mbps, use the following Ethernet cable,
as prescribed.
10Mbps: use EIA/TIA-568-100-Category 3,4 or 5 cable.
100Mbps: use EIA/TIA-568-100-Category 5 cable.
The LAN Port:
Notice: To prevent loss of signal, make sure that the length of any twisted-pair connection
does not exceed 100 meters.
The WAN Port:
PIN No.
RJ-45 Signal Assignment Designation
1 Output Transmit Data + TD+
2 Output Transmit Data - TD-
1
3 Input Transmit Data + RD+
4 Unused N/U
5 Unused N/U
6 Input Transmit Data - RD7 Unused N/U
8 Unused N/U
Table A-1 RJ-45 Uplink Connector
Check that the straight twisted-pair cable connection between the ISG-101 and the hub/router
conforms to the pin assignments show in the following diagram:
PIN No.
RJ-45 Signal Assignment Designation
1 Input Transmit Data + RD+
2 Input Transmit Data - RD-
1
3 Output Transmit Data + TD+
4 Unused N/U
5 Unused N/U
6 Output Transmit Data - TD7 Unused N/U
8 Unused N/U
Table A-1 RJ-45 Uplink Connector
Check that the straight twisted-pair cable connection between the ISG-101 LAN port and the
WAN port conforms to the pin assignments show in the following diagram:
PLANET ISG-101
Internet Subscriber Gateway
Page 29

DB9 Serial Console Port
PIN-9
58
59
Appendix B: Regulations/EMI Compliance
PIN-1
Console
PIN No. Mnemonic Function
1 DCD Received Line Signal Detector to ISG-101.
2 TXT Transmitted Data from ISG-101
3 RXT Received Data to ISG-101
4 DTR Data Terminal Ready from ISG-101
5 GND Signal Ground (Common)
6 DSR Data Set Ready to ISG-101
7 RTS Request to Send from ISG-101
8 CTS Clear to Send to ISG-101
9 RI Ring Indicator to ISG-101
FCC Regulatory Statement
Part 15-Class B compliant device
This device complies with Part 15 of the FCC Rules. Operation is subject to the following
conditions:
1. This device may not cause harmful interference, and
2. This device must accept any interference received, including that which may cause
undesired operation.
This equipment has been test and found to comply with the limits for a computing device,
pursuant to Part 15 of the FCC Rules. These limits are designed to provide reasonable
protection against harmful interference when the equipment is operated in a commercial
environment. This equipment generates, uses, and can radiate radio frequency energy and, if
not installed and used in accordance with the instructions, may cause harmful interference to
radio communications. However, there is no guarantee that interference will not occur in a
particular installation. If this equipment does cause harmful interference to radio or television
reception, which can be determined by turning the equipment off and on, the user is
encouraged to try to correct the interference by one or more of the following measures:
1. Reorient or relocate the receiving antenna.
2. Increase the separation between the equipment and receiver.
3. The equipment and the receiver should be connected the outlets on separate circuits.
PLANET ISG-101
4. Consult the dealer or an experienced radio/television technician for help.
Changes or modification not expressly approved be the party responsible for compliance could
void the user’s authority to operate the equipment.
Internet Subscriber Gateway
 Loading...